

Page 1

WASHER-DRYER
WTD1171A
WTC1012A
INSTALLATION, OPERATING AND
MAINTENANCE INSTRUCTIONS
Page 2

Contents
Safety /environment and savings ........................2
Releasing, moving and levelling ..........................3
Connecting to the cold water supply ..................3
Draining away the waste water ............................3
Connecting to the electricity supply ....................3
Sorting and checking your washing ....................4
Access to the machine’s drum ............................4
Inserting your washing ..........................................4
Closing the drum ....................................................4
Cleaning products ..................................................4
Programming ........................................................5-7
BEFORE READING THESE INSTRUCTIONS, REMOVE THE ILLUSTRATED PAGES IN THE CENTRE OF THIS DOCUMENT
This machine is only designed for domestic use and to wash, rinse, spin and, depending on the model,
You will find the following symbols used throughout this manual. They mean:
Safety instructions (for your machine and your washing), which must be observed
An electrical risk,
Ꮨ
dry machine-washable textiles.
Important advice and information
Details of the functions and the options ..........7-8
Changing a programme..........................................9
Automatic safety systems ....................................9
Characteristics ........................................................9
Running maintenance ..........................................10
Cleaning the pump and drying filters ................10
Incidents that may arise ......................................11
Textile care codes ................................................11
Incidents notified on the display,
which you can repair yourself
..........................12
Safety advice
In this manual, you will find the instructions
required for the safety, installation and use of your
machine and the relevant guarantees. Please keep
these and pass them on if you sell the machine.
• Dispose of the packaging and of your worn-out
machine (after rendering it unusable by removing
the hoses, cutting the power cable and breaking
the lock on the lid) in accordance with the
prevailing regulations.
•For a new installation, the machine must be
connected to the water supply with a new hose:
the old hose must not be re-used.
• Do not let children play with the machine or the
cleaning and maintenance products (water
unsuitable for drinking, ingestion of the products,
risk of physical harm, etc.). Keep pets away from
the machine.
• Protect your property and your machine by
checking the condition of the hoses regularly.
Never use solvents, inflammable products,
explosive products or aerosols near to or in your
machine. Use the machine in a well-ventilated,
frost-free area and do not use an extension lead
or a multiple adapter.
• Switch off the power supply to your machine
after use.
• If your machine should break down, call a
qualified washing machine engineer.
• Only use your machine in accordance with the
instructions in this manual. Only use washing and
maintenance products approved for domestic
machines.
For washer-dryers:
Some liquid detergent manufacturers may provide
a plastic device, meant to be placed in the washing
machine drum together with the laundry, for the
gradual release of the liquid detergent. If you are
using this device, please ensure that it is removed
from the drum before you activate the drying cycle
as its plastic material cannot withstand the high
temperature of the drying process.
Environment and savings
• Fill your machine to the maximum. You thereby
optimise your water and electricity consumption.
• Only programme a pre-wash when absolutely
necessary: e.g. for heavily soiled sports or
working clothes, etc.
• A programme with no pre-wash is sufficient for
slightly or moderately soiled clothes.
• For slightly soiled clothes, select a short washing
cycle (or an «Express» cycle, depending on the
model).
• Gauge the amount of detergent according to the
water hardness, the degree of soiling and the amount
of washing. Always follow the manufacturer’s
instructions on the detergent packets.
For washer-dryers:
• If you spin at high speed, little dampness will
remain and you will therefore consume little
electricity. Even synthetic textiles can be spun
before drying.
• Choosing your drying time well also helps to save
water and electricity.
• Avoid wasting water and electricity by not overdrying your laundry.
2
Page 3

Releasing your machine
THE FOLLOWING OPERATIONS MUST BE
PERFORMED BEFORE YOU USE THE
MACHINE. FIGs 1 & 2
First of all remove the piece of expanded
polystyrene from under the lid. (Keep the
transport material: you will need it if you
move).
Rear transport clamp FIG. 1 ➀ to ➃
➀ Unscrew the 6 screws using a No. 10 tube
spanner or a straight-edged screwdriver.
➁ Remove the clamp.
➂ Free the power cable from the plastic
holder clipping it to the transport clamp.
➃ Plug the holes left by the clamp using the
plugs supplied and re-screw the 4 external
screws into the casing.
Front transport clamp FIG. 2 ➀ to ➄
➀ Unclip the plinth by pressing simultaneously
on the side knobs and pulling them towards
you.
➁ Unscrew the screw holding the red plastic
«front» clamp.
➂ Remove the front clamp.
➃ Plug the hole left by the clamp with the
remaining plug.
➄ Clip the plinth on again.
Moving and levelling
Setting on castors, moving
To move your machine, unclip and slide the
castor release handle from right to left.
Your machine must not still be on its
castors when in operation.
Check that it is plumb and stable to avoid
vibration during spinning.
Levelling FIG. 6 ➀ ➁
- Set your machine on its castors.
- Unscrew the two screws with a straight-
edged screwdriver.
- Level the machine by adjusting the two feet
using a flat spanner or a pair of pliers.
- Set the machine back on the floor by sliding
the castor release lever to check the
chocking.
- If the machine is correctly level, retighten the
two locking screws.
To align your machine with your units, you can
break off the fixing hooks for the hoses.
Take care not to squash the hoses!
If you cannot avoid installing the machine on a
carpeted floor, adjust the feet so as to leave a
large gap for ventilation.
Connecting your machine
Connecting to the cold water supply (FIG. 5)
Your washing machine can be connected to
any cold water pipe. Connect the supply hose
provided to a threaded 20x27 Ø tap (3/4 BSP)
not forgetting to insert the seal supplied
(depending on the model, the hose may
already be fitted with a seal).
Water pressure may vary from 0.1 to 1 MPa
(1→10 bars). If the pressure is high, please
provide a pressure regulator. Your water
supplier can provide the necessary advice.
Draining away the waste water (FIG. 5)
NB: Ensure that the drain hose is tied firmly in
place with cord, etc. to avoid a possible flood.
In all cases, the height of the drain hose
bracket must be between 0.80 m minimum
and 1.10 m maximum above the floor. The
hose must be fastened to avoid it breaking
and its opening must be above the surface of
the water being drained away.
Connecting to the electrical supply (FIG. 5)
Please refer to the «Characteristics» section.
The socket must be easily accessible but out
of children’s reach.
The installation must conform to the country’s
regulations, in particular as regards earthing
requirements and installation in showerrooms. The machine must be earthed.
Never use an extension lead or a multiple
adapter for connecting to the socket.
* We cannot be held responsible for any
incident caused by poor earthing of the
machine or poor electrical installation.
The machine must be switched off (in the
«Stop» position) when connecting to the
electrical supply.
3
Page 4

Preparing your washing
cl
Failure to observe the following advice can
cause severe and even irremediable
damage (damage to the drum, torn
washing, etc.) and rescinds the guarantee.
Sorting your washing
•Ensure that all your washing is machinewashable: check the labels on your washing
(type, temperature, type of cleaning, etc.).
•Ensure that your coloureds do not run.
•When washing a mixed load, use the
washing programme for the most delicate
textiles in the mix.
Checking your washing
•Empty the pockets and close any zips and
press-studs.
•Remove any curtain hooks or place your
curtains and any small items of laundry
(ribbons, handkerchiefs, etc.) in a net bag.
Button up pillowcases, etc.
•Remove any poorly attached buttons, pins
and hooks.
Access to the machine’s drum (FIGs. 3 - 4)
Proceed as follows:
•
•Check that the machine is switched off.
•Open the machine’s door (FIG. 4).
•Press the button on the front flap. (FIG. 3 ➀➁)
Loading your washing
•For optimum washing performance, place the
previously sorted and folded washing in the
drum, distributing it evenly without heaping it
up. Mix large and small items to obtain
optimum spin-drying without unbalancing.
•Check that no items have fallen down the
side the drum.
Closing the drum
•Close the drum using both hands, ensuring
that the button returns to the correct
position. The coloured section must be
visible (FIG. 3 ➂ ➃).
CHECK THAT NO WASHING IS CAUGHT
BETWEEN THE TWO FLAPS.
Checking your washing before drying
(only for washer-dryer models)
Your washing is composed of different types of
fibres, of different origins: the various items may
therefore behave very differently during drying.
As a general rule, all machine-washable textiles
can be dried in a domestic tumble dryer except
for:
- Woollens, silks, net curtains, plasticised
fabrics, tights and nylon stockings
- Chlorofibres (Thermolactyl* for example)
* Registered trademark
- Foam, plastic or rubber-coated items or any
items with a framework that could become
detached, bulky items (duvets, eiderdowns,
etc.)
- Washing that has not been spun
- Items washed with chemical products.
You must however avoid drying light textiles
and thick cotton textiles at the same time.
The weight of the thick cotton textiles can
crease lighter ones.
It is better to dry textiles not guaranteed
colourfast separately.
Washing products (Fig 10)
Filling the detergent dispensers
Pre-wash dispenser (powder )
➀
Wash dispenser (powder or liquid )
➁
The «WASH» dispenser may contain either
powder or liquid but liquid detergents
should not be used with programmes WITH
pre-wash.
➂
disinfecting or bleaching agent. Concentrated
bleach must be diluted.
➃
should be diluted with warm water.
Loading the washing products
Follow the dosage instructions on the pack.
Warning: these are generally recommended
for a full load of washing. Adapt the amounts
to suit the condition of your washing.
Bleach: bleach can be used as a
Softener: Concentrated softener
Too much detergent can cause foam. An
excessive amount of foam reduces your
machine’s performance and increases the
washing time and water consumption.
We recommend the use of "low suds" detergent
on your washing machine.
Do not forget to reduce the amounts when
using concentrated detergents. See the
instructions on the pack.
Reduce the product amounts by 10%
When the water is soft, when your washing is
only slightly soiled and there is only a small
amount. When the washing programme is
short.
Detergents for woollens and delicate
fabrics
Use an appropriate detergent for washing
these textiles (avoid putting the detergent
directly into the drum because some of these
products can attack the metal).
4
Page 5
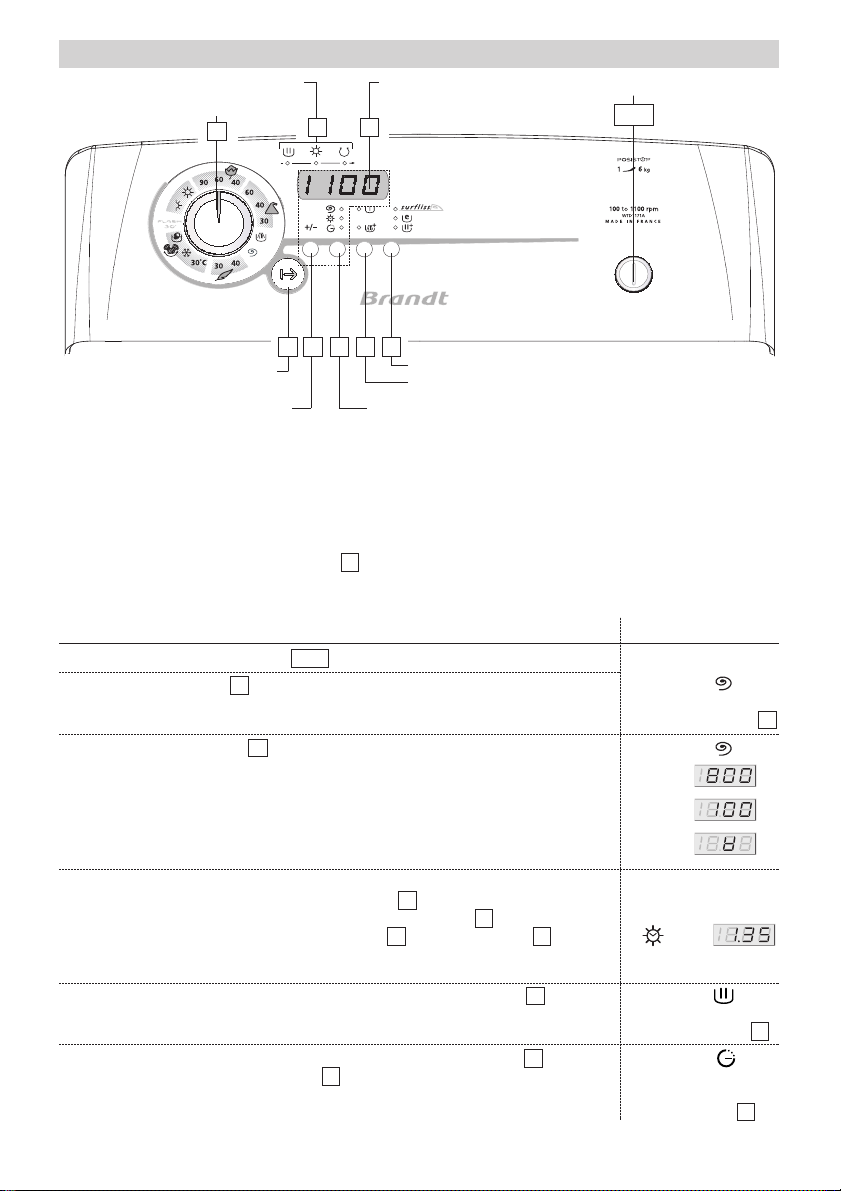
Programming
Cycle progress
Type of washing and temperature
1
Display
B
A
On/Off
I / O
Start/Pause: press briefly
Cancelled: long press
Spin speed,
and delay start setting
Apart from the «On/Off» button, all the buttons are sensitive and therefore do not remain depressed.
During programming, all the buttons except for «Start/Pause» can be kept depressed but, for
more precise adjustment, we recommend that you operate them with a series of brief presses.
You should operate the «Start/Pause» by pressing it briefly except when cancelling the
programme, in which case it should be kept depressed.
(*) Details of the function are provided in the following pages.
If one of the cycle progress lights is lit when you switch on, cancel before carrying out any
other operation.
Warning: the «
drying time
On/Off
Full programming (combined with drying or not)
•
Press in the «On/Off» button (1).
•
Turn the selector to select the programme and the washing
temperature. The machine proposes the recommended spin speed for
the type of textile selected.
•
Use the setting button
-
Either to alter the proposed spin speed. (If you programme for
sequenced drying, select the highest spin speed possible)
-
Or to select drip dry.
The cycle will finish with a gentle spin at 100 rpm
-
Or to select stopping with the drum full of water.
The machine will stop with the drum full of water before the final spin.
• Select, or not, any of the following options:
-
«Prewash» and/or «Rinse Plus» via button
-
«Sleekare» and/or «ECO» and «Intensive» via button
- Subsequent immediate drying via button then, via button , set the
desired drying time (for the washing load to be dried, see the Programmes
table)
•
Select immediate start by pressing the «Start/Pause» button
Or select a start delayed by 1 - 19 hours by using button to select
• ...
this option and then using button to set the period of the delay
2 R 3 4 5
B
» button cannot cancel a programme.
I / O
1
R
:
R
Sleekare, Eco, Intensive wash options
Prewash, Rinse Plus options
Selector for the spin speed,
delay start functions
4
5
R3
2
3
...
.
drying and
Lights and/or display
Light
+ spin speed
recommended on
Light
+ e.g.:
or
or
+ selected options
+
+ e.g.
Light
+
display of washing
time remaining
Light
+ display of time
remaining before the
cycle starts
A
A
A
5
Page 6

Programming
After spinning, the machine positions the drum automatically with
the opening at the top to help you in removing your laundry. This
operation takes 3 minutes at most.
• Then the message «-0-» appears on the display, indicating the end
of the cycle (2).
Wait a moment of two for the lid to unlock so that you can remove
your laundry. Release the «On/Off» button (3).
I / O
Programming a Drying Only cycle:
•
Press in the «On/Off» button
•
Turn the selector to select a normal or mixed drying
programme to suit your type of washing
•
Select the «Sleekare» option, or not, via button . This option
finishes your programme with a 2 hour «Resting» period (see
Function Details)
•
Set the desired time via button (only dry washing that has been
spun at least at 800 rpm)
•
Select immediate start by pressing the «Start/Pause» button
Or select a start delayed by 1 - 19 hours by using button to
• ...
select this option and then using button to set the period
of the delay
1
.
Adding or removing an item during the cycle
•
Press the «Start/Pause» button to interrupt the cycle
Add or remove the items of laundry
•
Press the «Start/Pause» button to restart the cycle.
•
(*) The lid may take 1-2 minutes to unlock
If you have selected a «Delay Start», you can instantaneously
access the drum at any time during the phase before the washing
cycle starts, without having to interrupt and restart the cycle.
I / O
.
5
R
R
(impossible during spin):
2
.
2
.
2
3
Lights and/or display
Light
and selected option
Light +
...
+ countdown of the
remaining cycle time on
+ display of time remaining
before the cycle starts
+
counter stopped
Light permanently lit
+
e.g.
+
light
Light
Flashing light
A
B
counter restarts
A
Cancelling during programming or washing or during a pause:
•
Hold down the «Start/Pause» button for at least 1 second.
This can be done at any time during the cycle or during
programming, or even during a pause.
If you do this while the machine is waiting to start during a delay
start, only the delay start is cancelled.
2
Return to initial display
B
A
A
B
Maintaining your washing machine’s performance:
• At the end of the cycle, you must clean the dryer filter (see the Chapter on “RUNNING MAINTENANCE”).
For more information, please refer to the section on «DETAILS OF THE FUNCTIONS».
Important: If you have stopped your machine by pressing the «On/Off» button or after a power
failure, when the power is restored the washing cycle automatically returns to the point at which
it was interrupted.
6
Page 7

Page 8

1 2
➃
➀
➀
➁
4
10
➁
➂
➁
3
➂
➃
➄
➀
➃
➂
➀
➁
➂
➃
Page 9

5 6
220-230 V - 50 Hz - 10 A.
8
0.1 ➞ 1 MPa
1 ➞ 10 bars
➀
0,80 m. min.
➀
1,10 m. max.
7
➀
➁ ➂
➁
➁
9
Page 10

Page 11

Programming
(1) -
To select the most suitable programme for your type of washing, follow the instructions on the labels
attached to most items.
Before starting your machine, check that the power cable is plugged in and the water
tap is open. Also ensure that the drum doors and the lid are firmly closed.
(2) - During the «end of cycle» phase, the machine will not recognize your pressing one of
the , , , or buttons but does allow you to return to «programming» mode.
R5432
(3) - As a safety measure, it is advisable to unplug the power cable and turn off the water tap.
Programmes
table
Type of fabric
COTTON /WHITES
COLOURS/SYNTHETICS
DELICATE
WOOL
SILK
Temperature (°C)
40°- 90°
30°- 60°
30°- 40°
- 30°
6
3
2
1,5
1
Max. load (kg)
Prewash
●●● ●●●
●●● ●●●
Eco
●
●
Drip-dry
Intensive
Sleekare
Rinse Plus
●● ●●
●●●
●●●
Rinse hold
Type of drying
and drying time
very dry
Drying : Normal or Mixed
Max. load (kg)
11/4 to
3
13/4 h
1 to
1,5
11/2 h
45 min
1
to 1h
Cannot be machine dried
Cannot be machine dried
Special programmes
Cannot be machine dried
Cannot be machine dried
Before drying, select the “Maximum”
speed the washing can withstand.
See above to select the load,
drying time and type of drying
for your type of textiles
RINSE only
SPIN only
40° 3
Depending
on the textile
●●
●●●
Normal Drying Only: COTTON / WHITES / COLOURS
Mixed Drying Only: SYNTHETICS / DELICATE
These functions can be used alone or in combinations: illogical combinations are impossible.
:
●
Details of the functions
COTTON
If your washing comprises hard-wearing white
or coloured COTTONS
COLOURS / SYNTHETICS
If your washing comprises DELICATE
COLOURS, HARD-WEARING SYNTHETICS of
MIXED FIBRES
DELICATE
If your washing comprises NET CURTAINS,
DELICATE FABRICS or FRAGILE TEXTILES
“”
When washing coloureds do not exceed a
maximum temperature of 60°C.
During the first few minutes of this
programme, your machine automatically
calculates the best programme to run for a
perfect wash.
“”
“”
WOOL
“”
If your washing comprises WOOLLENS or
MACHINE-WASHABLE WOOLLENS.
SILK
“”
If your washing comprises SILK or
PARTICULARLY DELICATE FABRICS
This programme enables you to refresh a small
load of 3 kg of lightly soiled washing composed
of WHITE or COLOURED COTTONS or HARDWEARING SYNTHETICS.
The cycle time is restricted to around 30 minutes.
In this programme, the washing temperature is
automatically programmed to 40°C.
For this programme, the doses of
detergent should be reduced by half.
7
1 to
11/2 h
45 min
to 1h
min
30
dry
iron dry
30
min
to 1h
30
min
to 45 min
30 min
to 45 min
Page 12

Details of the functions
RINSE ONLY
A separate rinse followed by a choice of:
- Either spin and drain
- Or drain only («Drip-dry» option)
- Or a stop with the drum full of water.
«»
(continued)
Details of the options
Prewash
Specially designed for heavily soiled washing
(mud, blood, etc.).
Detergent must be placed in the « »
container in the products’ box.
Rinse Plus
«Especially for sensitive and allergic skin»:
adds a Rinse Plus to the washing cycle.
Sleekare
Makes your washing easier to iron.
This option allows you to wash and spin your
washing more gently without any loss of
performance.
Eco
The «Eco» function provides you with perfect
washing results while saving on energy. It
reduces the washing temperature and
increases the agitation period.
Intensive wash
This function improves washing performance
and handles reputedly stubborn stains by
automatically increasing the temperature in
the drum and the agitation time.
Resting period at the end of the drying cycle
To use this function, you must first
programme the “Sleekare” option.
Your laundry will rest for 2 hours after the
drying cycle is complete. The
remains lit throughout the resting period.
To access your laundry during this period,
cancel the option by pressing the «Start/Pause»
2
button for at least one second.
light
«»
Delay start
You can delay the start of your programme by
1 to 19 hours to take advantage of off-peak
rates or finish the cycle at a particular time.
To do this, press button and select
function « » (delay start). Then press button
R
and select the cycle starting time.
While the machine is waiting to start,
A
display shows the time remaining before
the cycle effectively starts.
3
SPIN ONLY
This allows a separate spin and drain.
«»
In the case of «Rinse only» followed by a spin
or of «Spin only», take care to select a
suitable spin speed for the type of washing
in the machine.
Remaining time
During programming, pressing button
until the 3 lights go out lets you know the
length of the selected cycle*.
If you select the «time remaining» function
while the machine is waiting to start in «Delay
Start» mode, it is the selected programme’s
time that is permanently displayed.
(*) The time indicated by the machine at the
start of the programme may vary during the
course of the cycle:
- If you change the washing temperature
(even during a spin) or if you add or cancel
options, the time will be recalculated and
updated on the display.
- Certain operating variables (for instance:
detection of imbalance or foam, etc.) can
also alter the cycle’s duration.
- If there is a power failure during washing,
when the power is restored, the time
displayed may be less than the actual
remaining time. This time will be updated at
the start of the rinsing phase.
Rinse hold
This is used for textiles that you do not wish
to spin or if you envisage being absent for a
long time after the washing is finished.
When this function is selected, the cycle
interrupts before the final spin, enabling your
washing to soak in the water to avoid
creasing.
When the machine stops with the drum full of
water, display does not count off the time
remaining but remains fixed (including the
point).
Then:
- You either wish to drain and spin.
In which case, select the Spin function « »
using button then use button to set a
suitable spin speed for your type of washing.
The programme will shut down automatically.
- Or you just wish to drain.
In which case, select the Spin function « »
and then use button to display
(«Drip-dry» function).
A
3
R
R
3
8
Page 13

Modifying a washing or drying programme
During programming:
You can alter anything before you press the
«Start / Pause» button
«»
2
.
After the cycle starts:
• You cannot alter the type of textile (for
example, change from «COTTON» to
«SYNTHETICS» or from «SYNTHETICS» to
«DELICATES», etc.).
If you turn the programme selector to
a different textile, the progress cycle light
B
which is lit at the time, and the display
A
flash for a few seconds to indicate that
such an alteration is prohibited and will
not be effected.
To change the type of fabric during the cycle,
you must cancel the current programme and
then programme a new cycle.
• However, you can change the washing
temperature at the start of the washing
phase for the same type of textile.
The time remaining will then be adjusted
accordingly.
• You can also change the spin speed
throughout the cycle.
• You can select «Drip-dry» and «Rinse hold»
up to the end of rinsing.
1
• You can change the period for a «delay
start» period throughout the whole of the
waiting period, right up to the effective
cycle starting time.
If you wish to cancel «Delay start» during
this period, set display to «0» and then
briefly press button « ».
The cycle will then start immediately.
• You can only activate option « » (Prewash) during the waiting period for a
«Delay start».
• You can activate option « » (Rinse Plus)
up to the point that rinsing commences.
• You can only modify the options
« » (Sleekare), « » (Eco) and
« » (Intensive) during the waiting period for
a «Delay start».
• You can deactivate all the options at any time
during the cycle provided that the particular
action has not already been completed.
• You cannot programme or modify a drying
after the start of a washing or drying cycle.
At the end of the cycle:
When your display shows «-0-», you can
programme a new cycle without releasing the
«On/Off» button .
All you need to do is press any of the buttons
,,, or.
The machine is then ready for programming
again.
A
2
I / O
R5432
Automatic safety systems
Lid opening safety system:
As soon as washing commences, the lid on
your machine is locked.
When the cycle is finished or when the machine
has stopped with the drum full of water, the lid
unlocks.
If you have programmed a «Delay start», the
lid is not locked until the waiting period is over
and the cycle starts.
If you wish to open the lid during the cycle,
press button
minutes for the safety system to unlock the lid.
«»
2
briefly and wait 1-2
Water safety system:
The water is constantly controlled when the
machine is operating to prevent any possible
overflow.
Characteristics
Characteristics: 220-230V – 50 Hz – 10A – 2050-2200W.
Spin safety system:
Your washing machine is fitted with a safety
system that restricts the spin when poor load
distribution is detected.
In this case, your washing may be
insufficiently spun. Redistribute your washing
in the drum and programme a new spin.
Anti-foam system:
You machine can detect when too much foam
is being produced during spinning.
At such times, spinning stops and the
machine drains.
The cycle then restarts, adapting the spin
rates and possibly adding an extra rinse.
9
Page 14

Running maintenance
«Filt» message:
(only for washing machines)
After a certain number of cycles, your
machine (depending on the model) will warn
you that you should clean the pump filter.
At the end of the cycle, the display flashes
and then shows:
This information disappears as soon as you
programme a new washing cycle or when the
«On/Off» button is released.
If you do not clean the pump filter
regularly, this will affect your machine’s
performance.
I / O
A
Cleaning the pump filter
(for washing machines AND washer-dryers)
First of all drain the machine and then
disconnect the plug (FIG. 8)
- Remove the plinth and place a floor cloth
and a flat container under the access to the
pump.
- If your machine is fitted with one, remove
the purge hose.
- Open the stopper at the end of the hose and
let the water flow into the container.
- Close the stopper, ensuring that it is pushed
in well and reclip it in place.
- Unscrew the stopper for the drain pump’s
filter.
- Clean the filter. To re-insert it, snap it in by
orienting the small lug on the cylindrical
surface upwards and screwing the stopper
in fully.
- Re-install the plinth in its original position.
When you next wash, check that there are
no leaks during filling.
:
Cleaning the machine
• Only use a sponge, liquid soap and water to
clean the casing, the entry to the drum, the
control panel and the products’ box, etc.
• Never use: abrasive powders, metal or
plastic sponges, alcohol-based products,
thinners, etc.
Cleaning the detergent dispensers
- Pull the knob forward (
dispensers out (
- Clean everything with warm water, not
forgetting to wash the removable siphon
(blue). Check that you have replaced it
correctly.
- Then re-insert the whole dispensers,
checking that they are positioned correctly.
FIG. 7 ➁
FIG. 7 ➀
),
), and lift the
Replacing the power cable: For the sake of
your safety, this must necessarily be done by
the manufacturer’s After-Sales service or a
qualified electrician.
Regularly check: The condition of the water
supply and drain hoses. If you notice the
slightest cracking, do not hesitate to replace
them.
Replacing the water supply hose (FIG. 9):
When changing, check that the hose is tight
and that there is a seal on both ends.
When there is a risk of frost: Drain the drain
circuit as shown above.
Removing the drum’s paddle:
If an item of washing falls between the drum
and the side of the tub, empty the drum and
close it.
- Turn the drum until the paddle locks.
- Unscrew the screw between the two
openings (stamped TORX. T20) and remove
it. The paddle will fall into the drum (use a
terry towelling towel to cushion its fall as a
precaution).
- Turn the drum back and open it.
- Recover the fallen item through the holes
revealed by removing the paddle.
- To refit the paddle, slip it from front to back
over its support.
- Close the drum and turn it. Hold the paddle
while you re-insert the screw.
Cleaning the drying filter:
(only for washer-dryers)
Clean this after every drying operation:
- Remove the filter from its housing (on the
right, near to the opening for the drum) and
pull it towards you (FIG. 4).
- Clean it dry, removing any fluff it may have
caught.
- Replace it in its housing, pushing it in fully.
10
Page 15

Incidents that may occur
Points to be checked in the event of an incident occurring:
Possible causes / Remedies
The cycle does not start (1 and 2)
• You have not pressed the «Start /Pause»
button.
• There is no power to the machine:
- Check that the plug is correctly fitted in
the socket.
- Check the circuit breaker and the fuses.
• The water tap is shut off.
• The machine’s lid is not closed properly
Heavy vibration during spin (1 and 2)
• Your machine has not been correctly
released:
- Check that all the transport material has
been removed (see «RELEASING»).
• The floor is not horizontal.
• Your machine is not stable on its four feet
(see «LEVELLING»).
The washing is not spun or is insufficiently
spun (1 and 2)
• You have selected a programme with no
spin, for example «Drip-dry».
• The spin safety system has detected poor
distribution of the washing in the drum:
- Untangle the washing and programme a
new spin.
The machine does not drain (1 and 2)
• You have programmed «Rinse hold».
• The pump or the drain filter is blocked:
- Clean them (see «RUNNING
MAINTENANCE»).
• The drain hose is kinked or squashed.
You wish just to wash but a drying cycle
starts automatically (2)
• You have programmed a drying cycle.
The lid does not open (1 and 2)
• The programme has not yet finished.
The lid remains locked throughout the
programme.
.
Possible causes / Remedies
The drum doors open too slowly (depending
on the model)
• Your machine has not operated for a long
time.
• It is located in too cold a position.
• Detergent residue (powder) is blocking the
hinges.
- In all cases, everything returns to normal
once the doors have opened initially.
A pool of water forms around the machine (1
and 2)
First of all remove the electrical plug from the
Ꮨ
socket and close the water tap. Then check
whether:
• The drain hose bracket is wrongly
positioned in the drain pipe.
•The water hose’s connections to the
machine and the tap are properly
watertight:
- Check that the seals are in place and the
connections are tight.
Foam overflows (1 and 2)
• You have used too much detergent.
• You have not used a detergent designed for
washing machines:
- Drain and then programme several rinses.
Then restart the washing programme.
Use «low suds» detergent.
The drying cycle does not start (2)
• You have not selected a drying time.
The washing is not as dry as you wish (2)
• The drying programme selected is not
suitable for the type of textile placed in the
machine (Pay attention to the information
provided on the labels sewn on the clothes).
• The drying time selected is not suitable:
- For the level of dryness desired: increase
or reduce the drying time accordingly.
• The load of dried washing is greater than
the maximum authorised load (see
“PROGRAMMES TABLE”).
• The washing to be dried has not been spun
sufficiently.
(1)
Washing machines
Washer-dryers
(2)
Textile maintenance codes:
Do not exceed the indicated temperature.
95
Cold diluted bleach can be used.
Ironing:
cold ••medium
•
•••
hot.
F
Dry cleaning.
Do not use.
Heavy drying in a domestic machine.
Gentle drying in a domestic machine.
11
Page 16

Incidents notified on the display, which you can repair yourself
Your machine can automatically detect certain operating faults.
Particular messages are shown on the display to indicate what these faults are:
Message Possible causes / Remedies
Filling fault. Check that the water tap is on, then press the
to restart the cycle.
Draining fault. Clean the pump filter (see the chapter on «CLEANING THE
PUMP FILTER» for the procedure), then press the
restart the cycle.
«»
«»
button again to
button again
Locking fault. Check that the lid is closed correctly, then press the
button again to restart the cycle.
If the fault persists, contact your breakdown engineer.
Incidents notified on the display, which require a service engineer
Message
When one of these faults occurs, do not forget to note down the message displayed (d03, d04,
…. d23) so that you can inform your breakdown engineer of this during your call, making his
work easier.
Possible causes / Remedies
Heating fault. This message, which appears at the end of the cycle, indicates
that the machine did not achieve the washing temperature you selected.
Programming card fault. For your own safety, disconnect the machine and
contact your breakdown engineer.
Washing temperature fault.
Drum rotation fault. After switching the machine off, check whether an item of
washing or an object has slipped between the drum and the side of the tub,
causing a blockage (see the section on «RUNNING MAINTENANCE»:
removing the drum’s paddle” for details on how to access the bottom of the
tub). If the fault persists, contact your breakdown engineer.
Overflow. When this fault is detected, the supply of water is automatically cut
off, the machine is drained and the cycle stops.
Fault in the electronic unit. Your machine shuts down completely for its own
safety.
Drying temperature fault.
Heating fault. This message, which appears at the end of the cycle, indicates
that the machine did not achieve the drying temperature you selected.
for washer-dryer models).
(Only for washer-dryer models).
«»
(Only
After-Sales service
Any work on your machine must be performed either by your dealer or by a qualified electrician
approved by the manufacturer or his agent.
When you call, cite your machine’s complete reference (model, type and serial No.). This
information is shown on the information plate fixed to the rear of your machine (see FIG. 9).
You also find this information on a sticker fixed to the base of the machine, behind the front
plinth.
12
16897 A 01/04
 Loading...