

Brandt BDVDP9210 Instruction Manual

EN INSTRUCTION MANUAL
FR MANUEL D ’ UTILISATION
NL GEBRUIKERSHANDLEIDING
ES MANUAL DE USO
IT MANUALE D ’ USO
CZ N Á VOD K OBSLUZE
SK N Á VOD NA OBSLUHU
BDVDP
BDVDP
BDVDP
BDVDP 9210
9210
9210
9210
9
"
PORTABLE
9
"
PORTABLE
9
9 "
" PORTABLE
PORTABLE DVD
LECTEUR
LECTEUR
LECTEUR
LECTEUR DVD
9
"
BREEDBEELD
9
"
BREEDBEELD
9
9 "
" BREEDBEELD
BREEDBEELD PORTABLE
DVD
PORT
DVD
PORT
DVD
DVD PORT
PORT Á
LETTORE
LETTORE
LETTORE
LETTORE DVD
9
”
P
Ř
ENOSN
9
”
P
Ř
ENOSN
9
9 ”
” P
P Ř
Ř ENOSN
ENOSN Ý
9
”
PRENOSN
9
”
PRENOSN
9
9 ”
” PRENOSN
PRENOSN Ý
DVD
DVD
DVD PLAYER
DVD
PORTABLE
DVD
PORTABLE
DVD PORTABLE
PORTABLE DE
PORTABLE
PORTABLE
PORTABLE DVD
Á
TIL
9
"
Á
TIL
9
"
Á TIL
TIL 9
9 "
"
DVD
PORTATILE
DVD
PORTATILE
DVD PORTATILE
PORTATILE CON
Ý
DVD
Ý
DVD
Ý DVD
DVD P
Ý
DVD
Ý
DVD
Ý DVD
DVD PREHR
PLAYER
PLAYER
PLAYER
P
Ř
P
Ř
P Ř
Ř EHR
PREHR
PREHR
PREHR Á
DE
DE
DE 22,86
DVD
DVD
DVD SPELER
CON
CON
CON SCHERMO
EHR
Á
VA
EHR
Á
VA
EHR Á
Á VA
VA Č
Á
VA
Á
VA
Á VA
VA Č
22,86
22,86
22,86 CM
SPELER
SPELER
SPELER
SCHERMO
SCHERMO
SCHERMO 9
Č
Č
Č
Č
Č
Č
CM
CM
CM
9
"
9
"
9 "
"

..............................................................................................
WARNINGS
WARNINGS
WARNINGS
WARNINGS
IMPORTANT
IMPORTANT
IMPORTANT
IMPORTANT SAFETY
PACKAGE
PACKAGE
PACKAGE
PACKAGE CONTENT
IDENTIFICATION
IDENTIFICATION
IDENTIFICATION
IDENTIFICATION OF
GETTING
GETTING
GETTING
GETTING STARTED
I
NSTALLING
I
NSTALLING
I
I NSTALLING
NSTALLING DVD
C
ONNECTING
C
ONNECTING
C
C ONNECTING
ONNECTING P
C
ONNECTING
C
ONNECTING
C
C ONNECTING
ONNECTING A
C
HARGING
C
HARGING
C
C HARGING
HARGING THE
OPERATION
OPERATION
OPERATION
OPERATION
PLAYING
PLAYING
PLAYING
PLAYING A
PLAYING
PLAYING
PLAYING
PLAYING AN
PLAYING
PLAYING
PLAYING
PLAYING A
DIGITAL
DIGITAL
DIGITAL
DIGITAL CARD
SETUP
SETUP
SETUP
SETUP MENU
G
ENERAL
G
ENERAL
G
G ENERAL
ENERAL O
G
ENERAL
G
ENERAL
G
G ENERAL
ENERAL S
A
UDIO
A
UDIO
A
A UDIO
UDIO S
V
IDEO
V
IDEO
V
V IDEO
IDEO Q
P
REFERENCE
P
REFERENCE
P
P REFERENCE
REFERENCE P
P
ASSWORD
P
ASSWORD
P
P ASSWORD
ASSWORD S
S
LAVE
S
LAVE
S
S LAVE
LAVE S
SPECIFICATIONS
SPECIFICATIONS
SPECIFICATIONS
SPECIFICATIONS
CLEANING
CLEANING
CLEANING
CLEANING AND
TROUBLESHOOTING
TROUBLESHOOTING
TROUBLESHOOTING
TROUBLESHOOTING
..............................................................................................
..............................................................................................
..............................................................................................
SAFETY
SAFETY
SAFETY INSTRUCTIONS
CONTENT
CONTENT
CONTENT
STARTED
STARTED
STARTED
DVD
P
LAYERS
DVD
P
LAYERS
DVD P
P LAYERS
LAYERS TO
P
OWER
P
OWER
P OWER
OWER
A
UDIO
A
UDIO
A UDIO
UDIO /V
I
THE
NCORPORATED
I
THE
NCORPORATED
THE I
I NCORPORATED
NCORPORATED B
.............................................................................................
.............................................................................................
.............................................................................................
.............................................................................................
A
DVD/VCD
A
DVD/VCD
A DVD/VCD
DVD/VCD
AN
AUDIO
AN
AUDIO
AN AUDIO
AUDIO CD
A
JPEG
A
JPEG
A JPEG
JPEG DISC
CARD
AND
CARD
AND
CARD AND
AND USB
.........................................................................................
MENU
MENU
MENU
Q
Q
Q UALITY
S
S
S CREEN
.........................................................................................
.........................................................................................
.........................................................................................
O
PERATION
O
PERATION
O PERATION
PERATION
S
P
ETUP
AGE
S
P
ETUP
AGE
S ETUP
ETUP P
P AGE
AGE
S
P
ETUP
AGE
S
P
ETUP
AGE
S ETUP
ETUP P
P AGE
AGE
S
UALITY
UALITY
UALITY S
CREEN
CREEN
CREEN P
ETUP
S
ETUP
S ETUP
ETUP
P
(
AGE
P
(
AGE
P AGE
AGE (
( ACCESSIBLE
S
P
ETUP
S
P
ETUP
S ETUP
ETUP P
P AGE
P
ICTURE
P
ICTURE
P ICTURE
ICTURE S
....................................................................................
....................................................................................
AND
MAINTENANCE
AND
MAINTENANCE
AND MAINTENANCE
MAINTENANCE
CONTENTS
CONTENTS
CONTENTS
CONTENTS
......................................................
INSTRUCTIONS
INSTRUCTIONS
INSTRUCTIONS
.................................................................................
.................................................................................
.................................................................................
.................................................................................
OF
CONTROLS
OF
CONTROLS
OF CONTROLS
CONTROLS
...................................................................................
...................................................................................
...................................................................................
...................................................................................
C
S
TO
AR
EATS
C
S
TO
AR
TO C
.....................................................................................................
/V
IDEO
/V
IDEO
/V IDEO
IDEO C
................................................................................................
CD
,
CD
,
CD ,
, MP3
DISC
.............................................................................................
DISC
DISC
USB
USB
USB PLAY
..................................................................................................
.................................................................................................
.....................................................................................................
.................................................................................................
ACCESSIBLE
ACCESSIBLE
ACCESSIBLE WHEN
AGE
AGE
..............................................................................................
AGE
S
ETTING
S
ETTING
S ETTING
ETTING
....................................................................................
....................................................................................
..............................................................................
..............................................................................
..............................................................................
..............................................................................
EATS
C AR
AR S
S EATS
EATS
C
ABLE
..................................................................................
C
ABLE
C ABLE
ABLE
B
ATTERY
B
ATTERY
B ATTERY
ATTERY OF
MP3
DISC
MP3
DISC
MP3 DISC
DISC
PLAY
PLAY
................................................................................
PLAY
WHEN
NO
WHEN
NO
WHEN NO
NO DISC
...................................................................................
......................................................
......................................................
......................................................
..............................................................
..............................................................
..............................................................
..............................................................
.........................................................................
DVD
OF
THE
OF
THE
OF THE
THE DVD
........................................................................
DISC
DISC
DISC IS
............................................................
............................................................
............................................................
............................................................
DVD
DVD PLAYER
IS
INSERTED
IS
INSERTED
IS INSERTED
INSERTED )
PLAYER
PLAYER
............................................
PLAYER
)
)
..............................................
)
2
2
2
2
3
3
3
3
3
3
3
3
4
4
4
4
7
7
7
7
7
8
8
8
9
9
9
9
9
11
13
14
14
14
14
14
14
14
17
18
19
22
23
24
24
24
24
24
24
24
24
24
24
24
24
1

WARNINGS
WARNINGS
WARNINGS
WARNINGS
This appliance is intended for domestic household use only and
should not be used for any other purpose or in any other
application, such as for non-domestic use or in a commercial
environment.
Prior to cleaning or other maintenance, the appliance must be
disconnected from the supply mains.
The ventilation should not be impeded by covering the ventilation
openings with items, such as newspapers, table-cloths, curtains, etc.
No naked flame sources, such as lighted candles, should be placed
on the apparatus.
The apparatus shall not be exposed to dripping or splashing and
that no objects filled with liquids, such as vases, shall be placed on
the apparatus.
Ventilation
Allow at least a 10 cm gap all around the product.
This apparatus is not suitable for use in a tropical climate.
Never throw batteries on a fire! Danger of explosion.
CAUTION
Danger of explosion if battery is incorrectly replaced. Replace only
with the same or equivalent type.
2

IMPORTANT
IMPORTANT
IMPORTANT
IMPORTANT SAFETY
This equipment is designed to operate from a 100-240 Volt,
50/60Hz AC mains supply. Other power sources may damage it.
Check that the voltage marked on the rating plate on the power
adapter is the same as your mains supply.
If the power adapter becomes damaged, it should be replaced
with an adapter of the same type and rating to avoid a hazard.
If the incorporated battery starts to leak or becomes too hot
during operation or charging, please stop operation immediately
and dispose of the unit.
Do not expose the DVD player to excessive heat such as strong
sunshine, fire or the like as this strong sunshine can contribute to an
overheating of the battery and can damage the unit.
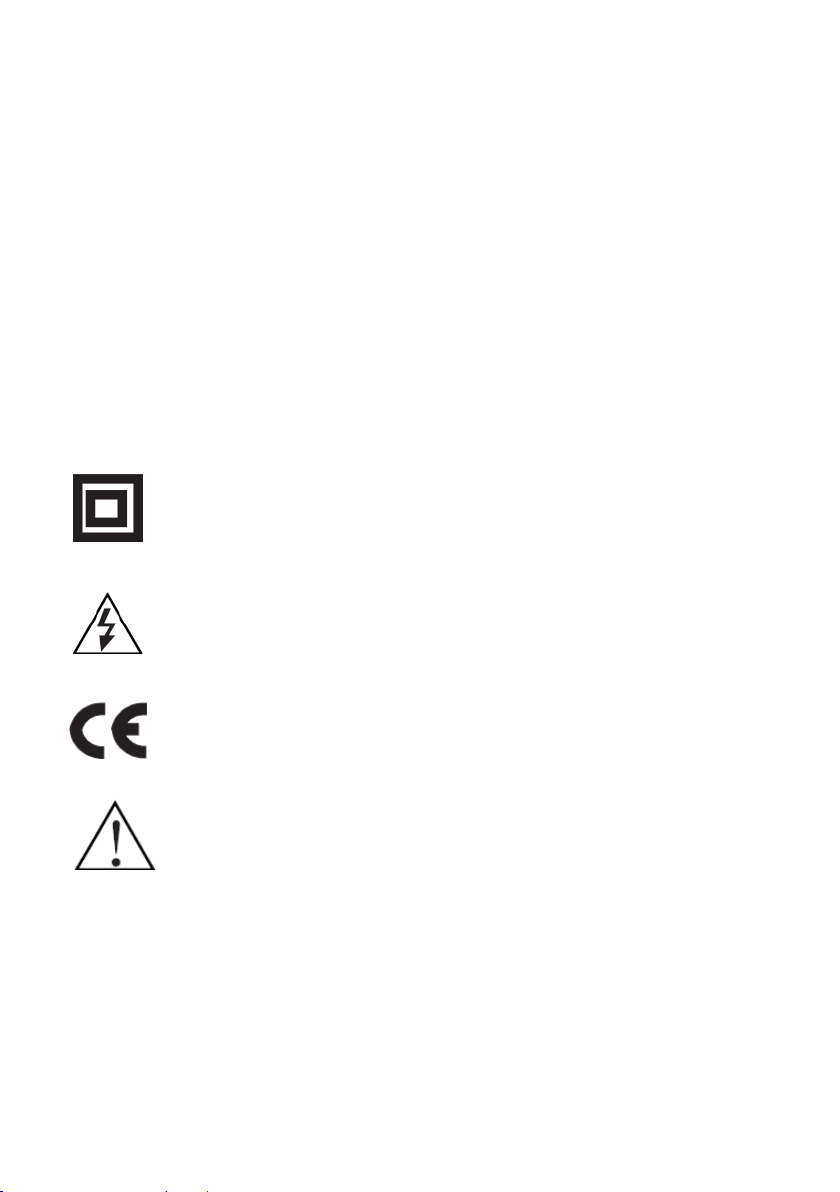
Symbols
Symbols
Symbols
Symbols
This equipment is double insulated and an earth connection is not
required.
SAFETY
SAFETY
SAFETY INSTRUCTIONS
INSTRUCTIONS
INSTRUCTIONS
INSTRUCTIONS
Dangerous voltage constituting a risk of electric shock is present inside
this equipment.
This mark is applied to show the equipment conforms to European safety
and electromagnetic compatibility standards.
There are important operating and maintenance instructions in the
literature accompanying this equipment.
3
Battery
Battery
Battery
Battery handling
Remote
Remote
Remote
Remote control
handling
handling
handling and
control
control
control battery:
and
and
and usage
battery:
battery:
battery:
usage
usage
usage
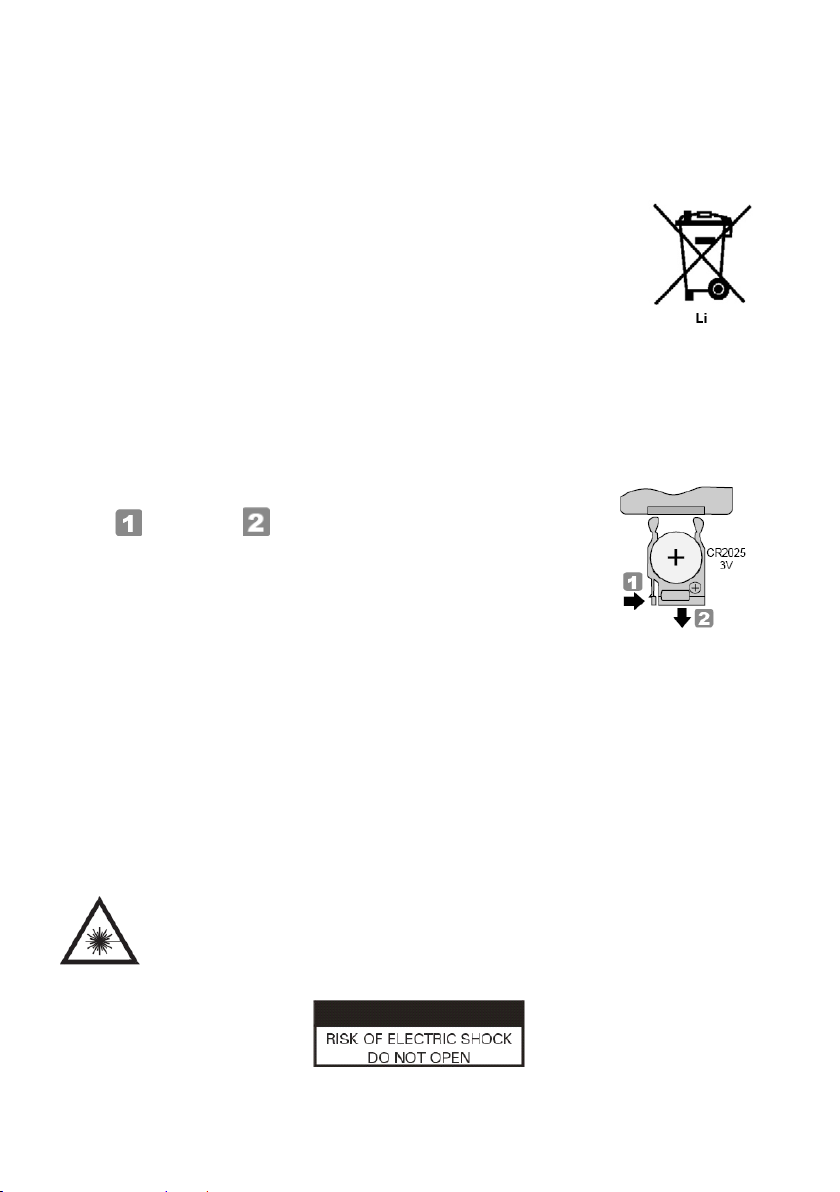
The battery should only be replaced by adults. Do not allow children to
use the remote control unless the battery cover is attached.
The battery type used in the remote is one CR2025 3V
Lithium battery which is accessible and can be replaced.
Remove the battery holder located on the bottom of the
remote control to remove the battery.
Incorporated
Incorporated
Incorporated
Incorporated Battery
Battery
Battery
Battery
The battery type used in the unit is one lithium battery. The battery is
in-cooperated and is not readily accessible.
The battery must be disposed of at your local recycling point.
Installing
Installing
Installing
Installing Remote
Remote
Remote
Remote Control
Control
Control
Control Battery
Battery
Battery
Battery
Push and pull to slide out the battery holder
from the remote control and insert one 3V CR2025
lithium battery in the battery holder with the print
face up, then replace the battery holder.
WARNING
WARNING
WARNING
WARNING :
To
save
To
To
To save
power:
save
power:
save power:
power: switch off mains power or pull out the power adapter
plug when you are not using the apparatus.
Never operate the apparatus and try to view video while driving a vehicle.
To prevent injury, this apparatus must be securely attached to the car
seats as in accordance with the installation instructions.
Class
1
laser
Class
Class
Class 1
1
1 laser
product
laser
product
laser product
product
This product contains a low power laser device. Invisible laser
radiation when the enclosure is opened and interlocks are
defeated.
Avoid exposure to beam.
4

This digital video disc player employs a laser system. Use of controls,
adjustments, or the performance of procedures other than those
specified herein may result in hazardous radiation Exposure.
To prevent direct exposure to laser beam, do not open the enclosure.
Never stare directly into the laser beam.
Do not install this product in a confined space such as a book case or
similar unit.
Notes
Notes
Notes
Notes on
on
Copyrights:
on
Copyrights:
on Copyrights:
Copyrights:
It is forbidden by law to copy, broadcast, show, broadcast via cable,
play in public, or rent copyrighted material without permission.
This product features the copy protection function developed by
Macrovision. Copy protection signals are recorded on some discs.
When recording and playing the pictures of these discs picture noise
will appear. This product incorporates copyright protection technology
that is protected by method claims of certain U.S. Patents and other
intellectual property rights owned by Macrovision Corporation and
other rights owners. Use of this copyright protection technology must
be authorised by Macrovision Corporation, and is intended for home
and other limited viewing uses only unless otherwise authorised by
Macrovision Corporation. Reverse engineering or disassembly is
prohibited.
Region
Region
Region
Region Code
Code
Code
Code
This DVD player is designed and manufactured for play of region
“ 2 ” encoded DVD software.
Notes
Notes
Notes
Notes on
Handling
Handling
Handling
Handling Discs
on
Discs
on
Discs
on Discs
Discs
Discs
Discs
Discs
Do not touch the play side of the disc. Hold the disc by the edges so that
fingerprints do not get on the surface. Never stick paper or tape on the
disc.
5

Storing
Storing
Storing
Storing Discs
After playing, store the disc in its case. Do not expose the disc to direct
sunlight or source of heat and never leave it in a parked car exposed to
direct sunlight.
Cleaning
Cleaning
Cleaning
Cleaning Discs
Fingerprints and dust on the disc can cause poor picture quality and
sound distortion. Before playing, clean the disc with a clean cloth. Wipe
the disc from the centre out.
Do not use strong solvents such as alcohol, benzine, thinner,
commercially available cleaners, or anti-static spray intended for older
vinyl records.
PACKAGE
PACKAGE
PACKAGE
PACKAGE CONTENT
1x Master screen
1x Slave screen
1x AC power adapter
1x Car adapter
2x Car seat strap
1x Remote control incl. Battery
2x Earphone
1x Connecting cable
1x AV cable
1x Carrying bag
Discs
Discs
Discs
Discs
Discs
Discs
CONTENT
CONTENT
CONTENT
6
IDENTIFICATION
IDENTIFICATION
IDENTIFICATION
IDENTIFICATION OF
Unit
Unit
Unit
Unit
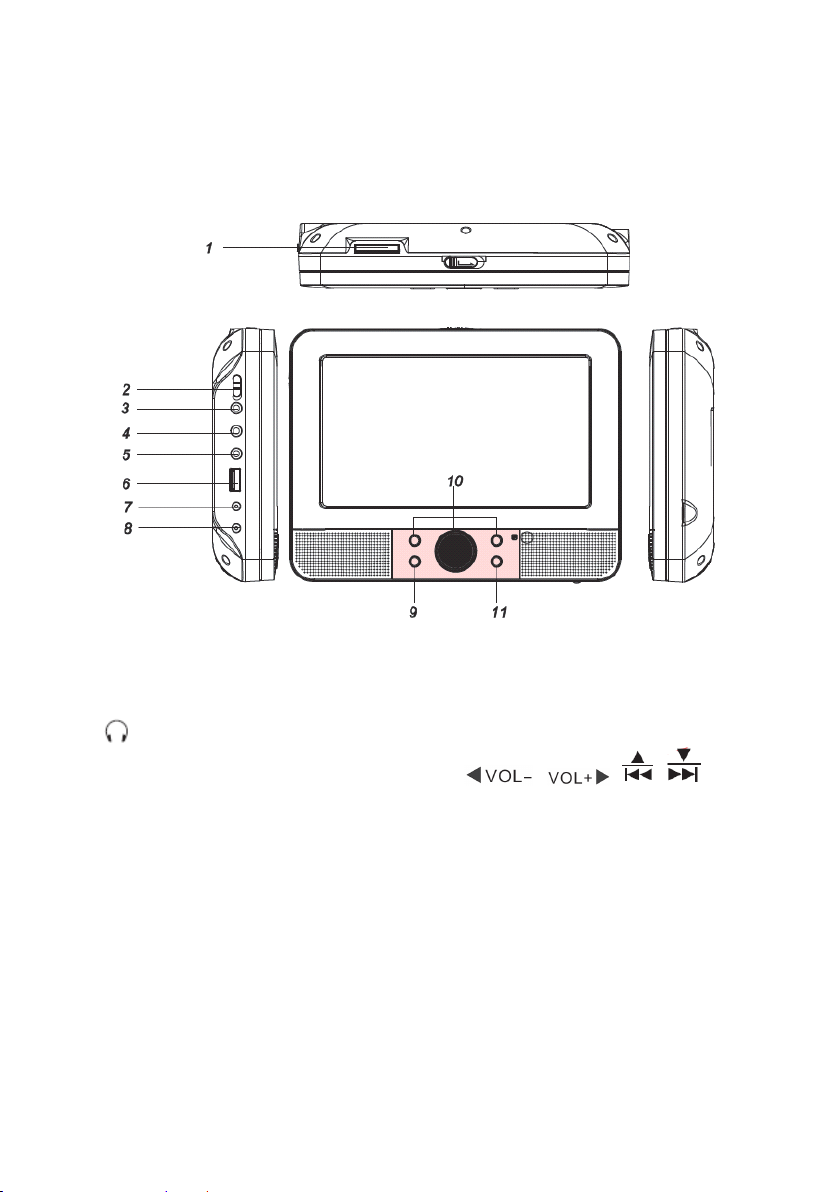
Master screen
MS
/
SD/
M
MS
1. MS
2. ON/OFF
3. Ear phone socket
/
MS /
/ SD/
ON/OFF
ON/OFF
ON/OFF switch
MC
SD/
M
MC
SD/ M
M MC
MC slot
OF
CONTROLS
OF
CONTROLS
OF CONTROLS
CONTROLS
DC
DC
7. DC
DC OUT
DC
DC
8. DC
DC IN
ENTER
ENTER
9. ENTER
ENTER
OUT
OUT
OUT jack
IN
9
-12
IN
9
-12
IN 9
9 -12
-12 V
V
V
V jack
AV
OUT
AV
4. AV
5. COAXIAL
6. USB
OUT
AV OUT
OUT jack
COAXIAL
COAXIAL
COAXIAL socket
USB
USB
USB port
10. /
SOURCE
SOURCE
11. SOURCE
SOURCE
7
/
/
/ / /
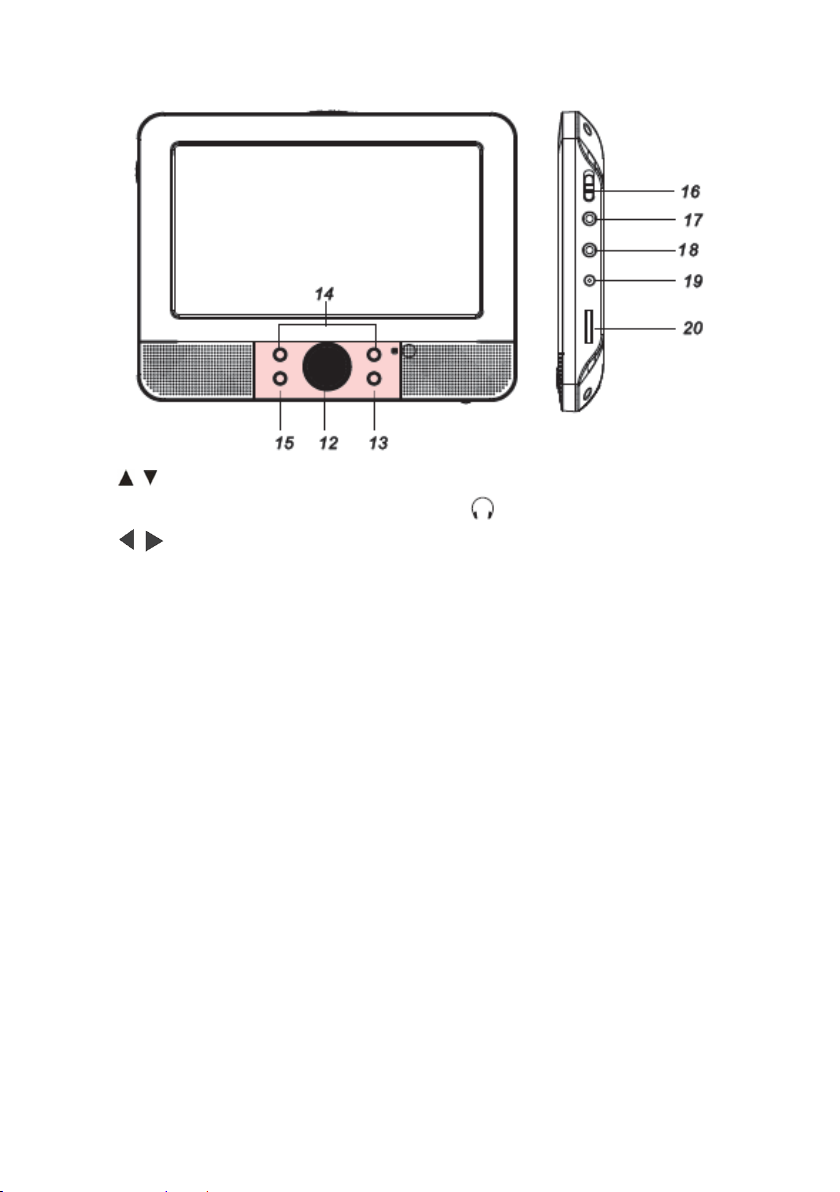
Slave screen
/
12. /
13. MODE
/
/
MODE
MODE
MODE
14. /
BACK
BACK
15. BACK
BACK LIGHT
ON/OFF
ON/OFF
16. ON/OFF
ON/OFF switch
LIGHT
LIGHT
LIGHT
AV
IN
AV
AV IN
IN
IN jack
17. AV
18. Ear phone socket
DC
IN
DC
DC IN
–
VOL+
–
VOL+
– VOL+
VOL+
IN
IN jack
19. DC
20. –
Headphones: Insert a standard 3.5mm headphone into the headphone
socket. The speakers will be muted.
HEADPHONE
HEADPHONE
HEADPHONE
HEADPHONE VOLUME
Connect headphones with volume
set low and increase it if required.
Prolonged listening through some
headphones at high volume
settings can result in hearing
VOLUME
VOLUME
VOLUME WARNING
WARNING
WARNING
WARNING
Earphones or headphones must
comply with EN50332-1 /
EN50332-2 to ensure continued
protection from excessive sound
pressure.
damage.
8
At full power, prolonged listening to the player can damage the
ear of the user.
WARNING
WARNING
WARNING
WARNING : To protect your hearing, it is important that any headphones or
earphones used in conjunction with this product are compliant
with French Decree of 8 November 2005 implementing Article
L.5232-1. This ensures that the sound level does not exceed 100
dB SPL. T he prolonged listening at high volume for more than five
hours a week can damage your hearing.
Remote
Remote
Remote
Remote Control
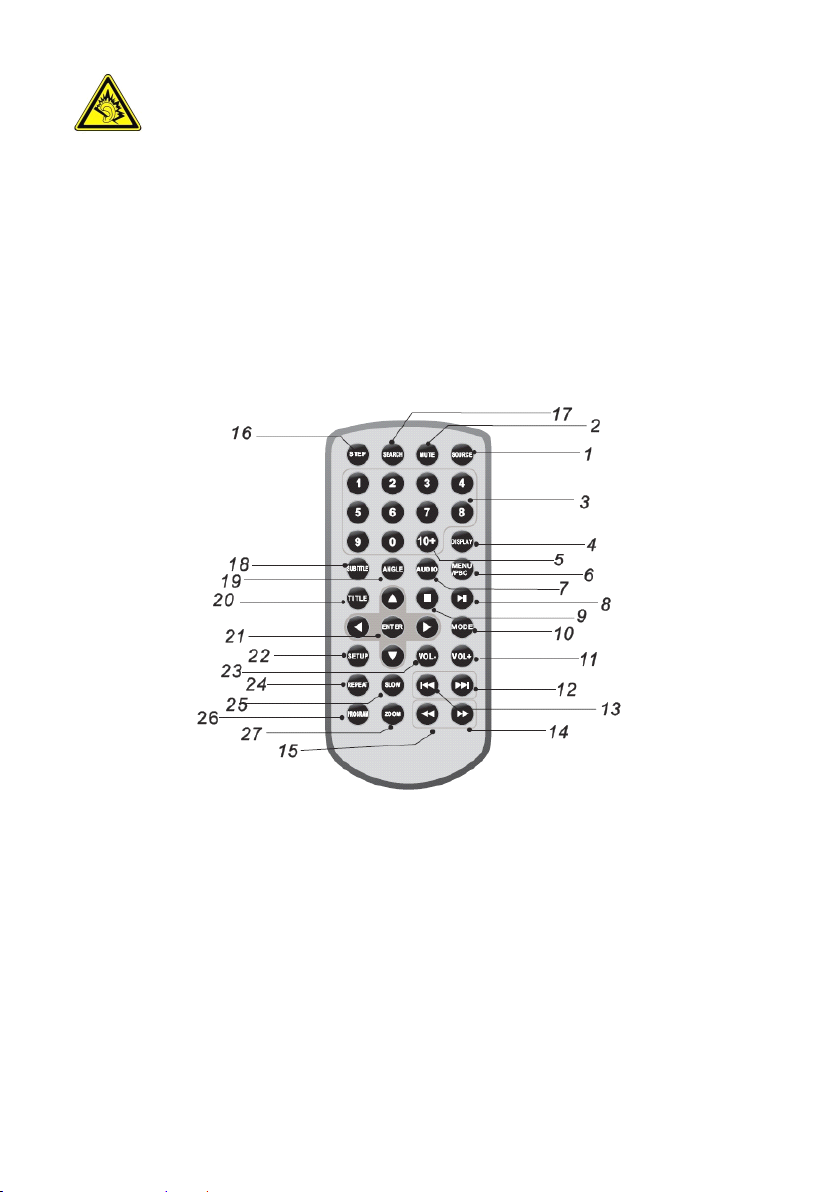
1. SOURCE
Control
Control
Control
SOURCE
SOURCE
SOURCE
•
To switch among DVD, card
and USB
MUTE
MUTE
2. MUTE
MUTE
0-9
0-9
3. 0-9
0-9 numeric button
DISPLAY
DISPLAY
4. DISPLAY
DISPLAY
• To display the play time and
status information
10+
10+
5. 10+
10+
• To select a track greater than
or equal to 10, first press 10+
and then press a numeric
button.
MENU/PBC
MENU/PBC
6. MENU/PBC
MENU/PBC
9
• To return to DVD root menu
• To switch PBC on/off (VCD)
AUDIO
AUDIO
7. AUDIO
AUDIO
•
To select an audio language
(DVD)
• To select an audio channel
(MP3, CD, VCD)
8.
9.
MODE
MODE
10. MODE
MODE
•
To access to video setup page
VOL+
VOL+
11. VOL+
VOL+
12.
13.
14.
15.
STEP
STEP
16. STEP
STEP
SEARCH
SEARCH
17. SEARCH
SEARCH
•
•
•
• To go to a track , title or
chapter you want
SUBTITLE
SUBTITLE
18. SUBTITLE
SUBTITLE
• To select a subtitle language
(DVD)
ANGLE
ANGLE
19. ANGLE
ANGLE
•
To select a DVD viewing angle
if available
TITLE
TITLE
20. TITLE
TITLE
•
To return to DVD title menu
ENTER
ENTER
21. ENTER
ENTER /
SETUP
SETUP
22. SETUP
SETUP
VOL-
VOL-
23. VOL-
VOLREPEAT
REPEAT
24. REPEAT
REPEAT
SLOW
SLOW
25. SLOW
SLOW
PROGRAM
PROGRAM
26. PROGRAM
PROGRAM
ZOOM
ZOOM
27. ZOOM
ZOOM
GETTING
GETTING
GETTING
GETTING STARTED
Installing
Installing
Installing
Installing main
1. Slide the support straps through the slot on the back of the two
screens.
2. Place the straps around the headrest of the car front seats.
3. Centre the screens then buckle the strap securely.
Connecting
Connecting
Connecting
Connecting Power
To connect power from inside a car, connect the supplied car adapter
to the DC
DC
DC
DC IN
STARTED
STARTED
STARTED
main
and
slave
main
and
main and
and slave
Power
Power
Power
IN
9-12V
IN
9-12V
IN 9-12V
9-12V jack of the unit.
screens
slave
screens
slave screens
screens to
to
Car
to
Car
to Car
Car Seats
10
Seats
Seats
Seats

To connect power from household power sources, connect the
DC
IN
supplied power adapter to the DC
DC
DC IN
9-12V
IN
9-12V
IN 9-12V
9-12V jack of the unit and to the
mains socket.
Caution
Caution
Caution
Caution !
When you unplug the adapter, always pull the plug from the mains
socket. Never pull the cord.
DC
OUT
DC
Use the supplied connecting cable to connect the DC
DC
IN
player to the DC
DC
DC IN
9-12V
IN
9-12V
IN 9-12V
9-12V jack on another player.
OUT
DC OUT
OUT jack on one
Connecting
Connecting
Connecting
Connecting Audio/Video
Audio/Video
Audio/Video
Audio/Video Cable
Cable
Cable
Cable
1. Connect the single-connector end of the supplied audio/video cable
AV
OUT
AV
to the AV
OUT
AV OUT
OUT jack of the master screen.
2. Connect the triple-connector end of the supplied audio/video cable
to the corresponding jacks of the TV display.
NOTE
NOTE
NOTE
NOTE : Match the colour of the AV cable with the jacks of TV display.
The yellow cable is for the yellow video jack, the red/white
cable is for the red/white audio jacks.
Charging
Charging
Charging
Charging the
the
Incorporated
the
Incorporated
the Incorporated
Incorporated Battery
Battery
Battery
Battery of
of
of
of the
the
DVD
the
DVD
the DVD
DVD player
player
player
player
The DVD player has an incorporated battery, to charge the battery,
DC
IN
connect the supplied power adapter cable to the DC
DC
DC IN
9-12V
IN
9-12V
IN 9-12V
9-12V jack. The
red charge indicator light will illuminate . When the battery is fully
charged, the red charge indicator light will turn green .
NOTE
NOTE
NOTE
NOTE :
It takes appr ox 4 hours to fully charge the battery. The fully charged
battery can last appr ox 2 hours.
OPERATION
OPERATION
OPERATION
OPERATION
PLAYING
PLAYING
PLAYING
PLAYING A
1. Slide the ON/OFF
A
DVD
A
A DVD
/VCD
DVD
/VCD
DVD /VCD
/VCD
ON/OFF
ON/OFF
ON/OFF switch at the side of the player to “ ON
ON
ON
ON ” to turn
the player on.
The power indicator light will illuminate .
OPEN
2. Slide OPEN
OPEN
OPEN on the top of the player to open the disc tray and insert
11

your chosen disc in the tray, with the label side facing up.
3. Close the tray.
Play starts automatically.
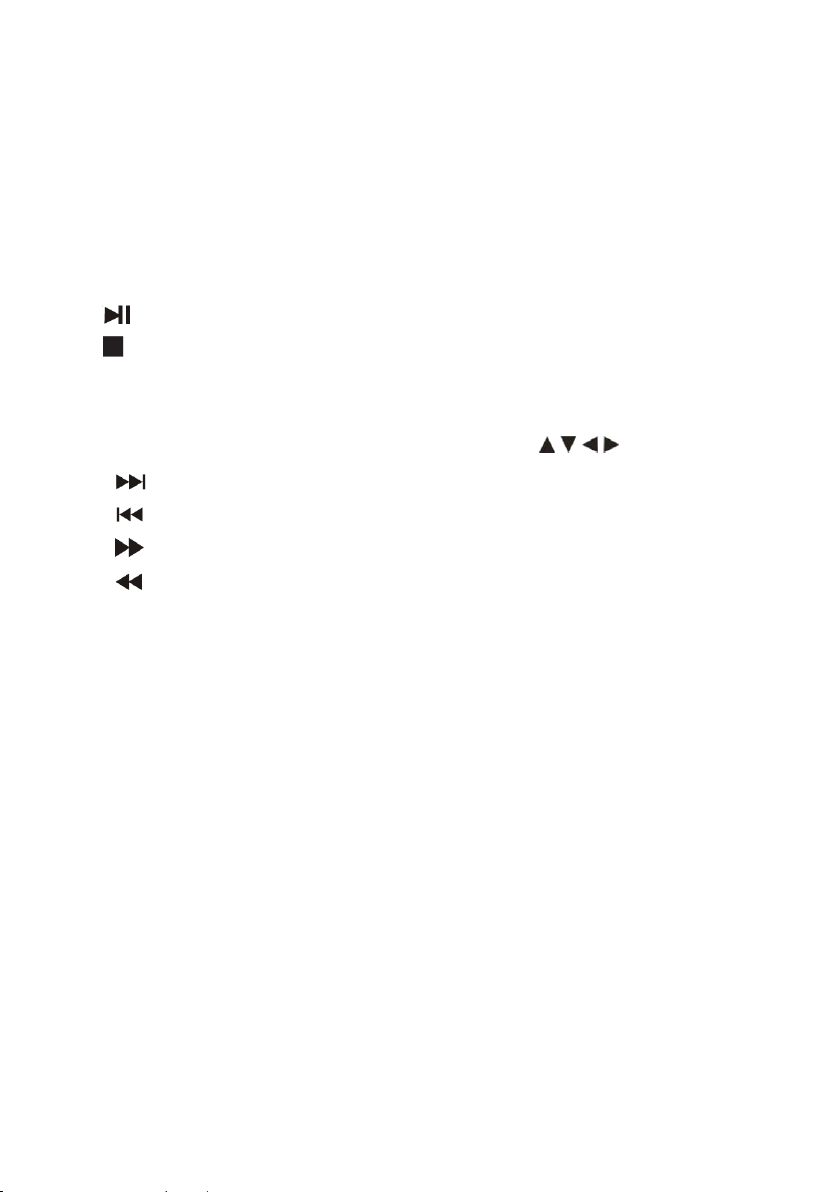
Moving to another CHAPTER/TRACK : DVD
When a title on a disc has more than one chapter or a disc has more
than one track, you can move to another chapter/track as follows:
1. Press or on the remote during play to select the next or
previous chapter/track.
2. To go directly to any chapter / track during DVD playback, input the
chapter/track number.
Repeat :
You can play a title/chapter/all the tracks on a disc repeatedly.
REPEAT
REPEAT
Press REPEAT
REPEAT during play to select a desired repeat mode.
Repeat
Repeat
“ Repeat
Repeat chapter
chapter
chapter
chapter /
/
/
/ title
title
title
title /
/
all
/
all
/ all
all ” (for DVD)
CHAPTER: repeat the current chapter.
TITLE: repeat the current title.
ALL: repeat all the tracks on a disc.
Repeat
Repeat
“ Repeat
Repeat track
track
track
track /
/
all
/
all
/ all
all ” (for V C D)
TRACK: repeat the current track.
ALL: repeat all the tracks on a disc.
Zoom :
You can zoom in for video images.
ZOOM
ZOOM
Press ZOOM
ZOOM repeatedly to change the size in the following sequence.
2X size → 3X size → 4X size →
1
/2size →
1
/3size →
1
/4size →
normal size
Menu :
MENU
MENU
Press MENU
MENU . If the current title has a menu, the menu appears on the
screen.
Selecting the Audio Language :
For DVDs that contain two or more audio languages, during play press
AUDIO
AUDIO
AUDIO
AUDIO until the desired language is selected.
AUDIO
For VCD, repeatedly press AUDIO
AUDIO
AUDIO to select the desired audio mode.
12

Selecting the Subtitle Language :
For DVDs that contain two or more subtitle languages, during play
SUB
TITLE
SUB
press SUB
TITLE
SUB TITLE
TITLE until the desired language is selected.
Camera Angle :
If the disc contains scenes recorded at different camera angles, you
can change to a different camera angle during playback.
ANGLE
ANGLE
Press ANGLE
ANGLE repeatedly during play to select a desired angle. Note
that the number of the current angle appears on screen.
Title :
TITLE
TITLE
Press TITLE
TITLE , then the DVD menu or titles available on the disc will be
ENTER
displayed. Then you can use and ENTER
ENTER
ENTER to select programs.
PBC :
MENU/
During VCD playback, press MENU/
MENU/
MENU/ PBC
PBC
PBC
PBC to turn the unit on or off.
Multi Speed Slow Motion Playback :
SLOW
Repeatedly press SLOW
SLOW
SLOW to select the desired slow motion playback
speed.
Slow motion playback has four speeds: 1/2, 1/4, 1/8 and 1/16.
Step:
STEP
STEP
Press STEP
STEP to play the disc frame by frame.
Search:
Use numeric buttons to select a desired title or chapter in DVD mode.
Program Play:
PROGRAM
1. Press PROGRAM
PROGRAM
PROGRAM , the program menu will appear.
2. Use the numeric keypad to input the titles, tracks or chapters.
3. Move the cursor by pressing to select PLAY and press
ENTER
ENTER
ENTER
ENTER .
PROGRAM
4. To resume normal play from programmed play, press PROGRAM
PROGRAM
PROGRAM
and select CLEAR on the program menu.
PLAYING
PLAYING
PLAYING
PLAYING AN
Audio
Audio
Audio
Audio CD
CD
CD
CD
AN
AUDIO
AN
AUDIO
AN AUDIO
AUDIO CD
CD
CD
CD ,
,
MP3
,
MP3
, MP3
MP3 DISC
DISC
DISC
DISC
Once an Audio CD is inserted it will be played automatically. Its play
13

information will be show n.
DISPLAY
W hen you press DISPLAY
DISPLAY
DISPLAY repeatedly the following time will be
displayed :
SINGLE REMAIN (current track) , TOTAL ELAPSED , TOTAL REMAIN (All
Tracks), SINGLE ELAPSED.
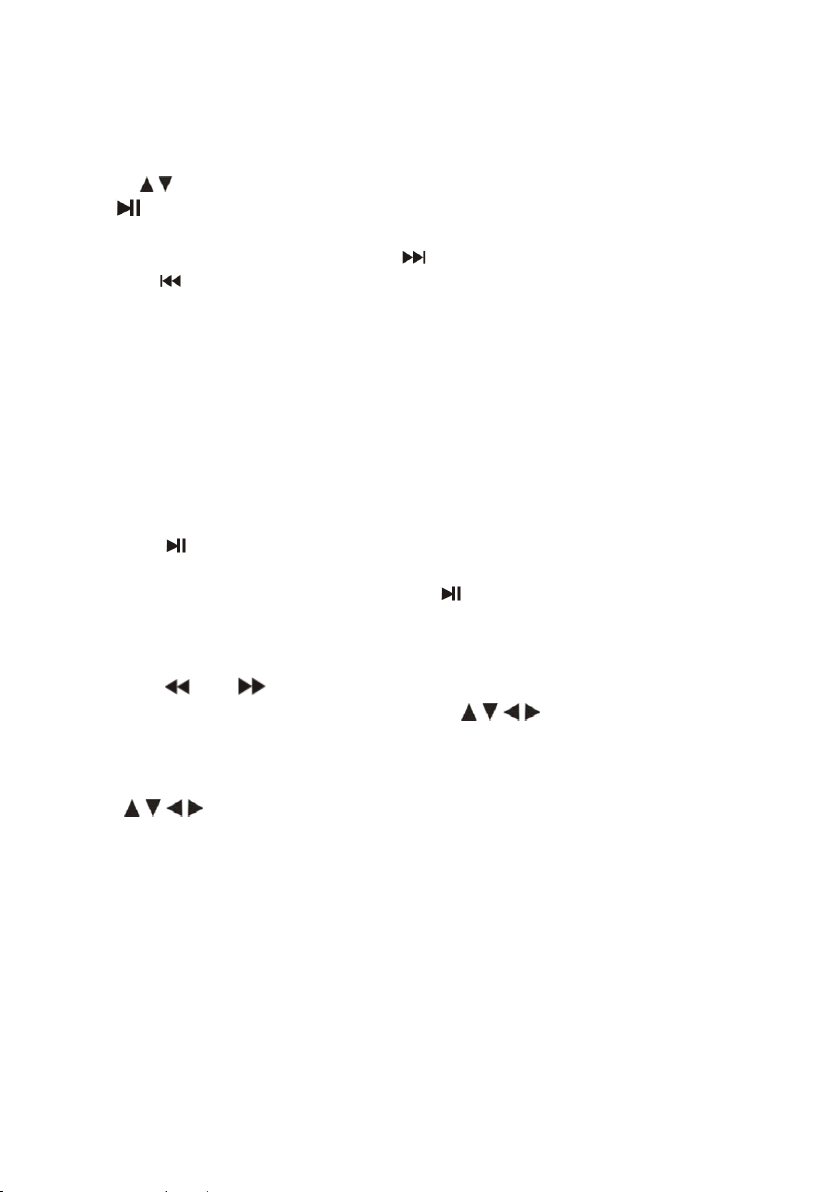
Press or to move to the next / previous track .
P ress or repeatedly to play (search) the current track at
different speeds, each press will select 2X, 4X, 8X, 16X, 32X or back to
play, the sound will be distorted during search, press to return to
normal play from any selected speed.
MP3
MP3
MP3
MP3
ENTER
1. Press ▲ or ▼ to select a folder if available and press ENTER
ENTER
ENTER to check
the folder contents.
2. Press ▲ or ▼ to select a track then press . Play starts.
Pause
1. Press during play.
2. To return to play, press again.
Moving to a Desired Track :
P ress , ,
▲
and then press ENTER
You can play any track by inputting its number then press ENTER
▼
and
ENTER
ENTER
ENTER to play.
during play to select the track you want to play
ENTER
ENTER
ENTER to
play it.
Repeat :
REPEAT
For audio CD, when REPEAT
REPEAT
REPEAT is pressed the repeat mode icon appears
on the screen.
Track:
Track:
Track:
Track: repeats the current track.
All:
All:
All:
All: repeats all the tracks on a disc.
Off:
Off:
Off:
Off: normal play.
REPEAT
For MP3, repeatedly press REPEAT
REPEAT
REPEAT to s elect the desired mode in the
following modes :
SHUFFLE
SHUFFLE
SHUFFLE
SHUFFLE →
Adjusting
Adjusting
Adjusting
Adjusting Volume
Press VOL+
→
→
→ RANDOM
VOL+
VOL+
VOL+ / -
RANDOM
RANDOM
RANDOM →
Volume
Volume
Volume
-
-
- to increase or decrease the volume level.
→
SINGLE
→
SINGLE
→ SINGLE
SINGLE →
→
REPEAT
→
REPEAT
→ REPEAT
REPEAT ONE
ONE
→
ONE
ONE →
14
REPEAT
→
REPEAT
→ REPEAT
REPEAT FOLD
FOLD
FOLD
FOLD ER
ER
→
ER
→
ER →
→ FOLDER
FOLDER
FOLDER
FOLDER
PLAYING
PLAYING
PLAYING
PLAYING A
A
JPEG
A
JPEG
A JPEG
JPEG DISC
DISC
DISC
DISC
Viewing a JPEG Disc:
1. Insert a JPEG disc and close the tray. The file menu appears on the
display.
ENTER
2. Use to highlight the file you want to play and then press ENTER
ENTER
ENTER
or .
Slide show starts from the selected file.
3. During playing JPEG disc, Press to move to the next picture ,
MENU/PBC
press to return to previous picture , and press MENU/PBC
MENU/PBC
MENU/PBC to
enter the folder menu .
DISPLAY
4. P ress DISPLAY
DISPLAY
DISPLAY to show the file number and the total number of files
on screen.
Slide Show :
There are 16 wipe modes for slide show.
PROGRAM
You can repeatedly press PROGRAM
PROGRAM
PROGRAM to select the desired slide show
m ode.
Still Picture :
1. Press during slide show. The player will now go into PAUSE
mode.
2. To return to the slide show, press again .
Zoom:
ZOOM
1. Press ZOOM
ZOOM
ZOOM on the remote.
2. Press or repeatedly to zoom in and out.
3. When the picture is enlarged, press to pan through it.
ZOOM
4. Press ZOOM
ZOOM
ZOOM again to exit.
To rotate a picture :
Press during play to rotate the picture clockwise or
anticlockwise or have an invert or mirror picture.
DIGITAL
DIGITAL
DIGITAL
DIGITAL CARD
CARD
CARD
CARD AND
AND
AND
AND USB
USB
PLAY
USB
PLAY
USB PLAY
PLAY
Digital cards (SD/MMC/MS card) and USB with mp3&pictures (.jpg)
may be played and displayed through the unit. Digital cards may be
directly inserted through the card reader slot. The USB socket can be
used to supply signals to the unit from USB sources.
1. Switch the unit on.
2. Insert a USB cable (not supplied) into the USB port or a card into the
15
card reader slot on the side of the unit.
SOURCE
3. Press SOURCE
4. P ress ENTER
USB/CARD.
5. If USB/CARD is selected, the unit will begin to read the card or USB
connected to it.
SOURCE
SOURCE and then press to highlight “ Media ” .
ENTER
ENTER
ENTER twice and the unit would automatically detect the
SETUP
SETUP
SETUP
SETUP MENU
General
General
General
General Operation
1. Press SETUP
2. Press to enter the submenu or return to the previous menu.
3. Press ▲▼ to highlight the desired menu.
4. Press to enter the next level of submenu or confirm your
5. To exit from the menu , p ress SETUP
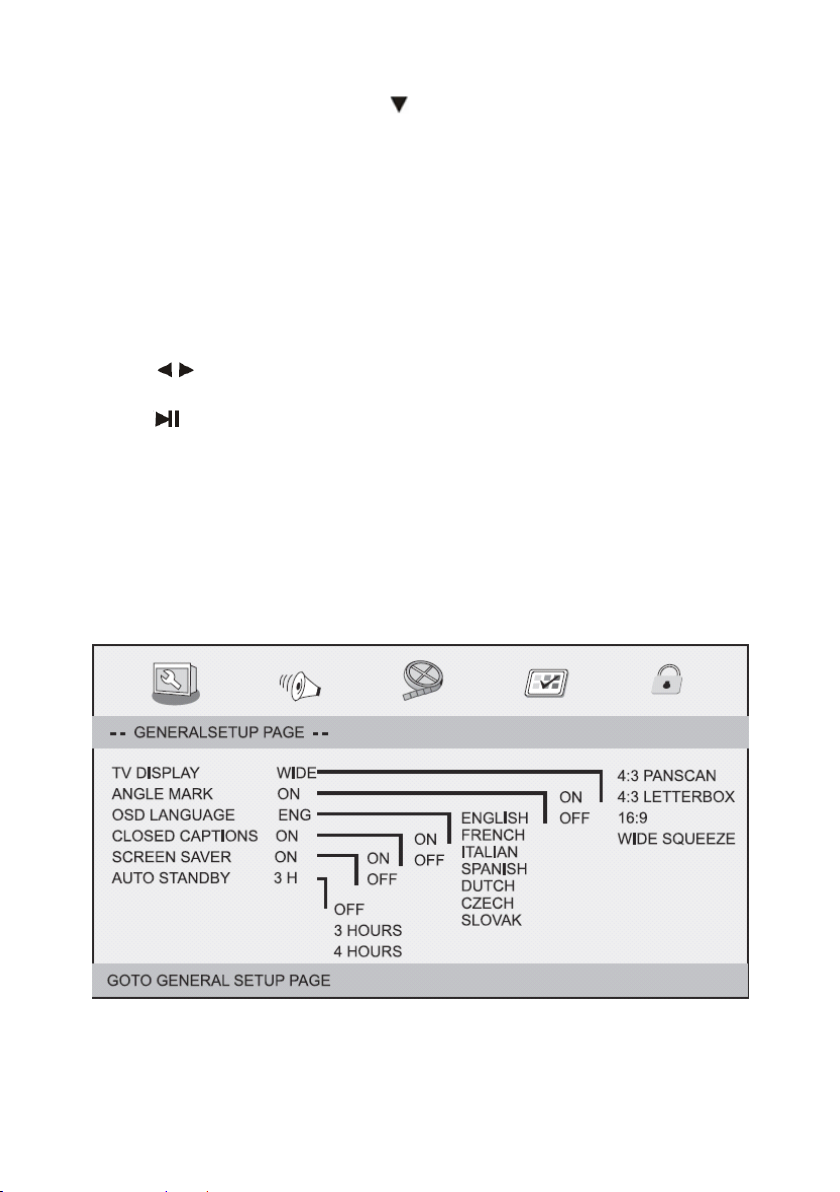
General
General
General
General Setup
The options included in General Setup page are: TV DISPLAY, ANGLE
MARK, OSD LANGUAGE, CLOSED CAPTIONS , SCREEN SAVER and AUTO
STANDBY.
MENU
MENU
MENU
Operation
Operation
Operation
SETUP
SETUP
SETUP to enter the setup menu.
selection .
stored in the player ’ s memory.
Setup
Setup
Setup Page
Page
Page
Page
SETUP
SETUP
SETUP again. The settings will be
SETUP
1. Press SETUP
SETUP
SETUP to enter the setup menu.
16

2. Press to select “ GENERAL SETUP PAGE ” .
TV DISPLAY :
Set the aspect ratio of the DVD Player according to the TV you have
connected.
1. Press ▲▼ repeatedly to highlight TV DISPLAY.
2. Enter its submenu by pressing .
3. Press
▲▼
repeatedly to highlight the selected item.
4. Press to confirm.
4:3
PANSCAN
4:3
PANSCAN
4:3
4:3 PANSCAN
PANSCAN
→ If you have a normal TV and want both sides of the picture to be
trimmed or formatted to fit your TV screen.
4:3
L
ETTERBOX
4:3
L
ETTERBOX
4:3
4:3 L
L ETTERBOX
ETTERBOX
→ If you have a normal TV and select the item , a wide picture with
black bands on the upper and lower portions of the TV screen will be
displayed.
16:9:
16:9:
16:9:
16:9: Wide screen display
Wide
Squeeze
Wide
Squeeze
Wide
Wide Squeeze
Squeeze : To set display mode to 4:3.
ANGLE MARK:
It displays current angle setting information on the display, if available
on the disc.
1. Press
▲▼
repeatedly to highlight ANGLE MARK.
2. Enter its submenu by pressing .
3. Press ▲▼ repeatedly to highlight the selected item.
On:
On:
→ On:
On: Enable Angle Mark.
Off:
Off:
→ Off:
Off: Disable the current angle setting display.
ENTER
4. Press ENTER
ENTER
ENTER to confirm.
OSD LANGUAGE :
You can select your own preferred language settings. This DVD system
will automatically switch to the selected language whenever you load a
disc. If the language selected is not available on the disc, the disc ’ s
default language will be used instead. The OSD language in the system
menu will remain once selected.
1. Press
▲▼
repeatedly to highlight OSD LANGUAGE.
2. Enter its submenu by pressing .
17
3. Press
▲▼
repeatedly to highlight the selected item.
4. Press to confirm.
CLOSED CAPTIONS:
Close captions are data that are hidden in the video signal of some
discs. Before you select the function, please ensure that the disc
contains closed captions information and your TV set also has this
function.
SCREEN SAVER :
This function is used to turn the screen saver On or Off.
AUTO STANDBY:
This function is used to set auto standby time (OFF, 3hr, 4hr).
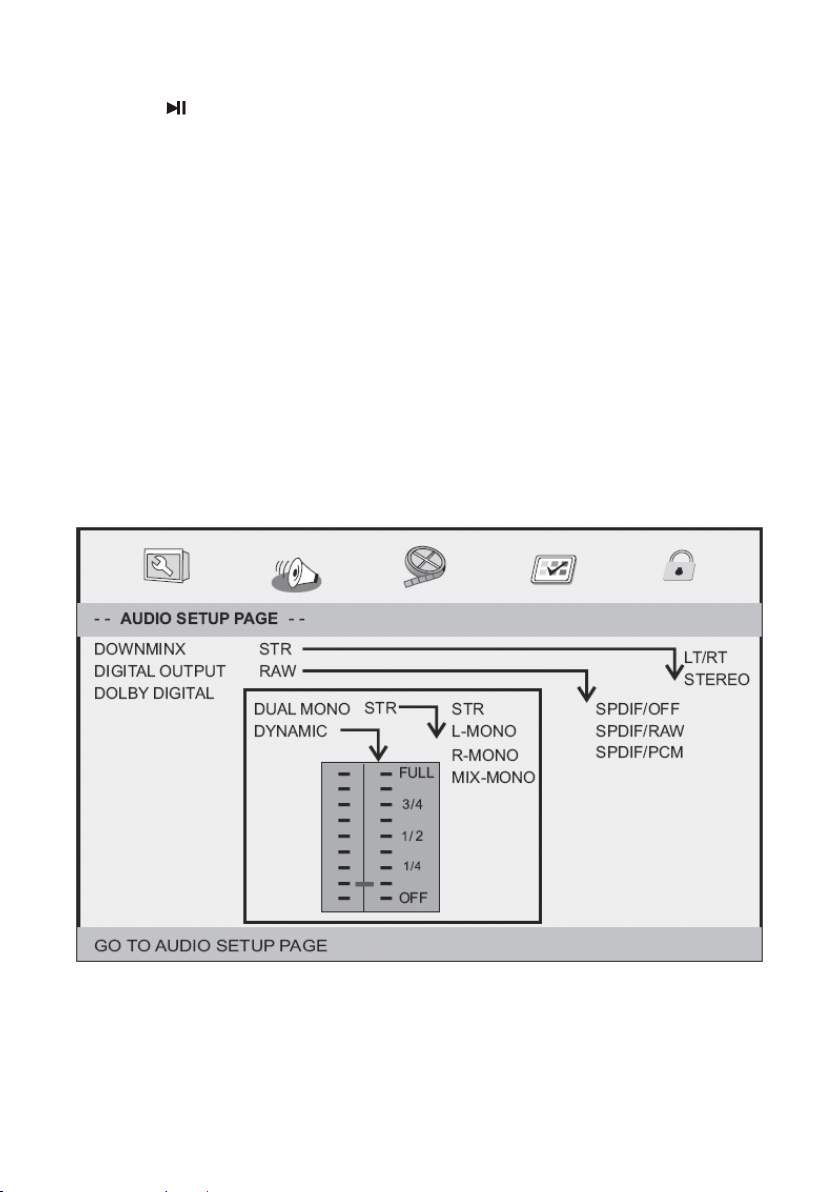
Audio
Audio
Audio
Audio Setup
Setup
Setup
Setup Page
Page
Page
Page
DOWNMIX:
The function allows you to set the stereo analog output of your DVD
player.
18

LT/RT
LT/RT
→ LT/RT
LT/RT : To select this option if your DVD player is connected to a
Dolby Pro Logic decoder.
STEREO
STEREO
→ STEREO
STEREO : To select this option when output delivers sound from only
the two front speakers.
DIGITAL OUPUT:
The function is used to select the SPDIF Output:
SPDIF/OFF
SPDIF/OFF
→ SPDIF/OFF
SPDIF/OFF : To turn off the SPDIF output.
SPDIF/RAW
SPDIF/RAW
→ SPDIF/RAW
SPDIF/RAW : To select this option if DIGITAL AUDIO OUTPUT is
connected to a multi-channel decoder/receiver.
SPDIF/PCM
SPDIF/PCM
→ SPDIF/PCM
SPDIF/PCM : To select this option only if your receiver is not capable
of decoding multi-channel audio.
DOLBY DIGITAL:
Dual Mono
STEREO
STEREO
→ STEREO
STEREO : Left mono sound will send output signals to the left speaker
and right mono sound will send output signals to the right
speaker.
L-MONO
L-MONO
→ L-MONO
L-MONO : Left mono sound will send output signals to the left and
right speakers.
R-MONO
R-MONO
→ R-MONO
R-MONO : Right mono sound will send output signals to the left and
right speakers.
MIX-MONO
MIX-MONO
→ MIX-MONO
MIX-MONO : Left and right mixed mono sound will send output
signals to the left and right speakers.
Dynamic
Dynamic range compression
19
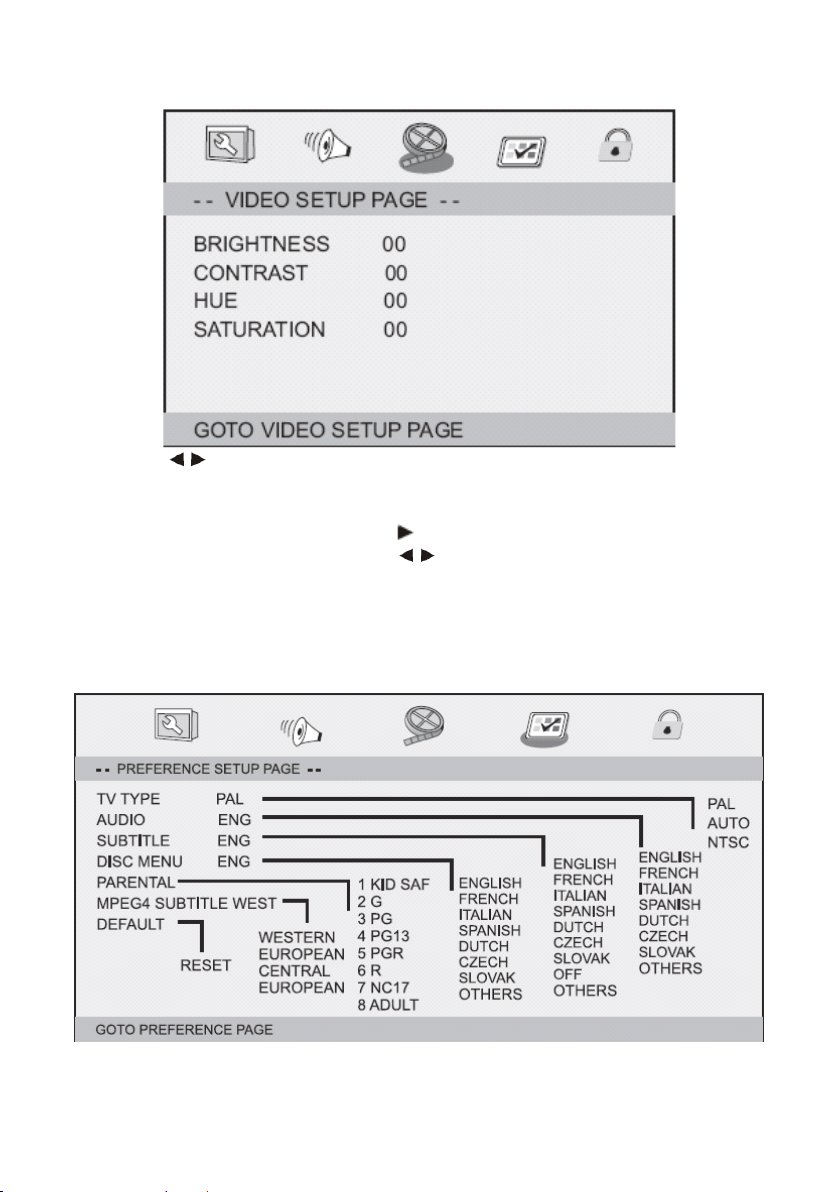
Video
Video
Video
Video Quality
1. Press to highlight VIDEO QUALITY SETUP and press ENTER
Quality
Quality
Quality Setup
Setup
Setup
Setup
ENTER
ENTER
ENTER .
2. Press ▲▼ repeatedly to highlight a submenu from BRIGHTNESS,
CONTRAST, HUE and SATURATION.
3. Enter its submenu by pressing .
4. Adjust the desired value using .
ENTER
5. Press ENTER
ENTER
ENTER to confirm.
Preference
Preference
Preference
Preference Page
Page
Page
Page (accessible
(accessible
(accessible
(accessible when
when
when
when no
no
no
no disc
20
disc
disc
disc is
is
inserted)
is
inserted)
is inserted)
inserted)

TV TYPE:
Select the colour system that corresponds to your TV when AV outputs.
This DVD player is compatible with both NTSC and PAL.
PAL
PAL
→ PAL
PAL : To select this option if the connected TV is PAL system. It will
change the video signal of a NTSC disc and output in PAL
format.
NTSC
NTSC
→ NTSC
NTSC : To select this option if the connected TV is NTSC system. It will
change the video signal of a PAL disc and output in NTSC
format.
AUTO
AUTO
→ AUTO
AUTO : To change the video signal output automatically according to
the playing disc format.
AUDIO, SUBTITLE AND DISC MENU:
These options set the Audio, Subtitle and Disc menu language for you.
- “ Audio ” (disc ’ s soundtrack)
- “ Subtitle ” (disc ’ s subtitles)
- “ Disc Menu ” (disc ’ s menu)
1. Press
▲▼
repeatedly to highlight AUDIO.
2. Enter its submenu by pressing .
3. Press
ENTER
ENTER
ENTER
ENTER to confirm.
▲▼
repeatedly to highlight a selected language and press
4. Repeat steps 1 to 3 for Subtitle and Disc language settings.
PARENTAL :
Some DVDs may have a parental level assigned to the complete disc or
to certain scenes on the disc. This feature lets you set a play limitation
level. The rating levels are from 1 to 8 and are country dependent. You
can prohibit the playing of certain discs that are not suitable for your
children or have certain discs played with alternative scenes.
1. Press ▲▼ repeatedly to highlight PARENTAL.
2. Enter its submenu by pressing .
3. Use ▲▼ repeatedly to highlight a rating level for the disc inserted.
ENTER
4. Press ENTER
ENTER
ENTER and type in the password to confirm.
→ DVDs that are rated above the level you selected will not play
unless you enter your four-digit password or choose a higher level
rating.
21

Rating
Rating
Rating
Rating explanations
1. KID
explanations
explanations
explanations
KID
SAFE
KID
SAFE
KID SAFE
SAFE
Kids material; recommended especially for children and viewers of
all ages.
G
G
2. G
G
General Audience; recommended as acceptable for viewers of all
ages.
PG
PG
3. PG
PG
Parental Guidance suggested.
PG13
PG13
4. PG13
PG13
Material is unsuitable for children under age 13.
PGR
PGR
5. PGR
PGR
R
R
6. R
R
Parental Guidance-Restricted; recommended that parents restrict
children under 17 from viewing or allow to view only when
supervised by a parent or adult guardian.
NC17
NC17
7. NC17
NC17
No children under age 17; not recommended viewing for children
under age 17.
ADULT
ADULT
8. ADULT
ADULT
Mature material; should be viewed only by adults due to graphic
sexual material, violence or language.
MPEG4 SUBTITLE:
Set the western or central European language.
DEFAULT:
Setting the Default function will reset all options and your personal
settings to the factory defaults and all your personal settings will be
erased.
1. Press ▲▼ repeatedly to highlight DEFAULT.
2. Highlight RESET by pressing .
ENTER
3. Press ENTER
Caution!
Caution!
Caution!
Caution!
When
When
When
When this
control
control
control
control settings
ENTER
ENTER to confirm selection.
this
function
this
function
this function
function is
settings
settings
settings will
is
is
is activated,
will
be
will
be
will be
be reset
activated,
activated,
activated, all
reset
reset
reset to
all
settings
all
settings
all settings
settings except
to
factory
to
factory
to factory
factory defaults.
22
defaults.
defaults.
defaults.
except
except
except the
the
parental
the
parental
the parental
parental
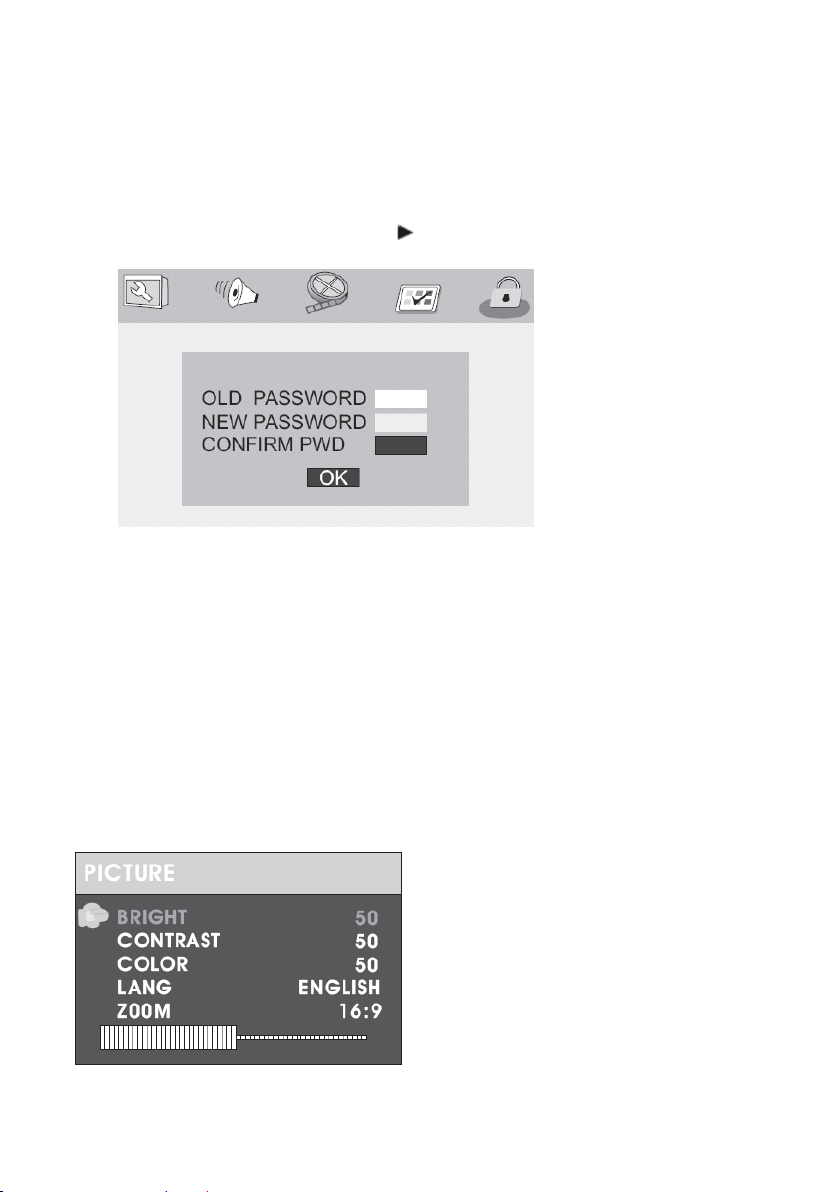
Password
Password
Password
Password Setup
Setup
Setup
Setup Page
Page
Page
Page
This feature is used for Parental Control. Enter your four digit
password when a hint is displayed on the screen. The default password
is 1369.
1. Press ▼ to highlight PASSWORD.
2. Enter its submenu by pressing .
ENTER
3. Press ENTER
ENTER
ENTER to open the Password Change page.
4. Enter the old password (default password) 1369.
5. Enter the new 4-digit code.
6. Enter the new 4-digit code again to confirm.
→ The new 4 digit code will take effect.
OK
7. Select OK
OK
OK to confirm and exit.
Helpful
Helpful
Helpful
Helpful Hints:
Hints:
Hints:
Hints:
If the password has been changed, the parental and disc lock code will
also be changed.
Slave
Screen
Slave
Screen
Slave
Slave Screen
Screen Picture
MODE
MODE
Press MODE
MODE on the slave screen and the picture page will be shown
Picture
Picture
Picture Setting
Setting
Setting
Setting
below:
23

1. Press ▲▼ repeatedly to highlight a desired option.
2. Adjust the desired value using .
SPECIFICATIONS
SPECIFICATIONS
SPECIFICATIONS
SPECIFICATIONS
Power adapter:
Input: 100-240V~, 50/60Hz
Output: 9.0V
Unit:
DC IN 9-12V
CLEANING
CLEANING
CLEANING
CLEANING AND
Cleaning
Cleaning
Cleaning
Cleaning the
To clean the player, use a soft, dry cloth. If the surfaces are extremely
dirty, use a soft cloth lightly moistened with a mild detergent solution.
Do not use strong solvents such as alcohol, benzine or thinner, as these
might damage the surface of the unit.
Maintaining
Maintaining
Maintaining
Maintaining the
The DVD player is a high-tech, precision device. If the optical pick-up
lens and disc drive parts are dirty or worn, the picture quality could be
diminished. Depending on the operating environment, regular
inspection and maintenance are recommended after every 1,000
hours of use.
AND
the
the
the unit
the
MAINTENANCE
AND
MAINTENANCE
AND MAINTENANCE
MAINTENANCE
unit
unit
unit
unit
the
unit
the unit
unit
24

TROUBLESHOOTING
TROUBLESHOOTING
TROUBLESHOOTING
TROUBLESHOOTING
Before calling for service, you can check the following items on
symptoms and solutions.
No
sound
No
sound
No
No sound
sound or
Ensure that the unit is connected properly.
Ensure that the input settings for the TV and stereo system are proper.
No
picture:
No
picture:
No
No picture:
picture:
Ensure that the unit is connected properly.
No
play:
No
play:
No
No play:
play:
Condensation has formed: wait about 1 to 2 hours to allow the player
to dry out. This player can ’ t play discs other than DVDs, MP3s and CDs.
The disc may be dirty and require cleaning.
Ensure that the disc is installed with the label side up.
No
remote
No
remote
No
No remote
remote control:
Check the battery is installed with the correct polarity (+&-).
The battery is depleted: replace it with a new one.
Point the remote control at the remote control sensor and operate.
Remove the obstacles between the remote control and the remote
control sensor. Operate the remote control at a distance of not more
than 8 meters from the remote control sensor.
or
distorted
or
distorted
or distorted
distorted sound:
control:
control:
control:
sound:
sound:
sound:
No
key
No
No
No key
Turn the unit off and then back to on. Alternatively, turn off the unit,
disconnect the AC power cord and the re-connect it. (The player may
not be operating properly due to lightning, static electricity or some
other external factor.)
Play
Play
Play
Play does
Confirm the “ Rating ” settings.
Audio
Audio
Audio
Audio soundtrack
the
the
the
the initial
If the audio soundtrack and/or subtitle language does not exist on the
disc, the language selected at the initial setting will not be seen/ heard.
No
No
No
No subtitles:
Subtitles appear only with discs which contain them.
operation
key
operation
key operation
operation (by
does
not
does
not
does not
not commence
soundtrack
soundtrack
soundtrack and/or
initial
initial
initial settings:
subtitles:
subtitles:
subtitles:
settings:
settings:
settings:
(by
the
(by
(by the
commence
commence
commence even
and/or
and/or
and/or subtitle
unit
the
unit
the unit
unit and/or
even
even
even when
subtitle
subtitle
subtitle language
and/or
and/or
and/or the
when
title
when
when title
language
language
language is
25
the
remote
the
remote
the remote
remote control)
is
title
title is
selected:
is
selected:
is selected:
selected:
is
is
is not
not
not
not the
control)
control)
control) is
the
one
the
one
the one
one selected
is
effective:
is
effective:
is effective:
effective:
selected
selected
selected at
at
at
at

Alternative
Alternative
Alternative
Alternative audio
selected:
selected:
selected:
selected:
An alternative language is not selected with discs which do not contain
more than one language.
In the case of some discs, the alternative language cannot be selected
by operating AUDIO or SUBTITLE. Try selecting it from the DVD menu if
one is available.
We apologise for any inconvenience caused by minor inconsistencies
in these instructions, which may occur as a result of product
improvement and development.
audio
audio
audio soundtrack
soundtrack
soundtrack
soundtrack (or
Kesa Electricals © UK: EC1N 6TE 11 / 10 / 2012
(or
subtitle)
(or
subtitle)
(or subtitle)
subtitle) language
language
language
language fails
fails
fails
fails to
to
to
to be
be
be
be
26

AVERTISSEMENTS
AVERTISSEMENTS
AVERTISSEMENTS
AVERTISSEMENTS
CONSIGNES
CONSIGNES
CONSIGNES
CONSIGNES DE
CONTENU
CONTENU
CONTENU
CONTENU DE
DESCRIPTION
DESCRIPTION
DESCRIPTION
DESCRIPTION DES
INSTALLATION
INSTALLATION
INSTALLATION
INSTALLATION
I
NSTALLER
I
NSTALLER
I
I NSTALLER
NSTALLER LES
B
RANCHEMENT
B
RANCHEMENT
B
B RANCHEMENT
RANCHEMENT SUR
B
RANCHEMENT
B
RANCHEMENT
B
B RANCHEMENT
RANCHEMENT DU
R
ECHARGER
R
ECHARGER
R
R ECHARGER
ECHARGER LES
UTILISATION
UTILISATION
UTILISATION
UTILISATION
L
IRE
UN
L
IRE
UN
L
L IRE
IRE UN
UN DVD/VCD
L
IRE
UN
L
IRE
UN
L
L IRE
IRE UN
UN CD
L
IRE
UN
L
IRE
UN
L
L IRE
IRE UN
UN D
L
IRE
UNE
L
IRE
UNE
L
L IRE
IRE UNE
UNE C
MENU
MENU
MENU
MENU DES
N
AVIGUER
N
AVIGUER
N
N AVIGUER
AVIGUER DANS
P
ARAM
P
ARAM
P
P ARAM
ARAM È
P
ARAM
P
ARAM
P
P ARAM
ARAM È
P
ARAM
P
ARAM
P
P ARAM
ARAM È
P
R
É
F
É
P
R
É
F
É
P
P R
R É
É F
F É
É RENCES
M
OT
M
OT
M
M OT
OT DE
P
ARAM
P
ARAM
P
P ARAM
ARAM È
SP
É
CIFICATIONS
SP
É
CIFICATIONS
SP
SP É
É CIFICATIONS
CIFICATIONS
NETTOYAGE
NETTOYAGE
NETTOYAGE
NETTOYAGE ET
D
É
PANNAGE
D
É
PANNAGE
D
D É
É PANNAGE
PANNAGE
DE
DE
DE L
LES
LES
LES É
LES
LES
LES B
DVD/VCD
DVD/VCD
DVD/VCD
CD
A
CD
A
CD A
A UDIO
D
ISQUE
D
ISQUE
D ISQUE
ISQUE JPEG
C
ARTE
C
ARTE
C ARTE
ARTE M
DES
PARAM
DES
PARAM
DES PARAM
PARAM È
DANS
DANS
DANS LES
È
TRES
È
TRES
È TRES
TRES G
È
TRES
È
TRES
È TRES
TRES A
È
TRES
È
TRES
È TRES
TRES V
RENCES
RENCES
RENCES (
P
DE
ASSE
P
DE
ASSE
DE P
P ASSE
ASSE
È
TRES
È
TRES
È TRES
TRES V
DE
DE
DE S
L
L
L ’
DES
DES
DES COMMANDES
É
CRANS
É
CRANS
É CRANS
CRANS M
SUR
SUR
SUR UNE
DU
DU
DU C
B
B
B ATTERIES
............................................................................................
............................................................................................
............................................................................................
............................................................................................
UDIO
UDIO
UDIO OU
G
É
G
É
G É
É N
A
UDIO
A
UDIO
A UDIO
UDIO
V
ID
V
ID
V ID
ID É
(
ACCESSIBLES
(
ACCESSIBLES
( ACCESSIBLES
ACCESSIBLES QUAND
...........................................................................................................
V
ID
V
ID
V ID
ID É
ET
ET
ET ENTRETIEN
..........................................................................................
..........................................................................................
..........................................................................................
..........................................................................................
TABLE
TABLE
TABLE
TABLE DES
....................................................................................
....................................................................................
....................................................................................
....................................................................................
S
É
CURIT
S
É
CURIT
S É
É CURIT
CURIT É
’
EMBALLAGE
’
EMBALLAGE
’ EMBALLAGE
EMBALLAGE
COMMANDES
COMMANDES
COMMANDES
.........................................................................................
.........................................................................................
.........................................................................................
.........................................................................................
M
A
Î
TRE
M
A
Î
TRE
M A
A Î
Î TRE
TRE ET
A
UNE
LIMENTATION
A
UNE
LIMENTATION
UNE A
A LIMENTATION
LIMENTATION É
C
A
Â
BLE
Â
 BLE
UDIO
A
BLE
UDIO
BLE A
A UDIO
UDIO /V
I
NT
I
NT
I NT
NT É
C
C Â
ATTERIES
ATTERIES
ATTERIES I
DES
MATI
DES
MATI
DES MATI
MATI È
É
IMPORTANTES
É
IMPORTANTES
É IMPORTANTES
IMPORTANTES
...................................................................
...................................................................
...................................................................
...................................................................
............................................................
............................................................
............................................................
............................................................
E
ET
SCLAVE
E
ET
ET E
E SCLAVE
/V
/V
/V ID
É
GR
É
É
GR
É
É GR
GR É
É ES
SUR
SCLAVE
SUR
SCLAVE SUR
SUR LES
É
LECTRIQUE
É
LECTRIQUE
É LECTRIQUE
LECTRIQUE
ID
É
O
..........................................................................
ID
É
O
ID É
É O
O
L
ES
DU
ECTEUR
L
ES
DU
ECTEUR
ES DU
DU L
L ECTEUR
ECTEUR DVD
È
RES
È
RES
È RES
RES
..............................................
..............................................
..............................................
..............................................
LES
LES
LES S
S
S
S I
’
I
È
GES
I
È
GES
I È
È GES
GES D
V
D
UNE
OITURE
’
V
D
UNE
OITURE
D ’
’ UNE
UNE V
V OITURE
..........................
OITURE
.........................................................
DVD
DVD
....................................................
DVD
.......................................................................................................
D
OU
UN
OU
UN
OU UN
UN D
JPEG
JPEG
.................................................................................................
JPEG
M
É
MOIRE
M
É
MOIRE
M É
É MOIRE
MOIRE OU
È
TRES
È
TRES
È TRES
TRES
M
LES
ENUS
M
LES
ENUS
LES M
M ENUS
ENUS
N
É
RAUX
N
É
RAUX
..............................................................................................
N É
É RAUX
RAUX
MP3
ISQUE
D
MP3
ISQUE
D ISQUE
ISQUE MP3
OU
UN
OU
UN
OU UN
UN P
......................................................................
......................................................................
......................................................................
......................................................................
.......................................................................
MP3
P
É
RIPH
P
É
RIPH
P É
É RIPH
RIPH É
É
RIQUE
É
RIQUE
É RIQUE
RIQUE USB
USB
....................................................
USB
USB
........................................................................................
....................................................................................................
É
O
É
O
....................................................................................................
É O
O
’É
É
O
DE
L
’É
É
O
DE
L
É O
O DE
DE L
L ’É
’É CRAN
....................................................................................
....................................................................................
....................................................................................
....................................................................................
ENTRETIEN
ENTRETIEN
ENTRETIEN
QUAND
AUCUN
QUAND
AUCUN
QUAND AUCUN
AUCUN DISQUE
E
CRAN
SCLAVE
E
CRAN
SCLAVE
CRAN E
E SCLAVE
SCLAVE
...................................................................
...................................................................
...................................................................
...................................................................
N
N
N ’
’
EST
’
EST
’ EST
EST INS
DISQUE
DISQUE
DISQUE N
......................................................................
)
INS
É
R
É
)
INS
É
R
É
......................................
INS É
É R
R É
É )
)
2
2
2
2
3
3
3
3
3
3
3
3
4
4
4
4
7
7
7
7
7
8
8
8
9
9
9
9
9
11
13
14
14
14
14
14
14
14
17
18
19
22
23
24
24
24
24
24
24
24
24
24
24
24
24
1

AVERTISSEMENTS
AVERTISSEMENTS
AVERTISSEMENTS
AVERTISSEMENTS
Cet appareil est destin é à un usage domestique uniquement.
Toute utilisation autre que celle pr é vue pour cet appareil, ou pour
une autre application que celle pr é vue, par exemple une application
commerciale, est interdite.
Qu ’ avant le nettoyage ou autre entretien, l ’ appareil doit ê tre
d é connect é de l ’ alimentation.
Il convient que l ’ a é ration ne soit pas g ê nee par l ’ obstruction des
ouvertures d ’ a é ration par des objets tels que journaux, nappes,
rideaux, etc.
Il convient de ne pas placer sur l ’ appareil de sources de flammes
nues, telles que des bougies allum é es.
L ’ appareil ne doit pas ê tre expos é á des é gouttements d'eau ou
des é claboussures et de plus qu'aucun objet rempli de liquide tel
que des vases ne doit ê tre plac é sur l ’ appareil.
A é ration
Pr é voyez un espace libre d'au moins 10 cm tout autour du produit.
Cette appareil n'est destin é pas a ê tre utilise sous un climat
tropical.
Ne jetez aucune pile dans le feu ! Elle risque d'exploser.
ATTENTION
Danger d'explosion si la pile n ’ est pas remplac é e correctement. Ne
remplacer que par le m ê me type ou un type é quivalent.
CONSIGNES
CONSIGNES
CONSIGNES
CONSIGNES DE
Cet appareil est con ç u pour ê tre aliment é par une prise secteur
fournissant un courant alternatif de 100-240V, 50/60Hz. L'utilisation
d'une alimentation fournissant un courant dont les sp é cifications sont
diff é rentes peut endommager l'appareil.
V é rifiez que la tension indiqu é e sur la plaque signal é tique de
l'adaptateur secteur est identique à celle du courant fourni par la prise
DE
DE
DE S
S
É
S
É
S É
É CURIT
CURIT
CURIT
CURIT É
É
IMPORTANTES
É
IMPORTANTES
É IMPORTANTES
IMPORTANTES
2
secteur.
Si l'adaptateur est endommag é , il doit ê tre remplac é par un
adaptateur de type et de sp é cifications identiques pour des raisons
de s é curit é .
Si la batterie int é gr é e se met à chauffer exag é r é ment ou à fuir
pendant l ’ utilisation ou la recharge de l ’ appareil, arr ê tez
imm é diatement d ’ utiliser l ’ appareil et mettez-le au rebut.
Le lecteur DVD ne doit pas ê tre expos é à une chaleur excessive
(feu, ensoleillement intense, etc.), car cela peut provoquer la
surchauffe de sa batterie et le d é t é riorer.
Symboles
Symboles
Symboles
Symboles
Cet appareil est é quip é d'une double isolation, il n'est donc pas n é cessaire
de le connecter à la terre.
Une tension é lectrique dangereuse pr é sentant un risque de choc
é lectrique est pr é sente à l'int é rieur de cet appareil.
Ce symbole indique que l'appareil est conforme aux normes europ é ennes
de s é curit é et de compatibilit é é lectromagn é tique.
La documentation fournie avec cet appareil comporte d'importantes
instructions d'utilisation et d'entretien.
Manipulation
Manipulation
Manipulation
Manipulation et
Piles
de
Piles
de
Piles
Piles de
de la
la
t
la
t
la t
t é
et
utilisation
et
utilisation
et utilisation
utilisation des
é
l
é
commande
é
l
é
commande
é l
l é
é commande
commande :
des
des
des piles
:
:
:
piles
piles
piles
Les piles doivent imp é rativement ê tre chang é es par un adulte. Ne laissez
3
 Loading...