

Brandt BDVDP7X2 CARKIT Instruction Manual
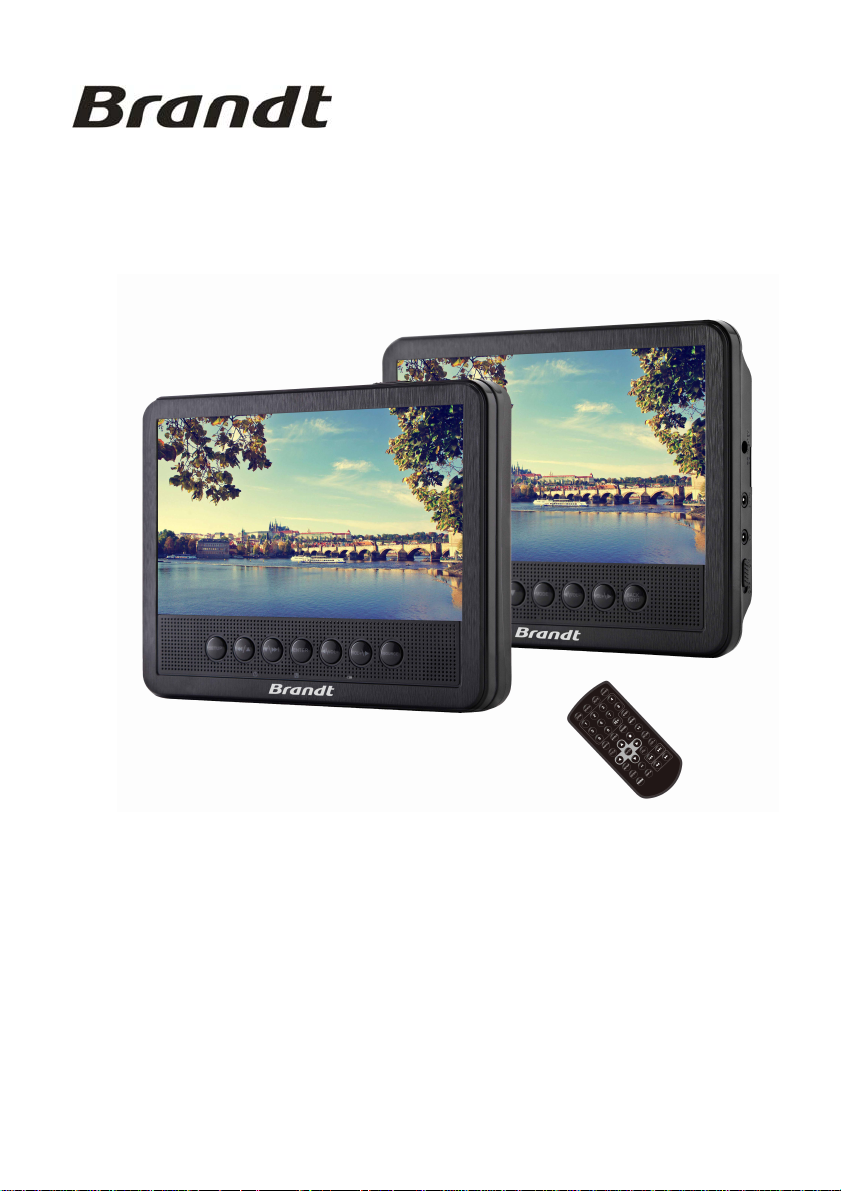
Model: BDVDP7X2 CARKIT
7” PORTABLE DVD DUAL SCREEN
INSTRUCTION MANUAL

CONTENTS
WARNINGS
..............................................................................................
IMPORTANT SAFETY INSTRUCTIONS
PACKAGE CONTENT
IDENTIFICATION OF CONTROLS
................................................................................................................
PLAYER
DVD
XTRA MONITOR
E
EMOTECONTROL
R
SETTING UP YOUR PLAYER
ONNECTING TO
C
NSTALLING YOUR PLAYER IN A VEHICLE
I
ONNECTING TO A CAR CIGARETTE LIGHTER SOCKET
C
ONNECTING ATVOR MONITOR
C
HARGING THEINCORPORATEDBATTERY OF THE
C
OPERATION
LAYING ADISC
P
ONTROLLINGPLAYBACK
C
DJUSTING THEVOLUME
A
EPEATVIEWING
R
ISPLAYINGDISCINFORMATION
D
ELECTING ANAUDIOLANGUAGE
S
ELECTING ASUBTITLELANGUAGE
S
ELECTING AVIEWINGANGEL
S
SING A
U
SING THETITLEFUNCTION
U
ETTINGPARENTALCONTROLS
S
IEWINGPHOTOS
V
SING
U
SING THESETUPMENU
U
...........................................................................................
..........................................................................................................
DVD M
USB
FUNCTION
SPECIFICATIONS
CLEANING AND MAINTENANCE
TROUBLESHOOTING
.................................................................................
..............................................................
.........................................................................................................
.......................................................................................................
....................................................................
.........................................................................................
OWER
AC P
...........................................................................
...................................................................................
..............................................................................................
..............................................................................................
........................................................................................................
....................................................................................
..................................................................................
.................................................................................
.......................................................................................
..................................................................................................
ENU
..........................................................................................
......................................................................................
.......................................................................................................
.................................................................................................
..............................................................................................
....................................................................................
............................................................
..............................................................................
......................................................
..........................................................
DVD
..........................................
PLAYER
2
3
7
8
8
10
12
15
15
15
17
18
18
19
19
19
20
20
21
21
21
21
22
22
22
23
23
23
25
26
27
1

WARNINGS
This appliance is intended for domestic household use only and should
not be used for any other purpose or in any other application, such as
for non‐domestic use or in a commercial environment.
Prior to cleaning or other maintenance, the appliance must be
disconnected from the supply mains.
The ventilation should not be impeded by covering the ventilation
openings with items, such as newspapers, table‐cloths, curtains, etc.
No naked flame sources, such as lighted candles, should be placed on
the apparatus.
The apparatus shall not be exposed to dripping or splashing and that
no objects filled with liquids, such as vases, shall be placed on the
apparatus.
Ventilation
Allow at least a 10 cm gap all around the product.
This apparatus is not suitable for use in a tropical climate.
CAUTION
Danger of explosion if battery is incorrectly replaced. Replace only with
the same or equivalent type.
Attention should be drawn to the environmental aspects of battery
disposal.
Batteries (battery pack or batteries installed) shall not be exposed to
excessive heat such as sunshine, fire or the like.
2
Where the MAINS plug or an appliance coupler is used as the
disconnect device, the disconnect device shall remain readily operable.
IMPORTANT SAFETY INSTRUCTIONS
Do not expose the DVD player to excessive heat such as strong
sunshine, fire or the like as this strong sunshine can contribute to an
overheating of the battery and can damage the unit.
Only use attachments/accessories specified by the manufacturer.
Unplug this apparatus during lightning storms or when not in use
for long periods of time.
Symbols
This equipment is
double insulated and an
earthconnectionisnot
required.
Dangerous voltage
constituting a risk of
electric shock is present
inside this equipment.
This mark is applied to show
the equipment conforms to
European safety and
electromagnetic
compatibility standards.
There are important
operating and maintenance
instructions in the literature
accompanying this
equipment.
3
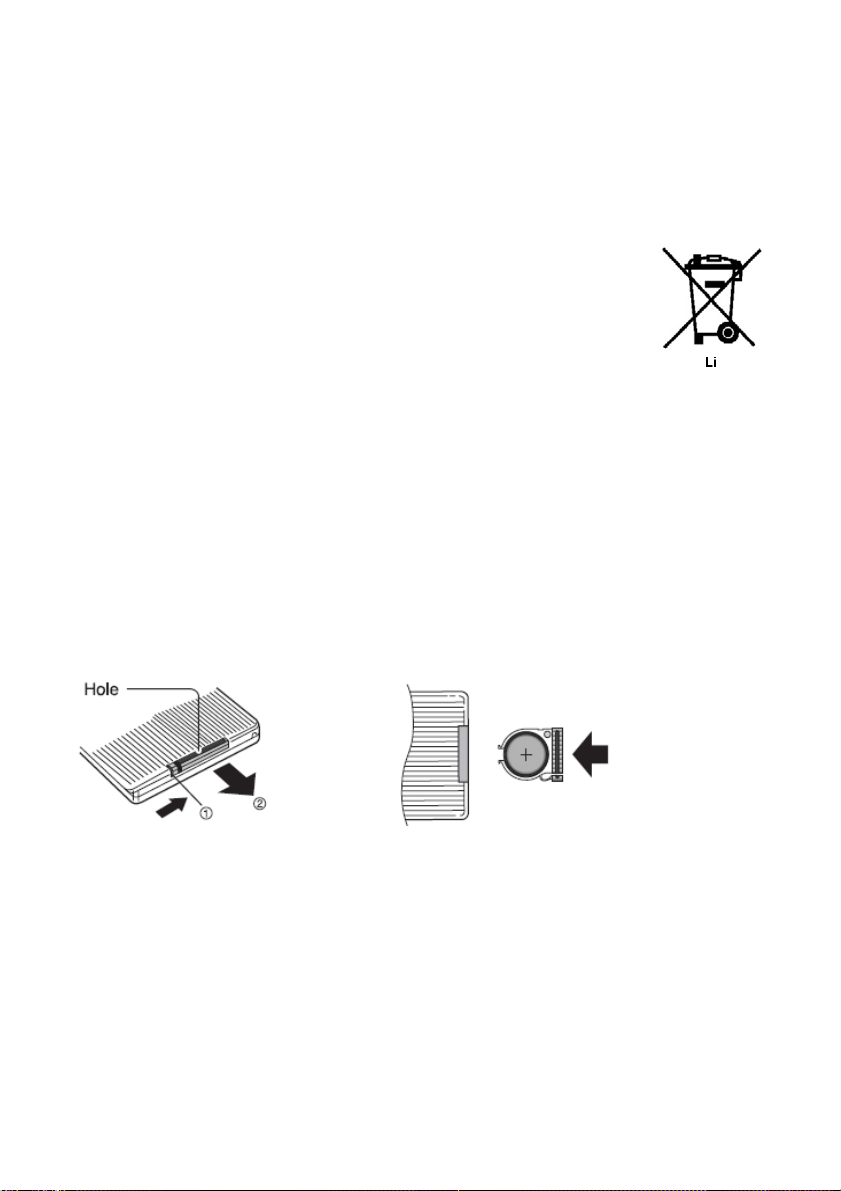
Battery handling and usage
Remote control battery:
The battery should only be replaced by adults. Do not allow children to
use the remote control unless the battery cover is attached.
The battery type used in the remote is one CR2025 3V
Lithium battery which is accessible and can be replaced.
Remove the battery holder located on the bottom of the
remote control to remove the battery.
Incorporated Battery
The battery type used in the unit is one lithium battery. The battery is
in‐cooperated and is not readily accessible.
The battery must be disposed of at your local recycling point.
Installing Remote Control Battery
1
○
and pull
Push
control and insert one 3V CR2025 lithium battery in the battery holder
with the print face up, then replace the battery holder.
WARNING:
To save power: switch off mains power or pull out the AC adapter
when you are not using the apparatus.
Never operate the apparatus and try to view video while driving a
vehicle.
To prevent injury, this apparatus must be securely attached to the car
seats as in accordance with the installation instructions.
2
to slide out the battery holder from the remote
○
5
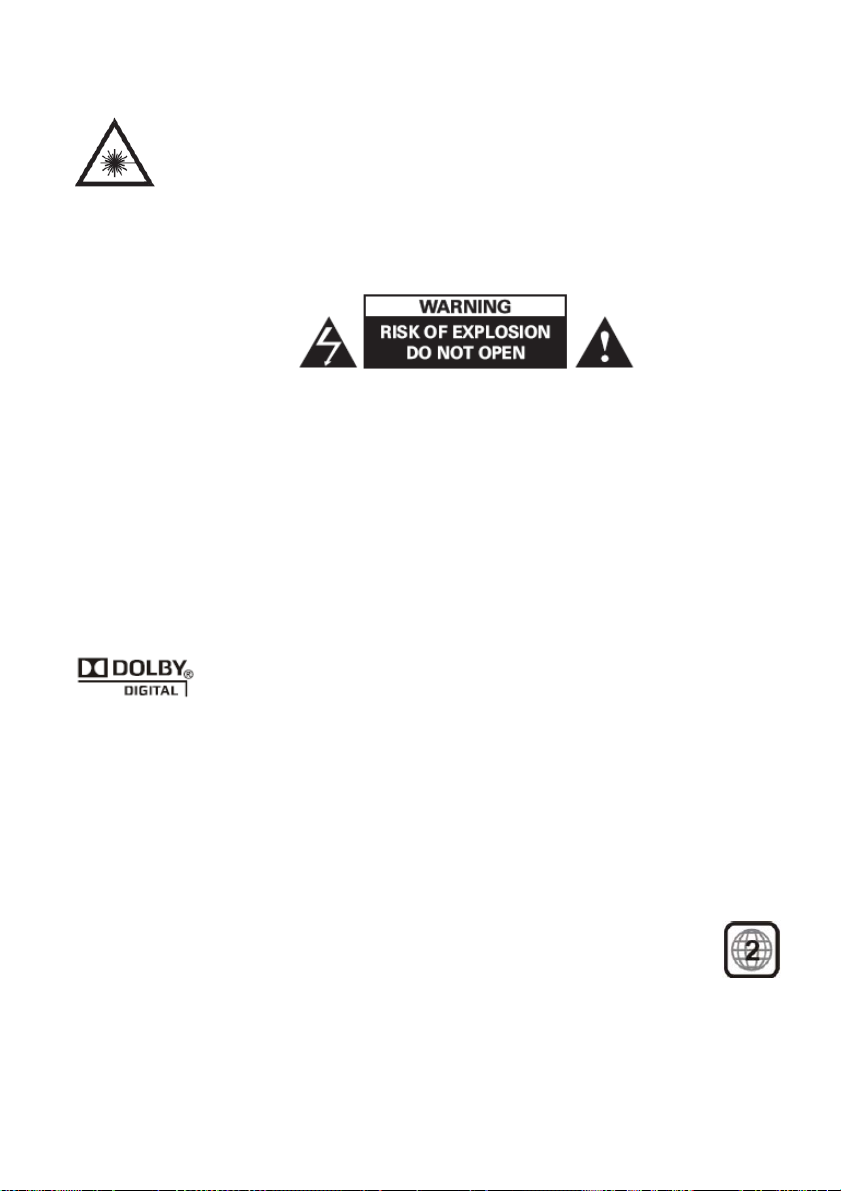
Class 1 laser product
This product contains a low power laser device. Invisible
laser radiation when the enclosure is opened and interlocks
are defeated.
Avoid exposure to beam.
This digital video disc player employs a laser system. Use of controls,
adjustments, or the performance of procedures other than those
specified herein may result in hazardous radiation exposure.
To prevent direct exposure to laser beam, do not open the enclosure.
Never stare directly into the laser beam.
Do not install this product in a confined space such as a book case or
similar unit.
Manufactured under license from Dolby Laboratories
"Dolby" and the double‐D symbol are trademarks of Dolby
Laboratories.
Confidential Unpublished Works. Copyrights 1992‐1997 Dolby
Laboratories, All rights reserved.
Region Code
This DVD player is designed and manufactured for play of region
“2” encoded DVD software.
6
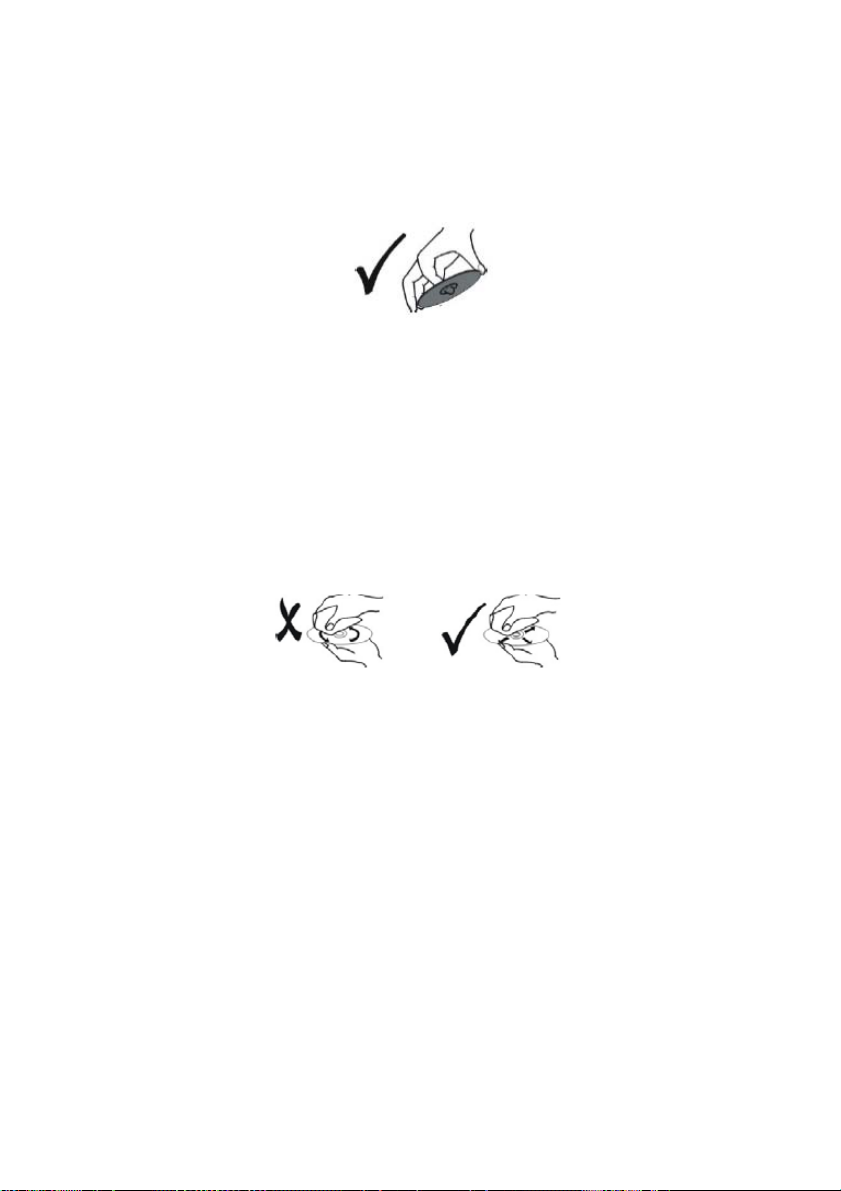
Notes on Discs
Handling Discs
Do not touch the play side of the disc. Hold the disc by the edges so
that fingerprints do not get on the surface. Never stick paper or tape
on the disc.
Storing Discs
After playing, store the disc in its case. Do not expose the disc to direct
sunlight or source of heat and never leave it in a parked car exposed to
direct sunlight.
Cleaning Discs
Fingerprints and dust on the disc can cause poor picture quality and
sound distortion. Before playing, clean the disc with a clean cloth.
Wipe the disc from the centre out.
Do not use strong solvents such as alcohol, benzine, thinner,
commercially available cleaners, or anti‐static spray intended for older
vinyl records.
PACKAGE CONTENT
Your box should contain:
•
7” main DVD player
• 7” extra monitor
• Carry bag
•
Earphones (2)
7
•
Remote control with battery
•
Power adapter
•
Car adapter
• AV/DC cable
• AV cable
• Car brackets (2)
•
Instruction manual
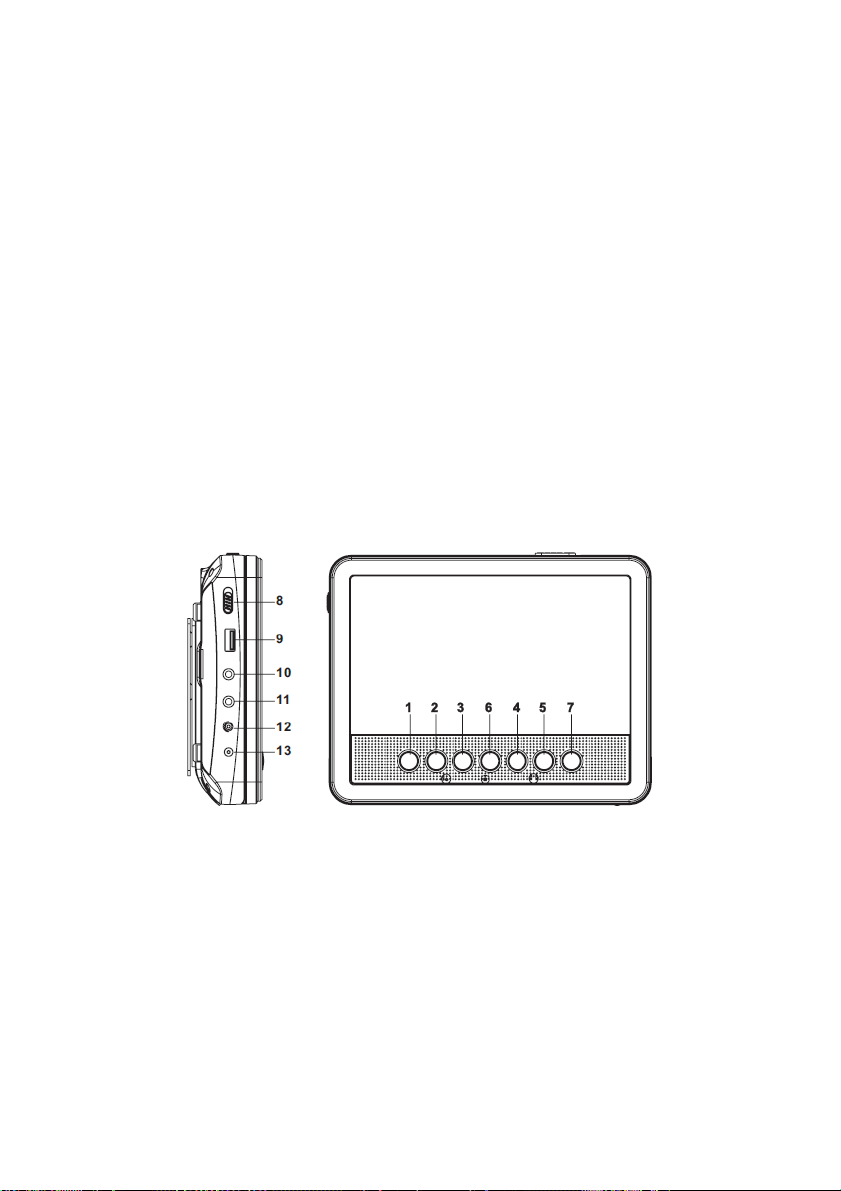
IDENTIFICATION OF CONTROLS
DVD player
8
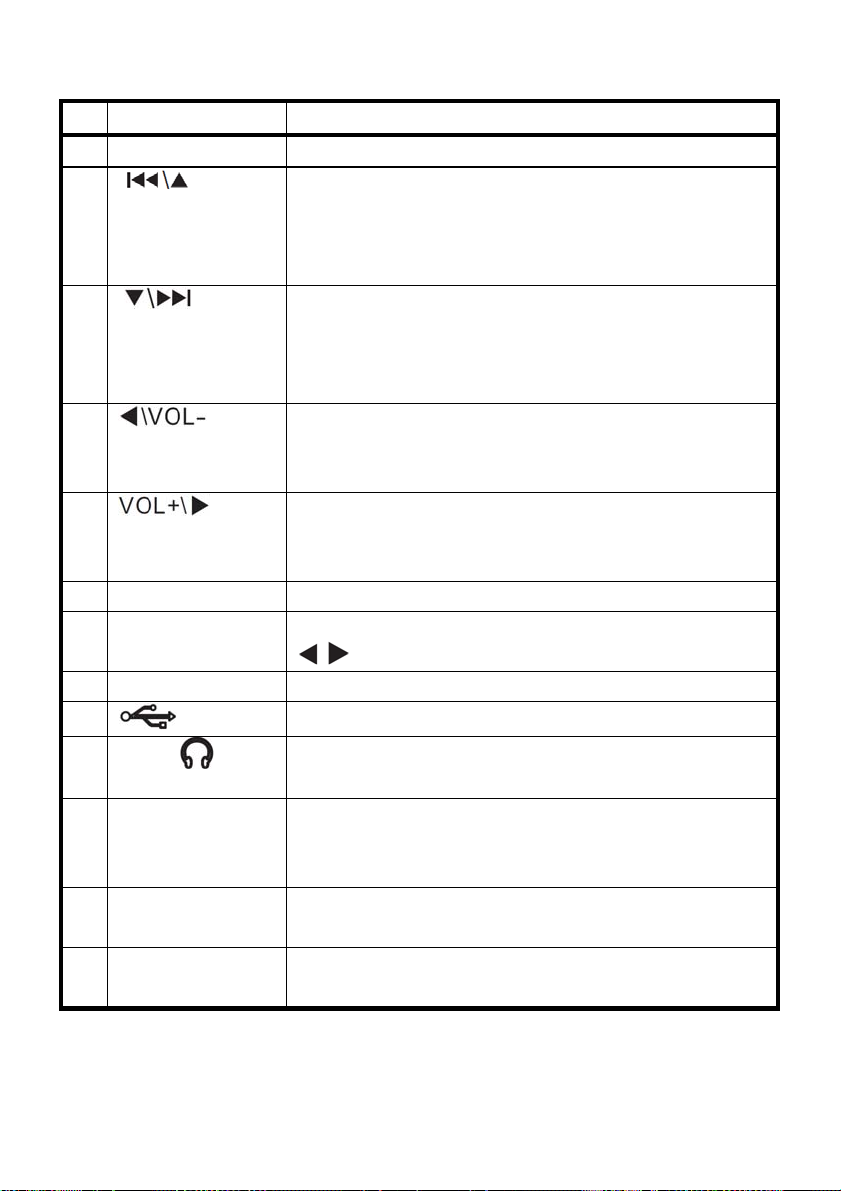
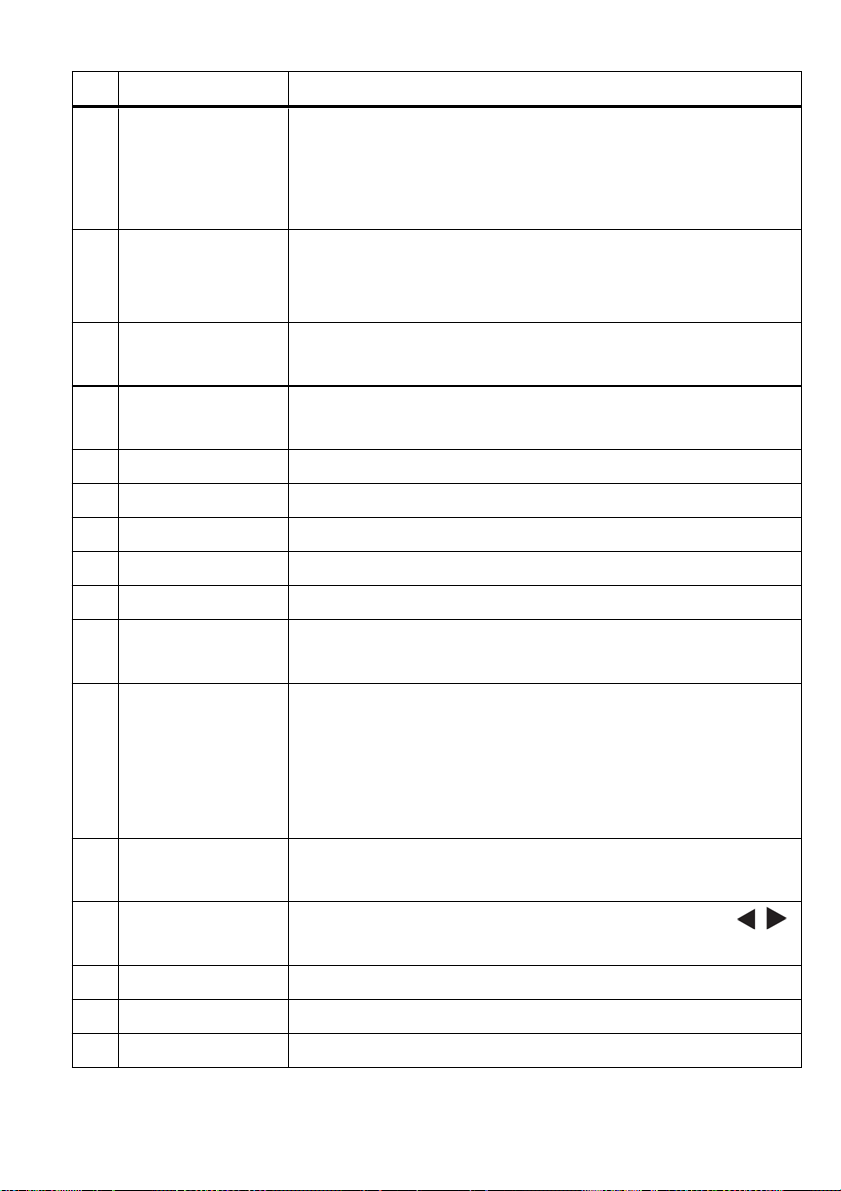
# Component Description
1 SETUP button Press to open or close the Setup menu.
2 button Press to move up in a list or menu.
Hold this button down for over one second to
go to the previous chapter, track, or scene
during disc playback.
3 button Press to move down in a list or menu.
Holding this button down for over one second
to go to the next chapter, track, or scene during
disc playback.
4 button Press to move left.
Holding this button down for over one second
to decrease the volume.
5 button Press to move right.
Holding this button down for over one second
to increase the volume.
6 ENTER button Press to confirm a selection.
7 SOURCE button Press to enter Disc/USB mode and then use
/ to switch between disc and USB modes.
8 ON/OFF switch Slide to turn your DVD player on or off.
9
10
USB port
Connect a USB device to this port.
Plug earphones into this jack.
Earphone jack
11 AV OUT jack Connect the extra monitor to this jack using
AV/DC cable, or connect a TV or monitor to this
jack using the supplied AV cable.
12 DC OUT jack Connect the extra monitor to this jack using the
AV/DC cable.
13 DC IN jack Connect the power adapter or car adapter to
this jack.
9
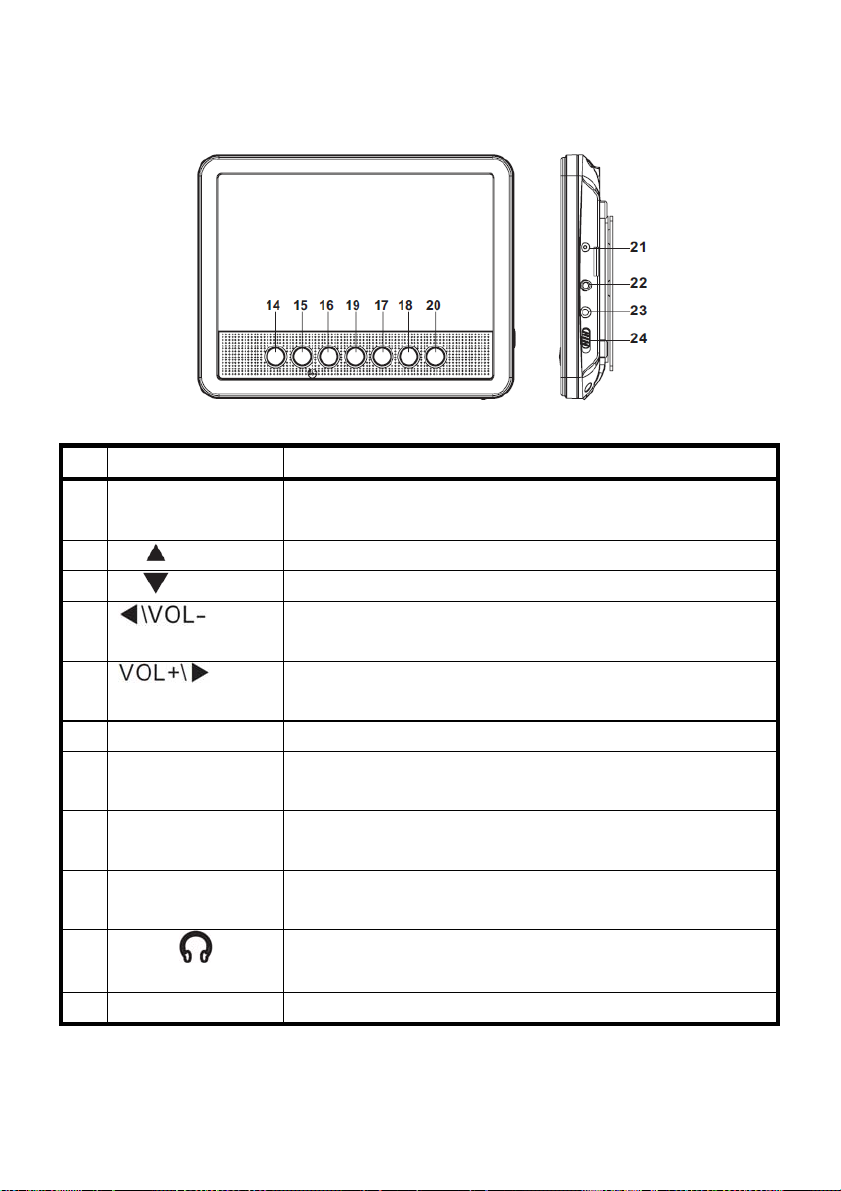
Extra monitor
# Component Description
14 MUTE button Press to turn on or turn off sound of the extra
monitor.
15 button Press to move up in the mode menu.
16
button
Press to move down in the mode menu.
17 button Press to decrease the volume.
In the mode menu, press to move left.
18
button
Press to increase the volume.
In the mode menu, press to move right.
19 MODE button Press to open or close the Mode menu.
20 BACKLIGHT
Press to turn on or turn off the screen backlight.
button
21 DC IN jack Connect the DC OUT jack on your DVD player to
this jack using the AV/DC cable.
22 AV IN jack Connect the AV OUT jack on your DVD player to
this jack using the AV/DC cable.
23
Plug earphones into this jack.
Earphone jack
24 ON/OFF switch Slide to turn the extra monitor on or off.
10

Earphones: Insert standard 3.5 mm earphones into the earphone
socket. The speakers will be muted.
EARPHONE VOLUME WARNING
Connect earphones with volume
set low and increase it if required.
Prolonged listening through some
earphones at high volume settings
can result in hearing damage.
Earphones or headphones must
comply with EN50332‐1/
EN50332‐2 to ensure continued
protection from excessive sound
pressure.
At full power, prolonged listening to the player can damage
the ear of the user.
To prevent possible hearing damage, do not listen at high
volume levels for long periods.
WARNING: To protect your hearing, it is important that any
headphones or earphones used in conjunction with this
product are compliant with French Decree of 8 November
2005 implementing Article L.5232‐1. This ensures that the
sound level does not exceed 100 dB SPL. The prolonged
listening at high volume for more than five hours a week
can damage your hearing.
11
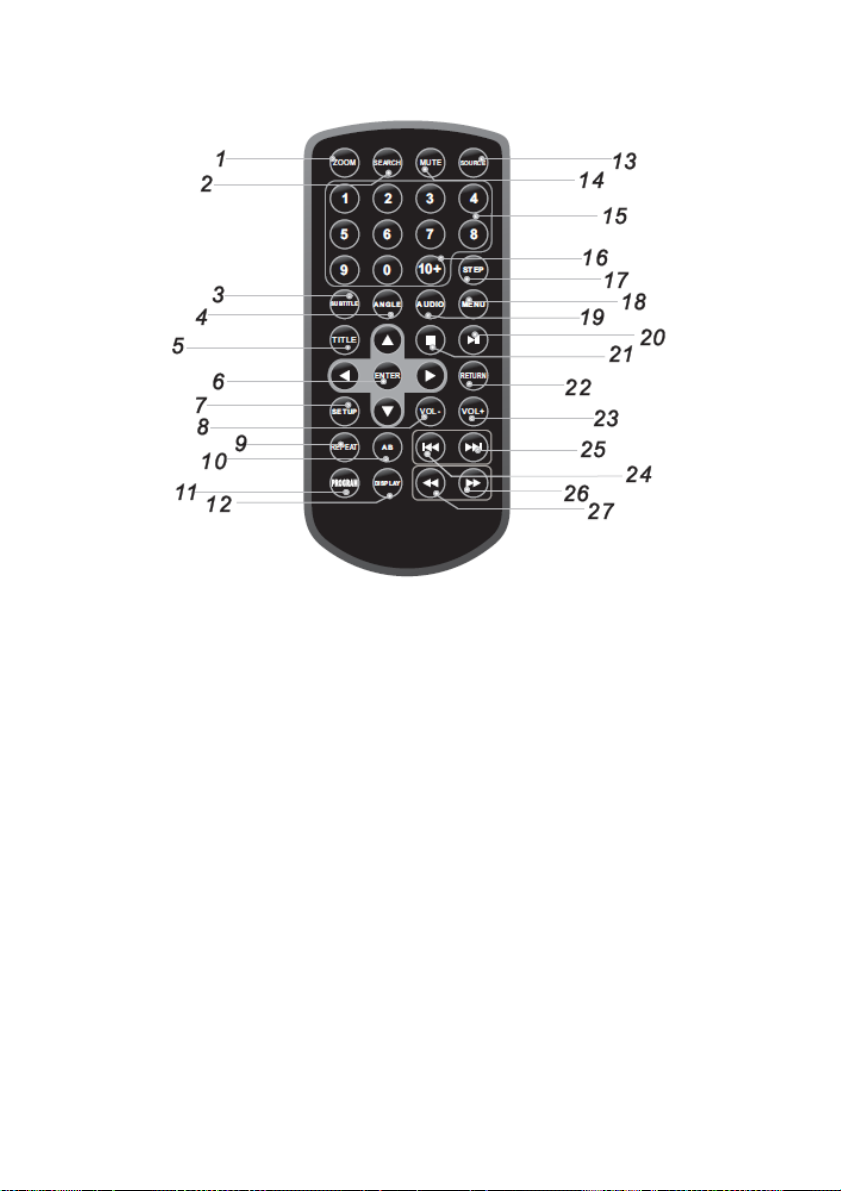
Remote Control
Note:
The first time you use the remote control, you must remove the film
between the battery and the compartment cover to activate the
remote control.
12
#Button Description
1 ZOOM Repeatedly press to enlarge or reduce the display
image. You can enlarge the image 2, 3, or 4 times
the normal size or reduce the image1/2,1/3,or1/
the normal size.
2 SEARCH Press to enter the title, chapter and time point
mode and then select the desired title, chapter or
time point.
3 SUBTITLE Repeatedly press to select the subtitle language.
This option works only if the DVD has subtitles.
4 ANGLE Press to select a view angle. This option works
only if the DVD has this feature.
5 TITLE Press to go to DVD tile menu.
6 ENTER Press to execute or confirm a selection.
7 SETUP Press to open or close the Setup menu.
8VOL‐ Repeatedly press to decrease the volume.
4
9 REPEAT Press to repeat the title, chapter, or track.
10 AB Press to repeat a specific portion (from point A to
point B) of a disc.
11 PROGRAM For DVD/MPEG4/MP3/CD disc, press to enter the
programmemodeandthenselectthedesired
title, chapter or track.
For JPEG disc, repeatedly press to select the
desired slide show mode.
12 DISPLAY Press to display information about the disc, such
as title, chapter number, track number, and time.
13 SOURCE
Press to enter Disc/USB mode and then use /
to switch between disc and USB modes.
14 MUTE Press to turn on or turn off sound.
15 Numbers Press to select menu items or enter the password.
16 10+ To select a track 10 or greater, press this button
13
and then press a number button.
17 STEP Press once to pause playback and then repeatedly
press to view a video frame by frame.
18 MENU Press once to open the main DVD menu. This
option works only if the DVD has a main menu.
19 AUDIO Repeatedly press to select the DVD audio
language or the CD audio channel.
This option works only if the DVD or CD has
multiple audio languages or channels.
20 (play/pause) Press to start playback. When a disc is playing,
press to pause playback. Press again to resume
playback.
21 (Stop) Press once to stop playback. Your player
remembers where you stopped. If you press ,
your player starts playing at the point where you
stopped.
Press twice to stop playback. If you press ,your
player starts playing at the beginning of the disc.
22 RETURN Press to go back to the previous page.
23 VOL+ Repeatedly press to increase the volume.
24 (previous) Press to go to the previous chapter or track.
25 (next) Press to skip forward to the next chapter or track.
26
(fast forward)
Press to fast‐forward on the disc. Each time you
press this button, the fast‐forward speed
increases from 2, 4, 8 to 20 times the normal
speed.
27
(reverse) Press to scan backward on the disc. Each time you
press this button, the fast‐reverse speed increases
from 2, 4, 8 to 20 times the normal speed.
14
Point the remote control at the DVD player no more than 3 metres
from the remote control sensor. The remote control will operate in a ±
30 degree angle in each the direction of the remote control sensor.
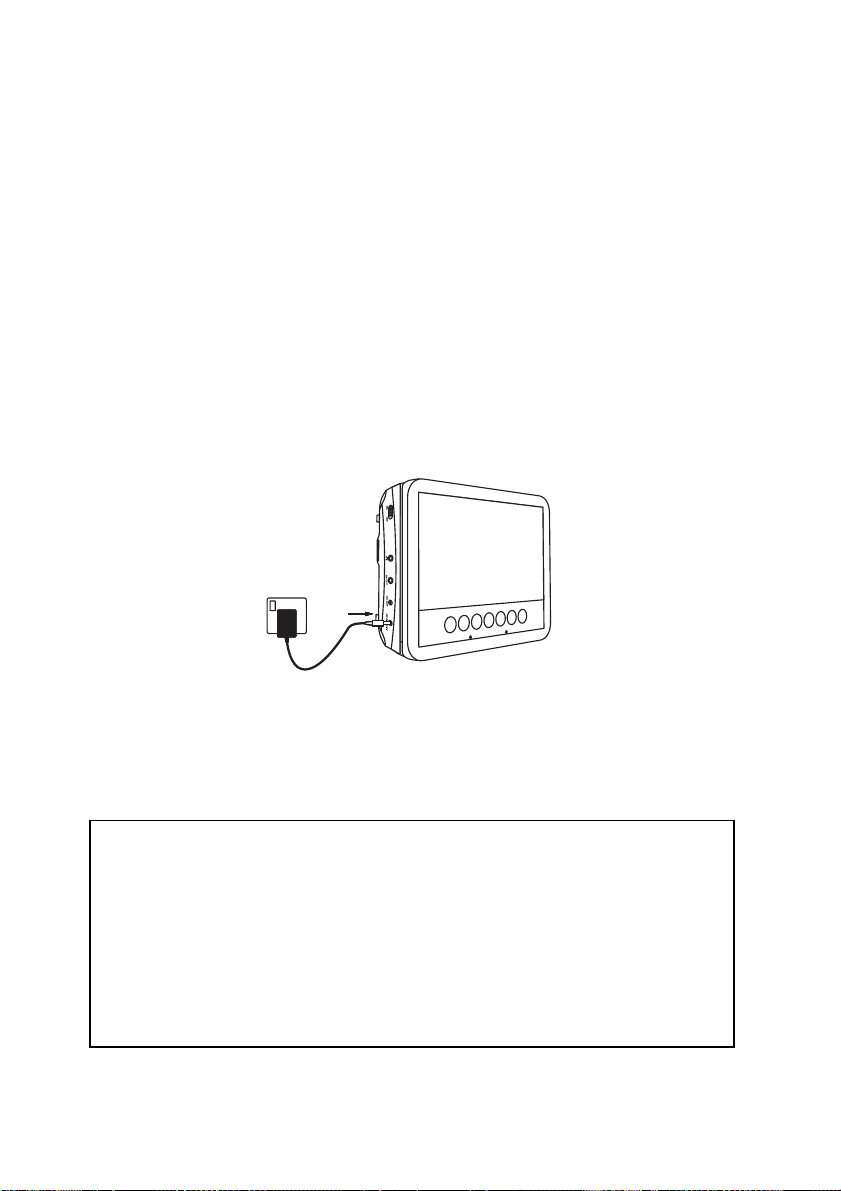
SETTING UP YOUR PLAYER
Connecting to AC Power
To connect to AC power, plug one end of the power adapter into the
DC IN jack on the side of your player, and the other end into the mains
socket.
To DC In
Installing your player in a vehicle
SAFETY WARNING!
On no account should this unit be used by the driver of a
moving motor vehicle, or left unsecured in the vehicle whilst
driving.
If this unit is being used by a passenger in your vehicle, be sure
that it is secured or held safely, and doe not obstruct any
safety device (i.e. airbag, seat belt, etc.) that is fitted.
15

1. Screw the support of the bracket on your DVD player / extra
monitor by aligning the support bolt to the screw hole on the back
of the player.
2. Unscrew 4 screws on the horizontal bar of the bracket.
3. Attach the horizontal bar to the metal pins of the headrest then
secure the horizontal bar with 4 screws.
4. Attach the DVD player / extra monitor with support to the
horizontal bar until a click is heard.
16
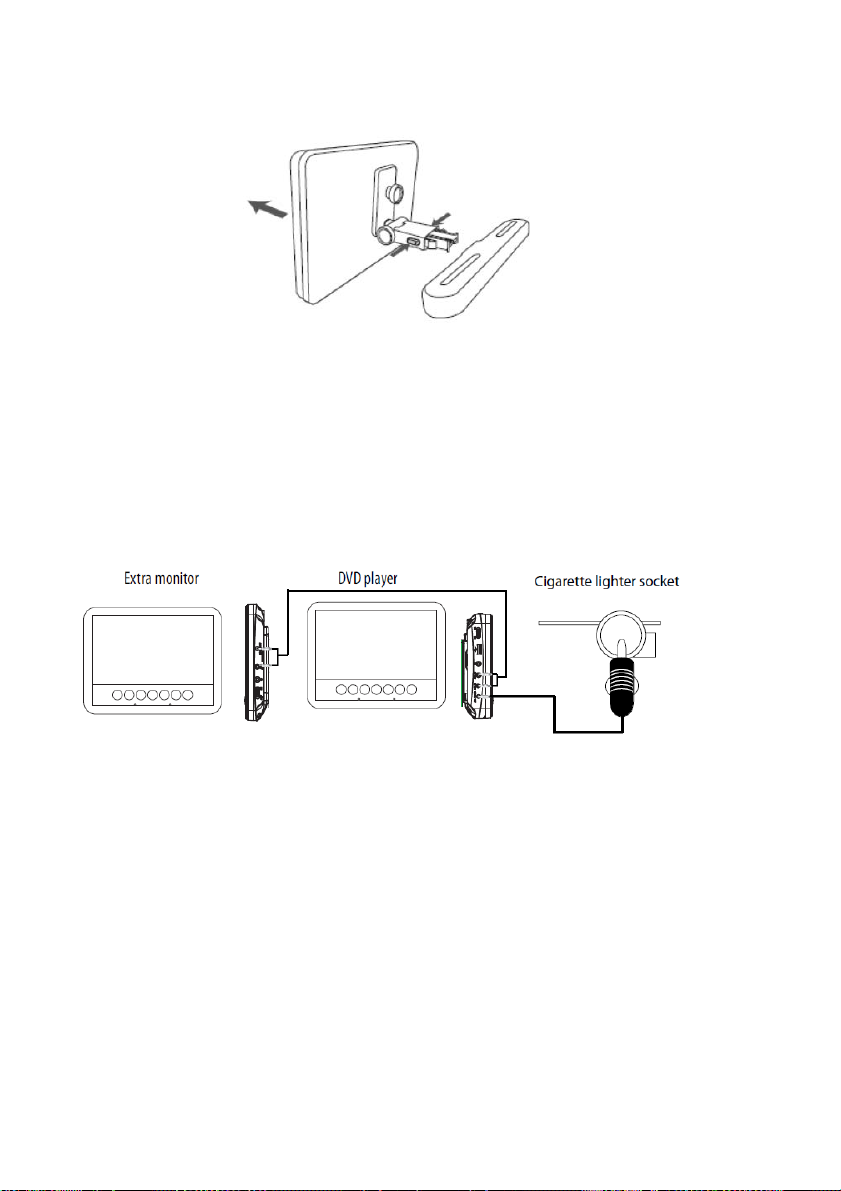
f
•
To detach the player / extra monitor from the support bar, press the
release buttons on both sides of the support.
Connecting to a car cigarette lighter socket
1. Plug one end of the car adapter into the DC IN jack on the side o
your player.
2. Plug the other end of the adapter into a car cigarette lighter socket.
3. Using the AV/DC cable, connect the AV OUT and DC OUT jacks on
the DVD player to the AV IN and DC IN jacks on the extra monitor.
4. Turn on your player.
17
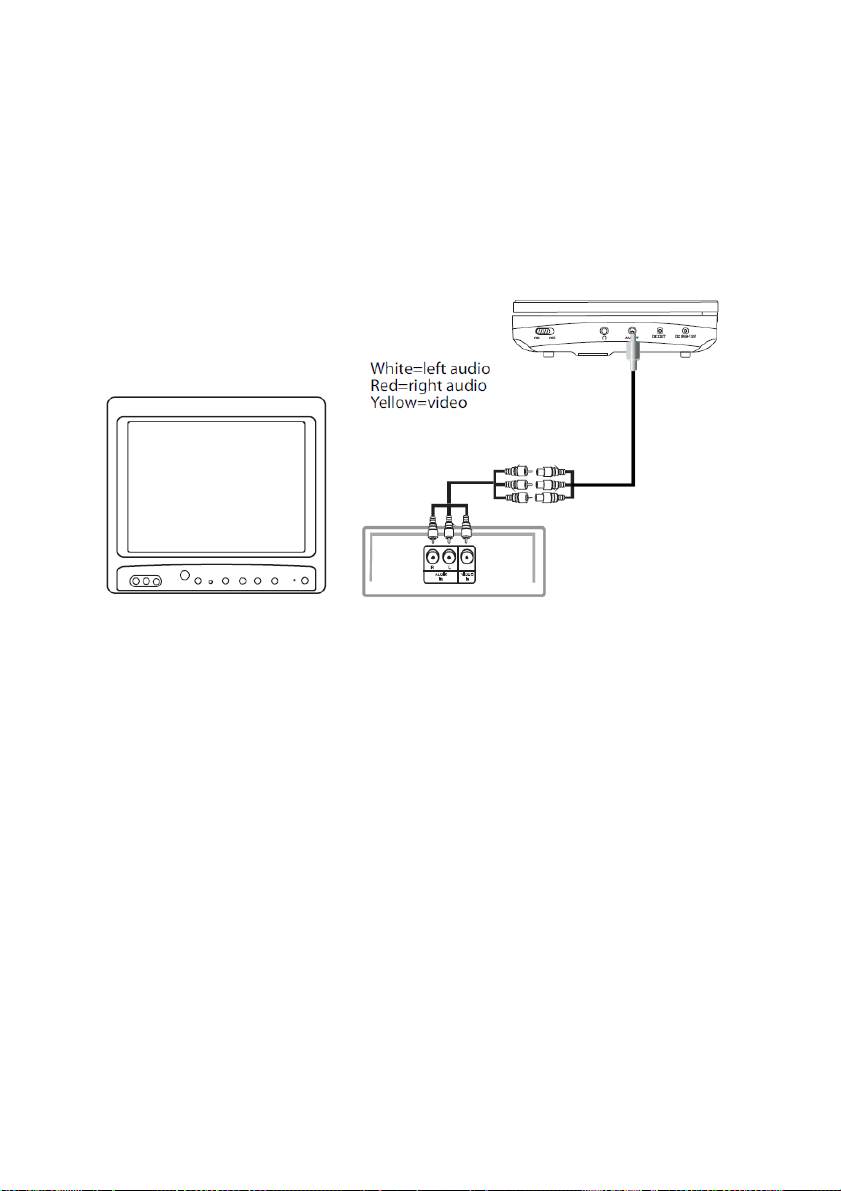
Connecting a TV or monitor
You can connect your player to a TV or monitor so you can watch DVDs
or view photos on the TV or monitor.
1. Plug the end of the supplied AV cable that has one black connector
into the AV OUT jack on your player.
2. Plug the connectors on an RCA cable (not included) into the
connectors on the other end of the supplied AV cable. Make sure
that the colours on the connectors match.
3. Plug the other end of the RCA cable into the AV jacks on the TV or
monitor. The white connector goes into the left audio jack. The red
connector goes into the right audio jack. The yellow connector goes
into the video jack.
Charging the Incorporated Battery of the DVD player
Connect the supplied power adapter cable to the DC IN jack of the
player.
The red charge indicator light will illuminate.
18

When the battery is fully charged, the red charge indicator light will
turn green.
NOTE:
It takes approximately 4 hours to fully charge the battery.
Normal play time for the fully charged battery is approximately 2
hours.
OPERATION
NOTE: When the player enters the standby mode as power saving
management, you need to switch on the player again to start
playback.
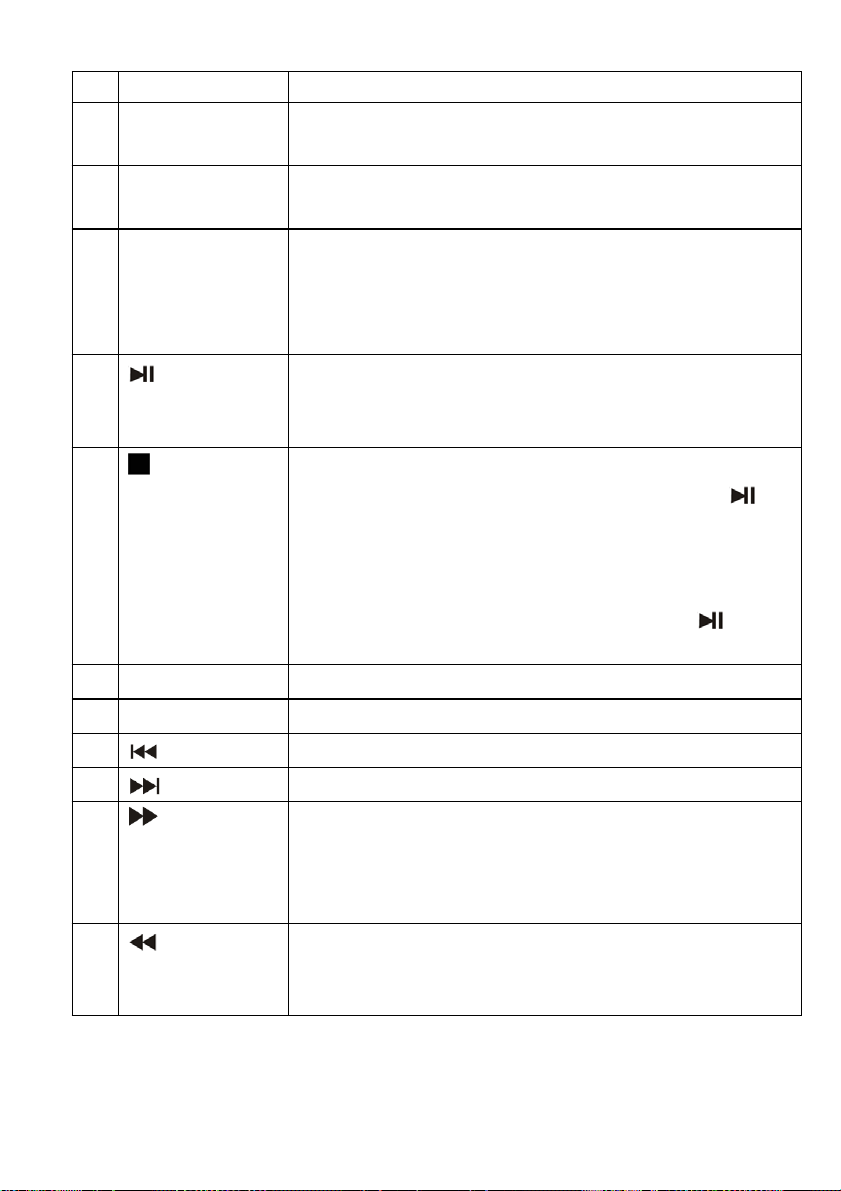
Playing a Disc
1. Slide the ON/OFF switch on the player to the ON position.
2. Slide the OPEN switch. The disc tray opens.
3. Place a disc, label side up, in the disc tray, then close the tray. The
disc starts playing automatically.
Controlling Playback
•
Press
stopped. If you press , your player starts playing at the point where
you stopped.
•
Press twice to stop playback. If you press ,yourplayerstarts
playing at the beginning of the disc.
•
Press to pause playback. Press this button again to resume
playback.
once to stop playback. Your player remembers where you
19

•
Press
on the remote control to fast‐forward on the disc. Each
time you press this button, the fast‐forward speed changes from 2 to
4 to 8 to 20 times the normal speed.
•
Press
on the remote control to fast‐reverse on the disc. Each time
you press this button, the fast‐reverse speed changes from 2 to 4 to 8
to 20 times the normal speed.
•
Press
•
Press
to go to the next title, chapter, or track.
to go to the previous title, chapter, or track.
Adjusting the Volume
Use VOL+/VOL‐ to adjust the volume.
If you wish to turn the sound off, press MUTE. Press this button again
to resume audio listening.
Repeat Viewing
While a disc is playing, repeatedly press REPEAT on the remote control
to select the following options:
To repeat a chapter, title, or DVD:
[CHAPTER]: Repeat the currently playing chapter.
[TITLE] : Repeat the currently playing title.
[REP ALL]: Repeat the entire DVD.
[OFF]: Turn off the repeat function.
To repeat a track or CD:
[REP 1]: Repeat the currently playing track.
[REP DIR] : Repeat all tracks under the currently playing folder.
[REP ALL]: Repeat the entire CD.
[OFF]: Turn off the repeat function.
20

Displaying Disc Information
During DVD playback, press DISPLAY on the remote control to display
the title number, chapter number, and other information on the
screen.
During CD playback, press this button to display the currently track
number and the elapsed playing time for the track.
Selecting an Audio Language
Some DVDs are recorded with multiple audio languages.
During playback, repeatedly press AUDIO on the remote control to
select the desired audio language.
Selecting a Subtitle Language
Some DVDs are recorded with subtitle languages that appear as text
on the screen.
During playback, repeatedly press SUBTITLE on the remote control to
select the desired subtitle language.
To turn off subtitles, press SUBTITLE until “OFF” appears.
Selecting a Viewing Angel
Some DVDs are recorded with multiple viewing angles for some scenes.
For these discs, the same scene can be viewed from each of these
different angles.
During playback, repeatedly press ANGLE on the remote control to
change the scene to the next recorded angle.
21
Using a DVD Menu
During playback, press MENU on the remote control. If the DVD has a
main menu, the menu opens.
Using the Title Function
Press TITLE on the remote control to enter the title list of the DVD (if
available).
Press andthenpressENTER to select the desired title.
Title function will only operate if available on the DVD disc.
Setting Parental Controls
1. Press SETUP. The System Setup Page opens and then press .
2. Press or to select PASSWORD,thenpress .
3. Enter the default password (0000) and press ENTER.
•
Rating can be set only when the correct password is input.
4. Press
or to select RATING,thenpress .
5. Press or to select the rating you want to block. The rating
you select and all higher ratings are blocked. You can select:
1 KID SAFE (All children)
2 G (General audiences)
3 PG (Parental guidance suggested)
4 PG‐13 (Parents strongly cautioned)
5 PG‐R (Parents very strong cautioned)
6 R (Restricted)
7 NC‐17 (No one under 17)
8 ADULT (Adults only)
6. Press ENTER to confirm.
22

Viewing Photos
You can view photos copied as JPEG files to a CD on your DVD player.
1. Insert the CD containing the photos into the disc tray. Your DVD
player reads the CD and the file menu appears on the display.
2. Press or to highlight the file you want to play and press
ENTER or .
•
Slide show starts from the selected file.
3. To control playback:
•
Press
to pause playback. Press again to re‐start the
slideshow.
•
Repeatedly press ZOOM to zoom in and out.
•
Repeatedly press PROGRAM to select the desired slide show
mode.
•
Press
to rotate the current photo 90° clockwise or
anticlockwise.
Using USB function
1. Connect a USB device to the DVD player.
2. Press SOURCE andthenpress to highlight USB option.
3. Press ENTER and the player will automatically detect the USB and
read the USB device.
Using the Setup Menu
Your player has a Setup menu to adjust settings for your player.
1. Press SETUP. The System Setup page opens.
2. Press or to select the menu page you want, then press .
23

3. Press or to select an option, then press to open the
sub‐menu.
4. Press or to select an option, then press ENTER to confirm
your selection.
5. To go to previous menu, press .
6. Repeat step 2 to 4 to change other menu options.
Setupmenupages
Page Options
System Setup TV System ― Select the colour system. You can
select NTSC or PAL.
Power Resume ― When this option is turned on,
your player starts playback where you left off in case
of interruptions such as power cuts.
TV Type ― Selects the aspect ratio. You can select:
•
4:3 PS – Select this option when the player is
connected to a normal TV. Wide‐screen
images are shown on the screen, but with
some parts cropped automatically.
•
4:3 LB – Select this when the player is
connected to a normal TV. Wide‐screen
images are shown on the screen, with a black
band on the top and bottom.
•
16:9 displays the vide image full‐screen when
your player is connected to a widescreen TV.
Password – To change the password, enter the old
password or default password (0000), then enter the
new password and press ENTER to confirm.
Rating – Blocks DVD playback based on ratings. For
more information, see “Setting Parental Control”
24

above.
Default – Reset all settings except parental controls
back to the factory default.
Language
Setup
Standby
Setting
Video Setup Brightness – Increases the brightness to add more
OSD Language – selects the language for the Setup
menu.
Audio Language – selects the audio language.
Subtitle Language – Selects the subtitle language.
Menu Language – Selects the DVD menu language.
Select the time for the player to enter standby
mode. You can turn off the function, select 3 or 4
hours.
light to dark areas of the picture or decreases the
brightness to add more dark to light areas of the
picture.
Contrast – Increases the picture level to adjust the
white areas of the picture or decreases the picture
level to adjust the black areas of the picture.
Hue – Increases the colour level to add more green
to skin tones or decreases the colour level to add
more purple to skin tones.
Saturation – Adjusts the colour saturation.
Sharpness – Adjusts the level of video sharpness.
SPECIFICATIONS
Power source: DC IN 9‐12 V
Compatible discs: DVD/MPEG4/MP3/CD/JPEG
25

CLEANING AND MAINTENANCE
Cleaning the unit
To clean the player, use a soft, dry cloth. If the surfaces are extremely
dirty, use a soft cloth lightly moistened with a mild detergent solution.
Do not use strong solvents such as alcohol, benzine or thinner, as these
might damage the surface of the unit.
Maintaining the unit
The DVD player is a high‐tech, precision device. If the optical pick‐up
lens and disc drive parts are dirty or worn, the picture quality could be
diminished. Depending on the operating environment, regular
inspection and maintenance are recommended after every 1,000
hours of use.
26

TROUBLESHOOTING
Problem Solution
No sound or
distorted sound.
Picture is distorted.
Remote control
does not work.
Disc does not play.
Play starts, then
stops immediately.
• Adjust the volume.
• Make sure that earphones are not plugged
in. When earphones are plugged in, the
internal speakers are turned off.
•
Make sure that all cables are inserted
correctly into the appropriate jacks.
• During fast‐forwarding or fast‐reversing,
distortion is normal.
•
The DVD may be damaged. Try another one.
•
Make sure that the battery is fresh.
•
Make sure that nothing is blocking the IR
sensor.
•
Make sure that you point the remote directly
at the IR sensor.
•
Make sure that the disc is inserted with the
label side up.
•
Make sure that the disc is compatible with
your player.
•
Make sure that the region code of a DVD
matches the region code for your player.
your player’s region code is 2.
•
Make sure that the disc is not dirty.
•
I
f condensation has formed inside your
player, let your player dry out.
We apologise for any inconvenience caused by minor inconsistencies
in these instructions, which may occur as a result of product
improvement and development.
Kesa Electricals © UK: EC1N 6TE 09/ 05 / 2013
27
 Loading...