

Boss Digital Studio BR-532 Owner's Manual
Owner’s Manual
Thank you, and congratulations on your choice of the BOSS
BR-532 Digital Studio.
Owner's Manual
Before using this unit, carefully read the sections entitled:
• USING THE UNIT SAFELY (page 2–3)
• IMPORTANT NOTES (page 4–5)
These sections provide important information concerning
the proper operation of the unit.
Additionally, in order to feel assured that you have gained a
good grasp of every feature provided by your new unit,
Owner’s manual should be read in its entirety. The manual
should be saved and kept on hand as a convenient reference.
■
Printing Conventions in This Manual
• Text or numerals enclosed in square brackets [ ] indicate buttons.
[START]
[REC]
• Reference such as (p. **) indicate pages in this manual to which
you can refer.
Copyright © 2001 BOSS CORPORATION
All rights reserved. No part of this publication may be reproduced in any form
without the written permission of BOSS CORPORATION.
START button
REC button
USING THE UNIT SAFELY
Used for instructions intended to alert
the user to the risk of death or severe
injury should the unit be used
improperly.
Used for instructions intended to alert
the user to the risk of injury or material
damage should the unit be used
improperly.
* Material damage refers to damage or
other adverse effects caused with
respect to the home and all its
furnishings, as well to domestic
animals or pets.
001
• Before using this unit, make sure to read the
instructions below, and the Owner’s Manual.
..........................................................................................................
002d
• Do not open or perform any internal modifications
on the unit or its AC adaptor. (The only exception
would be where this manual provides specific
instructions which should be followed in order to
put in place user-installable options; see p. 13.)
..........................................................................................................
003
• Do not attempt to repair the unit, or replace parts
within it (except when this manual provides
specific instructions directing you to do so). Refer
all servicing to your retailer, the nearest Roland
Service Center, or an authorized Roland
distributor, as listed on the "Information" page.
..........................................................................................................
004
• Never use or store the unit in places that are:
• Subject to temperature extremes (e.g., direct
sunlight in an enclosed vehicle, near a heating
duct, on top of heat-generating equipment); or are
• Damp (e.g., baths, washrooms, on wet floors);
or are
• Humid; or are
• Exposed to rain; or are
• Dusty; or are
• Subject to high levels of vibration.
..........................................................................................................
007
• Make sure you always have the unit placed so it is
level and sure to remain stable. Never place it on
stands that could wobble, or on inclined surfaces.
..........................................................................................................
008b
• Use only the specified AC adaptor (PSA-series),
and make sure the line voltage at the installation
matches the input voltage specified on the AC
adaptor’s body. Other AC adaptors may use a
different polarity, or be designed for a different
voltage, so their use could result in damage,
malfunction, or electric shock.
..........................................................................................................
The symbol alerts the user to important instructions
or warnings.The specific meaning of the symbol is
determined by the design contained within the
triangle. In the case of the symbol at left, it is used for
general cautions, warnings, or alerts to danger.
The symbol alerts the user to items that must never
be carried out (are forbidden). The specific thing that
must not be done is indicated by the design contained
within the circle. In the case of the symbol at left, it
means that the unit must never be disassembled.
The ● symbol alerts the user to things that must be
carried out. The specific thing that must be done is
indicated by the design contained within the circle. In
the case of the symbol at left, it means that the powercord plug must be unplugged from the outlet.
009
• Do not excessively twist or bend the power cord,
nor place heavy objects on it. Doing so can
damage the cord, producing severed elements and
short circuits. Damaged cords are fire and shock
hazards!
..........................................................................................................
010
• This unit, either alone or in combination with an
amplifier and headphones or speakers, may be
capable of producing sound levels that could
cause permanent hearing loss. Do not operate for
a long period of time at a high volume level, or at
a level that is uncomfortable. If you experience
any hearing loss or ringing in the ears, you should
immediately stop using the unit, and consult an
audiologist.
..........................................................................................................
011
• Do not allow any objects (e.g., flammable material,
coins, pins); or liquids of any kind (water, soft
drinks, etc.) to penetrate the unit.
..........................................................................................................
012c
• Immediately turn the power off, remove the AC
adaptor from the outlet, and request servicing by
your retailer, the nearest Roland Service Center, or
an authorized Roland distributor, as listed on the
“Information” page when:
• The AC adaptor or the power-supply cord has
been damaged; or
• Objects have fallen into, or liquid has been
spilled onto the unit; or
• The unit has been exposed to rain (or otherwise
has become wet); or
• The unit does not appear to operate normally or
exhibits a marked change in performance.
..........................................................................................................
2
013
• In households with small children, an adult
should provide supervision until the child is
capable of following all the rules essential for the
safe operation of the unit.
..........................................................................................................
014
• Protect the unit from strong impact.
(Do not drop it!)
..........................................................................................................
015
• Do not force the unit’s power-supply cord to share
an outlet with an unreasonable number of other
devices. Be especially careful when using
extension cords—the total power used by all
devices you have connected to the extension
cord’s outlet must never exceed the power rating
(watts/amperes) for the extension cord. Excessive
loads can cause the insulation on the cord to heat
up and eventually melt through.
..........................................................................................................
016
• Before using the unit in a foreign country, consult
with your retailer, the nearest Roland Service
Center, or an authorized Roland distributor, as
listed on the “Information” page.
..........................................................................................................
019
• Batteries must never be recharged, heated, taken
apart, or thrown into fire or water.
..........................................................................................................
101b
• The unit and the AC adaptor should be located so
their location or position does not interfere with
their proper ventilation.
..........................................................................................................
102d
• Always grasp only the plug or the body of the AC
adaptor when plugging into, or unplugging from,
an outlet or this unit.
..........................................................................................................
103b
• Whenever the unit is to remain unused for an
extended period of time, disconnect the AC
adaptor.
..........................................................................................................
104
• Try to prevent cords and cables from becoming
entangled. Also, all cords and cables should be
placed so they are out of the reach of children.
..........................................................................................................
106
• Never climb on top of, nor place heavy objects on
the unit.
..........................................................................................................
107d
• Never handle the AC adaptor body, or its plugs,
with wet hands when plugging into, or
unplugging from, an outlet or this unit.
..........................................................................................................
108b
• Before moving the unit, disconnect the AC
adaptor and all cords coming from external
devices.
..........................................................................................................
109b
• Before cleaning the unit, turn off the power and
unplug the AC adaptor from the outlet.
..........................................................................................................
110b
• Whenever you suspect the possibility of lightning
in your area, disconnect the AC adaptor from the
outlet.
..........................................................................................................
111: Selection
• If used improperly, batteries may explode or leak
and cause damage or injury. In the interest of
safety, please read and observe the following
precautions (p. 20 ).
1
• Carefully follow the installation instructions for
batteries, and make sure you observe the correct
polarity.
2
• Avoid using new batteries together with used
ones. In addition, avoid mixing different types
of batteries.
3
• Remove the batteries whenever the unit is to
remain unused for an extended period of time.
5
• If a battery has leaked, use a soft piece of cloth
or paper towel to wipe all remnants of the
discharge from the battery compartment. Then
install new batteries. To avoid inflammation of
the skin, make sure that none of the battery
discharge gets onto your hands or skin. Exercise
the utmost caution so that none of the discharge
gets near your eyes. Immediately rinse the
affected area with running water if any of the
discharge has entered the eyes.
6
• Never keep batteries together with metallic
objects such as ballpoint pens, necklaces,
hairpins, etc.
..........................................................................................................
112
• Used batteries must be disposed of in compliance
with whatever regulations for their safe disposal
that may be observed in the region in which you
live.
..........................................................................................................
118
• Should you remove screws, make sure to put them
in a safe place out of children's reach, so there is
no chance of them being swallowed accidentally.
..........................................................................................................
3

IMPORTANT NOTES
291a
In addition to the items listed under “USING THE UNIT SAFELY” on page 2–3, please read and observe the following:
Power Supply: Use of Batteries
301
• Do not use this unit on the same power circuit with any
device that will generate line noise (such as an electric
motor or variable lighting system).
302
• The AC adaptor will begin to generate heat after long
hours of consecutive use. This is normal, and is not a
cause for concern.
303a
• The use of an AC adaptor is recommended as the unit’s
power consumption is relatively high. Should you prefer
to use batteries, please use the alkaline type.
304a
• When installing or replacing batteries, always turn off the
power on this unit and disconnect any other devices you
may have connected. This way, you can prevent
malfunction and/or damage to speakers or other devices.
306b
• Batteries are supplied with the unit. The life of these
batteries may be limited, however, since their primary
purpose was to enable testing.
307
• Before connecting this unit to other devices, turn off the
power to all units. This will help prevent malfunctions
and/or damage to speakers or other devices.
Placement
351
• Using the unit near power amplifiers (or other equipment
containing large power transformers) may induce hum.
To alleviate the problem, change the orientation of this
unit; or move it farther away from the source of interference.
352
• This device may interfere with radio and television
reception. Do not use this device in the vicinity of such
receivers.
354a
• Do not expose the unit to direct sunlight, place it near
devices that radiate heat, leave it inside an enclosed
vehicle, or otherwise subject it to temperature extremes.
Excessive heat can deform or discolor the unit.
355
• To avoid possible breakdown, do not use the unit in a wet
area, such as an area exposed to rain or other moisture.
Additional Precautions
551
• Please be aware that the contents of memory can be
irretrievably lost as a result of a malfunction, or the
improper operation of the unit. To protect yourself against
the risk of loosing important data, we recommend that
you periodically save a backup copy of important data
you have stored in the unit’s memory on a memory card
or a personal computer.
552
• Unfortunately, it may be impossible to restore the contents
of data that was stored in the unit’s memory or a memory
card once it has been lost. Roland Corporation assumes no
liability concerning such loss of data.
553
• Use a reasonable amount of care when using the unit’s
buttons, sliders, or other controls; and when using its jacks
and connectors. Rough handling can lead to malfunctions.
554
• Never strike or apply strong pressure to the display.
556
• When connecting / disconnecting all cables, grasp the
connector itself—never pull on the cable. This way you
will avoid causing shorts, or damage to the cable’s
internal elements.
558a
• To avoid disturbing your neighbors, try to keep the unit’s
volume at reasonable levels. You may prefer to use
headphones, so you do not need to be concerned about
those around you (especially when it is late at night).
559a
• When you need to transport the unit, package it in the box
(including padding) that it came in, if possible. Otherwise,
you will need to use equivalent packaging materials.
562
• Use a cable from Roland to make the connection. If using
some other make of connection cable, please note the
following precautions.
• Some connection cables contain resistors. Do not use
cables that incorporate resistors for connecting to this
unit. The use of such cables can cause the sound level
to be extremely low, or impossible to hear. For information on cable specifications, contact the manufacturer of the cable.
Maintenance
401a
• For everyday cleaning wipe the unit with a soft, dry cloth
or one that has been slightly dampened with water. To
remove stubborn dirt, use a cloth impregnated with a
mild, non-abrasive detergent. Afterwards, be sure to wipe
the unit thoroughly with a soft, dry cloth.
402
• Never use benzine, thinners, alcohol or solvents of any
kind, to avoid the possibility of discoloration and/or
deformation.
4

Before Using Memory Cards
(SmartMedia)
Using Memory Cards
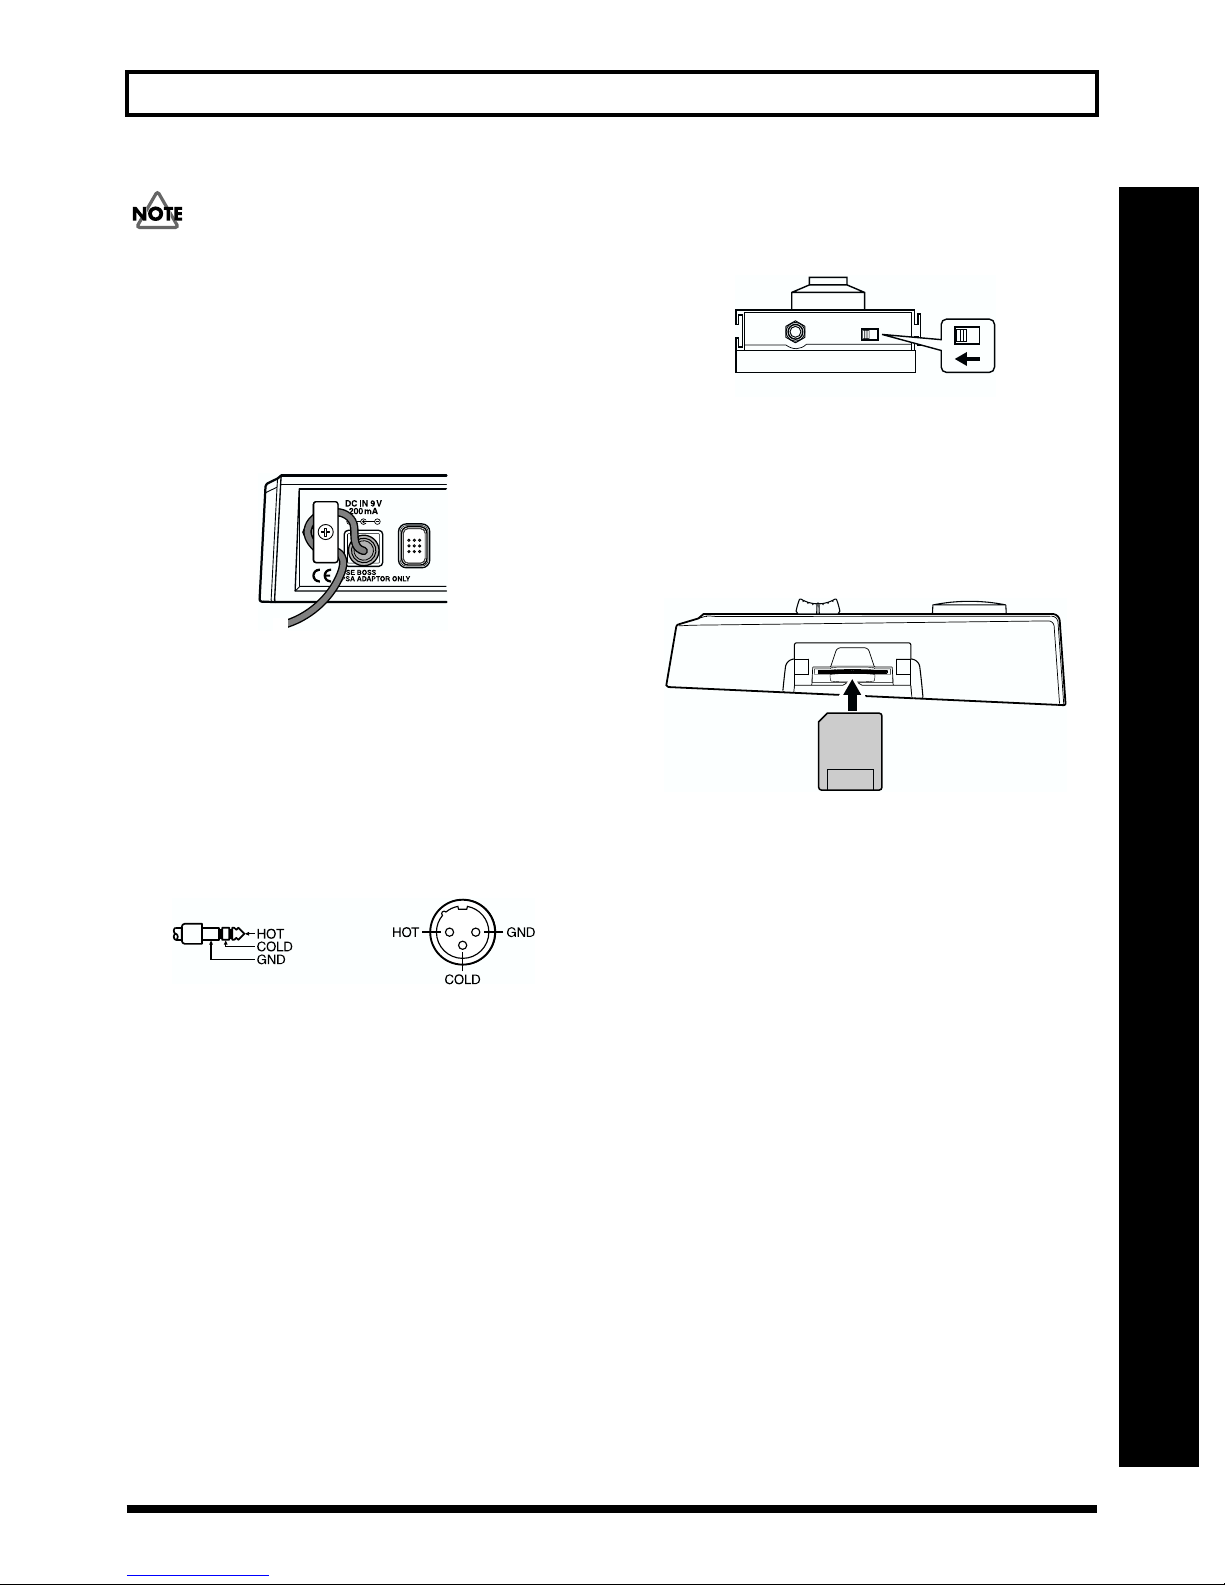
704
• Carefully insert the Memory card all the way in—until it is
firmly in place.
fig.Q01-04b
The surface without
gold contacts
must be upward
705
• Never touch the terminals of the Memory card. Also,
avoid getting the terminals dirty.
Copyright
851
• Unauthorized recording, distribution, sale, lending, public
performance, broadcasting, or the like, in whole or in part,
of a work (musical composition, video, broadcast, public
performance, or the like) whose copyright is held by a
third party is prohibited by law.
853
• Do not use this unit for purposes that could infringe on a
copyright held by a third party. Roland/BOSS assumes no
responsibility whatsoever with regard to any infringements of third-party copyrights arising through your use
of this unit.
IMPORTANT NOTES
5

Contents
IMPORTANT NOTES ..................................................................................................4
Introduction to the BR-532......................................................................................11
Features......................................................................................................................................................................... 11
Memory cards supported by your BR-532 .............................................................................................................. 13
Remove the Card Cover.............................................................................................................................................13
Panel Descriptions...................................................................................................14
Front Panel................................................................................................................................................................... 14
Display..........................................................................................................................................................................18
Rear Panel..................................................................................................................................................................... 19
Inserting batteries........................................................................................................................................................ 20
Quick Start......................................................21
Listening to the Demo Song ...................................................................................22
(1) Connecting peripheral devices............................................................................................................................22
(2) Turn on the BR-532................................................................................................................................................ 24
Adjusting the Display Contrast....................................................................................................................24
(3) Listening to the demo songs................................................................................................................................ 25
Selecting a song............................................................................................................................................... 25
Playing Back a Song ....................................................................................................................................... 25
Changing the current position...................................................................................................................... 26
Recording/playing back a song..............................................................................27
(1) Preparing the memory card.................................................................................................................................27
Formatting the memory card........................................................................................................................27
(2) Select the song to record.......................................................................................................................................28
Recording a new song.................................................................................................................................... 28
(3) Connecting instruments ....................................................................................................................................... 29
Choose which jack you will use to connect your instrument .................................................................. 29
Press the INPUT SELECT button of the instrument that you want to record....................................... 29
Turning off the internal microphone........................................................................................................... 30
Adjusting the input sensitivity..................................................................................................................... 30
Switching the LEVEL METER ...................................................................................................................... 30
Monitoring the sound.................................................................................................................................... 30
(4) Using insert effects ................................................................................................................................................ 31
Switch effect patches...................................................................................................................................... 31
Recording without effects ............................................................................................................................. 31
(5) Using the rhythm guide ....................................................................................................................................... 32
Playing the rhythm guide.............................................................................................................................. 32
Changing the Rhythm Pattern...................................................................................................................... 32
Changing a Rhythm’s Tempo....................................................................................................................... 32
Tapping to change the tempo....................................................................................................................... 33
(6) Recording................................................................................................................................................................ 33
Selecting the recording track......................................................................................................................... 33
(7) Playing back recorded music............................................................................................................................... 35
Playback........................................................................................................................................................... 35
Adjusting the volume of each track............................................................................................................. 35
(8) Turning off the power........................................................................................................................................... 35
(9) Removing the memory card ................................................................................................................................ 35
Conserving battery power (Power Save)................................................................................................................. 36
6

Contents
Advanced Use.................................................37
Repeating Playback—Repeat .................................................................................38
Setting the repeat portion........................................................................................................................................... 38
Setting the repeat portion with accurate timing..................................................................................................... 39
Recording an additional performance while listening to an existing
performance—Overdubbing ...................................................................................40
Changing the position of the input sound............................................................................................................... 40
Putting multiple tracks together—Bouncing.........................................................41
Finishing up the song—Mix Down .........................................................................42
Setting the sound positioning (Pan)......................................................................................................................... 42
Adding width to the sound—Loop Effect............................................................................................................... 42
Mixing down................................................................................................................................................................ 43
Disabling digital copying........................................................................................................................................... 43
Changing V-Tracks ..................................................................................................44
Re-recording only a mistake—Punch-in/out .........................................................45
Manually punching in/out........................................................................................................................................ 45
Manually punching in and out using [REC] .............................................................................................. 45
Manually punching in and out using a foot switch .................................................................................. 46
Auto punching in and out.......................................................................................................................................... 46
Specifying the area for recording................................................................................................................. 46
Erasing a registered auto punch in/out location....................................................................................... 47
How to Record................................................................................................................................................ 47
Repeatedly Recording Over the Same Location (Loop Recording)..................................................................... 48
Setting the portion to be repeated................................................................................................................ 48
How to Record................................................................................................................................................ 48
Registering time—Locator Function......................................................................49
Registering a locator point......................................................................................................................................... 49
Moving to the locator point....................................................................................................................................... 49
Deleting a locator point.............................................................................................................................................. 49
Editing the performance on a track (Track Editing)..............................................50
Copying recorded data (Track Copy) ...................................................................................................................... 50
Copying the repeated portion (AB) ............................................................................................................. 50
Copying by specifying the time (TIME/MES)........................................................................................... 51
Copying a complete track (ALL).................................................................................................................. 52
Moving recorded data (Track Move) ....................................................................................................................... 53
Moving the repeated portion (AB)............................................................................................................... 53
Moving by specifying the time (TIME/MES)............................................................................................. 53
Moving a complete track (ALL) ................................................................................................................... 54
Erasing recorded data (Track Erase) ........................................................................................................................ 55
Erasing the repeated portion (AB) ............................................................................................................... 55
Erasing by specifying the time (TIME/MES)............................................................................................. 56
Erasing a complete track (ALL).................................................................................................................... 56
Exchanging recorded data (Track Exchange) ......................................................................................................... 57
Canceling a recording or editing procedure—Undo/Redo...................................58
Reversing the last operation—Undo........................................................................................................................ 58
Canceling the Undo—Redo....................................................................................................................................... 58
Organizing the songs you’ve recorded..................................................................59
Copying a Song (Song Copy) .................................................................................................................................... 59
Erasing songs (Song Erase)........................................................................................................................................ 59
Saving memory on the memory card (Song Optimize)......................................................................................... 60
Naming songs—Song Name ..................................................................................................................................... 60
7

Contents
Formatting the memory card—Initialize.................................................................61
Using the Rhythm Guide.........................................................................................62
Patterns......................................................................................................................................................................... 62
Creating patterns......................................................................................................................................................... 63
Inserting a step................................................................................................................................................ 64
Erasing a step .................................................................................................................................................. 64
Deleting all steps............................................................................................................................................. 65
Saving the pattern....................................................................................................................................................... 65
Selecting a pattern....................................................................................................................................................... 66
Copying patterns............................................................................................................................................ 66
Changing a pattern name.............................................................................................................................. 66
Synchronizing with MIDI devices ...........................................................................67
MIDI Fundamentals.................................................................................................................................................... 67
Using an external MIDI sound module to play the rhythm guide...................................................................... 68
Synchronizing playback with a MIDI sequencer ................................................................................................... 69
Synchronized playback with the BR-532 as the master ............................................................................ 69
Using MMC.................................................................................................................................................................. 70
Operating MMC-compatible devices with the BR-532 ............................................................................. 70
Mixing the output from an external MIDI device
with the output from your BR-532 (AUDIO SUB MIX)...........................................72
Displaying the song information............................................................................73
Displaying the remaining available recording time .............................................................................................. 73
Displaying the memory card usage.......................................................................................................................... 73
Search for the music’s start and end (Scrub/Preview).........................................74
Scrubbing to find the music starting point.............................................................................................................. 74
Changing the scrub points......................................................................................................................................... 75
Using Scrub and Preview to find the music ending point.................................................................................... 75
Enabling the Preview Function .................................................................................................................... 75
Finding the music ending point ................................................................................................................... 75
Tuning an instrument—Tuner.................................................................................76
Changing to the tuner................................................................................................................................................. 76
Tuning........................................................................................................................................................................... 76
Setting the reference pitch of the tuner.................................................................................................................... 77
Copying difficult songs—Phrase Trainer ..............................................................78
Slowing down the speed (Time Stretch function).................................................................................................. 78
Canceling the center sound (Center Cancel function)........................................................................................... 78
Using the insert effects ...........................................................................................79
Effect patches and banks............................................................................................................................................ 79
Editing insert effect settings ...................................................................................................................................... 80
Saving insert effects settings (Write)........................................................................................................................ 81
Changing the insert effect connections.................................................................................................................... 81
Using the loop effects..............................................................................................82
Selecting the loop effect.............................................................................................................................................. 82
Adjusting how the loop effect is applied................................................................................................................. 82
Initializing the BR-532’s settings............................................................................83
Initializing all the BR-532’s settings.......................................................................................................................... 83
Initializing the system settings.................................................................................................................................. 83
Initializing the effect settings..................................................................................................................................... 84
Initializing the Rhythm Guide User patterns.......................................................................................................... 84
8

Contents
Appendices .....................................................85
Loop Effect Parameter Functions...........................................................................85
CHORUS/DOUBL’N/REVERB ............................................................................................................................... 85
Insert Effect Algorithm List.....................................................................................86
BANK: GUITAR/BASS.............................................................................................................................................. 86
1. COSM GUITAR AMP................................................................................................................................ 86
2. ACOUSTIC SIM.......................................................................................................................................... 86
3. BASS SIM..................................................................................................................................................... 86
4. ACOUSTIC GUITAR ................................................................................................................................. 87
5. BASS MULTI............................................................................................................................................... 87
6. COSM BASS AMP...................................................................................................................................... 87
BANK: MIC.................................................................................................................................................................. 87
7. VOCAL MULTI........................................................................................................................................... 87
8. VOICE TRANSFORMER........................................................................................................................... 87
BANK: LINE ................................................................................................................................................................ 88
9. STEREO MULTI.......................................................................................................................................... 88
10. LO-FI BOX ................................................................................................................................................. 88
BANK: SIMUL............................................................................................................................................................. 88
11. VO+GT.AMP............................................................................................................................................. 88
12. VO+AC.SIM .............................................................................................................................................. 88
Insert Effect Parameter Functions..........................................................................89
Acoustic Guitar Simulator............................................................................................................................. 89
Acoustic Processor.......................................................................................................................................... 89
Bass Simulator................................................................................................................................................. 89
Chorus.............................................................................................................................................................. 89
Compressor ..................................................................................................................................................... 90
De-esser............................................................................................................................................................ 90
Defretter........................................................................................................................................................... 90
Delay................................................................................................................................................................. 90
Doubling .......................................................................................................................................................... 91
Enhancer .......................................................................................................................................................... 91
Equalizer.......................................................................................................................................................... 91
Flanger.............................................................................................................................................................. 92
Lo-Fi Box.......................................................................................................................................................... 92
Noise Suppressor............................................................................................................................................ 92
Phaser............................................................................................................................................................... 92
Pitch Shifter ..................................................................................................................................................... 93
Preamp............................................................................................................................................................. 93
Speaker Simulator .......................................................................................................................................... 94
Tremolo/Pan................................................................................................................................................... 95
Voice Transformer.......................................................................................................................................... 95
Rhythm Guide Style/Pattern List............................................................................96
Style............................................................................................................................................................................... 96
Preset Pattern............................................................................................................................................................... 97
Practical applications of the BR-532......................................................................98
Reducing card memory use when creating songs.................................................................................................. 98
When the same phrase is repeated............................................................................................................... 98
Saving patterns ............................................................................................................................................... 98
Optimizing....................................................................................................................................................... 98
Utilizing the V-Tracks................................................................................................................................................. 99
Mixing a song using four tracks down to a single track........................................................................... 99
Correcting a mistake occurring only in one portion of a recording........................................................ 99
Lengthening a portion within the song after recording is finished ...................................................... 100
9

Contents
How to use the Rhythm Guide ............................................................................................................................... 100
Changing the development of the song .................................................................................................... 100
Inserting a one-measure count to synchronize the start of the song with an external device .......... 101
Recording using an external sound source ........................................................................................................... 101
Backing up a song.................................................................................................102
Troubleshooting.....................................................................................................103
Error Messages......................................................................................................105
Parameter List........................................................................................................107
Effect Patch List.....................................................................................................110
MIDI Implementation..............................................................................................111
MIDI Implementation Chart....................................................................................115
Specifications.........................................................................................................116
Index........................................................................................................................118
Track Sheet.............................................................................................................122
10
Introduction to the BR-532
Features
Simple operation
The BR-532 is designed to be operated as easily as a cassette
tape recorder, even by beginners.
Whether you are simply preparing a demo tape, or are
getting ready to go to master with your first album, the
simple operation of the BR-532 allows you to create digital
recordings the very day you take it out of the box.
Two-way power supply allows
you to record anywhere
What are V-Tracks?
Each track consists of eight virtual tracks, and you can
choose any one of these tracks for recording or playback.
his means that you can record to up to a maximum of 32
tracks, and then select any four of them to play back.
These virtual tracks that make up the actual tracks are
called “V-Tracks.”
fig.00-01
The BR-532 can also be powered by dry-cell batteries (six AA
batteries). And, thanks to its built-in microphone, you can
make recordings anywhere and anytime you desire.
Digital audio workstation
All processes are fully digital
In addition to a digital mixer and digital recorder, the BR-532
contains two digital effects processors.
It is possible to perform all steps needed for recording,
including editing, bouncing tracks, using effects, and mixing
down, entirely within the digital realm, so there is no
deterioration in the signal quality. In addition, by connecting
digital devices like DAT recorder, MD recorder and CD
recorder, you can do recording your data with full digital
processing.
Equipped with V-Tracks
The BR-532 has four audio recording tracks, which provides
for simultaneous recording on two tracks, or simultaneous
playback from four tracks. Moreover, each track incorporates
eight virtual tracks, called “V-Tracks,” for a total recording
capability of 4 x 8 = 32 tracks! This increased versatility
allows you to do things such as record numerous takes of a
guitar solo, which you can later choose from when putting it
all together. Also, while playing back four tracks, you can
use the bounce mode to bounce to a V-Track and perform
stereo bouncing without needing to erase any data.
V-Track 1
V-Track 2
V-Track 3
V-Track 4
V-Track 5
V-Track 6
V-Track 7
V-Track 8
A “Track Sheet” is provided at the rear of this
manual (p. 122), which you can make copies of, and
fill in when recording music to V-Tracks.
Rhythm Guide function
The “Rhythm Guide function” makes it easy to capture
phrases or musical ideas that come to mind. (p. 62) Simply
select an appropriate rhythm pattern, and set the tempo. You
can create your own original patterns by combining rhythm
patterns.
By recording using the Rhythm Guide function, editing
one measure at a time is greatly simplified.
11
Introduction to the BR-532
Two versatile digital effects processors
The BR-532 contains two types of effect units. One type is for
recording (insert effect) and the other type is independent
send/return effects (loop effect). These two types can be used
simultaneously. This means that the BR-532 does not require
any external effect devices to produce a sophisticated song.
The BR-532 has many built-in simulations and effects,
including amp modeling with COSM for a wide variety of
insert effects. Many effects for vocal, keyboard, and guitar
tracks are also included for a vast array of applications.
The loop effects include spatial effects such as chorus and
reverb, which are vital for proper stereo mixdown.
By using the insert effects and loop effects together, you can
add both sound and spatial effects to your music at one time.
For a more detailed explanation of insert and loop
effects, refer to “What is an insert effect?” (p. 31) and
“What is a loop effect?” (p. 42) respectively.
What is COSM
(Composite Object Sound Modeling)?
Sound modeling refers to technology that uses the latest
DSP technologies to recreate all the “objects” that play a
role in producing sound. COSM combines truly superior
sound modeling with a wide variety of objects, thus
allowing for the creation of almost any kind of sound,
from simulations of existing musical instruments to the
creation of fantastic instruments that can exist only in the
imagination.
Quick movement to a point
You can assign a marker to any point in a track that you wish
(locator function). If you assign markers to locations such as
the end of the opening or the beginning of a solo, you will be
able to move instantly to the point where you wish to begin
listening.
Registering time (p. 49)
Equipped with chromatic tuner
(C1 to B6 sound range)
Your BR-532 is also equipped with a chromatic tuner so that
you can tune your guitar or bass while it is still connected to
the BR-532 (p. 76).
Phrase Trainer Function
When you play back a song you have recorded from the CD
player or the MD player, you can slow down the tempo
without changing the pitch. Also, you can remove the sound
you hear at the center (such as vocals and guitar solo) from
the song. (p. 78)
Full complement of connectors (jacks)
Your BR-532 is equipped with the input jacks shown below.
GUITAR/BASS:
This high-impedance input jack allows you to directly
connect your guitar or bass (accepts 1/4” phone plugs).
Editing Functions
With the BR-532, you can perform editing operations such as
copying, moving, and erasing, which cannot be done with
multitrack recorders that use tapes. This means operations
such as copying and repeating a multiple-bar phrase, moving
a multiple-bar phrase to another track, and erasing the data
of a track, whole or in part, can be performed with ease.
Non-destructive editing
Being a digital recorder, the BR-532 offers non-destructive
editing. With non-destructive editing, after performing any
editing and recording operations, you can still return your
data to its previous state (undo and redo functions).
Undoing a recording/editing operation (p. 58)
12
MIC:
These jacks allow a mic to be connected. Both standard TRS
jacks (p. 19) and XLR jacks are provided. A built-in
microphone is also included, so you can perform recordings
with the BR-532 even when you don’t have a microphone
connected.
* The built-in microphone can be turned on or off.
LINE:
These jacks accept stereo input from keyboards, CD players,
and other devices at line level (RCA phono jacks).
For output, in addition to the LINE OUT jacks (stereo RCA
phono jacks), optical DIGITAL OUT connectors are also
provided for high-quality digital recording to digital audio
recording devices (e.g., CD recorders and MD recorders).
Introduction to the BR-532
Memory cards supported by
your BR-532
The BR-532 uses SmartMedia cards as the storage media for
recording and playback.
The BR-532 uses 16 to 128 MB SmartMedia cards with a 3.3 V
power supply.
SmartMedia cards are available at your nearest
computer or digital camera shop.
* The Roland S2M/S4M-5 cannot be used.
Formatting the memory card
(SmartMedia)
SmartMedia cards bought at a computer shop, or ones
previously used with a digital camera cannot be used as is
with the BR-532.
These SmartMedia cards must first be initialized for use with
the BR-532.
For more details regarding initializing, see p. 27, 61.
* SmartMedia is a trademark of Toshiba Corporation.
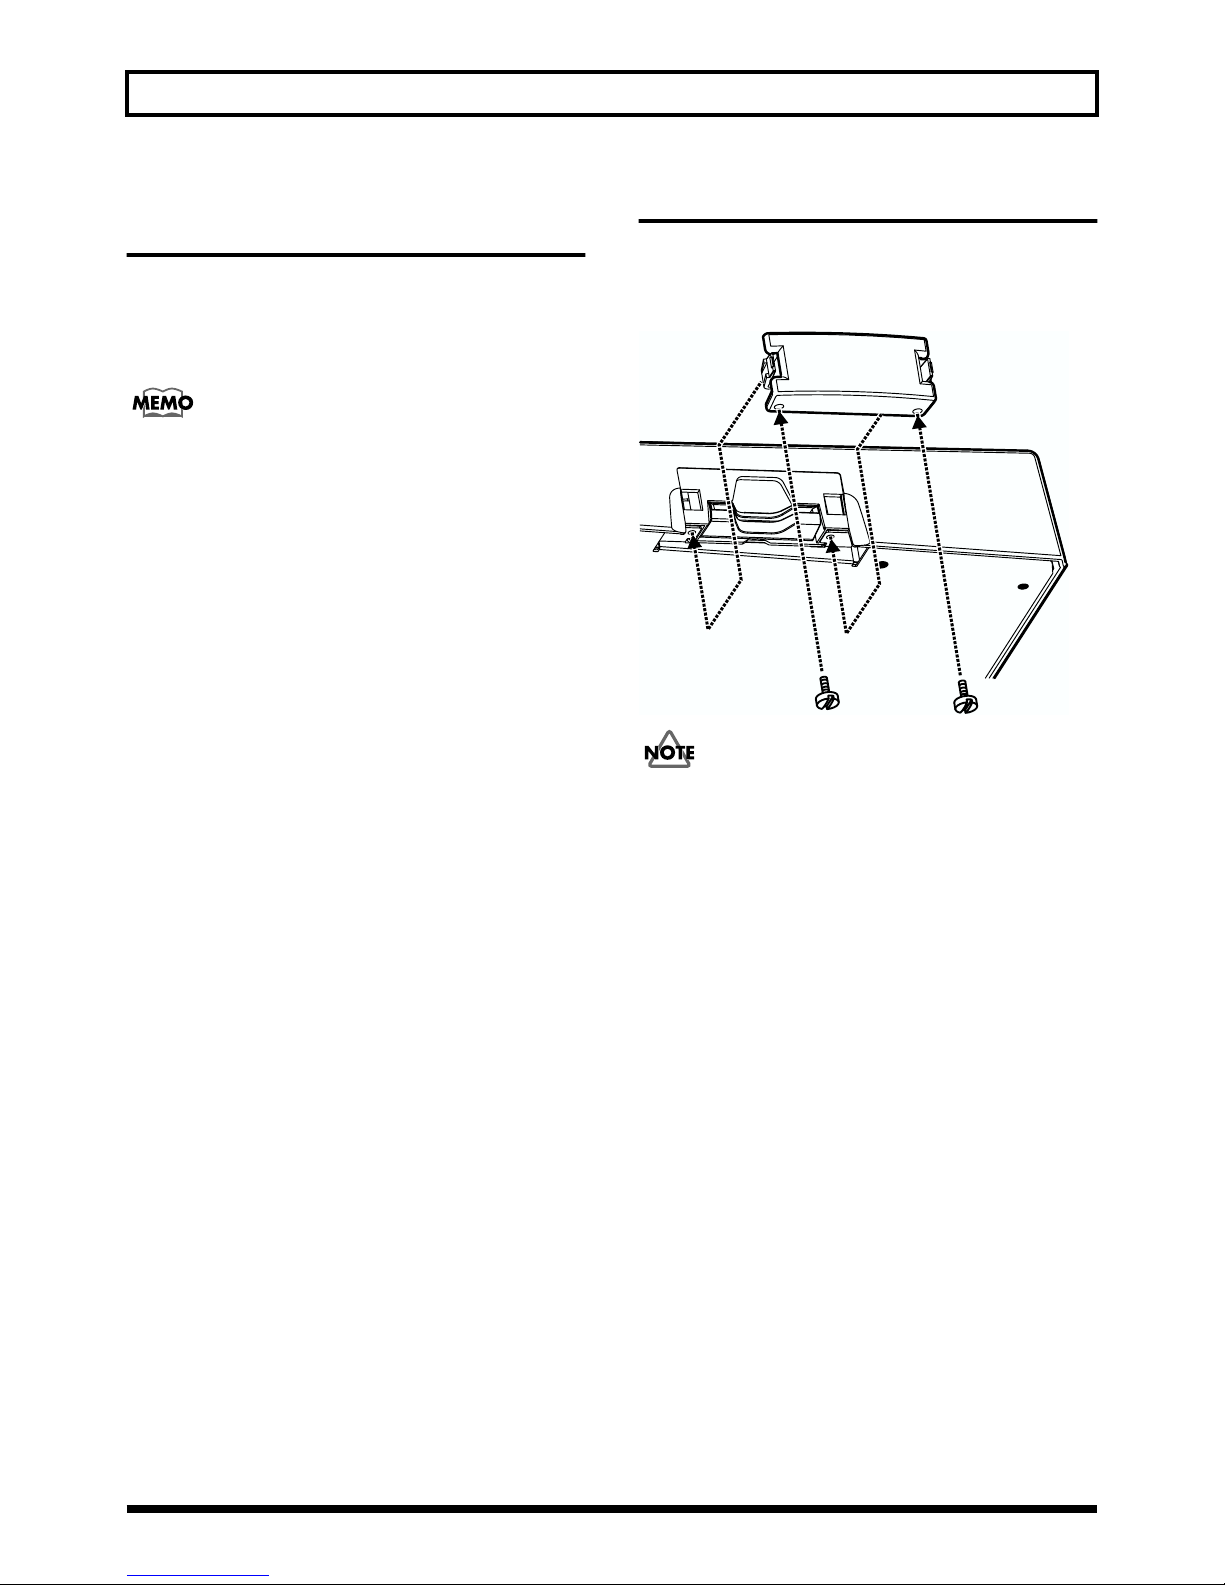
Remove the Card Cover
When removing the card cover, first remove the two screws
that hold the card cover on the bottom of the unit using a
coin or screwdriver.
fig.00-10
Should you remove the screws, make sure to put them in
a safe place out of children’s reach, so there is no chance
of them being swallowed accidentally.
13
Panel Descriptions
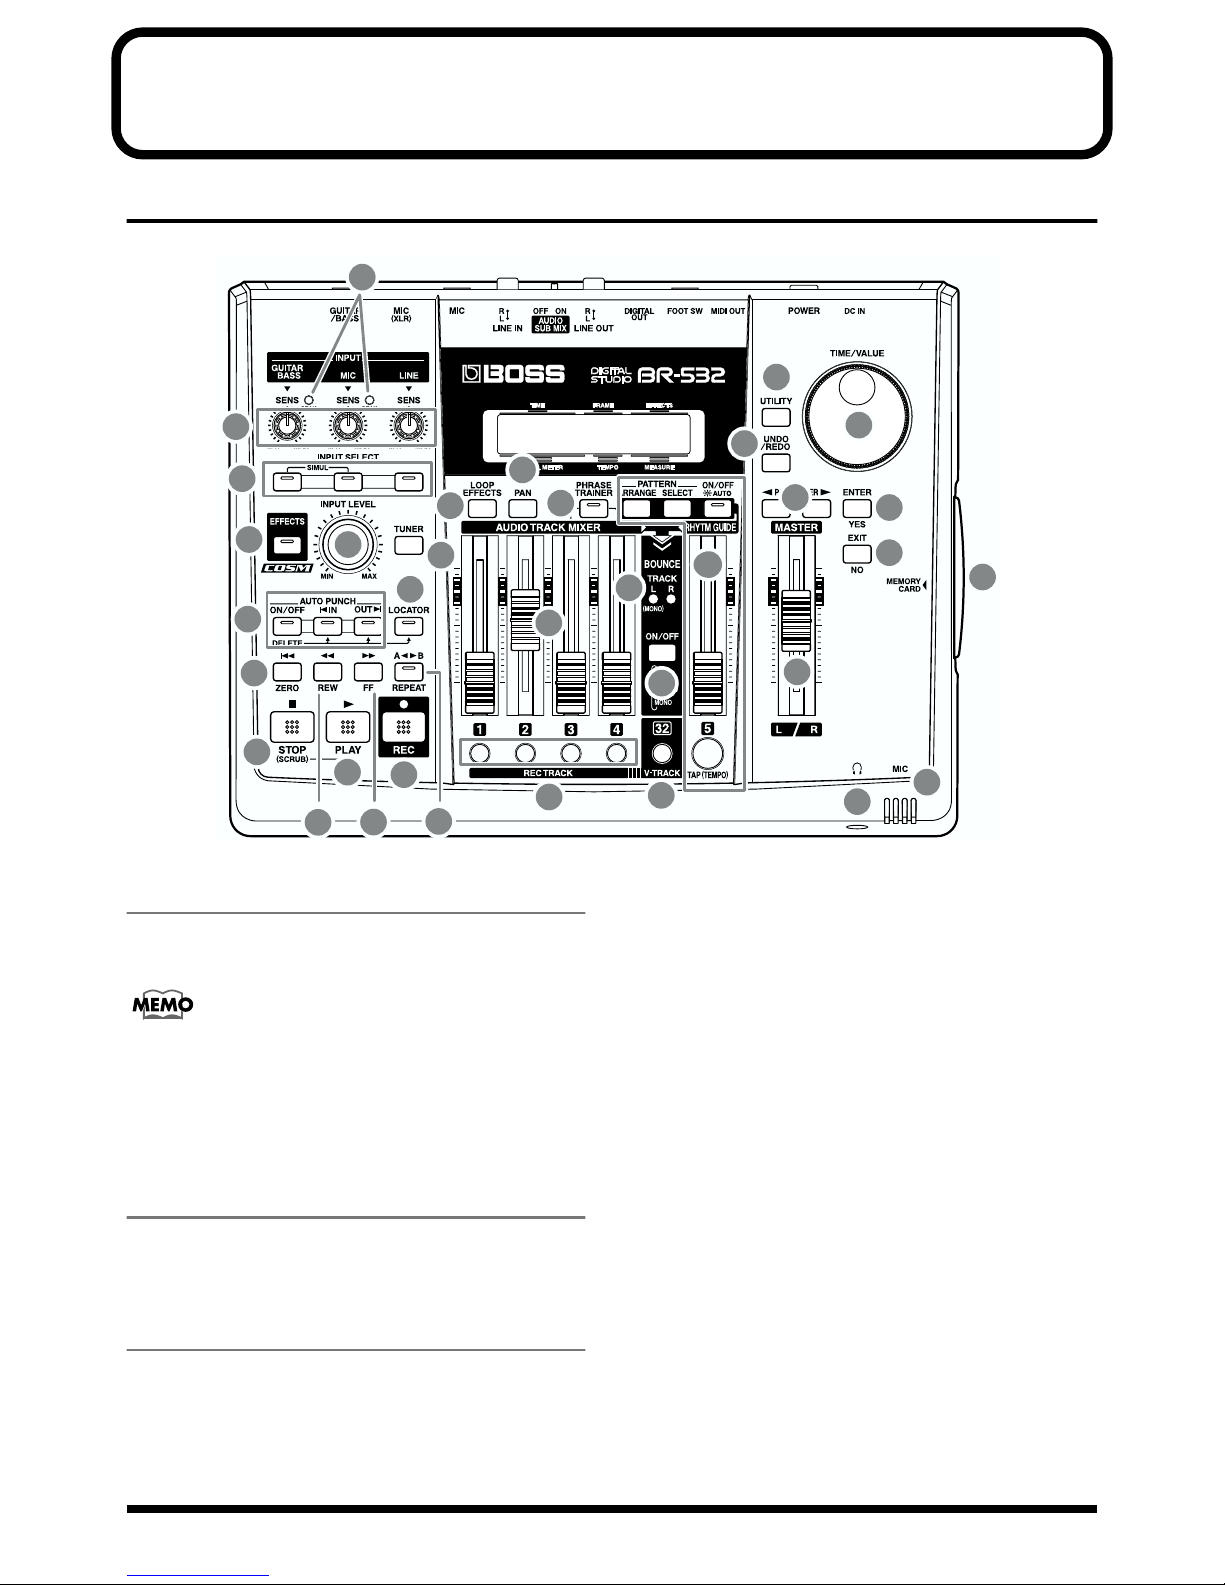
Front Panel
fig.00-02
1
26
2
3
20
4
5
6
21
22
8
7
16
9
13
14
15
18
10
11
12
1 PEAK (clip) indicator
This indicator shows how strong the input level is at the
various input jacks (e.g., GUITAR/BASS and MIC).
This indicator lights at a level -6 dB lower than where
sound distortion occurs. Adjust the input sensitivity
with the SENS knob so that this indicator lights only
occasionally, at those moments when you play your
guitar (or other instrument) at its loudest.
2 SENS knob
Use this knob to adjust the sensitivity at the input jacks (e.g.,
GUITAR/BASS, MIC, and LINE).
3 INPUT SELECT buttons
27
28
29
25
24
23
17
19
GUITAR/BASS:
For selecting either guitar or bass use of the GUITAR/
BASS jack.
MIC:
For selecting either the MIC jack when a microphone is
connected, or the internal microphone.
* You can turn on and off the internal microphone. (p. 30)
LINE:
For selecting the LINE jack (stereo) for the line inputs,
such as keyboards or CD players.
SIMUL:
By pressing the GUITAR/BASS and MIC buttons
simultaneously, you can record from both inputs at the
same time.
* If the INPUT SELECT setting is changed, the insert effect
bank (p. 31) changes automatically.(p. 79)
30
31
34
33
32
Use these buttons to select the input source (input jack) that
you wish to record. The indicator of the selected button will
light. You can mute (silence) the input sound by pressing a
button that is lit.
14

Panel Descriptions
4 EFFECTS button
Use this button to turn on and off the insert effects (p. 31) or
call up the screen for editing the various settings.
5 INPUT LEVEL knob
Use this knob to adjust the volume of the input source for
recording.
* If you use the INPUT LEVEL knob to turn down the volume
of the input source during recording, the sound will be
recorded in the audio track at a low volume, so that noise will
be more apparent when you raise the volume of the audio track
for playback. If you want to lower the volume of the input
source that you are monitoring during recording, lower the
volume with the MASTER fader.
6 TUNER button
Use this button to turn on and off the tuner (p. 76).
7 AUTO PUNCH
8 LOCATOR button
Use this button to store any location that you desire. Then, by
pressing this button, you can automatically move to that
stored location.
When a location is set, the indicator on this button will light
and you will jump to the location each time this button is
pressed.
* Press this button while holding down the AUTO PUNCH
ON/OFF button to clear the set location.
9 ZERO button
Press to jump to the beginning of the track.
10 REW button
The song will rewind while you hold down the button.
11 FF button
The song will fast-forward while you hold down the button.
This button is used to make settings for the automatic punch
in/out function.
ON/OFF button:
This turns the auto punch-in/out function on/off. When
this is on, the button indicator will light.
IN button:
For setting the auto punch-in location. Press this button
to set the punch-in point. When set, the indicator on this
button will light. After the punch-in location is set, you
can press this button to automatically jump to the punchin location.
* Press this button while holding down the ON/OFF button to
clear the set punch-in location.
OUT button:
For setting the auto punch-out location. Press this button
to set the punch-out location at the current location in the
track. When set, the indicator on this button will light.
After the punch-out location is set, you can press this
button to automatically jump to the punch-out location.
* Press this button while holding down the ON/OFF button to
clear the set punch-out location.
12 REPEAT button
You can specify a region that you wish to hear, and hear it
repeatedly. (p. 38)
This feature is useful if you want to repeatedly play back
the recording between the punch-in and out locations (p.
45) until you are satisfied or use the phrase trainer (p. 78)
to try to copy a difficult phrase recorded from a CD or
the like.
13 STOP button
Stops recording or playback of the song.
14 PLAY button
Plays back songs. When [REC] is pressed and the REC
indicator is flashing, press [PLAY] to start recording. During
recording or playback, the indicator on the button lights in
green.
15
Panel Descriptions
15 REC (Recording) button
This is the Record button. In addition to the Recording
operation, it is also used for manual punch-in/out. While in
recording standby, the indicator on this button flashes in red,
and during recording, it lights in red.
16 AUDIO TRACK MIXER fader 1–4
For controlling the volumes of each track during playback.
* Hereafter, the AUDIO TRACK MIXER faders shall be
referred to as the “TRACK faders.”
17 MASTER fader
Controls the overall volume of the BR-532.
18 REC TRACK (Recording Track)
button 1–4
Use these buttons to select to which track you will record.
The button of the track selected will flash in red and then
light in red when recording begins. When recording is
finished, the button of the selected track will light alternately
in orange and green.
The relationship between the indicator and the track
conditions is given below.
Off:
This track contains no recorded data.
Green:
An audio track that contains recorded data.
Flashing in red:
The track is selected as the recording destination, and is
in recording standby.
Red:
This track currently being recorded.
Lighting alternately in orange and green:
This track contains recorded data and is selected for
recording.
20 LOOP EFFECTS button
Use this button to call up the screen for setting the send level
of each track respective to the loop effects (p. 42), switching
between reverb and chorus, setting the various parameters,
and more (p. 82).
Loop Effect Parameter Functions (p. 85)
21 PAN button
Pressed to access a screen where you can set the pan (left/
right location of the sound) for the playback of each track or
for the input sound (p. 42).
22 PHRASE TRAINER button
Use this button to perform the settings for the phrase trainer
function.
When using the phrase trainer, you can turn on or off the
center cancel function (for removing vocals at the center), or
the time stretch function (for slowing down playback).
Canceling the center sound (p. 78)
Slowing down the speed (p. 78)
23 BOUNCE ON/OFF button
Use this button to mix the recordings on several tracks
together onto one or two other tracks.
24 BOUNCE MODE Indicator
Indicates the recording track at the bounce destination. The
relevant indicator lights depending on whether the track
being recorded is stereo or monaural.
19 V-TRACK button
Use this button to call up the screen for selecting a V-Track.
What are V-Tracks? (p. 11)
Utilizing the V-Tracks (p. 99)
16
Panel Descriptions
25 RHYTHM GUIDE
Here you can make settings for the Rhythm Guide function.
(p. 62)
RHYTHM GUIDE fader:
Adjusts the Volume of the Rhythm Guide
AUTO/ON/OFF button:
Pressed to cycle the Rhythm Guide function through the
available selections: Auto → On → Off.
PATTERN SELECT button:
Use this button to call up the screen for selecting the
rhythm.
PATTERN ARRANGE button :
Use this button to call up the screen for setting the
rhythm order and tempo.
TAP (TEMPO) button:
By tapping this button, you can set the tempo for the
rhythm guide.
26 UTILITY button
This button calls up various functions offered by your BR532, such as track editing, song management, and memory
card operations.
28 TIME/VALUE dial
You can use this dial to shift the current position within a
song (e.g., fast forwarding and rewinding). It is also used to
change the values of the various function settings.
29 PARAMETER button
Press this button to select a parameter.
30 ENTER/YES button
Press this button to confirm a selection or a value being
entered.
31 EXIT/NO button
Press this button to return to the previous screen or cancel
the last entry.
32 Headphones jack ( )
Headphones (sold separately) are connected here. When
headphones are connected, the same output as that from
LINE OUT can be heard from the headphones.
27 UNDO/REDO button
For undoing the last-performed recording or editing
operation and returning the data to its previous state. By
pressing this button once again, you can bring back the
canceled recording or re-execute the editing operation. (p. 58)
fig.00-03
34
33 MIC (Internal microphone)
This microphone can be used for recording with the BR-532.
Turning off the internal microphone (p. 30)
Changing the INPUT SELECT setting (p. 29)
34 MEMORY CARD slot
This slot is where a memory card (SmartMedia) needs to be
inserted in order to store the data you record. If a memory
card is not inserted, you cannot perform recording.
17
Panel Descriptions
Display
fig.00-04
1 2 3
4 5 6
Displays the menu screen, parameter setting screen, or other information,
depending on the type of settings being made.
If the screen is difficult to view, see “Adjusting the Display Contrast” (p. 24).
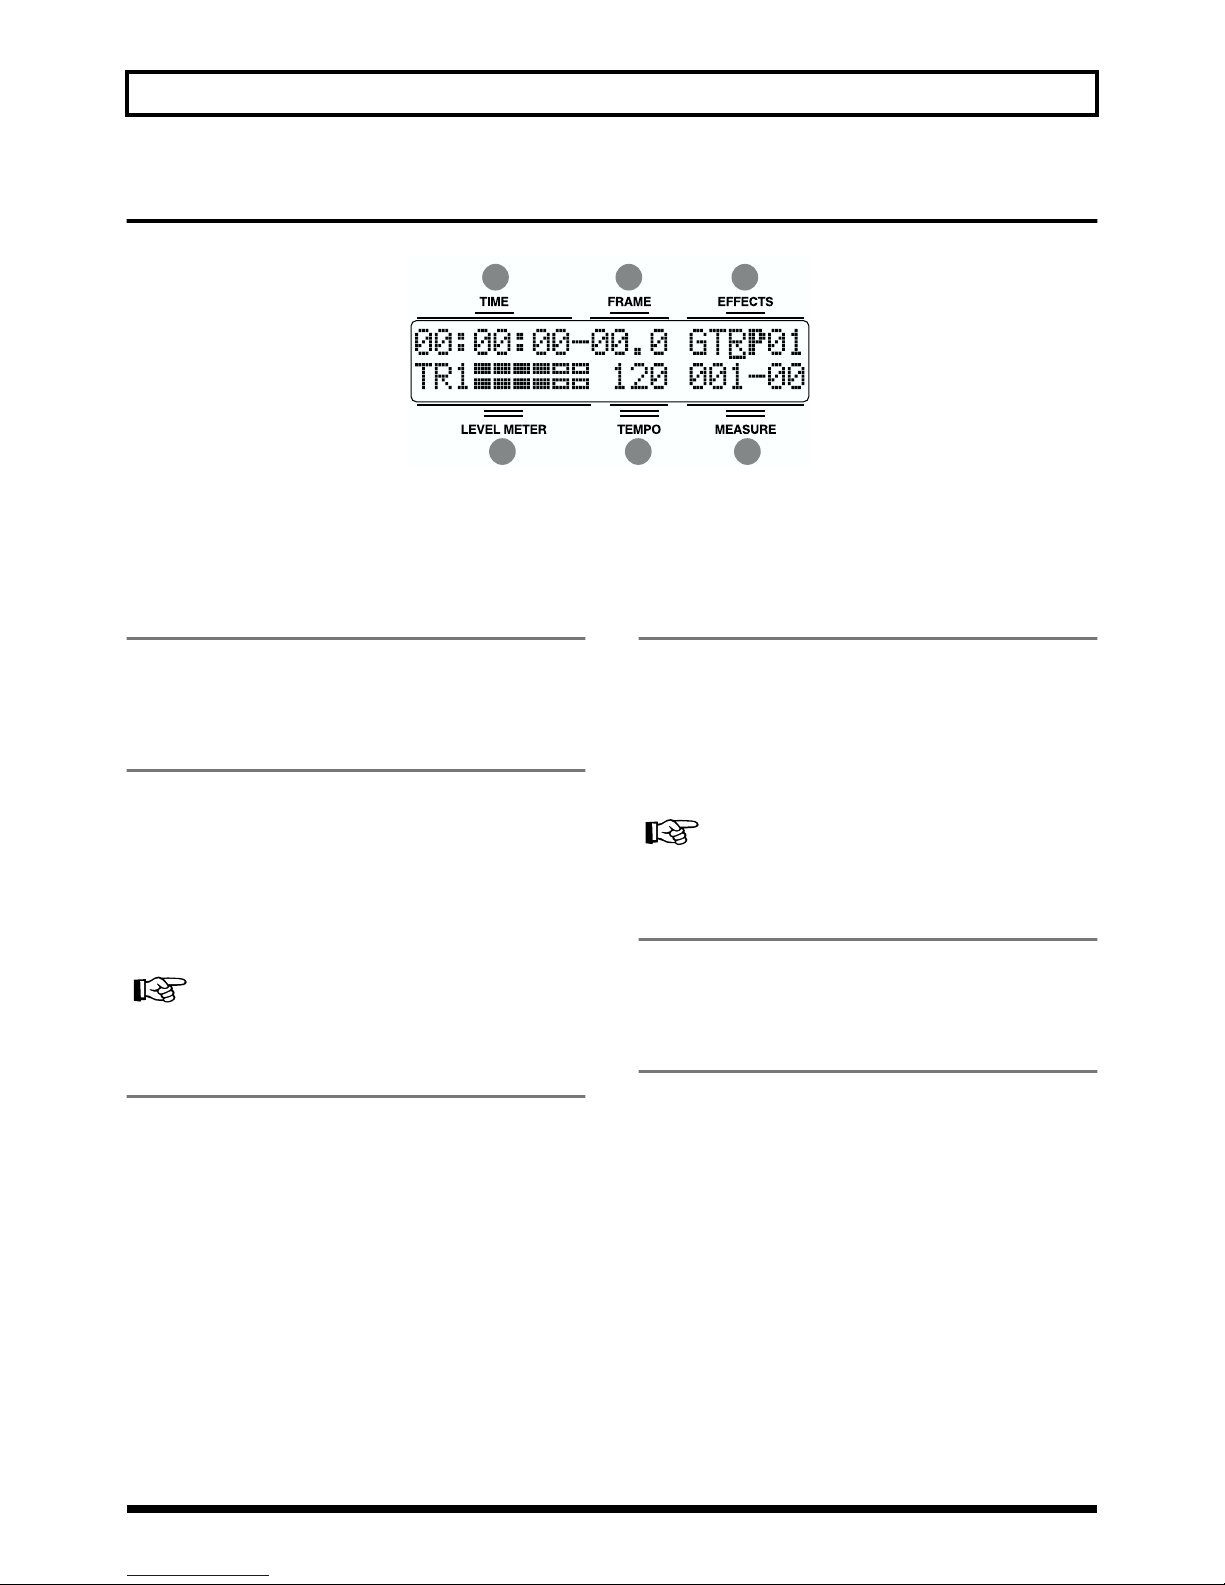
1 TIME
Displays the time of the current position of the song (hoursminutes-seconds).
2 FRAME
Displays the frame number of the current position of the
song.
At the factory settings, one second is set to 30 frames (nondrop).This is one type of a specification known as MTC
(MIDI Time Code), and when you use the BR-532 to play in
synchronization with another MIDI device, you will need to
set both devices to the same MTC type.
Synchronizing playback with a MIDI sequencer (p. 69)
3 EFFECTS
Displays the effect bank and patch number.
4 LEVEL METER
During play mode, the volume levels of instruments being
input, and volume levels of each track are displayed.
The levels displayed are the levels after the adjustments are
made with the INPUT LEVEL knob and TRACK fader (i.e.,
post fader). You can select the level meter to display each
type of level being set.
Select the level meter to be displayed (p. 30)
5 TEMPO
Displays the tempo. Displays the tempo of the tempo map
during playback that uses a tempo map.
6 MEASURE
Displays the measure number and beat of the current
position within the song. The left number is the measure
number, and the right number is the beat.
18

Rear Panel
fig.00-05
Panel Descriptions
5
11
10
68 79
1 GUITAR/BASS jack
High-impedance input jack to directly connect your guitar or
bass.
2 MIC jack (TRS/XLR types)
These jacks allow a mic to be connected.Both standard TRS
jacks (p. 23) and XLR jacks are provided.
* If microphones are connected to both jacks, the TRS jack is
given priority.
3 LINE IN jack
These are input jacks for analog audio signals.These jacks are
used to connect CD players and other audio devices and
keyboards, rhythm machines, and other external sound
sources.
4 AUDIO SUB MIX switch
Turn this switch on to mix the signal input from LINE IN
with the output to LINE OUT.
With INPUT SELECT set to a setting other than LINE, and
AUDIO SUB MIX turned on, the signal is mixed and output
to LINE OUT.
* Only the analog signal is mixed, so the DIGITAL OUT signal
will not be affected.
12
234
1
6 DIGITAL OUT connector
Optical connector for outputting digital audio signals. The
same sound that is output from LINE OUT is also output
from DIGITAL OUT, so you can digitally record the output
from the BR-532 to DAT recorders, CD recorders, and other
digital recording devices.
7 FOOT SW (Foot Switch) jack
This is an input jack for connecting a separately sold foot
switch (BOSS FS-5U, Roland DP-2). By using this FOOT SW
jack, you can start/stop playback, punch in/out, and more.
In order to use a foot switch (p. 46)
8 MIDI OUT connector
Connector for sending MIDI data.Connect it to the MIDI IN
connector of an external MIDI device (rhythm machine or
sound module).
9 POWER switch
This is the power switch. It turns the power of the BR-532
on/off.
10 DC IN (AC Adaptor) jack
5 LINE OUT jack
These are output jacks for the analog audio signal. You can
connect MD recorders, tape recorders, or other recording
devices to record the output analog signal from the BR-532.
Connect the AC adaptor (PSA-series; optional) to this jack.
You must use only the PSA-series AC adaptor. Use of
any other adaptor may cause overheating or
malfunctions.
19
Panel Descriptions
11 Cord Hook
Wrap the cable around this hook so that the AC adaptor
cable is not pulled out accidentally.
If the AC adaptor is disconnected during operation, your
important recorded data may be lost.
12 Security Slot ( )
http://www.kensington.com/
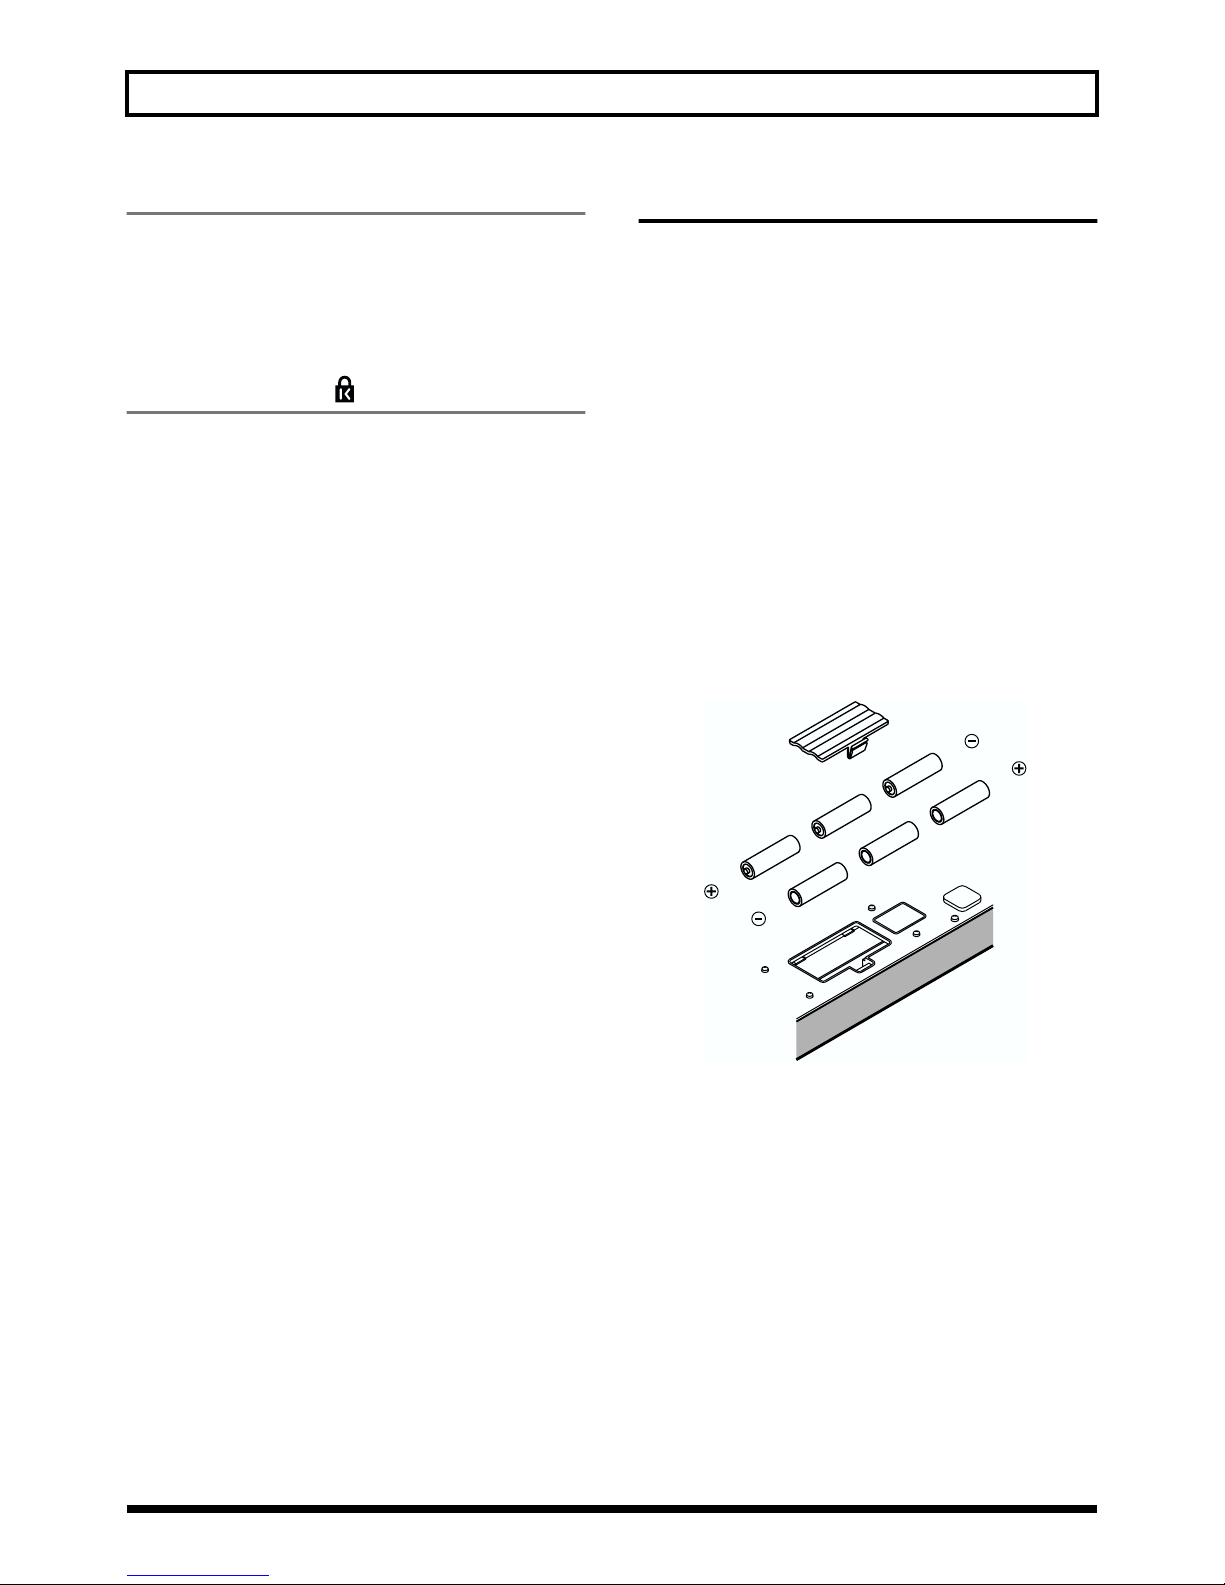
Inserting batteries
1. Make sure that the power of the BR-532 is turned off.
2. Remove the battery cover on the rear panel.
* When turning the unit upside-down, get a bunch of
newspapers or magazines, and place them under the four
corners or at both ends to prevent damage to the buttons and
controls. Also, you should try to orient the unit so no buttons
or controls get damaged.
* When turning the unit upside-down, handle with care to avoid
dropping it, or allowing it to fall or tip over.
3. Being careful not to reverse the polarity (+/-), insert six
AA dry-cell batteries into the battery compartment.
* Roland recommends using longer-life alkaline batteries.
* Do not mix new batteries with partially used batteries, and do
not mix batteries of differing types.
4. Close the battery cover.
fig.00-06
20
When the battery power becomes low, “Battery Low”
appears in the display. When this message appears, replace
the existing batteries with new ones as soon as possible.

Quick
Start
21
Listening to the Demo Song
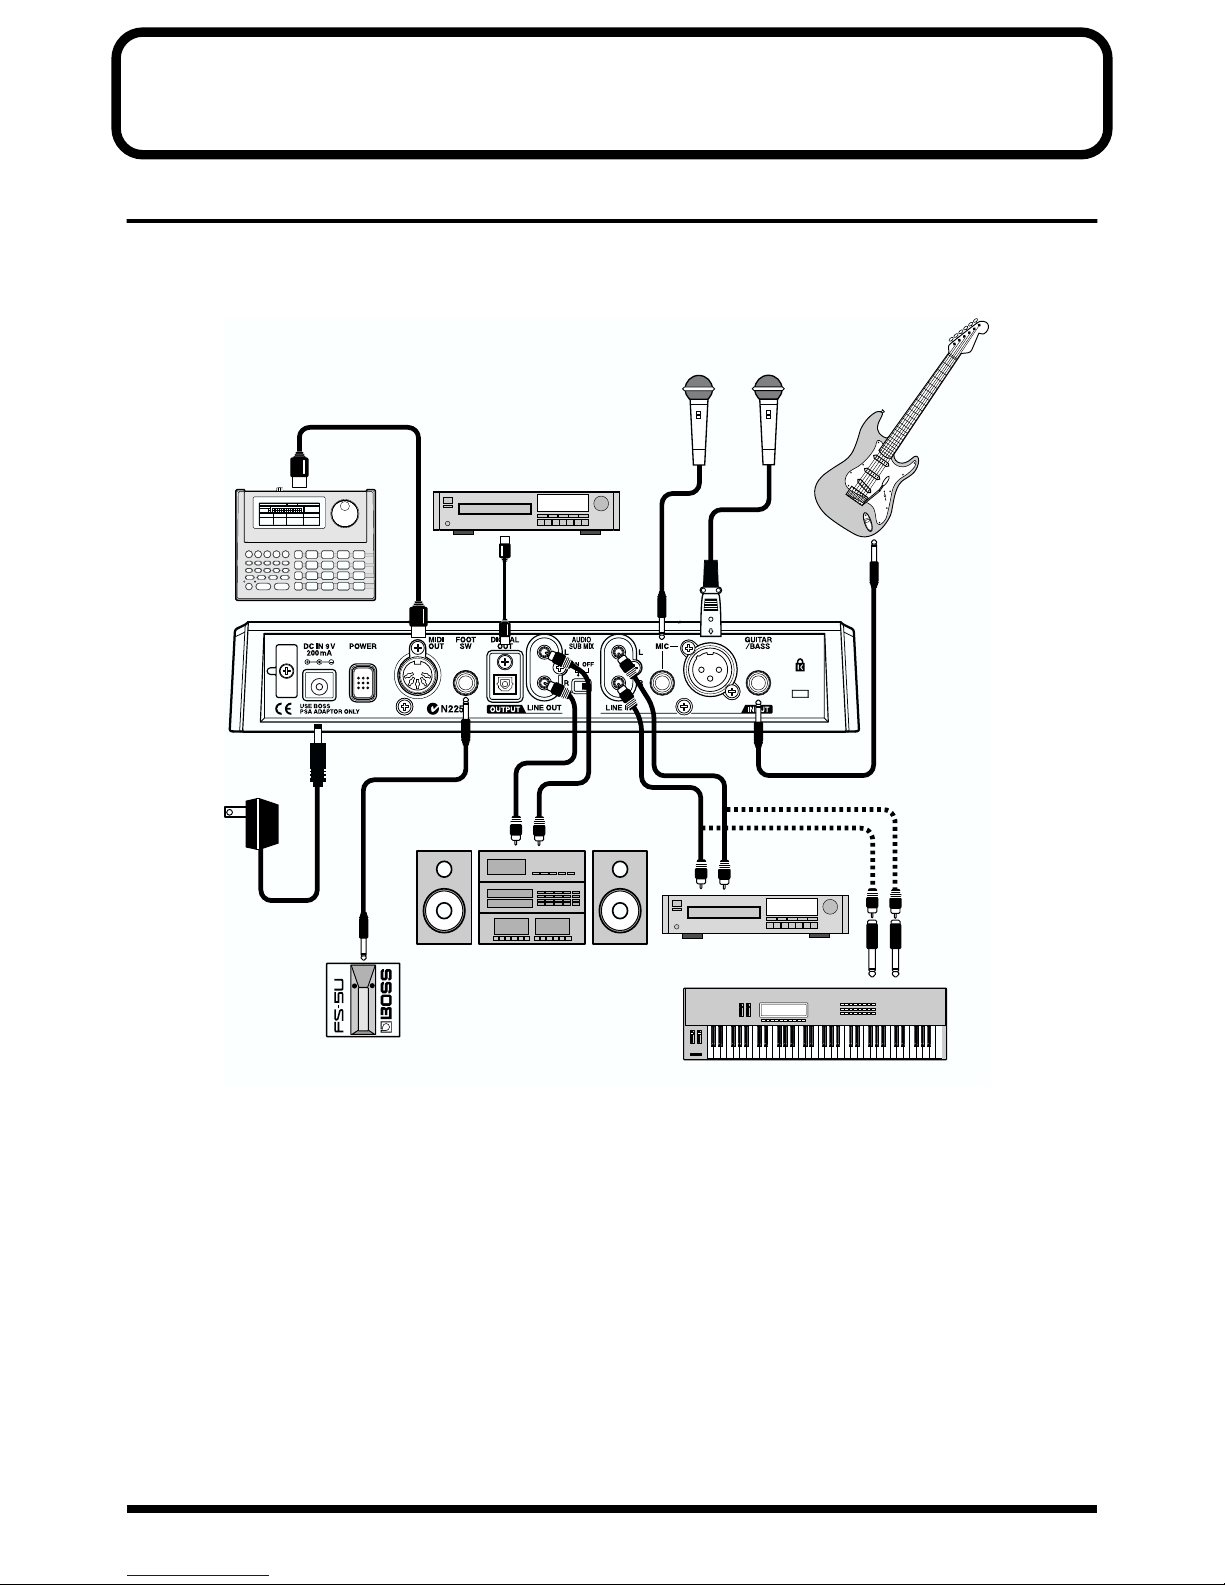
(1) Connecting peripheral devices
Make connections as shown in the diagram below. When making any connections, make sure that all devices are turned off.
fig.Q01-01
Electric Guitar
Mic
Rhythm Machine etc.
CD Recorder etc.
or
Electric Bass
AC Adaptor
(PSA-series)
Foot Switch
(FS-5U etc.)
Audio Set etc.
CD Player etc.
Keyboard etc.
22
To prevent malfunction and/or damage to speakers or
other devices, always turn down the volume, and turn
off the power on all devices before making any
connections.
● To prevent the inadvertent disruption of power to your
unit (should the plug be pulled out accidentally), and to
avoid applying undue stress to the AC adaptor jack,
anchor the power cord using the cord hook, as shown in
the illustration.
fig.Q01-02
● Feedback could be produced depending on the location of
microphones relative to speakers. This can be remedied by:
1. Changing the orientation of the microphone(s).
2.
Relocating microphone(s) at a greater distance from speakers.
3. Lower the volume
* The MIC jack supports the balanced input used with standard
TRS plugs. The pin assignment for the MIC jack is as shown
below. Before making any connections, make sure that this pin
assignment is compatible with that of all your other devices.
fig.Q01-03
Listening to the Demo Song
* When using the FS-5U foot switch (sold separately), set the
polarity switch as shown below. If the polarity switch is not set
correctly, the foot switch may not operate properly.
fig.Q01-04a
Polarity Switch
● Insert the memory card with the gold-colored contacts
facing downward (the side without contacts should be
facing upward).
* Be sure to insert the memory card all the way into the slot.
* Do not touch the contacts of the memory card or allow them to
become dirty.
fig.Q01-04b
Quick Start (Listening to the Demo Song)
The surface without
gold contacts
must be upward
12
3
23
Listening to the Demo Song
(2) Turn on the BR-532
Once the connections have been completed, turn on power to
your various devices in the order specified. By turning on
devices in the wrong order, you risk causing malfunction
and/or damage to speakers and other devices.
1. Before you turn the power on, make sure of the
following points.
❐ Are all external devices connected properly?
❐ Is the volume on the BR-532 and all other devices
completely lowered?
❐ Is the memory card inserted?
* The BR-532 is shipped with a memory card already inserted in
the slot.
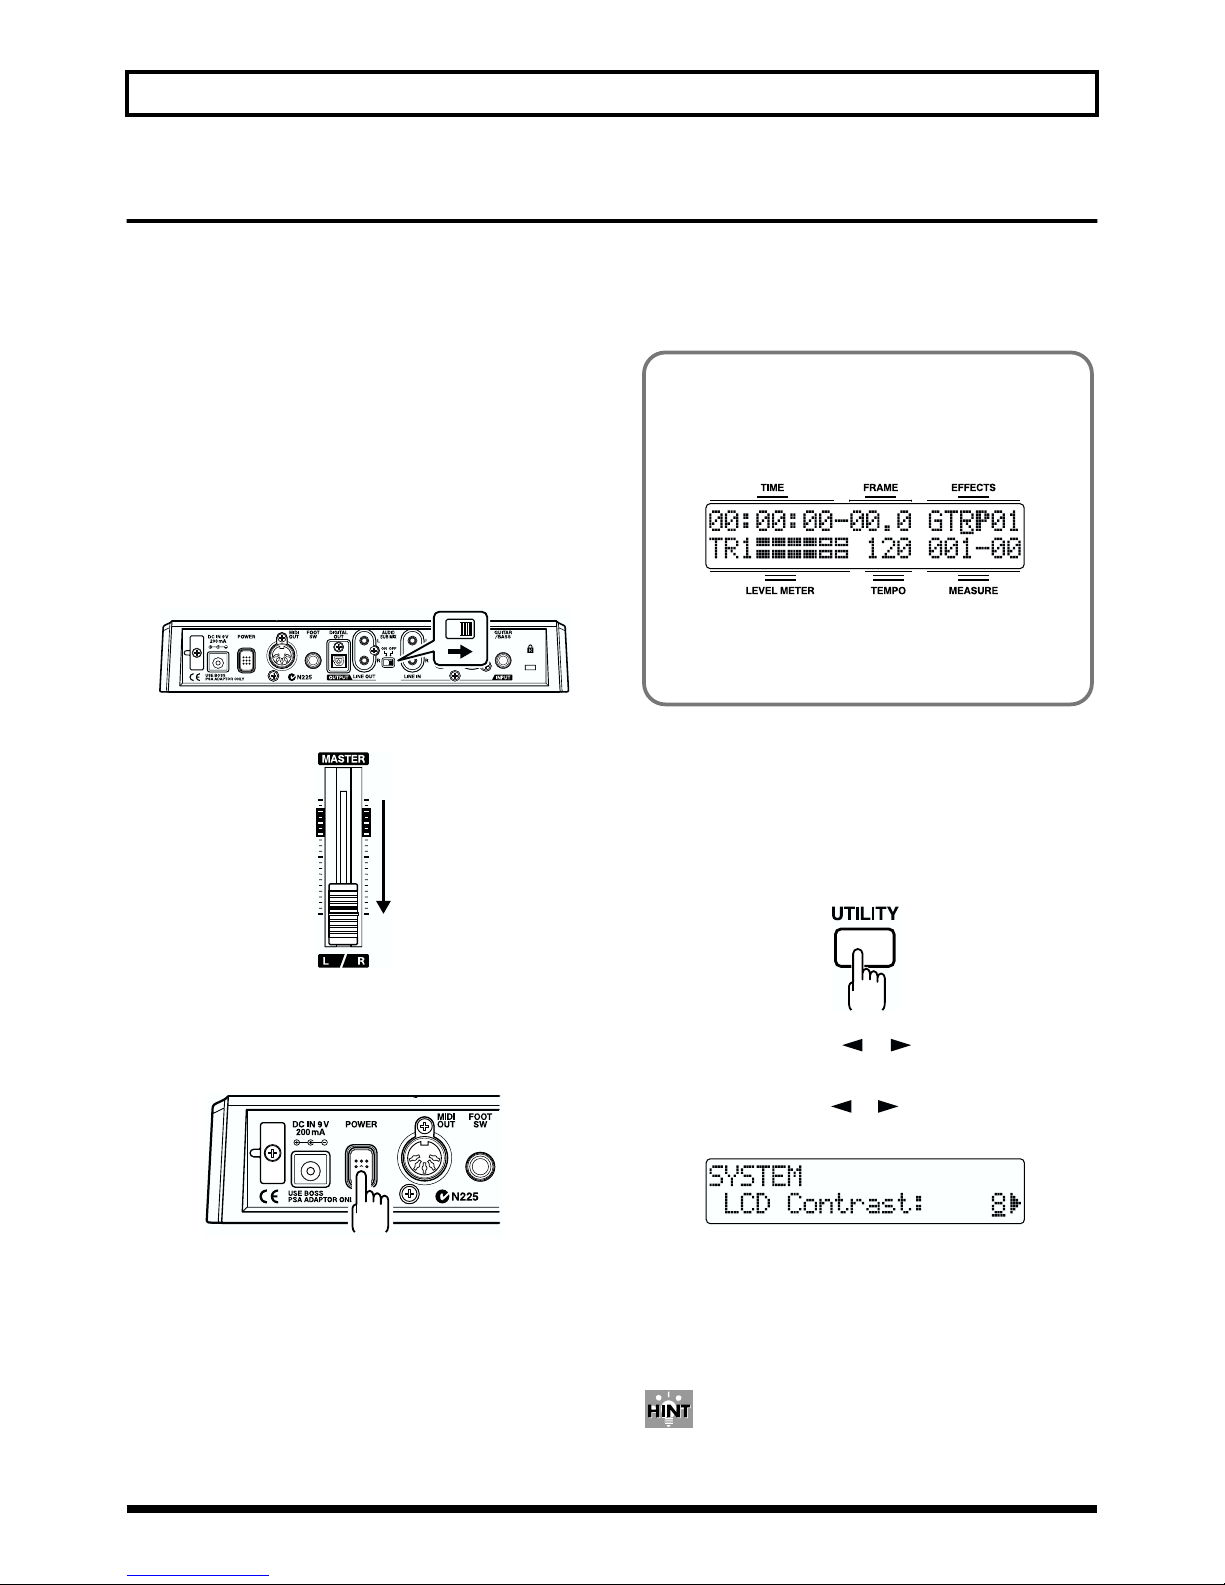
2. Turn off the AUDIO SUB MIX switch on the rear panel.
fig.Q01-05a
3. Lower the MASTER fader on the BR-532.
fig.Q01-05b
If you are using the AC adaptor, make sure that the AC
adaptor does not become unplugged during operation. If
the AC adaptor becomes unplugged accidentally, the
recorded data may become damaged.
Play Screen
The Play screen is the most fundamental screen of the
BR-532, and is the first screen that appears when the BR532 is turned on (see below).
fig.Q01-06b
* You can set the BR-532 so that the remaining recording
time is displayed during recording. Refer to “Displaying
the remaining available recording time” (p. 73).
Adjusting the Display Contrast
Depending on where the BR-532 is situated, the display
contents may be difficult to read. If this is the case, perform
the procedure given below to adjust the contrast (1 to 15).
4. Turn on the device connected to an input jack (i.e.,
GUITAR/BASS, MIC, or LINE IN).
5. Turn on the POWER switch located on the rear panel.
fig.Q01-06a
* Always make sure to have the volume level turned down before
switching on power. Even with the volume all the way down,
you may still hear some sound when the power is switched on,
but this is normal, and does not indicate a malfunction.
* This unit is equipped with a protection circuit. A brief interval
(a few seconds) after power up is required before the unit will
operate normally.
6. Turn on the device connected to the output jack (i.e.,
LINE OUT or DIGITAL OUT).
1. Press [UTILITY].
fig.Q01-08
2. Press PARAMETER [ ] [ ] to move the cursor to
“SYS,” and press [ENTER].
3. Press PARAMETER [ ] [ ] to select “LCD Contrast,”
and adjust the contrast with the TIME/VALUE dial.
fig.Q01-50
4. After completing the adjustment, press [EXIT]
repeatedly to return to the Play screen.
* During automatic updating, “Keep Power On!” appears in the
upper line of the display, while the lower line shows what is
being processed.
You can turn the TIME/VALUE dial while pressing [UTILITY]
to adjust the contrast. Use each procedure as appropriate.
24
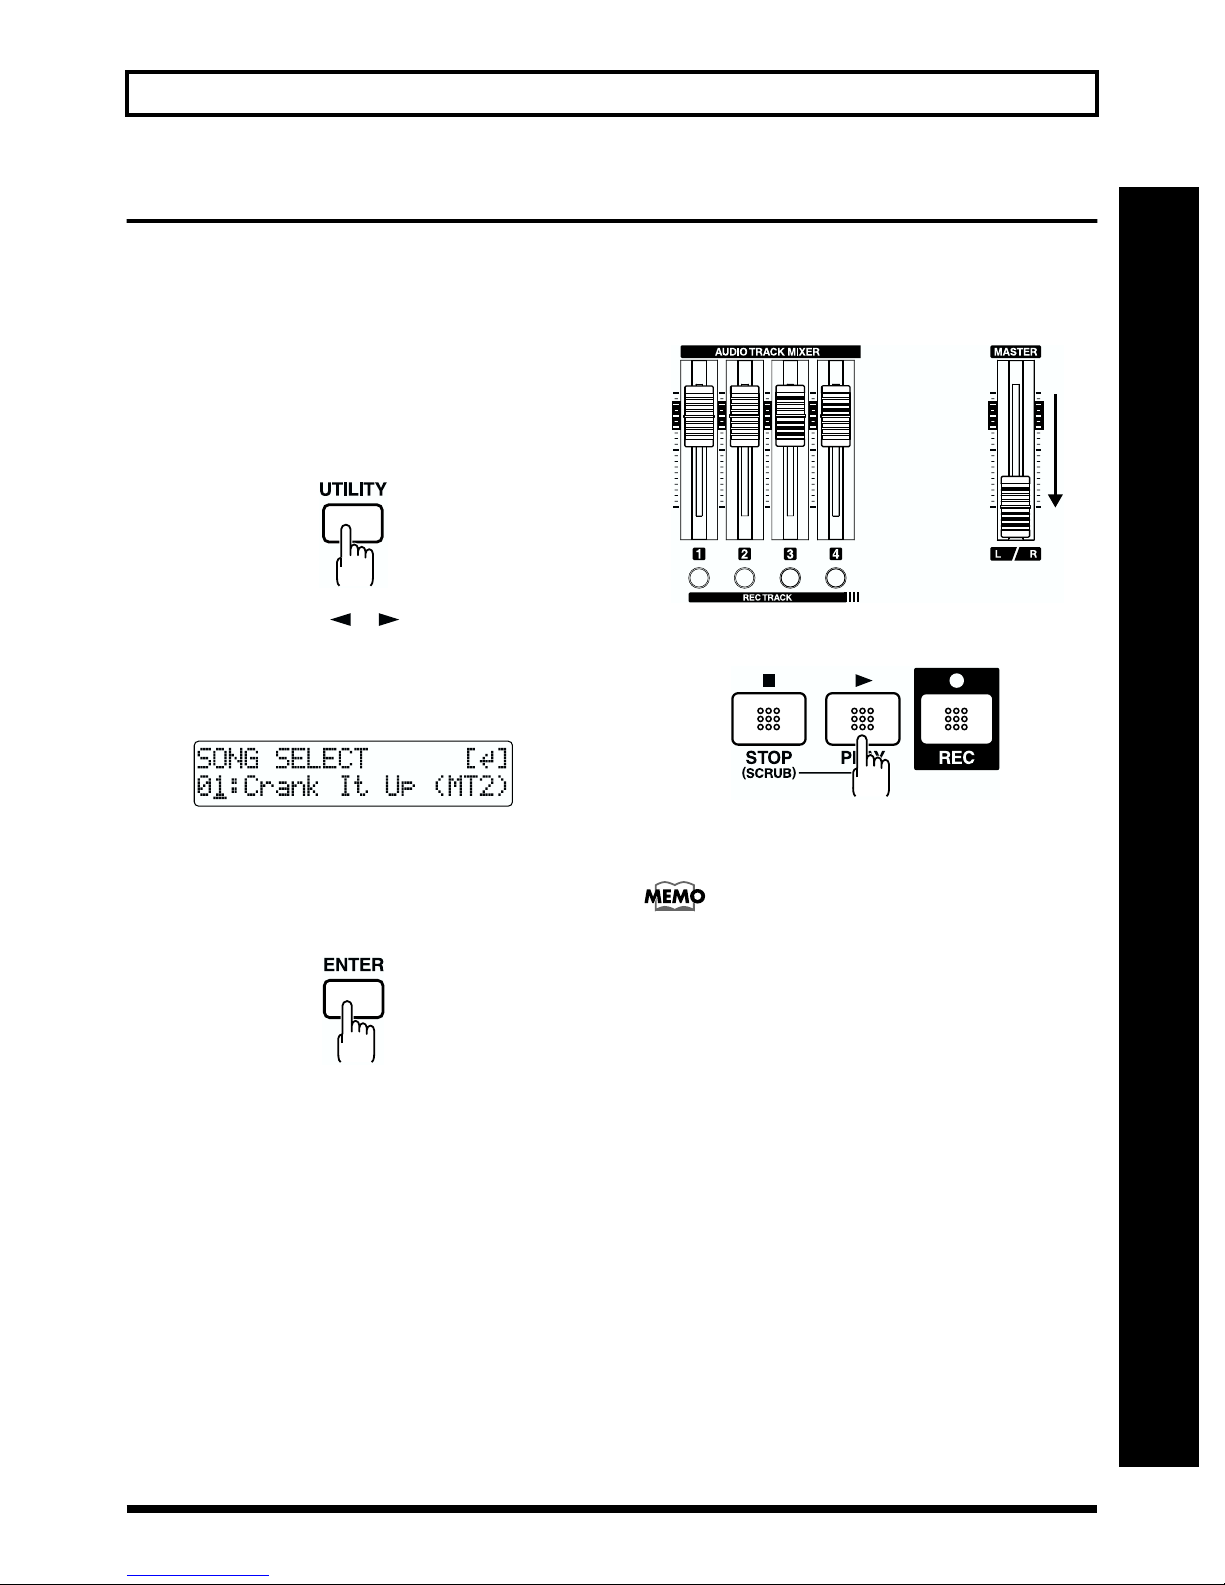
(3) Listening to the demo songs
Listening to the Demo Song
Selecting a song
Upon power-up, the song that was selected before the power
was turned off is selected, and the data of that song is loaded.
As soon as the data has been loaded, the Play page appears
in the display.
To change to a different song, follow the procedure given
below.
1. Press [UTILITY].
fig.Q01-08
2. Press PARAMETER [ ] [ ] to move the cursor to
“SEL,” and press [ENTER].
The Song Select screen appears.
3. Turn the TIME/VALUE dial to select “01:Crank It Up.”
fig.Q01-09
“Crank It Up”
Composed and produced by Gundy Keller
Copyright © 2001 A-TOWN recordings
Playing Back a Song
1. Move the TRACK faders 1 to 4 to the positions shown
below and lower the MASTER fader.
fig.Q01-13
2. Press [PLAY].
fig.Q01-14
The song starts. Slowly increase the MASTER fader and
adjust the volume to the desired level.
Quick Start (Listening to the Demo Song)
4. Press [ENTER].
fig.Q01-12
■ If you have changed the recording or editing
Since the BR-532 automatically updates the recorded
data and operation content if the recording or editing
have been changed, you do not need to perform any
special operations for saving.
During automatic updating, “Keep Power On!” appears
in the upper line of the display, while the lower line
shows what is being processed.
* If the write-protect sticker is affixed to the memory card (p. 61),
you won’t be able to record data onto it, nor will you be able to
edit any of the data on it. If you try to record or edit data using
a protected memory card, “Protected!” appears.
By adjusting the TRACK faders, you can listen to the
individual sounds recorded to each track one at a time or
listen to them at the balance you desire.
Press [FF] to fast-forward the song and press [REW] to
rewind the song. Press [ZERO] to return to the beginning
of the song.
In addition to the procedures given above, you can also change
your current position in the song using the procedures given
below.
25

Listening to the Demo Song
Changing the current position
Elapsed time display
The value given at “TIME” in the display shows the elapsed
time into the song using MTC (MIDI time codes) and is
expressed as follows: hours-minutes-seconds-frames-sub
frames.
The time code specifications can differ depending on the
device. To synchronize operation with another device using
MTC, you will first need to match the time code
specifications of both devices. At the factory settings, one
second is set to 30 frames (non-drop) (p. 70).
Moving to the start of a play
To move to the time where the first sound of a song is
recorded, press and hold [STOP] and press [REW].
Each V-Track of the selected track is checked and you move
to the time of the first recorded sound for the song.
Press [ZERO] to jump to the beginning of the song.
Moving to the end of a play
To move to the time where the last sound of a song is
recorded, press and hold [STOP] and press [FF].
Each V-Track of the selected track is checked and you move
to the time of the last recorded sound for the song.
Moving through a song using hours,
minutes, seconds, frames, or sub frames
Press PARAMETER [ ] [ ] to move the cursor to hours,
minutes, seconds, frames, or sub-frames display, and turn the
TIME/VALUE dial to change the current time in the song.
Moving through a song in measures or
beats
The current position’s measure number and beat number are
displayed at the location labeled “MEASURE” in the display.
* For the demo songs, a pattern (p. 62) has already been created
(SNG) and it is set so that measure numbers, beat numbers,
and pattern are properly synchronized.
Press PARAMETER [ ] [ ] to move the cursor to
MEASURE display, and turn the TIME/VALUE dial to
change the current measure or beat number in the song.
26
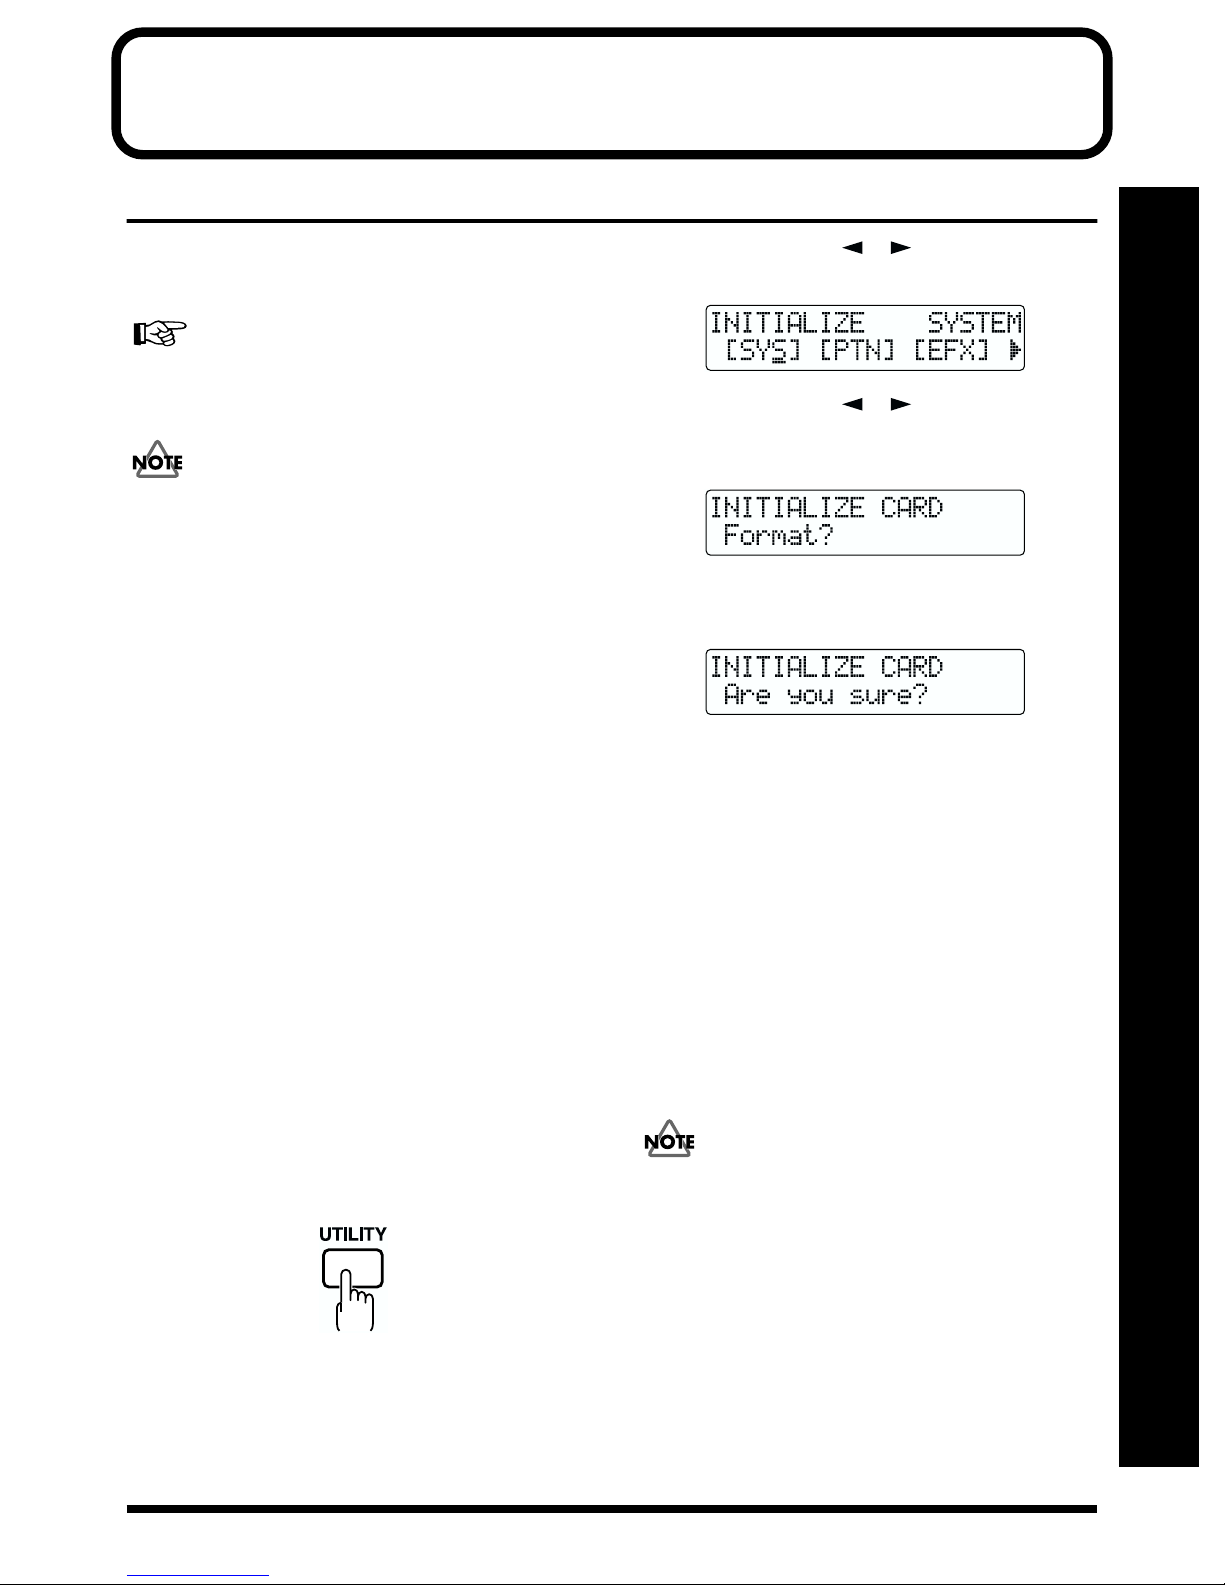
Recording/playing back a song
(1) Preparing the memory card
The BR-532 writes the recorded data directly to the inserted
memory card. Therefore, for recording or playback, the
memory card must be inserted.
Memory cards supported by your BR-532 (p. 13)
Inserting the memory card
Before inserting the memory card (SmartMedia), be sure
to first turn off the BR-532. If a memory card is inserted
when the power is turned on, the data in the memory
card may be destroyed, or the memory card may become
unusable.
Insert the memory card into the memory card slot.
The supplied memory card still has some remaining space;
however, for extended recording, you will need to erase
some of the demo song or prepare a new memory card (32
MB or greater is recommended).
For information on how to erase data from the memory card,
refer to “Erasing songs (Song Erase)” (p. 59).
* A write-protect sticker (p. 61) is not affixed to the supplied
memory card. In case you would like to save the data, you will
need to affix a write-protect sticker to the card.
Formatting the memory card
* This is not necessary for memory cards that have already been
used with the BR-532.
Newly purchased memory cards, or memory cards that have
been used previously with a computer will need to be
prepared so they can be used with the BR-532.
Carry out the following steps in the order given to complete
the procedure (this preparation process is called
“formatting”).
1. Press [UTILITY].
fig.Q01-08
2. Press PARAMETER [ ] [ ] to move the cursor to
“INI,” and press [ENTER].
fig.R11-01
3. Press PARAMETER [ ] [ ] to move the cursor to
“CRD,” and press [ENTER].
“Format?” appears in the display.
fig.R11-02
4. Press [ENTER].
“Are you sure?” appears.
fig.R11-03
* If the write-protect sticker is affixed to the memory card,
“Protected!” appears in the display. You cannot initialize the
memory card if this message appears.
5. To continue with the initializing, press [ENTER] (YES).
To cancel the operation, press [EXIT] (NO) (or [UTILITY]).
When [ENTER] (YES) is pressed, initializing begins.
When the formatting has been completed, “Completed!”
appears in the display, and you are returned to the Play
page.
* Depending on the capacity of the memory card, initializing
may take more than ten minutes to complete. This is not a
malfunction.The progress of the initializing is shown in the
display. Do not turn off the BR-532 until the initializing has
been completed.
Do not remove the memory card or turn off the BR-532
while the memory card is being initialized. Doing so can
destroy the data on the memory card and/or render the
memory card itself unusable.
* When formatting starts, a new song is automatically created.
In this case, the data type selected is STANDARD (LV1).
Quick Start (Recording/playing back a song)
27

Recording/playing back a song
(2) Select the song to record
When the memory card contains more than one song, the
song that was recorded last is automatically selected.
To record a new song, follow the procedure given below.
Recording a new song
About data types
When you record a new song, the BR-532 allows you to set
the data type. This enables you to select the combination of
audio quality and recording time that is most suitable for the
material you are recording. The following data types can be
selected.
* The data type of a song cannot be changed after it is created.
HiFi (MT2) (multitrack 2):
For high-quality recordings. This data type is
recommended when you will be doing a lot of track
bouncing. Normally you should select this type.
STANDARD (LV1):
For recordings that will take longer than what can be
provided with the MT2 data type. This data type is
useful for when there is little space remaining on the
memory card, or when recording live performances.
<Procedure>
1. Press [UTILITY].
fig.Q01-08
2. Press PARAMETER [ ] [ ] to move the cursor to
“NEW,” and press [ENTER].
“Type” appears in the display.
fig.Q01-14a
3. Turn the TIME/VALUE dial to select the desired data
type.
* The BR-532 uses a sample rate of 44.1 kHz. It is not possible to
change the sample rate.
4. Press [ENTER].
“Are you sure?” appears.
fig.Q01-15
LONG (LV2):
Of the three data types, this provides the longest
recording time.
Recording time
The recording times possible for each data type on one
memory card are given below (when recording one track).
Data type
HiFi (MT2) 8 min. 16 min. 32 min. 65 min.
Standard(LV1) 9 min. 19 min. 39 min. 78 min.
Long (LV2) 12 min. 24 min. 49 min. 98 min.
* The recording times shown above are approximate. Depending
on the number of songs, the allowable recording time may
decrease.
* The recording times shown above are for when only one track is
used. For example, if you record on all four tracks, the recording
time for each track will be 1/4th of the time shown above.
* The SmartMedia memory cards supported by your BR-532 are
16 to 128 MB SmartMedia cards for use with a 3.3 V power
supply voltage.
Recording time (times approximate)
16 MB 32MB 64 MB 128 MB
5. Press [ENTER].
When the new song is ready, you are returned to the
Play page.
28
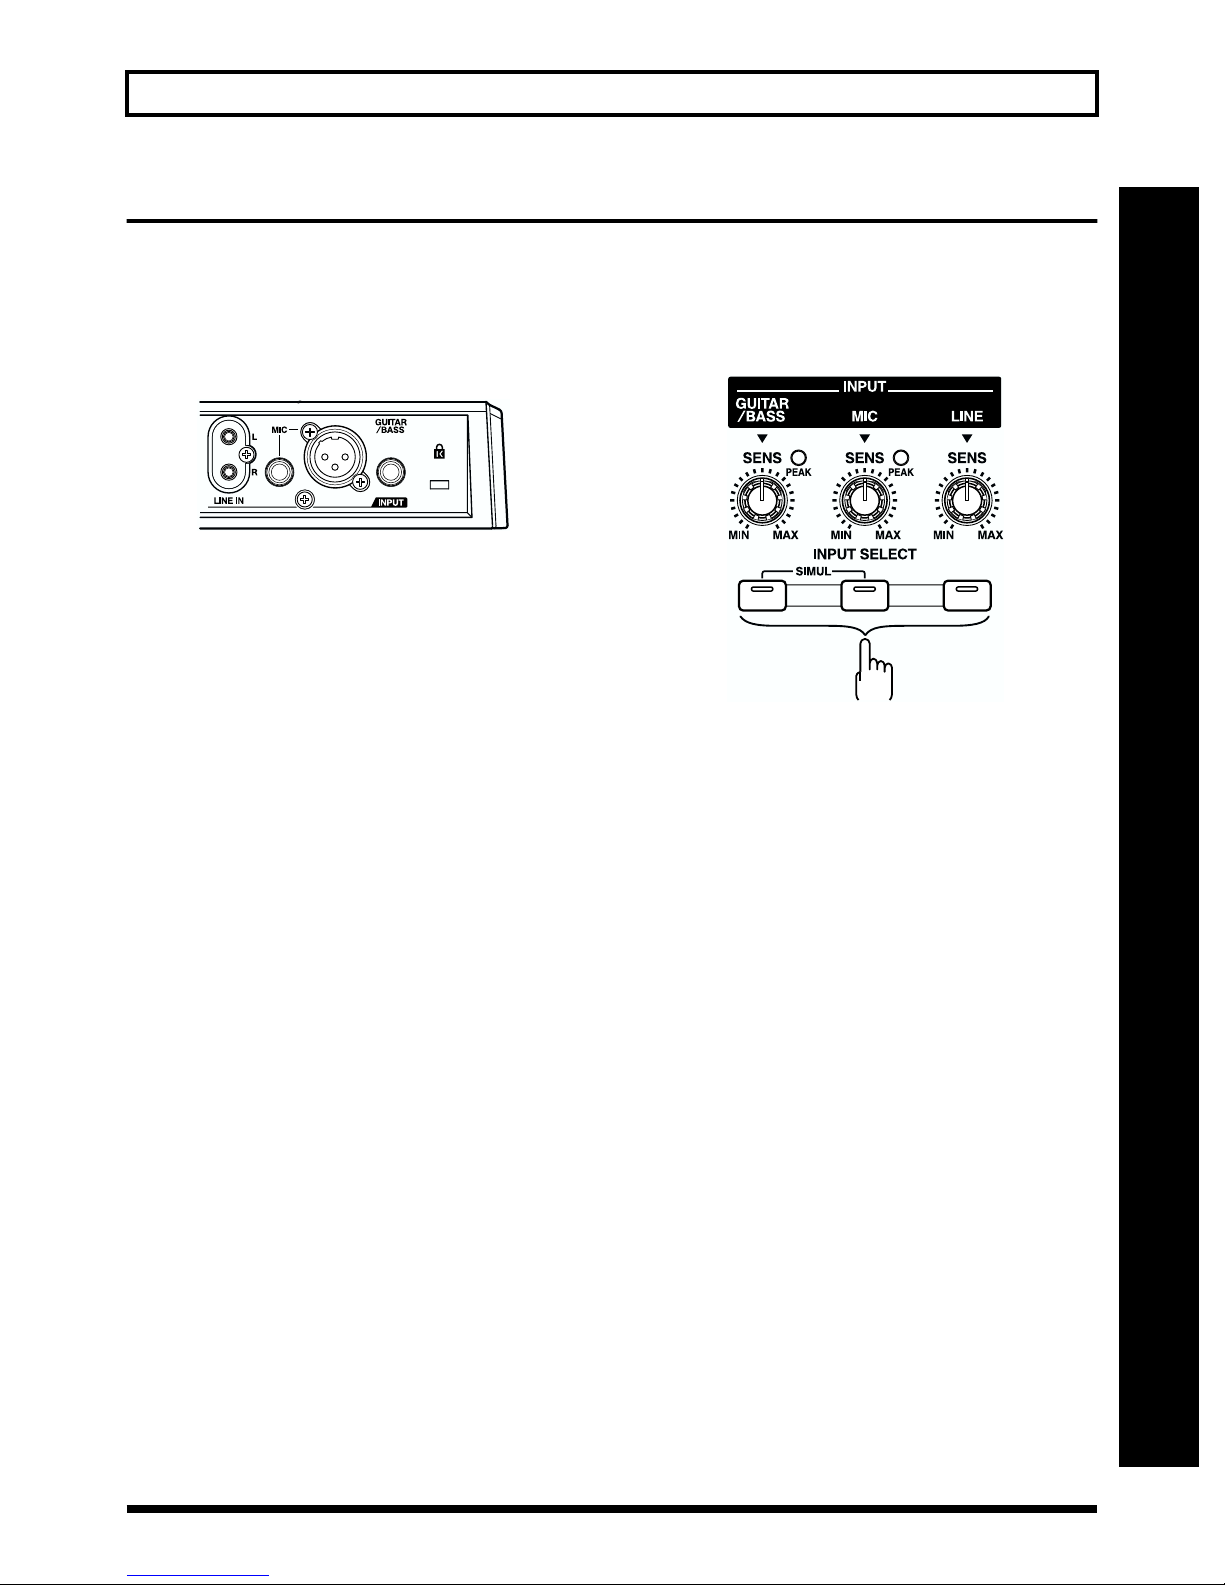
(3) Connecting instruments
Recording/playing back a song
Choose which jack you will use
to connect your instrument
Your BR-532 is equipped with a number of input jacks to
match the type of instrument that you will connect. Select an
instrument appropriate for your purposes.
fig.Q01-16
GUITAR/BASS
An electric guitar or bass can be connected to this jack. Since
this is a high-impedance input, a guitar or bass can be
connected directly.
MIC
These jacks allow a mic to be connected. Both standard TRS
jacks and XLR jacks are provided.
The standard TRS type allows for both balanced and
unbalanced connections.
* If both jacks are being used, the TRS jack is given priority.
* If you are recording an electric acoustic guitar using a shielded
connection, use the GUITAR/BASS jack.
LINE
When connecting to the output of a CD player, cassette
player, or other audio device, or to a rhythm machine,
external sound module, keyboard, or other sound source, use
the stereo input jacks.
Press the INPUT SELECT button of the
instrument that you want to record
Select the input source to record. The indicator of the selected
button will light.
fig.Q01-17a
Quick Start (Recording/playing back a song)
[GUITAR/BASS]
Select to record the instrument connected to the GUITAR/
BASS jack.
[MIC]
Select to record the signal from a microphone connected to
the MIC jack or from the internal microphone.
When the MIC indictor for the INPUT SELECT button is lit,
you can use both the microphone connected to the MIC jack
and the internal microphone simultaneously.
* Your BR-532 is shipped with its internal microphone turned
on. When not using the internal microphone, be sure to turn it
off (see next section).
[LINE]
Select this when you wish to record the sound of an
instrument or CD player connected to the LINE jacks.
[SIMUL]
To record the vocal and guitar at the same time, press
[GUITAR/BASS] and [MIC] simultaneously. Both indicators
light, telling you that simultaneous recording is now
possible.
• When two recording tracks are selected, the GUITAR/
BASS is recorded to Track 1 (or 3), and the MIC is
recorded to Track 2 (or 4).
• When one recording track is selected, the GUITAR/
BASS and MIC are mixed and then recorded.
29
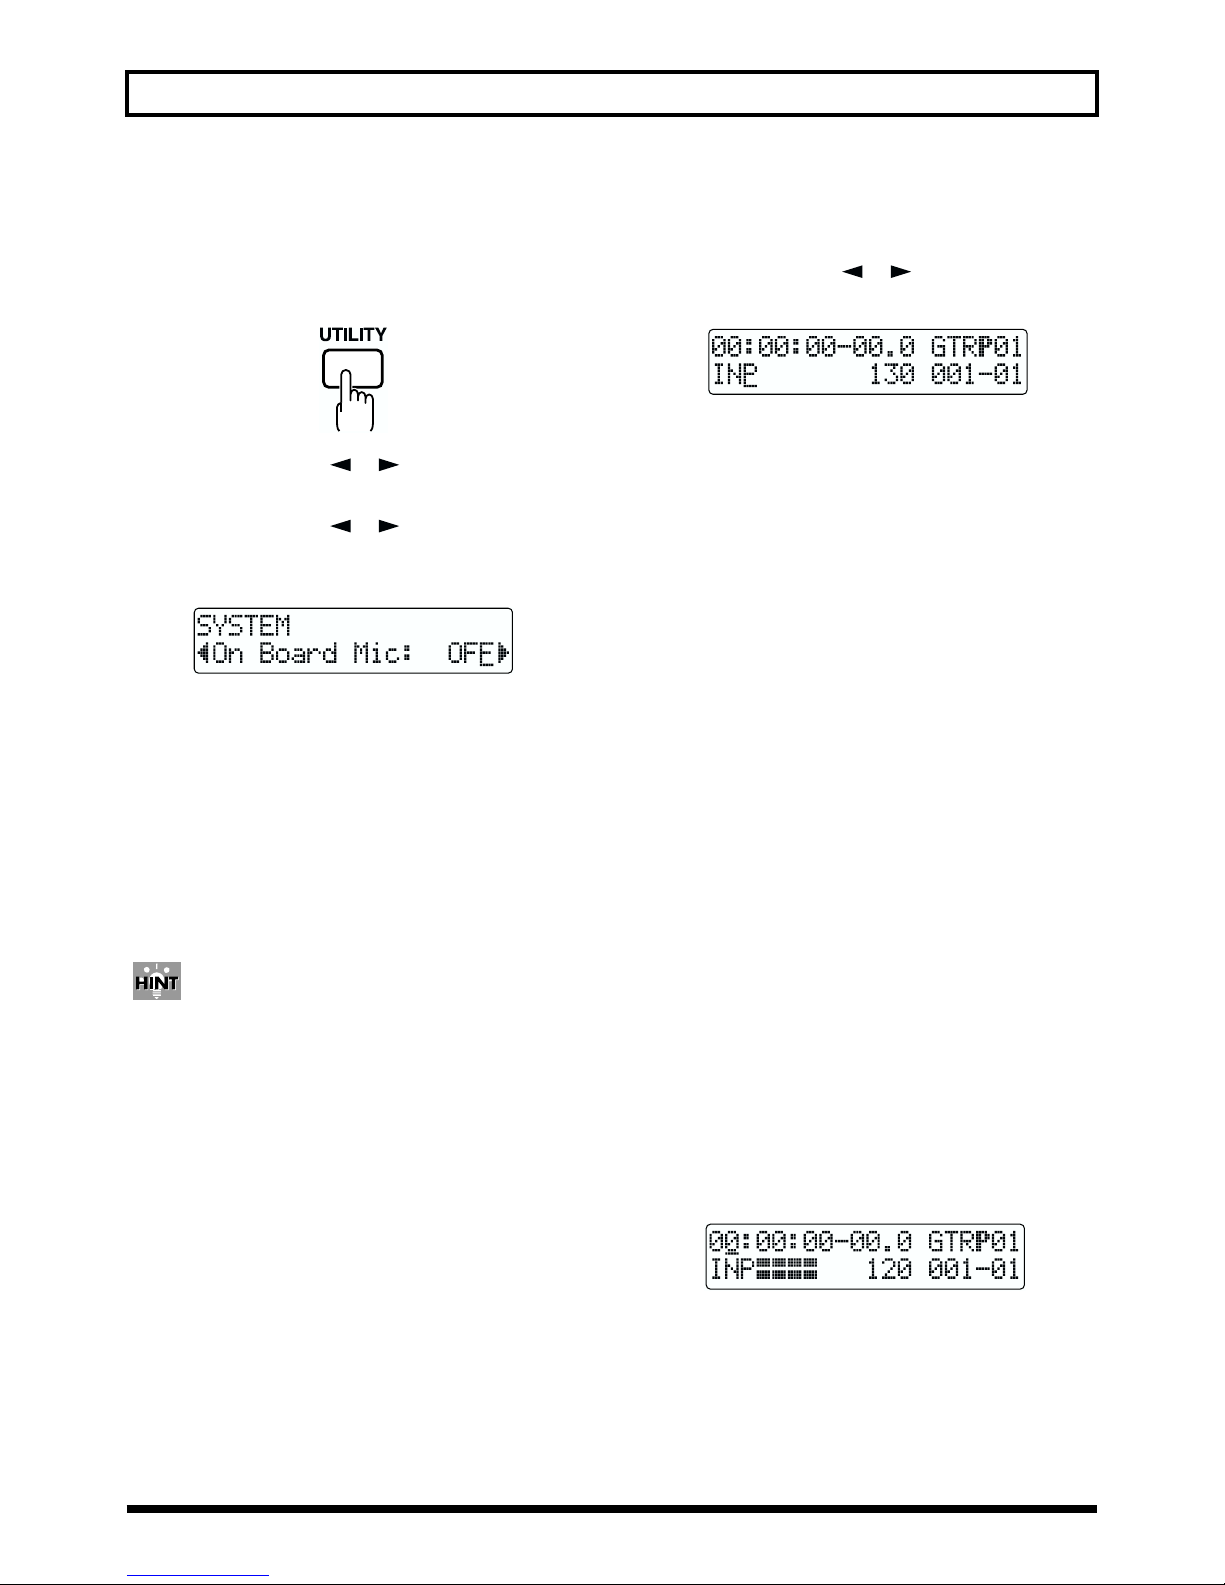
Recording/playing back a song
Turning off the internal microphone
To use only the microphone connected to the MIC jack, you
must first turn off the internal microphone.
1. Press [UTILITY].
fig.Q01-08
2. Press PARAMETER [ ] [ ] to move the cursor to
“SYS,” and press [ENTER].
3. Press PARAMETER [ ] [ ] to select “On Board
Mic,” and turn off the microphone with the TIME/
VALUE dial.
fig.Q01-17b
4. Press [EXIT] (or [UTILITY]) several times to return to
the Play page.
* During automatic updating, “Keep Power On!” appears in the
upper line of the display, while the lower line shows what is
being processed.
Switching the LEVEL METER
Switch the input or output indicated by the LEVEL METER.
1. Press PARAMETER [ ] [ ] to move the cursor to
the lower left of the screen.
fig.Q01-17c
2. Turn the TIME/VALUE dial to select the input or
output to be indicated by the LEVEL METER.
TR1–4: The output from each track is indicated in the
LEVEL METER.
1&2: The LEVEL METER shows the output of
Tracks 1 and 2. The Track 1 output is shown
in the upper meter, and the Track 2 output is
shown in the lower meter.
3&4: The LEVEL METER shows the output of
Tracks 3 and 4. The Track 3 output is shown
in the upper meter, and the Track 4 output is
shown in the lower meter.
INP: The LEVEL METER shows the input from
INPUT or LINE IN.
MST: The LEVEL METER shows the post-MASTER
FADER output level.
Press the INPUT SELECT button to switch to “INP.”
Adjusting the input sensitivity
When input from GUITAR/BASS or MIC is selected, adjust
their input sensitivity with the relevant SENS knob.
In order to record at a good sound level, you should
adjust the input levels so that the PEAK indicator lights
momentarily when a guitar is strummed strongly or
vocals are sung loudly.
Monitoring the sound
You can monitor the sound from the instruments and
microphones that are connected.
The volume level is adjusted with the MASTER fader and
INPUT LEVEL knobs.
1. Lower the MASTER fader.
2. Turn the INPUT LEVEL knob to its center position and
then slowly increase the MASTER fader.
At this point, adjust the INPUT LEVEL knob so that the
rightmost “■” of the LEVEL METER is indicated, while
“❐” appears only occasionally.
fig.Q01-18
Also, when monitoring the sound with headphones, use
the MASTER fader to adjust the volume to the level you
desire.
* To adjust the volume of devices connected to the LINE OUT
jack or DIGITAL OUT connector, refer to the instruction
manual that came with the device.
30
 Loading...