

Page 1
BV10.2AI
Page 2

Page 3

1
Contents
SafetyInformation..................................................................................……2
DVDPlayerFeatures……..........................................................................…4
DVDVideoFeatures..................................................................................4
Controls.........................................................................................................5
MonitorStowedView
MonitorOpenView
RemoteControl
BasicOperation
Openthemonitor
Stowthemonitor
Handlingdisc
Turntheplayeron
Turntheplayeroff
Adjustthedisplay
CareandMaintenance...............................................................................10
Usetheremotecontrol...............................................................................11
Replacethebatteryintheremotecontrol
UsetheiPod/iPhone
Play...............................................................................................................13
PlayDVDdisc
PlayAudioCDdisc
..........................................................................
...........................................................................
..............................................................................
............................................................................
.................................................................
.....................................................................
.......................................................................
........................................................................
......................................................................
......................................................................
.......................................................................
..................................
..................................................................
.....................................................................
……….....5
……….....6
……….....7
……….....9
……….....9
……….....9
…..….......9
…..….......9
…..….......10
…..….......10
……….....11
……….....12
……….....13
……….....15
PlayMP3disc
PlayUSBdeviceandSD/MMCcard
PlayiPod/iPhone
InstallationandWiring
What'sinthebox
Beforeyoubegin
MountingandWiringPrecautions
Installationprocedure
Wiringdiagram
SystemSetup
Specifications
Troubleshooting
Legal notice ................................................................................................24
.............................................................................
..........................................
........................................................................
................................................................
........................................................................
........................................................................
..............................................
.................................................................
...........................................................................
...............................................................................
...............................................................................
...........................................................................
……….....15
……….....16
……….....16
…........….17
……….....17
……….....17
……….....18
……….....19
……….....20
…........….21
…........….22
....……….23
Page 4

2
SafetyInformation
ThankyouforbuyingtheRoofMountLCDMonitorwithDVDplayer.
v
Pleasereadthismanualcarefullybeforeusingtheplayerinordertoget
themostoutofallthefeaturesandfunctions.Keepthismanualinasafe
place,asitcanbeavaluabletoolinhelpingyoutounderstandallthe
featuresandfunctions.
Donotoperatetheunitinanywayotherthandescribedwithinthismanual.
v
Failuretofollowtheinstructionswithinthemanualwillinvalidateyour
warranty.
SAFETYFIRST!Donotinstallthedisplaywhereitmay(i)obstructthe
v
driver’svision,(ii)impairtheperformanceofanyofthevehicle’soperating
systemsorsafetyfeatures,includingairbags,or(iii)impairthedriver’s
abilitytosafelyoperatethevehicle.
Whenusingthesystem,makesureyouarefirmlysecuredbyyourseat
v
belttoensureyoudonotaccidentallyhityourheadonthescreenduring
suddenbrakingorotherincidents.Ifyouareeverinanaccident,injuries
canbemoresevereiftheseatbeltisnotproperlybuckled.
v Donotattempttoinstallorserviceyourdisplaybyyourself.Installationor
servicingofthedisplaybypersonswithouttrainingandexperiencein
electronicequipmentandautomotiveaccessoriesmaybedangerousand
couldexposeyoutotheriskofelectricshockorotherhazards.
Becarefulnottodrainthecarbatterywhileusingtheunitwiththecar
v
enginestopped.Toavoiddrainingthebattery,itissuggestedthatthe
vehicleenginealwaysisrunningwhileusingtheunit.
Donotdisassembleoraltertheunitinanyway.Failuretodosocancause
v
damagetotheunitandinvalidthewarranty.
v Nevercleanthesurfaceofthescreenwithchemicalsolventorcorrosive
detergent,whichmaycausepermanentdamagetotheTFTLCDscreen.
Avoidinstallingtheunitwhereverisunderdirectsunlightornearhotair
v
vent.Pleasenotethatthenormalworkingtemperatureoftheunitis
between-5℃ to+50℃.Iftheinternaltemperatureofthevehicleis
extremelyhigh,ashortcoolingdownperiodisnecessarybeforeoperating
theunit.
Ifthetemperatureinsidethecarisverylowandthemonitorisusedsoon
v
afterswitchingontheheater,moisturemayformonthepaneloftheunit.
Turnofftheunitimmediately!Failuretodosomaycausetheinternal
componentstoshort.Allowtheunittorestforaboutonehourtoallowthe
condensationtodisappearbeforecontinueoperation.
v Inextremelycoldtemperatures,themovementofthepicturemaybeslow
andthepicturemaybedark.Itisnotamalfunction.Theunitwillwork
normallyonceitreachesitsoperatingtemperature.
v DonotdroporhittheLCDpanelwithahardobject,asitmaycause
Page 5

3
permanentdamagetotheLCDpanel.ShouldLCDpanelbreak,avoid
touchingglassandfluid.Ifdo,pleasecleanitwithplentyofwaterandask
formedicalattentionimmediately.
v Duetodifferentcarspecifications,pleasekindlyensuethatthedisplay
monitorisproperlylocatedandnotobstructingtheair-conditioningvent.
AvoidinsertinganyforeignobjectsintotheslotofthediscPlayer.Failure
v
toobservethismaycausemalfunctionduetotheprecisemechanismof
thisunit.
Protectyourdisc.Whenyouleavethecar,besuretoejectthediscfrom
v
thisunitandstoreitseparatelyawayfromdirectsunlight.
v Heatandhumiditymaydamagethediscandyoumaynotbeabletoplayit
again.
v UsethesuppliedscrewstofixthemonitorMetalMountingPlate.
Page 6

4
DVDPlayerFeatures
ThisplayerisaRoofMount10.2"TFT-LCDColorDisplaywithDVDplayer
thatcanbeusedasastand-alonedisplay,orcanbeintegratedintoamobile
multimediasystem.Thisplayerhasthefollowingfeatures:
10.2"TFT-LCDcolormonitor(16:9)
²
² RoofMountingApplication
² Pixel(dots):1152x234
WideViewingangle(up/down/left/right):45/65/65/65
²
² NTSCandPALCompatible
² AdjustableContrast/Brightness/Color/Tint
ManualViewingAngleAdjustment
²
² VerticalAngleAdjustable:up/down<120°
² WhiteLEDDomeLight
AutomotiveStartupProtection
²
² Built-inIRTransmitter
² IRRemoteControl
OnScreenDisplay
²
² 2xAVInput
² 1xAVOutput
Slot-inDVDmechanism
²
² SupportSD/MMCcardandUSB
² Built-iniPod/iPhone
Note: Madefor:iPod touch(4thgeneration);iPod touch(3rd generation);
iPodclassic;iPod nano (5thgeneration);iPodnano(3rd generation);
iPod nano(1st generation);iPhone4;iPhone3GS.
² Capabilitytoread:DVDFormat/DVD-ROM/DVD±R/DVD±RW/CD-DA/CD-
RW/CD-R/CD-ROM(XA)/MP3/WMA/VCD/SVCD/JPEG/DIVX/MPEG4.
Note:Multi-sessionCDsand320kbpsWMAfilescan'tbeplayed.
FMTransmitterforlisteningtheaudiofromyourcaraudiosystemviaFM
²
radioreceiver(settingfrequency:87.5MHz--108.0MHz).
DVDVideoFeatures
DVDdrivethatsupportsthefollowingformats:
DVDs(12cm),videoCDs(12cm),audioCDs(12cm),MP3CDs(12cm)
PlaybackofCDswithtworecordedsessions(oneaudioandonedata)
•
• Multi-sound:DVDaudiothatsupportsuptoseven languagesperfilm
• Subtitles:support up to 7 languges
TheplaybackofMP3musicfilesstoredonaCD-R/CD-RWdiscorUSB
•
SD or MMC or Card device
Page 7
5
Controls
Touch
and
hold
todisplay
the
OSD
menu
,
touch
again
to
close
the
OSD
menu
.OnDVD
mode
,
touch
to
display
DVD
list,
touch
again
to
close
the
DVD
list;On
iPod/iPhone
mode
,
touch
to
display
the
current
list
,touch
again
to
enter
the
main
menu
.2Play
or
pause
.
Previous
Chapter
or
Track
/
Navigation
Left
;
Press
and
hold
to
fast
reversef
at
2x,4x,8x,16x
,
32x
and
normal
speed.
Navigation
Up
.5Next
Chapter
or
Track
/
Navigation
Right
;
Press
and
hold
to
fast
forward
at
2x,4x,8x,16x
,
32x
and
normal
speed.
Navigation
Down
.
Selects
the
video
input
source:
AV1,AV2,
or
DVD
;OnDVD
mode
,
touch
and
hold
to
switch
the
mode
between
SD/MMC
and
USB
.
iPod/iPhone
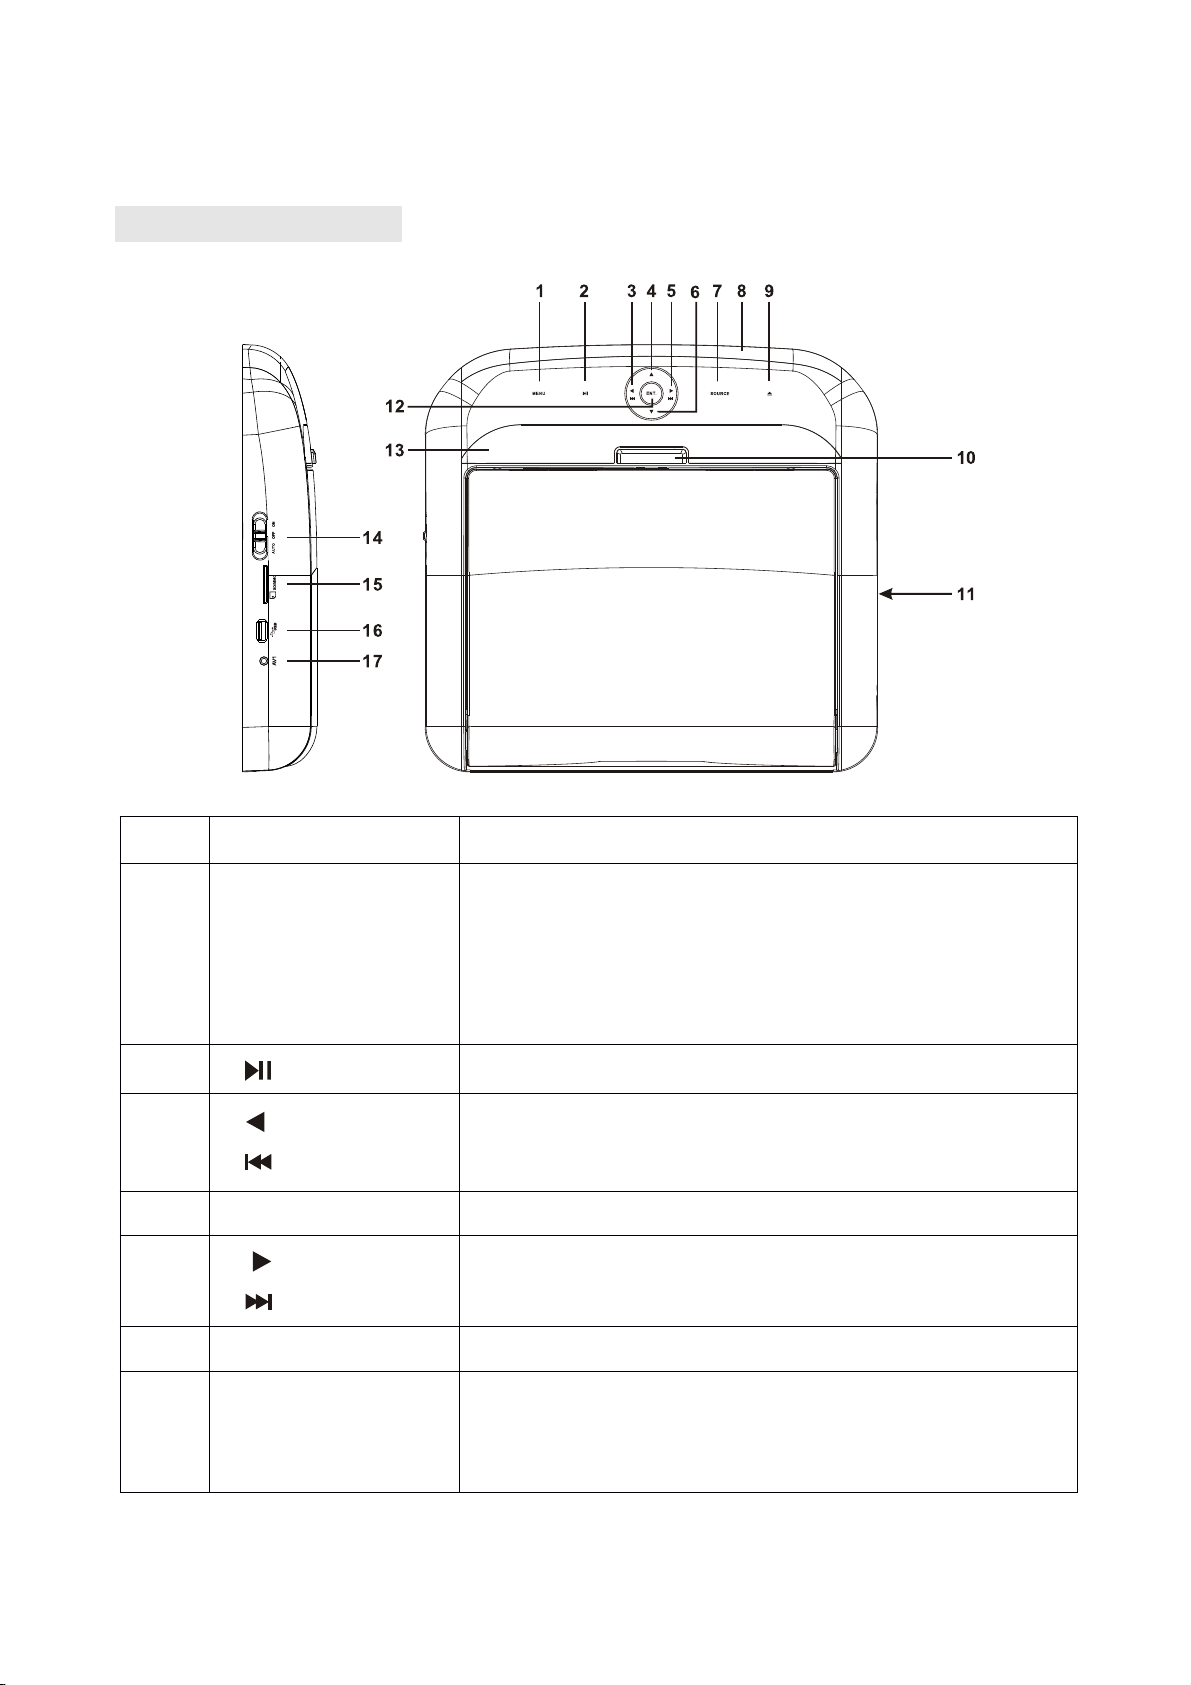
Monitor Stowed View
Item Name FunctionorControl
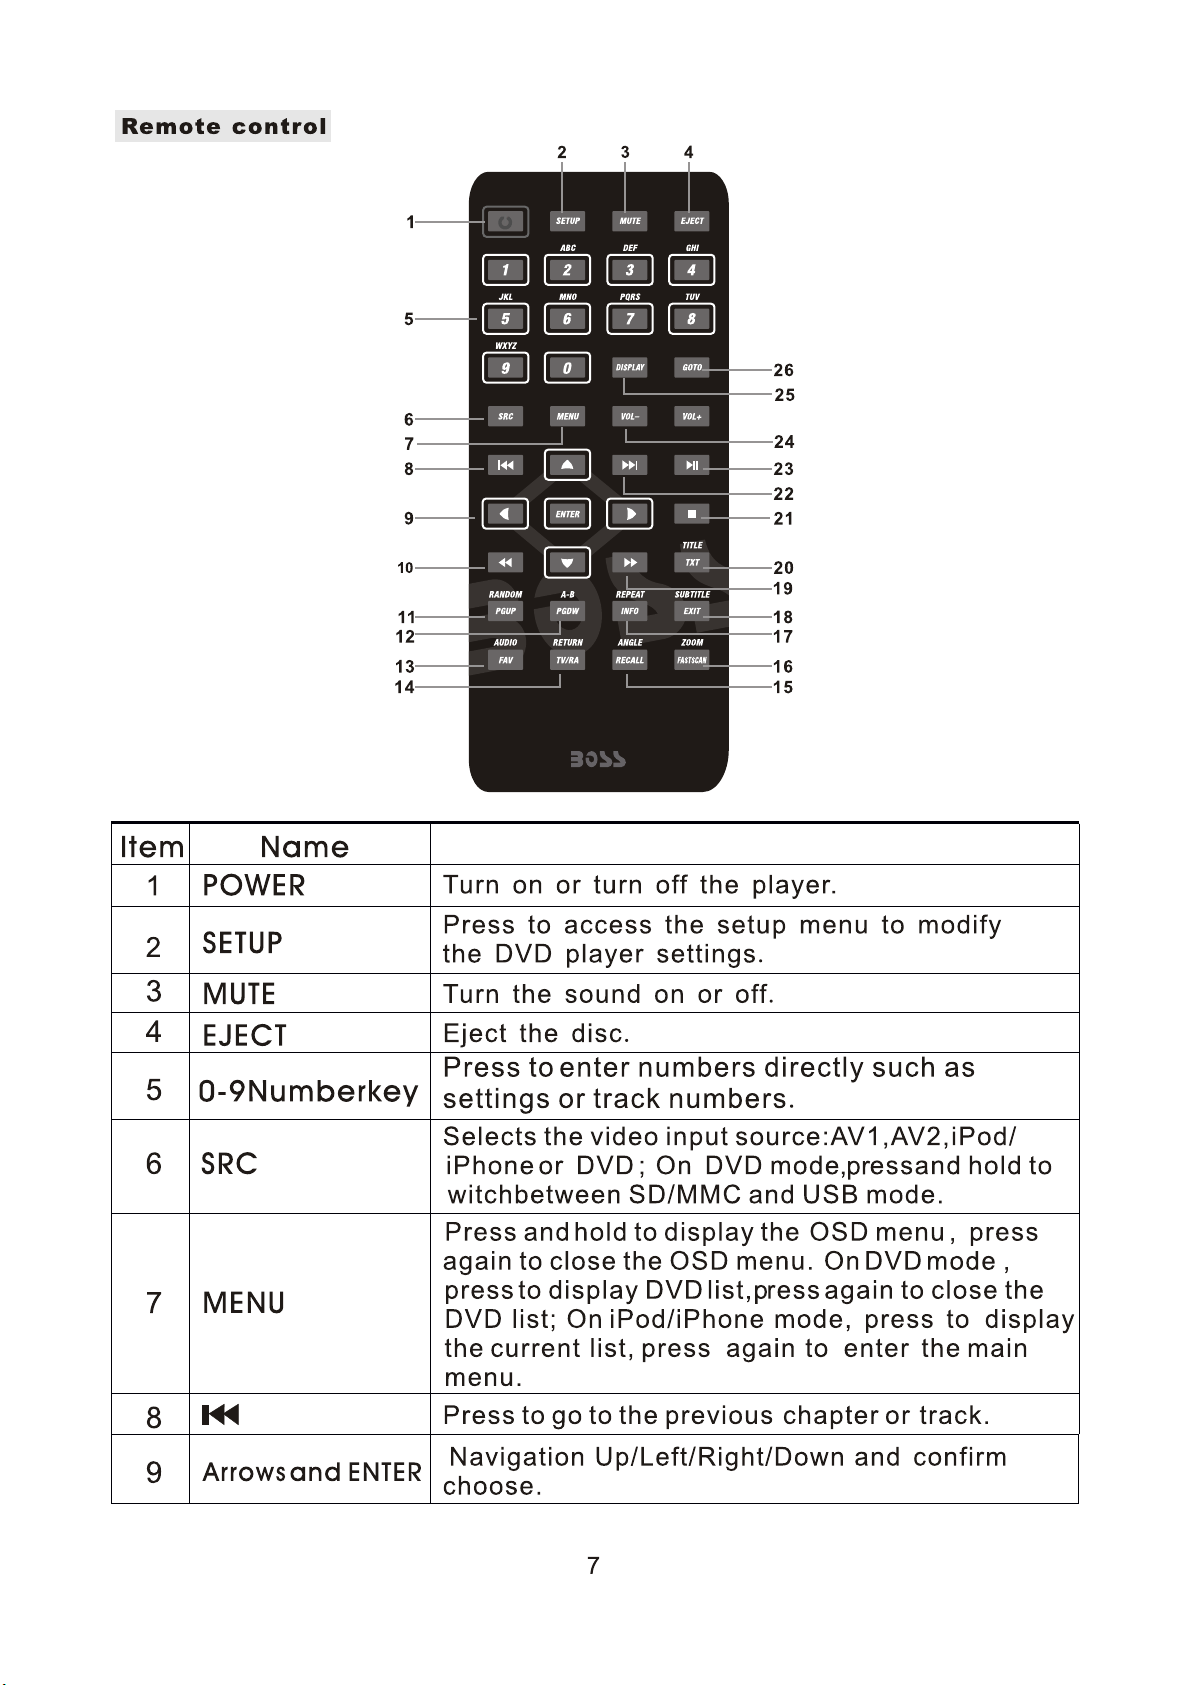
1 MENU
3
4 ▲
6 ▼
7 SOURCE
Page 8
6
8 IRWindow
Receives
IR
signals
from
the
remote
control
orsends
IR
signals
toIRwireless
headphone.
E
ject
the
disc.
Press
to
release
the
monitor
Panel
.
Insert
the
disc
.
Enter
/
Confirm
choose.
To
illuminate
in
the
car.
Turns
on/off
the
dome
light
.
When
the
switch
is
settoAUTO
,
the
dome
light
turns
on
when
the
door
is
open
.
Insert
theSDcard
or
MMC
card.
Connect
USB
device.
External
equipment
audio/video
in
socket.
9
10 Panelopenswitch
11
Discslot
12 ENT.
13 Domelight
14 DomelightSwitch
15 SD/MMCcardslot
16 USBsocket
17 AV1INsocket
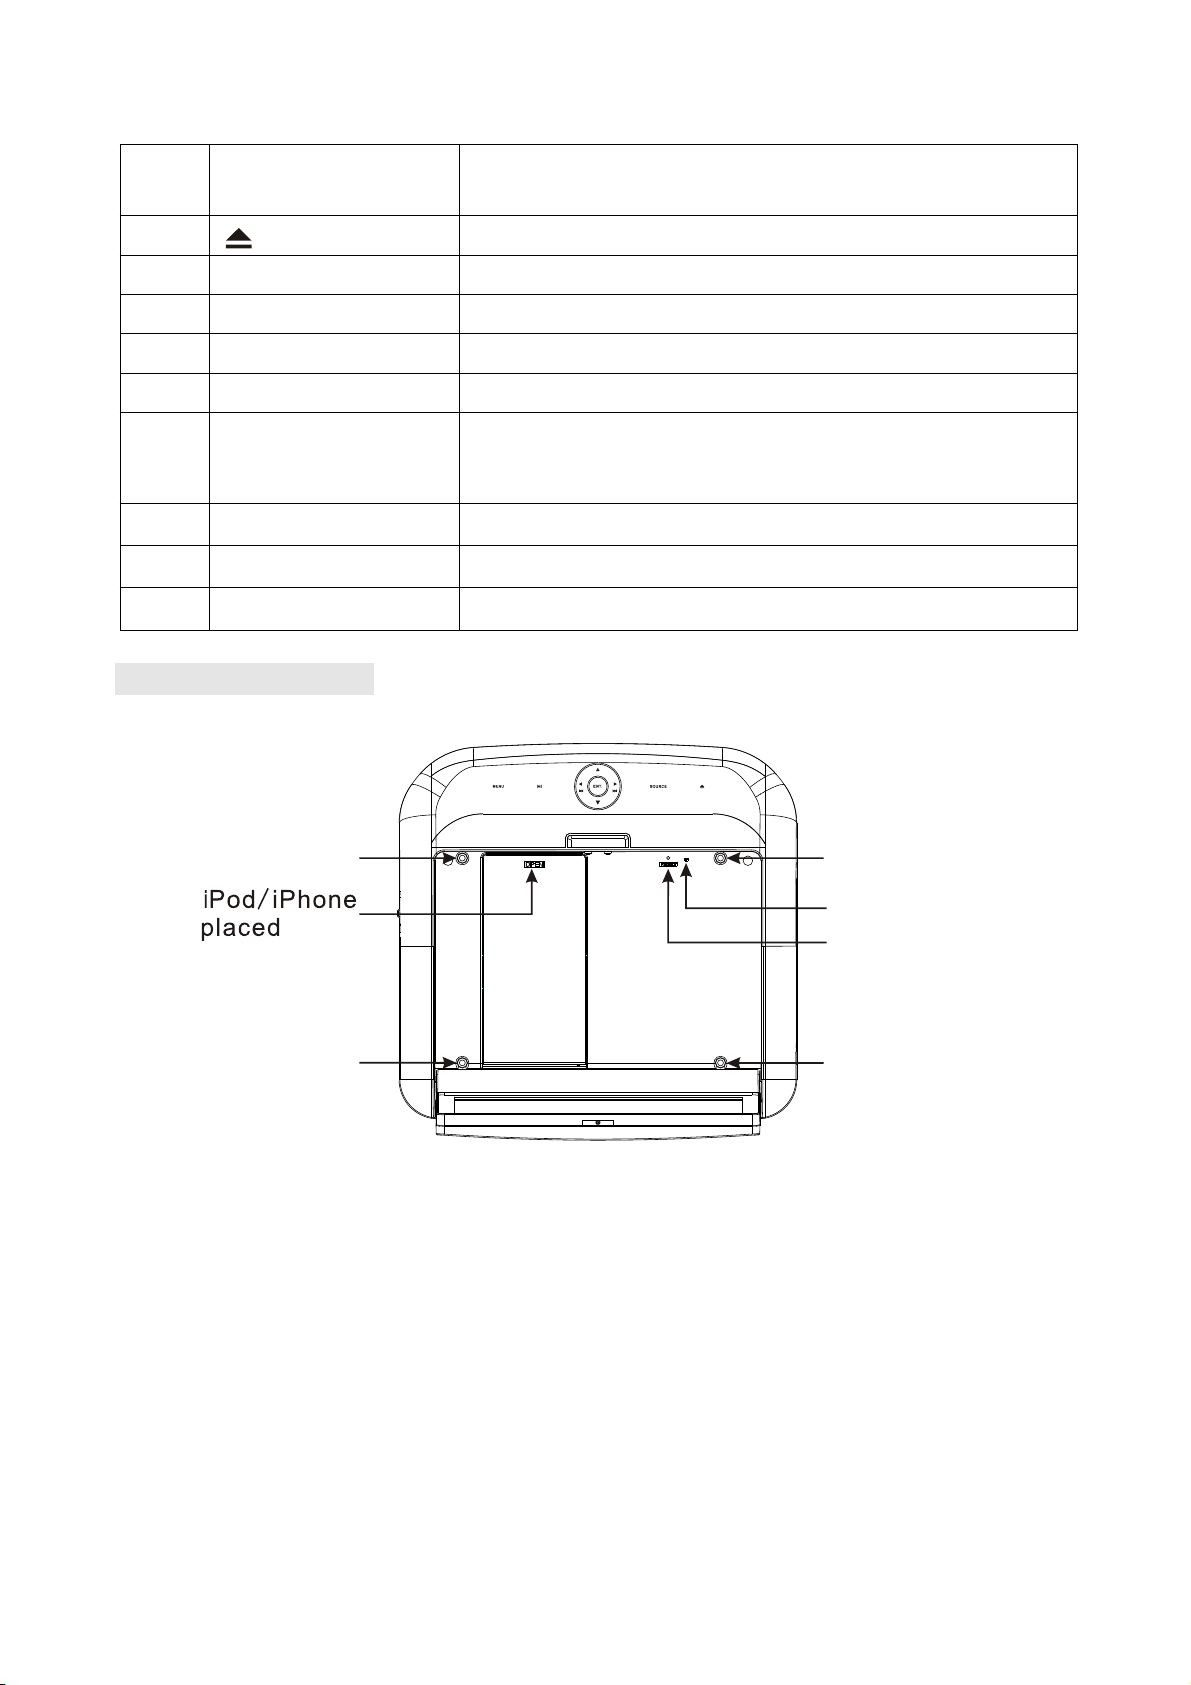
Monitor Open View
Screw hole
Screw hole
Screw hole
Power off
Reset hole
Screw hole
Page 9
Page 10

8
10
Press
to
fast
reverse
playback
at
2x,
4x,
8x,16x
and
32x
speeds.
Press
to
play
chapters
or
tracks
in
random
order.
Press
to
repeat
playback
from
point
Atopoint
B.
For
a
DVD:
Change
the
language
during
play
.
For
a
VCD/CD:
Change
audio
channel
(left,
right,
stereo)
during
playback
Press
to
return
the
main
menu,
press
again
to
return
the
last
position
of
playback.
Press
to
select
a
different
filming
angle.
T
his
feature
only
works
if
the
DVD
is
recorded
with
multiple
angles.
Press
to
set
the
zoom
for
movie
viewing.
Press
to
repeats
the
track
or
the
entire
disc.
Press
to
select
and
turn
on
subtitles
during
playback.
Press
to
fast
forward
playback
at
2x,
4x,
8x,16x
and
32x
speeds.
Press
to
view
the
DVD
disc
’stitle
menu.
Press
to
stop
playback,
press
or
ENTER
button
to
start
playing
at
the
last
position;
Press
this
button
twice
to
fully
stop
playback,
p
ress
or
ENTER
button
to
start
playing
at
the
beginning
of
DVD.
Press
togoto
the
next
chapter
or
track.
Play
or
pause
.
Press
to
decrease
/
increase
the
volume.
Fastreverse
11
12
13
14
15
16
17
18
19
RANDOM
A-B
AUDIO
.
RETURN
ANGLE
ZOOM
REPEAT
SUBTITLE
Fastforward
20
21
22
23
24
25
26
TITLE
■ Stop
VOL-/+
DISPLAY
GOTO
Presstodisplaytheplaybackinformation(suchas
title,chapter,trackandtime).
Presstostartplaybackataselectedchapter,track
ortime.
Page 11

9
BasicOperation
Open
the
monitor
Stow
the
monitor
Handling
disc
PressthePanelopenbuttontolower
1.
theoverheadmonitorscreen.
2.GentlyswingtheLCDdownandadjust
theangleforviewing.
CAUTION:TheLCDopenstoamaximum
angleof120° degrees.Donotattempttoopenitfurther.
Gentlypushthebacksideofthedisplaypaneluntilitclicksintotheoverhead
housing.Themonitorturnsoffautomaticallywhenyoureturnittotheclosed
position.
Note:Whenclosingthedisplaypanel,donotletcordsorotheritemsget
caughtbetweenthedisplayandtheoverheadhousing.Doingsocan
seriouslydamagethescreen.
Foryoursafety,closetheLCDpanelwhenyouarenotusingit.
l Tokeepadiscclean,donottouchtheplayside
(non-labelside).
l Donotattachstickynotestoorputtapeonadisc.
l Keepdiscsawayfromdirectsunlightandheat.
l Storediscsinaprotectivedisccase.
l Tocleanthedisc,wipethediscoutwards
fromthecenterwithacleancloth.
Turn the player on
1.Usethesystemwiththevehiclerunningorwiththeignitionkeyswitchin
the"accessory"position.
Tolowerthescreen,pressthePanelOpenbuttonandmovethescreen
2.
intoaviewingposition.Thesystemwillpoweronautomatically.
3.Touch SOURCE icontoswitchthemode.
Note:YoucannotinsertaDVDintotheslotifyouhaveselectedan
alternateaudio-videosource(AV 1 IN AV 2 IN oripod/iPhone).
Page 12

Turn the player off
Close the monitor or press the power button on the remote control to turn the
player off .
If a disc is playing when you turn the power off and back on again, the player
continues playback from where you stopped.
Note: Once the player is turned off, you cannot eject a disc in the player.
Adjust the display
Touch and hold the MENU button to display adjust menu (OSD).
1.
▲
2. In the OSD MENU , press or ▲
button to sequentially select each menu
item .
Contrast Adjusts the differences between the light and dark areas of
the image
Brightness Makes the whole image lighter or darker
Color Adjusts color based on the
AV1/AV2 mode.
Tint Adjusts the intensity of the color when in NTSC mode (to play
back DVDs recorded in the United States)
Wide Screen Selects the aspect ratio of the image wide, normal .
FMT Freq Select the frequency for FM transmitter : 87.5MHz--108.0
MHz.
Beep Select the beep sound when touch each icon or button .
Reset Returns all menu values to their default settings.
3. Press the or button to change the values of selected option.
▲
▲
Care and Maintenance
Cleaning the monitor
Use a clean, soft, dry cloth to gently wipe dust and dirt from the screen.
Do not use benzene, thinner, car cleaner, or other cleaners. These
substances may damage the monitor system or cause the paint to peel.
The surface of the LCD can be easily scratched. Do not rub it with
anything abrasive.
10
Page 13

11
Servicingthemonitor
N
ote:
Intheeventthattroublearises,neveropenthemonitorcase,disassemblethe
playerorattempttorepairityourself.Theinternalpartsarenotserviceableby
user.Openinganycomponentswillvoidthewarranty.
CAUTION:
Changesormodificationstothisproductnotapprovedbythe
manufacturermayvoidthewarranty.
Cleaningtheremotecontrol
Useonlyaclean,soft,dampclothtocleantheremotecontrol.Donotuse
lighterfluid,methylalcoholorothersolvents.
Cleaningdiscs
Beforeplayingadisc,wipeitoutwardsfromthecenterwithaclean,softcloth.
Use the remote control
Usetheremotecontrolonlyinsidethevehicle.
l
l Usetheremotecontrolnofurtherthantenfeet(threemeters)fromthe
sensor.
Directsunlight(oraverybrightlight)reducessensitivitytoremotesignals.
l
Donotusetheplayerindirectsunlight.
l Anyobjectthancomesbetweentheinfraredsensorandtheremote
controlmaydisruptreception.
Replace the battery in the remote control
Thebatteryneedschangingwhenthebuttonsontheremotestopworkingor
whenyouhavetomoveclosetoplayerfortheremotetowork.
Precautions
Disposeofusedbatteriesproperty.
l
l Donotdisposeofusedbatteriesthrowingthemintofire.Ifyoudoso,they
mayexplode.
Donotshortthepositive(+)andnegative(-)terminals.
l
l Keepthebatteryanditsholderawayfromyoungchildren.Theymay
chokeonthebatterywhileattemptingtoswalloworchewonit.
ThebatterytypemustbeCR2025.Donotreplacewithanyother
batterytype.
Procedure
1.Turntheremoteup-side-down.
2.Simultaneouslyslidethebatterylatchinthedirectionofthearrowandpull
thebatteryholderoutoftheslot.
Page 14

12
3.Removetheoldbattery.
4.Placethenewbatteryintheslotwiththeplus(+)sideup.
5.Pushthebatteryholderbackintotheslotuntilitlocksinplace.
Use the iPod/iPhone
Press OPEN iconontheiPod/iPhoneplacedboardtolowertheiPod/iPhone
placedboard.
GentlyswingtheboardandadjusttheangleforconnecttheiPod/iPhone.
Page 15

13
Play
OnDVDmode,insertadiscintothediscslotwhenthescreendisplay"NO
EJECT
RETURN
TITLE
DISPLAY
Note:
AUDIO
1.
DISC".Whenthediscwasinserted,“LOADING” displayed,thesystem
willreadandplaythediscautomatically.
Pressthe
2.
buttontoejectthedisc.
3.Ifthedischavenotbeentakeawayin10seconds,thesystemwillslotitin
automaticallyandplayagain.
Play DVD disc
Accesstherootmenu
ADVDisdividedintotitlesandchapters.Therootmenushowsthecontents
ofthedisc.SomeDVDdisconlyallowyoutoselectdiscplaybackoptions
fromtheDVDrootmenu.
ToaccesstherootmenuoftheDVD,pressthe
or
buttonon
theremotecontrolduringplayback.
Statusinformation
Toviewstatusinformationaboutthecurrentviewingsession,pressthe
buttoncontinuouslytocyclethroughthefollowinginformation.
Changlanguages
Allaudiblelanguagesmustbepre-recordedontheDVD.SomeDVDdisc
onlyallowlanguageaccessthroughtheDVDmenu.
l Tochangetheaudiblelanguage,pressthe AUDIO buttonontheremote
control.Theplayerdisplaysthecurrentlanguagenumberandname,and
thetotalnumberoflanguagesavailable.
l Tocyclethroughallavailablelanguages,continuepressingthe
buttonontheremotecontrol.Theaudioinformationwilldisappears
automaticallyafterthreeseconds.
Page 16

Page 17

15
•
Tozoomin(enlarge)theimagewhenwatchingaDVD,pressZOOMduring
•
DISPLAY
REPEAT
REPEAT
ENTER
playback.
AsyoupressZOOMontheremote,theplayeralternatesamongthe
availablezoomsettings(2x,3x,4x,1/2,1/3,1/4).
Tozoominwhenviewingphotographs(JPEG/JPGimages)storedona
disc,pressZOOMontheremote,theplayeralternatesamongthe
availablezoomsettings:ZOOM100%,ZOOM125%,ZOOM150%,ZOOM
200%,ZOOM75%,ZOOM50%.
Play Audio CD disc
DisplayCDinformation
InsertaCDdisc,thescreenwilldisplaySINGLEELAPSED.Continue
pressing
buttontoviewSINGLEELAPSED,SINGLEREMAIN,
TOTALELAPSED,TOTALREMAIN,DISPLAYOFF.
RepeatCDtracks
TorepeatatrackortheentireCD,press
buttonontheremoteduring
playback.
Tocyclethroughtheavailableoptions,continuepressing
.
• TRACK---Repeatplaythecurrentmusic
• ALL---Cyclesplayallmusic
• REPEATOFF---Resumenormalplayback
Repeatfavoritesections
Torepeatafavoritesectionyoumustfirstmarkwhereitbeginsandends.
1.PlaybacktheCD.
2.Toidentifythebeginningofyourfavoritesection(pointA),presstheA-B
buttonontheremotewhenthesectionstartsplayingback.
3.Toidentifytheendofyourfavouritesection(pointB),presstheA-Bbutton
againwhenplaybackreachestheendofthesection.
Tocanceltherepeatplaybackandresumenormalplayback,presstheA-B
buttonagain.
Play MP3 disc
MP3isaformatforstoringdigitalaudio,compresseseachaudiotrackwith
littlelossofaudioquality.Theresulttakesupmuchlessdiscspacethanthe
trackwouldwithoutMP3compression.
1.InsertaCDthatcontainsMP3filesintotheplayer.Theplayerdisplaythe
MP3menu.
Toselectthefoldersandtrackstoplay,pressthe
2.
button.The
playerdisplaysthefolderstructure.
Page 18

16
3.Tochooseafolderfromthelist,pressthe ▲/▼ button.
ENTER
ENTER
SOURCE
SRC
4.Pressthe
button,theplayerdisplaysthecontentsoftheselected
folder.
5.ToselecttheMP3file,pressthe ▲/▼ button.
6.Pressthe
buttontoplaythefile.
MP3controls
l ToplaybacktothenextMP3file,pressthenextbutton( ).
l ToplaybackthepreviousMP3file,pressthepreviousbutton( ).
RepeatMP3
TorepeatasingleMP3file,pressthe REPEAT buttonontheremote.Tocycle
through allthefollowingsettings,continuetopress REPEAT.
l REPEATONE---repeatsthecurrentfile.
l REPEATALL---cyclesplayallcurrentofthedisc.
l REPEATFOLDER---repeatsthecurrentthefolder.
● REPEATOFF---turnsoffrepeatandresumesnormalplayback.
Play USB device and SD/MMC card
InsertaUSBdeviceintotheUSBsocketofthemainunit.
1.
2.OnDVDmode,touch
buttononthepanelorpress
button
ontheremotecontrolformorethan2secondstoswitchtotheUSBmode.
ThesystemwillplayUSBdeviceautomatically.
3.Usethearrowbuttonstoselectafiletypeandpressentertoplayit.
PlayingSD/MMCcardisthesameoperationofUSBdevice,pleaserefer
4.
tothestepsofplayingUSBdevice.
Play iPod/iPhone
OnDVDmode,opentheiPod/iPhonedoor,connectiPod/iPhonecorrectly.
ThenthesystemwillswitchtotheiPod/iPhonemodeautomatically.There
threekindsofmodetochoose:MUSIC,VIDEO,PHOTO.
1.Selectamodeiconandpress ENTER toenterthemode.Thesystemwill
playiPod/iPhoneautomatically.
2.
Usethearrowbuttonstoselectafileandpressentertoplay.
3.Duringplay,press MENU buttontwicetoreturntotheiPod/iPhonemenu.
Note : BeforeenterthePHOTOmode,mustsettheiPod/iPhonetothephoto
modeandplaystarts.
Page 19

17
Installation
and
Wiring
Donotattempttoinstallorserviceyourplayerbyyourself.Installationand
servicinginelectronicequipmentandautomotiveaccessories.Ifyoudonot
haveknowledgeorexperiencethisinstallationmaybedangerousandcould
exposeyoutotheriskofelectricshockorotherhazards.
Readtheseinstructionsandprecautionscarefully.Improperinstallationcan
damagethemonitorandthevehicle.
What's in the box
Inadditiontothismanual,theboxcontains:
PartsName Quantity
Player 1
IRremotecontrolwithbattery 1
Powercable 1
AV1INcable 1
AV2INcable 1
AVOUTcable 1
ST4.2x16screw 8
TB2.6x6screw 7
PM4x8screw 4
InstallationBracket 1
TrimRing
Usermanual 1
Note:Useonlythecontentsofthispackagetoinstallandusethesystem.
Usingaccessoriesnotprovidedwiththisplayermaydamagetheplayer.
Before you begin
1. Verifythatthevehicleelectricalcomponentsfunction,includingpower
windows,powerdoorlocks,airconditioning,lights,etc.
1
2. Identifythepolarityofthedomelightcircuitandsettheswitchonthe
bottomoftheoverheadmonitorhousing.
Testfitthelocationoftheoverheadmonitorsystemtoensureitwillnot
3.
Page 20

18
interferewiththeoperationofthevehicle.
4. Ifapplicable,verifythatthemonitor,whenmounted,willnotinterferewith
theoperationofthesunroof.
5. Carefullymarkthelocationwithmaskingtape.
6. Lowerthevehicle’sheadlinerdowntoseeifaroofsupportbeamis
availabletoscrewthemountingbracketto.
Ifasupportbeamisnotavailable,usea3/4-inchpieceofplywoodcutto
theappropriatesize.Attachtheplywoodtotheroofofthevehicleusing
silicone.Allowforadequatedryingtime.
7. Determinethelocationofanyadditionalaudio/videosources.
8. Disconnectthenegativebatteryterminalbeforemakinganywiring
connections.
Caution:Donotopenthecase.Therearenoserviceablepartsinside.If
youdropanythingintotheunitduringinstallation,consultwithyourBoss
DealeroranauthorizedBossservicecenter.
Mounting and Wiring precautions
Thisunitisexclusivelyforvehicleswithanegativeground,12Vpower
l
supply.
Thisunitmaybeinstalledwithadditionalmobileaudiocomponents,such
l
asadigitalcamera.
l Alwaysusegreatcarewhenattachinganythingtoavehicle.Check
clearancesonbothsidesoftheplannedinstallationbeforedrillingany
holesorinstallinganyscrews.
l Agoodchassisgroundconnectioniscriticaltominimizeresistanceand
avoidnoiseproblems.Usetheshortestwirepossibleandsecurely
connectittothecarchassis.
l WhenroutingRCAcables,keepthemawayfromthepowercablesand
outputspeakerwires,engine,exhaustsystem,ect.Heatmaydamage
wires.
l Ifthefuseshouldblow,makesurethatallconnectionsarecorrect,the
cableshavenotcausedashortcircuit,andnowiresaredamaged.Then
replacethefusewithanewfuseofthesameamperagevalueasthe
originalfuse.Whenreplacingafuse,neverletthepowercabletouchany
metalpartorotherwire.
l Neverletdisconnectedcablesorterminalstouchmetalonthecarorany
otherconductingmaterial.
l Topreventshortcircuit,donotremovethecapsfromunusedterminalsor
fromtheendsofunconnectedcables.
Page 21

19
l Insulateunconnectedwireswithvinyltapeorothersimilarmaterial.
vehicle
’
s
negative
battery
lead
before
making
any
power
connections.
Warning!
Topreventshortcircuitsduringinstallation,disconnectthe
Installation procedure
ScrewtheInstallationBrackettothebeamorplywoodusingtheST4.2x16
1.
screws.
2.InstallingthetrimringontheplayerusingtheTB2.6x6screws.
3.Pluginpowerharnessandaudio/videosourcecablesintotheoverhead
monitor.
4.AttachtheplayertotheInstallationBracketusingthePM4x8.
5.Checkthecar’sbrakelights,blinkers,wiper,etc.toensuretheyare
workingproperty.
7 Screws TB 2. 6x6
8 Screws ST 4. 2x16
4 Screws PM 4x8
Page 22

20
Page 23

21
System
Setup
Press SETUP on the remote control to access the setup menu.
/
/
/
ENTER
.
Press
SETUP
ANGLE
MARK:
OSD
LANG:
CAPTIONS:
SCREEN
SAVER:
DOWNMIX:
TV
TYPE:
DISC
MENU:
SUBTITLE:
AUDIO:
1.
2. Press ▲
3. Press
Press ▲
4.
5. Press
6. Press to return the previous grade menu
7.
Menu Description
GENERAL SETUP
▲
button to select among menu items.
▲
▲
▲
button to change the values of selected option .
▲
button to select the option you wish to change.
to confirm your selection.
to exit the setup menu.
Turn the multiple-angle feature on or off ,
the multiple-angle must be prerecord on the DVD disc.
ON OFF
Selects a language for menu.
ENGLISH FRENCH SPANISH ITALIAN
PAGE
SPEAKER SETUP
PAGE
PREFERENCE
PAGE
Selects the caption .
ON OFF
Protects the screen if it paused about
5 minutes.
ON OFF
LOGO TYPE:
dem Standard-logo und einem aufgenommenen Logo
gewählt werden.
DEFAULT CAPTURED
LT/RT STEREO
PAL NTSC
Selects the audio track language.
ENGLISH GERMAN
CHINESE
displayed on the screen.
ENGLISH SPANISH GERMAN
CHINESE
Auswahl des Startbildes. Es kann zischen
Applies to Dolby digital sound.
Selects the TV system .
EFR NCH
IRUSS AN THAI
Selects the language of the subtitles
FRENCH
RUSSIAN
SPANISH
THAI OFF
Selects the language of the current dis
ENGLISH FRENCH SPANISH GERMAN
CHINESE RUSSIAN THAI
c.
Page 24

22
PARENTAL:
Restrictstheviewingofmoviestochildren
PASSWORD:
DEFAULT
:
ofappropriateagelevelsonly.Youcanselect1to8.
1KIDSAF (safeforchildren)
2G(generalaudience)
3PG (parentalguidancesuggested)
4PG13 (somematerialunsuitableforchildrenunder13)
5PGR (somematerialunsuitableforchildrenunder17)
6R(somematerialunsuitableforunder17)
7NC17 (notrecommendedviewingforchildrenunder17)
8ADULT (Onlyforadultsduetographiccontent.Thisisthe
defaultsetting.)
Afteryouselecttheparentalsetting,pressENTER,then
enterthe4-digitpassword(defaultis3308).PressENTER
againtoconfirm.
Letsyouchangethe4-digitpassword
usingthenumberkeysontheremotecontrol.The
defaultpasswordis3308,butnolongerworksafteryou
changethepassword.
Resetsallsettingstothefactorydefaults.
Specifications
Specificationsanddesignaresubjecttochangewithoutnotice.
PowerSource Vehiclebattery(DC+10V~+18V)
OperatingVoltage DC+14V
Mechanism ManualOpen/Close
DisplayAngle VerticalAdjustable:Up/Down<120°
Pixel 1152x234
HighBrightness 350cd/m
Viewingangle(up/down/left/right) 45/65/65/65
Operatingcurrent <2000mA(TypicalVDD=14V)
DomeLight <2W
2
OperationTemperature -10℃ to+50℃
StorageTemperature -20°Cto+70°C
Page 25

23
Troubleshooting
Problem
Cause
Solution
.
2.
Ifoperationfreezes,thescreengoesblackortheunitshouldotherwisenot
functionproperly,tryturningtheunitonandoff.Iftheunitdoesnotrespond,
presstheresetswitchontheFrontPanel.
Playerdoesnot
playdisc
Theplayer
suddenlystoppedworkingor
thescreenwent
black
Playerdoesn’t
turnon
Playeroperates
erratically
PictureSkips
Occasions
Discinsertedincorrectly
Discformatisnot
supported
Discisdirtyorscratched Cleanorreplacethedisc.
Playererror
Thecarignition(or
ACC/Accessory)isoff
Condensationintheplayer
Batteryneedsreplacing Replacethebattery.
DirtyIRwindowonthe
Playerorremotecontrol
Looseconnections
Discisdirtyorscratched Cleanorreplacethedisc.
Reinsertthediscwiththelabel
sideup(facingtheceiling).
Checkthediscformat.
Tryturningtheplayeroffandon
Iftheplayerstilldoesn’t
respond,presstheresetbutton.
Insertthekeyintotheignition
andturnittoACC/Accessory.
Waitforaboutonehouroruntil
condensationevaporates.
Cleantheplayer’sandthe
remotecontrol’sIRwindows.
Checkandtightenall
connections.
Blurpictureon
thescreen.
Thepictureon
thescreenis
dark.
Interferedbyshortdistancedstrong
interference.
(E.g.highvoltagewire,
transformationstationor
aircraftetc…)
1.Theequipmentlocates
atalowtemperature
area.
Brightnessissettoo
low.
Movethevehicleawayfrom
theinterference.
1.Thisisthecharacteristicsof
LCDdisplayinlowtemperature,
itwillrestoretonormal
brightnessafterstartingthe
displayforfewminutes.
2.Adjustthebrightnesssetting.
Page 26

Legal Notice and Credit Line:
“Made for iPod,”and“Made for iPhone,”mean that an electronic accessory has
been designed to connect specififically to iPod or iPhone, respectively, and has
been certifified by the developer to meet Apple performance standards.
Apple is not responsible for the operation of this device or its compliance with
safety and regulatory standards. Please note that the use of this accessory with
iPod or iPhone,may affect wireless performance.
iPhone, iPod, iPod classic, iPod nano, and iPod touch are trademarks of Apple Inc.,
registered in the U.S. and other countries.
24
Page 27

Page 28

 Loading...