

Bose Lifestyle 135 series III Setup Manual
i-=f
Lifestyle® 135 series Ill
home
entertainment
Setup
Guide
I
Guia
de
instalaci6n
I
Guide
system
d
installation

Important
Safety
Information
Please
take
Please
system
properly
&
&
®
_W_A_R_N_I
&
read this guide
follow
to
time
the
its
enjoy
and
lightning
The
uninsulated,
constitute
exclamation
The
the
to
WARNINGS:
reduce
To
•
Do
•
vases,
as
part
prevent
To
•
receptacle.
Do
•
flash
dangerous
risk
a
presence
N_G_:
the
expose
not
on
system.
the
of
electric
place
not
of
point
of
_c_o_nt_ai_ns_sm_a_ll_p_a_rt_s
risk
this
near
or
Insert
any
instructions
the
advanced
arrowhead
with
voltage
electric
shock.
within
important
or
fire
of
apparatus
apparatus.
the
Liquids
shock,
fully.
flame
naked
features.
CAUTIO
REFER
symbol
within
equilateral
an
operating
_w_h
electrical
dripping
to
cause
can
the
match
sources,
carefully.
owner's
this
in
Please
TO REDUCE THE
N:
DO NOT REMOVE COVER (OR
NO USER-SERVICEABLE PARTS INSIDE.
SERVICING TO QUALIFIED PERSONNEL.
within
system
the
triangle,
maintenance
and
guide
guide
this
save
RISK OF ELECTRIC SHOCK,
BACK
equilateral
an
enclosure
marked
as
instructions
i_ch_m_ay_be_a_ch_o_k_in_g
expose
not
do
shock,
and
electronic
fire
a
line
the
of
candles,
lighted
As
a
wide
splashing,
or
any
with
failure
blade
such
and/or
as
It
future
for
).
triangle
may
that
the
on
_ha_z_a_rd_.
product
the
not
do
products
hazard.
plug
cord
on
operate
and
up
set
you
help
will
reference.
presence
the
to
user
the
alerts
sufficient
of
be
system,
owner's
this
in
_N_ot_s_u_ita_b_le_f_o_r
rain
to
objects
place
care
use
,
wide
the
to
near
or
magnitude
alert
intended
is
to
guide.
c_h_ild_r_en_un_d_e_r
moisture.
or
liquids,
with
filled
liquids
spill
to
not
AC
the
of
slot
apparatus.
the
your
of
to
user
the
a_g_e_3_.
such
any
into
(mains)
CAUTIONS:
1.\
modifications
no
Make
~
rrlDOLBY
~TRUEHD
The terms
United
This product
technology outside of this product
Wi-Fi
©2014
without written permission.
•
regulatory
Long-term
•
using
.-a..._:
~
~
Digital
HDMI
States and other countries.
a registered mark
is
Bose Corporation. No part of this work may be reproduced, modified, distributed, or otherwise used
compliance,
exposure
headphones,
Surround
and the
protected by certain
is
especially
Manufactured under
trademarks of
DTS
For
Licensing Limited.
trademarks, and
Reserved.
HDMI
the Wi-Fi
of
to
patents, see http://patents.dts.com. Manufactured under
system
the
to
system
and
may
music
loud
extended
for
license
Laboratories.
Dolby
DTS,
Digital
DTS
trademarks or registered trademarks
are
Logo
intellectual
prohibited without a
is
Alliance.
accessories.
or
performance.
hearing
cause
periods.
Dolby
from
the Symbol,
Surround
property rights
Unauthorized
damage.
Laboratories.
DTS
&
a trademark of
is
Microsoft. Use or distribution of such
of
license
from Microsoft
and the
alterations
best
is
It
Dolby
Symbol
DTS,
of
compromise
may
DTS,
volume
from
Inc. All
DTS
in
extreme
avoid
to
and the double-D symbol
license
together are registered
©
Inc.
Licensing LLC
HDMI
safety,
when
are
Rights
the
English
2-
NOTES:
•
The
product
•
Where
readily
•
The
product
or
on
•
This
product
•
The
speaker
Please
•
Changes
this
equipment.
•
Operate
label
the
mains
operable.
must
boats.
is
wire
check
or
modifications
this
product
is
located
plug
be
intended
and
your
local
on
the
or
appliance
used
indoors.
to
be
used
interconnect
building
not
expressly
within
the
temperature
bottom
coupler
It
is
only
cables
codes
Important Safety Instructions
1.
Read
these
instructions.
2.
Keep
these
instructions.
3.
Heed
all
warnings.
4.
Follow
all
instructions.
5.
Do
not
use
this
6.
7.
8.
9.
10.
11.
12.
13.
14.
-
(
Clean
only
Do
not
block
Do
not
install
amplifiers)
Do
not
defeat
with
one
wider
blade
or
the
an
electrician
Protect
the
Only
~
~
Unplug
Refer
a
the
been
the
point
where
use
attachments/accessories
Use
apparatus.
~
injury
this
all
servicing
way,
such
apparatus,
dropped.
,..-,-.
I+~
+I
l:i..-1
ID'II
~
m~•ffil~sc
Bose
and
E
other
The
apparatus
with
a
dry
any
ventilation
near
any
that
produce
the
safety
than
third
prong
for
replacement
power
cord
they
only
with
from
apparatus
to
as
power-supply
the
apparatus
This
delivered
helps
disposal
shop
Corporation
relevant
complete
near
cloth.
openings.
heat
sources
heat.
purpose
the
other.
are
provided
from
being
exit
from
the
cart,
When
a
cart
tip-over
during
lightning
qualified
cord
has
symbol
means
to
an
protect
natural
and
recycling
where
you
hereby
provisions
declaration
water.
of
A
grounding
of
the
walked
the
apparatus.
stand,
is
personnel.
or
been
appropriate
bought
declares
of
of
conformity
or
the
is
used
neither
with
the
included
for
the
correct
approved
range
Install
such
as
the
polarized
type
for
your
obsolete
on
specified
tripod,
used,
use
storms
Servicing
plug
is
exposed
the
product
resources,
of
t~is
th1s
that
Directive
Important
back
of
the
product.
as
the
disconnect
designed
power
by
damaged,
collection
product.
this
can
nor
supply
with
the
type
by
Bose
of
32°F
in
accordance
radiators,
or
grounding-type
plug
has
safety.
If
outlet.
or
pinched
the
manufacturer.
bracket,
caution
or
product,
when
when
is
required
to
rain
must
not
facility
human
product
1999/5/EC
be
found
tested
provided.
system
of
wire
and
Corporation
to
104°F
with
heat
registers,
two
blades
the
provided
particularly
or
table
specified
moving
unused
contact
for
when
liquid
has
or
moisture,
be
discarded
for
health
and
your
is
in
compliance
and
all
at:
www.Bose.com/compliance.
Safety
device,
for
are
(0°C
the
been
recycling.
other
such
use
outdoors,
not
approved
cable
required
could
void
to
40°C).
manufacturer's
stoves,
plug.
A
and
a
plug
does
at
plugs,
by
the
cart/apparatus
long
periods
the
apparatus
spilled
does
as
the
environment.
local
municipality,
applicable
disconnect
in
for
for
the
user's
or
other
polarized
third
grounding
not
fit
convenience
the
manufacturer,
of
time.
has
or
objects
not
operate
household
Proper
disposal
with
the
essential
EU
Information
device
shall
remain
recreation
in-wall
in-wall
instructions.
apparatus
plug
into
combination
normally,
waste,
For
disposal
directive
vehicles,
installation.
installation.
authority
has
two
prong.
your
outlet
receptacles,
or
sold
been
damaged
have
fallen
or
and
and
recycling
more
information
service,
requirements
requirements.
to
operate
(including
blades
The
wide
,
consult
and
with
to
avoid
in
into
has
should
be
or
the
on
the
English- 3
Important
Safety
Information
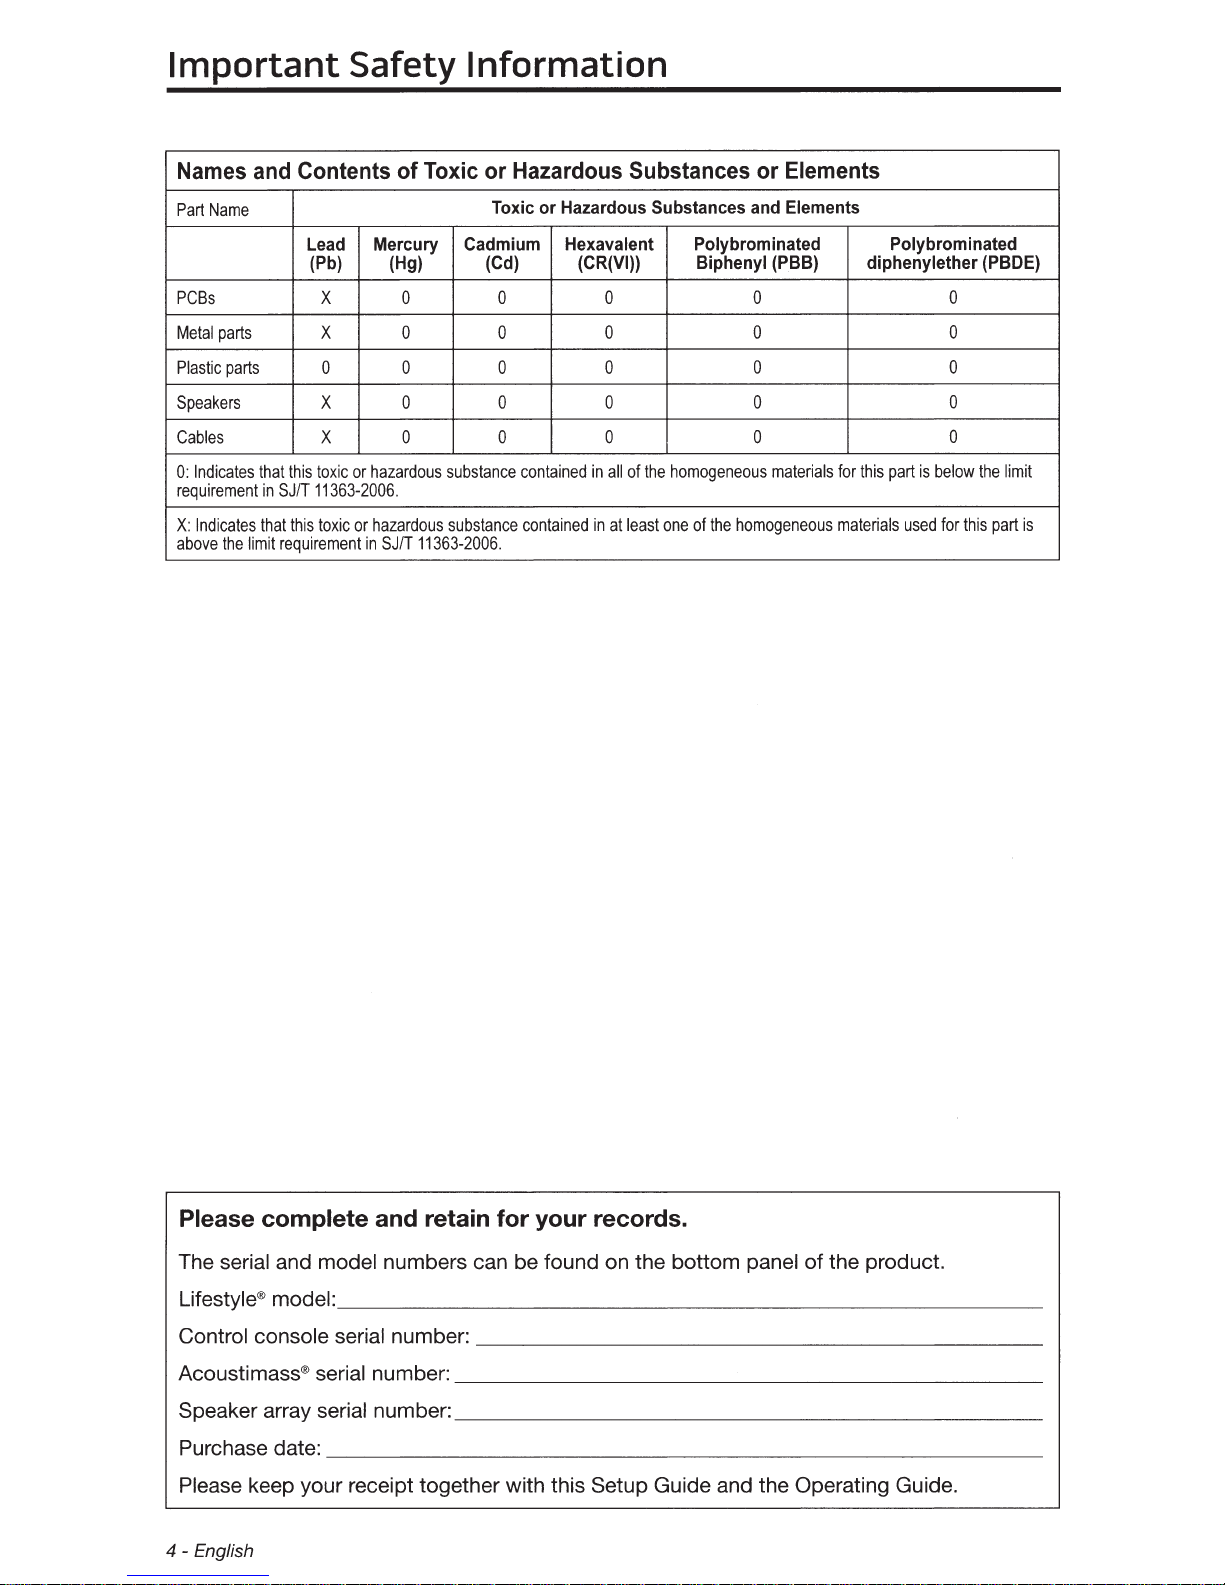
Names and Contents
Part
Name
Lead Mercury
(Pb) (Hg) (Cd)
PCBs
Metal
parts
Plastic
parts
Speakers
Cables
0:
Indicates
requirement
X:
Indicates
above
the
limit
that
X
X
0 0 0 0
X
X 0 0 0 0
this
toxic
or
in
SJ/T
that
this
requirement
hazardous
11363-2006.
toxic
or
hazardous
in
of
Toxic
0
0 0 0
0
SJ/T
11363-2006.
or
Hazardous Substances
Toxic
or
Hazardous Substances and Elements
Cadmium Hexavalent Polybrominated
0 0 0 0
0 0 0 0
substance
substance
contained
contained
(CR(VI))
in
all
of
in
at
least
or
Elements
Biphenyl (PBB) diphenylether (PBDE)
0 0
0 0
the
homogeneous
one
of
the
materials
homogeneous
Polybrominated
for
this
part
materials
is
used
0
below
for
this
the
limit
part
is
Please
complete
and
The serial and model numbers can be found on the bottom panel
Lifestyle® model:
~ontrol
console serial
Acoustimass®serial
Speaker array serial
Purchase date:
___________________________
numbe~
numbe~-----------------------~
numbe~-----------------------~
____________________________
Please keep your receipt together with this Setup Guide and the Operating Guide.
4-
English
retain
for
your
records.
----------------------~
of
the product.
_
~

Introduction
Contents
About
Introducing
Unpacking
Carton contents................................................................................................. 6
Accessories boxes ............................................................................................. 6
your Lifestyle® system.......................................................................... 5
SoundTouch™
About
Cables and power cords box..................................................................... 6
Essentials box............................................................................................. 7
Control console box................................................................................... 7
SoundTouch™ on your system..................................................... 5
the
System
from
Bose............................................................ 5
System Setup
Putting
Wall
Set up
Set up
Set up
the
system together..........................................................................
mounting
the
Soundbar .........................................................................................
the
control console...............................................................................
the
Acoustimass® module...................................................................
the
sound bar..........................................................................
10
10
10
12
15
First
time
Set up
Turnyoursystemon
Install
Add
the
If
you have setup problems............................................................................. 20
Contacting
startup..............................................................................................
the
remote
the
SoundTouchTM
system
customer
to
control ........................................................................
..................................................................................
app ..........................................................................
your
existing
service.......................................................................... 20
SoundTouch™ account...........................
17
17
18
19
19
English- 5

Introduction
About
Thank you for choosing a
easy-to-use system delivers superior performance for both music and video. This
guide provides step-by-step instructions for setting up your new system. Refer
the Operating guide for system features.
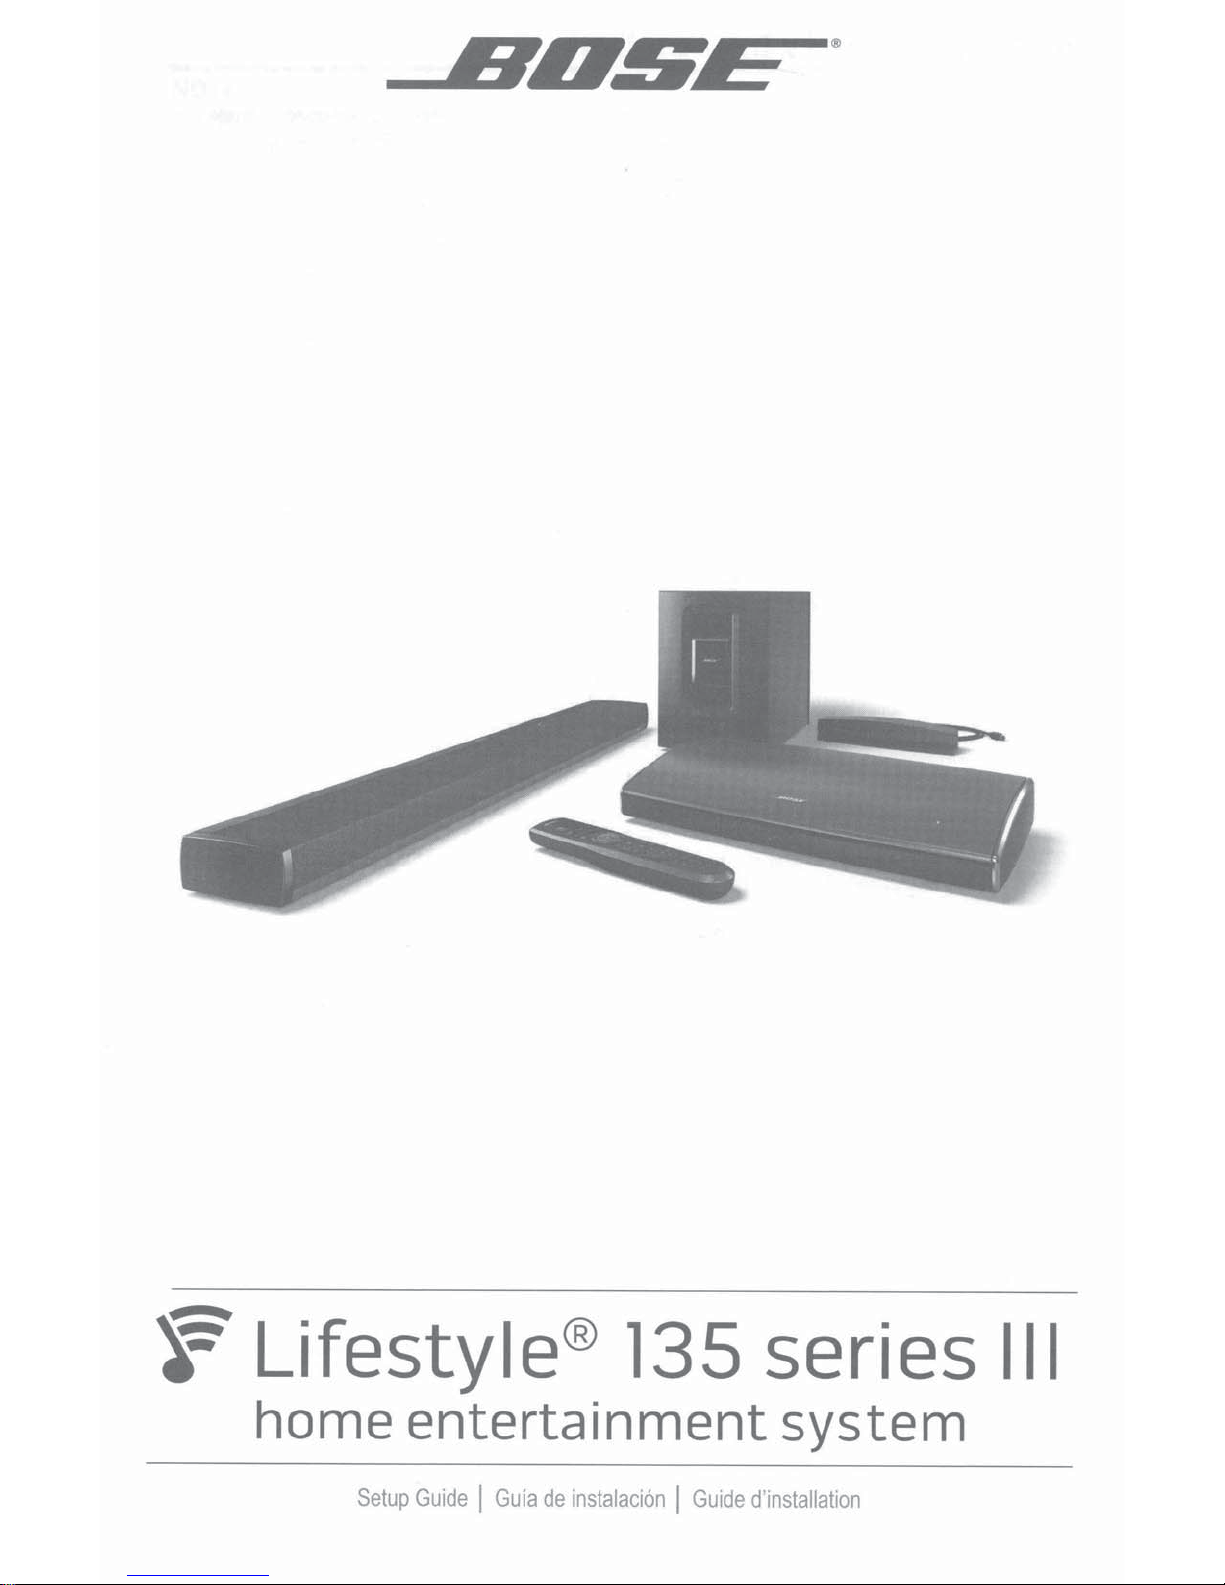
Your new home entertainment system includes a soundbar, control console,
Acoustimass® module, SoundTouch™ wireless adapter and a universal remote
control.
Introducing
With SoundTouch™, you can stream Internet radio, music services (where available),
and your music library. If you have
favorite music
your
Lifestyle®
Bose®
SoundTouch™
in
any room you want.
system
Lifestyle® system for your home. This elegant and
to
Wi-Fi®
from
at home, you're ready
Bose
to
enjoy your
Key Benefits
• Enjoy wireless access
• Stream your favorite music easily with personalized Presets.
to
Internet radio, music services and your music library.
• Works with your existing home Wi-Fi network.
• Free
• Simply add additional systems at any time for a multi-room listening experience.
• Wide selection
SoundTouchTM
powerful control.
of
any room.
app for your computer, smartphone or tablet provides more
Bose®
audio systems lets you choose the right solution for
About SoundTouch™on your system
The SoundTouch™ wireless adapter
your Lifestyle® system. Setting up your wireless adapter is part
process. Do not connect your wireless adapter until prompted by
page 18.
System Features
• Enables your
using SoundTouch™.
• SoundTouch™ source lets you view and control your Presets, Recents, and
Now Playing content on your
Bose®
home entertainment system
TV.
in
the essentials
box
enables SoundTouch™ on
of
the
UNIFY®
UNIFY®.
to
stream music wirelessly
setup
See
• The SoundTouch™ app lets you explore Internet radio, music services (where
available), and your music library from your computer, smartphone
• Personalize up
remote control.
For information on using SoundTouch™, download the SoundTouch™ user's guide
for your Lifestyle® system from the Bose website.
6-
English
to
six Presets
or
tablet.
to
deliver your music with just one touch from your
Unpacking
the
System
Carefully
Note:
Carton
unpack the carton and confirm that the
the system is damaged,
of
part
If
Bose®
carton.
dealer
or
Contents
Sound bar
Accessories
following
not use it. Contact your authorized
do
Bose customer service. Refer
Acoustimass® module
boxes
parts are included.
the contact sheet
to
in
the
Each box is identified by
indicate where parts are
setup steps
Cables
(!)The
to
and
appropriate power cords for your region are supplied.
power
Audio input cable AC power cord AM antenna
icon on the box. These icons appear
an
located.
cords
box
the system
in
English-
7
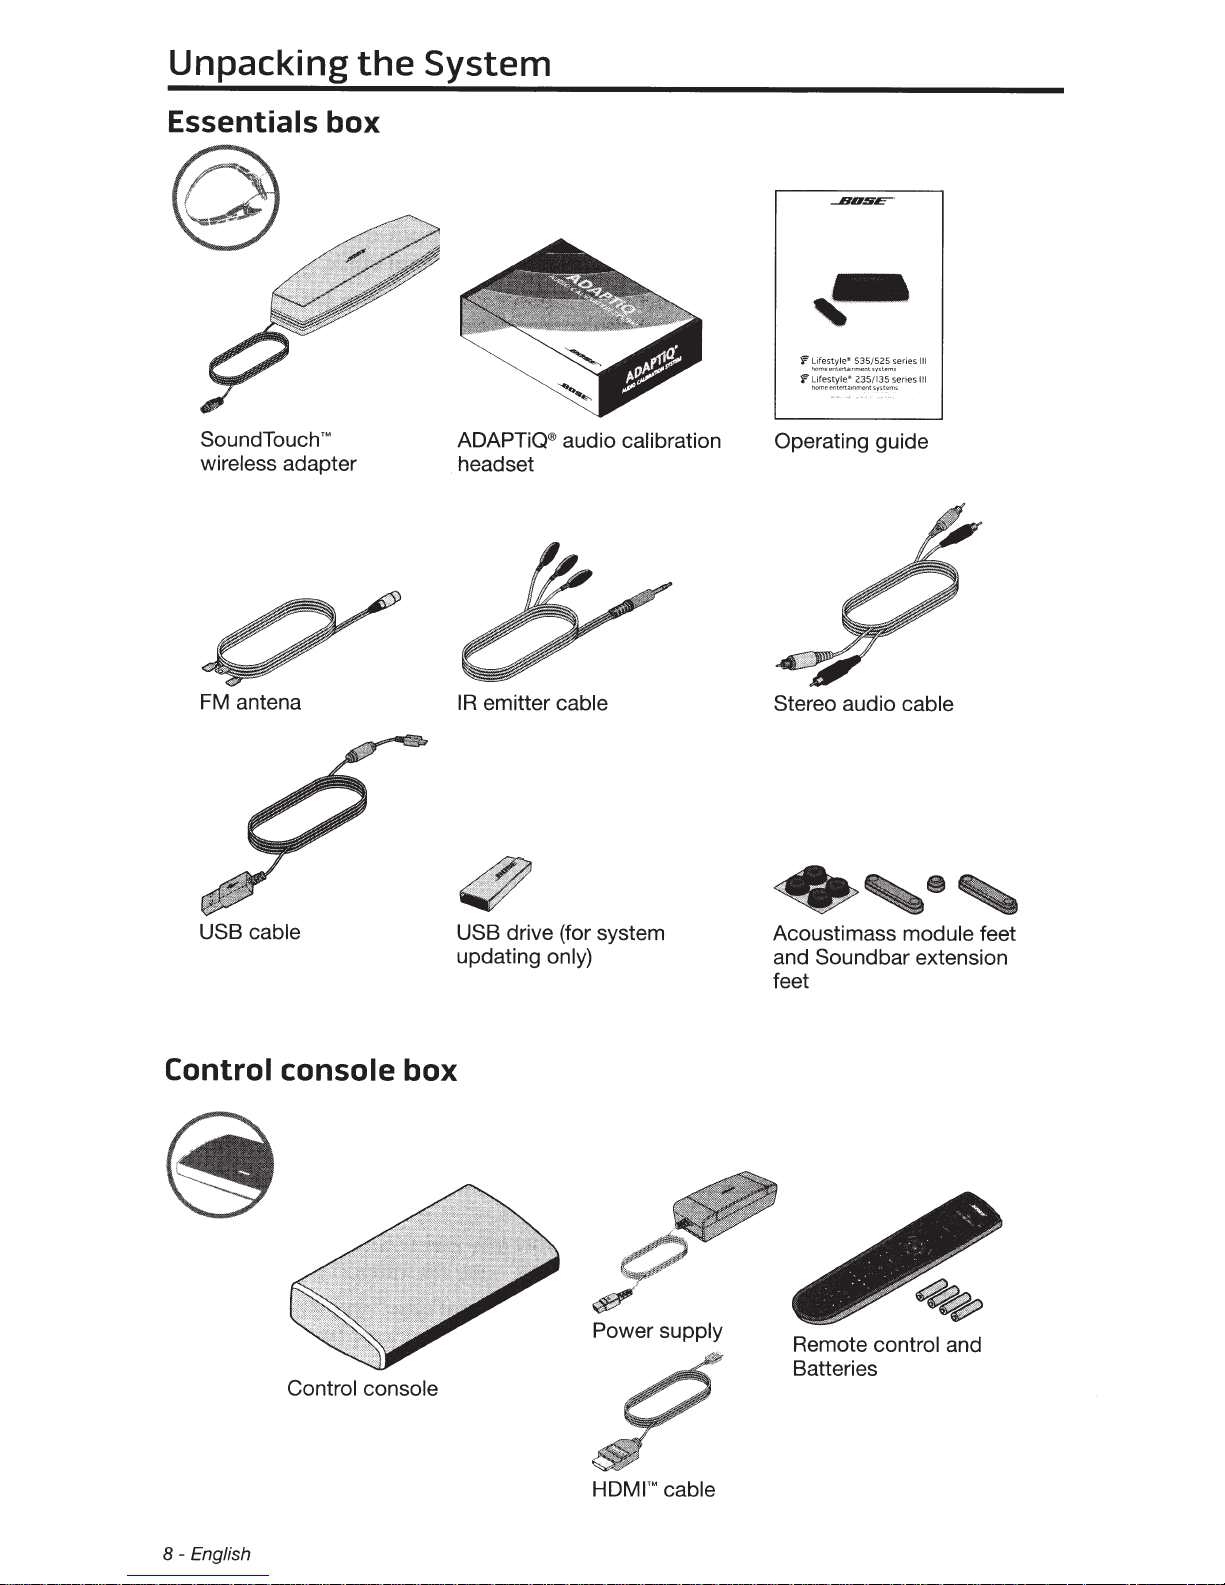
Unpacking
the
Essentials box
System
~Lifestyle
®
535/525 series
homeen
te
rta!nme
homeentertar
nt
"
235/135 series
nm
entsyst
~Lifestyle
Ill
svst
ems
Ill
ems
SoundTouch
TM
wireless adapter
FM
antena
USB
cable
ADAPTiQ®
audio calibration
headset
IR
emitter cable
USB
drive
(for system
updating only)
Operating guide
Stereo audio cable
Acoustimass module feet
and Soundbar extension
feet
Control console box
Control
8-
English
console
Power supply
HDMI'M
cable
Remote control and
Batteries

System Setup
Putting
Notes:
The Lifestyle® 135 series
•
surfaces
the soundbar
Keep other
•
cordless
away from the sound bar and Acoustimass®
Wall
The sound bar can be mounted on a
WB-135 Wall
CAUTIONS:
• Do not use any
mount the sound bar on a
Do not
•
damage that may occur to your sound bar as a
will not be covered by the
mounting
the
your room
of
should
wireless
phones, microwave ovens,
Mount Kit.
place
the sound bar near or over a source
system
home entertainment system uses the reflective
Ill
deliver
to
not be
equipment, such as
placed
the
wall-mounting
wall.
limited
together
wide, spacious sound. For best sound
inside a cabinet, or
wireless
other
or
sound bar
To
wall.
hardware other than the WB-135 Wall
warranty on your Lifestyle® system.
computer network routers,
WI-FI®
module.
this, contact
do
of
result
quality,
a corner.
diagonally
enabled
heat, such as a fireplace. Any
of
audio/video devices
Bose®
placing it over a fireplace
in
purchase the
to
Mount Kit to
the
Set
What you need:
A.
up
Sound bar Audio input
Lay the sound bar grille-side down on the
Notes:
protect the surface
To
•
under the sound bar
sound bar could be used for this purpose.
Remove
•
place.
sound
protective
all
bar
cable
table
you may want
table
your
of
until setup is complete. The foam bag removed from the
films.
These may affect acoustic performance if
Power
front
in
cord
TV.
your
of
put a protective
to
OPTIONAL:
speaker array
extension feet
cloth
in
left
English- 9
System Setup
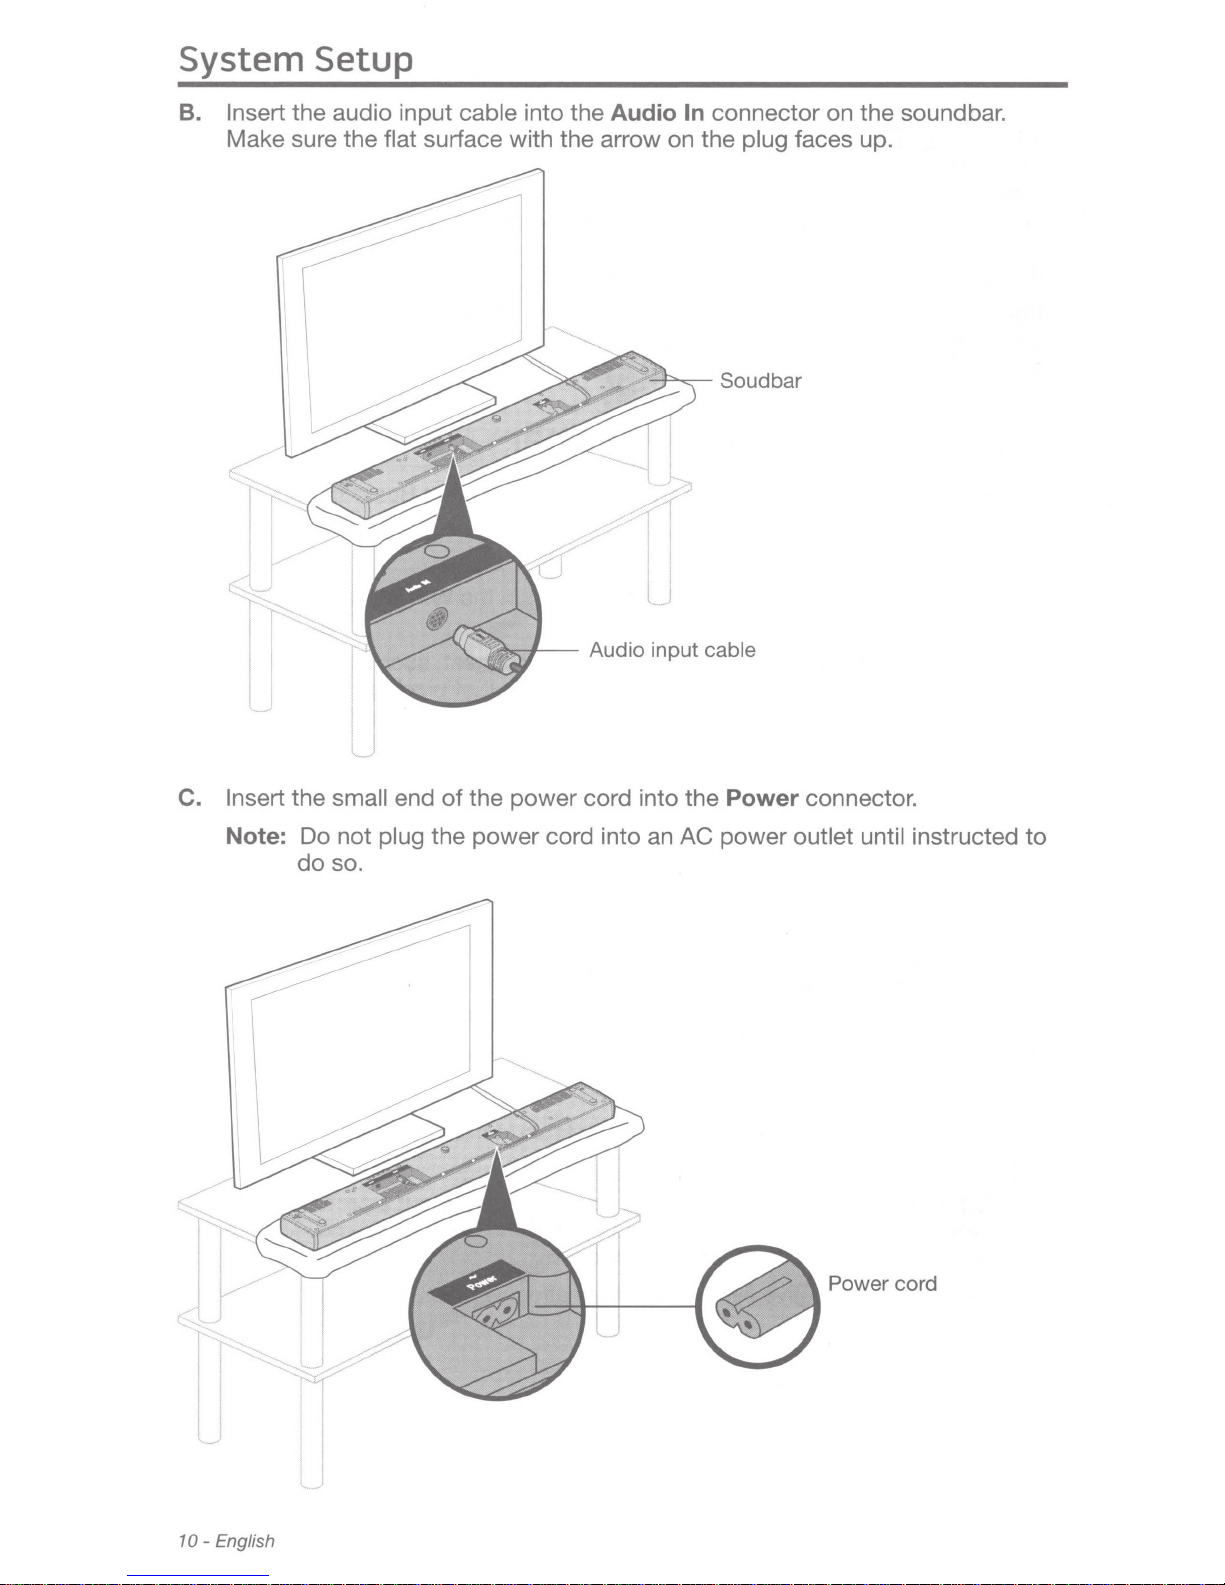
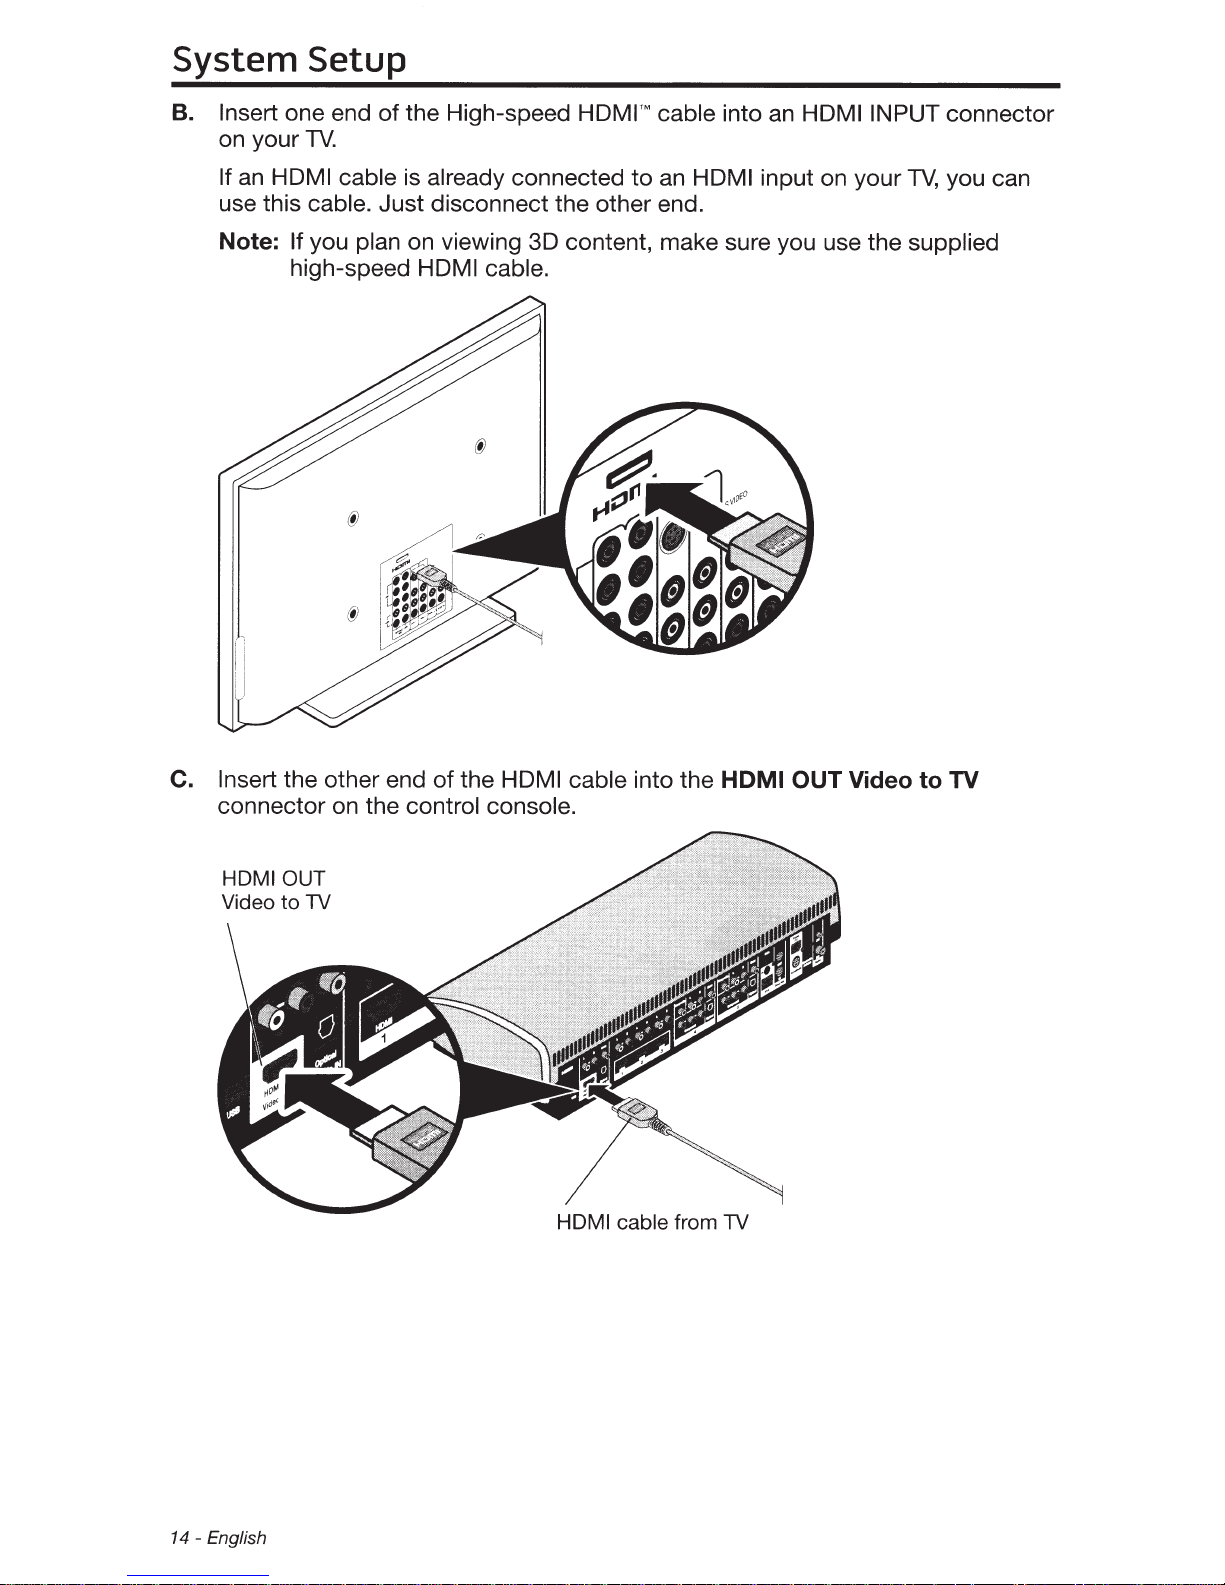
B.
Insert the audio input cable into the Audio In connector on the sound
Make sure the flat surface with the arrow on the plug faces up.
, I
bar.
_l
(.
/
r---
I I
"'
I I
I
I I
C. Insert the small end
Note: Do not plug the power cord into an AC power outlet until instructed
do
so.
of
the power cord into the Power connector.
I
LJ
to
,
L:r/-
I I
I
I I
' '
10-
English
Power cord
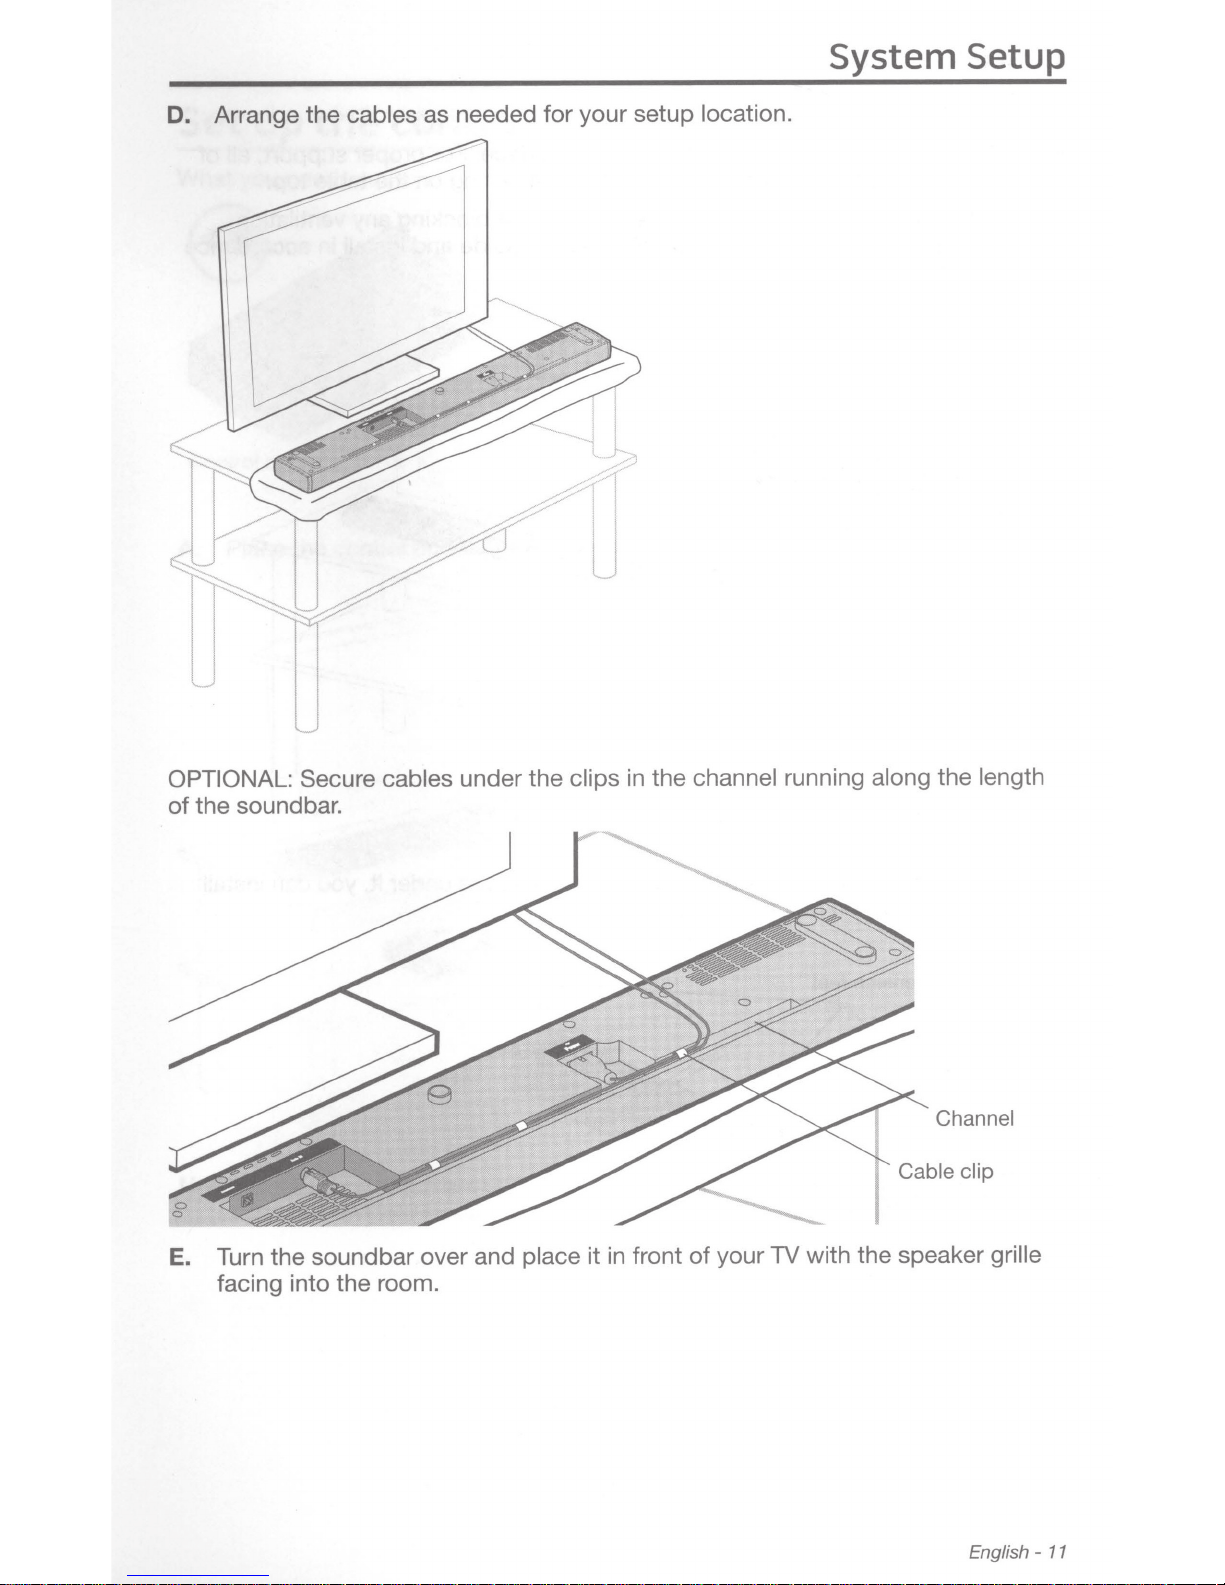
D. Arrange the cables
needed for your setup location.
as
System Setup
OPTIONAL: Secure cables under the clips
the sound
of
Turn the soundbar over and place it
E.
bar.
in
facing into the room.
the channel running along the length
in
Channel
Cable clip
with the speaker
TV
your
of
front
grille
English-
11
System Setup
CAUTIONS:
•
The soundbar must be
the feet on the bottom
placed
of
on a
solid flat
surface. For proper support,
the soundbar must be resting on the
table top.
all
of
• When positioning the soundbar, make sure it is not
openings on your
TV.
Refer
to
your TV's owner's guide and
with the manufacturer's instructions.
blocking
any
install
ventilation
in
accordance
OPTIONAL:
the optional
Optional
To
raise the soundbar and allow
extension feet
extension
:te~e~t
(supplied).
-------~-
more space under it, you can
install
12-
English

System Setup
Set up
What you need:
Control console
Place the
A.
the
control console
control console
Power
supply
flat, stable surface near your
on a
High-speed
HDMrM
cable
Power cord
TV.
your system is
Note:
Until
control console
positioned for easy access
Control console
completely installed,
it may be
to
helpful
its rear connector
keep the
to
panel.
English-
13
System Setup
B.
Insert
on your
If
use this
one end
TV.
an
HOM I cable
cable. Just disconnect the other end.
of
the High-speed HOM
is
already
connected
I™
to
cable
an
HOM I
into an HOM I INPUT
input on your
TV,
connector
you can
Note:
If
high-speed
C. Insert
the other end
connector on the
you
plan on viewing
@
@
control console.
30
HDMI cable.
of
the
HOM I cable into the
content, make sure you use the supplied
HOM I
OUT
Video to TV
HDMIOUT
Video
to
TV
HOM I
cable from TV
14-
English
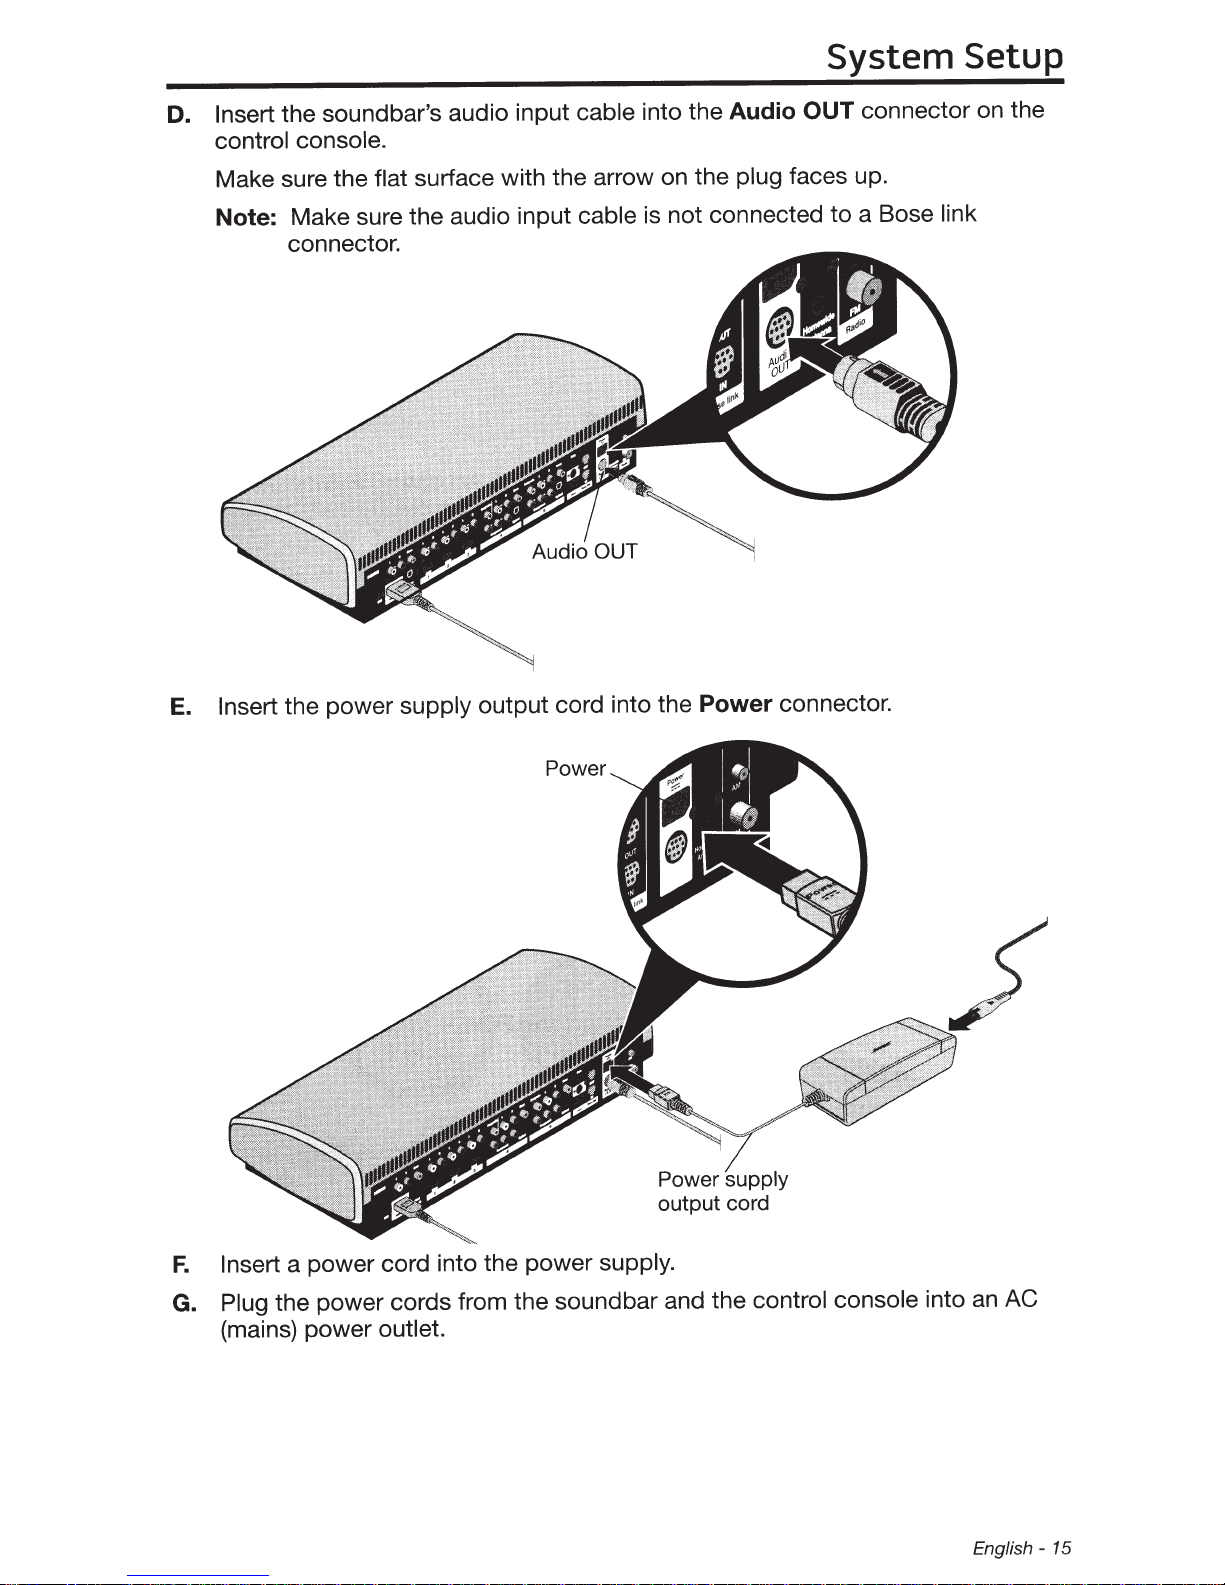
D.
Insert
the sound bar's audio input cable into the
Audio
control console.
Make sure the flat surface with the arrow on the plug faces up.
Note:
Make sure the audio input cable is not connected
connector.
System Setup
connector on the
OUT
a Bose link
to
Insert the power supply output cord into the
E.
Power
Insert
F.
Plug the power cords from the soundbar and the control console into
G.
a power cord into the power supply.
Power
Power supply
output cord
connector.
(mains) power outlet.
an
AC
English-
15
System Setup
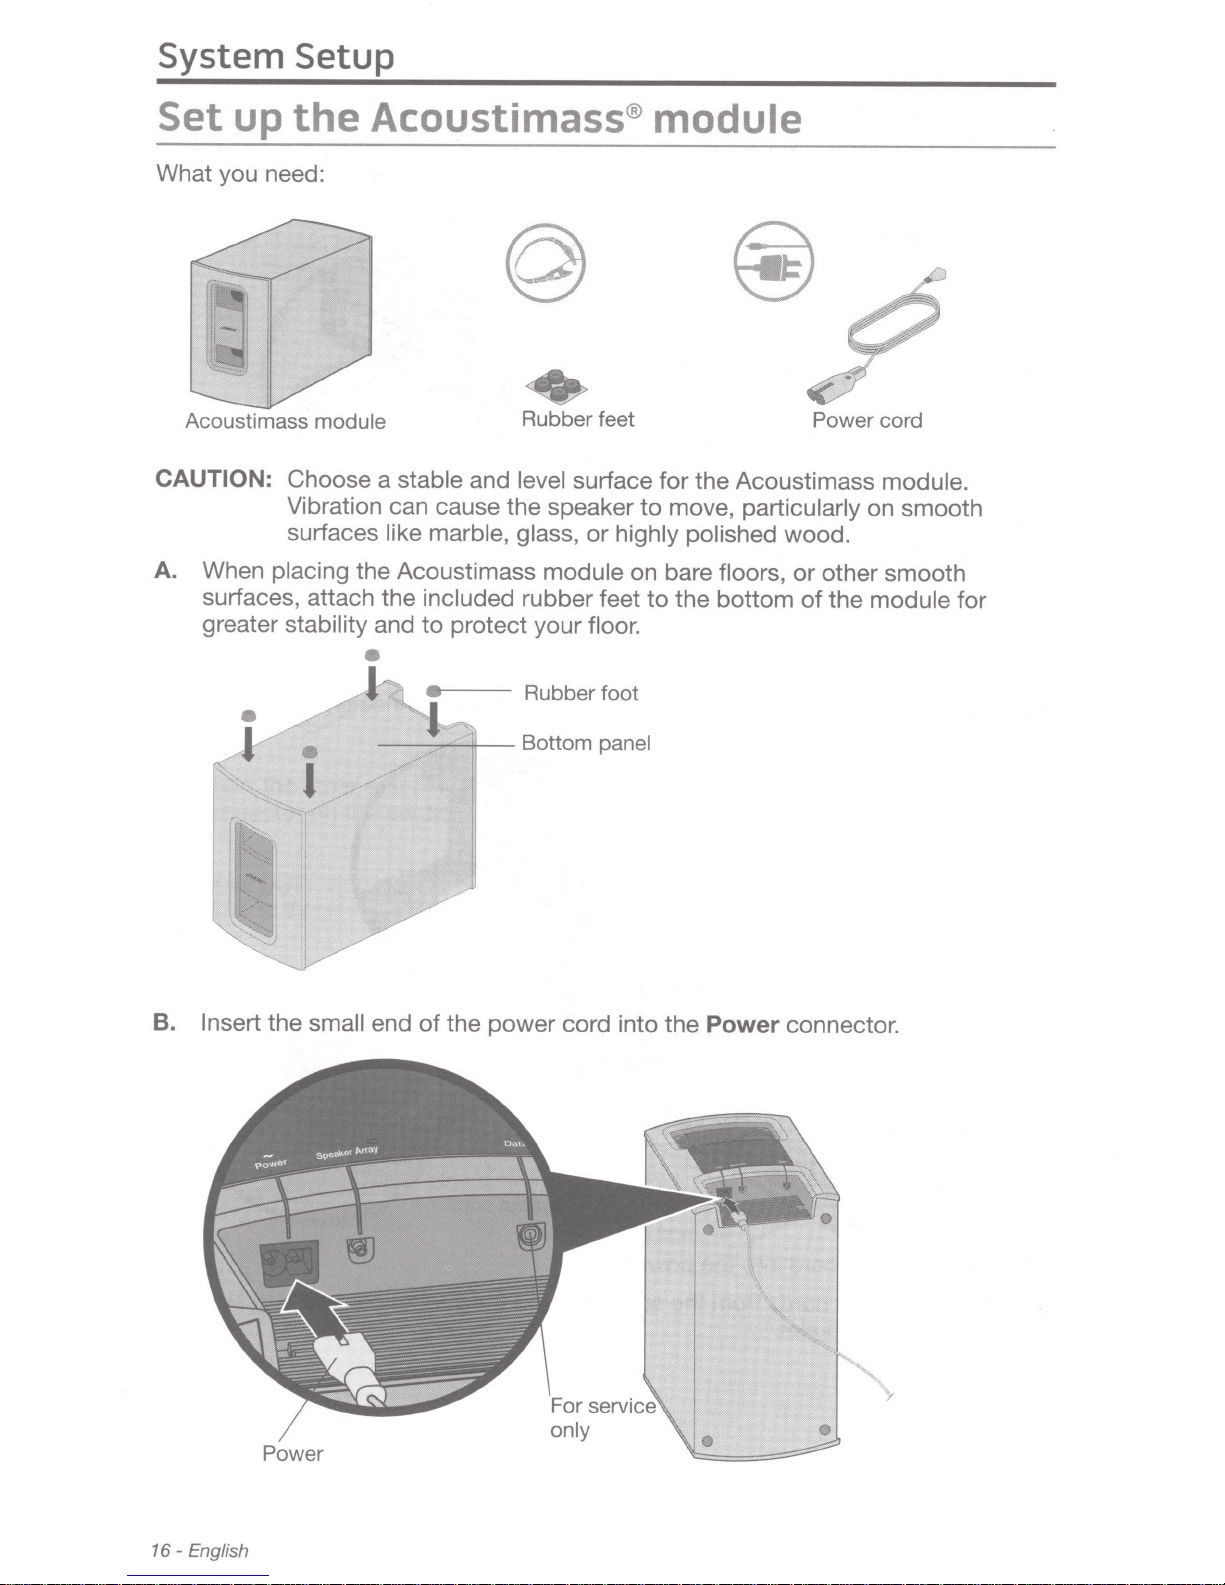
Set
What you need:
CAUTION:
A.
up
the
Acoustimass
Choose a stable and
Vibration can cause the speaker
surfaces like marble, glass,
When
surfaces, attach the included
greater
placing the Acoustimass
stability and
Acoustimass® module
module
•
to
protect your
Rubber feet Power cord
•
level
surface for the Acoustimass
to
or highly polished
module on bare
rubber feet
floor
to
.
move,
the bottom
particularly
floors,
wood.
or
other smooth
of
module.
on smooth
the
module
for
B.
Insert the small
.
_I/
r
""
I
I
end
/
of
the power cord into the
Bottom
panel
Power
connector.
Power
16-
English
or servi
only
C.
Place
the Acoustimass®
module according
System Setup
the following guidelines:
to
• For best sound quality, stand the Acoustimass
as your
same
The front opening
•
• Make sure there is
wall
TV,
of
an
the
or along
module
AC
any other
(mains) power
can face any direction.
wall
outlet
module
the front third
in
nearby.
on its feet
along
the room.
of
the
CAUTION:
Note:
D.
Remove
place.
the Acoustimass
Plug
Do not operate the Acoustimass
side, or top.
protective
all
films.
module's
These may affect acoustic performance if
power cord into
module on its front end, back end,
left
an
(mains) power
AC
outlet.
in
English- 17
System Setup
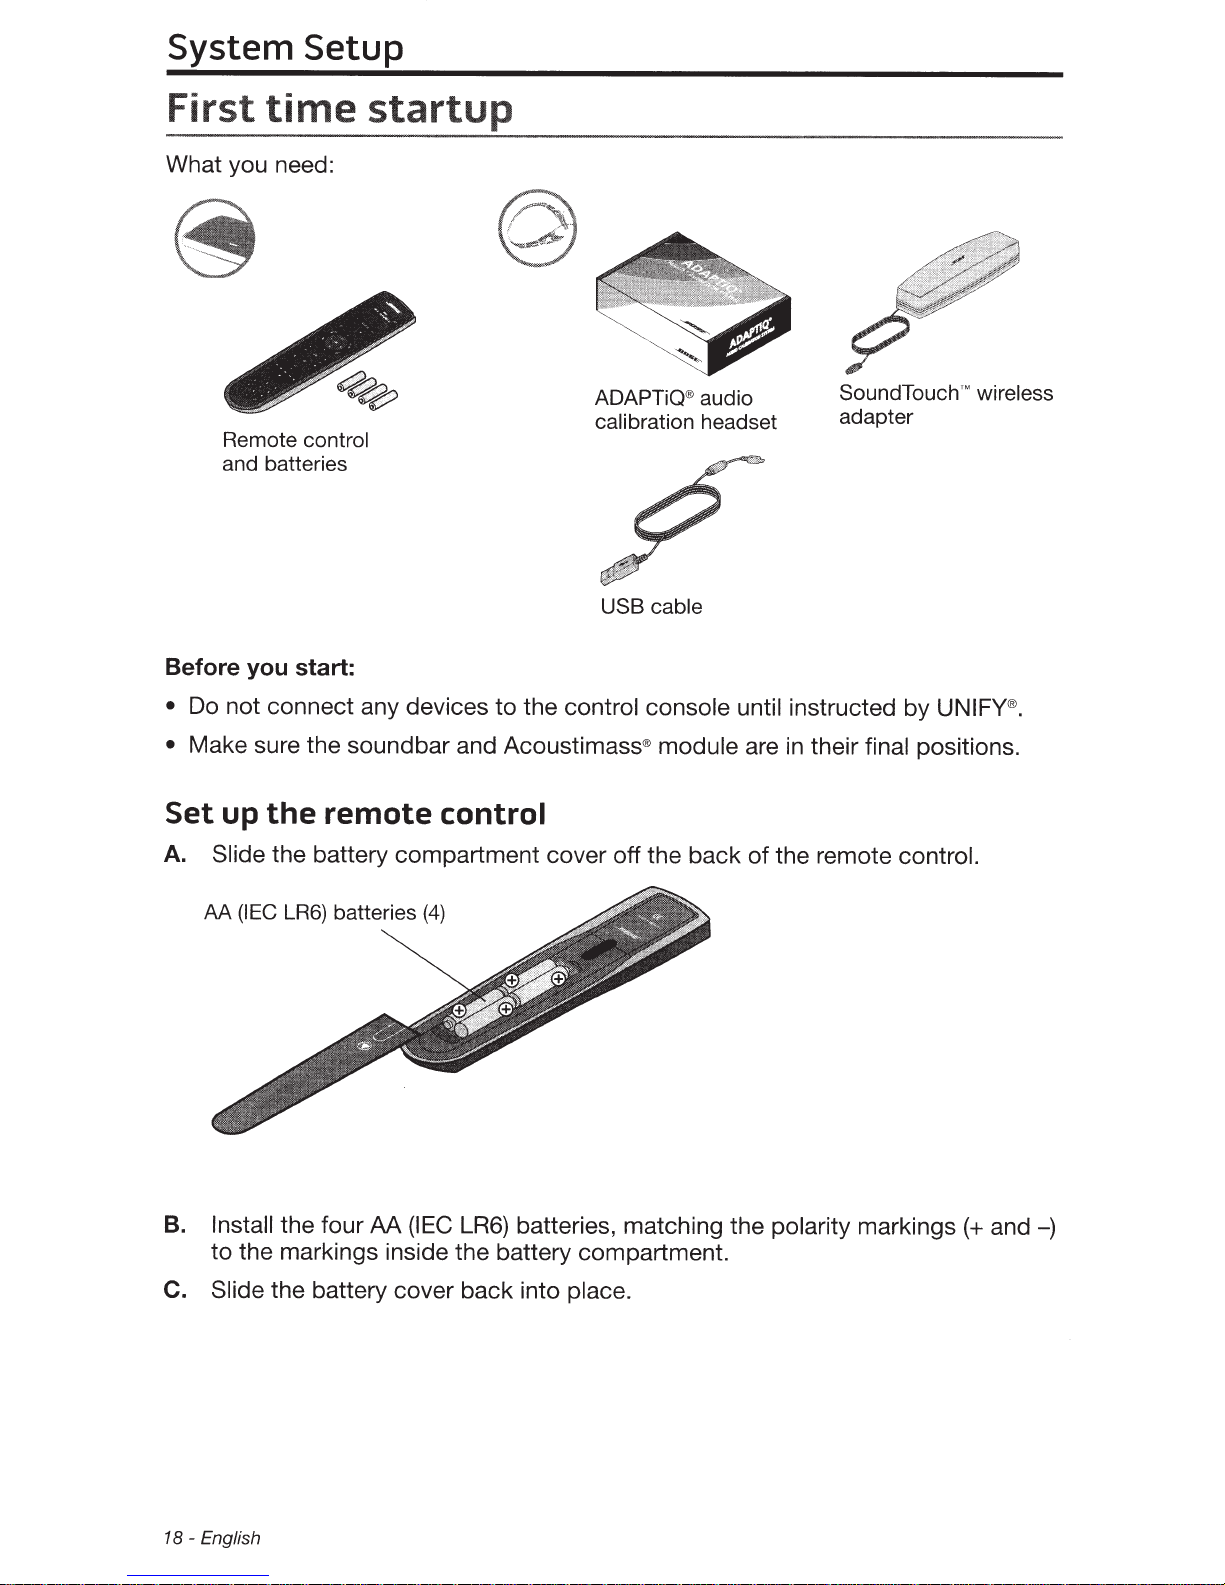
First
What you need:
Before you start:
time
Remote
and batteries
control
startup
ADAPTiQ® audio
calibration
USB cable
headset
SoundTouchTM
adapter
wireless
•
Do not connect any devices to the
• Make sure the sound bar and Acoustimass®
Set up
A.
AA (IEC
B.
the
remote
Slide
the battery
LR6) batteries
Install
to the markings inside the battery compartment.
the four AA
control
compartment cover off the back
(4)
(IEC
LR6) batteries, matching the
control console until instructed by
module are
of
in
their final positions.
the remote
polarity
control.
markings
UNIFY®.
(+
and
-)
C.
Slide
the battery cover back into place.
18-
English
Power on your system
Press the power button on the control console.
A.
power state when
low
a
Because the system is
start. When the status indicator on the control console changes
seconds
from blinking
Check that the status indicator on the sound bar is off.
B.
to
steady green, your system is ready to use.
to
Status indicator
Power
button
in
______;
_
Status indicator
System Setup
standby, it takes several
in
blinking orange:
status indicator
the
If
There is no wireless connection between the speaker and the Acoustimass®
•
module. Refer
Power on your
C.
Using your TV's remote control, change the TV input to the one that is
D.
connected
Follow
E.
to
the instructions on your TV screen. The system instructs you
to
TV.
your Lifestyle® 135 series
is
"Troubleshooting"
the operating guide.
in
home entertainment system.
Ill
following:
Select your language.
•
Run the ADAPTiQ® audio calibration system.
•
Connect and set up audio/video devices using the
•
UNIFY®
integration system.
control your connected devices.
Configure your
•
Complete network setup with the
•
Bose®
remote
to
SoundTouch™wireless adapter.
to
intelligent
do
the
English-
19
System
Setup
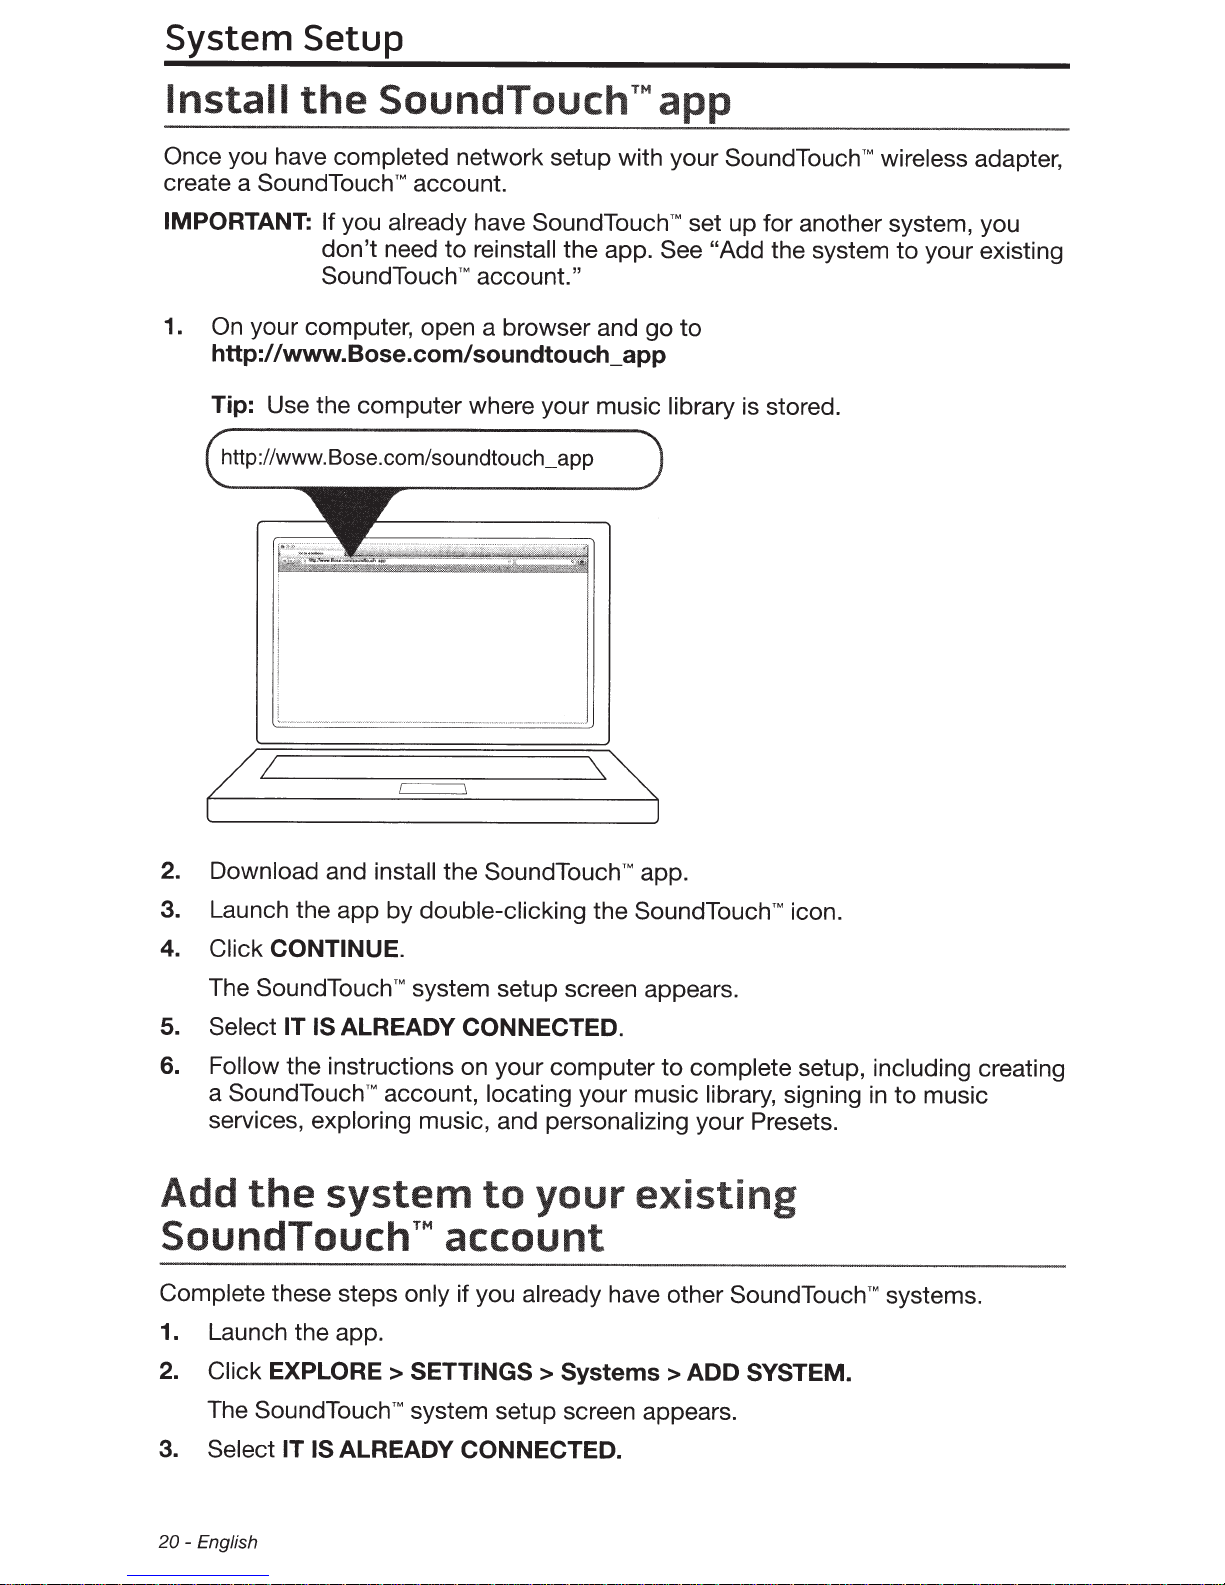
Install
Once
create a SoundTouch
IMPORTANT: If you already
1. On
you have
http:/
Tip:
http://www. Bose.com/soundtouch_app
the
your computer, open a browser and go
/www.Bose.com/soundtouch_app
Use the computer where your music library
SoundTouch™
completed
TM
don't
SoundTouch™ account."
need
network setup with your
account.
to
app
SoundTouchTM
have
SoundTouch™ set up for another system, you
reinstall
the app. See "Add the system
to
is stored.
wireless
adapter,
to
your existing
2. Download
3. Launch the app by
4.
Click CONTINUE.
The SoundTouch™
5.
Select IT IS ALREADY
6.
Follow the instructions on your computer
a
SoundTouchTM
services,
Add
the
SoundTouch™
Complete these steps
1. Launch the app.
2.
Click
The SoundTouch™
3. Select IT IS ALREADY
and install the
account,
exploring
system
EXPLORE >
SoundTouchTM
double-clicking the
system setup screen appears.
CONNECTED.
locating
music, and personalizing
to
your
account
only
if you
SETTINGS
system setup screen appears.
CONNECTED.
already
>
app.
SoundTouch™
your music
existing
have other
Systems
to
complete
library,
your Presets.
SoundTouchTM
>ADD
SYSTEM.
icon.
setup,
signing
including
in
to
music
systems.
creating
20-
English
 Loading...