

Page 1

The Bose® Companion® 3 Multimedia Speaker System
Owner’s Guide
AM271883_00_V.pdf August 18, 2003
Page 2
Safety Information
VIS
ATTENTION : POUR RÉDUIRE LE RISQUE DE DÉCHARGE
ÉLECTRIQUE, NE PAS RETIRER LE COUVERCLE (OU
L’ARRIÈRE). IL NE SE TROUVE À L’INTÉRIEUR AUCUNE
PIÈCE POUVANT ÊTRE RÉPARÉE PAR L’USAGER.
S’ADRESSER À UN RÉPARATEUR COMPÉTENT
,
WARNING: To reduce the risk of fire or electric shock, do not expose this system to rain or
moisture. The apparatus shall not be exposed to dripping or splashing, and objects filled with
liquids, such as vases, shall not be placed on the apparatus.
CAUTION
CAUTION
RISK OF ELECTRICAL SHOCK
RISK OF ELECTRICAL SHOCK
CAUTION: TO REDUCE THE RISK OF ELECTRIC SHOCK
CAUTION: TO REDUCE THE RISK OF ELECTRIC SHOCK,
DO NOT REMOVE COVER (OR BACK).
DO NOT REMOVE COVER (OR BACK).
NO USER-SERVICABLE PARTS INSIDE.
NO USER-SERVICABLE PARTS INSIDE.
REFER SERVICING TO QUALIFIED PERSONNEL.
REFER SERVICING TO QUALIFIED PERSONNEL.
DO NOT OPEN
DO NOT OPEN
RISQUE DE CHOC ÉLECTRIQUE
These CAUTION marks are located on the rear panel of the Acoustimass
AVIS
NE PAS OUVRIR
®
module:
The lightning flash with arrowhead symbol, within an equilateral triangle, is intended to alert
the user to the presence of uninsulated dangerous voltage within the system enclosure that
may be of sufficient magnitude to constitute a risk of electric shock.
The exclamation point, within an equilateral triangle, a s marked on the syst em, is intende d to
alert the user to the presence of important operating and maintenance instruction in this
owner’s guide.
CAUTION: To prevent electric shock, match wide blade of plug to wide slot, insert fully.
Please read this owner’s guide
Please take the time to read and follow this owner’s guide carefully. It will help you set up and
operate your system properly, and enjoy all of its advanced features. Save your owner’s
guide for future reference.
CAUTION: Do not place computer monitors, floppy disks, hard drives, or other magnetic
media within 6 inches of the Acoustimass module. The magnetic field produced by this module
can erase magnetic media and interfere with the monitor.
©2003 Bose Corporation. No part of this work may be reproduced, modified, distributed or otherwise
used without prior written permission.
2
AM271883_00_V.pdf August 18, 2003
Page 3

Important Safety Instructions
1. Read these instructions – for all components before
using this product.
2. Keep these instructions – for future reference.
3. Heed all warnings – on the product and in the
owner’s guide.
4. Follow all instructions.
5. Do not use this apparatus near wat er or moisture –
Do not use this product near a bathtub, washbowl,
kitchen sink, laundry tub, in a wet basement, near a
swimming pool, or anywhere else that water or moisture are present.
6. Clean only with a dry cloth – and as directed by
7. Do not block any ventilation openings. Install in
8. Do not install near any heat sources, s uch as radia-
9. Do not defeat the safety purpose of the polarized
10. Protect the power cord from being walked on or
11. Only use attachment s/access ories specified by the
12. Use only with the cart, stand, tripod,
13. Unplug this apparatus during lightning storms or
®
Bose
Corporation. Unplug this product from the wall
outlet before cleaning.
accordance with the manufacturer’s instructions –
To ensure reliable operation of the product and to protect it from overheating, put th e product in a position
and location that will not interfere with its proper ventilation. For example, do not place the product on a
bed, sofa, or similar surface that may block the ventilation openings. Do not put it in a built-in system, such
as a bookcase or a cabinet that may keep air from
flowing through its ventilation openings.
tors, heat registers, stoves or other apparatus
(including amplifiers) that produce heat.
or grounding-type plug. A polarized plug has two
blades with one wider than the other. A groundingtype plug has two blades and a third grounding
prong. The wider blade or third prong are prov ided
for your safety. If the provided plug does not fit in
your outlet, consult an electrician for replacement
of the obsolete outlet.
pinched, particularly at plugs, convenience receptacles, and the point where the y exit from the apparatus.
manufacturer.
bracket or table specified by the
manufacturer or sold with the apparatus. When a cart is used, use caution when moving the cart/appa ratus
combination to avoid injury from tip-over.
when unused for long periods of time – to prevent
damage to this product.
14. Refer all servicing to qualified service personnel.
Servicing is required when the appara tus has bee n
damaged in any way: such as power-supply cord
or plug is damaged; liquid has been spilled or
objects have fallen into the apparatus; the apparatus has been exposed to rain or moisture, does not
operate normally, or has been dropped – Do not
attempt to service this product yourself. Opening or
removing covers may expose you to dangerous voltages or other hazards. Please call Bose to be referred
to an authorized service center near you.
15. To prevent risk of fire or electric shock, avoid over-
loading wall outlets, extension cords, or integral
convenience receptacles.
16. Do not let objects or liquids enter the product – as
they may touch dangerous voltage points or short-out
parts that could result in a fire or electric shock.
17. See product enclosure bottom for safety related
markings.
Information about products that
generate electrical noise
If applicable, this equipment has been tested an d found t o
comply with the limits for a Class B digital device, pursuant
to Part 15 of the FCC rules. These limits are designed to
provide reasonable pr otec tion against harmf ul interfer ence
in a residential installation. This equipment generates,
uses, and can radiate radio frequency energy and, if not
installed and used in accordance with the instructions,
may cause harmful interference to radio communications.
However, this is no guarantee that interference will not
occur in a particular installation. If this equipment does
cause harmful interference to radio or television reception,
which can be determined by turning the equipment off and
on, you are encouraged to try to correct the interference
by one or more of the following measures:
• Reorient or relocate the receiving antenna.
• Increase the separation between the equipment and
receiver.
• Connect the equipment to an outlet on a different circuit
than the one to which the receiver is connected.
• Consult the dealer or an experienced radio/TV technician
for help.
Note: Unauthorized modification of the receiver or radio
remote control could void the user’s authority to operate
this equipment.
This product complies with the Canadian ICES-003 Class
B specifications.
AM271883_00_V.pdf August 18, 2003
2a
Page 4
Important Safety Instructions
18. Use Proper Power Sources – Plug the pr o duct into a
proper power source, as described in the operating
instructions or as marked on the product.
19. Avoid Power Lines – Use extreme care when installing an outside antenna system to keep from touching
power lines or circuits, as contact with them may be
fatal. Do not install external antennas near overhead
power lines or other electric light or power circuits, nor
where an antenna can fall into such circuits or power
lines.
20. Ground All Outdoor Antennas – If an ex ternal
antenna or cable system is connected to this product,
be sure the antenna or cable system is grounded. This
will provide some protection against voltage surges
and built-up static charges.
Section 810 of the National Electrical Code ANSI/
NFPA No. 70 provides information with respect to
proper grounding of the mast and supporting structure, grounding of the lead-in wire to an antenna discharge unit, size of grounding conductors, location of
antenna-discharge unit, connection to grounding electrodes, and requirements for the ground electrode.
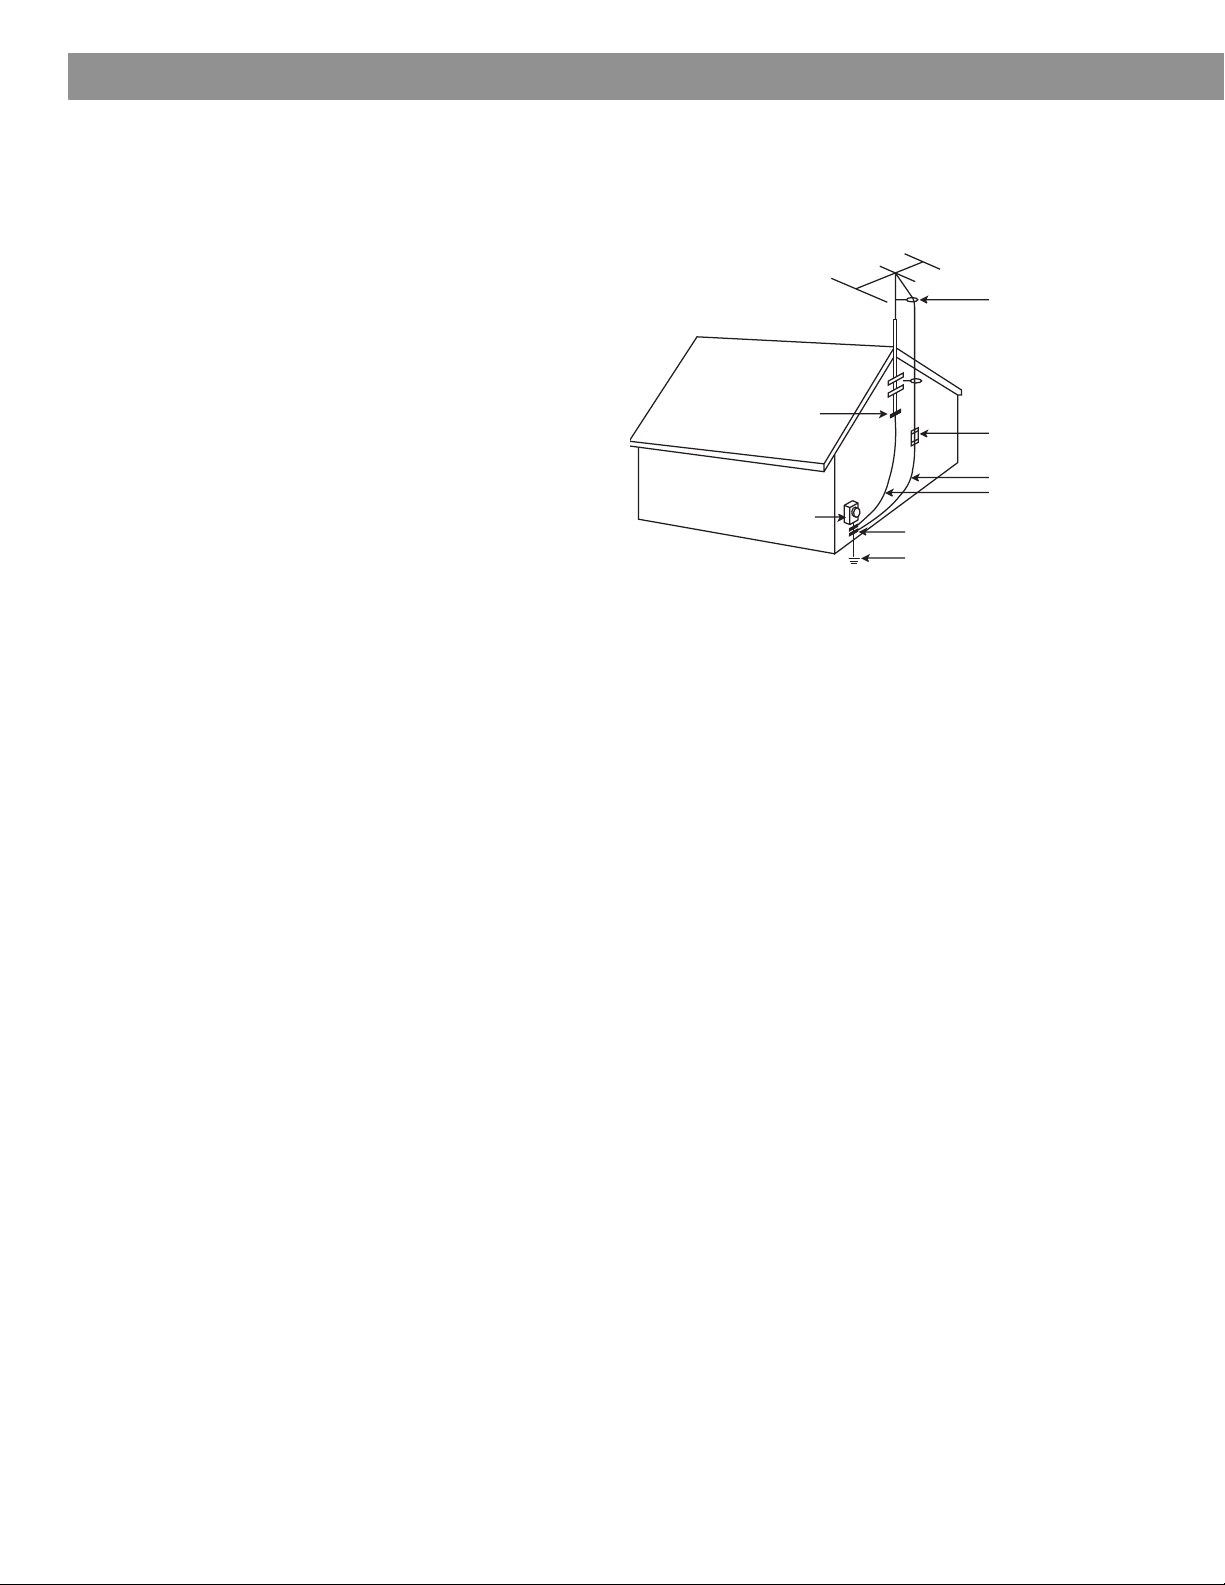
Refer to the antenna grounding illustration on this
page.
Antenna grounding
Example of antenna grounding as per National Electrical
Code, ANSI/NFPA 70.
Antenna lead-in wire
Ground clamp
Electric service
equipment
Ground clamps
Power service grounding electrode
system (NEC ART 250, Part H)
Antenna discharge unit
(NEC Section 810-20)
Grounding conductors
(NEC Section 810-21)
Note to CATV system installer
This reminder is provided to call the CATV system
installer’s attention to Article 820-40 of the NEC (of USA)
that provides guidelines for pr oper gr ounding. In part icular,
it specifies that the cable ground shall be connected to the
grounding system of the building, as close to the point of
cable entry as is practical.
2b
AM271883_00_V.pdf August 18, 2003
Page 5

Contents
F
Your Companion® 3 multimedia speaker system . . . . . . . . . . . . . . . . . . . . . . . . . . . . . . . . . . . 4
Unpacking . . . . . . . . . . . . . . . . . . . . . . . . . . . . . . . . . . . . . . . . . . . . . . . . . . . . . . . . . . . . . . . . 5
Selecting a location for your Companion 3 multimedia speaker system . . . . . . . . . . . . . . . . . 6
Positioning the Acoustimass
Positioning the satellite speakers . . . . . . . . . . . . . . . . . . . . . . . . . . . . . . . . . . . . . . . . . . . 7
If placing your speakers on the desktop . . . . . . . . . . . . . . . . . . . . . . . . . . . . . . . . . . . 7
If mounting speakers on your monitor . . . . . . . . . . . . . . . . . . . . . . . . . . . . . . . . . . . . . 7
Making connections . . . . . . . . . . . . . . . . . . . . . . . . . . . . . . . . . . . . . . . . . . . . . . . . . . . . . . . . . 9
To connect . . . . . . . . . . . . . . . . . . . . . . . . . . . . . . . . . . . . . . . . . . . . . . . . . . . . . . . . . . . . . 9
To make the final connection and power the system . . . . . . . . . . . . . . . . . . . . . . . . . . . . 9
Additional Connections . . . . . . . . . . . . . . . . . . . . . . . . . . . . . . . . . . . . . . . . . . . . . . . . . . . . . . 9
To connect an additional sound source. . . . . . . . . . . . . . . . . . . . . . . . . . . . . . . . . . . . 9
To connect headphones . . . . . . . . . . . . . . . . . . . . . . . . . . . . . . . . . . . . . . . . . . . . . . . 9
Operating the Companion 3 multimedia speaker system . . . . . . . . . . . . . . . . . . . . . . . . . . . . 10
Turning your speaker system on and off . . . . . . . . . . . . . . . . . . . . . . . . . . . . . . . . . . . 10
Adjusting the sound . . . . . . . . . . . . . . . . . . . . . . . . . . . . . . . . . . . . . . . . . . . . . . . . . . . 10
Bass . . . . . . . . . . . . . . . . . . . . . . . . . . . . . . . . . . . . . . . . . . . . . . . . . . . . . . . . . . . . . . . 10
Volume . . . . . . . . . . . . . . . . . . . . . . . . . . . . . . . . . . . . . . . . . . . . . . . . . . . . . . . . . . . . . 10
Troubleshooting . . . . . . . . . . . . . . . . . . . . . . . . . . . . . . . . . . . . . . . . . . . . . . . . . . . . . . . . . . . . 11
Maintaining the Companion 3 multimedia speaker system . . . . . . . . . . . . . . . . . . . . . . . . . . . 12
Cleaning the system . . . . . . . . . . . . . . . . . . . . . . . . . . . . . . . . . . . . . . . . . . . . . . . . . . . . . 12
Warranty period . . . . . . . . . . . . . . . . . . . . . . . . . . . . . . . . . . . . . . . . . . . . . . . . . . . . . . . . . 12
Technical Information . . . . . . . . . . . . . . . . . . . . . . . . . . . . . . . . . . . . . . . . . . . . . . . . . . . . . . . . 12
Features . . . . . . . . . . . . . . . . . . . . . . . . . . . . . . . . . . . . . . . . . . . . . . . . . . . . . . . . . . . . . . . 12
Driver complement . . . . . . . . . . . . . . . . . . . . . . . . . . . . . . . . . . . . . . . . . . . . . . . . . . . . . . . 12
Power rating . . . . . . . . . . . . . . . . . . . . . . . . . . . . . . . . . . . . . . . . . . . . . . . . . . . . . . . . . . . . 12
Dimensions . . . . . . . . . . . . . . . . . . . . . . . . . . . . . . . . . . . . . . . . . . . . . . . . . . . . . . . . . . . . 12
Weight . . . . . . . . . . . . . . . . . . . . . . . . . . . . . . . . . . . . . . . . . . . . . . . . . . . . . . . . . . . . . . . . 12
Finish . . . . . . . . . . . . . . . . . . . . . . . . . . . . . . . . . . . . . . . . . . . . . . . . . . . . . . . . . . . . . . . . . 12
®
module . . . . . . . . . . . . . . . . . . . . . . . . . . . . . . . . . . . . . . . . 6
or your records
Serial numbers are located on the back of the Acoustimass module.
Serial number: __________________________________ and ____________________________________________
Dealer name: ___________________________________________________________________________________
Dealer phone: ___________________________________________________________________________________
We suggest you keep your sales slip together with this owner’s guide.
Note: Now would be a good time to register your product online at www.bose.com/register.
3
AM271883_00_V.pdf August 18, 2003
Page 6

Introduction
Your Companion
®
3 Multimedia Speaker System
Thank you for purchasing the Bose
®
Companion 3 multimedia speaker system. Bose
designed this amplified speaker system to provide high-fidelity stereo sound for your
computer and a variety of other desktop sources. Its unique features make this system
a superior choice for your home or office workspaces.
• Small satellite speakers and an Acoustimass
®
module that hides away helps maximize
workspace.
• Magnetically-shielded satellite speakers protect your screen from color distortion so you
can place satellite speakers right next to your monitor or television.
•TrueSpace
®
stereo signal processing provides a wide soundstage even when the
speakers are close together.
• Tethered control pod allows you to control system volume and connect headphones or
portable players.
• Integrated signal processing provides full, rich sound at all listening levels.
• Auxiliary input jack lets you expand your system to include an external source such as a
CD player, MP3 player, or other audio source.
4
AM271883_00_V.pdf August 18, 2003
Page 7

Unpacking
System Setup
Carefully unpack your system. Save all packing materials, which provide the safest way to
transport your system as needed.
WARNING: To avoid danger of suffocation, keep the plastic bags out of the reach of children.
If any part of the system appears damaged, do not attempt to use it. Notify Bose Corporation
or your authorized Bose
sheet included in the carton.
Check to be sure your system includes the parts shown in Figure 1.
®
dealer immediately. For contact information, refer to the address
Figure 1
Contents of the shipping
carton
Note: Now is a good time to find the serial number on the back of the Acoustimass
Copy that number in the space provided under “For your records” on page 3.
Acoustimass module
Satellite speakers
Brackets
Detachable AC power cord
Audio input cable
Tethered
control pod
®
module.
AM271883_00_V.pdf August 18, 2003
5
Page 8

System Setup
Selecting a location for your Companion
Use the following guidelines to choose locations and positions for the speakers and the
Acoustimass
system performance, you may find other placement options that are more convenient and
provide the sound you enjoy.
Figure 2
Recommended system
placement
®
module (Figure 2). While these guidelines are offered to provide outstanding
2 feet (60 cm) minimum
®
3 Multimedia Speaker System
Figure 3
Module placement
3 inches (8 cm)
minimum
Positioning the Acoustimass module
The Acoustimass module is designed to be the unseen part of this system. It can be placed
under or behind furniture, for example, and contribute to the lifelike sound you hear from the
speakers without being visible.
Place the module on a flat surface:
• within reach of an AC (mains) power outlet and
• place the module a minimum of 2 feet (.60 m) from the computer monitor (or TV) to prevent
interference from the module, which is not magnetically shielded.
CAUTION: Do not place computer monitors, floppy disks, hard drives, or other magnetic
media within 6 inches (15 cm) of the Acoustimass module. The magnetic field produced by this
module can erase magnetic media and interfere with the monitor.
• Stand the Acoustimass module on its feet. Do not lay it on its side or stand it on either end
(Figure 3).
6
AM271883_00_V.pdf August 18, 2003
Page 9

System Setup
• Aim the port of the module away from the wall to decrease bass or toward the wall to
increase bass; in either case, be sure it is at least 3 inches (8 cm) from the wall.
• Place the module away from heat sources (radiators, baseboard, quartz heater, etc.).
Adequate ventilation is necessary to prevent the module from overheating during use. Do
not block the openings on the bac k of t he mod ule, which provide ventilation for the built-in
circuitry.
• Using the supplied audio input cable, you can place the module up to 6 feet (2 m) away
from the multimedia sound source. If you put the module farther away, use an audio input
extension cable available from any retail electronics store.
Positioning the satellite speakers
These speakers are designed t o sit upright on yo ur desk, or be mounted on your mon itor with
the supplied speaker brackets. The speakers are magnetically shielded to prevent
interference when they are on or near your monitor. Using the supplied speaker cables, you
can place the satellite speakers up to 6 feet (2 m) away from the module.
If placing your speakers on the desktop:
• Attach the three small rubber feet to each satellite speaker as indicated by the indentations
on the bottom of each speaker.
• Place speakers facing you, at an equal distance on either side of monitor.
• Place both speakers a maximum of 3 feet (90 cm) from the edge of the screen, and at
approximately the same height.
CAUTION: Choose a stable, level surface for the speakers. V ibration can cause the speakers
to move, particularly on smooth surfaces like marble, glass, or highly polished wood. If
needed, you may obtain additional rubber feet from Bose
Customer Service, refer to the address sheet included in the product carton.
®
Customer Service. To contact
Figure 4
Mounting the bracket
If mounting speakers on your monitor (Figure 4):
1. Attach a pad to the right speaker
bracket (marked R).
Pad
3. Insert the speaker wire into the
center of the open bracket.
2. Peel off one side of the moun ting a dhe sive,
and attach it to the bracket.
4. Move the bracket along the cord toward
the speaker.
AM271883_00_V.pdf August 18, 2003
7
Page 10

System Setup
5. Center the bracket opening over
the screw hole and press the
bracket snugly into the speaker
cutouts. Rotate the bracket
counterclockwise to secure. Install
supplied screw.
7. Repeat steps 1-6 for the left bracket, marked L.
8. Note: The speakers mounted on the monitor are designed to perform at their best
when they are angled slightly away from the listener. This orientation provides the
most lifelike performance for the seated listener, and expands coverage for other
listeners in the room.
6. Peel off the remaining tape on the mounting
adhesive, and attach the bracket to the
appropriate side of the monitor.
Right
bracket
8
AM271883_00_V.pdf August 18, 2003
Page 11

Making connections
Labeled jacks on the rear of the Acoustimass® module and the custom cables supplied with
the system permit fast and easy hookup (Figure 5).
CAUTION: Do not plug the Acoustimass module into an AC power (mains) outlet until all the
source components are connected to the module.
Figure 5
Making connections
System Setup
Bass Compensation
Left speaker
Right speaker
Companio 3
To Satellites
Bas
Compensati
L
R
T Satellit
T
Power AC-
Input from
computer
To Control Pod
To Connect:
• Speakers to the Acoustimass module; Plug each speaker connector into the corresponding
“L” or “R” jack marked “To Satellite”, on the rear of the module.
• Control pod to the Acoustimass module; Plug the control pod cable into the jack marked
“Control Pod”, on the rear of the Acoustimass module.
• Sound source to the Acoustimass module; Connect one end of the audio input cable to the
“Input from computer” jack on your Acoustimass module. Connect the other end to your
computer’s audio output jack.
Note: If your computer only has two phono jacks, instead of a stereo mini jack, you will need
an audio adapter cable. Connect the audio input cable from your module to the adapter cable.
Then insert the ends of the adapter cable into your computer’s stereo phono jacks.
To make the final connection and power the system
1. Insert the small connector end of the power cord into the AC INPUT jack on the module.
2. Insert the large end of the cord into an AC power (mains) outlet.
3. Push in the power button to turn on your system.
The LED on the control pod will light up yellow indicating standby mode.
Additional Connections
To connect an additional sound source:
To connect an external CD or MP3 player to your system, plug the cable from the sound
source into the input jack on the tethered control pod (Figure 6).
To connect headphones:
Insert the headphone connector int o the headphone jack on the tethered control pod.
Note: Connecting headphones will silence the output from your speakers.
9
AM271883_00_V.pdf August 18, 2003
Page 12

Operation
Operating the Companion
Turning your speaker system on and off
1. Turn on your computer or sound source.
2. Turn the power switch on the back of the Acoustimass
Note: To conserve energy, your system can be put into standby mode. The mute or standby
mode is activated by touching the center portion of the control pod.
Adjusting the sound
The acoustics of your listening room affect the sound quality of any speaker syste m .
Upholstered furniture, wall-to-wall carpets, or heavy drapes can muffle the treble (high
frequencies). Bare floors and walls and unupholstered furniture reflect the treble and may
cause it to sound too shrill.
Bass
After listening to your speaker system, you may wish to adjust the sound. Use the bass
compensation control on the Acoustimass module. Turn the control clockwise to increase, or
counterclockwise to decrease bass. You may also adjust the placement of the module to
affect bass; simply aim the port of the module away from the wall to decrease bass, or
toward the wall to increase bass.
Volume
Use the volume control on the control pod. Rotate the outer ring clockwise to increase, or
counterclockwise to decrease the volume (Figure 6).
To mute the system, gently tap the silver touch-sensitive panel on the remote. Tap again to
unmute. The indicator light turns yellow when the system is muted, and green when it is
active.
®
3 multimedia speaker system
®
module to ON (I).
Figure 6
Tethered control pod
features
Standby/Active indicator
Touch-sensitive
mute/unmute switch
Volume control
Headphone jack
Sound source in
Note: Using the volume controls in their maximum position may reduce the speaker system’ s
maximum volume, by causing the internal protection circuity to engage.
If you wish to control volume at the sound source instead of from the control pod, set the
volume control on the remote near maximum volume; then make all other adjustments using
the volume control on your sound source. For instance, you may be able to control the volume on your computer from its cont rol panel.
10
AM271883_00_V.pdf August 18, 2003
Page 13

Troubleshooting
Troubleshooting
If you have a problem with your Companion® 3 multimedia speaker system, try the following
solutions. If you still have trouble with your system, turn off the multimedia sound source and
disconnect the speaker system. Contact your authorized Bose dealer. The dealer will check
for any defects and arrange for service by an authorized Bose
tion will make every effort to remedy your problem within the terms of the warranty.
Problem What to do
®
service center . Bose Corpora-
The speaker system does not
play
The speaker system sound
seems distorted
A satellite speaker doesn’t play
or sounds distorted
• Make sure connections are secure (see “Making connections” on page 9). Check your speaker wires for
cuts or frays which can cause a short c ircuit.
• Ensure the sound source is plugged in and playing at
an audible volume.
• Make sure the power is on and the system is not
muted. The LED on the control pod should be green
when unmuted.
• If using a PC, check your sound car d sett ings to mak e
sure the “Digital output only” setting is turned OFF.
This setting is typically found in the Options menu of
the volume control icon. This icon is usually located in
the lower right hand corner of the Windows desktop.
• Decrease the volume at the sound source and
increase the volume on the control pod.
• Check all the connections between the satellite
speakers, control pod, sound source and the
Acoustimass
®
module. Insert the audio connectors
completely into the jacks on the module.
• At the Acoustimass module, switch the wire
connected to the left satellite with the wire connected
to the right satellite. If the problem remains in the
same satellite, the problem is with that satellite
speaker. If the problem switches to the other satellite
(the one that previously played), the problem is with
the sound source or the Acoustimass module.
• To determine if the problem is in the sound source or
the Acoustimass module, disconnect the audio input
cable from the sound source. Plug it into another
sound source (such as a portable CD player
headphone jack) and adjust the volume on the sound
source. If the Companion 3 speaker system operates
properly, the problem is in the original sound source. If
the problem remains, then the problem is in the
Acoustimass module.
AM271883_00_V.pdf August 18, 2003
11
Page 14

Reference
Maintaining the Companion
Cleaning the system
• Wipe with a damp cloth.
• Do not use solvents or chemicals.
• Do not put liquids or objects on the back panel or in the opening on the Acoustimass
module, speaker grilles or control pod.
Warranty period
The Companion® 3 multimedia speaker system is covered by a limited transferable warranty.
Details of the warranty are provided on the product registration card that came with your
system. Please fill out the information section on your warranty card and mail it to Bose.
Technical Information
Features
Built-in amplification
Active equalization
Automatic protection circuitry
TrueSpace
Driver complement
Two magnetically-shielded 2-inch (5.0 cm) long-throw, wide-range transducers
One 5.25-inch (13.3 cm) woofer
®
stereo signal processing
®
3 Multimedia Speaker System
®
Power Rating
USA/Canada: 115VAC~50/60 Hz
International: 230VAC~50/60 Hz
Dimensions (approximate)
Satellite speakers: 31/2"H x 21/2"W x 23/8"D (8.89 cm x 6.35 cm x 6.10 cm)
Acoustimass
Control pod: 2
®
module: 85/8"H x 71/8"W x 14"D (21.8 cm x 18 cm x 35.56 cm)
1
/2"D x 11/8"H (6.35 cm x 2.79 cm)
Weight (approximate)
One satellite speaker, unpacked: 0.5 lbs (0.23 kg)
Acoustimass module, unpacked: 15.4 lbs (6.98 kg)
Finish
Acoustimass module: Scratch-resistant, satin-finished vinyl
Satellite speakers: Painted polymer finish
12
AM271883_00_V.pdf August 18, 2003
Page 15

Reference
AM271883_00_V.pdf August 18, 2003
13
Page 16

AM271883_00_V.pdf August 18, 2003
©2003 Bose Corporation, The Mountain
Framingham, MA 01701-9168 USA
271883 AM Rev.00 JN31136
 Loading...