

Bosch TouchOne User Manual

TouchOne
User’s Guide

32
Contents
1 Introduction 1
1.1 Product Summary 1
1.2 Version 1
1.3 Features not covered
1
2 General Usage 2
2.1 Home Screen 2
2.2 Keypad Screen 3
2.3 Arming the System 4
2.3.1 Arming in AWAY Mode 4
2.3.2 Arming in STAY Mode 5
2.3.3 Arming in STAY Mode 2 7
2.3.4 Disarming the System
9
3 Zones 10
3.1 Isolating Zones 10
3.2 Renaming Zones 11

14
4 Users 12
4.1 Adding a User 12
4.2 Deleting a User 13
4.3 Renaming a User 13
4.4 Adding / Changing a User Photo 14
4.5 Editing a User PIN 15
4.6 Adding a Mobile Device 16
4.7 Removing a Mobile Device 17
4.8 Adding an RF Keyfob 17
4.9 Deleting an RF Keyfob 18
5 Outputs 18
5.1 Controlling Outputs 19
5.2 Renaming Outputs 19
6 Date and Time 20
6.1 Change the System Date and Time 20
7 WiFi 20
7.1 Connect the TouchOne to a WiFi network 21
7.2 Disconnect from a WiFi network 22
8 Display, Wallpaper & Sounds 22
8.1 Change the TouchOne Volume 21
8.2 Change the TouchOne Brightness 23
8.3 Change the Wallpaper 23
8.4 Standby Screen 24
8.4.1 Make the Screen sleep during Standby. 24
8.4.2 Show a Photo Slideshow during Standby. 25
8.4.3 Change the Standby Time 26
8.4.4 Enable Standby when the system is armed in AWAY Mode 26
8.4.5 Show the Alarm Status on the Standby Screen. 27
9 Language 28
9.1 Change the TouchOne Language 28
10 Tutorials 30
10.1 Viewing a Tutorial Video 30

32
1. Introduction
1.1.Product Summary
The TouchOne is a High Denition 7”Touchscreen keypad for Bosch Control
Panels that provides a rich user interface and extended functionality.
1.2 Version
This User Guide has been written for TouchOne Software Version 2.2. Please contact
your installer for a revised User Guide should the options shown in this document
differ from what is on your touchscreen.
1.3 Features not covered
The TouchOne provides a graphical interface to the major functions of the system.
Other less common features are accessed using the Keypad screen in the same way
in which you would interact with a Bosch TEXT LCD Codepad. As the interface is the
same, please refer to the “Operation with TEXT LCD Codepad” section in the Control
Panel User Guide for operating instructions of the features listed below:
• Forced Arming
• Programming STAY Mode 2 Zones
• Reset Latching Outputs
• Telco Arm/Disarm Sequence
• Testing
• General Usage
2.1 Home Screen
Figure 1 shows the TouchOne Home
Screen. This screen allows you to view
critical status information of the system
and perform common actions:
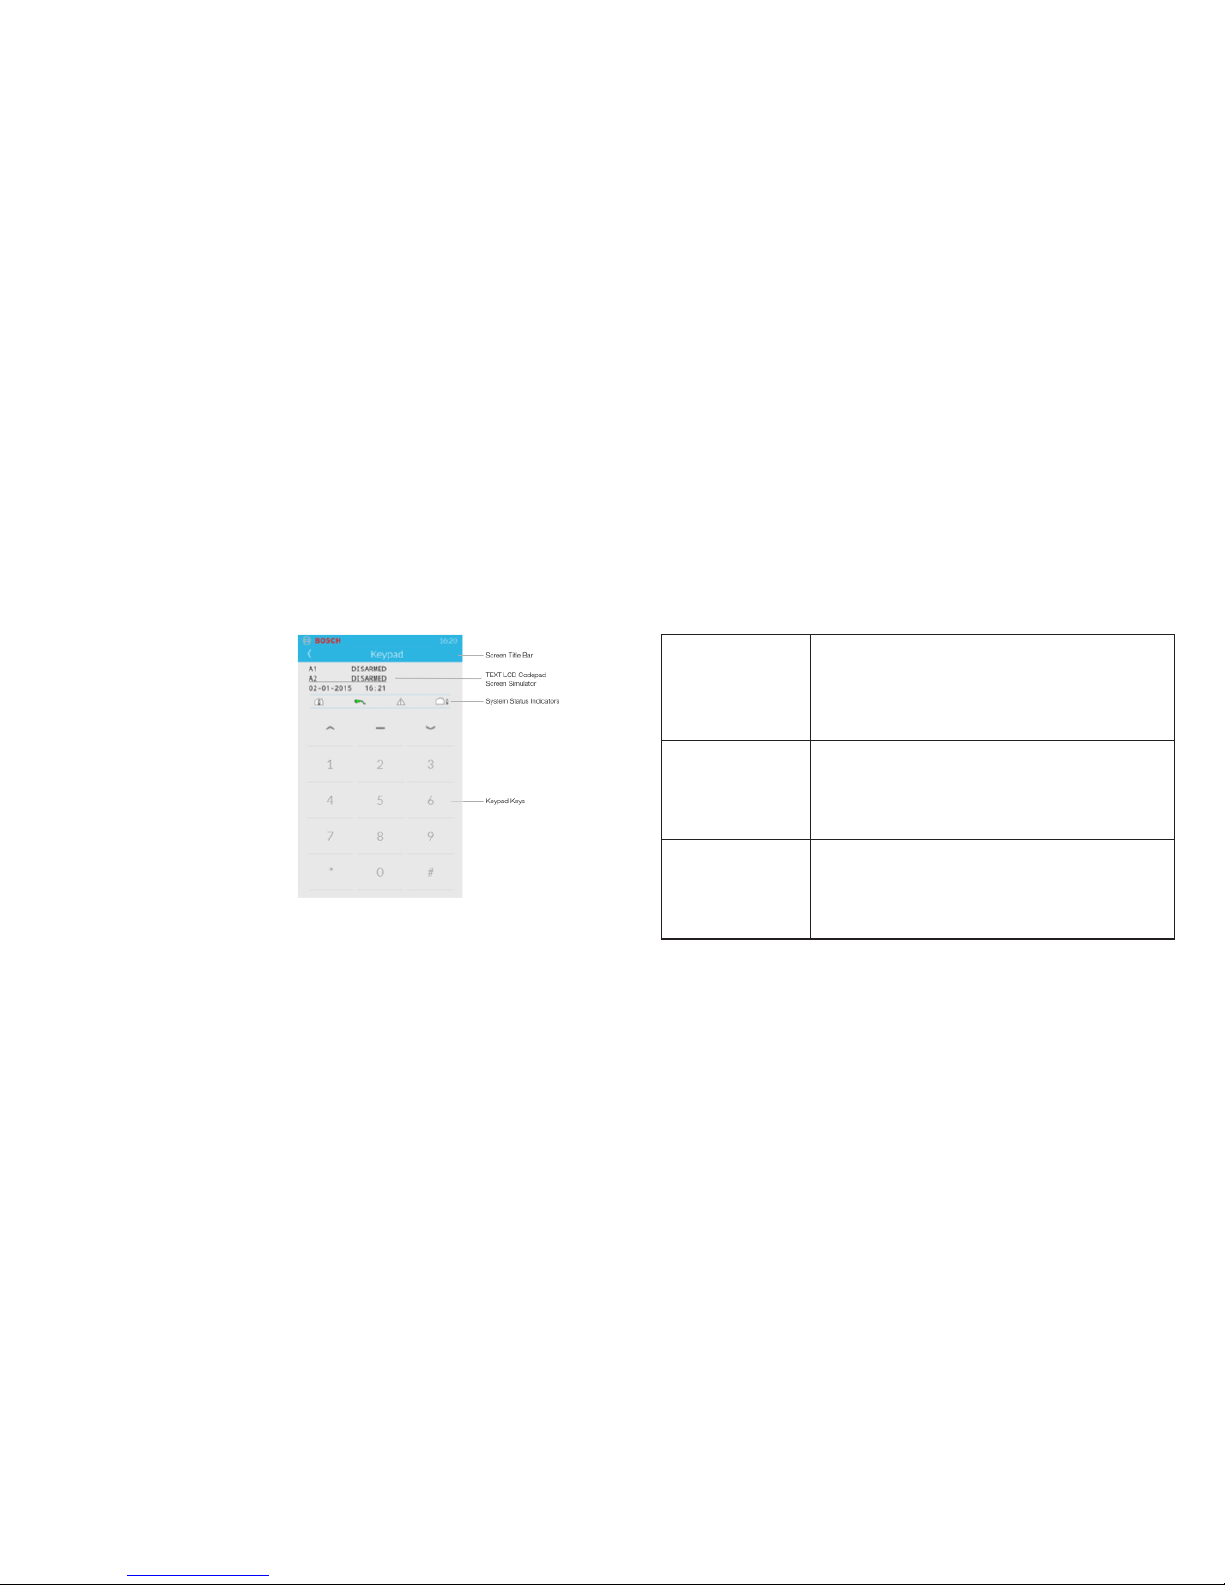
2.2 Keypad Screen
Figure 2 shows the TouchOne Keypad
Screen. This allows you to perform
system functions that do not have a
graphical interface on the TouchOne.
Please refer to the “Operation with
TEXT LCD Codepad” section in
the Control Panel User Guide for
instructions on performing these
functions on this screen.
Figure 1: Home Screen
54
2.3 Arming the System
2.3.1 Arming in AWAY Mode
When you leave your premises and
require all zones to be in a ready
state to detect intrusion, arm the
system in AWAY Mode. There are
two different methods for arming
the system in AWAY Mode. Method
one is optional and can be disabled
by your installer if you do not
want to use single button arming.
Method two is standard and always
operates.
Method One (Quick Arm) 1. From the Home Screen, touch the Arm Area button.
Two beeps will sound and the Area Status Card changes.
Note: if you have multiple areas enabled, you will need to enter
your user code. If your user code has authority for both areas,
both areas will arm.
Method Two 1. From the Home Screen, touch and drag the Area
Status Box you want to arm.
2. Drag the Area Status Box into the Away Arm circle.
3. Enter your user code.
Two beeps will sound and the Area Status Card changes.
Method Three 1. Touch the Keypad button to show the Keypad
screen.
2. Enter your user code followed by the [#] button (for
example, [2580 #]).
Two beeps will sound and the Area Status Card changes.
Figure 2: Keypad Screen

76
2.3.2 Arming in STAY Mode 1
STAY Mode 1 is only used when the perimeter and unused areas of the premises
need to be armed to detect an intruder from entering the premises. At the same time,
you can move freely within an area that is automatically isolated. Only your installer
can program zones automatically isolated in STAY Mode 1. There are two different
methods for arming the system in STAY Mode 1. Method one is standard and always
operates. Method two is optional and may be disabled by your installer if you do not
want to use single button arming.
Entry Guard Timer for STAY Mode 1
When arming the system in STAY Mode 1, an optional entry timer called Entry Guard
Time for STAY Mode is available. Use this entry timer to delay the sirens if a zone is not
automatically isolated and activates an alarm condition.
Entry Guard Time for STAY Mode is the delay time used for all zones except 24-hour
zones when the system is armed in STAY Mode 1 or STAY Mode 2.
If the Entry Guard Time for STAY Mode is programmed and a zone that was not
automatically isolated is activated, the TouchOne beeps twice per second until the
entry timer expires or the system is disarmed. If the alarm condition is not reset by
entering your user code (such as [2580]) before the entry time expires, the sirens
activate into alarm. Only your installer can program this feature.
Method One 1. Touch the Keypad button to show the Keypad
screen.
2. Enter your user code followed by the [*] button (for
example, [2580 *]).
Two beeps will sound and the Area Status Card changes.
Method Two 1. From the Home Screen, touch and drag the Area
Status Box you want to arm.
2. Drag the Area Status Box into the Stay Arm circle.
3. Enter your user code.
Two beeps will sound and the Area Status Card changes.
2.3.3 Arming in STAY Mode 2
STAY Mode 2 is only used when the perimeter and unused areas of the premises
need to be armed to detect an intruder from entering the premises, at the same time
allowing you to move freely within an area that is automatically isolated. Any Master
Code or Installer Code user can program zones to be automatically isolated in STAY
Mode 2.
 Loading...