

Bosch HCA854450A User Manual
Free standing cooker
HCA8544.0A
[en] Instruction manual


Table of contents
[en]Instruction manual
Important safety information..................................................... 4
Causes of damage...................................................................... 6
Overview ...............................................................................................6
Damage to the oven...........................................................................6
Damage to the plinth drawer............................................................6
Installation and connection.......................................................7
For the installer....................................................................................7
Levelling the cooker ...........................................................................7
Your new cooker......................................................................... 7
General information............................................................................7
Cooking area .......................................................................................7
Control panel .......................................................................................8
Cooking compartment .......................................................................8
Your accessories ........................................................................9
Inserting accessories .........................................................................9
Optional accessories ...................................................................... 10
After-sales service products .......................................................... 10
Before using the appliance for the first time .........................11
Setting the clock .............................................................................. 11
Heating up the cooking compartment ......................................... 11
Cleaning the accessories...............................................................11
Setting the hob .........................................................................11
Setting procedure ............................................................................ 11
Large dual-circuit hotplate and extended cooking zone .......... 11
Table of cooking times ................................................................... 12
Switching the oven on and off ................................................13
Switching on ..................................................................................... 13
Switching off...................................................................................... 13
Setting the oven........................................................................13
Types of heating............................................................................... 13
Setting the type of heating and temperature..............................13
Setting rapid heating ....................................................................... 14
Time-setting options ................................................................14
Setting the time-setting options in brief..................................... 14
Setting the timer ...............................................................................14
Setting the cooking time................................................................. 15
Setting a later end time .................................................................. 15
Setting the clock .............................................................................. 16
Memory...................................................................................... 16
Saving settings in the memory......................................................16
Starting the memory........................................................................16
Sabbath mode........................................................................... 16
Starting Sabbath mode................................................................... 16
Childproof lock .........................................................................17
Basic settings ..........................................................................17
Changing the basic settings .......................................................... 18
Automatic switch-off................................................................18
Self-cleaning .............................................................................18
Important notes ................................................................................ 18
Before self-cleaning.........................................................................19
Setting the cleaning level ............................................................... 19
After self-cleaning ............................................................................ 19
Care and cleaning ....................................................................19
Cleaning agents ............................................................................... 19
Detaching and refitting the rails .................................................... 20
Detaching and attaching the oven door......................................20
Removing the door cover............................................................... 21
Removing and installing the door panels ................................... 21
Troubleshooting .......................................................................22
Malfunction table.............................................................................. 22
Replacing the bulb in the oven ceiling light ............................... 23
Glass cover .......................................................................................23
After-sales service ...................................................................23
E number and FD number ............................................................. 23
Energy and the environment...................................................24
Hot air eco heating type ................................................................. 24
Saving energy................................................................................... 25
Saving energy with the hob ........................................................... 25
Environmentally-friendly disposal.................................................. 25
Automatic programmes ...........................................................25
Ovenware ..........................................................................................25
Preparing the dish ........................................................................... 25
Programmes ..................................................................................... 26
Selecting and setting a programme............................................. 28
Tips for the automatic programmes.............................................29
Tested for you in our cooking studio .....................................29
Cakes and pastries ......................................................................... 29
Baking tips ........................................................................................ 31
Meat, poultry, fish............................................................................. 32
Tips for roasting and grilling..........................................................34
Slow cooking .................................................................................... 35
Tips for slow cooking......................................................................35
Bakes, gratins, toast with toppings .............................................. 36
Convenience products....................................................................36
Special dishes .................................................................................. 37
Defrost................................................................................................ 37
Drying.................................................................................................37
Preserving ......................................................................................... 38
Acrylamide in foodstuffs .........................................................38
Test dishes................................................................................ 39
Baking ................................................................................................39
Grilling................................................................................................39
Produktinfo
Additional information on products, accessories, replacement
parts and services can be found at www.bosch-home.com and
in the online shop www.bosch-eshop.com
3

: Important safety information
Read these instructions carefully. Only then will you be able to operate your appliance safely and correctly. Retain the instruction manual for future use or for subsequent owners.
Check the appliance for damage after unpacking it. Do not connect the appliance if it has been damaged in transport.
Only a licensed professional may connect appliances without plugs. Damage caused by incorrect connection is not covered under warranty.
This appliance is intended for domestic use only. The appliance must only be used for the preparation of food and drink. The appliance must be supervised during operation. Only use this appliance indoors.
This appliance is intended for use up to a maximum height of 2000 metres above sea level.
This appliance is not designed for operation with an external timer or by remote control.
Do not use inappropriate child safety shields or hob guards. These can cause accidents.
This appliance may be used by children
over the age of 8 years old and by persons
with reduced physical, sensory or mental
capabilities or by persons with a lack of
experience or knowledge if they are
supervised or are instructed by a person
responsible for their safety how to use the
appliance safely and have understood the
associated hazards.
Children must not play with, on, or around the appliance. Children must not clean the appliance or carry out general maintenance unless they are at least 8 years old and are being supervised.
Keep children below the age of 8 years old at a safe distance from the appliance and power cable.
Risk of fire!
■
Combustible items stored in the cooking
compartment may catch fire. Never store
combustible items in the cooking
compartment. Never open the appliance
door if there is smoke inside. Switch off
the appliance and unplug it from the
mains or switch off the circuit breaker in
the fuse box.
Risk of fire!
■
A draught is created when the appliance
door is opened. Greaseproof paper may
come into contact with the heating
element and catch fire. Do not place
greaseproof paper loosely over
accessories during preheating. Always
weight down the greaseproof paper with a
dish or a baking tin. Only cover the
surface required with greaseproof paper.
Greaseproof paper must not protrude over
the accessories.
Risk of fire!
■
Hot oil and fat can ignite very quickly.
Never leave hot fat or oil unattended.
Never use water to put out burning oil or
fat. Switch off the hotplate. Extinguish
flames carefully using a lid, fire blanket or
something similar.
Risk of fire!
■
The hotplates become very hot. Never
place combustible items on the hob.
Never place objects on the hob.
Risk of fire!
■
The appliance becomes very hot, and
flammable materials can easily catch fire.
Do not store or use any flammable
objects (e.g. aerosol cans, cleaning
agents) under or in the vicinity of the oven.
Do not store any flammable objects inside
or on top of the oven.
Risk of fire!
■
The surfaces of the plinth drawer may
become very hot. Only store oven
accessories in the drawer. Flammable and
combustible objects must not be stored in
the plinth drawer.
Always slide accessories into the cooking compartment correctly. See "Description of accessories in the instruction manual.
4
Risk of burns!
■
The appliance becomes very hot. Never
touch the interior surfaces of the cooking
compartment or the heating elements.
Always allow the appliance to cool down.
Keep children at a safe distance.
Risk of serious burns!
■
Accessories and ovenware become very
hot. Always use oven gloves to remove
accessories or ovenware from the cooking
compartment.
Risk of burns!
■
Alcoholic vapours may catch fire in the hot
cooking compartment. Never prepare food
containing large quantities of drinks with a
high alcohol content. Only use small
quantities of drinks with a high alcohol
content. Open the appliance door with
care.
Risk of burns!
■
The hotplates and surrounding area
(particularly the hob surround, if fitted)
become very hot. Never touch the hot
surfaces. Keep children at a safe distance.
Risk of burns!
■
During operation, the surfaces of the
appliance become hot. Do not touch the
surfaces when they are hot. Keep children
away from the appliance.
Risk of burns!
■
The hotplate heats up but the display does
not work. Switch off the circuit breaker in
the fuse box. Contact the after-sales
service.
Risk of burns!
■
The appliance becomes hot during
operation. Allow the appliance to cool
down before cleaning.
Risk of scalding!
■
The accessible parts become hot during
operation. Never touch the hot parts. Keep
children at a safe distance.
Risk of scalding!
■
When you open the appliance door, hot
steam may escape. Open the appliance
door with care. Keep children at a safe
distance.
Risk of scalding!
■
Water in a hot cooking compartment may
create hot steam. Never pour water into
the hot cooking compartment.
Risk of injury!
■
Scratched glass in the appliance door
may develop into a crack. Do not use a
glass scraper, sharp or abrasive cleaning
aids or detergents.
Risk of injury!
■
Saucepans may suddenly jump due to
liquid between the pan base and the
hotplate. Always keep the hotplate and
saucepan bases dry.
Risk of injury!
■
If the appliance is placed on a base and is
not secured, it may slide off the base. The
appliance must be fixed to the base.
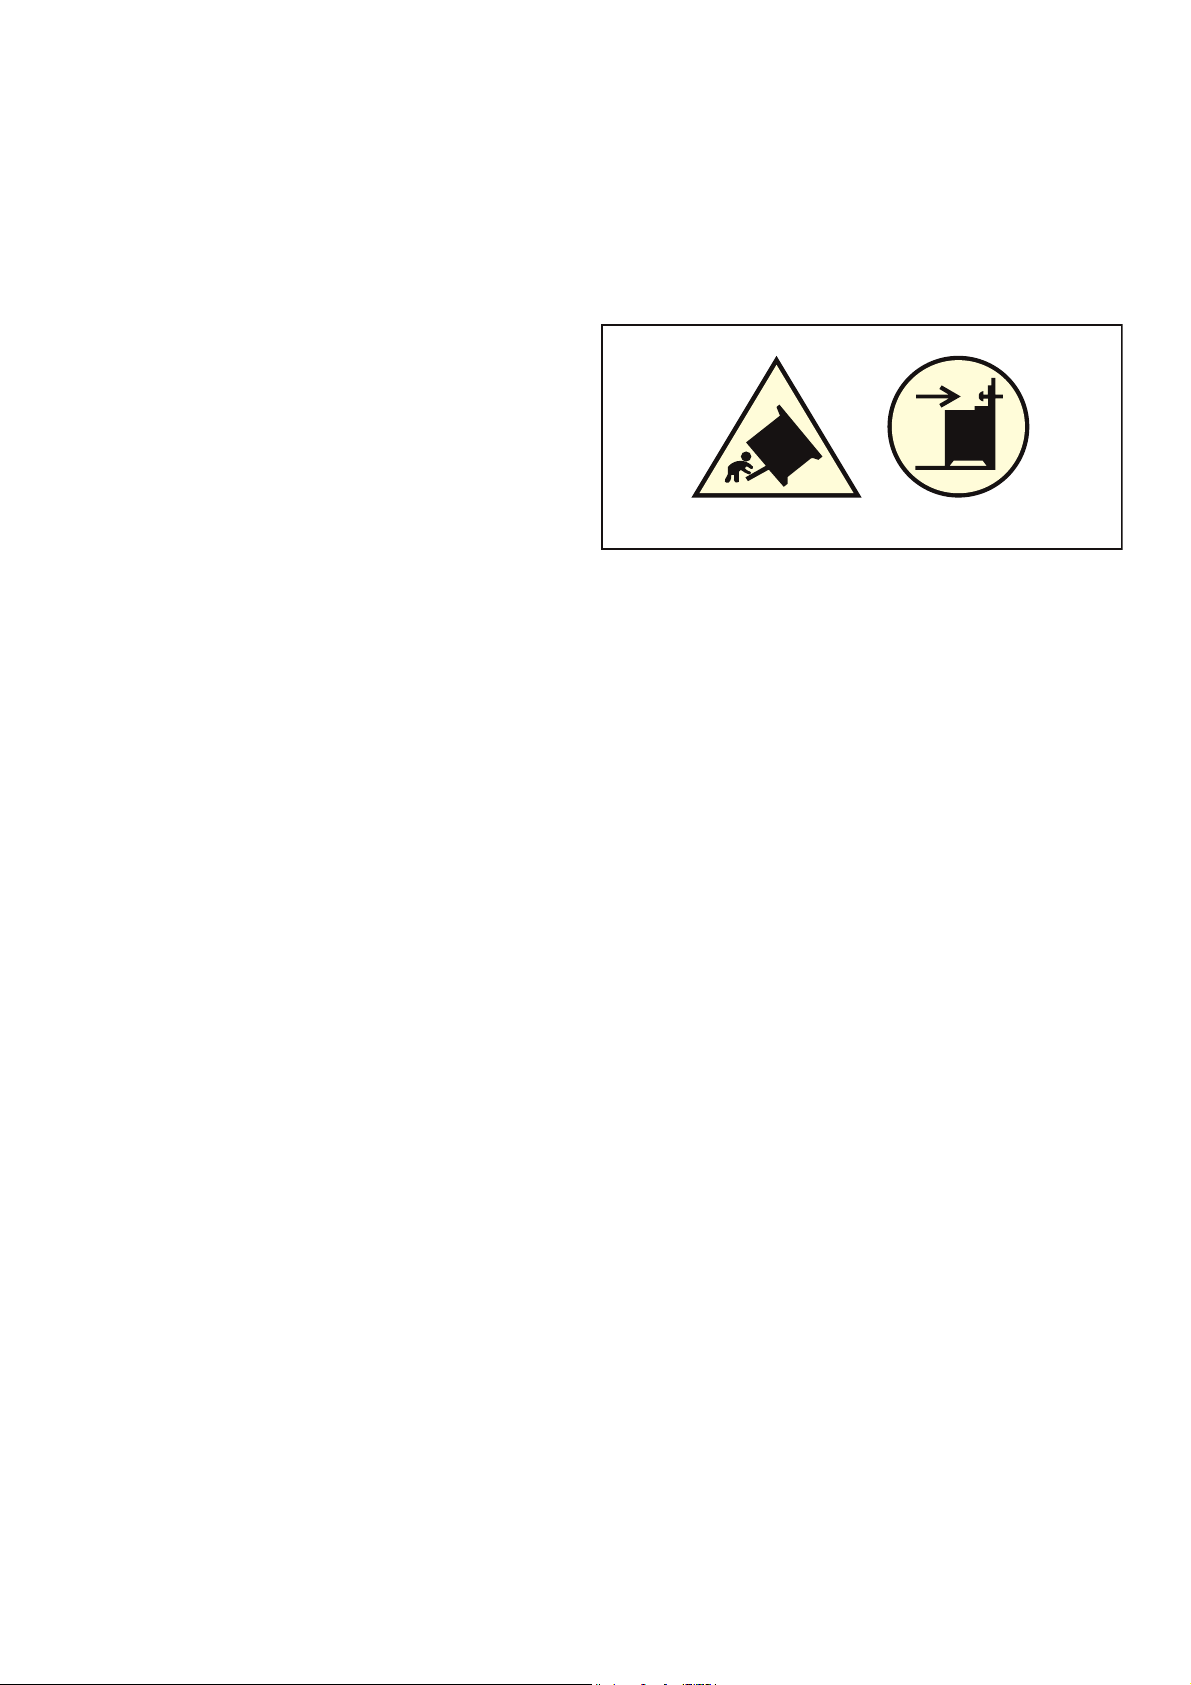
Risk of tipping!
Warning: In order to prevent tipping of the
appliance, this stabilizing means must be
installed. Refer to the instructions for
installation.
Risk of electric shock!
■
Incorrect repairs are dangerous. Repairs
may only be carried out by one of our
trained after-sales engineers. If the
appliance is faulty, unplug the mains plug
or switch off the fuse in the fuse box.
Contact the after-sales service.
Risk of electric shock and serious injury!
■
The cable insulation on electrical
appliances may melt when touching hot
parts of the appliance. Never bring
electrical appliance cables into contact
with hot parts of the appliance.
Risk of electric shock!
■
Do not use any high-pressure cleaners or
steam cleaners, which can result in an
electric shock.
Risk of electric shock!
■
When replacing the cooking compartment
bulb, the bulb socket contacts are live.
Before replacing the bulb, unplug the
appliance from the mains or switch off the
circuit breaker in the fuse box.
Risk of electric shock!
■
A defective appliance may cause electric
shock. Never switch on a defective
appliance. Unplug the appliance from the
mains or switch off the circuit breaker in
the fuse box. Contact the after-sales
service.
Risk of electric shock!
■
Cracks or fractures in the glass ceramic
may cause electric shocks. Switch off the
circuit breaker in the fuse box. Contact the
after-sales service.
5

Risk of fire!
■
Loose food residues, grease and meat
juices may catch fire during the Selfcleaning cycle. Remove coarse dirt from
the cooking compartment and from the
accessories before every Self-cleaning
cycle.
Risk of fire!
■
The appliance will become very hot on the
outside during the Self-cleaning cycle.
Never hang combustible objects, e.g. tea
towels, on the door handle. Do not place
anything against the front of the oven.
Keep children at a safe distance.
Causes of damage
Risk of burns!
■
The cooking compartment will become
very hot during the Self-cleaning cycle.
Never open the appliance door or move
the locking latch by hand. Allow the
appliance to cool down. Keep children at
a safe distance.
Risk of burns!
■
; The appliance will become very hot on
the outside during the Self-cleaning cycle.
Never touch the appliance door. Allow the
appliance to cool down. Keep children at
a safe distance.
Hob
Caution!
■ Rough pot and pan bases scratch the ceramic.
■ Avoid boiling pots dry. This may cause damage.
■ Never place hot pots or pans on the control panel, the
display area or the surround. This may cause damage.
■ Damage can occur if hard or pointed objects fall on the hob.
■ Aluminium foil and plastic containers melt on hot hotplates.
Oven protective foil is not suitable for your hob.
Damage Cause Action
Stains Food spills Remove spills immediately with a glass scraper.
Unsuitable cleaning agents Only use cleaning agents which are suitable for ceramic
Scratches Salt, sugar and sand Do not use the hob as a work surface or storage space.
Rough pot and pan bases scratch the
ceramic.
Discolouration Unsuitable cleaning agents Only use cleaning agents which are suitable for ceramic
Pan abrasion (e.g. aluminium) Lift the pots and pans when moving them.
Blisters Sugar, food with a high sugar content Remove spills immediately with a glass scraper.
Check your cookware.
Damage to the oven
Caution!
■ Accessories, foil, greaseproof paper or ovenware on the
cooking compartment floor: do not place accessories on the
cooking compartment floor. Do not cover the cooking
compartment floor with any sort of foil or greaseproof paper.
Do not place ovenware on the cooking compartment floor if a
temperature of over 50 ºC has been set. This will cause heat
to accumulate. The baking and roasting times will no longer
be correct and the enamel will be damaged.
■ Water in a hot cooking compartment: do not pour water into
the cooking compartment when it is hot. This will cause
steam. The temperature change can cause damage to the
enamel.
■ Moist food: do not store moist food in the cooking
compartment when it is closed for prolonged periods This will
damage the enamel.
■ Fruit juice: when baking particularly juicy fruit pies, do not
pack the baking tray too generously. Fruit juice dripping from
the baking tray leaves stains that cannot be removed. If
possible, use the deeper universal pan.
■ Cooling with the appliance door open: only allow the cooking
compartment to cool when it is closed. Even if the appliance
Overview
The following table provides an overview of the most frequent
kinds of damage:
door is only open a little, front panels of adjacent units could
be damaged over time.
■ Very dirty door seal: If the door seal is very dirty, the
appliance door will no longer close properly when the
appliance is in use. The fronts of adjacent units could be
damaged.Always keep the door seal clean.
■ Appliance door as a seat, shelf or worktop: Do not sit on the
appliance door, or place or hang anything on it. Do not place
any cookware or accessories on the appliance door.
■ Inserting accessories: depending on the appliance model,
accessories can scratch the door panel when closing the
appliance door. Always insert the accessories into the
cooking compartment as far as they will go.
■ Carrying the appliance: do not carry or hold the appliance by
the door handle. The door handle cannot support the weight
of the appliance and could break.
Damage to the plinth drawer
Caution!
Do not place hot objects in the plinth drawer. It could be
damaged.
6
Installation and connection
Electrical connection
The appliance must be connected to the mains by a licensed
expert. The regulations of your electricity supplier must be
observed.
Any damage arising from the appliance being connected
incorrectly will invalidate the guarantee.
For the installer
■ An all-pole isolating switch with a contact gap of at least
3 mm must be present in the installation circuit. This is not
necessary if the appliance is connected by a plug that is
accessible to the user.
■ Electrical safety: The cooker corresponds to safety class I
and may only be used in conjunction with a safety earth
terminal.
Your new cooker
Here you will learn about your new cooker. We will explain the
control panel, the hob and the individual operating controls.
General information
The design depends on the respective appliance model.
■ A type H 05 VV-F or equally rated lead must be used to
connect the appliance.
Levelling the cooker
Always place the cooker directly on the floor.
The cooker has height-adjustable feet. This allows you to raise
the plinth by about 15 mm. Please observe the special
installation instructions.
Wall fixing
To prevent the cooker from tipping over, you must fix it to the
wall at the chain and with the protection angle. Please observe
the installation instructions for fixing the oven to the wall.
You will find information on the cooking compartment and the
accessories.
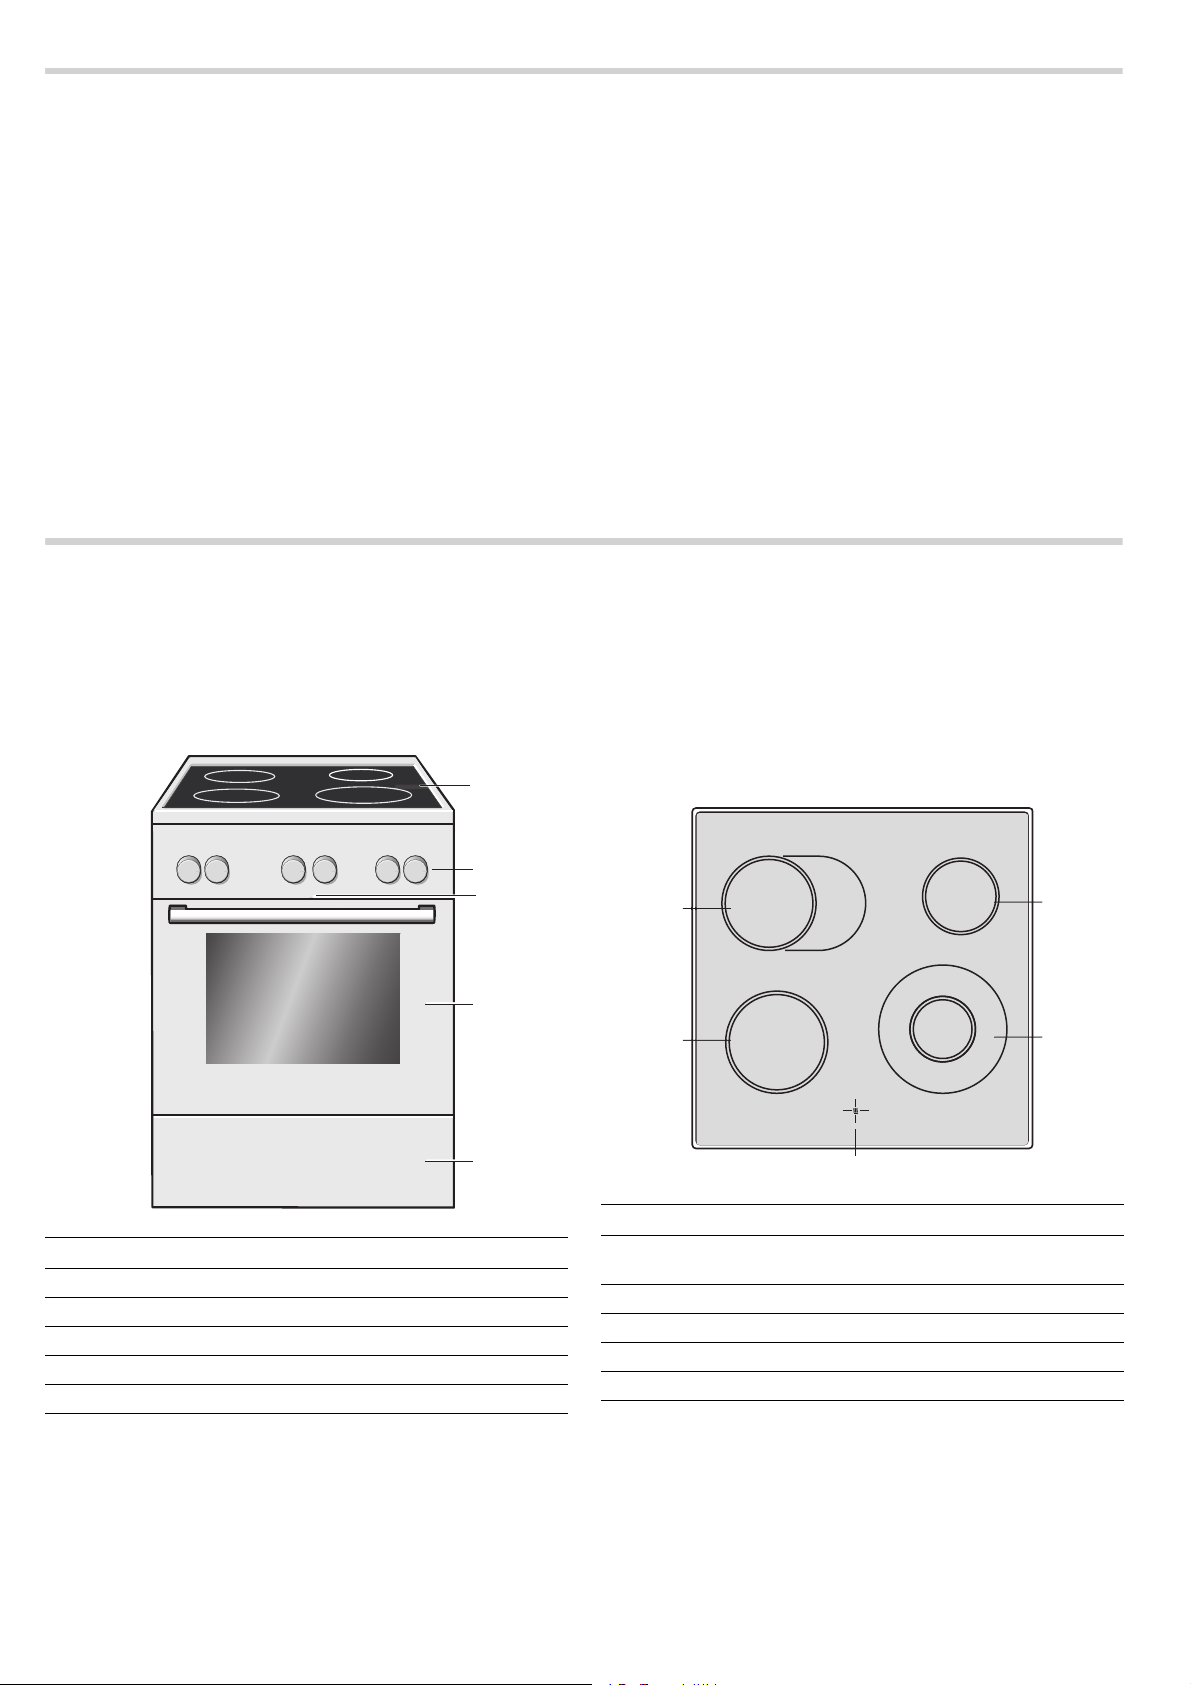
Cooking area
Here is an overview of the control panel. The design depends
on the respective appliance model.
Explanations
1 Hob**
2 Control panel**
3 Cooling fan
4 Oven door**
5* Plinth drawer**
* Optional (available for some appliances)
** Details may vary depending on the appliance model.
Explanations
1 Hotplate 17 cm or extended cooking zone 17x26
cm
2 Hotplate 14,5 cm
3 Hotplate 18 cm
4 Dual-circuit hotplate 21 and 12 cm
5 Residual heat indicator
Residual heat indicator
The hob has a residual heat indicator for each hotplate. It
shows which hotplates are still hot. Even if the hob is switched
off, the display remains lit until the hotplate has cooled down
sufficiently.
You can save energy by using the residual heat to keep a small
dish warm, for example.
7
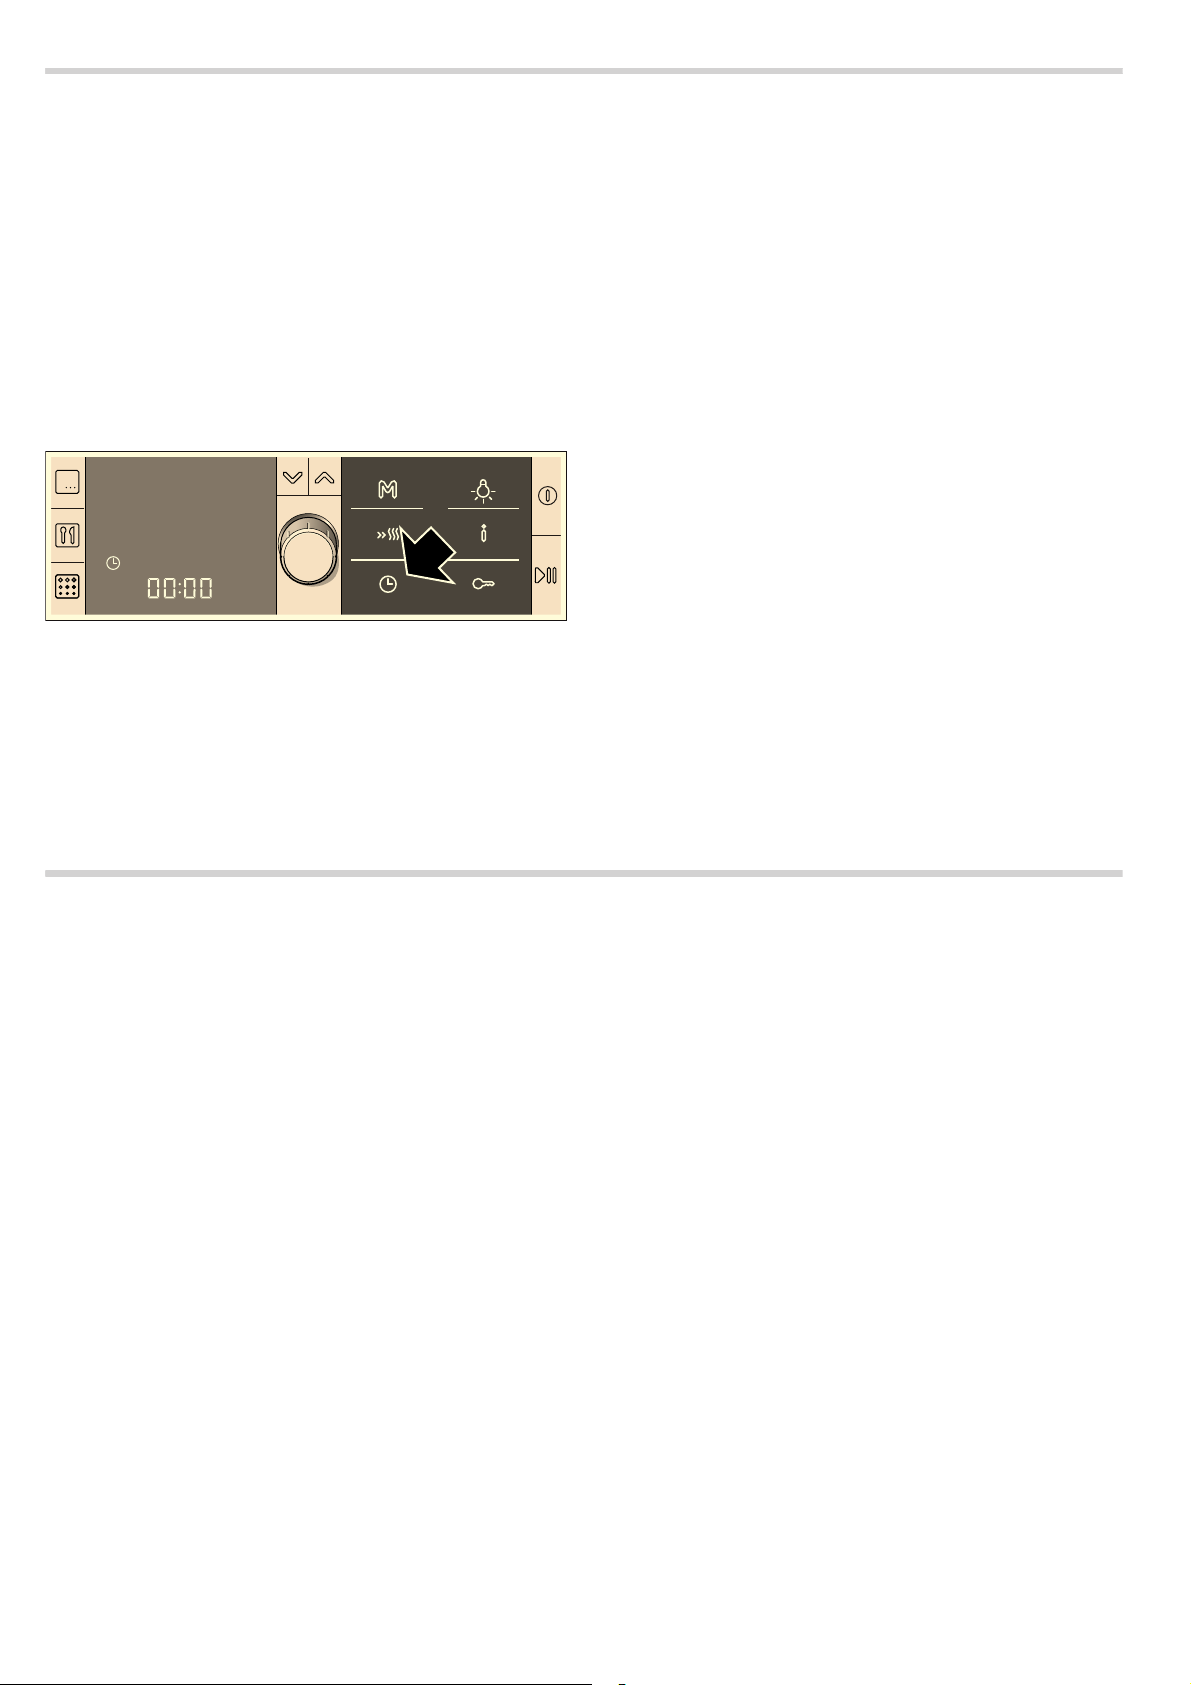
Control panel
Details may vary depending on the appliance model.
Control knobs
The control knobs can be pushed in and remain pressed down
when they are in the "out" position. Press down on the control
knob again to release it back up.
Buttons
The sensors are located under the individual buttons. They
must not be pressed too firmly. Just touch the corresponding
symbol.
Symbol Button function
!
`
p
X
Y
f
c
0
B
°
D
%
n
Rotary selector
The rotary selector is used to alter the default values and set
values. The brackets in the control panel show which value you
can adjust.
The rotary selector is retractable. Press on the rotary selector to
pop it in or out.
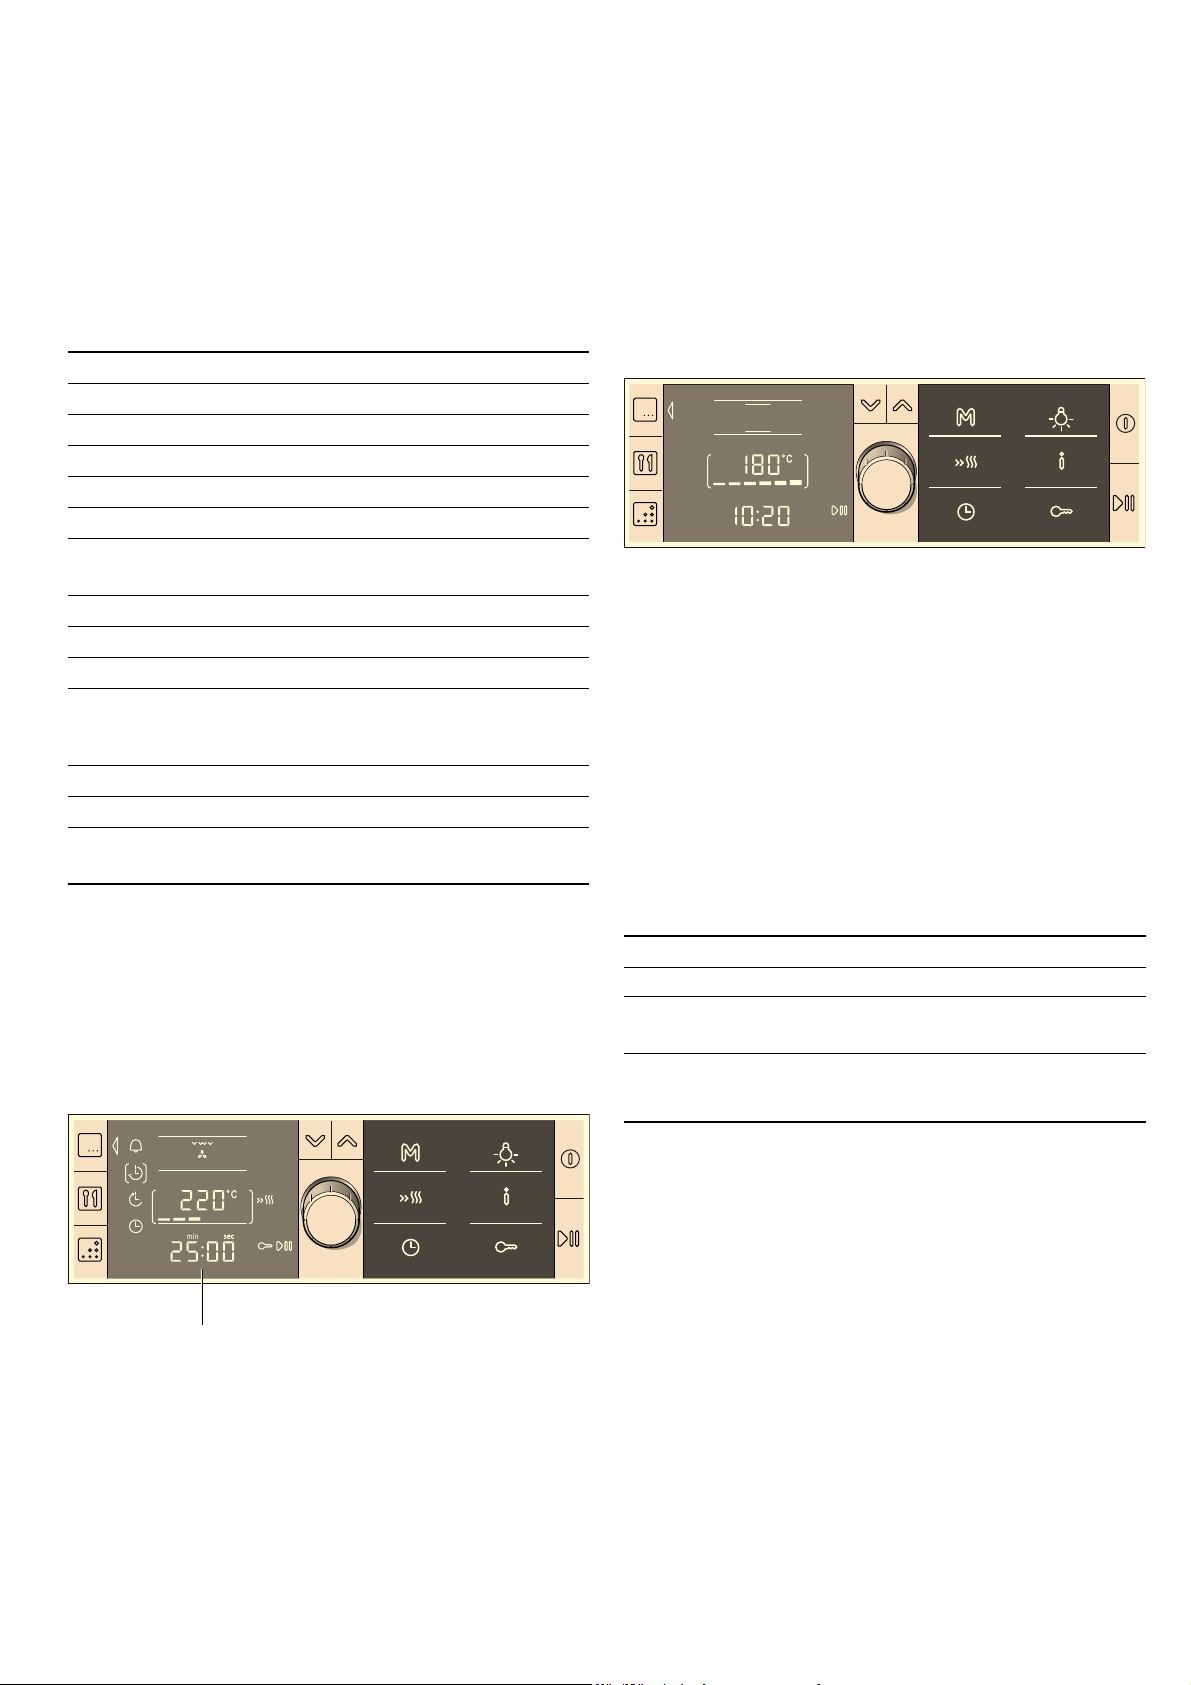
Display
The display is divided into different areas.
Selects the type of heating and temperature
Selects automatic programmes
Selects the cleaning system
Moves one row down
Moves one row up
Press and hold = selects the memory
Press briefly = starts the memory
Setting rapid heating
Opens and closes the time-setting options
Switches the oven light on and off
Press briefly = calls up the temperature
Press and hold = opens and closes the Basic
settings menu
Activates/deactivates the childproof lock
Switches the oven on and off
Press briefly = starts/pauses operation
Press and hold = cancels operation
■ Right area = display
Symbols for the various functions are displayed here, e.g. for
the childproof lock or rapid heating, etc. if they have been
set.
Temperature indicator
The temperature indicator bars show the heating phases or
residual heat in the cooking compartment.
Heating indicator
The heating indicator displays the rising temperature in the
cooking compartment. If all bars are filled, the optimum time for
placing the dish in the oven has been reached.
The bars do not appear when settings are made for grilling and
cleaning.
You can use the
temperature while the oven is heating up. Due to thermal
inertia, the temperature displayed may differ slightly from the
actual temperature in the cooking compartment.
Residual heat
The temperature indicator shows the residual heat in the
cooking compartment when the appliance is switched off. If all
the bars are filled, the temperature in the cooking compartment
is approximately 300 °C. Once the temperature has dropped to
approximately 60 °C, the display goes out.
Hotplate controls
Adjust the heat setting of the individual hotplates using the four
hotplate controls.
Setting Meaning
0 Off position The hotplate is switched off.
1-9 Heat settings 1 = lowest setting
ö//õ/
Zone activation Switches on the large dual-circuit
í/æ
° button to check the current heating
9 = highest setting
hotplate or extended cooking
zone.
'LVSOD\
■ Left area = time-setting options
When you open the Time-setting options menu, the symbols
for the time-setting options are displayed here. An outside
arrow on the left points to the operating mode which has
been selected.
■ Centre area = settings area
1st row = type of heating display
2nd row = temperature display
3rd row = clock display
You can use the
from one row to the other. Brackets are displayed around the
row you are currently in. You can use the rotary selector to
change the value in brackets.
8
X and Y navigation buttons to switch
When you switch on a hotplate , the indicator lamp lights up.
Cooking compartment
The oven light is located in the cooking compartment. A cooling
fan protects the oven from overheating.
Oven light
During operation, the oven light in the cooking compartment is
on. When temperatures up to 60 °C are selected, the light
remains switched off. This enables precise temperature
regulation.
Z
You can use the
Cooling fan
The cooling fan switches on and off as required. The hot air
escapes above the door. Caution: do not cover the ventilation
slots. Otherwise the oven will overheat.
So that the cooking compartment cools down more quickly
after operation, the cooling fan continues to run for a certain
period afterwards.
B button to switch the light on and off.
Your accessories
The accessories supplied with your appliance are suitable for
making many meals. Ensure that you always insert the
accessories into the cooking compartment the right way round.
There is also a selection of optional accessories, with which
you can improve on some of your favourite dishes, or simply to
make working with your oven more convenient.
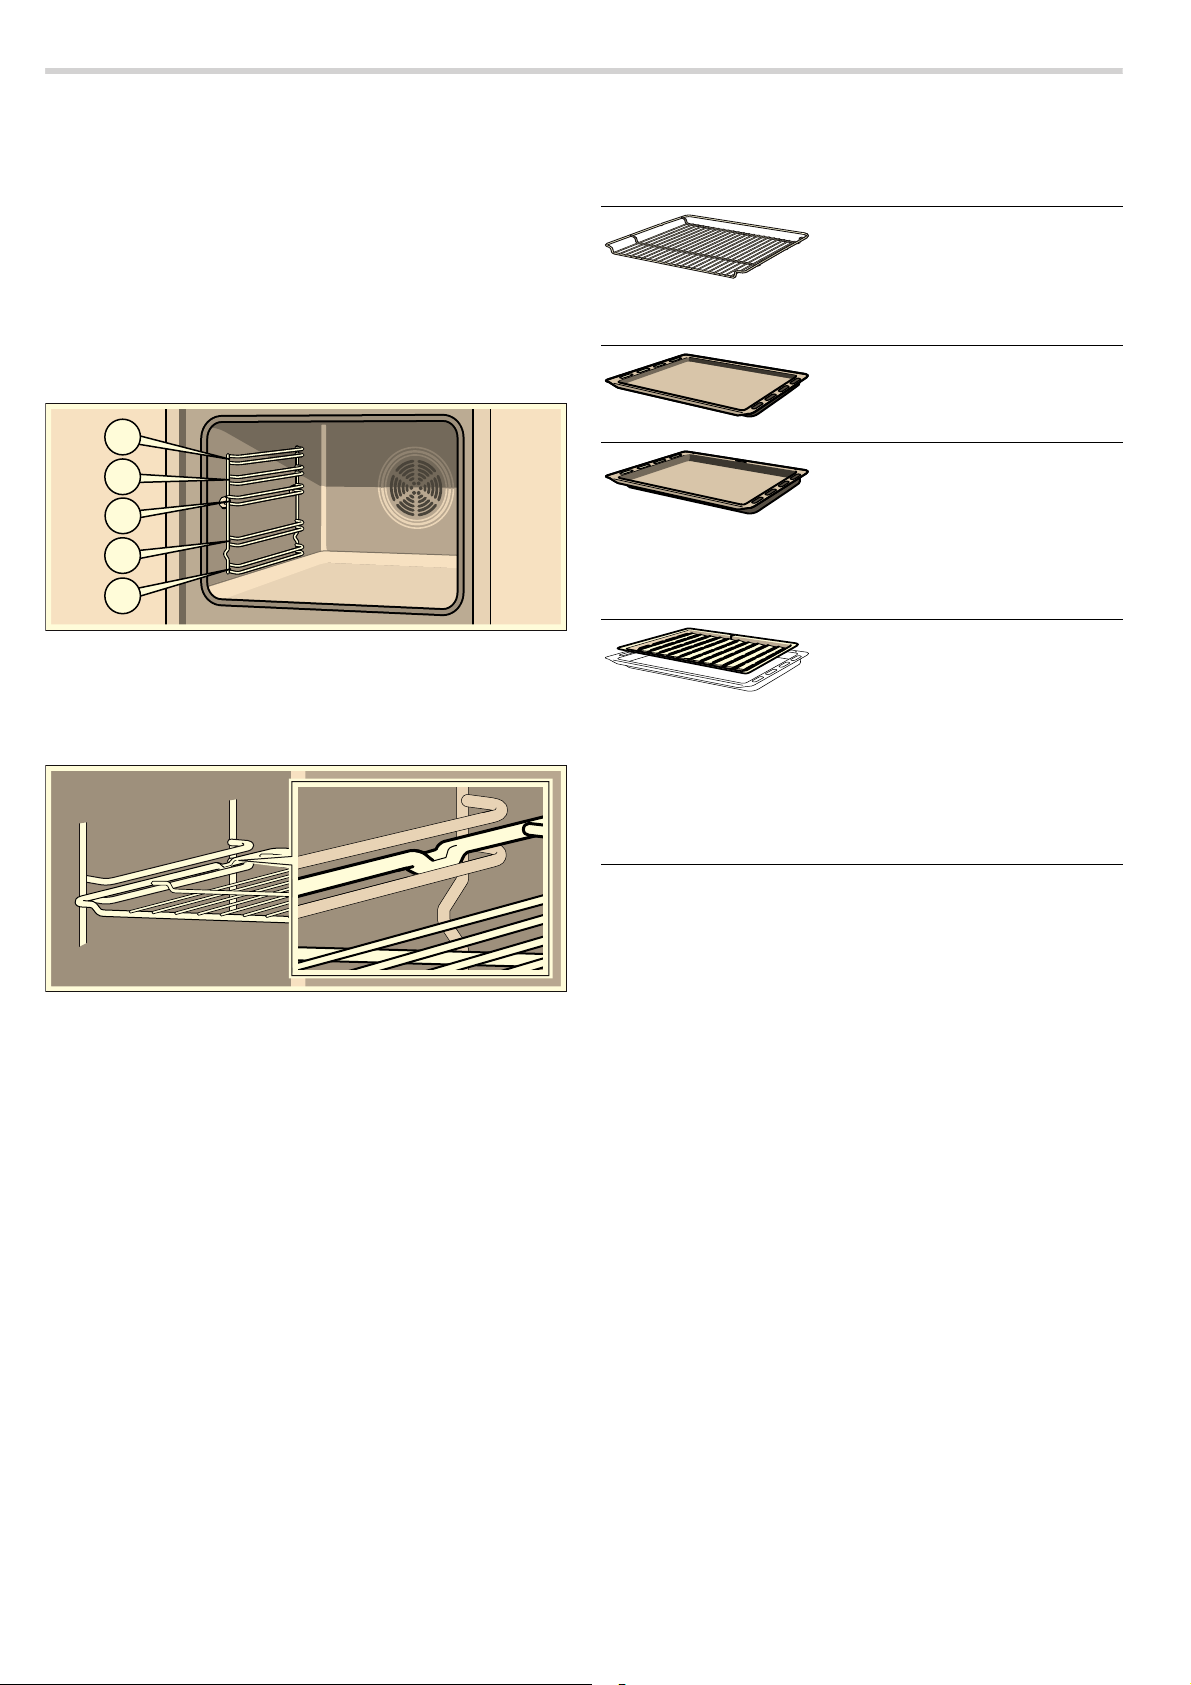
Inserting accessories
You can insert the accessories into the cooking compartment
at 5 different levels. Always insert them as far as they will go so
that the accessories do not touch the door panel.
The accessories can be pulled out approximately halfway until
they lock in place. This allows dishes to be removed easily.
When sliding the accessories into the cooking compartment,
ensure that the indentation is at the back. They can only lock in
place from this position.
You can buy accessories from the after-sales service, from
specialist retailers or online. Please specify the HEZ number.
Wire rack
For ovenware, cake tins, joints,
grilled items and frozen meals.
Insert the wire rack with the open
side facing the oven door and the
curvature pointing downwards
Enamel baking tray
For cakes and biscuits.
Slide in the baking tray with the
sloping edge facing the oven door.
Universal pan
For moist cakes, pastries, frozen
meals and large roasts. It can also
be used to catch dripping fat when
you are grilling directly on the wire
rack.
Slide in the universal pan with the
sloping edge facing the oven door.
Grill tray
Use for grilling in place of the wire
insert or as a splatter guard, so that
the oven does not become very
dirty. Only use the grill tray in the
universal pan.
Grilling on the grill tray: only use at
shelf height 1, 2 or 3.
Using the grill tray as a splatter
guard: insert the universal pan with
the grill tray under the wire rack.
¾.
Note: The accessories may deform when they become hot.
Once they cool down again, they regain their original shape.
This does not affect their operation.
9

Optional accessories
You can purchase optional accessories from the after-sales
service or specialist retailers. You will find a comprehensive
range of products for your oven in our brochures and on the
Internet. The availability of optional accessories and the option
for ordering these online varies from country to country. Please
see the sales brochures for more details.
Not all optional accessories are suitable for every appliance.
When purchasing, please always quote the exact designation
(E-no.) of your appliance.
Optional accessories HEZ number Use Suitable for
Wire rack HEZ334000 For ovenware, cake dishes, joints, grilled items and frozen meals. no
Enamel baking tray HEZ331072 For cakes and biscuits.
Push the baking tray into the oven with the sloping edge facing
towards the oven door.
universal pan HEZ332073 For moist cakes, baked items, frozen meals and large joints. It can
Wire insert HEZ324000 For roasting. Always place the wire rack in the universal pan. This
Grill tray HEZ325070 Use for grilling in place of the wire rack or as a splatter guard, so
Pizza tray HEZ317000 Ideal for pizza, frozen products or large round cakes. You can use
Bakestone HEZ327000 The bakestone is perfect for preparing home-made bread, bread
Profi extra-deep pan with wire
insert
Lid for the Profi extra-deep
pan
Glass roasting dish HEZ915001 The glass roasting dish is suitable for stews and bakes that are
3-level telescopic shelf HEZ338353 The pull-out rails fitted at positions 1, 2 and 3 allow you to pull
3-level complete telescopic
pull-out with stop function
System steamer HEZ24D300 For a gentler preparation of vegetables and fish. no
HEZ333072 Ideally suited for preparing large amounts. yes
HEZ333001 The lid converts the Profi extra-deep pan into the Profi roasting dish. no
HEZ338357 The pull-out rails fitted at positions 1, 2 and 3 allow you to pull
also be used to catch dripping fat when grilling directly on the wire
rack.
Slide the universal pan into the oven with the sloping edge facing
the oven door.
ensures that dripping fat and meat juices are collected.
that the oven does not become as dirty as it otherwise might. Only
use the grill tray in the universal pan.
Grilling on the grill tray: only use at shelf position 1, 2 and 3.
Using the grill tray as a splatter guard: insert the universal pan with
the grill tray under the wire rack.
the pizza tray instead of the universal pan. Place the baking tray on
the wire rack and proceed according to the details in the tables.
rolls and pizzas which require a crispy base. The bakestone must
always be preheated to the recommended temperature.
cooked in the oven. It is ideally suited to automatic programmes or
automatic roasting.
accessories out further without them tipping.
accessories out fully without them tipping. The pull-out rails lock in
position allowing accessories to be easily placed on top.
self-cleaning
yes
yes
no
yes
no
yes
no
no
no
After-sales service products
You can obtain suitable care and cleaning agents and other
accessories for your domestic appliances from the after-sales
Cleaning cloths for stainless-steel surfaces Product no. 311134 Reduces the build-up of dirt. Impregnated with a special oil for
Oven and grill cleaning gel Product no. 463582 For cleaning the cooking compartment. The gel is odourless.
Microfibre cloth with honeycomb structure Product no. 460770 Especially suitable for cleaning delicate surfaces, such
Door lock Product no. 612594 To prevent children from opening the oven door. The locks on
10
service, specialist retailers or (in some countries) online via the
eShop. Please specify the relevant product number.
perfect maintenance of your appliance's stainless-steel surfaces.
as glass, glass ceramic, stainless steel or aluminium. The
microfibre cloth removes liquid and grease deposits in one go.
different types of appliance door are screwed in differently.
See the information sheet supplied with the door lock.
Before using the appliance for the first time
This section tells you everything you need to do before using
the appliance for the first time.
■ Set the clock
■ Heat up the cooking compartment
■ Clean the accessories
■ Read the safety information at the start of the instructions for
use. This is very important.
Setting the clock
Once your new appliance has been connected, the 0 symbol
and
‹‹:‹‹ appear in the display. Set the clock and then the
oven is ready to use.
1. Press the 0 button.
0] symbol for the clock is shown in brackets
The [
and [
‚ƒ:‹‹] appears.
2. Turn the rotary selector to set the current time.
3. Press the 0 button.
The current time is saved.
Note: You can read how to change the time in the Time-setting
options section.
Heating up the cooking compartment
To get rid of the new cooker smell, heat up the cooking
compartment when it is empty and the oven door closed. Set
% Top/bottom heating and 240 °C.
Make sure that the cooking compartment contains no leftover
packaging, e.g. polystyrene pellets.
1. Press the % button.
: 3D hot air heating type and a temperature of 160 °C
The
are suggested. Brackets are shown around the type of
heating.
2. Turn the rotary selector to change the type of heating to
% Top/bottom heating.
3. Press the X button to switch to the temperature.
Brackets are shown around the temperature.
4. Using the rotary selector, change the temperature to 240 °C.
5. Press the n button.
Appliance operation begins. The
display.
6. Switch the oven off after 60 minutes using the % button.
The temperature indicator bars show the residual heat in the
cooking compartment.
n symbol lights up in the
Cleaning the accessories
Before you use the accessories for the first time, clean them
thoroughly with hot soapy water and a soft dish cloth.
Setting the hob
This section informs you how to set the hotplates. The table
shows heat settings and cooking times for various meals.
Setting procedure
Adjust the heat setting of the individual hotplates using the
hotplate controls.
Position 0 = off
Position 1 = lowest heat setting
Position 9 = highest heat setting
When you switch on a hotplate, the indicator lamp lights up.
Large dual-circuit hotplate and extended cooking zone
The size of these hotplates can be altered.
Switching on the large area
Turn the hotplate control to position 9 - where you will feel slight
resistance - then continue turning to the
large dual-circuit hotplate or extended cooking zone
Then immediately turn it back to the desired heat setting.
Switching back to the small area
Turn the hotplate control to 0 and reset.
The small dual-circuit hotplate is particularly good for heating
small amounts.
Caution!
Never turn the hotplate control beyond the
to 0.
ö/õ/í/æ symbol =
ö/õ/í/æ symbol
11

Table of cooking times
The following table provides some examples.
Cooking times and heat settings may vary depending on the
type of food, its weight and quality. Deviations are therefore
possible.
When heating thick liquids, stir regularly.
For bringing liquids to the boil, use heat setting 9.
Melting
Chocolate, cooking chocolate, gelatine
Butter
Heating and keeping warm
Stew (e.g. lentil stew)
Milk**
Poaching, simmering
Dumplings
Fish
White sauces, e.g. béchamel sauce
Boiling, steaming, stewing
Rice (with double the quantity of water)
Unpeeled boiled potatoes
Boiled potatoes
Pasta, noodles
Stew, soups
Vegetables
Vegetables, frozen
Cooking in a pressure cooker
Braising
Roulades
Pot roasts
Goulash
Frying**
Escalope, plain or breaded
Escalope, frozen
Steak (3 cm thick)
Fish and fish fillet, plain
Fish and fish fillet, breaded
Fish and fish fillet, breaded and frozen, e.g. fish fingers
Stir fry, frozen
Pancakes
* Continue cooking without a lid
** Without lid
Ongoing cooking
setting
1
1-2
1-2
1-2
4*
3*
1
3
3-4
3-4
5*
3-4
3-4
3-4
3-4
3-4
3-4
3-4
6-7
6-7
7-8
4-5
4-5
6-7
6-7
5-6
Ongoing cooking
time in minutes
-
-
-
-
20-30 mins
10-15 mins
3-6 mins
15-30 mins
25-30 mins
15-25 mins
6-10 mins
15-60 mins
10-20 mins
10-20 mins
-
50-60 mins
60-100 mins
50-60 mins
6-10 mins
8-12 mins
8-12 mins
8-20 mins
8-20 mins
8-12 mins
6-10 mins
continuous
12
 Loading...