

Page 1
Robert Bosch Power Tools GmbH
1 609 92A 6E9
70538 Stuttgart
GERMANY
www.bosch-pt.com
1 609 92A 6E9 (2020.11) O / 25
GWS Professional
24-180 | 24-230 | 24-180 P | 24-230 P|
24-180JZ| 24-230JZ
en Original instructions
he תוארוה הלעפה תוירוקמ
Page 2
2 |
English . . .. .. .. .. .. . .. .. .. .. .. .. .. .. .. .. .. . .. .. .. .. .. . .. .. Page 6
תירבע. .. .. .. .. .. .. .. . .. .. .. .. .. .. .. .. .. .. .. . .. .. .. .. .. . .. דומע 15
1 609 92A 6E9 | (25.11.2020) Bosch Power Tools
Page 3
| 3
A
(3)
Bosch Power Tools 1 609 92A 6E9 | (25.11.2020)
Page 4
4 |
(1)
(2)
(3)
(4)
(24)
(4)
(6)
(7)
(7)
(8) (8)
(9)
(10) (10)
(11) (11)
(12) (12)
(13)
(14)
(15)
(4)
1 609 92A 6E9 | (25.11.2020) Bosch Power Tools
Page 5
GWS 24-180 JZ
GWS 24-230 JZ
(8)
(5)
(10) (12)
(23)
(22)
(16) (16)
(21)
(11)
(20)
(17)
(18)
(19)
| 5
Bosch Power Tools 1 609 92A 6E9 | (25.11.2020)
Page 6
6 | English
English
Safety instructions
General Power Tool Safety Warnings
WARNING
warnings and instructions may result in electric shock, fire
and/or serious injury.
Save all warnings and instructions for future reference.
The term "power tool" in the warnings refers to your mainsoperated (corded) power tool or battery-operated (cordless) power tool.
Work area safety
u Keep work area clean and well lit. Cluttered or dark
areas invite accidents.
u Do not operate power tools in explosive atmospheres,
such as in the presence of flammable liquids, gases or
dust. Power tools create sparks which may ignite the dust
or fumes.
u Keep children and bystanders away while operating a
power tool. Distractions can cause you to lose control.
Electrical safety
u Power tool plugs must match the outlet. Never modify
the plug in any way. Do not use any adapter plugs with
earthed (grounded) power tools. Unmodified plugs and
matching outlets will reduce risk of electric shock.
u Avoid body contact with earthed or grounded sur-
faces, such as pipes, radiators, ranges and refrigerators. There is an increased risk of electric shock if your
body is earthed or grounded.
u Do not expose power tools to rain or wet conditions.
Water entering a power tool will increase the risk of electric shock.
u Do not abuse the cord. Never use the cord for carry-
ing, pulling or unplugging the power tool. Keep cord
away from heat, oil, sharp edges or moving parts.
Damaged or entangled cords increase the risk of electric
shock.
u When operating a power tool outdoors, use an exten-
sion cord suitable for outdoor use. Use of a cord suitable for outdoor use reduces the risk of electric shock..
u If operating a power tool in a damp location is un-
avoidable, use a residual current device (RCD) protected supply. Use of an RCD reduces the risk of electric
shock.
Personal safety
u Stay alert, watch what you are doing and use common
sense when operating a power tool. Do not use a
power tool while you are tired or under the influence
of drugs, alcohol or medication. A moment of inatten-
tion while operating power tools may result in serious personal injury.
Read all safety warnings and all instructions. Failure to follow the
u Use personal protective equipment. Always wear eye
protection. Protective equipment such as dust mask,
non-skid safety shoes, hard hat, or hearing protection
used for appropriate conditions will reduce personal injuries.
u Prevent unintentional starting. Ensure the switch is in
the off-position before connecting to power source
and/or battery pack, picking up or carrying the tool.
Carrying power tools with your finger on the switch or energising power tools that have the switch on invites accidents.
u Remove any adjusting key or wrench before turning
the power tool on. A wrench or a key left attached to a
rotating part of the power tool may result in personal injury.
u Do not overreach. Keep proper footing and balance at
all times. This enables better control of the power tool in
unexpected situations.
u Dress properly. Do not wear loose clothing or jew-
ellery. Keep your hair, clothing and gloves away from
moving parts. Loose clothes, jewellery or long hair can
be caught in moving parts.
u If devices are provided for the connection of dust ex-
traction and collection facilities, ensure these are connected and properly used. Use of dust collection can re-
duce dust-related hazards.
Power tool use and care
u Do not force the power tool. Use the correct power
tool for your application. The correct power tool will do
the job better and safer at the rate for which it was designed.
u Do not use the power tool if the switch does not turn it
on and off. Any power tool that cannot be controlled
with the switch is dangerous and must be repaired.
u Disconnect the plug from the power source and/or the
battery pack from the power tool before making any
adjustments, changing accessories, or storing power
tools. Such preventive safety measures reduce the risk
of starting the power tool accidentally.
u Store idle power tools out of the reach of children and
do not allow persons unfamiliar with the power tool or
these instructions to operate the power tool. Power
tools are dangerous in the hands of untrained users.
u Maintain power tools. Check for misalignment or bind-
ing of moving parts, breakage of parts and any other
condition that may affect the power tool’s operation.
If damaged, have the power tool repaired before use.
Many accidents are caused by poorly maintained power
tools.
u Keep cutting tools sharp and clean. Properly main-
tained cutting tools with sharp cutting edges are less
likely to bind and are easier to control.
u Use the power tool, accessories and tool bits etc. in
accordance with these instructions, taking into account the working conditions and the work to be per-
1 609 92A 6E9 | (25.11.2020) Bosch Power Tools
Page 7
English | 7
formed. Use of the power tool for operations different
from those intended could result in a hazardous situation.
Service
u Have your power tool serviced by a qualified repair
person using only identical replacement parts. This
will ensure that the safety of the power tool is maintained.
Safety information for the angle grinder
Safety Warnings common for Grinding, Sanding, Wire Brushing or Abrasive Cutting Off operations
u This power tool is intended to function as a grinder,
sander, wire brush or cut-off tool. Read all safety
warnings, instructions, illustrations and specifications provided with this power tool. Failure to follow all
instructions listed below may result in electric shock, fire
and/or serious injury.
u Operations such as polishing are not recommended to
be performed with this power tool. Operations for
which the power tool was not designed may create a hazard and cause personal injury.
u Do not use accessories which are not specifically de-
signed and recommended by the tool manufacturer.
Just because the accessory can be attached to your
power tool, it does not assure safe operation.
u The rated speed of the accessory must be at least
equal to the maximum speed marked on the power
tool. Accessories running faster than their rated speed
can break and fly apart.
u The outside diameter and the thickness of your ac-
cessory must be within the capacity rating of your
power tool. Incorrectly sized accessories cannot be ad-
equately guarded or controlled.
u Threaded mounting of accessories must match the
grinder spindle thread. For accessories mounted by
flanges, the arbour hole of the accessory must fit the
locating diameter of the flange. Accessories that do not
match the mounting hardware of the power tool will run
out of balance, vibrate excessively and may cause loss of
control.
u Do not use a damaged accessory. Before each use in-
spect the accessory such as abrasive wheels for chips
and cracks, backing pad for cracks, tear or excess
wear, wire brush for loose or cracked wires. If power
tool or accessory is dropped, inspect for damage or install an undamaged accessory. After inspecting and
installing an accessory, position yourself and bystanders away from the plane of the rotating accessory and
run the power tool at maximum no load speed for one
minute. Damaged accessories will normally break apart
during this test time.
u Wear personal protective equipment. Depending on
application, use face shield, safety goggles or safety
glasses. As appropriate, wear dust mask, hearing protectors, gloves and workshop apron capable of stopping small abrasive or workpiece fragments. The eye
protection must be capable of stopping flying debris gen-
erated by various operations . The dust mask or respirator must be capable of filtrating particles generated by
your operation. Prolonged exposure to high intensity
noise may cause hearing loss.
u Keep bystanders a safe distance away from work area.
Anyone entering the work area must wear personal
protective equipment. Fragments of workpiece or of a
broken accessory may fly away and cause injury beyond
immediate area of operation.
u Hold the power tool by insulated gripping surfaces
only, when performing an operation where the cutting
accessory may contact hidden wiring or its own cord.
Cutting accessory contacting a "live" wire may make exposed metal parts of the power tool "live" and could give
the operator an electric shock.
u Position the cord clear of the spinning accessory. If
you lose control, the cord may be cut or snagged and your
hand or arm may be pulled into the spinning accessory.
u Never lay the power tool down until the accessory has
come to a complete stop. The spinning accessory may
grab the surface and pull the power tool out of your control.
u Do not run the power tool while carrying it at your
side. Accidental contact with the spinning accessory
could snag your clothing, pulling the accessory into your
body.
u Regularly clean the power tool’s air vents. The motor’s
fan will draw the dust inside the housing and excessive
accumulation of powdered metal may cause electrical
hazards.
u Do not operate the power tool near flammable materi-
als. Sparks could ignite these materials.
u Do not use accessories that require liquid coolants.
Using water or other liquid coolants may result in electrocution or shock.
Kickback and Related Warnings
Kickback is a sudden reaction to a pinched or snagged rotating wheel, backing pad, brush or any other accessory. Pinching or snagging causes rapid stalling of the rotating accessory which in turn causes the uncontrolled power tool to be
forced in the direction opposite of the accessory’s rotation
at the point of the binding.
For example, if an abrasive wheel is snagged or pinched by
the workpiece, the edge of the wheel that is entering into the
pinch point can dig into the surface of the material causing
the wheel to climb out or kick out. The wheel may either
jump toward or away from the operator, depending on direction of the wheel’s movement at the point of pinching. Abrasive wheels may also break under these conditions.
Kickback is the result of power tool misuse and/or incorrect
operating procedures or conditions and can be avoided by
taking proper precautions as given below.
u Maintain a firm grip on the power tool and position
your body and arm to allow you to resist kickback
forces. Always use auxiliary handle, if provided, for
maximum control over kickback or torque reaction
Bosch Power Tools 1 609 92A 6E9 | (25.11.2020)
Page 8
8 | English
during start-up. The operator can control torque reac-
tions or kickback forces, if proper precautions are taken.
u Never place your hand near the rotating accessory.
Accessory may kickback over your hand.
u Do not position your body in the area where power
tool will move if kickback occurs. Kickback will propel
the tool in direction opposite to the wheel’s movement at
the point of snagging.
u Use special care when working corners, sharp edges
etc. Avoid bouncing and snagging the accessory.
Corners, sharp edges or bouncing have a tendency to
snag the rotating accessory and cause loss of control or
kickback.
u Do not attach a saw chain woodcarving blade or
toothed saw blade. Such blades create frequent kickback and loss of control.
Safety Warnings specific for Grinding and Abrasive Cutting-Off operations
u Use only wheel types that are recommended for your
power tool and the specific guard designed for the selected wheel. Wheels for which the power tool was not
designed cannot be adequately guarded and are unsafe.
u The grinding surface of centre depressed wheels must
be mounted below the plane of the guard lip. An improperly mounted wheel that projects through the plane
of the guard lip cannot be adequately protected.
u The guard must be securely attached to the power tool
and positioned for maximum safety, so the least
amount of wheel is exposed towards the operator.
The guard helps to protect operator from broken wheel
fragments, accidental contact with wheel and sparks that
could ignite clothing.
u Wheels must be used only for recommended applica-
tions. For example: do not grind with the side of cutoff wheel. Abrasive cut-off wheels are intended for peri-
pheral grinding, side forces applied to these wheels may
cause them to shatter.
u Always use undamaged wheel flanges that are of cor-
rect size and shape for your selected wheel. Proper
wheel flanges support the wheel thus reducing the possibility of wheel breakage. Flanges for cut-off wheels may
be different from grinding wheel flanges.
u Do not use worn down wheels from larger power
tools. Wheel intended for larger power tool is not suitable for the higher speed of a smaller tool and may burst.
Additional Safety Warnings specific for Abrasive Cutting Off operations
u Do not “jam” the cut-off wheel or apply excessive
pressure. Do not attempt to make an excessive depth
of cut. Overstressing the wheel increases the loading
and susceptibility to twisting or binding of the wheel in
the cut and the possibility of kickback or wheel breakage.
u Do not position your body in line with and behind the
rotating wheel. When the wheel, at the point of operation, is moving away from your body, the possible kick-
back may propel the spinning wheel and the power tool
directly at you.
u When wheel is binding or when interrupting a cut for
any reason, switch off the power tool and hold the
power tool motionless until the wheel comes to a complete stop. Never attempt to remove the cut-off wheel
from the cut while the wheel is in motion otherwise
kickback may occur. Investigate and take corrective ac-
tion to eliminate the cause of wheel binding.
u Do not restart the cutting operation in the workpiece.
Let the wheel reach full speed and carefully re-enter
the cut. The wheel may bind, walk up or kickback if the
power tool is restarted in the workpiece.
u Support panels or any oversized workpiece to minim-
ize the risk of wheel pinching and kickback. Large
workpieces tend to sag under their own weight. Supports
must be placed under the workpiece near the line of cut
and near the edge of the workpiece on both sides of the
wheel.
u Use extra caution when making a “pocket cut” into ex-
isting walls or other blind areas. The protruding wheel
may cut gas or water pipes, electrical wiring or objects
that can cause kickback.
Safety Warnings specific for Sanding operations
u Do not use excessively oversized sanding disc paper.
Follow manufacturers recommendations, when selecting sanding paper. Larger sanding paper extending bey-
ond the sanding pad presents a laceration hazard and
may cause snagging, tearing of the disc, or kickback.
Safety Warnings specific for Wire Brushing operations
u Be aware that wire bristles are thrown by the brush
even during ordinary operation. Do not overstress the
wires by applying excessive load to the brush The wire
bristles can easily penetrate light clothing and/or skin.
u If the use of a guard is recommended for wire brush-
ing, do not allow any interference of the wire wheel or
brush with the guard. Wire wheel or brush may expand
in diameter due to work load and centrifugal forces.
Additional safety information
Wear safety goggles.
u Use suitable detectors to determine if utility lines are
hidden in the work area or call the local utility company for assistance. Contact with electric lines can lead
to fire and electric shock. Damaging a gas line can lead to
explosion. Penetrating a water line causes property damage or may cause an electric shock.
u Do not touch grinding and cutting discs until they have
cooled down. The discs can become very hot while working.
u Release the On/Off switch and set it to the off position
when the power supply is interrupted, e. g., in case of
1 609 92A 6E9 | (25.11.2020) Bosch Power Tools
Page 9

English | 9
a power failure or when the mains plug is pulled. This
prevents uncontrolled restarting.
u Secure the workpiece. A workpiece clamped with
clamping devices or in a vice is held more secure than by
hand.
Products sold in GB only:
Your product is fitted with an BS 1363/A approved electric
plug with internal fuse (ASTA approved to BS 1362).
If the plug is not suitable for your socket outlets, it should be
cut off and an appropriate plug fitted in its place by an authorised customer service agent. The replacement plug
should have the same fuse rating as the original plug.
The severed plug must be disposed of to avoid a possible
shock hazard and should never be inserted into a mains
socket elsewhere.
Product Description and Specifications
Read all the safety and general instructions.
Failure to observe the safety and general instructions may result in electric shock, fire
and/or serious injury.
Please observe the illustrations at the beginning of this operating manual.
Intended use
The power tool is intended for cutting, roughing and brushing metal and stone materials without the use of water.
A special protective guard for cutting must be used when
cutting bonded abrasives.
Sufficient dust extraction must be provided when cutting
stone.
With approved abrasive tools, the power tool can be used for
sanding with sanding discs.
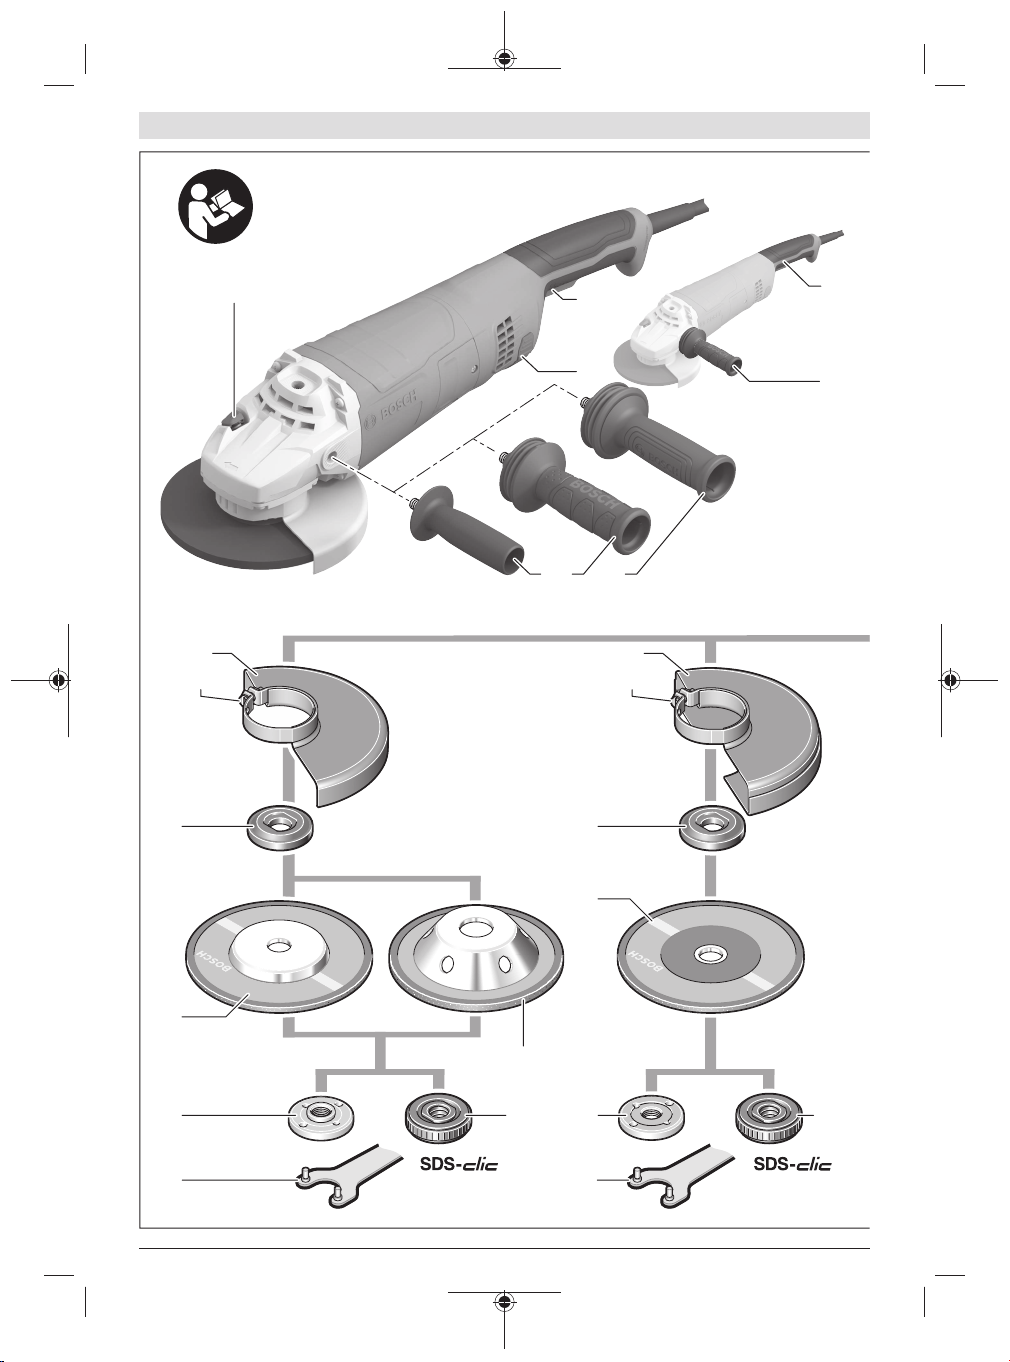
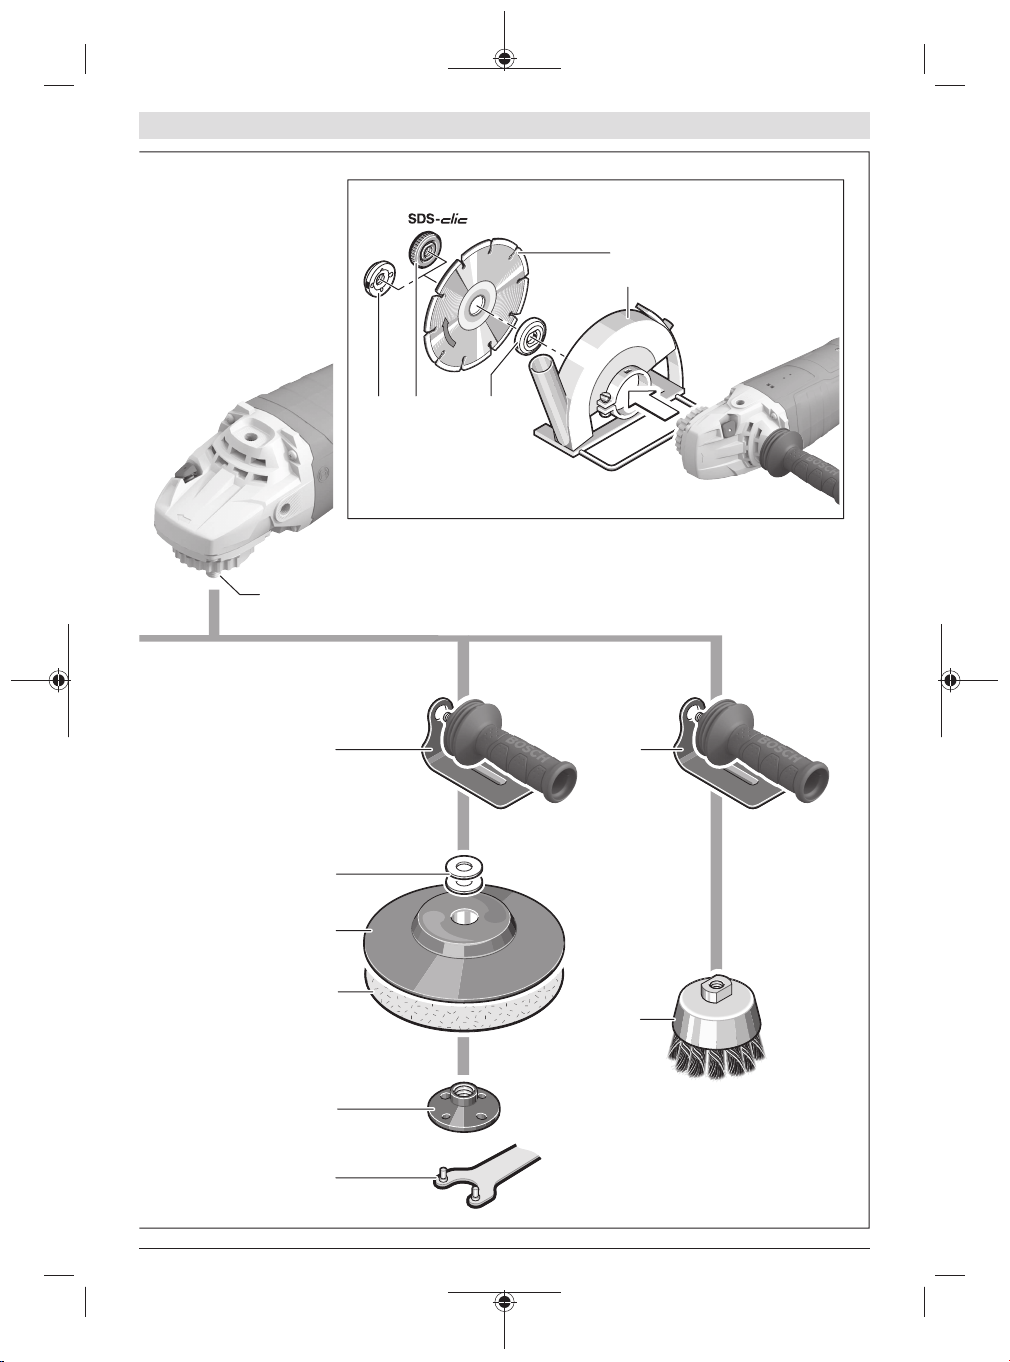
Product Features
The numbering of the product features refers to the diagram
of the power tool on the graphics page.
Spindle lock button
(1)
On/off switch
(2)
Dust box (GWS24-180JZ/GWS24-230JZ)
(3)
Auxiliary handle (insulated gripping surface)
(4)
Grinding spindle
(5)
Protective guard for grinding
(6)
Locking screw for protective guard
(7)
Mounting flange with O‑ring
(8)
Grinding disc
(9)
Clamping nut
(10)
Two-pin spanner for clamping nut
(11)
Quick-clamping nut
(12)
Carbide grinding head
(13)
Protective guard for cutting
(14)
Cutting disc
(15)
Hand guard
(16)
Spacer discs
(17)
Rubber sanding pad
(18)
Abrasive disc
(19)
Round nut
(20)
Cup brush
(21)
Extraction guard for cutting with cutting guides
(22)
Diamond cutting disc
(23)
Handle (insulated gripping surface)
(24)
a)
Accessories shown or described are not included with the
product as standard. You can find the complete selection of
accessories in our accessories range.
a)
a)
a)
a)
a)
a)
a)
a)
a)
a)
a)
a)
a)
Technical Data
Angle grinder GWS 24-180 GWS 24-230 GWS 24-180PGWS 24-230PGWS 24-180JZGWS 24-230
Article number
Rated power input W 2400 2400 2400 2400 2400 2400
Rated speed min
Max. grinding disc
diameter
Grinding spindle
thread
Max. thread
length of grinding
spindle
Restart protection – – – – ● ●
Starting current
limitation
Bosch Power Tools 1 609 92A 6E9 | (25.11.2020)
3601HC20.. 3601HC30.. 3601HC21.. 3601HC31.. 3601HC23.. 3601HC33..
-1
8500 6500 8500 6500 8500 6500
mm 180 230 180 230 180 230
M 14 M 14 M 14 M 14 M 14 M 14
mm 25 25 25 25 25 25
– – – – ● ●
JZ
Page 10

10 | English
Angle grinder GWS 24-180 GWS 24-230 GWS 24-180PGWS 24-230PGWS 24-180JZGWS 24-230
Overload protec-
– – – – ● ●
tion
Weight according to EPTA-Procedure 01:2014
– with low-vibra-
kg 5.7 5.9 5.7 5.9 5.8 6.0
tion auxiliary
handle
– with standard
kg 5.6 5.8 5.6 5.8 5.7 5.9
auxiliary
handle
Protection class
The specifications apply to a rated voltage [U] of 230 V. These specifications may vary at different voltages and in country-specific models.
Only for power tools without starting current limitation: Switching these on causes the voltage to drop briefly. Other tools may be adversely af-
fected by these if the conditions in the electricity supply are unfavourable. Malfunctions are not to be expected for system impedances
below0.058ohm.
Fitting
Fitting Protective Equipment
u Pull the plug out of the socket before carrying out any
work on the power tool.
Note: If the grinding disc breaks during operation or the
holding fixtures on the protective guard/power tool become
damaged, the power tool must be sent to the after-sales service immediately; see the "After-Sales Service and Application Service" section for addresses.
Protective guard for grinding
Place the protective guard (6) on the spindle collar. Adjust
the position of the protective guard (6) to the requirements
of the operation and lock the protective guard (6) with the
locking screw (7).
u Adjust the protective guard (6) such that sparking in
the direction of the operator is prevented.
Protective guard for cutting
u Always use the protective guard for cutting (14) when
cutting bonded abrasives.
u Provide sufficient dust extraction when cutting stone.
The protective guard for cutting (14) is fitted in the same
way as the protective guard for grinding (6).
Extraction guard for cutting with a guide block
The extraction guard for cutting with a guide block (22) is fitted in the same way as the protective guard for grinding (6).
Side handle
u Do not operate your power tool without the side
handle (4).
Screw the side handle (4) on the left or right of the machine
head depending on how your are working.
Low-vibration auxiliary handle
/ II / II / II / II / II / II
machine head depending on the working method.
The low-vibration auxiliary handle reduces vibration, en-
abling the tool to be used safely and more comfortably.
u Do not operate your power tool without the side
handle (4).
u Do not make any alterations of any kind to the auxili-
ary handle.
Do not continue to use a damaged auxiliary handle.
Hand guard
u Always fit the hand guard (16) when working with the
rubber sanding plate (18) or with the cup brush/disc
brush/flap disc.
Attach the hand guard (16) to the side handle (4).
Fitting the abrasive tools
u Pull the plug out of the socket before carrying out any
work on the power tool.
u Do not touch grinding and cutting discs until they have
cooled down. The discs can become very hot while work-
ing.
Clean the grinding spindle (5) and all the parts to be fitted.
Lock the grinding spindle with the spindle lock button (1)
before clamping and releasing the abrasive tools.
u Do not press the spindle lock button while the grind-
ing spindle is moving. The power tool may become dam-
aged if you do this.
Grinding/cutting disc
Pay attention to the dimensions of the abrasive tools. The
diameter of the hole must match that of the mounting flange.
Do not use an adapter or reducer.
When using diamond cutting discs, ensure that the arrow indicating the direction of rotation on the diamond cutting disc
matches the direction of rotation of the power tool (see the
Screw the auxiliary handle
(4) on the right or left of the
direction of rotation arrow on the machine head).
See the graphics page for assembly instructions.
JZ
1 609 92A 6E9 | (25.11.2020) Bosch Power Tools
Page 11

English | 11
(25)
To fasten the grinding/cutting disc, screw on the clamping
nut(10) and tighten with the two-hole spanner(see " Quickclamping nut ", page11).
u After fitting the abrasive tool, check that the abrasive
tool is fitted correctly and can turn freely before
switching on the power tool. Make sure that the abrasive tool does not brush against the protective guard or
other parts.
A plastic part (O-ring) is fitted around the centring collar in the mounting flange (8). If the O-
ring is missing or damaged, the mounting
flange (8) must be replaced before operation
can resume.
Flap disc
u Always fit the hand guard (16) when working with the
flap disc.
Rubber sanding pad
u Always fit the hand guard (16) when working with the
rubber sanding pad (18).
See the graphics page for fitting instructions.
Before fitting the rubber sanding pad (18), place the two
spacer discs (17) on the grinding spindle (5).
Screw on the round nut (20) and tighten with the two-pin
spanner.
Cup brush/disc brush
u Always fit the hand guard (16) when working with the
cup brush or disc brush.
See the graphics page for fitting instructions.
The cup brush/disc brush must be screwed onto the grinding
spindle until it rests firmly against the grinding spindle flange
at the end of the grinding spindle thread. Tighten the cup
brush/disc brush with an open-ended spanner.
Quick-clamping nut
To change the abrasive tool easily without having to use any
additional tools, you can use the quick-clamping nut (12) instead of the clamping nut (10).
u The quick-clamping nut (12) may be used only for
grinding or cutting discs.
Only use quick-clamping nuts (12) that are in good work-
ing order and not damaged.
When screwing on, make sure that the printed side of the
quick-clamping nut (12) is not facing the grinding disc;
the arrow must be pointing towards the index mark (25).
Press the spindle lock button (1) to lock the grinding
spindle. To tighten the
quick-clamping nut, turn
the grinding disc firmly
clockwise.
If the quick-clamping nut
has been attached correctly
and is not damaged, you
can loosen it by hand by
turning the knurled ring anticlockwise. If the quick-
clamping nut is stuck, do
not attempt to loosen it
with pliers – always use
the two-pin spanner. Posi-
tion the two‑pin spanner as
shown in the figure.
Approved abrasive tools
You can use all the abrasive tools mentioned in these operating instructions.
The permissible speed [min-1] or the circumferential speed
[m/s] of the abrasive tools used must at least match the values given in the table.
It is therefore important to observe the permissible rota-
tional/circumferential speed on the label of the abrasive
tool.
max. [mm] [mm]
D b d [min-1] [m/s]
180
230
180
230
100 30 M 14 8500 45
8822.2
22.2
–
––8500
–
8500
65008080
65008080
Dust/Chip Extraction
The dust from materials such as lead paint, some types of
wood, minerals and metal can be harmful to human health.
Touching or breathing in this dust can trigger allergic reactions and/or cause respiratory illnesses in the user or in
people in the near vicinity.
Certain dusts, such as oak or beech dust, are classified as
Bosch Power Tools 1 609 92A 6E9 | (25.11.2020)
Page 12

12 | English
carcinogenic, especially in conjunction with wood treatment
additives (chromate, wood preservative). Materials containing asbestos may only be machined by specialists.
– Use a dust extraction system that is suitable for the ma-
terial wherever possible.
– Provide good ventilation at the workplace.
– It is advisable to wear a P2 filter class breathing mask.
The regulations on the material being machined that apply in
the country of use must be observed.
u Avoid dust accumulation at the workplace. Dust can
easily ignite.
Operation
Start-up
u Pay attention to the mains voltage. The voltage of the
power source must match the voltage specified on the
rating plate of the power tool. Power tools marked
with 230V can also be operated with 220V.
When operating the power tool using a mobile generator that
does not have sufficient reserve capacity or an adequate
voltage control system with inrush current boost converter,
loss of performance or atypical behaviour may occur upon
switch-on.
Please check the suitability of the power generator you are
using, particularly with regard to the mains voltage and frequency.
u Products that are only sold in AUS and NZ: Use a resid-
ual current device (RCD) with a nominal residual current
of 30 mA or less.
u Hold the tool by the insulated gripping surfaces and
auxiliary handle only. The application tool could come
into contact with hidden wiring or its own cord. Con-
tact with live wires may make metal parts of the tool live,
posing a risk of electric shock.
Switching on/off
To start the power tool, push the on/off switch (2) forward
and then press it down.
To lock the on/off switch (2) in position, push the on/off
switch (2) further forward.
To switch off the power tool, release the on/off switch (2);
or, if the switch is locked, briefly press the on/off switch (2)
and then release it.
u Always check abrasive tools before using them. The
abrasive tool must be fitted properly and be able to
move freely. Carry out a test run for at least one
minute with no load. Do not use abrasive tools that are
damaged, run untrue or vibrate during use. Damaged
abrasive tools can burst apart and cause injuries.
Switch without locking mechanism (country-specific):
(GWS 24-180 P / GWS 24-230 P)
To start the power tool, push the on/off switch (2) forward
and then press it down.
To switch off the power tool, release the on/off switch (2).
Restart protection
(GWS 24-180 JZ / GWS 24-230 JZ)
The restart protection feature prevents the power tool from
uncontrolled starting after the power supply to it has been
interrupted.
To restart the tool, set the on/off switch (2) to the "off" position and then switch the power tool on again.
Starting current limitation
(GWS 24-180 JZ / GWS 24-230 JZ)
The electronic starting current limitation feature restricts the
power of the power tool when it is switched on and enables
operation using a 16 A fuse.
Note: If the power tool runs at full speed immediately after
being switched on, this means that the starting current limitation and restarting protection mechanisms have failed. The
power tool must be sent to the after-sales service immediately; see the "After-Sales Service and Application Service"
section for addresses.
Overload protection
(GWS 24-180 JZ / GWS 24-230 JZ)
When overloaded, the motor comes to a stop. Allow the
power tool to cool down unloaded at its maximum no-load
speed for approx. 5–10 seconds.
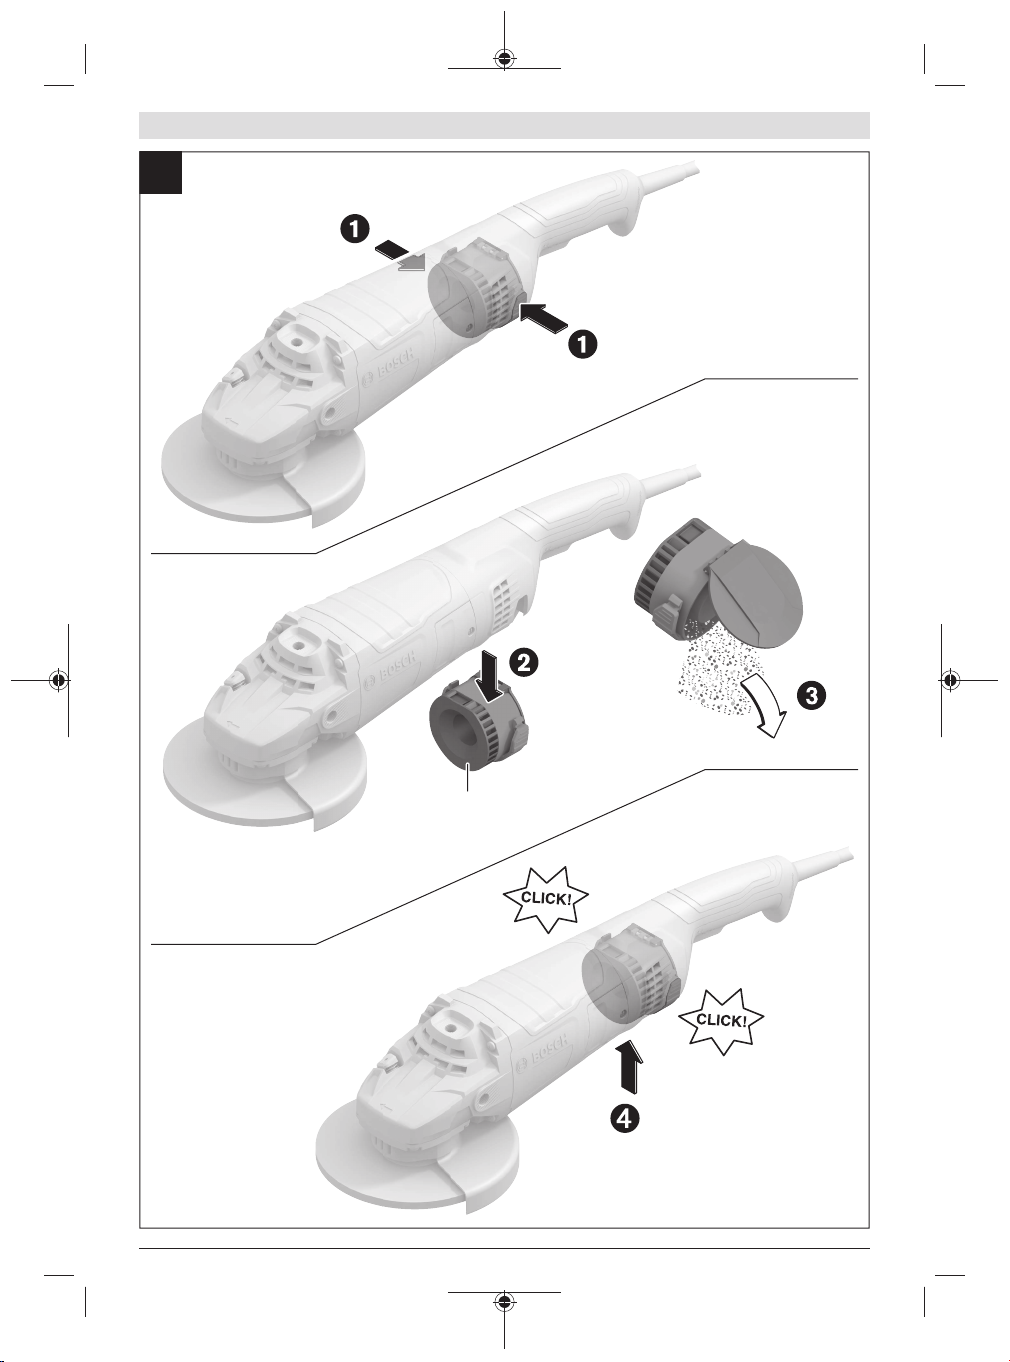
Emptying the dust box (see figureA)
(GWS 24-180 JZ / GWS 24-230 JZ)
Press both sides of the dust box(3) and remove the dust
box(3) from the power tool. Open the cover and empty the
dust box(3). Slide the dust box(3) back into the power tool
until it clicks into place.
Working advice
u Pull the plug out of the socket before carrying out any
work on the power tool.
u Exercise caution when cutting slots in structural walls;
see the "Information on structural design" section.
u Clamp the workpiece if it is not secure under its own
weight.
u Do not load the power tool so heavily that it comes to a
stop.
u If the power tool has been subjected to a heavy load,
continue to run it at no-load for several minutes to
cool down the accessory.
u Do not use the power tool with a cut-off stand.
u Do not touch grinding and cutting discs until they have
cooled down. The discs can become very hot while working.
Note: Remove the plug from the socket when not using the
tool. When the power tool is plugged in, mains voltage is
present and the tool consumes a small amount of electricity,
even if switched off.
Rough grinding
u Never use cutting discs for rough grinding.
1 609 92A 6E9 | (25.11.2020) Bosch Power Tools
Page 13

English | 13
The best rough grinding results are achieved with a set angle
of 30° to 40°. Move the power tool back and forth with moderate pressure. This will ensure that the workpiece does not
become too hot or discolour and that grooves are not
formed.
Flap Disc
With the flap disc (accessory), curved surfaces and profiles
can be worked. Flap discs have a considerably higher service life, lower noise levels and lower sanding temperatures
than conventional sanding sheets.
Cutting Metal
u Always use the protective guard for cutting (14) when
cutting bonded abrasives.
When carrying out abrasive cutting, use a moderate feed
that is suited to the material being machined. Do not exert
pressure on the cutting disc and do not tilt or swing the
power tool.
Do not attempt to reduce the speed of a cutting disc coming
to a stop by applying pressure from the side.
The power tool must always
work in an up-grinding motion. Otherwise, there is a
risk that it will be pushed
uncontrolled out of the cut.
For best results when cutting profiles and rectangular
tubing, start at the smallest
cross section.
Cutting stone
u Provide sufficient dust extraction when cutting stone.
u Wear a dust mask.
u The power tool may be used only for dry cutting/grind-
ing.
For best results when cutting stone, use a diamond cutting
disc.
When using the extraction guard for cutting with a guide
block (22), the vacuum cleaner must be approved for vacuuming stone dust. Suitable vacuum cleaners are available
from Bosch.
Switch on the power tool
and position it with the
front part of the guide block
on the workpiece. Move the
power tool with a moderate
feed motion that is suited to
the material being machined.
When cutting especially
hard materials such as concrete with a high pebble content, the diamond cutting disc
can overheat and become damaged as a result. This is
clearly indicated by circular sparking, rotating with the diamond cutting disc.
If this happens, stop cutting and allow the diamond cutting
disc to cool down by running the power tool for a short time
at maximum speed with no load.
Working noticeably slower and with circular sparking indicate that the diamond cutting disc that has become dull. You
can resharpen the disc by briefly cutting into abrasive material (e.g. lime-sand brick).
Information on structural design
Slots in load-bearing walls are subject to DIN 1053 part 1 or
country-specific regulations. These regulations must be observed under all circumstances. Seek advice from the responsible structural engineer, architect or construction supervisor before starting work.
Maintenance and Service
Maintenance and cleaning
u Pull the plug out of the socket before carrying out any
work on the power tool.
u To ensure safe and efficient operation, always keep
the power tool and the ventilation slots clean.
u In extreme conditions, always use a dust extractor if
possible. Blow out ventilation slots frequently and install a residual current device (RCD) upstream. When
machining metals, conductive dust can settle inside the
power tool, which can affect its protective insulation.
Store and handle the accessories carefully.
In order to avoid safety hazards, if the power supply cord
needs to be replaced, this must be done by Bosch or by an
after-sales service centre that is authorised to repair Bosch
power tools.
Dust box
To ensure optimum dust protection, we recommend cleaning the dust box(3) daily or at regular intervals after use.
The cleaning intervals depend on usage.
After-Sales Service and Application Service
Our after-sales service responds to your questions concerning maintenance and repair of your product as well as spare
parts. You can find explosion drawings and information on
spare parts at: www.bosch-pt.com
The Bosch product use advice team will be happy to help you
with any questions about our products and their accessories.
In all correspondence and spare parts orders, please always
include the 10‑digit article number given on the nameplate
of the product.
Malaysia
Robert Bosch Sdn. Bhd.(220975-V) PT/SMY
No. 8A, Jalan 13/6
46200 Petaling Jaya
Selangor
Tel.: (03) 79663194
Toll-Free: 1800 880188
Fax: (03) 79583838
Bosch Power Tools 1 609 92A 6E9 | (25.11.2020)
Page 14

14 | English
E-Mail: kiathoe.chong@my.bosch.com
www.bosch-pt.com.my
You can find further service addresses at:
www.bosch-pt.com/serviceaddresses
Disposal
The power tool, accessories and packaging should be recycled in an environmentally friendly manner.
Do not dispose of power tools along with
household waste.
1 609 92A 6E9 | (25.11.2020) Bosch Power Tools
Page 15

הדובעה ילכ םע הדובעה ןמזב בל תמושת רסוח לש דחא
.תושק תועיצפ םורגל ידכ ילמשחה
,הקלחה תוענומ תוחיטב ילענ ,קבא תכסמ ןוגכ ,ןגמ דויצ
םיתיחפמ הדובעה יאנתל ןוכנ דויצו העימש ינגמ וא הדסק
.תועיצפל ןוכיסה תא
הדובעה ילכ תא רבחמ התאש ינפל יובכ בצמב
,הללוסה רוביח ינפל וא/ו למשח רוקמל ילמשחה
.ילכה לש האישנ וא המרהילמשחה הדובעה ילכ תאישנ
הדובע ילכל למשח תקפסא וא גתמה לע עבצאה םע
.תונואתל יוכיסה תא םיריבגמ לעפומ בצמב םיאצמנה
.ילמשחה הדובעה ילכןונווכ ילכ וא םיגרב חתפמ
ילמשחה הדובעה ילכ לש בבותסמ קלחל םירבוחמ םירתונש
.תועיצפ םורגל םילולע
.ןמז לכב תנזואמו הביציילכב רתוי בוט טולשל ולכות ךכ
.םייופצ אל םיבצמב ילמשחה הדובעה
.םיטישכתםיקלחמ תופפכו םידגב ,רעיש וקיחרה
.םיענםילולע ךורא רעיש וא םיטישכת ,םיפפור םידגב
.םיענ םיקלחב ספתיהל
.הנוכנו הניקת הרוצב םירבוחמ םירבחמהששומיש
תועבונה תונכסה תא תיחפהל יושע קבא תביאשל דויצב
.קבאמ
םהב לופיטו םיילמשח הדובע ילכב שומיש
.םכלש הדובעה גוסל םיאתמה ילמשחה הדובעה ילכב
רתוי בוט הדובעה תא עצבי םיאתמה ילמשחה הדובעה ילכ
.ודועייל םאתהב ,רתוי החוטב הרוצבו
.ותוא הבכמו ליעפמרשפא יאש ילמשח הדובע ילכ לכ
ןכוסמ ילכ אוה יוביכ/הלעפהה גתמ תועצמאב וב טולשל
.ונקתל שיש
תפלחה ,םייוניש עוציב ינפל הדובעה ילכמ הללוסה
.ילמשחה הדובעה ילכ ןוסחא וא םירזיבאענמ יעצמא
לועפל ליחתי הדובעה ילכש ןוכיסה תא םיתיחפמ הלא
.גגושב
םיריכמ םניאש םישנאל ורשפאת לאו ,םידלי לש םדי
ילכ תא לעפתל הלא תוארוהו ילמשחה הדובעה ילכ תא
.ילמשחה הדובעהםהשכ םינכוסמ םיילמשח הדובע ילכ
.םיסונמ אל םישמתשמ לש םיידיב
וקדב ,םיענ םיקלח ןיב הקלח אל העונת וא המאתה
לע עיפשהל לולעש רחא בצמ לכ וא םירובש םיקלח
.ילמשחה הדובעה ילכ תלועפהדובעה ילכ םא
.שומישה ינפל ונקתל וגאד ,קוזינ ילמשחהתונואת
םיקזחותמ םניאש םיילמשח הדובע ילכמ תומרגנ תובר
.הכלהכ
טולשל רתוי לק היהי ךכ ,תוארוהל םאתהב ךותיחה ילכ תא
.רמוחב ועקתיי םהש יוכיס תוחפ שיו םהב
t .ישיא ןגמ דויצב ושמתשה .ןגמ יפקשמ דימת ושבל
תוחיטב תוארוה
םיילמשח הדובע ילכל תויללכ תוחיטב תורהזא
t .תנווכמ אל הלועפ תלחתה וענמאצמנ גתמהש ואדו
tתלעפה ינפל ןונווכ ילכ וא םיגרבה חתפמ תא וריסה
t .המידק הלודג הניכרב דובעל ןיאהדימע לע ורמש
t .םיאתמ ןפואב ושבלתהוא םיפפור םידגב ושבלת לא
tואדו קבא תביאשל דויצ םע םידבוע םתא םא
t .ילמשחה הדובעה ילכ םע חוכב דובעל ןיאושמתשה
tוניא גתמה םא ילמשחה הדובעה ילכב שמתשהל ןיא
tתא ואיצוה וא/ו למשחה עקשמ עקתה תא וקתנ
tגשיהמ קחרה שומישב וניאשכ הדובעה ילכ תא ונסחא
t .םיילמשחה הדובעה ילכ תא וקזחתרסוח וקדב
t .םייקנו םידח ךותיחה ילכ לע ורמשזיחשהלו קזחתל שי
תוחיטבה תורהזא לכ תא וארק
תויחנההווא תורהזאל תויצ יא.
תועיצפל וא/ו הפרשל ,תולמשחתהל ליבוהל לולע תויחנהל
.דיתעב ןויעל תויחנההו תורהזאה לכ תא ורמש
הדובע ילכל סחייתמ תורהזאב "ילמשח הדובע ילכ" חנומה
הדובע ילכל וא (לבכ תועצמאב) למשחה תשרל רבוחמה
.(ןעטנ) הללוס תועצמאב לעפומה
הדובעה רוזאב תוחיטב
.תונואתל תורשפאה תא םיריבגמ םיכושח וא םירדוסמ
.םיקילד םיקבא וא םיזג ,םילזונ תוחכונב ןוגכ ,הציפנ
וא קבא תיצהל םילולע רשא ,תוצוצינ םירצוי הדובע ילכ
םיילמשח הדובע ילכ םע םימאתמ םיעקתב שמתשהל
.תולמשחתהל ןוכיסה
.םיררקמו םירונת ,םירוטאידרלדג קראומ םכפוג רשאכ
.תולמשחהל ןוכיסה
ןוכיסה תא םילידגמ ילמשחה הדובעה ילכל םירדוחש םימ
הדובעה ילכ לש הכישמל וא האישנל ילמשחה לבכב
.עקתה קותינל וא ילמשחהילמשחה לבכה תא וקיחרה
.םיענ םיקלח וא םידח תווצק ,ןמש ,םוחמםילבכ
ןוכיסה תא םילידגמ םילתופמ וא םימוגפ םיילמשח
.ץוחב הדובעל םיאתמה ךיראמ לבכבלבכ םע הדובע
ןוכיסה תא התיחפמ ץוחב הדובעל םיאתמה ךיראמ
ןגומה למשח רוקמל ותוא רבחל שי החל הביבסב
) תחפ רסממ תועצמאבRCD .(תחפ רסממב שומיש
.תולמשחתהל ןוכיסה תא תיחפמ
.ילמשחה הדובעה ילכב םישמתשמ םתאשכ הנובתב
םיפייע םתאשכ ילמשחה הדובעה ילכב ושמתשת לא
.תופורת וא לוהוכלא ,םימס תעפשה תחת ואעגרב יד
תירבע | 15
תירבע
הרהזא
.תושק
t.בטיה ראומו יקנ הדובעה רוזא לע ורמשאל םירוזא
tהביבס ילעב םירוזאב םיילמשח הדובע ילכ וליעפת לא
.םידא
tילמשחה הדובעה ילכמ םירחא םישנאו םידלי וקיחרה
.הדובעה ךלהמבתא דבאל ךל םורגל לולע תעד חסיה
.ילכב הטילשה
תילמשח תוחיטב
tעקשל םיאתהל בייח ילמשחה הדובעה ילכ לש עקתה
.ילמשחה .עקתב והשלכ יוניש ךורעל ןיא םלועלןיא
.םיקראומתא םיתיחפמ םימאות םיעקשו םיירוקמ םיעקת
t,תורוניצ ןוגכ ,םיקראומ םיחטשמב עגממ וענמיה
t .תוביטרל וא םשגל םיילמשח הדובע ילכ ףושחל ןיא
.תולמשחתהל
t .למשחה לבכב עוגפל ןיאשמתשהל ןיא ןפוא םושב
.תולמשחתהל
tשמתשהל שי ץוחב ילמשח הדובע ילכ םע הדובעב
.תולמשחתהל
tילמשחה הדובעה ילכ םע דובעל אלא הרירב ןיא םא
תישיא תוחיטב
tוגהנו םכלש תולועפל בל ומיש ,דימת םיינריע ויה
Bosch Power Tools 1 609 92A 6E9 | (25.11.2020)
Page 16

16 | תירבע
ןנסל תולגוסמ תויהל תובייח המישנה תכסמ וא קבאה
שערל תכשוממ הפישח .הדובעב םירצונה םיקיקלח
.העימש ןדבואל םורגל הלולע יביסנטניא
.ןגמ דויצ שובלל בייח הדובעה רוזאל סנכנשםיבבש
ףפועתהל םילולע רובש רזיבא לש וא דבועמה קלחה לש
.הדובעה םוקממ קחורמ רוזאב םג תועיצפ םורגלו קוחר
תעגל יושע ילכה ןהבש תודובע םיעצבמ םתא רשאכ
הדובעה ילכ לש למשחה לבכב וא תרסומ טוויחב
.ומצעםיקלח ,"יח" לבכב עגונ רבוחמה ילכה םא
למשחלו םרזב ןעטיהל םייושע הדובעה ילכ לש םייתכתמ
.ליעפמה תא
עורזה וא דיהו ,ספתיהל וא ךתחיהל לולע רזיבאה הטילש
.בבותסמה רזיבאה לע ךשמיהל הלולע םכלש
.ירמגלינפב לקתיהל לולע אוה בבותסמ רזיבאה רשאכ
.ךתטילשל ץוחמ הדובעה ילכ תא ךושמלו חטשה
.םכדצלםכלש םידגבה תא סופתל לולע בבותסמה רזיבאה
.םכלש ףוגה לא ךשמיהלו גגושב
.ילמשחה,הדובעה ילכ תיב ךותל קבא באוש עונמה ררוואמ
.ילמשח ןוכיס הווהמ יתכתמ קבא לש תורבטצהו
.םיקילד.הלא םירמוח תיצהל םילולע תוצוצינ
.תולמשחתהל ליבוהל לולע רחא רוריק לזונב וא םימב
תורושק תורהזאו עתר
,קסיד לש תוספתיה וא תועקתיהל תימואתפ הבוגת אוה עתר
תועקתיה וא תוספתיה .רחא בבותסמ רזיבא לכ וא תשרבמ
םרוג זא רשא ,בבותסמה רזיבאה לש הריהמ הריצעל תמרוג
ןוויכמ ךופהה ןוויכל טלשנ יתלב ןפואב הדובעה ילכ תכישמל
.עגמה תדוקנב רזיבאה לש בוביסה
הצק ,דבועמה רמוחב ספתנ וא עקתנ הזחשה ילכ םא ,המגודל
לש חטשה ינפ ךותל וכרד רופחל לולע רמוחל סנכנה קסידה
קסידה .הצוחה קרזיהל וא הצוחה ספטל קסידל םורגלו רמוחה
תעונת ןוויכב יולת ,ליעפמהמ קחרה וא המידק ץופקל וא לולע
רבשיהל םילולע ףא הזחשה יקסיד .עגמה תדוקנב קסידה
.הלא םיאנתב
ילהונ וא/ו הדובעה ילכב ןוכנ אל שומיש לש האצות אוה עתר
ידי לע ותוא עונמל רשפאו ,םינוכנ אל הדובע יאנת וא הדובע
.ןלהל םיניוצמה תוריהזה יעצמא תטיקנ
דגנתהל םכל רשפאיש ןפואב םכיתועורזו םכפוג
.עתרה תוחוכלםא ,רזעה תידיב דימת ושמתשה
לש הרקמב תיברמ הטילש חיטבהל ידכ ,תקפוסמ
.רישכמה תלעפה בלשב לותיפ וא עתר תבוגת
טוקני םא לותיפה וא עתרה תוחוכב טולשל לוכי ליעפמה
.םישורדה תוריהזה יעצמא תא
.עתר בקע דיה רבעל תוימואתפב עונל לולע
.הדובעהלגלגה בוביסל דגונמה ןוויכל ילכה תא עיני עתר
.עגמה תדוקנב
תובשחתה ךות ,הלא תוארוהל םאתהב וילא םירבוחמה
.עצבל םכילעש הדובעבו הדובעה תביבסבילכב שומיש
t .הדובעה רוזאמ חוטב קחרמל םישנא וקיחרהימ
tםידדובמה הזיחאה יחטשמב קר הדובעה ילכב וזחא
לולע דעוימ אוה ןמשל אלש תודובעל ילמשחה הדובעה
.םינכוסמ םיבצמל ליבוהל
ףוליח יקלחב תשמתשמה ,תישרומ םינוקית תדבעמב
תיווז תוזחשמל תוחיטב תוארוה
השרבה ,שוטיל ,הזחשה רובע תויללכ תוחיטב תורהזא
t .בבותסמה רזיבאהמ לבכה תא וקיחרהודבאת םא
םיקפוסמה םיטרפמהו םירויאה ,תוארוהה ,תוחיטבה
tרצענ רזיבאהש ינפל הדובע ילכ חינהל ןיא םלועל
וא/ו הפרש ,תולמשחתהב םייתסהל לולע ןלהל תוניוצמה
tותוא םיאשונ םתא רשאכ הדובעה ילכ תא וליעפת לא
tהדובעה ילכ לש רורוואה יחתפ תא רידס ןפואב וקנ
tםירמוח דיל ילמשחה הדובעה ילכ תא ליעפהל ןיא
t.רוריק ילזונ םישרודה םירזיבאב שמתשהל ןיאשומיש
רמוא הז ןיא ןיידע ,ךלש ילמשחה הדובעה ילכל םיוסמ
.ךלש הדובעה ילכ רובע תורתומה תודימה תרגסמב
םינגמ תנקתה םירשפאמ םניא תונוכנ אל תודימב םירזיבא
ןיפ רטוקל םיאתהל בייח רזיבאב רוחה ,םינגוא לע
המצועב ודערי ,ןוזיאמ ואציי הדובעה ילכ לש הנקתהה
םיקדס רותיאל ,הזחשה קסיד ןוגכ ,רזיבאה תא
הקיחש וא יאלב ,הכימתה תחלצב םיקדס ,םירבשו
וא ףפור לית רותיאל ליתה תשרבמ תא קודב ,םירבגומ
tתא ומקמו ,ילמשחה הדובעה ילכ תא בטיה וזחא
.קוזינ אלש רזיבא וניקתה וא םיקזנ רותיאלרחאל
םישנאו םכמצע תא ומקמ רזיבא לש הנקתהו הקידב
וליעפהו ,םירזיבאה לש בוביסה רושיממ קחרה םירחא
ךשמל סמוע אלל תיברמ תוריהמב הדובעה ילכ תא
t.בבותסמ רזיבאל םיידיה תא ברקל ןיא םלועלרזיבאה
tילכ לש עתר שחרתמ ובש רוזאב ףוגה תא םקמל ןיא
הדובע רניסו תופפכ ,העימש ינגמ ,קבא תכסמ
וא הזחשהה רמוח לש םינטק םיבבש רוצעל לגוסמה
תכסמ .הדובעה ךלהמב םירצונש םיפפועתמ םיבבש רוצעל
קסיד תועצמאב ךותיחו לית תשרבמב
.ךותיח ילכ וא לית תשרבמתורהזא לכ תא וארק
.ילמשחה הדובעה ילכ םעתוארוהה לכל תויצ יא
.תועיצפלו תונכסל םורגל
.ילכה ןרצי ידי לע שרופמברזיבא רבחל רשפא םא םג
.שומישל חוטב אוהש
ילכ לע תנמוסמה םומיסקמה תוריהמל הווש
.קרפתהל וא רבשיהל םילולע םהלש הבוקנה
.הבוט הטילשו םימיאתמ
.תזחשמה ריצ לע גירבתהםינקתומה םירזיבא רובע
.ןגואה לש םוקימהדויצ תא םימאות םניאש םירזיבא
.הטילש ןדבוא םורגל םילולעו
.ןגמ יפקשמב וא םינפ ןגמבושבל ךרוצל םאתהב
.דבועמה רמוחהםילגוסמ תויהל םיבייח םייניעה ינגמ
tםילכבו םירזיבאב ,ילמשחה הדובעה ילכב ושמתשה
תוריש
tקר םילופיטלו םינוקיתל םכלש הדובעה ילכ תא ואיבה
.םיירוקמ.הדובעה ילכ תוחיטב לע הרימש וחיטבת ךכ
t,תשטלמ ,תזחשמכ דקפתל דעוימ הז הדובע ילכ
.השק העיצפ
tןוגכ תודובע הז הדובע ילכ תועצמאב עצבל ץלמומ אל
.הקרבהתולולע ןרובע ןנכות אל הדובעה ילכש תודובע
tוצלמוהו וננכות אלש םירזיבאב שמתשהל ןיא
tתוחפל תויהל תבייח רזיבאה לש הבוקנה תוריהמה
הדובעהתוריהמהמ ההובג תוריהמב םיענש םירזיבא.
tתויהל םיבייח ךלש רזיבאה לש יבועהו ינוציחה רטוקה
tתא םואתל םיבייח םירזיבא לש הנקתה יגירבת
t .קוזינש רזיבאב שמתשהל ןיאוקדב שומיש לכ ינפל
.קודסותוא וקדב ,לפנ רזיבאה וא הדובעה ילכ םא
.תחא הקדןמז ךשמב ללכ ךרדב ורבשיי םימוגפ םירזיבא
.הז
t .ישיא ןגמ דויצ ושבלשמתשהל שי הדובעל םאתהב
1 609 92A 6E9 | (25.11.2020) Bosch Power Tools
Page 17

תחתמ תוכימתה תא םקמל שי .םלקשמ תחת עוקשל םיטונ
.עתר רוציי וא דכליי קסידהש ןוכיסה תאםילודג םיקלח
דבועמה קלחה הצק דילו ךותיחה וק דיל דבועמה קלחל
.קסידה ידצ ינשמ
.םירחא םייולג אל םירוזאב וא םימייקלולע קסידה
םימצעב וא ילמשח טוויחב ,םימ וא זג תורוניצב עוגפל
.עתר ומרגיש
שוטיל תודובע רובע תויפיצפס תוחיטב תורהזא
.שטלה ריינ תריחבב ןרציה תוארוהללודג שטל ריינ
םורגל לולעו םיכתחל הנכס הווהמ קסידל רבעמ טלובה
.עתרלו קסידה לש העירקל ,תועקתיהל
לית תשרבמ םע תודובע רובע תויפיצפס תוחיטב תורהזא
.הליגר הלועפ ךלהמביטוח לע ידמ בר סמוע רוציל ןיא
תשרבמה לע זרפומ סמוע תלעפה ידי לע ליתהיטוח
.רועה תא וא/ו לק שובל יטרפ תולקב ורדחי ליתה
תשרבמה לש וא תשרבמה קסיד לש עגמ רשפאל
.ןגמב המצעבחרתהל םילולע תשרבמה וא ליתה לגלג
.םיילגופירטנצ תוחוכו הדובע סמוע בקע םרטוקב
תופסונ תוחיטב תוארוה
.ןגמ יפקשמ שובחל שי
.המיאתמה הרבחה תא ךכ םשל ןמזה וא םירתסומ
וא הפירשל םורגל לולע םיילמשח םילבכב עגמ
הרידח,ץוציפל םורגל לולע זג תרנצל קזנ ,תולמשחתהל
ףא םורגל הלולעו שוכרל קזנ םורגת םימ תרנצל
.תולמשחתהל
.הדובעה ךלהמב םיטהלתמ םיקסידה
תא וררחש ,למשחה לבכ קותינ וא למשח תקספה
.יובכ בצמל ותוא וריבעהו יוביכ/הקלדהה גתמךכ
.תרקובמ אל שדחמ הלעפה וענמת
הקזחה רשאמ רתוי חוטב קזחומ םייצחלמ וא קודיה ןקתה
.תינדי
ולש םיעוציבהו רצומה רואית
.תויחנההו תוחיטבה תוארוה תא ארקיא
ליבוהל לולע תויחנהלו תוחיטבה תוארוהל תויצ
.תושק תועיצפ וא/ו הפירש ,תולמשחתהל
לש ימדקה קלחב םירויאל השקבב בל םיש
.הלעפהה תוארוה
דועייל םאתהב שומיש
,ןבאו תכתמ לש השרבהו הזחשה ,ךותיחל דעוימ הדובעה ילכ
.םימב שומיש אלל
tרעזמל ידכ םירחא םילודג םיקלח וא תוחול ךומתל שי
.הדצה היטהו רזיבאה לש תועקתיה וענמ .האלה
תוספתיהל םורגל םיטונ היטה וא םידח תווצק ,תוניפ
.עתרו הטילש ןדבואל ,רזיבאה
tתוריקב "םיסיכ" ךותיח תעב דחוימב םיריהז ויה
.הטילש ןדבואלו עתרל תובורק םיתעל םימרוג הלאכ
ךותיחו הזחשה רובע תויפיצפס תוחיטב תורהזא
.רחבנש קסידל דעוימה ןגמבו םכלש הדובעהםיקסיד
יאו שומישל םיחוטב םניא םרובע ןנכות אל הדובעה ילכש
t .קסידה רובע ידמ לודג שטל ריינב שמתשהל ןיאותייצ
.םרובע םיאתמ ןגמ ןיקתהל רשפא
.ןגמה תפש לש רושימל תחתמ רועקאל ןקתומש קסיד
ןגומ וניא ןגמה תפש לש רושימל רבעמ טלובו הכלהכ
tםג ליתה תורעש תא תקרוז תשרבמה יכ בל ומיש
תוחפש המכש ךכ ,תיברמ תוחיטב חיטבתש הרוצב
.ליעפמה ןוויכל ףושח היהי קסידהמןגהל עייסמ ןגמה
עגמ ינפמ ,קסידהמ םירבשנש םיבבש ינפמ ליעפמה לע
tןיא ,לית תושרבמ רובע ןגמב שמתשהל ץלמומ םא
.םידגב תיצהל םילולעש תוצוצינו קסידה םע גגושב
.ךותיח קסיד לש דצה םע זיחשהל ןיא :המגודליקסיד
םיידצ תוחוכ ;תיפקיה הזחשהל םידעוימ הזחשה-ךותיח
.רבשיהל םהל םורגל םילולע הלא םיקסיד לע םילעופה
.תרחבש קסידל תומיאתמה הרוצבוקסיד ינגוא
תריבשל תורשפאה תא ותיחפי ךכו קסידב וכמתי םימיאתמ
tהקפסא יווק רתאל ידכ םיאתמ דויצב שמתשה
םינוש תויהל םייושע ךותיח יקסיד רובע םינגוא .קסידה
.הזחשה יקסיד רובע םינגואמ
.רבשיהל לולע אוהו ,רתוי ןטק ילכ לש תוהובגה תויוריהמל
ךותיח רובע תויפיצפס תופסונ תוחיטב תורהזא
t.וררקתה םהש ינפל ךותיחו הזחשה יקסידב תעגל ןיא
tלש הרקמב ןוגכ ,למשחה תקפסאב קתנ לש הרקמב
לש תועקתיהלו תוויעל תורשפאה תא לידגמ קסידה לע
לש הריבשל וא עתרל תורשפאה תא ךכו ,ךתחב קסידה
t .הדובעבש קלחה תא וחטבאתועצמאב קדוהמש קלח
בבותסמה קסידה תא ץיאהל לולע ירשפאה עתרה ,םכפוגמ
.םכילא תורישי הדובעה ילכו
ותוא קיזחהלו הדובעה ילכ תא תובכל שי ,יהשלכ
.ירמגל רצענ קסידהש דע זוזל ילב םוקמבןיא םלועל
ןמזב ךתחהמ ךותיחה קסיד תא איצוהל תוסנל
.עתר שחרתהל לולע תרחא ,בבותסמ קסידהשוררב
תביסב לופיטל תושורדה תולועפה תא וטקנו הביסה תא
.תוריהזב ךתחל וסנכיה זא קרו ,ולשלולע קסידה
דובעל שדחמ םיליחתמ םא עתר רוציל וא ספטל ,עקתיהל
תירבע | 17
tןכו םידח תווצקב ,תוניפב הדובעב דחוימב םיריהז ויה
t .ןנושמ רוסמ קסיד וא תרשרש קסיד רבחל ןיאםיקסיד
קסיד תועצמאב
tילכ רובע םיצלמומה םיקסיד יגוסב קר ושמתשה
tזכרמ םע קסיד לש הזחשהה חטשמ תא ןיקתהל שי
.הכלהכ
tותוא םקמלו הדובעה ילכל החטבב ןגמה תא רבחל שי
t.םיצלמומה םישומישל קר םיקסידב שמתשהל שי
tהדימב ,ירמגל םיניקת יקסיד ינגואב דימת שמתשה
tםילודג הדובע ילכמ םיקוחש םיקסידב שמתשהל ןיא
.רתויםיאתמ וניא רתוי לודג הדובע ילכל דעוימה קסיד
קסיד תועצמאב
tחוכ ליעפהל ןיאו ךותיחה לגלג תא "עוקתל" ןיא
.זרפומ .ידמ קומע ךותיח עצבל תוסנל ןיארתי סמוע
.קסידה
tבבותסמה קסידה םע דחא וקב םכפוג תא ומקמת לא
.וירוחאמוקחרה ענ קסידה הלעפהה תדוקנב רשאכ
tהביסמ ךותיח םיקיספמ רשאכ וא עקתנ קסיד רשאכ
.תועקתיהה
tקלחה ךותב אצמנ קסידהשכ ךותיח שדחמ ליחתהל ןיא
.הדובעבשהאלמה תוריהמל עיגהל קסידל ורשפא
.ךתחה ךותב
Bosch Power Tools 1 609 92A 6E9 | (25.11.2020)
Page 18

18 | תירבע
a(
a(
a(
a(
a(
a(
a(
a(
אצמת אלמה םירזיבאה ןווגמ תא,יטרדנטסה הקפסאה
GWS 24-230
JZ
GWS 24-180
JZ
.ונלש םירזיבאה גולטקב
GWS 24-230
P
ןגמב שמתשהל שי םיבכרומ הזחשה ירמוח תועצמאב ךותיחל
)10(קודיה םוא
)11(קודיהה םוא רובע םיניפ חתפמ
)12(ריהמ רורחש םוא
הדובעה ילכב שמתשהל רשפא םימיאתמ שוטיל ילכ תועצמאב
)13(דיברק בהל םע ךותיח סוכ
a(
a(
)14(הדרפהל ןגמ הסכמ
)15(ךותיח קסיד
)16(םיידי ןגמ
.הקיפסמ קבא תביאשל גואדל שי ןבא לש ךותיחב
.שוטיל ריינ תועצמאב שוטיל ךרוצל םג
הדובעה ילכ לש הגוצתל סחייתמ םיגצומה םיביכרה רופסמ
)17(חוורמ ירמוש
a(
a(
)18(ימוגמ ףויש תירכ
)19(ףויש תעירי
)20(לוגע םוא
)21(סוכ תשרבמ
)22(הלבוה חטשמ םע קבא תביאשל הסכמ
)23(םולהי ךותיח קסיד
)24((דדובמ הזיחא חטשמ) הזיחא תידי
a(טרפמב םילולכ םניא םיראותמה וא םיגצומה םירזיבאה
.םיכותיחל דחוימ קסיד
םיגצומ םיקלח
.םימישרתה ףדב ילמשחה
JZ(
a(
)1(ריצ תליענ ןצחל
)2(יוביכ/הקלדה גתמ
)3() קבא לכימGWS 24-180 JZ / GWS 24-230
)4((דדובמ הזיחא חטשמ) תפסונ תידי
)5(תזחשמה ריצ
)6(הזחשהל קסיד ןגמ
)7(קסידה ןגמ קודיהל גרוב
)8( תעבט םע סיסב ןגועO
)9(הזחשה קסיד
ינכט עדימ
P
GWS 24-180GWS 24-230GWS 24-180
3601HC20..3601HC30..3601HC21..3601HC31..3601HC23..3601HC33..
W240024002400240024002400
הקדל850065008500650085006500
מ"מ180230180230180230
M 14M 14M 14M 14M 14M 14
מ"מ252525252525
––––●●
––––●●
––––●●
ק"ג5,75,95,75,95,86,0
ק"ג5,65,85,65,85,75,9
/ II / II / II / II / II / II
תיווז תזחשמ
ט"קמ
בוקנ קפסה
בוקנ ד"לס
הזחשה קסיד רטוק
ילמיסקמ
ריצ גירבת
תזחשמה
גירבת ךרוא
ריצ לש ילמיסקמ
תזחשמה
הלחתה תנגה
תשדוחמ
הכר הענתה
רתי סמוע תנגה
יפל לקשמEPTA-Procedure 01:2014
םיעוזעז תמלוב
תיטרדנטס
הנגה גוריד
םיככרעה ונתינש םיפקת חתמל ילאנימונ [U] לש 230V .חתמל ךומנ רתוי םימגדלו תוצראב תומייוסמ ,םיכרע הלא םייושע תונתשהל.
םירישכמל םירחא .םא תבקע תשרה הכומנ מ-0,058 םהוא ,אל ריבס ויהיש תוערפה.
–רזע תידי םע
–רזע תידי םע
קר רובע ילכ הדובע םיילמשח אלל תלבגה םרז הלחתה :יבלש הלעפהה םירצוי תוליפנ חתמ תורצק .יאנתב שומיש אל םיבוט ונכתיי תוערפה
1 609 92A 6E9 | (25.11.2020) Bosch Power Tools
Page 19

ריצה תליענ ןצחל לע וצחל הזחשהה ילכ תא ררחשלו קדהל ידכ
.בבותסמ וניא.קזניהל לולע הדובעה ילכ תרחא
ךותיח / הזחשה קסיד
םיאתהל ךירצ רוחה רטוק .הזחשהה ילכ לש תודימל בל ומיש
.םיניטקמב וא םימאתמב שמתשהל ןיא .סיסבה ןגואל
לע בוביסה ןוויכ ץחש ואדו םולהי ךותיח יקסידב שומיש תעב
לע בוביסה ןוויכ ץח ואר) הדובעה ילכ לש בוביסה ןוויכו קסידה
.םימיאתמ (הרסממה תדיחי
.םימישרתה ףדב רוריבב הארנ הנקתהל תולועפה רדס
םוא תא גרבה ,ךותיחה/הזחשהה קסיד תא קדהל ידכ
קודיהה)10(ינש לעב םיגרבה חתפמ תרזעב ותוא קדהו
םירוחה ריהמ קודיה םוא" האר),"
דומע19(.
אוהשו ןוכנ ןקתומ ןכא הזחשהה ילכש הדובעה
וניא הזחשהה ילכש ואדו .תוישפוחב בבותסמ
.םירחא םיקלחב וא קסידה ןגמב ףשפתשמ
סיסבה ןגואב)8(תעבט) קיטסלפ קלח ונשי
O .זוכרמה תדיחי ביבס (-ה תעבט םאO
המוגפ וא הרסחסיסבה ןגוא תא ףילחהל הבוח
)8(.הדובעה ילכב שמתשהל םיכישממש ינפל
הפינמ קסיד
דיה ןגמ תא דימת )16(.
ימוג קסיד
דיה ןגמ)16(.
.םימישרתה ףדב רוריבב הארנ הנקתהל תולועפה רדס
ימוגה קסיד תנקתה ינפל)18( תא וביכרה 2חוורמה תויקסיד
הלוגעה םואה תא וגירבה)20(חתפמ תועצמאב התוא וקדהו
.םיניפה
קסיד תשרבמ/סוכ תשרבמ
דיה ןגמ תא דימת ןיקתהל ודיפקה )16(.
.םימישרתה ףדב רוריבב הארנ הנקתהל תולועפה רדס
תזחשמה ריצ לע גרבתהל תבייח קסידה תשרבמ/סוכה תשרבמ
ריצ ןגואל דמצית איה תזחשמה ריצ לש גירבתה ףוסבש ךכ
תועצמאב קסידה תשרבמ/סוכה תשרבמ תא וקדה .תזחשמה
.םיניפ חתפמ
ריהמ קודיה םוא
הדובע ילכב שומיש אלל הזחשה ילכ לש הטושפ הפלחה ךרוצל
קודיהה םוא םוקמב רשפא םיפסונ)10(םואב שמתשהל
ריהמה קודיהה)12(.
.ךותיח וא הזחשה יקסיד
דבלב ירמגל תוניקת ריהמ קודיה ימואב ושמתשה )12(.
םוא לש בותיכה םע דצהש ואדו םואה תגרבה תעב
ריהמה קודיהה )12( ;הזחשהה קסיד ןוויכל הנופ וניא
ןומיסה ץירח לא תונפל בייח ץחה)25(.
)1(.תזחשמה ריצ תא עבקל ידכ ,
tתזחשמה ריצ רשאכ קר ריצה תליענ ןצחל לע וצחל
הנגה דויצ תנקתה
.למשחה עקשמ
חולשל שי ,הדובעה ילכב/קסידה ןגמב רוביחה יביכרל קזנ לש
ואצמת תבותכה תא .תוריש תדבעמל דימ הדובעה ילכ תא
."תוחוקלל ץועייו תוחוקל תוריש" קרפב
הזחשהל קסיד ןגמ
קסידה ןגמ תא ופחד)6(םוקימ תא ומיאתה .ריצה ראווצ לע
tילכ תלעפה ינפל וקדב הזחשהה ילכ תנקתה רחאל
.ליעפמה ןוויכל ףפועתהל
םיכותיחל קסיד ןגמ
םיכותיחל קסידה ןגמב דימת שמתשהל )14(.
םיכותיחל קסידה ןגמ תא)14(קסידה ןגמ ומכ םיניקתמ
הכלוה ילגרס םע ךותיחל הביאש ןגמ
הכלוה לגרס םע ךותיחל הביאשה ןגמ תא)22(ומכ םיניקתמ
הזחשהל קסידה ןגמ)6(.
tןיקתהל דיפקהל שי הפינמ קסיד םע תודובע ינפל
tימוג קסיד םע הדובע ינפל )18( תא דימת ןיקתהל שי
תפסונה תידיה תא וגירבה)4(דצב ,הדובעה ןפואל םאתהב
.הרסממה תדיחי לש לאמש וא ןימי
םיעוזעז תמלוב רזע תידי
רזעה תידי תא גירבהל שי
)17( תזחשמה ריצ לע )5(.
ןפואל םאתהב רישכמה שאר
)4(לש לאמש וא ןימי דצב
.הלועפה
ךכבו תודיערה תנטקה תרשפאמ םיעוזעז תמלוב רזעה תידי
.רתוי החוטבו החונ הדובע
t,קסידה תשרבמ וא סוכה תשרבמ םע הדובע ינפל
.המוגפ רזע תידיב שמתשהל ךישמהל ןיא
ןגמב דימת שמתשהל שי הפינמ קסיד/קסיד תשרבמ
םיידיה ןגמ תא ורבח)16( תפסונה תידיה םע )4(.
הזחשה ילכ תנקתה
tריהמה קודיהה םואב שמתשהל רתומ )12( רובע קר
.הדובעה ךלהמב םיטהלתמ םיקסידה
.למשחה עקשמ
תזחשמה ריצ תא וקתנ)5(םידעוימה םיקלחה לכ תאו
תירבע | 19
הנקתה
tעקתה תא קתנל שי הדובעה ילכב הדובע לכ ינפל
:הרעההרקמב וא הדובעה ךלהמב רבשנ הזחשהה קסיד םא
קסידה ןגמ)6( קסידה ןגמ תא ולענו ,הדובעה תושירדל )6(
גרובה תועצמאב)7(.
tקסידה ןגמ תא וננווכ )6( ולכוי אל םיצגש ךכ
tשי םיבכרומ הזחשה ירמוח םע ךותיח תודובעב
t.הקיפסמ קבא תביאשל וגאד ןבא לש ךותיחב
הזחשהל)6(.
תפסונ תידי
tתפסונה תידיה םע קר הדובעה ילכב ושמתשה )4(.
tתפסונה תידיה םע קר הדובעה ילכב ושמתשה )4(.
t.רזעה תידיב םייוניש עצבל ןיא
די ןגמ
tימוג קסיד םע תודובעל )18( /סוכ תשרבמ םע וא
םיידיה )16(.
tעקתה תא קתנל שי הדובעה ילכב הדובע לכ ינפל
t.וררקתה םהש ינפל ךותיחו הזחשה יקסידב תעגל ןיא
.הנקתהל
Bosch Power Tools 1 609 92A 6E9 | (25.11.2020)
Page 20

20 | תירבע
(25)
םישמשמה םירחא םירמוח םע בולישב דחוימב ,םינטרסמ
םיאשר םיחמומ קר .(ץעל הנגה רמוח ,טמורכ) ץעב לופיטל
.טסבסא םיליכמה םירמוחב דובעל
םירמוח םע הדובע יבגל םכצראב תויטנוולרה תונקתל בל ומיש
.ולא
.תולקב קלדיהל
ריצ תליענ ןצחל לע וצחל
תא קדהל ידכ .תזחשמה ריצ
ובבוס ריהמה קודיהה םוא
–.רמוחה גוסל המיאתמה קבא תביאשב שמתשהל ולדתשה
–.הדובעה םוקמב קיפסמ רורוואל גואדל שי
– הגרדב ןנסמ תללוכה המישנ תכיסמ שובחל ץלמומP2.
t ,הדובעה םוקמב קבא תויורבטצה ענמלולע קבא
חוכב הזחשהה קסיד תא
תזחשמה)1(תא עבקל ידכ
.ןועשה ןוויכב
לועפת
הנושאר הלעפה
לש םגדה תיחול לע םיניוצמה םינותנל םיאתהל בייח
-ב םינמוסמה הדובע ילכ ,הדובעה ילכ230Vםילוכי
לש חתמב םג לועפל220V.
למשח יללוחמ תועצמאב הדובעה ילכ תא םיליעפמ רשאכ
םהל ןיאש וא תוקיפסמ קפסה תודותע םהל ןיאש (םירוטרנג)
תוליפנ ונכתיי ,הלחתה םרז קזחמ םע קיפסמ חתמ תוסיו
.הלעפהה תעב תינייפוא אל תוגהנתה וא םיעוציבב
םתא הבש למשחה ללוחמ לש המאתהל השקבב בל ומיש
.תורידתו ילמשח חתמ אשונב דחוימב ,םישמתשמ
.תפסונה תידיבויווקב עוגפל לולע רבוחמה רזיבאה
.הדובעה ילכ לש למשחה לבכב וא םירתסנ למשחעגמ
ילכ לש םיקלח םג תילמשח ןועטל לולע למשח ךילומ לבכב
.תולמשחתהל ליבוהלו הדובעה
יוביכ/הקלדה
.וילע ץחל
ידכלוענליוביכ/הלעפהה גתמ תא )2(גתמ תא קלחה ,
יוביכ/הלעפהה)2(.המידק
ידכתובכליוביכ/הלעפהה גתמ תא ררחש ,ילכה תא )2(וא ,
גתמה לע ץחל ,לוענ אוה םא)2(.ותוא ררחש זאו הרצק הציחל
בבותסהלו ,ירמגל הניקת הרוצב ןקתומ תויהל ךירצ
.תוישפוחבתחא הקד ךשמל ןויסינ תלעפה ועצב
.סמוע אלל ,תוחפלהזחשה ילכב שמתשהל ןיא
.םידעור וא םילוגע אל ,םימוגפםימוגפ הדובע ילכ
.תועיצפ םורגלו ץצופתהל םילולע
:(הנידמל םאתהב) עוביק ללוכ וניאש גתמ
.וילע ץחל
ידכתובכליוביכ/הלעפהה גתמ תא ררחש ,ילכה תא )2(.
תשדוחמ הלחתה תנגה
תרקובמ אל הלועפ תלחתה תענומ הלועפ שודיח ינפמ הנגהה
.למשחה תקפסאב הקספה רחאל הדובעה ילכ לש
ידכשדחמ ליעפהלגתמ תא רבעה ,הדובעה ילכ תא
יוביכ/הקלדהה)2(ילכ תא שדחמ לעפה זאו ,יובכ בצמל
.הדובעה
ריהמה קודיהה םוא םא
רשפא הכלהכ הקדוהו הניקת
ידי לע תינדי התוא ררחשל
tלמשחה רוקמב חתמה !למשחה תשר חתמל בל םיש
דגנ תקרוחמה תעבטה בוביס
ריהמ קודיה םוא ררחשל
,ריילפ תועצמאב העוקת
חתפמב שמתשהל שי אלא
tםידדובמה הזיחאה ירוזאב קר רישכמה תא וקיזחה
.ןועשה ןוויכןיא םלועל
.םיניפחתפמ תא וביכרה
.רויאב גצומכ םיניפה
םירתומ הזחשה ילכ
תוארוהב םיניוצמה הדובעה ילכ לוכב שמתשהל רתומ
['נש/'מ] ףקיהה תוריהמ וא [ד"לס] תרתומה בוביסה תוריהמ
לתלעפהיוביכ/הלעפהה גתמ תא קלחה ,ילכה )2(זאו המידק
t .שומישה ינפל הזחשהה ילכ תא וקדבהזחשהה ילכ
)GWS 24-180 P / GWS 24-230 P(
לתלעפהיוביכ/הלעפהה גתמ תא קלחה ,ילכה )2(זאו המידק
הבוגב תוחפל תויהל הכירצ שומישבש הזחשהה ילכ לש
['נש
8500
80
6500
80
8500
80
6500
80
.ןלהל הלבטב תניוצמה תוריהמה
.הזחשהה ילכ תיוות
[מ"מ] 'סקמ[מ"מ]
180
22.2
22.2
8
230
8
180
–
–
230
–
–
10030M 14850045
בל םישל שי ןכלףקיהה תוריהמל וא ד"לסללע תניוצמה
םיבבש/קבא תביאש
,םימיוסמ ץע יגוס ,תרפוע םיליכמה םיעבצ ןוגכ םירמוחמ קבא
)GWS 24-180 JZ / GWS 24-230 JZ(
הלא קבא יגוסב העיגנ .תואירבל קיזהל לולע תוכתמו םילרנימ
תולחמל וא/ו תויגרלא תובוגתל םורגל תולולע םתפיאש וא
םיאצמנה םירחא םישנא לש וא שמתשמה לש המישנה יכרדב
םיבשחנ ,רושא וא ןולא ץע לש קבא ןוגכ ,םימיוסמ קבא יגוס
.הלעפהה
Dbd[הקדל]/'מ]
.םוקמ תברקב
1 609 92A 6E9 | (25.11.2020) Bosch Power Tools
Page 21

םאתהב ,ןותמ הפיחד ץחל לעפה ךותיח יקסיד םע הדובעב
,ךותיחה קסיד לע ץחל ליעפהל ןיא .דבוע התא וילעש רמוחל
.תויבוביס תועונתב דובעל וא ןוסכלאב ותוא תוטהל ןיא
ידי לע הדובעה ילכ יוביכ רחאל ךותיחה קסיד תא םולבל ןיא
.הדובעבש קלחה דגנכ הדצה ותציחל
הדובעה ילכ תא ליבוהל שי
רחא .בוביסה ןוויכ דגנ דימת
קרזיי אוהש הנכס תמייק
ךתחה ךותמיתלב ןפואב
טלשנםיליפורפ ךותיח תעב .
ץלמומ םיעבורמ תורוניצו
רטוקה םע םוקמב דובעל
.רתויב ןטקה
ןבא ךותיח
.תושבי הזחשה
.םולהי ךותיח קסידב שמתשהל ץלמומ ןבא ךותיחל
הכלוה ילגרס םע ךותיחל הביאש ןגמב םישמתשמ רשאכ
Bosch.םימיאתמ קבא יבאוש העיצמ
הדובעה ילכ תא וליעפה
קלחה םע ותוא וחינהו
לע הכלוהה לגרס לש ימדקה
תא ופחד .הדובעבש קלחה
,ןותמ ץחלב הדובעה ילכ
םתא וילעש רמוחל םאתהב
.םידבוע
םירמוח לש ךותיח תעב
םע ןוטב ןוגכ ,דחוימב םישק
קסיד ,ההובג ץצח תלוכת
רשאכ .קזניהל ךכ בקעו ידמ םמחתהל יושע םולהי ךותיחה
םולהי ךותיחה קסיד ביבס תוצוצינ תעבטב םיניחבמ םתא
.ידמ טהלתמ אוהש ןמיס והז ,בבותסמה
םולהי ךותיחה קסידל חינהלו הדובעה תא רוצעל שי הז הרקמב
.ררקתי אוהש ידכ ,תיברמה בוביסה תוריהמב קרסב בבותסהל
ךכל םינמיס םה תוצוצינ תעבטו הדובעה קפסהב הרורב הדירי
בוש ותוא זיחשהל םילוכי םתא .ההקתה םולהי ךותיחה קסידש
.ריג ןבא ןוגכ ,קחוש רמוחב םירצק םיכתח עוציב ידי לע
הקיטטס אשונב תורעה
ןקתל םיפופכ םיכמות תוריקב םיצירחDIN1053 קלח 1וא
תויחנהל תייצלו דיפקהל שי .הנידמל תויפיצפסה תויחנהל
רתא להנמב ,לכירדאב ץעייתהל שי הדובעה תליחת ינפל .הלא
.רחא יארחא םרוגב וא היינבה
תורישו הקוזחת
יוקינו הקוזחת
.למשחה עקשמ
.החוטבו הבוט הדובע חיטבהל
לש קפסהה תא הליבגמ תינורטקלאה הלחתהה םרז תלבגה
ךיתנ םע הלעפה תרשפאמ ךכו ,הלעפהה עגרב הדובעה ילכ
ינפמ הנגההו הלעפהה םרז תלבגהש ןמיס הז ,הלעפהה רחאל
הדובעה ילכ תא דימ חולשל שי .תודקפתמ ןניא הלועפ שודיח
תוריש" קרפב אצמת תובותכה תא .תישרומ תוריש תדבעמל
."תוחוקל ץועייו תוחוקל
רתי סמוע תנגה
אוהשכ ררקתהל ילכל חנה .רצענ עונמה רתי סמוע לש הרקמב
-כ ךשמל תיברמה קרסה תוריהמב קורפ5–10.תוינש
רויא האר) קבאה לכימ ןוקירA(
t.הקיפסמ קבא תביאשל וגאד ןבא לש ךותיחב
t.קבא תכסמ ושבל
t/ךותיח תודובעל קר הדובעה ילכב שמתשהל רתומ
קבאה לכימ תא ןקורו הסכמה תא חתפ .ילמשחה)3(תא ףחד .
קבאה לכימ לע ץחל)3(לכימה תא ףולשו הדיצה)3(ילכהמ
הדובעל תויחנה
)22(.ןבא קבא הביאשל רושיא לעב תויהל בייח קבאה באוש ,
."הקיטטס אשונב תורעה"
.ולקשמ םצעמ קיפסמ ביצי דמוע
רזיבאהש ידכ ,קרס תוריהמב תוקד המכ בבותסהל
.הדובעה ךלהמב םיטהלתמ םיקסידה
למשחה עקת רשאכ הכומנ למשח תכירצ שי ילמשחה ילכל
.יובכ אוה רשאכ םג עקשל רבוחמ
ךות בושו ךולה הדובעה ילכ תא וזיזה .הזחשה תודובעב
,ידמ םמחתי אל הדובעבש קלחה ךכ בקע .ןותמ ץחל תלעפה
.םיצירח ורצוויי אלו ועבצ תא הנשי אל
םיליפורפו םיחטשמ םג דבעל רשפאמ (רזיבא) הפינמה קסיד
סלפמ ,ךורא רתוי הברה םייח ךשמ שי הפינמ יקסידל .םירומק
שוטיל יקסידמ רתוי תוכומנ שוטיל תרוטרפמטו רתוי ךומנ שער
tעקתה תא קתנל שי הדובעה ילכב הדובע לכ ינפל
tידכ ,רורוואה יחתפו הדובעה ילכ ןויקינ לע רומש
םיכותיחל קסידה ןגמב דימת שמתשהל )14(.
.למשחה עקשמ
.ררקתי רבוחמה
תירבע | 21
הכר הענתה
)GWS 24-180 JZ / GWS 24-230 JZ(
16.רפמא
:הרעהדימ ילמיסקמ ד"לסב רובעל ליחתמ הדובעה ילכ םא
)GWS 24-180 JZ / GWS 24-230 JZ(
)GWS 24-180 JZ / GWS 24-230 JZ(
קבאה לכימ)3(.ומוקמב לענייש דע ילכל הרזח
tעקתה תא קתנל שי הדובעה ילכב הדובע לכ ינפל
tקרפה ואר ,םיכמות תוריק לש ץוריח תעב תוריהז
tוניא אוה םא ,וילא םידבוע םתאש קלחה תא ועבק
tאוהש ךכ הדובעה ילכ לע בר הכ סמוע ליעפהל ןיא
.רצעיי
tול חינהל שי הדובעה ילכ לע הובג סמוע רחאל
t.תזחשמל דמעמ םע הדובעה ילכב שמתשהל ןיא
t.וררקתה םהש ינפל ךותיחו הזחשה יקסידב תעגל ןיא
:הרעה.שומישב וניא ילכהשכ עקשהמ למשחה עקת תא קתנ
הזחשה
t.הזחשה תודובעל ךותיח יקסידב שמתשהל ןיא םלועל
לש השיג תיווז30° דע 40°רתויב תובוטה תואצותה תא בינת
הפינמ קסיד
.םיליגר
תכתמ ךותיח
tשי םיבכרומ הזחשה ירמוח םע ךותיח תודובעב
Bosch Power Tools 1 609 92A 6E9 | (25.11.2020)
Page 22

22 | תירבע
.קבא תביאש תכרעמבתא תופוכת םיתעל תוקנל שי
tדימת שמתשהל ץלמומ םיינוציק שומיש יאנתב
שמתשהלו ,סוחד ריווא תועצמאב ריוואה יצירח
.תחפ רסממברבטצהל יושע םייתכתמ םירמוח לע הדובעב
עוגפל לולע רבדה .ילמשחה הדובעה ילכ ךותב ךילומ קבא
.ילמשחה הדובעה ילכ לש הנגהה דודיבב
.תוריהזב םהב ולפטו םירזיבאה תא ונסחא
ידי לע תאז עצבל שי ,למשחה לבכ תא ףילחהל ךירצ םא
Bosch השרומ תוריש תדבעמב וא Boschהדובע ילכל
.תוחיטב תונכס עונמל ידכ ,םיילמשח
קבא לכימ
קבאה לכימ תא תוקנל םיצילממ ונא)3(יחוורמב וא םוי ידמ
.קבא ינפמ תיבטימ הנגה ךרוצל שומישה רחאל םיעובק ןמז
.םושייב םייולת יוקינה יחוורמ
תוחוקל ץועייו תוחוקל תוריש
תקוזחתו םינוקית אשונב ךלש תולאשל הנעי תוחוקלה תוריש
םיטרופמ םיטוטרש .ףוליח יקלח אשונב םג ומכ ךלש רצומה
:תבותכב אוצמל ןתינ ףוליח יקלח לע עדימו
www.bosch-pt.com
לש ץועייה תווצBoschאשונב תולאשב ךל עייסל חמשי
.ונלש םירזיבאהו םירצומה
ןב טירפה רפסמ תא ןייצל שי ףוליח יקלח תנמזהו היינפ לכב
10.רצומה לש םגדה תיחול לע ןיוצמכ ,תורפס
לארשי
מ"עב וקידל
בורזל בוחר31 צ"לשאר ,7565434
:'לט03-9630040
:סקפ03-9630050
:ל"אודservice@ledico.com
:ןאכ ואצמת תופסונ תוריש תובותכ
www.bosch-pt.com/serviceaddresses
קוליס
רוזחימל איבהל שי תוזיראו םירזיבא ,םיילמשח הדובע ילכ
תלוספל םיילמשח הדובע ילכ ךילשהל ןיא
1 609 92A 6E9 | (25.11.2020) Bosch Power Tools
.הביבסל יתודידי
!תיתיבה
Page 23

| 23
Bosch Power Tools 1 609 92A 6E9 | (25.11.2020)
Page 24

24 |
1 605 703 099
1 603 340 031
1 603 340 040
1 607 950 048
2 602 025 181
1 602 025 030
1 607 000 247
1 601 329 013
2 608 900 001
1 601 329 013
1 600 793 007
1 605 510 179Ø 180 mm
1 605 510 180Ø 230 mm
1 619 P15 622
1 619 P15 668
Ø 180 mm
Ø 230 mm
2 605 510 299
2 605 510 300
Ø 180 mm
Ø 230 mm
1 619 P15 700
2 608 000 741
1 609 92A 6E9 | (25.11.2020) Bosch Power Tools
 Loading...