How it Works
Log In / Sign Up
Buy Points
How it Works
FAQ
Contact Us
Questions and Suggestions
Users
Bosch
Loading...
G
GBA 12V 3.0 Ah
GBA 12 V 4,0 Ah
GBA 12V 6.0 Ah
GBA 14,4 V 2,0 Ah
GBA 14.4V 4.0Ah
4
GBA 18V
GBA 18V 2.0Ah
2
GBA 18V 2.0Ah W Wireless Charging
2
GBA 18V 3.0Ah
2
GBA 18V 4.0Ah
10
GBA 18V 5.0Ah
GBA 18V 6.0Ah
GBA 18 V 6,3 Ah
GBA 36 V
GBG 35-15
4
GBG 35-15 Professional
GBG 6
2
GBG 60-20
4
GBG 60-20 Professional
2
GBG 6 Professional
GBG 8
3
GBG 8 Professional
GBG Professional 6
GBG Professional 8
GBH 10 DC
GBH 11 DE
5
GBH 11 DE Professional
3
GBH 12-52D
5
GBH 12-52 D Professional
GBH 12-52 DV
5
GBH 12-52 DV Professional
GBH 14
GBH 14,4V-LI Compact
GBH 14.4 V-LI Compact Professional
GBH 180-LI
7
GBH 180-LI Professional
GBH 18V-20
4
GBH 18V-20H
GBH 18V-21
3
GBH 18V-26
5
GBH 18V-26 D
3
GBH 18V-26 F
16
GBH 18V-26FH
GBH 18V-26H
GBH 18V-34 CF
4
GBH 18V-36 C
5
GBH 18V-45 C
3
GBH 18 V-EC
19
GBH 18V-ECH
GBH 18 V-EC Professional
7
GBH 18 V-LI
2
GBH 18 V-LI Compact
10
GBH 18 V-LI Compact Professional
GBH 18 V-LI Professional
2
GBH 18V-LIYH
GBH 18V-LIYN
GBH 2-18 E
2
GBH 2-18 E Professional
GBH 2-18 RE
3
GBH 2-18 RE Professional
GBH 2-20 D
6
GBH 2-20 D Professional
8
GBH 2-20 DRE
GBH 2-20 SE PROFESSIONAL
GBH 2-20 S PROFESSIONAL
GBH 2-20 SRE PROFESSIONAL
GBH 2-21
2
GBH 2-22 E
2
GBH 2-22 E PROFESSIONAL
GBH 2-22 RE
2
GBH 2-22 RE PROFESSIONAL
GBH 2-22 S
2
GBH 2-22 S PROFESSIONAL
GBH 2-23 E Professional
GBH 2-23 RE
GBH 2-23 REA
8
GBH 2-23 REA Professional
7
GBH 2-23 RE PROFESSIONAL
5
GBH 2-23 S Professional
GBH 2 24 D
4
GBH 2-24 DF
4
GBH 2-24 DFR
5
GBH 2-24 DFR Professional
2
GBH 2-24 DRE
GBH 2-24 DRE Professional
GBH 2-24 DRЕ
GBH 2-24 DS
3
GBH 2-24 DSE
4
GBH 2-24 DSE PROFESSIONAL
GBH 2-24 DSR
4
GBH 2-24 DSR PROFESSIONAL
GBH 2-24NDFR
GBH 2-24 RE Professional
GBH 2-26 DBR
GBH 2-26 DE
GBH 2 POWER PLUS
GBH 2 S
3
GBH 2 SE
2
GBH 2 S PROFESSIONAL
GBH 2 SR
2
Loading...
Loading...
Nothing found
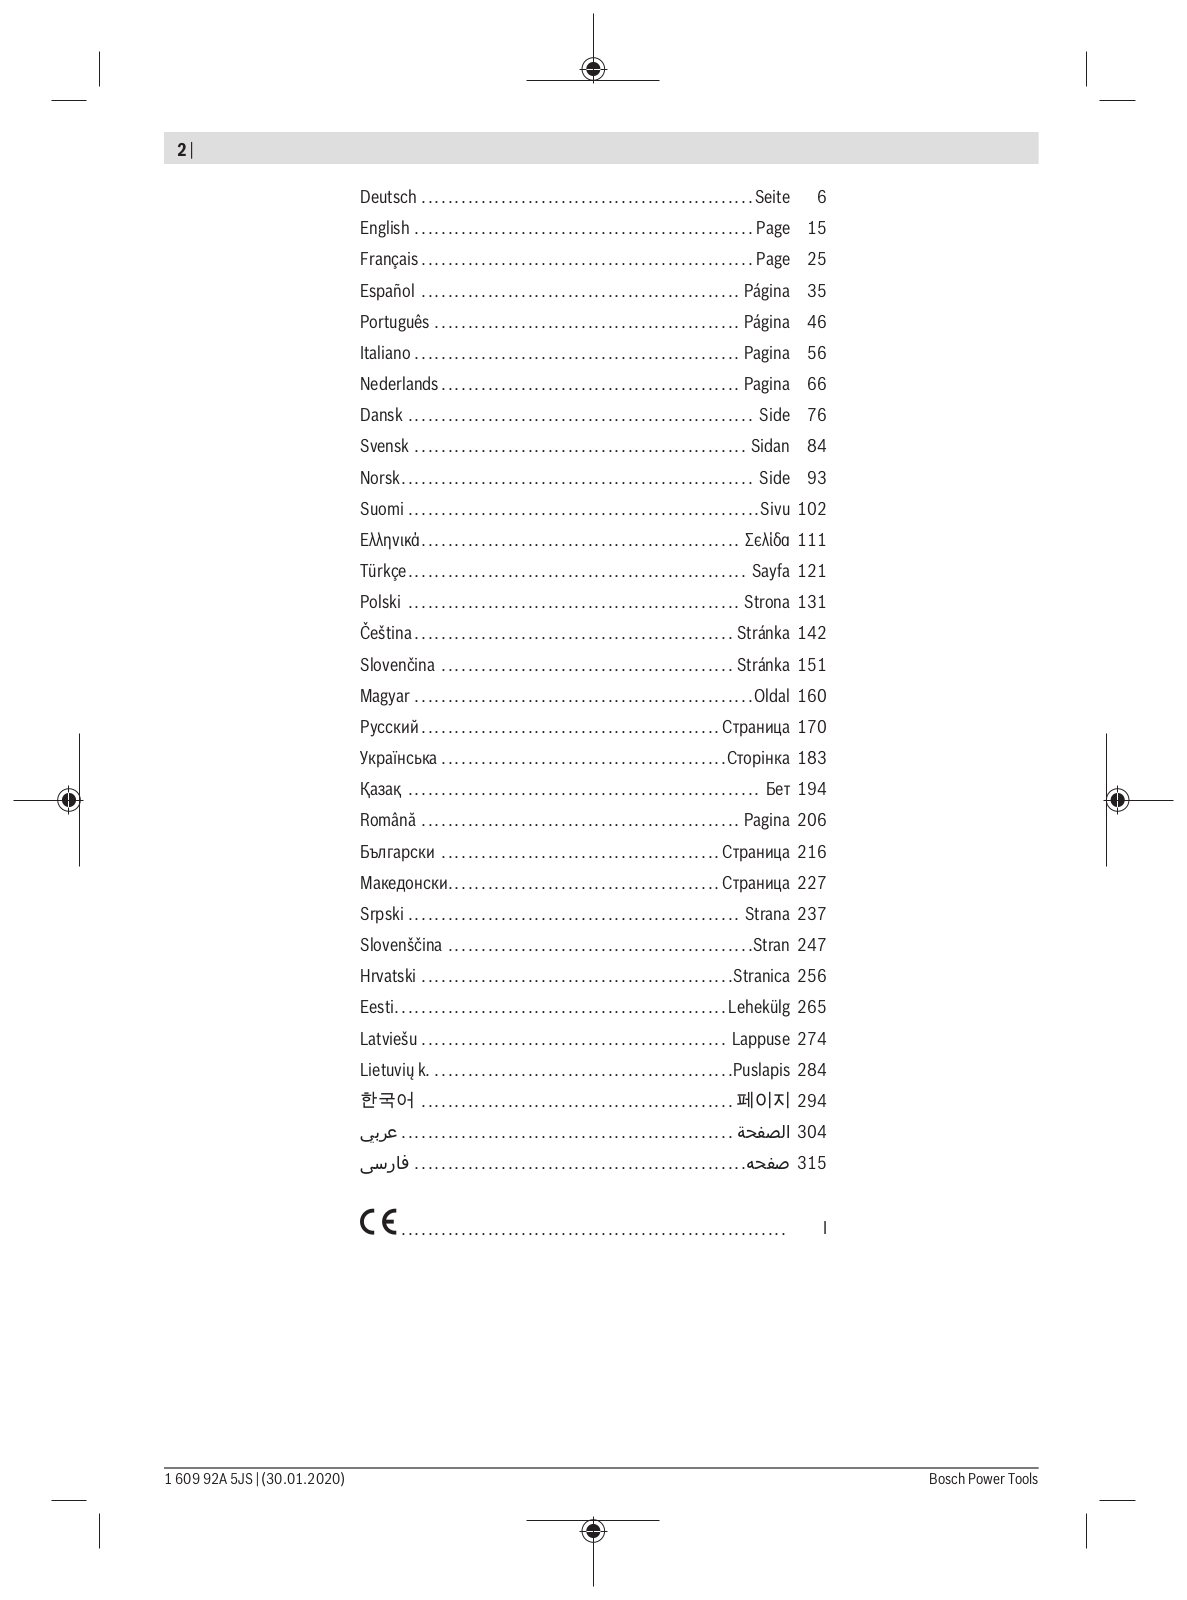
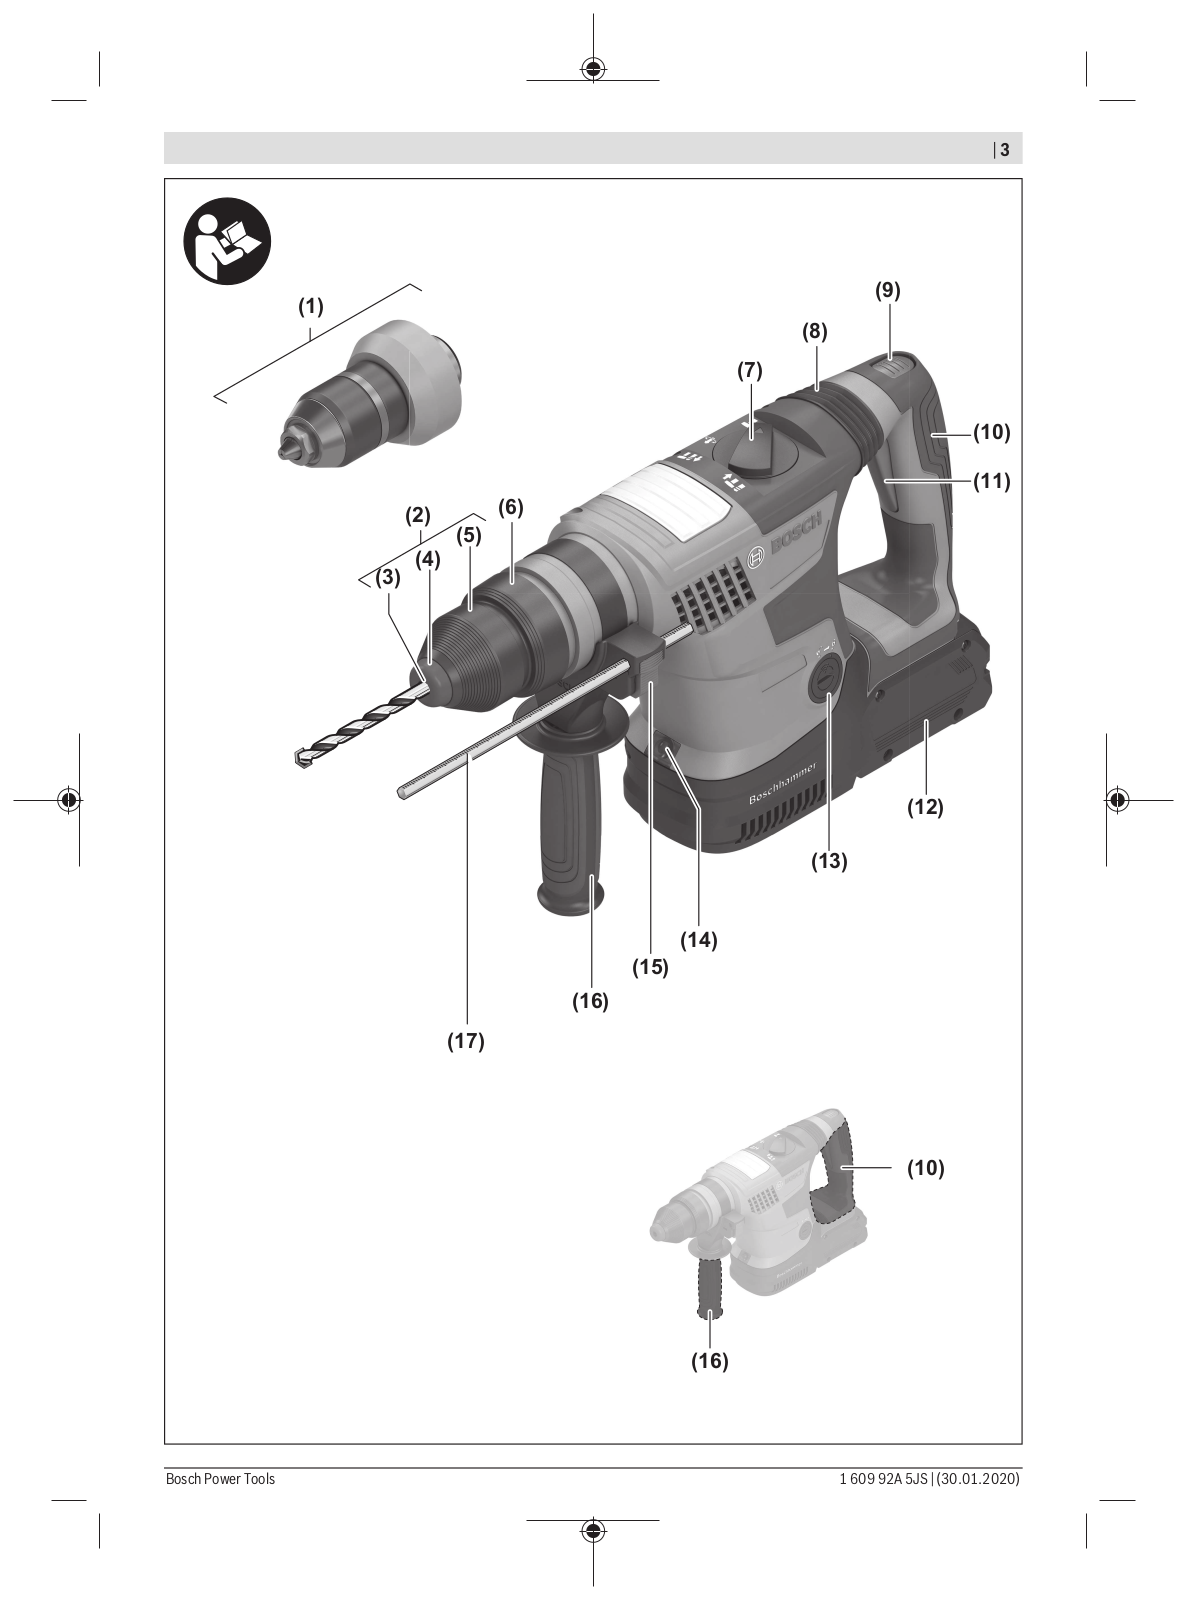
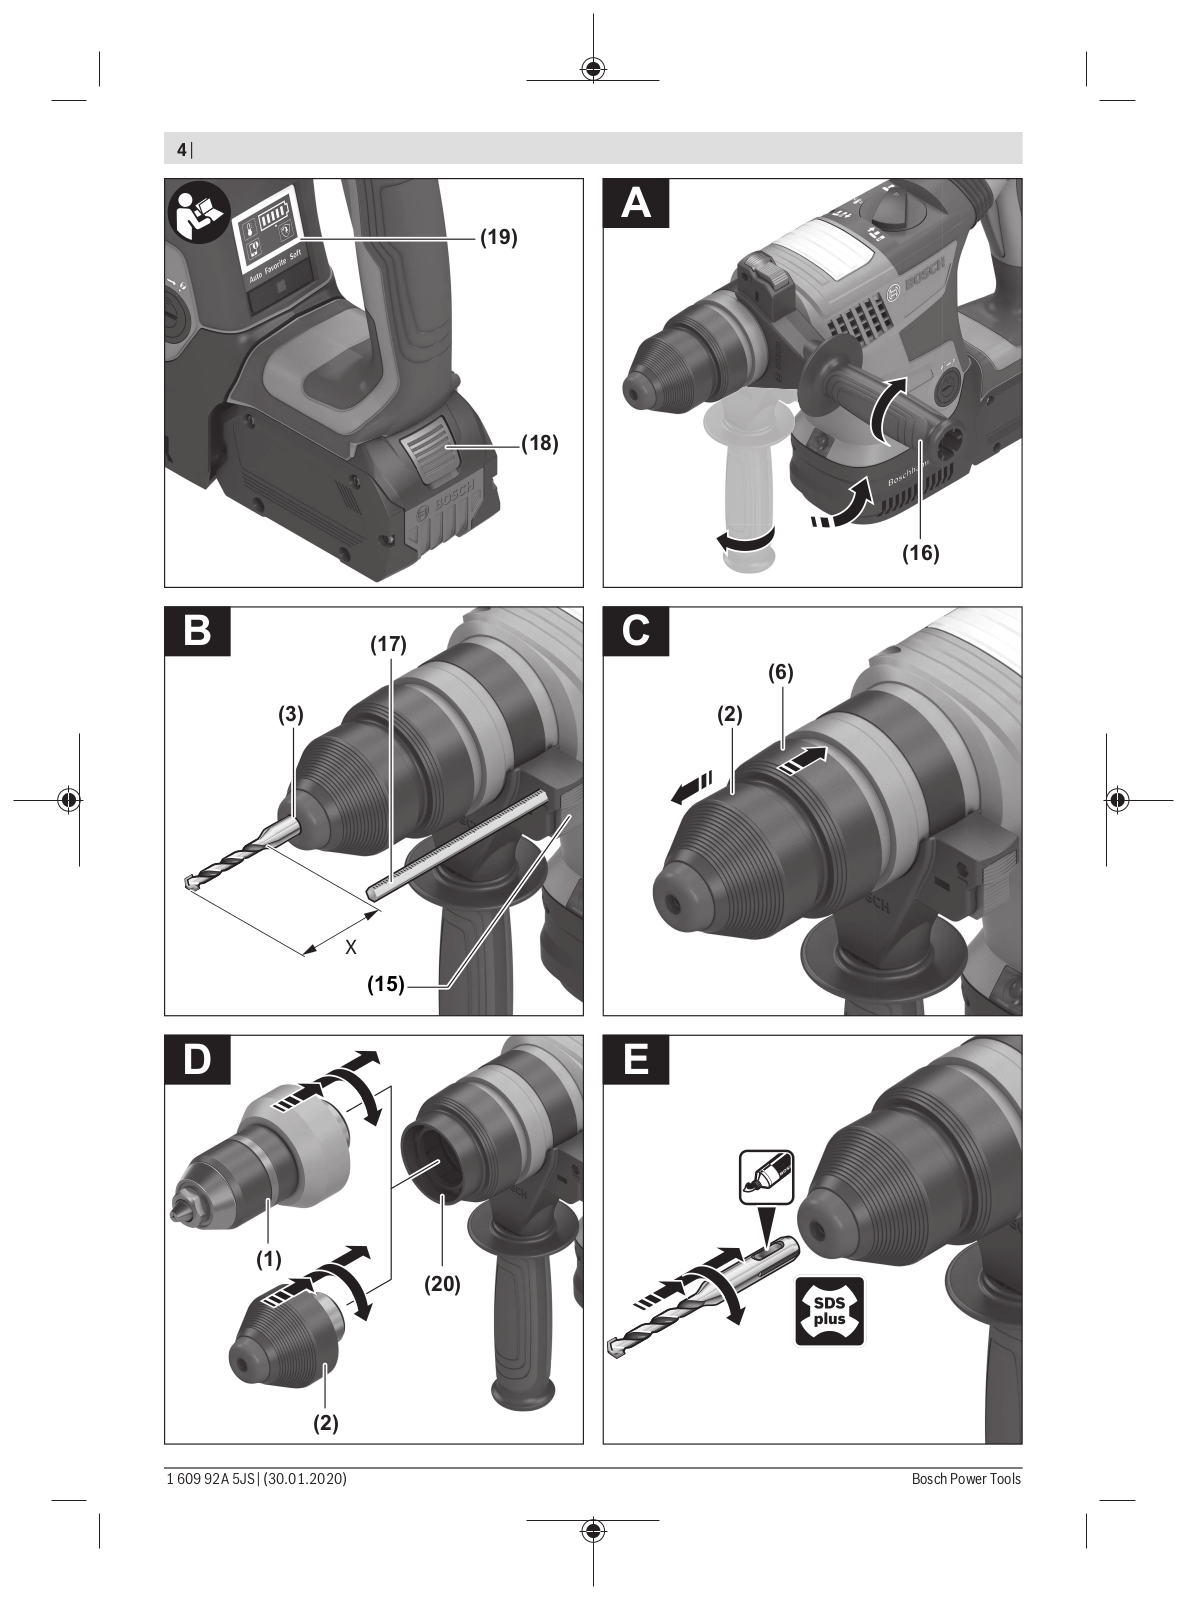
GBH 18V-34 CF
Service Manual
331 pgs
5.4 Mb
0
User Manual
45 pgs
8.37 Mb
0
User Manual
129 pgs
4.19 Mb
0
User Manual [de]
2 pgs
1.34 Mb
0
Table of contents
Loading...
Bosch GBH 18V-34 CF Service Manual
...
Bosch Service Manual
Download
Specifications and Main Features
Frequently Asked Questions
User Manual
Download
Loading...
+
301
hidden pages
Unhide
You need points to download manuals.
1 point = 1 manual.
You can buy points or you can get point for every manual you upload.
Buy points
Upload your manuals
 Loading...