

Bosch GAS18V-3 Operating/Safety Instructions
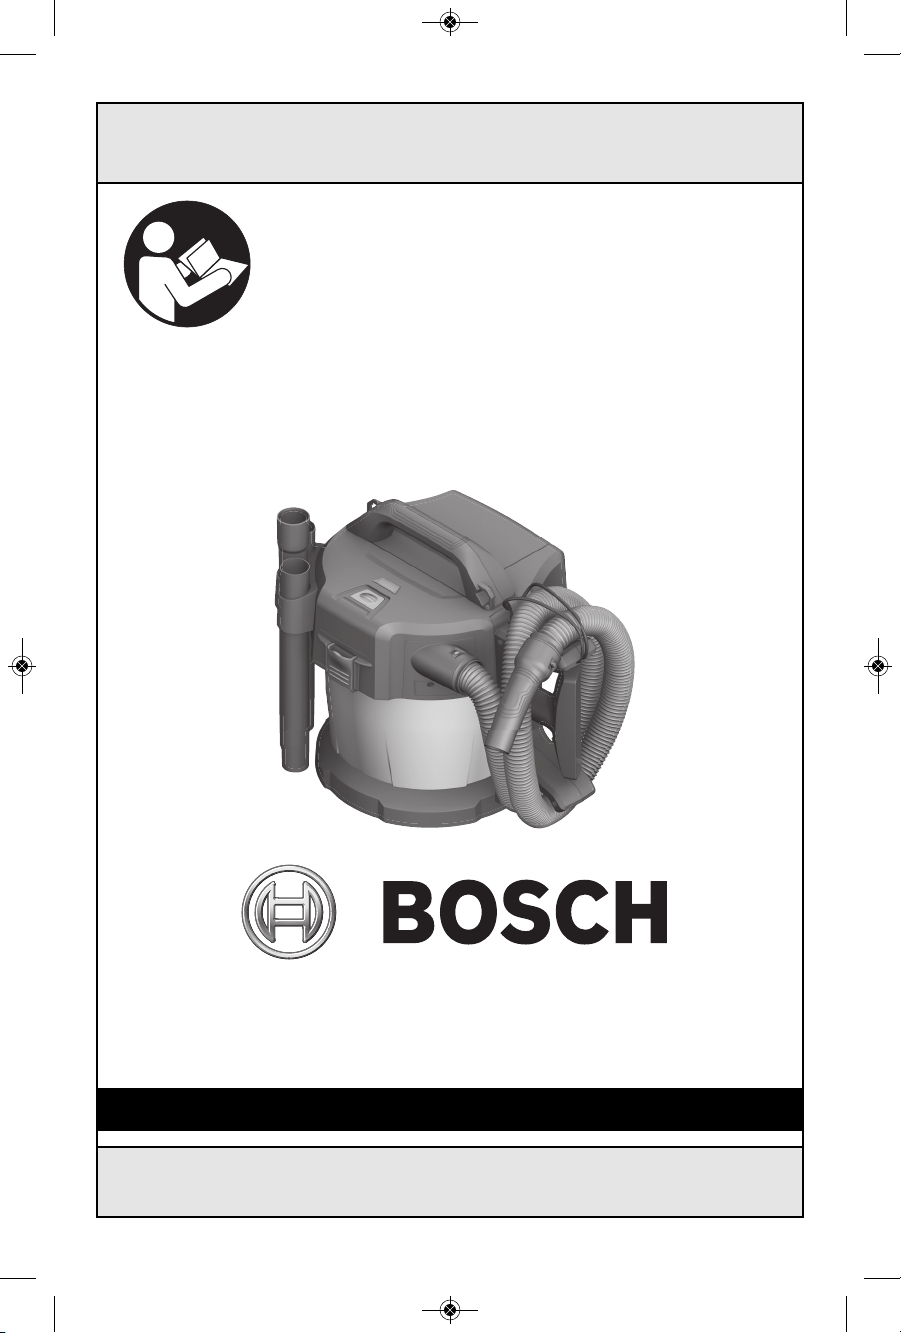
1-877-BOSCH99 (1-877-267-2499) www.boschtools.com
GAS18V-3
Operating/Safety Instructions
Consignes d’utilisation/de sécurité
Instrucciones de funcionamiento y seguridad
IMPORTANT
Read Before Using
●
IMPORTANT
Lire avant usage
●
IMPORTANTE
Leer antes de usar
For English Version
See page 2
●
Version française
Voir page 16
●
Versión en español
Ver la página 32
Call Toll Free for Consumer Information & Service Locations
Pour obtenir des informations et les adresses de nos centres de service après-vente, appelez ce numéro gratuit
Llame gratis para obtener información para el consumidor y ubicaciones de servicio
160992A45R_GAS18V-3 5/22/18 9:27 AM Page 1
2
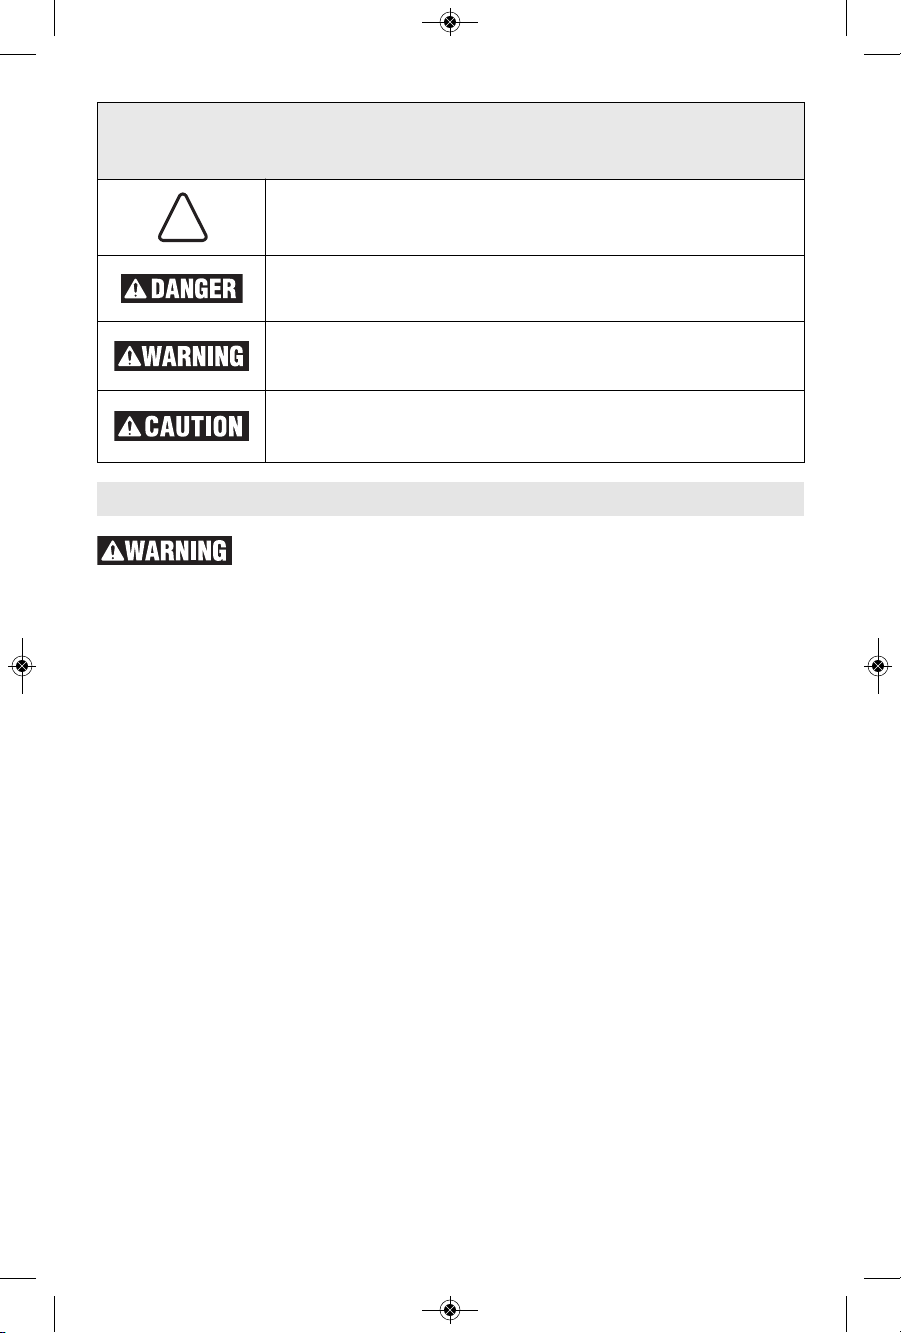
Safety Symbols
The definitions below describe the level of severity for each signal word. Please read the
manual and pay attention to these symbols.
!
This is the safety alert symbol. It is used to alert you to potential
personal injury hazards. Obey all safety messages that follow this
symbol to avoid possible injury or death.
DANGER indicates a hazardous situation which, if not avoided, will
result in death or serious injury.
WARNING indicates a hazardous situation which, if not avoided,
could result in death or serious injury.
CAUTION, used with the safety alert symbol, indicates a hazardous
situation which, if not avoided, will result in minor or moderate
injury.
Read and understand all instructions before using this appliance.
Failure to follow all instructions listed below, may result in electric
shock, fire and/or serious personal injury.
SAVE THESE INSTRUCTIONS
Work Area
Keep your work area clean and well lit.
Cluttered and dark areas invite accidents.
Do not operate vacuum clean ers in
explosive atmospheres, such as in the
presence of flammable liquids, gases, or
dust. Appliances create sparks and static
discharge, which may ignite the dust or
fumes.
Keep bystanders, children, and visitors
away while operating the vacuum
cleaner. Do not allow to be used as a toy.
Close attention is necessary when used
by or near children.
Electrical Safety
This vacuum cleaner intended for use
indoor / outdoor and for dry or wet pickup.
Avoid body contact w i t h grounded
surfaces such as pi p e s , ra d i a t o r s ,
ranges and refrigerators. There is an
increased risk of electric shock if your
body is grounded. Electrician’s rubber
gloves and footwear will further enhance
your personal safety.
Don’t expose vacuum cleaner to rain or
we t con ditions. Store indoor s. This
vacuum cleaner can be used for picking
up non-flammable liquids but it is not
intended to be immersed or submerged
in a fluid. Electric shock may occur.
Do not handle plug or appliance with
wet hands. Electric shock may occur.
Personal Safety and
Vacuum Cleaner Use
Stay alert, watch what you are doing
and use common sense when operating
a vacuum cleaner. Do not use vacuum
cleaner while tired or under the influence
of drugs, alcohol, or medication. A
moment of inattention while operating
vacuum cleaner may result in serious
personal injury.
Do not overreach. Keep proper footing
and balance bo t h for you an d the
vacuum cleaner at all times. Use extra
care when cleaning on stairs. Proper
footing and b a lance e n a b l e s better
control of the vacuum cleaner in
unexpected situations.
Do not vacuum burning, smoking or
smoldering things like cigarettes,
matches or hot ashes. Fire inside the
vacuum cleaner canister may occur.
Do not use to vacuum flammable liquids,
alcohol, gases, or explosive dusts, like
Important Safety Rules
160992A45R_GAS18V-3 5/22/18 9:27 AM Page 2
3
gasoline or other fuels, lighter fluid,
varnish, polyurethane coatings, cleaners,
oil-based paints, natural gas, hydrogen,
coal dust, magnesium dust, grain dust, or
gun powder. Electric motors create sparks
which may ignite the dust or fumes.
Dress properly. Do not wear loose
clothing or jewelry. Contain long hair.
Keep your hair, clothing, and gloves away
from moving parts. Loose clothes, jewelry,
or long hair can be caught in moving parts,
hose, and suction nozzles. Keep handles
dry, clean and free from oil and grease.
Do not hold the hose against any body
parts during operation. Static electricity
build-up in the hose during operation may
result in static shock.
Use safety equipment.
Always wear eye and
hearing protection. Dust mask, non-skid
safety shoes, hard hat , or hearing
protection must be used for appropriate
conditions.
This product contains chemicals, including
lead, known to the State of California to
cause cancer, and birth defects or other
reproductive harm. Wash hands after
handling.
If appliance is not working as it should,
has b e e n dr o p p e d , damaged, left
outdoors, or dropped into water, return
it to a service center.
Do not put any object into openings. Do
not use with any opening blocked; keep
free of dust, lint, hair, and anything that
may reduce air flow.
Use only attachments that are
recommended by the manufacturer for
your model. Attachments that may be
suitable for one vacuum cleaner may
become hazardous when u s e d o n
another vacuum cleaner.
Battery tool use and care
Recharge only with the charger specified
by the manufacturer. A charger that is
suitable for one type of battery pack may
create a r i s k of fire when used with
a
nother battery pack.
Use power tools only with specifically
designated battery packs. Use of any
other battery packs may create a risk of
injury and fire.
When battery pack is not in use, keep it
away from other metal objects like paper
clips, coins, keys, nails, screws, or other
sm all metal objects that can make a
connection from one terminal to another.
Shorting the battery terminals together
may cause burns or a fire.
Under abusive conditions, liquid may be
ejected from the battery; avoid contact.
If contact accidentally occurs, flush with
water. If liquid contacts eyes,
additionally seek medical help. Liquid
ejected from the ba t t e r y may cause
irritation or burns.
Do not use a battery pack or tool that is
damaged o r mo d i f i e d . D a m a g e d or
modified batteries may exhibit
unpredictable behaviour resulting in fire,
EXPLOSION or risk of injury.
Do not expose a battery pack or tool to
fire or excessive temperature. Exposure
to fire or temperature above 265 °F (130
°C) may cause explosion.
Follow all charging instructions and do
not charge the b a t t e r y pack or tool
outside the temperature range specified
in the instructions. Charging improperly
or at temperatures outside the specified
range m a y damage the B A T T E R Y and
increase the risk of fire.
160992A45R_GAS18V-3 5/22/18 9:27 AM Page 3
4
Vacuum Cleaner Safety Rules
Vacuum Cleaner Care
Do not use this vacuum
cleaner for EPA Lead
Based Paint Renovation, Repair and
Painting Program (RRP), where lead may
be present. Using this vacuum cleaner for
EPA RRP program may cause health and
environmental hazards.
Do not use to vacuum
hazardous or toxic
substances or dusts, e.g., asbestos. The
standard HEPA filter is not able to capture
all hazardous particles, which may cause
health hazards.
Do not use to vacuum
concrete dust and/or
other materials that include silica. The
filter is not able to capture all silica dust,
which may cause health hazards.
Do not use vacuum cleaner if switch
does not turn it ON or OFF. Any vacuum
cleaner that cannot be controlled with
the switch is dangerous and must be
repaired.
Do not vacuum dust when liquid/fluid is
contained in th e v a c u u m c l e a n e r
canister. Do not vacuum liquids/fluids
when dust is in the canister. In either
case empty the canister and/or remove
dust bag before use so that dust does
not cake and harden inside the canister.
Dry fi l t e r s completely after wet
vacuuming or use a second dry filter set
for dust vacuuming. Damp or wet filters
will cake with dust or develop mold or
mildew.
Store idle vacuum cleaner out of reach
of children and other untrained persons.
Vacuum cleaners are dangerous in the
hands of untrained users.
Maintain vacuum cleane r with care.
Properly maintain vacuum cleaner to
keep hose unobstructed. Do not put any
object into openings. Do not use with
any opening blocked; keep free of dust,
lint, hair and anything that may reduce
air flow. Any alteration or modification is
a misuse and may result in a dangerous
condition.
Check for misalignment or binding of
moving parts, breakage of parts, and
any other condition that may affect the
vacuum cleaner operation. If damaged,
have the va c u u m cleaner serviced
before using. Poorly maintained vacuum
cleaners cause many accidents. Develop
a periodic maintenance schedule for your
vacuum cleaner.
Service
Only qualified repair personnel must
perform vacuum cleaner service. Service
or maintenance performed by unqualified
personnel could result in a risk of injury.
For e x a m p l e : internal wires m a y be
misplaced or pinched.
When servicing a vacuum cleaner, use
only identical replacement parts. Follow
instructions in the Maintenance section
of this manual. Use of unauthorized parts
or failure to fo llow the Maintenance
Instructions may create a risk of electric
shock or injury. Certain cleaning agents
such as gasoline, carbon tetrachloride,
ammonia, etc. may damage plastic parts.
160992A45R_GAS18V-3 5/22/18 9:27 AM Page 4
5
Symbols
Important: Some of the following symbols may be used on your tool. Please study them
and learn their meaning. Proper interpretation of these symbols will allow you to operate
the tool better and safer.
Symbol Designation / Explanation
V Volts (voltage)
A Amperes (current)
Ah Amp hour (measurement of battery capacity)
Hz Hertz (frequency, cycles per second)
W Watt (power)
kg Kilograms (weight)
min Minutes (time)
s Seconds (time)
CFM Cubic feet per minute [or ft3/min] (air flow rate)
Diameter (size of drill bits, grinding wheels, etc.)
n0 No load speed (rotational speed at no load)
n Rated speed (maximum attainable speed)
.../min
Revolutions or reciprocation per minute (revolutions, strokes, surface
speed, orbits etc. per minute)
0 Off position (zero speed, zero torque...)
1, 2, 3, ...
I, II, III,
Selector settings (speed, torque or position settings. Higher number
means greater speed)
0
Infinitely variable selector with off (speed is increasing from 0 setting)
Arrow (action in the direction of arrow)
Alternating current (type or a characteristic of current)
Direct current (type or a characteristic of current)
Alternating or direct current (type or a characteristic of current)
Class II construction (designates double insulated construction tools)
Earthing terminal (grounding terminal)
160992A45R_GAS18V-3 5/22/18 9:27 AM Page 5

6
Symbols
Important: Some of the following symbols may be used on your tool. Please study them
and learn their meaning. Proper interpretation of these symbols will allow you to operate
the tool better and safer.
Symbol Designation / Explanation
Designates Li-ion battery recycling program
Designates Ni-Cad battery recycling program
Alerts user to read manual
Alerts user to wear eye protection
This symbol designates that this tool is listed by Underwriters
Laboratories.
This symb ol designates that this c ompo nent is recognized by
Underwriters Laboratories.
This symbol designates that this tool is listed by Underwriters
Laboratories, to United States and Canadian Standards.
This symbol designates that this tool is listed by the Canadian
Standards Association.
This symbol designates that this tool is listed by the Canadian
Standards Association, to United States and Canadian Standards.
This symbol designates that this tool is listed by the Intertek Testing
Services, to United States and Canadian Standards.
This symbol designates that this tool complies to NOM Mexican
Standards.
160992A45R_GAS18V-3 5/22/18 9:27 AM Page 6

7
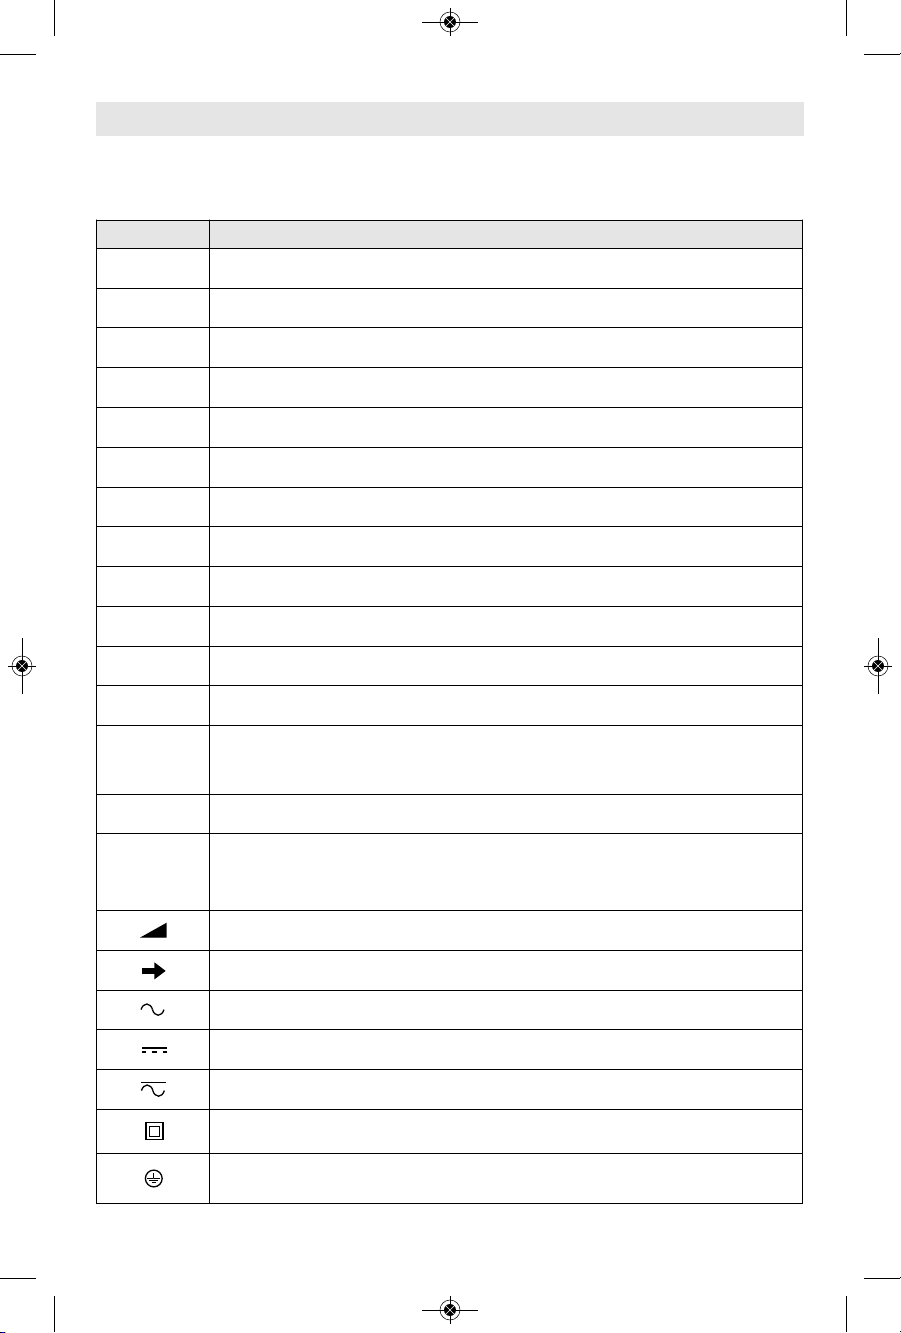
Getting to Know Your Vacuum Cleaner
Remove the battery pack before making any assembly, adjustments or
changing attachments. Such preventive safety measures reduce the risk
of starting the tool accidentally.
18V Canister Vacuum Cleaner GAS18V-3
12112
12 996 10 34 5
87
1 Canister
2 Latch
3 On/Off button
4 Battery charge status indicator
5 Motor unit
6 Carrying handle
7 Slot for vacuum hose holder
8 Hose connection port
9 Lock loop
10 Slot for extension tube holder
11 Battery compartment cover release
button
12 Battery compartment cover
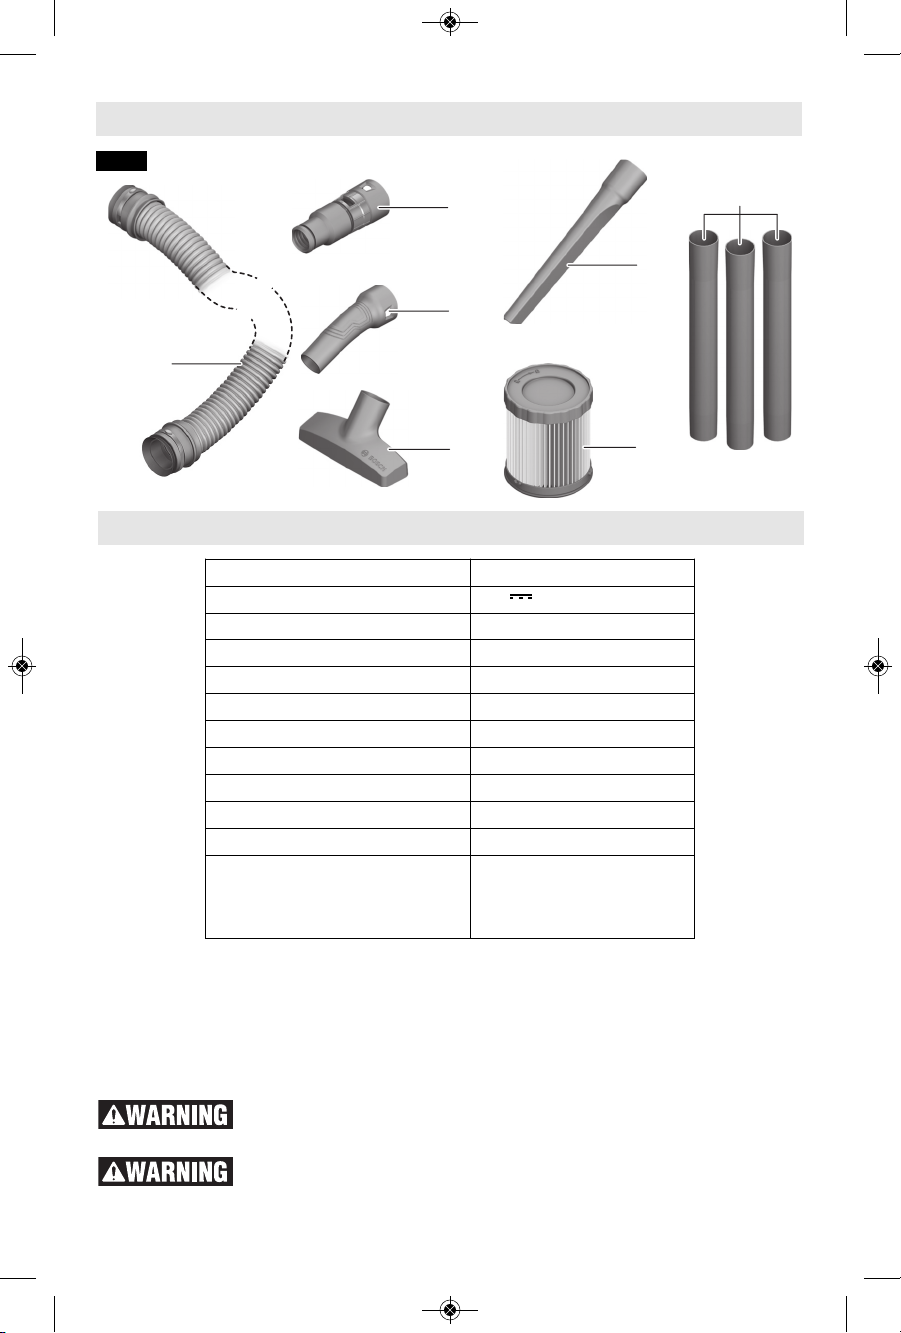
13 Vacuum hose**
14 Power tool adapter (SOLD
SEPARATELY)**
15 Bend**
16 Crevice nozzle**
17 Floor nozzle**
18 Extension tube**
19 Battery compartment*
20 Battery pack (SOLD SEPARATELY)*
21 Battery release button*
22 Extension tube holder*
23 Vacuum hose holder*
24 Mounting bolt for holder 23*
25 Snap fasteners*
26 Air diffuser*
27 Filter**
28 Filter base*
29 Retaining strap of the vacuum hose*
* Not Shown. See further in these
operating instructions.
** Shown in Fig. 2 on the next page.
Fig. 1
160992A45R_GAS18V-3 5/22/18 9:27 AM Page 7
8
Specifications
Model GAS18V-3
Voltage
18 V
Battery type / chemistry Bosch Li-ion
Canister volume (gross) 2.6 Gal
Canister volume (net) 1.6 Gal
Air flow 51 CFM
Suction pressure 90 mbar (max)
Sound pressure level 79 dB
Weight 10.1 lb
Hose length 5.25 ft (1.6 m)
Approximate run time 4 min/Ah
Allowed ambient temperature
– during charging
– during operation* / storage
32...113 °F (0...+45 °C)
–4...122 °F (–20...+50 °C)
13
14
16
27
18
15
17
Fig. 2
Getting to Know Your Vacuum Cleaner
Battery Packs / Chargers:
Please refer to the charger Operating/Safety Instructions included with your tool.
Use only Bosch 18V Li-ion BAT-series and GBA-series battery
packs. Use of any other battery packs may create a risk of injury and
fire.
For use only with Bosch BC1836, BC1880, BC3680, BC630, BC660,
GAX18V-30 chargers. Use of any other chargers may create a risk of
injury and fire.
*performance is limited at temperatures below 32 °F (0 °C)
For household or commercial use.
160992A45R_GAS18V-3 5/22/18 9:27 AM Page 8
9
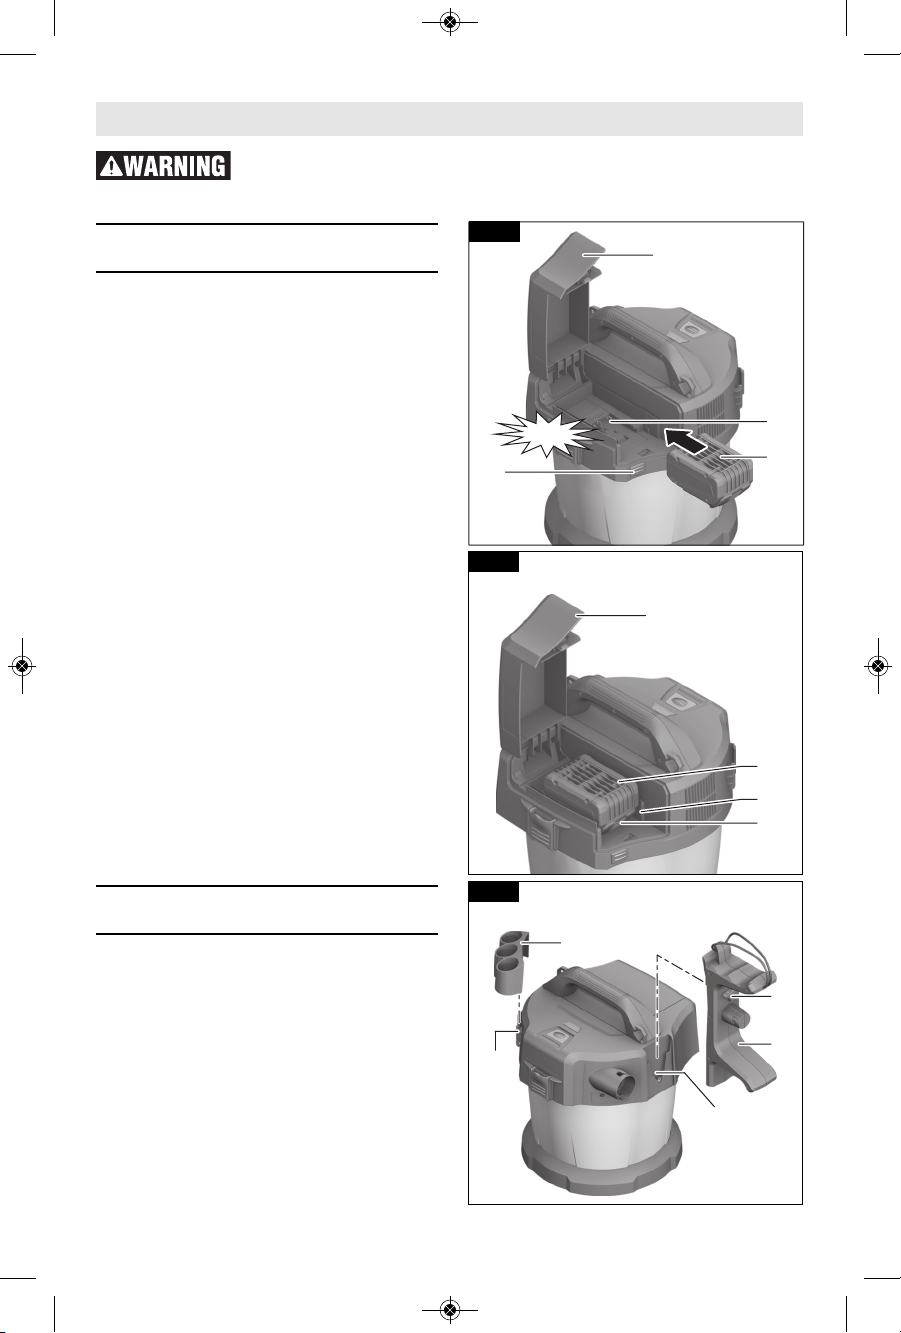
Assembly and Preparation
Inserting And Releasing
Battery Pack
Do not use force to insert the battery.
The battery is designed in such a way
that it can only be inserted into the
vacuum cleaner when it is in the right
position.
Keep the battery compartment and the
battery bay clean and dry at all times
to ensure reliable, safe operation.
To insert battery:
- press battery compartment cover
unlocking button 11 and the springloaded compartment cover 12 will
open automatically (Fig. 3);
- slide the battery 20 into battery
compartment 19 as shown, until it
clicks in place (Fig. 3);
- close the battery compartment cover
12.
To remove battery:
- press battery compartment cover
unlocking button 11 and the springloaded compartment cover 12 will
open automatically (Fig. 3);
- press battery unlocking button 21
and pull the battery 20 out of battery
compartment 19 (Fig. 4);
- close the battery compartment cover
12.
Hose And Attachment
Holders
To mount attachment holders:
- slide the extension tube holder 22
into the slot 10 as shown, until it is
held securely in place (Fig. 5);
- slide the vacuum hose holder 23 into
the slot 7 as shown (Fig. 5);
- tighten the bolt 24 to secure the
vacuum hose hol der 23 in pla ce
(Fig. 5).
Remove the battery pack before making any assembly, adjustments or
changing attachments. Such preventive safety measures reduce the risk
of starting the tool accidentally.
12
19
20
11
Fig. 3
19
20
21
12
Fig. 4
CL
ICK
!
24
22
23
Fig. 5
7
10
160992A45R_GAS18V-3 5/22/18 9:27 AM Page 9
10
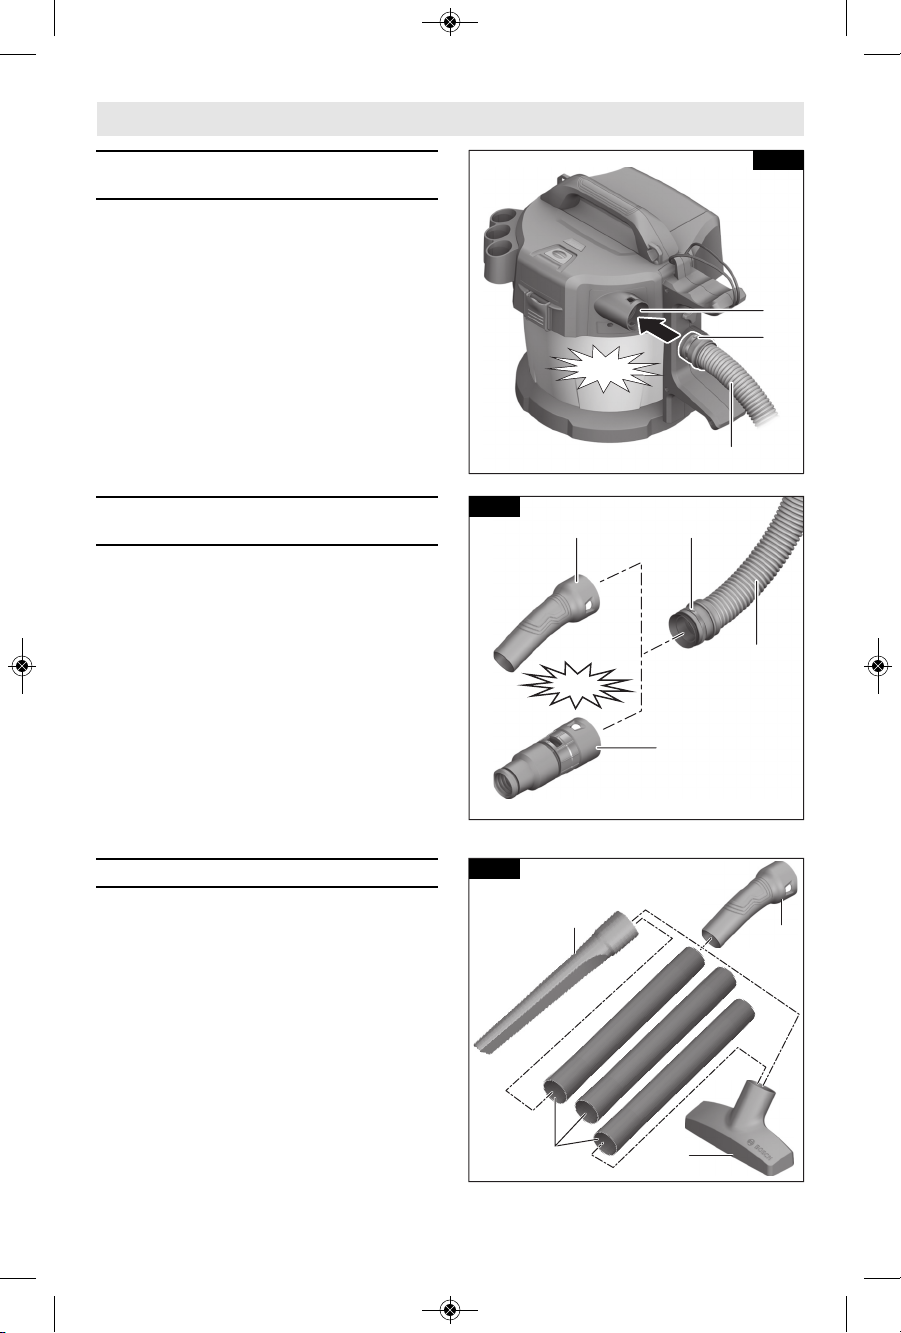
Attaching The
Vacuum Hose
- Insert vacuum hose 13 into port 8
until both snap fasteners 25 audibly
lock in place (Fig.6).
Note: The friction generated by the dust
in t h e vacuum h o se and a c c e ssory
duri n g vacu u m i n g ca u s e s an
electrostatic charge that the user may
expe r i e n ce as st atic discharge
(depending on environmental factors
and their physiological state).
Attaching The Power Tool
Adapter Or The Bend
Attach the power tool adapter 14 (sold
separa tely ) or the bend 15 to the
vacu u m hose 13 until both sn a p
fasteners 25 of the vacuum hose click
into place (Fig. 7).
To disassemble, press bot h snapfast e n e r s 2 5 in w a r d and pull the
components apart.
Mounting Nozzles And Tubes
If required, place the extension tubes 18
fi r mly i nside one a nother and then
attach them firmly to the bend 15.
Attach the floor nozzle 17 or the crevice
nozzle 16 firmly to the extension tube
18 or the bend 15 (Fig. 8).
8
25
13
Fig. 6
C
LI
C
K!
2515
14
13
C
LI
C
K!
Fig. 7
Fig. 8
15
16
18
17
Assembly and Preparation
160992A45R_GAS18V-3 5/22/18 9:27 AM Page 10
11
Remove the battery
pack before making
any assembly, adjustments or changing
attachments. Such preventive safety
measures reduce the risk of starting the
tool accidentally.
Do not us e t his
vacuum cleaner for
EPA Lead Based Paint Renovation,
Repair and Painting Program (RRP),
where lead may be present. Using this
vacuum cleaner for EPA RRP program
may cause health and environmental
hazards.
Do not u s e to
vacuum hazardous or
toxi c substances o r dusts, e.g. ,
asbestos. The standard HEPA filter is
not able to capture all haza r d o u s
part i c l e s, which may cause health
hazards.
Do not u s e to
vacu u m concrete
dust a n d / or other material s t h a t
include silica. The filter is not able to
capture all silica dust, which may cause
health hazards.
Ensure that the work area is clean and
tidy to minimize the risk of tripping.
Starting Operation
Befor e vacuuming, ensure that the
filter assembly is assembled securely.
Only use a n undamag e d filter (no
cracks, small holes, etc.). Replace a
dama g e d filter immediately. See
“Cleaning/replacing HEPA filters”.
- Insert battery pack (see “Inserting
And Releasing Battery Pack”). Make
sure the battery compartment cover
is securely closed.
BATTERY CHARGE STATUS
INDICATOR
After activating th e devic e, the five
green LEDs of the battery charging level
indicator 4 will light up individually
ascending and descending. Afterwards
the LEDs indicate the charging level of
the battery 20 (Fig 1).
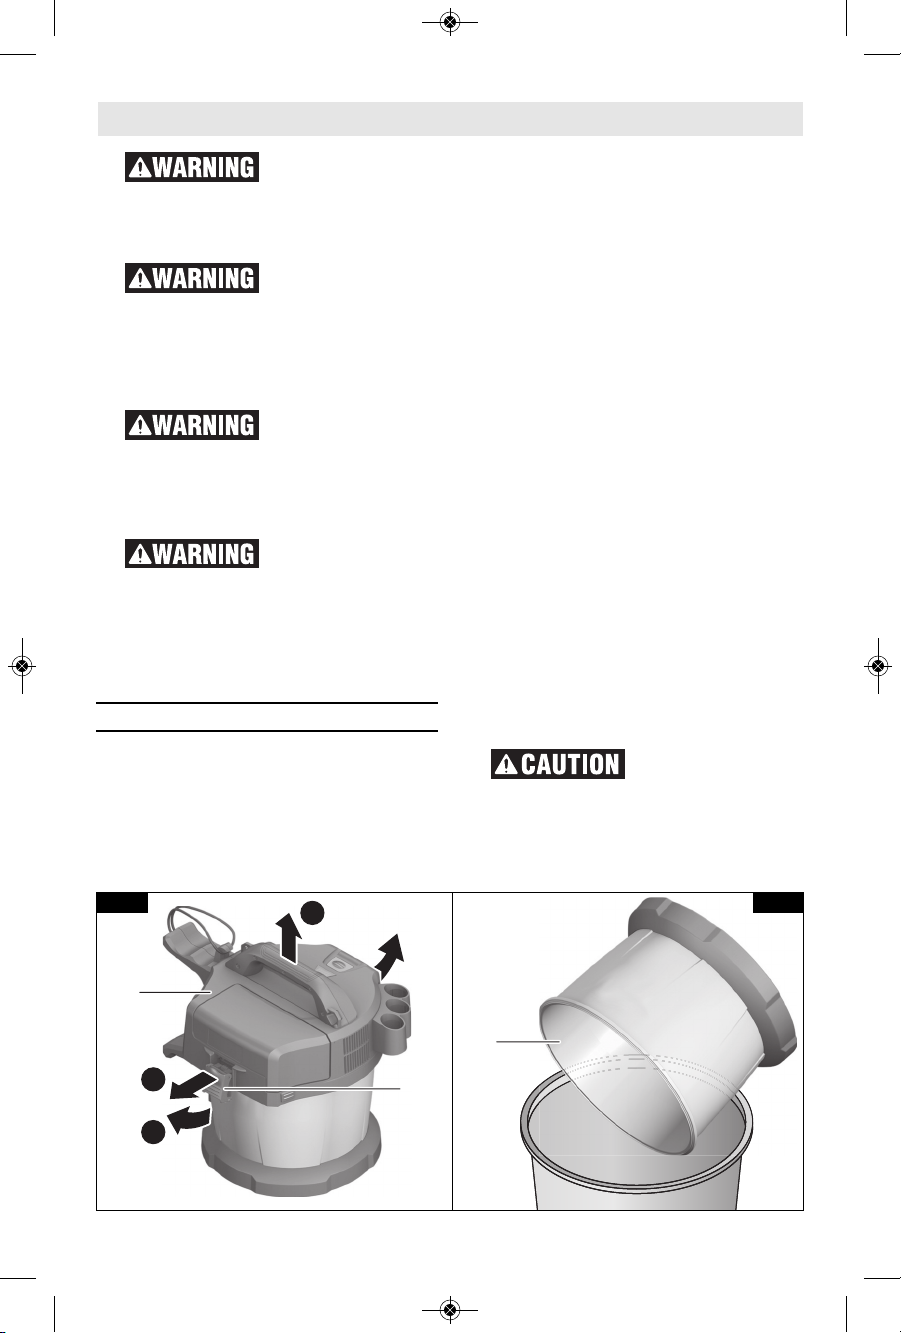
CLEANING THE CANISTER
Clean the canister 1 after each use in
order to ensure that the vacuum cleaner
continues to perform optimally.
- Switch the unit off and remove the
batter y p ack (See In serting and
Releasing Battery Pack).
- Unlock the latches 2 and remove the
control unit 5 (Fig. 10).
- Shak e out t he c anis ter 1 o ver a
suitable waste bin (Fig. 11).
- If necessary, clean the canister with a
damp cloth. If necessary, clean the
filter (see “Cleaning/ replacing HEPA
filters”).
- Reattach the motor unit 5 and lock
the latches 2.
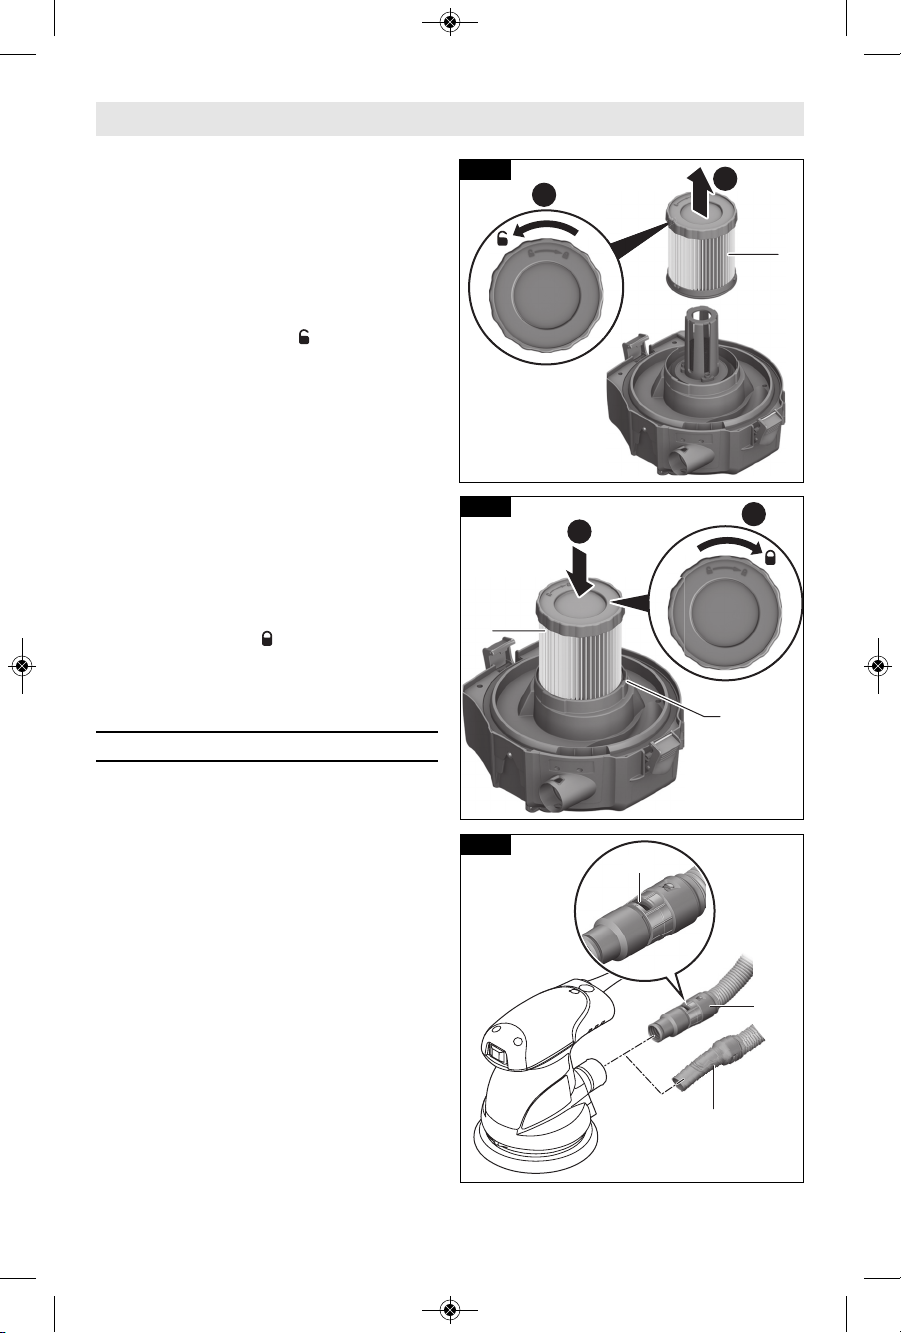
CLEANING/REPLACING HEPA
FILTERS
Check filter period ically and replace if
worn out or damaged. Using damaged
filter can lead to release of unwanted
airb o r n e contami n a n t s from the
canister.
The suction power is dependent on the
Operating Instructions
B
A
C
5
2
1
Fig. 10 Fig. 11
160992A45R_GAS18V-3 5/22/18 9:27 AM Page 11
12
condition of the filter, therefore clean
the filter regularl y . Repl a c e any
damaged filters immediately.
- Switch the unit off and replace the
batter y pack (S ee Inserting And
Releasing Battery Pack).
- Unlock the latches 2 and remove the
motor unit 5 (Fig. 10).
- Turn the filter 27 as far as it will go in
the direction of “ ” and remove it
from the filter base 28 (Fig. 12).
If the filter is dry:
- To preserve the maximal suction
power, brush down the flaps of the
filter regularly with a soft brush
or
If the filter is wet:
- Rinse the filter 27 under running
water a nd th en le ave i t to d ry
thoroughly.
or
Replace a damaged filter:
- Insert the filter 27 into the filter base
28 and turn it as far as it will go in the
direction of “ ” (Fig. 13).
- Reattach the motor unit 5 and lock
the latches 2. Make sure that the
latches engage firmly.
Dry Vacuuming
REGULAR VACUUMING
- To switch on the vacuum cleaner,
briefly press the on/off button 3.
- To switch off the vacuum cleaner,
press the On/Off button 3 again.
To save energy, only switch the vacuum
cleaner on when using it.
CONNECTING VACUUM CLEANER
TO POWER TOOLS AND
ATTACHMENTS
This v acuum clean e r can also b e
connected to various power tools or
their attachments to easily extract and
collect dust. These power tools include
sanders, routers, planers and saws. To
determine if any attachment and/or
adapter is required to connect a given
power tool and vacuum hose, consult
the Bo s c h catalog or w e b s ite
(www.boschtools.com). Depending on
th e du st po rt o n th e po wer tool or
attachment, the VX120 power tool hose
Operating Instructions
A
B
A
B
28
27
27
Fig. 13
Fig. 12
15
14
26
Fig. 14
160992A45R_GAS18V-3 5/22/18 9:27 AM Page 12
13
In the case of insufficient vacuuming
performance, check the following:
– Is the canister 1 full?
Empty the canister. See “Cleaning
The Canister” on page 11.
– Is the filter 27 clogged with dust?
Clean or replace the filter. See
“Cleaning/replacing HEPA filters” on
page 11.
– Is the battery pack charge too low?
Charge or replace the battery. Refer
to your battery charger Operating and
Safety Instructions.
Regularly emptying the dust canister 1
and cleaning the filter 27 will ensure
optimum suction power.
If the vacuuming performance is not
achieved thereafter, take the vacuum
cleaner to Bosch Factory Service Center
or Autho rized Bosch Service Station.
Operating Instructions
Troubleshooting
adapter (sold separately) can be either
slid into the hose port or snapped into
place. Bosch also offers a variety of
othe r vacu u m h o s e a d a p ters (not
incl u d e d ) to al low the hose to be
co nnected to hose por ts of v ario us
sizes. See page 15.
- Fit the power tool adapter 14 or the
bend 15 (refer to “Fitting The Power
Tool Adapter Or Bend”).
- Insert the power tool adapter 14 or
the bend 15 into the power tool's
dust port (Fig. 14).
Note: When working with power tools
that have a low air feed into the vacuum
hose (e.g. jigsaws, sanders, etc.), the air
diffuser 26 of the power tool adapter 14
must be opened. This will improve the
total output of the vacuum cleaner and
the power tool. To do so, turn the ring
above the air diffuser 26 until the widest
possible opening is produced.
Wet Vacuuming
Do not u s e to
vacu u m flammable
liquids, gases, or explosive dusts, like
gasoline or other fuels, lighter fluid,
varn i s h , polyuretha n e coatings,
cleaners, oil-based paints, natural gas,
hydrogen, coal dust, magnesium dust,
grain dust, or gun powder. Electric
motors create sparks, which may ignite
the dust or fumes.
A filter must be used
when wet vacuuming.
Before wet vacuuming:
- Empty the canister 1.
- Clean the filter 27 and reinstall it into
the mot or un it. (see “Cleanin g/
replacing HEPA filters “, page 11).
The vacuum is equipped with a floater.
Once the maximum fill level is reached,
vacuuming will be stopped.
When the vacuum cleaner is shut off,
some water may flow out of the hose.
After every wet vacuuming application:
- Empty the container 1.
- Make sure that the filter 27 is being
empt i e d as w ell s o no w a t er
remains inside.
To prevent the formation of mold:
- Remove the vacuum lid 5 and leave it
to dry thoroughly
- Remove the filter 27 and leave this
out to dry thoroughly as well (see
“Cleaning/replacing HEPA filters”,
page 11)
Use a dry filter for subsequent dry
vacuuming. We suggest purchasing an
extra filter when frequently alternating
between wet and dry vacuuming and
swap them out as needed.
160992A45R_GAS18V-3 5/22/18 9:27 AM Page 13
14
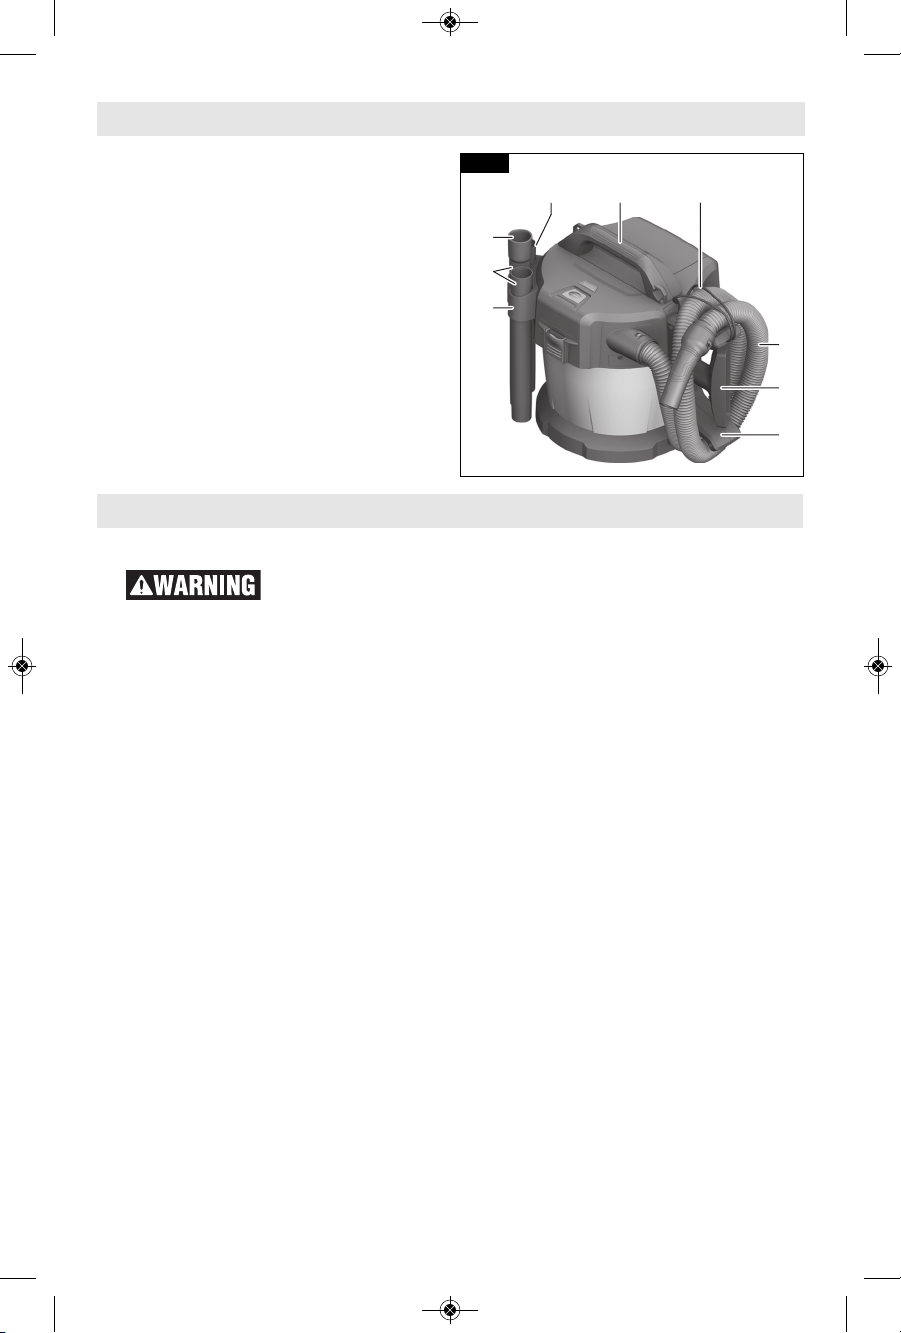
To store vacuum cleaner:
- Insert the extension tubes 18 into the
extension tube holder 22.
- Insert the crevice nozzle 16 into an
extension tube 18.
- Insert the floor nozzle 17 into the
vacuum hose holder 23.
- Wind the vacuum hose 13 around the
vacuum hose holder 23 from below
and fasten the strap 29.
Carry the vacuum cleaner only by the
carrying handle 6.
Store the vacuum cleaner in a dry room
and secure it against unauthorized use.
18
6 29
13
17
23
18
22
16
Fig. 15
SERVICE
Preventive ma in te -
nanc e must b e
performed by a Bosch Factory Service
Center or Autho rized Bosch Service
Stat i o n . Servic e performed by
unauthorized per so n nel may result in
misp l a c i ng of i n t e rnal wires a nd
components, which could cause serious
injury.
BATTERIES
Be alert f or battery packs that are
nearing their end of life. If you notice
decr e a s e d tool performanc e o r
sign i f i c antly shorter running time
be t ween charges then it is t i me t o
replace the battery pack. Failure to do
so ca n c a use the tool to o p e r a te
improperly or damage the charger.
Long term battery storage should be in
the discharged state. Battery packs
last longer and re-charge better when
they are stored discharged. Remember
to fully re-charge battery packs before
using after prolonged storage.
D.C. MOTORS
The motor in y o u r tool has b een
engi n e e r ed f o r many hours of
dependable service. To maintain peak
efficiency of the motor, we recommend
it be examined every six months. Only a
genu i n e Bosch replaceme n t mo tor
specially designed for your tool should
be used.
Maintenance
Storage
160992A45R_GAS18V-3 5/22/18 9:27 AM Page 14
15
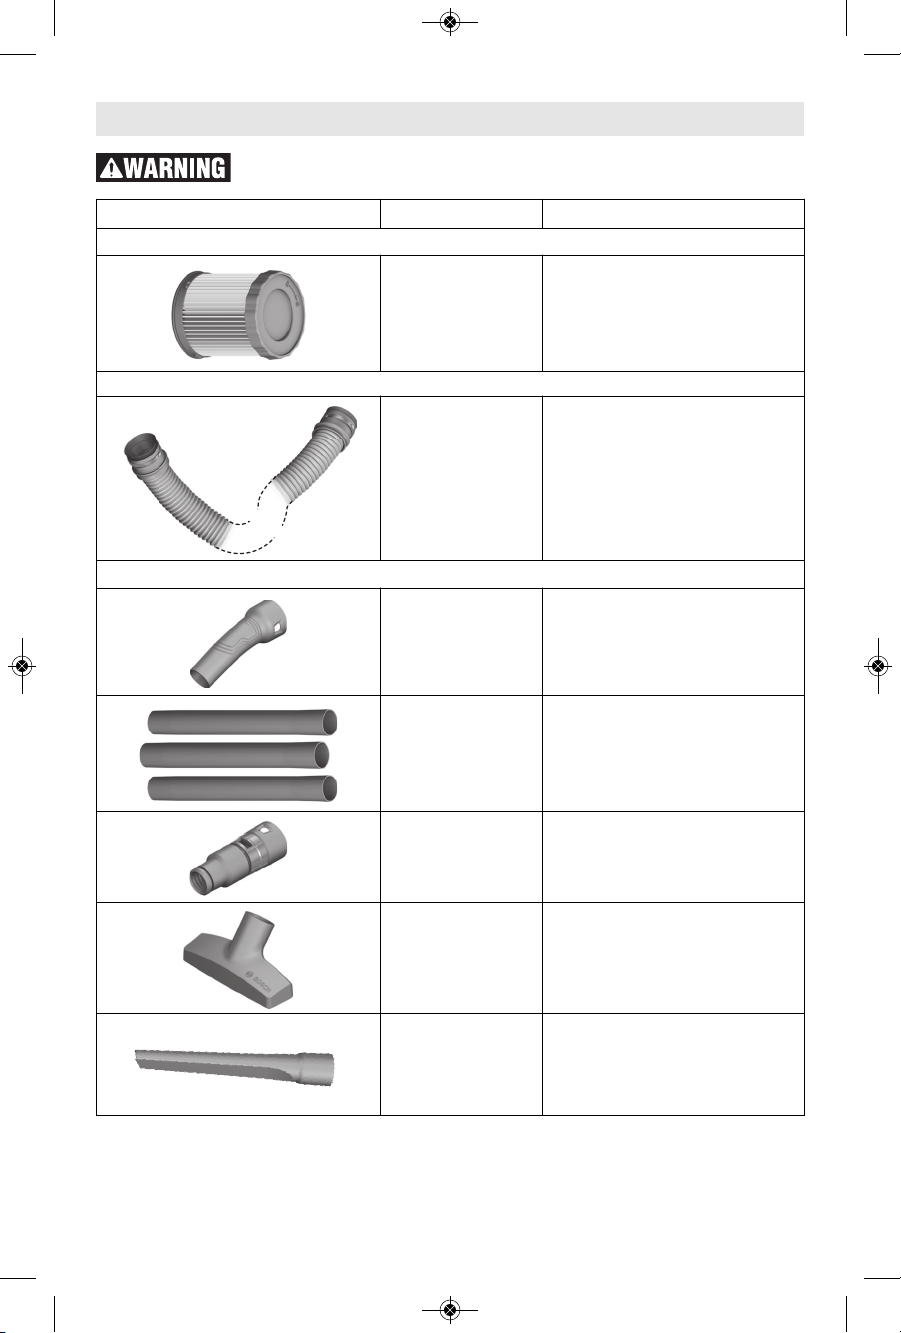
Use of any other attachments not specified in this manual may create a
hazard.
Attachments
Bosch Model No. Product description
Vacuum Cleaner Filter
VF320H HEPA Filter
Vacuum Hose
1 600 A01 1RL 5.25ft (1.6m), 35mm Hose
Nozzles, Adapters, etc.
1 600 A01 1RN Bend
1 600 A01 1RP 3-piece extension tube (3 x 32”)
VX120
Power tool adapter (Adapter for
Bosch 22/35 mm hoses)
1 600 A01 1RR Floor nozzle
1 600 A01 1RS Crevice nozzle
160992A45R_GAS18V-3 5/22/18 9:27 AM Page 15
 Loading...