

Page 1
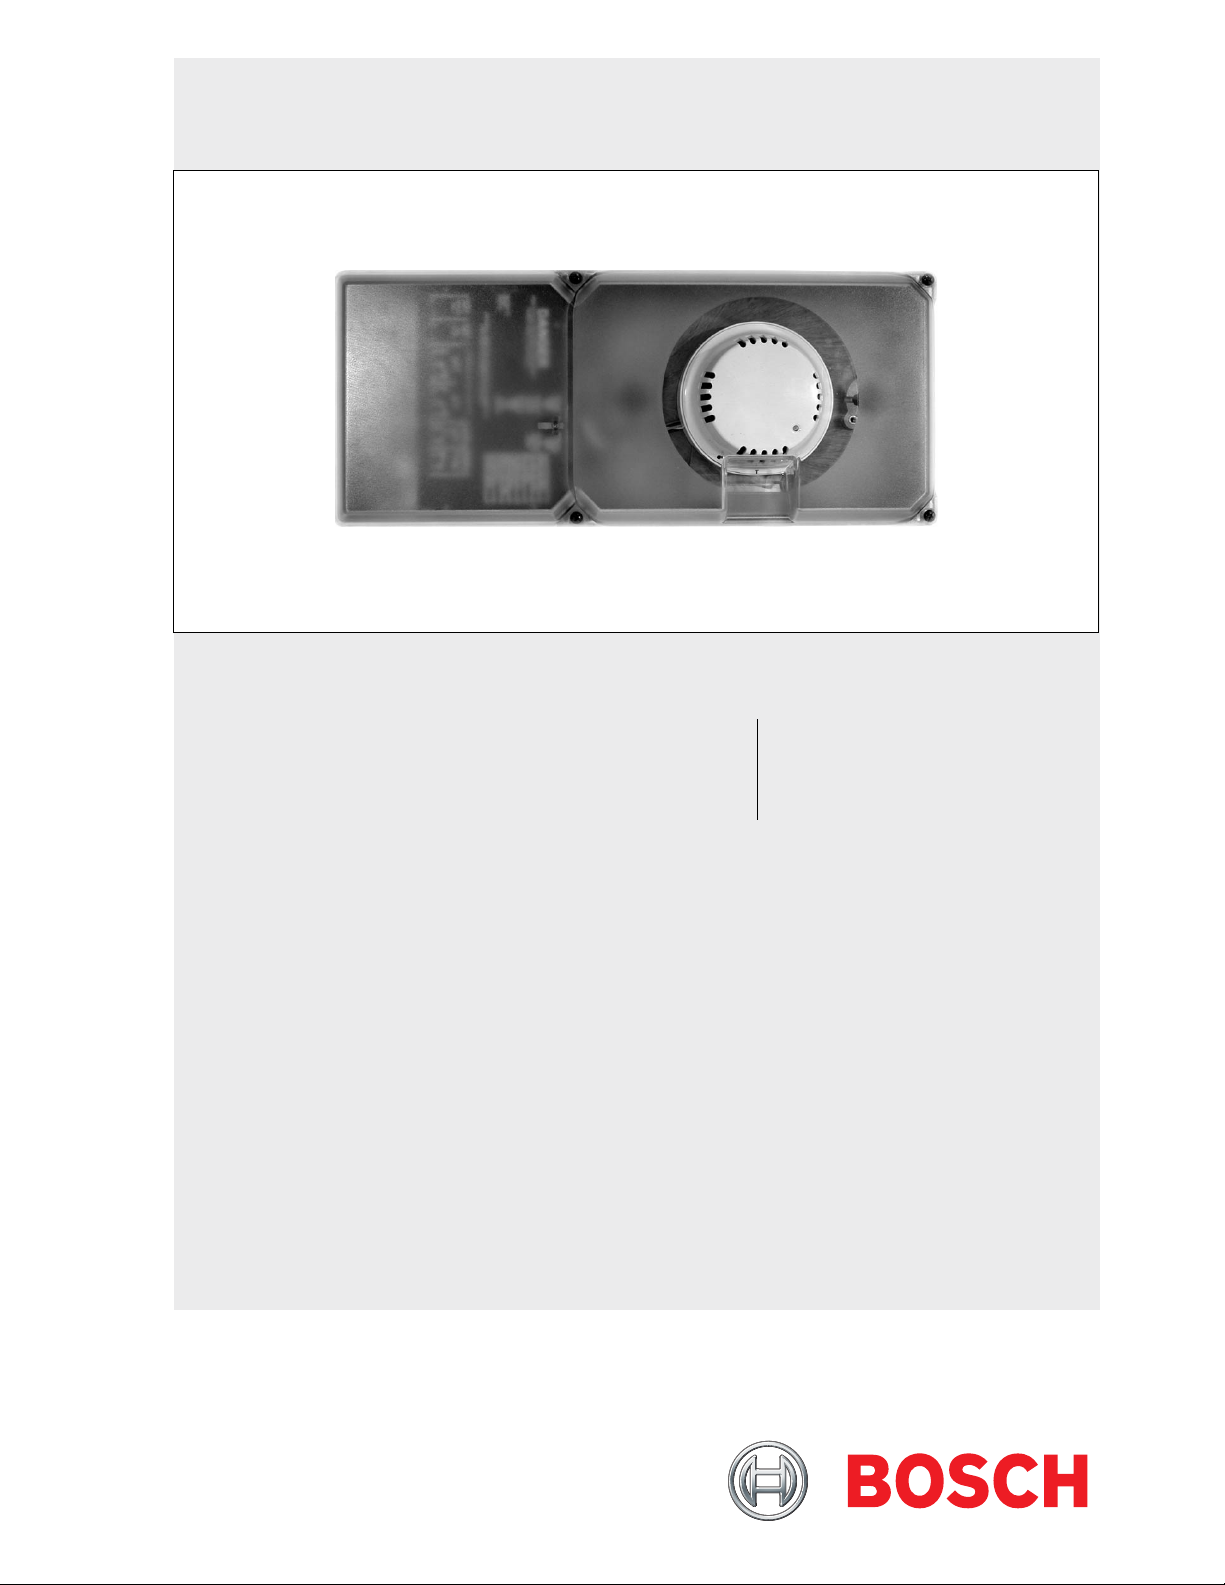
D341/D342
Installation Instructions
EN
Air Duct Smoke Detector
Housing
Page 2

D341/D342 | Installation Instructions | 1.0 Overview
Trademarks
The National Fire Alarm Code® is a registered
trademark of the National Fire Alarm Association, Inc.
®
Life Safety Code
is a registered trademark of the
National Fire Alarm Association, Inc.
1.0 Overview
The D341/D342 Air Duct Smoke Detector Housings
are designed to mount to heating, ventilation, and air
conditioning (HVAC) system ducts to monitor the
presence of smoke in the conditioned air. These
housings work with D285DH Photoelectric Detectors
and D286 Ionization Smoke Detectors (provided
separately) for general property protection.
The D341/D342 combines with an efficient housing
design that samples the air passing through a duct and
allows the detection of a potentially hazardous
condition. When smoke is detected, the detector sends
an alarm signal to the control panel that initiates the
necessary action to shut off fans and blowers or to
change over to other air handling systems.
The D341/D342 operates on 24 VDC, 24 VAC, 120
VAC, 220 VAC, or 240 VAC. Alarm and trouble relay
contacts are provided for the control panel interface. In
addition, two auxiliary Form “C” alarm relay contacts
are available for other functions such as fan shutdown.
Test the system by placing an external magnet on the
detector housing or switching a signal from a remote
test or indicator plate.
Reset the system by shutting down power and placing
a magnet on the detector housing, or by sending a
signal from the remote test or indicator plate.
2.0 Description
Table 1: Product Description
Types
Optional
Equipment:
D341: Air Duct Smoke Detector Housing
for 24 VDC, 24 VAC, or 120 VAC
operation. This housing requires a detector
head.
D342: Air Duct Smoke Detector Housing
for 24 VDC, 24 VAC, or 220 VAC, or 240
VAC operation. This housing requires a
detector head.
D285DH : Photoelectric smoke
D286:
D344-1.5: 1.5 ft (0.46 m) sample tube
D344-3: 3 ft (0.9 m) sample tube
D344-5: 5 ft (1.5 m) sample tube
D344-RT: Remote test kit (D307)
D344-RL: Remote LED indicator kit
D344-TF: Tube filters (20 per package)
SMK-TM: Test magnet
DRA-5: Remote alarm indicator
EOL200: End-of-line (EOL) Module
detection head
Ionization smoke detection
Head
(D306)
for sample and exhaust tubes
Install the D341/D342 according to NFPA
90A: Standard for the Installation of Air
Conditioning and Ventilating Systems,
NFPA 72: National Fire Alarm Code®,
NFPA 101: Life Safety Code®, any
applicable local and state codes, and your
local authority having jurisdiction (AHJ).
2 Bosch Security Systems, Inc. | 9/06 | 48196H
Page 3
.
3.0 Assembly
The D341/D342 includes:
• One housing, power card, and cover assembly
• Two #10-24 x 1 in. machine screws for mounting
• Two #10-24 jack nuts
• One exhaust tube
• Two tube clamps with four screws
• Two foam gaskets
• Two air filters
• One drilling template
• One cover gasket
The D341I/P and D342I/P also include a head and 1.5
ft (0.46 m) sample tube.
D341/D342 | Installation Instructions | 3.0 Assembly
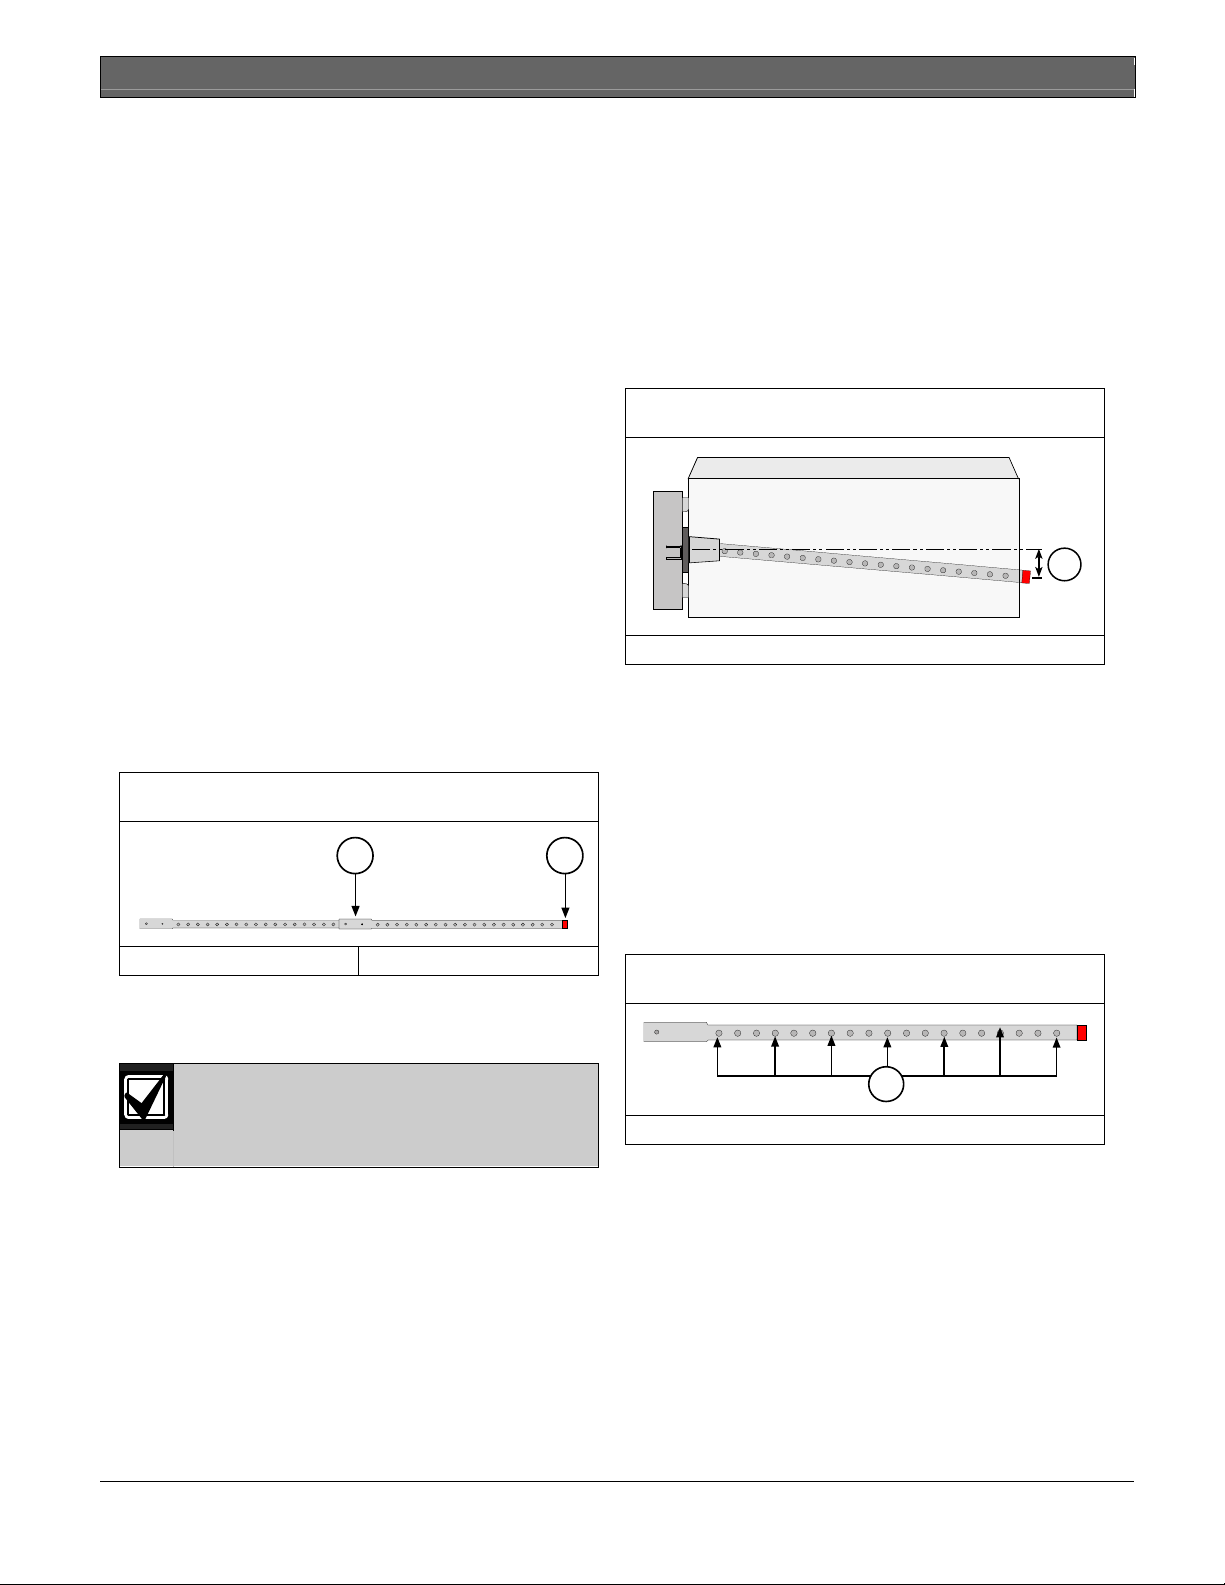
For example, you need a 7 ft (2.13 m) sample tube.
Combine a 3 ft (0.91 m) sample tube and a 5 ft (1.52
m) sample tube. Cut 1 ft (30.48 cm) from the narrow
end.
Sample tubes that are more than 3 ft (0.91 m) must be
supported at the end opposite the duct detector. The
support hole should be 1 in. to 2 in. (2.5 cm to 5 cm)
below the entry hole to allow for possible moisture
drainage (refer to Figure 2). Seal the gap between duct
and sample tube.
Figure 2: Sample Tube Support Hole
4.0 Sample Tubes
Sample tubes must extend across the width of the duct.
These tubes are available in three sizes:
• D344-1.5 (1.5 ft [0.46 m])
• D344-3 (3 ft [0.91 m])
• D344-5 (5 ft [1.52 m])
Sample tubes include an end plug that must be
installed in the narrow end (refer to Figure 1).
Figure 1: Sample Tube
1 2
1 - Set screw 2 - End plug
A sample tube’s maximum length is 10 ft (3.05 m); its
minimum length is 1 ft (30.48 cm). You can join or cut
sample tubes to make different lengths.
Sample tubes must have at least 12 sample
holes within the duct. Do not cut sample
tubes to less than 12 sample holes.
1 - 1 in. to 2 in. (2.5 cm to 5 cm)
You can remove a maximum of 6 in. (15 cm) from the
D344-1.5 for 1 ft (0.30 m) duct installations. If using the
D344-1.5 in installations where the duct width is
between 12 in. (30.5 cm) and 18 in. (45.7 cm), cover
some of the sample holes. There are 19 sample holes in
the D344-1.5, but only 12 of them are needed for
normal installation. Depending on the length, you
might need to cover some of the holes with duct tape.
Use even spacing when you cover sample holes. This
allows for an even sample across the width of the duct
(refer to Figure 3).
Figure 3: Covering Sample Tube Holes
1
1 - Place duct tape over these holes
1
To create a new sample tubes by combining two tubes:
1. Remove the roll pin and set screw from one tube.
2. Remove the end plug from the other tube.
3. Push the flared end over the tube you want to
lengthen.
4. Align the air holes and insert the set screw.
5. Reinstall the end plug.
Bosch Security Systems, Inc. | 9/06 | 48196H 3
Page 4
D341/D342 | Installation Instructions | 5.0 Mounting
5.0 Mounting
5.1 Preparing the Duct
5.2 Placing the Housing
The D341/D342 can be mounted in any direction in
90° increments without regard to air flow direction
(refer to Figure 5).
Verify the duct air flow and velocity.
The D341/D342 is designed for use in air handling
systems that have air velocities between 300 ft/min and
4000 ft/min (1.52 m/c to 20.3 m/c). Check the HVAC
engineering specifications to ensure the air velocity in
the duct falls within these parameters. If necessary, use
a velocity meter to check the air velocity in the duct.
5.1 Selecting a Mounting Location
Avoid stratification and dead air space when taking a
representative air sample. These conditions can be
caused by return duct openings, sharp turns,
connections, and long uninterrupted runs.
Place the duct smoke detectors in a range of six to ten
times the width of the duct from any uninterrupted run.
Refer to Figure 4 for a typical duct detector placement.
Figure 4: Typical Duct Detector Placement
1
Figure 5: D341/D342 Placement
1
2 2
1
2 2
1
1
2
3
2
1 - Bend or other obstruction
2 - Six to ten times the width of the duct
3 - Return air inlet
4 - Width of the duct
11
4
2 2
1
4
1 - Air flow
2 - Correct placement
3 - Incorrect placement
3 3
1
4 Bosch Security Systems, Inc. | 9/06 | 48196H
Page 5

.
1. Locate the mounting template and remove it from
its backing (refer to Figure 6).
2. Place the mounting template over the desired
location on the duct (refer to Figure 7).
3. Drill out the required holes (two) and remove any
remaining debris.
4. Remove the template after the drilling is complete.
5. Place a #10-24 jack nut in each of the two 3/8 in.
(9.5 mm) holes (refer to Figure 8).
6. Insert the #10-24 x 1 in. machine screws into the
jack nuts and tighten the screws firmly. This
attaches the jack nuts to the duct. You might need
to hold the jack nuts with an installer wrench or a
pair of pliers while tightening the screws. This stops
the jack nut from spinning in the hole. Remove the
screws and set them aside for later use.
Figure 6: Mounting Template
16.1 in.
6.5 in.
(16.5 cm)
1
(40.8 cm)
D341/D342 | Installation Instructions | 5.0 Mounting
7. Place the two foam gaskets over the sample and
exhaust ports located on the back of the
D341/D342 (refer to Figure 9).
8. Mount the D341/D342 to the jack nuts in the duct
using the #10-24 x 1 in. screws. Do not over
tighten the screws. Over tightening can cause
excessive bowing of the duct (refer to Figure 10).
9. Locate the sample and exhaust tubes. Ensure the
sample tube has a plug installed at the narrow end
of the assembly (refer to Figure 11).
Figure 9: Foam Gaskets
1
2
3
1 - Exhaust tube port
2 - Sample tube port
3 - Foam gasket (2)
2
1 - 1-3/4 in. (44.5 mm) diameter sample tube
holes (2)
2 - 3/8 in. (9.5 mm) diameter duct mounting holes
(2)
Note: Remove template after drilling
Figure 7: Mounting Template Location
1
16.070 in. (40.8 cm)
6.480 in. (16.5 cm)
(2) 1-3/4 in. (44.5 mm) DIA. HOLES FOR SAMPLING TUBES
(2) 3/8 in. (9.5 mm) DIA. HOLES FOR DUCT MOUNTING
1 - Duct 2 - Mounting template
Figure 8: Jack Nuts
DUCT SMOKE DETECTOR
MOUNTING TEMPLATE
REMOVEABLE AFTER DRILLIN G
2
Figure 10: Mounting the Housing
3
1 - Duct
2 - Duct detector housing’
3 - #10-24 x 1 in. machine screw (2)
Figure 11: Exhaust and Sample Tubes
1
2
1 - Exhaust tube
2 - Sample tube
3 - Leave end open
4 - Insert plug
1
2
3
4
Bosch Security Systems, Inc. | 9/06 | 48196H 5
Page 6

D341/D342 | Installation Instructions | 5.0 Mounting
10. Note the direction of the airflow in the duct. Place
the sample tube so the sampling holes face into the
air flow (refer to Figure 12).
11. Ensure the exhaust tube is downwind from the
sample tube (refer to Figure 13).
Figure 12: Airflow Direction
1
3
2
1 - Sample tube
2 - Air flow
Figure 13: Exhaust and Sample Tube Placement
3 - Sample holes
1
2
12. Insert the sample and exhaust tubes into the
housing. The sample tube holes must face into the
air flow. The alignment pins on the tubes must seat
into the housing. Secure the tubes in place using
the tube clamps provided (refer to Figure 14).
13. Place the tube filters over the open ends of the
sample and exhaust tubes (refer to Figure 15).
14. Visually inspect the duct smoke detectors.
NFPA-72 requires a semi-annual visual
inspection. Clean or replace the tube filters
during this inspection. Order part D344-TF
for replacements as needed.
Figure 14: Placing the Sample and Exhaust
Tubes in the Housing
1
1 - Sample tube 2 - Tube clamps (2)
2
Figure 15: Tube Filters
3
3
1 - Exhaust tube
2 - Sample tube
3 - Air flow
6 Bosch Security Systems, Inc. | 9/06 | 48196H
1
1 - Sample tube
2 - Exhaust tube
2
3
3 - Tube filters (2)
Page 7

D341/D342 | Installation Instructions | 6.0 Jumpers
.
6.0 Jumpers
The power card contains two jumpers:
• Tamper jumper that enables or disables the
housing cover tamper switch.
• Reset jumper that enables or disables the remote
keyswitch reset function. The power off reset
functions normally regardless of the jumper setting.
Figure 16 shows the location of the two jumpers on the
power card.
Figure 17 shows the enable and disable settings for the
tamper and reset jumpers.
Disable the reset jumper when not using
the D344-RT.
Figure 16: Power Card
1
2
7.0 Wiring
Figure 18 shows the wiring knockout holes in the smoke
detector duct.
Refer to Figure 19 for the wiring terminals.
Figure 18: Wiring Knockout Holes
1
1
1 - Duct detector housing
2 - Wiring knockout holes
1 - Tamper jumper
2 - Reset jumper
Figure 17: Tamper and Reset Jumper Settings
1
2
1 - Disabled
2 - Enabled
Figure 19: Wiring Terminals
1
2
22 21 20 19 18 17 16 15 14 13 12 11 10 9
3
1 - Power input (120 VAC and 230 VAC)
2 - Power input (24 VDC)
3 - Alarm relay auxiliary contacts
4 - Alarm contacts
5 - Trouble contacts
4
5
Bosch Security Systems, Inc. | 9/06 | 48196H 7
Page 8

D341/D342 | Installation Instructions | 7.0 Wiring
7.1 Primary Power
The D341 is designed for a primary power of 24 VAC,
120 VAC, or 24 VDC.
The D342 is designed for a primary power of 220
VAC, 240 VAC, 24 VDC, or 24 VAC.
Figure 22: D344-RT Wiring
1
2
The D341/D342 is designed for one power
source only. Do not connect a high-voltage
AC source and a low-voltage AC/DC
source to the same detector.
Refer to Figure 20 for 120 VAC, 220 VAC, or
240 VAC wiring.
Refer to Figure 21 for 24 VAC or 24 VDC wiring.
Figure 20: 120 VAC, 22VAC, or 240 VAC Wiring
22 21 20 19 18 17 16 15 14 13 12 11 10 9
1
1 - 120 VAC for the D341
220 VAC or 240 VAC for the D342
Figure 21: 24 VAC or 24 VDC Wiring
1
2
3
4
5
6
7
8
1 - D341/D342 power card 2 - D307
7.3 D344-RL Remote Indicator
Do not exceed a distance of 500 ft (152 m)
between the D306 and the D341/D342.
Refer to Figure 23 for the D344-RL wiring.
Use #18 AWG (1.2 mm) wire or larger.
Figure 23: D344-RL Wiring
GREEN
YELLOW
RED
BLACK
BLUE
ORANGE
+OUT
+IN
22 21 20 19 18 17 16 15 14 13 12 11 10 9
1
1 - 24 VAC or 24 VDC
7.2 D344-RT Remote Test/Indicator
NFPA-72 requires detectors have remote alarm
indicators where induct smoke detectors are installed in
concealed locations that are more than 10 ft (3 m)
above the finished floor. Remote alarm indicators are
also required in arrangements where the detector’s
alarm indicator is not visible to responding personnel.
Do not exceed a distance of 500 ft (152 m)
between the D307 and the D341/D342.
Refer to Figure 22 for the D344-RT wiring.
Use #18 AWG (1.2 mm) wire or larger.
1 2
1
2
3
4
5
6
7
8
1 - D341/D342 power card
2 - D306
3 - Green wire
4 - Yellow wire
3
4
5
6
7
5 - RED WIRE
6 - Violet wire
7 - Black wire
8 Bosch Security Systems, Inc. | 9/06 | 48196H
Page 9

.
7.4 DRA-5 Remote Alarm Indicator
Do not exceed a distance of 500 ft (152 m)
between the DRA-5 and the D341/D342.
Refer to Figure 24 for the DRA-5 wiring.
Figure 24: DRA-5 Wiring
Use #18 AWG (1.2 mm) wire or larger
2
1
D341/D342 | Installation Instructions | 7.0 Wiring
7.6 Multiple D341/D342s to Control
Panel
Refer to Figure 26 for multiple D341/D342 to control
panel wiring.
Figure 26: Multiple D341/D342s to Control Panel
Wiring
1
22 21 20 19 18 17 16 15 14 13 12 11 10 9
1
2
3
4
5
6
7
8
3
4
ALARM
1 - D341/D342 power card
2 - DRA-5
3 - Red wire
4 - White wire
7.5 D341/D342 to Control Panel
Refer to Figure 25 for the D341/D342 to control panel
wiring.
Figure 25: D341/D342 to Control Panel Wiring
1
22 21 20 19 18 17 16 15 14 13 12 11 10 9
1
2
22 21 20 19 18 17 16 15 14 13 12 11 10 9
3
4
1 - D341/D342
2 - EOL resistor
3 - Control panel
4 - Alarm loop
7.7 D341/D342 to Mux Point Module
Mount the small mux point modules inside the
D341/D342 on the power card side. Refer to Figure 27
for the D341/D342 to mux point module wiring.
Figure 27: D341/D342 to Mux Point Module
Wiring
1
22 21 20 19 1 8 17 16 15 14 13 12 11 10 9
2
3
2
3
1 - D341/D342
2 - EOL resistor
3 - Control panel
4 - Alarm loop
4
1 - D341/D342
2 - EOL resistor
4
3 - Zone
4 - FACP or mux point module
Bosch Security Systems, Inc. | 9/06 | 48196H 9
Page 10

D341/D342 | Installation Instructions | 8.0 Testing
7.8 Single D341/D342 for Fan Control
Refer to Figure 28 for single D341/D342 to fan control
wiring.
Figure 28: Single D341/D342 for Fan Control
Wiring
1
3. When the system is free of alarms, check each
detector to ensure the red LED indicator is flashing
approximately every 4 sec for the D285DH and
every 11 sec for the D286. This verifies the
detector is receiving power and operating properly.
4. Test each detector to ensure it will cause a control
panel alarm. Reset the control panel after each test.
5. Test the detectors by doing one of the following:
a. Place a SMK-TM magnet against the duct
housing’s test point notch located on the front
cover (refer to Figure 29).
Figure 29: Testing the Detector
2
14 13
HEAT COOL
3
ON OFF
1 - Power control
2 - Fan control
3 - System control/thermostat
8.0 Testing
Verify air flow to ensure the system is operating
properly. Use a manometer to verify the correct
velocity pressure readings ranging 300 ft/min to 4000
ft/min (1.52 m/s to 20.3 m/s). Ensure the water
pressure differential between the sampling tubes ranges
from 0.01 in. (0.25 mm) to 1.8 in. (4.57 cm).
1. Check the wiring from the control panel to the last
D341/D342 on each run for proper polarity and
continuity. Ensure each run terminates with an
EOL resistor as specified by the control panel’s
manufacturer.
2. Apply power to the system and check for alarms.
a. Note which smoke detectors are in alarm, if
any, and shut down the system down.
b. Remove these detectors from their duct
housing and recheck the duct housing for
proper wiring. If the problems persist, replace
the affected smoke detectors or swap them
with known good units. This determines if the
problem is caused by the detector or the duct
housing.
c. If there is a system alarm with no detector
alarms present, remove all smoke detectors
and check the wiring at each duct housing. Pay
close attention to the wiring of each EOL
resistor.
1
2
3
4
1 - SMK-TM magnet
2 - Test point notch
3 - Detector
4 - Duct housing
When a detector alarms, the red LED indicator
activates and latches in the ON position.
Ensure you clear the alarm before proceeding
to the next detector.
b. Reset the detector by momentarily removing
power or by placing a magnet in the reset
notch located near the rear of the housing
(refer to Figure 30 on page 11).
c. Test and reset duct detectors with the D344-RT
installed by moving the keyswitch to the
appropriate position and observing the Alarm
LED.
6. Check the overall loading of the alarm loop by
measuring the voltage across each EOL resistor.
This voltage should equal or exceed the minimum
specified by the control panel’s manufacturer.
10 Bosch Security Systems, Inc. | 9/06 | 48196H
Page 11

D341/D342 | Installation Instructions | 9.0 Maintenance
.
Figure 30: Resetting the Detector
9.0 Maintenance
NFPA-72 requires a semi-annual visual
inspection of the duct smoke detectors.
Clean or replace the tube filters during this
inspection. Order part DS294-TF for
replacements as needed.
1
Notify all concerned parties before and
4
3
2
after performing maintenance or testing on
the
fire alarm system.
At least once a year, clean the detector and base using
1 - SMK-TM magnet
2 - Test point notch
3 - Detector
4 - Duct housing
a vacuum or clean/dry compressed air.
10.0 Specifications
Refer to Table 2 for the D341/D342 specifications.
Table 2: Specifications
Duct Detector Housing Power Requirements
Operating
Voltage:
Maximum RMS
Ripple:
Current Draw:
Alarm Output: Form “A” Normally Open (NO and C) contacts 0.5 A at 24 VDC and 24 VAC, 0.1 A at 120 VAC
Trouble Output:
Auxiliary Output: Two Form “C” Normally Open and Normally Closed (NO and C and NC) contacts 10 A at 24 VDC,
Operating
Temperature:
Humidity: 0 to 95% RH
Air Velocity: 300 ft/min to 4000 ft/min (1.52 m/s to 20.3 m/s)
Weight: 3.75 lb (1.7 kg)
Dimensions
(H x W x D):
Powerup Time:
D341:
D342:
25 percent of DC input
Condition 24 VDC 24 VAC 120 VAC 230 VAC
Standby 15 mA 85 mA 100 mA 25 mA
Trouble 15 mA 85 mA 100 mA 25 mA
Alarm 65 mA 200 mA 110 mA 30 mA
Condition 24 VDC 24 VAC 120 VAC 230 VAC
Standby 10 mA 0 mA 0 mA 0 mA
Trouble 10 mA 0 mA 0 mA 0 mA
Alarm 15 mA 0 mA 0 mA 0 mA
Alarm and Remote Coil (ON)
Form “A” Normally Open (NO/C) contacts 0.5 A at 24 VDC/24 VAC, 0.1 A at 120 VAC
24 VAC, 120 VAC, or 240 VAC
+32°F to +120°F (0°C to +49°C). For UL Listed requirements, the operating temperature is +32°F to
+100°F (0°C to + 37.8°C).
6.5 in. x 15.5 in. x 4.25 in. (16.5 cm x 39.5 cm x 11 cm)
22 sec maximum
20 VDC to 29 VDC and 24 VAC or 120VAC
20 VDC to 29 VDC and 24 VAC or 120 VAC
Nominal Primary Voltage (D341/D342)
D341/D342 when connected to the D344-RL/D344-RT Remote Indicator
150 mA 150 mA 25 mA 20 mA
Bosch Security Systems, Inc. | 9/06 | 48196H 11
Page 12

Bosch Security Systems, Inc.
130 Perinton Parkway
Fairport, NY 14450-9199
Customer Service: (800) 289-0096
Technical Support: (888) 886-6189
© 2006 Bosch Security Systems, Inc.
48196H
 Loading...