

Bosch c-Si M 60-225-16, c-Si M 60-240-16, c-Si M 60-230-16, c-Si M 60-235-16 Installation And Safety Manual
Page 1

Solar Energy
Installation and Safety Manual of the Bosch Solar Modules
c-Si M 60-225-16, c-Si M 60-230-16, c-Si M 60-235-16, c-Si M 60-240-16
Read Me
Thank you for buying our Bosch Solar photovoltaic (PV) modules. This manual describes the
installation and maintenance instructions for
the modules intended for use in North America.
Before installing, wiring and using a module, it
is important to thoroughly read this manual and
understand the instructions. Installers must
understand the basic principles of electricity
and electrical apparatuses as well as article 690
of the National Electrical Code. Special attention must be given to the safety instructions.
Disclaimer of Liability
Since the use of this Safety and Installation
Manual and the conditions or methods of installation, operation, use and maintenance of the
module are beyond the control of Bosch Solar,
Bosch Solar does not assume responsibility and
expressively disclaims liability for loss, damage
injury or expense arising out of or in any connected with such installation operation, use or
maintenance of the module.
Bosch Solar assumes no responsibility for infringement of patents or other rights of third
parties which may result from use of the module. No license is granted by implication or otherwise under any patent or patent rights. The
information in this Manual is based on Bosch
Solar‘s knowledge and experience and is believed to be reliable; but such information including product specifications (without limitations) and suggestions do not constitute a warranty, expressed or implied. Bosch Solar reserves the right to make changes to the product, specification or the Manual without prior
notice.
1. Important Safeguards/Warnings
Read this section carefully before installing,
using, repairing or performing maintenance on
the PV modules or the PV power system.
WARNING
• Lethal voltages and/or shock hazard may
be present in modules and arrays during
sunlight hours, even at low light level.
This hazard increases when multiple
modules are connected together to provide higher system voltage or current
levels. Dangerous voltages may also be
present at night from connections to
batteries and feedback from inverters or
other parts of the system.
Bosch Solar modules should only be installed
by qualified installers with adequate solar installation experience. You must comply with the
standards and regulations applicable to PV installations, such as National Electrical Code
(NEC) and other building codes, the grid operator’s technical connection requirements, and
trade association rules concerning accident
prevention. Failure to comply can lead to significant personal injury and equipment damage.
Lethal voltages and/or a shock hazard may be
present in modules and arrays during sunlight
hours, even at low light level. This hazard increases when multiple modules are connected
together to provide higher system voltage or
current levels. Dangerous voltages may also be
present at night from connections to batteries
and feedback from inverters or other parts of
the system.
2. Underwriters Laboratories Information
(U.S. and Canada Only)
Bosch Solar c-Si M 60-225-16, c-Si M 60-230-16,
c-Si M 60-235-16 and c-Si M 60-240-16 are UL
1703 listed. This UL standard covers flat-plate
photovoltaic modules and panels intended for
installation on or integral with buildings or to be
freestanding (not attached to buildings), in
accordance with the National Electrical Code
(NFPA 70), appropriate Building Codes, and any
other applicable Local Codes in the US.
UL Listed Bosch Solar c-Si modules are rated
class C and intended to be installed on “Class
A” fire rated roofs, residential or commercial,
per local codes in US.
1/9
photovoltaikforum.com
Page 2

Solar Energy
For “Class C” modules, the assembly is to be
mounted over a fire resistant roof covering
rated for the application.
Under normal conditions, a photovoltaic module
is likely to experience conditions that produce
more current and/or voltage than reported at
standard test conditions. Therefore, the values
of Isc and Voc marked on this module must be
sized according to section 690-8 of the National
Electrical Code for all component voltage ratings, conductor ampacities, fuse sizes, and size
of controls connected to PV output.
Use only UL Listed grounding lugs suitable for
outdoor use: Burndy P/N CL-50-DB or ILSCO
P/N GBL-4DB in conjunction with an 8-32
stainless steel fastener and star washer. USE
conductor cable of minimum 10 AWG and
minimum 90°C temperature rating, which is
also sunlight resistant rated, for modules and
interconnect wiring that is exposed to weather
as per NEC.
National Electrical Code (NEC)
The National Electrical Code (NEC) covers the
installation of photovoltaic systems and must
be adhered to when systems are designed and
installed. Article 690, Solar Photovoltaic Systems, of the NEC applies to solar photovoltaic
electrical energy systems including the array
circuit(s), power conditioning unit(s) and controller(s) for such systems.
All wiring shall be in accordance with the NEC,
and grounding method of the frame of arrays
shall comply with the NEC, article 250.
USL/CNL
All USL/CNL installations shall be in accordance
with CSA C22.1, Safety Standard for Electrical
Installations, Canadian Electrical Code, Part 1.
2/9
photovoltaikforum.com
Page 3
Solar Energy
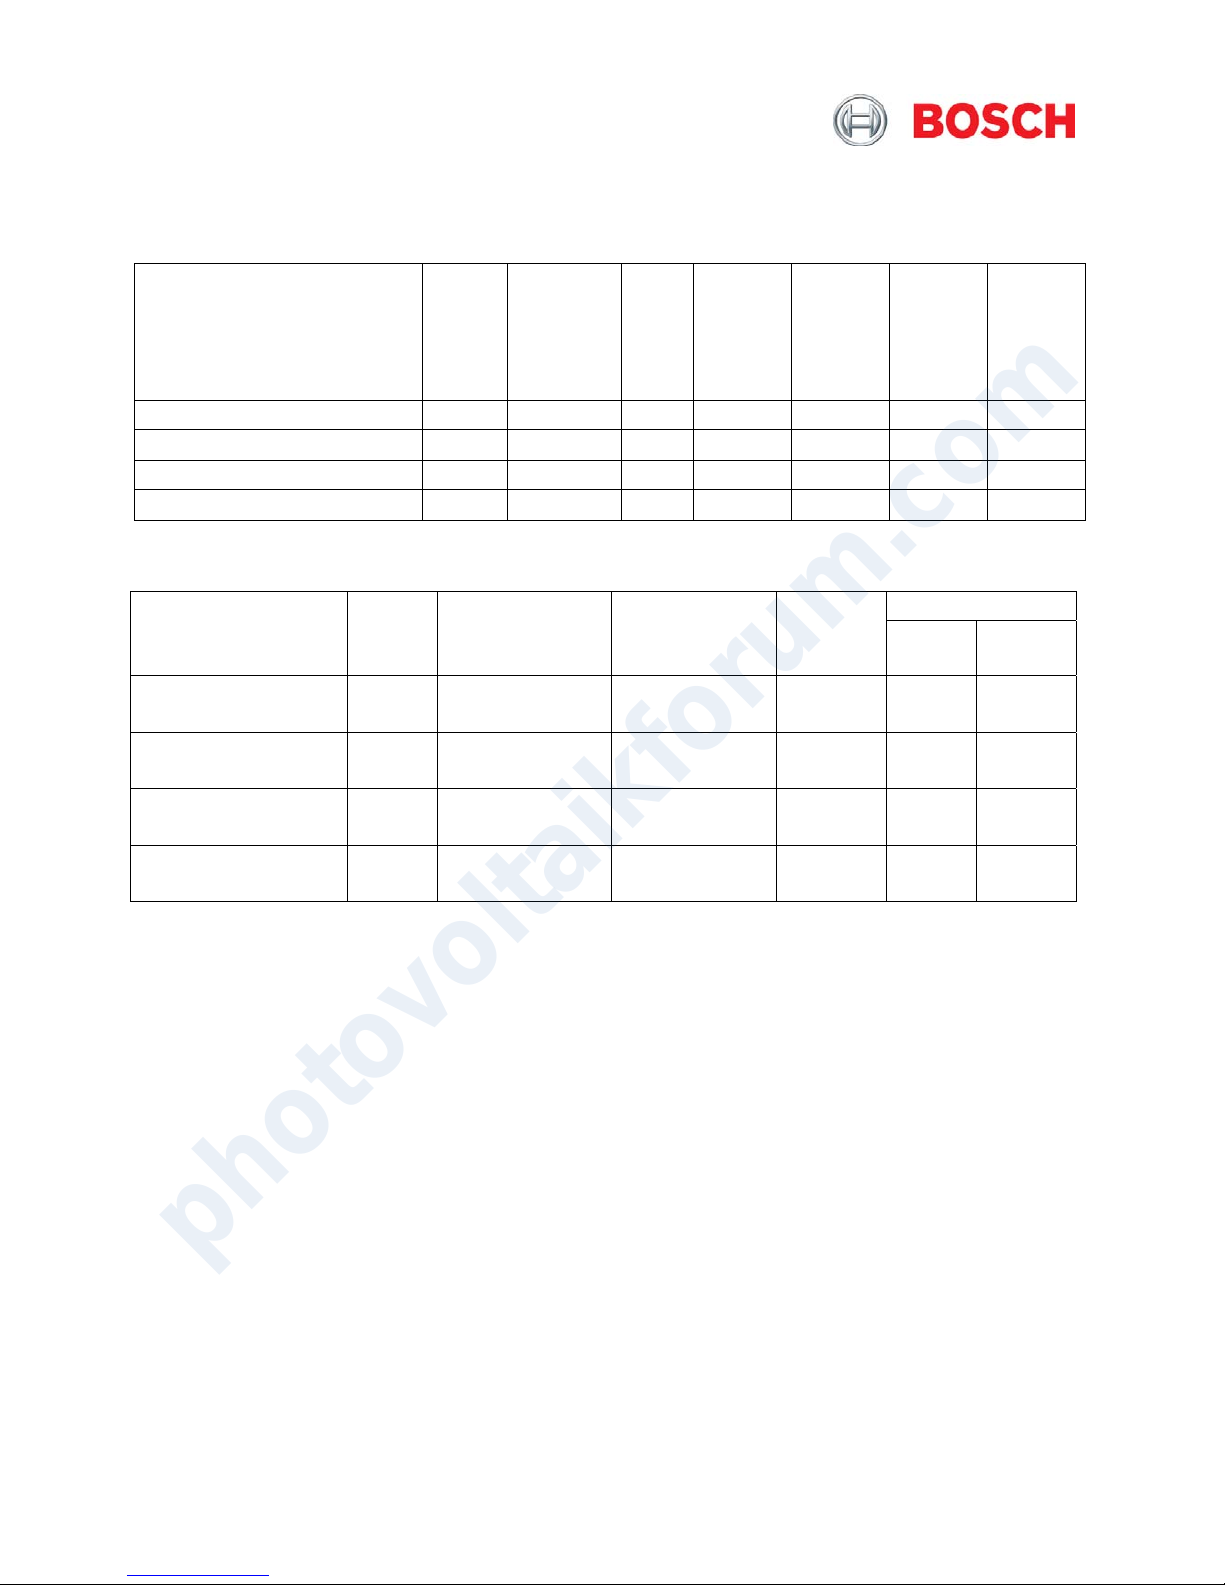
3. Bosch Solar Module Electrical Characteristics
Model
Open
Circuit
Voltage
at STC,
(V dc)
Rated
Voltage at
STC,
(V dc)
Maximum
System
Voltage, (V
dc)
Rated
Current at
STC,
(A dc)
Short
Circuit
Current at
STC,
(A dc)
Rated
Maximum
Power at
STC,
(Watts)
Maximum
Series
Fuse,
(A)
c-Si M 60-225-16
36.0 28.3
600
7.95 8.7 225 15
c-Si M 60-230-16
36.35 28.75
600
8.0 8.75 230 15
c-Si M 60-235-16
36.5 29.35
600
8.0 8.75 235 15
c-Si M 60-240-16
36.7 29.65
600
8.1 8.8 240 15
Module bypass diode type, voltage rating, current rating, and configuration of the diode
Diode Ratings Module series Total #
of Dio-
des
Diodes # in par-
allel for each
string
Diode Manufac-
turer
Diode
Type
(A) (PIV)
c-Si M 60-225-16
3 1 Tyco SL1010 11 40
c-Si M 60-230-16
3 1 Tyco SL1010 11 40
c-Si M 60-235-16
3 1 Tyco SL1010 11 40
c-Si M 60-240-16
3 1 Tyco SL1010 11 40
NOTE:
DO NOT attempt to open the diode housing or junction box located on the back side of any Bosch Solar
module. There are no user serviceable parts inside.
4. SAFETY INSTRUCTIONS
Handling Safety
DO NOT drop, allow objects to fall on,
or stand or step on modules.
DO NOT install during high winds.
Never leave a module unsupported or
unsecured. If a module falls, the glass
could break. A module with broken
glass cannot be repaired and must not
be used.
DO NOT disassemble the module, or
remove any part installed by Bosch Solar. Use modules for their intended use
only and follow all manufacturers’ instructions.
DO NOT attempt to remove snow or ice
from the module.
DO NOT direct artificially concentrated
sunlight on the module.
Installation Safety
DO NOT attempt to install or service
any portion of the PV system unless you
understand the electrical operation and
are fully qualified to do so.
3/9
photovoltaikforum.com
Page 4

Solar Energy
DO NOT drill holes in the frame or glass
of the module. Doing so will void the
warranty.
Have a fire extinguisher, and first aid kit
when performing field work on all energized equipment where the system
open circuit voltage is 30 volts or
greater.
Since sparks may be produced, do not
install module where flammable gases
or vapours are present
DO NOT attempt to open the diode
housing or junction box located on the
back side of any Bosch Solar module.
There are no user serviceable parts inside.
DO NOT work on modules when mod-
ules are wet. If a wet module is cracked
or broken the full system voltage may
be present.
Fire Safety
1. Refer to your local authority for guide-
lines and requirements of building or
structural fire safety.
2. It may be necessary to use components
such as earth ground fault circuit
breakers, fuses and circuit breakers
3. Do not use modules near equipment or
locations where flammable gasses can
be generated or can collect.
Electrical Safety
Rated electrical characteristics are
within ±10 percent of the indicated values of Isc, Voc, Pmax under Standard
Test Conditions. (Irradiance of
100 W/cm, Am 1.5 spectrum and a cell
temperature of 25°C (77°F).
Under normal conditions, a photo-
voltaic module may experience conditions that produce more current and/or
voltage than reported at Standard Test
Conditions. Accordingly, the values of
ISC and VOC marked on UL Listed
modules should be multiplied by a factor of 1.25 when determining component voltage ratings, conductor capacities, fuse sizes and size of controls
connected to the module output. Refer
to Sec. 690-8 of the National Electric
Code for an additional multiplying factor of 125 percent (80 percent of rating) which may be applicable.
DO NOT wear jewellery when working
on the modules.
A two-person team is to be used while
performing field work on all energized
equipment where the system open circuit voltage is 30 volts or greater.
Wear electrical insulating gloves rated
at 1000 volts and suitable eye protection when working on systems where
the system open circuit voltage is 30
volts or greater.
DO NOT touch terminals while the
module is exposed to light without
wearing electrical insulating gloves.
DO NOT use modules in systems that
can exceed 600 volts open circuit under
any combination of solar irradiation and
ambient temperature.
DO NOT connect or disconnect a mod-
ule unless the array string is open- circuited or all of the modules in the
string are covered.
5. Mechanical Installation
NOTE:
The maximum wind and snow loads on a module
mounted in any position must not exceed a resultant surface load of 30lb/ft² over the module
surface. Reference ASCE 7-95 for determining
the proper wind and snow load calculations for
each location. All installations should also be in
accordance with local building codes and regulations. For proper structural design, it is recommended to retain the services of a structural
engineer experienced with the installations of PV
systems.
NOTE:
It is the sole responsibility of the user and/or
installer to verify that the module mounting system and mounting method are properly engineered and in accordance with local building
codes and regulations.
4/9
photovoltaikforum.com
Page 5

Solar Energy
NOTE:
Modules shall be mounted so that the junction
box shall be in the uppermost position to minimize the ingress of water.
Clearance between Modules
A clearance of 6mm/.25” between modules is
sufficient in most installations to accommodate
thermal expansion. However, the appropriate
clearance is dependent upon installation specific factors including the module mounting
system, temperature at the site and the maximum operating temperature of the module. The
maximum distance between modules should
not exceed 12” based on using standard wiring.
Orientation, Tilt Angle & Shading
Photovoltaic modules generate maximum power
when facing directly towards the sun. PV systems can track the sun or remain in a fixed tilt
position. Tracking systems will produce more
energy but are more costly and require more
maintenance. PV systems are predominantly set
at a tilt. The further North from the equator, the
more tilt. Since applications and needs are
different, consult a PV system integrator or use
a commercially available software program to
determine the expected energy output. The
following chart may serve as a rule of thumb.
Site Latitude Horizontal Tilt Angle
0-10 = 10 Degrees
11-20 = Latitude
21-30 = Latitude + 5~
31-40 = Latitude + 10~
41+ = Latitude + 15~
The following paragraphs list some other general rules of thumb:
It is not recommended to set the tilt angle below 10-15 degrees. Dirt tends to accumulate on
modules installed at flatter angles and does not
wash off as readily during rainfall. Dirt accumulation or any debris, even snowfall on the module will reduce its energy output.
Modules should be located in areas with an
unobstructed view of the sun where they will
receive maximum exposure of sunlight for the
longest possible time during the day. Shadowing caused by buildings, trees, utility poles and
other obstructions, significantly reduces the
module energy output.
In systems that are configured with multiple
rows of modules, the rows must be spaced far
enough apart to minimize the impact of shading
on other rows. This distance is dependent on
the latitude and tilt angle at which the system is
installed. The closer to the equator, requires a
lower tilt angle and therefore the shorter this
distance. The further from the equator, higher
tilt angle and therefore the greater this distance
needs to be. If there are questions regarding
the optimum configuration in which to arrange,
mount or wire the modules, obtain assistance
from your Bosch Solar dealer or distributor or
retain the services of an engineer familiar with
the proper design of PV systems.
Suggested Mounting Methods
The information in this section only suggests
possible methods of securing the PV modules to
a ‘module mounting system.’
It is the sole responsibility of the user and/or
installer to verify that the module mounting
system and mounting method is properly engineered and is in accordance with local building
codes and regulations.
Bosch Solar PV modules can be arranged in
either landscape or portrait position on flat or
sloped roofs or surfaces and at flat or tilted
angles.
The modules shall be mounted so that the junction box shall be in the uppermost position to
minimize the ingress of water.
NOTE:
Always use caution when mounting a module on
tilted angles or sloped roofs so the module does
not slide out of position while attaching it to the
module mounting system.
NOTE:
The minimum standoff distance between Bosch
Solar modules and the roof is 40mm.
CAUTION
Never leave a module unsupported or unsecured.
If a module falls, the glass could break. A module
with broken glass cannot be repaired and must
not be installed.
Bosch Solar requires one of the following methods for mounting Bosch Solar PV Modules:
5/9
photovoltaikforum.com
Page 6

Solar Energy
A. The four provided mounting holes
on the bottom of the modules, using ¼” bolts with washers and nuts.
Bolt torque is 15-20 ft-lbs.
B. Uni-Rac type “unistrut” or C-
channel rails, using Uni-Rac clamp
mount clips part numbers
N:320201 (end clamps) or
N:320199 (mid clamps) secured
with ¼” – 14 bolts. Bolt torque is
12-15ft-lbs.
Refer to Figure 2, Details A, B, and C for three
examples of different methods using various
hardware for attaching the PV module to the
module mounting system.
NOTE:
Under no circumstances may the short frame
edges be used for anchoring the module.
Use only the 4 recommended mounting holes
(See Figure 1)
Mounting holes
(4X)
Grounding holes
(4X)
Figure 1: Mechanical Layout
6/9
photovoltaikforum.com
Page 7

Solar Energy
Figure 2: Examples of Attaching Modules
7/9
photovoltaikforum.com
Page 8

Solar Energy
6. Electrical Installation
Module To Module Interconnection
Bosch Solar modules have been designed to be
easily interconnected. Each module comes with
one positive (+) wire with a plug on one end
and one negative (-) wire with a receptacle on
one end. Both wires are connected inside of
the junction box (diode housing). Modules are
interconnected by inserting the plug from one
module into the receptacle of the next module
in the array string. Secure the mated connector
pair to the inside flange of the module frame to
protect it from damage.
Building Source Circuit and Configuring
Modules
PV arrays are comprised of source circuits. A
source circuit is a series of modules connected
together to reach the desired power. The number of modules in a source circuit can vary depending on the module voltage and desired
system voltage, provided the max system voltage does not exceed that allowed by NEC Section 690-7 (600 volts).
When calculating the system operational voltages use the module V
p. However, for NEC
compliance, the maximum system voltage is
calculated using Voc.
When determining component voltage ratings,
conductor ampacities, fuse sizes, and size of
controls connected to PV output, use the values
of Isc and Voc marked on the module or found
in this instruction manual.
NOTE:
Under normal conditions, a photovoltaic module
is likely to experience conditions that produce
more current and/or voltage than reported at
standard test conditions. Accordingly, the values of Isc and Voc marked on this module must
be multiplied by a factor of 1.25 when determining component voltage ratings, conductor ampacities, fuse sizes, and size of controls connected to PV output.
Refer to Section 690-8 of the National Electrical
Code for an additional multiplying factor of 125
percent (80 percent derating) which may be
applicable.
CAUTION
DO NOT connect or disconnect a Bosch Solar
module unless the array string is open-circuited
or all of the modules in the string are covered.
The connectors are not designed to make or
break the full system current.
CAUTION
Be aware that the artificially concentration
sunlight shall not be directed on the modules or
panels.
Module Grounding
The module frame must be properly grounded.
The installer shall ground the frame using the
grounding method described in NEC Article 250.
All USL/CNL installations shall be in accordance
with CSA C22.1, Safety Standard for Electrical
Installations, Canadian Electrical Code, Part 1.
The grounding wire must be properly fastened
to the module using a ground bonding lug. Use
only UL Listed grounding lugs suitable for outdoor use: Burndy P/N CL-50-DB or ILSCO P/N
GBL-4DB in conjunction with an 8-32 stainless
steel fastener and star washer. An uncoated
copper lug is not acceptable for attachment to
the aluminium frame.
Four grounding holes are provided on the inside
of the module frame located in the middle of
each of the four frame flanges. See Figure 3 for
location of module grounding holes.
See Figure 4 for installation of lug.
Note:
The star washers are required for making a
reliable electrical earth connection with the
anodized aluminium frame as well as to prevent
loosening of the screw over time.
To attach grounding lugs, use #8-32 (4mm)
bolts and nuts, star washers, and lock washers
that are provided for use with module ground
points. The ground lug shall be installed from
the bottom side of the frame using the paint
cutting star washers, lock washer and bolt.
Torque hex bolt to 50-70 in-lbs. This ground
hardware can accommodate a 14AWG through
4AWG bare (stranded or solid) wire.
8/9
photovoltaikforum.com
Page 9

Solar Energy
Grounding wire
Figure 3: Grounding Hole Locations
Figure 4: Installation of the grounding lug
Use only UL Listed grounding lugs suitable for
outdoor use: Burndy P/N CL-50-DB or ILSCO
P/NGBL-4DBin conjunction with an 8-32
stainless steel fastener and star washer. Attach
this lug to the module frame with a nut, bolt
and star washer as shown in Figure 4.
Grounding
Holes (4X)
Contact Information:
www.bosch-solarenergy.com
solarenergy@us.bosch.com
9/9
photovoltaikforum.com
 Loading...