

Bosch BBHMOVE4 User guide [ml]
Gedruckt auf Recyclingpapier
䡲
Printed on recycled paper
䡲
Imprimé sur papier recyclé
䡲
Stampato su carta riciclata
䡲
Gedrukt op recyclingpapier
䡲
Trykt på genbrugspapir
䡲
Trykket på resirkulert papir
䡲
Tryckt på återvunnet papper
䡲
Painettu uusiopaperille
䡲
Impreso sobre papel reciclable
䡲
Imprimido em papel reciclado
䡲
Εκτυπωµνο σε ανακυκλ!σιµο χαρτ
䡲
Geri kazanılmıș ka
䡲
Wydrukowano na papierze z recyklingu
䡲
Újrahasznosított papírra nyomtatva
䡲
ç‡Ô˜‡Ú‡ÌÓ Ì‡ ˆËÍΡ̇ ı‡ÚËfl.
䡲
з‡ФВ˜‡Ъ‡МУ М‡ ·ЫП‡„В, ЛБ„УЪУ‚ОВММУИ
䡲
ËÁ
χÍÛ·ÚÛ˚.
Tip˘arit pe hîrtie din materiale reciclabile.
䡲
燉ÛÍÓ‚‡ÌÓ Ì‡ Ô‡ÔÂ¥ Á ‚ÚÓËÌÌÓª ÒËÓ‚ËÌË.
䡲
˘gıda basılmıștır.
䡲
Das Design dieses Produkts ist umweltfreundlich.
䡲
Alle Kunststoffteile sind zur Wiederverwertung gekennzeichnet.
The design of this product is environment-friendly.
䡲
All plastic parts are identified for recycling purposes
Le design de ce produit est écologique.
䡲
Toutes les pièces en matière plastique peuvent être recyclées.
Questo prodotto è stato ideato per essere in armonia con l'ambiente.
䡲
Tutte le parti in plastica sono contrassegnate per il loro riciclaggio.
Het design van dit product is milieuvriendelijk.
䡲
Alle kunststof delen zijn gemarkeerd voor hernieuwd gebruik.
Dette produkts design er miljøvenlig.
䡲
Alle dele af plast er markeret til genanvendelse.
Dette produktet har en miljøvennlig utforming.
䡲
Alle plastdelene er merket for resirkulering.
Denna produkt är miljövänlig.
䡲
Alla delar a
Tämä tuote on ympäristöystävällinen.
䡲
Kaikki muoviosat on merkitty uudelleenkäyttöä varten.
El diseño de este producto es ecológico.
䡲
Todas las piezas de plástico se han marcado para el posterior reciclaje.
O design deste produto é sem efeito nocivo sobre o ambiente.
䡲
Todas as peças de material plástico foram caracterizadas para a reciclagem
Το ντισιν αυτο του προϊντος εναι φιλικ προς το περιβλλον.
䡲
λα τα µρη που αποτελονται απ συνθετικ λη φρουν διακριτικ
ανακκλωσης.
Bu ürün, çevre korumasına dikkat edilerek dizayn edilmiștir.
䡲
Tüm plastik parçalar geri kazanma ișlemi için ișaretlenmiștir.
Konstrukcja tego produktu jest przyjazna dla śr
䡲
Wszystkie elementy z tworzyw sztucznych przeznaczone są do recyklingu.
A termék formatervezése környezetbarát.
䡲
A műanyag részek meg vannak jelölve az újraértékesítéshez.
СЛБ‡ИМ˙Ъ М‡ ЪУБЛ ФУ‰ЫНЪ В ВНУОУ„Л˜ВМ.
䡲
ÇÒ˘ÍË Ô·ÒÚχÒÓ‚Ë ˜‡ÒÚË Ò‡ Ó·ÓÁ̇˜ÂÌË Á‡ ˆËÍΡÌÂ.
С‡ММ˚И ФУ‰ЫНЪ ЛПВВЪ ˝НУОУ„Л˜ВТНЛ ‡БЫПМ˚И ‰ЛБ‡ИМ.
䡲
ЗТВ ФО‡ТЪП‡ТТУ‚˚В ‰ВЪ‡ОЛ ЛПВ˛Ъ П‡НЛУ‚НЫ, ЫН‡Б˚‚‡˛˘Ы˛ М‡
‚УБПУКМУТЪ¸ ЫЪЛОЛБ‡ˆЛЛ.
Designul acestui produs este simpatich mediului ambiant
䡲
ñÂÈ ‚Ë¥· ‚¥‰ÔÓ‚¥‰‡π ‚ËÏÓ„‡Ï ¥Á Á‡ıËÒÚÛ Ì‡‚ÍÓÎË¯Ì¸Ó„Ó Ò‰ӂˢ‡.
䡲
мТ¥ ФО‡ТЪП‡ТУ‚¥ ‰ВЪ‡О¥ ПУКЫЪ¸ ·ЫЪЛ ‚ЛНУЛТЪ‡М¥, flН ‚ЪУЛММ‡ ТЛУ‚ЛМ‡.
v plast är märkta för återvinning
odowiska.
䡲
A
de Gebrauchsanweisung
en Instructions for use
fr Notice d'utilisation
it Istruzioni per l'uso
nl Gebruiksaanwijzing
da Brugsanvisning
12/11
Let’s
de Gebrauchsanweisung . . . . . . . . . . . . . . . . . . . . . . . . . . . . . . . . . . . . . . . . .1
CLICK!
CLICK!
CLICK!
CLICK!
CLICK!
en Instructions for use . . . . . . . . . . . . . . . . . . . . . . . . . . . . . . . . . . . . . . . . . . .5
fr Notice d'utilisation . . . . . . . . . . . . . . . . . . . . . . . . . . . . . . . . . . . . . . . . . . .9
it Instruzioni per l´uso . . . . . . . . . . . . . . . . . . . . . . . . . . . . . . . . . . . . . . . . .13
nl Gebruiksaanwijzing . . . . . . . . . . . . . . . . . . . . . . . . . . . . . . . . . . . . . . . . . .17
1 2 3
98
10
17b
18
da Brugsanvisning . . . . . . . . . . . . . . . . . . . . . . . . . . . . . . . . . . . . . . . . . . . . .21
4
5
7 8
11
6
14 15
16
12 13
17a
19

Gerätebeschreibung de
10
11
12
9
8
7
6
5
4
3
2
1
1 Bodendüse mit Elektrobürste
2 Funktionsanzeige Bodendüse
3 Entriegelungsknopf Bodendüse
4 Schmutzbehälter
5 Schmutzfilter
6 Textilfilter
7 Minibürste
8 Saugeinheit
9 Entriegelungsknopf Schmutzbehälter
10 Fugendüse
13
14
15
16
17
18
19
20
11 Handgriff Handstaubsauger
12 Ein-/Ausschalter Handstaubsauger
13 Entriegelungsknopf Handgriff
14 Entriegelungsknopf Akkusauger
15 Handgriff Akkusauger
16 Tastschalter Akkusauger
17 Anzeige Ladebetrieb
18 Ladestation
19 Bodenhalterung Ladestation
20 Ladekabel
1

de
Die Gebrauchsanweisung bitte aufbewahren.
Bei Weitergabe des Staubsaugers an Dritte bitte
Gebrauchsanweisung mitgeben.
Bestimmungsgemäße Verwendung
Dieser Staubsauger ist nur für den Gebrauch im Haushalt und nicht für gewerbliche Zwecke bestimmt. Den
Staubsauger ausschließlich gemäß den Angaben in
dieser Gebrauchsanweisung verwenden. Der Hersteller
haftet nicht für eventuelle Schäden, die durch nicht
bestimmungsgemäßen Gebrauch oder falsche Bedienung verursacht werden. Deshalb beachten Sie bitte
unbedingt die nachfolgenden Hinweise!
Der Staubsauger darf nur bedient werden mit:
Original-Filtereinsätzen
Original-Ersatzteilen, -Zubehör
Der Staubsauger ist nicht geeignet für:
das Absaugen von Menschen oder Tieren
das Aufsaugen von:
– Kleinlebewesen
– gesundheitsschädlichen, scharfkantigen, heißen
oder glühenden Substanzen
– feuchten oder flüssigen Substanzen
– leicht entflammbaren oder explosiven Stoffen und
Gasen
– Asche, Ruß aus Kachelöfen und Zentral-Heizungs-
anlagen.
Sicherheitshinweise
Dieser Staubsauger entspricht den anerkannten Regeln
der Technik und den einschlägigen Sicherheitsbestimmungen.
Ladegerät nur gemäß Typenschild anschließen und in
Betrieb nehmen.
Niemals ohne Filtereinsätze saugen.=> Gerät kann
beschädigt werden!
Nicht am Netzanschlusskabel, sondern am Stecker
ziehen, um das Ladegerät vom Netz zu trennen.
Das Gerät kann von Kindern ab 8 Jahren
und darüber und von Personen mit verringerten physischen, sensorischen oder
mentalen Fähigkeiten oder Mangel an
Erfahrung und / oder Wissen benutzt
werden, wenn sie beaufsichtigt werden
oder bezüglich des sicheren Gebrauchs
des Gerätes unterwiesen wurden und
die daraus resultierenden Gefahren
verstanden haben.
Kinder dürfen nicht mit dem Gerät
spielen.
Reinigung und Benutzer- Wartung dürfen
nicht durch Kinder ohne Beaufsichtigung
durchgeführt werden.
Laden Sie das Gerät nicht bei Temperaturen unter
0°C oder über 40°C.
Defektes Ladegerät nicht anschließen oder öffnen,
sondern gegen neues tauschen.
Beschädigten Akkusauger nicht in Betrieb nehmen.
Um Gefährdungen zu vermeiden, dürfen Reparaturen
und Ersatzteilaustausch, soweit sie nicht unter
»Reinigung « in dieser Gebrauchsanweisung
beschrieben sind, nur vom autorisierten Kundendienst durchgeführt werden.
Staubsauger und Ladestation vor Witterungseinflüssen, Feuchtigkeit und Hitzequellen schützen.
Ausgediente Geräte sofort unbrauchbar machen,
danach das Gerät einer ordnungsgemäßen Entsorgung zuführen.
Hinweise zur Entsorgung
Über aktuelle Entsorgungswege informieren Sie sich
bitte bei Ihrem Fachhändler oder bei Ihrer
Gemeindeverwaltung.
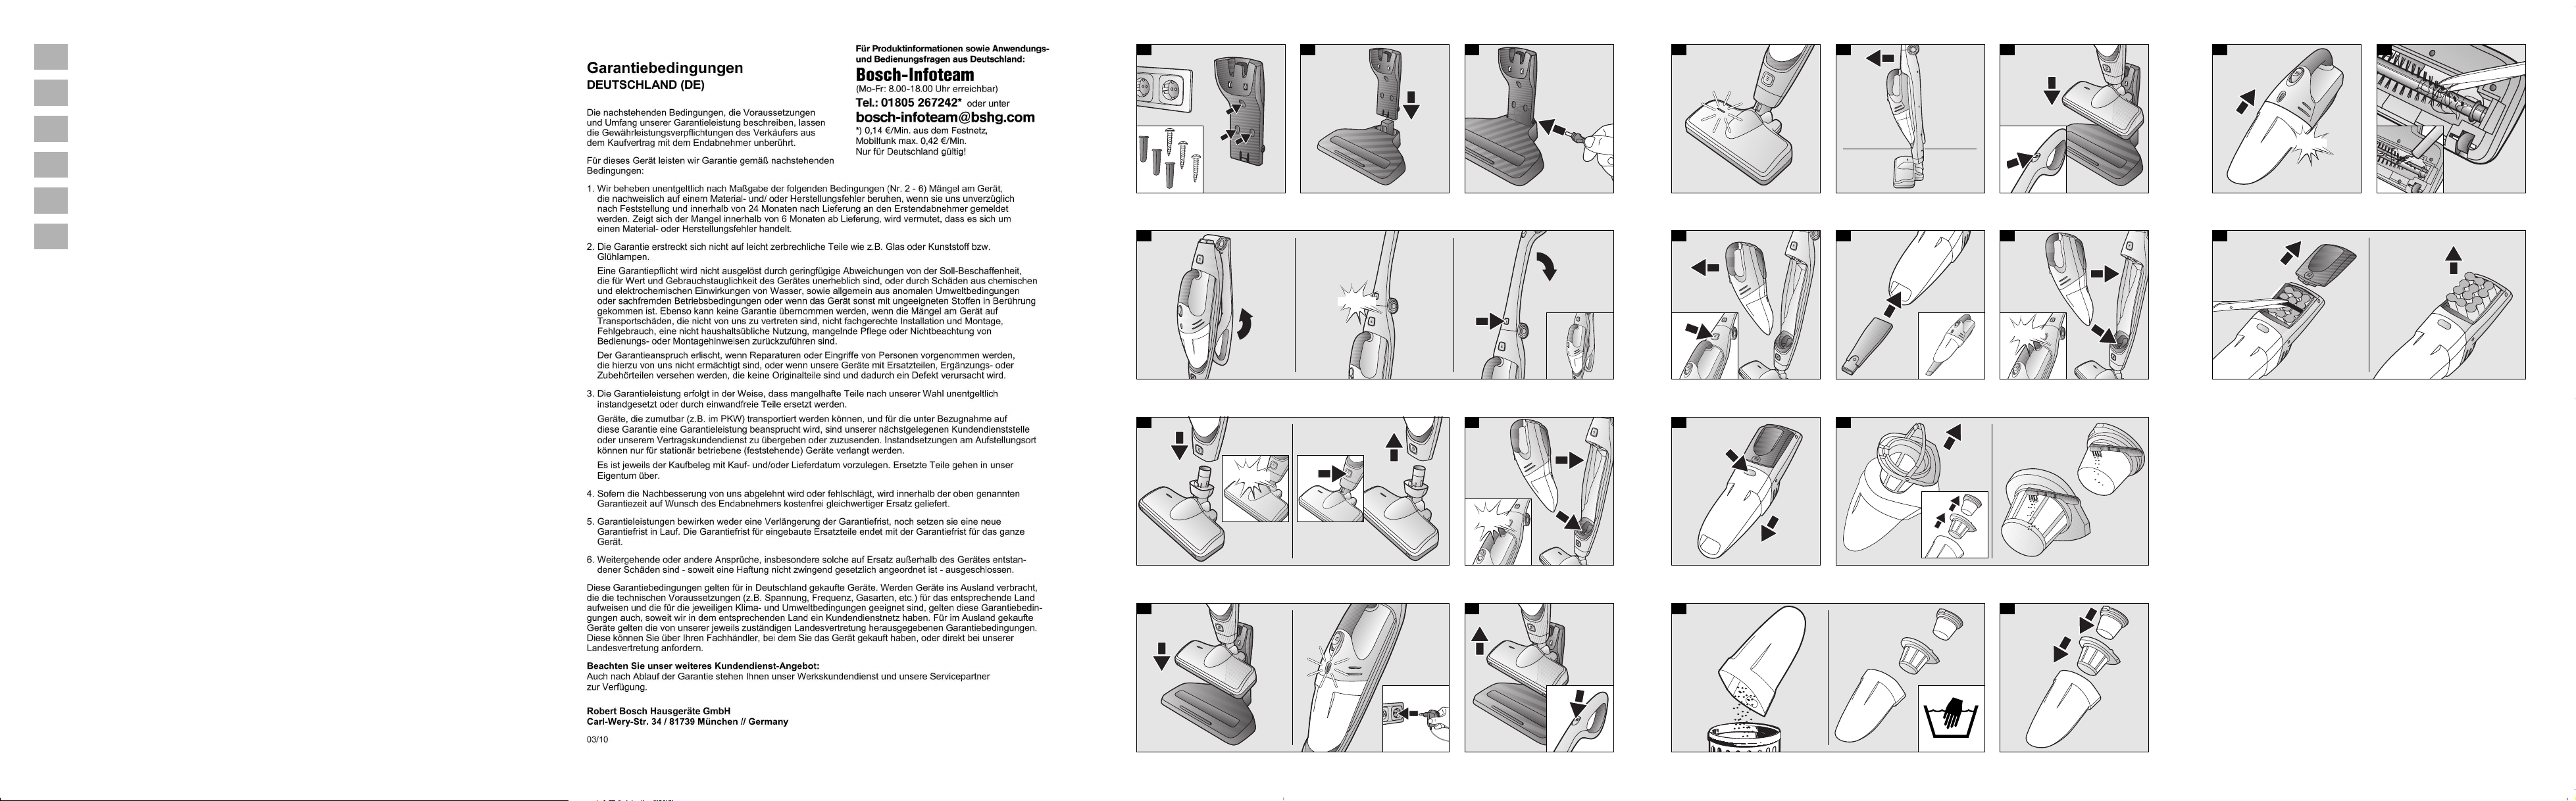
Achtung: Dieses Gerät enthält wieder aufladbare NiMHBatterien (Akkus). Vor der Entsorgung des Gerätes die
entladenen Batterien ausbauen (siehe Bilder 19) und
umweltgerecht entsorgen.
2
de
Bitte Bildseiten ausklappen!
Vor dem ersten Gebrauch
Montage Ladegerät
Das Ladegerät ist sowohl zur Wandmontage als auch
als Bodenhalterung verwendbar.
1
Bild
Zur Wandmontage suchen Sie sich einen Platz in der
Nähe einer Steckdose und montieren das Ladegerät
ohne Bodenhalterung mit Hilfe der beigelegten
Schrauben an der Wand.
2
Bild
Bei Verwendung als Bodenhalterung Ladegerät auf
den Sockel aufstecken.
3
Bild
Ladekabel seitlich in den Anschluss des Kontaktarms
stecken.
4
Bild
Handgriff aufrichten und verrasten
Um den Handgriff umzuklappen Entriegelungsknopf
drücken und Handgriff- Verrastung lösen.
5
Bild
Handstaubsauger in die Bodendüse stecken und
verrasten.
Zum Lösen der Bodendüse Entriegelungsknopf
drücken und Handstaubsauger aus der Düse ziehen.
6
Bild
Akkusauger wie dargestellt in den Handstaubsauger
einsetzen und verrasten.
Achten Sie darauf, dass die Kontakte von Akku-
!
sauger und Handstaubsauger nicht verschmutzt
sind. Gegebenenfalls die Kontakte reinigen.
7
Bild
Handstaubsauger wie dargestellt in die Ladestation
einsetzen.
Achten Sie darauf, dass die Kontakte von Hand-
!
staubsauger und Ladestation nicht verschmutzt
sind. Gegebenenfalls die Kontakte reinigen.
Beim Einsetzen des Handstaubsaugers in die
Ladestation wird das Gerät automatisch ausgeschaltet, falls es versehentlich noch in Betrieb war.
Vor dem ersten Betrieb müssen die Akkus des
!
Staubsaugers mindestens 16 Stunden geladen
werden.
Stecker des Ladegerätes in Steckdose stecken.
Die Anzeige Ladebetrieb leuchtet.
Die Anzeige leuchtet solange der Staubsauger über
das Ladegerät mit dem Stromnetz verbunden ist.
Sie erlischt auch dann nicht, wenn die Akkus des
Staubsaugers komplett geladen sind.
Eine Erwärmung des Ladegerätes und Staubsaugers
ist normal und unbedenklich.
Sie können den Staubsauger immer laden, wenn er
nicht benutzt wird. Auf diese Weise steht er immer
zur Verfügung.
Saugen
Verwendung des Handstaubsaugers
8
Bild
Gerät aus der Ladestation nehmen und den Ein-/ Aus-schalter in Pfeilrichtung betätigen.
Die Funktionsanzeige der Bodendüse leuchtet und zeigt
damit an, dass sich die Bürstenwalze dreht.
Für Modell BBHMOVE4, BBHMOVE5, BBHMOVE6
Der Ein-/Ausschalter kann in folgende zwei
Positionen geschaltet werden:
Position 1 = mittlere Leistungsstellung
=> Das Gerät hat eine längere Laufzeit.
Position 2 = hohe Leistungsstellung
=> Das Gerät hat eine höhere Leistung bei
kürzerer Laufzeit.
9
Bild
Bei kurzen Saugpausen kann das Gerät frei im Raum
abgestellt werden. Dazu den Sauger leicht nach
vorne in Richtung Düse kippen.
Achtung: Zum Abstellen das Gerät unbedingt
!
ausschalten, da die drehende Bürste bei Stillstand
des Saugers Schäden am Bodenbelag verursachen
könnte.
10
Bild
Nach dem Saugen Gerät ausschalten und in die
Ladestation zurückstellen.
Achtung!
Bodendüsen unterliegen, abhängig von der Beschaffenheit ihres Hartbodens (z.B. raue, rustikale Fließen)
einem gewissen Verschleiß. Deshalb sollten Sie in
regelmäßigen Abständen die Laufsohle der Düse überprüfen. Verschlissene, scharfkantige Düsensohlen
können Schäden auf empfindlichen Hartböden wie
Parkett oder Linoleum verursachen. Der Hersteller
haftet nicht für eventuelle Schäden, die durch eine
verschlissene Bodendüse verursacht werden.
3

de
Verwendung des Akkusaugers
11
Bild
Durch Betätigen des Entriegelungsknopfs Akkusauger
entriegeln und aus dem Handstaubsauger
entnehmen.
Fugendüse
12
Bild
Zum Absaugen von Fugen und Ecken, etc.
Die Fugendüse, wie dargestellt, in die Saugöffnung
des Akkusaugers stecken.
13
Bild
Zum Laden Akkusauger in den Handstaubsauger
einsetzen und verrasten. Auf korrekten Sitz achten.
Reinigung der Filter
Der Staubbehälter sollte möglichst nach jedem
Saugvorgang geleert werden.
14
Bild
Entnehmen Sie den Akkusauger aus dem
Handstaubsauger(siehe Bild 11)
Staubbehälter mit Hilfe der Entriegelungstaste
entriegeln und von der Saugeinheit abziehen.
15
Bild
Schmutzfilter und Textilfilter mit Hilfe des Handgriffs aus dem Staubbehälter entnehmen und durch
Ausklopfen bzw. Ausbürsten mit dem beigefügten
Bürstchen reinigen.
16
Bild
Staubbehälter entleeren.
Bei starker Verschmutzung können die Filter und der
Staubbehälter ausgewaschen werden.
Staubbehälter im Anschluss mit einem trockenen
Tuch ausreiben; Filter vor dem Wiedereinsetzen
komplett trocknen lassen.
17
Bild
a)Schmutzfilter und Textilfilter in den Staubbehälter
einsetzen.
b)
Staubbehälter auf die Saugeinheit aufsetzen und
verrasten.
Reinigung der Bodendüse
18
Bild
Die Bodendüse sollte in regelmäßigen Abständen
gereinigt werden.
Dazu die Bodendüse vom Handstaubsauger lösen.
(siehe Bild 5)
Aufgewickelte Fäden und Haare mit einer Schere
durchschneiden.
Fäden und Haare mit der Fugendüse absaugen.
Pflege
Vor Reinigung des Akkusaugers bzw. Handgerätes müssen
diese ausgeschaltet und vom Ladegerät getrennt sein. Sie
können mit einem handelsüblichen Kunststoffreiniger
gepflegt werden.
Keine Scheuermittel, Glas- oder Allzweckreiniger
!
verwenden. Sauger niemals in Wasser tauchen
Entsorgung der Akkus
Vor der Entsorgung des Gerätes Akkublock bitte ausbauen
und getrennt entsorgen.
19
Bild
Batteriefach in Pfeilrichtung aufschieben.
Halteband durchtrennen und Akkublock aus dem
Gerät entnehmen.
Zuleitungen durchtrennen und zur Sicherheit Kabelenden mit Band zur Isolierung einzeln verkleben.
Bei Bedarf können die Filter über den Kundendienst
bezogen werden
4
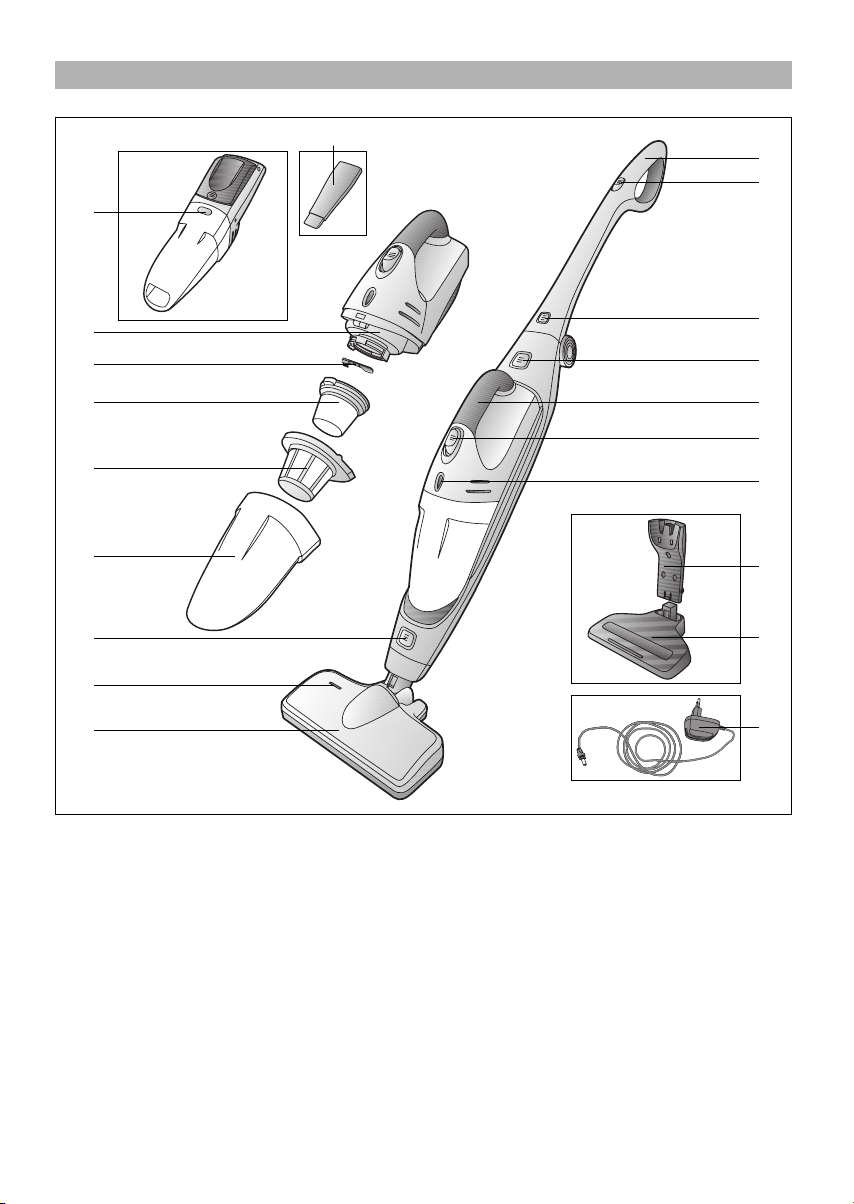
Your vacuum cleaner en
10
11
12
9
8
7
6
5
4
3
2
1
1 Floor tool with electric brush
2 Floor tool function indicator
3 Floor tool unlocking knob
4 Dirt container
5 Dirt filter
6 Textile dust bag
7 Mini brush
8 Suction unit
9 Dirt container unlocking knob
10 Crevice nozzle
13
14
15
16
17
18
19
20
11 Handstick vacuum cleaner handle
12 Handstick vacuum cleaner ON / OFF button
13 Handle unlocking knob
14 Handheld vacuum cleaner unlocking knob
15 Handheld vacuum cleaner handle
16 Handheld vacuum cleaner pushbutton
17 Charging indicator
18 Charger
19 Charger floor support
20 Charging cable
5
en
Please keep this instruction manual in a safe place.
When passing the vacuum cleaner on to a third party,
please also pass on this instruction manual.
Intended use
This vacuum cleaner is intended for domestic use only,
not for commercial use. Only use this vacuum cleaner
in accordance with the instructions in this instruction
manual. The manufacturer will not accept any
responsibility for damage caused by improper use or
incorrect operation. Therefore, please note the
following points.
The vacuum cleaner must only be operated with:
Original filter inserts
Original spare parts and accessories
The vacuum cleaner is not suitable for:
cleaning persons or animals
vacuuming up:
– Microbes
– Hazardous, sharp-edged, hot or burning
substances.
– Damp or liquid substances
– Highly flammable or explosive substances and
gases
– Ash, soot from tiled stoves and central heating
systems
Safety information
This vacuum cleaner complies with the generally
accepted standards of technology and relevant safety
regulations.
The charger must only be connected and operated as
specified on the rating plate.
Never use the vacuum cleaner without filter inserts.
The appliance may be damaged.
When disconnecting the charger from the mains,
pull on the plug, not the power cord.
The appliance may be used by children
over the age of 8 years and by persons
with reduced phy-sical, sensory or
mental capacity or by persons with a
lack of experience or knowledge if they
are supervised or have been instructed
on the safe use of the appliance and the
have under-stood the potential dangers
of using the appli-ance.
Children must never play with the
appliance
Cleaning and user maintenance must
never be carried out by children without
supervision.
Do not charge the appliance in temperatures below
0 °C or above 40 °C.
Do not connect or open a defective charger; replace
it with a new unit.
Do not operate a cordless vacuum cleaner if it is
damaged.
To avoid dangerous situations, repairs and spare part
replacements, which are not dealt with in this
instruction manual under »Cleaning«, must only be
carried out by an authorised after-sales service.
Protect vacuum cleaner and charger from
atmospheric exposure, moisture and sources of heat.
At the end of its life, the vacuum cleaner should be
disposed of in accordance with appropriate
regulations.
Disposal information
Please contact an exclusive dealer or your local council
to find out about current disposal routes.
Caution: This appliance contains rechargeable NiMHbatteries. Before disposing of the appliance, remove
the discharged batteries (see pictures 19) and dispose
of them in an environmentally responsible manner.
Fold out the picture pages.
Before using for the first time
Fitting the charger
The charger can be used either fitted to the wall or
mounted on its floor support.
1
Figure
If fitting the charger to the wall, select a location
close to a socket and mount the charger (without its
floor support) on the wall using the screws provided.
2
Figure
When using the charger mounted on its floor support
fit the charger onto the base.
3
Figure
Plug the charging cable into the connection at the
side of the contact arm.
6

en
4
Figure
Raise the handle and lock into place
To fold the handle back down, press the unlocking
knob and release the handle catch.
5
Figure
Plug the handstick vacuum cleaner into the floor tool
and lock into place.
To release the floor tool, press the unlocking knob
and pull the handstick vacuum cleaner out of the
tool.
6
Figure
Insert the handheld vacuum cleaner into the
handstick vacuum cleaner as shown and lock into
place.
Make sure that the contacts of the handheld
!
vacuum cleaner and handstick vacuum cleaner are
not dirty. Clean the contacts if necessary.
7
Figure
Insert the handstick vacuum cleaner into the charger
as shown.
Make sure that the contacts of the handstick
!
vacuum cleaner and charger are not dirty. Clean the
contacts if necessary.
When the handstick vacuum cleaner is inserted into
the charger, the appliance is automatically switched
off, should it have still been left on by mistake.
Before using the appliance for the first time, the
!
vacuum cleaner batteries must be charged for at
least 16 hours.
Plug the charger plug into the socket.
The charging indicator lights up.
The indicator remains lit for as long as the vacuum
cleaner is connected to the mains via the charger.
It does not go out even when the vacuum cleaner
batteries are fully charged.
It is normal for the charger and vacuum cleaner to
become hot and not a cause for concern.
You can charge the vacuum cleaner at any time when
it is not in use. In this way, it is always ready for use.
Vacuuming
Using the handstick vacuum cleaner
8
Figure
Remove the appliance from the charger and operate the
on/off switch in the direction of the arrow.
The function indicator on the floor tool lights up,
indicating that the brush roller is turning.
For models BBHMOVE4, BBHMOVE5 and BBHMOVE6
The on/off switch can be moved to the following two
positions:
Position 1 = medium power setting
=> The appliance has a longer run time.
Position 2 = high power setting
=> The appliance has more power for a shorter run
time.
9
Figure
During short pauses in vacuuming, the appliance can
be left standing upright anywhere in the room. To do
this, tilt the vacuum cleaner forwards slightly in the
direction of the nozzle.
Caution: When the appliance is left standing,
!
it must be switched off, because if the brush is
turning while the appliance is standing still, it
could cause damage to the floor covering.
10
Figure
After vacuuming, switch the appliance off and return
it to the charger.
Caution!
Floor tools are subject to a certain amount of wear,
depending on the type of hard floors you have
(e.g. rough, rustic tiles). Therefore, you must check
the underside of the floor tool at regular intervals.
Worn undersides of floor tools may have sharp edges
that can damage sensitive hard floors, such as parquet
or linoleum. The manufacturer does not accept any
responsibility for damage caused by worn floor tools.
Using the handheld vacuum cleaner
11
Figure
Unlock the handheld vacuum cleaner by pressing the
unlocking knob and remove it from the handstick
vacuum cleaner.
Crevice nozzle
12
Figure
For vacuuming crevices and corners, etc.
Insert the crevice nozzle into the air intake opening
of the handheld vacuum cleaner, as illustrated.
7

en
13
Figure
To charge the handheld vacuum cleaner, insert it into
the handstick vacuum cleaner and lock into place.
Make sure it is correctly seated.
Cleaning the filters
As far as possible, the dust container should be
emptied every time after vacuuming.
14
Figure
Remove the handheld vacuum cleaner from the
handstick vacuum cleaner (see Figure 11)
Using the release button, unlock the dust container
and withdraw it from the suction unit.
15
Figure
Using the handle, remove the dirt filter and cloth
filter from the dust container and clean them by
tapping out or brushing out the dirt with the brush
provided.
16
Figure
Empty the dust container.
If heavily soiled, the filters and dust container can be
washed out.
Then wipe out the dust container with a dry cloth.
Allow the filters to dry completely before refitting.
17
Figure
a)Insert the dirt filter and cloth filter into the dust
container.
b)
Fit the dust container onto the suction unit and lock
into place.
Care
Before cleaning, the
held appliance must be switched off and disconnected
from the charger. They can be cleaned using an ordinary
cleaning agent for plastics.
Do not use a scourer, glass-cleaning agent or all-
!
purpose cleaning product. Never immerse the vacuum
cleaner in water
handheld
vacuum cleaner or hand-
Battery disposal
Before disposing of the appliance, please remove the
battery cartridge and dispose of it separately.
19
Figure
Slide open the battery compartment in the direction
of the arrow.
Cut through the retaining tape and remove the
battery cartridge from the appliance.
Cut through the power cables and to ensure safety,
bind and insulate each of the cable ends with tape.
Filters can be obtained from our after-sales service as
required
Cleaning the floor tool
18
Figure
The floor tool should be cleaned at regular intervals.
To clean it, release the floor tool from the handstick
vacuum cleaner. (see Figure 5)
Cut through threads and hairs wound round the
rollers using scissors.
Vacuum threads and hairs with the crevice nozzle.
8

Description de l'appareil fr
10
11
12
9
8
7
6
5
4
3
2
1
1 Brosse pour sols avec électrobrosse
2 Témoin de fonctionnement de la brosse pour sols
3 Bouton de déverrouillage de la brosse pour sols
4 Collecteur de saletés
5 Filtre de saletés
6 Filtre textile
7 Minibrosse
8 Unité d'aspiration
9 Bouton de déverrouillage du collecteur de saletés
10 Suceur de joints
13
14
15
16
17
18
19
20
11 Poignée de l'aspirateur balai
12 Interrupteur marche/arrêt de l'aspirateur balai
13 Bouton de déverrouillage de la poignée
14 Bouton de déverrouillage de l'aspirateur à accus
15 Poignée de l'aspirateur à accus
16 Bouton-poussoir aspirateur à accus
17 Témoin "recharge"
18 Station de charge
19 Support de base station de charge
20 Câble de chargement
9

fr
Conservez cette notice d'utilisation.
Si vous remettez l'aspirateur à un tiers,
veuillez-y joindre sa notice d'utilisation.
Utilisation conforme aux prescriptions et
à l'emploi prévu
Cet aspirateur est destiné exclusivement à l'emploi
domestique et non pas à l'usage industriel. Utilisez
l'aspirateur exclusivement selon les indications figurant
dans cette notice d'utilisation. Le fabricant n'est pas
responsable d'éventuels dommages résultant d'un
emploi non conforme ou d'un maniement incorrect.
Veuillez donc respecter impérativement les consignes
suivantes !
L'aspirateur doit être utilisé uniquement avec :
des cartouches de filtre d'origine
des pièces de rechange et des accessoires d'origine
L'aspirateur n'est pas approprié à :
aspirer sur des personnes ou des animaux
aspirer des :
– petits organismes vivants
– substances nocives, à arêtes vives, chaudes ou
incandescentes
– substances humides ou liquides
– substances et gaz facilement inflammables ou
explosifs
– cendres, suie des poêles et d'installations de
chauffage central.
Consignes de sécurité
Cet aspirateur répond aux règles techniques reconnues
et aux prescriptions de sécurité applicables.
Raccorder et mettre le chargeur en service
conformément aux indications figurant sur la plaque
signalétique.
Ne jamais aspirer sans les cartouches de filtre.
=> L'appareil peut être endommagé !
Ne pas tirer sur le cordon électrique mais sur la
fiche, pour déconnecter le chargeur du secteur.
L'appareil peut tre utilisé par des
enfants à par-tir de 8 ans et par des
personnes ayant des capa-cités
physiques, sensorielles ou mentales
restreintes ou ayant un manque
d'expérience et / ou de connaissances
s'ils sont sous surveillance ou ont été
informés de la manipulation sûre de
l'appareil et ont compris les dangers qui
en résultent.
Les enfants ne doivent pas jouer avec
l'appareil.
Le nettoyage et la maintenance ne
doivent pas tre effectués par des
enfants sans surveillance.
Ne pas recharger l'appareil lors de températures
inférieures à 0°C ou supérieures à 40°C.
Ne pas raccorder ou ouvrir le chargeur s'il est
défectueux, mais le remplacer par un chargeur neuf.
Ne pas mettre l'aspirateur à accus en service s'il est
défectueux.
Pour éviter des dangers, les réparations et le
remplacement des pièces d'usure doivent
uniquement être exécutés par le SAV agréé, dans la
mesure où ces opérations ne sont pas décrites dans
le chapitre « Nettoyage » de cette notice d'utilisation.
Ne pas exposer l'aspirateur et la station de charge
aux influences atmosphériques, à l'humidité ni aux
sources de chaleur.
Rendre immédiatement inutilisables les appareils
hors d'usage, ensuite mettre l'appareil au rebut de
manière réglementaire.
Indication pour la mise au rebut
Pour obtenir les coordonnées d'un centre de recyclage
ou des informations sur les moyens actuels de mise au
rebut, veuillez consulter votre revendeur ou
l'administration de votre municipalité.
Attention : Cet appareil contient des batteries NiMH
rechargeables (accus). Avant la mise au rebut de
l'appareil, enlever les accus déchargés (voir fig. 19) et
les éliminer en respectant l'environnement.
10
 Loading...