

Bosch B36CD50SNB Installation And Use Instructions

Refrigerator-freezer
Réfrigérateur / congélateur combiné
Refrigerador/congelador
B36CD...
en Installation and Using Instructions ...................................... 2
fr Notice de montage et d’utilisation .................................... 35
es Instrucciones de uso y montaje ......................................... 69

en-us
en Table of contents
enInstallation and Us i ng Inst r ucti ons
( Important safety instructions . . . . . . . . . . . . 3
Definitions . . . . . . . . . . . . . . . . . . . . . . . . . . . . . . . .3
About these instructions . . . . . . . . . . . . . . . . . . . . . 3
Introduction . . . . . . . . . . . . . . . . . . . . . . . . . . . . . . . 3
Restriction of user group. . . . . . . . . . . . . . . . . . . . . 3
Risk of explosion. . . . . . . . . . . . . . . . . . . . . . . . . . . 3
Risk of electric shock . . . . . . . . . . . . . . . . . . . . . . . 3
Risk of cold burns . . . . . . . . . . . . . . . . . . . . . . . . . .4
Risk of injury . . . . . . . . . . . . . . . . . . . . . . . . . . . . . .4
Fire hazard/Danger due to refrigerants . . . . . . . . . .4
Risk of fire . . . . . . . . . . . . . . . . . . . . . . . . . . . . . . . .4
Risk of suffocation. . . . . . . . . . . . . . . . . . . . . . . . . . 4
Damage . . . . . . . . . . . . . . . . . . . . . . . . . . . . . . . . . 4
Weight . . . . . . . . . . . . . . . . . . . . . . . . . . . . . . . . . . .4
State of California Proposition 65 Warnings . . . . . . 4
Light of ice and water dispenser. . . . . . . . . . . . . . 21
Setting the bottle fill water amount . . . . . . . . . . . . 22
Switching the ice and water dispenser and
ice maker on or off . . . . . . . . . . . . . . . . . . . . . . . . 22
M Alarm. . . . . . . . . . . . . . . . . . . . . . . . . . . . . . . 22
Door alarm . . . . . . . . . . . . . . . . . . . . . . . . . . . . . . 22
Temperature alarm . . . . . . . . . . . . . . . . . . . . . . . . 22
o Home Connect. . . . . . . . . . . . . . . . . . . . . . . . 23
Setting up Home Connect . . . . . . . . . . . . . . . . . . 23
Installing updates for the
Home Connect software . . . . . . . . . . . . . . . . . . . . 24
Information on data protection . . . . . . . . . . . . . . . 25
Remote Diagnostics . . . . . . . . . . . . . . . . . . . . . . . 25
8 Intended use . . . . . . . . . . . . . . . . . . . . . . . . . . 5
7 Environmental protection . . . . . . . . . . . . . . . 5
Packaging . . . . . . . . . . . . . . . . . . . . . . . . . . . . . . . . 5
Old appliances . . . . . . . . . . . . . . . . . . . . . . . . . . . . 5
5 Installation and connection . . . . . . . . . . . . . . 5
Contents of package. . . . . . . . . . . . . . . . . . . . . . . . 5
Technical data. . . . . . . . . . . . . . . . . . . . . . . . . . . . . 5
Installing the appliance . . . . . . . . . . . . . . . . . . . . . . 5
Saving energy . . . . . . . . . . . . . . . . . . . . . . . . . . . .12
Before using for the first time . . . . . . . . . . . . . . . . 13
Water connection . . . . . . . . . . . . . . . . . . . . . . . . .13
Electrical connection . . . . . . . . . . . . . . . . . . . . . . .13
* Getting to know your appliance . . . . . . . . . 14
Appliance . . . . . . . . . . . . . . . . . . . . . . . . . . . . . . .14
Operating controls. . . . . . . . . . . . . . . . . . . . . . . . . 15
Ice and water dispenser . . . . . . . . . . . . . . . . . . . . 16
Equipment . . . . . . . . . . . . . . . . . . . . . . . . . . . . . . .16
1 Operating the appliance . . . . . . . . . . . . . . . . 19
Switching the appliance on . . . . . . . . . . . . . . . . . . 19
Switching off and disconnecting the appliance . . . 19
Setting the temperature unit . . . . . . . . . . . . . . . . .19
Setting the temperature. . . . . . . . . . . . . . . . . . . . . 20
Super cooling . . . . . . . . . . . . . . . . . . . . . . . . . . . .20
Super freezing . . . . . . . . . . . . . . . . . . . . . . . . . . . .20
Energy saving mode . . . . . . . . . . . . . . . . . . . . . . .20
Freshness mode . . . . . . . . . . . . . . . . . . . . . . . . . .20
Vacation mode . . . . . . . . . . . . . . . . . . . . . . . . . . . 20
Sabbath mode. . . . . . . . . . . . . . . . . . . . . . . . . . . . 21
Setting the light . . . . . . . . . . . . . . . . . . . . . . . . . . . 21
Change filter alarm . . . . . . . . . . . . . . . . . . . . . . . . 21
Switching the ice and water dispenser
button lock (child lock) on or off . . . . . . . . . . . . . . 21
U Refrigerator compartment. . . . . . . . . . . . . . 25
Vegetable bin . . . . . . . . . . . . . . . . . . . . . . . . . . . . 25
Cold storage bin. . . . . . . . . . . . . . . . . . . . . . . . . . 26
Note when storing food . . . . . . . . . . . . . . . . . . . . 26
W Freezer compartment. . . . . . . . . . . . . . . . . . 26
; Ice and water dispenser . . . . . . . . . . . . . . . 26
Before using the appliance for the first time. . . . . 26
Observing drinking water quality . . . . . . . . . . . . . 26
Operation of the ice and water dispenser. . . . . . . 27
Dispensing ice or water . . . . . . . . . . . . . . . . . . . . 27
Bottle fill option. . . . . . . . . . . . . . . . . . . . . . . . . . . 27
= Defrosting . . . . . . . . . . . . . . . . . . . . . . . . . . . 27
D Cleaning . . . . . . . . . . . . . . . . . . . . . . . . . . . . 28
Cleaning the appliance interior. . . . . . . . . . . . . . . 28
Cleaning the equipment . . . . . . . . . . . . . . . . . . . . 28
l Odors. . . . . . . . . . . . . . . . . . . . . . . . . . . . . . . 30
9 Lighting. . . . . . . . . . . . . . . . . . . . . . . . . . . . . 30
> Noises . . . . . . . . . . . . . . . . . . . . . . . . . . . . . . 31
Normal noises . . . . . . . . . . . . . . . . . . . . . . . . . . . 31
Preventing noises . . . . . . . . . . . . . . . . . . . . . . . . . 31
3 Troubleshooting – what to do?. . . . . . . . . . 31
Appliance . . . . . . . . . . . . . . . . . . . . . . . . . . . . . . . 31
Dispenser . . . . . . . . . . . . . . . . . . . . . . . . . . . . . . . 32
4 Customer service. . . . . . . . . . . . . . . . . . . . . 34
Appliance self-test . . . . . . . . . . . . . . . . . . . . . . . . 34
Warranty statement. . . . . . . . . . . . . . . . . . . . . . . . 34
2
9 Important safety instructions
READ INSTRUCTIONS - DO NOT DISCARD!
(Important safety instructions
Impor t ant saf et y i nst r ucti ons
READ INSTRUCTIONS - DO NOT DISCARD!
Important safety instructions en-us
Definitions
9 WARNING
Non-compliance with safety information
that could lead to a dangerous situation
with risk of death or serious injury.
9 CAUTION
Non-compliance with safety information
that could lead to a dangerous situation
with risk of injury.
NOTICE: Non-observance of this
information could damage the appliance.
Note: This indicates important information
and/or tips.
About these instructions
■ Read and follow the operating and
installation instructions. They contain
important information on how to install,
use and maintain the appliance.
■ Retain all documents for subsequent use
or for the next owner.
Introduction
■ This appliance complies with the relevant
safety regulations for electrical
appliances.
■ The refrigeration circuit has been
checked for leaks.
Restriction of user group
■ Avoid placing children and vulnerable
persons at risk.
■ This appliance may be used by children
and persons who have reduced physical,
sensory or mental abilities or inadequate
experience and/or knowledge, provided
they are supervised or have been
instructed on how to use the appliance
safely and have understood the resulting
dangers.
■ Children should be supervised to ensure
that they do not play with the appliance.
Risk of explosion
■ Never use electric devices inside the
appliance (e.g. heaters or electric ice
makers).
■ Do not store products which contain
flammable propellants (e.g. spray cans)
or explosive substances in the appliance.
■ Only store high-proof alcohol tightly
closed and standing up.
■ Do not use other means to accelerate the
defrosting process other than those
recommended by the manufacturer.
Risk of electric shock
Improper installations or repairs may put the
user at considerable risk.
■ When installing the appliance, make sure
that the power cord does not get jammed
or damaged.
■ In order to avoid danger, if the power
cord is damaged, disconnect the
appliance from the power source
immediately. Have the power cord
replaced by the manufacturer, customer
service or a similarly qualified person.
■ Do not use multiple outlets, extension
cords, or adapters.
■ Before servicing the appliance or
carrying out installation work, disconnect
the appliance from the power source or
switch off the circuit breaker.
■ Before cleaning the appliance, press the
ÿ power button to turn the appliance off.
Glass shelves and other equipment can
be moved while the appliance is
switched on.
■ Never cut through or remove the power
cord's third conductor (grounding
conductor).
■ Never defrost or clean the appliance
using a steam cleaner. The steam may
penetrate electrical parts and cause a
short circuit.
3
en-us Important safety instructions
9 Important safety instructions
READ INSTRUCTIONS - DO NOT DISCARD!
■ The appliance, cord and accessories
should only be repaired or replaced by
the manufacturer or an authorized
service provider.
■ Only use original parts supplied by the
manufacturer.
These parts come with a warranty from
the manufacturer that they satisfy the
safety requirements.
Risk of cold burns
■ Never put frozen food straight from the
freezer compartment into your mouth.
■ Avoid prolonged skin contact with frozen
food, ice or any other surface inside the
freezer compartment.
Risk of injury
■ Containers with carbonated drinks may
burst.
■ Do not store containers which contain
carbonated drinks in the freezer
compartment.
Risk of fire
Portable multi-outlet power strips and
portable power supplies may overheat,
causing a fire.
■ Never leave portable multi-outlet power
strips or portable power supplies behind
the appliance.
Risk of suffocation
■ Keep children away from the packaging
and its parts.
■ To avoid having children climb into the
appliance, never remove the partition
wall of the frozen food bin (large).
Damage
To avoid damage:
■ Do not stand or lean on the base,
runners or doors.
■ Keep plastic parts and door seals free of
oil and grease.
■ Pull the power plug – not the power cord.
Fire hazard/Danger due to refrigerants
The tubes of the refrigeration circuit contain
a small quantity of an environmentally
friendly but flammable refrigerant (R600a).
If the refrigerant escapes, it may injure your
eyes or ignite.
■ Do not damage the tubes.
If the tubes are damaged:
■ Keep open flames and ignition sources
away from the appliance.
■ Ventilate the room.
■ Switch off the appliance and unplug the
power cord.
■ Please contact customer service.
Weight
The appliance is very heavy. The appliance
should always be transported and set up by
at least 2 people.
~ "Installation and connection" on page 5
State of California Proposition 65 Warnings
This product may contain a chemical known
to the State of California, which can cause
cancer or reproductive harm. Therefore, the
packaging of your product may bear the
following label as required by California:
4
Intended use en-us
8Intended use
Intended use
Use this appliance
■ only for cooling and freezing food, ice making
and water dispensing.
■ only in the home and in the home environment.
■ only according to these operating instructions.
This appliance is intended for use at an altitude of
max. 13123 ft (4000 meters) above sea level.
7Environmental protection
Env i r o n ment al pr ot ect ion
Packaging
All materials are environmentally safe and
recyclable:
■ Dispose of packaging in an environmentally
responsible manner.
■ Please ask your dealer or inquire at your local
authority about current means of disposal.
Old appliances
5 Installation and
connection
Installation and connect i on
Contents of package
After unpacking, check all parts for damage during
transportation.
In the event of damage, contact your dealer or our
customer service.
~ "Customer service" on page 34
The delivery consists of the following parts:
■ Free-standing appliance
■ Installation material
■ Equipment (depending on model)
■ Installation and Using Instructions
■ Statement of limited product warranty
■ Information on the energy consumption and
noises
Technical data
Refrigerant, cubic capacity and further technical
specifications can be found on the rating plate.
~ "Getting to know your appliance" on page 14
Valuable raw materials can be reclaimed by
recycling old appliances.
9 WARNING
CHILDREN MAY BECOME LOCKED IN THE APPLIANCE AND SUFFOCATE!
Before disposing of your old appliance:
■ Remove the doors and drawer.
■ Leave shelves and bins in the appliance to
prevent children from climbing in.
■ Keep children away from the discarded
appliance.
9 CAUTION
REFRIGERANT AND HARMFUL GASES MAY ESCAPE.
Do not damage the tubes of the refrigeration
circuit and insulation.
1. Pull out the power cord.
2. Cut through the power cord.
3. Have the appliance disposed properly.
Installing the appliance
Installation location
Follow these instructions when installing your
appliance.
9 WARNING
RISK OF EXPLOSION!
If the appliance is installed in a space that is
too small, a leak in the refrigeration circuit may
result in a flammable mixture of gas and air.
Only install the appliance in a space with a
volume of at least 36 ft³(1 m³) per 0.3 oz (8 g)
of refrigerant. The amount of refrigerant is
indicated on the rating plate.
~ "Getting to know your appliance"
on page 14
Depending on the model, the weight of the
appliance factory-made may be up to 320 lb
(145 kg). The subfloor must be sufficiently stable to
bear the weight of the appliance.
5
en-us Installation and connection
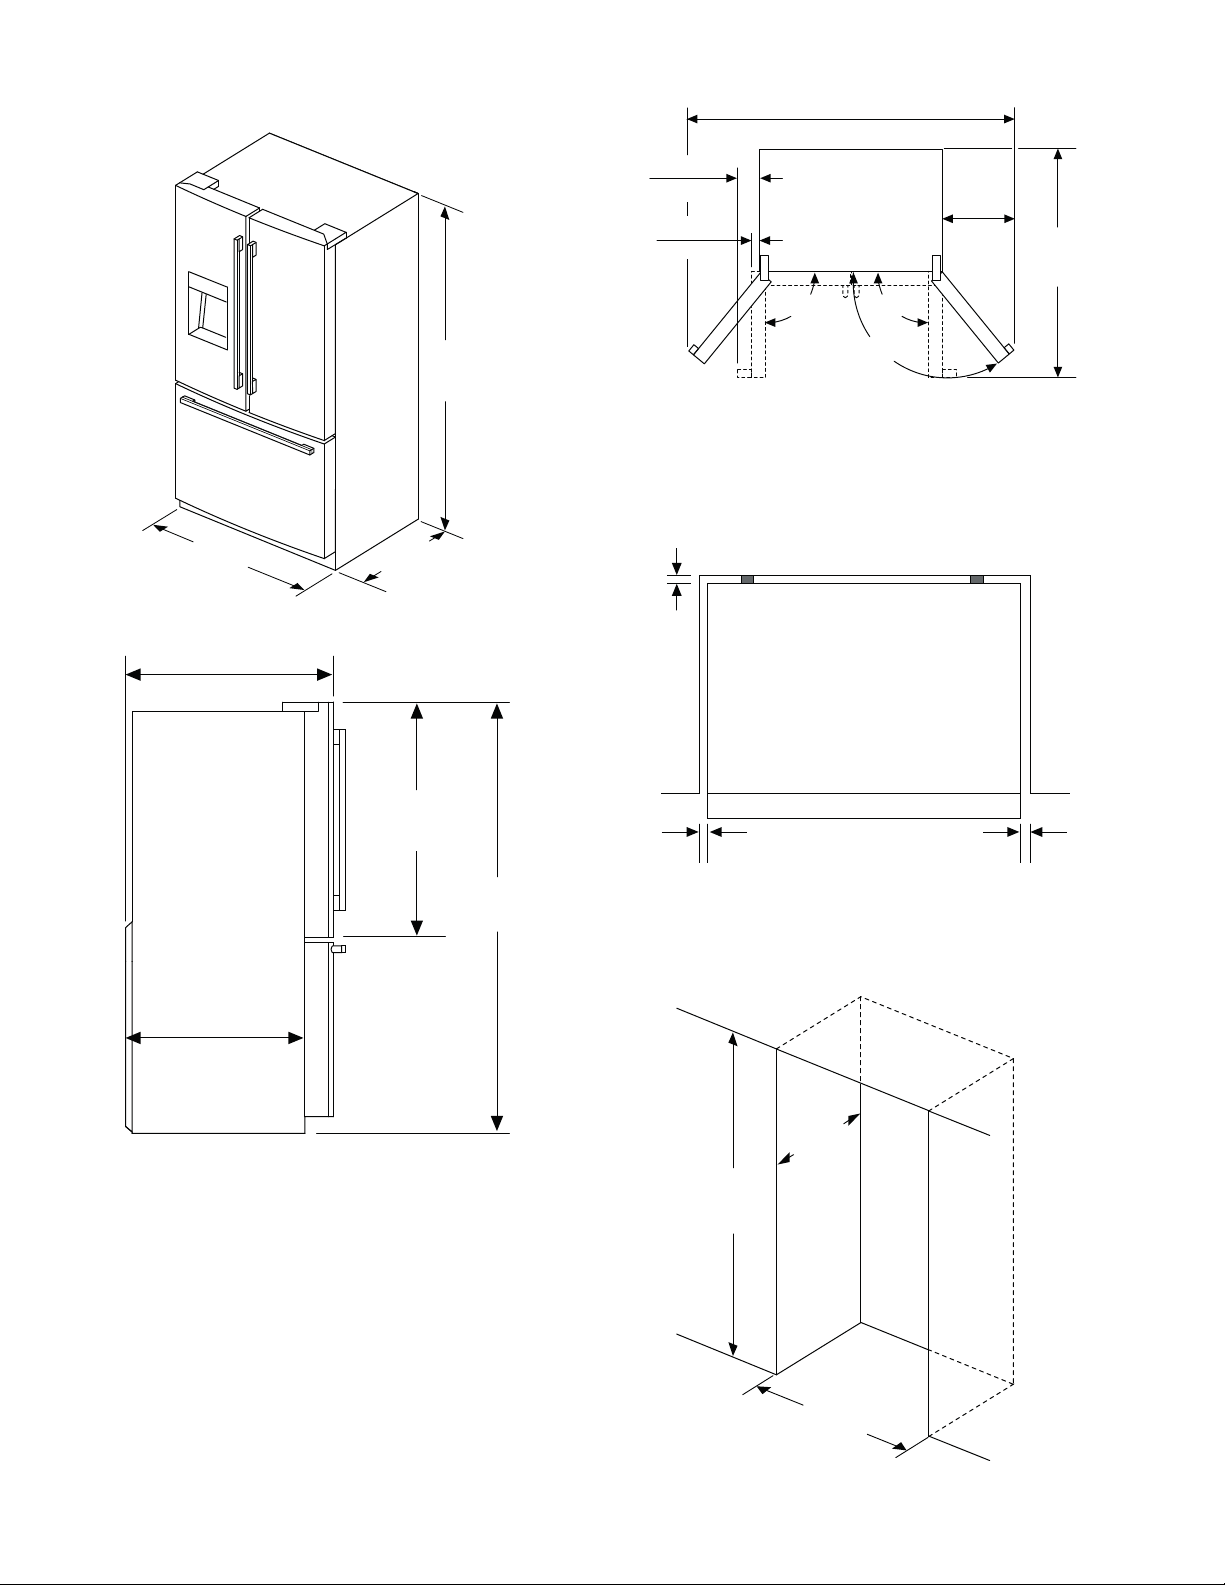
Installation dimensions
35
⅝
″
(905 mm)
28 ¾ ″
(731 mm)
69
(1765 mm)
24 ″
(610 mm)
½
56 ¾ ″
(1441 mm)
3
¹¹/
″
(93 mm)
1
¾ ″
(45 mm)
90°90°
″
118°
10
⁹/
(268 mm)
″
43 ⅜
(1102 mm)
″
Minimum clearances
Leave a clearance of 1/2 ˝ (12.7 mm) above the
appliance.
Observe minimum clearances as follows:
1 ″
(25 mm)
42 ¾ ″
(1085 mm)
70 ″
(1780 mm)
25 ″
(635 mm)
Door opening angle
If the installation location limits the door opening
angle to less than 118°, buy a 90° door stopper
from our customer service.
~ "Customer service" on page 34
⅛
″
(3,2 mm)
⅛
″
(3,2 mm)
Niche dimensions
If you install the appliance in a niche, adhere to the
following dimensions:
25
″
(635 mm)
″
70
(1780 mm)
36
″
(914 mm)
6
Installation and connection en-us
Ventilation
Never cover or block ventilation openings.
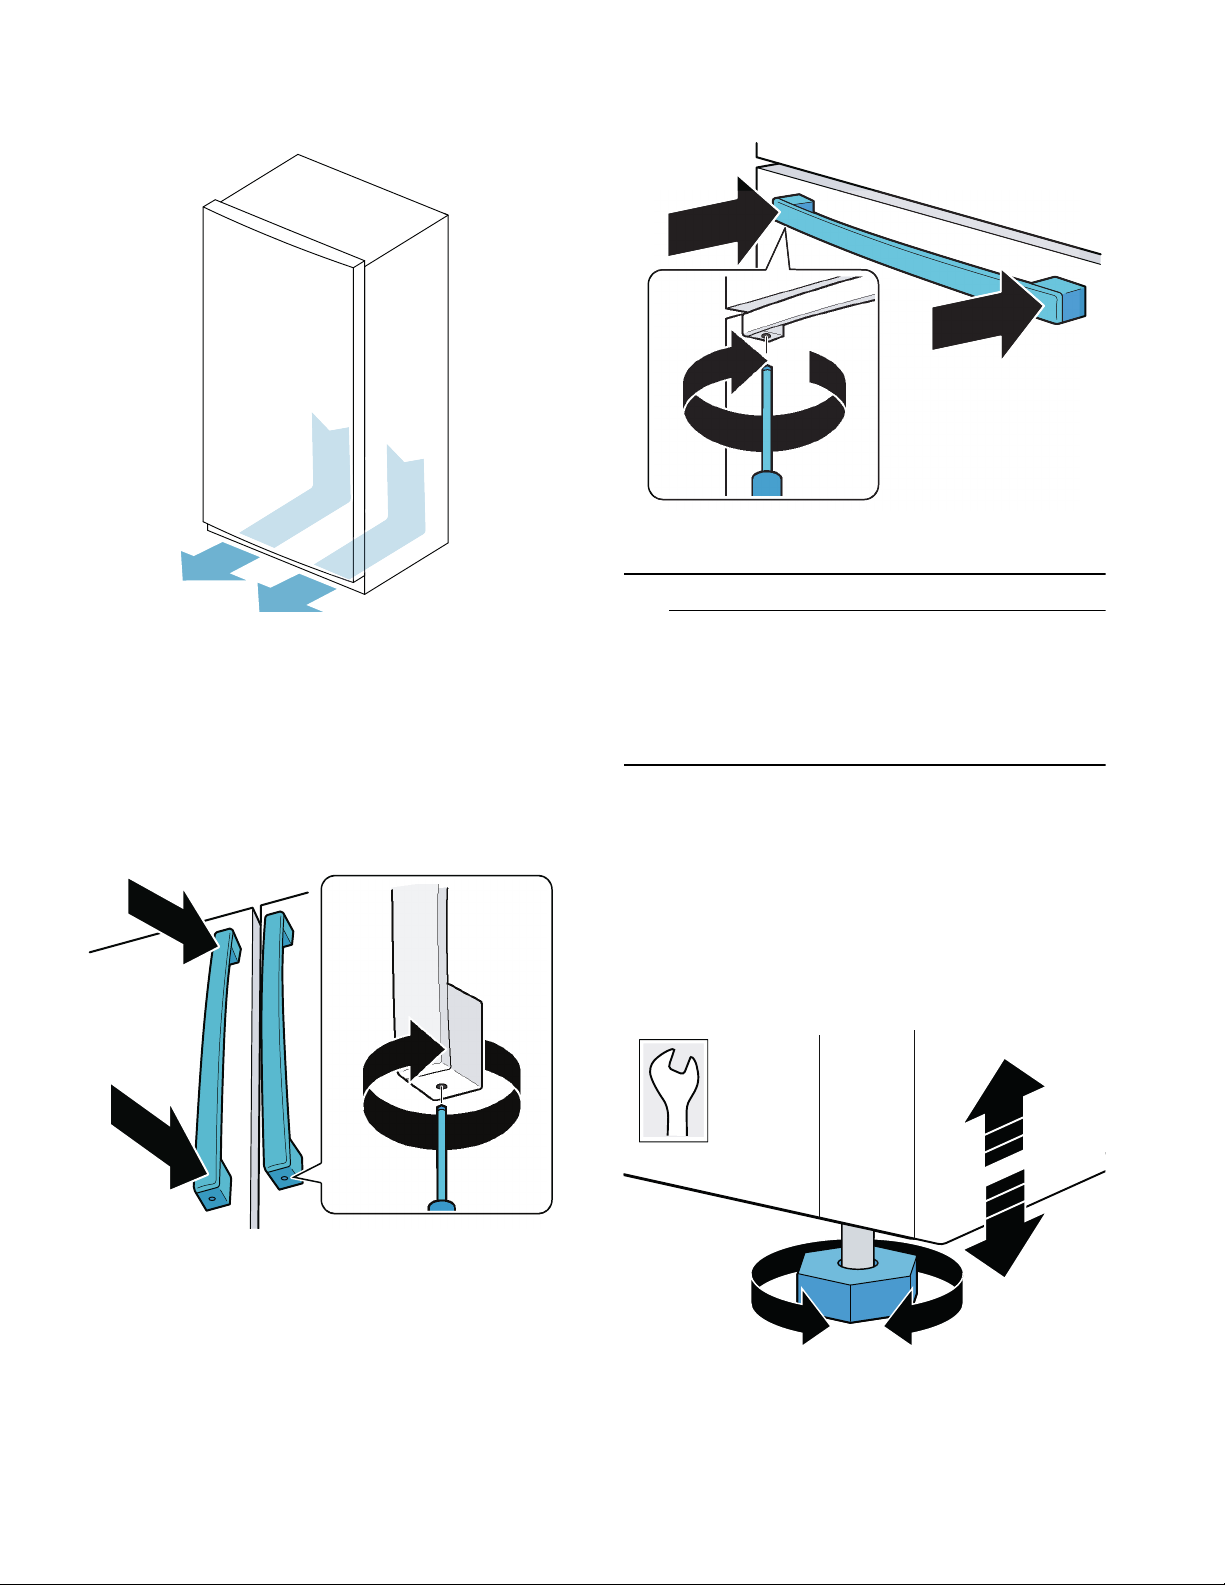
Installing the door handle
1. Fit the handle vertically onto the pre-assembled
bolts.
Note: The holes in the handle must face up and
down.
2. Use a 2.5 mm Allen wrench to tighten the bottom
pre-assembled screws clockwise.
Aligning the appliance
9 CAUTION
■ To avoid damaging the floor, always move the
appliance with the height-adjustable feet
screwed upwards.
■ The two front height-adjustable feet must
always be in contact with the floor to avoid the
appliance from rolling or tipping when the door
is opened.
2. Use a 2.5 mm Allen wrench to tighten the top and
bottom pre-assembled screws clockwise.
Installing the drawer handle
1. Fit the handle horizontally onto the pre-assembled
bolts.
Note: The holes in the handle must be facing down.
Rollers are located under the appliance for easy
movement and alignment:
1. Place the appliance vertically on a firm and
leveled floor.
2. Using a wrench, screw down both of the front
height-adjustable feet so that they touch the floor.
3. Compensate for floor unevenness with the front
height-adjustable feet.
Note: To align, use a level.
13
7

en-us Installation and connection
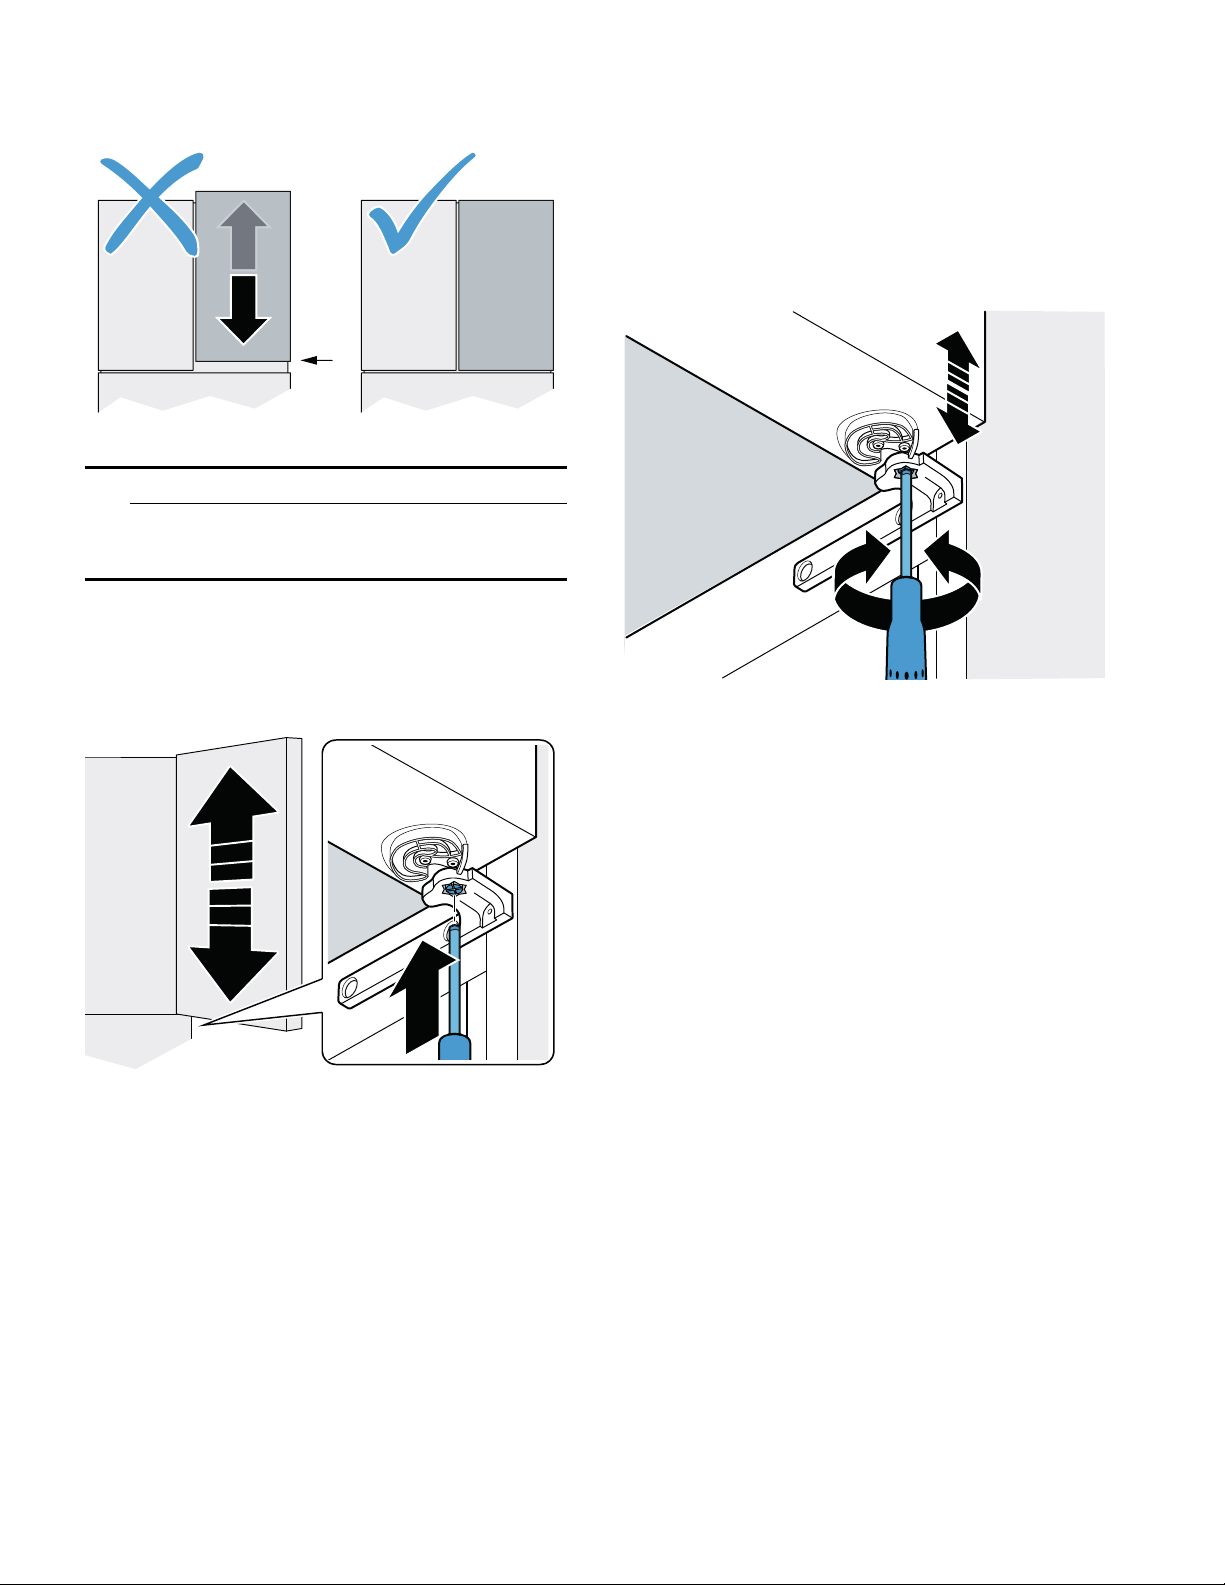
Align refrigerator compartment doors
Aligning the vertical gap of the doors:
Note: Remove any items contained in the doors.
1. Remove T20 screw and cover cap on the door
hinge.
2. Loosen the safety screw.
9 CAUTION
Do not remove the safety screw.
3. With the door closed, turn the adjustment screw
until the desired position is reached.
– To move the upper end of the door outwards,
turn clockwise.
– To move the upper end of the door inwards,
turn counterclockwise.
4. Close the door to check the position and correct
if necessary.
5. Tighten the safety screw again.
6. Fit the cover cap and screw in T20 screw again.
8
Installation and connection en-us
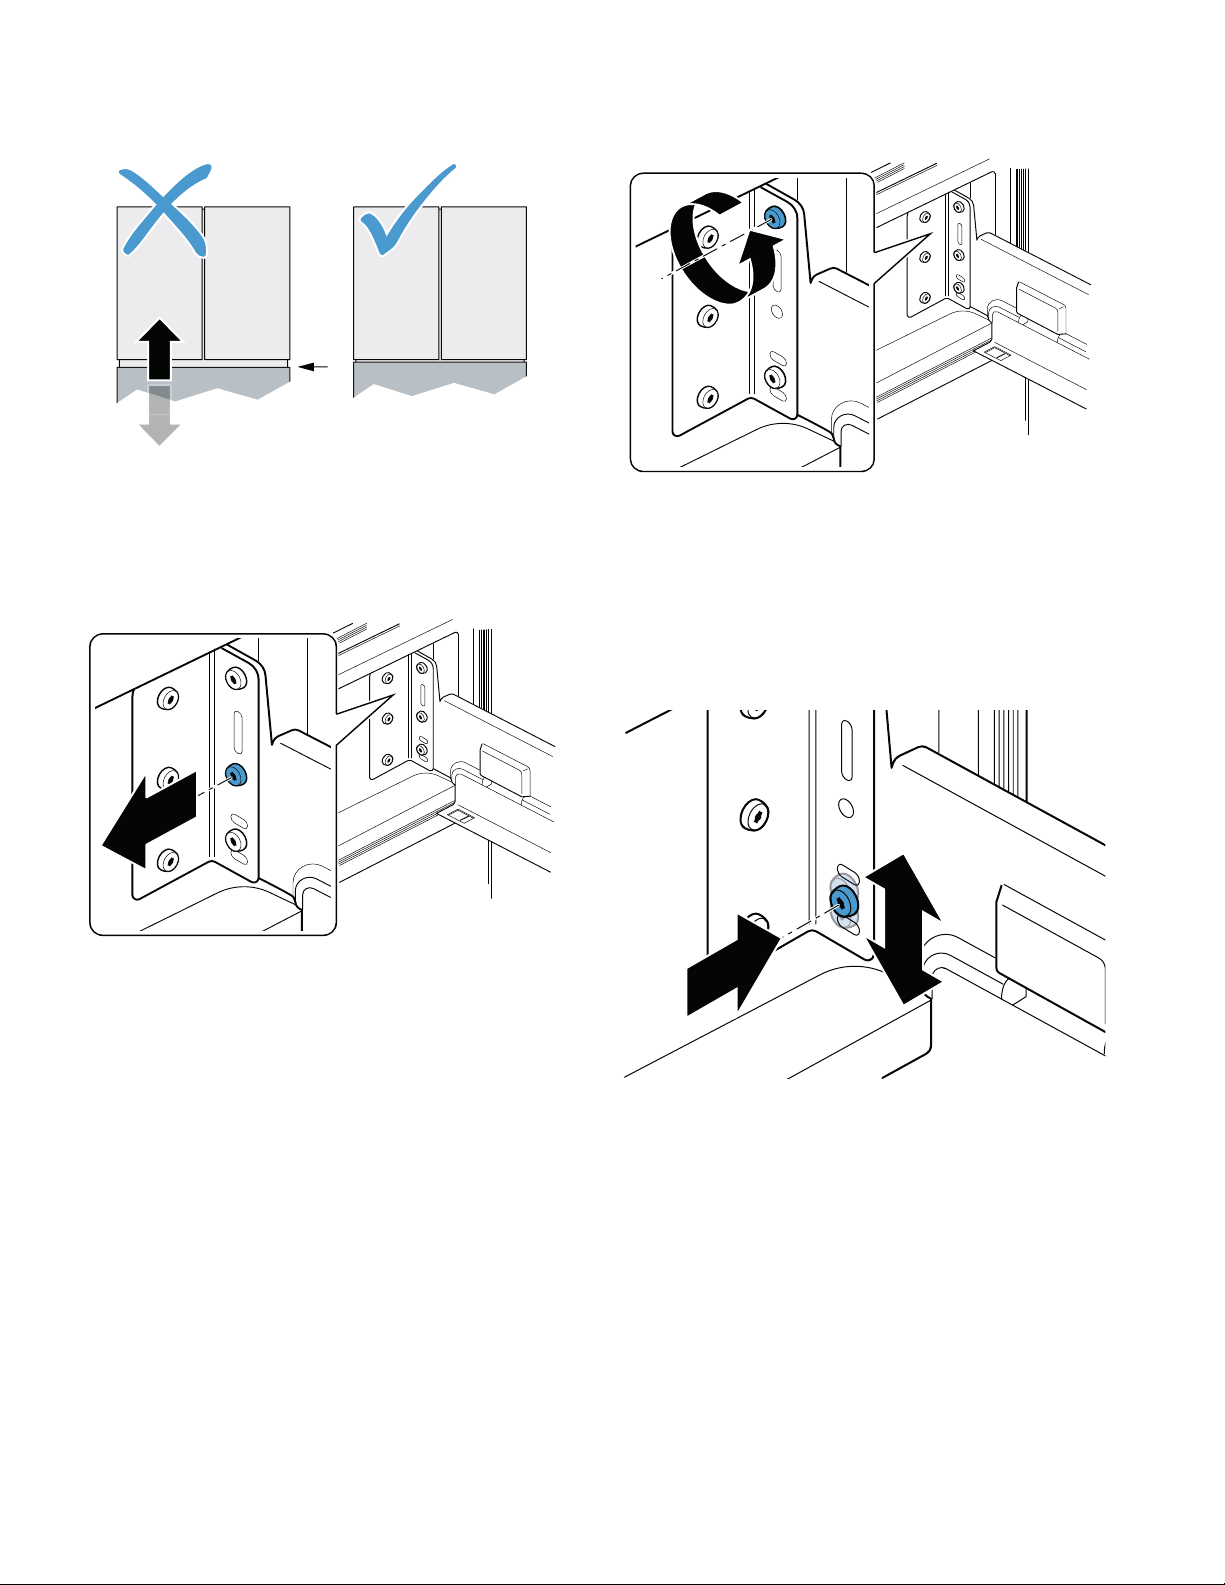
Aligning the horizontal gap between the doors and drawer:
9 CAUTION
To avoid damaging the appliance, move the
right-hand door down if the top of the door pillar
interferes with the housing.
Note: Remove any items contained in the doors.
1. Open the door and drawer.
2. Lift the door and insert a screwdriver into the door
hinge from below.
3. Push up the adjustable part and turn by 60° until
the desired position is reached.
– The door height can be set at 2 levels,
adjusted by 1/16" (1.6 mm) in each case. The
higher level is followed by the lower. The
adjustable part engages as soon as a position
is reached.
– To move the door up, turn clockwise.
– To move the door down, turn
counterclockwise.
4. Close the door and drawer to check the position
and correct if necessary.
9
en-us Installation and connection
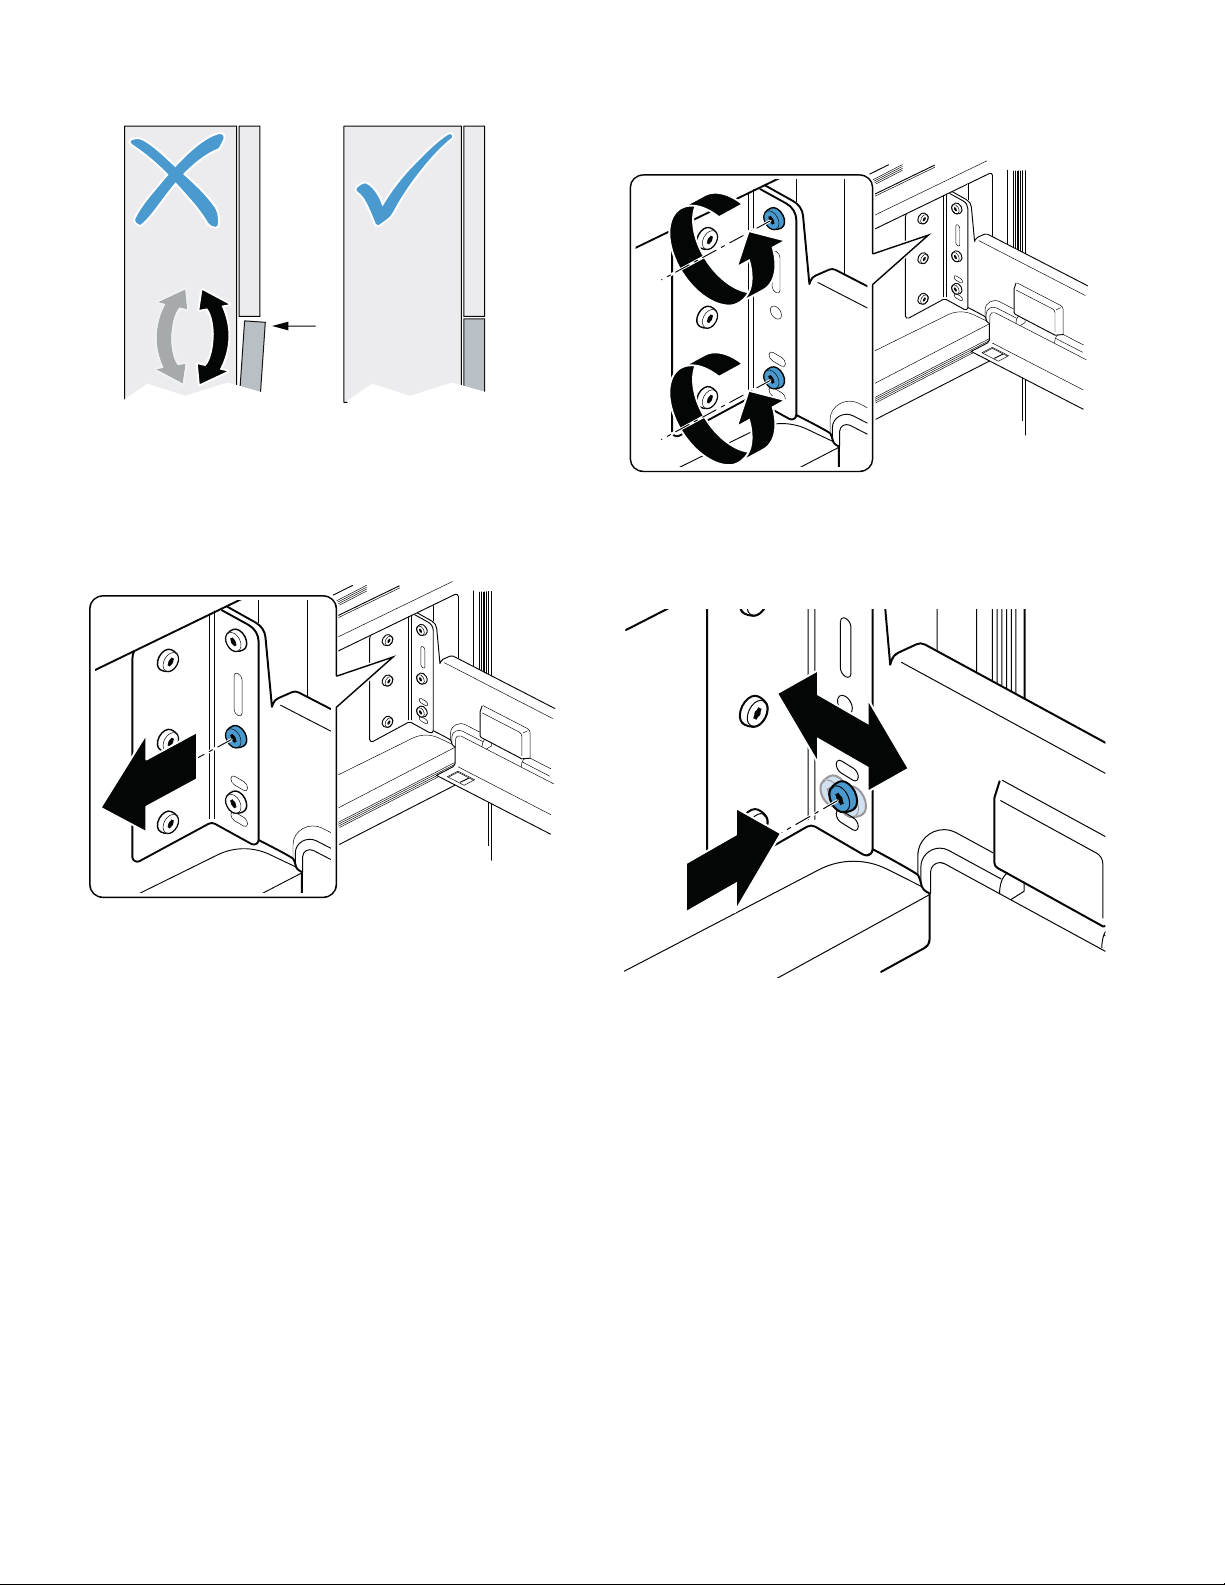
Aligning the drawers
You can align the drawer vertically:
1. Open the drawer as far as it will go and remove
the bin.
2. Remove the center screw on both sides.
Note: If you want to reset the drawer to the factory
settings, keep the screws.
3. Loosen the upper screw on both sides.
Note: Do not remove the screws.
4. Lift the drawer and remove the lower screw on
both sides.
5. Move the drawer up or down to the required
position and screw the lower screw into one of
the available holes.
Note: The drawer can be adjusted by 1/16"
(1.6 mm) up and down.
10
6. Retighten all the screws.
7. To check the position, close the drawer and
correct if necessary.
Installation and connection en-us
You can adjust the angle of the drawer:
1. Open the drawer as far as it will go and remove
the bin.
2. Remove the center screw on both sides.
Note: If you want to reset the drawer to the factory
settings, keep the screws.
3. Loosen the upper and lower screw on both sides.
Note: Do not remove the screws.
4. Move the drawer on the lower screw to the left or
right into the required position and tighten the
screw.
5. Retighten all the screws.
6. To check the position, close the drawer and
correct if necessary.
11

en-us Installation and connection
Saving energy
If you follow the instructions below, your appliance will use less power.
Note:
The arrangement of the equipment does not affect the energy consumption of the appliance.
Installing the appliance
Keep the appliance out of direct sunlight. The appliance needs to cool less frequently at low ambient temperaInstall the appliance as far away as possible from heating elements,
cooker and other heat sources:
At least 1¼” (3 cm) from electric or gas cookers.
At least 11¾" (30 cm) from oil or solid-fuel cookers.
Select an installation location at a room temperature of approx. 68 °F
(20 °C).
Do not cover or block the ventilation openings. The appliance needs to cool less frequently if the warm air can
Ventilate the room daily.
Using the appliance
Open the appliance door only briefly. The air in the appliance does not warm up as intensely. The appliance
Transport purchased food in a cooler and place in the appliance
quickly.
Allow warm food and drinks to cool down before placing in the appli-
ance.
Thaw frozen food in the refrigerator compartment to utilize the low
temperature of the frozen food.
Always leave some space between the food and to the back panel. The air can circulate and the humidity will remain constant. The appliPack food airtight.
Do not cover or block the ventilation openings. The appliance consumes less power if the warm air can escape.
Vacuum the ventilation openings once a year or as frequently as
needed.
tures and therefore consumes less power.
escape and therefore consumes less power.
needs to cool less frequently and therefore consumes less power.
ance needs to cool less frequently and therefore consumes less
power.
--------
12
Installation and connection en-us
Before using for the first time
1. Remove information material, adhesive tape and
protective foil.
2. Remove the power cord from inside the
appliance.
3. Clean the appliance.
~ "Cleaning" on page 28
4. Install the equipment.
~ "Equipment" on page 16
Water connection
9 CAUTION
■ Never bend, crush, modify or cut water hoses.
■ Never pull on the water hose on the rear panel
of the appliance.
■ To avoid damaging the appliance and to
ensure proper functioning, it should only be
connected to a drinking water line.
■ To avoid water damage, a shut-off valve must
be installed.
Notes
■ Installation and connection of the appliance must
be carried out by a qualified technician.
■ The shut-off valve must also be freely accessible
following installation of the appliance.
■ Observe the local regulations for water
connection.
The water quality of the water connection is tested:
■ Rinse the water line leading to the appliance
thoroughly until there are no more sediments or
turbidity in the water.
■ If the water line leading to the appliance still
contains sediments or turbidity, install an external
water filter system.
Water pressure of drinking water line
9 CAUTION
To avoid damage to the appliance, a pressure
relief valve must be installed between the
drinking water connection and the hose set if
the water pressure exceeds the maximum
value.
Note: If the water pressure is too low, this will impair
functioning of the appliance.
Electrical connection
9 CAUTION
Do not connect the appliance to electronic
energy saver plugs.
Note: You can connect the appliance to mains-
controlled and sine-controlled inverters.
Mains-controlled inverters are used for photovoltaic
systems which are connected directly to the national
grid. Sine-controlled inverters must be used for
isolated applications. Isolated applications, e.g. on
ships or in mountain lodges, are not directly
connected to the national grid.
1. Insert the power cord plug in the rear of the
appliance.
2. Check that the power outlet has been installed
according to the regulations and complies with
the requirements.
Requirements for power outlets
Power outlet with
grounding conductor: 110 V ... 127 V / 60 Hz
Circuit breaker: min. 15 A ... 20 A
Maximum load
Appliance: 5.5 A
3. Connect the appliance to an outlet near the
appliance.
The outlet must also be freely accessible
following installation of the appliance.
9 WARNING
RISK OF ELECTRIC SHOCK!
Never use multiple outlets, extension cords
or adapters.
The appliance must be grounded correctly.
Never cut through or remove the power
cord's third conductor (grounding
conductor).
9 WARNING
RISK OF ELECTRIC SHOCK!
If the power cord is too short, never use
multiple outlets or extension cords. Instead,
please contact customer service.
■ Water pressure min.: 0.2 MPa (2 bar / 29 psi)
■ Water pressure max.: 0.8 MPa (8 bar / 116 psi)
13
en-us Getting to know your appliance
*Getting to know your
appliance
Gett i ng to know your appl i ance
Appliance
#
+
(
0
8
@
H
P
X
bottle
`
h
)"
)*
)2
):
)B
# Refrigerator compartment
+ Freezer compartment
)J
( Ice maker
0 Ice cube bin
8 Dispenser
@ Operating controls
H Water filter
P Interior light
X Rating plate
` Door pillar with condensation protection
h Partition with humidity controller
)" Vegetable bin
)* Storage compartment for large bottles
)2 Cold storage bin
): Frozen food bin (top)
)B Frozen food bin (large)
)J Height-adjustable feet
14
Getting to know your appliance en-us
Operating controls
(08@ H P X `h)")*)2):
( Refrigerator compartment Û super button
Switches super cooling on or off.
0 Refrigerator compartment temperature
display
Indicates the set temperature in °C/°F.
8 Refrigerator compartment Y/X button
Sets the temperature of the refrigerator
compartment.
@ fresh button
Switches freshness mode on or off.
H eco button
Switches energy-saving mode on or off.
P vacation button
Switches vacation mode on or off.
Controls submenu
X ÿ power button
Switches the appliance on or off.
` alarm off button
Switches off the alarm.
h menu button
Opens the menu.
)" change filter button
Switches the change filter alarm off.
)* Freezer compartment ¾ super button
Switches super freezing on or off.
)2 Freezer compartment temperature display
Indicates the set temperature in °C/°F.
): Freezer compartment Y/X button
Sets the temperature of the freezer
compartment.
( Submenu display
Displays the selected submenu.
0 Y/X submenu button
Used to navigate through the submenu.
8 connect button
Opens the Home Connect menu.
@ light settings button
Opens the lighting menu.
H °C/°F button
Opens the temperature unit menu.
P Settings display
Displays the settings of the submenu.
P`hXH(0 @8
X Y/X Settings button
Changes the settings of the submenu.
` alarm off button
Opens the alarm menu.
h change filter button
Opens the filter menu.
15
en-us Getting to know your appliance
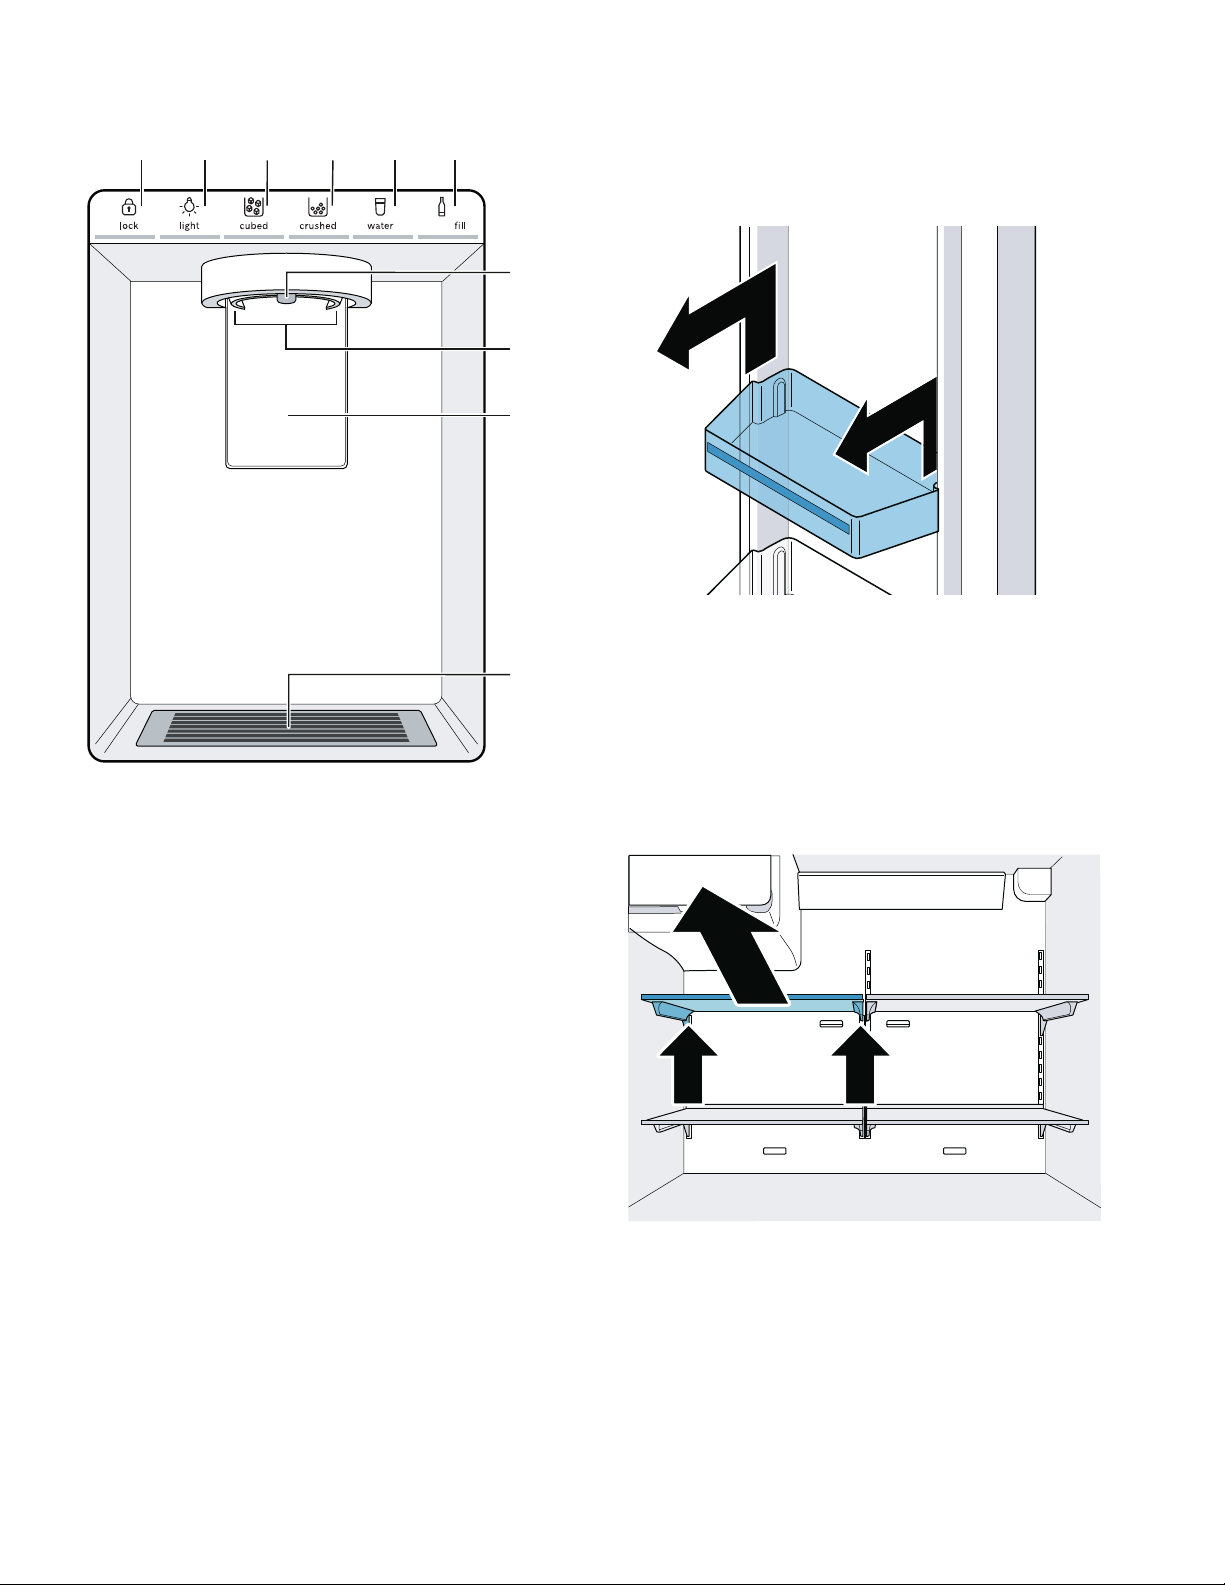
Ice and water dispenser Equipment
( lock button
Locks or unlocks the ice and water
dispenser.
0 light button
Switches the continuous light of the ice and
water dispenser on or off.
8 cubed button
Sets dispensing to ice cubes.
@ crushed button
Sets dispensing to crushed ice.
H water button
Sets dispensing to water.
P bottle fill button
Sets dispensing to a specific amount of
water.
X Water dispenser outlet
` Ice dispenser opening
h Dispenser lever
)" Drip tray
H(0 @8P
bottle
X
`
h
)"
Storage compartment
You can remove the storage compartment:
■ Lift up the storage compartment and remove.
Shelf
You can remove and adjust the shelf:
■ Lift shelf and remove.
Notes
■ Do not cover the ventilation openings.
■ Insert shelf carefully to avoid scratching the
appliance.
■ Ensure that the hooks are fully inserted and the
shelf is horizontal.
16
Getting to know your appliance en-us
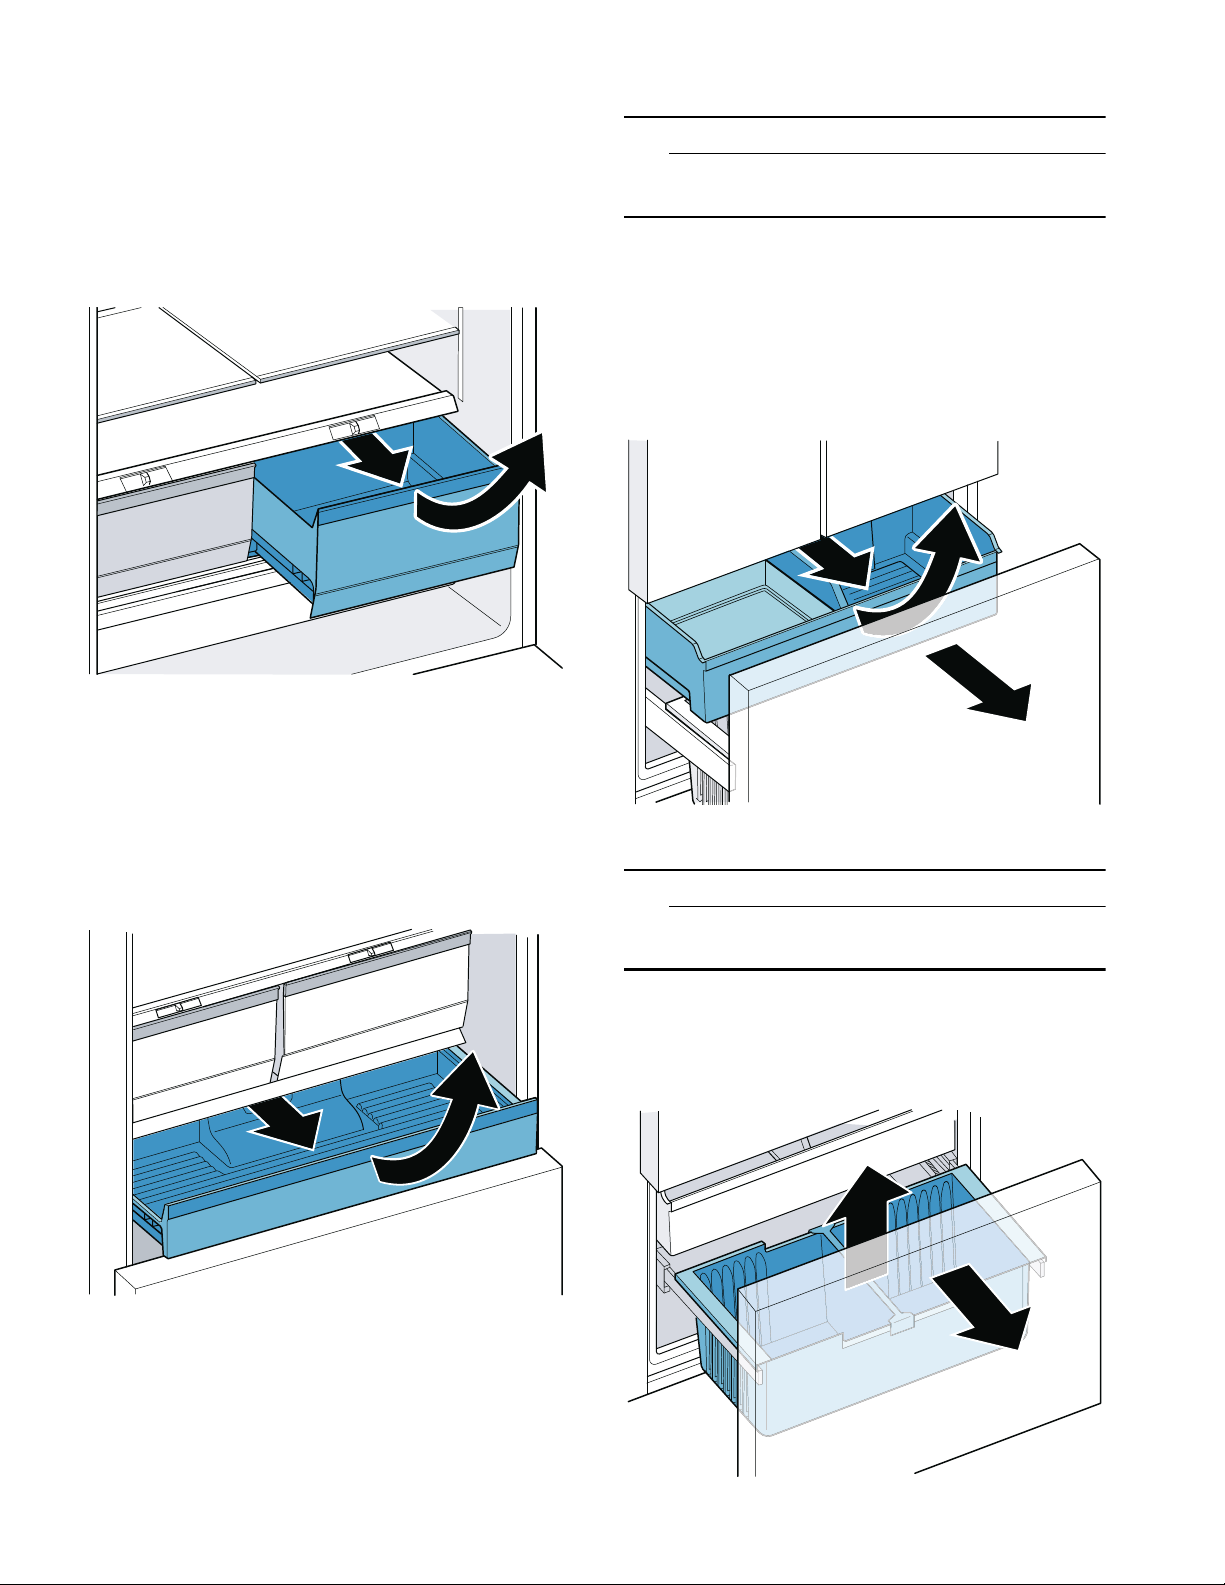
Vegetable bin
You can remove the bin:
■ Pull out the bin all the way, lift at the front and
remove.
You can insert the bin:
■ Pull out the telescopic rails all the way.
■ Place the bin on the telescopic rails and push into
the appliance until it engages.
Frozen food bin (top)
9 CAUTION
DAMAGE TO EQUIPMENT
Never remove the partition wall from the bin.
You can remove the bin:
■ Pull out the bin all the way, lift at the front and
remove.
You can insert the bin:
■ Pull out the telescopic rails all the way.
■ Place the bin on the telescopic rails and push into
the appliance until it engages.
Cold storage bin
You can remove the bin:
■ Pull out the bin all the way, lift at the front and
remove.
You can insert the bin:
■ Pull out the telescopic rails all the way.
■ Place the bin on the telescopic rails and push into
the appliance until it engages.
Frozen food bin (large)
9 CAUTION
DAMAGE TO EQUIPMENT
Never remove the partition wall from the bin.
You can take out the frozen food bin (large):
1. Pull the freezer compartment drawer all the way
out and remove the frozen food bin (top).
2. Lift the frozen food bin (large) and remove it.
17
en-us Getting to know your appliance
Ice maker
9 WARNING
RISK OF INJURY!
Never reach under or into the ice maker.
Notes
■ Ice cube production will start as soon as freezer
and refrigerator compartments reach the set
temperatures.
■ As soon as the appliance reaches the set
temperature, the first batch of ice cubes will be
ready in approximately 4 hours.
■ Once ready, the ice cubes are automatically
discharged into the ice cube bin.
■ Ice cube production stops automatically when the
ice cube bin is full.
■ For hygiene reasons, discard the ice cubes
produced within the first 24 hours.
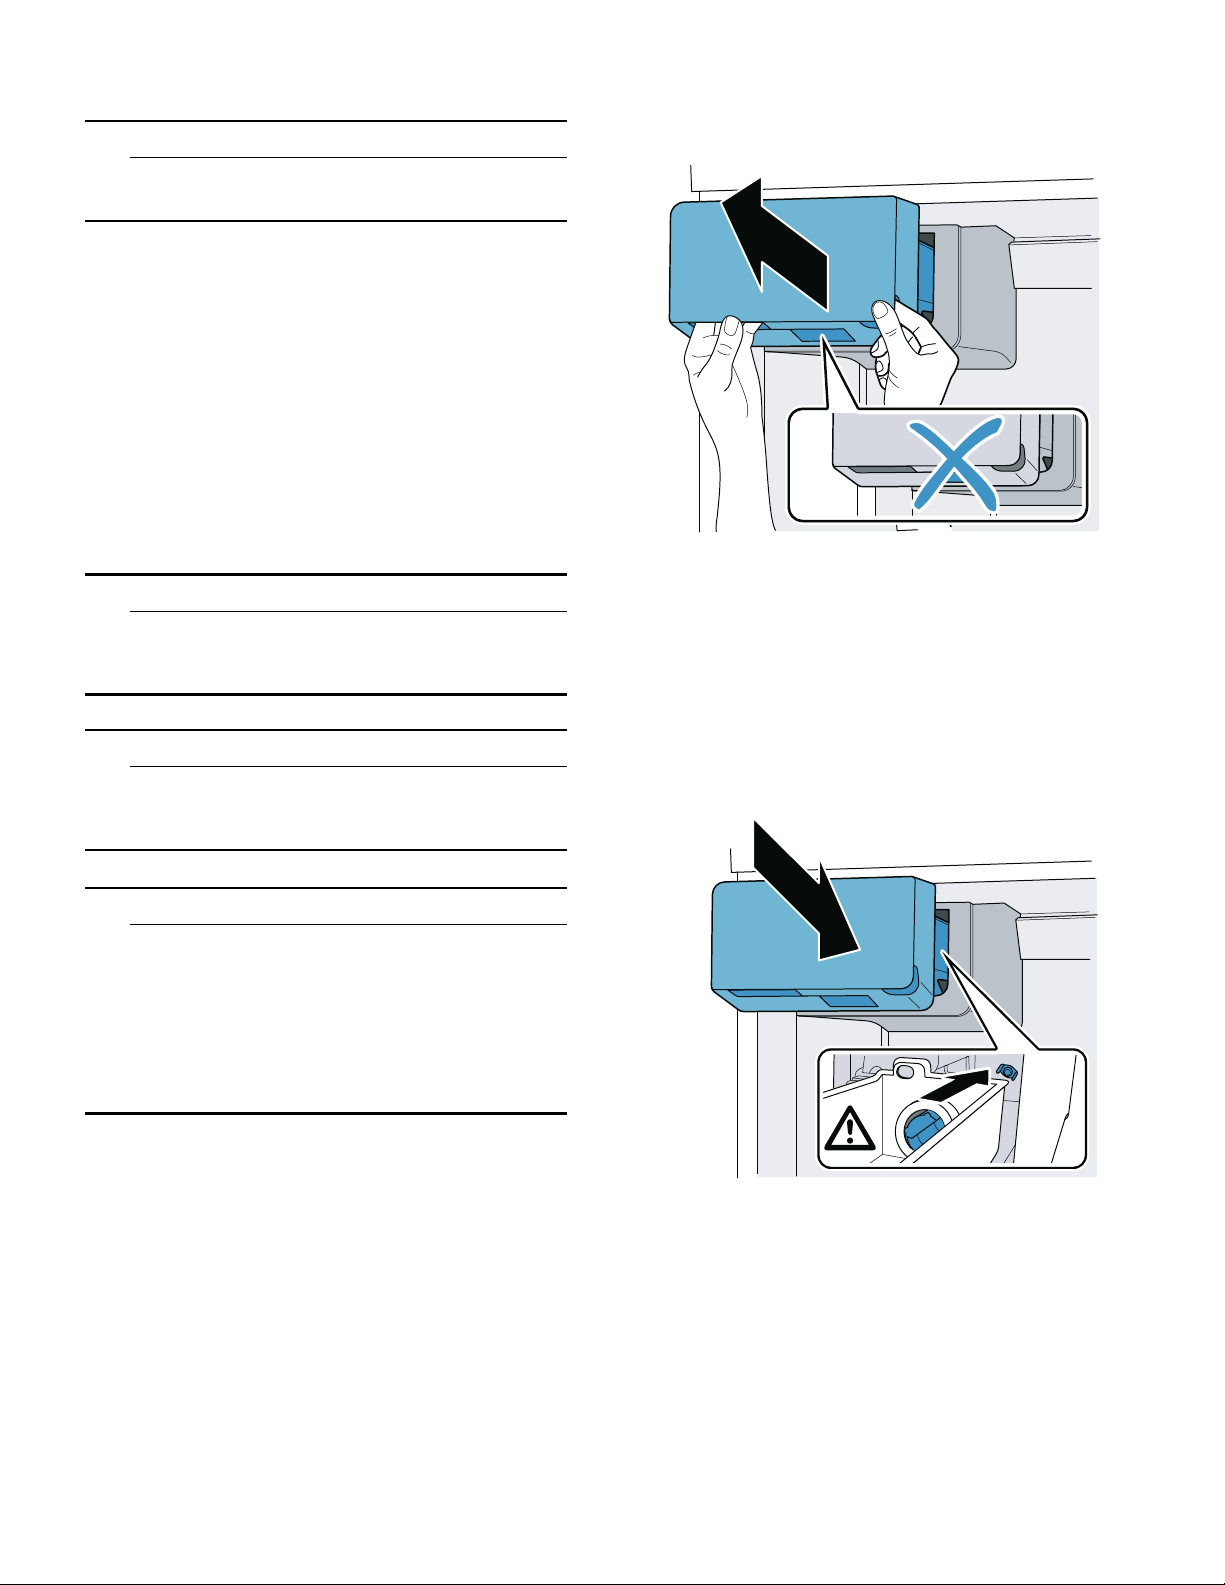
Ice cube bin
9 WARNING
RISK OF INJURY!
Never reach into the dispenser opening of the
ice cube bin.
9 WARNING
RISK OF COLD BURNS!
Avoid prolonged contact between the skin and
ice or metal surfaces in the ice cube bin.
You can remove the ice cube bin:
■ Grasp the left and right-hand notch under the bin
and pull forward to remove.
You can insert the ice cube bin:
■ Position the bin in the opening and slide back
until it engages.
Notes
■ If the bin jams during insertion, remove any
excess ice from the opening.
■ During insertion, the turning position of the screw
conveyor on the bin and the opening must match
up.
■ If the bin cannot be inserted, rotate the screw
conveyor on the bin and try again.
9 CAUTION
■ Damage to the appliance: Never store bottles or
food in the ice cube bin, even for short
periods. This may block and damage the ice
maker.
■ Damage to equipment: Never clean the ice cube
bin in the dishwasher.
■ When full, the ice cube bin is heavy: Pull the ice
cube bin out with both hands.
Notes
■ You can take large amounts of ice cubes directly
out of the ice cube bin or store them in the frozen
food bin (top).
■ Never put ice cubes into the ice cube bin
manually.
■ Clean the ice cube bin with lukewarm water and
wipe dry with a soft cloth so new ice cubes
cannot stick to it.
18

Operating the appliance en-us
Water filter
Note: After installing a new water filter, for hygiene
reasons discard the ice cubes produced within the
first 24 hours and dispense water for 5 minutes and
discard.
The water filter supplied filters particles and the taste
of chlorine out of the water, not bacteria or microbes:
Replace the water filter
■ every 6 months
■ as soon as the change filter button lights up
■ if the water flow is visibly reduced
Note: A new water filter is available from our
customer service, your dealer or on our website.
If you use an external water filtration system, you can
also use the appliance without an internal water filter
To do this, replace the water filter with a bypass filter:
■ The bypass filter removes coarse particles from
the drinking water and can be cleaned as
required.
■ The bypass filter can remain in the appliance
permanently and does not need to be changed.
■ Switch off the change filter alarm as soon as the
change filter button lights up.
~ "Change filter alarm" on page 21
Note: A new bypass filter is available from our
customer service or on our website.
Change water filter or replace with bypass filter:
Notes
■ When changing, some water will drip from the
filter. Wipe drips up with a soft cloth.
■ You can dispose the used filter with your
household garbage.
1. Reach into the lower recess of the filter cover,
pull forwards slightly and move to the bottom left.
2. Turn the filter 90° counterclockwise and remove.
3. Insert the new filter in the filter opening to the
stop and turn 90° clockwise as far as it will go.
4. Move the filter cover up to the right again and
slide back as far as it will go.
1Operating the appliance
Operat i ng the appl i ance
Switching the appliance on
1. Press ÿ power button.
The appliance begins to cool. The alarm off
button will blink and a warning sound will beep if
the temperature in the freezer compartment is still
too warm.
2. Press alarm off button.
The warning sound switches off.
3. Set the required temperature.
~ "Setting the temperature" on page 20
Operating tips
■ When the appliance has been switched on, it may
take several hours until the set temperatures have
been reached. Do not put in any food until the
selected temperature has been reached.
■ The fully automatic NoFrost system ensures that
the appliance remains frost-free. Defrosting is not
required.
■ The front sides of the housing are warmed to
prevent condensation in the area of the door seal.
Switching off and disconnecting the appliance
Switching off the appliance
■ Press ÿ power button.
The appliance is no longer cooling.
Disconnecting the appliance
If you are not going to use the appliance for a long
period:
1. Interrupt the water supply to the appliance.
2. Take all food out of the appliance.
3. Press ÿ power button.
The appliance is no longer cooling.
4. Pull out the power plug or switch off the circuit
breaker.
5. Remove the water filter, empty the ice cube bin
and clean the appliance.
~ "Cleaning" on page 28
6. Leave the doors and drawers of the appliance
open.
Setting the temperature unit
You can choose between the units °C and °F:
1. Press menu button.
2. Press °C/°F button.
3. Press Y/X Settings button until settings display
shows °C or °F.
4. Press menu button.
The setting is saved.
19

en-us Operating the appliance
Setting the temperature
Recommended temperature
Refrigerator compartment: 37 °F (3 °C)
Freezer compartment: 0 °F (–18 °C)
Cooling compartment
■ Keep pressing the Y/X button until the display
indicates the required temperature.
Freezer compartment
■ Keep pressing Y/X button until the display
indicates the required temperature.
Super cooling
Super cooling cools the refrigerator compartment as
cold as possible.
Switch on super cooling, e.g.:
■ Before placing large quantities of food into the
compartment
■ For cooling drinks quickly
Note: When super cooling is switched on, increased
operating noises may occur.
After approx. 6 hours, the appliance switches to
normal operation.
Switching super cooling on/off:
■ Press Û super button.
When super cooling is switched on, the button is
lit up.
Super freezing
With super freezing, the freezer compartment cools
down to the coldest temperature setting of the
freezer compartment.
Switch on super freezing, e.g.:
■ To quickly freeze food all the way to the center
■ To increase ice cube production
Note: When super freezing is switched on, increased
operating noise may occur.
After approx. 8 hours, the appliance automatically
returns to normal operation.
Switching super freezing on/off:
■ Press ¾ super button.
When super freezing is switched on, the button
lights up.
Energy saving mode
You can set the appliance to save energy with the
energy-saving mode.
The appliance automatically sets the following
temperatures:
■ Refrigerator compartment: 43 °F (6 °C)
■ Freezer compartment: 6 °F (–14 °C)
Switch energy-saving mode on or off:
■ Press eco button.
The temperatures are changed, and the display
shows the new temperatures. When energysaving mode is switched off, the last temperature
set is displayed.
Freshness mode
Food stays fresh for even longer with freshness
mode.
The appliance automatically sets the following
temperature:
■ Refrigerator compartment: 36 °F (2 °C)
The temperature in the freezer compartment remains
unchanged.
Switch freshness mode on or off:
■ Press fresh button.
The temperature is changed, and the display
shows the new temperature. When freshness
mode is switched off, the last temperature set is
displayed.
Vacation mode
If leaving the appliance for a long period, you can
switch it to energy-saving vacation mode.
The appliance automatically sets the following
temperature:
■ Refrigerator compartment: 43 °F (6 °C)
The temperature in the freezer compartment remains
unchanged.
Switch on vacation mode:
■ Press vacation button.
The temperature is changed and the display
shows the new temperature.
Empty the ice cube bin for hygiene reasons.
Switching off vacation mode:
■ Press vacation button.
The last temperature set is displayed.
For hygiene reasons, dispense water for
5 minutes and discard.
20

Operating the appliance en-us
Sabbath mode
All non-essential functions are switched off so you
can also use the appliance on the Sabbath.
The appliance switches off the following:
■ Super cooling and super freezing
■ Audible signals
■ Interior light
■ Messages on the control panel
■ Water dispenser
■ Ice maker
Note: Background illumination of display is reduced
in Sabbath mode.
Switch on Sabbath mode:
■ Press and hold vacation button for 10 seconds
until an audible signal sounds.
When Sabbath mode is switched on, the
alarm display lights up.
Switching Sabbath mode off:
■ Press and hold the alarm display for 5 seconds
until an audible signal sounds.
Note: After approx. 72 hours, the appliance
automatically returns to normal operation.
Setting the light
You can adjust the brightness levels of the interior
lighting from 0 to 5:
Note:
0 = lighting off
1 = minimum brightness
5 = maximum brightness
1. Press menu button.
2. Press light settings button.
The submenu display shows In.
3. Press Y/X Settings button repeatedly until the
settings display shows the desired brightness
level.
4. Press menu button.
The setting is saved.
Change filter alarm
When the change filter alarm switches on, the
change filter button lights up. The alarm is designed
to switch on every 6 months. It is recommended to
change the water filter every 6 months.
Note: An increase in ice and water consumption will
cause the change filter alarm to be switched on
earlier.
Switching off the change filter alarm:
1. Change water filter or replace with bypass filter.
~ "Water filter" on page 19
2. Press and hold change filter button for
3 seconds.
The change filter alarm is switched off and the
change filter button no longer lights up. The
water filter timer is reset automatically.
If you replace the water filter before the change filter
alarm lights up, reset the water filter timer manually:
Note:
1 = water filter timer running
0 = reset water filter timer
1. Press menu button.
2. Press change filter button.
3. Press Y/X Settings button until settings display
shows 0.
4. Press menu button.
The setting is saved.
Switching the ice and water dispenser button lock (child lock) on or off
The button lock protects the ice and water dispenser
from being operated unintentionally:
Note: When the button lock is switched on, no ice or
water can be dispensed. The ice maker continues to
produce ice cubes.
■ Press and hold lock button until all light bars light
up.
The button lock is switched on and the light bar
of the lock button lights up. When the button lock
is switched off, the light bar of the last button
used lights up.
Light of ice and water dispenser
Note: If no ice or water is dispensed for a long
period, the ice and water dispenser light will turn off.
You can switch the light of the ice and water
dispenser permanently on or off:
■ Press light button.
The ice and water dispenser light is switched on
permanently, and the light bar of the light button
lights up.
21

en-us Alarm
Setting the bottle fill water amount
You can adjust the factory-set water bottle filling
amount:
Note: The maximum fill time is 60 seconds. The light
bars flash during the operation.
1. Press bottle fill button.
2. Place a pitcher or bottle under the water
dispenser opening.
3. Simultaneously press and hold bottle fill and
crushed buttons until the required water amount
has been dispensed.
The new water amount is now preset to memory.
Every time you press the bottle fill button, that
water amount will be dispensed.
Switching the ice and water dispenser and ice maker on or off
If you are not going to use the ice and water
dispenser and the ice maker for a long period:
■ Press and hold lock and light buttons until all
light bars light up.
The ice and water dispenser and the ice maker
are switched off. When switched on, the light bar
of the last button used lights up.
MAlarm
Al ar m
Door alarm
If the appliance door is left open for a while, a
warning sound is switched on and the alarm off
button flashes.
Switching off door alarm:
■ Close the door or press the alarm off button.
The warning sound is switched off and the
alarm off button no longer flashes.
You can switch the door alarm warning sound on or
off:
Note: On = switch on door alarm warning sound
OF = switch off door alarm warning sound
1. Press menu button.
2. Press alarm off button.
3. Press Y/X Settings button until settings display
shows On or OF.
4. Press menu button.
The setting is saved.
Temperature alarm
If the freezer compartment becomes too warm, the
warning sound switches on and the alarm off button
flashes.
9 CAUTION
DURING THE THAWING PROCESS, BACTERIA MAY DEVELOP AND SPOIL THE FROZEN ITEMS
Do not refreeze partly or completely thawed
food.
Refreeze food only after cooking. The frozen
items should no longer be stored for the
maximum storage period.
Note: The temperature alarm can be set off without
risk to the frozen food in the following situations:
■ The appliance is switching on.
■ If the freezer compartment door has been open
too long.
■ Large quantities of fresh food are being placed
inside.
Switching off the temperature alarm:
1. Check that the cause of the temperature alarm
has been eliminated.
2. Press the alarm off button.
The warning sound will be switched off and the
freezer compartment temperature display will
briefly indicate the warmest temperature reached
in the freezer compartment. Then the display
indicates the set temperature again. The warmest
temperature will be measured again and saved.
Note: The alarm off button remains lighted until the
set temperature has been reached again.
22

Home Connect en-us
o Home Connect
Home Connect
This appliance is Wi-Fi-capable and can be
controlled remotely using a mobile device.
Note: Wi-Fi is a registered trade mark of the Wi-Fi
Alliance.
The appliance functions without a network
connection and can still be operated manually via
the controls:
■ The appliance is not connected to a home
network.
■ The availability of the Home Connect function
depends on the availability of Home Connect
services in your country. Home Connect services
are not available in every country. You can find
more information on www.home-connect.com.
Note: Please observe the safety information in this
instruction manual. Ensure that this is also observed
if you operate the appliance via the Home Connect
app and are not at home when doing so.
~ "Important safety instructions" on page 3
Follow the instructions in the Home Connect app as
well.
Setting up Home Connect
Notes
■ Take note of the Home Connect supplementary
sheet, which is available for download at http://
www.bosch-home.com together with the
instructions. To do so, enter the E-number of your
appliance in the search field.
■ After switching on the appliance, wait at least two
minutes until the internal device initialization
process has been completed. Only then start
setting up Home Connect.
■ To be able to make settings with Home Connect,
you need to install the Home Connect app on
your end device.
To do this, please take note of the documentation
that has also been supplied from Home Connect.
Follow the steps specified by the app to make the
settings.
■ If the device is not operated for a prolonged
period, the Home Connect menu will close
automatically. You can find information on how to
open the Home Connect menu at the start of the
appropriate chapter.
Automatic connection with the WLAN home network (Wi-Fi)
If a router with WPS function is available, the
refrigerator can be automatically connected to the
home network.
3. Press Y Settings button.
The appliance is ready for automatic connection.
The settings display shows an animation for
2 minutes.
The appliance is ready for automatic connection
for as long as the animation is displayed.
4. Within those 2 minutes, activate the WPS function
on the home network router (e.g. using
WPS button, note the information in the router
documentation).
If the connection is successful, On flashes in the
settings display.
The refrigerator is ready to connect with the app.
Note: If the settings display shows OF, it was not
possible to establish a connection.
1. Check whether the refrigerator is located within
the range of the WLAN home network (Wi-Fi).
2. Repeat the process or establish the connection
manually.
Manual connection with the WLAN home network (Wi-Fi)
If the available router does not have a WPS function,
or or if this is unknown, you can connect the
refrigerator to the WLAN home network (Wi-Fi)
manually.
1. Press the menu button.
The connect button lights up. The
submenu display shows Cn.
2. Press the Y/X submenu button repeatedly until
submenu display shows SA and the
settings display OF.
3. Press the Y Settings button.
The appliance is ready for manual connection.
The settings display shows an animation.
The appliance is ready for manual connection for
as long as the animation is displayed.
4. The refrigerator has now set up its own WLAN
home network (Wi-Fi) with the network name
HomeConnect.
You can now access this network with your
mobile device.
5. Follow the instructions in the app until the
process is complete.
– If the connection is successful, On flashes in
the settings display.
The device connects automatically to the app.
– If the settings display shows OF, it was not
possible to establish a connection.
Check whether the refrigerator is located
within the range of the WLAN home network
(Wi-Fi).
Repeat the process.
1. Press menu button.
The connect button lights up. The
submenu display shows Cn.
2. Press Y/X submenu button repeatedly until
submenu display shows AC and the
settings display OF.
23

en-us Home Connect
Connecting the refrigerator to the Home Connect app
The appliance automatically connects to the app
with set-up for the first time after a connection to the
WLAN home network has been established (Wi-Fi).
If the appliance does not automatically connect to
the app, connect the appliance manually:
1. Press the menu button.
The connect button lights up. The
submenu display shows Cn.
2. Press the Y/X submenu button repeatedly until
the submenu display shows PA and the settings
display OF.
3. Press Y Settings button to connect the
appliance to the app.
The settings display shows an animation.
As soon as the refrigerator and the app are
connected, the settings display shows On.
4. Open the app and wait until the refrigerator is
displayed.
Press Add to confirm the connection between the
app and the refrigerator.
If the refrigerator is not automatically displayed,
click on Add appliance in the app and follow the
instructions. As soon as your refrigerator is
displayed, add it with +.
5. Follow the instructions in the app until the
process is complete.
The submenu display shows PA and the
settings display On.
The refrigerator has been connected to the app.
If the connection fails, check whether the mobile
device is connected to the WLAN home
network (Wi-Fi).
Then try to establish the connection again.
If the settings display shows Er, reset the
Home Connect settings.
Note: On resetting, all Home Connect settings are
reset.
Verifying signal strength
You should verify the signal strength if no connection
can be established.
Reset Home Connect settings
If there is a problem when trying to establish a
connection, or if you would like to register the
appliance on a different WLAN home network (Wi-Fi),
the Home Connect settings can be reset:
1. Press the menu button.
The connect button lights up. The
submenu display shows Cn.
2. Press the Y/X submenu button repeatedly until
submenu display shows rE and the
settings display OF.
3. Press Y/X Settings button.
The settings display shows an animation for
15 seconds.
The display then shows OF settings.
The Home Connect settings have been reset.
Installing updates for the Home Connect software
The refrigerator checks at regular intervals whether
updates are available for the Home
Connect software.
If an update is available, the submenu display shows
UP:
■ Confirm update in Home Connect app.
Do not switch the refrigerator off during updates.
The settings display shows an animation. The
update is being installed.
Note: All buttons are locked during installation.
■ If installation has been completed successfully,
the settings display shows On.
■ If installation has not been completed
successfully, the settings display shows Er.
Start the update again at a later time.
If installation could not be completed even after
multiple attempts, notify customer service.
Press any button to reset the display to the set
temperature.
1. Press the menu button.
The connect button lights up. The
submenu display shows Cn.
2. Press the Y/X submenu button repeatedly until
the submenu display shows SI. The
settings display shows a value between 0 (no
reception) and 3 (full reception).
The signal strength should be at least 2. If the
signal strength is too weak, the connection may
be interrupted.
– Place the router and refrigerator closer
together.
– Check that screening walls do not interfere
with the connection.
– Alternatively, install a repeater to make the
signal stronger.
24
Refrigerator compartment en-us
Information on data protection
The first time your Home Connect appliance is
registered on a WLAN home network connected to
the Internet (Wi-Fi), your appliance will transmit the
following types of data to the Home Connect server
(initial registration):
■ Unique appliance identification (consisting of
appliance codes as well as the MAC address of
the installed Wi-Fi communication module).
■ Security certificate of the Wi-Fi communication
module (to ensure a secure data connection).
■ The current software and hardware version of
your domestic appliance.
■ Status of any previous resetting to factory
settings.
This initial registration prepares the
Home Connect functions for use and is only required
when you want to use these
Home Connect functions for the first time.
Note: Please note that the Home Connect functions
can be utilized only in conjunction with the
Home Connect app. Information on data protection
can be called up in the Home Connect app.
Remote Diagnostics
Customer service can use Remote Diagnostics to
access your appliance if you contact them, have
your appliance connected to the Home Connect
server, and if Remote Diagnostics is available in the
country in which you are using the appliance.
Note: For further information and details about the
availability of Remote Diagnostics in your country,
please visit the service/support section of your local
website: www.home-connect.com
URefrigerator
compartment
Refr i gerat or compar t ment
The refrigerator compartment is suitable for storing
meat, sausages, fish, dairy products, eggs, ready
meals and pastries.
The temperature can be set from
33° F (1° C) to 43° F (6° C).
The refrigerator compartment can also be used to
store highly perishable groceries in the short to
medium term. A temperature of +39°F (+4°C) or
lower ensures optimum freshness and hygiene of
the stored groceries.
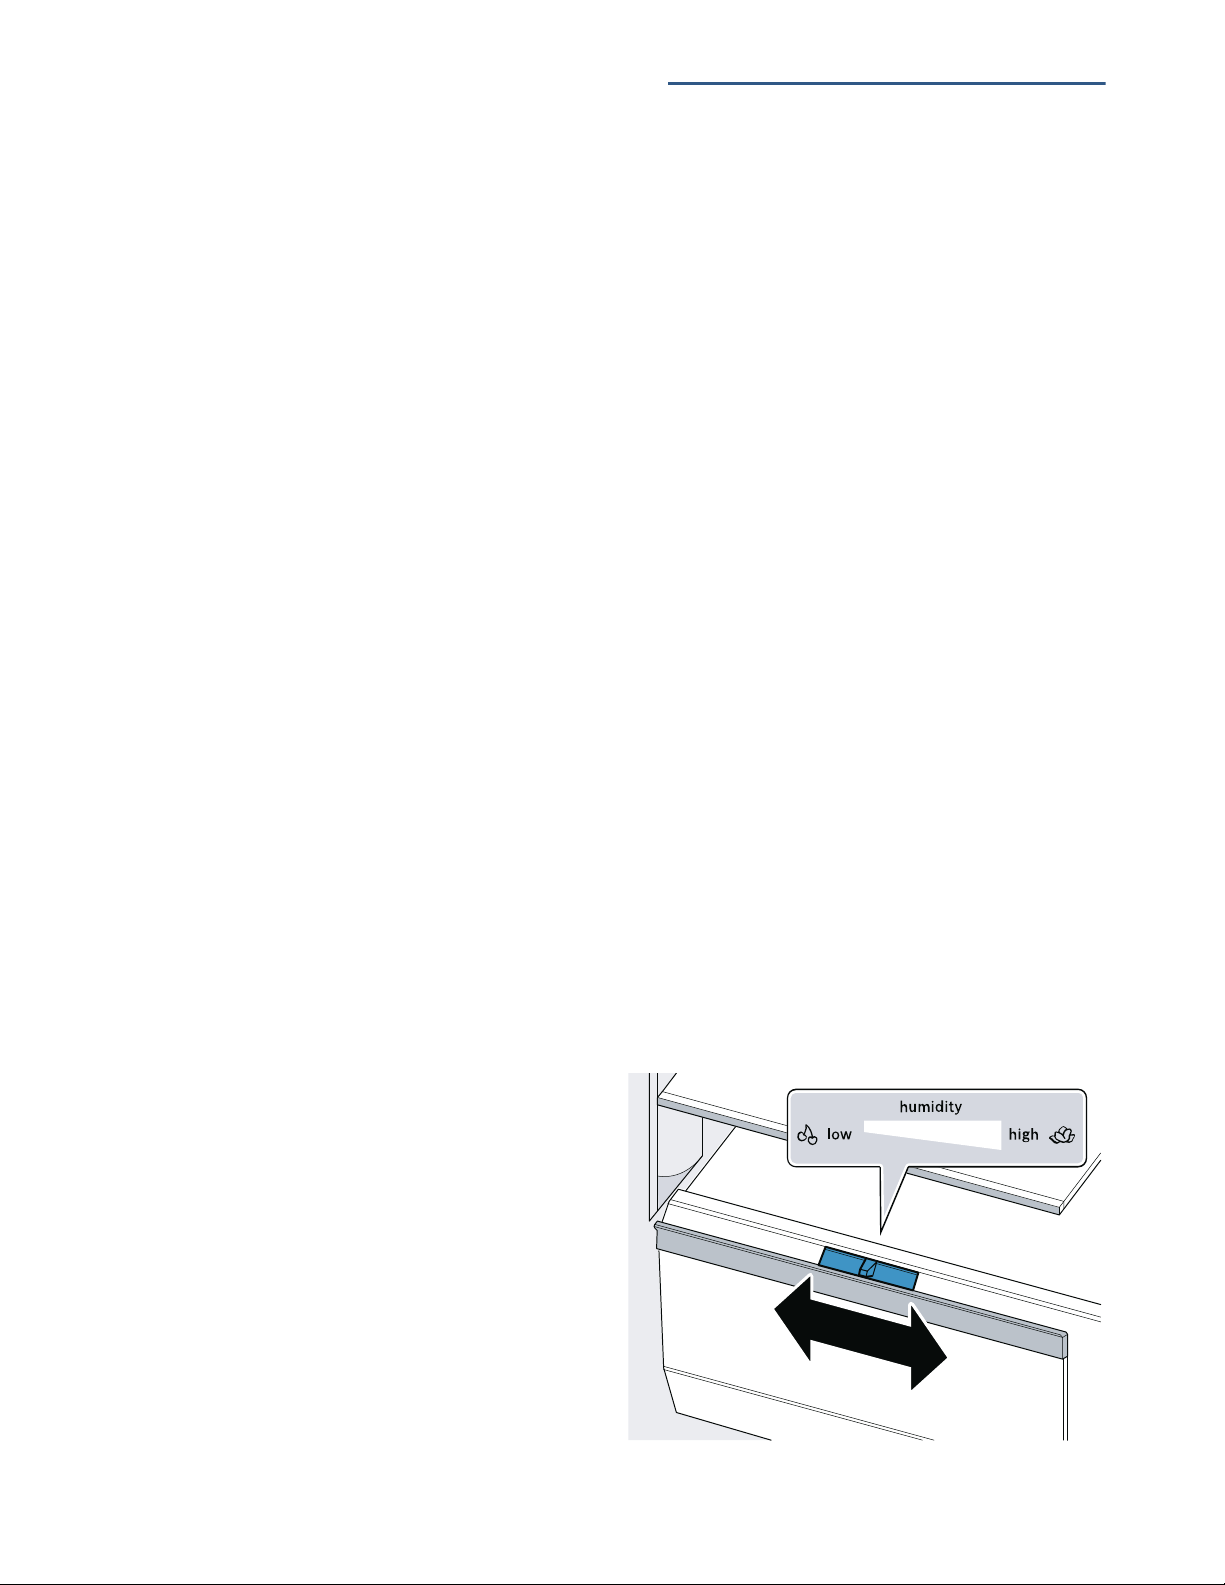
Vegetable bin
The vegetable bin is the optimum storage location
for fresh fruit and vegetables. You can adjust the
humidity in the vegetable bin via the division plate's
humidity controller and a special seal.
The humidity in the vegetable bin can be set
according to the type and quantity of products to be
stored:
■ Mainly fruit as well as for a large load – set lower
air humidity
■ Mainly vegetables as well as for a mixed or small
load – set higher air humidity
Notes
■ Fruit sensitive to cold (e.g. pineapple, banana,
papaya and citrus fruit) and vegetables sensitive
to cold (e.g. eggplant, cucumbers, zucchini,
peppers, tomatoes and potatoes) should be
stored outside of the appliance at temperatures
of approx. +46°F ... +54°F (+8°C ... +12°C) for
optimum preservation of quality and aroma.
■ Condensation may form in the vegetable bin
depending on the type and quantity of products
stored.
Remove condensation with a dry cloth and adjust air
humidity in the vegetable bin with the humidity
controller.
25

en-us Freezer compartment
Cold storage bin
The temperatures in the cold storage bin are lower
than in the refrigerator compartment. Temperatures
below +32 °F (0 °C) may occur.
Ideal for storing fish, meat and sausage. Not suitable
for salads, vegetables and groceries sensitive to
cold.
Note when storing food
■ Store fresh undamaged food.
The quality and freshness will then be retained for
longer.
■ In the case of convenience products and bottled
goods, do not exceed the minimum sell-by date
or use-by date specified by the manufacturer.
■ To retain aroma, color and freshness, pack or
cover food well before placing it into the
appliance.
This will prevent flavors being transferred
between foods and the plastic parts from
becoming discolored.
■ Leave warm food and drinks to cool down before
placing them into the refrigerator compartment.
;Ice and water dispenser
Ice and wa t er di spenser
You can use the ice and water dispenser to
dispense:
■ cooled water
■ crushed ice
■ ice cubes
To obtain maximal ice production (up to 12 lb
(5.4 kg) in a 24 hour period):
■ The appliance must be installed according to the
installation instructions.
■ The freezer compartment must be set to the
coldest temperature.
■ The ice cube bin must be emptied every 3 hours.
Results may vary depending on operating conditions
such as:
■ door openings
■ food load
■ ambient temperature and ambient humidity
■ water pressure and water filter condition
Before using the appliance for the first time
WFreezer compartment
Freez er compart ment
The freezer compartment is suitable for:
■ storing frozen food
■ making ice cubes
■ freezing food
The temperature can be set from
6 °F (–14 °C) to –7 °F (–22 °C).
The freezer compartment can be used to store
perishable foods long-term almost without any
noticeable reduction in quality, as the low
temperatures considerably slow down or stop
deterioration. Appearance, flavor and all valuable
ingredients are largely retained.
The time between putting fresh food in the freezer
compartment and it freezing solid depends on the
following factors:
■ temperature set
■ type of food
■ amount of food in the freezer compartment
■ quantity and type of storage
9 CAUTION
To avoid water damage to the floor or to the
appliance, never dispense water without a glass
underneath.
Note: The ice and water dispenser only works if the
appliance is connected to a drinking water line and a
filter is installed.
■ Once the appliance has been connected or a
new water filter has been installed, there will be
air in the water circuit. Keep dispensing water
until it contains no more bubbles. Wipe splashes
away with a soft cloth.
■ For hygiene reasons, dispense water for
5 minutes and discard, and discard the ice cubes
produced during the first 24 hours.
Observing drinking water quality
All materials used in the ice and water dispenser are
odorless and tasteless.
If the water has an aftertaste, this may be due to the
following causes:
■ Mineral content and chlorine content of the
drinking water
■ Material of the water line leading to the appliance
■ Freshness of the drinking water
Note: If you dispense water again after a long
period, it may taste stale. Allow water to dispense
for at least 5 minutes and discard.
26
You will obtain optimum water quality if you dispense
some water regularly.
Defrosting en-us
Operation of the ice and water dispenser
■ When the appliance door is open, the ice and
water dispenser stops, and the button lock is
switched on.
■ To prevent water damage, the ice and water
dispenser stops automatically after a period of
continuous dispensing. Wait a few seconds
before dispensing ice or water again.
■ The ice and water dispenser stops automatically
after several consecutive dispensing operations.
Wait a few minutes before dispensing ice or water
again.
■ To prevent ice from falling on the floor, hold the
glass directly under the ice dispenser opening
when dispensing crushed ice.
■ When you switch from the crushed button to
the cubed button, a little crushed ice may be
dispensed.
■ The dispensed water is cooled to a palatable
temperature. To obtain a colder drinking
temperature, put additional ice cubes in the
glass.
■ The water may become warmer when dispensing
large amounts of water.
■ If ice cubes taste stale, discard the remainder
and the cubes produced over the next 24 hours.
If ice cubes still taste stale, change the water
filter.
■ Regularly check the drip tray and clean as
necessary.
~ "Cleaning" on page 28
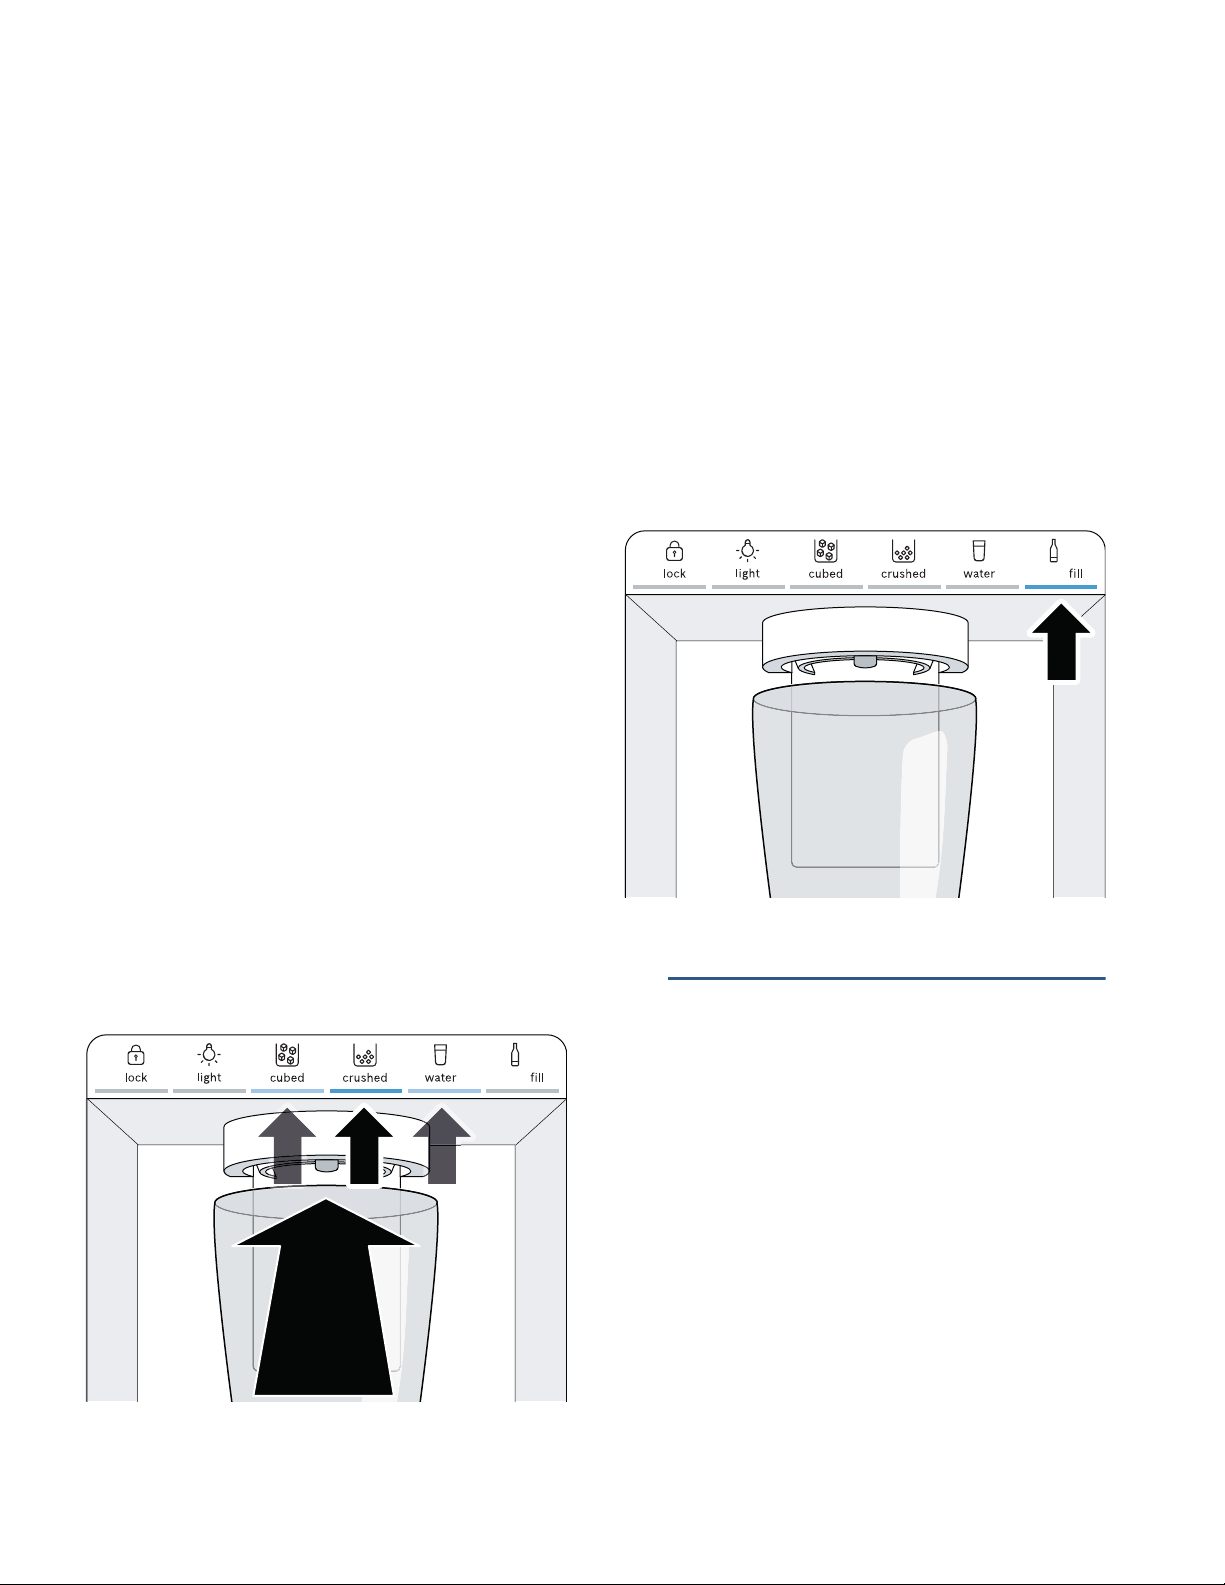
Bottle fill option
You can dispense a specific water amount with the
bottle fill option:
Note: The factory-set amount of water is approx.
17 fl oz (0.5 l).
~ "Setting the bottle fill water amount" on page 22
1. Press bottle fill button.
2. Place a pitcher or bottle under the water
dispenser opening.
3. Press bottle fill button.
The bottle filling is dispensed.
Notes
■ To interrupt dispensing, press any button of the
ice and water dispenser.
■ To dispense the bottle filling again, press bottle
fill button.
■ If no bottle filling is dispensed for a long period,
dispensing switches to the water button.
bottle
Dispensing ice or water
Note: Always hold the glass directly under the
dispenser opening.
1. Press cubed button, crushed button or
water button.
2. Keep pressing a glass against the dispenser
lever until the glass contains the required amount
of ice or water.
bottle
=Defrosting
Def r o s t i ng
The fully automatic NoFrost system ensures that the
appliance remains frost-free. Defrosting is not
required.
27
en-us Cleaning
DCleaning
Cleani ng
9 CAUTION
AVOID DAMAGING THE APPLIANCE AND THE EQUIPMENT.
■ Do not use abrasive, chloride-based or acidic
cleaning agents or solvents.
■ Do not use scouring or abrasive sponges.
The metallic surfaces may corrode.
■ Never clean the shelves or bins in the
dishwasher.
The parts may become deformed.
9 CAUTION
AVOID DAMAGE TO APPLIANCE.
■ Do not use stainless steel cleaner on the
exterior.
■ Test all cleaning agents or solvents on a small
area before using them on the entire
appliance.
Cleaning the appliance interior
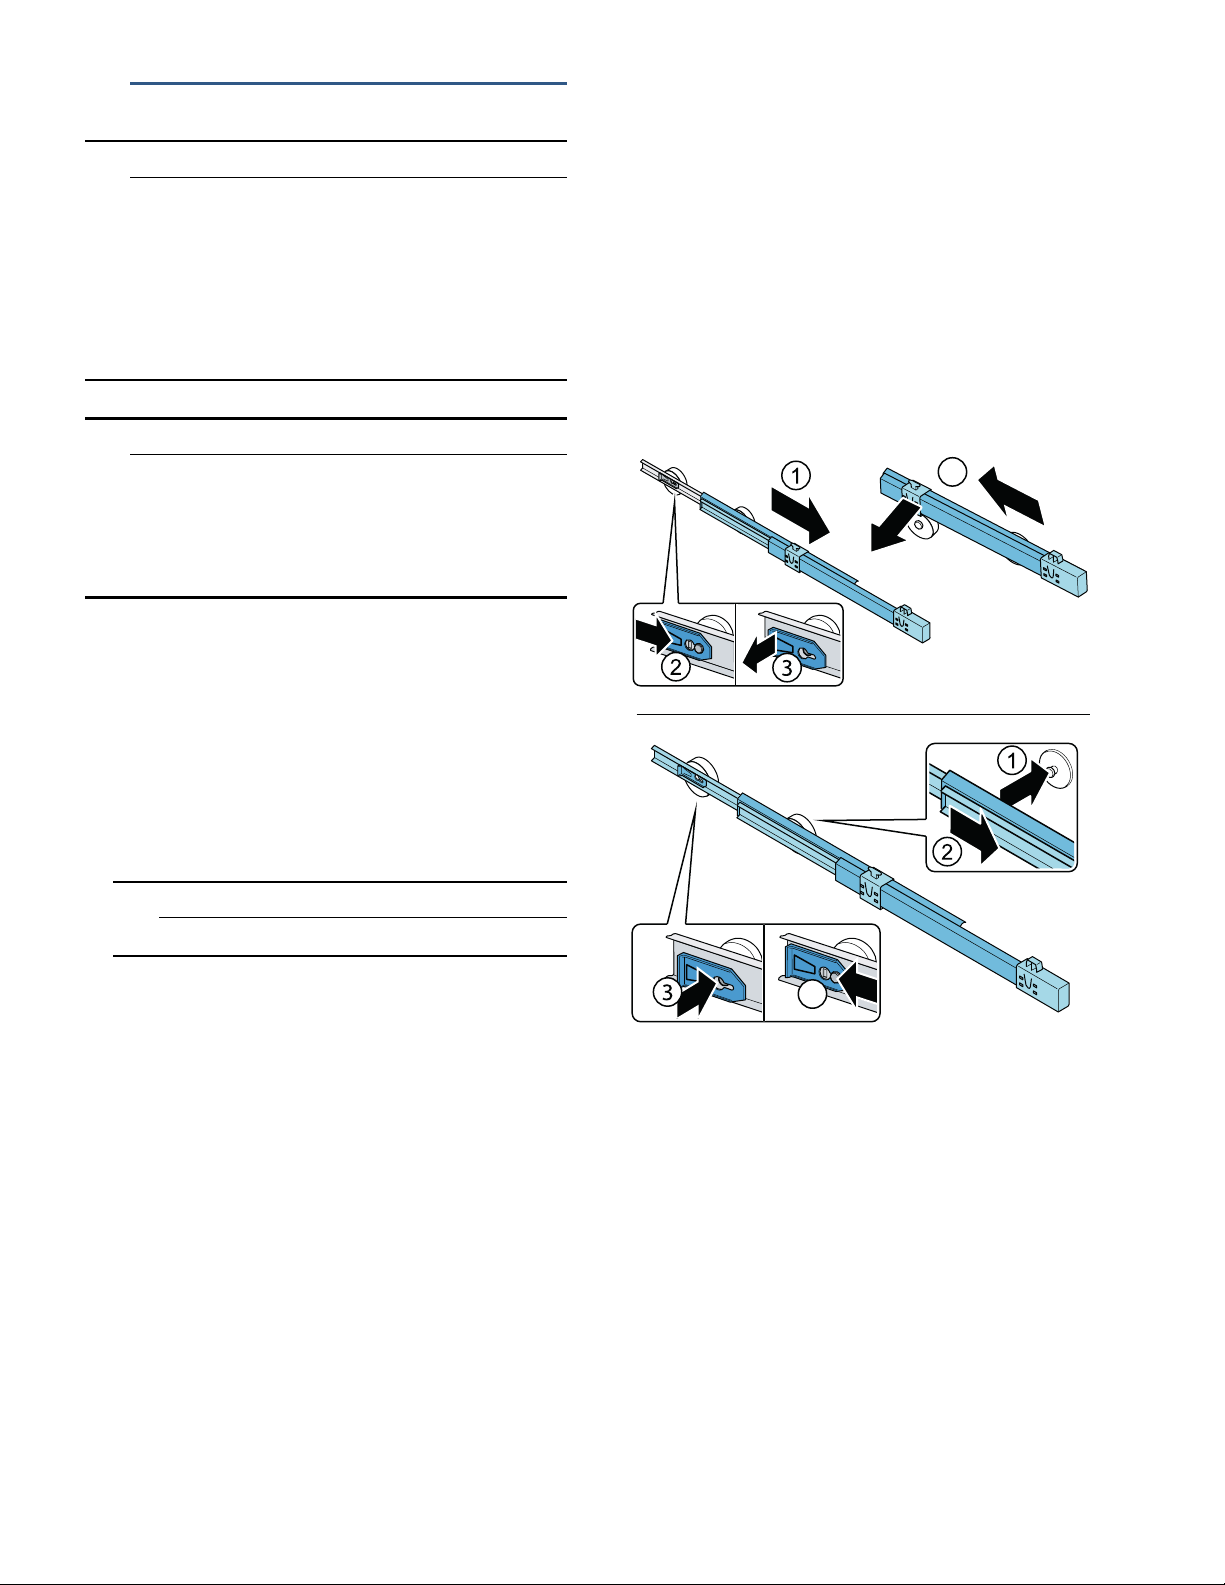
Telescopic rails
Removing telescopic rails
1. Pull out telescopic rail.
2. Push lock in the direction of the arrow.
3. Detach telescopic rail from the rear pin.
4. Push telescopic rail together, push backwards
above the rear pin, and disengage.
Installing telescopic rails
1. Place the extended telescopic rail on the front
pin.
2. Pull the telescopic rail forwards slightly until it
engages.
3. Insert telescopic rail on the rear pin.
4. Push lock backwards.
4
Proceed as follows:
1. Press ÿ power button.
2. Pull out the power plug or switch off the circuit
breaker.
3. Take out food and store in a cool location.
Place ice pack (if available) on the food.
4. Clean the appliance with a soft cloth, lukewarm
water and a little pH-neutral liquid detergent.
9 CAUTION
The rinsing water must not run into the lights.
5. Wipe door seal with clean water and dry
thoroughly with a cloth.
6. Switch appliance back on and load the food.
Cleaning the equipment
To clean, take the removable parts out of the
appliance.
~ "Equipment" on page 16
4
28
Cleaning en-us
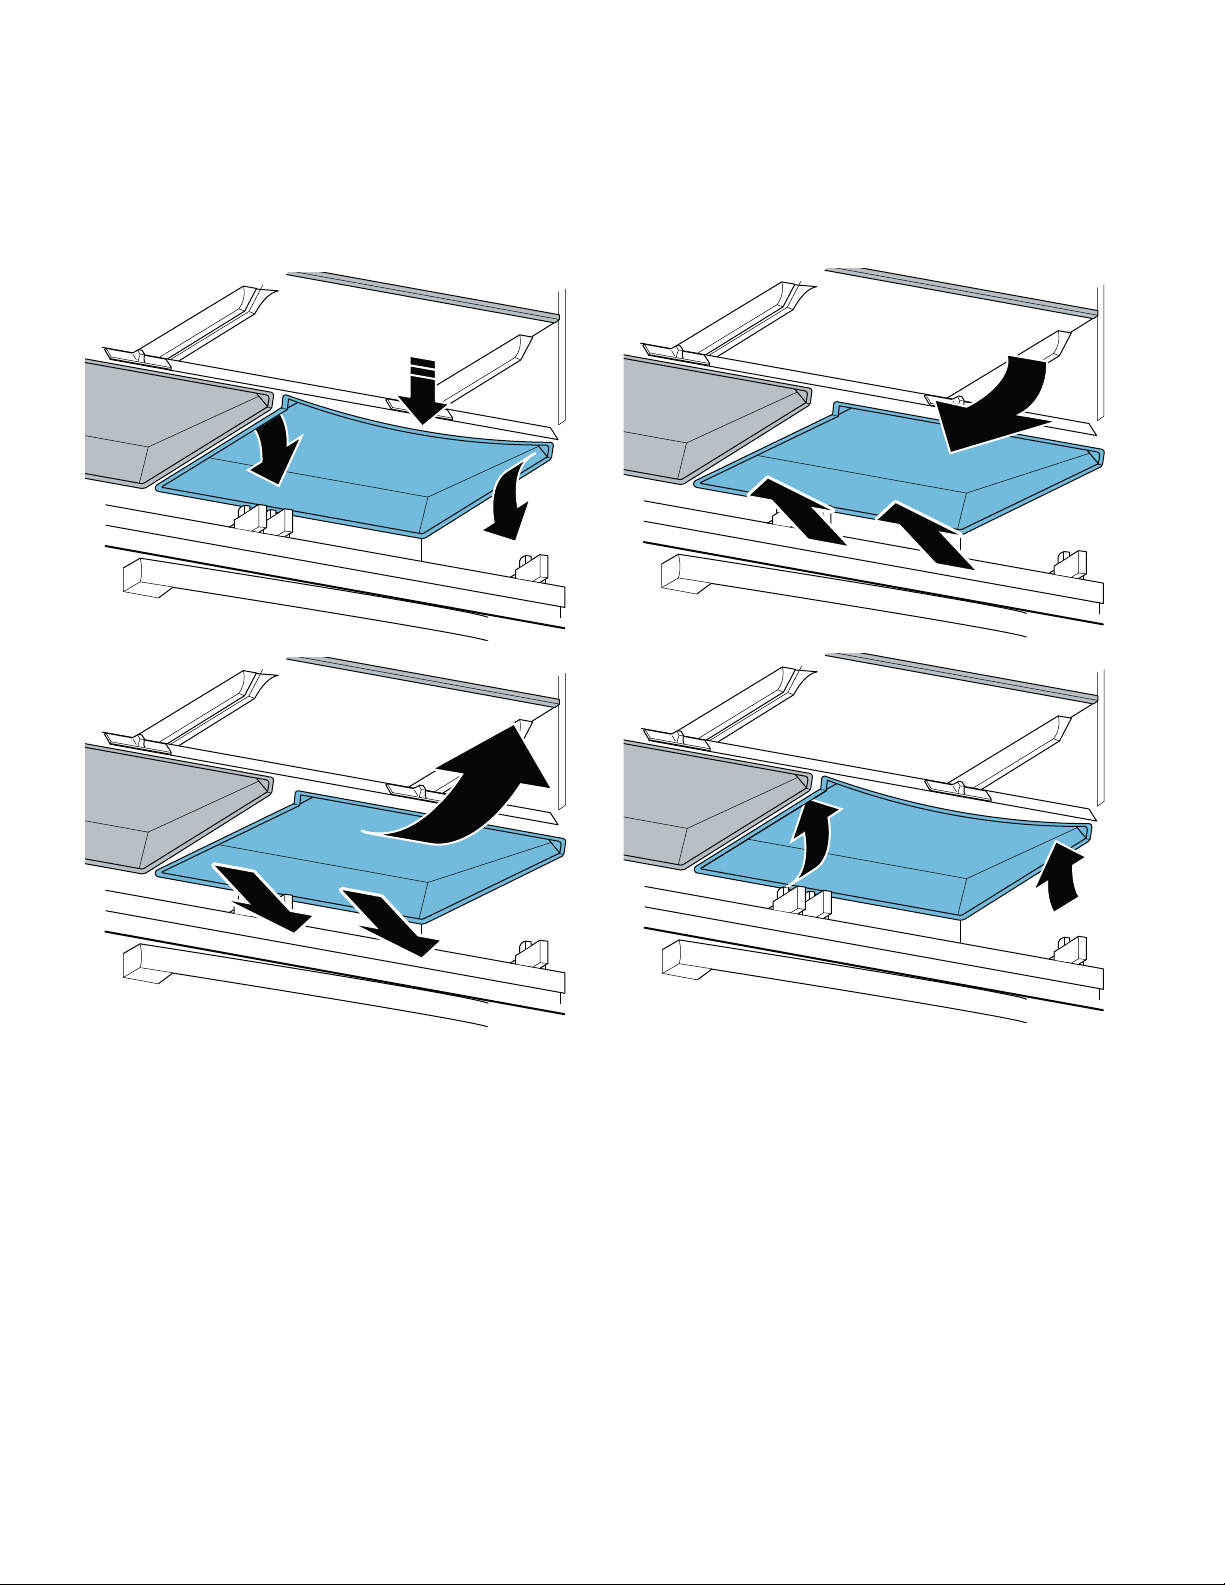
Vegetable bin cover
Remove the cover:
1. Take out the vegetable bin.
2. Bend down the cover slightly in the middle and
detach at the front on one side.
3. Detach the cover at the front on the other side.
4. Detach the cover at the back and take out.
Installing the cover:
1. Attach the cover at the back.
2. Attach the cover at the front on one side.
3. Bend down the cover slightly in the middle and
attach at the front on the other side.
Note: If the cover remains bent, move the humidity
controller to allow the cover to engage.
29
en-us Odors
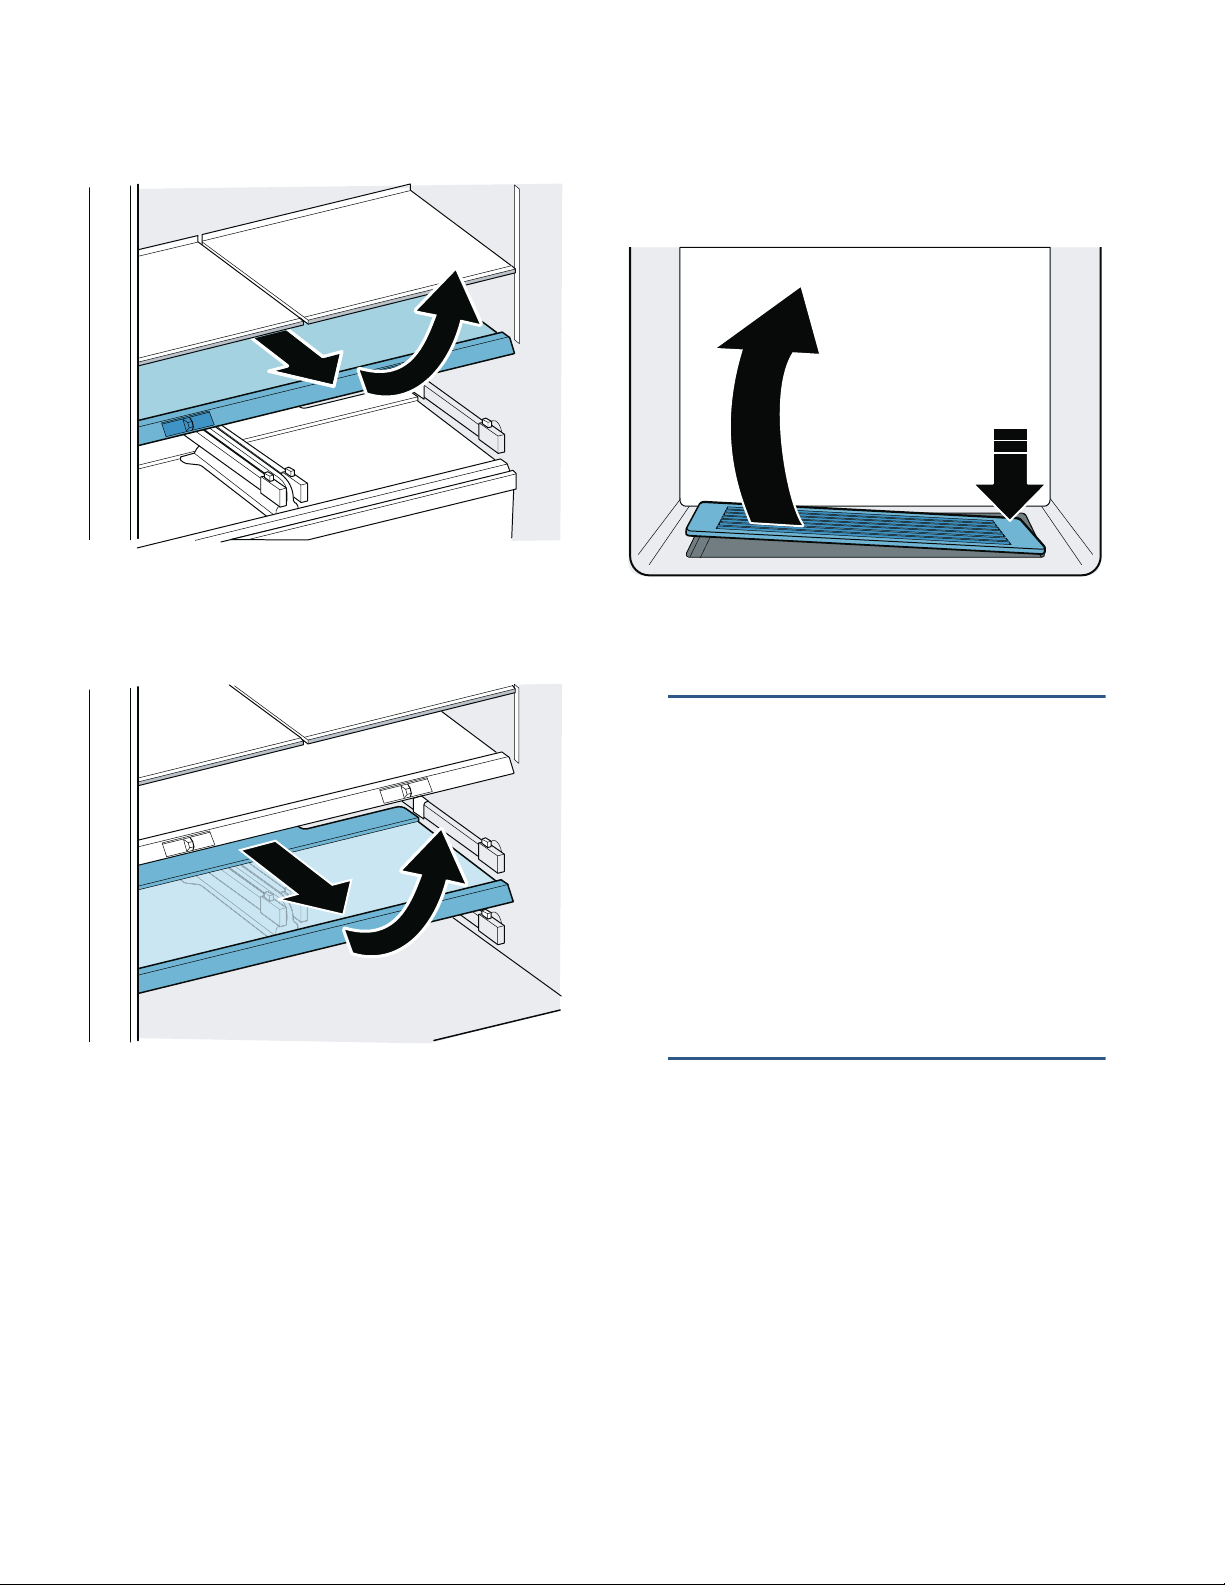
Shelf above the vegetable bin
1. Pull out the vegetable bin all the way.
2. Lift the shelf at the front and take out.
Shelf above the cold storage bin
1. Pull the cold storage bin all the way out.
2. Lift the shelf at the front and take out.
Drip tray
1. Press down and remove drip grate in top right
corner.
2. Wipe drips away with a soft cloth and clean the
drip tray with lukewarm water.
3. Re-insert drip grate.
lOdors
Odors
If you notice any unpleasant odors:
1. Switch off the appliance with the ÿ power button.
2. Take all food out of the appliance and look for
spoiled food or any spillage.
3. Clean the inside.~ "Cleaning" on page 28
4. Seal strong-smelling food.
5. Switch the appliance on again.
6. Arrange food in the appliance.
7. After 24 hours, check whether odors are building
up again.
9Lighting
Li ght i ng
Your appliance features a maintenance-free LED
light.
Only customer service or authorized technicians may
repair the light.
30
 Loading...