

Bosch ASL-APE3P-BASE, ASL-APE3P-BEXT, ASL-APE3P-CLI, ASL-APE3P-RDR, ASL-APE3P-VIDB Installation Manual
...Page 1

Access PE 3.0
en Installation Manual
Page 2

Page 3

Access PE 3.0 Table of Contents | en 3
Table of contents
1
1.1 Restrictions and options 6
1.2 Installation on one computer 8
1.3 Installation on multiple computers 9
1.4 System Prerequisites 10
2
2.1 Introduction 12
2.2 User Login 15
2.3 Menu and Tool bar 18
2.4 General system settings 22
2.5 Layout of the main dialog 27
2.6 Menu and tool bar 28
2.7 Layout of the main dialog 32
2.8 Menu and Tool bars 33
2.9 Enrollment Configuration 35
2.9.1 Enrollment via AMC connected readers 37
3
3.1 Requirements 43
3.2 Beginning the Installation 44
3.3 Language Selection and Preparing 44
3.4 License Agreement 47
3.5 Customer Information 48
3.6 Choosing the type of Installation. 49
3.6.1 Entering the Server for Client installations 50
3.7 Choosing the installation path 50
3.8 Choosing Components 53
3.8.1 Client Installation 55
3.9 Selecting supported languages 56
3.10 Default configuration language (server only) 57
3.11 Confirming Choices 58
3.12 Setup Status 59
3.13 Installation completed 60
System Overview 5
General 12
Installation 42
Bosach Access Systems GmbH 2014-06 | 3.0 | Installation Manual
Page 4

4 en | Table of Contents Access PE 3.0
4
Product usage 61
4.1 Licensing 61
4.1.1 License packages and their content 62
4.1.2 Activating licenses 65
4.2 Setting Server access rights 68
4.3 Changing the backdrop 69
4.4 Language settings 70
4.5 Configuring the system to your needs 72
4.6 Map Viewer and Alarm Management 73
4.6.1 Configuring a map 74
4.6.2 Adding a device to a map 78
4.7 X-Protect Integration 81
5
Deinstallation - Reinstallation 83
5.1 Deinstallation 83
5.1.1 Windows Software 84
5.1.2 Initialization 85
5.1.3 Confirming the Deinstallation 86
5.1.4 Close all programs 86
5.1.5 Performing an Export 87
5.1.6 Declining the Export 88
5.1.7 DbiTool 88
5.1.8 Setup Status 90
5.1.9 Completion and Reboot 91
5.2 Modify the software 92
5.3 Reinstallation/Update 94
5.3.1 Import 95
5.3.2 DbiTool 97
5.3.3 Check the Configuration 97
5.3.4 Installation completed 98
6
User rights 99
6.1 User rights 99
6.2 Setting user access rights 103
6.3 User handover and workstation security 104
2014-06 | 3.0 | Installation Manual Bosach Access Systems GmbH
Page 5

Access PE 3.0 System Overview | en 5
1
System Overview
Access Professional Edition System (hereunder referred to as
Access PE) consists of four modules
– LAC Service: a process which is in constant communication
with the LACs (Local Access Controllers – hereafter
referred to as Controllers). AMCs (Access Modular
Controllers) are used as Controllers.
– Configurator
– Personnel Management
– Logviewer
These four can be divided into server and client modules.
The LAC service needs to remain in constant contact with the
controllers because firstly it constantly receives messages from
them regarding movements, presence and absence of
cardholders, secondly because it transmits data modifications,
e.g. assignment of new cards, to the controllers, but mainly
because it carries out meta-level checks (access sequence
checks, anti-passback checks, random screening).
The Configurator should also run on the server; however it can
be installed on client workstations and operated from there.
The modules Personnel Management and Logviewer belong to
the Client component and can be run on the Server in addition,
or on a different PC with a network connection to the server.
The following Controllers can be used.
– AMC2 4W (with four Wiegand reader interfaces) - can be
extended with an AMC2 4W-EXT
– AMC2 4R4 (with four RS485 reader interfaces)
Bosach Access Systems GmbH 2014-06 | 3.0 | Installation Manual
Page 6

6 en | System Overview Access PE 3.0
1.1
Restrictions and options
You can use Access PE for systems that do not exceed the
following thresholds for connectable components and
manageable data volume.
– Max. 10,000 cards
– Up to three cards per person
– PIN length: 4 to 8 characters (configurable)
– PIN types:
– Verification PIN
– Identification PIN
– Arming PIN
– Door PIN
– Access variants:
– Only with card
– Only with PIN
– PIN or card
– Max. 255 time models
– Max. 255 access authorizations
– Max. 255 area-time authorizations
– Max. 255 authorization groups
– Max. 16 workstations
– Max. 128 readers
– Max. one I/O extension board (AMC2 8I-8O-EXT, AMC2
16I-16O-EXT or AMC2 16I-EXT) per Controller
– The following restrictions apply to each controller type:
2014-06 | 3.0 | Installation Manual Bosach Access Systems GmbH
Page 7

Access PE 3.0
System Overview | en 7
Controller AMC2 4W AMC2 4W
Readers/entrances
Max. readers per
4 8 8
with AMC2
4W-EXT
AMC2 4R4
AMC
Max. readers per
1 1 8
interface/bus
Table 1.1: System limits — readers and entrances
Video system — restrictions and options
– Max. 128 cameras
– Up to 5 cameras per entrance
– 1 identification camera
– 2 back surveillance cameras
– 2 front surveillance cameras
– You can configure one of these cameras as an alarm
and log book camera.
Offline Locking System (OLS) — restrictions and options
– Max. 1024 doors
– The number of entrances and authorization groups in the
authorizations depends on the dataset length that can be
written to the cards.
– Max. 15 time models
– Up to 4 periods per time model
– Max. 10 special days/holidays (from the online system)
Bosach Access Systems GmbH 2014-06 | 3.0 | Installation Manual
Page 8
8 en | System Overview Access PE 3.0
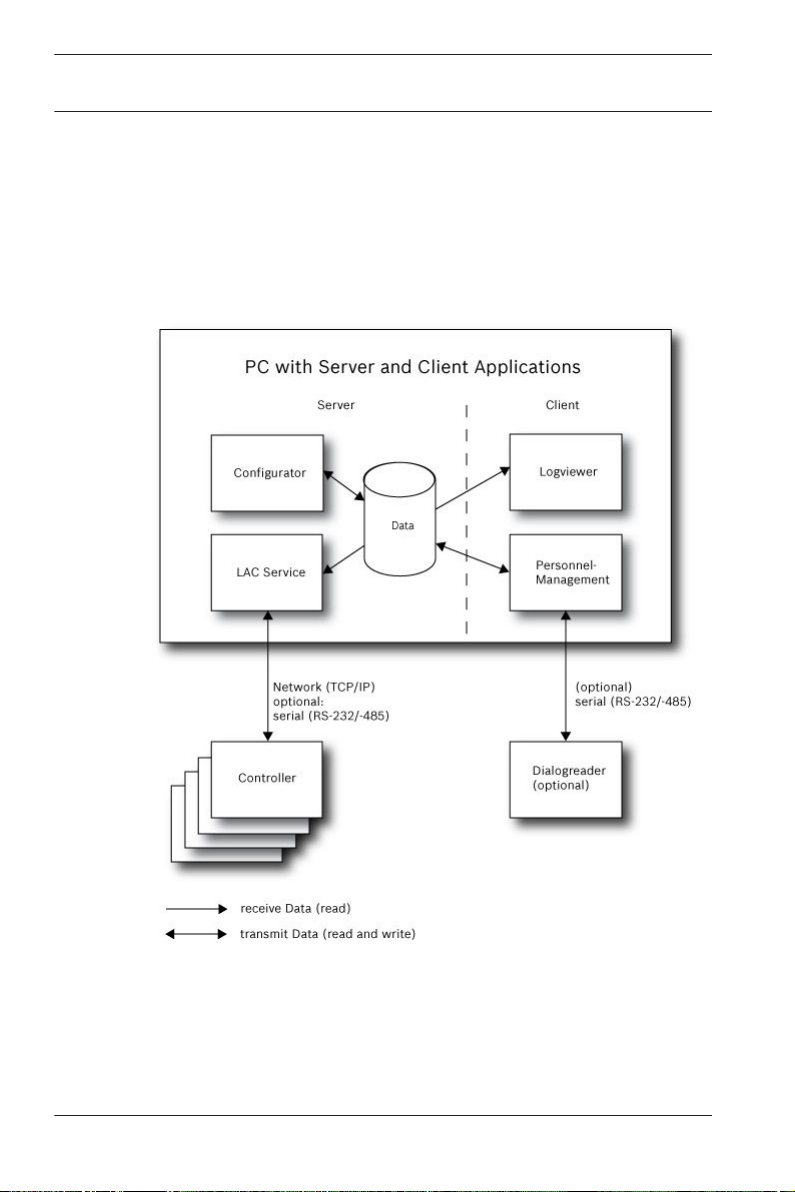
1.2
Installation on one computer
The following figure shows a complete Access PE system
installed on a single computer. Controllers can be connected via
a serial interface. If a dialog reader is used then this is also
connected via a serial interface.
Figure 1.1: System Overview – Single Computer Configuration
2014-06 | 3.0 | Installation Manual Bosach Access Systems GmbH
Page 9

Access PE 3.0 System Overview | en 9
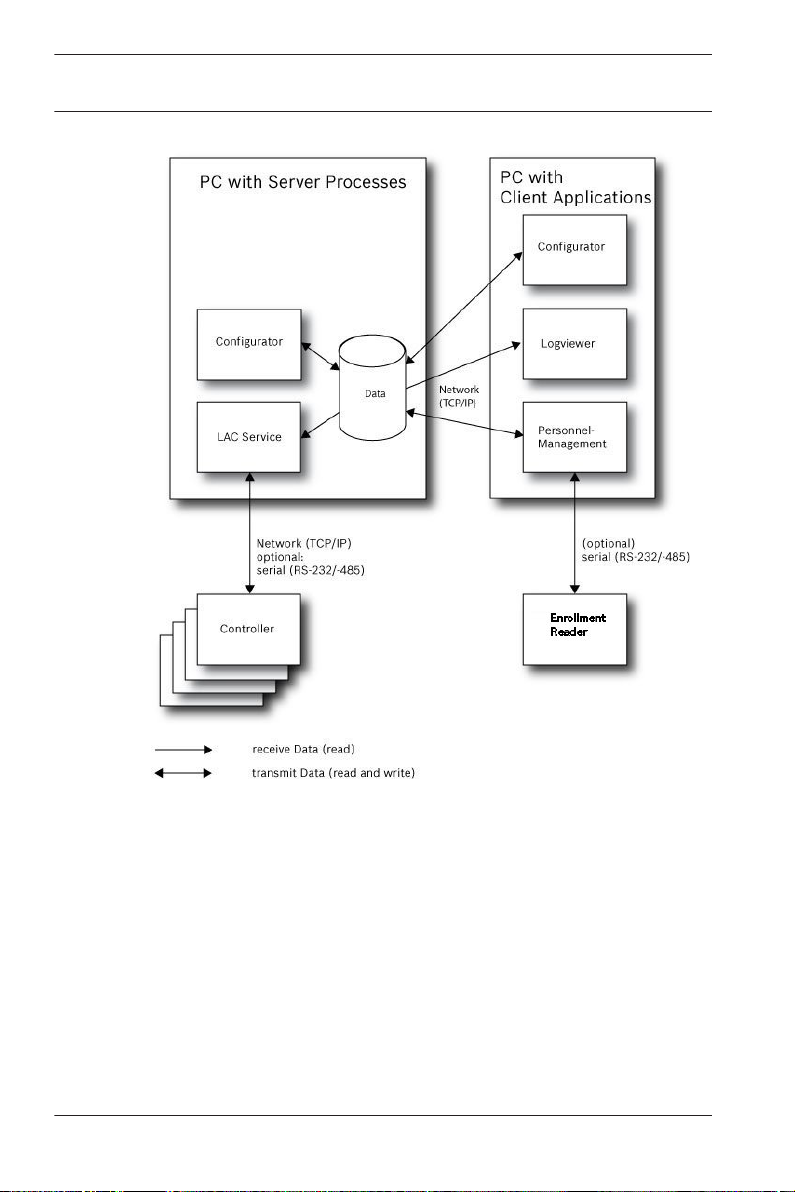
1.3
Installation on multiple computers
The following figure shows an Access PE system distributed
across 2 computers. This is particularly beneficial in cases
where the Server to which the Controllers are connected is in a
locked computer room, but the personnel data is maintained,
for example, by the personnel department elsewhere.
The Access PE Client can be installed on up to 16 computers,
which access common data on the Server via the network.
Client workstations can be configured to use two monitors.
Window positions maintained by the operating system, ensure a
familiar operators’ environment across login sessions.
Bosach Access Systems GmbH 2014-06 | 3.0 | Installation Manual
Page 10
10 en | System Overview Access PE 3.0
Figure 1.2: System overview – Distributed System
1.4
2014-06 | 3.0 | Installation Manual Bosach Access Systems GmbH
System Prerequisites
The installation of Access PE requires:
Operating Systems (one of):
– Windows XP SP2 Professional
– Windows XP SP3 Professional
– Windows 2008 Server
– Windows 7
Other software:
Page 11

Access PE 3.0 System Overview | en 11
– To run the AmcIpConfig application supplied (and the
Bosch Video SDK), you need the .NET Framework 4.0
platform.
– To create and display lists and reports, you must install
Crystal Reports applications.
Separate setups are available on the installation CD.
Hardware Requirements
Both Server an Client require a Standard Windows PC with:
– 4 GHz CPU
– 4 GB RAM at least
– 20 GB free disk space (Server)
– 1 GB free disk space (Client)
– 100 Mbit Ethernet Network Card (PCI)
– Graphical adapter with 1024x768 resolution and 32k colors
– Resolution support:
– 1024 by 768
– 1280 by 1024
– 2048 by 768
– 2560 by 1024
– CD/DVD-ROM Drive
– I/O Expansion Option
– USB Keyboard and Mouse
Notice!
Microsoft Windows XP Professional is required for any video
integration.
Please consult the documentation of the chosen devices and
ensure that you can use an operating system supported by both
software and devices.
Bosach Access Systems GmbH 2014-06 | 3.0 | Installation Manual
Page 12

12 en | General Access PE 3.0
2
2.1
General
Introduction
Access PE is an Access Control System which has been
designed to offer the highest standards of security and flexibility
to small and medium sized installations.
Access PE owes its stability and upgradeability to a 3-tier
design: The top tier is the administration level with its
controlling services. All administrative tasks are carried out
here, e.g. the registration of new cards and the assignment of
access rights.
The second tier is formed by the Local Access Controllers
(LACs) which govern each group of doors or entrances. Even
when the system is offline a LAC is able independently to make
access control decisions. LACs are responsible for controlling
the entrances, governing door opening times or requesting PINcodes at critical access points.
The third tier consists of card readers which, like the
Controllers, are identical across all BOSCH access controls.
They provide not only a consistently high degree of security, but
also a simple upgrade and expansion path for the system,
protecting previous investments.
Access PE multi-user version allows multiple workstations to
control the system. Customizable user rights levels regulate
access and guarantee security. In this way it is possible, for
example, to maintain card data from one workstation whilst
using another to verify whether an employee is present in the
building.
Access PE offers exceptionally flexible configuration of access
rights, time models and entrance parameters. The following list
gives an overview of the most important features:
Quick & Easy card Assignment
2014-06 | 3.0 | Installation Manual Bosach Access Systems GmbH
Page 13

Access PE 3.0
General | en 13
Cards (up to three) can be assigned to persons either manually
or using a dialog reader connected to a PC via a serial
connection. Only one card can be active per person at any one
time. When upgrading cards the old card is automatically
overwritten and becomes invalid, thus preventing old cards from
gaining access even if those responsible forgot or were unable
to cancel them.
Access Rights (including Group Privileges)
Each person can inherit group privileges as well as having
individual rights assigned to him. Privileges can be restricted by
area and time to an accuracy of one minute. Group privileges
can be used to grant and limit access rights for any or all
cardholders simultaneously. Group privileges can be made
dependent on time models which restrict their access to certain
times of day.
Access tracking
By defining Areas it is possible to track and enforce a correct
sequence of accesses. Even without monitoring, this
configuration makes it possible to display a cardholder's
location.
Anti-Passback
When a card has been read it can be blocked for a defined
period from entering at the same access point. Hence it is
possible to prevent "passback", where a user hands his card
back across a barrier to provide access for an unauthorized
person.
Automatic Cancelation of cards upon Expiration
Visitors and temporary staff frequently require access for a
limited period only.
cards can be registered for a specific time period, so that they
automatically lose their validity when that period expires.
Time Models and Day Models
Bosach Access Systems GmbH 2014-06 | 3.0 | Installation Manual
Page 14

en | General Access PE 3.0
14
A cardholder can be assigned to specific time models which
regulate the hours in which that person has access. Time
models can be defined flexibly using day models which
determine how specific weekdays, weekends, holidays and
special days deviate from normal working days.
Identification via PIN-Code
Instead of a card a person can use a special PIN-Code to enter.
Verification via PIN-Code
Particularly sensitive areas can be programmed to require
additional PIN-Codes. This protection can in turn be made
dependent on time models, so that, for instance, a PIN-Code is
only required for access during holiday times or outside of
defined working hours.
Flexible Door Management
Flexible parameterization of individual door models allows an
optimum balance between security and comfort. The "shunt" or
alarm suppression period can be individually specified to
regulate for how long a door may remain open. In cooperation
with an alarm system the access point can then optionally be
locked.
Periodic Door Release
In order to facilitate access, door alarms can be shunted to
release doors for specific periods. Door release periods can be
defined manually or automatically via a time model.
Time and Attendance
Access points can be parameterized to record ingress and
egress for time & attendance purposes.
Card Design
The graphical add-in module Card Personalization (CP) is fully
integrated into the Access Control system to allow the operator
to create cards without switching applications.
Assignment of Photos
If the add-in module Card Personalization (CP) is not activated
photographic identification can nevertheless be imported and
associated with cardholders.
2014-06 | 3.0 | Installation Manual Bosach Access Systems GmbH
Page 15
Access PE 3.0 General | en 15
Offline locking system
Areas which are not covered, for whatever reason, by the highavailability online access control system can nevertheless be
locked offline.
Administration of video devices
Entrances can be equipped additionally with cameras to identify
and track the movements of persons using them.
2.2
User Login
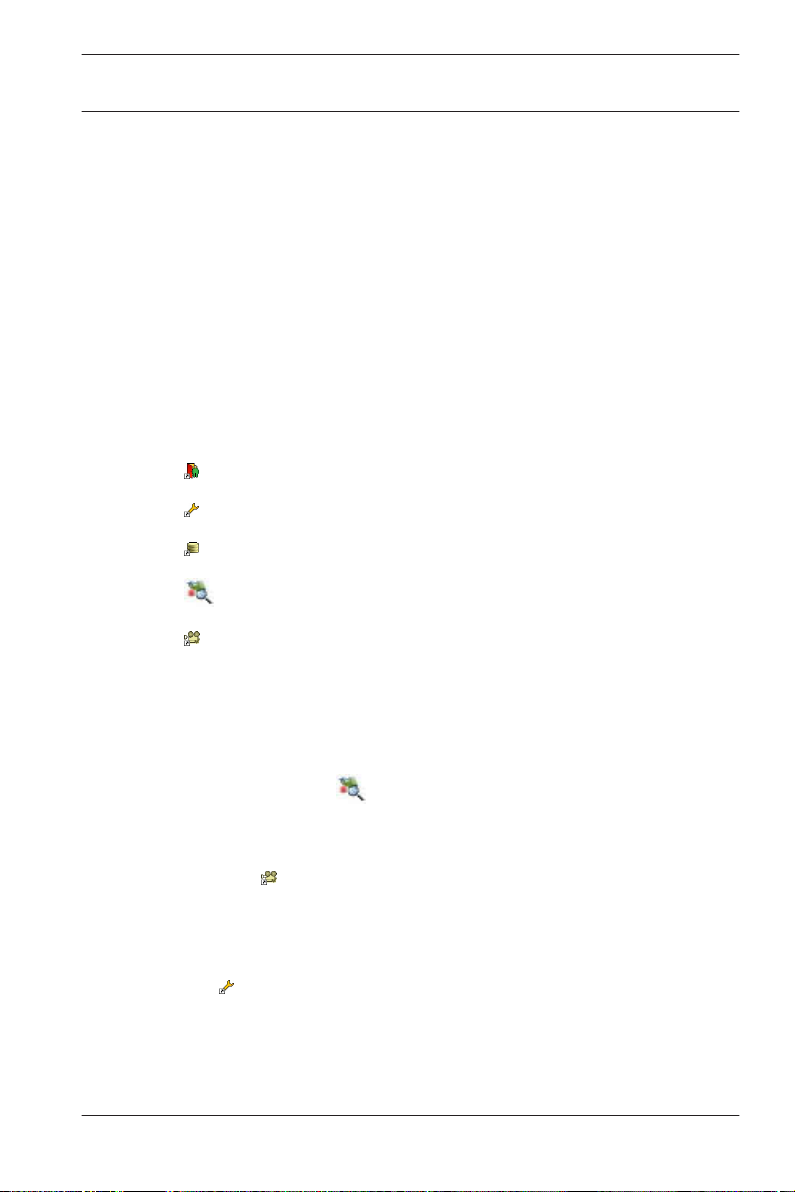
– Start the user applications using the desctop icons:
Personnel Management
Configurator
Logviewer
Map and Alarm Management
Video Verification
or choose the tools via : Start > Programs > Access
Professional Edition
– Start the : Map & Alarm Management application using the
desctop icon
Professional Edition > Map & Alarm Management.
– Start the : Video Verification application using the desctop
or via : Start > Programs > Access Professional
icon
Edition > Video Verification.
– Start the : Configurator application using the desctop icon
or via : Start > Programs > Access Professional Edition >
Configurator.
or via : Start > Programs > Access
Bosach Access Systems GmbH 2014-06 | 3.0 | Installation Manual
Page 16

en | General Access PE 3.0
16
– Start the : Logviewer application using the desctop icon
or via : Start > Programs > Access Professional Edition >
Logviewer.
– Start the : Personnel Management application using the
desctop icon
or via : Start > Programs > Access
Professional Edition > Personnel Management.
The system's applications are protected from unauthorized use.
A login with a valid username and password is required in order
to invoke the dialog-based subsystems.
The upper drop-down list can be used to select the desired
interaction language. The default is that language which was
used to install the application. If there is a change of user
without restarting the application then the previous language is
retained. For this reason it is possible for a dialog box to appear
in an undesired language. In order to avoid this, please log in to
Access PE again.
Access PE applications can be run in the following languages:
– English
– German
– Russian
– Polish
– Chinese (PRC)
– Dutch
– Spanish
2014-06 | 3.0 | Installation Manual Bosach Access Systems GmbH
Page 17
Access PE 3.0 General | en 17
– Portuguese (Brazil)
Notice!
All facilities such as device names, labels, models and user-
rights schemes are displayed in the language in which they
were entered.Similarly buttons and labels controlled by the
operating system may appear in the language of the operating
system.
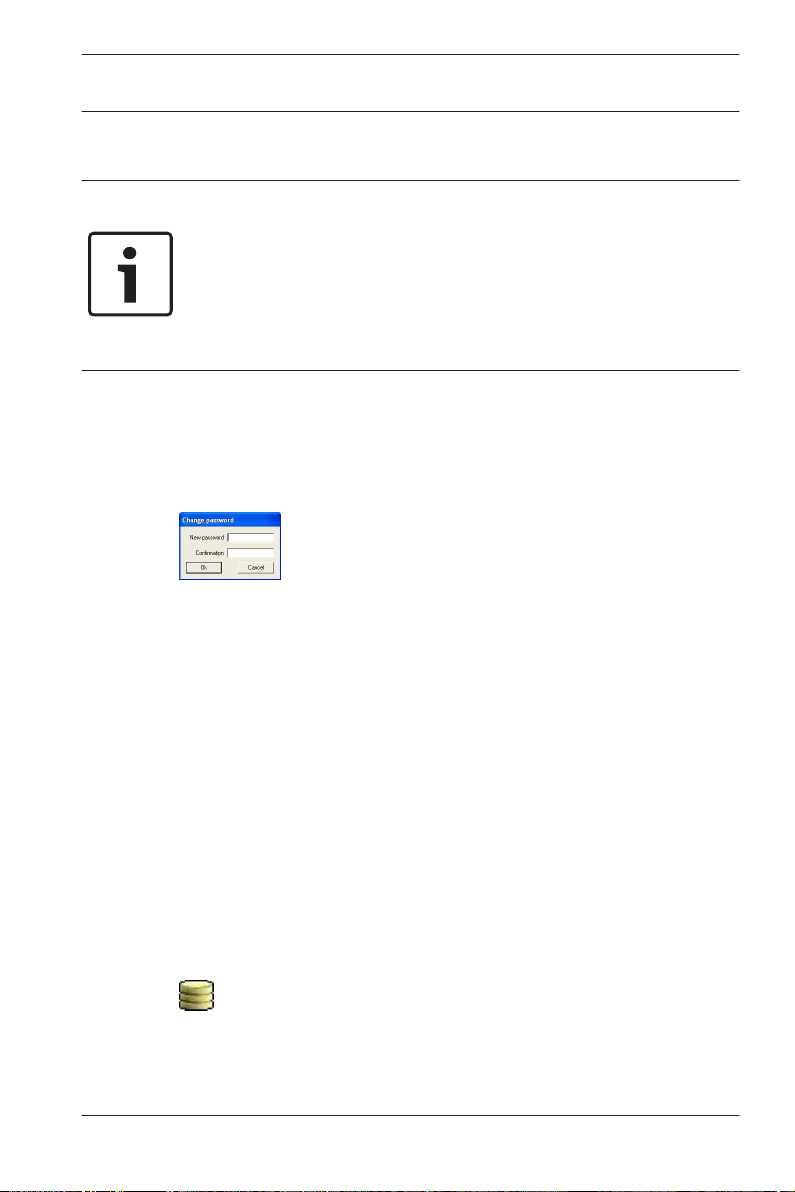
If a valid username/password pair are entered then the button :
Change Password appears. This can be used to start a new
dialog to change the password.
The button Start the application checks the user's privileges
and, based on these, starts the application. If the system is
unable to authenticate the login then the following error
message appears: : Wrong username or password!
Login via Personnel Management
If the user is already logged into the Access PE Personnel
Management application, and if the user's rights include the
other tools, he can start the : LogViewer, : Configurator, : Alarm
Management and : Video Verification using the toolbar buttons.
If the user is already logged into the Access PE Personnel
Management application, and if the user's rights include :
LogViewer, then : LogViewer may be invoked directly using the
button in the tools list, without requiring a separate login to
the LogViewer application.
Bosach Access Systems GmbH 2014-06 | 3.0 | Installation Manual
Page 18
18 en | General Access PE 3.0
If the user is already logged into the Access PE Personnel
Management application, and if the user's rights include :
Configurator, then : Configurator may be invoked directly using
the button in the tools list, without requiring a separate
login to the Configurator application.
If the user is already logged into the Access PE Personnel
Management application, and if the user's rights include : Video
Verification, then : Video Verification may be invoked directly
using the
login to the Configurator application.
If the user is already logged into the Access PE Personnel
Management application, and if the user's rights include : Alarm
Management, then : Alarm Management may be invoked
button in the tools list, without requiring a separate
directly using the
separate login to the Configurator application.
2.3
2014-06 | 3.0 | Installation Manual Bosach Access Systems GmbH
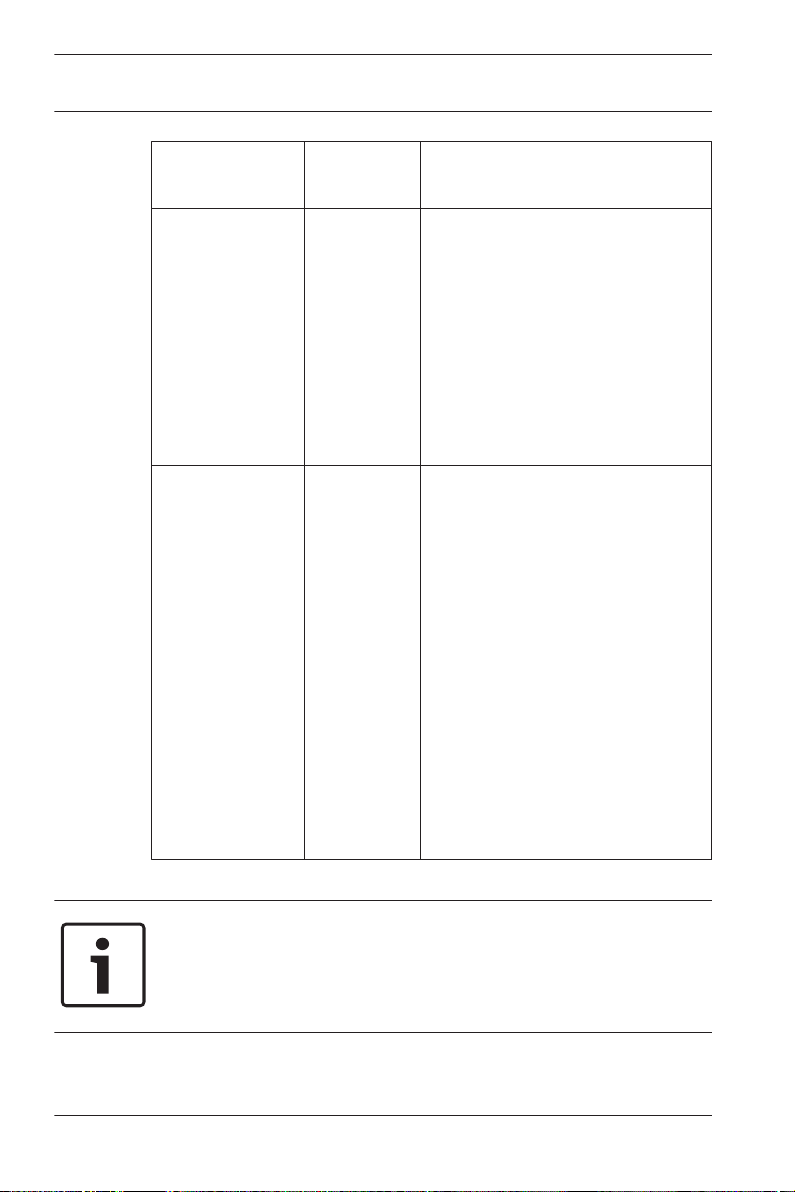
Menu and Tool bar
The following functions can be invoked via the menus, the icons
in the toolbar or specific keyed shortcuts.
Function Icon/
Menu File
New
button in the tools list, without requiring a
Description
Shortcut
Clears all configuration dialog
Crtl + N
boxes (except for default
settings) in order to define a
new configuration.
Page 19
Access PE 3.0 General | en 19
Function Icon/
Description
Shortcut
Open...
Crtl + O
Opens a dialog box to select a
different configuration for
loading.
Save
Saves changes into the current
configuration file.
Crtl + S
Save as... Saves the current configuration
into a new file.
Activate
Configuration
Activates a loaded configuration
and saves the hitherto active
configuration.
Send
Configuration to
Propagates saved configuration
changes to the LAC-Service.
LAC
List recently
active
configurations
Opens configurations directly,
circumventing the Open
function's selection dialog.
Exit Shuts down Access PE
Configurator.
Function Icon/
Description
Shortcut
Menu View
Tool bar Toggles display of the tool bar
(default = on).
Status bar Toggles display of the status bar
at the bottom edge of the
window (default = on).
Bosach Access Systems GmbH 2014-06 | 3.0 | Installation Manual
Page 20

20 en | General Access PE 3.0
Function Icon/
Description
Shortcut
Menu Configuration
General Opens the General Settings
dialog for setting up Controllers
and general system parameters.
Input signals Opens the dialog box for
parametrizing input signals.
Output signals Opens the dialog box for
parametrizing output signals.
Entrances Opens the Entrances dialog for
parametrizing doors and card
readers.
Areas Opens the Area Configuration
dialog for dividing the protected
installation into virtual areas.
Holidays Opens the Holidays dialog box
for defining holidays and special
days.
Day Models Opens the Day Models dialog
box for defining time periods
within a day for the activation of
access functions.
Time Models Opens the dialog Time Models
for defining timezones
dependent on days of the week
or calendar.
2014-06 | 3.0 | Installation Manual Bosach Access Systems GmbH
Page 21
Access PE 3.0 General | en 21
Function Icon/
Description
Shortcut
Personnel
Groups
Opens the dialog box Personnel
Groups for dividing personnel
into logical groups.
Access
Authorization
Groups
Opens the dialog box Access
Authorization Groups for
defining groupings of
authorizations to entrances.
Offline locking
system
Opens the Offline locking
system dialog for configuring
special elements of the
installation (Entrances, Time
models, Authorization groups).
Display Texts Opens the dialog box Display
texts for editing the texts to be
displayed at the card readers.
Log Messages Opens the dialog box Log
Messages for editing and
categorizing log messages.
Additional
personnel fields
Opens the dialog box
Additional personnel fields for
defining data fields for
personnel.
Wiegand - cards Opens the dialog box Wiegand-
cards for defining the structures
of card data.
Administering
video devices
Opens the Video devices dialog
for configuring cameras to be
used in video verification.
Bosach Access Systems GmbH 2014-06 | 3.0 | Installation Manual
Page 22
22 en | General Access PE 3.0
2.4
Function Icon/
Shortcut
Map Viewer and
Alarm
management
Menu ? (Help)
Help topics Opens this help text.
About Access
Professional
Edition Configurator
Displays general information
Description
Opens the Map Viewer for an
areal view of maps and control
devices and the alarm list for
alarm handling.
about Access Professional
Edition - Configurator
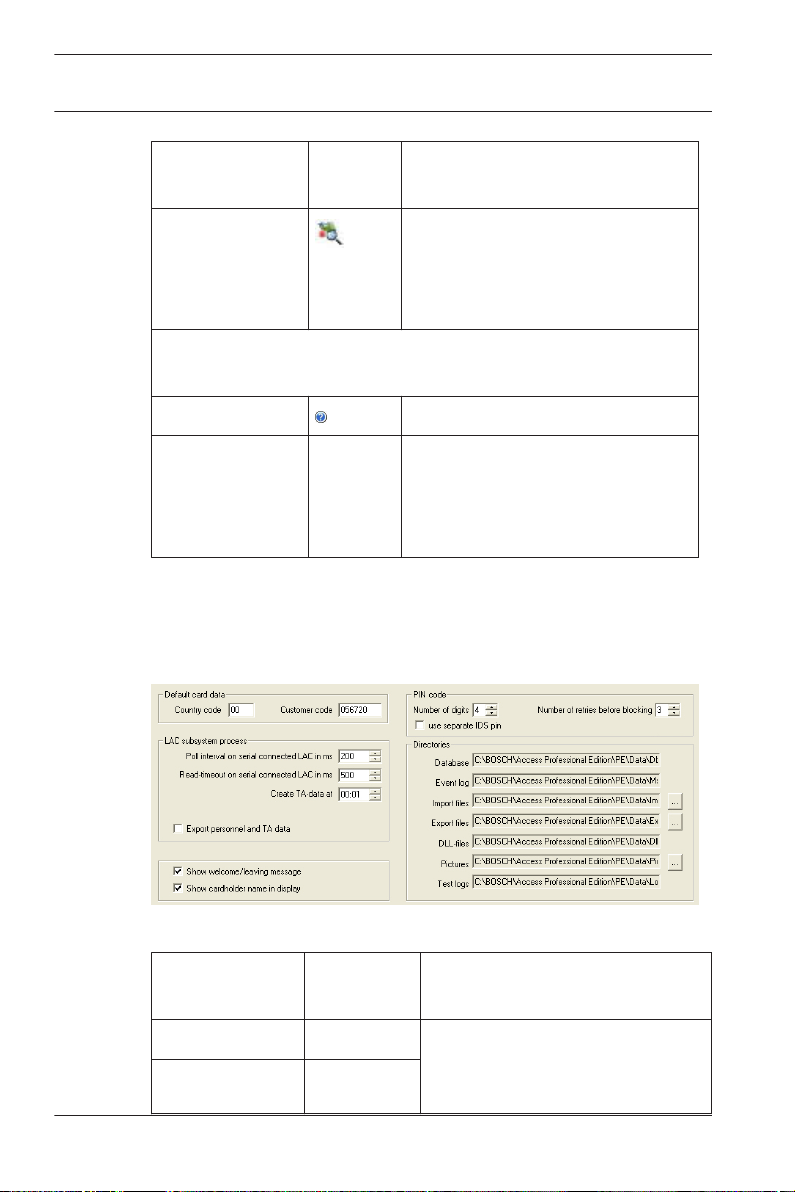
General system settings
General system settings are displayed below the list of
controller settings. These are valid for all installations.
Parameter
Country Code 00 Some card data are appended
Customer Code 056720
2014-06 | 3.0 | Installation Manual Bosach Access Systems GmbH
Default
value
Description
to the manually entered card
number.
Page 23

Access PE 3.0 General | en 23
Parameter Default
Description
value
Poll interval on
serial
connected LAC
in ms
Read-Timeout
on serial
connected LAC
in ms
200 The time interval in milliseconds
between pollings by the LACService to verify intact
connections to a controller.
500
Range of values for poll interval:
1 to 500
Possible values for readtimeout: 1 to 3000
Create TA dataat00:01 Specification of the time at
which the Time & Attendance
data file should be created.
Export
personnel and
TA data
deactivated When activated this option
causes time & attendance data
to written continuously to the
export file.
When not activated the data file
is created at the time specified
by the parameter Create TA
data at.
The file containing attendance time-stamps is created in the
following directory:
C:\Program Files\Bosch\Access Professional Edition\PE\Data
\Export
Under the name TA_<Current date YYYYMMDD>.dat
Bosach Access Systems GmbH 2014-06 | 3.0 | Installation Manual
Page 24

24 en | General Access PE 3.0
Parameter Default
value
Show welcome/
activated Given appropriate reader type
leaving
message
Show
aktiviert Readers with display will show
cardholder
name in display
Number of
4 Determines the number of
digits
Description
and settings (Arriving, Leaving
or Check ok in the Entrances
dialog) the reader will display
those welcome and leaving
texts which are stored for the
cardholder in the Personnel
Data dialog of the Personnel
Management application.
Does not apply to Wiegand
readers.
the Display Name as stored in
the cardholder's Personnel
Data.
Does not apply to Wiegand
readers.
digits a verification or arming
PIN requires.
This setting applies also to the
door PIN which can be set
during the configuration of
entrances.
Possible values: 4 to 8
2014-06 | 3.0 | Installation Manual Bosach Access Systems GmbH
Page 25

Access PE 3.0 General | en 25
Parameter Default
value
use separate
If no separate IDS PIN is set,
IDS PIN
Description
then a verification PIN can be
used to arm the IDS.
Only if the check box is
selected do the input fields for
the arming-PIN become active
in the Personnel dialog screen.
In this case the verification PIN
can no longer be used to arm
the IDS.
Bosach Access Systems GmbH 2014-06 | 3.0 | Installation Manual
Page 26
26 en | General Access PE 3.0
Parameter Default
value
Count of retries
3 Number of failed attempts to
before blocking
Directory paths
to:
Database
Log file
Import files
Export files
DLL files
Image data
Test-Logging
C:\Program
Files
\BOSCH
\Access
Professiona
l Edition\PE
\Data...
\Db
\MsgLog
\Import
\Export
\Dll
\Pictures
\Log
Description
enter the PIN. If the cardholder
mistypes the PIN this many
times then s/he will incur a
system-wide block which can
only be removed by an
authorized system user
(Personnel Management).
Possible values: 1 to 9
These are the default paths. The
directories for import, export
and image files can be changed.
Notice!
When using Wiegand controllers and readers, in order to use
Identification-, arming- or door-PINs the Wiegand card definition
PIN or Card (Nr. 6) needs to be activated.
2014-06 | 3.0 | Installation Manual Bosach Access Systems GmbH
Page 27
Access PE 3.0 General | en 27
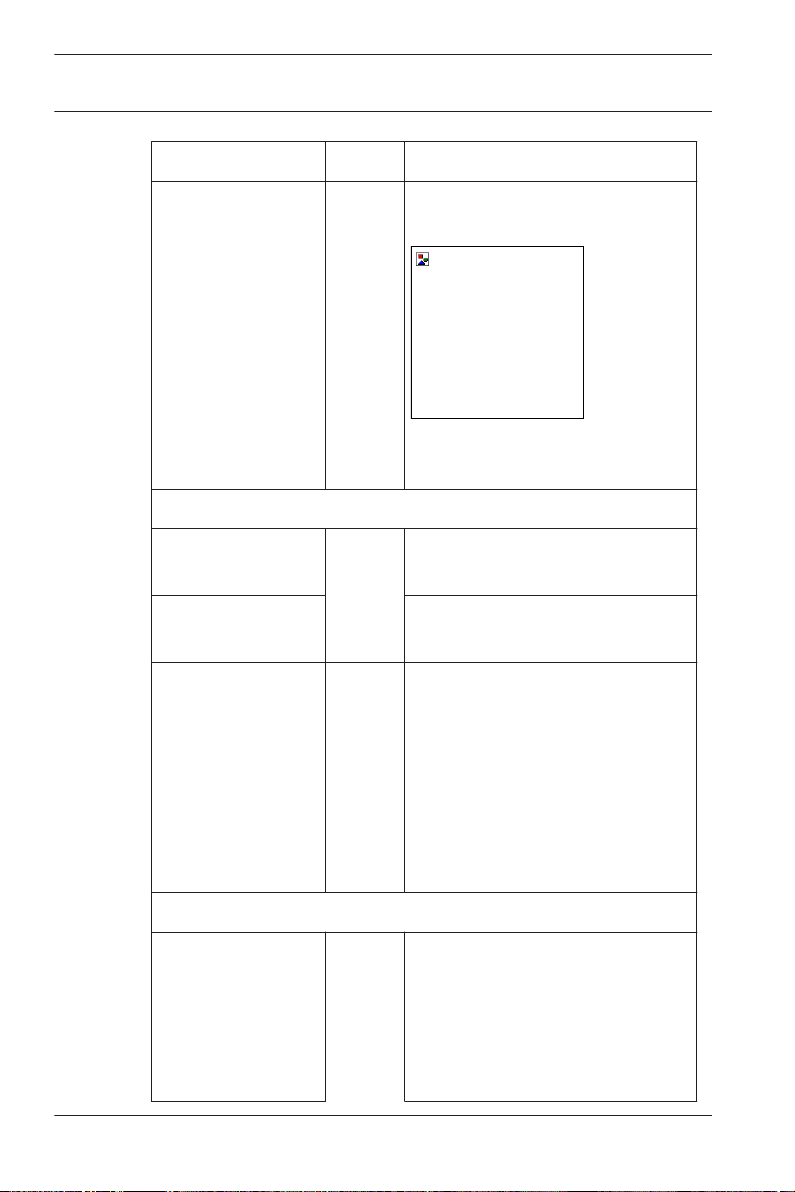
2.5
Layout of the main dialog
The dialog consists of the following parts:
1 = Menu bar — contains dialog functions displayed
according to the menu order.
2 = Toolbar — contains shortcut keys for the most
important dialog functions.
3 = Title bar — conforms to Windows standard and
contains buttons for minimizing or closing the dialog
window. The name of the registered user appears in
square brackets.
4 = Personnel table — lists all people known in the system
along with their attendance status (authorization and
location).
Bosach Access Systems GmbH 2014-06 | 3.0 | Installation Manual
Page 28

28 en | General Access PE 3.0
5 = Dialog field — the first time this field is opened or
when no user is logged in, it shows a neutral image
(map of the world). When an entry is selected from the
Personnel list, this person's data is displayed.
6 = Online swipe — lists the last five people (with
database image) that have swiped their cards at the
entrance selected.
7 = Device status — lists the configured devices and
entrances along with their connection status. Enables
door control functions.
8 = Event display — faults are indicated by a flashing red
bar (flashes three times) with details on the cause.
9 = Status bar — displays information on buttons and
menu entries that are controlled with the cursor.
Status display on card personalization program (CP),
dialog readers and LAC service.
When you enable the Video Verification component, additional
facilities will be added to this dialog; see Personnel
Management.
When you enable the Video Verification component, additional
facilities will be added to this dialog.
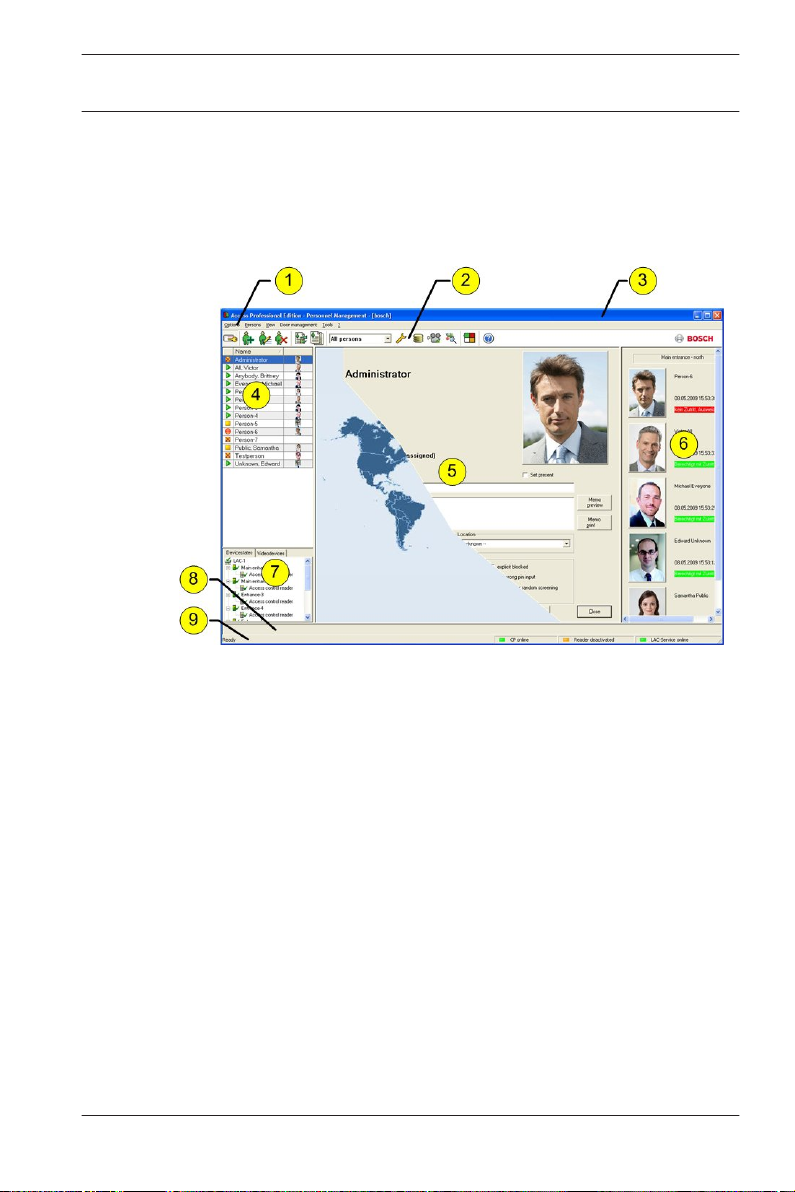
2.6
2014-06 | 3.0 | Installation Manual Bosach Access Systems GmbH
Menu and tool bar
The following functions are available via the menus or the icon
buttons.
Function Icon Description
Menu Options
Refresh Refreshes the Personnel list
Page 29
Access PE 3.0 General | en 29
Function Icon Description
Exit Exits the Access PE Personnel
Management application
Menu Persons
New person Opens a blank personnel and
card data dialog
Modify person Opens the personnel and card
data dialog with the data of the
selected person.
Delete person Deletes the selected person
(after confirming a safety check
dialog).
Transmit selected
person to the LAC
service
Transmit all
persons to the
LAC service
Set all persons
absent
Transmits the selected person's
data to the LAC service and
reports success.
Transmits all persons' data to
the LAC service and reports
success.
Sets all persons absent (after
confirming a safety check
dialog).
Set location of all
persons present
to unknown
Sets the location of all persons
to unknown and deactivates
access tracing for the next
booking of each person.
View/print reports Calls the dialog for creating
report lists.
Bosach Access Systems GmbH 2014-06 | 3.0 | Installation Manual
Page 30
30 en | General Access PE 3.0
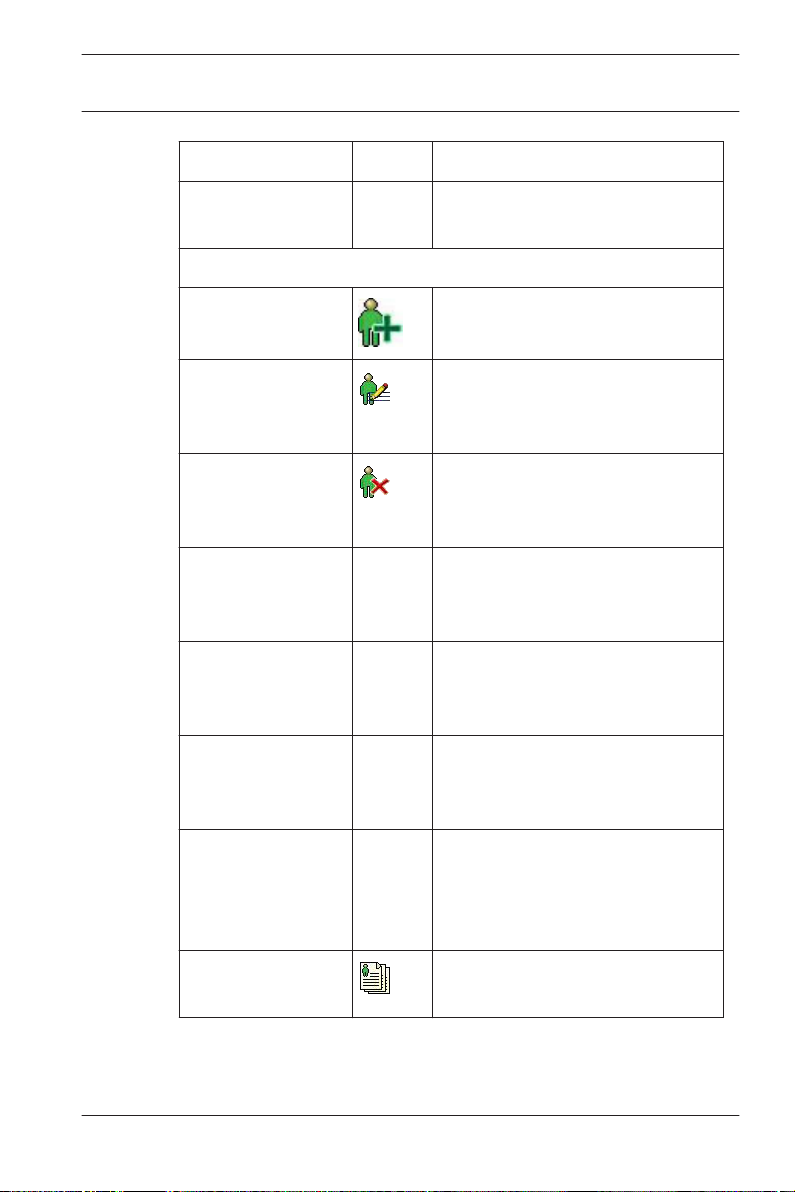
Function Icon Description
List
control
Restricts the persons shown to
those of the selected group.
Menu View
Symbol bar Toggles display of the tool bar.
Default = on.
Status bar Toggles display of the status
bar. Default = on.
Personnel data:
State
Card No.
Personnel-No.
Company
Personnel Group
Choice of columns displayed in
the personnel overview in
addition to symbol and name
columns.
Default = State - Company -
Location
Phone
Location
Menu Door management
open door These
functio
ns are
The entrance selected in the
device list is displayed and can
be opened (one-off).
also
availabl
e via
2014-06 | 3.0 | Installation Manual Bosach Access Systems GmbH
Page 31

Access PE 3.0 General | en 31
Function Icon Description
Long-term open
the
context
menu
The entrance selected in the
device list is displayed and can
be opened (long-term).
(right
lock door The entrance selected in the
click on
the
desired
device list is displayed and can
be locked.
door/
entranc
e)
Menu Tools
User logon Log in/off Personnel
management.
Execute the
Configurator
Executes Configurator and
transfers data from personnel
management.
Execute log
viewer
Executes Log viewer and
transfers data from personnel
management.
Execute Video
verification
Execute Alarm and
Map management
Starts the application for
executing video verification.
Starts the Map viewer and
Alarm management processing
application.
Video panel Shows four displays in the
dialog field for individual video
camera feeds.
Properties Opens a dialog box for general
system settings.
Menu ? (Help)
Bosach Access Systems GmbH 2014-06 | 3.0 | Installation Manual
Page 32

32 en | General Access PE 3.0
Function Icon Description
Help topics Opens this help file.
2.7
About Access
Professional
Edition Personnel
Management
Displays information about
Personnel Management.
Layout of the main dialog
1 = Menu bar - Contains all dialog functions arranged in
menus.
2 = Tool bar - Contains the most important dialog
functions as icon buttons
3 = Title bar - Conforms to Windows standard and
contains buttons to minimize and close the main
dialog window. The name of the current user is
displayed in square brackets.
2014-06 | 3.0 | Installation Manual Bosach Access Systems GmbH
Page 33

Access PE 3.0 General | en 33
4 = Device status - List of the configured devices and
entrances along with their connection status.
5 = Message list - List of messages arrived hitherto. The
display can be modified by specific filter settings.
6 = Filter selection - Predefined and customized filters
can be selected from the combo-box.
7 = Alarm activation - Triggers the activation/
deactivation of alarms for messages. An incoming
message can be accompanied by an acoustic signal.
8 = Status bar - Dates of the log files opened. Status of
the LAC Service. Alarm settings.
2.8
Menu and Tool bars
The following functions are available for log evaluation via
menus and icon buttons.
Menu Function Icon
button
File Print... Print the log messages
Exit Closes the LogViewer
Filter Filter
definition
Description
displayed
application.
Opens the message
filtering dialog.
Bosach Access Systems GmbH 2014-06 | 3.0 | Installation Manual
Page 34

34 en | General Access PE 3.0
Menu Function Icon
button
Continuous
mode on
Continuous
mode off
Events
previous
day
Description
Starts continuous
message display. This
icon is only active
when the function is
not already running
and the message filter
is set to the current
day.
Continuous message
display is the default
setting.
Pauses the continuous
message display. This
icon is only active
when continuous
message display is
running.
Switch to previous
day's messages.
Events next
day
Switch to next day's
messages.
View Symbol bar Hides/Displays the
tool bar.
Default = on.
Status bar Hides/Displays the
status bar.
Default = on.
without a menuitem
2014-06 | 3.0 | Installation Manual Bosach Access Systems GmbH
Page 35

Access PE 3.0 General | en 35
2.9
Menu Function Icon
button
? (Help) Help topics Opens this help file.
About
LogViewer
Opens Help About
Description
Access PE LogViewer.
Enrollment Configuration
Enrollment Readers (RS 232) > Tools > Settings calls a dialog
in which it is possible to perform basic configuration tasks
(activate, modify) from any workstation.
– Administrative workplaces, where persons are assigned
cards, can be fitted with an enrollment reader. This must be
parameterized and configured according to the
manufacturer's specifications, or those delivered with the
device. If an enrollment reader is set up then manual card
checking is deactivated.
The required settings for supported readers are:
Reader name
DELTA 1200 Prox RS232 9600 8 N 1
DELTA 1200 iClass RS232 57600 8 E 1
DELTA 1200 USB Hitag, Legic, Mifare 9600 8 N 1
DELTA 1200 RS232 Hitag, Legic, Mifare 19200 8 N 1
Rosslare ARD-1200EM USB 9600 8 N 1
LECTUS secure 5000 MD 9600 8 N 1
Bosach Access Systems GmbH 2014-06 | 3.0 | Installation Manual
BAUD D P S
Page 36

en | General Access PE 3.0
36
D = Data bits N = none
P = Parity E = even
S = Stop bits O = odd
– If the system has been installed with the optional Card
Personalization (CP) module then the corresponding check
box is selected in settings. Unchecking this box blocks all
functions for card design/creation.
2014-06 | 3.0 | Installation Manual Bosach Access Systems GmbH
Page 37

Access PE 3.0 General | en 37
– In addition the automatic transfer of personnel data via
Connection to the LAC Server is also checked. This box
should always remain checked.
– The display of card information during card assignment can
be disabled here. This display is only necessary when,
contrary to default settings (see General Settings in Access
PE Configurator) card data are required which do not
conform to the company standard settings.
2.9.1
Enrollment via AMC connected readers
Make sure that at least one reader is configured with a Door
Model 06c, which is the door model for enrollment.
Start the Configuration Browser and select a Local Access
Controller (LAC) (e.g. AMC2…)
Bosach Access Systems GmbH 2014-06 | 3.0 | Installation Manual
Page 38

38 en | General Access PE 3.0
Click the Entrances symbol an add a new Entrance reader:
The dialog window Define Entrance opens:
2014-06 | 3.0 | Installation Manual Bosach Access Systems GmbH
Page 39

Access PE 3.0
General | en 39
In this dialog:
– Enter a Description (e.g. Enrollment Reader AMC)
– Select a LAC and a group ID (GID)
– Select a reader type (e.g. Wiegand)
– Select a number between 1 and 8 as Access Reader
Address
Click OK to conform the enrollment configuration.
Bosach Access Systems GmbH 2014-06 | 3.0 | Installation Manual
Page 40

en | General Access PE 3.0
40
To assign the configured enrollment reader to a specific
workstation, you have to change tot he APE client.
– Select Tool > Properties.
Select an available enrollment reader to activate the enrollment
process.
Confirm that your enrollment reader is online.
If you don’t get an immediate response, restart the Personnel
Management dialog.
2014-06 | 3.0 | Installation Manual Bosach Access Systems GmbH
Page 41

Access PE 3.0 General | en 41
Bosach Access Systems GmbH 2014-06 | 3.0 | Installation Manual
Page 42

42 en | Installation Access PE 3.0
3
Installation
In addition to the access control applications Personnel
Management, Configurator and Logviewer, Access Professional
Edition Installation also includes a facility for setting up the
LacSp (LAC Subprocess) service and the Card Personalization
automatic background process (if CP is to be installed).
The following applications are also installed and can all be
accessed via Start > Programs > Access Professional Edition.
–
– Alarm Management
– AMC IP Configuration
– Badge Designer
– Bosch Video Player
– Card Personalization Configuration (German and
English)
– Card Personalization Interface
– Database Management
– Video Verification
Notice!
If you wish to migrate from [MISSINGDISPLAYTEXT: Access
Personal Edition] to [MISSINGDISPLAYTEXT: Access
Professional Edition], you should first remove the existing
software via [MISSINGDISPLAYTEXT: Start > Settings >
Control Panel > Add or Remove Programs] before installing
the new software, making use, if necessary, of the data backup
feature described in the installation guide.
2014-06 | 3.0 | Installation Manual Bosach Access Systems GmbH
Page 43

Access PE 3.0 Installation | en 43
3.1
Requirements
You must have the following software components to enable
fault-free operation of the Access PE software and its tools.
If these software components are not available on your
computer, you can install them from the Access PE installation
CD. Details regarding the products you require are as follows.
1. dotnetfx40.exe (= .NET Framework 4.0)
is needed for...
2.
– ... the AmcIpConfig application for configuring the
Access Modular Controllers (AMC) on the network.
– ... for the Bosch Video SDK if you wish to use the
video components in your system.
Details on the exact version are available from the
README.txt on the software CD.
3. VideoSDK_Redist443.exe and VideoSDK_Redist510.exe (=
Bosch Video SDK) for the functionalities associated with
the integrated Video System.
For selecting the proper VSDK please refer to the VDSK
device compatibility sheet included on the DVD.
4. CRXI_R2_SP4Runtime.msi (= Crystal Reports) for creating
and displaying reports and lists.
Notice!
We recommend that you install the components in the order
they are listed above.
Bosach Access Systems GmbH 2014-06 | 3.0 | Installation Manual
Page 44

44 en | Installation Access PE 3.0
3.2
3.3
Beginning the Installation
Before starting the installation please close all other programs.
Log in as Administrator or use an account which has
administrator privileges. Place the installation CD in the CD
Drive and begin the installation by double-clicking the file
Access Professional Edition Setup.exe in the main directory.
Notice!
The installation and the way it is carried out does not depend
on the components ordered for your access control system. All
components are installed, and these are either released or
blocked by the licensing procedure performed later; see .
Language Selection and Preparing
Choose the desired language (English or German) for you
installation from the list. Confirm your choice by clicking OK.
2014-06 | 3.0 | Installation Manual Bosach Access Systems GmbH
Page 45

Access PE 3.0
Installation | en 45
Figure 3.1: Installation – Language Selection
This selection only relates to the language used in the
installation wizard dialogs during installation. It does not affect
the languages of applications used later.
After setup the Install Shield wizard will start up in the chosen
language. Press Next
Bosach Access Systems GmbH 2014-06 | 3.0 | Installation Manual
Page 46

46 en | Installation Access PE 3.0
Figure 3.2: Installation - Start of the Install Shield Wizard
Notice!
If you have chosen for the installation a language other than
that of the operating system, it is nevertheless possible that
some system elements (particularly button labels) appear in the
language of the operating system.
2014-06 | 3.0 | Installation Manual Bosach Access Systems GmbH
Page 47

Access PE 3.0 Installation | en 47
3.4
License Agreement
In order to continue the installation it is necessary to accept the
terms of the license agreement. Please read these carefully and
indicate your acceptance by clicking I accept the terms of the
license agreement.
Figure 3.3: Installation - License Agreement
Only then will the button Next be activated so that the
installation can proceed to the next stage.
Bosach Access Systems GmbH 2014-06 | 3.0 | Installation Manual
Page 48

48 en | Installation Access PE 3.0
3.5
Customer Information
Enter the user and company information in the fields provided.
The default values shown are those which were entered during
the installation of the operating system.
Figure 3.4: Installation – Customer Information
Confirm your entries by clicking Next.
2014-06 | 3.0 | Installation Manual Bosach Access Systems GmbH
Page 49

Access PE 3.0 Installation | en 49
3.6
Choosing the type of Installation.
You can choose between Server and Client type installations.
Figure 3.5: Installation – Choosing the type of installation
Confirm your choice by clicking Next.
Notice!
Install Access PE on the server first. When installing the clients
you need to enter the computer name of the server where the
Server component of Access PE has been installed.
Notice!
Additional information is necessary for Client installations. Any
such divergences from the steps of the Server installation will
be described at the appropriate points in this guide.
Bosach Access Systems GmbH 2014-06 | 3.0 | Installation Manual
Page 50

50 en | Installation Access PE 3.0
3.6.1
Entering the Server for Client installations
If you have chosen Client installation, you will first need to enter
the computer name of the Server to which the Client will
connect, and on which Access PE has already been installed.
Figure 3.6: Installation - Client: Entering the Server name
Confirm your input by clicking Next.
3.7
2014-06 | 3.0 | Installation Manual Bosach Access Systems GmbH
Choosing the installation path
Choose the directory where the Access PE files are to be
installed.
The default path is on the C-partition of your computer. The
various components are located in the following directory
structure:
C:\BOSCH\Access Professional Edition\
The subdirectories CP and PE contain the files for Card
Personalization, and access control respectively.
Page 51

!
Access PE 3.0 Installation | en 51
Notice!
Access PE documentation assumes the default paths shown
here. If you choose a different directory structure be sure to
inform the users so that they can later find the relevant files.
Caution!
If you are installing the components in Vista, do not use the
programs folder on your operating system (C:\Programs or C:
\Program files) if you change the installation path. This is
specially protected (from write access) so that database access
is limited.
This restriction only applies to the installation of Access PE
and is not generally applicable to other installations.
Figure 3.7: Installation - Choosing the installation path
Confirm your choice by clicking Next.
Bosach Access Systems GmbH 2014-06 | 3.0 | Installation Manual
Page 52

52 en | Installation Access PE 3.0
2014-06 | 3.0 | Installation Manual Bosach Access Systems GmbH
Page 53

Access PE 3.0 Installation | en 53
3.8
Choosing Components
According to the default settings all components are installed on
the server. By clearing the relevant check-box you can exclude
individual components from the installation.
The following components are available:
Personnel Management
Installs the dialogs for Personnel Administration.
Log Viewer
Installs the application for log book evaluation including a link
on the desktop and in the Personnel Management dialog.
Configurator
Installs the Configurator program, for setting up devices and
systems, with a link on the desktop and in the Personnel
Management dialog. These components should be installed at
least on the server. They can however be executed from any
client.
Card Personalization
Installs the Card Personalization application in the CP folder.
Functions for card processing (e.g. importing pictures, printing
receipts) can only be executed if the badge designer program is
installed and running.
Notice!
It is recommended that you install all components on the
server, so that in the case of network problems between Server
and Clients there is always one computer from which these
tasks can be performed.
Bosach Access Systems GmbH 2014-06 | 3.0 | Installation Manual
Page 54

54 en | Installation Access PE 3.0
Figure 3.8: Installation - Server: Choosing Components
Confirm your choice by clicking Next.
2014-06 | 3.0 | Installation Manual Bosach Access Systems GmbH
Page 55

Access PE 3.0 Installation | en 55
3.8.1
Client Installation
The component Configurator is deselected by default in the
components for Client installation.
Figure 3.9: Installation - Client: Choosing Components
The Configurator can however be installed on any client so that
configuration changes do not have to be carried out on the
Server.
Confirm your choice by clicking Next.
Bosach Access Systems GmbH 2014-06 | 3.0 | Installation Manual
Page 56

56 en | Installation Access PE 3.0
3.9
Selecting supported languages
Select from the list of available languages those which the userinterface should offer.
Figure 3.10: Select the supported languages
By default all available languages are selected, however
individual languages can be excluded from your installation by
clearing the appropriate check-box.
Notice!
English is always installed and the selection can not be cleared.
This is to provide technical support access in cases where, for
example, only East Asian languages have been installed.
Languages thus installed can be selected in the login dialogs of
the applications in order to display the user-interface in the
desired language.
To retrospectively change the language selection you make here,
you must uninstall the Access PE software and then reinstall it.
2014-06 | 3.0 | Installation Manual Bosach Access Systems GmbH
Page 57

Access PE 3.0 Installation | en 57
Click Next when you have made your choice of languages.
3.10
Default configuration language (server only)
Predefined configuration data (including public holidays) are
available, in principle, in all of the languages listed here. Select
the language in which these configuration data are to be loaded
and maintained.
Figure 3.11: Select the default configuration language
The default configuration language is, like the installation
language, the language of the operating system. Nevertheless
any listed language can be selected. As only one default
configuration language is possible the check-box for the default
language will be cleared whenever a different language is
selected.
Bosach Access Systems GmbH 2014-06 | 3.0 | Installation Manual
Page 58

58 en | Installation Access PE 3.0
3.11
Confirming Choices
The information entered up to now can be re-examined here and
changed or confirmed as required.
Changes can be made via the Back button, which can recall the
last and all previous dialog screens.
Figure 3.12: Installation – Confirming choices and starting file copy
In order to check all settings it may be necessary to scroll down
the list. The illustration below shows a full list of choices.
Confirm your choice by clicking Next if all settings are
satisfactory.
2014-06 | 3.0 | Installation Manual Bosach Access Systems GmbH
Page 59

Access PE 3.0 Installation | en 59
3.12
Setup Status
The actual installation process begins now. Its status can be
tracked via the progress bar displayed.
Figure 3.13: Fig. 3.12 Installation – Progress bar
Bosach Access Systems GmbH 2014-06 | 3.0 | Installation Manual
Page 60

60 en | Installation Access PE 3.0
3.13
Installation completed
The installation is complete and the Install Shield Wizard can be
closed. To do this click Finish.
Figure 3.14: Installation completed
2014-06 | 3.0 | Installation Manual Bosach Access Systems GmbH
Page 61

Access PE 3.0 Product usage | en 61
4
4.1
Product usage
At the time of installation, default and sample data was also
created for Access PE; this can help when you are setting up the
system. This preinstalled data makes it possible for a user to log
on and make changes.
Nevertheless, it is necessary to configure a few settings before
you can use the system in the way and to the extent you require.
The following sections describe the details regarding the
definitive implementation.
Licensing
Once you have installed the Access PE software, you will only
have limited access to the applications until you activate your
licenses. Installation enables Access PE components to be used
in demo mode. In addition to the standard components
(Personnel Management, Configurator and Logviewer), this
includes the release of the following facilities:
–
– 1 workstation
– 400 cards
– 2 AMCs
– 8 readers
– 2 cameras
In order to operate and use the software according to the scope
of your order, you must activate the licenses you have
purchased.
Bosach Access Systems GmbH 2014-06 | 3.0 | Installation Manual
Page 62

62 en | Product usage Access PE 3.0
4.1.1
License packages and their content
License name SAP no. CTN
Functionality provided
Access PE — Basic
License
Enabling the standard Access PE components:
Personnel Management, Configurator,
Logviewer, Card personalization
1 workstation = one user logged on
16 readers
2000 cards
Access PE — Extended
License
Enabling the standard Access PE components:
Personnel Management, Configurator,
Logviewer, Card personalization
2 workstations = two users logged on at the
same time
64 readers
10,000 cards
F.01U.127.354 ASL-APE2P-BASE
F.01U.127.352 ASL-APE2P-BEXT
You must order one of these two licenses; otherwise, you will
not be able to use the following extension options.
Access PE — Reader
Expansion License
2014-06 | 3.0 | Installation Manual Bosach Access Systems GmbH
F.01U.127.353 ASL-APE2P-RDR
Page 63

Access PE 3.0 Product usage | en 63
License name SAP no. CTN
Functionality provided
16 additional readers
You can also purchase several of these licenses
up to the maximum of 128 readers.
Access PE — Client
F.01U.127.355 ASL-APE2P-CLI
Expansion License
1 further workstation = one user logged on
You can also purchase several of these licenses
up to the maximum of 16 workstations.
Access PE — Video
F.01U.127.356 ASL-APE2P-VIDB
Activation License
Enabling the video components.
16 channels
Access PE — Video
F.01U.127.357 ASL-APE2P-VIDE
Expansion License
16 further channels
You can also purchase several of these licenses
up to the maximum of 128 cameras.
Access PE — OLS
F.01U.127.358 ASL-APE2P-OLSB
Activation License
Enabling the offline locking system.
16 doors
Bosach Access Systems GmbH 2014-06 | 3.0 | Installation Manual
Page 64

64 en | Product usage Access PE 3.0
License name SAP no. CTN
Functionality provided
Access PE — OLS
Expansion License
1 further door
You can also purchase several of these licenses.
F.01U.127.359 ASL-APE2P-OLSE
2014-06 | 3.0 | Installation Manual Bosach Access Systems GmbH
Page 65

Access PE 3.0 Product usage | en 65
4.1.2
Bosach Access Systems GmbH 2014-06 | 3.0 | Installation Manual
Activating licenses
There are two steps to activating a license:
1. Activating the base package.
2. Activating all purchased extensions.
The base packages are ASL-APE2P-BASE and ASL-APE2P-BEXT all other software components are extensions.
To activate the software licenses, proceed as follows:
– Start the Access PE Configurator.
–
– Select Configuration > License activation... from the
menu to open the activation dialog.
– In the activation dialog...
–
– ... select the appropriate base package from the
selection list under no. 1 the first time you activate the
license and skip point b. in this list.
– (the second time you activate the license, do not
select a base package) ... select the extension and
additional packages you have purchased by clicking
the checkbox for the corresponding list entry from the
list field (more than one selection is possible).
Page 66

en | Product usage Access PE 3.0
66
If you have bought several packages of the same type,
click again in the corresponding field in the # column
to activate write mode and adjust the number to the
actual number of purchased licenses.
– Have the authorization no. (2 — Authorization no.) you
received with the product CD ready.
– Copy or manually input the computer signature—shown
in field 3 of the dialog—to a text file.
– If necessary, switch to a computer with Internet access and
start the browser.
–
– Enter the following URL in the address bar:
https://activation.boschsecurity.com
If you do not have an access account for the Bosch
License Activation Center, you have two options:
Create a new account (recommended) or click the link
to activate the new license without registering. If you
create an account and register before activation, the
License Manager records your activations. You can
display this log at any time.
– Follow the instructions for retrieving the license
activation key.
– Switch to the Access PE activation dialog and enter the
activation key you retrieved from the License Manager in
the bottom field.
– Complete your inputs by clicking [MISSINGDISPLAYTEXT:
Activate].
The activated software package appears in the right-hand
list box ([MISSINGDISPLAYTEXT: Active licences]) and the
activated components appear in the Summary area below
the list box.
2014-06 | 3.0 | Installation Manual Bosach Access Systems GmbH
Page 67

Access PE 3.0 Product usage | en 67
Notice!
If during use of the access control system the limits set by the
licences are exceeded, then a license-violation message will
appear every time the configurator is opened, and every time
configuration data are saved.
Bosach Access Systems GmbH 2014-06 | 3.0 | Installation Manual
Page 68

68 en | Product usage Access PE 3.0
4.2
Setting Server access rights
The standard protection settings under Windows XP
Professional, Windows 2008 Server, and Windows 7 have
changed vis-à-vis previous versions such that Client applications
can not access the folder
C:\BOSCH\Access Professional Edition\PE\Data (= default
installation path) even when that folder is shared. This issue
exists for changed installation paths, too.
Windows users who are logged into the workstations must have
at least write-access to this folder. This access right for users
and groups can be instated via the folder’s Properties menu,
Security tab.
Figure 4.1: Write-access for workstation users
The System administrator can choose whether to assign these
rights to each individual user or to all users within the domain.
2014-06 | 3.0 | Installation Manual Bosach Access Systems GmbH
Page 69

Access PE 3.0 Product usage | en 69
Showing the Security tab
If your system is using standard settings it can happen that the
Security tab is not displayed.
To change the standard settings invoke Folder Options as
follows:
Start > Settings > Control Panel > Folder Options
On the View tab clear the check-box Use simple file sharing
(Recommended) and confirm the changes with Apply and OK.
4.3
Bosach Access Systems GmbH 2014-06 | 3.0 | Installation Manual
Changing the backdrop
The backdrop for the Personnel Management and Video
Verification dialogs is set by the installation procedure to the
BOSCH world map.
This backdrop can be replaced by any jpg file, for instance one
showing a floor-plan.
To do this first open the file Client.ini in the directory C:
\BOSCH\Access Professional Edition\PE\Data\Cfg with the
text editor of your choice.
Page 70

70 en | Product usage Access PE 3.0
Change the entry MapImage=BOSCH_WorldMap (line 28) so
that the path to the desired jpg file appears after the equals sign
- e.g. C:\BOSCH\MyImage.jpg.
Notice!
These jpg backdrops are simple images and do not support
control elements for user interaction.
4.4
Language settings
Ideally only those languages are used in Access PE which are
compatible with the language of the operating system, e.g.
under a German operating system only Western European
languages.
If it should prove necessary to install languages in Access PE
which do not correspond to the operating system, e.g. Chinese
under a German operating system, then the following settings
need to be made. We demonstrate the individual steps here
using the example of Chinese.
Invoke the Regional and Language Options dialog under:
Start > Settings > Control Panel
Install additional languages
Open the Languages tab, and select in the Supplemental
language support field the language group to which the desired
language belongs.
2014-06 | 3.0 | Installation Manual Bosach Access Systems GmbH
Page 71

Access PE 3.0 Product usage | en 71
In the case of Chinese the appropriate option is Install files for
East Asian languages.
Notice!
During the installation you will be required to insert the
installation CD for the operating system. Continue with this
installation only if the operating system CD is available to you.
Click the Advanced tab and select from the upper combo-box
(Select a language to match the language version of the non-
Unicode programs you want to use) the appropriate entry. In
our example this is Chinese (PRC).
In addition, check the box marked Apply all settings to the
current user account and the default user profile at the lower
edge of the dialog.
When these settings have been applied you will need to read
and confirm various message boxes before being invited to
restart the computer. Restart the computer.
After restarting log into an Access PE application and select, for
example, Chinese as your language. All dialogs and menus
should now contain the appropriate characters.
Keyboard settings
If the additional language is to be entered as well as read, then
further steps are necessary in addition to the settings described
above.
Bosach Access Systems GmbH 2014-06 | 3.0 | Installation Manual
Page 72

72 en | Product usage Access PE 3.0
On the Languages tab in the field Text services and input
languages click the button Details... This will open a further
dialog containing keyboard settings.
In the list field Installed Services click Add... to install further
keyboard layouts.
Choose from the combo-box Input language the desired
language and, if available, the desired keyboard layout and click
OK.
The list of keyboard layouts will be visible in the task bar
alongside the icons representing running programs.
Change the keyboard layout by selecting the desired list entry.
4.5
2014-06 | 3.0 | Installation Manual Bosach Access Systems GmbH
Configuring the system to your needs
Before your system can enter production usage, it needs to be
configured with personnel and location-specific data. The
following applications are available for this purpose, and may be
Page 73

Access PE 3.0 Product usage | en 73
invoked via Start > Programs > Access Professional Edition. For
further details, please refer to the online help within the
individual applications
Icon Application Description
4.6
Personnel
Management
For creating and
administering personnel data.
Badge Designer For designing and creating
badge layouts.
Configurator For configuring system data.
AMC IP Configuration
Card Personalization
Configuration
Notice!
AMC IP Configuration requires the presence of the .NET
Framework 3.0. If required this can be installed using a
separate setup on the installation CD.
Map Viewer and Alarm Management
The Access PE Map Viewer enables to control devices as
entrances, readers, cameras directly from a map.
The Access PE alarm list shows all incoming alarms to the
operator. Alarms can be accepted by the operator. In case of an
alarm, the location map will be displayed. The icon of the device
that triggered the alarm is highlighted by animation. Related
video live views are shown to verify the alarm.
Bosach Access Systems GmbH 2014-06 | 3.0 | Installation Manual
Page 74

74 en | Product usage Access PE 3.0
4.6.1
1. Map tree
2. Active location map
3. Device control from the map; controls are shown in the
map
4. Alarm list with event information (incl. video)
5. Device tree with status overview and control elements
Mapviewer features:
– Home map for easy navigation
– Navigation between photo views and floor plans via
hyperlink
– Navigation via device tree structure up to three levels
– Interactive Graphical Maps for alarms with integrated alarm
list
– Live view and door control from the map and device tree
– 128 maps per system
– 64 devices per map
– 64 hyperlinks per map
– Max 2 MB per map
– Map viewer use a standard image format .bmp, .jpg, .png
Configuring a map
Start the Map Editor
2014-06 | 3.0 | Installation Manual Bosach Access Systems GmbH
Page 75

Access PE 3.0 Product usage | en 75
Klick the button to add a map.
Bosach Access Systems GmbH 2014-06 | 3.0 | Installation Manual
Page 76

76 en | Product usage Access PE 3.0
The map is shown on the dialog.
– Optionally configure this map as Home Map
Add a detail view, e.g. the canteen, to the map tree.
2014-06 | 3.0 | Installation Manual Bosach Access Systems GmbH
Page 77

Access PE 3.0 Product usage | en 77
– To connect the new Canteen map with the main map, go to
the Shape Tab and select a Rectangle.
– Place the rectangle over the area of the main map that
should be shown as a detail view (shown as a red rectangle
in the example below).
– In the Link to Map Display select the respective detail view,
which is “Canteen” in this example.
Bosach Access Systems GmbH 2014-06 | 3.0 | Installation Manual
Page 78

78 en | Product usage Access PE 3.0
4.6.2
Adding a device to a map
Select the Device Tab and add Devices to the map by pulling
them with the mouse into the map. In the example below the
following devices have been added:
– One Access point
– One Reader
– Two Cameras
2014-06 | 3.0 | Installation Manual Bosach Access Systems GmbH
Page 79

Access PE 3.0 Product usage | en 79
– Click a device in the map and resize by holding the mouse
button pressed,
– Click a device and rotate as required using the scroll wheel
of your mouse.
Device Types Control elements
Access Point
Open door
(Entrance)
Open door long-term / Reset door long-
term
Lock door / Unlock door
Front Identification Camera
Back Identification Camera
Bosach Access Systems GmbH 2014-06 | 3.0 | Installation Manual
Page 80

en | Product usage Access PE 3.0
80
Device Types Control elements
Back camera
Front camera
Reader All Entrance Controls
Camera Live Video
Device Types
Access Point
Door opened without authorization
Alarms
(Entrance)
Door opened too long
(* All Reader alarm also reflect as Entrance
Alarm)
Reader Reader error
Camera N.A.
*) These alarm events can be customized by the user. That
means, a user can configure any event as an alarm event using
AcConfig -> Event Log message (Double click on second column
will cause an alarm).
2014-06 | 3.0 | Installation Manual Bosach Access Systems GmbH
Page 81

Access PE 3.0 Product usage | en 81
4.7
X-Protect Integration
The Access PE can be interfaced with the video management
system X-Protect from the company
Milestone. Access control and video related features will be
subject in the integration between products.
Following integration°° features can be set up between both
products:
– Entrance monitoring with simultaneous live view and
instant playback
– Video verification via the X-Protect dialogs incl. cardholder
details
– Mapviewer with entrance control and device status
– Alarm management with integrated access alarm, maps and
video verification
– History event log with correlated video footage and card
holder details
Access control management will remain to be operated through
Access PE in integrated set-up.
Video management and security management will handled
through via the X-Protect system. In the
integrated set-up the mapviewer, video features and alarm list
will be disabled in the Access PE.
Bosach Access Systems GmbH 2014-06 | 3.0 | Installation Manual
Page 82

82 en | Product usage Access PE 3.0
Figure 4.2: APE_3.0_milestonIntegratoion
2014-06 | 3.0 | Installation Manual Bosach Access Systems GmbH
Page 83

Access PE 3.0 Deinstallation - Reinstallation | en 83
5
5.1
Deinstallation - Reinstallation
If a reinstallation becomes necessary (e.g. due to a product
update) the existing version should first be deinstalled. During
the deinstallation process you will be invited to perform a
database export. This export is to ensure that your entire data is
saved. Your data is saved to your installation folder in the
subfolder \Savedata. During the following reinstallation you will
be invited before completion to perform a database import. This
re-import restores all the data from your previous installation. If
required by new product functionality, the Export/Import option
also supports the simultaneous conversion of your data to a new
format.
Deinstallation
Notice!
Before beginning the deinstallation you should close all Access
PE applications.
This includes the card personalization program and the
Windows Service LAC-Service.
Bosach Access Systems GmbH 2014-06 | 3.0 | Installation Manual
Page 84

84 en | Deinstallation - Reinstallation Access PE 3.0
5.1.1
Windows Software
To deinstall Access PE open the Windows dialog box via
[MISSINGDISPLAYTEXT: Start > Settings > Control Panel >
Add or Remove programs].
Figure 5.1: Deinstallation - Windows Software dialog
Select the list entry [MISSINGDISPLAYTEXT: Access Personal
Edition] or Access Professional Edition and then click Change
or Remove.
Whereas the Remove function after initializing (see Initialization,
page 85) invites you to confirm your intention, the Change
function first presents a dialog box with various options.
Modify
You can add program components or remove
existing ones.
Repair All program components will be re-installed.
Remove All program components will be removed.
2014-06 | 3.0 | Installation Manual Bosach Access Systems GmbH
Page 85

Access PE 3.0 Deinstallation - Reinstallation | en 85
Figure 5.2: Deinstallation - Change options
Notice!
You can also execute an earlier or new Setup.exe. The
application recognizes an existing installation and offers, like
the Change option, the alternatives listed above.
5.1.2
Initialization
As with Installation the Deinstallation first initializes.
Figure 5.3: Deinstallation – Initialization
Bosach Access Systems GmbH 2014-06 | 3.0 | Installation Manual
Page 86

86 en | Deinstallation - Reinstallation Access PE 3.0
5.1.3
5.1.4
Confirming the Deinstallation
When the safety check appears answer Yes to the question for
the deinstallation to proceed:
[MISSINGDISPLAYTEXT: Do you want to completely remove
the selected application and all of its features?]
Close all programs
Before performing a data export in the next step please close all
Access PE applications. Do not click Next until you have done
this.
Figure 5.4: Deinstallation -
2014-06 | 3.0 | Installation Manual Bosach Access Systems GmbH
Page 87

Access PE 3.0 Deinstallation - Reinstallation | en 87
5.1.5
Performing an Export
Export saves your configuration and data to the folder SaveData
and creates the following subdirectories in the process:
cfg_Save Backup of the configuration data,
containing devices and all system
settings.
DB_Save Backup of the database tables.
MsgLog_Save Backup of the logs.
Pictures_Save Backup of the pictures.
Figure 5.5: Deinstallation – Performing a database export
To perform the export, confirm the default action by clicking
Next.
Bosach Access Systems GmbH 2014-06 | 3.0 | Installation Manual
Page 88

88 en | Deinstallation - Reinstallation Access PE 3.0
5.1.6
Declining the Export
You can forego the export by selecting the option No, all data
can be lost!
In this case you will have to reconfirm the setting by selecting
the option Yes, I ’m sure, all data can be lost. in the following
dialog box. Alternatively, if you confirm the default setting, the
data export will be started.
Figure 5.6: Deinstallation – Safety check when declining the Export.
5.1.7
2014-06 | 3.0 | Installation Manual Bosach Access Systems GmbH
DbiTool
The Export function executes a separate application, also
located in the bin directory of Access PE, and exports the
selected tables. The default directory for containing exports is
called SaveData and is created parallel to the software
directories under C:\Program Files\BOSCH\Access Professional
Edition\
Depending on the amount of data this process can take several
minutes.
Page 89

Access PE 3.0
Deinstallation - Reinstallation | en 89
Figure 5.7: Deinstallation - Database-Export
The application is automatically closed upon completion of the
export.
The tables contain the following:
– areas – Areas and the number of persons in these areas
– permissions – access permissions
– persons – personnel data with card and permissions
information.
– security – user permissions
– sysno – internal administration table for system counter-
data.
Open Applications:
If you have Personnel Management, Configurator or Logviewer
open at this time, then a pop-up window will prompt you to
close them.
Close the window and wait for a moment before clicking OK, to
make sure that the application has been completely closed.
Bosach Access Systems GmbH 2014-06 | 3.0 | Installation Manual
Page 90

90 en | Deinstallation - Reinstallation Access PE 3.0
If this OK button is clicked while an application is running, then
an error message is displayed and the deinstallation is aborted.
Notice!
This application can be started manually at any time via
[MISSINGDISPLAYTEXT: Start > Programs > Access
Professional Edition > Database Management] in order to
perform a database export.
The default export format can be changed between DFS
(default) and CSV using the toggle button. CSV is editable in
e.g Excel.
5.1.8
Setup Status
The window below shows the progress of the deinstallation.
Figure 5.8: Deinstallation – Progress bar.
2014-06 | 3.0 | Installation Manual Bosach Access Systems GmbH
Page 91

Access PE 3.0 Deinstallation - Reinstallation | en 91
5.1.9
Completion and Reboot
After the deinstallation has completed the Install Shield Wizard
can be closed by clicking Finish.
Figure 5.9: Deinstallation – Completing the Deinstallation
A reboot is only necessary if you did not close all programs and
services before the deinstallation.
Bosach Access Systems GmbH 2014-06 | 3.0 | Installation Manual
Page 92

92 en | Deinstallation - Reinstallation Access PE 3.0
Figure 5.10: Deinstallation - Completion and Reboot
5.2
2014-06 | 3.0 | Installation Manual Bosach Access Systems GmbH
Modify the software
If the original installation left out one or more applications, or if
it is decided that certain applications on certain computers are
no longer needed, then use the Modify option for subsequent
installations and or deinstallations. A dialog appears listing
those applications currently installed (box checked) or not
installed.
Page 93

Access PE 3.0 Deinstallation - Reinstallation | en 93
Check the boxes of those applications which you wish to add to
the installation.
Notice!
Please do not clear the check-boxes of any applications you
wish to retain. This would lead to their being deinstalled.
Bosach Access Systems GmbH 2014-06 | 3.0 | Installation Manual
Page 94

94 en | Deinstallation - Reinstallation Access PE 3.0
5.3
Reinstallation/Update
Reinstallation can begin immediately after completion of the
deinstallation process. This process is identical to a first
installation –compare Section 3 Installation- and hence we will
only briefly list the steps and their responses here:
– Execute the file Access Professional Edition Setup.exe
– Language Selection - OK
– Initialization of the Install Shield Wizard - Next
– License Agreement – Select the Option I accept the terms
of the license agreement. - Next
– Customer Information - Next
– Choose the Installation Type - Next
– Choose the Installation Path - Next
– Choose the Components - Next
– Confirm the current settings - Next
– Progress bar
– Database Import – compare Import, page 95 and DbiTool,
page 97
– Completing the Installation – Finish.
Notice!
It is possible to choose a different installation path for the
reinstallation as was used in the previous installation. The
backup files will still be found by the Import Tool enabling a
data import to be performed.
2014-06 | 3.0 | Installation Manual Bosach Access Systems GmbH
Page 95

Access PE 3.0 Deinstallation - Reinstallation | en 95
5.3.1
Import
Before the Installation completion message appears you will be
asked whether you wish to import saved data.
Figure 5.11: Reinstallation - Perform an Import?
Declining the Import
If you do not wish to import the saved data, then select the
option No, all data from last installation will be lost!
Once again a safety check follows which defaults to a data
import. Only selecting the option Yes, I ’m really sure. All data
will be lost. will prevent a data import.
Bosach Access Systems GmbH 2014-06 | 3.0 | Installation Manual
Page 96

96 en | Deinstallation - Reinstallation Access PE 3.0
Figure 5.12: Reinstallation – Safety check when declining Data Import.
Notice!
The only way to redo a previously declined data import is
manually via Start > Programs > Access Professional Edition >
Database Management. Please note however that any data
stored in the meantime will be overwritten by the import.
2014-06 | 3.0 | Installation Manual Bosach Access Systems GmbH
Page 97

Access PE 3.0 Deinstallation - Reinstallation | en 97
5.3.2
DbiTool
The import function calls a separate application, which also
resides in Access PE’s bin directory and imports selected tables.
Depending on the amount of data this process can take some
minutes.
Figure 5.13: Reinstallation – Database Import
5.3.3
Bosach Access Systems GmbH 2014-06 | 3.0 | Installation Manual
Check the Configuration
After importing the data a message appears informing you that
the Access PE Configurator is about to be started.
[MISSINGDISPLAYTEXT: Now the configurator will be started.
Please check your configuration and save it!]
Click OK to start the Configurator and check the configuration
data which have been loaded.
Page 98

98 en | Deinstallation - Reinstallation Access PE 3.0
5.3.4
Installation completed
After checking the configuration close the Configurator. At this
point the installation can be completed by clicking Finish in the
final installation screen.
2014-06 | 3.0 | Installation Manual Bosach Access Systems GmbH
Page 99

Access PE 3.0 User rights | en 99
6
6.1
User rights
The rights for users of Access PE applications (as well as users
of the Configurator and the Logviewer) are assigned in
Personnel Management on a special personnel data tab (= User
Rights).
User rights
This tab is only visible if the user currently logged in has
administrator rights. Only administrators can set and modify
their own rights and those of others.
If a person is to receive user rights for Access PE applications,
then these must be explicitly assigned. By default all persons
are configured without user rights.
Bosach Access Systems GmbH 2014-06 | 3.0 | Installation Manual
Page 100

100 en | User rights Access PE 3.0
User rights can be assigned by entering a user name and a
password. The person's surname is suggested by default as the
user name, but this is arbitrary. The password can be max. 16
characters long, is case sensitive and may contain any special
characters.
Notice!
It is highly recommended that you create a separate user for
each person who is to use the system. Do not create a generic
user under whose name different persons will work. All data
entries, modifications etc. are logged under the name of the
user who carried them out, but this is only worthwhile if each
user has his/her own password and changes user settings
(User handover and workstation security, page 104) as necessary
when sharing the workstation with another person.
The default installation contains one predefined administrator.
Hence when these predefined users are logged on it is possible
to create and modify any other kind of user or administrator.
Administrators differ from normal users only in as far as they are
able to administrate user rights. There is no difference between
the user types as far as the availability of applications or access
to data and log files is concerned. Each of the users can be
configured with restricted or unrestricted data access.
If one of the administrator options is chosen then the various
groups of user rights for Access PE applications become active
and can be assigned individually.
In detail, the assignable user rights are the following:
2014-06 | 3.0 | Installation Manual Bosach Access Systems GmbH
 Loading...