

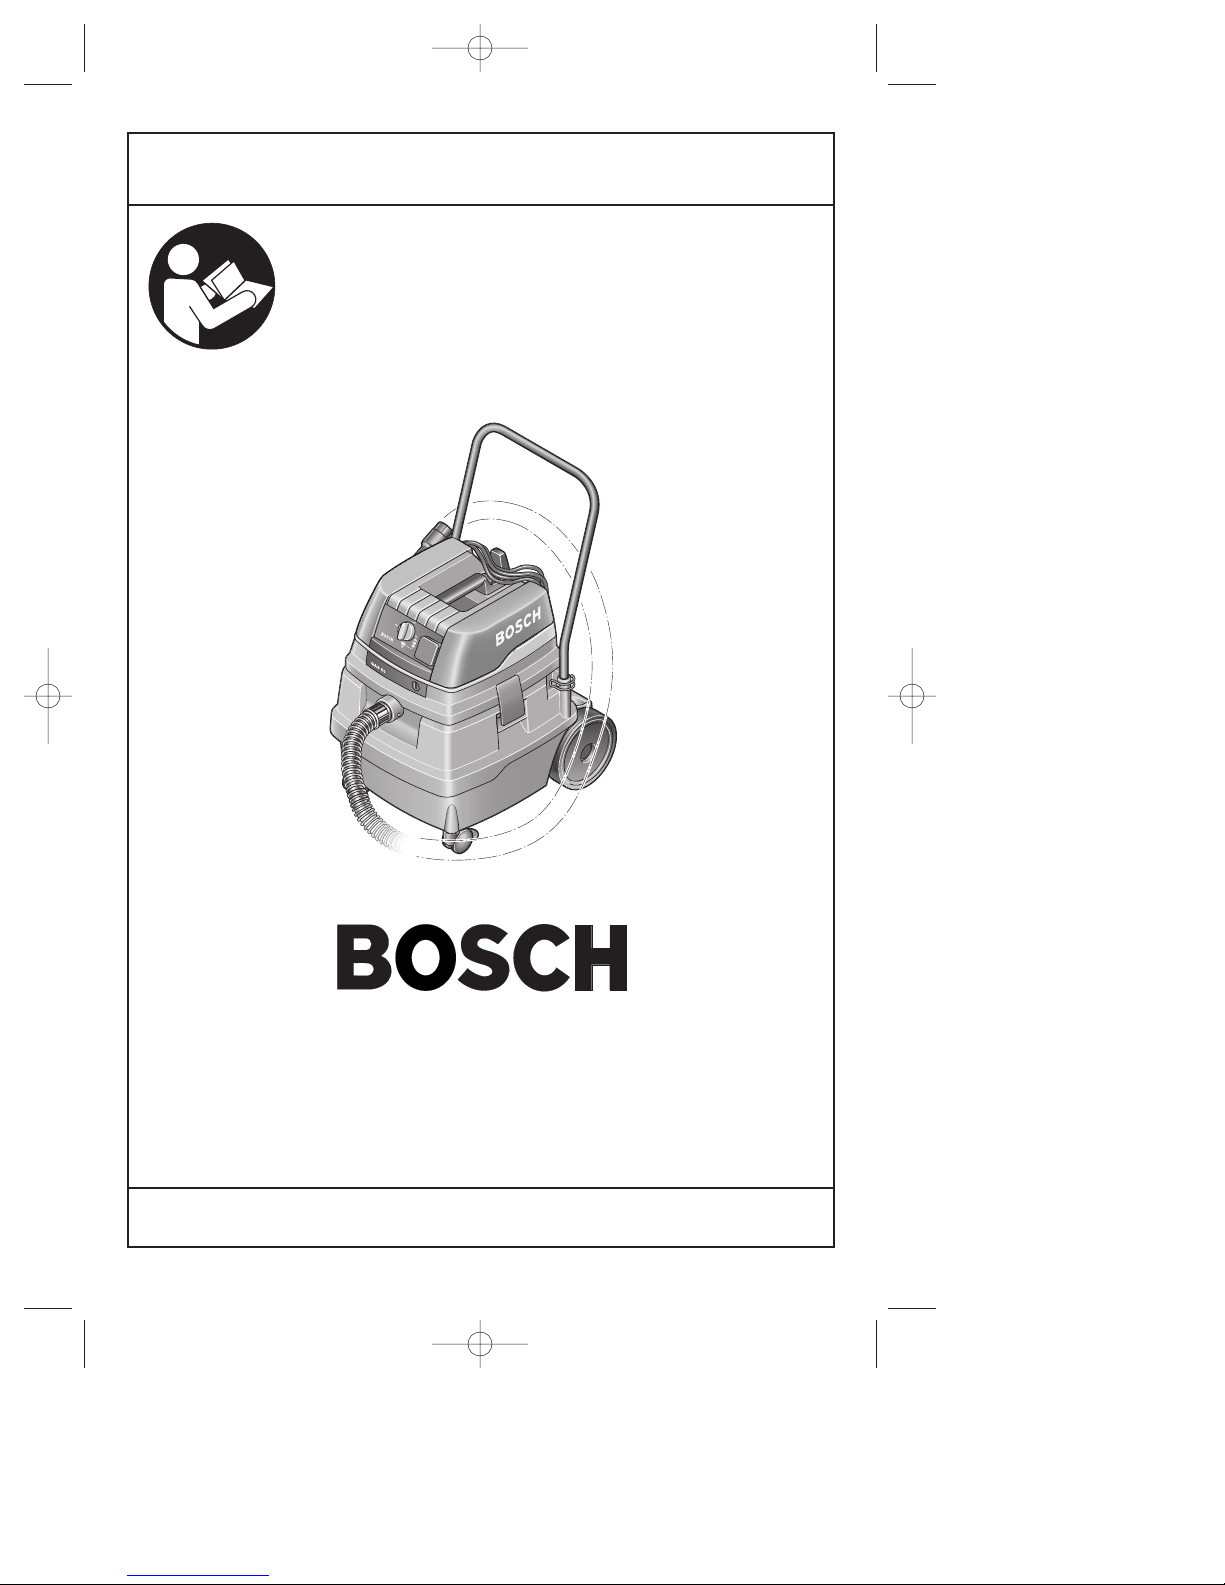
Bosch 3931 Operating/safety Instructions Manual
Operating/Safety Instructions
Consignes de fonctionnement/sécurité
Instrucciones de funcionamiento
y seguridad
IMPORTANT: IMPORTANT : IMPORTANTE:
Read Before Using Lire avant usage Leer antes de usar
For English Parlez-vous français? ¿Habla español?
See page 2 Voir page 14 Ver página 26
Consumer Information
Renseignement des consommateurs
Información para el consumidor
Toll Free Number: Appel gratuit : Número de teléfono gratuito:
1-877-BOSCH99 (1-877-267-2499) http://www.boschtools.com
3931
BM 2610919254 12/02 12/18/02 10:52 AM Page 1

Read and understand all instructions. Failure to follow all instructions
listed below, may result in electric shock, fire and/or serious personal injury.
SAVE THESE INSTRUCTIONS
-2-
Work Area
Keep your work area clean and well lit.
Cluttered and dark areas invite accidents.
Do not operate vacuums in explosive
atmospheres, such as in the presence of
flammable liquids, gases, or dust.
Appliances create sparks, which may ignite
the dust or fumes.
Keep bystanders, children, and visitors
away while operating the vacuum. Do not
allow to be used as a toy. Close attention is
necessary when used by or near children.
Electrical Safety
This vacuum cleaner intended only for
use indoor and for dry or wet pick-up.
The power tool outlet is grounded and the
vacuum must be plugged into an outlet
properly installed and grounded in
accordance with all codes and
ordinances. Never remove the grounding
prong or modify the plug in any way. Do
not use any adapter plugs. Check with a
qualified electrician if you are in doubt as
to whether the outlet is properly
grounded. If the vacuums should electrically
malfunction or break down, grounding
provides a low resistance path to carry
electricity away from the user.
Do not insert objects like paper clips or
screwdrivers into power tool outlet. The
outlet is live when the vacuum is plugged
into power source and switch is set to power
tool activation mode or filter cleaning mode.
Electric shock may occur.
Avoid body contact with grounded
surfaces such as pipes, radiators, ranges
and refrigerators. There is an increased risk
of electric shock if your body is grounded. If
operating the vacuum in damp locations is
unavoidable; a Ground Fault Circuit
Interrupter must be used to supply the
power to your vacuum. Electrician’s rubber
gloves and footwear will further enhance
your personal safety.
Don’t expose vacuum to rain or wet
conditions. This vacuum can be used for
picking up non-flammable liquids but it is not
intended to be immersed or submerged in a
fluid. Electric shock may occur.
Do not handle plug or appliance with wet
hands. Electric shock may occur.
Do not abuse the cord. Never use the
cord to carry the vacuum, pull the vacuum
or yank the plug from an outlet. Keep
cord away from heat, oil, sharp edges or
moving parts. Replace damaged cords
immediately. Don’t drive over it or close a
door on it. Damaged cords increase the risk
of electric shock.
When operating a vacuum outside, use an
outdoor extension cord marked “W-A” or
“W”. These cords are rated for outdoor use
and reduce the risk of electric shock. Refer
to Recommended sizes of Extension Cords
in the Accessory section of this manual.
Personal Safety and Vacuum Use
Stay alert, watch what you are doing and
use common sense when operating a
vacuum. Do not use vacuum while tired or
under the influence of drugs, alcohol, or
medication. A moment of inattention while
operating vacuum may result in serious
personal injury.
Avoid accidental starting. Be sure vacuum
and tool switches are OFF before
plugging in or putting vacuum switch into
power tool activation mode or filter
cleaning mode. Do not keep power tool
plugged into the vacuum cleaner’s power
tool outlet during normal vacuuming.
Plugging in vacuums or tools that have the
switch ON invites accidents.
Do not overreach. Keep proper footing
and balance both for you and the vacuum
at all times. Use extra care when cleaning
on stairs. Proper footing and balance
enables better control of the vacuum in
unexpected situations.
Do not vacuum burning, smoking or
smoldering things like cigarettes,
matches or hot ashes. Fire inside the
vacuum tank may occur.
Do not use to vacuum flammable liquids,
alcohol, gases, or explosive dusts, like
!
WARNING
General Safety Rules
BM 2610919254 12/02 12/18/02 10:52 AM Page 2

-3-
gasoline or other fuels, lighter fluid,
varnish, polyurethane coatings, cleaners,
oil-based paints, natural gas, hydrogen,
coal dust, magnesium dust, grain dust, or
gun powder. Electric motors create sparks
which may ignite the dust or fumes.
Dress properly. Do not wear loose
clothing or jewelry. Contain long hair.
Keep your hair, clothing, and gloves away
from moving parts. Loose clothes, jewelry,
or long hair can be caught in moving parts,
hose, and suction nozzles. Keep handles
dry, clean and free from oil and grease.
Do not hold the hose against any body
parts during operation.
Use safety equipment. Always wear eye
and hearing protection. Dust mask, non-
skid safety shoes, hard hat, or hearing
protection must be used for appropriate
conditions.
This product contains
chemicals, including lead,
known to the State of California to cause
cancer, and birth defects or other
reproductive harm. Wash hands after
handling.
Not suitable to vacuum hazardous or
toxic substances or dusts e.g. asbestos.
The filters will not be able to capture all
particles and may exhaust them back into
the environment.
!
WARNING
Vacuum Cleaner Safety Rules
Vacuum Care
Do not use vacuum if switch does not
turn it ON or OFF. Any vacuum that cannot
be controlled with the switch is dangerous
and must be repaired.
Disconnect the plug from the power
source before making any adjustments,
changing accessories, or storing the
vacuum. Such preventive safety measures
reduce the risk of starting the vacuum
accidentally.
Never connect a tool with a rating greater
than the maximum amperes listed on the
receptacle. This vacuum has a power tool
outlet for use in conjunction with other
appliances such as sanders, jigsaws and
planers; tools with greater ratings may cause
a fire.
Do not vacuum dust when liquid/fluid is
contained in the vacuum tank. Do not
vacuum liquids/fluids when dust is in the
tank. In either case empty the tank and/or
remove dust bag before use so that dust
does not cake and harden inside the tank.
Dry filters completely after wet
vacuuming or use a second dry filter set
for dust vacuuming. Damp or wet filters will
cake with dust or develop mold or mildew.
Store idle vacuum out of reach of children
and other untrained persons. Vacuums are
dangerous in the hands of untrained users.
Maintain vacuum with care. Properly
maintain vacuum to keep hose
unobstructed. Do not put any object into
openings. Do not use with any opening
blocked; keep free of dust, lint, hair and
anything that may reduce air flow. Any
alteration or modification is a misuse and
may result in a dangerous condition.
Check for misalignment or binding of
moving parts, breakage of parts, and any
other condition that may affect the
vacuums operation. If damaged, have the
vacuum serviced before using. Poorly
maintained vacuums cause many accidents.
Develop a periodic maintenance schedule
for your vacuum.
Use only accessories that are
recommended by the manufacturer for
your model. Accessories that may be
suitable for one vacuum may become
hazardous when used on another vacuum.
Service
Only qualified repair personnel must
perform vacuum service. Service or
maintenance performed by unqualified
personnel could result in a risk of injury. For
example: internal wires may be misplaced or
pinched, safety guard return springs may be
improperly mounted.
When servicing a vacuum, use only
identical replacement parts. Follow
instructions in the Maintenance section of
this manual. Use of unauthorized parts or
failure to follow the Maintenance Instructions
may create a risk of electric shock or injury.
Certain cleaning agents such as gasoline,
carbon tetrachloride, ammonia, etc. may
damage plastic parts.
BM 2610919254 12/02 12/18/02 10:52 AM Page 3
-4-
IMPORTANT: Some of the following symbols may be used on your tool. Please study them
and learn their meaning. Proper interpretation of these symbols will allow you to operate the
tool better and safer.
Symbol Name Designation/Explanation
V Volts Voltage (potential)
A Amperes Current
Hz Hertz Frequency (cycles per second)
W Watt Power
kg Kilograms Weight
min Minutes Time
s Seconds Time
Diameter Size of drill bits, grinding wheels, etc.
n
0
No load speed Rotational speed, at no load
.../min Revolutions or reciprocation per minute Revolutions, strokes, surface speed,
orbits etc. per minute
0 Off position Zero speed, zero torque...
1, 2, 3, ... Selector settings Speed, torque or position settings.
I, II, III, Higher number means greater speed
Infinitely variable selector with off Speed is increasing from 0 setting
Arrow Action in the direction of arrow
Alternating current Type or a characteristic of current
Direct current Type or a characteristic of current
Alternating or direct current Type or a characteristic of current
Class II construction Designates Double Insulated
Construction tools.
Earthing terminal Grounding terminal
Warning symbol Alerts user to warning messages
Ni-Cad RBRC seal Designates Ni-Cad battery recycling
program
Symbols
0
This symbol designates
that this tool is listed by
Underwriters Laboratories.
This symbol designates
that this tool is listed by
the Canadian Standards
Association.
This symbol designates
that this tool is listed to
Canadian Standards by
Underwriters Laboratories.
T
his symbol
designates
that
this tool
complies
to NOM
Mexican
Standards.
This symbol designates
that this tool is listed by
Underwriters Laboratories,
and listed to Canadian
Standards by Underwriters
Laboratories.
This symbol designates that this tool is listed by
Intertek Testing Services.
BM 2610919254 12/02 12/18/02 10:52 AM Page 4
-5-
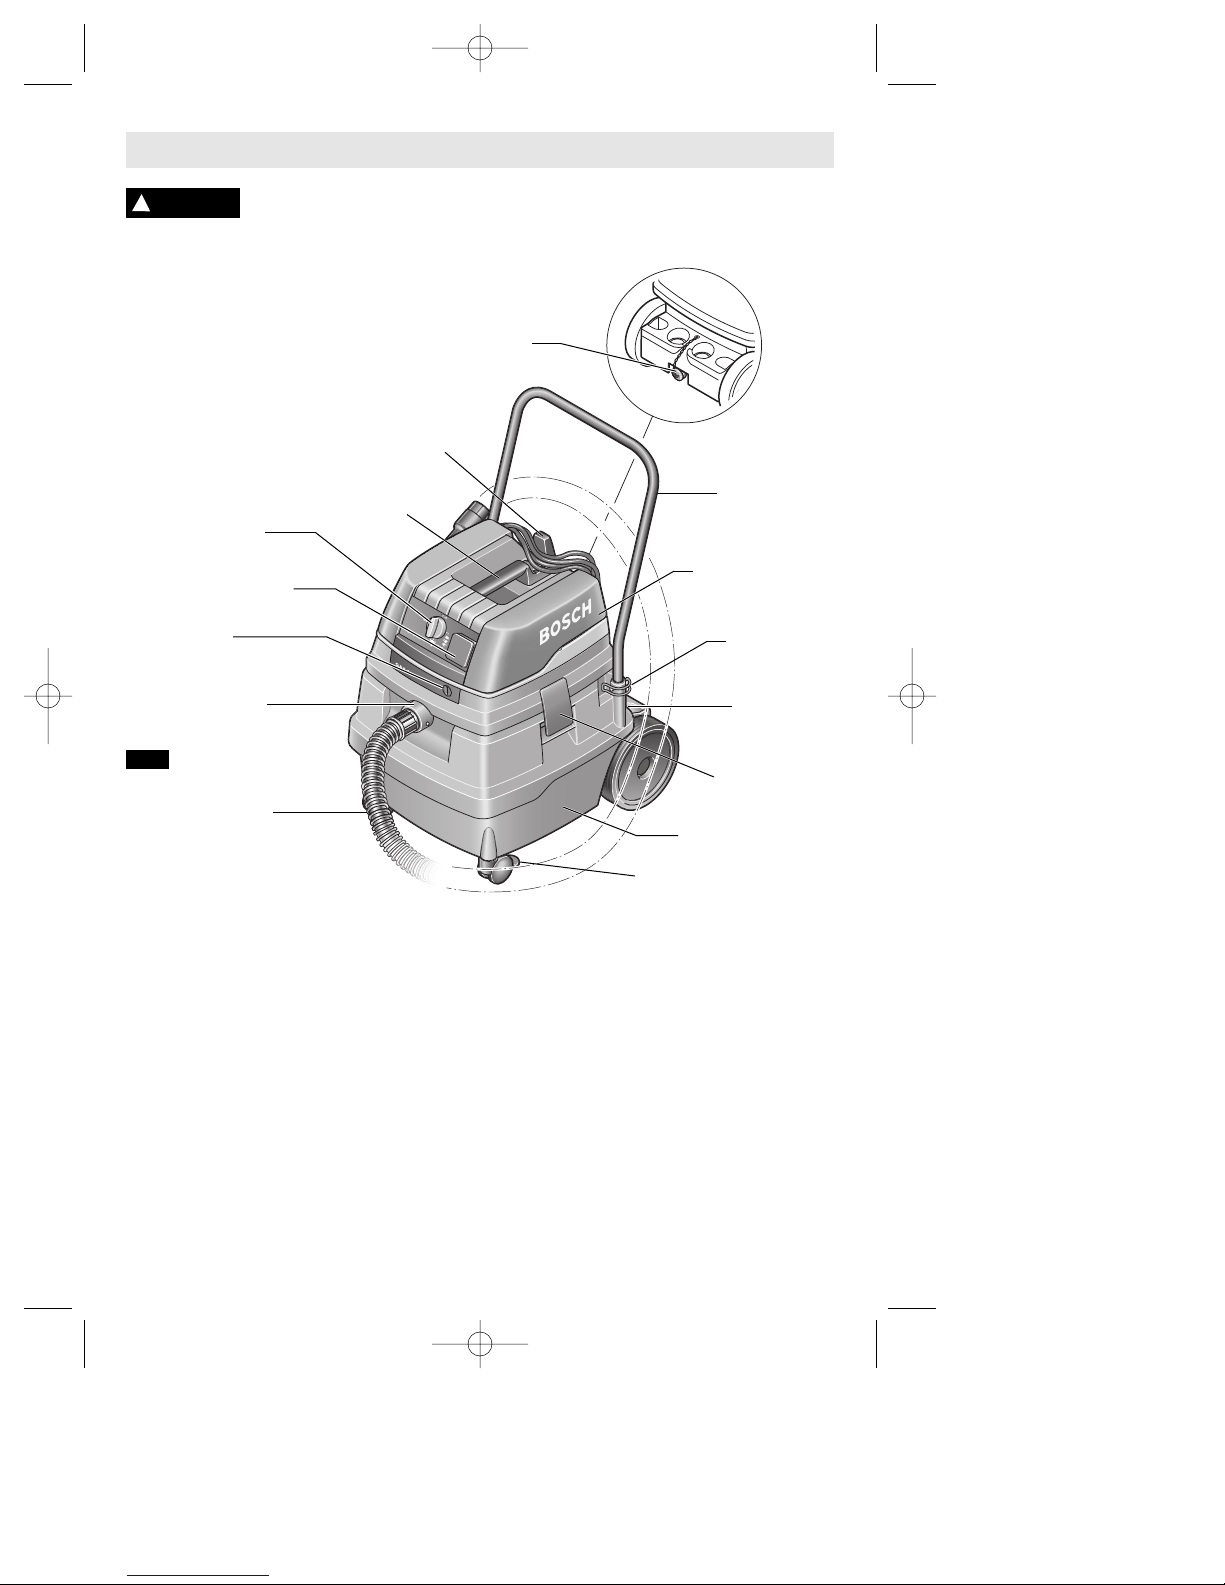
Functional Description and Specifications
Disconnect the plug from the power source before making any
assembly, adjustments or changing accessories. Such preventive safety
measures reduce the risk of starting the tool accidentally.
!
WARNING
MAIN HANDLE
HANDLE
CLAMPS
WAND
STORAGE
CANISTER
LATCH
RUST PROOF
CANISTER
VACUUM
HOSE
HOSE PORT
FILTER
COMPARTMENT
LOCK
POWER TOOL
SOCKET
MODE
SELECTOR
SWITCH
CARRYING
HANDLE
CORD
WRAP
CANISTER
DRAIN
All-Purpose Vacuum Cleaner
CONTROL UNIT
FIG. 1
Specifications:
Part number ........................................... 0 601 989 139
Voltage.................................................... 120V
Frequency................................................ 60 Hz
Rated Power of Vacuum Cleaner
No Power Tool Connected ...................... 11.1 Amps
Power Tool Connected ............................ 11.1 to 4.8 Amps
Max. Rating of Connected Power Tool .... 7.2 Amps
Canister Volume (gross) ........................ 13.3 gal. (50 ltr.)
Canister Volume wet (net) ...................... 11.35 gal. (45 ltr.)
Canister Volume dry (net) ...................... 11.35 gal. (45 ltr.)
Dust Bag Volume (net)............................ 5.5 gal. (21 ltr.)
Air Flow* ........................................ 130 CFM (61 ltr./sec.)
Static Water Lift*............................. 100 in.
Vacuum Suction Pressure* .................... 248 millibars
Filter Cartridge Type ............................... (BIA) M
Filter Cartridge Surface Area (Ea.)........... 4300 cm2
Number of Filter Cartridges..................... 2
Total Filter Surface Area .......................... 8600 cm2
Dust Retention ........................................ 99.93%
Sound Pressure Level ............................. 69 dB (A)**
Weight w/o Main Handle ......................... 39 lbs. (17.7 kg)
Weight w/ Main Handle .......................... 42.2 lbs. (19.2 kg)
Cord Length ............................................ 26 feet
Hose Length............................................ 9.84’ (3 meter)
Standard Equipment:
1 35 mm Vacuum Hose (stored in canister)
1 Main Handle and 2 Handle Clamps
1 Dust Bag, 2 Filter Cartridges
2 Motor Protection Filters
2 Rear Wheels, 1 Axle
2 Axle Cap-and-Pin Assemblies
2 Front Casters
*Measured at the blower.
**The typical A-weighted sound pressure level of the product is 69 dB (A), which is determined at 1.60 m height and 1 m
distance according to IEC 704-1.
CASTER BRAKE
BM 2610919254 12/02 12/18/02 10:52 AM Page 5
-6-
When unpacking, make sure that all of the
standard equipment is present and that
there is no transportation damage.
Before preforming any work on the
machine itself, disconnect the power
plug.
CASTERS
1. The front casters are equipped with
brakes.
2. To actuate the castor brake, press the
lever downwards.
3. To deactivate, lift up.
ATTACHING THE REAR WHEELS
1.Place one axle cap-and-pin assembly
onto end of axle.
2. Hammer pin into cap until the top of the
pin is flush with the top of the cap.
3. Slide one wheel onto the axle, slide axle
through the canister, then slide second
wheel onto axle as shown in figure 2.
4. Turn canister on its side. So as to provide
support during step 5, place small block
of wood or stack of quarters under the
already-capped end of the axle
5. Place second axle cap-and-pin assembly
onto end open of axle.
6. Hammer pin into cap until the top of the
pin is flush with the top of the cap.
ASSEMBLING THE MAIN HANDLE
The vacuum cleaner can be moved easily
with the main handle. Always move the unit
using both hands. Insert the handle into the
two openings and fasten with the two handle
clamps.
ATTACHING THE VACUUM HOSE
Connect the 35-mm vacuum hose (standard
equipment) onto the 3931’s hose port by
sliding the wider end of the hose onto the
port then turning it to the right slightly to lock
it in place.
The 35-mm hose can be connected to
optional accessories, including the Bosch
VAC011 wand kit and the dust extraction
hoods on various power tools, including
Bosch routers, planers and grinder hoods.
The 3931’s universal hose port also accept
many other vacuum hoses, including most
1-1/4” hoses, 1-1/2” hoses, 2-1/2” hoses
and other Bosch hoses. (See Accessories,
page 13)
Assembly & Preparation
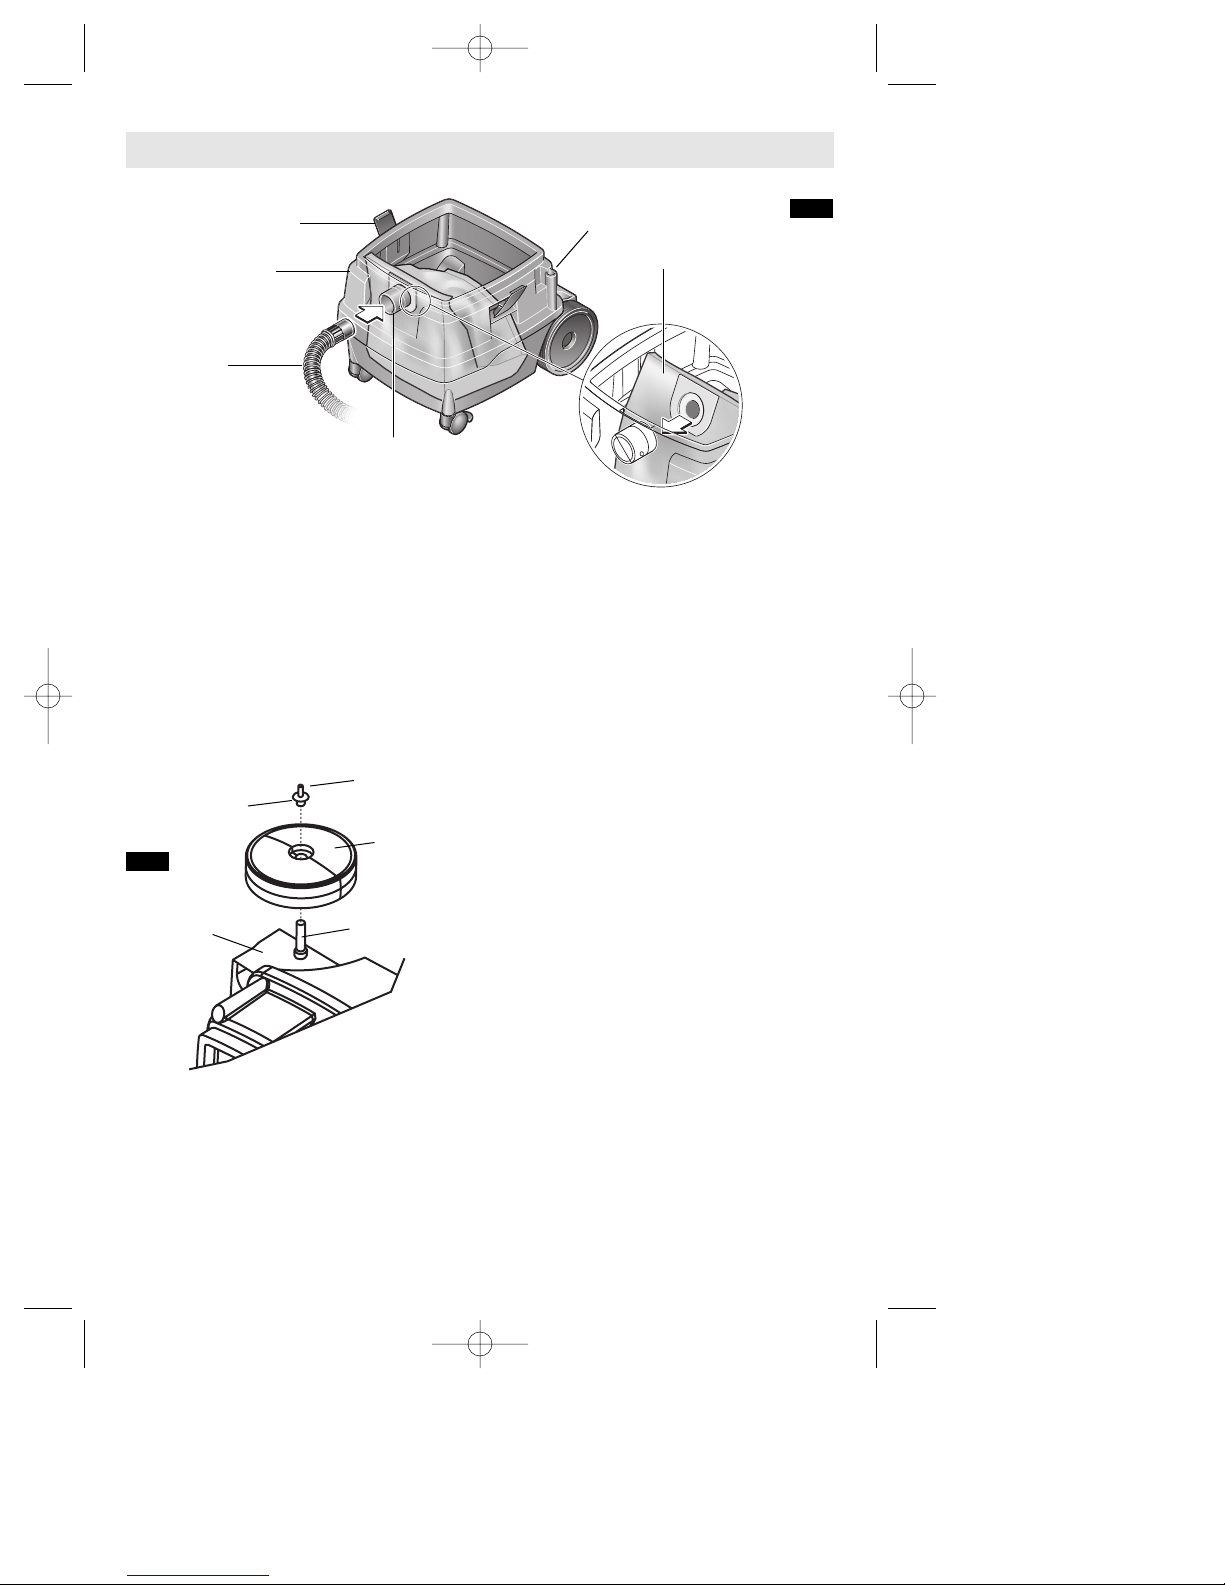
CANISTER LATCH
CANISTER
HANDLE OPENING
HOSE PORT
VACUUM
HOSE
DUST BAG
FIG. 3
AXLE CAP
WHEEL
AXLE
CANISTER
PIN
FIG. 2
BM 2610919254 12/02 12/18/02 10:52 AM Page 6
INSTALLING THE DUST BAG
When dry-vacuuming such materials as dust
from drywall, plaster, cement, soot, and
flour, a dust bag should be inserted.
Even when vacuuming other dry materials,
using a dust bag extends the amount of time
the unit operates at high performance and
extends the amount of time it takes for the
filter cartridge to become clogged. It also
makes the disposal of dust easier.
Notes:
• Bags should not be used when wetvacuuming.
• The filter cartridges must be installed,
even when using a bag.
To install the bag:
1. Unlock the canister latches and remove
the control unit.
2. Grasp a new dust bag at the flange. Push
it over the bottom of the connection piece
first and then over the catch on the top of
the connection piece. Make sure that the
full length of the dust bag faces against
the inner wall of the canister.
3. Re-attach the control unit.
4. Lock the canister latches.
REMOVING THE DUST BAG
1. Unlock the canister latches and remove
the control unit.
2. Pull the dust bag away from and off of the
connection piece.
3.Close the opening in the dust bag by
folding down the lid
4. Remove bag and dispose of properly.
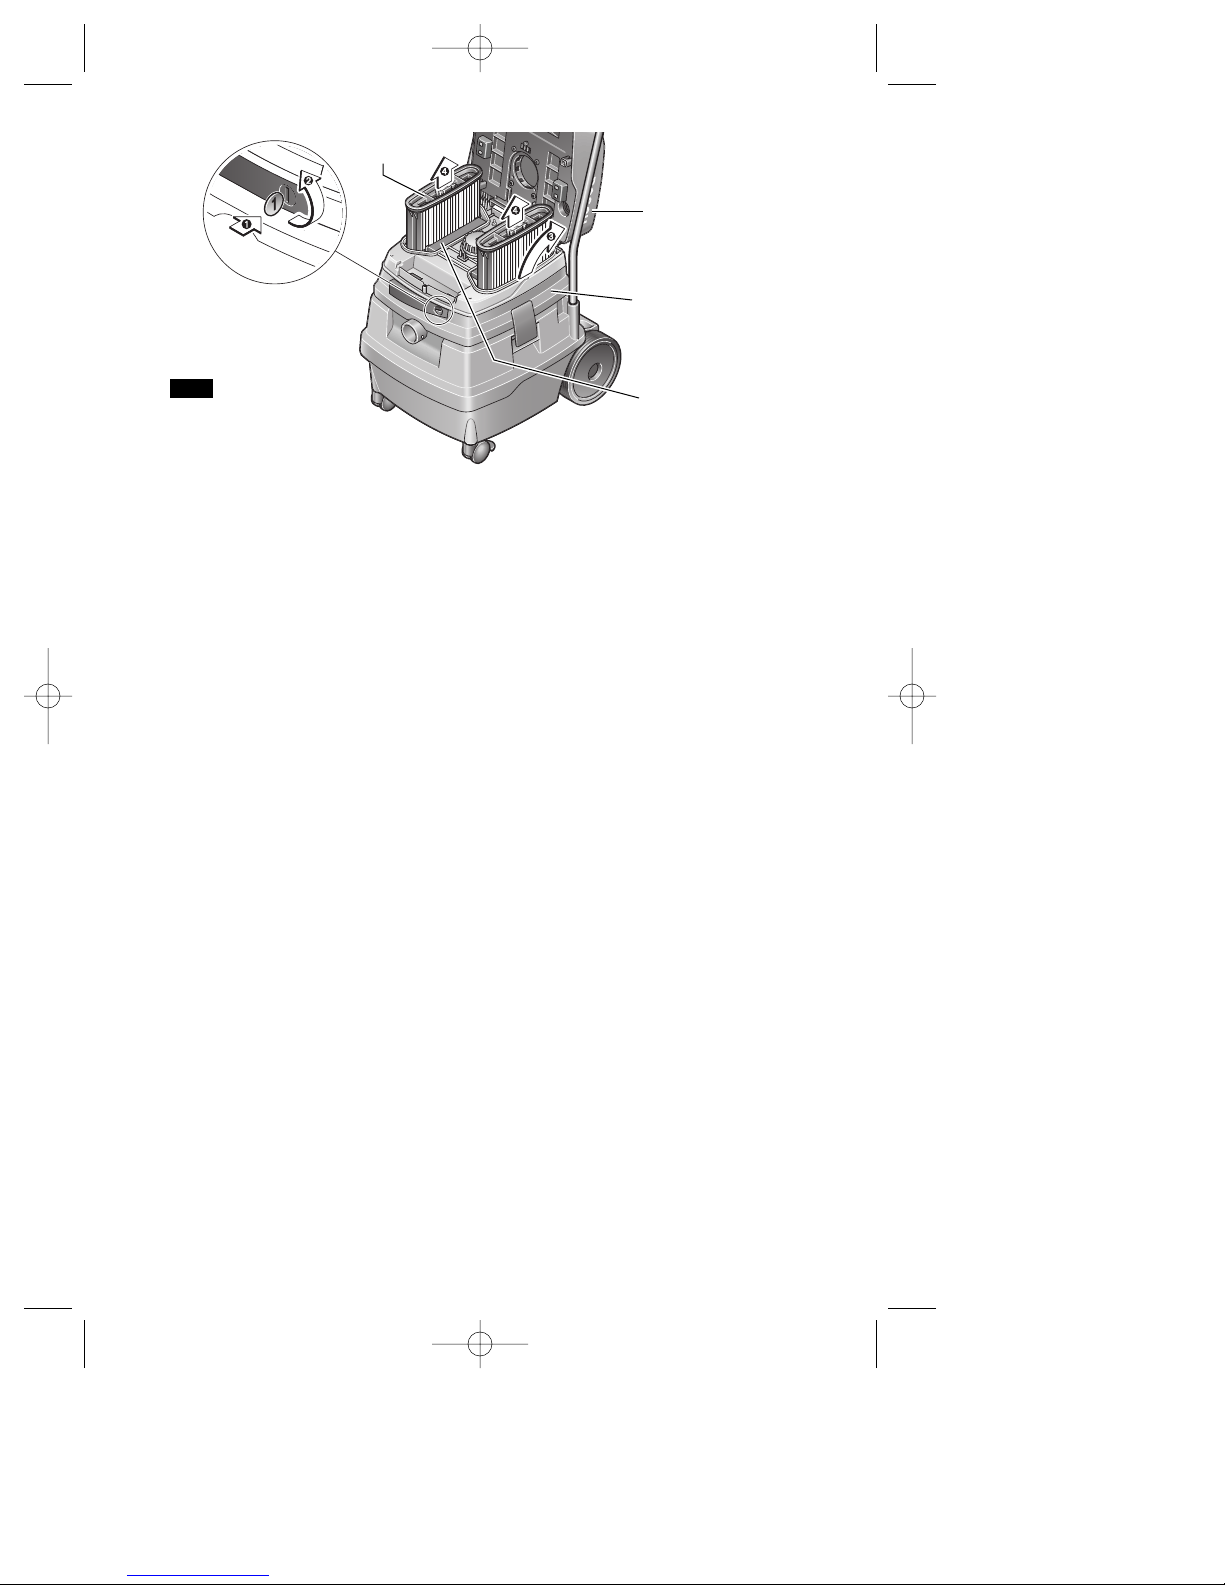
REMOVING THE FILTER CARTRIDGES
1. First, clean the filters by setting the mode
selector switch to the PULSE-CLEAN™
mode, which takes only 10 seconds.
2. To open the filter access compartment,
use a coin to rotate the filter compartment
lock by 1/4 turn in the direction of the
arrow and push the lock in.
3. Lift up the top section of the control unit.
4. Grasp the filter cartridge by the fins, pull
up and remove.
Replace a damaged filter cartridge
immediately.
THOROUGH CLEANING OF THE
FILTER CARTRIDGES
If necessary, the filter cartridges can also be
cleaned with a soft brush and can also be
washed with water.
REPLACING THE FILTER CARTRIDGES
1. Insert new or cleaned filter cartridge and
ensure firm seating.
2. Lower the top section down again.
3. With slight pressure from the top of the
control unit, the filter compartment lock
will snap back again.
CLEANING THE MOTOR
PROTECTION FILTERS
The motor protection filters are basically
maintenance-free. Take out the motor
protection filters from time to time and wash
them. Allow them to dry thoroughly before
reinserting.
-7-
FILTER
CARTRIDGE
CONTROL UNIT
TOP SECTION
CONTROL UNIT
BOTTOM SECTION
MOTOR PROTECTION
FILTER
FILTER
COMPARTMENT
LOCK
FIG. 4
BM 2610919254 12/02 12/18/02 10:52 AM Page 7

-8-
REMOVING THE MOTOR
PROTECTION FILTERS
1. To open the filter access compartment,
use a coin to rotate the lock by 1/4 turn in
the direction of the arrow and push the
lock in.
2. Lift up the top section.
3. Grasp the filter, pull up and remove.
REPLACING THE MOTOR
PROTECTION FILTERS
See Figure 4.
1. Insert clean motor protection filters and
ensure firm seating.
2. Lower the top section.
3. With slight pressure from the top of the
control unit, the filter compartment lock
will snap back again.
WAND STORAGE
The wands from the optional VAC011 wand
kit can be stored in the recesses at the
bottom of the rear of the container. See
Figure 1.
BM 2610919254 12/02 12/18/02 10:52 AM Page 8
-9-
Operating Instructions
The vacuum cleaner has four operating
modes:
• Normal Vacuuming Mode
• Power Tool Activation Mode
• Pulse-Clean Filter Cleaning Mode
• Pulse-Clean Filter Cleaning Combined
with Power Tool Activation Mode
Avoid accidental starting.
Be sure vacuum and tool
switches are OFF before plugging in or
putting vacuum switch into power tool
activation mode or filter cleaning mode.
Do not keep power tool plugged into the
vacuum cleaner’s power tool outlet
during normal vacuuming. Plugging in
vacuums or tools that have the switch ON
invites accidents.
Not suitable to vacuum
hazardous or toxic
substances or dusts e.g. asbestos. The
filters will not be able to capture all particles
and may exhaust them back into the
environment.
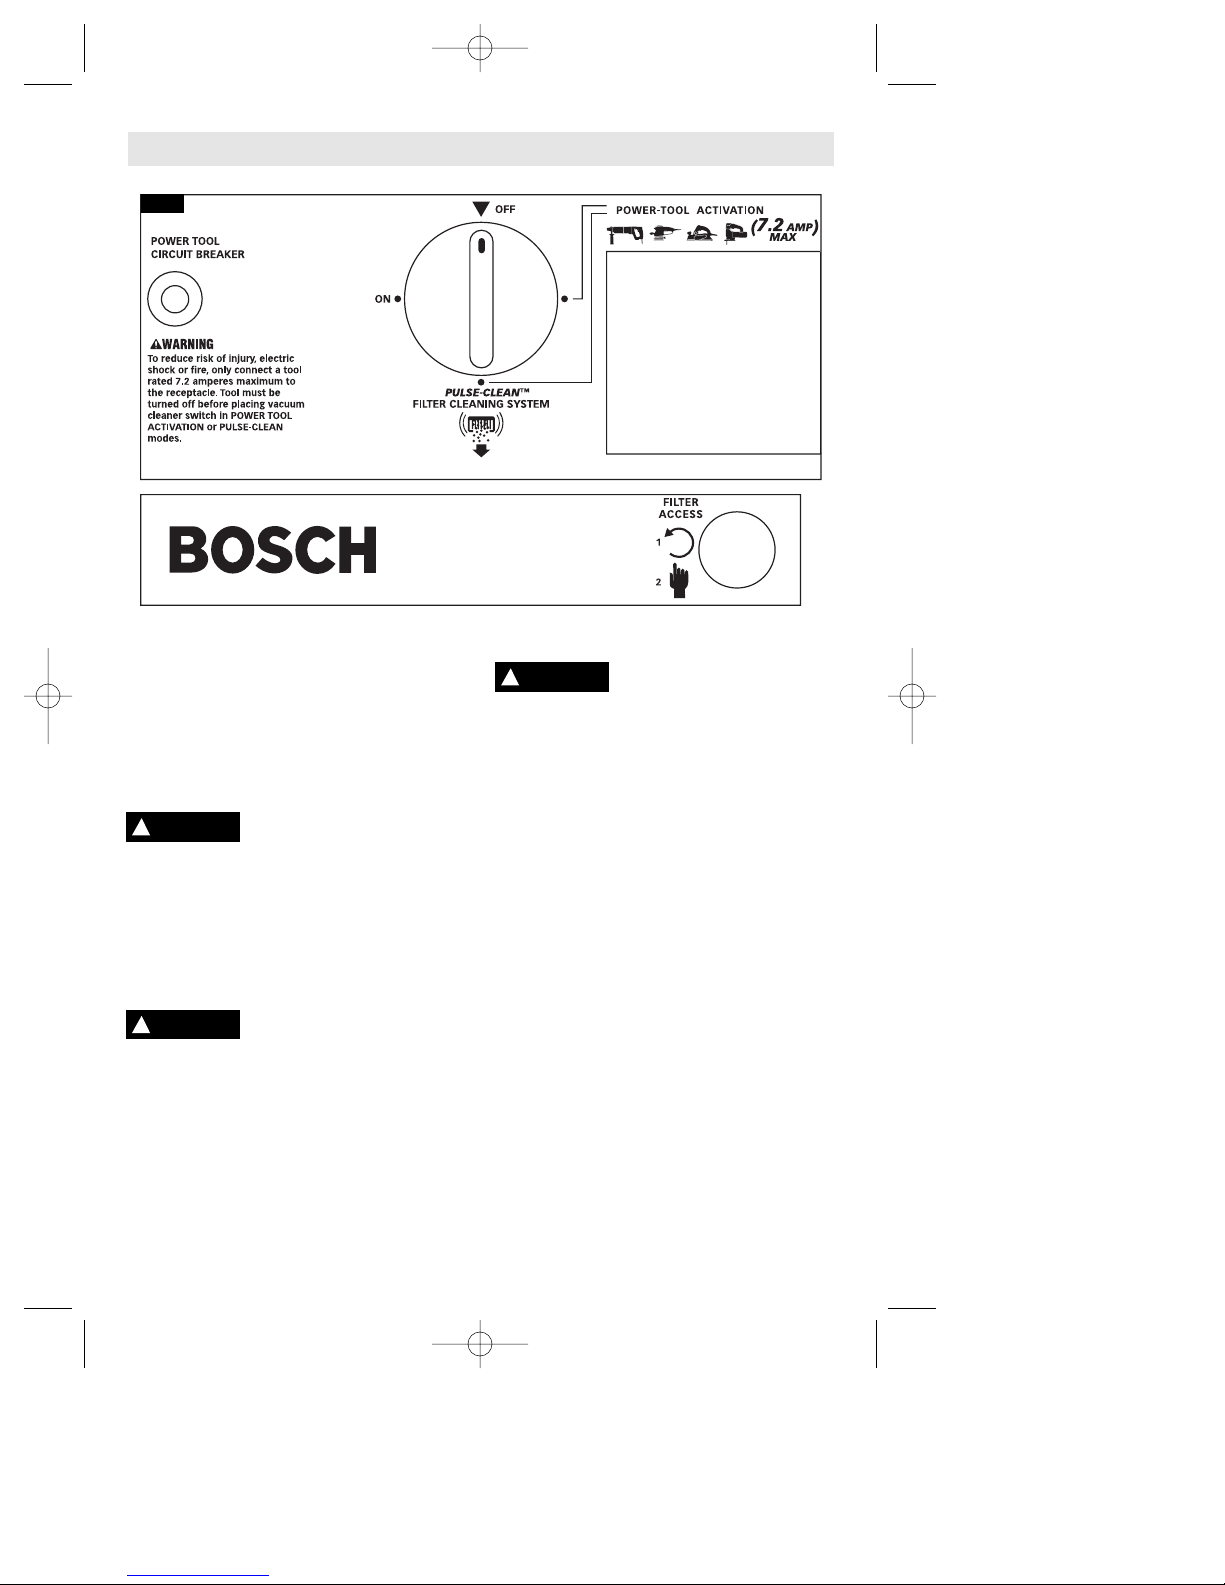
NORMAL VACUUMING MODE
Switching the Unit On: Set mode selector
switch to ON.
Switching the Unit Off: Set mode selector
switch to OFF.
POWER-TOOL ACTIVATION MODE
Never connect a tool with
a rating greater than the
amperes listed on the receptacle. This
vacuum has a power tool outlet for use in
conjunction with other appliances such as
sanders, jigsaws and planers; tools with
ratings greater ratings may cause a fire.
1. Check power tool nameplate for
acceptable amperage rating. Only tools
with rated at 7.2 amps or less should be
connected to the vacuum cleaner.
2. Make sure the power tool is switched off,
and then plug it in.
3. Set the mode selector switch to POWER
TOOL ACTIVATION position.
4. When the power tool is switched on, the
power tool automatically switches on the
vacuum cleaner.
Switching The Vacuum Cleaner ON: When
the power tool is switched on, the vacuum
cleaner automatically switches on.
In the Power Tool Activation Mode or
Pulse-Clean Mode combined with Power
Tool Activation, the vacuum cleaner power is
set at 4.8 amps. In the normal vacuuming
and normal PULSE-CLEAN mode, the power
is 11.1 amps.
!
WARNING
!
WARNING
!
WARNING
FIG. 5
GROUNDED OUTLET
(OUTLET COVER)
BM 2610919254 12/02 12/18/02 10:52 AM Page 9

-10-
Switching The Vacuum Cleaner OFF:
When the power tool is switched off, the
vacuum cleaner is switched off. In order to
empty the hose, the vacuum cleaner
switches off after a 6 second delay.
BUILT-IN CIRCUIT BREAKER
If a power tool is connected to the vacuum
cleaner and draws more than 12 amps, the
circuit breaker will trip and shut down the
power supply to the outlet. This will stop
operation of the power tool and stop the
operation of the vacuum cleaner in the
following modes:
• Power Tool Activation
• Pulse-Clean Filter Cleaning Combined
with Power Tool Activation
(The circuit breaker has no affect on the
Normal Vacuuming mode or the regular
PULSE-CLEAN™ Filter Cleaning mode.)
PULSE-CLEAN™ FILTER CLEANING
The vacuum cleaner is equipped with the
electromagnetic PULSE-CLEAN™ filter
cartridge cleaning system, which in 10
seconds allows the unit to self-remove dust
that is adhering to the filter cartridge.
Before using the PULSE-CLEAN™ mode,
we suggest to advise those in hearing
range about the sound of this feature.
PULSE-CLEAN™ MODE
(when no power tool is plugged in)
1.Turn vacuum cleaner dial to PULSECLEAN™ setting.
2. The filter cleaning process will be
automatically completed within about 10
seconds.
3. After PULSE-CLEAN™ cycle completes
itself, the vacuum cleaner will become
idle.
4. Switch the vacuum cleaner to the OFF or
ON position, as desired.
See PULSE-CLEAN™ notes below.
PULSE-CLEAN™ MODE COMBINED
WITH POWER TOOL ACTIVATION
The PULSE-CLEAN™ system can also be
used when a power tool is connected and
used with the “POWER TOOL
ACTIVATION MODE”. This is very handy
when the location of vacuum cleaner is
separated from the connected power tool,
such as when the tool is being used up on a
scaffold.
1.Plug the power tool into the vacuum
cleaner’s power tool outlet.
2. Turn the vacuum cleaner dial to PULSECLEAN™ setting.
3. The vacuum cleaner goes into the PULSECLEAN™ mode for 10 seconds.
4. After PULSE-CLEAN™ mode is
completed, switch on the power tool, and
the vacuum cleaner will operate until the
power tool is switched off or disconnected
from the vacuum cleaner.
5. At the time the tool is switched off, the
vacuum cleaner will automatically
determine if the filter needs to be cleaned.
If it determines that cleaning is necessary,
the PULSE-CLEAN™ system
automatically activates, the cleaning
process will be completed within about 10
seconds.
6. After PULSE-CLEAN™ cycle completes
itself, the vacuum cleaner will become
idle.
7. Switch the vacuum cleaner OFF, or to
continue working, switch the power tool
on again.
8. If power tool is switched on before the
PULSE-CLEAN™ cycle is complete,
PULSE-CLEAN™ automatically stops and
vacuum cleaner starts to vacuum.
PULSE-CLEAN™ Notes:
• The sound of the PULSE-CLEAN™
system may surprise those near the work
area. Before using PULSE-CLEAN™, alert
those in the vicinity of the vacuum cleaner
of this feature and the associated sound it
makes.
• Any power tool plugged into the vacuum
cleaner’s power tool outlet will receive
power during the PULSE-CLEAN™
modes, as well as the power-tool
activation mode. Don’t keep power tool
plugged into the vacuum cleaner’s power
tool outlet during normal vacuuming.
• The PULSE-CLEAN™ system must be
activated when the suction power
decreases to the point of being
insufficient.
• The PULSE-CLEAN™ system should be
activated regularly to keep the filter
cartridges clean. The proper frequency for
activating the PULSE-CLEAN™ system
depends on the type and amount of dust.
With regular usage, the maximum
vacuuming performance is maintained
longer.
BM 2610919254 12/02 12/18/02 10:52 AM Page 10

-11-
RESETTING THE CIRCUIT BREAKER
1. Switch off the power tool
2. Press the circuit breaker button.
3. Restart the vacuum cleaner in the desired
mode.
WET VACUUMING
Your 3931 can also be used for wet
vacuuming.
Do not use to vacuum
flammable liquids, gases,
or explosive dusts, like gasoline or other
fuels, lighter fluid, varnish, polyurethane
coatings, cleaners, oil-based paints,
natural gas, hydrogen, coal dust,
magnesium dust, grain dust, or gun
powder. Electric motors create sparks,
which may ignite the dust or fumes.
1. Before wet vacuuming, run the vacuum in
the PULSE-CLEAN™ mode.
2. Empty the canister to prevent encrustation
when wet vacuuming. If bag is in canister,
remove it as well.
Notes:
• Empty the canister before wet vacuuming.
• Do not use a dust bag when wet
vacuuming
• The filter cartridge must be used when
wet vacuuming.
• Do not activate the PULSE-CLEAN™
mode when the contents of the vacuum
cleaner are wet.
• The unit is equipped with water level
sensors. The unit switches off when the
maximum filling height is reached. The
unit still has power, but will not operate.
The unit must be first switched off before
it can be switched on again.
• When the unit is shut off, some water may
flow out of the hose.
• To prevent siphoning or spillage, lift the
suction hose out of the liquid before
draining the vacuum cleaner.
• Before opening and emptying, move the
switch to the OFF position.
• Always disconnect the vacuum cleaner
cord from the power supply.
• In order to avoid mildew, after wet
vacuuming, remove both filter cartridges
and allow them to dry thoroughly, Dry the
filter and canister thoroughly so that dust
cannot adhere to moist parts. Also remove
the control unit and allow it to dry, too.
• Use a dry filter for subsequent dry
vacuuming. We suggest purchasing extra
filter cartridges when frequently
alternating between wet and dry
vacuuming and swap them out as
appropriate.
Clean the canister and accessories with
water. Wipe the top section with a moist
cloth.
WATER-LEVEL SENSOR MAINTENANCE
Clean the water level sensors occasionally:
See Figure 6.
1. Unlock the canister latches and remove
the control unit.
2. Clean the water level sensors with a soft
cloth.
3. Reattach the control unit again
4. Lock the canister latches.
EMPTYING THE CANISTER
1. Switch the unit off.
2. Disconnect from the power supply.
3. Open the canister latches.
4. Remove control unit.
5. Remove the paper filter bag; dump out the
canister, or drain out the canister as
appropriate.
CANISTER MAINTENANCE
Wipe out the canister from time to time with
a commercially available, non-scouring
cleaning agent and allow to dry.
LEVEL
SENSOR
FIG. 6
!
WARNING
BM 2610919254 12/02 12/18/02 10:52 AM Page 11

-12-
Service
Preventive maintenance
performed by unauthorized personnel may result in misplacing
of internal wires and components which
could cause serious hazard. We
recommend that all tool service be
performed by a Bosch Factory Service
Center or Authorized Bosch Service Station.
TOOL LUBRICATION
Your Bosch tool has been properly
lubricated and is ready to use.
Cleaning
To avoid accidents always
disconnect the tool from
the power supply before cleaning or
performing any maintenance. The tool may
be cleaned most effectively with
compressed dry air. Always wear safety
goggles when cleaning tools with
compressed air.
Ventilation openings and switch levers must
be kept clean and free of foreign matter. Do
not attempt to clean by inserting pointed
objects through openings.
Certain cleaning agents
and solvents damage
plastic parts. Some of these are: gasoline,
carbon tetrachloride, chlorinated cleaning
solvents, ammonia and household
detergents that contain ammonia.
!
WARNING
!
WARNING
Maintenance
!
CAUTION
If an extension cord is
necessary, a cord with
adequate size conductors that is capable
of carrying the current necessary for your
tool must be used. This will prevent
excessive voltage drop, loss of power or
overheating. Grounded tools must use 3wire extension cords that have 3-prong
plugs and receptacles.
NOTE: The smaller the gauge number, the
heavier the cord.
The length of the vacuum cleaner cord must
be included in calculating the total length of
cord.
RECOMMENDED SIZES OF EXTENSION CORDS
120 VOLT ALTERNATING CURRENT TOOLS
Tool’s
Ampere
Rating
Cord Size in A.W.G.
Wire Sizes in mm
2
3-6
6-8
8-10
10-12
12-16
18 16 16 14 .75 .75 1.5 2.5
18 16 14 12 .75 1.0 2.5 4.0
18 16 14 12 .75 1.0 2.5 4.0
16 16 14 12 1.0 2.5 4.0 —
14 12 — — — — — —
25 50 100 150 15 30 60 120
Cord Length in Feet Cord Length in Meters
!
WARNING
Accessories
BM 2610919254 12/02 12/18/02 10:52 AM Page 12
 Loading...