


FOR MODELS: SHI
4302 4306
6802 6805
6806
SHU
3002 3006
3012 3016
4002 4006
4016 4022
4026 4036
4302 4306
4312 4316
5302 5304
5305 5306
5312 5314
5315 5316
6802 6805
6806
SHV
4303 4803
BOSCH
Dishwasher Repair Manual
Effective: December 1, 1998 |
1st Edition/Rev. 0 |
|
|
|
|
BSH Home Appliances
2800 South 25th Avenue
Broadview, Illinois 60153
Introduction
This Repair Manual is designed to assist you in the evaluation, diagnosis and repair of the current SHI, SHU and SHV model dishwasher series. To better understand these appliances, their operation and construction we suggest that you read this manual thoroughly before attempting any repairs.
All information is current at the time of printing.

H |
1 |
|
Table of Contents |
Description |
Page |
Section 1 . . . . . . . . . . . . . . . . . . |
. . . . . . . . . . . . . . . . . . . . . . . . . . . . . . . . . . . . . . . . . . . . . 3 |
Warranty / Technical Specifications . . . . . . . . . . . . . . . . . . . . . . . . . . . . . . . . . . . . . . . . . . . . . . . . . 4
Model / Serial Number Location . . . . . . . . . . . . . . . . . . . . . . . . . . . . . . . . . . . . . . . . . . . . . . . . . . . . 5
Product Overview . . . . . . . . . . . . . . . . . . . . . . . . . . . . . . . . . . . . . . . . . . . . . . . . . . . . . . . . . . . . . 6 – 7
Notes . . . . . . . . . . . . . . . . . . . . . . . . . . . . . . . . . . . . . . . . . . . . . . . . . . . . . . . . . . . . . . . . . . . . . . . . . . 8
Section 2 . . . . . . . . . . . . . . . . . . . . . . . . . . . . . . . . . . . . . . . . . . . . . . . . . . . . . . . . . . . . . . . 9
Operation, SHU 3002 / 3006 / 3012 / 3016 / 4002 / 4006 / 4016 / 4022 / 4026 / 4036 . 10 Cycle Chart . . . . . . . . . . . . . . . . . . . . . . . . . . . . . . . . . . . . . . . . . . . . . . . . . . . . . . . . . . . . . . . . . . . . 11 Operation, SHI 4302 / 4306 — SHU 4302 / 4306 / 4312 / 4316 . . . . . . . . . . . . . . . . . . . . . . 12 Cycle Chart . . . . . . . . . . . . . . . . . . . . . . . . . . . . . . . . . . . . . . . . . . . . . . . . . . . . . . . . . . . . . . . . . . . . 13 Operation, SHU 5302 / 5304 / 5305 / 5306 / 5312 / 5314 / 5315 / 5316 . . . . . . . . . . . . . . 14 Cycle Chart . . . . . . . . . . . . . . . . . . . . . . . . . . . . . . . . . . . . . . . . . . . . . . . . . . . . . . . . . . . . . . . . . . . . 15 Operation, SHI / SHU 6802 / 6805 / 6806 . . . . . . . . . . . . . . . . . . . . . . . . . . . . . . . . . . . . . . . . . 16 Cycle Chart . . . . . . . . . . . . . . . . . . . . . . . . . . . . . . . . . . . . . . . . . . . . . . . . . . . . . . . . . . . . . . . . . . . . 17 Notes . . . . . . . . . . . . . . . . . . . . . . . . . . . . . . . . . . . . . . . . . . . . . . . . . . . . . . . . . . . . . . . . . . . . . . . . . 18
Section 3 . . . . . . . . . . . . . . . . . . . . . . . . . . . . . . . . . . . . . . . . . . . . . . . . . . . . . . . . . . . . . . 19
Rack System . . . . . . . . . . . . . . . . . . . . . . . . . . . . . . . . . . . . . . . . . . . . . . . . . . . . . . . . . . . . . . 20 – 21
Interior Features . . . . . . . . . . . . . . . . . . . . . . . . . . . . . . . . . . . . . . . . . . . . . . . . . . . . . . . . . . . 22 – 25
Detergent / Rinse-Agent Dispenser . . . . . . . . . . . . . . . . . . . . . . . . . . . . . . . . . . . . . . . . . . . . . . . . 26
Washability / Drying . . . . . . . . . . . . . . . . . . . . . . . . . . . . . . . . . . . . . . . . . . . . . . . . . . . . . . . . . . . . . 27
SERVICE REMINDER . . . . . . . . . . . . . . . . . . . . . . . . . . . . . . . . . . . . . . . . . . . . . . . |
. . . . 28 |
Section 4 . . . . . . . . . . . . . . . . . . . . . . . . . . . . . . . . . . . . . . . . . . . . . . . . . . . . . . . . . . |
. . . . 29 |
Outer Door Removal . . . . . . . . . . . . . . . . . . . . . . . . . . . . . . . . . . . . . . . . . . . . . . . . . . . . . . . . |
. . . . 30 |
Door Components . . . . . . . . . . . . . . . . . . . . . . . . . . . . . . . . . . . . . . . . . . . . . . . . . . . . . . . . . . |
. . . . 31 |
Dispenser Operation . . . . . . . . . . . . . . . . . . . . . . . . . . . . . . . . . . . . . . . . . . . . . . . . . . . . . . . . |
. . . . 32 |
Dispenser Removal . . . . . . . . . . . . . . . . . . . . . . . . . . . . . . . . . . . . . . . . . . . . . . . . . . . . . . . . . . |
. . . . 33 |
Facia Assembly . . . . . . . . . . . . . . . . . . . . . . . . . . . . . . . . . . . . . . . . . . . . . . . . . . . . . . . . . . . . |
34 – 35 |
Notes . . . . . . . . . . . . . . . . . . . . . . . . . . . . . . . . . . . . . . . . . . . . . . . . . . . . . . . . . . . . . . . . . . . . . |
. . . . 36 |
Section 5 . . . . . . . . . . . . . . . . . . . . . . . . . . . . . . . . . . . . . . . . . . . . . . . . . . . . . . . . . . . |
. . . 37 |
Base Components – Front Accessible: Electrical Connection . . . . . . . . . . . . . . . . . . . . . |
. . . . 38 |
Circulation Motor Capacitor . . . . . . . . . . . . . . . . |
. . . . 38 |
Leveling Legs . . . . . . . . . . . . . . . . . . . . . . . . . . . . |
. . . . 39 |
Water Valve . . . . . . . . . . . . . . . . . . . . . . . . . . . . . |
. . . . 39 |
Drain Motor . . . . . . . . . . . . . . . . . . . . . . . . . . . . . |
40 — 41 |
2 |
H |
Table of Contents
SERVICE REMINDER . . . . . . . . . . . . . . . . . . . . . . . . . . . . . . . . . . . . . . . . . . . . . . . . . . . 42
Description Page
Section 6 . . . . . . . . . . . . . . . . . . . . . . . . . . . . . . . . . . . . . . . . . . . . . . . . . . . . . . . . . . . . . . 43
Left Side Access . . . . . . . . . . . . . . . . . . . . . . . . . . . . . . . . . . . . . . . . . . . . . . . . . . . . . . . . . . . |
. . . . 44 |
Left Side Components . . . . . . . . . . . . . . . . . . . . . . . . . . . . . . . . . . . . . . . . . . . . . . . . . . . . . . . |
. . . . 45 |
Water Inlet / Discharge System – Operation . . . . . . . . . . . . . . . . . . . . . . . . . . . . . . . . . . . . . |
46 – 47 |
Water Inlet / Discharge System – Removal . . . . . . . . . . . . . . . . . . . . . . . . . . . . . . . . . . . . . . |
. . . . 48 |
Section 7 . . . . . . . . . . . . . . . . . . . . . . . . . . . . . . . . . . . . . . . . . . . . . . . . . . . . . . . . . . . . . . 49
Right Side Access . . . . . . . . . . . . . . . . . . . . . . . . . . . . . . . . . . . . . . . . . . . . . . . . . . . . . . . . . . . . . . 50
Right Side Components . . . . . . . . . . . . . . . . . . . . . . . . . . . . . . . . . . . . . . . . . . . . . . . . . . . . . . . . . 51
NTC Operation . . . . . . . . . . . . . . . . . . . . . . . . . . . . . . . . . . . . . . . . . . . . . . . . . . . . . . . . . . . . . . . . . 52
NTC Removal . . . . . . . . . . . . . . . . . . . . . . . . . . . . . . . . . . . . . . . . . . . . . . . . . . . . . . . . . . . . . .53 – 57
Notes . . . . . . . . . . . . . . . . . . . . . . . . . . . . . . . . . . . . . . . . . . . . . . . . . . . . . . . . . . . . . . . . . . . . . . . . . 58
Section 8 . . . . . . . . . . . . . . . . . . . . . . . . . . . . . . . . . . . . . . . . . . . . . . . . . . . . . . . . . . . |
. . . 59 |
Tank Removal . . . . . . . . . . . . . . . . . . . . . . . . . . . . . . . . . . . . . . . . . . . . . . . . . . . . . . . . . . . . . |
60 – 62 |
Base Components . . . . . . . . . . . . . . . . . . . . . . . . . . . . . . . . . . . . . . . . . . . . . . . . . . . . . . . . . . |
. . . . 63 |
Circulation Pump / Motor Removal . . . . . . . . . . . . . . . . . . . . . . . . . . . . . . . . . . . . . . . . . . . . . |
. . . . 64 |
Circulation Pump / Motor Assembly . . . . . . . . . . . . . . . . . . . . . . . . . . . . . . . . . . . . . . . . . . . . |
. . . . 65 |
Heater Assembly Removal . . . . . . . . . . . . . . . . . . . . . . . . . . . . . . . . . . . . . . . . . . . . . . . . . . . . |
. . . . 66 |
Heater Assembly . . . . . . . . . . . . . . . . . . . . . . . . . . . . . . . . . . . . . . . . . . . . . . . . . . . . . . . . . . . |
. . . . 67 |
Aqua Sensor . . . . . . . . . . . . . . . . . . . . . . . . . . . . . . . . . . . . . . . . . . . . . . . . . . . . . . . . . . . . . . . |
. . . . 68 |
Door Spring Removal . . . . . . . . . . . . . . . . . . . . . . . . . . . . . . . . . . . . . . . . . . . . . . . . . . . . . . . . |
. . . . 69 |
Notes . . . . . . . . . . . . . . . . . . . . . . . . . . . . . . . . . . . . . . . . . . . . . . . . . . . . . . . . . . . . . . . . . . . . . |
. . . . 70 |
Section 9 . |
. |
. . . . . |
. . . . . . |
. . . . . . . . . . . . . . . . . . . . . . . . . . . . . . . . . . . . . . |
. . . . . . . . . . . 71 |
|
Wiring Diagrams / Schematics . . . . . . . . . . . . . . . . . . . . . . . . . . . . . . . . . . . . . . . |
. . . . . . . . .72 – 84 |
|||||
Test Program |
. . . . . |
. . . . . . . |
. . . . . . . . . . . . . . . . . . . . . . . . . . . . . . . . . . . . . . . . . |
Diagram 1 |
||
SHI |
4302 |
/ |
4306 |
. . . . . . . |
. . . . . . . . . . . . . . . . . . . . . . . . . . . . . . . . . . . . . . . . . |
Diagrams 1, 8, 9 |
SHI |
6802 / |
6805 |
/ 6806 . . . . . . . . . . . . . . . . . . . . . . . . . . . . . . . . . . . . . . . . . |
Diagrams 1, 8, 11 |
||
SHU 3002 / |
3006 |
/ 3012 |
/ 3016 . . . . . . . . . . . . . . . . . . . . . . . . . . . . . . . . . . . |
Diagrams 2, 3, 4 |
||
SHU 4002 / |
4006 |
/ 4016 |
/ 4022 / 4026 / 4036 . . . . . . . . . . . . . . . . . . . . . . |
Diagrams 5, 6, 7 |
||
SHU 4302 / |
4306 |
/ 4312 / 4316 . . . . . . . . . . . . . . . . . . . . . . . . . . . . . . . . . . . |
Diagrams 1, 8, 9 |
|||
SHU 5302 |
/ |
5304 |
/ 5305 |
/ 5306 / 5312 / 5314 / 5315 / 5316 . . . . . . . . . |
Diagrams 1, 8, 10 |
|
SHU 6802 / |
6805 |
/ 6806 . . . . . . . . . . . . . . . . . . . . . . . . . . . . . . . . . . . . . . . . . |
Diagrams 1, 8, 11 |
|||
SHV 4303 |
/ |
4803 |
. . . . . . . |
. . . . . . . . . . . . . . . . . . . . . . . . . . . . . . . . . . . . . . . . . |
Diagrams 12, 13 |
|
H |
3 |
Section 1
Description |
Page |
Warranty / Technical Specifications . . . . . . . . . . . . . . . . . . . . . . . . . . . . . . . . . . . . . . . . . . . . . . . . . 4
Model / Serial Number Location . . . . . . . . . . . . . . . . . . . . . . . . . . . . . . . . . . . . . . . . . . . . . . . . . . . . 5
Product Overview . . . . . . . . . . . . . . . . . . . . . . . . . . . . . . . . . . . . . . . . . . . . . . . . . . . . . . . . . . . . . 6 – 7
Notes . . . . . . . . . . . . . . . . . . . . . . . . . . . . . . . . . . . . . . . . . . . . . . . . . . . . . . . . . . . . . . . . . . . . . . . . . . 8

4 |
H |
Warranty / Technical Specifications
Warranty
1st |
Year |
Parts & Labor. |
2nd |
Year |
Parts only. |
3rd – 5th Year |
Electronic Boards, parts only. |
|
3rd – 5th Year |
Racks, parts only. |
|
|
|
This does not include rack wheels; silverware baskets or plastic shelving. |
Lifetime Stainless Steel.
Must receive a special authorization before attempting any repairs or replacement.
Cosmetic items, Facia and Door Panels are only warranted against manufacturing defects. In the event of a scratch or dent have the customer contact the Customer Service Department.
CUSTOMER SERVICE 800-944-2904
TECHNICAL SERVICE 888-522-6724
Technical Specifications
Electrical Requirements |
|
|
|
|
|
|
|
|
Rating |
|
120V / 60Hz |
|
|
|
|
||
|
|
|
|
|
|
|
|
|
Dedicated Circuit |
|
15 Amp |
|
|
|
|
||
|
|
|
|
|
|
|
|
|
Total Amps (load rated) |
11 Amp |
|
|
|
|
|||
|
|
|
|
|
|
|
|
|
Water Supply |
|
|
|
|
|
|
|
|
Suggested Incoming Temp. |
140° f |
|
|
|
|
|||
|
|
|
|
|
|
|
|
|
PSI Min / Max |
|
|
20 / 60 |
|
|
|
|
|
|
|
|
|
|
|
|
|
|
Water Connection |
|
|
3/8” Copper or Flexible Stainless Steel |
|
||||
Component Values |
|
|
|
|
|
|
|
|
Component |
|
Ohms* |
|
Amperage |
Other |
|||
Water Valve |
|
|
1K |
|
— |
— |
||
Drain Motor |
|
16 |
|
.75 |
— |
|||
Circulation Motor |
|
10 |
|
1.25 |
— |
|||
|
|
|
|
|
||||
NTC |
55K at room temp. |
|
— |
Resistance decreases as |
||||
|
|
(75° f) |
|
|
temperature increases |
|||
PTC (actuator) |
|
200 |
|
— |
— |
|||
|
|
|
|
|
|
|||
Heater |
|
10.5 |
|
9.75 |
1200 watts |
|||
*always disconnect both component leads before measuring for resistance.
Electrical Warning:
To avoid personal injury and/or property damage it is important that safe servicing practices and procedures are observed at all times. Disconnect the electrical service before attempting any repairs, and live tests are to be performed by experienced and qualified service personnel only.
H |
5 |
Model / Serial Number Location
Fig. 1-1 |
Fig. 1-2 |
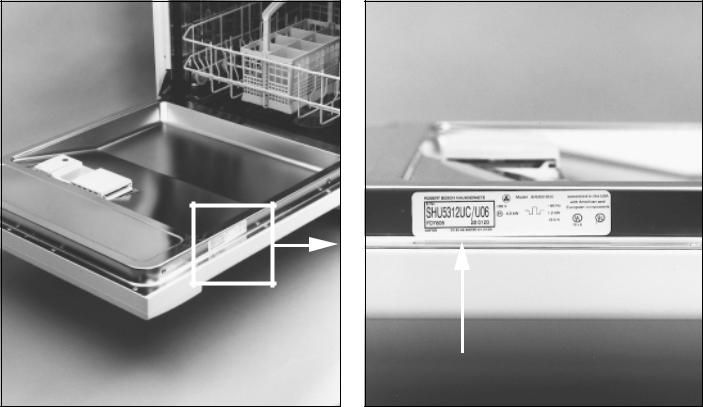
Located on the right hand side of the Inner Door is the Model and Serial number tag, Fig. 1-1.
The Model and Serial numbers can be found on the left side of the tag within the black outline box, Fig. 1-2. The Model Number for this unit is SHU 5312 UC/U06.
Located just under the Model Number is the ten-digit Serial Number.
The Serial Number for this unit is FD 7801 123456.
Service note: A second Model and Serial number tag is located on the Base, see Section 5, Fig. 10-1.
6 |
H |
Product Overview
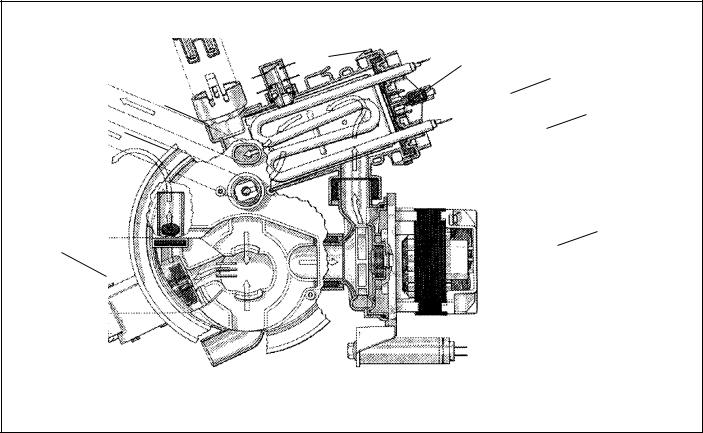
The Bosch dishwasher utilizes a two motor system with separate Circulation and Drain Motors, and a Flow Through Heater controlled by a Flow Switch and NTC Thermistor. With some models also having the advanced logic feature of an Aqua Sensor turbidity measuring devise, Fig. 2-1.
•A two motor system allows each motor to be designed for a single function, thus reducing overall size and energy consumption. While also reducing operating noise.
•The Flow-Through Heater allows a shorter heating cycle since all water must pass through the Heater, increasing water temperature by approximately two degrees a minute. To protect the heater from dry fire, the Flow Switch will not allow the Heater to activate unless water is flowing.
•Water temperature is controlled by the NTC (negative temperature coefficient). As water temperature increases the NTC records the decrease in resistance. The Control Unit Logic Board measures this resistance change and allows the program to advance once the correct temperature (resistance level) is reached.
•The Aqua Sensor turbidity measuring device, which is available only on select models, evaluates the pre-wash water using a beam of light and a pick-up sensor. If the beam passes easily through the pre-wash water then no additional wash water is added. If the beam cannot pass through, then the pre-wash water is drained and a fresh fill is added for the main wash cycle.
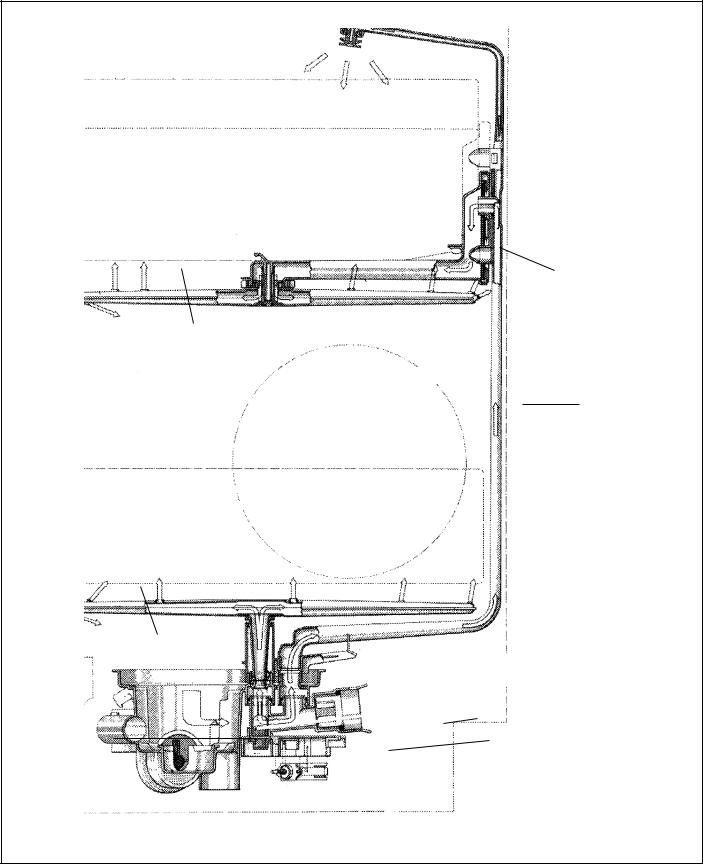
The heated water then advances through the system via a four level wash system that uses both an upper and lower spray arm as well as an overhead sprayer, Fig. 2-2.
Aqua Sensor
NTC
Flow Through Heater
Upper Spray Arm
Flow Switch
Lower Spray Arm
Circulation Motor / Pump
Impeller Cover
Drain Motor 
Fig. 2-1
H |
7 |
Product Overview
Overhead Spray
Coupling
Upper Spray Arm
Feed Tube
Lower Spray Arm
|
Aqua Sensor |
Sump |
Flow Through |
|
Heater |
Fig. 2-2
8 |
H |
Notes
H |
9 |
Section 2 |
|
Description |
Page |
Operation, SHU 3002 / 3006 / 3012 / 3016 / 4002 / 4006 / 4016 / 4022 / 4026 / 4036 . 10 |
|
Cycle Chart . . . . . . . . . . . . . . . . . . . . . . . . . . . . . . . . . . . . . . . . . . . . . . . . . . . . . . . . . . . . . . . . . |
. . . 11 |
Operation, SHI 4302 / 4306 |
|
SHU 4302 / 4306 / 4312 / 4316 . . . . . . . . . . . . . . . . . . . . . . . . . . . . . . . . . . . . . |
. . 12 |
Cycle Chart . . . . . . . . . . . . . . . . . . . . . . . . . . . . . . . . . . . . . . . . . . . . . . . . . . . . . . . . . . . . . . . . . . |
. . 13 |
Operation, SHU 5302 / 5304 / 5305 / 5306 / 5312 / 5314 / 5315 / 5316 . . . . . . . . . . . . |
. . 14 |
Cycle Chart . . . . . . . . . . . . . . . . . . . . . . . . . . . . . . . . . . . . . . . . . . . . . . . . . . . . . . . . . . . . . . . . . . |
. . 15 |
Operation, SHI & SHU 6802 / 6805 / 6806 . . . . . . . . . . . . . . . . . . . . . . . . . . . . . . . . . . . . . . |
. . 16 |
Cycle Chart . . . . . . . . . . . . . . . . . . . . . . . . . . . . . . . . . . . . . . . . . . . . . . . . . . . . . . . . . . . . . . . . . . |
. . 17 |
Notes . . . . . . . . . . . . . . . . . . . . . . . . . . . . . . . . . . . . . . . . . . . . . . . . . . . . . . . . . . . . . . . . . . . . . . . |
. . 18 |
10 |
H |
Operation
SHU 3002/3006/3012/3016/4002/4006/4016/4022/4026/4036
Fig. 3-1 |
Fig. 3-2 |
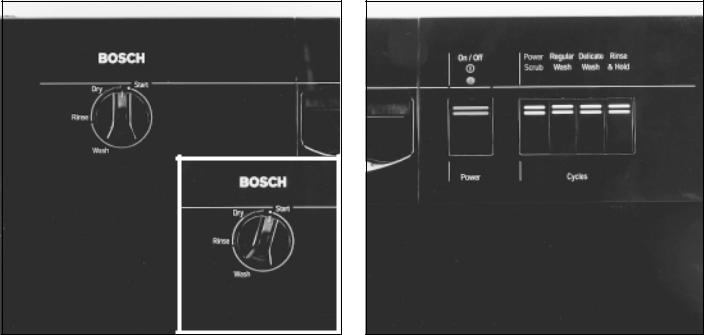
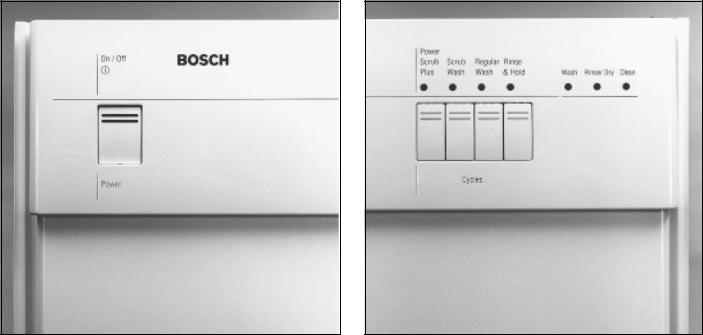
The SHU 30** and 40** are both mechanical units that operate using a basic Timer and Selector Switch.
TO OPERATE EITHER MODEL, (a SHU 4006 is shown):
Fig. 3-2.
First select a cycle by pushing the corresponding Cycle Button in. The Cycle Button remains in the indented position until another cycle is chosen.
Now, depress the On/Off Button until it locks in place and the On LED illuminates.
Note: The On lamp will remain illuminated until the On/Off Button is depressed a second time turning the unit off.
If the door is opened during the cycle, the On/Off Button will be reset to off and must again be depressed to re-active the unit.
Fig. 3-1.
Then, turn the Timer Knob slowly clockwise to the start position and release. You will hear the
Drain Motor activate.
The Timer Knob will continue to advance clockwise back to the twelve O’clock position until the cycle is complete.
Please note: During the Rinse & Hold Cycle the Timer Knob will only advance to the two O’clock position and then stop, indicating the end of the Rinse & Hold cycle.

H |
11 |
Cycle Chart
SHU 3002/3006/3012/3016/4002/4006/4016/4022/4026/4036
Type of dishware e.g. china,
pots/pans,
cutlery,
glasses,
etc.
Type of food remains
Amount of food remains
Condition of food remains
Wash cycle
Cycle sequence
Cycle details
Duration in minutes
Water consumption in gallons
Water consumption in liters
Non-deli- |
Mixed |
|
|
|
|
Delicate |
|
|
Mixed |
||||||
cate |
|
|
|
|
|
|
|
|
|
|
|
|
|||
Soups, casseroles, |
Soups, potatoes, |
|
Coffee, cakes, milk, |
||||||||||||
sauces, potatoes, |
pasta, rice, eggs, |
|
salami, cold drinks, |
||||||||||||
pasta, rice, eggs, |
roast or fried food |
|
|
|
salads |
||||||||||
roast or fried food |
|
|
|
|
|
|
|
|
|
|
|
|
|||
|
|
|
|
|
|
|
|
|
|
|
|
|
|
|
|
|
|
|
|
|
|
|
|
|
|
|
|
|
|
|
|
|
a lot |
|
a lot |
|
|
|
a little |
|
a |
little |
|
|
very little |
||
stuck on hard |
|
|
|
|
|
|
|
|
|
|
|
|
|
||
|
|
|
|
|
|
|
|
|
|
|
|
|
|||
|
|
|
|
|
loosely attached |
|
|
|
|||||||
|
|
|
|
|
|
|
|
|
|
|
|
|
|||
|
|
|
|
|
|
|
|
|
|
|
|
||||
|
Power |
|
|
Regular |
|
Delicate |
|
|
|
|
|
|
Rinse |
||
|
Scrub |
|
Wash |
|
|
Wash |
|
|
|
|
|
|
& Hold |
||
|
|
|
|
|
|
|
|
|
|
|
|
||||
|
Pre-rinse |
Pre-rinse |
|
Pre-rinse |
|
|
|
|
|
Pre-rinse |
|||||
|
Pre-wash |
Pre-wash |
|
|
Wash |
|
|
|
|
|
|
|
|||
|
Wash |
Wash |
|
|
140˚F |
|
|
|
|
|
|
|
|||
|
|
|
Rinse |
|
|
|
|
|
|
|
|||||
|
161˚F |
140˚F |
|
|
|
|
|
|
|
|
|
||||
|
Rinse |
Rinse |
|
Rinse-aid |
|
|
|
|
|
|
|
||||
|
Rinse-aid |
Rinse-aid |
|
|
161˚F |
|
|
|
|
|
|
|
|||
|
|
|
|
|
|
|
|
|
|
|
|||||
|
161˚F |
161˚F |
|
|
Drying |
|
|
|
|
|
|
|
|||
|
|
|
|
|
|
|
|
|
|
|
|
|
|
|
|
|
Drying |
|
|
Drying |
|
|
|
|
|
|
|
|
|
|
|
85 |
|
|
|
|
|
|
|
|
|
|
|
||||
|
|
78 |
|
70 |
|
|
|
|
10 |
||||||
6.55 |
|
|
6.55 |
|
5.36 |
|
|
|
|
1.19 |
|||||
24.75 |
|
|
24.75 |
|
20.25 |
|
|
|
|
4.5 |
|||||
|
|
|
|
|
|
|
|
|
|
|
|
|
|
|
|
Shown above are the range of values that may be obtained while running the dishwasher under normal conditions. Actual values may vary. The actual cycle duration, water and energy usage are dependent upon inlet water temperature.
 Delicate cycle not used on SHU 3002/3006/3012/3016
12 |
H |
Operation
SHI 4302/4306 SHU 4302/4306/4312/4316
Fig. 3-3 |
Fig. 3-4 |
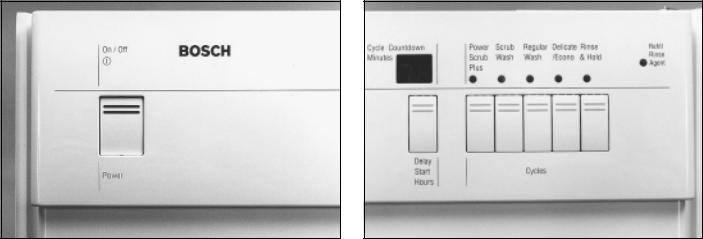
The SHI or SHU 43** series operates using an electronic Control Unit.
TO OPERATE:
Fig. 3-3.
First depress the On/Off Button until it locks in place.
Fig. 3-4.
Once the On/Off Button is depressed the LED above the previously used cycle will illuminate.
To change the cycle, simply press the desired Cycle Button twice. The LED above that cycle will then illuminate.
As the program advances the Cycle Progress LED’s will illuminate (wash, rinse / dry). When the cycle is complete the Clean LED will be illuminated.
TO CANCEL A CYCLE:
Press the Power Scrub Plus and Regular Wash Buttons both in at the same time. The unit will then drain and the Clean LED will illuminate.
Please note: If the door is opened during the cycle, the On/Off Button will be reset to off andmust be depressed again to re-active the cycle. The cycle will resume from where it left off.
H |
13 |
Cycle Chart
SHI 4302/4306 SHU 4302/4306/4312/4316
Type of dishware |
|
|
|
|
|
|
|
|
|
|
|
|
|
|
|
||
e.g. china, |
|
|
|
|
|
|
|
|
|
|
|
|
|
|
|
|
|
pots/pans, |
Non-deli- |
|
|
Mixed |
|
|
|
|
Delicate |
|
|
Mixed |
|||||
cutlery, |
cate |
|
|
|
|
|
|
|
|
|
|
|
|
|
|
|
|
glasses, |
|
|
|
|
|
|
|
|
|
|
|
|
|
|
|
||
|
|
|
|
|
|
|
|
|
|
|
|
|
|
|
|
|
|
etc. |
|
|
|
|
|
|
|
|
|
|
|
|
|
|
|
|
|
Type of food |
Soups, casseroles, |
Soups, potatoes, |
|
Coffee, cakes, milk, |
|||||||||||||
remains |
|
||||||||||||||||
sauces, potatoes, |
pasta, rice, eggs, |
|
salami, cold drinks, |
||||||||||||||
|
pasta, rice, eggs, |
roast or fried food |
|
|
|
salads |
|||||||||||
|
roast or fried food |
|
|
|
|
|
|
|
|
|
|
|
|
|
|||
Amount of |
|
|
|
|
|
|
|
|
|
|
|
|
|
|
|
|
|
|
|
|
|
|
|
|
|
|
|
|
|
|
|
|
|
|
|
a lot |
|
a |
lot |
|
|
a little |
|
a |
little |
|
|
very little |
|||||
food remains |
|
|
|
|
|
|
|||||||||||
|
|
|
|
|
|
|
|
|
|
|
|
|
|
|
|
|
|
|
|
|
|
|
|
|
|
|
|
|
|
|
|
|
|
|
|
Condition of |
|
|
|
|
|
|
|
|
|
|
|
|
|
|
|
|
|
stuck on hard |
|
|
|
|
|
|
loosely attached |
|
|
|
|||||||
food remains |
|
|
|
|
|
|
|
|
|
||||||||
|
|
|
|
|
|
|
|
|
|
|
|
|
|
|
|
|
|
Wash |
|
|
|
|
|
|
|
|
|
|
|
|
|
|
|
|
|
Power |
|
Scrub |
|
|
|
|
|
|
Regular |
|
|
|
|
|
|
Rinse |
|
cycle |
|
|
|
|
|
|
|
|
|
|
|
|
|
||||
Scrub |
|
Wash |
|
|
|
|
|
|
Wash |
|
|
|
|
|
|
& Hold |
|
|
Plus |
|
|
|
|
|
|
|
|
|
|
|
|
|
|
|
|
Cycle |
Pre-rinse |
Pre-rinse |
|
|
|
|
Pre-rinse |
|
|
|
|
|
Pre-rinse |
||||
sequence |
|
|
|
|
|
|
|
|
|
||||||||
|
|
|
|
|
|
|
|
|
|
|
|
|
|
|
|
|
|
|
Pre-wash |
Wash |
|
|
|
|
|
Wash |
|
|
|
|
|
|
|
||
|
125˚F |
150˚F |
|
|
|
|
|
140˚F |
|
|
|
|
|
|
|
||
|
Wash |
First Rinse |
|
|
|
|
|
Rinse |
|
|
|
|
|
|
|
||
|
161˚F |
|
|
|
|
|
|
|
|
|
|
|
|
||||
|
|
|
|
|
|
|
|
|
|
|
|
|
|
|
|
||
|
First Rinse |
Second |
|
|
|
|
Rinse-aid |
|
|
|
|
|
|
|
|||
|
Rinse |
|
|
|
|
|
161˚F |
|
|
|
|
|
|
|
|||
|
|
|
|
|
|
|
|
|
|
|
|
|
|
|
|||
|
Second |
Rinse-aid |
|
|
|
|
|
|
|
|
|
|
|
|
|
||
|
|
|
|
|
|
Drying |
|
|
|
|
|
|
|
||||
|
Rinse |
161˚F |
|
|
|
|
|
|
|
|
|
|
|
|
|||
|
|
|
|
|
|
|
|
|
|
|
|
|
|
||||
|
Rinse-aid |
|
|
|
|
|
|
|
|
|
|
|
|
|
|
|
|
|
Drying |
|
|
|
|
|
|
|
|
|
|
|
|
|
|
||
|
161˚F |
|
|
|
|
|
|
|
|
|
|
|
|
|
|
||
|
|
|
|
|
|
|
|
|
|
|
|
|
|
|
|
||
|
|
|
|
|
|
|
|
|
|
|
|
|
|
|
|
|
|
Cycle |
Drying |
|
|
|
|
|
|
|
|
|
|
|
|
|
|
|
|
|
|
|
|
|
|
|
|
|
|
|
|
|
|
|
|
|
|
details |
|
|
|
|
|
|
|
|
|
|
|
|
|
|
|
|
|
99 |
|
85 |
|
|
|
|
|
80 |
|
|
|
|
10 |
||||
Duration in |
|
|
|
|
|
|
|
|
|
|
|||||||
minutes |
7.1 |
|
6 |
|
|
|
|
|
5.4 |
|
|
|
|
1.2 |
|||
Water consumption |
|
|
|
|
|
|
|
|
|
|
|||||||
in gallons |
26.9 |
|
22.7 |
|
|
|
|
|
20.4 |
|
|
|
|
4.5 |
|||
Water consumption |
|
|
|
|
|
|
|
|
|
|
|||||||
in liters |
|
|
|
|
|
|
|
|
|
|
|
|
|
|
|
|
|
Shown above are the range of values that may be obtained while running the dishwasher under normal conditions. Actual values may vary. The actual cycle duration, water and energy usage are dependent upon inlet water temperature.
14 |
H |
Operation
SHU 5302/5304/5305/5306/5312/5314/5315/5316
Fig. 3-5 |
Fig. 3-6 |
The SHU 53** series operates using an electronic Control Unit.
TO OPERATE:
Fig. 3-5.
First depress the On/Off Button until it locks in place.
Fig. 3-6.
Once the On/Off Button is depressed the LED above the previously used cycle will illuminate. To change the cycle, simply press the desired Cycle Button twice. The LED above that cycle will then illuminate.
The Cycle Countdown will display an approximate run time for the cycle chosen. This run time will depend on incoming water temperature and the turbidity of the pre-wash water.
Note: |
It is normal for the Countdown Display to remain at a time increment for more than one minute, or skip a time increment |
|
depending on the calculations of the Control Unit. |
|
Also, with continued use the Control Unit will learn the wash and temperature patterns for the most commonly used |
|
programs and will then reduce the overall start and running times. |
At the end of the cycle the display will show a CL, indicating that the cycle is complete.
TO CANCEL A CYCLE:
Press the Scrub Wash and Delicate / Econo Buttons both in at the same time. The unit will then drain and the figure CL will appear in the display.
DELAY START:
The Delay Start feature allows the unit to be delayed for up to nine hours. To program, start the unit as described above, but after selecting a cycle push the Delay Start button. The display will show a 1h, or one-hour delay. Continue to depress the Delay Start Button until the desired delay time is reached (up to nine hours, 9h).
The unit will begin automatically once the delay time has elapsed. To reset the delay, press the Delay Start Button until it reaches 0h.
REFILL RINSE AGENT LED:
The Refill Rinse Agent LED is activated via a Reed Switch on the Detergent Dispenser, Section 4, Fig. 8-3. The LED will illuminate when the Rinse Agent Dispenser is empty.
Service note: |
The Refill Rinse Agent LED will also illuminate when the dishwasher door is opened and then |
|
closed even if the Dispenser is full, but will only remain lit for a few seconds. |
“F” CODE: |
|
An “F” in the display window indicates a filling fault, see Section 6, Fig. 12-1 through Fig.12-6.
Please note: |
If the door is opened during the cycle, the On/Off Button will be reset to off and must be depressed again |
|
to re-active the cycle. The cycle will resume from where it left off. |

H |
|
|
|
|
|
|
|
|
|
|
|
|
|
15 |
|||
|
|
|
|
|
|
|
|
|
|
|
|
|
|
|
|
Cycle Chart |
|
|
|
|
|
|
|
|
SHU 5302/5304/5305/5306/5312/5314/5315/5316 |
||||||||||
|
|
|
|
|
|
|
|
|
|
|
|
|
|
|
|
|
|
Type of dishware |
|
|
|
|
|
|
|
|
|
|
|
|
|
|
|
||
e.g. china, |
|
|
|
|
|
|
|
|
|
|
|
|
|
|
|
|
|
pots/pans, |
Non-deli- |
|
|
Mixed |
|
|
|
|
Delicate |
|
|
Mixed |
|||||
cutlery, |
cate |
|
|
|
|
|
|
|
|
|
|
|
|
|
|
|
|
glasses, |
|
|
|
|
|
|
|
|
|
|
|
|
|
|
|
||
|
|
|
|
|
|
|
|
|
|
|
|
|
|
|
|
|
|
etc. |
|
|
|
|
|
|
|
|
|
|
|
|
|
|
|
|
|
Type of food |
Soups, casseroles, |
|
Soups, potatoes, |
|
Coffee, cakes, milk, |
||||||||||||
remains |
|
|
|||||||||||||||
sauces, potatoes, |
|
pasta, rice, eggs, |
|
salami, cold drinks, |
|||||||||||||
|
pasta, rice, eggs, |
|
roast or fried food |
|
|
|
salads |
||||||||||
|
roast or fried food |
|
|
|
|
|
|
|
|
|
|
|
|
|
|
||
Amount of |
|
|
|
|
|
|
|
|
|
|
|
|
|
|
|
|
|
|
|
|
|
|
|
|
|
|
|
|
|
|
|
|
|
|
|
a lot |
|
a lot |
|
|
|
a little |
|
a |
little |
|
|
very little |
|
||||
food remains |
|
|
|
|
|
|
|
|
|||||||||
|
|
|
|
|
|
|
|
|
|
|
|
|
|
|
|
|
|
|
|
|
|
|
|
|
|
|
|
|
|
|
|
|
|
|
|
Condition of |
|
|
|
|
|
|
|
|
|
|
|
|
|
|
|
|
|
stuck on hard |
|
|
|
|
|
loosely attached |
|
|
|
|
|||||||
food remains |
|
|
|
|
|
|
|
|
|
||||||||
|
|
|
|
|
|
|
|
|
|
|
|
|
|
|
|
|
|
Wash |
|
|
|
|
|
|
|
|
|
|
|
|
|
|
|
|
|
Power |
|
Scrub |
|
Regular |
|
Delicate/ |
|
|
|
|
|
|
Rinse |
|
|||
cycle |
|
|
|
|
|
|
|
|
|
|
|||||||
Scrub |
|
Wash |
|
Wash |
|
Economy |
|
|
|
|
|
|
& Hold |
|
|||
|
Plus |
|
|
|
|
|
|
|
|
|
|
|
|
|
|
|
|
Cycle |
Pre-rinse |
Pre-rinse |
|
Pre-rinse |
|
|
Wash |
|
|
|
|
|
Pre-rinse |
||||
sequence |
|
|
|
|
|
|
|
|
|||||||||
|
Pre-wash |
Wash |
|
Wash |
|
|
140˚F |
|
|
|
|
|
|
|
|
||
|
|
|
|
|
|
|
|
|
|
|
|
|
|||||
|
125˚F |
150˚F |
|
140˚F |
|
|
Rinse |
|
|
|
|
|
|
|
|
||
|
Wash |
First Rinse |
|
Rinse |
|
Rinse-aid |
|
|
|
|
|
|
|
|
|||
|
161˚F |
|
|
|
|
|
|
|
|
|
|
||||||
|
|
|
|
|
|
|
155˚F |
|
|
|
|
|
|
|
|
||
|
|
|
Second |
|
Rinse-aid |
|
|
|
|
|
|
|
|
|
|
||
|
First Rinse |
|
|
|
|
|
|
|
|
|
|
|
|
||||
|
Rinse |
|
161˚F |
|
|
Drying |
|
|
|
|
|
|
|
|
|||
|
|
|
|
|
|
|
|
|
|
|
|
|
|
||||
|
Second |
Rinse-aid |
|
|
|
|
|
|
|
|
|
|
|
|
|
|
|
|
|
Drying |
|
|
|
|
|
|
|
|
|
|
|
||||
|
Rinse |
161˚F |
|
|
|
|
|
|
|
|
|
|
|
|
|||
|
|
|
|
|
|
|
|
|
|
|
|
|
|
|
|||
|
Rinse-aid |
|
|
|
|
|
|
|
|
|
|
|
|
|
|
|
|
|
Drying |
|
|
|
|
|
|
|
|
|
|
|
|
|
|
||
|
161˚F |
|
|
|
|
|
|
|
|
|
|
|
|
|
|
||
|
|
|
|
|
|
|
|
|
|
|
|
|
|
|
|
||
|
|
|
|
|
|
|
|
|
|
|
|
|
|
|
|
|
|
Cycle |
Drying |
|
|
|
|
|
|
|
|
|
|
|
|
|
|
|
|
|
|
|
|
|
|
|
|
|
|
|
|
|
|
|
|
|
|
details |
|
|
|
|
|
|
|
|
|
|
|
|
|
|
|
|
|
99 |
|
85 |
|
80 |
|
|
70 |
|
|
|
|
10 |
|
||||
Duration in |
|
|
|
|
|
|
|
|
|
||||||||
minutes |
7.1/5 |
|
6/4.2 |
|
5.4/3.8 |
|
|
3.6/2.5 |
|
|
|
|
1.2/0.8 |
|
|||
Water consumption |
|
|
|
|
|
|
|
|
|
||||||||
in gallons |
26.9/18.9 |
|
22.7/15.9 |
|
20.4/14.4 |
|
13.5/9.5 |
|
|
|
|
4.5/3.2 |
|
||||
Water consumption |
|
|
|
|
|
|
|
|
|||||||||
in liters |
|
|
|
|
|
|
|
|
|
|
|
|
|
|
|
|
|
The Bosch Sensotronic™ will reduce water consumption by approximately 20%, in the case of lightly soiled dishes. When Top Rack Only™ feature is used the water consumption is reduced approximately 30%. Shown above are the range of values that may be obtained while running the dishwasher under normal conditions. Actual values may vary. The actual cycle duration, water and energy usage are dependent upon inlet water temperature and amount of soil on dishware.
16 |
H |
Operation
SHI/SHU 6802/6805/6806
Fig. 3-7 Fig. 3-8
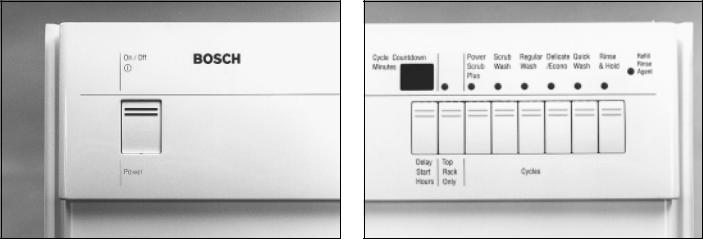
The SHI / SHU 68** series operates using an electronic Control Unit.
TO OPERATE:
Fig. 3-7.
First depress the On/Off Button until it locks in place.
Fig. 3-8.
Once the On/Off Button is depressed the LED above the previously used cycle will illuminate. To change the cycle, simply press the desired Cycle Button twice. The LED above that cycle will then illuminate.
The Cycle Countdown will display an approximate run time for the cycle chosen. This run time will depend on incoming water temperature and the turbidity of the pre-wash water.
Note: |
It is normal for the Countdown Display to remain at a time increment for more than one minute, or skip a time increment |
|
depending on the calculations of the Control Unit. |
|
Also, with continued use the Control Unit will learn the wash and temperature patterns for the most commonly used |
|
programs and will then reduce the overall start and running times. |
At the end of the cycle the display will show a CL, indicating that the cycle is complete.
TO CANCEL A CYCLE:
Press the Scrub Wash and Delicate / Econo Buttons both in at the same time. The unit will then drain and the figure CL will appear in the display.
DELAY START:
The Delay Start feature allows the unit to be delayed for up to nine hours. To program, start the unit as described above, but after selecting a cycle push the Delay Start button. The display will show a 1h, or one-hour delay. Continue to depress the Delay Start Button until the desired delay time is reached (up to nine hours, 9h).
The unit will begin automatically once the delay time has elapsed. To reset the delay, press the Delay Start Button until it reaches 0h.
TOP RACK ONLY:
The Top Rack Only feature can be used in conjunction with any cycle. To active, press the Top Rack Only Button after selecting a cycle, the Top Rack Only LED will illuminate and all water will be diverted to the upper wash arm for the complete cycle.
REFILL RINSE AGENT LED:
The Refill Rinse Agent LED is activated via a Reed Switch on the Detergent Dispenser, Section 4, Fig. 8-3. The LED will illuminate when the Rinse Agent Dispenser is empty.
Service note: |
The Refill Rinse Agent LED will also illuminate when the dishwasher door is opened and then |
|
|
|
closed even if the Dispenser is full, but will only remain lit for a few seconds. |
“F” CODE: |
|
|
An “F” in the display window indicates a filling fault, see Section 6, Fig. 12-1 through Fig.12-6. |
||
Please note: |
If the door is opened during the cycle, the On/Off Button will be reset to off and must be depressed again |
|
|
to re-active the cycle. The cycle will resume from where it left off. |
|
H |
|
|
|
|
|
|
|
|
|
|
|
|
17 |
||||
|
|
|
|
|
|
|
|
|
|
|
|
|
|
|
Cycle Chart |
||
|
|
|
|
|
|
|
|
|
|
|
SHI/SHU 6802/6805/6806 |
||||||
|
|
|
|
|
|
|
|
|
|
|
|
|
|
|
|
|
|
Type of dishware |
|
|
|
|
|
|
|
|
|
|
|
|
|
|
|
||
e.g. china, |
|
|
|
|
|
|
|
|
|
|
|
|
|
|
|
|
|
pots/pans, |
Non-deli- |
|
|
Mixed |
|
|
|
|
Delicate |
|
|
Mixed |
|||||
cutlery, |
cate |
|
|
|
|
|
|
|
|
|
|
|
|
|
|
|
|
glasses, |
|
|
|
|
|
|
|
|
|
|
|
|
|
|
|
||
|
|
|
|
|
|
|
|
|
|
|
|
|
|
|
|
|
|
etc. |
|
|
|
|
|
|
|
|
|
|
|
|
|
|
|
|
|
Type of food |
Soups, casseroles, |
|
Soups, potatoes, |
Coffee, cakes, milk, |
|||||||||||||
remains |
|
||||||||||||||||
sauces, potatoes, |
|
pasta, rice, eggs, |
salami, cold drinks, |
||||||||||||||
|
pasta, rice, eggs, |
|
roast or fried food |
salads |
|||||||||||||
|
roast or fried food |
|
|
|
|
|
|
|
|
|
|
|
|
|
|
||
Amount of |
|
|
|
|
|
|
|
|
|
|
|
|
|
|
|
|
|
a lot |
|
a lot |
|
|
|
a little |
|
a little |
|
|
|
very little |
|
||||
food remains |
|
|
|
|
|
|
|
|
|
||||||||
|
|
|
|
|
|
|
|
|
|
|
|
|
|
|
|
|
|
|
|
|
|
|
|
|
|
|
|
|
|
|
|
|
|
|
|
Condition of |
|
|
|
|
|
|
|
|
|
|
|
|
|
|
|
|
|
stuck on hard |
|
|
|
|
|
loosely attached |
|
|
|
|
|
||||||
food remains |
|
|
|
|
|
|
|
|
|
|
|||||||
|
|
|
|
|
|
|
|
|
|
|
|
|
|
|
|
|
|
Wash |
|
|
|
|
|
|
|
|
|
|
|
|
|
|
|
|
|
Power |
|
Scrub |
|
Regular |
|
Delicate/ |
|
Quick |
|
|
Rinse |
|
|
||||
cycle |
|
|
|
|
|
|
|
||||||||||
Scrub |
|
Wash |
|
Wash |
|
Economy |
|
Wash |
|
|
& Hold |
|
|||||
|
Plus |
|
|
|
|
|
|
|
|
|
|
|
|
|
|
|
|
Cycle |
Pre-rinse |
Pre-rinse |
|
Pre-rinse |
|
|
Wash |
Wash |
|
Pre-rinse |
|||||||
sequence |
|
|
|
|
|||||||||||||
|
Pre-wash |
Wash |
|
Wash |
|
|
140˚F |
104˚F |
|
|
|
|
|
||||
|
|
|
|
|
|
|
|
|
|
|
|
|
|||||
|
125˚F |
150˚F |
|
140˚F |
|
|
Rinse |
Rinse |
|
|
|
|
|
||||
|
Wash |
First Rinse |
|
Rinse |
|
Rinse-aid |
Rinse-aid |
|
|
|
|
|
|||||
|
161˚F |
|
|
|
|
|
|
|
|||||||||
|
|
|
|
|
|
|
155˚F |
140˚F |
|
|
|
|
|
||||
|
|
|
Second |
|
Rinse-aid |
|
|
|
|
|
|
|
|||||
|
First Rinse |
|
|
|
|
|
|
|
|
|
|
|
|
||||
|
Rinse |
|
161˚F |
|
|
Drying |
|
Drying |
|
|
|
|
|
||||
|
|
|
|
|
|
|
|
|
|
|
|
||||||
|
Second |
Rinse-aid |
|
|
|
|
|
|
|
|
|
|
|
|
|
|
|
|
|
Drying |
|
|
|
|
|
|
|
|
|
|
|
||||
|
Rinse |
161˚F |
|
|
|
|
|
|
|
|
|
|
|
|
|||
|
|
|
|
|
|
|
|
|
|
|
|
|
|
|
|||
|
Rinse-aid |
|
|
|
|
|
|
|
|
|
|
|
|
|
|
|
|
|
Drying |
|
|
|
|
|
|
|
|
|
|
|
|
|
|
||
|
161˚F |
|
|
|
|
|
|
|
|
|
|
|
|
|
|
||
|
|
|
|
|
|
|
|
|
|
|
|
|
|
|
|
||
|
|
|
|
|
|
|
|
|
|
|
|
|
|
|
|
|
|
Cycle |
Drying |
|
|
|
|
|
|
|
|
|
|
|
|
|
|
|
|
|
|
|
|
|
|
|
|
|
|
|
|
|
|
|
|
|
|
details |
|
|
|
|
|
|
|
|
|
|
|
|
|
|
|
|
|
Duration in |
99 |
|
85 |
|
80 |
|
|
70 |
|
30 |
|
10 |
|
|
|||
minutes |
7.1/5 |
|
6/4.2 |
|
5.4/3.8 |
|
|
3.6/2.5 |
|
2.7/1.9 |
|
1.2/0.8 |
|
|
|||
Water consumption |
|
|
|
|
|
|
|
|
|||||||||
in gallons |
26.9/18.9 |
|
22.7/15.9 |
|
20.4/14.4 |
|
13.5/9.5 |
|
10.5/7.4 |
|
4.5/3.2 |
|
|
||||
Water consumption |
|
|
|
|
|
|
|
||||||||||
in liters |
|
|
|
|
|
|
|
|
|
|
|
|
|
|
|
|
|
The Bosch Sensotronic™ will reduce water consumption by approximately 20%, in the case of lightly soiled dishes. When Top Rack Only™ feature is used the water consumption is reduced approximately 30%. Shown above are the range of values that may be obtained while running the dishwasher under normal conditions. Actual values may vary. The actual cycle duration, water and energy usage are dependent upon inlet water temperature and amount of soil on dishware.
18 |
H |
Notes
H |
19 |
Section 3
Description |
Page |
Rack System . . . . . . . . . . . . . . . . . . . . . . . . . . . . . . . . . . . . . . . . . . . . . . . . . . . . . . . . . . . . . . 20 – 21
Interior Features . . . . . . . . . . . . . . . . . . . . . . . . . . . . . . . . . . . . . . . . . . . . . . . . . . . . . . . . . . . 22 – 25
Detergent / Rinse-Agent Dispenser . . . . . . . . . . . . . . . . . . . . . . . . . . . . . . . . . . . . . . . . . . . . . . . . 26
Washability / Drying . . . . . . . . . . . . . . . . . . . . . . . . . . . . . . . . . . . . . . . . . . . . . . . . . . . . . . . . . . . . . 27
Notes . . . . . . . . . . . . . . . . . . . . . . . . . . . . . . . . . . . . . . . . . . . . . . . . . . . . . . . . . . . . . . . . . . . . . . . . . 28
20 |
H |
Rack System
Rack configurations for individual dishwasher models will vary. However, all Racks are constructed from a steel wire grid with a gray nylon outer covering.
Note: |
Racks may discolor due to the water |
|
supply or types of food remaining on |
|
the dishes. We recommend that a |
|
vinegar wash be used to assist in |
|
removing these stains. |
|
Start the unit, and let run approximately |
|
ten minutes, then pour in two cups of |
|
white vinegar and let the unit complete |
|
the cycle, repeat if necessary. |
Fig. 4-1
Fig. 4-2
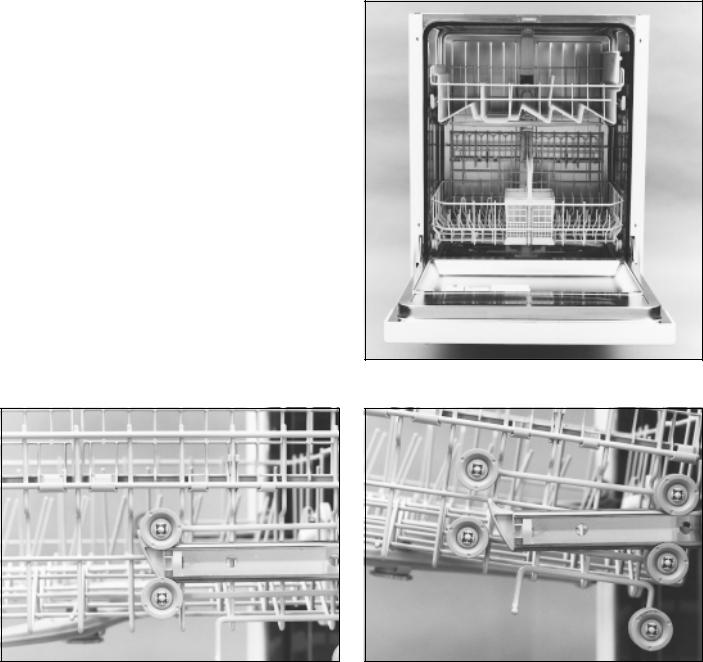
On select models the Upper Rack is height adjustable. To adjust rack height, or to remove the Rack from the unit.
Fully extend the Rack as shown in Fig. 4-2
Note how the Rack Rollers are designed to ride on the outside of the Rails for a smoother operation.
Fig. 4-3
With the Rack fully extended. Lift up on the Rack until the Front Rollers disengage from the Rail.
Now bring the Rack out further and allow the Rear Wheels to disengage.
Rollers: |
Rack Rollers are a press fit making |
|
for easy removal and replacement. |
H |
21 |
Rack System
Fig. 4-4 |
Fig. 4-5 |
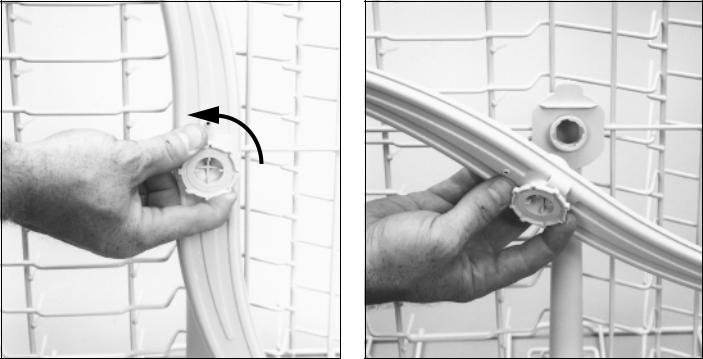
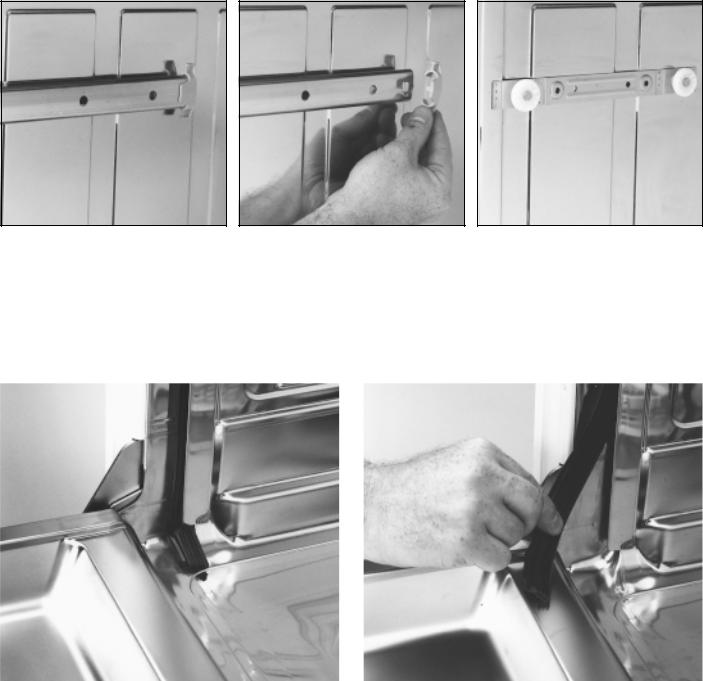
Attached to the Upper Rack is the Upper Spray Arm Assembly.
The Upper Spray Arm can be removed from the Upper Spray Arm Assembly for cleaning or replacement by turning the Arm Nut counter-clockwise, Fig. 4-4.
And then bringing the Arm down and off the Arm Assembly, Fig. 4-5.
22 |
H |
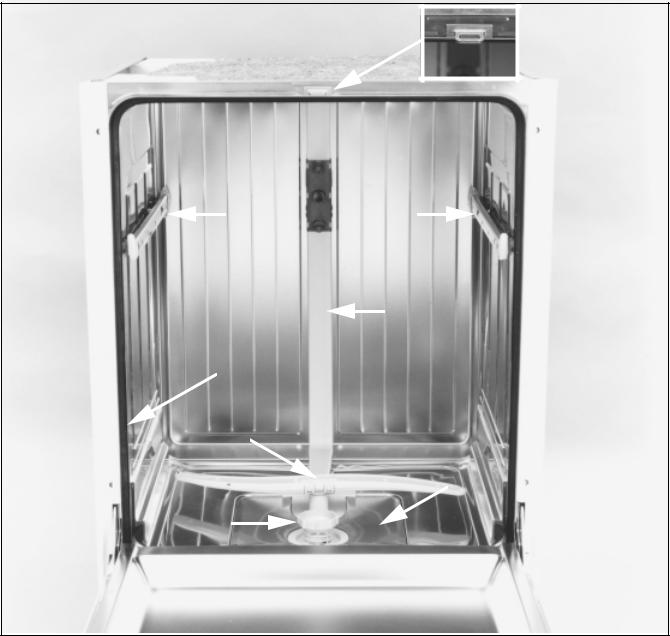
Interior Features
|
1 |
2 |
2 |
|
7 |
3 |
|
4 |
|
|
6 |
5 |
|
Fig. 5-1 |
|
Interior features for all model dishwasher covered in this repair manual are identical. Those features include:
1.Strike Plate. The Strike Plate is in a fixed position and cannot be adjusted.
2.Upper Rack Rails and Guide Rollers.
3.Door Gasket
4.Lower Spray Arm
5.Filter Basket
6.Filter Screen
7.Feeder Tube Assembly
H |
23 |
Interior Features
Fig. 5-2 |
Fig. 5-3 |
Fig. 5-4 |
||
The Upper Rack Rails are made |
To remove the Rail, disengage |
The Upper Rack Guide Rollers |
||
of stainless steel with a plastic |
the End Cap by applying |
are permanently attached to the |
||
end cap. |
outward pressure to the Cap’s |
Tank and cannot be removed or |
||
|
top tab, unclipping it from the |
repaired. |
||
|
Rail. Then slide the Rail out from |
|
||
|
the Guide Rollers. |
|
||
|
|
|
|
|
|
|
|
|
|
Fig. 5-5
The Door Gasket is press fit into a channel molded around the Tank.
Note: Two inches of overlap are left at each end of the Gasket to insure a proper seal.
Fig. 5-6
To remove the Gasket, simply pull it away from the Tank Channel.
To replace, press the ribbed end firmly into the channel until secure. No sealant or glue is required.
Service tip: To test for a bad Door Gasket, open the dishwasher door and insert a dollar bill, then close the door and pull the bill out. If the bill is snug the Gasket is good, if the bill slides out easily the Door Gasket may need to be replaced.

24 |
H |
Interior Features
Water
Level
Fig. 5-7
Fig. 5-9
Fig. 5-8
Fig. 5-10
2 2
1
Fig. 5-11 |
Fig. 5-12 |
H |
25 |
Interior Features
Fig. 5-7 The operating water level of the dishwasher is at approximately the upper edge of the filter basket.
Fig. 5-8 The Lower Spray Arm is press fit into the Feeder Tube Socket.
To remove the Arm, grasp the Arm Hub and pull up until the Arm disengages from the Socket.
The Arm or Arm Socket can now be checked for debris.
Fig. 5-9 The Filter Basket is removed by turning it ninety degrees counter-clockwise.
Fig. 5-10 Then lift it out for cleaning.
The Filter is a fine mesh of stainless steel and should be inspected and cleaned at least once a month.
Fig. 5-11 With the Filter Basket removed, the filter screen can then be lifted out.
The Filter Screen is also made of stainless steel, and was designed with rolled ends to eliminate sharp edges. It too should be inspected and cleaned at least once a month.
Fig. 5-12 With the Filter Screens removed you now have access to the sump area.
The Sump has a Drain Intake on the left, and the Circulation Pump Intake on the right.
A removable cover, item 1, hides the Drain Impeller. To remove the cover, remove the single T-20 Torx screw and then lift the cover off. You may now examine the Impeller for any obstructions.
The Feeder Tube Assembly allows water to flow to the Lower, then Upper Spray Arms and then to the Top Sprayer Head. It is replaced as a complete assembly by first removing the two T-20 Torx screws, item 2, at its base.
Then bring the tube up and off the Sump Housing, and remove it from the retaining clip located on the rear wall.
 Loading...