

Page 1

© Copyright Trek Bicycle Corporation 2004
All rights reserved
Part Number 253511
Important: About Tubeless Ready tires
Tire and rim compatibility
2
Before you start: Tubeless tips
Tubeless tires fit tightly and require unique mounting procedures
2-3
Pre-stretch the beads to make tire mounting easier
3
Use soapy water to mount tubeless tires
3
Be careful when using tire tools
3
Installation
Removing a Bontrager Tubeless Ready or UST tubeless tire
4
Installing a Tubeless Ready or UST tubeless tire with an inner tube
4
Installing a Tubeless Ready or UST tubeless tire without an inner tube
4-5
Troubleshooting
Causes of leaks
6
Checking for leaks
Fixing a puncture in a tubeless tire
8
The Bontrager Wheelset Owner’s Manual has additional
information about Bontrager Tubeless technology. This
manual and other useful information is available at http:
//www.bontrager.com, or at a Bontrager dealer.
Page 2
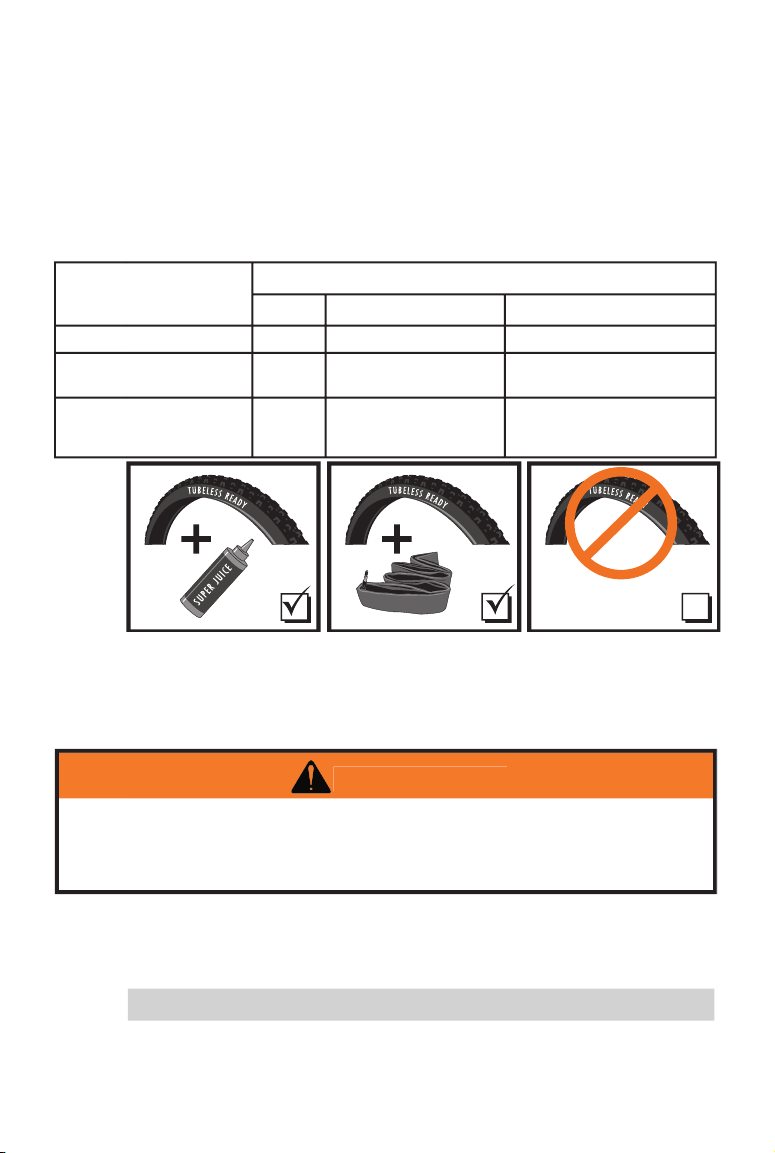
The following chart shows which tires are compatible with
which rims, and any parts that are needed to make the tires
compatible with the rims.
Tubeless Ready tires do not hold air without either an inner
tube or liquid sealant inside the tire. To use a Tubeless Ready
tire in tubeless mode, follow these instructions to install
Bontrager Super Juice sealant. Super Juice is a long-lasting,
quick-acting, glycol-based sealant developed for this purpose.
Standard UST tubeless tires are designed to hold air with-
out sealant, but using Bontrager Super Juice sealant in these
tires will increase their puncture resistance and reduce their
tendency to leak air.
There are some variations in the way tubeless tires from each
Table 1- Tire and rim compatibility
Tubeless
Tubeless Ready
Standard
Standard 26” (ETRTO 599)
NO
with inner tube
NO
Tubeless Compatible
with inner tube
inner tube
to hold air. Air loss can cause loss of control resulting in
Page 3

3
tire manufacturer t, so some tires are more dif cult to mount
than others. Carefully follow the installation instructions, and
you should be able to easily mount any tubeless tire.
When mounting a tubeless tire, the tire must make an air-
tight seal against the inner surface of the rim to allow initial
in ation. When riding, the bead must t the rim securely
when the tire is mounted in order retain air, especially at
low in ation pressures. Because of these requirements, a
tubeless tire ts the rim more tightly and can be more dif-
cult to mount than a conventional tire on a conventional
rim. It’s especially important to pay attention to the installa-
tion instructions for tubeless tires if you’ve already mastered
installing conventional tires; there are very important differ-
ences between the two.
The Kevlar bead of a new tubeless tire will stretch a sub-
stantial amount after it has been in ated initially. It’s best to
mount a new tubeless tire onto a standard rim before install-
ing it on a tubeless rim- any wheel will do. Use an inner tube,
in ate the tire to 60 psi (4 ATM) and leave it overnight. This
will make it much easier to mount onto your tubeless rim.
With a tubeless or Tubeless Ready tire, the tire beads have to
move along the surface of the rim and remain in contact with
it during the in ation process. Friction resists this motion
and causes problems. The source of the friction is between the
sticky rubber of the tire bead and the inner surface of the rim.
A lm of soapy water reduces the friction, allows the tire to
more easily slide into place on the rim, and lets the tire seal
better. Use dishwashing liquid diluted with water (1 part soap
to 4 parts water). Brush, wipe or spray this solution onto both
the rim and tire surfaces before you mount a tire. If you have
to x a at on the trail, plain water also works.
It is often easier to mount a tight tire using tire tools, espe-
cially if it’s a new tire, so it’s a good idea to carry tire tools
with you in case you have to repair a at on the trail. If you
choose to use tire tools, do not use excessive force on the tool.
If you have to use a lot of force, something is wrong; stop and
determine the cause of the problem. Incorrect use of tire tools
can damage the sealing surfaces of the rim strip or the tire
bead; this damage can cause air leaks.
Page 4

If the tire has sealant installed, be careful not to spill it as
you remove the tire. It is best to remove the old sealant and
replace it. If you have to reuse the sealant, carefully pour the
pool of uid into a container. Scrape the sealant that remains
on the casing into the container too. Rinse the rim and tire
casing with water.
thumbs.
Leave the other bead in place and push the entire first bead inward until it is free from
the bead seat and a loose fit on the rim.
3. Begin at the valve and pull the tire bead up and away from
the rim with your fingers or a tire tool.
4. Continue removing the entire first bead from the center of
the rim.
from the rim.
The plastic rim strip is not necessary for use with a tube; a high-quality fiber tape like
Bontrager rim tape is best. Carefully push the tape down into the center channel of
the rim so that the tire bead has enough room to fit all the way to the bottom of that
channel.
tional set up, remove the tubeless valve now.
Keep the valve so you can change back to a tubeless set up.
3. Install the tire and tube in the same way you would using a
conventional tire and rim.
If it is difficult to fully seat the tire on the rim, spray some bead lubricant (soapy water)
into the gap between the tire and rim, even if the tire is already on the rim.
To use a Tubeless Ready tire in tubeless mode, sealant must
be added to the tire (see
The sealant must be put into the tire before you in ate it.
Use no less than 50 ml of sealant per tire. Additional sealant
maximize puncture protection. There are indicators on the
side of the Super Juice bottle so that you can easily control the
amount of sealant you use.
Page 5

Work carefully to avoid spilling any sealant.
unmounted portion of the tire so that it is at the 6 o’clock position.
squeeze the proper amount of sealant through the gap into the
inner portion of the tire.
3. Carefully rotate the wheel so that the unmounted portion of the bead
is at the 12 o’clock position and finish mounting the second bead.
you will have to be able to remove the nut by hand.
3. Install the first tire bead onto the rim.
Start 180 degrees away from the valve and position the bead into the center channel of
the rim. Push the bead over the rim, working your way to the portion near the valve.
4. Start the installation of the second bead.
As in Step 3, start on the side opposite the valve. Position the second tire bead in the
central channel of the rim and continue around the rim in both directions towards the
valve area. When the bead becomes tight, complete the installation using one of the
options below.
that the beads fit properly on either side of the
valve before adding the sealant.
and remove the core (Figure 2).
3. Trim the tip of the plastic sealant bottle to fit the
outer diameter of the valve core, or use a piece
of plastic tubing that is a tight fit on both the
core and the tip of the bottle to transport the
sealant into the wheel.
4. Carefully squeeze the proper amount of sealant
into the wheel (Fig. 3).
to clear sealant out of the threaded area.
place with pliers.
stem with removable core
Juice to the tire
Page 6

location and orientation of the tire
beads in the rim (Figure 4).
The beads must fit uniformly into the central channel of
the rim without twisting. The beads must straddle the valve
where it projects through the rim strip, and make good
contact with the rim strip surface in order to seal in that
area. It is common to have to adjust the beads in the area
around the valve before inflating the tire.
floor pump or compressed air source.
If you are using a floor pump, it is usually necessary to
initially inflate the tire with the fastest pumping motion
possible. Once the tire starts to seal and hold air you can
slow down. If the tire doesnʼt begin to seal after attempting
to inflate it, stop and reposition the bead of the tire with
your hands. Small changes in the position of the tire can
make a big difference.
onto the rim (Figure 5).
The beads often make an audible popping sound as they
snap into place. Use no more than 60PSI (4 ATM) to seat
the beads.
If the beads donʼt seat properly, deflate the tire and relubri-
cate the bead and rim surfaces by squirting the lubricant
through the gap between the tire and rim, and reinflate the
tire.
Make sure the beads are seated correctly in their locked
position before you use the wheel.
8. Thoroughly distribute the sealant
around the inner surface of the tire
Hold the axle tips in each hand and spin the wheel. Orient
the spinning wheel into a variety of positions (angles) so
that the sealant can reach the entire inner surface of the tire.
Some leaks in the casing can take time to seal, especially if
they are located near the bead area.
9. Adjust the tire pressure to the desired
value and install the wheel.
completely sealed
Ride the bike for a short time, and then check the tire
pressure. If the tire pressure drops too quickly, remove the
wheel and follow the Step #8 above to distribute the sealant
over the leak.
the valve stem
onto rim
Page 7

Check the tire pressure on your bike before every ride; all tires
lose air pressure due to air leaking through the inner tube
or tire casing sidewall. Follow these troubleshooting steps in
order to minimize the time it takes to repair a leaking tire.
If the rate at which air leaks from a tubeless tire is excessive,
it can be reduced by repairing the source of the leak.
Use Bontrager Super Juice tire sealant in any UST tubeless
tire to reduce the rate of air loss and add puncture protection.
A small piece of glass or a thorn can embed in the tread and cause a slow leak.
Air can leak around the seal in the valve stem if it is loose or misaligned. If it is
misaligned, loosen the valve nut and gently shift the valve slightly to seat it properly.
Then tighten the nut. However, do not over-tighten it; if you puncture on the trail, you
will have to remove it by hand.
This is a problem that is unique to lightweight tubeless tires. The inner liner ply (the
butyl rubber sealing ply on the inner surface of a UST tubeless tire) is as thin as
possible to save weight and it will break down from hard use. The material will form
gaps and these will allow air to escape at increasing rates through the casing. Adding
Bontrager Super Juice sealant will stop this type of leak.
undamaged.
These include all of the contact surfaces between the tire, rim strip, and valve. Gaps in
the seals due to damage or dirt trapped on any of these surfaces can cause leaks. Clean
or replace any damaged parts.
First, visually inspect all of the components for damage or evi-
dence of leaks, and simply listen for the sound of escaping air.
If that doesn’t work, cover all of the areas that might be
leaking with a solution of soap and water, and watch for bub-
bles. With this method, you can also nd some leaks through
the tire or between the tire and rim strip near the brake wall.
Use the same soap and water solution that you use to mount
the tires. It’s best to spray the solution on with a household
spray bottle so that it is distributed evenly on the tire surface.
It’s normal to see some bubbles forming through the sidewall
of the tire (a surprising amount!), but a signi cant leak will
cause a very large amount of foam to form quickly.
Sometimes air leaks into the interior cavities of the rim, and
these can be hard to nd. Sources of these leaks include the
Page 8

area around the valve seal or between the tire bead and rim
strip. The leaking air can be detected at the spoke holes, but
the location of the actual leak will not necessarily be close to
the leaking spoke hole. There are two ways to nd and elimi-
nate leaks like these:
Partially immerse the wheel into a tub of water. Leave it in
the tub long enough for the portion of the rim that is under-
water to ll with water. Then, with your ear close to surface of
the water listen for the sound of bubbles forming as you rotate
the wheel slowly in the water. When a leak is at the water
surface it will cause a bubbling noise and this will allow you to
detect the location of the leak as accurately as possible.
Eliminate the possibility of all other possible leaks. If you
have eliminated all visible sources, replace the rim strip or
valve stem.
Using Super Juice sealant in any tubeless tire is a huge advan-
tage; Super Juice will seal small punctures and prevent air
loss.
A puncture can be patched if it is not too severe, but rst,
the tire must be cleaned. The inside surface of a tire has
release agents on it left over from the manufacturing process.
Remove the release agents with an abrasive or tire buffer
before installing the patch.
A large hole or fracture in the casing will weaken the tire.
You should replace a severely damaged tire immediately, or as
soon as possible. In an emergency a large patch, called a boot,
can be made up of a brous material to cover the hole. The
boot should overlap the hole by at least an inch in all direc-
tions and be bonded rmly to the casing. A tire repaired in
this way should only be ridden slowly and used only as long as
it takes to get back from the ride.
You should not try to patch a tubeless tire that is punctured
on the trail. It’s best to install a tube. Remove the tire and
tubeless in ation valve. Find the cause of the puncture and
remove any sharp objects in the tire so they will not puncture
the tube. Install the tube and reinstall the tire.
 Loading...