

Page 1
389
389
389389
////
KKKK
ÜHL
ÜHLBOX
BOX MIT
MIT
EEEE
ISFACH
CCCC
OOLING B
OOLING BOX
OOLING BOOLING B
KKKK
OELBOX MET IJSCOMPAR
OELBOX MET IJSCOMPARTMENT
OELBOX MET IJSCOMPAROELBOX MET IJSCOMPAR
OX WITH I
WITH ICE
OXOX
WITH IWITH I
CE CCCCOMPARTMENT
OMPARTMENT
CECE
OMPARTMENT OMPARTMENT
TMENT
TMENTTMENT
ÜHLÜHL
BOXBOX
MIT MIT
////
CCCC
OOLBOX S
OOLBOX S MMMMRAZÍCÍ PŘIHRÁDKA
OOLBOX S OOLBOX S
////
CCCC
OOLBOX AVEX COMPARTM
OOLBOX AVEX COMPARTMENT À GLACE
OOLBOX AVEX COMPARTMOOLBOX AVEX COMPARTM
ISFACH
ISFACHISFACH
KB
KB
KBKB
RAZÍCÍ PŘIHRÁDKA
RAZÍCÍ PŘIHRÁDKARAZÍCÍ PŘIHRÁDKA
ENT À GLACE
ENT À GLACEENT À GLACE
Bedienungsanleitung/Garantie
Bedienungsanleitung/Garantie
Bedienungsanleitung/GarantieBedienungsanleitung/Garantie
Instruction Manual
Instruction Manual····Návod k obsluze
Instruction ManualInstruction Manual
Návod k obsluze····Gebruiksaanwijzin
Návod k obsluzeNávod k obsluze
Gebruiksaanwijzingggg····Mode d
GebruiksaanwijzinGebruiksaanwijzin
Mode d’emploi
Mode dMode d
emploi
emploiemploi
Page 2

DEUTSCH
DEUTSCH
DEUTSCHDEUTSCH
Inhalt
Inhalt
InhaltInhalt
Einleitung…………………………………………Seite 4
Allgemeine Hinweise……………………………Seite 4
Spezielle Sicherheitshinweise für dieses
Gerät..…………………………………………….Seite 5
Auspacken des Gerätes……………………...…Seite 6
Geräteausstattung……………………………….Seite 7
Installation…………………………………..……Seite 7
ENGLISH
ENGLISH
ENGLISHENGLISH
Contents
Contents
ContentsContents
Introduction……………………………………..Page 14
General Notes……………………….…………Page 14
Special safety Information for this Unit………Page 14
Unpacking the Appliance…………………..….Page 16
Appliance Equipment……...……….….……...Page 16
Installation……….………...…………………...Page 16
Inbetriebnahme / Betrieb………………………..Seite 8
Reinigung und Wartung……………..…..….…Seite 10
Störungsbehebung……………………...…..…Seite 10
Technische Daten………………………..........Seite 11
Garantie / Kundenservice..……..……..………Seite 11
Entsorgung……………………………………...Seite 12
Produktdatenblatt………………………………Seite 13
Startup / Operation………....…………..…..…Page 18
Cleaning and Maintenance….....…….…..…..Page 19
Troubleshooting……………….……...….........Page 20
Technical Data……………...…………….……Page 20
Disposal….………………………...……….…..Page 20
Product Data Sheet……………………………Page 21
ČESKY
ČESKY
ČESKYČESKY
Úvod………………………………....……..Strana 22
Obecné poznámky……………...…………Strana 22
Speciální bezpečnostní informace pro toto
zařízení……………………………….….…Strana 22
Vybalení zařízení……………………....….Strana 24
Příslušenství zařízení……...……….….....Strana 24
Instalace……….………...………………....Strana 24
Obsah
Obsah
ObsahObsah
Spuštění / provoz………....…………....…Strana 25
Čištění a údržba….....…….….……….…..Strana 27
Odstraňování závad ……….….…...….....Strana 28
Technické údaje...............…….................Strana 28
Likvidace….………………………...……...Strana 28
Bezpečnostní list......................................Strana 29
2
Page 3

NEDERLANDS
NEDERLANDS
NEDERLANDS NEDERLANDS
Inhoudsopgave
Inhoudsopgave
InhoudsopgaveInhoudsopgave
Inleiding……………………………….……..Pagina 30
Algemene opmerkingen……………………Pagina 30
Bijzonder veiligheidsinstructies voor dit
apparaat………………………………………Pagina 30
Het apparaat uitpakken……………….....….Pagina 32
Onderdelen van het apparaat…….………...Pagina 32
Installatie……….………...………….…….....Pagina 32
FRANÇAIS
FRANÇAIS
FRANÇAISFRANÇAIS
Contenu d
Contenu du produit
Contenu dContenu d
Introduction…………………………………..Page 39
Remarques générales……...……….….…..Page 39
Consignes de sécurité spéciales pour cet
appareil……………………………………….Page 40
Déballage de l'appareil……...………...……Page 41
Équipement de l'appareil……...…….…..…Page 41
Opstarten / Bediening………....……..…..…Pagina 34
Reiniging en onderhoud….....…….…....…..Pagina 35
Probleemoplossing………………....….........Pagina 36
Technische gegevens………………….……Pagina 36
Verwijdering……………………………...…..Pagina 37
Overzicht van productgegevens..................Pagina 38
u produit
u produitu produit
Mise en marche / Fonctionnement.….....…Page 43
Nettoyage et entretien……...……….…...…Page 45
Dépannage……...……….….…………….…Page 45
Données techniques……...………...………Page 46
Élimination……...……….….………….….…Page 46
Fiche technique du produit……………..….Page 47
Montage.……...……….….………..….….…Page 42
3
Page 4

DDDDEUTSCH
EUTSCH
EUTSCHEUTSCH
Einleitung
Einleitung
EinleitungEinleitung
Vielen Dank, dass Sie sich für unser Produkt entschieden haben. Wir wünschen Ihnen viel Freude mit
dem Gerät.
Symbole in dieser Bedienungsanleitung
Symbole in dieser Bedienungsanleitung
Symbole in dieser BedienungsanleitungSymbole in dieser Bedienungsanleitung
Wichtige Hinweise für Ihre Sicherheit sind besonders
gekennzeichnet. Beachten Sie diese Hinweise unbedingt, um Unfälle und Schäden zu vermeiden:
WARNUNG:
WARNUNG:
WARNUNG:WARNUNG:
Warnt vor Gefahren für Ihre Gesundheit und zeigt
mögliche Verletzungsrisiken auf.
ACHTUNG:
ACHTUNG:
ACHTUNG:ACHTUNG:
Weist auf mögliche Gefährdungen für das Gerät oder
andere Gegenstände hin.
HINWEIS
HINWEIS:
HINWEISHINWEIS
:
: :
Hebt Tipps und Informationen für Sie hervor.
• Benutzen Sie das Gerät nicht im Freien. Halten
Sie es vor Hitze, direkter Sonneneinstrahlung,
und Feuchtigkeit fern.
• Schalten Sie das Gerät aus, ziehen Sie den Netz-
stecker (ziehen Sie am Stecker, nicht am Kabel)
oder schalten Sie die Sicherung ab, wenn Sie das
Gerät nicht benutzen, zur Reinigung, Benutzerwartung oder bei Störung.
• Das Gerät und wenn möglich das Netzkabel müs-
sen regelmäßig auf Zeichen von Beschädigungen
untersucht werden. Bei Beschädigung, darf das
Gerät nicht mehr benutzt werden.
• Umbauten oder Veränderungen am Gerät sind
aus Sicherheitsgründen nicht zulässig.
• Zur Sicherheit Ihrer Kinder lassen Sie keine Ver-
packungsteile (Plastikbeutel, Karton, Styropor,
etc.) erreichbar liegen.
WARNUNG:
WARNUNG:
WARNUNG:WARNUNG:
Lassen Sie kleine Kinder nicht mit Folie spielen.
Allgemeine Hinweise
Allgemeine Hinweise
Allgemeine HinweiseAllgemeine Hinweise
Lesen Sie vor Inbetriebnahme dieses Gerätes die
Bedienungsanleitung sehr sorgfältig durch und bewahren Sie diese inkl. Garantieschein und Kassenbon gut auf. Falls Sie das Gerät an Dritte weitergeben, geben Sie auch die Bedienungsanleitung mit.
HINWEIS
HINWEIS:
HINWEISHINWEIS
:
: :
Die Darstellungen in dieser Bedienungsanleitung
können vom Originalgerät abweichen.
• Benutzen Sie das Gerät ausschließlich für den
privaten und den dafür vorgesehenen Zweck.
Dieses Gerät ist nicht für den gewerblichen Gebrauch bestimmt.
• Es darf nur in der Art und Weise benutzt werden,
wie es in dieser Bedienungsanleitung beschrieben ist. Jede andere Verwendung gilt als nicht
Es besteht Erstickungsgefahr!
Erstickungsgefahr!
Erstickungsgefahr!Erstickungsgefahr!
bestimmungsgemäß und kann zu Sachschäden
oder sogar zu Personenschäden führen.
4
Page 5

Spezielle Sicherheitshinweise für dieses Gerät
Spezielle Sicherheitshinweise für dieses Gerät
Spezielle Sicherheitshinweise für dieses GerätSpezielle Sicherheitshinweise für dieses Gerät
• Dieses Gerät ist dazu bestimmt, im Haushalt und ähnlichen Anwendun-
gen verwendet zu werden wie beispielsweise
- in Personalküchen von Läden, Büros und anderen Arbeitsbereichen;
- in der Landwirtschaft und von Gästen in Hotels, Motels und anderen
Unterkünften;
- Frühstückspensionen;
- im Catering und ähnlichem Großhandelseinsatz.
WARNUNG:
WARNUNG:
WARNUNG:WARNUNG:
• Stellen Sie sicher, dass die Belüftungsöffnungen im Gerätegehäuse
oder im Einbaugehäuse nicht blockiert werden.
• Gebrauchen Sie keine mechanischen Einrichtungen oder sonstigen Mit-
tel um den Abtauvorgang (falls notwendig) zu beschleunigen, außer
den in der Anleitung beschriebenen Hilfsmitteln (Modellabhängig im
Lieferumfang enthalten).
• Beschädigen Sie nicht den Kältemittelkreislauf.
• Betreiben Sie keine elektrischen Geräte innerhalb des Gerätes.
• Lagern Sie keine explosionsfähigen Stoffe, wie z. B. Aerosolbehälter
mit brennbarem Treibgas im Gerät.
• Dieses Gerät kann von Kindern
Kindern ab 8 Jahren und darüber und von Per-
KindernKindern
sonen mit reduzierten physischen, sensorischen oder mentalen Fähigkeiten oder Mangel an Erfahrung und/oder Wissen benutzt werden,
wenn sie beaufsichtigt oder bezüglich des sicheren Gebrauchs des G
rätes
rätes unterwiesen wurden und die daraus resultierenden Gefahren ver-
rätesrätes
Gebrauchs des Ge-
Gebrauchs des GGebrauchs des G
standen haben.
• Kinder
Kinder dürfen nicht mit dem Gerät spielen.
KinderKinder
5
e-
e-e-
Page 6

• Reinigung und Benutzer
Benutzer----Wartung
BenutzerBenutzer
Wartung dürfen nicht durch Kinder
WartungWartung
Kinder durchge-
KinderKinder
führt werden, es sei denn, sie sind älter als 8 Jahre und werden beaufsichtigt.
• Reparieren Sie das Gerät nicht selbst, sondern suchen Sie einen auto-
risierten Fachmann auf. Um Gefährdungen zu vermeiden, ein defektes
Netzkabel nur vom Hersteller, einem qualifizierten Techniker oder dem
Kundendienst durch ein gleichwertiges Kabel ersetzen lassen. Wenn
Kabel oder Stecker beschädigt sind, dürfen Sie das Gerät nicht mehr
benutzen.
• Bei Entsorgung nutzen Sie die von Elektrogeräten vorgesehenen
Sammelstellen.
Kühlmittel
Kühlmittel
KühlmittelKühlmittel
• Im Schadensfall nehmen Sie das Gerät nicht in
WARNUNG:
WARNUNG:
WARNUNG:WARNUNG:
Der Kühlmittelkreislauf enthält das Kühlmittel Isobutan (R600a), ein Naturgas mit hoher Umweltverträglichkeit, das brennbar ist. Achten Sie beim Transportieren und Aufstellen des Gerätes darauf, dass keine
Teile des Kühlkreislaufs beschädigt werden.
Bei Beschädigung
Bei Beschädigung des Kühlkreisla
Bei BeschädigungBei Beschädigung
• offenes Feuer, Zündquellen unbedingt vermeiden,
• Gerät von der Stromversorgung trennen,
• Raum, in dem das Gerät steht durchlüften und
• einen Fachmann kontaktieren.
• Nehmen Sie das Gerät aus seiner Verpackung.
• Entfernen Sie sämtliches Verpackungsmaterial,
wie Folien, Füllmaterial und Kartonverpackung.
• Überprüfen Sie das Gerät auf eventuelle
Transportschäden, um Gefährdungen zu
des Kühlkreislaufs:
des Kühlkreislades Kühlkreisla
Auspacken
Auspacken des Gerätes
Auspacken Auspacken
des Gerätes
des Gerätesdes Gerätes
ufs:
ufs:ufs:
Betrieb. Wenden Sie sich an Ihren Händler.
HI
HINNNNWE
WEIS
WEWE
IS::::
ISIS
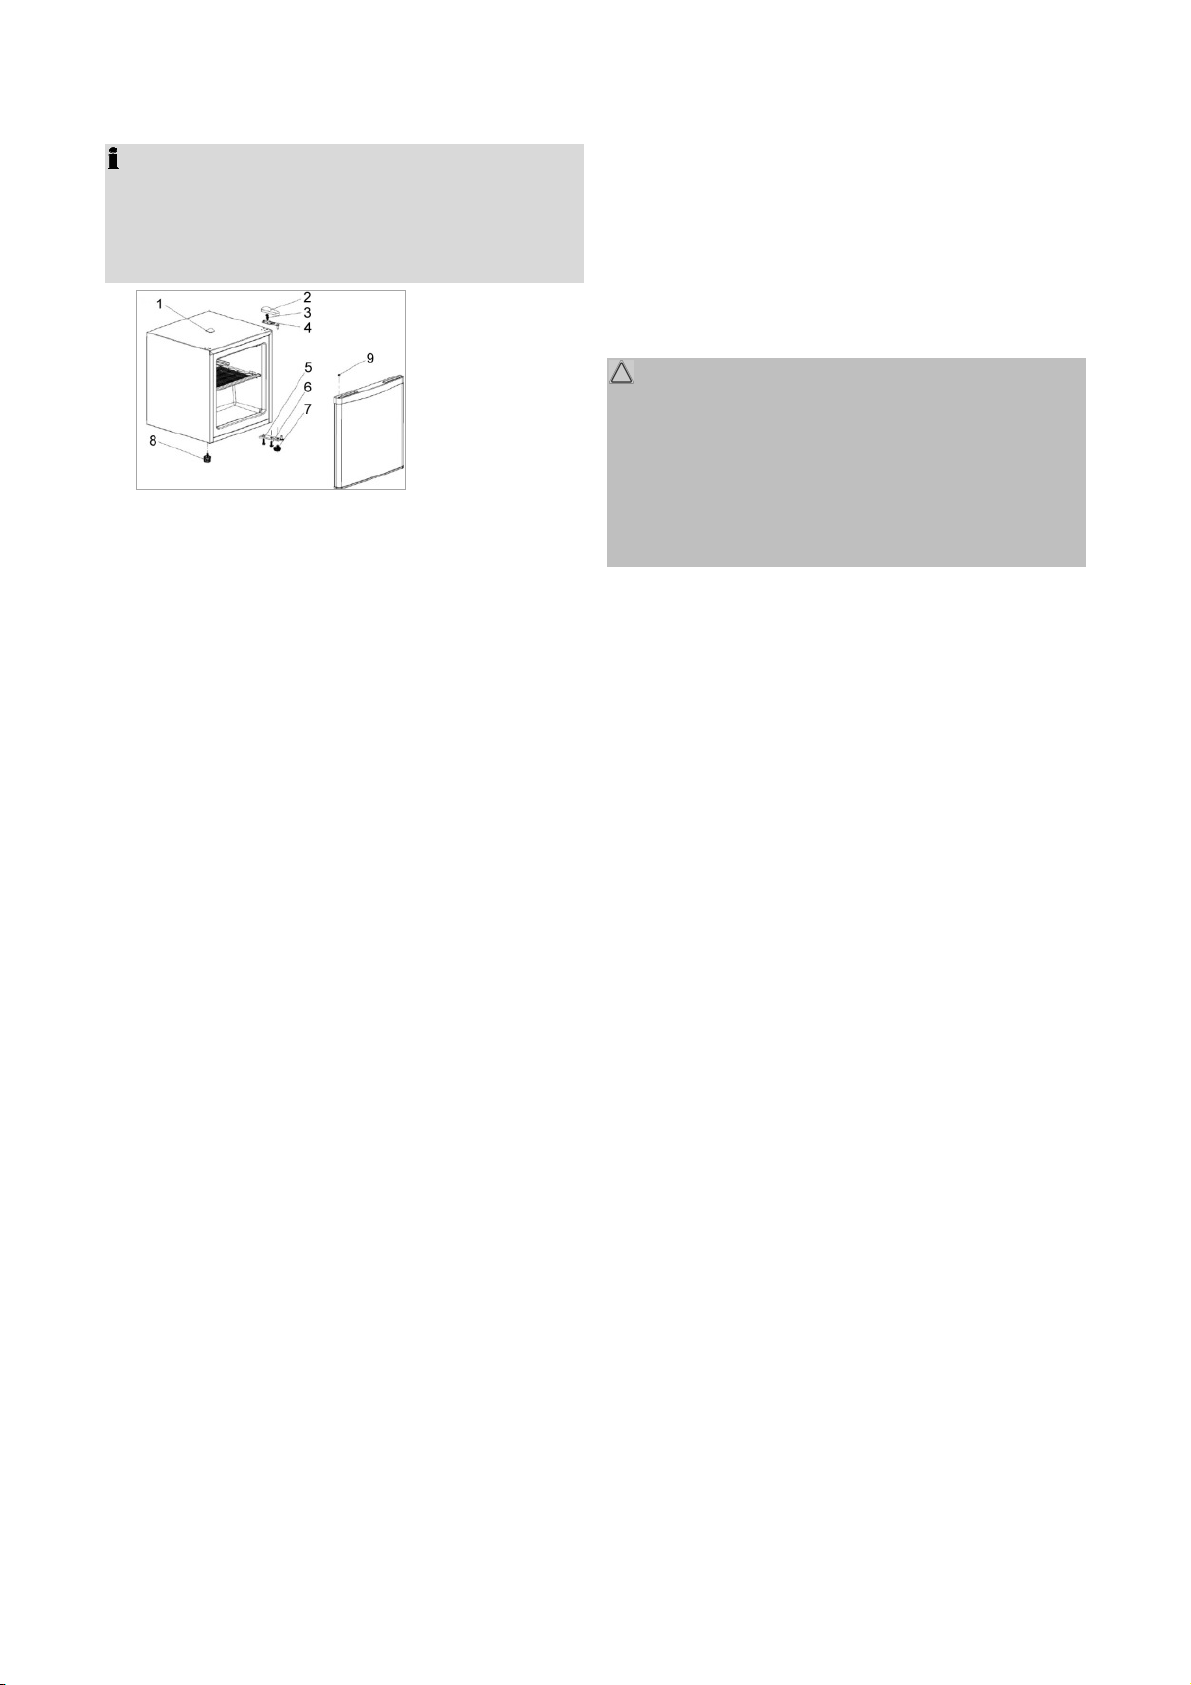
Geräteausstattung
Geräteausstattung
GeräteausstattungGeräteausstattung
Gitterablage 2222 Eisfach
HIHI
Am Gerät können sich noch Staub oder
Produktionsreste befinden. Wir empfehlen Ihnen, das
Gerät wie unter „Reinigung und Wartung“
beschrieben zu säubern.
Geräteübersicht
Geräteübersicht
GeräteübersichtGeräteübersicht
1111 Eiswürfelschale 4444 herausnehmbare
3333 Türablagen 5555 Wasserauffangschale
vermeiden.
Lieferumfang
Lieferumfang
LieferumfangLieferumfang
Gitterablage, Eiswürfelschale, Wasserauffangschale
6
Page 7

Installation
Installation
InstallationInstallation
Voraussetzungen an den Aufstellort
Voraussetzungen an den Aufstellort
Voraussetzungen an den AufstellortVoraussetzungen an den Aufstellort
• Eine gute Belüftung rund um das Gerät ist erfor-
derlich, damit die Hitze ordnungsgemäß abgeleitet und der Betrieb effektiv und mit möglichst
niedrigem Energieverbrauch gewährleistet werden kann. Zu diesem Zweck muss genügend
Freiraum rund um das Gerät vorhanden sein.
- Abstand zur Geräterückseite und zu den Sei-
tenwänden jeweils ca. 5 cm;
-
Stellen Sie das Gerät so auf, dass die Gerätetür vollständig zu öffnen ist.
• Das Gerät darf nur an einem Ort stehen, dessen
Umgebungstemperatur der Klimaklasse entspricht, für die das Gerät ausgelegt ist. Die Klimaklasse finden Sie unter „Technische Daten“ und
auf dem Typenschild, welches sich im Innenraum
oder auf der Geräterückseite befindet.
• Stellen Sie das Gerät nur auf einer stabilen und
sicheren Standfläche auf. Falls das Gerät nicht
waagerecht steht, stellen Sie die Standfüße entsprechend nach.
• Vermeiden Sie eine Aufstellun
Vermeiden Sie eine Aufstellung:
Vermeiden Sie eine AufstellunVermeiden Sie eine Aufstellun
g:
g:g:
- neben Heizkörpern, einem Herd, direkter Son-
neneinstrahlung oder sonstigen Wärmequellen;
- an Orten, an denen eine hohe Feuchtigkeit
auftritt (z. B. im Freien, Badezimmer), da die
Metallteile in solchen Fällen rostanfällig sind;
- in der Nähe von flüchtigen und entflammbaren
Materialien (z. B. Gas, Benzin, Alkohol, Lacken etc.) und in Räumen mit schlechter Luftzirkulation (z. B. Garage).
- Setzen Sie das Gerät keinerlei Witterungsein-
flüssen aus.
Elektrischer Anschluss
Elektrischer Anschluss
Elektrischer AnschlussElektrischer Anschluss
WARNUNG:
WARNUNG:
WARNUNG:WARNUNG:
• Die Installation an das Stromnetz muss gemäß
den lokalen Gesetzen und Vorschriften erfolgen.
• Ein unsachgemäßer Anschluss kann zu einem
elektrischen Schlag
elektrischen Schlag führen!
elektrischen Schlagelektrischen Schlag
• Verändern Sie den Gerätenetzanschlussstecker
nicht! Lassen Sie die Netzsteckdose durch einen
Fachmann ersetzen, wenn diese für den Gerätenetzstecker nicht geeignet ist.
• Die Zugänglichkeit des Netzsteckers muss ge-
währleistet sein, um das Gerät im Notfall sofort
von der Stromversorgung zu trennen.
ACHTUNG:
ACHTUNG:
ACHTUNG:ACHTUNG:
Sollten Sie das Gerät vom Stromnetz trennen oder
sollte es zu einem Stromausfall kommen:
- Warten Sie etwa 5 Minuten bevor Sie das Gerät
wieder in Betrieb nehmen.
- Überprüfen Sie die Betriebseinstellungen.
• Prüfen Sie, ob die Netzspannung, die Sie benut-
zen wollen, mit der des Gerätes übereinstimmt.
Die Angaben hierzu finden Sie auf dem Typenschild des Gerätes.
• Schließen Sie das Netzkabel an eine vorschrifts-
mäßig installierte Schutzkontakt-Steckdose an.
• Wenn der Netzstecker nach der Installation nicht
frei zugänglich ist, muss zur Erfüllung der einschlägigen Sicherheitsvorschriften installationsseitig eine entsprechende Trennvorrichtung vorhanden sein.
Türanschlag wechseln
Türanschlag wechseln
Türanschlag wechselnTüranschlag wechseln
Der Türanschlag kann von rechts (Lieferzustand)
nach links gewechselt werden, falls der Aufstellort
dies erfordert.
WARNUNG:
WARNUNG:
WARNUNG:WARNUNG:
Beim Auswechseln des Türanschlags darf das Gerät
nicht mit dem Netzstrom verbunden sein.
7
Page 8
HI
HINNNNWEIS
WEIS::::
HIHI
WEISWEIS
loses Öffnen sowie Schließen der Tür gewährleis-
• Ziehen Sie eine weitere Person zur Hilfe hinzu.
•
Sie benötigen ggf.:
schraubendreher sowie Schlitzschraubendreher.
Schraubenschlüssel, Kreuz-
• Entfernen Sie die Blindkappe (1) und die Schar-
nierabdeckung (2).
• Demontieren Sie das obere Türscharnier (4),
indem Sie die Schrauben (3) lösen. Öffnen Sie
die Gerätetür ein wenig und heben Sie sie aus
dem unteren Türscharnier.
• Versetzen Sie den Blindstopfen (9) der Gerätetür.
Stellen Sie die Gerätetür sicher beiseite.
tet ist.
IIIInbetrie
nbetriebbbbnahme
nbetrienbetrie
Vor der Erstinbetriebnahme
Vor der Erstinbetriebnahme
Vor der ErstinbetriebnahmeVor der Erstinbetriebnahme
ACHTUNG:
ACHTUNG:
ACHTUNG:ACHTUNG:
nahme / Betrieb
nahmenahme
/ Betrieb
/ Betrieb/ Betrieb
Nach dem Transport sollte das Gerät für ca. 4 Stunden aufrecht stehen, bevor Sie es an die Stromversorgung anschließen. Die Nichtbeachtung könnte zur
Fehlfunktion des Kühlsystems und dadurch zum
Ausfall des Gerätes führen.
Reinigen Sie den Innenraum des Gerätes mit allen
sich darin befindenden Zubehörteilen. Beachten Sie
die Anweisungen, die wir Ihnen im Kapitel „Reinigung
und Wartung“ dazu geben.
Gerät starten
Gerät starten
Gerät startenGerät starten
• Kippen Sie das Gerät leicht nach hinten und blo-
ckieren Sie es in dieser Position. Schrauben Sie
die Standfüße (7+8) ab.
• Demontieren Sie das untere Türscharnier (5),
indem Sie die Schrauben (6) lösen.
• Versetzen und befestigen Sie das Türscharnier
(5) auf der gegenüberliegenden Geräteseite. Drehen Sie die Standfüße (7+8) entsprechend ein.
• Stellen Sie das Gerät wieder in die aufrechte Po-
sition. Setzen Sie die Gerätetür auf den Scharnierstift und fixieren Sie sie in der vorgesehenen
Position.
• Versetzen und befestigen Sie das obere Tür-
scharnier (4) auf die gegenüberliegende Geräteseite.
• Setzen Sie die zu Anfang abgenommene Blind-
kappe (1) in die gegenüberliegende Bohrung und
die Scharnierabdeckung (2) wieder auf.
• Überprüfen Sie, ob die Tür vertikal sowie horizon-
tal optimal ausgerichtet ist, so dass ein reibungs-
• Schließen Sie das Gerät an die Stromversorgung
an.
• Bedienen Sie den Temperaturregler. Lesen Sie
hierzu auch den folgenden Abschnitt „Einstellungen“.
Einstel
Einstellungen
EinstelEinstel
lungen
lungenlungen
Stellung [0] bedeutet, dass sich das Gerät im ausgeschalteten Zustand befindet. Drehen Sie den Temperaturregler von dieser Stellung aus im Uhrzeigersinn,
das Gerät schaltet sich automatisch ein.
Die Leistungsstufen [1–7] regeln die verschiedenen
Werte der Innentemperatur.
Stellung 0
Stellung 0 Stellung 1
Stellung 0Stellung 0
ausgeschalteter
Zustand
Stellung 1 Stellung 7
Stellung 1Stellung 1
niedrigste Stufe
(wärmste Innentemperatur)
Stellung 7
Stellung 7Stellung 7
höchste Stufe
(kälteste Innentemperatur)
Beachten Sie, dass sich die Temperatur in Abhängigkeit von der Umgebungstemperatur (Aufstellungsort), von der Häufigkeit des Türöffnens und der Bestückung ändert.
8
Page 9
Bei Erstbetrieb stellen Sie den Temperaturregler
Eisfach
Eisfach
EisfachEisfach
zunächst auf die höchste Stufe, bis das Gerät die
gewünschte Betriebstemperatur erreicht hat. Es wird
empfohlen, danach auf eine mittlere Stufe zurück zu
stellen, dann können Sie eine eventuelle Temperaturkorrektur einfach vornehmen.
Lebensmittel lagern
Lebensmittel lagern
Lebensmittel lagernLebensmittel lagern
HI
HINNNNWEIS
WEIS:
: Empfehlung!
HIHI
WEISWEIS
Empfehlung!
: :
Empfehlung!Empfehlung!
Damit die Temperatur tief genug ist, lassen Sie das
Gerät einige Zeit vorkühlen, bevor Sie erstmals Lebensmittel einlegen.
ACHTUNG:
ACHTUNG:
ACHTUNG:ACHTUNG:
Beachten Sie grundsätzlich die Lagerungsvorschriften auf den Verkaufsverpackungen.
Lebensmittel sollten immer abgedeckt oder verpackt
ins Gerät gelangen, um Austrocknen und Geruchsoder Geschmacksübertragung auf anderes Kühlgut
zu vermeiden. Zum Verpacken eignen sich z. B.
• Frischhaltebeutel, Foli-
en aus Polyäthylen
• Kunststoffbehälter mit
Deckel
EEEEmpfehlungen
mpfehlungen
mpfehlungenmpfehlungen
• Spezielle Hauben
aus Kunststoff mit
Gummizug
• Aluminiumfolie
• Stellen Sie Flaschen in die Türablage.
• Durch die Luftzirkulation entstehen unterschiedli-
che Kältezonen.
- Die kälteste Zone befindet sich an der Rück-
wand und im unteren Kühlraumteil. Empfohlen
Das Eisfach ermöglicht Ihnen bereits gefrorene Lebensmittel bei einer Temperatur bis -4°C kurzzeitig
zu lagern. Beachten Sie zusätzlich die empfohlenen
Lagerungszeiten auf der Verkaufsverpackung. Es ist
aber besonders für die Bereitung und Lagerung von
Eiswürfeln vorgesehen.
Betriebsgeräusche
Betriebsgeräusche
BetriebsgeräuscheBetriebsgeräusche
Geräuscheart
Geräuscheart UUUUrrrrsache
GeräuscheartGeräuscheart
sache
sachesache
Murmeln Kompressor in Betrieb
Flüssigkeitsgeräusche Zirkulation des Kühlmittels
Klickgeräusche Temperaturregler schaltet
Kompressor ein oder aus.
Störende Geräusche Vibrieren der Ablagen oder
der Kühlschlangen
Abschalten
Abschalten
AbschaltenAbschalten
Zum Abschalten des Gerätes den Temperaturre
Zum Abschalten des Gerätes den Temperaturreggggler
Zum Abschalten des Gerätes den TemperaturreZum Abschalten des Gerätes den Temperaturre
auf die
auf die Aus
auf die auf die
Aus----Position stellen.
Position stellen.
AusAus
Position stellen.Position stellen.
ler
ler ler
Sollte das Gerät für längere Zeit außer Betrieb genommen werden:
• Entnehmen Sie den Geräteinhalt.
• Gerät von der Stromversorgung trennen.
• Gerät gründlich reinigen (siehe „Reinigung und
Wartung“).
• Gerätetür anschließend geöffnet lassen, um Ge-
ruchsbildung zu vermeiden.
Tipps zur Energieeinsp
Tipps zur Energieeinsparung
Tipps zur EnergieeinspTipps zur Energieeinsp
arung
arungarung
für die Lagerung von Lebensmitteln wie Fisch,
Wurst und Fleisch.
- Die wärmste Zone befindet sich an der Tür
und im oberen Kühlraumteil. Geeignet zur Lagerung von z. B. Käse und Butter.
• Lassen Sie warme Lebensmittel erst abkühlen.
• Gerät von der Stromversorgung trennen, wenn
Sie das Gerät nicht in Gebrauch haben.
• Stellen Sie das Gerät nicht in der Nähe von Her-
den, Heizkörpern oder anderen Wärmequellen
auf. Bei hoher Umgebungstemperatur läuft der
Kompressor häufiger und länger.
• Achten Sie auf ausreichende Be- und Entlüftung
am Gerätesockel und an der Geräterückseite.
Lüftungsöffnungen dürfen Sie niemals abdecken.
9
Page 10

• Lassen Sie warme Speisen erst abkühlen, bevor
Abtauen
Abtauen
AbtauenAbtauen
Sie sie in das Gerät stellen.
• Stellen Sie den Temperaturwert nicht kälter als
notwendig ein.
• Die Gerätetür nur so lange wie nötig geöffnet
lassen.
• Das Gerät sollte regelmäßig abgetaut werden.
• Die Türdichtung muss vollkommen intakt sein,
damit die Tür ordnungsgemäß schließt.
Reinigung und Wartung
Reinigung und Wartung
Reinigung und WartungReinigung und Wartung
WARNUNG:
WARNUNG:
WARNUNG:WARNUNG:
• Vor Reinigungs- und Wartungsarbeiten das Gerät
grundsätzlich von der Stromversorgung trennen.
• Das Gerät nie mit Dampfreinigungsgeräten reini-
gen. Feuchtigkeit könnte in elektrische Bauteile
gelangen. Stromschlaggefahr!
Stromschlaggefahr! Heißer Dampf
Stromschlaggefahr!Stromschlaggefahr!
kann zu Schäden an Kunststoffteilen führen.
• Das Gerät muss trocken sein, bevor Sie es wie-
der in Betrieb nehmen.
ACHTUNG:
ACHTUNG:
ACHTUNG:ACHTUNG:
• Benutzen Sie keine Drahtbürste oder anderen
ACHTUNG:
ACHTUNG:
ACHTUNG:ACHTUNG:
Gebrauchen Sie niemals Metallgegenstände (z. B.
Messer), um Eis vom Verdampfer zu entfernen. Anderenfalls kann dieser beschädigt werden. Ein beschädigter Verdampfer kann schwere Schäden verursachen.
Für eine bessere Kühlung und den Stromverbrauch
zu minimieren, muss das Gerät regelmäßig manuell
wie folgt abgetaut werden:
• Zum Einleiten des Abtauvorgangs drehen Sie den
Temperaturregler auf die Aus-Position und tren-
nen Sie das Gerät von der Stromversorgung.
• Entnehmen Sie die Lebensmittel und lagern Sie
alles abgedeckt an einem kühlen Ort.
• Sobald das Eis geschmolzen ist, wischen Sie das
Tauwasser auf und trocknen das Geräteinnere.
• Anschließend können Sie das Gerät wieder in
Betrieb nehmen durch den Anschluss an die
Stromversorgung und Einstellung des Tempera-
turreglers.
scharfkantigen, scheuernden Gegenstände.
• Benutzen Sie keine scharfen oder scheuernden
Reinigungsmittel.
• Beschädigen Sie nicht den Kältemittelkreislauf.
Reinigung des
Reinigung des Gerät
Reinigung desReinigung des
tung
tung
tungtung
Gerätes
es einschließlich Innenaussta
GerätGerät
einschließlich Innenausstat-
eses
einschließlich Innenausstaeinschließlich Innenaussta
t-
t-t-
• Reinigen Sie den Geräte- Innenraum, die Außen-
flächen, das Zubehör sowie die Türdichtung regelmäßig mit lauwarmem Wasser und milden
Reinigungsmittel.
• Entnehmen Sie dafür den Geräteinhalt und lagern
Sie diesen abgedeckt an einem kühlen Ort.
• Nachdem alles gründlich getrocknet wurde, kön-
nen Sie das Gerät wieder in Betrieb nehmen.
Störungsbehebung
Störungsbehebung
StörungsbehebungStörungsbehebung
Bevor Sie sich an den
Bevor Sie sich an den Kundenservice wenden
Bevor Sie sich an den Bevor Sie sich an den
Störung
Störung Ursache /
StörungStörung
Gerät arbeitet nicht bzw.
nicht richtig
Eingelagerte
Lebensmittel
sind zu
warm
Das Gerät ist
laut im Betrieb
Ursache / Maßnahme
Ursache /Ursache /
- Überprüfen Sie die Stromversorgung.
- Prüfen Sie die Temperatureinstellung.
- Umgebungstemperatur überprüfen.
- Lüftungsöffnungen frei räumen, Gerät
- Prüfen Sie die Temperatureinstellung.
- Lassen Sie die Tür nur so lange wie
- Überprüfen Sie den Aufstellort.
- Prüfen Sie den Stand des Gerätes.
- Siehe „Betriebsgeräusche“.
Kundenservice wenden
Kundenservice wendenKundenservice wenden
Maßnahme
MaßnahmeMaßnahme
frei aufstellen.
notwendig geöffnet.
10
Page 11

Störung
Störung Ursache / Maßnahme
StörungStörung
Wasser auf
dem Geräteboden
Wasser am
Gerätegehäuse
HINWEIS
HINWEIS::::
HINWEISHINWEIS
Ursache / Maßnahme
Ursache / MaßnahmeUrsache / Maßnahme
Prüfen Sie die Temperatureinstellung.
An Tagen mit sehr hoher Luftfeuchtigkeit
kann es zur Bildung von Kondensflüssigkeit kommen. Keine Fehlfunktion!
Falls Sie nach dem Durcharbeiten der obigen
Schritte immer noch Probleme mit Ihrem Gerät
haben sollten, wenden Sie sich an ihren Fachhandel
oder den Kundenservice (siehe „Garantie / Kundenservice“).
Garantie / Kunden
Garantie / Kundenservice
Garantie / KundenGarantie / Kunden
Garantiebedingungen
Garantiebedingungen
GarantiebedingungenGarantiebedingungen
service
serviceservice
1. Voraussetzung für unsere Garantieleistungen ist
der Erwerb des Gerätes bei einem unserer Vertragshändler.
2. Gegenüber Verbrauchern gewähren wir bei priva-
ter Nutzung des Gerätes eine Garantie von 24
Monaten. Die Garantie beginnt mit dem Zeitpunkt
der Übergabe, der durch die Rechnung, Lieferschein oder gleichwertiger Unterlagen nachzuweisen ist. In diesem Zeitraum erstrecken sich die
Garantieleistungen über die Arbeitszeit, die Anfahrt und über die zu ersetzenden Teile. Die Ga-
Technische Daten
Technische Daten
Technische DatenTechnische Daten
Elektrischer A
Elektrischer Annnnschluss………………………...………..
Elektrischer AElektrischer A
schluss………………………...………..
schluss………………………...………..schluss………………………...………..
Netzspannung: …………......………………...220-240 V~
Netzfrequenz: ………………………...……………...50 Hz
Leistungsaufnahme: ……………………………........70 W
Abmessung H x B x T / Gewicht……...…
Abmessung H x B x T / Gewicht……...………………..
Abmessung H x B x T / Gewicht……...…Abmessung H x B x T / Gewicht……...…
……………..
……………..……………..
Geräteabmessung: …………….…51.0 x 43.9 x 47.0 cm
Nettogewicht: ……………………..…………...ca. 14.0 kg
Technische und gestalterische Änderungen im Zuge
stetiger Produktentwicklungen vorbehalten.
Hinweis zur Richtlinienkonformität
Hinweis zur Richtlinienkonformität
Hinweis zur RichtlinienkonformitätHinweis zur Richtlinienkonformität
Hiermit erklärt der Hersteller, dass sich das Gerät
KB 389 in Übereinstimmung mit den folgenden Anforderungen befindet:
Europäische Niederspannungsrichtlinie 2014/35/EU
EU-Richtlinie für elektromagnetische Verträglichkeit
2014/30/EU
Ökodesign Richtlinie 2009/125/EG
RoHS-Richtlinie 2011/65/EU
rantiezeit für Verbraucher reduziert sich auf 6
Monate, sofern sie ein zur gewerblichen Nutzung
geeignetes Gerät – auch teilweise – gewerblich
oder gemeinschaftlich nutzen. Ist das Gerät zur
gewerblichen Nutzung geeignet, leisten wir beim
Kauf durch Unternehmer für das Gerät eine Garantie von 6 Monaten.
3. Innerhalb der Garantiezeit werden Funktionsfeh-
ler, die trotz vorschriftsmäßigem Anschluss,
sachgemäßer Behandlung und Beachtung der
gültigen Einbauvorschriften und der Betriebsanleitung auf Fabrikations- oder Materialfehler zurückzuführen sind, durch Reparatur oder Austausch
beseitigt.
4. Garantieleistungen werden nicht für Mängel erb-
racht, die auf Nichtbeachtung der Gebrauchsanweisung beruhen, durch unsachgemäßen Anschluss oder Installation, unsachgemäßer Behandlung, normale Abnutzung des Gerätes, höhere Gewalt oder sonstige äußere Einflüsse zurückzuführen sind.
Garantieansprüche sind ferner ausgeschlossen
für leicht zerbrechliche Teile, wie zum Beispiel
Glas, Kunststoff oder Leuchtmittel. Der Garantie-
11
Page 12

anspruch erlischt bei Eingriffen durch den Käufer
oder durch nicht autorisierte Dritte.
5. Transportschäden unterliegen nicht der Garantie
und müssen unmittelbar nach Feststellung dem
Entsorgung
Entsorgung
EntsorgungEntsorgung
Verkäufer gemeldet werden.
6. Die Garantieleistung erfolgt in der Weise, dass
mangelhafte Teile nach unserer Wahl unentgeltlich instandgesetzt oder durch einwandfreie Teile
ersetzt werden. Ersetzte Teile gehen in unser Eigentum über. Die Garantie gilt nur für Geräte,
welche sich im Bereich der Bundesrepublik
Deutschland bzw. Österreich befinden.
7. Durch Garantieleistungen wird die Garantiezeit
nicht verlängert. Es besteht auch kein Anspruch
auf neue Garantieleistungen. Diese Garantieerklärung ist eine freiwillige Leistung von uns als
Hersteller des Gerätes. Die gesetzlichen Gewährleistungsrechte (Nacherfüllung, Rücktritt, Schadensersatz und Minderung) werden durch diese
Garantie nicht berührt.
Stand 03 2017
Garantieabwicklung
Garantieabwicklung
GarantieabwicklungGarantieabwicklung
Bedeutung des Symbols „Mülltonne“
Bedeutung des Symbols „Mülltonne“
Bedeutung des Symbols „Mülltonne“Bedeutung des Symbols „Mülltonne“
Schonen Sie unsere Umwelt, Elektrogeräte gehören
nicht in den Hausmüll.
Nutzen Sie die für die Entsorgung von Elektrogeräten
vorgesehenen Sammelstellen und geben dort Ihre
Geräte ab, die Sie nicht mehr benutzen werden.
Sie helfen damit die potenziellen Auswirkungen,
durch falsche Entsorgung, auf die Umwelt und die
menschliche Gesundheit zu vermeiden. Sie leisten
damit Ihren Beitrag zur Wiederverwertung, zum Recycling und zu anderen Formen der Verwertung von
Elektro- und Elektronik-Altgeräten.
Informationen, wo die Geräte zu entsorgen sind,
erhalten Sie über Ihre Kommunen oder die
Gemeindeverwaltungen.
WARNUNG:
WARNUNG:
WARNUNG:WARNUNG:
Entfernen oder zerstören Sie evtl. vorhandene
Schnapp- und Riegelschlösser, wenn Sie das Gerät
Sollte Ihr Gerät innerhalb der Garantiezeit einen
Mangel aufweisen, bitten wir Sie, die Internetseite
des Serviceportals
www.sli24.de
aufzurufen. Nach Eingabe des Gerätetyps wird Ihnen
angezeigt, wie die Reklamation bearbeitet wird.
C. Bomann GmbH
C. Bomann GmbH
C. Bomann GmbHC. Bomann GmbH
Heinrich-Horten-Straße 17
D-47906 Kempen
außer Betrieb nehmen oder es entsorgen.
12
Page 13
Produktdatenblatt für Haushaltskühl
Produktdatenblatt für Haushaltskühl----/Gefriergeräte
Produktdatenblatt für HaushaltskühlProduktdatenblatt für Haushaltskühl
Brand
Brand
BrandBrand
Modell
Modell
ModellModell
1)
1)
Kategorie
Kategorie
KategorieKategorie
1)1)
Energieeffizienzklasse2)
/Gefriergeräte nnnnach Verordnung (EU) Nr. 1060/2010
/Gefriergeräte/Gefriergeräte
ach Verordnung (EU) Nr. 1060/2010
ach Verordnung (EU) Nr. 1060/2010ach Verordnung (EU) Nr. 1060/2010
BBBBOMANN
KB 389
KB 389
KB 389KB 389
3333
A++
Jährlicher Energieverbrauch3) kWh/Jahr 84
Nutzinhalt Kühlraum gesamt L 42
OMANN
OMANNOMANN
- davon Kaltlagerfach
- davon Weinlagerfach
- davon Kellerfach
L -
L -
L -
- davon Lagerfach für frische Lebensmittel L 42
Nutzinhalt Gefrierraum gesamt L Sternekennzeichnung4)
Auslegungstemperatur sonstige Fächer °C Niedrigste Lagertemperatur Weinlagerfach °C Frostfrei
Lagerzeit bei Störung h Gefriervermögen kg/24h Klimaklasse5)
N/ST/T
Luftschallemission dB(A) re1 pW 43
Einbaugerät
Weinlagerschrank
1) Haushaltskühlgeräte-Kategorien: 1 = Kühlschrank mit einem oder mehreren Lagerfächern für frische Lebensmittel; 2 = Kühlschrank mit Kellerzone, Keller-
fach-Kühlgerät und Weinschrank; 3 = Kühlschrank mit Kaltlagerzone und Kühlschrank mit einem Null-Sterne-Fach; 4 = Kühlschrank mit einem Ein-SterneFach; 5 = Kühlschrank mit einem Zwei-Sterne-Fach; 6 = Kühlschrank mit einem Drei-Sterne-Fach; 7 = Kühl-Gefriergerät; 8 = Gefrierschrank; 9 = Gefriertruhe; 10 = Mehrzweck-Kühlgeräte und sonstige Kühlgeräte
2) A+++ (höchste Effizienz) bis G (geringste Effizienz)
3) Energieverbrauch „XYZ“ kWh/Jahr auf der Grundlage von Ergebnissen der Normprüfung über 24 Stunden. Der tatsächliche Verbrauch hängt von der
Nutzung und vom Standort des Gerätes ab.
4) * = Fach -6°C oder kälter
** = Fach -12°C oder kälter
*** = Tiefkühl-Lagerfach -18°C oder kälter
*(***) = Gefrier- und Tiefkühlfach -18°C oder kälter und mit einem Mindestgefriervermögen
5) Klimaklasse SN: Dieses Gerat ist für den Betrieb bei einer Umgebungstemperatur zwischen +10°C und +32°C bestimmt
Klimaklasse N: Dieses Gerät ist für den Betrieb bei einer Umgebungstemperatur zwischen +16°C und +32°C bestimmt
Klimaklasse ST: Dieses Gerät ist für den Betrieb bei einer Umgebungstemperatur zwischen +16°C und +38°C bestimmt
Klimaklasse T: Dieses Gerät ist für den Betrieb bei einer Umgebungstemperatur zwischen +16°C und +43°C bestimmt
-
-
13
Page 14

ENGLISH
ENGLISH
ENGLISHENGLISH
Introduction
Introduction
IntroductionIntroduction
Thank you for choosing our product. We hope you
will enjoy using the appliance.
Symbols in th
Symbols in theeeese Instructions for Use
Symbols in thSymbols in th
se Instructions for Use
se Instructions for Usese Instructions for Use
Important information for your safety is specially
marked. It is essential to comply with these instructions to avoid accidents and prevent damage.
WAR
WARNING
NING::::
WARWAR
NINGNING
• The appliance is designed exclusively for private
use and for the envisaged purpose. This appliance is not fit for commercial use.
• The appliance is only to be used as described in
the user manual. Do not use the appliance for any
other purpose. Any other use is not intended and
can result in damages or personal injuries.
• Do not use it outdoors. Keep it away from sources
of heat, direct sunlight and humidity.
• When not in use, for cleaning, user maintenance
This warns you of dangers to your health and indicates possible injury risks.
CAUTION
CAUTION::::
CAUTIONCAUTION
This refers to possible hazards to the machine or
other objects.
NOTE
NOTE:::: This highlights tips and information.
NOTENOTE
General Notes
General Notes
General NotesGeneral Notes
Read the operating instructions carefully before putting the appliance into operation and keep the instructions including the warranty and the receipt. If
you give this appliance to other people, please also
pass on the operating instructions.
NOTE
NOTE::::
NOTENOTE
The illustrations in this instruction manual can deviate from the original appliance.
works or with disruption, switch off the appliance
and disconnect the plug (pull the plug itself, not
the lead) or turn off the fuse.
• The appliance and if possible the mains lead have
to be checked regularly for signs of damage. If
damage is found the appliance must not be used.
• For safety reasons, alterations or modifications of
the appliance are prohibited.
• In order to ensure your children’s safety, please
keep all packaging (plastic bags, boxes, polystyrene etc.) out of their reach.
WAR
WARNING
NING::::
WARWAR
NINGNING
Do not allow small children to play with the foil.
There is a danger of suffocation!
danger of suffocation!
danger of suffocation!danger of suffocation!
Special safety Information for this Unit
Special safety Information for this Unit
Special safety Information for this UnitSpecial safety Information for this Unit
• This unit is intended to be used in household and similar applications
such as
- staff kitchen areas in shops, offices and other working environ-
ments;
14
Page 15

- farm houses and by clients in hotels, motels and other residential
type environments;
- bed and breakfast type environments;
- catering and similar non-retail applications.
WARNING:
WARNING:
WARNING:WARNING:
• Keep ventilation openings, in the appliance enclosure or in the built-in
structure, clear of obstruction.
• Do not use mechanical devices or other means to accelerate the de-
frosting process (if necessary), except those described in this manual
(depending on the model included the scope of delivery).
• Do not damage the refrigerant circuit.
• Do not operate any electrical devices inside the appliance.
• Do not store explosive substances such as aerosol containers with
flammable propellant in the appliance.
• This appliance can be used by children
children aged from 8 years and above
children children
and persons with reduced physical, sensory or mental capabilities or
lack of experience and knowledge if they have been given supervision
or instruction concerning use of the
use of the appliance
use of theuse of the
appliance in a safe way and under-
applianceappliance
stand the hazards involved.
• Children
Children shall not play with the appliance.
ChildrenChildren
• Cleaning and user maintenance
user maintenance shall not be made by children
user maintenanceuser maintenance
children unless
childrenchildren
they are older 8 years and supervised.
• Do not try to repair the appliance on your own. Always contact an au-
thorized technician. To avoid the exposure to danger, always have
faulty cable be replaced only by the manufacturer, by our customer
service or by qualified person and with a cable of the same type.
15
Page 16

• Use the provided collection points of electrical equipment for the dis-
posal of the appliance.
Coolant
Coolant
CoolantCoolant
WAR
WARNI
NING
NINI
NG::::
NGNG
WARWAR
The coolant circuit of this appliance contains the
refrigerant Isobutane (R600a), a natural gas that is
flammable and of high environmental compatibility.
Make sure no parts of the coolant circuit get damaged during transport and installation of the appli-
Appliance overview
Appliance overview
Appliance overviewAppliance overview
Appliance Equipment
Appliance Equipment
Appliance EquipmentAppliance Equipment
ance.
If the coolant circuit is damaged:
If the coolant circuit is damaged:
If the coolant circuit is damaged:If the coolant circuit is damaged:
• avoid any open flames or ignition source,
• disconnect the plug,
• thoroughly air the room in which the appliance is
installed and
• contact an authorized technician.
Unpacking the Appliance
Unpacking the Appliance
Unpacking the ApplianceUnpacking the Appliance
• Remove the appliance from its packaging.
• Remove all packaging material, such as foils, filler
and cardboard packaging.
• To prevent hazards, check the appliance for any
transport damage.
• In case of damage, do not put the appliance into
operation. Contact your distributor.
NOTE
NOTE::::
NOTENOTE
Production residue or dust may have collected on the
appliance. We recommend cleaning the appliance
according to chapter “Cleaning and Maintenance”.
1111 Ice-cube tray 4444 Removeable grid shelf
2222 Ice compartment 5555 Water drip tray
3333 Door storage racks
Delivery scope
Delivery scope
Delivery scopeDelivery scope
Grid shelf, ice-cube tray, water drip tray
Installation
Installation
InstallationInstallation
Condition
Conditions for the installation location
ConditionCondition
s for the installation location
s for the installation locations for the installation location
• Good ventilation is required around the appliance,
in order to dissipate the heat properly and to
guarantee efficient cooling operation at low power
consumption. Sufficient clearance is necessary.
- Gap to the back and to the side walls each
approx. 5 cm;
- Place the appliance so that the appliance door
can open without being impeded.
• Only install at a location with an ambient tempera-
ture suitable for the climate class of the appliance.
For information on the climate class, please refer
to chapter “Technical Data” or to the rating label
located in the interior or on the rear side of the
appliance.
• Place the appliance on a steady and safe surface.
If the appliance is not horizontally leveled, adjust
the feet accordingly.
16
Page 17

• Avoid the installation:
Avoid the installation:
Avoid the installation:Avoid the installation:
Reverse the
Reverse the door o
Reverse the Reverse the
door opening
door odoor o
pening
peningpening
- near heaters, next to a stove, direct sunlight or
any other heat sources;
- at locations with high humidity (e.g. outdoors,
bathroom), as metal parts would be susceptible to corrosion under such circumstances;
- near volatile or flammable materials (e.g. gas,
fuel, alcohol, paint, etc.), in rooms which may
have poor air circulation (e.g. garages).
- Do not expose the appliance any weather.
Electrical connection
Electrical connection
Electrical connectionElectrical connection
WARNING:
WARNING:
WARNING:WARNING:
• The installation to the mains supply must conform
to the local standards and regulations.
• Improper connection may cause to an electric
shock
shock!
shockshock
electric
electric electric
• Do not modify the appliance plug. If the plug does
not fit properly to the outlet, let install a proper
outlet by an authorized specialist.
• The accessibility of the power plug must be en-
sured to disconnect the appliance from the power
supply in case of emergency.
CAUTION
CAUTION::::
CAUTIONCAUTION
In case of disconnection or power failure:
- Wait for approx. 5 minutes before restarting.
- Check the operation settings.
• Ensure that your mains power corresponds with
the specifications of the appliance. The specifications are printed on the rating label.
• Connect the mains cable to a properly installed
and earthed wall outlet.
• If the plug after installation is not accessible, a
corresponding disconnect device must be available to meet the relevant safety regulations.
If required, the door opening can be moved from the
right (supplied condition) to the left side.
WARNING:
WARNING:
WARNING:WARNING:
When replacing the door stop, the appliance must be
disconnected from the power supply first.
NOTE
NOTE::::
NOTENOTE
• Ask another person to assist.
•
You possibly need:
driver as well as a thin-blade screwdriver.
screw wrench, Phillips screw-
• Remove the blind cap (1) and the hinge cover (2).
• Dismount the upper door hinge (4) by loosening
the screws (3). Opfen the appliance door a little
and lift it out of the lower door hinge.
• Displace the blind plug (9) of the appliance door
accordingly. Place the appliance door safely
aside.
• Tilt the appliance slightly backwards and block it
in this position. Unscrew the feet (7+8).
• Dismount the lower door hinge (5) by loosening
the screws (6).
• Displace and attach the door hinge (5) at the op-
posite appliance side. Turn in the feet (7+8)
accordingly.
• Replace the appliance upright. Put the appliance
door on the hinge pin and fix it in its intended position.
• Displace and attach the upper door hinge (4) at
the opposite appliance side.
• Insert in the blind cap (1) at the opposite hole and
put on the hinge cover (2) again, which you have
removed at the beginning.
17
Page 18

• Check if the door is aligned vertically and horizon-
wards it is recommended to turn the control back to a
tally optimally so that the smooth opening and
closing of the door is guaranteed.
Startup / Operation
Startup / Operation
Startup / OperationStartup / Operation
Prior to first use
Prior to first use
Prior to first usePrior to first use
CAUTION
CAUTION::::
CAUTIONCAUTION
After transport, the appliance should be left standing
upright for about 4 hours before connecting to the
power supply. Nonobservance could lead to malfunction of the cooling system and causes an appliance
breakdown.
Clean the appliance interior including all accessory
parts. Consider the instructions which we provide in
the chapter “Cleaning and Maintenance”.
Starting the appliance
Starting the appliance
Starting the applianceStarting the appliance
• Connect the appliance to the power supply.
• Operate the temperature control. See also the
following section "Settings".
Settings
Settings
SettingsSettings
medium setting; correcting the temperature at a later
point would then be easier.
Storing food
Storing food
Storing foodStoring food
NOTE:
NOTE: Recommendation!
NOTE:NOTE:
Recommendation!
Recommendation!Recommendation!
To guarantee that the temperature is low enough,
you should pre-cool the appliance a few times before
initial loading foods.
CAUTION:
CAUTION:
CAUTION:CAUTION:
Always pay attention to the storage instructions on
the sales packaging.
Always store food covered or packed in order to prevent drying-out and transfer of odor or taste onto
other food items. You may pack the food with e.g.
• Polyethylene plastic
bags or foil
• Plastic bowl with lid
Recommendations
Recommendations
RecommendationsRecommendations
• Special plastic covers
with elastic strip
• Aluminum foil
• Place bottles in the door storage rack.
• By the air circulation different climate zones aris-
es.
Setting [0] means that the appliance is in the off
state. Turn the temperature control clockwise, starting from this setting; the appliance will turn on automatically.
The power levels [1–7] regulate the different values
of the internal temperature.
Setting 0
Setting 0 Setting 1
Setting 0Setting 0
Off state Lowest setting
Setting 1 Setting 7
Setting 1Setting 1
Setting 7
Setting 7Setting 7
Highest setting
(warmest inside
temperature)
(coldest inside
temperature)
Note that the temperature will change depending on
the ambient temperature, frequency of door opening
and the amount of food in the appliance.
During initial operation, turn the temperature control
to the highest setting first, until the appliance has
reached the desired operating temperature. After-
- The coldest zone is located at the rear and the
lower fridge part. Recommended for the storage of foods such as fish, sausages and meat.
- The warmest zone is located at the door and
the upper fridge part. Suitable for the storage
of e.g. cheese and butter.
• Let warm food cool down first.
Ice compartment
Ice compartment
Ice compartmentIce compartment
The ice compartment allows you to store already
frozen food at a temperature up to -4°C temporarily.
In addition, observe the recommended storage times
on the sales packaging. However, it is especially
intended for the preparation and storage of ice cubes.
18
Page 19

Operating noise
Operating noise
Operating noiseOperating noise
Type of sound
Type of sound Cause
Type of soundType of sound
Mumbling Compressor during its operation
Liquid sounds Circulation of the refrigerant
Click sounds The temperature control turns the
Disturbing
noises
Switching
Switching off
SwitchingSwitching
To switch off the appliance t
To switch off the appliance turn the temperature
To switch off the appliance tTo switch off the appliance t
trol
trol to
trol trol
If the appliance is out of use for long periods:
off
offoff
to the off state.
the off state.
to to
the off state.the off state.
Cause
CauseCause
compressor on or off
Vibration of the shelves or cooling
coils
urn the temperature co
urn the temperature urn the temperature
con-
coco
• Remove the appliance content.
• Disconnect the appliance from the power supply.
• Thoroughly clean the appliance (see ”Cleaning
Cleaning
Cleaning and
CleaningCleaning
WARNING:
WARNING:
WARNING:WARNING:
and Maintenance
Maintenance
and and
MaintenanceMaintenance
• Always disconnect the appliance from the power
supply before cleaning and user maintenance.
• Do not use steam cleaners for cleaning the appli-
ance; moisture could enter electrical components.
Risk of electric shock!
Risk of electric shock! Hot steam could damage
Risk of electric shock!Risk of electric shock!
the plastic parts.
• The appliance must be dry before restarting oper-
ation.
n-
n-n-
CAUTION:
CAUTION:
CAUTION:CAUTION:
• Do not use a wire brush or other sharp, abrasive
items.
• Do not use any acidic or abrasive detergents.
• Do not damage the refrigerant circuit.
and Maintenance”).
• Leave open the appliance door to prevent un-
pleasant odours.
Tips for Energy saving
Tips for Energy saving
Tips for Energy savingTips for Energy saving
• Disconnect the appliance from the power supply,
if it isn’t in use.
• Do not install the appliance near stoves, heaters
or other heat sources. In case of higher ambient
temperatures, the compressor will run more frequently and longer.
• Ensure sufficient ventilation at the bottom and
rear side. Never block ventilation openings.
• Allow warm dishes to cool down before putting
into the appliance.
• Do not adjust the temperature colder than neces-
sary.
• Do not open the door longer than necessary.
• The appliance should be defrosted regularly.
• The seal of the appliance door must be complete-
ly intact, so that the door closes properly.
Cleaning the appliance
Cleaning the appliance including interior
Cleaning the applianceCleaning the appliance
including interior
including interiorincluding interior
• Clean the appliance interior, the exterior surfaces,
the accessories and the door seal regularly with
warm water and mild detergent.
• Remove for that the appliance content and stor-
age at a cool location.
• After everything was thoroughly dried, you can
restart the operation.
Defrosting
Defrosting
DefrostingDefrosting
CAUTION:
CAUTION:
CAUTION:CAUTION:
Never use metal objects (e.g. knifes) to remove ice
from the evaporator. Otherwise it can be damaged.
A defect evaporator can cause serious damage.
To achieve better cooling and to save energy, defrost
the appliance regularly as follows:
• To start the defrosting process turn the tempera-
ture control to the off state and disconnect the
appliance from the power supply.
• Remove the food items and keep covered at a
cool location.
• When the ice has melted, wipe the condensate
away and dry the appliance interior.
19
Page 20

• Then you may restart the appliance by connecting
the plug and turning the temperature control.
Troubleshooting
Troubleshooting
TroubleshootingTroubleshooting
Before you contact an authorized specialist
Before you contact an authorized specialist
Before you contact an authorized specialistBefore you contact an authorized specialist
Problem
Problem Cause / Action
ProblemProblem
Appliance is
not working
properly or
at all
Cause / Action
Cause / ActionCause / Action
- Check the power supply.
- Check the temperature setting.
- Check the ambient temperature.
- Check the appliance content.
- Unblock the ventilation openings, install
the appliance freely.
Stored food
is too warm
- Check the temperature setting.
- Open the door only as long as neces-
sary.
- Check the location.
Loud noise
during oper-
- Check the appliance position.
- See the section “Operating noise”.
ation
Water on the
Check the temperature setting.
appliance
bottom
Water on the
outer surface
On days of high humidity, condensation
might occur on the outer appliance sur-
face. No malfunction!
NOTE:
NOTE:
NOTE:NOTE:
If a problem still persists after following the steps
above, contact your trader or an authorized technician.
Technical Data
Technical Data
Technical DataTechnical Data
Electrical conn
Electrical conneeeecccction………………...…………………..
Electrical connElectrical conn
tion………………...…………………..
tion………………...…………………..tion………………...…………………..
Mains voltage: …………………………......….220-240 V~
Mains frequency: …………………………………….50 Hz
Power consumption: ……………………….…….…..70 W
Dimension H x W x D / Weight…..…...………………..
Dimension H x W x D / Weight…..…...………………..
Dimension H x W x D / Weight…..…...………………..Dimension H x W x D / Weight…..…...………………..
Appliance size: ……..….……….…51.0 x 43.9 x 47.0 cm
Net weight: …………………………..……approx. 14.0 kg
The right to make technical and design modifications
in the course of continuous product development
remains reserved.
Disposal
Disposal
DisposalDisposal
Meaning of the “Dustbin” Symbol
Meaning of the “Dustbin” Symbol
Meaning of the “Dustbin” SymbolMeaning of the “Dustbin” Symbol
Protect our environment; do not dispose of electrical
equipment in the domestic waste.
Please return any electrical equipment that you will
no longer use to the collection points provided for
their disposal.
This helps avoid the potential effects of incorrect
disposal on the environment and human health.
This will contribute to the recycling and other forms of
reutilization of electrical and electronic equipment.
Information concerning where these can be disposed
of can be obtained from your local authority.
WARNING:
WARNING:
WARNING:WARNING:
Remove or disable any existing snap and bolt locks,
if you take the unit out of operation or dispose it.
20
Page 21

Product data sheet for household refriger
Product data sheet for household refrigeraaaators/freezers a
Product data sheet for household refrigerProduct data sheet for household refriger
Brand
Brand
BrandBrand
Model
Model
ModelModel
1)
1)
Category
Category
CategoryCategory
1)1)
Energy Efficiency class2)
tors/freezers according to regulation (EU) No. 1060/2010
tors/freezers ators/freezers a
ccording to regulation (EU) No. 1060/2010
ccording to regulation (EU) No. 1060/2010ccording to regulation (EU) No. 1060/2010
BOMANN
BOMANN
BOMANNBOMANN
KB 389
KB 389
KB 389KB 389
3333
A++
Annual Energy consumption3) kWh/a 84
Net capacity cooling total l 42
- thereof cold storage compartment
- thereof wine storage compartment
- thereof cellar compartment
l -
l -
l -
- thereof storage compartment for fresh-food l 42
Net capacity freezing total l Star rating4)
Design temperature of other compartments °C Coldest storage temperature of wine storage compartment °C Frost-free
Temperature rise time h Freezing capacity kg/24h Climate class5)
N/ST/T
Noise emission dB(A) re1 pW 43
Built-in
Wine storage appliance
1) 1Category: 1 = Refrigerator with one or more fresh-food storage compartments, 2 = Refrigerator-cellar, Cellar and Wine storage appliances, 3 = Refrigera-
tor-chiller and Refrigerator with a 0-star compartment, 4 = Refrigerator with a one-star compartment, 5 = Refrigerator with a two-star compartment, 6 = Refrigerator with a three-star compartment, 7 = Refrigerator-freezer, 8 = Upright freezer, 9 = Chest freezer, 10 = Multi-use and other refrigerating appliances
2) A+++ (highest efficiency) to G (lowest efficiency)
3) Annual energy consumption „XYZ” kWh per year based on standard test results for 24 h. Actual energy consumption will depend on how the appliance is
used and where is located.
4) * = compartment: a frozen-food storage compartment in which the temperature is not warmer than -6°C
** = compartment: a frozen-food storage compartment in which the temperature is not warmer than -12°C
*** = compartment: a frozen-food storage compartment in which the temperature is not warmer than -18°C
*(***) = food freezer compartment in which the temperature is not warmer than -18°C and a min. freezing capacity in 24 h
5) Climate class SN: ambient temperature of +10°C up to +32°C
Climate class N: ambient temperature of +16°C up to +32°C
Climate class ST: ambient temperature of +16°C up to +38°C
Climate class T: ambient temperature of +16°C up to +43°C
-
-
This appliance has been tested according to all relevant current CE guidelines, such as electromagnetic compatibility and low voltage directives, and has been constructed in accordance with the latest safety regulations.
21
Page 22
ČČČČESKY
ESKY
ESKYESKY
Úvod
Úvod
ÚvodÚvod
Děkujeme Vám za výběr našeho výrobku. Doufáme,
že budete s jeho používáním spokojeni.
Symboly v tomto návodu k ob
Symboly v tomto návodu k obsluze
Symboly v tomto návodu k obSymboly v tomto návodu k ob
sluze
sluzesluze
Důležité informace týkající se vaší bezpečnosti jsou
vyznačeny zvlášť. Abyste předešli nehodám a
zabránili poškození přístroje, je nezbytné postupovat
podle těchto pokynů.
VÝSTRAHA:
VÝSTRAHA:
VÝSTRAHA:VÝSTRAHA:
Vás varuje před nebezpečím pro vaše zdraví a
možným nebezpečím poranění.
POZOR
POZOR::::
POZORPOZOR
Toto se týká možného nebezpečí poškození zařízení
nebo jiných předmětů.
POZNÁMKA
POZNÁMKA:
POZNÁMKAPOZNÁMKA
: Zvýrazňuje rady a informace.
: :
Obecné poznámky
Obecné poznámky
Obecné poznámkyObecné poznámky
• Zařízení je určeno výhradně pro soukromé použití
a pro zamýšlený účel. Toto zařízení není vhodné
pro komerční použití.
• Zařízení je nutno používat tak, jak je uvedeno v
tomto návodu. Nepoužívejte toto zařízení k
žádnému jinému účelu. Jakékoli jiné použití je
použití, ke kterému zařízení nebylo určeno, a
může vést k poškození nebo zranění osob.
• Nepoužívejte je venku. Zařízení nevystavujte
působení tepelných zdrojů, přímého slunečního
světla nebo vlhkosti.
• Pokud zařízení nepoužíváte, chystáte se provést
jeho údržbu nebo jej vyčistit, vždy jej nejprve
vypněte a odpojte ze sítě (vytahujte za zástrčku,
nikoliv za kabel) nebo vypojte pojistku.
• Zařízení i přívodní šňůru je nutno pravidelně
kontrolovat, zda nevykazují známky poškození.
Pokud je nalezeno poškození, zařízení se nesmí
používat.
• Z bezpečnostních důvodů je zakázáno zařízení
Před uvedením spotřebiče do provozu si nejprve
pozorně přečtěte návod k obsluze a uschovejte si ho
včetně záručního listu a dokladu o koupi. Pokud
předáte tento spotřebič třetí straně, předejte, prosím,
také tento návod.
POZNÁMKA
POZNÁMKA:
POZNÁMKAPOZNÁMKA
:
: :
Zařízení se může odlišovat od ilustrací vyobrazených
v tomto návodu k obsluze.
jakkoli upravovat.
• Aby se zajistila bezpečnost dětí, uschovejte,
prosím, všechny obaly (plastové sáčky, krabice,
polystyrén, apod.) mimo jejich dosah.
VÝSTRAHA:
VÝSTRAHA:
VÝSTRAHA:VÝSTRAHA:
Nenechávejte děti, aby si hrály s fólií. Hrozí
nebezpečí udušení!
nebezpečí udušení!
nebezpečí udušení!nebezpečí udušení!
Speciální bezpečnostní informace pro toto zařízení
Speciální bezpečnostní informace pro toto zařízení
Speciální bezpečnostní informace pro toto zařízeníSpeciální bezpečnostní informace pro toto zařízení
• Toto zařízení je navrženo pro použití v domácnosti,
- kuchyňkách pro zaměstnance nebo zákazníky penzionů či
podobných ubytovacích zařízení;
Hrozí
Hrozí Hrozí
- hosty v hotelech, motelech a jiných ubytovacích zařízeních;
22
Page 23

- v turistických ubytovnách;
- při cateringových a obdobných akcích.
VÝSTRAHA:
VÝSTRAHA:
VÝSTRAHA:VÝSTRAHA:
• Dbejte na to, aby ventilační otvory, ať už v příslušenství či vestavěných
částech, nebyly ucpány.
• Rozmrazování neurychlujte pomocí žádných mechanických nástrojů
(pokud je to nutné), s výjimkou těch, které jsou popsány v návodu (v
závislosti na modelu a obsahu balení).
• Nepoškoďte chladící obvod.
• Uvnitř zařízení nepoužívejte žádné elektrické přístroje.
• Nepoužívejte toto zařízení ke skladování výbušných látek jako jsou
aerosolové spreje s hořlavou hnací látkou.
• Toto zařízení smějí používat děti
děti od 8 let a osoby s omezenými
děti děti
tělesnými, smyslovými či mentálními schopnostmi nebo s nedostatkem
zkušeností a znalostí, pokud jsou pod dohledem osoby odpovědné za
jejich bezpečnost nebo pokud byly o použití tohoto
použití tohoto zařízení
použití tohotopoužití tohoto
zařízení touto
zařízenízařízení
osobou poučeny a uvědomují si možné nebezpečí.
• Děti
Děti si s přístrojem nesmí hrát.
DětiDěti
• Čištění a údržbu
údržbu nesmějí provádět děti
údržbuúdržbu
děti mladší 8 let a bez dozoru.
dětiděti
• Nezkoušejte opravovat spotřebič sami. Vždy se obraťte na
oprávněného technika. Abyste se nevystavovali nebezpečí, poškozený
kabel vždy nechejte vyměnit pouze u výrobce, našeho zákaznického
servisu nebo jiné kvalifikované osoby, a to kabelem stejného typu.
• K likvidaci zařízení využijte sběrných míst recyklace elektrických
přístrojů.
23
Page 24

Chladící kapalina
Chladící kapalina
Chladící kapalinaChladící kapalina
VÝSTRAHA:
VÝSTRAHA:
VÝSTRAHA:VÝSTRAHA:
V chladícím obvodu tohoto zařízení se nachází
chladící kapalina Izobutan (R600a), což je hořlavý
přírodní plyn šetrný k životnímu prostředí. Dbejte na
to, aby při přepravě a instalaci zařízení nedošlo k
poškození chladícího obvodu.
V případě poškození chladícího obvodu:
V případě poškození chladícího obvodu:
V případě poškození chladícího obvodu:V případě poškození chladícího obvodu:
• zabraňte kontaktu s otevřeným ohněm nebo
1111 Forma na led 4444 Odstranitelná drátěná
přihrádka 2222 Mrazící přihrádka
3333 Dveřní odkládací
přihrádky
Obsah balení
Obsah balení
Obsah baleníObsah balení
5555 Odkapávací přihrádka
Drátěná přihrádka, forma na led, odkapávací
přihrádka
Instalace
Instalace
InstalaceInstalace
tepelnými zdroji,
• odpojte zařízení z elektrické sítě,
• důkladně vyvětrejte místnost, ve které je zařízení
instalováno, a
• kontaktujte oprávněného technika.
Vyba
Vybalení zařízení
lení zařízení
VybaVyba
lení zařízenílení zařízení
• Vyjměte zařízení z obalu.
• Sejměte veškerý obalový materiál, jako např.
fólie, výplňový materiál a kartonové obaly.
• Aby se zabránilo riziku, zkontrolujte spotřebič, zda
nedošlo při transportu k poškození.
• V případě poškození neuvádějte zařízení do
provozu. Kontaktujte svého dodavatele.
POZNÁMKA
POZNÁMKA:
POZNÁMKAPOZNÁMKA
:
: :
Je možné, že se na zařízení usadily zbytky z výroby
nebo prach. Doporučujeme zařízení vyčistit tak, jak
je uvedeno v kapitole “Čištění a údržba”.
Příslušenství zařízení
Příslušenství zařízení
Příslušenství zařízeníPříslušenství zařízení
Podmínky pro instalaci
Podmínky pro instalaci
Podmínky pro instalaciPodmínky pro instalaci
• Okolí zařízení musí být dobře odvětráno, aby byl
umožněn nezbytný odvod tepla a bylo zajištěno
efektivní chlazení při nízké spotřebě energie.
Okolo zařízení musí být dostatečný prostor.
- Prostor okolo zadní a bočních stran musí být
alespoň 5 cm.
- Umístěte zařízení tak, aby jeho dvířka bylo
možné bez problému otevřít.
• Zařízení instalujte v prostředí, jehož teplota
odpovídá jeho klimatické třídě. Informace o
klimatické třídě naleznete v kapitole "Technické
údaje" nebo na výrobním štítku umístěném uvnitř
nebo na zadní straně zařízení.
• Zařízení umístěte na stabilní a bezpečný povrch.
Zařízení nastavte do horizontální roviny pomocí
nastavitelných nožiček.
• Zařízení neinstalujte:
Zařízení neinstalujte:
Zařízení neinstalujte:Zařízení neinstalujte:
- v blízkosti přímotopů, kamen či jiných
tepelných zdrojů, nebo na přímém slunečním
záření;
Popis zařízení
Popis zařízení
Popis zařízeníPopis zařízení
- na místech s vysokou vlhkostí (např. venku, v
koupelně), jelikož by kovové části mohly být v
takovémto prostředí vystaveny korozi;
- v blízkosti nestabilních nebo hořlavých látek
(např. plynu, topiva, lihu, barev atp.) a v
místnostech s nedostatečným odvětráním
(např. garáži).
- Zařízení nevystavujte působení vody.
24
Page 25

Elektrické zapojení
Elektrické zapojení
Elektrické zapojeníElektrické zapojení
VÝSTRAHA:
VÝSTRAHA:
VÝSTRAHA:VÝSTRAHA:
• Elektrické zapojení musí odpovídat místním
předpisům a nařízením.
• V důsledku nesprávného zapojení může dojít k
úrazu elektrickým proudem
úrazu elektrickým proudem!
úrazu elektrickým proudemúrazu elektrickým proudem
• Elektrickou zástrčku zařízení nijak neupravujte.
Pokud nelze zástrčku do zásuvky náležitě zapojit,
požádejte o instalaci odpovídající zásuvky
odpovědného odborníka.
• Pro případ potřeby nouzového odpojení zařízení z
elektrické sítě musí být zásuvka dobře přístupná.
POZOR
POZOR::::
POZORPOZOR
V případě rozpojení nebo výpadku elektrické energie:
- Před opětovným zapnutím počkejte přibližně 5
minut.
- Zkontrolujte nastavení zařízení.
• Přesvědčte se, zda napětí ve vaší síti odpovídá
technickým údajům uvedeným na zařízení.
Technické údaje jsou uvedeny na typovém štítku.
• Napájecí kabel zapojte do správně nainstalované
a uzemněné zásuvky.
• Pokud po instalaci zařízení není zástrčka dobře
přístupná, je z bezpečnostních důvodů použít
odpovídající odpojovací zařízení.
Přesazení dvířek
Přesazení dvířek
Přesazení dvířekPřesazení dvířek
V případě potřeby je možné přemístit dvířka zařízení
z pravé (při dodání) na levou stranu.
VÝSTRAHA:
VÝSTRAHA:
VÝSTRAHA:VÝSTRAHA:
Při výměně pojistky dvířek je nutno zařízení nejprve
odpojit od elektrické sítě.
POZNÁMKA
POZNÁMKA::::
POZNÁMKAPOZNÁMKA
• Požádejte o pomoc jinou osobu.
• Odstraňte záslepku (1) a kryt závěsu dvířek (2)
• Uvolněte šrouby (3) a odmontujte horní závěs
dvířek (4). Mírně dvířka pootevřete a vysuňte je
ze spodního závěsu.
• Odstraňte záslepku (9) dvířek zařízení. Opatrně
dvířka odložte.
• Naklopte zařízení mírně dozadu a zajistěte jej.
Odšroubujte nožičky (7+8).
• Uvolněte šrouby (6) a odmontujte spodní závěs
dvířek (5).
• Sejměte závěs dvířek (5) a nasaďte jej na druhou
stranu zařízení. Dle potřeby zašroubujte nožičky
(7+8).
• Vraťte zařízení do svislé polohy. Nasaďte dvířka
na čep závěsu a zajistěte je v zamýšlené pozici.
• Sejměte horní závěs dvířek (4) a nasaďte jej na
druhou stranu zařízení.
• Nasaďte záslepku (1) do protilehlého otvoru a
znovu nasaďte závěs dvířek (2), který jste prve
sundali.
• Zkontrolujte optimální horizontální a vertikální
zarovnání dvířek, aby je bylo možné snadno
otevírat a zavírat.
Spuštění / provoz
Spuštění / provoz
Spuštění / provozSpuštění / provoz
Před prvním použitím
Před prvním použitím
Před prvním použitímPřed prvním použitím
POZOR
POZOR::::
POZORPOZOR
Po přepravě by mělo být zařízení před zapojením do
•
Pravděpodobně budete potřebovat:
křížový a plochý šroubovák.
šroubový klíč,
elektrické sítě ponecháno ve svislé poloze po dobu
přibližně 4 hodin. Nedodržení tohoto pokynu může
způsobit selhání chladícího systému a poruchu
zařízení.
25
Page 26
Vyčistěte vnitřek zařízení, včetně veškerého
Potraviny vždy ukládejte zakryté nebo zabalené,
příslušenství. Dbejte prosím pokynů uvedených v
kapitole “Údržba a čištění”.
Spuštění zařízení
Spuštění zařízení
Spuštění zařízeníSpuštění zařízení
• Zapojte zařízení do zásuvky.
• Upravte nastavení teploty- Další informace
naleznete v kapitole "Nastavení".
Nastavení
Nastavení
NastaveníNastavení
Nastavení [0] znamená, že je zařízení vypnuto.
Zařízení zapnete otočením ovládání teploty z této
výchozí pozice po směru hodinových ručiček.
Jednotlivé stupně výkonu (1-7) určují stupeň vnitřní
teploty.
Nastavení 0
Nastavení 0 Nastavení 1
Nastavení 0Nastavení 0
Vypnuto Nejnižší nastavení
Nastavení 1 Nastavení 7
Nastavení 1Nastavení 1
Nastavení 7
Nastavení 7Nastavení 7
Nejvyšší
(nejvyšší vnitřní
teplota)
nastavení
(nejnižší vnitřní
teplota)
Upozorňujeme, že se vnitřní teplota mění v závislosti
čímž zabráníte jeho oschnutí nebo přenosu vůně či
chutě na jiné potraviny. Potraviny můžete zabalit
např. do
• Polyetylenového
sáčku nebo fólie
• Plastové misky s
víčkem
Doporučení
Doporučení
DoporučeníDoporučení
• Speciálních
plastových obalů s
elastickým proužkem
• Hliníkové fólie
• Lahve ukládejte do dveřní ukládací přihrádky.
• V důsledku cirkulace vzduchu se vytvářejí oblasti
s různou teplotou.
- Nejchladnější oblast se nachází v zadní dolní
části chladícího boxu. Ta je doporučena pro
skladování ryb, uzenin a masa.
- Nejteplejší oblast se nachází v horní části
chladícího boxu u dvířek. Ta je vhodná pro
skladování např. sýrů nebo másla.
• Teplé potraviny nechte nejprve vychladnout.
Mrazící přihrádka
Mrazící přihrádka
Mrazící přihrádkaMrazící přihrádka
na okolní teplotě, četnosti otevírání dvířek a množství
potravin v zařízení.
Během prvního uvedení do provozu nejprve otočte
nastavením teploty na nejvyšší stupeň, dokud se
zařízení nezahřeje na požadovanou provozní teplotu.
Následně doporučujeme změnit nastavení teploty na
střední stupeň; následná úprava teploty bude pak
jednodušší.
Skladování potravin
Skladování potravin
Skladování potravinSkladování potravin
POZNÁMKA: Doporučení!
POZNÁMKA: Doporučení!
POZNÁMKA: Doporučení!POZNÁMKA: Doporučení!
Aby byla zaručena dostatečně nízká teplota, měli
byste před prvním vložení potravin zařízení
několikrát předchladit.
POZOR
POZOR::::
POZORPOZOR
Vždy věnujte pozornost pokynům ke skladování
uvedeným na potravinovém obalu.
Mrazící přihrádka umožňuje dočasné skladování již
zmražených potravin při teplotě až -4°C. Řiďte se
také doporučenou skladovací lhůtou uvedenou na
potravinových obalech. Tato přihrádka však primárně
slouží k přípravě a skladování kostek ledu.
Provozní hlučnost
Provozní hlučnost
Provozní hlučnostProvozní hlučnost
Typ zvuku
Typ zvuku Př
Typ zvukuTyp zvuku
Příčina
íčina
PřPř
íčinaíčina
Vrnění Kompresor za chodu
Šplouchání Obíhající chladící kapalina
Cvakání Zapínání a vypínání kompresoru
ovládáním teploty
Rachocení Vibrace přihrádek nebo chladících
cívek
26
Page 27

Vypnutí
Vypnutí
VypnutíVypnutí
• Zařízení musí být před opětovným uvedením do
Zařízení vypnete nastavením přepínače teploty do
Zařízení vypnete nastavením přepínače teploty do
Zařízení vypnete nastavením přepínače teploty do Zařízení vypnete nastavením přepínače teploty do
polohy „OFF“.
polohy „OFF“.
polohy „OFF“.polohy „OFF“.
Pokud je zařízení delší dobu mimo provoz:
• Vyndejte obsah zařízení.
• Odpojte zástrčku ze zásuvky.
• Důkladně zařízení očistěte (viz. kapitola 'Čištění a
údržba').
• Dvířka zařízení nechte otevřené, aby vyvětraly
nežádoucí pachy.
Tipy na úsporu energie
Tipy na úsporu energie
Tipy na úsporu energieTipy na úsporu energie
• Pokud zařízení nepoužíváte, vypojte jej z
elektrické sítě.
• Zařízení neinstalujte v blízkosti kamen, topení
nebo jiných tepelných zdrojů. V případě vyšší
okolní teploty se kompresor bude spouštět častěji
a na delší dobu.
• Zajistěte dostatečnou cirkulaci vzduchu ve spodní
a zadní části. Nikdy nezakrývejte ventilační
otvory.
• Teplé nádobí nechte před vložením do zařízení
vychladnout.
• Nenastavujte teplotu na nižší úroveň, než je
nutné.
• Nenechávejte dvířka otevřená déle, než je nutné.
• Zařízení je nutné pravidelně odmrazovat.
• Těsnění dvířek musí být zcela nepoškozeno, aby
dvířka dobře těsnila.
provozu zcela vysušeno.
POZOR
POZOR::::
POZORPOZOR
• Nepoužívejte drátěný kartáč ani žádné jiné
abrazivní předměty.
• Nepoužívejte žádné kyselinové či abrazivní čisticí
prostředky.
• Nepoškoďte chladící obvod.
Čištění zařízení včetně jeho vnitřku
Čištění zařízení včetně jeho vnitřku
Čištění zařízení včetně jeho vnitřkuČištění zařízení včetně jeho vnitřku
• Pravidelně čistěte vnitřek přístroje, vnější
povrchy, příslušenství a těsnění dveří pomocí
teplé vody a šetrného mycího prostředku.
• Pře čištěním vyjměte obsah zařízení a uložte jej
na chladném místě.
• Po důkladném vysušení lze přístroj znovu uvézt
do provozu.
Odmrazení
Odmrazení
OdmrazeníOdmrazení
POZOR
POZOR::::
POZORPOZOR
K odstranění ledu z výparníku nikdy nepoužívejte
kovové předměty (např. nože). Mohlo by dojít k jeho
poškození.
Poškozený výparník by mohl způsobit závažné
poškození zařízení.
Za účelem dosažení lepšího chlazení a nižší
spotřeby energie doporučujeme zařízení pravidelně
rozmrazovat dle následujícího postupu:
• Před zahájením rozmrazování vypněte nastavení
teploty a vypojte zařízení z elektrické sítě.
Čištění a údržba
Čištění a údržba
Čištění a údržbaČištění a údržba
VÝSTRAHA:
VÝSTRAHA:
VÝSTRAHA:VÝSTRAHA:
• Před čištěním či údržbou vždy vypojte zařízení z
elektrické sítě.
• K čištění zařízení nepoužívejte parní čistící
přístroje; vlhkost by mohla poškodit elektrické
součásti. Nebezpečí úrazu elektrickým proudem!
Nebezpečí úrazu elektrickým proudem!
Nebezpečí úrazu elektrickým proudem!Nebezpečí úrazu elektrickým proudem!
Horká pára by mohla poškodit plastové části.
• Vyjměte potraviny a zakryté je uložte na
chladném místě.
• Po roztání ledu vytřete vnitřek do sucha.
• Poté lze zařízení znovu spustit tak, že jej zapojíte
do elektrické sítě a nastavíte požadovanou
teplotu.
27
Page 28

Odstraňování závad
Odstraňování závad
Odstraňování závadOdstraňování závad
Než budete kontaktovat autorizovaného specialistu
Než budete kontaktovat autorizovaného specialistu
Než budete kontaktovat autorizovaného specialistuNež budete kontaktovat autorizovaného specialistu
Problém
Problém Příčina / opatření
ProblémProblém
Zařízení
nefunguje
správně
nebo vůbec
Příčina / opatření
Příčina / opatřeníPříčina / opatření
- Zkontrolujte napájení.
- Zkontrolujte nastavení teploty.
- Zkontrolujte okolní teplotu.
- Uvolněte zablokované ventilační otvory
a umístěte zařízení na místo s
dostatečnou cirkulací vzduchu.
Uložené
potraviny
jsou příliš
teplé.
Vysoká
hlučnost při
- Zkontrolujte nastavení teploty.
- Nechte dvířka otevřená po nezbytně
dlouhou dobu.
- Zkontrolujte umístění.
- Zkontrolujte pozici zařízení.
- Viz. kapitola "Provozní hlučnost".
provozu.
Voda na
Zkontrolujte nastavení teploty.
spodní části
zařízení.
Voda na
vnějším
povrchu.
POZNÁMKA:
POZNÁMKA:
POZNÁMKA:POZNÁMKA:
Ve dnech s vysokou vlhkostí může
docházet ke srážení výparů na vnějších
površích zařízení. Nejedná se o závadu!
Pokud problém přetrvává i po provedení výše
uvedených pokynů, kontaktujte svého dodavatele
nebo autorizovaného technika.
Likvidace
Likvidace
LikvidaceLikvidace
Význam symbolu “odpadkového koše”
Význam symbolu “odpadkového koše”
Význam symbolu “odpadkového koše”Význam symbolu “odpadkového koše”
Pečujte o naše životní prostředí: nelikvidujte
elektrické přístroje společně s domácím odpadem.
Vraťte, prosím, jakýkoliv elektrický spotřebič, který již
nebudete používat, do sběren, které se zabývají
jejich likvidací.
Pomůžete tím zabránit negativním vlivům nesprávné
likvidace na životní prostředí a lidské zdraví.
Přispějete k recyklaci a ostatních formám
opětovného použití elektrických a elektronických
zařízení.
Informace týkající se míst, kde lze taková zařízení
zlikvidovat, lze získat na místním úřadě.
VÝSTRAHA:
VÝSTRAHA:
VÝSTRAHA:VÝSTRAHA:
Pokud zařízení vyřazujete z provozu nebo jej hodláte
nechat zlikvidovat, odstraňte veškeré západky a
zámky šroubů.
Technické údaje
Technické údaje
Technické údajeTechnické údaje
Elektrické zapojení………………...…………
Elektrické zapojení………………...…………...
Elektrické zapojení………………...…………Elektrické zapojení………………...…………
...………..
………..
......
………..………..
Síťové napětí: …………………………......….220-240 V~
Síťová frekvence: …………………………………....50 Hz
Spotřeba elektrické energie: ……………………......70 W
Rozměry V x Š x H / hmotnost…..…...………………..
Rozměry V x Š x H / hmotnost…..…...………………..
Rozměry V x Š x H / hmotnost…..…...………………..Rozměry V x Š x H / hmotnost…..…...………………..
Rozměry zařízení: ……..….…...…51,0 x 43,9 x 47,0 cm
Čistá hmotnost: …………………...……….…cca. 14,0 kg
Právo provádět v průběhu neustálého vývoje produktu
technické změny a změny designu zůstává i nadále
vyhrazeno.
28
Page 29
Bezpečnostní
Bezpečnostní list pro domácí chladničky/mrazničky v souladu s nařízením (EU) č. 1060/2010
BezpečnostníBezpečnostní
Značka
Značka
ZnačkaZnačka
Model
Model
ModelModel
Kategorie
Kategorie
KategorieKategorie
Tříde energetické účinnosti2)
list pro domácí chladničky/mrazničky v souladu s nařízením (EU) č. 1060/2010
list pro domácí chladničky/mrazničky v souladu s nařízením (EU) č. 1060/2010list pro domácí chladničky/mrazničky v souladu s nařízením (EU) č. 1060/2010
1)
1)
1)1)
BOMANN
BOMANN
BOMANNBOMANN
KB 389
KB 389
KB 389KB 389
3333
A++
Roční spotřeba energie3) kWh/a 84
Celková čistá chladící kapacita l 42
- z toho chladící oddělení
- z toho oddělení pro skladování vína
- z toho vrchní oddělení
l -
l -
l -
- z toho oddělení pro skladování čerstvých potravin l 42
Celková čistá mrazící kapacita l Hvězdičkové hodnocení4)
Teplota ostatních oddělení °C Nejnižší teplota oddělení pro skladování vína °C Beznámrazový
Čas nárůstu teploty h Mrazící kapacita kg/24h Klimatická třída5)
N/ST/T
Hlučnost dB(A) re1 pW 43
Zabudováno
Zařízení pro skladování vína
5) 1Kategorie: 1 = Chladnička s jedním či více odděleními na skladování čerstvých potravin, 2 = Horní mrazící box, horní box a oddělení na skladování vína,
3 = Chladnička a lednička s oddělením bez hvězdiček, 4 = Chladnička s oddělením s jednou hvězdičkou, 5 = Chladnička s oddělením se dvěma
hvězdičkami, 6 = Chladnička s oddělením se třemi hvězdičkami, 7 = Chladnička-mraznička, 8 = Stojací mraznička, 9 = Pultový mrazák, 10 = Víceúčelová a
jiná chladící zařízení
6) A+++ (nejvyšší efektivita) až G (nejnižší efektivita)
7) Roční spotřeba energie „XYZ” kWh na základě výsledků standardních testů za 24 h. Aktuální spotřeba energie bude záviset na použití a umístění zařízení.
8) * = oddělení pro skladování zmrazených potravin, ve kterém není teplota vyšší než -6°C
** = oddělení pro skladování zmrazených potravin, ve kterém není teplota vyšší než -12°C
*** = oddělení pro skladování zmrazených potravin, ve kterém není teplota vyšší než -18°C
*(***) = mrazící box, ve kterém není teplota vyšší než -18°C a jehož minimální kapacita mrazení je 24 h.
5) Klimatická třída SN: okolní teplota v rozmezí +10°C až +32°C
Klimatická třída N: okolní teplota v rozmezí +16°C až +32°C
Klimatická třída ST: okolní teplota v rozmezí +16°C až +38°C
Klimatická třída T: okolní teplota v rozmezí +16°C až +43°C
-
-
Toto zařízení bylo testováno v souladu se všemi příslušnými současnými směrnicemi ES, jako jsou
elektromagnetická kompatibilita a směrnice o nízkém napětí, a je vyrobeno podle nejnovějších
bezpečnostních nařízení.
29
Page 30

NEDERLANDS
NEDERLANDS
NEDERLANDSNEDERLANDS
Inleiding
Inleiding
InleidingInleiding
Bedankt voor het kiezen van ons product. We hopen
dat u veel plezier aan het gebruik van het apparaat
zult beleven.
Symbolen in deze gebruiksaanwijzing
Symbolen in deze gebruiksaanwijzing
Symbolen in deze gebruiksaanwijzingSymbolen in deze gebruiksaanwijzing
Belangrijke aanwijzingen voor uw veiligheid zijn
speciaal gekenmerkt. Neem deze aanwijzingen strikt
in acht om ongevallen en schade aan het apparaat te
vermijden.
WAARSCHUWING:
WAARSCHUWING:
WAARSCHUWING:WAARSCHUWING:
Dit apparaat is niet geschikt voor commercieel
gebruik.
• Dit apparaat mag alleen gebruikt worden zoals
beschreven in de handleiding. Gebruik het
apparaat niet voor andere doeleinden. Elk ander
gebruik is niet bedoeld en kan tot schade of
persoonlijk letsel leiden.
• Gebruik het apparaat niet buitenshuis. Houd het
uit de buurt van warmtebronnen, direct zonlicht en
vochtigheid.
• Wanneer niet in gebruik, voor het reinigen,
onderhoudswerkzaamheden door de gebruiker of
Dit waarschuwt u voor gevaren voor uw gezondheid
en geeft mogelijke letselrisico's aan.
LET OP:
LET OP:
LET OP:LET OP:
Dit verwijst naar mogelijke gevaren voor het apparaat
of andere objecten.
OPMERKING
OPMERKING:::: Dit markeert tips en informatie.
OPMERKINGOPMERKING
Algemene opmerkingen
Algemene opmerkingen
Algemene opmerkingenAlgemene opmerkingen
Lees de gebruiksaanwijzing zorgvuldig door alvorens
het apparaat in werking te stellen en bewaar de
instructies inclusief de garantie en het
aankoopbewijs. Als u dit apparaat aan derden
doorgeeft, geef ook de gebruiksaanwijzing door.
OPMERKING
OPMERKING::::
OPMERKINGOPMERKING
De afbeeldingen in deze handleiding kunnen ietwat
afwijken van het daadwerkelijke product.
• Gebruik het apparaat uitsluitend privé en
uitsluitend voor de voorgeschreven toepassing.
tijdens storing, schakel het apparaat uit en trek de
stekker (trek aan de stekker zelf, niet aan het
snoer) uit het stopcontact of verwijder de
zekering.
• Het apparaat en, indien mogelijk, het netsnoer
moeten regelmatig op tekenen van schade
worden gecontroleerd. Als schade wordt
geconstateerd mag het apparaat niet worden
gebruikt.
• Om veiligheidsredenen zijn aanpassingen of
wijzigingen van het apparaat verboden.
• Met het oog op de veiligheid van uw kinderen,
houd alle verpakkingen (plastic zakken, dozen,
polystyreen enz.) buiten hun bereik.
WAARSCHUWING:
WAARSCHUWING:
WAARSCHUWING:WAARSCHUWING:
Laat kleine kinderen niet met de folie spelen. Er
bestaat verstikkingsgevaar!
verstikkingsgevaar!
verstikkingsgevaar!verstikkingsgevaar!
Bijzondere veiligheidsinstructies voor dit apparaat
Bijzondere veiligheidsinstructies voor dit apparaat
Bijzondere veiligheidsinstructies voor dit apparaatBijzondere veiligheidsinstructies voor dit apparaat
• Dit apparaat is bedoeld om in huishoudelijke en soortgelijke
toepassingen te worden gebruikt zoals
- personeelkeukens in winkels, kantoren en andere werkplekken;
30
Page 31

- woonboerderijen en door klanten in hotels, motels en andere type
residentiële omgevingen;
- bed & breakfast gelegenheden;
- catering en soortgelijke niet-commerciële toepassingen.
WAARSCHUWING:
WAARSCHUWING:
WAARSCHUWING:WAARSCHUWING:
• Voorkom dat de ventilatie-openingen in het apparaat of binnenkant
geblokkeerd worden.
• Gebruik geen mechanische apparaten of andere middelen om het
ontdooiproces (indien nodig) te versnellen, behalve die in deze
handleiding (afhankelijk van het model inclusief de leveringsomvang)
zijn beschreven.
• Voorkom dat het koelcircuit wordt beschadigd.
• Gebruik geen enkel elektrisch apparaat binnenin het product.
• Bewaar geen explosieve stoffen zoals spuitbussen met ontvlambaar
drijfgas in het apparaat.
• Mits onder toezicht of geïnstrumenteerd over de risico’s en het veil
gebruik
gebruik kan dit apparaat worden gebruikt door kinderen
gebruikgebruik
kinderen vanaf 8 jaar en
kinderen kinderen
veilig
ig
veilveil
ig ig
door personen met verminderde lichamelijke, zintuiglijke of geestelijke
vermogens of onvoldoende ervaring en kennis,
• Kinderen
Kinderen mogen niet met het apparaat spelen.
KinderenKinderen
• Reiniging en onderho
onderhoud door de gebruiker
onderhoonderho
ud door de gebruiker mogen niet door kinderen
ud door de gebruikerud door de gebruiker
kinderen
kinderenkinderen
worden verricht, tenzij ze ouder dan 8 jaar zijn en begeleid worden.
• Probeer het apparaat niet zelf te repareren. Neem altijd contact op met
een erkende monteur. Om blootstelling aan gevaar te voorkomen, laat
een defecte kabel altijd alleen door de fabrikant, door onze
31
Page 32

klantendienst of door een gekwalificeerd persoon met hetzelfde type
kabel vervangen.
• Gebruik de beschikbare inzamelpunten voor elektrische apparatuur
voor de verwijdering van het apparaat.
Koelv
Koelvloeistof
loeistof
KoelvKoelv
loeistofloeistof
WAARSCHUWING:
WAARSCHUWING:
WAARSCHUWING:WAARSCHUWING:
Het koelcircuit van dit apparaat bevat het koelmiddel
isobutaan (R600a), een natuurlijk gas dat brandbaar
en zeer milieuvriendelijk is. Zorg ervoor dat geen
enkel deel van het koelcircuit beschadigd raakt
tijdens het transport en de installatie van het
Overzicht van het apparaat
Overzicht van het apparaat
Overzicht van het apparaatOverzicht van het apparaat
Onderdelen van het app
Onderdelen van het apparaat
Onderdelen van het appOnderdelen van het app
araat
araataraat
apparaat.
Als het koelcircuit beschadigd is:
Als het koelcircuit beschadigd is:
Als het koelcircuit beschadigd is:Als het koelcircuit beschadigd is:
• vermijd eventuele open vlammen of
ontstekingsbronnen,
• haal de stekker uit het stopcontact,
• ventileer de ruimte grondig waarin het apparaat
zich bevindt.
• neem contact op met een erkende technicus.
Het apparaat uitpakken
Het apparaat uitpakken
Het apparaat uitpakkenHet apparaat uitpakken
• Haal het apparaat uit de verpakking.
• Verwijder alle verpakkingsmaterialen zoals folies,
vulmaterialen en kartonverpakking.
• Controleer het apparaat op transportschade om
mogelijk gevaar te voorkomen.
• In geval van schade, zet het apparaat niet aan.
Neem contact op met uw distributeur.
OPMERKING
OPMERKING::::
OPMERKINGOPMERKING
Er is eventueel wat productieresidu of stof op het
apparaat te vinden. We raden aan om het apparaat
te reinigen volgens hoofdstuk “Reiniging en
onderhoud”.
1111 Lade voor ijsklontjes 4444 Afneembare
3333 Opslagrekken deur 5555 Wateropvangbak
Leveringsomvang
Leveringsomvang
LeveringsomvangLeveringsomvang
roosterschap 2222 Ijscompartiment
Roosterschap, lade voor ijsklontjes, wateropvangbak
Installatie
Installatie
InstallatieInstallatie
Voorwaarden voor de ins
Voorwaarden voor de installatielocatie
Voorwaarden voor de insVoorwaarden voor de ins
tallatielocatie
tallatielocatietallatielocatie
• Voldoende ventilatie rondom het apparaat is
noodzakelijk om hitte af te voeren en efficiënte
koeling te verzekeren bij laag stroomverbruik.
Voldoende speling is noodzakelijk.
- Speling aan de achterzijde en zijwanden elk
ca. 5 cm:
- Plaats het apparaat zodanig dat de deur ervan
ongehinderd kan openen.
• Installeer alleen op een plaats met een
omgevingstemperatuur die geschikt is voor de
klimaatklasse van het apparaat. Raadpleeg het
hoofdstuk "Technische gegevens" of het
vermogenslabel aan de binnenkant of de
32
Page 33

achterkant van het apparaat voor informatie over
• Controleer of de elektrische specificaties van uw
de klimaatklasse.
• Plaats het apparaat alleen op een stabiele en
veilige ondergrond. Als het apparaat niet
horizontaal staat, verstel de poten
dienovereenkomstig.
• Vermijd de installatie:
Vermijd de installatie:
Vermijd de installatie:Vermijd de installatie:
- in de buurt van verwarmingstoestellen, naast
een oven, in direct zonlicht of in de buurt van
andere warmtebronnen;
- op locaties met een hoge vochtigheidsgraad
(bijvoorbeeld buitenshuis, badkamer), omdat
metalen onderdelen onder dergelijke
omstandigheden gevoelig zijn voor corrosie.
- in de buurt van vluchtige of ontvlambare
stoffen (bijvoorbeeld gas, brandstof, alcohol,
verf, enz.) of in ruimtes met slechte
luchtcirculatie (bijvoorbeeld garages).
- Stel het apparaat niet bloot aan slecht weer.
Elektrische aansluiting
Elektrische aansluiting
Elektrische aansluitingElektrische aansluiting
WAARSCHUWING:
WAARSCHUWING:
WAARSCHUWING:WAARSCHUWING:
• De installatie op het lichtnet moet aan de lokale
normen en voorschriften voldoen.
stroomvoorziening overeenkomen met de
specificaties van het apparaat. De specificaties
staan op het typeplaatje vermeld.
• Steek de stekker in een correct geïnstalleerd en
geaard stopcontact.
• Als de stekker na installatie niet toegankelijk is,
dan moet er een overeenkomstige
ontkoppeleenheid beschikbaar zijn om te voldoen
aan de relevante veiligheidsvoorschriften.
De openi
De openingsrichting van de deur omkeren
De openiDe openi
ngsrichting van de deur omkeren
ngsrichting van de deur omkerenngsrichting van de deur omkeren
Indien nodig, kan de openingsrichting van de deur
van rechts (geleverde situatie) naar links worden
veranderd.
WAARSCHUWING:
WAARSCHUWING:
WAARSCHUWING:WAARSCHUWING:
Bij het terugplaatsen van de deurvanger, moet het
apparaat eerst van het lichtnet worden losgekoppeld.
OPMERKING
OPMERKING::::
OPMERKINGOPMERKING
• Vraag iemand anders om assistentie.
•
U hebt het volgende eventueel nodig:
imbussleutel, Philips schroevendraaier en tevens
een dunne schroevendraaier.
• Een verkeerde aansluiting kan tot een elektrische
schok
schok leiden!
schokschok
elektrische
elektrische elektrische
• Pas de stekker van het apparaat niet aan. Als de
stekker niet goed op het stopcontact past, laat
een gekwalificeerde elektricien een goed
stopcontact installeren.
• De bereikbaarheid van de stekker moet worden
verzekerd om in een noodgeval het toestel van
het stopcontact los te koppelen.
LET OP:
LET OP:
LET OP:LET OP:
In het geval van loskoppeling of stroomuitval:
- Wacht 5 minuten voordat u het apparaat opnieuw
opstart.
- Controleer de gebruiksinstellingen.
• Verwijder de blinde dop (1) en scharniercover (2).
• Demonteer het bovenste deurscharnier (4) door
de schroeven (3) los te draaien. Open de deur
van het apparaat een beetje en til het onderste
deurscharnier er uit.
• Verplaats de blinde stop (9) van de deur van het
apparaat dienovereenkomstig. Houd de deur van
het apparaat veilig terzijde.
33
Page 34

• Kantel het apparaat ietwat naar achteren en zet
Instellingen
Instellingen
InstellingenInstellingen
het in deze positie vast. Draai de voetstukken
(7+8) los.
• Demonteer het onderste deurscharnier (5) door
de schroeven (6) los te draaien.
• Verplaats en bevestig het deurscharnier (5) op de
tegenovergestelde zijde van het apparaat. Draai
de voetstukken (7+8) dienovereenkomstig in.
• Zet het apparaat weer rechtop. Plaats de deur
van het apparaat op de scharnierpin en bevestig
deze in zijn bestemde positie.
• Verplaats en bevestig het bovenste deurscharnier
(4) op de tegenoverliggende zijde van het
apparaat.
• Steek de blinde dop (1) in het tegenovergestelde
gat en zet de scharniercover (2), die u in het
begin had verwijdert, weer op zijn plek.
• Zorg ervoor dat de deur verticaal en horizontaal is
uitgelijnd, zodat het soepel openen en sluiten van
de deur gegarandeerd is.
Opstarten / Bediening
Opstarten / Bediening
Opstarten / BedieningOpstarten / Bediening
Instelling [0] betekent dat het apparaat is
uitgeschakeld. Draai de temperatuurregeling
rechtsom; het apparaat zal vanaf deze instelling
automatisch inschakelen.
De vermogenniveaus [1-7] regelen de verschillende
waarden van de interne temperatuur.
Instelling 0
Instelling 0 Instelling 1
Instelling 0Instelling 0
Uitgeschakelde status
Instelling 1 Instelling 7
Instelling 1Instelling 1
Laagste instelling
(hoogste binnentemperatuur)
Instelling 7
Instelling 7Instelling 7
Hoogste instelling
(laagste binnentemperatuur)
Houd er rekening mee dat de temperatuur zal
veranderen afhankelijk van de
omgevingstemperatuur, hoe vaak de deur wordt
geopend en hoeveel voedsel het apparaat bevat.
Draai de temperatuurregeling tijdens het
aanvankelijke gebruik eerst naar de hoogste
instelling totdat het apparaat de gewenste
gebruikstemperatuur heeft bereikt. Wij raden u aan
de temperatuurregeling hierna terug te draaien naar
een gemiddelde instelling; de temperatuur kan dan
op een later moment eenvoudiger worden
Voorafgaand aan het eerste gebruik
Voorafgaand aan het eerste gebruik
Voorafgaand aan het eerste gebruikVoorafgaand aan het eerste gebruik
LET OP:
LET OP:
LET OP:LET OP:
Na transport moet het apparaat voor ongeveer 4 uur
rechtop staand worden gelaten voordat u het op het
stopcontact aansluit. Het niet in acht nemen kan tot
storing van het koelsysteem en defect raken van het
apparaat leiden.
Reinig de binnenzijde van het apparaat, inclusief alle
accessoires. Raadpleeg de instructies die wij in het
hoofdstuk “Reiniging en onderhoud” hebben
opgenomen.
Het
Het apparaat starten
apparaat starten
Het Het
apparaat startenapparaat starten
• Sluit het apparaat aan op het stopcontact.
• Stel de temperatuurregeling in. Zie ook de
volgende sectie "Instellingen".
gecorrigeerd.
Voedsel opbergen
Voedsel opbergen
Voedsel opbergenVoedsel opbergen
OPMERKING: Aanbeveling!
OPMERKING: Aanbeveling!
OPMERKING: Aanbeveling!OPMERKING: Aanbeveling!
Om ervoor te zorgen dat de temperatuur laag
genoeg is, dient u het apparaat enkele keren vooraf
te koelen voordat u er voedsel in opbergt.
LET OP:
LET OP:
LET OP:LET OP:
Let altijd goed op de opslaginstructies op de
voedselverpakking.
Berg voedsel altijd afgedekt of verpakt op, om
uitdroging en overdracht van luchtjes of smaak naar
ander voedsel te voorkomen. U kunt het voedsel
verpakken met bijv.
34
Page 35

• Polyethyleen plastic
• Speciale plastic
• Verwijder de inhoud uit het apparaat.
zakjes of folie
• Plastic container met
deksel
Aanbevelingen
Aanbevelingen
AanbevelingenAanbevelingen
covers met
elastiekstrip
• Aluminium folie
• Plaats flessen in het opslagrek in de deur.
• Er treden verschillende klimaatzones op door de
luchtcirculatie.
- De koudste zone zit aan de achterzijde en in
het lagere koelkastgedeelte. Aanbevolen voor
het opbergen van etenswaar zoals vis, worst
en vlees.
- De warmste zone zit bij de deur en in het
bovenste koelkastgedeelte. Aanbevolen voor
het opbergen van bijv. kaas en boter.
• Laat warm voedsel eerst afkoelen.
Ij
Ijscompa
scompartiment
IjIj
scompascompa
rtiment
rtimentrtiment
U kunt in het ijscompartiment reeds bevroren voedsel
tijdelijk opbergen op een temperatuur van tot op 4°C. Let bovendien op de aanbevolen opslagtijden
op de voedselverpakking. Het is echter specifiek
bestemd voor de bereiding en opslag van ijsklontjes.
• Zonodig de stekker uit het stopcontact halen.
• Reinig het apparaat grondig (zie “Reiniging en
onderhoud”).
• Laat de deur van het apparaat open om
onaangename geuren te voorkomen.
Tips voor energiebesparing
Tips voor energiebesparing
Tips voor energiebesparingTips voor energiebesparing
• Koppel het apparaat los van de voeding wanneer
niet in gebruik.
• Installeer het apparaat niet in de buurt van
fornuizen, verwarming of andere warmtebronnen.
Bij hoge omgevingstemperaturen zal de ventilator
vaker en langer draaien.
• Zorg voor voldoende ventilatie aan de onder- en
achterkant van het apparaat. Blokkeer nooit de
ventilatieopeningen.
• Laat warme gerechten afkoelen voordat u deze in
het apparaat plaatst.
• Stel de temperatuur niet lager in dan
noodzakelijk.
• Open de deur niet langer dan nodig is.
• Het apparaat dient regelmatig te worden
ontdooid.
Lawaai tijdens gebruik
Lawaai tijdens gebruik
Lawaai tijdens gebruikLawaai tijdens gebruik
Type geluid
Type geluid Mogelijke oorzaken
Type geluidType geluid
Gemompel Compressor in werking
Vloeistofgeluiden Circulatie van het koelmiddel
Klikgeluiden De temperatuurregeling schakelt
Storend lawaai Vibratie van de schappen of
Uitschakelen
Uitschakelen
UitschakelenUitschakelen
Draai de temperatuurregeling naar de
Draai de temperatuurregeling naar de
Draai de temperatuurregeling naar de Draai de temperatuurregeling naar de
uitgeschakelde stand om het apparaat uit te
uitgeschakelde stand om het apparaat uit te
uitgeschakelde stand om het apparaat uit te uitgeschakelde stand om het apparaat uit te
schakelen.
schakelen.
schakelen.schakelen.
Mogelijke oorzaken
Mogelijke oorzakenMogelijke oorzaken
de compressor in of uit.
koelspoelen
Wanneer het apparaat voor lange periodes niet wordt
gebruikt:
• De afdichting van de deur moet volledig intact
zijn, zodat de deur goed sluit.
Reinigen en onderhoud
Reinigen en onderhoud
Reinigen en onderhoudReinigen en onderhoud
WAARSCHUWING:
WAARSCHUWING:
WAARSCHUWING:WAARSCHUWING:
• Het apparaat altijd loskoppelen van de voeding
voorafgaand aan reiniging en
gebruikersonderhoud.
• Gebruik geen stoomreinigers om het apparaat te
reinigen. vocht kan bij de elektrische
componenten terechtkomen. Risico van een
elektrische schok!
elektrische schok! Hete stoom kan de plastic
elektrische schok!elektrische schok!
Risico van een
Risico van een Risico van een
onderdelen beschadigen.
• Het apparaat moet droog zijn voordat u het
opnieuw inschakelt.
35
Page 36

LET OP:
LET OP:
LET OP:LET OP:
• Gebruik geen draadborstels of andere scherpe,
schurende materialen.
• Gebruik geen scherpe of schurende
reinigingsmiddelen
• Voorkom dat het koelcircuit wordt beschadigd.
Reinig het apparaat en het interieur regelmatig
Reinig het apparaat en het interieur regelmatig
Reinig het apparaat en het interieur regelmatigReinig het apparaat en het interieur regelmatig
• Reinig het interieur van het apparaat, de
buitenoppervlaktes, de accessoires en de
deurverzegeling regelmatig met warm water en
een mild afwasmiddel.
• Verwijder hiertoe de inhoud van het apparaat en
bewaar het op een koele plaats.
• Nadat alles grondig gedroogd is, kunt u het
apparaat opnieuw inschakelen.
Ontdooien
Ontdooien
OntdooienOntdooien
LET OP:
LET OP:
LET OP:LET OP:
Gebruik nooit metalen voorwerpen (bijv. messen) om
ijs uit de verdamper te verwijderen. Dit kan anders tot
beschadiging leiden. Een defecte verdamper kan
ernstige schade veroorzaken.
Voor een betere koeling en energiebesparing,
ontdooi het apparaat regelmatig als volgt:
• Om het ontdooiproces te starten, draai de
Probleemoplossing
Probleemoplossing
ProbleemoplossingProbleemoplossing
Voordat u contact opneemt met een geautoriseerde
Voordat u contact opneemt met een geautoriseerde
Voordat u contact opneemt met een geautoriseerde Voordat u contact opneemt met een geautoriseerde
specialist
specialist
specialistspecialist
Probleem
Probleem Oorzaak / Actie
ProbleemProbleem
Het apparaat
werkt niet
goed of
helemaal
niet
Het
opgeborgen
voedsel is te
warm
Hard geluid
tijdens
gebruik
Water op de
bodem van
het apparaat
Water aan
de buitenkant
OPMERKING:
OPMERKING:
OPMERKING:OPMERKING:
Oorzaak / Actie
Oorzaak / ActieOorzaak / Actie
- Controleer de voeding.
- Controleer de temperatuurinstelling.
- Controleer de omgevingstemperatuur.
- Reinig de ventilatieopeningen, zorg
voor voldoen ruimte rondom het
apparaat.
- Controleer de temperatuurinstelling.
- Open de deur alleen zo lang als nodig
is.
- Controleer de locatie.
- Controleer de positie van het apparaat.
- Zie het hoofdstuk “Lawaai tijdens
gebruik”.
Controleer de temperatuurinstelling.
Op dagen met hoge vochtigheid kan
condensatie optreden op de buitenkant
van het apparaat. Geen storing!
Als een probleem na het volgen van de
bovenstaande stappen blijft bestaan, neem contact
op met uw verkoper of een erkende technicus.
temperatuurregeling naar de uitgeschakelde
stand en koppel het apparaat los van de voeding.
• Verwijder het voedsel en bewaar het op een koele
plek.
• Wanneer het ijs is gesmolten, veeg de
condensatie weg en droog het interieur van het
apparaat.
• U kunt het apparaat vervolgens weer starten door
de stekker aan te sluiten en de
temperatuurregeling te draaien.
Technische gegevens
Technische gegevens
Technische gegevensTechnische gegevens
Elektrische aansluiting………………...………………..
Elektrische aansluiting………………...………………..
Elektrische aansluiting………………...………………..Elektrische aansluiting………………...………………..
Netspanning: …………………………......….220-240 V~
Netfrequentie: ……………………………………......50 Hz
Stroomverbruik: ……………………….…….….........70 W
Afmetingen H x B x D / Gewicht…..…...…………
Afmetingen H x B x D / Gewicht…..…...……………………..
Afmetingen H x B x D / Gewicht…..…...…………Afmetingen H x B x D / Gewicht…..…...…………
Apparaatafmeting: ……..……….…51,0 x 43,9 x 47,0 cm
Netto gewicht: …………………..………..……ca. 14,0 kg
Wij behouden ons het recht voor om in de loop van
onze voortdurende productontwikkeling, technische
en ontwerpwijzigingen aan te brengen.
36
....
....
..
....
Page 37
Verwijdering
Verwijdering
VerwijderingVerwijdering
Bete
Betekenis van het symbool “Vuilnisbak”
kenis van het symbool “Vuilnisbak”
BeteBete
kenis van het symbool “Vuilnisbak”kenis van het symbool “Vuilnisbak”
Bescherm het milieu; gooi geen elektrische
apparatuur in het huishoudelijk afval weg.
Maak voor het afvoeren van elektrische apparaten
gebruik van de voorgeschreven verzamelpunten en
geef daar de elektrische apparaten af die u niet meer
gebruikt.
Daardoor helpt u de potentiële effecten te voorkomen
die een verkeerde afvoer op het milieu en de
menselijke gezondheid kunnen hebben.
Dit zal bijdragen aan de recycling en andere vormen
van hergebruik van elektrische en elektronische
apparatuur.
Informatie over waar de apparatuur kan worden
afgevoerd kan bij uw gemeente worden verkregen.
WAARSCHUWING:
WAARSCHUWING:
WAARSCHUWING:WAARSCHUWING:
Verwijder of stel bestaande snel- en
boutvergrendelingen buiten werking, als u het toestel
buiten bedrijf stelt of het afvoert.
37
Page 38

Overzicht van productgegevens voor huishoudelijke koelkasten/vrieskisten volgens EU
Overzicht van productgegevens voor huishoudelijke koelkasten/vrieskisten volgens EU----richtlijn nr. 1060/2010
Overzicht van productgegevens voor huishoudelijke koelkasten/vrieskisten volgens EUOverzicht van productgegevens voor huishoudelijke koelkasten/vrieskisten volgens EU
Merk
Merk
MerkMerk
Model
Model
ModelModel
1)
1)
Categorie
Categorie
CategorieCategorie
1)1)
Energie-efficiëntieklasse2)
Jaarlijks energieverbruik
3)
kWh/a 84
richtlijn nr. 1060/2010
richtlijn nr. 1060/2010richtlijn nr. 1060/2010
BOMANN
BOMANN
BOMANNBOMANN
KB 389
KB 389
KB 389KB 389
3333
A++
Nettocapaciteit koeling totaal l 42
- waarvan compartiment voor koude-opslag
- waarvan compartiment voor wijnopslag
- waarvan kelderruimte
l -
l -
l -
- waarvan opslagruimte voor vers voedsel l 42
Netto totale vriescapaciteit l Sterrenclassificatie4)
Ontwerptemperatuur voor andere compartimenten °C Laagste opslagtemperatuur van wijncompartiment °C Vorstvrij
Stijgtijd van de temperatuur h Vriescapaciteit kg / 24u -
Klimaatklasse
5)
N/ST/T
Geluidsniveau dB(A) re1 pW 43
Ingebouwd
Apparaat voor wijnopslag
1) 1Categorie: 1) 1 = Koelkast met één of meer versvoedsel opslagcompartimenten, 2 = Koelkastkelder, kelder en wijn opslagapparaten, 3 = Koelkast-chiller
en koelkast met een 0-ster compartiment, 4 = Koelkast met een één-ster compartiment, 5 = Koelkast met een twee-sterren compartiment, 6 = Koelkast met
een drie-sterren compartiment, 7 = Koelkast-vriezer, 8 = Rechtop staande vriezer, 9 = Dieprvieskist, 10 = Multigebruik en andere koelapparaten
2) A +++ (hoogste efficiëntie) tot G (laagste efficientie).
3) Jaarlijkse energieverbruik XYZ kWu per jaar op basis van standaard testresultaten gedurende 24 uur. Werkelijke energieverbruik zal afhangen van hoe het
toestel wordt gebruikt en waar het is geplaatst.
4) * = compartiment: een vriesruimte waarin de temperatuur niet warmer dan -6°C is.
** = compartiment: een vriesruimte waarin de temperatuur niet warmer dan -12°C is.
*** = compartiment: een vriesruimte waarin de temperatuur niet warmer dan -18°C is.
*(***) = een vriesruimte waarin de temperatuur niet warmer dan -18°C en een min. vriescapaciteit in 24 u
5) Klimaatklasse SN: omgevingstemperatuur van +10°C tot +32°C.
Klimaatklasse N: omgevingstemperatuur van +16°C tot +32°C.
Klimaatklasse ST: omgevingstemperatuur van +16°C tot +38°C.
Klimaatklasse T: omgevingstemperatuur van +16°C tot +43°C.
-
-
Dit apparaat is getest volgens alle relevante huidige CE-richtlijnen, zoals elektromagnetische compatibiliteit en
laagspanningsrichtlijnen en is volgens de meest recente veiligheidsvoorschriften gebouwd.
38
Page 39

FRANÇAIS
FRANÇAIS
FRANÇAISFRANÇAIS
Introduction
Introduction
IntroductionIntroduction
Merci d'avoir choisi notre produit. Nous espérons que
vous aurez plaisir à utiliser cet appareil.
Symboles de ce mode d
Symboles de ce mode d
Symboles de ce mode dSymboles de ce mode d
’’’’
emploi
emploi
emploiemploi
Les informations de sécurité importantes sont indiquées de manière spéciale. Il est essentiel de respecter ces instructions pour éviter les accidents et
éviter les dommages.
AVERTISSEMENT :
AVERTISSEMENT :
AVERTISSEMENT :AVERTISSEMENT :
pas prévue et peut provoquer des dommages ou
des blessures corporelles.
• N'utilisez pas cet appareil à l'extérieur. Conser-
vez-le éloigné des sources de chaleur, de l'exposition directe au soleil et de l'humidité.
• Lorsque l'appareil n'est pas utilisé, pour le net-
toyer, pour les travaux d'entretien ou en cas d'interruption de service, éteignez l'appareil et débranchez le cordon (tirez sur la fiche et non pas
sur le câble) ou désactivez le fusible.
• L'appareil et, si possible, le cordon d'alimentation
Avertit contre les dangers pour la santé et indique les
risques potentiels de blessure.
ATTENTION :
ATTENTION :
ATTENTION :ATTENTION :
Ce symbole fait référence à des dangers potentiels
de la machine ou d'autres objets.
NOTE
NOTE :::: Attire votre attention sur des conseils et
NOTENOTE
informations.
Remarques générales
Remarques générales
Remarques généralesRemarques générales
Lisez attentivement le mode d'emploi avant de mettre
l'appareil en marche et conservez les instructions, y
compris la garantie et le reçu. Si vous donnez l'appareil à d'autres personnes, veuillez également leur
communiquer le mode d'emploi.
NOTE
NOTE ::::
NOTENOTE
Les illustrations de ce manuel d'instructions peuvent
différer de l'appareil d'origine.
• L'appareil est conçu exclusivement pour un usage
privé et dans le but pour lequel il est prévu. Cet
appareil ne convient pas à une utilisation commerciale.
• Celui-ci doit uniquement être utilisé de la manière
décrite dans le mode d’emploi. N'utilisez pas l'appareil à d'autres fins. Toute autre utilisation n'est
doivent être contrôlés régulièrement pour déceler
tout signe de dommage. En cas de dommages,
l'appareil ne doit pas être utilisé.
• Pour des raisons de sécurité, les altérations ou
modifications de l'appareil sont interdites.
• Afin de garantir la sécurité de vos enfants, veuil-
lez conservez tous les emballages (sacs en plastique, boîtes, polystyrène, etc.) hors de leur porté.
AVERTISSEMENT :
AVERTISSEMENT :
AVERTISSEMENT :AVERTISSEMENT :
Ne laissez pas de jeunes enfants jouer avec le
film. Il y a risque de suffocation
Il y a risque de suffocation !!!!
Il y a risque de suffocationIl y a risque de suffocation
39
Page 40

Consignes de sécurité spéciales pour cet appareil
Consignes de sécurité spéciales pour cet appareil
Consignes de sécurité spéciales pour cet appareilConsignes de sécurité spéciales pour cet appareil
• Cet appareil est destiné à être utilisé dans des applications domes-
tiques et similaires, telles que
- les cuisines des employés de magasins, de bureaux et d'autres en-
vironnements professionnels ;
- les fermes et les clients des hôtels, motels et autres environne-
ments de type résidentiel ;
- les environnements de type bed and breakfast ;
- la restauration à domicile et autres applications qui ne font pas de
la vente au détail.
AVERTISSEMENT :
AVERTISSEMENT :
AVERTISSEMENT :AVERTISSEMENT :
• Conservez les orifices d'aération, du boîtier de l'appareil ou de la struc-
ture intégrée, libres d'obstructions.
• N'utilisez pas de dispositifs mécaniques ou d'autres moyens pour ac-
célérer le processus de dégivrage (si nécessaire), sauf ceux décrits
dans ce manuel (en fonction du modèle inclus dans la livraison).
• N'endommagez pas le circuit de réfrigérant.
• N'utilisez aucun appareil électrique à l'intérieur de l'appareil.
• Ne stockez pas de substances explosives, telles que des aérosols à
propulseur inflammable, dans l'appareil.
• Cet appareil peut être utilisé par des enfants
enfants âgés de 8 ans et plus et
enfantsenfants
des personnes ayant des capacités physiques, sensorielles ou mentales réduites ou un manque d'expérience et de connaissances s'ils ont
été supervisés ou instruits sur l'utilisation de l'appareil
l'utilisation de l'appareil en toute sécuri-
l'utilisation de l'appareill'utilisation de l'appareil
té.
• Les enfants
Les enfants ne doivent pas jouer avec l'appareil.
Les enfantsLes enfants
40
Page 41

• Le nettoyage et l'entretien
fants
fants à moins qu'ils ne soient âgés de plus de 8 ans et qu'ils soient
fantsfants
l'entretien ne doivent pas être effectués par des eeeen-
l'entretienl'entretien
n-
n-n-
surveillés.
• N'essayez pas de réparer l'appareil vous-même. Contactez plutôt un
technicien qualifié. Pour éviter l'exposition au danger, faites toujours
remplacer le câble défectueux par le fabricant, par notre service à la
clientèle ou par une personne qualifiée et avec un câble du même
type.
• Utilisez les points de collecte désignés pour les appareils électriques
afin de mettre l'appareil au rebut.
Réfrigérant
Réfrigérant
RéfrigérantRéfrigérant
AVERTISSEMENT :
AVERTISSEMENT :
AVERTISSEMENT :AVERTISSEMENT :
Le circuit de refroidissement de l'appareil contient un
réfrigérant Isobutane (R600a), un gaz naturel inflammable et de haute compatibilité environnementale. Assurez-vous qu'aucune partie du circuit de
refroidissement n'est endommagée pendant le transport et l'installation de l'appareil.
Si le circuit de refroidissement en endommagé
Si le circuit de refroidissement en endommagé ::::
Si le circuit de refroidissement en endommagéSi le circuit de refroidissement en endommagé
• évitez toute flamme nue ou source d'étincelles,
• En cas de dommage, ne mettez pas l'appareil en
marche. Contactez votre distributeur.
NOTE
NOTE ::::
NOTENOTE
Il est possible que des résidus de production ou de la
poussière se soient accumulés sur l'appareil. Nous
recommandons de nettoyer l'appareil conformément
au chapitre « Nettoyage et entretien ».
Équipement de l'appareil
Équipement de l'appareil
Équipement de l'appareilÉquipement de l'appareil
Aperçu de l'appareil
Aperçu de l'appareil
Aperçu de l'appareilAperçu de l'appareil
• débranchez la fiche,
• aérez la pièce dans laquelle l'appareil est installé
cet
• contactez un technicien autorisén.
Déballage de l
Déballage de l
Déballage de lDéballage de l
• Sortez l’appareil de son emballage.
• Retirez tous les matériaux d'emballage, tels que
les films, les rembourrages et les emballages en
carton.
• Par prévention des risques, vérifiez que l'appareil
n'a pas été endommagé pendant le transport.
’’’’
app
appareil
areil
appapp
areilareil
1111 Bac à glaçons 4444 Tablette de grille amo-
glace 5555 Bac de récupération de
ment de porte
41
vible 2222 Compartiment à
l'eau 3333 Supports de range-
Page 42

Fourniture
Fourniture
FournitureFourniture
des pièces qui peuvent avoir une mauvaise
Tablette de grille, bac à glaçons, bac de récupération
de l'eau
Montage
Montage
MontageMontage
Conditions relatives à l'emplacement d'installation
Conditions relatives à l'emplacement d'installation
Conditions relatives à l'emplacement d'installationConditions relatives à l'emplacement d'installation
• Une bonne ventilation est nécessaire autour de
l'appareil, afin de dissiper correctement la chaleur
et de garantir un parfait fonctionnement du refroidissement et une faible consommation d'énergie.
Un dégagement suffisant est nécessaire.
- Écart à l'arrière et aux parois latérales chaque
env. 5 cm ;
- Placez l'appareil de sorte que la porte de l'ap-
pareil puisse s'ouvrir sans être gênée.
• Seul un emplacement d'installation dont la tempé-
rature ambiante correspond à la classe de client
de l'appareil convient. Pour plus d'informations
sur la classe climatique, reportez-vous au cha-
pitre «
Données techniques
» ou à la plaque signalétique située à l'intérieur ou à l'arrière de
l'appareil.
• Placez l'appareil sur une surface stable et sûre. Si
l'appareil n'est pas horizontal, ajustez les pieds en
fonction.
• Éviter une installation
Éviter une installation ::::
Éviter une installationÉviter une installation
- à proximité d'un radiateur, d'une cuisinière,
exposée à la lumière directe du soleil ou à
d'autres sources de chaleur ;
- aux emplacements extrêmement humides (par
ex. en extérieur, dans une salle de bain), dans
la mesure où les pièces en métal seraient sujettes à la corrosion dans de tels environnements ;
- des matières proches des matières volatiles
ou inflammables (par exemple du gaz, du carburant, de l'alcool, de la peinture, etc.), dans
circulation d'air (par exemple des garages).
- N'exposez pas l'appareil aux intempéries.
Branchement électrique
Branchement électrique
Branchement électriqueBranchement électrique
AVERTISSEMENT
AVERTISSEMENT ::::
AVERTISSEMENTAVERTISSEMENT
• L'installation de l'alimentation secteur doit être
conforme aux normes et réglementations locales.
• Une mauvaise connexion peut provoquer un choc
électrique !
électrique !
électrique !électrique !
choc
choc choc
• Ne modifiez pas la fiche de l'appareil. Si la prise
ne convient pas correctement à la fiche, faites
installer une prise adéquate par un spécialiste autorisé.
• L'accessibilité de la fiche d'alimentation doit être
assurée pour déconnecter l'appareil de l'alimentation électrique en cas d'urgence.
ATTENTION :
ATTENTION :
ATTENTION :ATTENTION :
En cas de déconnexion ou de panne de courant :
- Attendez environ 5 minutes avant de redémarrer.
- Vérifiez les paramètres de fonctionnement.
• Assurez vous le réseau électrique de votre foyer
correspond aux spécifications de l’appareil. Les
spécifications sont imprimées sur la plaque signalétique.
• Connectez le câble secteur à une prise électrique
correctement installée et mise à la terre.
• Si la prise après l'installation n'est pas accessible,
un dispositif de déconnexion correspondant doit
être disponible pour répondre aux réglementations de sécurité applicables.
Inverser le sens d'ouverture de la porte
Inverser le sens d'ouverture de la porte
Inverser le sens d'ouverture de la porteInverser le sens d'ouverture de la porte
Si besoin, l'ouverture de la porte peut être déplacée
de la droite (ainsi que l'appareil est livré) vers la
gauche.
42
Page 43
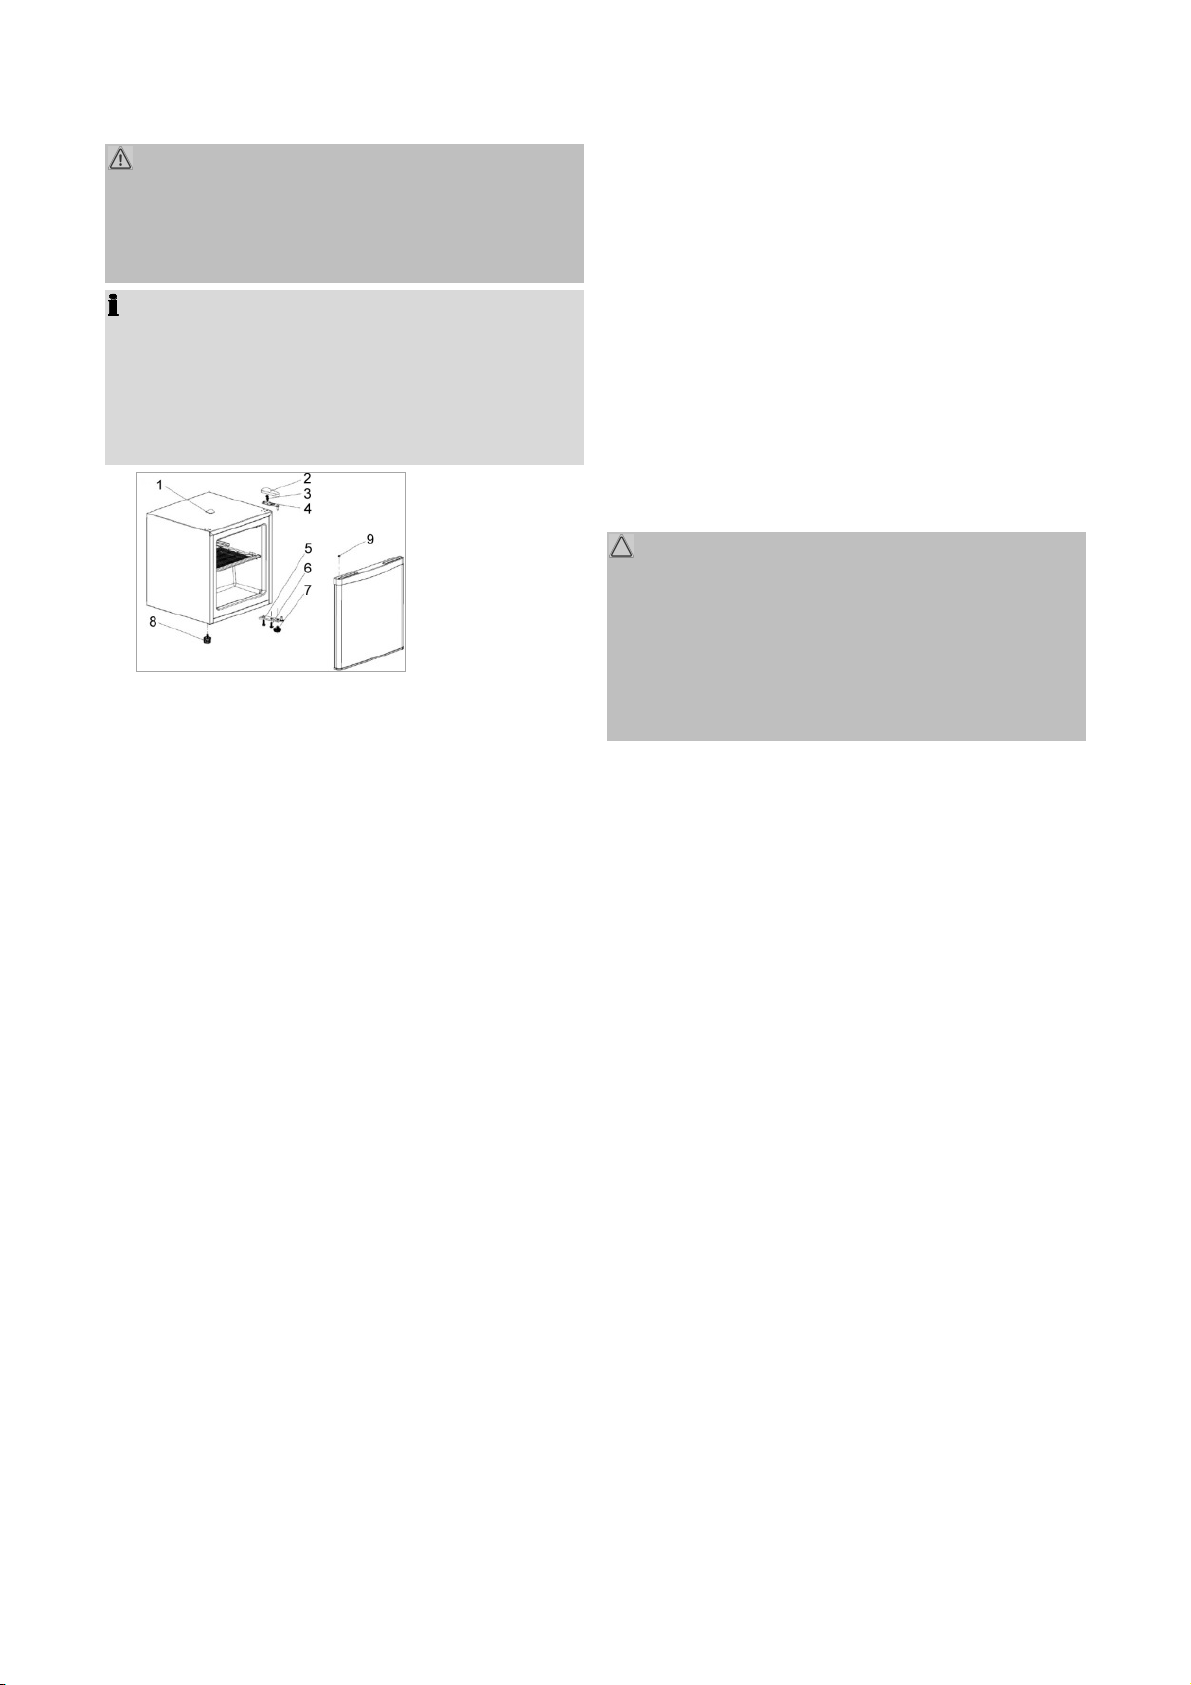
AVERTISSEMENT :
AVERTISSEMENT :
AVERTISSEMENT :AVERTISSEMENT :
• Introduire dans le bouchon opposé (1) le trou
Lors du remplacement de la butée de porte, l'appareil
doit d'abord être déconnecté de l'alimentation électrique.
NOTE
NOTE ::::
NOTENOTE
• Demandez à une autre personne d'aider.
•
Vous avez peut-être besoin
: d'une clé à vis, d'un
tournevis cruciforme ainsi que d'un tournevis à
lame mince.
• Enlevez le capuchon du cache (1) et le cache de
la charnière (2).
• Démontez la charnière supérieure de la porte (4)
opposé et remettre le couvercle de la charnière
(2), que vous avez enlevé au début.
• Vérifiez si la porte est alignée verticalement et
horizontalement de manière optimale afin que
l'ouverture et la fermeture de la porte soient garanties.
Mise en marche / Fonctionnement
Mise en marche / Fonctionnement
Mise en marche / FonctionnementMise en marche / Fonctionnement
Avant la première utilisation
Avant la première utilisation
Avant la première utilisationAvant la première utilisation
ATTENTION :
ATTENTION :
ATTENTION :ATTENTION :
Après le transport, l'appareil doit rester doit pendant
4 heures avant de le connecter à l'alimentation électrique. Le non-respect peut entraîner un dysfonctionnement du système de refroidissement et entraîner
une panne de l'appareil.
Nettoyez l'intérieur de l'appareil, y compris toutes les
en desserrant les vis (3). Ouvrez légèrement la
porte de l'appareil et sortez-la de la charnière inférieure de la porte.
• Déplacez le bouchon borgne (9) de la porte de
l'appareil en conséquence. Placez la porte de
l'appareil en toute sécurité.
• Inclinez légèrement l'appareil vers l'arrière et blo-
quez-le dans cette position. Dévissez les pieds (7
+ 8).
• Démontez la charnière inférieure de la porte (5)
en desserrant les vis (6).
• Déplacez et fixez la charnière de la porte (5) du
côté de l'appareil opposé. Tournez dans les pieds
(7 + 8) en conséquence.
• Replacez l'appareil en position verticale. Placez la
porte de l'appareil sur l'axe de la charnière et
fixez-la dans la position prévue.
• Déplacez et fixez la charnière supérieure de la
porte (4) du côté opposé de l'appareil.
pièces accessoires. Considérez les instructions que
nous fournissons dans le chapitre « Nettoyage et
entretien ».
Mettre l'appareil en marche
Mettre l'appareil en marche
Mettre l'appareil en marcheMettre l'appareil en marche
• Connectez l'appareil à l'alimentation électrique.
• Actionnez le contrôle de température. Voir aussi
la section suivante « Réglages ».
Réglages
Réglages
RéglagesRéglages
Le réglage [0] signifie que l'appareil est éteint. Tournez la commande de température dans le sens des
aiguilles d'une montre à partir de ce réglage ; l'appareil s'allume automatiquement.
Les niveaux de puissance [1-7] régulent les différentes valeurs de la température interne.
Réglage 0
Réglage 0 Réglage 1
Réglage 0Réglage 0
Éteint Réglage le plus bas
Réglage 1 Réglage 7
Réglage 1Réglage 1
Réglage 7
Réglage 7Réglage 7
Réglage le plus
(température intérieure la plus
chaude)
élevé (tempéra-
ture intérieure la
plus froide)
43
Page 44

Notez que la température change en fonction de la
- La zone la plus chaude est située à la porte et
température ambiante, de la fréquence d'ouverture
de la porte et de la quantité de nourriture dans l'appareil.
Pendant le fonctionnement initial, tournez d'abord le
commande de la température au réglage le plus élevé, jusqu'à ce que l'appareil ait atteint la température
de fonctionnement désirée. Ensuite, il est recommandé de ramener la commande à un réglage
moyen ; corriger la température à un moment ultérieur serait alors plus facile.
Stocker de la nourriture
Stocker de la nourriture
Stocker de la nourritureStocker de la nourriture
NOTE
NOTE : Recommandation !
NOTENOTE
: Recommandation !
: Recommandation !: Recommandation !
Pour garantir que la température est suffisamment
basse, vous devez pré-refroidir l'appareil plusieurs
fois avant de charger les aliments.
ATTENTION :
ATTENTION :
ATTENTION :ATTENTION :
Toujours faire attention aux instructions de stockage
sur l'emballage de vente.
Entreposez toujours les aliments couverts ou emballés afin de prévenir le dessèchement et le transfert
de l'odeur ou du goût sur d'autres aliments. Vous
la partie supérieure du réfrigérateur. Convient
pour le stockage de par ex. fromage et beurre.
• Laisser les aliments chauds refroidir en premier.
Compartiment à glace
Compartiment à glace
Compartiment à glaceCompartiment à glace
Le compartiment à glace vous permet de stocker
temporairement des aliments déjà congelés à une
température allant jusqu'à -4°C. Respectez également les temps de stockage recommandés sur l'emballage de vente. Cependant, il est spécialement
destiné à la préparation et au stockage des glaçons.
Bruit de fonctionnement
Bruit de fonctionnement
Bruit de fonctionnementBruit de fonctionnement
Type de son
Type de son Cause
Type de sonType de son
Cause
CauseCause
Marmonnement Compresseur pendant son fonc-
tionnement
Sons liquides Circulation du fluide frigorigène
Sons de claquement
Bruits dérangeants
Éteindre
Éteindre
ÉteindreÉteindre
La commande de la température
active ou désactive le compresseur
Vibration des étagères ou des
serpentins de refroidissement
pouvez emballer la nourriture avec, par exemple,
• Sacs en plastique de
polyéthylène ou
feuille
• Bol en plastique avec
• Couvercles spéciaux
en plastique avec
bande élastique
• Feuille d'aluminium
couvercle
Recommandations
Recommandations
RecommandationsRecommandations
• Placez les bouteilles dans le panier de rangement
de la porte.
• Par la circulation de l'air, différentes zones clima-
tiques apparaissent.
- La zone la plus froide est située à l'arrière et la
partie inférieure du réfrigérateur. Recommandé pour le stockage d'aliments tels que le
poisson, les saucisses et la viande.
Pour éteindre l'appareil, mettez la commande de
Pour éteindre l'appareil, mettez la commande de
Pour éteindre l'appareil, mettez la commande de Pour éteindre l'appareil, mettez la commande de
température à l'état éteint.
température à l'état éteint.
température à l'état éteint.température à l'état éteint.
Si l'appareil n'est pas utilisé pendant de longues
périodes :
• Retirez le contenu de l'appareil.
• Débranchez l'appareil de l'alimentation électrique.
• Nettoyez soigneusement l'appareil (voir « Net-
toyage et entretien »).
• Laissez ouverte la porte de l'appareil pour préve-
nir l'apparition de mauvaises odeurs.
Conseils pour économiser l'énergie
Conseils pour économiser l'énergie
Conseils pour économiser l'énergieConseils pour économiser l'énergie
• Débranchez l'appareil de l'alimentation électrique
s'il n'est pas utilisé.
• N'installez pas l'appareil à proximité de cuisi-
nières, radiateurs ou autres sources de chaleur.
44
Page 45

En cas de température ambiante élevée, le com-
la porte avec de l'eau chaude et un détergent
presseur fonctionnement plus fréquemment et
plus longtemps.
• Assurez-vous que la ventilation est suffisante au
bas et sur les côtés de l'appareil. Ne bloquez jamais les orifices de ventilation.
• Laissez refroidir les plats chauds avant de les
placer dans l'appareil.
• N'ajustez pas la température plus froide que né-
cessaire.
• N'ouvrez pas la porte plus longtemps que néces-
saire.
• L'appareil devrait être dégivré régulièrement.
• Le joint de la porte de l'appareil doit être complè-
tement intact, afin que la porte se ferme correctement.
Nettoyage et entretien
Nettoyage et entretien
Nettoyage et entretienNettoyage et entretien
AVERTISSEMENT :
AVERTISSEMENT :
AVERTISSEMENT :AVERTISSEMENT :
• Débranchez toujours l'appareil de l'alimentation
électrique avant le nettoyage et la maintenance
par l'utilisateur.
• N'utilisez pas de nettoyeur vapeur pour nettoyer
l'appareil ; de l'humidité pourrait pénétrer dans les
composants électriques. Risque de choc éle
trique
trique !!!! La vapeur chaude pourrait endommager
triquetrique
Risque de choc élec-
Risque de choc éleRisque de choc éle
c-
c-c-
les pièces en plastique.
• L'appareil doit être sec avant d'être remis en
doux.
• Retirez pour cela le contenu de l'appareil et stoc-
kez le dans un endroit frais.
• Une fois que l'appareil est entièrement sec, vous
pouvez reprendre le fonctionnement.
Décongeler
Décongeler
DécongelerDécongeler
ATTENTION :
ATTENTION :
ATTENTION :ATTENTION :
N'utilisez jamais d'objets métalliques (par exemple
des couteaux) pour enlever la glace de l'évaporateur.
Sinon, il peut être endommagé. Un évaporateur défectueux peut causer de sérieux dommages.
Pour obtenir un meilleur refroidissement et économiser de l'énergie, dégivrez régulièrement l'appareil
comme suit :
• Pour démarrer le processus de dégivrage, mettez
la commande de la température hors tension et
débranchez l'appareil de l'alimentation électrique.
• Retirez les aliments et gardez couvert dans un
endroit frais.
• Lorsque la glace a fondu, essuyez le condensat
et séchez l'intérieur de l'appareil.
• Ensuite, vous pouvez redémarrer l'appareil en
branchant la prise et en tournant la commande de
température.
Dépannage
Dépannage
DépannageDépannage
route.
ATTENTION :
ATTENTION :
ATTENTION :ATTENTION :
• N'utilisez pas de brosse en fer ou d'autre article
coupant ou abrasif.
• N'utilisez pas de détergents abrasifs ou acides.
• N'endommagez pas le circuit de réfrigérant.
Nettoyage de l'appareil y compris l'intérieur
Nettoyage de l'appareil y compris l'intérieur
Nettoyage de l'appareil y compris l'intérieurNettoyage de l'appareil y compris l'intérieur
• Nettoyez régulièrement l'intérieur de l'appareil, les
surfaces extérieures, les accessoires et le joint de
Avant
Avant de contacter un spécialiste autorisé
de contacter un spécialiste autorisé
Avant Avant
de contacter un spécialiste autoriséde contacter un spécialiste autorisé
Problème
Problème Cause / Action
ProblèmeProblème
L'appareil ne
fonctionne
pas correctement ou
pas du tout
La nourriture
stockée est
trop chaude
45
Cause / Action
Cause / ActionCause / Action
- Vérifiez l’alimentation.
- Vérifiez le réglage de température.
- Vérifiez la température ambiante.
- Débloquez les orifices de ventilation,
dégagez l'appareil.
- Vérifiez le réglage de température.
- Ouvrez uniquement la porte aussi long-
temps que nécessaire.
- Vérifiez l'emplacement.
Page 46

Problème
Problème Cause / Action
ProblèmeProblème
Bruit fort
pendant le
fonctionne-
Cause / Action
Cause / ActionCause / Action
- Vérifiez la position de l'appareil.
- Voir la section « Bruit de fonctionnement ».
ment
Eau sur le
Vérifiez le réglage de température.
fond de
l'appareil
Eau sur la
surface
extérieure
NOTE
NOTE ::::
NOTENOTE
Les jours de forte humidité, de la con-
densation peut se former sur la surface
extérieure de l'appareil. Aucun dysfonc-
tionnement !
Si un problème persiste après avoir suivi les étapes
ci-dessus, contactez votre revendeur ou un technicien agréé.
Données techniques
Données techniques
Données techniquesDonnées techniques
Connexion
Connexion électrique
Connexion Connexion
électrique………………...………………….
électriqueélectrique
………………...………………….
………………...………………….………………...………………….
Tension secteur : …………………………......220-240 V~
Fréquence du réseau : ………………………...……50 Hz
Consommation électrique : …………………………70 W
Dimension H x l x P / Poids
Dimension H x l x P / Poids…..…...………………
Dimension H x l x P / PoidsDimension H x l x P / Poids
…..…...…………………..
…..…...…………………..…...………………
…....
…..…..
..
....
Taille de l'appareil : …………….…51,0 x 43,9 x 47,0 cm
Poids net : ……………………..………….environ 14,0 kg
Nous nous réservons le droit d’apporter des modifications techniques ainsi que des modifications de
conception dans le cadre du développement continu
de nos produits.
Élimination
Élimination
ÉliminationÉlimination
Signification du symbole «
Signification du symbole « poubelle
Signification du symbole «Signification du symbole «
poubelle »»»»
poubellepoubelle
Protégez notre environnement ; ne jetez pas les appareils électriques dans les ordures ménagères.
Utilisez, pour l’élimination de vos appareils électriques, les bornes de collecte prévues à cet effet où
vous pouvez vous débarrasser des appareils que
vous n’utilisez plus.
Cela permet d'éviter les effets néfastes potentiels
d'une élimination incorrecte sur l'environnement et la
santé humaine.
Cela contribuera au recyclage et autres formes de
réutilisation des équipements électriques et électroniques.
Les informations concernant l'endroit où ceux-ci peuvent être éliminés peuvent être obtenues auprès de
votre autorité locale.
AVERTISSEMENT :
AVERTISSEMENT :
AVERTISSEMENT :AVERTISSEMENT :
Enlevez ou désactivez tous les verrous à pression et
à boulon existants, si vous mettez l'appareil hors
service ou au rebut.
46
Page 47

Fiche technique du
Fiche technique du produit pour les réfrigérateurs/congélateurs ménagers conformément au r
Fiche technique du Fiche technique du
n° 1060/2010
n° 1060/2010
n° 1060/2010n° 1060/2010
Marque
Marque
MarqueMarque
Modèle
Modèle
ModèleModèle
1)
1)
Catégorie
Catégorie
CatégorieCatégorie
1)1)
3333
produit pour les réfrigérateurs/congélateurs ménagers conformément au rèèèèglement (UE)
produit pour les réfrigérateurs/congélateurs ménagers conformément au rproduit pour les réfrigérateurs/congélateurs ménagers conformément au r
glement (UE)
glement (UE) glement (UE)
BOMANN
BOMANN
BOMANNBOMANN
KB 389
KB 389
KB 389KB 389
Classe d'efficacité énergétique2) A++
Consommation d'énergie annuelle3) kWh/a 84
Capacité de refroidissement nette totale l 42
- de ce compartiment de stockage à froid
- de ce compartiment de stockage de vin
- de ce compartiment de cave
l -
l -
l -
- de ce compartiment de stockage pour aliments frais l 42
Capacité de congélation nette totale l
Nombre d'étoiles4)
Température de conception des autres compartiments °C
Température de stockage la plus froide du compartiment de stockage du vin °C
Sans givre
Temps de montée en température h
Capacité de congélation kg/24h
-
-
-
-
-
-
-
Classe climatique5) N/ST/T
Émission de bruit dB(A) re1 pW 43
Intégré
Appareil de stockage de vin
9) 1Catégorie : 1 = Réfrigérateur avec un ou plusieurs de stockage de denrées alimentaires fraîches compartiments, 2 = Réfrigérateur-cave, cave et stockage
du vin appareils, 3 = Réfrigérateur-refroidisseur et un réfrigérateur avec un compartiment 0 étoiles, 4 = Réfrigérateur avec un compartiment d'une étoile, 5
= Réfrigérateur avec un compartiment deux étoiles, 6 = Réfrigérateur avec un compartiment trois étoiles, 7 = Réfrigérateur-congélateur, 8 = Congélateur
vertical, 9 = Congélateur, 10 = Multi-usage et autres appareils de réfrigération.
10) A+++ (rendement le plus élevé) à G (rendement le plus faible)
11) Consommation d'énergie annuelle « XYZ » kWh par an sur la base des résultats d'essais standard pendant 24 h. La consommation d'énergie réelle
dépend de la façon dont l'appareil est utilisé et où se trouve l'appareil.
12) * = compartiment : un compartiment de stockage des aliments congelés dans lequel la température ne dépasse pas -6°C
** = compartiment : un compartiment de stockage des aliments congelés dans lequel la température ne dépasse pas -12°C
*** = compartiment : un compartiment de stockage des aliments congelés dans lequel la température ne dépasse pas -18°C
*(***) = compartiment pour aliments congelés pour lequel la température ne dépasse pas -18°C et ayant une capacité de congélation minimum de 24 h
5) Classe climatique SN : température ambiante de +10°C à +32°C
Classe climatique N : température ambiante de +16°C à +32°C
Classe climatique ST : température ambiante de +16°C à +38°C
Classe climatique T : température ambiante de +16°C à +43°C
-
-
Cet appareil a été testé en accord avec les normes de courant en vigueur dans la CE, comme la compatibilité
électromagnétique et la basse tension, il a été construit en accord avec les dernières lois de sécurité.
47
Page 48

C. Bomann GmbH
C. Bomann GmbH
C. Bomann GmbHC. Bomann GmbH
www.bomann.de
www.bomann.de
www.bomann.dewww.bomann.de
Stand 03/17
Made in P.R.C.
48
 Loading...