

Page 1
Installation Instructions
Transmission Oil Temperature Gauge
(See www.bmracing.com for the latest technical product information)
Part Number 80212/80226
©2005 by B&M Racing and Performance Products
Your new B&M transmission oil temperature gauge will
accurately monitor transmission oil temperature and
warn you before excessive heat ruins transmission uid
or causes damage. High heat conditions are destructive
of both transmission friction materials and transmission
components. Transmission operation in the normal operating range of 150°F to 250°F will ensure long life and
dependable service. This gauge will work with all 12 volt
negative ground electrical systems.
STEP 1. Disconnect positive terminal battery cable to
prevent accidental shorts and/or damage. Mount temperature gauge.
Mounting panel: Install panel in position and secure using
the two sheet metal screws supplied with the kit.
Dashboard or console: Drill 2-1/16" hole into surface
you wish to mount the gauge in.
Gauge pod: Gauge will t into 2-1/16" gauge pod hole.
Position gauge in mounting hole. Install mounting bracket,
nuts and lock washers in position. (See Fig. 1) Install one
brass at washer, one lock washer and one nut on each stud.
Rotate gauge until it is properly aligned and tighten each
nut nger tight.
STEP 2. Locate the oil return line to the transmission. On
Chrysler and most Ford transmissions, this is the line to
the rear of the transmission case. On GM TH-350, TH400, TH-700R4, and Powerglide transmissions, this is the
upper oil line to the transmission case. On GM TH-200,
TH-200R4, 4L80E and Ford AOD transmissions, this is the
lower oil line to the transmission case. Note: This loca-
tion is recommended to monitor the true transmission
temperature going in, as well as checking the oil cooler
efciency. Cut the steel tube oil line in a convenient location using a tubing cutter or hacksaw. Carefully deburr the
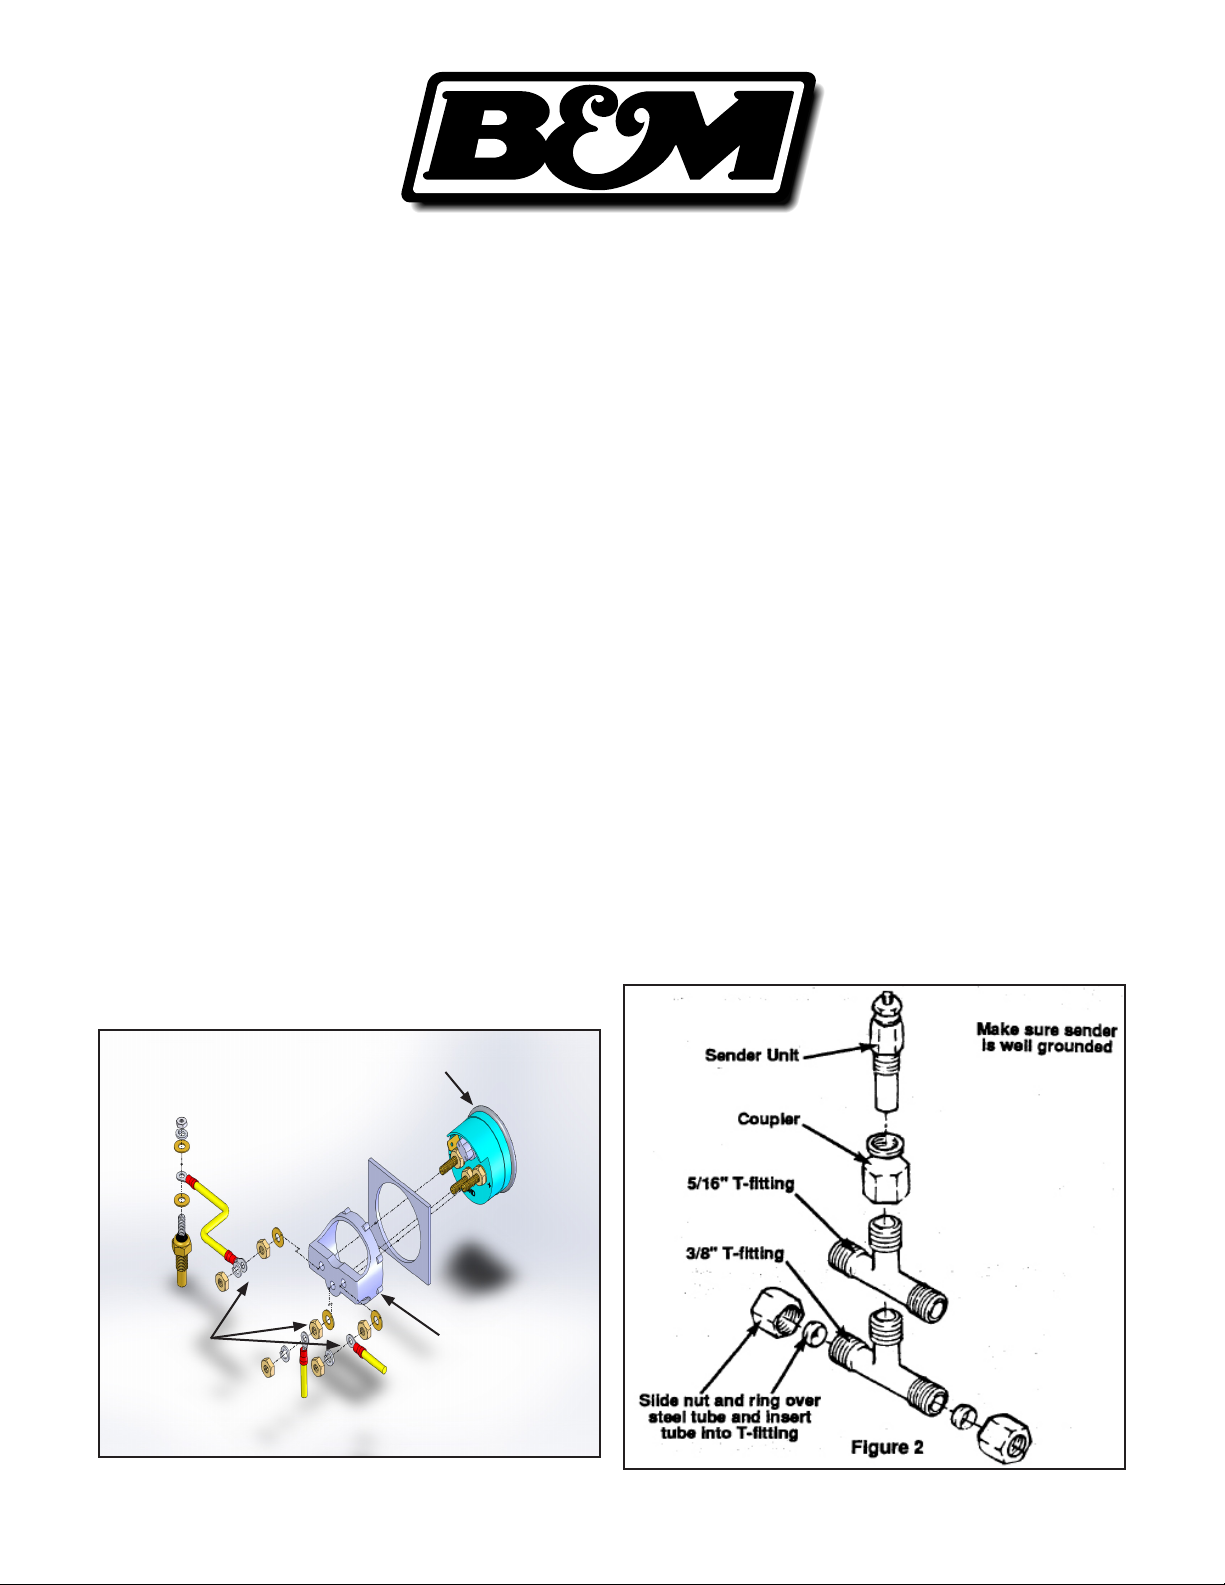
ends of the tubing. Select the proper T-tting and tighten
the compression nuts securely. Be sure to double-check
T-tting holes are bored through all the way.
STEP 3. Place a small amount of sealer on the threads of
the T-tting, install the proper coupler and tighten securely. Place a small amount of sealer on the threads of the
temperature gauge sender unit. Install the sender unit into
Supplied
Hardware &
Terminals
Printed in U.S.A.
Temp Gauge
2 - 1/16" Dia Hole
(Mounting Panel, Dash,
or Gauge Pod)
Mounting Bracket
Figure 1: Mechanical Layout
1
9500048-09
Page 2

the coupler and TIGHTEN VERY LIGHTLY!
STEP 4. Run a length of wire from the temperature gauge
to the sender unit using the wire supplied with the kit. Bare
1/4" of the end of the wire supplied at the sender unit.
Install an eyelet terminal supplied with the kit on the end
of the wire and crimp it tightly. Install the terminal onto
the sender unit stud. Install nut on to the stud and tighten
securely. Be sure the connector/wire does not touch the
body of the sender. Secure the wire in position so it cannot
touch any hot engine components. Be sure that the base
of the sending unit is properly grounded. A sending unit
installed in a rubber cooling line is not properly grounded.
Improper grounding will cause a false reading. Install another eyelet terminal at the gauge end of the temperature
wire. Remove the nut and lock washer from the negative
("-") stud on the temperature gauge (see Figure 3). Install
the terminal onto the stud and install lock washer and nut.
Tighten nut snugly. DO NOT OVER-TIGHTEN AS THIS
COULD DISTORT BRACKET OR DAMAGE GAUGE.
STEP 5. Run a length of wire from the temperature gauge
to the ignition switch or fuse block using the wire supplied
with the kit. Bare 1/4" of the end of the wire at the temperature gauge. Install an eyelet terminal on the end of the
wire and crimp it tightly. Remove the nut and lock washer
from the positive ("+") stud on the temperature gauge (see
Figure 3). Install the terminal onto the stud and re-install
lock washer and nut.
Tighten nut snugly. DO NOT OVER-TIGHTEN AS THIS
COULD DISTORT BRACKET OR DAMAGE GAUGE.
Connect other end of wire to an accessory or ignition
circuit that is "hot" when the ignition key is on. DO NOT
ALLOW "HOT" WIRE TO TOUCH THE "-" STUD ON
THE TEMPERATURE GAUGE.
STEP 6. Run a ground wire from the "GND" stud to
chassis ground (frame or body). See gure 3. DO NOT
OVER-TIGHTEN AS THIS COULD DISTORT BRACKET
OR DAMAGE GAUGE.
STEP 7. Run a length of wire from the temperature gauge
to the dashboard instrument light wires or terminal board.
Bare 1/4" of the end of wire at the temperature gauge.
Install the female spade connector furnished and crimp
tightly. Slip connector onto gauge spade terminal (see
Figure 3). Secure all wires up out of the way from heat or
any moving parts to prevent damage.
STEP 8. Re-connect battery cable. Turn ignition key on.
Gauge will read oil temperature. Start engine and check
T-tting for leaks. As transmission oil temperature warms
up, the gauge will indicate properly. Turn on lights to check
operation of illumination bulb.
Tool List
7/16" Wrench
1/2" Wrench
9/16" Wrench
5/8" Wrench
3/8" Socket or Nut driver
Pliers
Wire strippers
Wire Crimping Tool
Tubing cutter
Small le
Phillips Screwdriver
Temperature Gauge
Bracket
Eyelet terminals (3)
Spade terminal
Brass washers (3)
Lock washers (4)
Nuts (3)
Coupler
Hook-up wire
Mounting screws (2)
Mounting panel
3/8 " T-tting
5/16" T-tting
Sender Unit (1/8" NPT)
Parts List
TROUBLE SHOOTING GUIDE
Malfunction Probable Cause
Gauge shows no reading -Gauge is not hooked to power, or is not grounded properly
Gauge shows false reading -Sending unit no properly grounded
Reading too high -Power and ground wire reversed
2
Page 3

Spade Terminal - To
Instrument Illumination
Circuit
Negative ("-") Stud - To
Temperature Sender
Temperature Sender
Note: Sender Body / Connecting
T-tting must be connected to
Chassis Ground
Temp Gauge
Positive ("+") Stud - To
Ignition Terminal (Switched
12V circuit)
GND Stud - To Chassis Ground
( )
Figure 3: Electrical Details
3
 Loading...