

Page 1
BLAUPUNKT
SAN
JOSE
120
6.2"Touch
Screen
Instruction
Display
DVD
Manual
Receiver
Page 2
IN
CAR
MULTI-MEDIA
PLAYER
OPERATION
MANUAL
IMPORTANT NOTICE & PRECAUTIONS
Thank you for buying a
operation manual carefully before using. Keep this operation manual for future reference.
unit
The
connected
to
the
the
The normal rem perature for operation
in extreme temperature and lock vents
up inside
designed only for
to
DC
12V negative
speaker(-) terminal. Never connect
vehicle body.
the
unit
BLAUPUNKT
DV
12V negative
and may cause damage or a fire.
product.
ground
To
operate this
ground
operation system.
the
left and
is
between -20 and +60 degree Fahrenheit. Do
or
radiator panels
unit
correctly, please read
operation system. Make sure
Be
sure
to
connect
right
channel speaker wires together or
of
the
unit,
as
the
this will cause heat
the
your
vehicle
speaker(-) leads
not
is
to
operate
to
build
This
unit
can play
SVCD/
This operation manual shows
multi-colour
tuner; Bluetooth and AM radio are optional features
Please
VCD/ MP3/
refer
the
following
WMA/
illumination; back
to
the
exact funtions & features
CD-R/ RW/
discs (4.72 in) and media files: DVD±R/RW/RMVB/MPEG4/ A VI/
JPEG.
the
full version
USB
connection; iPod connection, digital
of
that
the
unit.
GPS
of
the
equipped
navigation system, dynamic
TV
tuner; analog
software and may
with
this
unit
not
be include.
for operation.
[ 1 ]
TV
Page 3
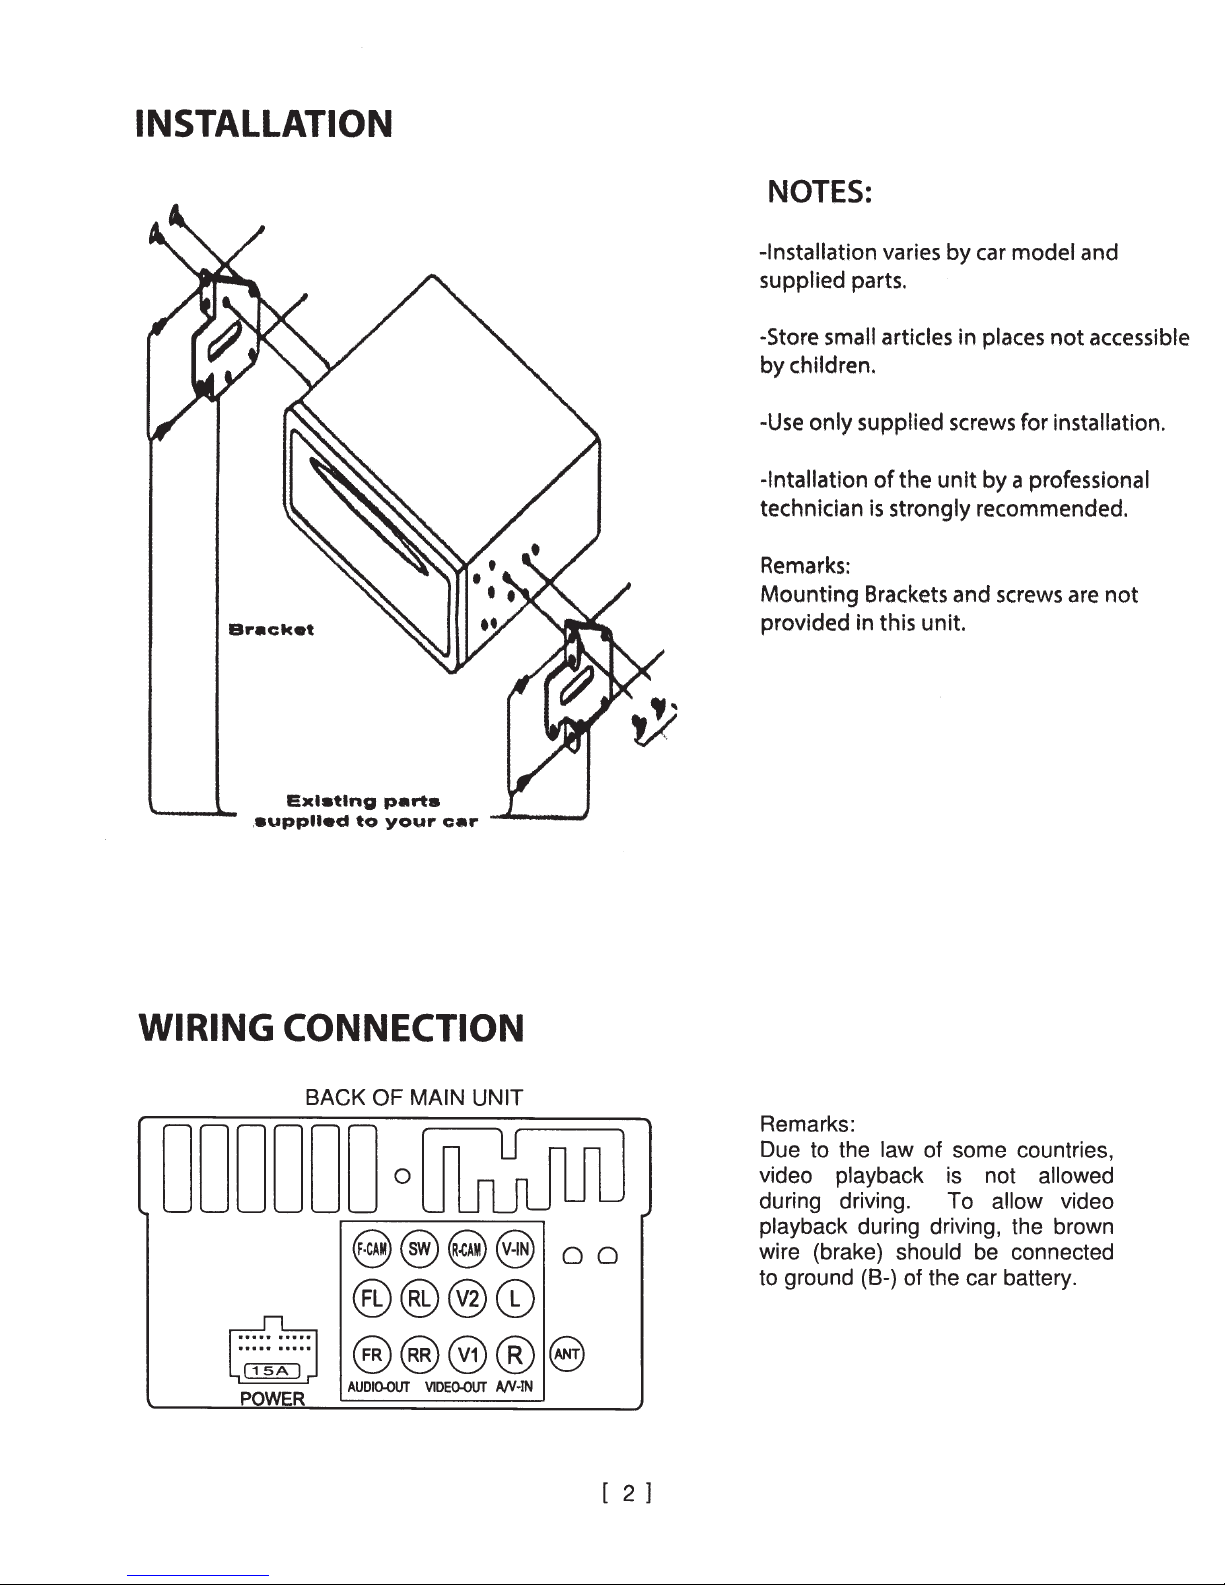
INSTALLATION
NOTES:
Bracket
.
aupplled
Exlatlng
to
parts
your
car
......__....J
-Installation
supplied parts.
-Store
by
children.
-Use
only
-lntallation
technician
Remarks:
Mounting
provided in this unit.
varies
small articles in
supplied
of
is
Brackets and screws are
by
screws for
the
unit
strongly
car
model
places
by
a professional
recommended.
and
not
accessible
installation.
not
WIRING CONNECTION
BACK
OF MAIN UNIT
000000o01J&JUU
9®§@
®®®C0
.
A
~
POWER
@@®®
AUDIO-OUT
VIDE().()UT
A/V·IN
00
8
[ 2 ]
Remarks:
Due
to
the
law of some countries,
video playback
during driving. To
playback
wire (brake) should
to
ground (8-) of the car battery.
during driving, the brown
is
not allowed
allow
be
connected
video
Page 4

Portion
I
/Colour
Connection
I
Connecting
Audio output jack
Audio input jack L White
Video output jack
Video input jack
Socket POWER
ANT
sw
FL White Front left speaker output
FR
RL White Rear left speaker output
RR
R Red Auxiliary right speaker input
V1
V2
R-CAM
V-IN
F-CAM Brown
Red
Black
Yellow
White Front left speaker(+)
White
Grey Front right speaker (
Grey
Green Rear left speaker (
Green
Purple
Purple
Blue
Pink Back sight (B+)
Pink
Grey Steering wheel control (
Green
Black (Fine) Steering wheel control (Ground)
Orange Headlamp detection
Blue Amplifier control (B+)
Brown
Green Sub-woofer output
Red Front right speaker output
Red
Yellow
Yellow
Yellow Back sight camera input
Yellow Video
Ignition
_(Coarse)
Black
I
Black Front right speaker (-)
I
Black
I
Black
I
White Auto antenna (B+)
I
Black Front camera (B+)
I
Ground (B-)
Memory back up (B+)
Front left speaker
Rear left speaker (-)
Rear right speaker(+)
Rear right speaker(-)
Steering wheel control (2)
(Connect to on/off control of car headlamp)
Brake (B-)
Radio antenna
Rearrightspeakeroutput
Auxiliary left speaker input
Video output
Video output
Front camera input
switch (B+)
input
(-)
+)
+)
1)
[ 3 ]
Page 5
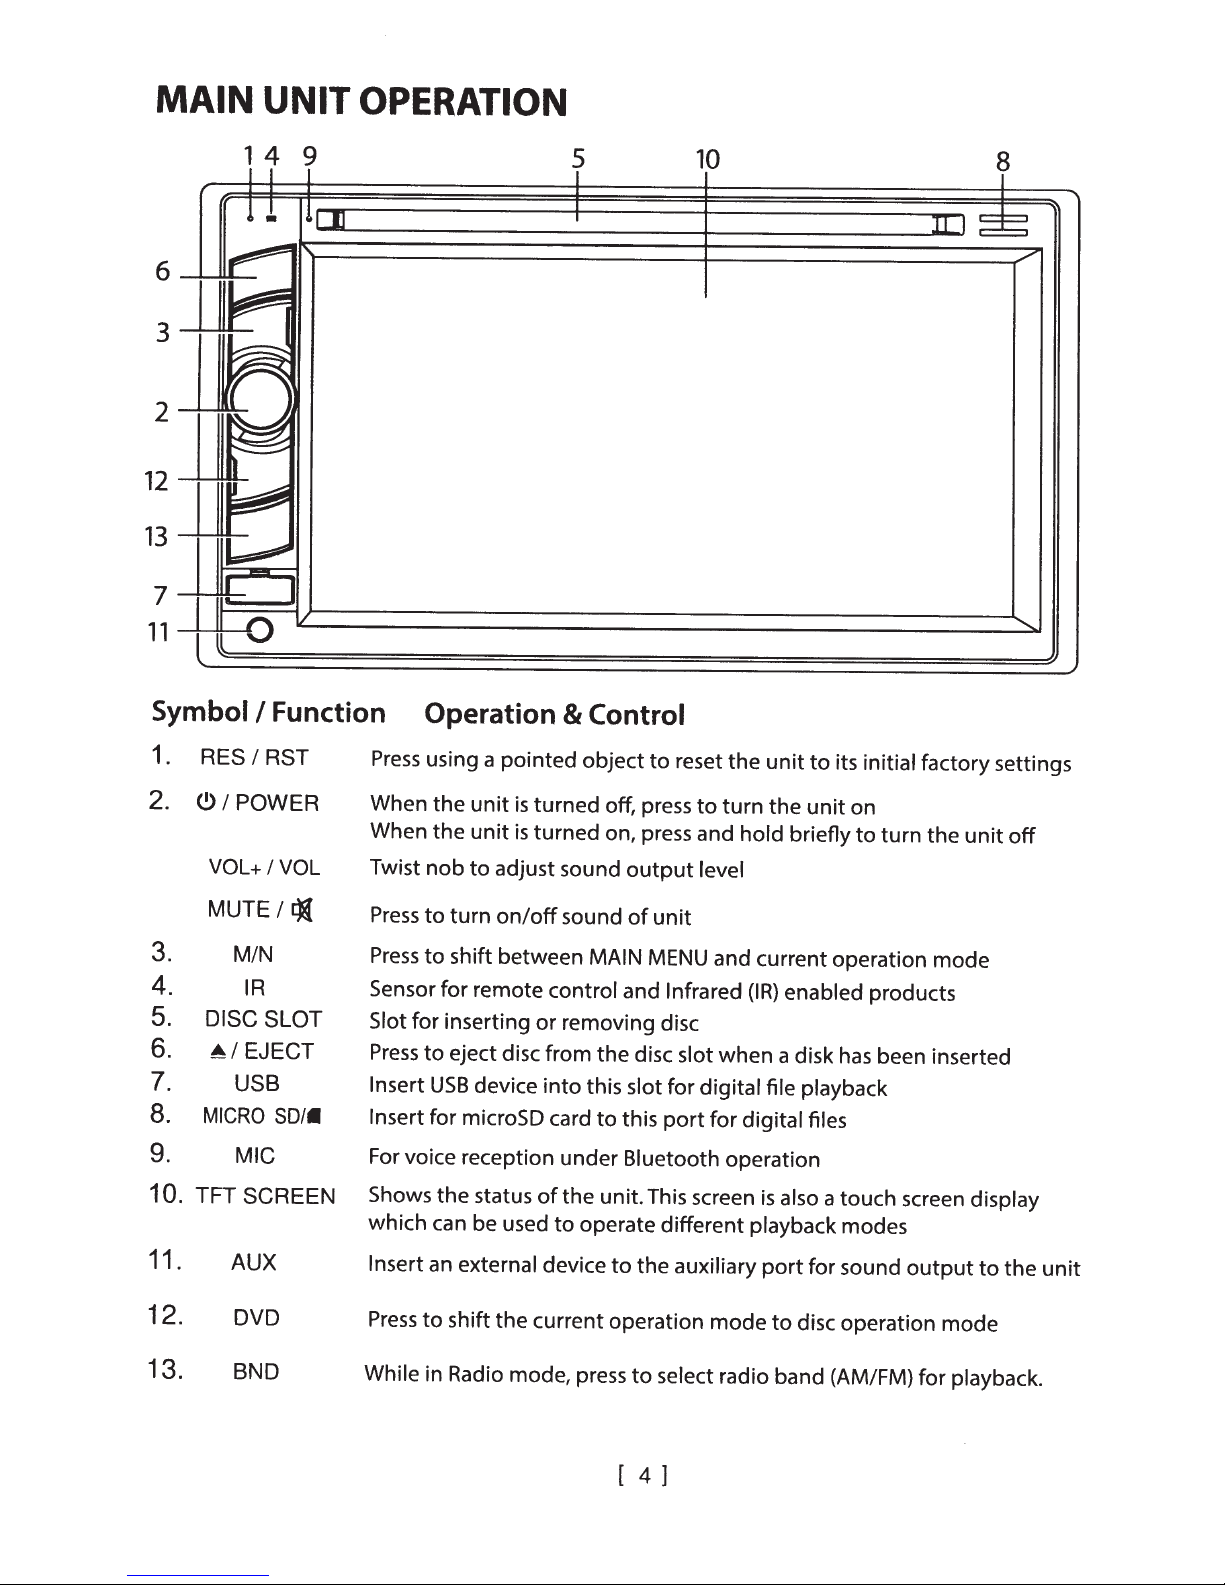
MAIN
UNIT
OPERATION
6
p-
~
3
~
~
2
12
13
7
11
Symbol/
-
:---
II
~ ~
~
~
t~
,__.
~
1 4 9
I I I
l
!
I!
:n
~
-
~
/
0
Function Operation
5
I
I
I
& Control
10
8
llJ~~
./'
..........
1.
2.
3.
4.
5.
6.
7.
8.
9.
10.
11.
12.
(.!)I
TFT
RES
I
RST
POWER
VOL+
I
VOL
MUTE
I£){
MIN
IR
DISC SLOT
~I
EJECT
USB
MICRO
SO/.
MIG
SCREEN
AUX
DVD
Press
using a pointed
When the
When
Twist
Press
Press
Sensor for remote control and
Slot for inserting
Press
Insert
Insert
For voice reception under Bluetooth operation
Shows the status
which can be used
Insert
Press
unit
is
the
unit
is
nob
to
adjust sound
to
turn
on/off
to
shift between MAIN
to
eject disc from
USB
device
for microSD card
an external device
to
shift the current operation
object
turned off, press
turned on, press and
sound
or
removing disc
into
this slot
of
the
to
operate different playback modes
to
reset the
to
turn
output
of
the
disc
to
this
unit. This screen
to
the
level
unit
MENU
Infrared
slot
for digital
port
for digital files
auxiliary
mode
and current operation
when
unit
the
hold
briefly
(IR)
enabled products
a disk
file
playback
is
also
port
to
disc operation
unit
for sound
to
its initial factory settings
on
to
turn
the
unit
off
mode
has
been inserted
a touch screen
output
display
to
mode
the
unit
13.
BND
While
in Radio mode, press
to
select radio band (AM/FM) for playback.
[ 4 ]
Page 6
Note:
he
mentioned
may vary
Printings and symbols
functions and features available.
be used
to
symbols I
between
operate
units,
may
the
unit.
functions
and
may
vary
I operations I controls
not
be available
from
the
unit. Refer
It
is
recommended
for
control
to
the
that
shown
in
main
touch
in
this
user manual
this
unit.
unit
for
the
exact
screen controls
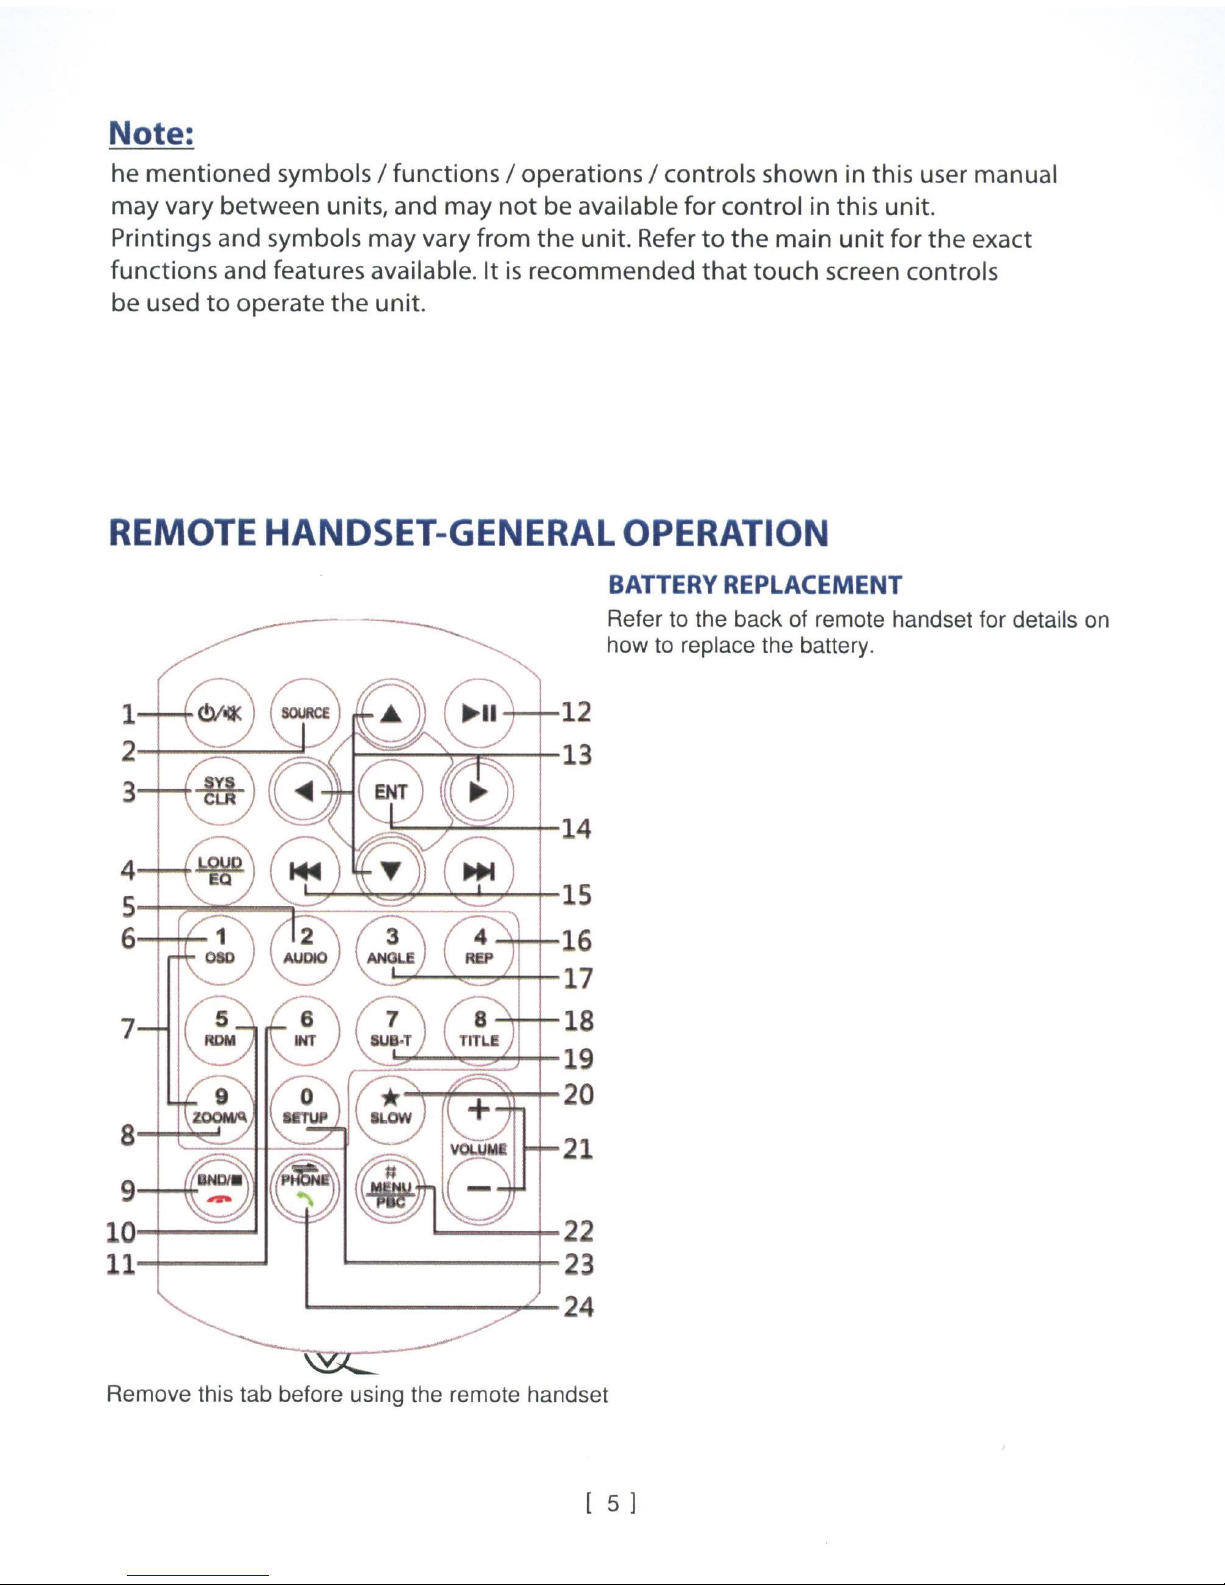
REMOTE
HANDSET-GENERAL
~~~~~~~~~
7
15
.....,.._+-
....,....__..,~"+-+-
......lr+-+-
~
:::o:::::~~t-
~"'f'-!~-+-2
16
17
18
19
0
OPERATION
BATTERY
Refer to the
how to replace the battery.
REPLACEMENT
back
of remote handset for details on
a
~~
'---.::=-
9
--+--~+-
10
-+----'
ll
......j---...1
Remove this tab before using the remote handset
"
-H-
-=
::....__r
"-----+-23
.._
____
21
....._;;;.__~22
..,..._ 24
[ 5 ]
Page 7
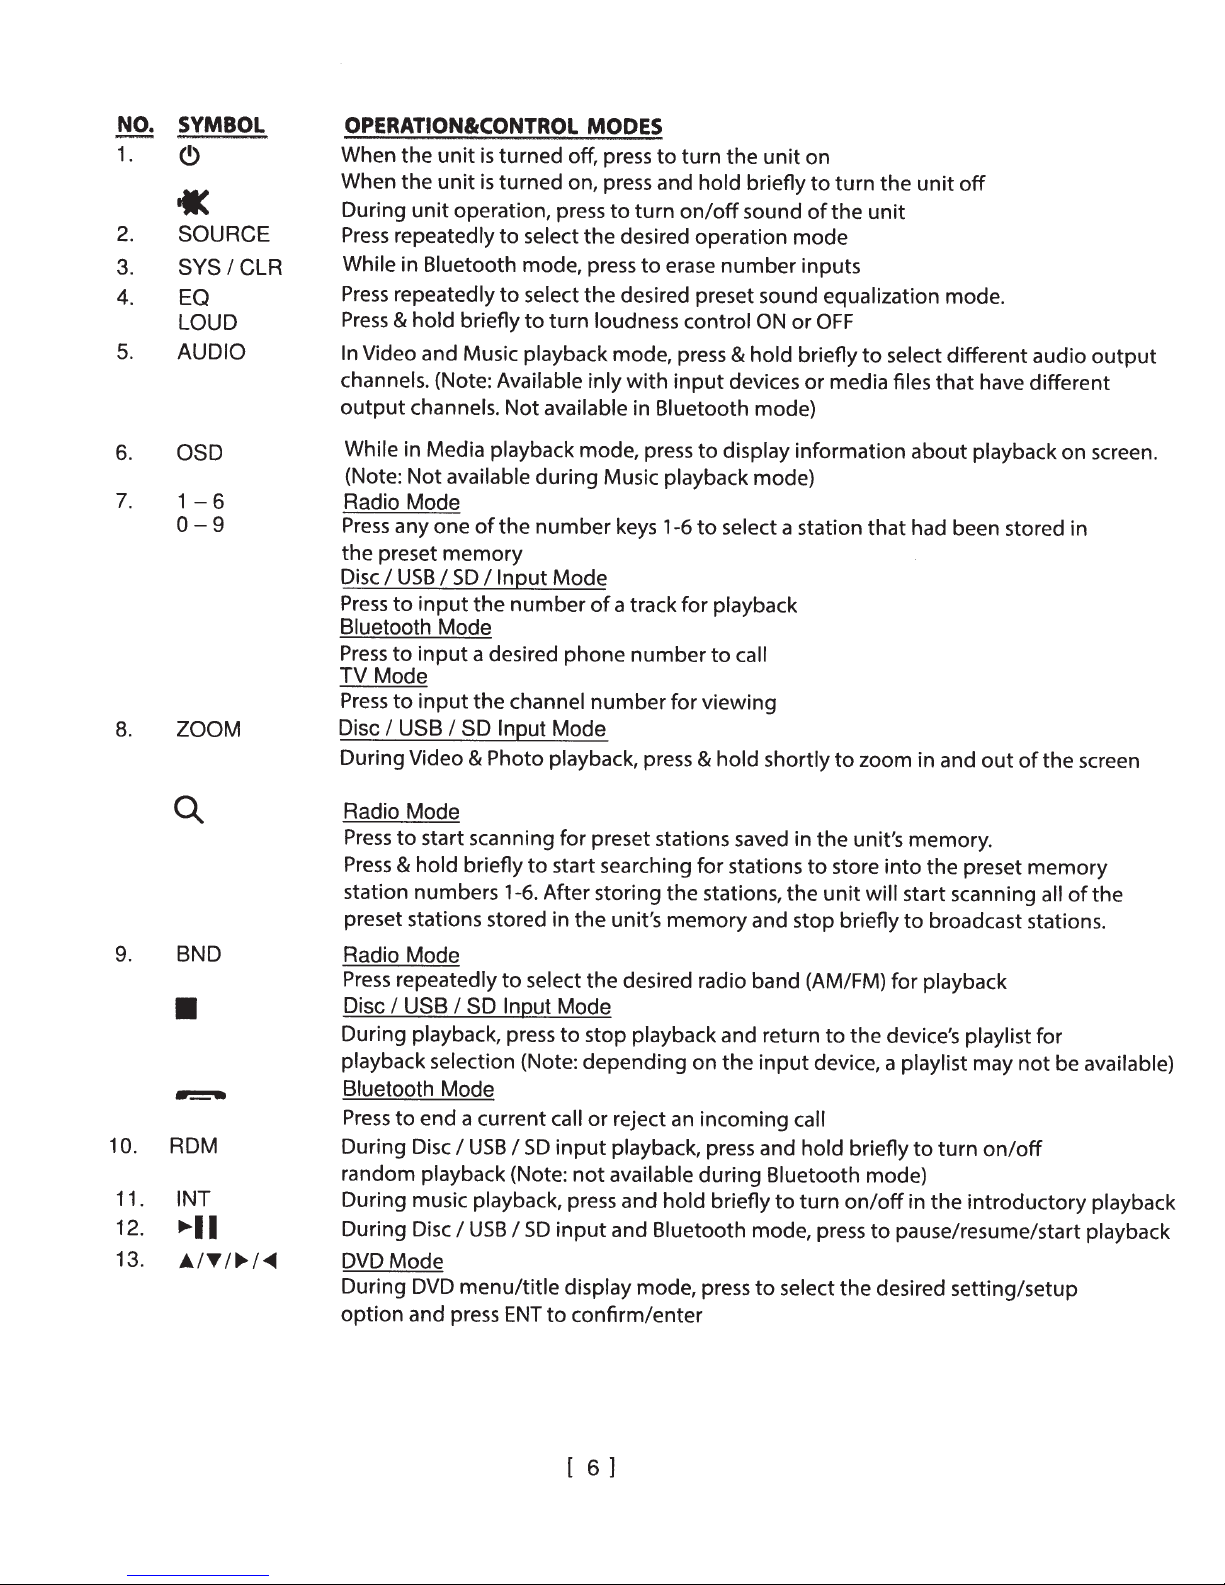
NO.
1.
2.
3.
4.
5.
SYMBOL
«
SOURCE
SYS
I
CLR
EQ
LOUD
AUDIO
OPERATION&CONTROL
When
When
During
Press
While in Bluetooth mode, press
Press
Press
In
channels. (Note: Available
output
the
unit
is
turned
the
unit
is
turned
unit
operation, press
repeatedly
repeatedly
&
hold
Video and Music playback mode, press
channels.
to
to
briefly
Not
select
select
to
MODES
off, press
on, press and
to
turn
the
desired
the
desired preset sound equalization mode.
turn
loudness
inly
with
available in
to
to
erase
Bluetooth
turn
the
hold
on/off
operation
number
control
&
input
devices
unit
briefly
sound
ON
hold
mode)
on
to
turn
of
the
mode
inputs
or
OFF
briefly
or
media files
the
unit
to
unit
select
off
different
that
have
audio
output
different
6.
7.
8.
9.
10.
11.
12.
13.
OSD
1-6
0-9
ZOOM
BND
•
ADM
INT
....
••
A.ITI~I""4
While in Media playback
(Note:
Radio
Press
the
Disc
Press
Bluetooth
Press
TV
Press
Disc
During
Radio
Press
Press
station
preset stations stored in
Radio
Press
Disc
During
playback selection (Note:
Bluetooth
Press
During
random
During
During
DVD
During
option
Not
available
Mode
any
one
of
preset
Mode
memory
I
USB
I
SD
to
input
the
Mode
to
input
a desired
to
input
the
I
USB
I
SD
Video
Mode
to
&
Mode
repeatedly
I
USB
to
Mode
and press
&
start scanning
hold
briefly
numbers
I
SD
playback, press
Mode
end
a
Disc
I
USB
playback (Note:
music playback, press and
Disc
I
USB
DVD
menu/title
during
the
number
I
Input
Mode
number
phone
channel
Input
Mode
Photo
current
playback, press
for
to
start searching
1-6. After storing
to
select
Input
Mode
to
call
I
SD
input
I
SD
input
display mode, press
ENT
to
mode,
the
stop playback and return
depending
not
confirm/enter
press
to
display
Music playback
keys 1-6
of
a track
number
preset stations saved in
unit's
the
or
reject an
playback, press and
available
and
for
number
for
the
memory
desired radio band (AM/FM)
on
hold
Bluetooth
mode)
to
select a station
playback
to
call
viewing
&
hold
shortly
for
stations
stations,
and stop briefly
the
input
incoming
during
Bluetooth
briefly
mode, press
to
to
select
information
that
to
zoom
the
unit's
to
store
into
the
unit
will
for
to
the
device's playlist
device, a playlist
call
hold
briefly
mode)
turn
on/off
to
pause/resume/start playback
the
desired
about
had been stored in
memory.
start scanning all
to
to
in
playback
in and
out
the
preset
broadcast stations.
playback
may
turn
on/off
the
introductory
setting/setup
on
of
the
memory
for
not
be available)
screen.
screen
of
the
playback
[ 6 ]
Page 8

14. ENT
16.
17.
18.
19.
20.
21
22.
23. SETUP
24.
REP
ANGLE
TITLE
SUB-T
SLOW
VOL+IVOL-
.
MENUIPBC
'
Playlist Mode
Folder
During media playback
repeatedly
Photo Playback Mode
Press
DVD Mode
During media playback
/playlist
press
Radio Mode
Press
Press
and stop broadcasting when a station signal
Disc
Press
Press
Bluetooth Mode
Press
TV
Press
Press
During playback
During video playback mode, press and
sequential order (Note: available on media files recorded
DVD Mode
Press
Video Playback Mode
Press
device
Radio
While
stations and distant setting for reception
screen on local settings whereas no indication for distant settings)
During Video playback mode, press
motion
Press
DVD Mode
Press
VCDMode
Press
During
Press
of
by
Bluetooth Mode
Press
number; redial last
I
mode
select a track for playback.
to
rotate
to
display, press
ENT
repeatedly
and
USB
I
repeatedly
and
shift
to
Mode
repeatedly
and
and hold briefly
hold briefly
&
or
Mode
on an
playback
repeatedly
and hold briefly
and hold briefly
unit
and hold briefly again
cannot be operated by remote
unit
touch
pick
to
photo
FolderiPiaylist
I
confirm/enter
to
hold
SD Input
I
to
hold
to
hold
media files.
FM
operation, press and hold briefly
screen - refer
up
position
mode
(ICONS)
tune
fine
to
tune
briefly
briefly
to
Mode (Playback Mode)
the
to
shift
to
fast-forward
previous track for
or
next
the
the
to
shift
to
switch between channels
to
USB
I
Disc
of
display
to
select different subtitles
to
radio band, press
press and hold
or
display
to
turn
to
ON
to
incoming
an
number
called
folder/playlist display
when
or
Mode
when viewing
to
radio frequency up or
radio frequency
I
on/off
to
SCREEN
call;
the
selected, press
Once
display
select
next
rewind a track
or
next
SD
the
the
return
make an
photo
the
previous track for playback
or
previous track for playback
or
input, press and
hold
of
title
select local settings for reception
to
hold
&
adjust sound
to
main menu
PBC
previous operation mode (Note:
to
control. Setup
OPERATION
in
DVD
desired setting/setup and
up
found
is
playbac~
briefly
disc
the
that
weak signal stations (Note:
of
briefly
playback
to
outgoing
is
ENT
up-down,
menu/title
down
down
or
hold
to
are
select different speeds on slow
to
output
the
of
activate setup menu on screen.
of
for
call after
left-right
display
band
the
band
the
this feature)
with
level
can
inputting
to
briefly
view angle changes in
available
disc
unit
details)
visible, press
confirm
to
mirror image positions
and folder
mode
repeat playback.
through the
of
be operated
only
input
strong signal
appears on
LOC
Setup
a phone
[ 7
1
Page 9

25.
~I
PHONE
Notes:
Depending on the
Bluetooth Conversation Mode
Press
and
hold
input
devices and playback media
briefly
to
shift conversation between main
files,
functions may be varied
unit
or
not
and
mobile
available
phone.
on this device.
ON
~
i.&,i
10.
11. Touch
12. Touch
13. Touch repeatedly
SCREEN-
During unit operation and when this icon appeared on screen, touch to shift screen to
MENU for various operation and setup. Touch the icon on the desired mode on screen and
the unit
made for a
9 8 7 6 5
1.
Touch
2. Touch
3. Touch to start USB input operation (when
4. Touch to start
5. Touch to start Bluetooth operation (when connected to a
6. Touch
7. Touch to activate
8. Touch to start viewing front camera (when connected to front camera and
9. Touch to start
Touch to turn off the screen. When the screen has been turned off, touch any portion of
the screen to turn it on again.
Note: When a
off, touch any portion of the screen
brightness modes can be
..
r..t
will then enter into the mode that
MAIN
MENU
to
start radio operation (when the radio antenna connected).
to
start disc input operation (when a disc inserted).
repeatedly
to
activate
to
start
~,...II
~ ~
MAIN
while,
the unit
SO
card input operation (when a micro SO
to
select
SYSTEM SETUP
auxiliary
Bluetooth operation (when connected to a
mobile
input operation (when an
AUDIO
phone has been connected, Bluetooth icon will
to select
MENU
will
shift back to the previous operation mode.
the desired background (wallpaper)
CONTROL
brightness
selected:
II
At this brightness mode, the brightness of screen is set
by the user (user setting).
OPERATION
selected
AUDIO CONTROL
15
an
USB device inserted).
MENU on screen to have various setup of the unit.
auxiliary
MENU
of
for
various audio setup.
screen or turn off the screen. When the screen is
to
turn the screen on again.
for operation. If
MENU
16
card inserted).
mobile phone).
of the unit.
device inserted).
mobile phone).
no
selection
pink/black wire).
be
highlighted
Following
MAIN
has been
preset
[ 8
l
Page 10

14. Touch to
set by user.
15. Hold
16.
17. Touch to
Hold
&
slide
&
slide to set for the output level
select
close
the desired preset
up/down to set for the output
AUDIO
CONTROL
equalization
level
on front
MENU
mode. At
on bass
I
rear
I
r
User
&
treble
left
I
right speakers .
J
mode, bass
at
r
User
J
mode.
&
treble c
an
be
ON SCREEN-
~At
MAIN
SYSTEM
AUDIO SETUP MENU VISUAL SETUP MENU
MENU
SETUP MENU
UNIT
,
touch to activate various setup of the unit.
SETUP
DISC SETUP MENU CALENDAR SETUP MENU
OPERATION
SCREEN
SETUP MENU
ILLUMINATION SETUP MENU
1. Touch to shift screen to
2. Touch to shift to
Note: This icon
3. Touch
to
activate
Bluetooth
will only
MAIN
be appeared when the unit has been
AUDIO
MENU
operation.
CONTROL
SW
SETUP MENU
for various operation and setup.
linked up with a
MENU
for
various audio setup.
[ 9 ]
VERSION MENU
mobile phone.
Page 11

4.
Touch to turn off the screen. When the screen turned off, touch any portion of the screen to
turn on the screen again.
5.
Hold
&
slide
to
show
6.
7.
8.
9.
10.
11.
12.
13.
14.
Touch
Touch
Touch
Touch
Touch
Touch
Touch
Touch
Touch
to
shift to SYSTEM SETUP
to
shift
to
to
shift
to
to
shift
to
to
shift
to
to
shift to
to
shift to
to
shift
to
to
shift
to
15. Touch repeatedly to
16
. Touch
to
turn on or off of
the
hidden
operatio
icons.
MENU for various setting.
DISC
CALENDAR
AUDIO SETUP
VISUAL SETUP
SCREEN SETUP
SETUP
SETUP
MENU
for
various
setting.
MENU for various setting.
MENU for various setting.
MENU for various setting.
MENU for various setting.
ILLUMINATION SETUP MENU for various setting.
SW SETUP
VERSION
select
MENU for various setting.
MENU for various setting.
the
default
allowing
on
screen
watching video during driving (when the
language.
brake-
has not been connected).
17.
Touch to turn
18. Touch
to
turn
on
or off of beep sound when touching
on
or off of front camera input (when front camera and the pink/black wire
on
screen for control.
connected):
....
when the front camera input
forward mode, front camera input
....
the
default
be display
19. Touch
repeatedly to select "Audio Language"; "Subtitle
Language" for DVD
Note: During DVD
setting after first
when the car is shifted from backward mode to forward mode
playback
playback
to set before inserting a DVD for
20.
Touch to activate
21. Touch
repeatedly to set for year
SCREEN RATIO MENU to
22. Touch repeatedly to set for output
balance
(BAL).
23. Touch repeatedly to set for brightness
24. Touch to reset and brightness
25. Touch repeatedly
26. Touch
touch
27. Touch
At
At
28. Touch to
as
29. Touch
to
activate SCREEN CALIBRATION
to
complete the
to
select
AUTO
USER
mode,
mode,
select the function for setting (when the steering
well
as the ground wire connected).
to
reset.
30. Touch repeatedly to
to set for the dimmer (brightness) of screen.
calibration.
the desired illumination backlight colour.
colour
colour
of
backlight will
of
backlight
select
the radio frequency that suit the country/region
31. These show the version of the unit and not available
is
turn
on
will
installation
and the car
be
display
for 1 0 seconds
is off and at this moment, no front camera input
is
shifted from backward mode
Language"
&
provided the DVD recorded with relative
mode, new setting cannot be activated.
playback
I
month
level
I
contrast
select
I
day
I
hour
on
volume
I
contrast
I
hue
I
I
saturation will
MENU
change automatically (cycle
aspect ratio of screen for viewing.
I
I
hue
minute
treble
I
I
12/24 hour format.
(TRE)
I
bass (BAS)
saturation of screen.
return to its default
on
screen.
Follow
the r
change).
can be set by user.
wheel control
for setting.
"Menu
Language"
languages.
It is recommended
I
fader (FAD)
stage.
+
J
mark appeared,
!I
wires
-grey
located.
brown wire
to
will
&
green
I
[
10]
Page 12

ON
SCREEN-
RADIO OPERATION
At
MAIN
MENU, touch
RADIO
011
.
:~:
.l .... l ..
""1"
1
~
~~
IU~.fll
IM1
«
, M
AM
7
1.
8 9
Touch to shift to
. ,
r-:.
1
:
...
lol
87.50
.i
10
MENU
.....
,
..
cl~
1111
1
1
~~~
MHr
~
>
<
11 11
1
Radio
'
cluu I
11
l
..
'I
II
1
»
Q)
12
MAIN
RADIO
MENU RADIO
,,
"'
MI~t
.SO
·~
Q.
13
12
:k
"I
II
icon to shift screen to
J
RADIO
/""'.
1
(lt1:
:~L
«
87
IMI
>
<
11
9
7 7
11
,
Q)
MENU for various operation and setup.
MENU for radio operation.
,\
•..t
111111111
I
II II
I
Ill
'
J:
Otll
....
»
-
,.,.
M
I'
~
14 7
AM
8
7
.i
10
I
MENU
-
< >
11
.....
,..
....
11
looul
o
1111
'1
..
Q)
12
:k
1
2. Touch to turn off the screen. When the screen turned off, touch any portion of the screen to
turn on the screen again .
various audio setup.
activate
3. Touch
Touch to start Bluetooth operation (when connected to a
4.
Note:
Hold
5.
to
When a
slide
&
AUDIO
mobile
to select
CONTROL
phone has been connected,
the radio frequency for broadcasting.
MENU
6. Touch to tune the radio frequency to upward
to show the hidden setup modes.
slide
&
Hold
7.
AM radio band for broadcasting.
&
8. Touch to select
FM
9. Touch to activate the preset memory stations
start searching the radio frequency & storing the strongest signal
Touch
0.
1
After one
a
. Touch repeatedly to fine tune radio frequency upward or downward.
11
Touch
to
searcher, the unit starts intro broadcasting
cycle
seconds. Touch again
few
hold shortly
&
this intro broadcasting .
stop
to
to turn frequency upward or downward and stop broadcasting when a
for
mobile phone).
Bluetooth
downward station for broadcasting.
or
on screen.
list
icon
be highlighted
will
station into memory.
the present memory stations for
of
station received.
radio band. When stereo
12. Touch to select
stereo
(ST)
or mono
mode at
FM
stereo indicator will be appeared on screen and this is no indicator for mono
13. Touch to start intro broadcasting of the preset memory stations
Touch
hold shortly
&
to start searching the radio frequency
for a few seconds.
&
stations into memory. After storing, the unit starts intro broadcasting
signal
signal.
storing the strongest
the preset memory
of
received,
signal
stations for a few seconds.
14. Touch to
select local (LOC)
for reception of weak stations. When
no indication for distant setting.
screen and this
Touch the desired preset station number (any of 1-20) to start broadcasting
15.
hold shortly
Touch
&
is
setting for reception of strong
local (LOC)
the preset station number can store the current broadcasting station
signal
setting
stations and a distant setting
selected, LOC will
is
appear on
selected
station.
(frequency) into that station number.
7
]
11
[
Page 13

ON
At
playback mode and playback
SCREEN- DISC/USB/SO CARD INPUT OPERATION
MAIN MENU,
touch r DISC
will
J
I
start
r
USB
J
I
automatically.
r
CARD
J
icon
Depends
media, touch on screen to show various menus for operation.
DVD
VIDEO
PLAYBACK
MENU
DVD
VIDEO
PLAYBACK
MENU
on
screen to shift to multi-media
on
the input device and playback
DVD
VIDEO
PLAYBACK
MENU
18
I -
2 3 4
~
jt
•
VCD/VIDEO
PLAYBACK
MUSIC
MENU
PLAYBACK
18
MENU
2 3 4
VCD/VIDEO
PLAYBACK
MUSIC
MENU
PLAYBACK
18
MENU
2 3 4 1
PLAYBACK
PHOTO
19
VCD/VIDEO
MENU
PLAYBACK
MENU
2 3 4
PHOTO
1 19
PLAYBACK
MENU
2 3 4 1
PHOTO
19
PLAYBACK
[
12]
MENU
2 3 4
FOLDER/PLAYLIST
MENU
2 3 4
Page 14

KEYBOARD MENU
0000/0055
411'
A
q
-
'i
0
R
1
1
?
7
R
30
AUDIO CONTROL MENU 1 AUDIO CONTROL MENU 2
32
1.
Touch to shift to
to
2. Touch
Note: This icon will only be appeared when the unit has been linked up with a mobile phone.
3. Touch to activate
4.
Touch
screen to turn it
5. Hold
6.
At DVD mode, touch to show on screen the menu of the disc.
At VCD mode, touch to shift PBC
the beginning
At media playback mode, touch to activate
device recorded with folder) to select folder
7. Touch to shift
shift to Bluetooth operation.
to
turn off the screen. When the screen has been turned off, touch any portion of the
& slide to show the hidden setup modes.
Each time touch
MAIN
on
in
sequence order.
to
MENU for various operation and setup.
AUDIO
again.
CONTROL
on
MENU 1 for various audio setting.
or off. At PBC
next or previous track for playback.
& hold shortly
to
33
on
mode, touch to start the playback at
FOLDER/PLAYLIST MENU (available for input
I track for playback.
activate various fast forward I fast rewi
speeds for playback.
8.
Touch to pause or resume playback.
9. Touch repeatedly to select repeat playback mode.
1 o. Touch to turn
11. Touch repeatedly to view the angle changes
on
or off of random playback.
in
sequential order.
nd
12. Touch repeatedly to zoom in and zoom out of screen for viewing.
13. Touch repeatedly to select the audio output channels that recorded
in
the
playback device.
14. Touch repeatedly to select different sub-titles that recorded
in
the playback
device.
15. Touch repeatedly to select various slow motion playback.
16. At DVD playback mode, touch to show the on-screen menu of the disc
At VCD playback mode, touch to shift PBC on or off. At PBC on mode, touch
to start the playback at the beginning
17
. Touch
18. Hold & slide
This
19.
At
20.
At
card input, touch to
seconds.
to
activate KEYBOARD MENU
to
select the desired position (time) for playback .
shows
video playback
music I photo playback
the
current input
mode
stop
under
playback
playback
disc
mode
input, touch
under
temporarily
in
to
device.
disc
[
13]
sequence order.
direct input track number for playback.
to
stop playback.
input and playback
and
resume
mode
normal
under
playback
USB I SD
after a
few
Page 15

21. Touch
22. At sub-folder
23. Touch to shift to
24. Touch to shift to
25. Touch to shift to
26. Touch to show
27. Touch to shift page up and down.
to
rotate photo position or show up-down, left-right mirror image for viewing .
playback,
MUSIC FOLDER/PLAYLIST MENU to
PHOTO FOLDER/PLAYLIST
VIDEO FOLDER/PLAYLIST
folders
touch to shift touch to show
on
FOLDER/PLAYLIST
folders
MENU to select photo folder/track for
MENU to
MENU .
on
select
select
FOLDER/PLAYLIST
music folder/track for playback.
video folder/track for
MENU.
playback.
playback.
28. Touch to confirm after inputting
29. Touch
30.
Touch
31. Touch to
set by user.
32.
Hold
33. Hold
34. Touch to close AUDIO CONTROL
35. Touch repeatedly to
for output
36.
Hold
37. Touch repeatedly or touch
38. Touch repeatedly to
Note
: Depending
not
all
of
to
erase the input
directly
select
&
slide
up/down to set for the output level
&
slide
to set for the output
level
&
slide
to adjust output
the
mention
channel
to input
the desired preset equalization mode. At
setting.
on
channel
select volume
select
the
input
operation may work.
channel
number for broadcasting.
level.
&
hold
the desired preset equalization mode.
devices and playback
number for broadcasting.
number.
level
on front
MENU
I
treble
to adjust output
I
1.
(TRE)
on
bass
rear
I
I
bass (BAS)
level.
media
r
User
&
treble
left
I
right speakers.
files,
J
mode , bass
at
r
User
J
I
Fader (FAD)
&
treble
mode.
I
balance (BAL)
can be
ON
At
auxiliary
activate AUX
SCREEN- AUXILIARY INPUT OPERATION
MAIN
MENU, touch "AV in"
device had been connected). At auxiliary
AUX
INPUT
INPUT
MENU for operation.
MENU
icon on screen to shift to
input operation, touch any portion of screen to
1. Touch to shift to
setup.
2.
Touch to turn off the screen. When the screen has been
turned off, touch any portion of the screen to turn
3. Touch to activate AUDIO CONTROL MENU
audio setup.
4. Touch to shift to
Note: This icon
been
linked
up with a
[
14]
auxiliary input operation (provided an
MAIN
Bluetooth operation.
will only
MENU for various operation and
FOR various
be appeared when the
mobile
phone.
it
on
un
again.
it has
Page 16

ON SCREEN- BLUETOOTH OPERATION
At MAIN MENU or at other operation modes, touch "BT" icon on screen to shift to Bluetooth
operation .
LINK
UP
WITH MOBILE PHONE
To linkup Bluetooth connection with the mobile phone, take your phone and follow the steps:
- set the mobile phone to Bluetooth state
- start to search new device
-after
-
-once
- connection succeeded and you can start using Bluetooth function
searched, new device (SAN JOSE120 I CAR BT or similar) searched out, confirm the search
in
case of need, input default code "0000" or "8888"
connected, BT icon appeared
BT
DIAL MENU
on
screen & "Connected" appeared
BT
PHONEBOOK MENU
in
the mobile phone
on
BT PHONE MENU.
BT
PHONE MENU
:..t
,.,.
\jl
0
BT
MUSIC MENU
4 5 6
2J
7 8
...
. t .
\;.
•·
011
\;.
,.
\.
BT
4 5
~~~"
.,
.
I
t
1#1'\a~A
'1'•1"1.
\:·
.1.
SETUP
6 7 8
...
I:''-'~"
" '
'
n
MENU
1. Touch to shift to MAIN MENU for various operation and setup.
2. Touch to activate
AUDIO
CONTROL
MENU
for various audio setup.
3. Touch to turn off the screen. When the screen has been turned off, touch any portion of the
screen to turn it
4. Touch to shift to BT DIAL MENU for dial out
5. Touch to shift to
6.
Touch to shift to BT PHONEBOOK MENU to show phonebook.
on
again.
of
phone.
BT PHONE MENU to show record
on
dial out I incoming call I missing call.
7.
Touch to shift
to
BT MUSIC MENU for transmission of music playback from the connected
mobile phone.
8. Touch to shift to
(Note: This menu
9.
Touch to dial out after input the phone number or redial when
to
10. Touch
11
. Touch directly to input the phone number.
12. Touch
13. Touch
hang up or refuse
to
erase the digit input by error.
to
shift conversation between mobile phone & Bluetooth of the unit.
BT SETUP MENU
is
not available for setting)
to
an
incoming call.
show the device name & pin code for pairing.
no
phone number input.
15]
[
Page 17

14. Touch
15
.
Touch
16. Touch to start downloading the outgoing call from the linked mobile phone.
Touch anyone of the contact for dial out.
17. Touch to start downloading the incoming call from the linked mobile phone.
Touch anyone of the contact for dial out.
18.
Touch to start downloading the missing call from the linked mobile phone.
Touch anyone of the contact for dial out.
19. Touch to start
20
. Touch repeatedly to select upward or downward track for playback.
to
shift page up or down.
to
act
i
vate
or
close
I
pause
I
resume music playback transmitted from the mobile phone.
the
key
board
for
phone
book
searching
.
ON
At
viewing mode, touch any portion of screen to activate
operation.
IMPORTATION NOTICE
Interfaces,
varied from the exact unit. However, all of them come with similar outlook of the same type and
with the same operation method.
SCREEN- FRONT CAMERA
MAIN MENU,
FRONT CAMERA
INPUT MENU
photos,
touch
"F.CAM"
4 3 2
FOR
images , icons
icon on screen to shift to front camera viewing. At front camera
1. Touch to shift to
setup.
2. Touch to turn off the screen. When
turned off, touch any portion of the screen to turn it
3. Touch to activate
audio setup.
4. Touch to shift to Bluetooth operation.
Note : This icon will only be appeared
been linked up with a mobile phone.
ON
SCREEN
&
location as shown
INPUT OPERATION
OPERATION
FRONT
MAIN MENU
AUDIO
in
this part of operation manual may be
CAMERA
for various operation and
CONTROL
INPUT
th
e screen has been
MENU FOR
wh
MENU
on
various
en the unit has
for
again.
[
16]
Page 18

SPECIFICATION
GENERAL
Power Requirement:
Load
Impedance:
Maximum Power Output:
DC
12
40hms
40
watts x 4
Volts, negative ground
channels
RADIO
SECTION
Frequency Range:
Area:
Europe
OIRT
Australia
Middle
East
America 1
America 2
America 3
America 4
Japan
Brazil
China
IF:
DISC
SECTION
Disc
Play
Mounting
Angle
VIDEO
Video
Video Output
Horizontal Resolution:
Level:
AM
Section
Frequency
522
-1620
522 -
1620 KHz
522-1710
531530
530
1602KHz
-
1620
-
1620
530-1710
530522-
1710KHz
1629KHz
520-1710
522 -
1620
450KHz
KHz
KHz
KHz
KHz
KHz
KHz
KHz
Stepping
9KHz
9KHz
9KHz
9KHz
10KHz
10KHz
10KHz
10KHz
9KHz
10KHz
9KHz
FM
Frequency
87.5-108
65-74
87.5-
87.5-
87.5-
87.5-
87.5-107.9
87.5-
76-90
87.5-
87.5-
10.7
DVD
I
VCD
+1-
30"
PAL
I
SECAM
1.0Vp-p
500
Section
MHz
108 MHz
108 MHz
108
107.9 MHz
108
MHz
108 MHz
108
MHz
I
MP3
75
Ohms
MHz
MHz
MHz
MHz
MHz
I
I
NTSC
CD
Stepping
50
30KHz
100KHz
100KHz
100KHz
100KHz
50
50
100KHz
50
IMPS
50
KHz
KHz
KHz
KHz
KHz
BLUETOOTH
SECTION
Communication type:
Maximum Distance:
AUDIO
SECTION
Maximum Output Level:
Frequency Response:
Signal
to
Noise Ratio:
Channel Separation:
NOTE:
segment
operation manual
operation
Specification and design; functions and features;
are
subject
to
might
might
be varied from the operation manual
V2.1
5 meters
2 Vrms (
20
+1-3
Hz
to 20 KHz
dB)
85 dB
80
dB
unit
illumination;
change
without
prior notice. Photos
and drawings on
be varied from the exact unit. Depending on the
described.
[
17]
colour and display
gift
box or
input
devices,
Page 19

SIMPLE
TROUBLE
SHOOTING
PROBLEMS,
No
power
-Check
-Check
No
sound
Check
-
No
picture
-Check
and
whether the
and
whether the video wire
--------------------------------------------------
make
sure
make
the connecting
fuse
is
blown.
sure
the
speaker
is
wires
Replace
wires
connected to the video device
Unit hang-up
-Press
the
RESET
button to
No
function when pressing the buttons or
-Press
the
RESET
button to
reset
reset
the unit to
the unit to
Poor effect or unable to receive radio I
-
Check
whether the radio/TV antenna
may
not
be
-Antenna
Antenna
-
may
Stereo cannot
-Tune
the radio frequency
-The
broadcasting singnal
be
be
the proper length.
not poorly grounded.
received under radio mode
accurately.
is
too
weak,
Disc Inserted but cannot play
-Check
-Check
-Lens
whether the
whether the
is
dirty.
Clean
disc
inserted upside down.
disc
is
dirty or badly
lens
by
using
the
lens
CAUSES & SOLUTIONS
are
connected properly
with the propet
are
connected correctly.
its
default
TFT
screen
Its
default
stage.
stage
value
fuse
TV
is
inserted or properly connected.
Make
sure
Check
set
the mode to
the antenna
and
make
sure
MONO.
Is
fully extended.
the antenna
cracked.
clean
disc.
if
necessary.
is
properly grounded.
Picture without colour or no sound under disc I
-Improper setting of colour
·The
disc
is
dirty or
demange.
system.
Wipe
Set
the
again
disc
with a dry soft cloth or
TV
to
''PAt:~
'SECAM"
Abnormal moving, skipping or sound during playback
-The
disc
is
dirty or
damange.
Wipe
the
disc
with a dry soft cloth or replace.wlth.(l
Remote handset does not work
·Replace
-Point the remote handset directly
-Clean
BLUETOOTH
-Check
with a new battery of the remote
at
the
to
surface
make
of the remote
not
working
sure
the
devices
sensor.
are
linked up correctly.
handset.
the remote
sensor
NOTE:
After attempting the above effort,
your service dealer. Never
attempt
part inside the unit.
if
the
unit
to
disassemble the
mode
or"
NTSC"
of the
replace
main
unit.
a new
disc.
~.eV\1
~lsc,!
~
..
-.-.,
cannot operate normally, consult
unit
by yourself. No service
........
,~
....
-~.
,,_,
-~-
...............
Mo•'•'
·n<-•·······"·"'''
[18]
Page 20

NOTE:
device, pursuant
This equipment
to
part
has
been tested and found
15
of
the
FCC
Rules.
to
comply
with
the limits for a
These limits are designer
class
to
provide reasonable
protection harmful interference in a residential installation. This equipment generates,
and can radiate radio frequency energy and,
instructions, maybe cause harmful interference
not
guarantee
does cause harmful interference
by turning the equipment
by one or more
that
interference will
to
off
and on, the user
of
the following measures:
not
radio or television reception, which can be determined
if
not
installed and used in accordance
to
radio communications. However, there
occur in a particular installation.
is
encouraged
to
try
to
correct the interference
with
If
this equipment
-Reorient or relocate the receiving antenna.
-Increase the separation between the equipment and receiver.
into
an
-Connect the equipment
is
connected.
-Consult the dealer
"Due to
Safety
or
an
regulations
outlet on a circuit different from
experienced radio/TV technician for help.
the
video
will
not
display
while
the
that
to
vehicle
which
is
being
the
receiver
operated"
B digital
uses
the
is
[
19]
Page 21

Shag
BLAUPUNKT
Angeles, California 90064
hal Ltd.
2231
Colby
Ave,
Los
Rights Reserved. The Bluetooth word mark and
by
All
the
with
to
Bluetooth
part
this device may
(1)
cause cancer and reproductive toxicity.
SIG,
of
15
WARNING:
the
This
Rules.
FCC
cause harmful interference, and
not
product
and are used
Inc.
under license by Shag hal
Operation
contains a chemical known
subject
is
©2017
trademarks
Ltd. This device complies
following
(2)
my cause undesired operation.
the
to
BLAUPUNKT.
owned
conditions:
two
this device must accept any interference received, including interference
California
State
of
logos
to
are
the
that
Page 22

BLAUPUNKT
Warranty
1 Year
BLAUPUNKT
defect, under normal conditions, such defect(s) will be repaired or replaced with new or reconditioned
product (at the Company's option)
said
If
at our discretion. This warranty only covers manufacturer defects and must be returned
original condition.
Proof
product damages
Limited
warrants
product
of
Purchase
Manufacturer
to
the original retail purchaser
is
out
of
stock,
is
required. This Warranty does
(i.e.
discs, tapes, etc.) or reinstallaL
Warranty
without
BLAUPUNKThas
-
charge for parts and repair labor.
the option
Information
of
this product that should this product have any
to
replace
not
cover the costs incurred for installation, removal,
nf
the product.
it
with a similar product or
issue
to
company in
a refund
This
warranty
installation, negligence, misuse, or tampering with the
warranty
BLAUPUNKT
BLAUPUNKT
warranty support.
Customer
Please
can
9AM-5PM
inquiry before calling
customerservice@ematic.com make sure
you
visit our
also
are
encountering.
is
void
if
company deems the unit
is
a limited warranty for repair/replacement
is
never responsible for more than the purchase price
encourages customers
is
responsible for shipping the product
F.A.Q
section where you will find answers
reach
a customer service representative by calling: 1-888-968-1985.
PST
except weekends and major Holidays.
as
this will enable
to
contact the retailer first and only then contact
to
include the model number and brief description
to
have been damaged through modification, improper
to
us;
we cover shipping back
BLAUPUNKT
us
to
Serial
of
to
number and/or bar code
product
most
better assist you. Our email address
if it
falls under the above conditions.
of
the product.
to
the customer.
of
your questions at www.ematic.com
We
are
strongly urges customers
open
of
the unit. This
BLAUPUNKT
Monday-
to
of
the problem
for
You
Friday
email their
is:
 Loading...