

Blaupunkt NEVADA RDM 168, NEVADA RDM 168 BLUE, NEVADA RDM 168 YELLO, NEVADA RDM 168 RED User Manual
Page 1
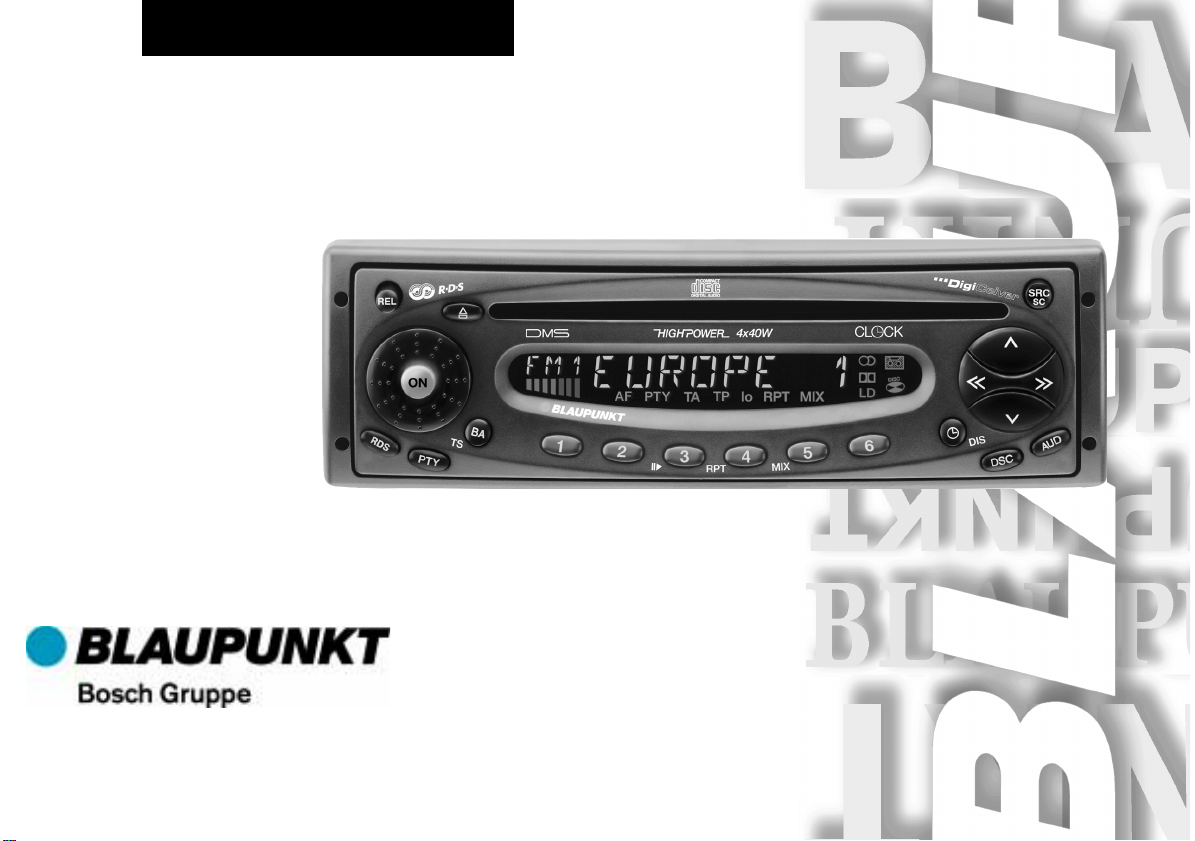
Radio / CD / Changer
Florida RD 168 US
Nevada RDM 168 US
Alaska RDM 168 US
Operation instructions
Page 2
15
14
1213
11
1
10
22
3
4
5 9
2
1
2
6
Thummer™ III Steering Wheel Remote Control (sold separately)
Commande à distance Thummer™ III (optionnelle)
Funcionamiento del control remoto Thummer™ III (opcional)
11
Funcionamento do Controle Remoto Thummer™ III (opcional)
10
87
Page 3

Table of contents
Equipment overview ...................... 5
Florida RD 168........................................ 5
Nevada RDM 168 ................................... 5
Alaska RDM 168..................................... 5
Quick reference .............................. 6
Important information.................. 11
What you definitely should read ........... 11
Traffic safety ......................................... 11
Installation............................................. 11
Telephone mute.................................... 11
Accessories .......................................... 11
Anti-theft security system/
detachable face ............................ 12
Detaching face...................................... 12
Attaching face ....................................... 12
Care of face .......................................... 12
Locking face ...................................... 12
Choosing mode of operation ...... 12
RDS radio operation .................... 13
AF alternative frequency ...................... 13
Selecting frequency band areas........... 13
Station tuning........................................ 13
Station search
Manual tuning with << >>.................. 1 3
/ ........................... 13
Scrolling through station chains
(only FM)............................................... 13
Changing storage level (FM) ................ 14
Storing stations..................................... 14
Automatic storage of strongest stations
with Travelstore .................................... 1 4
Calling stored stations .......................... 14
Scanning stations with radio scan........ 14
Changing scan time.............................. 14
Changing sensitivity of station search.. 15
Switching stereo/mono (FM) ................ 15
Activating automatic IF bandwidth
switching ............................................... 15
PTY- Program type (mode) .................. 15
Program types ...................................... 15
Turning PTY on/off ............................ 15
Inquiring about station program type 15
Choosing program type..................... 16
Storing program type ............................ 16
Scanning stations with PTY scan......... 16
PTY priority ........................................... 1 6
CD operation................................. 17
Turning CD operation on ...................... 17
Inserting CD.......................................... 17
Removing CD ....................................... 17
Choosing title ........................................ 17
CD mix operation.................................. 18
CD pause .............................................. 18
CD repeat (RPT/repeat function) ......... 18
CD SCAN operation ............................. 18
CD changer operation.................. 18
Inserting CDs ........................................ 18
Removing CDs...................................... 18
Playing CDs .......................................... 19
Choosing titles ...................................... 19
CD MIX operation ................................. 19
CD PAUSE............................................ 19
CD Repeat (RPT/repeat function) ........ 19
CD SCAN operation ............................. 19
Choosing the display mode .................. 20
To change the display mode............. 20
Naming CDs.................................. 20
Starting CD name input ........................ 20
Deleting CD name input ....................... 21
Deleting one CD name...................... 21
Deleting all CD names of a CD
magazine ........................................... 21
Deleting entire name storage of a CD
changer.............................................. 21
Deleting entire name storage of a CD
player................................................. 21
ENGLISH
FRANÇAIS
ESPAÑOL
PORTUGUÊS
NEDERLANDS
SVENSKA
ESPAÑOL
3
PORTUGUÊS
Page 4

Clock / time ................................... 22
Setting time........................................... 22
Displaying time ..................................... 22
Adjusting time after power outage........ 22
Turning off adjustment for daylight
savings time.......................................... 22
Equalizer Setting .......................... 23
Setting instructions ............................... 23
Assistance in setting your equalizer..... 24
DSC programming ....................... 25
Overview of the basic DSC factory
settings.................................................. 27
Specifications............................... 27
Amplifier................................................ 27
Tuner..................................................... 27
Cassette................................................ 27
CD ......................................................... 27
CD changer
(optional, only for Alaska RDM168
and Nevada RDM168).......................... 27
Troubleshooting Guide................ 28
General ................................................. 28
Radio reception..................................... 28
CD Changer operation (optional) ......... 28
Error Displays ....................................... 29
4
Page 5

Equipment overview
Florida RD 168
Florida RD 168 with multi-tone green display
Features:
– CD player
– 4 x 40 watt maximal output perform-
ance
– 4-channel preamp-output (3V)
– Release panel (detachable electronic
face)
– RDS (FM/AM) EON
– PTY (station search by program type)
– Codem D reception model
– 30 storage areas
– Clock (exact time controlled by RDS
with automatic daylight savings setting)
– Hicut (reduced interference when re-
ception is difficult)
Nevada RDM 168
Nevada RDM 168 with multi-tone orange
display
Same features as Florida RD 168, but in
addition:
– Equalizer for setting of low and middle
frequencies (1 band equalizer, bass
logic)
– Source tone memory (customized tone
setting of each signal source (Radio,
CD, CD changer) is stored automatically for the respective signal source)
– Connection of remote control possible
– Telephone mute (muting during phone
call)
– Disc management system
(Control of a connected CD changer
possible)
– AUX function (connection of an exter-
nal signal source (e.g., a walkman)
possible)
Alaska RDM 168
Alaska RDM 168 with multi-tone yellow and
green display
Same features as Nevada RDM 168, but in
addition:
– Equalizer for setting of low, middle,
and high frequencies (digital parametric equalizer / 2 band)
– Sharx (automatic IF bandwidth switch-
ing to reduce interference from adjacent stations)
– CD naming (possibility of naming the
CDs in the CD changer to be able to
list them on the display)
ENGLISH
FRANÇAIS
ESPAÑOL
PORTUGUÊS
NEDERLANDS
SVENSKA
ESPAÑOL
PORTUGUÊS
5
Page 6

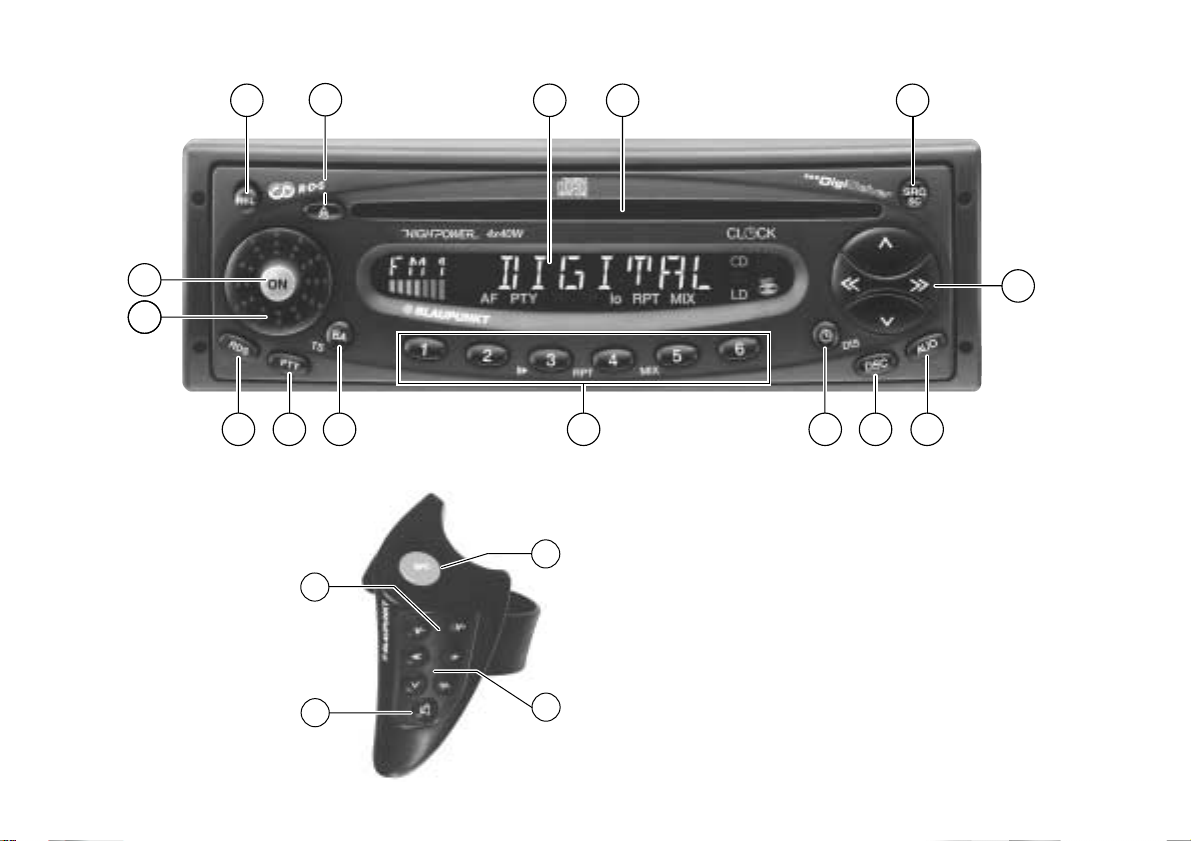
Quick reference
“Press” means a momentary press of less
than 1/2 second. All presses requiring more
than 1/2 second are followed by a beep.
(Beep for all button presses available
through Direct software Control Menu.)
1 Power On/Off:
Press the On/Off button in the center
of the level volume control or inserting
a disc into the unit - the face must be
installed and the ignition must be on.
The unit operates at the preset volume
level.
Power on/off when ignition is on:
When unit on, the unit can be turned
off and then on again through the car
ignition.
Last-used source becomes active unless unit is turned on by inserting disc,
in which case CD player becomes active.
Power on when ignition is off:
The unit (with faceplate installed) can
be operated again as follows when the
ignition is off:
The unit is turned on by pressing the
On/Off button in the center of the volume level control.
In order to protect the car battery, the
unit will automatically stop playing after
approximately one hour.
2 Adjusting the volume:
The unit will operate at the preset volume level when it is turned on. The
volume is changed by adjusting the
loudness control.
Turn control to right to increase volume level. Turn control to left to decrease volume level.
Press On/Off button to temporarily reduce volume. “Mute” appears and volume level returns to the mute value set
in the DSC menu.
To clear the mute function, press the
On/Off button again or adjust the level
control.
The mute function for reducing the volume level and the preset volume level
of the unit can be changed according
to the instructions under “Programming
with DSC”.
3 AF
To turn the AF function on/off:
Press the RDS key for approximately
2 seconds. You will hear a beep and
“AF” appears.
With the assistance of RDS the unit
will search for an alternative frequency
that provides better reception for the
station presently being listened to.
The AF function is turned off by pressing the RDS key for approximately
2 seconds.
After the beep the display will no longer display the letters “AF”.
3 RDS
By briefly pressing the RDS key you
can switch from the display of the station frequency to the name of the station (if available).
4 PTY
Program type = program mode
“PTY” turns the station keys to program type keys. Each station key allows you to choose a program type
such as news, sports, rock, pop, education, etc. Once PTY is activated, the
toggle switch << >> is able to call all
program types. To activate press on
the PTY key and “PTY” appears. Press
the PTY key again to disactivate.
6
Page 7

5 BA
To switch between the storage levels/
frequency band areas FM 1, FM II, TS
(Travelstore) AM, and AM Travelstore.
Additional Travelstore features:
To activate Travelstore press the BA
key until you hear a beep and
“T-STORE” appears.
TS stores the six strongest stations.
6 Station keys 1 - 6
Radio operation
At each storage level (I, II, and “T”) of
the FM area, you can store up to six
stations.
You can also store 6 stations in the
AM area and the AM Store area.
Preset Station Storage
Set the radio to the station to be
stored. Press the station key where the
station should be stored (program will
be muted) and hold down the key until
the program can be heard again and
the beeping stops.
Preset Station Selection
To set the frequency band area and
choose the desired storage level (FM,
AM or FM/AM Travelstore) press one
of the six preset stations. You can listen to the station stored there.
Additional features of the preset
station keys
To store and select the PTY program
type.
After activating PTY (“PTY” appears in
the display), you can store and select
a program type (e.g., rock, pop, classical, news, etc.) on each station key in
FM operation.
CD operation
3/II pause
Press station key number 3 and the
current CD program will be switched
and “pause” appears. Press station
key 3 again to stop pause.
4/RPT repeat
CD titles can be played repeatedly.
You are able:
To repeat the presently playing title
(“REPEAT-T”) or all titles of the CD
you are presently playing (“REPEATD”).
When the RPT function is activated the
display lights up with “RPT”. After
choosing the repeat function and after
each title change, the display will brief-
ly show “REPEAT-T” or “REPEAT-D”.
REPEAT-T on:
• Press “4/RPT”.
REPEAT-D on:
• Depress “4/RPT” and hold.
To turn “RPT” off: Press “4/RPT”.
5/Mix operation
Press station key 5 to turn on the mix
operation for the currently playing CD.
This will cause the titles of this CD to
be played in a random sequence. “MIX
CD” appears and the word “MIX” will
fade in at the bottom of the display.
Pressing station key 5 again to disactivate this function.
5/Mix operation of the CD changer
CD titles can be played in random sequence.
You are able to:
Play all titles of a CD (“MIX-CD”) or all
titles of all inserted CDs (“MIX-ALL”) in
random sequence.
When the MIX function is activated,
“MIX” appears.
After switching to this function and after each title change, the display will
briefly show “MIX-CD” or “MIX-ALL”.
MIX-CD on:
• Press “5/MIX”.
ENGLISH
FRANÇAIS
ESPAÑOL
PORTUGUÊS
NEDERLANDS
SVENSKA
ESPAÑOL
PORTUGUÊS
7
Page 8

MIX-ALL on:
• Hold “5/MIX” depressed.
Press “5/MIX” to disactivate MIX.
7 Clock display
Press the DIS key when the unit is
turned on and the current time will be
shown for approximately 8 seconds.
Additional features of the clock display
Press and hold DIS key until it beeps
which will result in a permanent time
display.
When carrying out other functions, the
time display will be masked for approximately 8 seconds.
8 DSC (direct software control)
You can customize certain basic unit
settings with DSC. Additional information can be found in the section “Programming with DSC”.
9 AUD
This key activates the tone setting
menu. You can set different tone settings for each operation mode. The last
setting for each operation mode will be
stored. (This applies only to the Nevada RDM 168 and the Alaska RDM
168.)
Setting treble (high tones) and bass
(low tones):
Press the AUD key once. The display
will show “BASS” and you can change
the setting by pressing the toggle
switch either to the left or right.
You can change the treble setting by
pressing the rocker switches either up
or down while the display shows “TREBLE”.
The display will show the chosen values. The last value will be stored.
Press the AUD key to disactivate.
The AUD setting will end automatically
if there is no change within 8 seconds.
Setting balance (left/right) and fader
(front/back):
Press the AUD key two times.
By operating the rocker switches up or
down you can set the volume ratio between the front and the back speakers.
At the same time the display will indicate “FADER”.
Press the toggle switches to the left
and right to adjust the volume. At the
same time, the display will indicate
“BALANCE”.
The display will show the selected values. The last value will be stored.
Press the AUD key to turn off.
The AUD setting will be end automatically if there is no change within 8 seconds.
9 LD - loudness
To set the low tones appropriate for
the human ear at low volume levels.
Press the AUD key to turn the loudness function on/off and hold the key
down until you hear a beep. In units
with source tone memory, the loudness function can be turned on and off
for each signal source independently.
: Toggle switch
Radio operation
Automatic tuning
/ Station search
up
down
Manual tuning
<< >> incrementally up/down
(in FM only when AF turned off)
8
Page 9
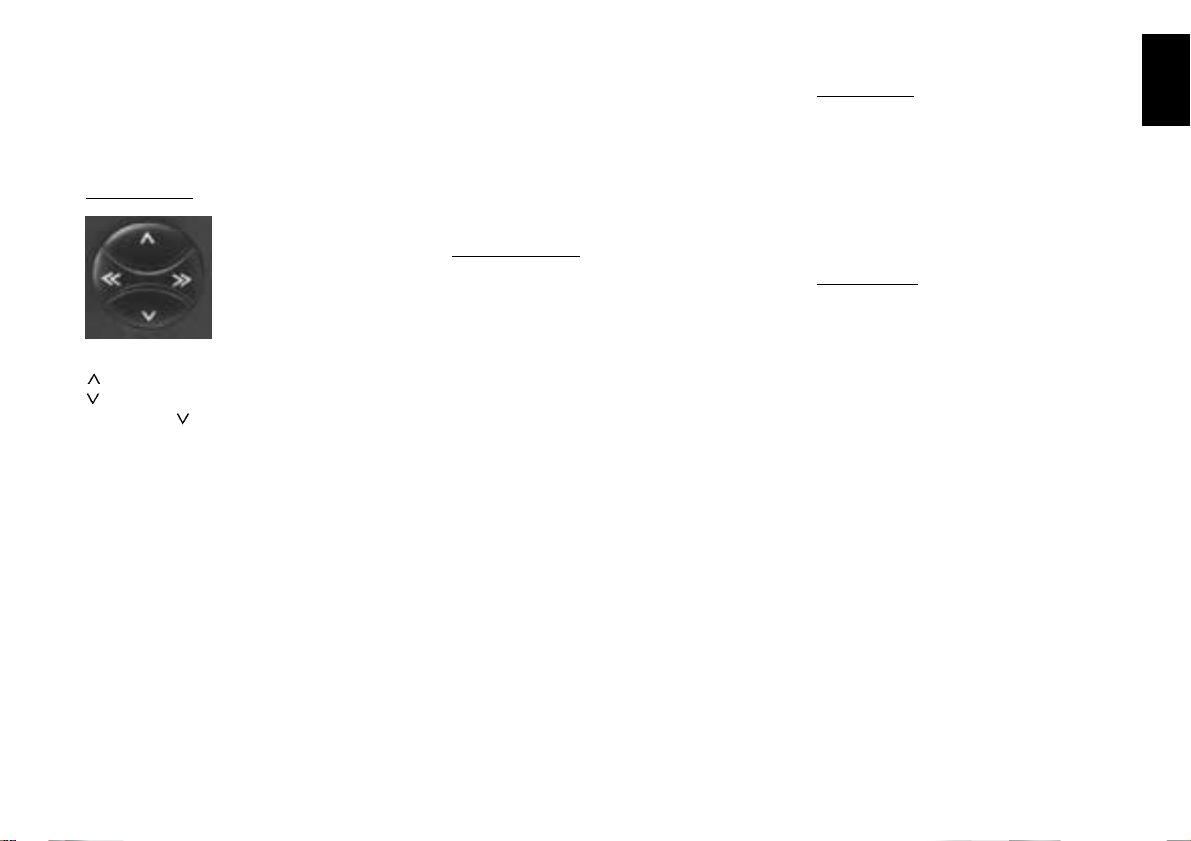
In FM only:
<< >> Scrolling through the station chains
when AF is on (e.g. NDR1,2,3,4,
N-Joy ...) .
CD operation
Select title
up
down
By pressing once, the currently playing
title will start from the beginning.
>> Fast forward, audible
Hold depressed as necessary
<< Fast reverse, audible
Hold depressed as necessary
Additional functions of the toggle
switch:
Possible other settings with
AUD 9
DSC Mode 8
PTY 4
The respective function must be activated.
; SRC
“SRC” (source)
This key allows you to switch between
the operation modes Radio, CD and a
CD changer (if one is connected).
; SC Scan
Radio operation
Press the SC key for approximately
2 seconds.
You will hear a beep and the display
will alternate between “SCAN” and the
abbreviated name of the scanned station. All FM stations that can be received will be briefly scanned.
PTY scan:
The PTY scan can only be started if
PTY is turned on. (The display will
show “PTY”.)
Press the SC key for approximately
2 seconds.
You will hear a beep and the display
will alternate between “PTY SCAN”
and the abbreviated name of the
scanned station.
The stations with the selected program
type will be briefly scanned.
Stop Scan / PTY: Press the SC key.
CD changer
Press the SC key for approximately
2 seconds. You will hear a beep and
the display will show “SCAN”. Each title of each CD will be briefly scanned
sequentially.
Stop CD Scan: Press the SC key.
CD Changer
Press the SC key for approximately
2 seconds. You will hear a beep and
the display will show “SCAN”. Each title of each CD will be briefly scanned
sequentially.
Stop CD Scan: Press the SC key
again.
< Inserting CD
After inserting the CD with the label
facing up, it is automatically transported to the operating position. The unit
automatically switches and plays the
content of the inserted CD.
ENGLISH
FRANÇAIS
ESPAÑOL
PORTUGUÊS
NEDERLANDS
SVENSKA
ESPAÑOL
PORTUGUÊS
9
Page 10

= Display
a b c hd e f g li j k
a) - Station name
b) - Frequency band area
c) - Peak/volume display
m
on
p
d) - Station keys (1 - 6)
e) - Alternative frequency with RDS
f) - Program type activated
g) - Sensitivity of station search
h) - CD repeat function activated
i) - CD mix operation activated
j) - Loudness function on
k) - CD in unit
l) - Program played in stereo
m) - Time display
n) - First CD title being played
o) - Length of time CD title has been playing
p) - Fifth CD in CD changer being played
q) - CD name
> Eject
When you press this key the unit will
eject the inserted CD.
? Detachable face
By pressing the REL key the face will
be freed and can be detached.
When you attach the face, first insert it
into the mounting unit on the right
hand side of the radio. Then press the
face to the left side of the radio until
you can hear it snap into place.
Be sure not to press on the display
when attaching the face.
10
q
Page 11

Important information
What you definitely should read
You should read the following information
carefully before operating your car radio.
Traffic safety
Traffic safety should be your main concern.
At all times you should use your car radio
system so that you are able to react to the
existing traffic conditions quickly.
Consider that your automobile travels 46 feet
per second when driven at a speed of 31
miles/hour.
We recommend that you refrain from operating the car radio when traffic conditions
are critical.
You must be able to react to warning signals (e.g. ,by the police and the fire department) in a timely and safe manner when
driving your car.
For that reason, you should listen to your
program at an appropriate volume level.
Installation
We urge you to read the enclosed information about installation and add-ons before
you attempt to install or expand your system.
In order for the system to operate problemfree you must connect “Plus” with the ignition and with the permanent +12V lead.
You must definitely not ground the speaker
outputs because that will damage the power amplifiers.
Telephone mute
If you use a car telephone, the radio and
CD output can automatically be muted (telephone mute) when you receive a call. The
display will then show “PHONE”.
Accessories
You should use only the accessories and
replacement parts authorized by Blaupunkt.
You can operate the following Blaupunkt
products with this unit:
Additional amplifiers
All Blaupunkt amplifiers
CD changer
Only the Nevada RDM 168 and the Alaska
RDM 168 can be operated with a CD changer. The CD changer CDC-A 08 and CDC-A
072 can be used for that purpose.
Remote control
The infrared remote control RC 08 enables
the operation of the most important radio
functions from the steering wheel.
Protective case for detachable face
A protective case is delivered with the radios designed with a detachable face.
ENGLISH
FRANÇAIS
ESPAÑOL
PORTUGUÊS
NEDERLANDS
SVENSKA
ESPAÑOL
11
PORTUGUÊS
Page 12

Anti-theft security system/detachable face
Choosing mode of operation
The radio it is equipped with a detachable
face in order to prevent theft.
Detaching face
You detach the face by pressing the REL
button at the top left of the radio. The face
will snap out of its mounting unit and can be
detached from the radio. The face can be
detached when the radio is on or off.
Attaching face
You attach the face by sliding it into the
mounting points on the right side of the radio and by pressing the face into the mounting unit until you can hear it snap into place.
Be sure not to press on the display when
attaching the face.
After attaching the face the radio will return
to the same operating mode as before the
face was last removed.
Care of face
The detached face should be carefully protected from the impact of blows and shock.
The face must not come into contact with
any liquids and should not be exposed to
direct sunlight and other heat sources. In
order to guarantee the trouble-free operation of the radio the terminal strip visible at
the back of the face must be in excellent
condition.
Therefore, when storing the detachable
face, please use the protective case that was
delivered with the radio.
Locking face
In order to prevent the unauthorized removal of the face (e.g., during a sales presentation of the radio equipment), it is possible to
lock it.
For that purpose, you insert the face and
turn the delivered screw into the threaded
hole at the left side of the radio.
“SRC” (source) enables you to choose between the operation modes Radio, CD and
CD Changer (if one is connected).
“CD” can only be chosen if a CD is inserted.
“CD changer” can only be chosen if a CD
changer including a CD magazine is connected.
If that is not the case, the display will show
“NO CD”.
You can switch the mode of operation by
pressing the SRC key.
12
Page 13

RDS radio operation
The radio data system improves the ease
of listening to FM stations.
More and more radio stations send RDS information in addition to the program.
As soon as station programs can be identified, the abbreviated name of the station
along with the abbreviation of the region (if
available) will be displayed (e.g., NDR 1,
NDS (Niedersachsen)).
When the AF function is activated, RDS
turns the station keys into program keys.
Now you know exactly which program you
are receiving and you are able to select the
desired program directly.
RDS offers the following additional benefits:
AF alternative frequency
The AF function automatically assures that
the program is received at the best frequency.
This function is on when the display lights
up with the letters “AF”.
The radio output can be muted during the
search for the best frequency of the selected program.
The unit is automatically searching for an
alternative frequency if the display shows
“SEARCH” when you turn the radio on or
call a stored frequency.
“SEARCH” is no longer displayed when an
alternative frequency is found or the entire
frequency band was searched.
You should choose a different program if the
selected one can no longer be received with
acceptable quality.
Selecting frequency band areas
You may choose between the following frequency band areas:
FM 87.7 - 107.9 MHz,
AM 530 - 1710 kHz
You select the desired frequency band area
by pressing the BA key.
Station tuning
Station search /
When you press / the car radio will automatically search for the next station.
When you hold
down position the station search will quickly fast forward or reverse.
Station search
up
dpwn
<< >> incrementally up/down (in FM only if AF
is turned off)
/ depressed in the up or
Manual tuning with << >>
You can tune manually.
AF and PTY must be turned off. (The symbols do not light up in the display.)
You may also turn these functions off by
pressing the RDS key or the PTY key.
To perform manual tuning:
Pressing << >> will incrementally change the
frequency up or down.
If you hold the toggle switch down on the
right or left, the frequency search will be
conducted quickly.
Scrolling through station chains
(only FM)
You can call a station in the reception area
by pressing << >>.
If several programs of the station chains can
be received you are able to scroll >> (forward) or << (reverse) through the station
chains (e.g., NDR 1, 2, 3, 4, N-JOY ...).
In order for this to work, the stations must
have been received at least once before and
AF must be activated (lit up in the display).
For example, you can start Travelstore as
follows:
• Press the BA key for 2 seconds. This
will cause a frequency search.
• If AF is not lit up you press the RDS
key.
13
ENGLISH
FRANÇAIS
ESPAÑOL
PORTUGUÊS
NEDERLANDS
SVENSKA
ESPAÑOL
PORTUGUÊS
Page 14

Pressing << >> enables you to chose the
station.
Changing storage level (FM)
In order to store or call the stored stations,
you may switch between the storage levels
1, 2, and T, as well as AM and AM Travelstore.
The display will indicate the selected storage level.
• Press the BA key until the display
shows the desired storage level.
Storing stations
By pressing the station keys 1 - 6 you can
store six stations per storage level (1, 2, and
T) in the FM area.
In the AM and the AM Travelstore area you
can also store six stations per storage level.
• The BA key allows you to choose the
frequency band area.
• Select a station by using the toggle
switch (automatically
<< >>).
• Press the desired station key until the
muted program is audible again (approximately 2 seconds) or the beeping
stops.
/ or manually
Now the station is stored.
The display shows the stored station.
Automatic storage of strongest
stations with Travelstore
You can automatically store the six strongest FM and AM stations of the respective
reception area you are presently in. This
function is particularly useful when you are
traveling.
• Press the BA key for 2 seconds.
The display will show “T-Store”.
The six strongest FM or AM stations will
automatically be stored in storage level T
(Travelstore). When the process is completed the strongest of the six stations will be
shown in the display and its program will be
audible. You may also store stations in the
Travelstore level by following the instructions
under “Storing stations”.
Calling stored stations
You may call the stored stations by pressing the respective keys again.
• Choosing the frequency band area
with the BA key and selecting the desired storage level. Press the BA key
repeatedly until the desired level appears in the display, then press the respective station key.
Scanning stations with radio
scan
You can briefly scan the stations you are
able to receive.
To turn on scan:
• Press the SC key for 2 seconds.
The display will flash the scanned frequen-
cy or the abbreviated station name. During
the search the display will light up with “FMSCAN” or “AM-SCAN”.
If you would like to listen to the scanned station for a longer period, you Press the SC
key and thereby terminate the preset scan.
If no station is selected, the scan operation
will be turned off after the search of the frequency band is concluded and the station
you selected prior to the scan function will
be played again.
Changing scan time
You may increase the duration of the scan
process incrementally from 5 to 20 seconds.
Additional information can be found under
“Programming with DSC”.
14
Page 15

Changing sensitivity of station
search
You may change the sensitivity of the automatic station search.
If “lo” is displayed, the search will only look
for stations with good reception (low sensitivity).
If “lo” is not displayed, the search will also
include stations with lower reception quality.
Under “Programming with DSC” you can find
information about how to switch the sensitivity of the station search and how to program the station search sensitivity.
Switching stereo/mono (FM)
The DSC menu allows you to switch between stereo and mono. This can be useful
in marginal reception areas.
When turning the unit on it automatically
provides stereo output.
As the quality of the reception decreases
the unit changes smoothly to mono output.
The chapter “Programming with DSC/Stereo/Mono” informs you how to switch to
mono.
The chosen mode will be briefly indicated in
the display.
Activating automatic IF bandwidth switching
The SHARX function in the DSC menu allows you to activate automatic IF bandwidth
switching. This function proves to be beneficial when a reception area contains many
stations. Choosing “SHARX ON” eliminates
most of the interference caused by strong
adjacent stations.
You can find additional information under
“Programming with DSC - SHARX”.
PTY- Program type (mode)
This is an RDS service that is gradually being implemented by the broadcast companies. It allows you to automatically search
for stations with a certain program content.
You choose the specific program type and
a search for the respective stations is conducted by station search or the scan function.
Program types
Turn on PTY by pressing the PTY key.
By pressing << >> you can identify the program type you chose last and select a different one.
The station keys 1 - 6 enable you to select
the stored program types. Some of the avail-
able program types are mentioned below:
POP
ROCK
WEATHER
CHILDREN
TRAVEL
HOBBIES
JAZZ
OLDIES
NEWS
SPORTS
CULTURE
Turning PTY on/off
• Press the PTY key.
When the function is activated the display
will briefly indicate the program type you last
chose and then it permanently shows “PTY”.
Inquiring about station program type
• Press the PTY key for approximately
2 seconds.
After the beep the display will indicate the
program type the received station is broadcasting.
If the display indicates “NONE,” the station
is without PTY identification.
ENGLISH
FRANÇAIS
ESPAÑOL
PORTUGUÊS
NEDERLANDS
SVENSKA
ESPAÑOL
15
PORTUGUÊS
Page 16

Choosing program type
a) with the station keys:
When PTY is turned on, the station
keys 1- 6 select the program types determined by the factory.
• Press one of keys (1 - 6). The display will show the selected program
type for 2 seconds.
• If you would like to listen to a station
broadcasting this program type, start
the station search by pressing
Should no station with the chosen program
type be found, the display will briefly indicate “NO PTY” and you will hear a beep.
The station last selected will be received.
Each storage area can be used for a different available program type. Should you wish
further information, you may turn to the next
paragraph titled “Storing the program type”.
b) with the station search toggle switch
<< >>:
When PTY is turned on, you can
choose a program type by pressing
<< >>.
• Press << or >>. The program type
last selected will be displayed for
3 seconds.
/ .
• During that time you are selecting
the desired program type by pressing >> (forward) or << (reverse).
• Press >> or << as often as necessary.
• If you would like to listen to a station
with a particular program type start
the station search by pressing
If no station with the selected program type
can be found, the display will briefly indicate “NO PTY” and you will hear a beep.
The last selected station will be received.
/ .
Storing program type
The factory has stored one program type on
each of the keys 1 - 6.
You may, however, store other available
program types.
If you would like to store a different program
type, “PTY” must be illuminated in the display.
• If you wish you may turn “PTY” on by
pressing the PTY key.
• Select the program type by pressing
<< >> and then press the selected key
(1-6) until you hear a beep.
The selected program type can be called
with this key when “PTY” is illuminated in
the display.
Scanning stations with PTY
scan
The display must show “PTY”.
• Press the SC key.
The stations that can be received and are
broadcasting this program type will be briefly
scanned.
To turn off scan:
• Press the SC key or the station search
toggle switch once more.
PTY priority
Scenario:
PTY is turned on; the letters appear in the
display.
Presently no station of the selected program
type can be received (not with station search
or the scan function).
The unit switches back to the previous station.
If the radio is on, it will switch to that station
for the duration of the program as soon as a
station within the station chain of the selected program type can be received.
Example:
- Current station: NDR 3;
- “PTY” lit up in the display;
- POP chosen;
16
Page 17

CD operation
- Station search started, no station with
PTY-POP found.
- Display shows “NO PTY” and automatically switches back to NDR 3.
- NDR 2 is broadcasting PTY-POP; the unit
switches within the station chain to NDR
2 for the duration of the program.
Even during CD operation, the unit automatically switches within the station chain to the
radio station broadcasting the selected program type.
At the end of the PTY program, the unit will
switch back to the previous source (radio or
CD).
Note:
Please note that, as already mentioned, not
all RDS stations are supporting those functions yet.
You can play CDs with this unit.
Note:
You should only use the commercially available round CDs with a diameter of 12 cm!
CDs with a diameter of 8 cm or CDs in the
shape of, for example, a butterfly or a beer
mug are not suitable to be played in the unit.
You could cause serious damage to the CD
and the drive.
We can not be held liable for damages
caused by unsuitable CDs.
Turning CD operation on
After inserting the CD (the display shows
“CD”), you switch the sound source with the
SRC key:
• Press the SRC key as often as necessary for the display to show CD functions (title number and playing time).
Inserting CD
• Turn the unit on.
• Gently insert the CD (with the label
facing up).
The CD is automatically moved to the playing position and is played.
Removing CD
• Press the eject key.
The CD will be ejected.
In order to protect the mechanism that automatically inserts or ejects CDs, you must
not interfere with it. If the CD is not removed,
it will be retracted automatically after approximately 30 seconds.
Choosing title
After you insert the CD, the display will show
the activated CD functions.
Choose title /
up
down
Pressing once will start the presently
played title from the beginning.
>> Fast forward, audible (CUE).
Press as long as necessary.
<< Fast reverse, audible (REVIEW).
Press as long as necessary.
ENGLISH
FRANÇAIS
ESPAÑOL
PORTUGUÊS
NEDERLANDS
SVENSKA
ESPAÑOL
17
PORTUGUÊS
Page 18

CD changer operation
The toggle switch acts as a sequence
switch; by pressing it several times several
songs can be skipped.
The display will indicate “T” (Track) and the
respective number of the song just selected.
CD mix operation
CD titles can be played in a random sequence. To activate and deactivate that
function Press station key 5. The mix function is on when the display briefly shows
“MIX CD” after implementing the change and
at the beginning of each new title.
CD pause
If you press station key 3 while playing a
CD, the CD program will stop. The display
shows “CD PAUSE”.
By pressing station key 3 again, the pause
function is deactivated and the CD program
will be continued where it stopped.
CD repeat (RPT/repeat function)
CD title can be played repeatedly.
You are able to:
Repeat the presently playing title (REPEATT) or all titles of the CD you are currently
playing (REPEAT-D).
When the RPT function is activated, the display will light up with “RPT”. After choosing
the repeat function and
after each title change, the display will briefly
show “REPEAT-T” or “REPEAT-D”.
REPEAT-T on:
• Press 4/RPT.
REPEAT-D on:
• Depress 4/RPT and hold.
To turn RPT off: Press 4/RPT.
CD SCAN operation
To briefly scan the CD titles.
To activate SCAN:
• Press the SC key for 2 seconds; the
display will show “CD-SCAN”.
The titles will be briefly scanned sequentially.
To deactivate SCAN:
• Press the SC key for 2 seconds.
The title last played will be continued.
Note: The operation of the CD changer is
only possible with the Nevada RDM 168 and
Alaska RDM 168!
The changer is equipped with a magazine
for 10 CDs.
Note:
You should only use the commercially available round CDs with a diameter of 12 cm!
CDs with a diameter of 8 cm or CDs in the
shape of, for example, a butterfly or a beer
mug are not suitable to be played in the unit.
You could cause serious damage to the CD
and the drive.
We can not be held liable for damages
caused by unsuitable CDs.
You should keep the door of the CD changer closed after inserting the magazine in
order to prevent dirt from entering.
Inserting CDs
Load the magazine with one or several CDs
(with the label facing up). Slide the magazine into the CD changer. Note the direction of the arrow. The CDs are counted from
the bottom up.
Removing CDs
Open the door of the CD changer and press
the eject button.
18
Page 19

Playing CDs
Select the CD changer with the SRC key.
• Press the SRC key repeatedly until the
display shows “CHANGER”.
The first CD recognized by the changer will
be played.
Choosing titles
When you first begin to play the CD the display will indicate the information identifying
the CD (e.g., number, name, or playing
time).
Choose CD /
up
down
The display will show the number or name
of the currently played CD.
>> Fast forward, audible (CUE)
<< Fast reverse, audible (REVIEW).
You can skip several songs by pressing the
key several times.
The display will indicate “T” (Track) and next
to it the respective number of the song just
selected.
CD MIX operation
CD titles can be played in a random sequence.
You are able to:
Play all titles of a CD (MIX-CD) or all titles
of all inserted CDS (MIX-ALL) in random
sequence.
When the MIX function is activated, the display will show “MIX”.
After switching to this function and after each
title change, the display will briefly show
“MIX-CD” or “MIX-ALL”.
MIX-CD on:
• Press 5/MIX.
MIX-ALL on:
• Depress 5/MIX and hold.
To turn off MIX: Press 5/MIX.
CD PAUSE
If you press station key 3 while playing a
CD, the CD program will stop. The display
shows “CD PAUSE”.
By pressing station key 3 again, the pause
function is deactivated and the CD program
will be continued where it stopped.
CD Repeat (RPT/repeat function)
CD titles can be played repeatedly.
You are able to:
Repeat the presently playing title (REPEATT) or all titles of the CD you are currently
playing (REPEAT-D).
When the RPT function is activated, the display lights up with “RPT”. After choosing the
repeat function and after each title change,
the display will briefly show “REPEAT-T” or
“REPEAT-D”.
REPEAT-T on:
• Press 4/RPT.
REPEAT-D on:
• Depress 4/RPT and hold.
To turn RPT off: Press 4/RPT.
CD SCAN operation
To briefly scan the CD titles.
To activate SCAN:
• Press the SC key for 2 seconds; the
display will show “CD-SCAN”
The titles will be briefly scanned sequentially.
To deactivate SCAN:
• Press the SC key for 2 seconds.
The title last scanned will be continued.
19
ENGLISH
FRANÇAIS
ESPAÑOL
PORTUGUÊS
NEDERLANDS
SVENSKA
ESPAÑOL
PORTUGUÊS
Page 20

Naming CDs
Choosing the display mode
When playing CDs, you may select the display mode:
“DISC NO”–The number of the CD cur-
rently being played is displayed.
“NAME”–The name entered (e.g.,
Madonna) will be displayed
(only the Alaska RDM 168).
“TIME”–The number of minutes the
title has already been playing (e.g., 2:32) is displayed.
To change the display mode
The display mode can be changed in the
DSC menu (see “Programming with DSCCD DISP”).
The factory setting for the display mode is
TIME.
The display mode is briefly indicated and
then the respective value is displayed (e.g.,
“TIME,” “2:32”).
If you select NAME and the CD does not
have a name, the display will remain in the
TIME mode.
For more information about this you should
also read the section “Naming CDs”.
Note: The following functions can only
be activated on the Alaska RDM 168.
You can name CDs. This name (e.g., MADONNA) will appear in the display once you
select the display mode “CD NAME” in the
DSC menu.
If your radio has a built-in CD player you
can name up to 30 CDs. When you insert
one of those CDs, the unit recognizes the
CD and displays its name if this display function has been selected in the DSC menu.
You can name up to 99 CDs when you are
using a CD changer. When playing one of
those CDs through the CD changer, the unit
recognizes this CD and displays its name if
this display function has been selected in
the DSC menu.
Starting CD name input
Select “CD player” or “CD changer” with the
SRC key and insert a CD if necessary.
• Press the DSC key repeatedly until
“CD/CDC NAME” appears in the dis-
play.
• Press << >> to set the modus CD
NAMING.
A CD number or a CD name will be diplayed.
• Select the desired CD by pressing
/ .
• Press << >> to set the mode CD
NAME EDIT MODE.
If the CD has not yet been named 8 spaces
will appear in the display. The first space
will blink.
• Press
number or an empty space.
To select an empty space, select the
symbol “_”.
• Press << or >> to set the next charac-
ter.
• Press the DSC key to store the name.
The display will return to the mode
CDC NAME.
• Repeat this procedure to name an ad-
ditional CD.
• If you would like to leave this mode en-
tirely, press the DSC key.
To change a CD name:
If you would like to change an existing name,
follow the steps under “Starting CD name
input”.
or and select the letter, the
20
Page 21

Deleting CD name input
You may delete individual names, the CD
magazine, or the complete name list of a
player or changer.
Deleting one CD name
• Select CD NAMING MODE.
• Choose the CD to which you would like
to assign a new name.
• Select the mode CD NAME EDIT.
• Press the DSC key and hold it down.
You will hear a beep after 2 seconds (and
after 8 and 12 seconds). After 2 seconds,
one name is deleted. If you are only planning on deleting one name, press the DSC
key for at least 2 seconds and release it
before the end of 8 seconds.
After the name has been removed, the display will show “DELETED”.
Then the display will return to the
CDC NAME mode.
Deleting all CD names of a CD magazine
• Select CD NAMING MODE.
• Choose the mode CD NAME EDIT.
• Press the DSC key and hold it down.
After 2, 8, and 12 seconds you will hear a
beep. The names stored in a CD magazine
will be deleted in 8 seconds. Therefore, you
should press the DSC key for at least 8 seconds and release it again prior to the end of
12 seconds. After the names have been removed, the display will show “DELETED”.
Then the display will return to the
CDC NAME mode.
Deleting entire name storage of a CD
changer
• Select CD NAMING MODE.
• Choose the mode CD NAME EDIT.
• Press the DSC key and hold it down.
After 2, 8, and 12 seconds you will hear a
beep. The names of all CDs in the CD
changer will be deleted in 12 seconds.
Therefore, you should press the DSC key
for at least 12 seconds. After the names
have been removed, the display will show
“DELETED”.
Then the display will return to the
CDC NAME mode.
Deleting entire name storage of a CD
player
The procedure is the same as for the CD
changer except that the name storage is
deleted after the DSC key has been depressed and held for 8 seconds.
21
ENGLISH
FRANÇAIS
ESPAÑOL
PORTUGUÊS
NEDERLANDS
SVENSKA
ESPAÑOL
PORTUGUÊS
Page 22

Clock / time
The unit is equipped with an internal clock
for which the hours and minutes are set via
RDS in order to assure a high degree of
accuracy.
This RDS control is only possible when an
RDS station with CT (clock time) function
can be received.
The automatic adjustment for daylight savings time can be turned off. Please note that
presently not all RDS stations broadcast a
time signal.
Setting time
a) Automatically
The time will be set automatically if an
RDS station with CT (clock time) function can be received.
b) Manually with DSC-CLOCKSET
• Press the DSC key; the display
shows “MENU”. Press
“CLOCK SET” is displayed.
• Press << >> to set the hours/min-
utes. The blinking area can be
changed by using
• Press the DSC key to store the entered setting.
/ until
/ .
Displaying time
The time can be displayed permanently during radio and CD operation. If another function is chosen, the time display will disappear for approximately 8 seconds while, for
example, the selected station is being indicated.
To change the display mode:
• Press the DIS key for approximately
2 seconds until you her a beep.
Adjusting time after power outage
If the unit is without power for an extended
period of time, the display will show “0:00”
when it is in operation again. The time will
be reset automatically by RDS-CT. It can,
however, also be set manually.
Manual setting of the time is only necessary
if there is no RDS station with CT function
in the reception area.
Turning off adjustment for daylight savings time
The DSC menu option CLK MAN/CLK
AUTO allows you to turn off the adjustment
for daylight savings time. The minutes will
continue to be adjusted automatically.
This can be useful if, for example, you are
interested in displaying the time of a different time zone.
For this purpose
• Press the DSC key repeatedly and
/ until “CLK MAN/CLK AUTO” is
displayed.
To deactivate the time adjustment use
<< >> to select “CLK MAN”.
22
Page 23

Equalizer Setting
The sound in a vehicle is determined to a
greater extent by the acoustic characteristics of the interior than by the characteristics of the loudspeaker.
Position, installation and the rear volume of,
for example, the door or the rear shelf play
a larger role.
Even if the loudspeakers are carefully selected and installed resonances in the interior of the car can negatively impact the
sound.
This could lead to an elimination of the base
level or to roaring or a dominating [?] middle level.
The musical instrument or voices could be
seriously distorted or the sound could appear completely muffled.
The sound effect from a car radio could be
significantly improved if certain frequency
areas could be suppressed or amplified.
This unit is equipped with one (Nevada RDM
168) or two (Alaska RDM 168) parametric
filters.
The first filter referred to as LOW EQ can
be set to a range between 32 Hz and 500
Hz. The second filter referred to as HIGH
EQ can be set to a range between 630 Hz
and 10,000 Hz. In this case, parametric
means that the frequency and the volume
increase/decrease (+10 to -20db) can be
adjusted separately for each filter.
This parametric filter can be adjusted precisely without any measuring instruments.
The individual steps necessary for the settings are described in the table.
Setting instructions
The following instructions are only recommendations. You are free to implement your
own sound preferences.
When you adjust the filters we recommend
that you use a CD with music you are familiar with.
The CD titles should present various instruments and songs. Music that is purely electronic will not serve the purpose because
the original sound will not be known.
Set the bass, treble, balance and fader to
“0” before you set the equalizers and, if necessary, turn off the loudness function.
This setting is described under “AUD” in the
quick reference.
Now listen to the CD you are familiar with.
Determine whether the sound effect meets
your expectations.
Then read the table under “Sound effect/
problem” and find a solution under “Action”.
Adjust the bass and middle sound level with
the LOW EQ filter.
For the high and middle levels, choose HIGH
EQ (only the Alaska RDM 168).
You can set the HIGH EQ and LOW EQ filters in the DSC menu:
• Press the DSC key.
Press
/ repeatedly until HIGH EQ
or LOW EQ appears in the display.
• Press << or >> once and set the level
by pressing
/ according to the table
below.
• Change the frequency areas by press-
ing << >>.
• Press the DSC key to store the new
settings.
You can activate the equalizer in the DSC
menu under the option EQ ON and deactivate it under the option EQ OFF. Thus, you
are able compare the sound with and without the equalizer.
ENGLISH
FRANÇAIS
ESPAÑOL
PORTUGUÊS
NEDERLANDS
SVENSKA
ESPAÑOL
23
PORTUGUÊS
Page 24

Assistance in setting your equalizer
Start to make your settings in the mid-range/treble and end it with the bass range.
Frequency range Sound impression/problem What to do Notes
Bass
30 - 100 Hz
Lower mid-range
100 - 400 Hz
Mid-range sound
400 - 4 000 Hz
Treble
4 000 - 20 000 Hz
24
Bass reproduction too weak
Unclear bass
Playback reverberates
Unpleasant pressure on the
ears
Sound appears to be in the
foreground, very aggressive,
no stereo effect
Lifeless reproduction
Lack of transparency
Instruments do not sparkle
Boost the basses with the
“LOW EQ” filter
Frequency: 50 to 100 Hz
Level: +4 to +6 dB
Reduce the lower mid-range
with the “LOW EQ” filter
Frequency: 125 to 400 Hz
Level: approximately –4 dB
Reduce the mid-range with
“HIGH EQ” filter
Frequency: 1000 to 2500 Hz
Level: -4 to –6 dB
Boost treble range with
“HIGH EQ” filter
Frequency: approximately
10 kHz
Level: +2 to +4 dB
Avoid distortion. Boost the
level carefully if the speaker
diameter is too small
The tone may become too
lean and aggressive.
Pay attention to the underlying tone of the music.
Playback should not be too
quiet.
Tone too powerless
Avoid a piercing type of tone
Strong hissing sound unpleasant
Page 25

DSC programming
The DSC (direct software control) function
of the car radio offers you the opportunity to
adjust some of the settings and functions
according to your needs and to store these
changes.
The units are delivered with factory settings.
An overview of the basic factory settings is
provided below to enable you to return to
these basic settings at any time.
Should you wish to change a programmed
setting
• Press the DSC key.
Use the toggle switch to implement the
choice and setting of the functions described
below. The display will show the selected
setting.
Select the function by pressing
/ .
Set or select the value by pressing << >>.
Note:
Whether the various settings explained below are available to you depends on the
model of your car radio and its features. This
means, for example, that you will not find
the setting for CDC DISPLAY in the DSC
menu of the Florida RD 168 radio which is
not intended to be operated with a CD
changer. Basically the rule applies that you
are not able to select functions the radio is
not equipped with. Consequently, the set-
tings of these functions don’t need to be
adjusted (see also chapter “Unit overview”).
AM ON/OFF It is possible to lock the
AM area.
AM ON - all areas
AM OFF - FM
AUX IN If another signal source is
to be connected through
the CD changer, input AUX
must be set to ON. Select
the AUX function with the
SRC key. The display indicates “AUX”.
BEEP Confirms functions for
which the key needs to be
pressed down longer than
1 second. The loudness of
the beep can be set between 0 and 9 (0 = Off).
CLOCKSET For setting the clock time
manually. Refer to “Clock/
time”.
CLK. MAN. Turn off adjustment for
daylight savings time. Refer to “Clock/time”.
CLK. AUTO Automatic time adjustment
with RTS/CT signal. Refer
to “Clock/time”.
CLK. 12/24 Setting of 12 or 24 hour
modes.
CD DISP. Select display NAME,
TIME. Refer to “Select display mode”.
CDC DISP Display NAME, TIME, or
CD NUMBER when using
CD changer.
CD NAME Appears only when CDs
are played. This function
allows you to name the
CDs. Refer to “Naming
CDs”.
DISP ON/OFF Enables you to set “perma-
nent time display when unit
is off”. The time display is
visible as long as the ignition is on.
EQ ON/OFF This is where you turn the
equalizer function on and
off.
25
ENGLISH
FRANÇAIS
ESPAÑOL
PORTUGUÊS
NEDERLANDS
SVENSKA
ESPAÑOL
PORTUGUÊS
Page 26

HIGH EQ Equalizer setting used to
select and adjust the level
of the upper frequency
area. Refer to “Equalizer
setting”.
HICUT Reduces interference dur-
ing poor reception by “cut-
ting” the high levels.
Settings: NO HICUT or HICUT 1, 2, or 3 (3 = most
drastic cut of high levels).
LO-DX Changes the sensitivity of
the station search.
LO indicates reception of
close stations.
DX indicates reception of
distant stations.
Select LO 3 if you wish to
receive strong close stations and DX 1 if you wish
to receive weak distant
stations.
LOUDNESS Loudness of the high and
low tones at low volume
levels adjusted to the human ear.
LOUD 1 - slight level increase
LOUD 6 - highest level increase
MUTE LEVEL Used to quickly reduce the
volume level with the push
of a button. The resulting
level can be programmed.
PEAK PEAK ON : Display of the
sound signal volume
range.
PEAK OFF: Static display
of the sound volume.
SCANTIME This function sets the scan
time (5-20 sec.) for radio
and CD during scan operations.
avoid to the extent possible interference from adjacent stations.
STEREO/MO Used to manually select
stereo/mono operation.
The display briefly indicates the mode selected.
Each time the radio is
turned on, it is automatically set to STEREO.
T. ON VOL Allows you to determine
the setting of the initial volume level. If Vol. 0 is set,
the level last set is used.
Press the DSC key to store changed values
and to leave the DSC menu.
LOW EQ Equalizer setting.
To select and adjust the
level of the low frequency
area. Refer to “Equalizer
setting”.
26
SHARX Used to activate the auto-
matic setting of ZF bandwidths. Set to SHARX ON
when reception area contains many stations to
Page 27

Specifications
Overview of the basic DSC factory settings
AM ON/OFF ON
AUX IN OFF
BEEP 4
CLK MAN/AUTO AUTO
CLK 12/24 12
CD DISP TIME
CDC DISP TIME
DISP ON/OFF OFF
EQ. ON/OFF OFF
HICUT 2
HIGH EQ 630 Hz / 0 dB
LO-DX SENS DX 1
LOW EQ 32 Hz / 0 dB
LOUDNESS 3
MUTE LEVEL 15
Peak ON/OFF ON
SCANTIME 10
SHARX ON
STEREO/MONO Stereo
T. ON VOL 0
Amplifier
17 watts per channel minimum continuous
average output into 4 ohms. 4 channels
driven from 30-15000 Hz with no more
than 1% total harmonic distortion.
40 watts max. power.
Tuner
Wavebands:
FM : 87.5 - 107.9 MHz
AM : 530 - 1710 kHz
FM frequency response: 35 - 16 000 Hz
Cassette
Frequency response: 30 - 18 000 Hz
CD
Frequency response: 20 - 20 000 Hz
CD changer
(optional, only for Alaska RDM168
and Nevada RDM168)
This unit offers you the ability to conveniently
control a Blaupunkt CDC-A08 or CDC-A071
changer (or CDC-A05 with a special adaptor), all sold separately
Frequency response: 20 - 20 000 Hz
ENGLISH
FRANÇAIS
ESPAÑOL
PORTUGUÊS
NEDERLANDS
SVENSKA
Features and specifications subject to
change without notice.
27
ESPAÑOL
PORTUGUÊS
Page 28

T roubleshooting Guide
The following check will assist in the correction of most problems which you may encounter with your unit. Before going through the
check list below, refer back to the connection and operating procedures.
General
Trouble Cause/Solution
No sound. • Adjust the volume with the volume knob.
• With a two-speaker system, set the fader control to the center position.
Radio reception
Trouble Cause/Solution
Preset stations are not receivable. • The broadcast is too weak.
Automatic tuning is not possible. • The broadcast is too weak
Travelstore feature does not complete • Not enough broadcast frequencies are receivable.
storing of six stations.
Also make sure that antenna is connected, extended and dry inside.
CD Changer operation (optional)
Trouble Cause/Solution
CD does not start. • Dusty or defective disc.
• The ambient temperature is more then 50° C (120° F).
The disc cannot be loaded or is • The disc is inserted with the printed side downwards.
automatically ejected.
The sound skips due to vibration. • The changer is installed at an angle of more than 20°.
• The changer is not installed on the sturdy part of a car.
• Dusty or defective disc.
Use manual tuning.
28
Page 29

Error Displays
Trouble Cause Solution
“CD ERR” A disc such as an upside down or dirty Insert the disc correctly.
disc, or a CD-ROM (computer) disc. Clean the disc.
“NO DISC” No magazine or disc in changer Take out the magazine and insert the disc.
ENGLISH
FRANÇAIS
ESPAÑOL
PORTUGUÊS
NEDERLANDS
SVENSKA
If the above mentioned solutions do not help to improve the situation, consult your nearest Blaupunkt dealer or in
the United States call 1-800-266-2528.
ESPAÑOL
PORTUGUÊS
29
Page 30

Blaupunkt-Werke GmbH
Postfach 77 77 77
D-31132 Hildesheim
Germany
Robert Bosch Corporation
Sales Group – Blaupunkt Division
2800 South 25th Avenue, Broadview, Illinois 60153
1-800-266-2528
Made in Portugal
Fabrique en Portugal
Hecho en Portugal
Fabricado en Portugal
Copyright 1998 by the Robert Bosch Corporation
No portion of this work may be reproduced in any
form without the written consent of the Robert
Bosch Corporation.
®
K7/VKD 8 622 401 549
 Loading...