

Page 1
Radio / Cassette
Munich CM 168
FRANÇAIS ENGLISHESPAÑOL
Operating instructions
PORTUGUÊSNEDERLANDS
SVENSKAESPAÑOL
®
PORTUGUÊS
1
Page 2
1
2
3
9
10
2
3
4
5
6
7 8
9
10
16
17
2
3
2
RC08H Remote Control, included with the set
15
10
9
14
Steering Wheel Remote Control RC08 (sold separately)
13
12
11
Page 3
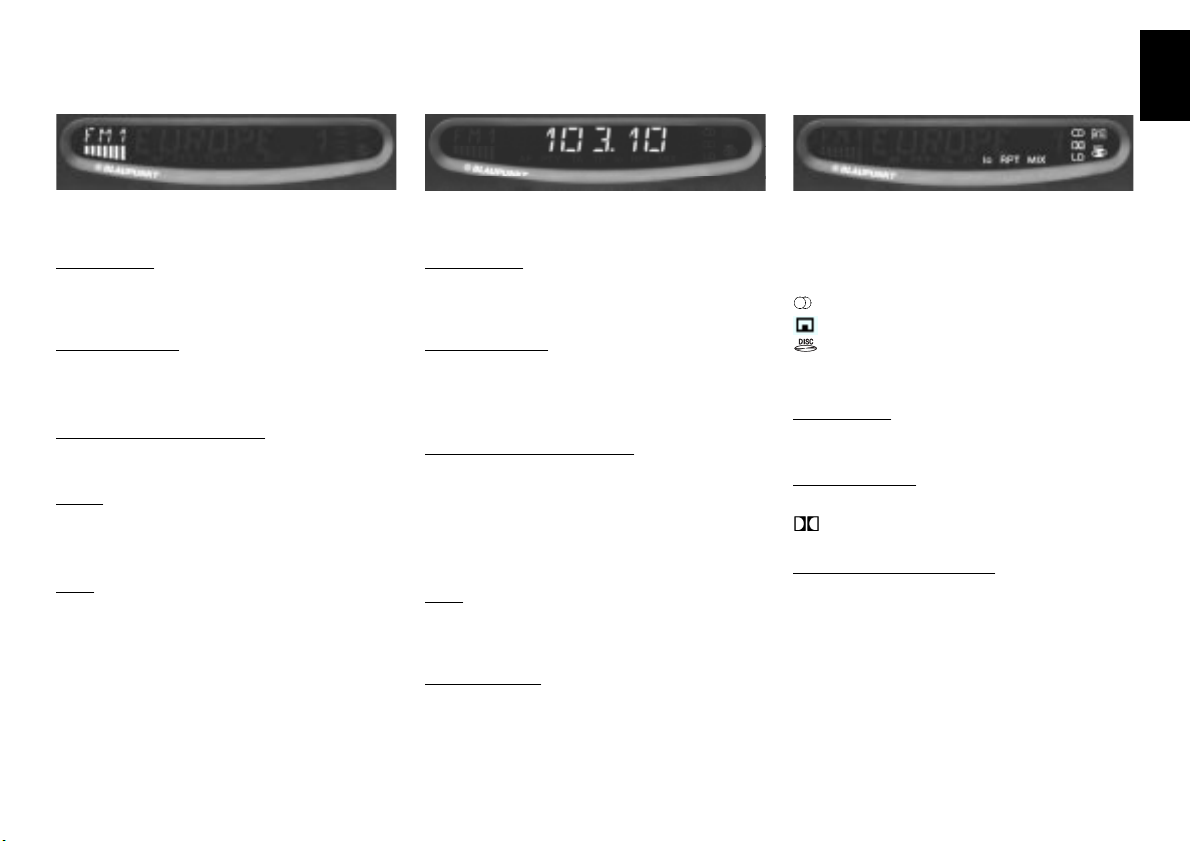
Display
The display consists of three fields and varies according to the operating mode and function.
Display field 1:
Radio mode
Memory banks and wavebands
Brief indication of preset station (e.g. P1)
Cassette mode
CAS - cassette inserted
MTL - tape type
Changer mode (optional)*
Current track
Audio
Numeric and graphic representation of volume and audio settings
DSC
Permanent display for DSC programming.
Graphic representation of the adjusted volume level.
Display field 2:
Radio mode
Radio frequency or station name
Clock display
Cassette mode
TAPE1/TAPE2 - side of tape playing
Active functions (e.g. CPS)
Clock display
Changer mode (optional)*
Current CD playing
CD time (elapsed time), CD name, CD
number and Brief indication of changes in
function
Clock display
DSC
Serves as display and input field during
DSC programming
Miscellaneous
Indicates new source (e.g. when changing
from radio to cassette) and active functions
(e.g. BASS, SCAN)
Display field 3:
Active functions
- Stereo
- Cassette inserted
- CD changer connected
LD - Loudness
Radio mode
lo - Seek tuning sensitivity
Cassette mode
RPT - Repeat function
- Dolby noise reduction
Changer mode (optional)
RPT - Repeat function
MIX - Tracks played at random
FRANÇAIS ENGLISHESPAÑOL
PORTUGUÊSNEDERLANDS
SVENSKAESPAÑOL
* CD changer all sold separately.
PORTUGUÊS
3
Page 4

Contents
Display ........................................... 3
Quick reference............................. 5
RC 08H Remote control
operation................................................ 8
Important notes............................. 9
What you need to know ......................... 9
Traffic safety ..........................................9
Installation..............................................9
Accessories ........................................... 9
Warning note ...................................9
Detachable face .......................... 10
Theft protection.................................... 10
Affixing the detachable face ................ 10
Selecting the audio source ........ 10
Radio operation .......................... 11
Selecting a waveband ......................... 11
Station tuning....................................... 11
Automatic seek tuning
Manual tuning with << >>.................11
Switching between the memory
banks (FM)........................................... 11
Storing stations.................................... 11
Recalling stored stations ..................... 11
Scanning stations with Preset Scan.... 11
Scanning stations with Radio Scan..... 12
Changing the scan time....................... 12
Selecting the automatic tuning
sensitivity ............................................. 12
/ ............. 11
Automatically storing the strongest
stations with Travelstore......................12
Naming radio stations..........................12
Deleting radio station names...............13
Deleting a radio station name .......... 13
Deleting all of the radio station
names............................................... 13
Setting the TIMER ............................... 13
Cassette deck operation ............ 14
Cassette playback ............................... 14
Reversing the tape direction................ 14
Skipping cassette tracks...................... 14
Repeat song tracks.............................. 14
SCAN ................................................... 14
Fast winding......................................... 14
Tape type selection .............................14
DOLBY B NR (Noise reduction)*......... 14
Cassette eject ...................................... 15
CD changer operation ................ 15
Inserting a CD...................................... 15
Switching to the CD changer mode..... 15
Ejecting CDs ........................................ 15
CD playback ........................................ 15
Selecting a CD..................................... 15
Selecting a track .................................. 16
RPT ...................................................... 16
MIX....................................................... 16
SCAN ................................................... 16
Naming CDs ........................................ 17
LIST ..................................................... 17
Deleting CD names ............................. 17
Deleting one CD name..................... 17
Deleting all CD names ..................... 18
Clock/Display changes............... 18
Setting the clock ......................... 18
Naming an external audio
source .......................................... 18
Turn On Message (TOM) ............ 19
DSC programming ...................... 19
Overview of the DSC factory settings . 21
Specifications.............................. 21
Amplifier............................................... 21
Tuner.................................................... 21
Cassette............................................... 21
CD changer (optional) ......................... 21
Troubleshooting Guide .............. 22
General ................................................ 22
Radio reception ................................... 22
CD Changer operation......................... 22
Error Displays ...................................... 23
4
Page 5
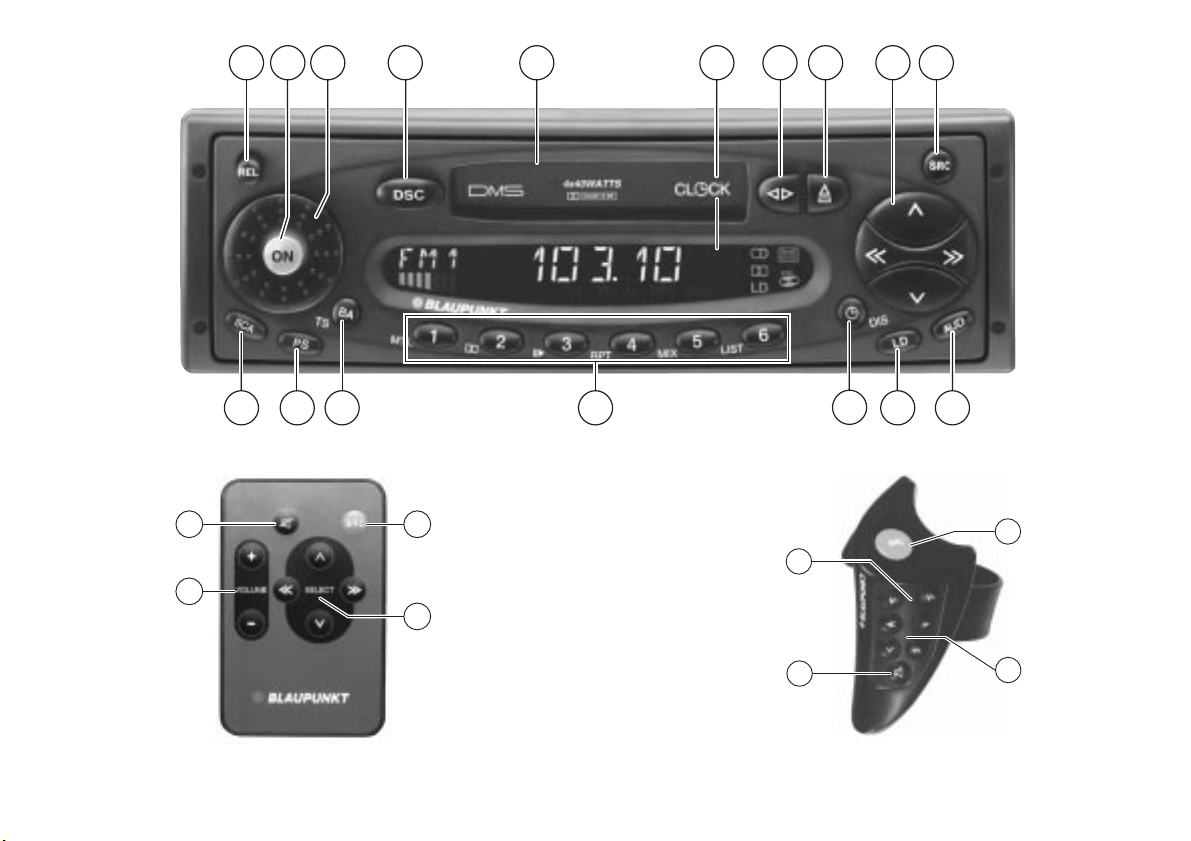
Quick reference
1 REL
To release the detachable panel (theft
protection).
Press this knob and remove the release panel.
2 ON - Power up/down
Press this button to turn the unit on. It
will play at the volume set under DSC.
Mute: If you press this button briefly
during radio reception, the volume will
turn down instantly.
This function is cancelled by pressing
the ON button again. You can programme the mute volume (refer to
“DSC programming”).
Press the button for about 1 second to
turn the unit off.
Switching on/off via the ignition:
If the unit has been connected correspondingly, it can also be turned on
and off with the vehicle ignition.
If ON is pressed while no power is being supplied to the red (ignition) lead,
the unit will automatically turn off after
one hour. This prevents the battery
from going dead.
3 Volume knob
Turn the knob to adjust the volume.
4 DSC Direct Software Control
This feature allows you to adjust the
basic programmable settings.
For further information, refer to the
section on DSC programming.
5 Cassette slot
Insert the tape into the slot with the
open side showing to the right. The
tape will be played in direction
“TAPE 1”.
6 Display
The display indicates all settings, operating modes and functions.
7
This button switches tape playback
between Tape 1 and Tape 2 (different
sides of the tape).
88
8
Eject
88
Press this button to eject the
cassette.
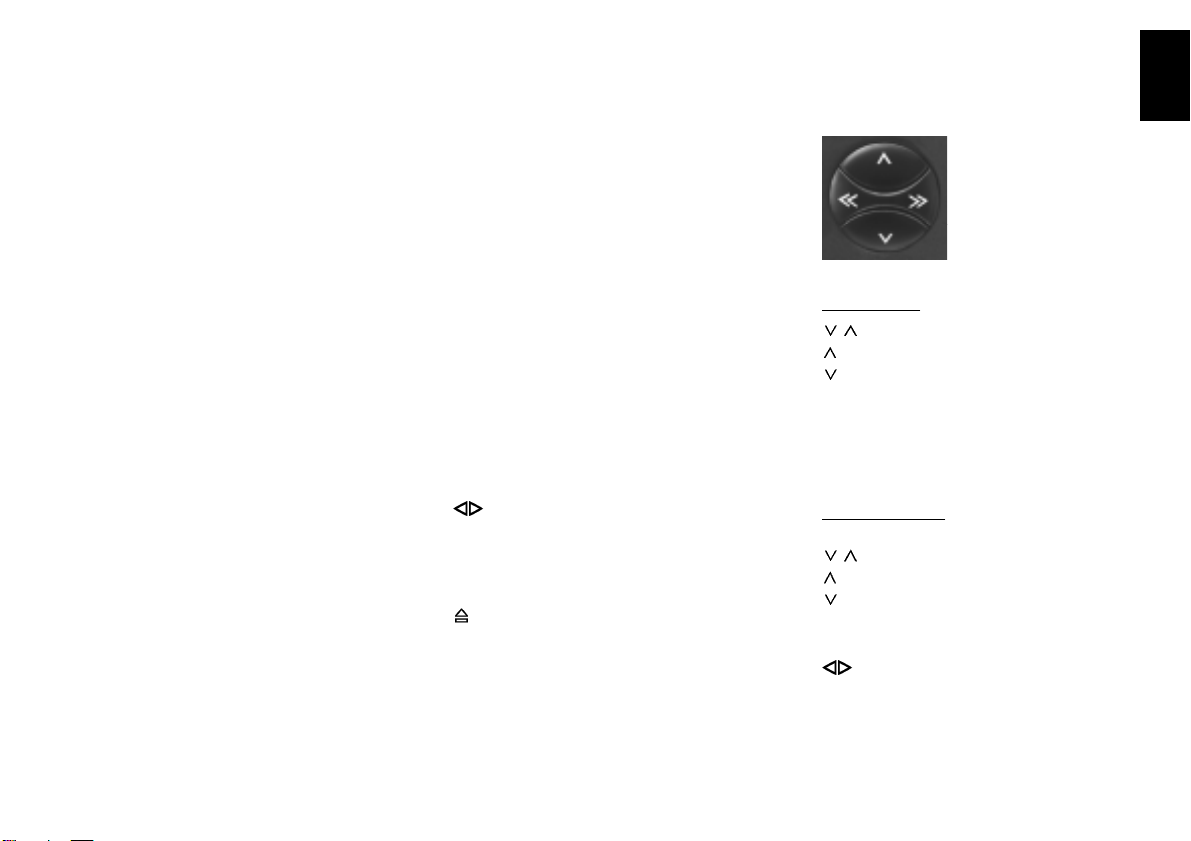
9 Rocker switch
Radio mode
/ Seek tuning
Up
Down
<< / >> Manual tuning
>> up in short intervals
<< down in short intervals
Cassette mode
/ CPS function
Up
Down
Press repeatedly to skip over the corresponding number of songs. Press
or << >> to stop the function.
<< Fast forward
>> Fast rewind
FRANÇAIS ENGLISHESPAÑOL
PORTUGUÊSNEDERLANDS
SVENSKAESPAÑOL
PORTUGUÊS
5
Page 6
Press the button indicating the opposite direction,
winding.
Changer mode (optional)
Select CD
Select track
>> Up: press briefly
<< Down: press two or more
Additional rocker switch functions:
For additional settings use
AUD ;
DSC-MODE 4
Important: The corresponding function must be active.
6
or / to stop tape
Up
Down
CUE - fast forward (audible):
hold button down.
times briefly
Repeat track: press once
briefly.
REVIEW - fast reverse
(audible) - hold button
down.
: SRC (Source)
Press button briefly to select the operating mode (tuner, cassette, changer
or Aux-in). The active mode will appear in the display.
; AUD
Treble and bass adjustment
You can store different settings for the
FM, AM, cassette, CD-changer mode
or Aux-in.
Setting the tone:
• Select the operating mode.
Press AUD once and use the rocker
switch to set the tone.
Treble +
Treble << Bass >> Bass +
For Fader and balance adjustment:
press AUD twice.
Fader front
Fader rear
<< Balance left
>> Balance right
The selected values will appear in the
display. The last setting is stored automatically.
Switching AUD off: Press the button
again briefly.
If you do not make any adjustments to
the tone within 8 seconds, the AUD
mode will quit automatically.
< LD: Loudness
Loudness boosts the bass frequency
at low volume.
Loudness on/off: Press LD briefly.
“LD” will appear when this setting is
active.
Refer to the section on DSC programming to adjust Loudness to different
levels.
=
DIS - Clock display
This unit is equipped with an internal
clock.
Display priority
To alter the display priority, press
until you hear a beep. Repeat this procedure until the desired display appears.
Temporary display change
Press
needed to show the desired information for a few seconds.
Radio mode
Press this button to switch between
the clock, the station name and the
frequency.
briefly as many times as
Page 7

Cassette mode
Press this button to switch between
the track played and the clock.
Changer mode (optional)
Press this button to switch the display
of the CD Name, CD number, the
playback time elapsed and the clock.
> Preset buttons 1 to 6
Radio mode
You can store six stations in each FM
memory bank (1, 2, and “T”).
On AM you can store six stations.
Store station - hold down a preset
button in radio mode until a beep is
emitted.
Recall station - select a waveband
and also the memory bank on FM;
press the relevant preset button briefly. The selected preset button will
briefly appear in display field 1 (e.g.
P1).
Cassette mode
1/MTL -
Press 1/MTL when playing CrO
Metal tapes.
2/
- Dolby
Press 2/
when playing Tapes re-
corded with the Dolby B system.
3/
- Pause
Interrupts tape playback. “PAUSE” will
appear in the display.
Press this button once again to
resume playback.
4/RPT
Repeats song tracks.
“REPEAT-T” will appear briefly in the
display. RPT will light up in the display
and the track will repeat until 4/RPT is
pressed again. “RPT” will disappear
from the display.
Changer mode
- Pause
3/
Interrupts CD playback. “PAUSE” will
appear in the display. Press button
again to resume CD playback.
4/RPT
Repeats tracks: press 4/RPT. “REPEAT-T” will appear briefly. The track
will be repeated until 4/RPT is
5/MIX
“MIX CD” plays the tracks of one CD
in random order.
“MIX ALL” plays the tracks of all the
CDs in one changer magazine in random order as determined by CD
changer.
To turn “MIX CD” on:
Press 5/MIX briefly.
The current setting is briefly indicated
in the display: “MIX-CD”.
Hold down 5/MIX to select “MIX-ALL”.
Keep 5/MIX pressed down until a
beep is emitted.The desired option
lights up in the display.
To stop MIX functions, press 5/MIX
briefly.
6/LIST
Accesses CD-List mode.
? BA/TS
Switches between the wavebands/
memory banks FM1, FM2, FMT (Travelstore) and AM
FRANÇAIS ENGLISHESPAÑOL
PORTUGUÊSNEDERLANDS
SVENSKAESPAÑOL
pressed again.
Repeat CD: select “REPEAT-D”.
or
2
Hold down 4/RPT to select “REPEATD” until a beep is emitted.
To stop “REPEAT-CD”, press 4/RPT
again.
Extra function: Travelstore
To store the six most powerful FM or
AM stations in the Travelstore bank:
Select FM or AM by pressing BA/TS.
Press BA/TS until a beep sounds and
“T-STORE” appears.
PORTUGUÊS
7
Page 8
Remote control operation
@ Preset Scan
Press PS. “PS Scan” will appear in
the display, followed by the station
symbol (flashing).
The stations stored on the station preset buttons and within reception range
will be scanned.
You can set the scan time in DSC programming.
To stop Preset Scan:
• Press PS again.
A SCA Scan
Scans radio stations or song titles/
tracks.
You can set the scan time in DSC programming.
Radio mode
Press SCA briefly.
All of the FM or AM stations within reception range will be scanned.
“SCAN” will appear in the display, alternating with the radio station currently being scanned (flashing).
To stop scan:
Press SCA again.
Cassette mode
Press SCA briefly. “SCAN” will appear
in the display.
All of the tracks on the cassette will be
scanned.
To stop Scan:
Press SCA again
Changer mode
Press SCA briefly.
All of the CD tracks will be scanned.
“SCAN” will appear in the display.
To stop CD scan:
Press SCA again.
General
SRC Press briefly: change the audio
source
Press briefly: muting
V+ Higher volume
V- Lower volume
Radio mode
Seek tuning upwards
Seek tuning downwards
>> Next preset station upwards
<< Press briefly: select the wave-
band
Hold down: Travelstore
Cassette mode
Select track (CPS) upwards
Select track (CPS) downwards
>> Fast forward
<< Fast rewind
Hold down: reversing the tape
direction
CD changer
Next CD
Previous CD
>> Press briefly: next track
Hold down: cue
<< Press briefly: previous track
Hold down: review
SRC Hold down: access to list mode
8
Page 9

Important notes
What you need to know
Before using your new car radio, please
read through the following information carefully.
Traffic safety
As the driver of a motor vehicle, it is your
responsibility to pay attention to the traffic
situation at all times.
Never use your car radio in a way that could
distract you.
Please keep in mind that you travel a distance of 14 m per second at a speed of only
50 km/h.
Should the traffic situation become particularly demanding, we advise you not to use
the radio.
Always make sure that you are still able to
hear any warning signals coming from outside the vehicle, such as police or fire engine sirens, so that you can react accordingly.
Consequently, you should always select a
moderate volume for playing your car radio while you are driving.
Installation
If you would like to install your new car radio yourself or add other audio components
to existing ones, please read the enclosed
instructions on installation and connection
carefully.
In order to ensure that the unit operates
properly the positive power supply line must
be connected via the ignition and the permanent +12 V lead.
Do not ground the loudspeaker outputs!
Accessories
Use Blaupunkt-approved accessories and
spare parts only.
Changer
(not included with the unit, sold separately)
CDC-A08
CDC-A072
CDC-A05 (with adapter only)
Remote Control unit RC 08H
The RC 08H infrared remote control unit
allows you to conveniently operate the most
important functions.
Remote Control unit RC 08
(not included with the unit, sold separately)
The RC 08 infrared remote control unit al-
lows you to conveniently operate the most
important functions from the steering wheel.
Warning note
Danger of damaging the automatic
power antenna in a car wash
Before you drive into a car wash
• switch the radio off by pressing the
ON button.
The power antenna will retract, if it
doesn’t, press ON again.
Do not drive into the car wash unless
the power antenna has retracted!
FRANÇAIS ENGLISHESPAÑOL
PORTUGUÊSNEDERLANDS
SVENSKAESPAÑOL
PORTUGUÊS
9
Page 10

Detachable face
Selecting the audio source
Theft protection
This unit is equipped with a detachable
face. A car radio without face is worthless
for thieves.
Protect your car radio and detach the face
when you leave your car. It is very easy to
attach and detach the detachable face.
Note:
Do not pull the detachable face straight out
from the chassis, but detach it as illustrated below. Be sure not to drop the panel.
Do not expose the detachable face to direct sunlight or other heat sources.
Do not leave it in a humid place.
Detaching the detachable face
Press the REL button to release the control panel. Then pull it off gently as illustrated.
If the unit was still in operation, it will turn
off now. All current settings remain stored.
If a cassette is inserted, it will be kept in
the unit.
The radio will turn on automatically when
you attach the detachable face again.
Attaching the detachable face
Slide the panel (B) from the left to the guide
of the chassis (A). Gently push the left side
of the panel against the front of the chassis
until it snaps into place.
Affixing the detachable face
If you wish to fix the detachable face permanently to the chassis, screw down the
enclosed bolt at the left hand side of the
chassis into the hole, see Fig.
Use the SRC (source) button to select between radio, cassette and CD or Aux-in
mode.
The CD mode is not available unless a CD
changer is connected.
The Aux-in mode is available if a changer
is not connected. (See DSC programming.)
To select the operating mode:
• Press SRC.
10
Page 11

Radio operation
Selecting a waveband
With this car radio you can select between
the following wavebands:
FM 87.5 – 108.0 MHz
AM 531 – 1602 kHz
• Select the desired waveband by
pressing the BA/TS button.
Station tuning
Automatic seek tuning /
• Press or ; the car radio will automatically search for the next station.
If you hold
rocker switch, seek tuning will speed up in
the upwards or downwards direction.
Automatic seek tuning
Up
Down
Manual tuning with << >>
You can also tune into a station manually.
• Press << >>; the frequency will
/ pressed up or down on the
change in short intervals in the downwards or upwards direction.
If you hold << >> pressed to the left or the
right on the rocker switch, the frequency
scan will speed up.
Switching between the memory
banks (FM)
You can switch between the memory banks
FM1, FM2 and FMT in order to store stations and recall them later.
The currently selected memory bank appears in the display.
• Press the BA/TS button as many
times as necessary until the desired
memory bank lights up in the display.
Storing stations
On FM, you can store six stations on the
preset buttons 1, 2, 3, 4, 5, 6 for each of
the memory banks (FM1, FM2, FMT).
You can also store six stations on AM.
• Select the waveband by pressing
BA/TS.
• Tune into a station with the rocker
switch (either automatically
manually << >>).
• Press the desired preset button until
the radio resumes play after the mut-
/ or
ing (takes approximately 2 seconds)
or until you hear a beep.
Now the station has been stored.
The display will temporarily indicate which
preset button is currently activated.
Recalling stored stations
You can recall any stored station at the
touch of a button.
• Select the waveband by pressing
BA/TS. For FM, also choose the corresponding memory bank by pressing
the BA/TS button as many times as
necessary until the desired bank appears in the display.
• Press the corresponding preset button
briefly to recall the station.
Scanning stations with
Preset Scan
You can scan all of the radio stations on
AM or FM.
The scanned stations of the current waveband will appear briefly one after the other
in the display.
Start Preset Scan:
• Press PS briefly.
“PS-Scan” and the station name or frequency will appear alternately in the display.
11
FRANÇAIS ENGLISHESPAÑOL
PORTUGUÊSNEDERLANDS
SVENSKAESPAÑOL
PORTUGUÊS
Page 12

The preset station indication (e.g. P1) will
flash in the display
Listen to scanned station/end Preset
Scan:
• Press PS briefly.
Scanning stations with
Radio Scan
You can scan through all of the stations in
your reception area.
To start the Scan function:
• Press SCA briefly.
The scanned frequency or the station name
will start flashing in the display.
During the actual scanning process “SCAN”
will appear in the display.
Listen to scanned station/end Radio
Scan:
• Press SCA briefly.
You will hear the current selected station.
Changing the scan time
The scan time can be selected from between 5 to a maximum of 20 seconds.
If you would like to alter the scan time,
please refer to the section on “DSC programming - SCANTIME”.
12
Selecting the automatic tuning
sensitivity
You can alter the automatic tuning sensitivity.
If “lo” is displayed, the radio will only pick
up strong, local stations (low sensitivity).
If “lo” does not light up, the radio will also
pick up weaker, more distant stations (high
sensitivity).
If you would like to alter the sensitivity level
please refer to the section on “DSC programming - SENS”.
Automatically storing the strongest stations with Travelstore
You can automatically store the six FM /
AM stations with the most powerful signals
in your current reception area sorted according to their signal strength. This function is particularly convenient on longer
trips.
• Press the BA/TS button to select the
waveband.
• hold the BA/TS button for 2 seconds
down.
“T-STORE” will appear in the display.
The six strongest FM stations will be automatically stored in the “FMT” memory bank
(Travelstore).
If the AM band is active, the six strongest
AM stations will be automatically stored in
the AM memory bank.
When this process has been completed, the
radio will play the strongest station.
If desired, stations can also be stored manually in the Travelstore bank (see “Storing
stations”).
Naming radio stations
To enable you to pick out your favorite radio station more quickly, DSC programming
allows you to give up to 30 radio stations
individual names.
The radio station does not have to be stored
in the memory bank. The names are linked
to the radio frequencies.
Proceed as follows:
Select the DSC mode.
• Press DSC.
• Press
• Press << >> to switch to the stationselect mode.
• Press
would like to name.
• Press << >> to confirm your selection.
• Now you are in the edit mode. If the
station selected does not have a
name, 8 dashes “_” will appear in the
display.
/ to select STA-NAME.
/ to select the station you
Page 13

• The cursor will flash at the current position. Press << >> to move the cursor.
• Press / to select a character. If
you want to enter a blank, select the
dash “_”.
• Press DSC to store the name. Press
DSC again to quit the DSC mode or
press << >> to re-enter the station-select mode.
If you want to change the name, select the
name in the DSC mode and overwrite it in
the edit mode. If you want to change just a
few of the letters, press << >> to move the
cursor to the corresponding position and
change only that character.
Deleting radio station names
Deleting a radio station name
Select the DSC mode.
• Press DSC.
• Press
• Press << >> to switch to the station
select mode.
• Press
you would like to delete.
• Press and hold down DSC.
“ONE NAME” will appear in the display.
/ to select STA-NAME.
/ to select the station name
• Release the DSC button after 2 sec-
onds but before 8 seconds. “DELETED” will appear in the display.
• The station name has been deleted.
The unit will switch back to DSC
mode.
Deleting all of the radio station names
Select the DSC mode.
• Press DSC.
• Press
/ to select STA-NAME.
• Press << >> to switch to the station
select mode.
• Press and hold down DSC for 8 seconds.
• After 2 seconds and 8 seconds you
will hear a beep. “ONE NAME” will appear first in the display, followed by
“ALLNAMES”
• Release DSC . “DELETED” will appear
in the display. All of the station names
have been deleted. The unit will
switch back to DSC mode.
Setting the TIMER
Using this unit it is possible to conveniently
switch on any two radio stations you select
at any time you select. The radio stations
can be selected independently of the currently active operating mode.
Proceed as follows:
• Select the radio station of your choice.
• Press DSC.
• Press
• Press >> to turn the TIMER on. (Press
<< to turn the TIMER off.).
• Press >> again to select time display.
The minutes will flash.
• Press
• Press << to activate the hours.
(>> back to the minutes).
• Press
• Press DSC to store your entry. You
have now set TIMER 1.
If you would like to set TIMER 2 as well,
repeat the steps as described above.
Note
The timers can be turned on and off while
any audio source is in use.
/ to select TIMER 1.
/ to set the minutes.
/ to set the hours.
13
FRANÇAIS ENGLISHESPAÑOL
PORTUGUÊSNEDERLANDS
SVENSKAESPAÑOL
PORTUGUÊS
Page 14

Cassette deck operation
Cassette playback
Insert the tape into the slot with the open
side showing to the right. “CASSETTE” will
appear in the display. The tape will play in
the direction “TAPE 1”.
If a tape is already inside, press SRC to
select “CASSETTE” mode. The tape will
play in the direction last selected.
Reversing the tape direction
Press to change the tape direction during cassette playback from TAPE1 to
TAPE2 or vice versa:
At the end of the tape, the unit will automatically switch to the opposite side.
Skipping cassette tracks
CPS stands for Cassette Program Search
and allows you to skip over songs on the
tape.
The tracks must, however, be separately
by at least 3 seconds of blank tape.
During tape playback press either
on the rocker switch to activate the CPS
mode. “CPS FF” or “CPS FR” will appear
in the display. Press the button
tedly to skip the corresponding number of
tracks in either direction.
The number of tracks to be skipped will appear in the display and count down until the
or
/ repea-
track selected has been reached.
Press
If you have activated “Radio Monitor ON”,
the unit will play the radio station last selected while the tape is winding. You can
alter the Radio Monitor setting in DSC
mode.
or << >> to stop the function.
Repeat song tracks
During tape playback press 4/RPT. “RPT”
will light up in display field 3; “REPEAT-T”
will appear briefly in display field 2. While
the tape is rewinding, “REWIND-T” will appear in the display. The track playing will
repeat until you press 4/RPT again. “RPT”
will disappear from the display.
Playback will now continue normally.
If you have activated “Radio Monitor ON”,
the unit will play the radio station last selected while the tape is winding. You can
alter the Radio Monitor setting in DSC
mode.
SCAN
To scan all of the songs on a tape, press
SCA. “SCAN” will appear in the display.
All of the tracks on the tape in the tape deck
will be scanned briefly one after the other.
Press SCA again to switch the SCAN function off. The track currently playing will continue to play.
Fast winding
Use the rocker switch to fast forward or rewind the tape during cassette operation:
>> forward
<< rewind
“FORWARD” or “REWIND” will light up in
the display.
Press the button indicating the opposite
direction,
If you have activated “Radio Monitor ON”,
the unit will play the radio station last selected while the tape is winding. You can
alter the Radio Monitor setting in DSC
mode.
, or / to stop the function.
Tape type selection
If you are playing METAL or CrO2 cassettes,
press MTL. “MTL” will then light up in display field 1.
DOLBY B NR (Noise reduction)*
Cassettes which have been recorded with
the DOLBY B NR system exhibit considerably less tape noise and higher dynamics.
To play properly cassettes recorded using
this system, press
will light up in display field 3
.
14
Page 15

CD changer operation
Cassette eject
Press to eject the cassette.
* Dolby noise reduction system is manufactured
under licence by Dolby Laboratories Licensing
Corporation. The word “Dolby” and the doubleD symbol are trademarks of Dolby Laboratories
Lincensing Corporation.
This unit offers you the ability to conveniently control a Blaupunkt CDC-A08 or
CDC-A072 changer (or CDC-A05 with a
special adaptor), all sold separately
If the CD changer is connected, the
symbol will light up in the display.
The changer is equipped with a magazine
for 10 discs.
Inserting a CD
Insert one or several CDs into the magazine (printed surface facing up).
Slide the magazine into the CD changer in
the direction of the arrow.
The CDs are counted from bottom to top.
Note:
Use only perfectly circular CDs with a diameter of 12 cm.
CDs with a diameter of 8 cm or CDs manufactured in the shape of a mug, for example, are not suitable for use with this equipment.
Using such CDs can very likely result in the
destruction of the CD and the CD drive.
We assume no responsibility for damages
caused by using unsuitable CDs.
After you have inserted the magazine, keep
the door closed to prevent the magazine
from becoming dusty or dirty.
Switching to the CD changer
mode
Make sure that at least one CD has been
inserted into the magazine.
Press SRC to change the audio source:
• Press SRC repeatedly until the CD
functions appear in the display.
Ejecting CDs
Open the door of the CD changer and press
the eject button.
CD playback
• Use SRC to select the CD changer.
Press SRC repeatedly until “CHANGER” appears in the display.
CD playback starts with the first CD identified by the changer.
Selecting a CD
When CD playback starts, all active CD
functions and the CD number or name will
light up in the display.
To change the display between CD Name,
CD number, elapsed time indication and
clock, press
during CD playback.
15
FRANÇAIS ENGLISHESPAÑOL
PORTUGUÊSNEDERLANDS
SVENSKAESPAÑOL
PORTUGUÊS
Page 16

/ CD selection
Up
Down
CD Select-By-Name
If you have named a CD and it has been
selected at least once since the magazine
was inserted, the name is seen immediately, so that you can easily find the desired
CD.
Selecting a track
>> Up: Press briefly.
CUE - fast advance (audible): Hold button
down.
<< Down: Press two or more times briefly.
To re-start a track: Press briefly.
REVIEW - fast reverse (audible):
Hold button down. When at start of first
track, unit goes to last track on same disc.
16
Press the button repeatedly to skip several
tracks.
The number of the selected track will appear beside “T” (track).
RPT
CD tracks can be played repeatedly.
The following options are available:
– Repeat the current track (“REPEAT-
T”) or
– Repeat the CD, i.e. all tracks on the
current disc (“REPEAT-D”).
“RPT” will appear in display field 3 as long
as RPT is active. “REPEAT-T” will light up
briefly in display field 2 when you activate
this function and each time the track changes. “REPEAT-D” will show when a CD is
repeated.
Switch REPEAT-T on:
• Press 4/RPT briefly.
Switch REPEAT-D on:
• Hold 4/RPT down for longer.
To stop repeat functions, press 4/RPT.
MIX
You can have the CD tracks played in random order.
The following options are available:
– Mix all tracks of one CD (“MIX-CD”) or
– Mix all tracks of all CDs (“MIX-ALL”) in
manner determined by the CD changer model.
“MIX” will appear in display field 3 as long
as the MIX function is active.
“MIX-CD” or “MIX-ALL” will light up briefly
in display field 2 when you activate this
function and each time when the track changes.
Switch MIX-CD on:
• Press 5/MIX briefly.
Switch MIX-ALL on:
• Hold 5/MIX down for longer.
To stop mix functions, press 5/MIX again.
SCAN
Use this function to scan all of the CD
tracks.
To start the Scan function:
• Press SCA, “SCAN” will appear in the
display, alternatimg with CD number
or CD Name of the CD currently being
scanned.
All tracks on the CD will be scanned one
after the other in ascending order.
To stop the Scan function:
• Press SCA briefly.
The track currently scanned will continue
to play.
Page 17

Naming CDs
To allow you to identify your CDs more
quickly, you can use DSC programming to
enter individual names for up to 99 CDs.
The names can have up to 7 characters.
If you attempt to enter more than 99 names,
“FULL” will appear in the display. The CD
name has priority over the CD number in
the display when manually changing CDs.
Proceed as follows:
Select DSC programming mode.
• Press DSC.
• Press
• Press << >> to enter the select mode.
• Press
to name.
• Press << >> to switch to the editing
mode. If the CD you have selected
does not already have a name, 7
dashes “_” will appear in the display.
• The cursor will flash at its current position. Press << >> to move it.
• Press
want to enter. Select a dash “_” to
leave a blank space.
• Press DSC to store the name. The
main CDC_NAME menu will appear
again in the display.
/ to select CDC_NAME.
/ to select the CD you want
/ to select the character you
If you want to alter a name which has already been entered, select that CD in the
DSC mode and overwrite it in the editing
mode. If you want to change individual letters only, press << >> to move the cursor
to the corresponding position and change
that letter.
LIST
In DSC mode (Direct Software Control) it
is possible to assign names to your CDs.
In LIST mode you can view these names
without interrupting CD playback. If you
have not named the CDs, the display will
list the numbers only.
To enter LIST mode:
• Press 6/LIST, “LST” will appear in display field 1
• Press
• If you see a CD you want to hear,
press << >> to select that CD and it
will begin to play.
• If you don't select a CD, the LIST
mode will automatically end after 8
seconds.
Note:
In order for names to be seen in the LIST
mode, the named CD must have been selected at least once since the magazine was
inserted.
/ to see CD names
Deleting CD names
Deleting one CD name
Proceed as follows:
Select DSC programming mode.
• Press DSC.
• Press
• Press << >> to enter the CD select
mode.
• Press
want to delete.
• Press DSC and hold it down. After 2
seconds you will hear a beep and
“ONE_NAME” will appear in the display.
• Release DSC after 2 seconds but before 8 seconds. “DELETED” will appear in the display.
• The name of this CD has now been
deleted. The main CDC_NAME menu
will appear again in the display.
/ to select CDC_NAME.
/ to select the name you
FRANÇAIS ENGLISHESPAÑOL
PORTUGUÊSNEDERLANDS
SVENSKAESPAÑOL
PORTUGUÊS
17
Page 18

Clock/Display changes
Deleting all CD names
All of the CD names stored in the CD changer will be deleted.
Select DSC programming mode.
• Press DSC.
• Press
• Press << >> to enter the CD select
mode.
• Press DSC and hold it down. After 2
seconds and after 8 seconds you will
hear a beep respectively
“ONE_NAME” and then “ALLNAMES”
will appear in the display.
• Release DSC. “DELETED” will appear
in the display. The names of all of the
CDs have now been deleted. The
main CDC_NAME menu will appear
again in the display.
/ to select CDC_NAME.
This unit is equipped with an internal clock.
Display priority:
To alter the display priority, press
you hear a beep. Repeat this procedure
until the desired display appears.
Temporary display change:
Press
the desired information for a few seconds.
Radio mode
Press
station name and the frequency.
Cassette mode
Press
and the clock.
Changer mode
Press
CD Name,CD number, the playing time
elapsed and the clock.
as many times as needed to show
to switch between the clock, the
to switch between the track played
to switch between a display of the
until
Setting the clock
Set the clock in the DSC mode.
• Press DSC briefly.
• Press
“CLOCKSET”.
• Press << >> to activate the hours or
the minutes. The option you can set
will flash.
• Press
play.
• When you have completed the setting,
press DSC briefly to store it.
• Press DSC again to exit DSC mode.
/ to select the function
/ to alter the flashing dis-
18
Page 19

Naming an external audio
source
AUX NAME makes it possible to enter a
name of up to 8 characters for an external
audio source (AUX ON, see DSC Menu).
For this, press SRC to select the AUX mode
(only possible if AUX ON is set in the DSC
menu and CD changer is not connected).
• Press SRC as often as required until
AUX appears in the display.
Enter the AUX NAME in the DSC menu.
• Press DSC briefly.
• Press
function
• Press << >> to enter into editing
mode.
The adjustable position will flash.
• Press
want to enter. Select a dash “_” to
leave a blank space.
• Press << >> to select the next position.
• When you have entered the name
completely, press DSC briefly to store
the name.
• Press DSC again to quit the DSC
menu.
/ to select the AUX NAME
/ to select the character you
Turn On Message (TOM)
This unit offers you the possibility to enter
a turn on message of up to 40 characters.
The message will briefly appear in the display each time you turn the unit on.
Proceed as follows:
Select the DSC mode.
• Press DSC.
• Press
• Press << to turn the message off.
• Press >> two times to select the edit
mode.
• If there is no TOM programmed, dashes “_” will appear in the display.
• The cursor will flash at the current position. Press << / >> to move the cursor.
• Press
you want to enter a blank, select the
dash “_”.
• Press DSC to store the message.
Press DSC again to quit the DSC
mode.
If you want to change the message, select
TOM in the DSC mode and overwrite it in
the edit mode. If you want to change just a
few of the letters, press << / >> to move
the cursor to the corresponding position and
change that character only.
/ to select TOM.
/ to select a character. If
FRANÇAIS ENGLISHESPAÑOL
PORTUGUÊSNEDERLANDS
SVENSKAESPAÑOL
19
PORTUGUÊS
Page 20

DSC programming
The car radio has been equipped with DSC
(Direct Software Control) to allow you to
customize certain programmable, basic
settings to suit your personal needs and
preferences and then store them.
The basic settings for this car radio were
made at the factory.
In the following you can find an overview of
these settings, so that you can always reset to them if desired.
If you wish to alter any of the programming,
• press DSC.
“MENU
display.
Use the
to select the function you wish to change.
The display will show you the setting you
have selected. Press the << >> buttons of
the rocker switch to change the settings and
exit the current mode. Confirm the setting
you have selected by pressing the DSC
button.
/ Select function
<< >> Adjust/recall setting
/ ” will temporarily appear in the
/ buttons of the rocker switch
LOUDNESS Loudness boosts the bass
frequencies at low volume.
LOUD 1 - Low boost
LOUD 6 - Max. boost
BAS CENT Bass Center Frequency Ad-
justment.
Adjusts the mid-range frequency to the specific
equipment in the vehicle
(50 or 100 Hz)
STA NAME Allows you to name up to
30 radio stations based on
their frequency.
SENS LO Adjusts seek tuning
sensitivity.“LO” stands for
local reception.“DX” stands
for distant reception.
Select “LO” if you want to
receive strong stations in
the local area, select “DX” if
you want to tune into weaker stations which are further
away.
CDC NAME Names CDs. A maximum of
99 CDs can be given names
of up to 7 characters.
CLOCK 12 Switches between 12-h and
24-h clock display.
CLOCKSET Sets the clock manually.
Press << >> to select
hours/minutes. Press
to adjust the flashing value.
TIMER 1 The radio will automatically
switch to a station you have
selected at the time you
program.
TIMER 2 You can also program the
unit to go to a second station at a programmed time.
ON VOL Sets the turn-on volume.
Press << >> to adjust the
turn-on volume as desired.
TOM
ON/OFF Turn-on-message.
You can enter a message
of up to 40 characters
which appears in the display when you switch the
unit on.
/
20
Page 21

MUTE Changes the mute volume.
BEEP Changes the volume of the
acknowledgement tone
(beep) between 0 and 9.
(0 = off)
RM ON Radio Monitor
If the Radio Monitor function is active during fast
winding of the tape, the unit
will switch to the radio and
play the station listened to
last.
SCANTIME Use this function to set the
scan time for the cassette,
radio or CD player from 5 to
20 seconds.
BL SKIP Switches the Blank Skip
function off and on;If tape
has blank on more than 10
seconds the unit fast winds
to next song.
AUX Select AUX-ON if you wish
to connect a portable CD or
tape player instead of the
CD changer. Contact your
dealer for more information
about the required adapter
cable (7 607 897 093),
which is sold separately.
AUX NAME While in the Aux mode, you
can change the source
name to “VIDEO” for example.
DISPLAY Display indications on or off
with the car radio turned
off.
Overview of the DSC factory
settings
LOUDNESS 3
BAS CENT 50 Hz
SENS DX
STA NAME
CDC NAME
CLOCK CLOCK 12
CLOCKSET
TIMER 1 OFF
TIMER 2 OFF
ON VOL 20
TOM ON
MUTE 10
BEEP 3
RM ON
SCANTIME 10 seconds
BL SKIP ON
AUX OFF
AUX NAME
DISP ON
FRANÇAIS ENGLISHESPAÑOL
PORTUGUÊSNEDERLANDS
SVENSKAESPAÑOL
21
PORTUGUÊS
Page 22

Specifications
Amplifier
17 watts per channel minimum continuous average output into 4 ohms. 4 channels driven from 30-15000 Hz with no
more than 1% total harmonic distortion.
40 watts max. power.
Tuner
Wavebands:
FM : 87.5 - 107.9 MHz
AM : 530 - 1602 kHz
FM frequency response: 35 - 16000 Hz
Cassette
Frequency response: 30 - 18000 Hz
CD changer (optional)
This unit offers you the ability to conveniently control a Blaupunkt CDC-A08 or
CDC-A072 changer (or CDC-A05 with a
special adaptor), all sold separately
Frequency response: 20 - 20000 Hz
Features and specifications subject to
change without notice.
22
Page 23
Troubleshooting Guide
The following check will assist in the correction of most problems which you may encounter with your unit. Before going through the
check list below, refer back to the connection and operating procedures.
General
Trouble Cause/Solution
No sound. • Adjust the volume with the volume knob.
• With a two-speaker system, set the fader control to the center position.
Radio reception
Trouble Cause/Solution
Preset stations are not receivable. • The broadcast is too weak.
Automatic tuning is not possible. • The broadcast is too weak
Travelstore feature does not complete • Not enough broadcast frequencies are receivable.
storing of six stations.
Also make sure that antenna is connected, extended and dry inside.
CD Changer operation
Trouble Cause/Solution
CD does not start. • Dusty or defective disc.
• The ambient temperature is more then 50° C (120° F).
The disk cannot be loaded or is • The disc is inserted with the printed side downwards.
automatically ejected.
The sound skips due to vibration. • The changer is installed at an angle of more than 20°.
• The changer is not installed on the sturdy part of a car.
• Dusty or defective disc.
Use manual tuning.
FRANÇAIS ENGLISHESPAÑOL
PORTUGUÊSNEDERLANDS
SVENSKAESPAÑOL
23
PORTUGUÊS
Page 24

Error Displays
Trouble Cause Solution
“CD ERR” A disc such as an upside down or dirty Insert the disc correctly.
disk, or a CD-ROM (computer) disc. Clean the disc.
“NO DISC” No magazine or disc in changer Take out the magazine and insert the disc.
24
Page 25

Blaupunkt-Werke GmbH
Postfach 77 77 77
D-31132 Hildesheim
Germany
Made in Malaysia
Copyright 1998 by the Robert Bosch Corporation
No portion of this work may be reproduced in any form without
the written consent of the Robert Bosch Corporation.
FRANÇAIS ENGLISHESPAÑOL
PORTUGUÊSNEDERLANDS
SVENSKAESPAÑOL
K7/VKD 8 622 401 538
PORTUGUÊS
25
 Loading...