

Page 1
www.blaupunkt.com
Radio CD MP3 WMA
Key West MP38 7 648 005 510
Operating and installation instructions
Mode d’emploi et de montage
Instrucciones de manejo e instalación
Instruções de serviço e de montagem
操作及安裝手冊
사용 및 장착 설명서사용 및 장착 설명서
Page 2
IR
2 3
1
6
4
5
7
8
9
10
14
13
15
16
1112
2
Page 3

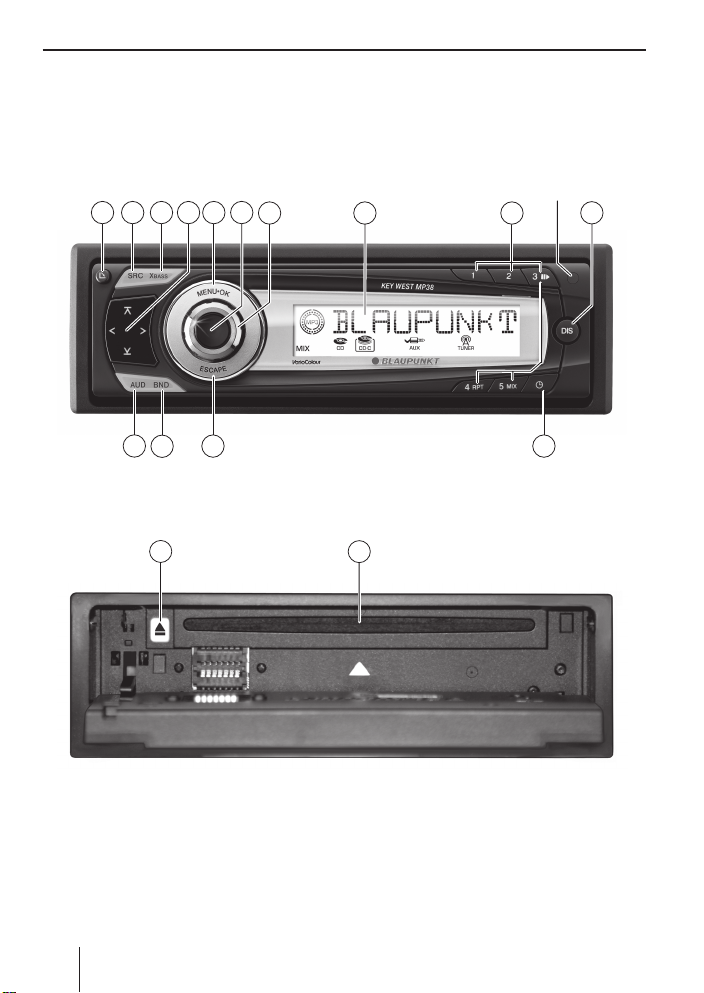
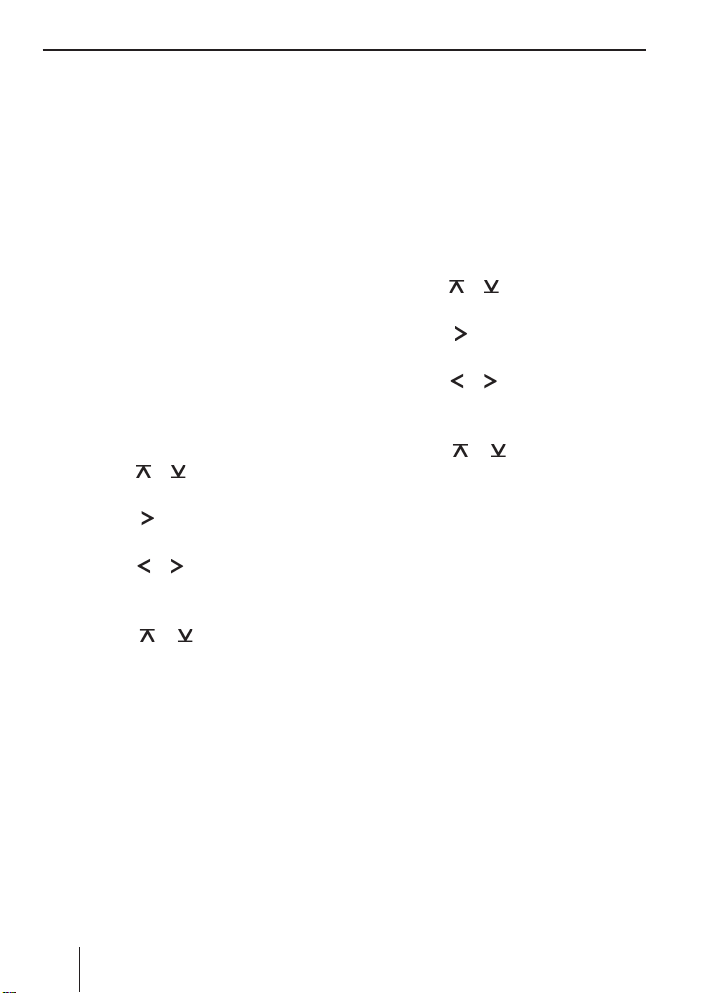
Controls
1 button
to open the detachable control panel
(fl ip-release panel).
2 SRC button
Source selection between radio and CD
and (if connected or switched on) CD
changer and AUX.
3 XBASS button
Switching X-BASS on/off and adjusting it.
4 Arrow buttons
5 MENU•OK button
Short press: Calls up the menus for basic settings and confi rms settings.
Ending the scan function.
Long press: Starts the Scan function.
6 On/Off button
Short press: Switches the device on. In
operation: Mutes the device.
Long press: Switches the device off.
7 Volume control
8 Display
9 Keys 1 - 5
: DIS button
Changes display contents.
button
;
Briefl y displaying the time
< ESCAPE
button
Confi rm menu item and return to the
display of the MENU or AUDIO main
level.
= BND button
Short press: Selects the FM memory
banks and the AM waveband.
Long press: Starts the Travelstore function.
> AUD button, sets bass, treble, middle,
balance, and fader.
Selects an equalizer presetting.
button (Eject) for removing a CD
?
from the device.
@ CD tray
ENGLISH
3
Page 4

Contents
About these instructions ....................6
Symbols used.................................. 6
Use as directed ................................ 6
Declaration of conformity .................. 6
For your safety ..................................7
If you are installing device yourself ...... 7
Observe the following! ...................... 7
Cleaning instructions ........................7
Disposal of old unit .......................... 7
Scope of delivery ............................... 8
Optional equipment
(not part of the scope of delivery) ...... 8
Remote control .................................. 8
Warranty ...........................................9
Service .......................................... 9
Detachable control panel ................... 9
Theft protection...............................9
Detaching the control panel ............... 9
Attaching the control panel .............. 10
Switch-off time (OFF TIMER) ...........10
Timeout function ........................... 10
Switching on/off .............................. 11
Adjusting the volume .......................11
Setting the power-on volume ........... 11
Quickly reducing the volume (MUTE) .. 12
Telephone Audio/Navigation Audio ... 12
Switching the confi rmation beep
on/off .......................................... 13
Radio mode .....................................13
Adjusting the tuner......................... 13
Switching to radio mode ................. 14
Selecting the waveband/
memory bank ................................14
Tuning into a station ....................... 14
Setting the sensitivity of station
seek tuning ...................................14
Storing stations .............................14
Storing stations automatically
(Travelstore) ................................. 15
Listening to stored stations ............. 15
Scanning receivable stations (SCAN) . .15
Setting the scanning time ................ 15
Confi guring the display ................... 15
CD mode ......................................... 16
Switching to CD mode .................... 16
Selecting tracks ............................. 16
Fast seek tuning (audible) ............... 16
Random track play (MIX) ................. 17
Scanning tracks (SCAN).................. 17
Repeating tracks (REPEAT) ............. 17
Interrupting playback (PAUSE) ......... 17
Confi guring the display ................... 17
Displaying CD text .......................... 17
Ejecting a CD................................. 18
MP3/WMA mode ............................. 18
Preparing an MP3/WMA CD ............. 18
Switching to MP3 mode .................. 20
Confi guring the display ................... 20
Selecting a directory ...................... 20
Selecting Tracks/Files ..................... 21
Fast search ................................... 21
Random track play (MIX) ................. 21
Scanning tracks (SCAN).................. 21
Repeating individual tracks or
whole directories (REPEAT) ............. 21
Interrupting playback (PAUSE) ......... 22
CD-changer mode ............................22
Switching to CD-changer mode ........ 22
Selecting CDs ................................22
Selecting tracks ............................. 22
Fast searching (audible) .................. 23
Confi guring the display ................... 23
Repeating individual tracks or
whole CDs (REPEAT) ...................... 23
Random track play (MIX) ................. 23
Scanning all tracks on all CDs
(SCAN) ........................................23
Interrupting playback (PAUSE) ......... 24
4
Page 5

Clock – Time.................................... 24
Setting the time ............................. 24
Selecting 12/24-hour clock mode ....24
Displaying the time continuously
when the device is off and
the ignition is on ............................ 25
Sound ............................................. 25
Adjusting the bass ......................... 25
Adjusting the middle ...................... 26
Adjusting the treble ........................ 26
Setting the left/right
volume distribution (Balance) .......... 27
Adjusting the front/rear
volume distribution (Fader) .............27
X-BASS ...........................................27
Adjusting the X-BASS boost ............. 27
Equalizer presettings (Presets) ........ 28
Adjusting the display settings ........... 28
Adjusting the display brightness ....... 28
Setting the display illumination
colour .......................................... 28
Activating/deactivating demo mode.. 29
External audio sources ..................... 30
Specifi cations .................................30
Amplifi er ......................................30
Tuner ...........................................30
CD ............................................... 31
Pre-amp out .................................. 31
Input sensitivity ............................. 31
Installation instructions ................ 180
Contents
ENGLISH
5
Page 6

About these instructions
About these instructions
These instructions contain important information to easily and safely install and operate the device.
Read these instructions carefully and
•
completely before using the device.
•
Keep the instructions at a location so
that they are always accessible to all
users.
•
Always pass on the device to third parties together with these instructions.
In addition, observe the instructions of the
devices used in conjunction with this device.
Symbols used
These instructions employ the following
symbols:
CAUTION!
Warns about laser beam
CAUTION!
Warns about damaging the CD
drive
Use as directed
This device is intended for installation and
operation in a vehicle with 12 V vehicle system voltage and must be installed in a DIN
slot. Observe the 'performance limits in the
technical data. Repairs and installation, if
necessary, should be performed by a specialist.
Declaration of conformity
The Blaupunkt GmbH declares that the
Key West MP38 device complies with the
basic requirements and the other relevant
regulations of the directive 89/336/EWG.
The CE mark confi rms the compliance with EU directives.
Identifi es a sequencing step
쏅
Identifi es a listing
•
6
Page 7
For your safety
The device was manufactured according to
the state of the art and established safety
guidelines. Even so, dangers may occur if
you do not observe the safety notes in these
instructions:
If you are installing device
yourself
You may only install the device yourself if
you are experienced in installing car sound
systems and are very familiar with the electrical system of the vehicle. For this purpose, observe the installation instructions
at the end of these instructions.
Observe the following!
CAUTION
The device contains a Class 1 laser
that can cause injuries to your eyes.
Do not open the device and do not perform
any modifi cations.
In operation
Operate the device only if traffi c situa-
•
tion permits it! Stop at a suitable location to perform more extensive operations.
Remove or attach the control panel only
•
while the vehicle is standing an.
To protect your hearing, always listen
•
at a moderate volume. During mute
phases (e.g. when changing the audio
source or CD in the CD changer and
Travelstore), changing the volume is
not audible. Do not increase the volume
during this mute phase.
For your safety
•
Always listen at a moderate volume so
that you can always hear acoustic warning signals (e.g. police).
After operation
•
The device is worthless to a thief without the control panel. Always remove
the control panel whenever you leave
the vehicle.
•
Transport the control panel so that it is
protected against impacts and the contacts cannot become dirty.
Cleaning instructions
Solvents, cleaning and scouring agents as
well as dashboard spray and plastics care
product may contain ingredients that will
damage the surface of the device.
Use only a dry or slightly moistened cloth
for cleaning the device.
Disposal of old unit
Do not dispose of your old unit in the
household trash!
Use the return and collection systems available to dispose of the old device.
ENGLISH
7
Page 8

Scope of delivery Remote control
Scope of delivery
The scope of delivery includes:
1 car sound system
1 support frame
2 disassembly tools
1 guide pin
3 connecting cables
1 operating instructions
1 handheld remote control RC 12H
Optional equipment
(not part of the scope of delivery)
Use only accessories approved by
Blaupunkt.
Steering wheel remote control
A steering wheel remote control allows for
safely and conveniently operating the basic
functions of your car sound system from the
steering wheel.
You cannot switch the device on/off using
the remote control!
You can fi nd out from your Blaupunkt dealer
or on the Internet at www.blaupunkt.com
which remote controls can be used with
your car sound system.
Remote control
Your car sound system is equipped with an
RC 12H handheld remote control.
Most of the functions can be operated conveniently and safely with the remote control.
Note that a line of sight must exist between
the remote control and the remote control
receiver, which is located in the detachable
control panel.
You cannot switch the device on/off using
the remote control.
Amplifi er
You can use all Blaupunkt and Velocity amplifi ers.
CD changers
You can connect the following Blaupunkt
CD changers:
CDC A 03, CDC A 08 and IDC A 09.
8
Page 9
Warranty Detachable control panel
Warranty
We provide a manufacturer's warranty
for products bought within the European
Union. Devices purchased outside the
European Union are subject to the warranty
terms published by our respective regional
agency.
Service
In some countries, Blaupunkt offers a repair
and pick-up service.
Information about the availability of this
service in your country can be found at
www.blaupunkt.com.
If you want to take advantage of this service, you may request a pick-up service for
your device via the Internet.
Detachable control panel
Theft protection
The device is equipped with a detachable
control panel (fl ip-release panel) as a way
of protecting your equipment against theft.
The device is worthless to a thief without
this control panel.
Protect your device against theft by taking
the control panel with you whenever you
leave your vehicle. Do not leave the control
panel inside your vehicle - not even in a hiding place.
Notes:
•
Never drop the control panel.
•
Do not expose the control panel to direct sunlight or another heat source.
•
Avoid direct skin contact with the
control panel’s electrical contacts. If
necessary, clean the contacts with a
lint-free cloth moistened with cleaning alcohol.
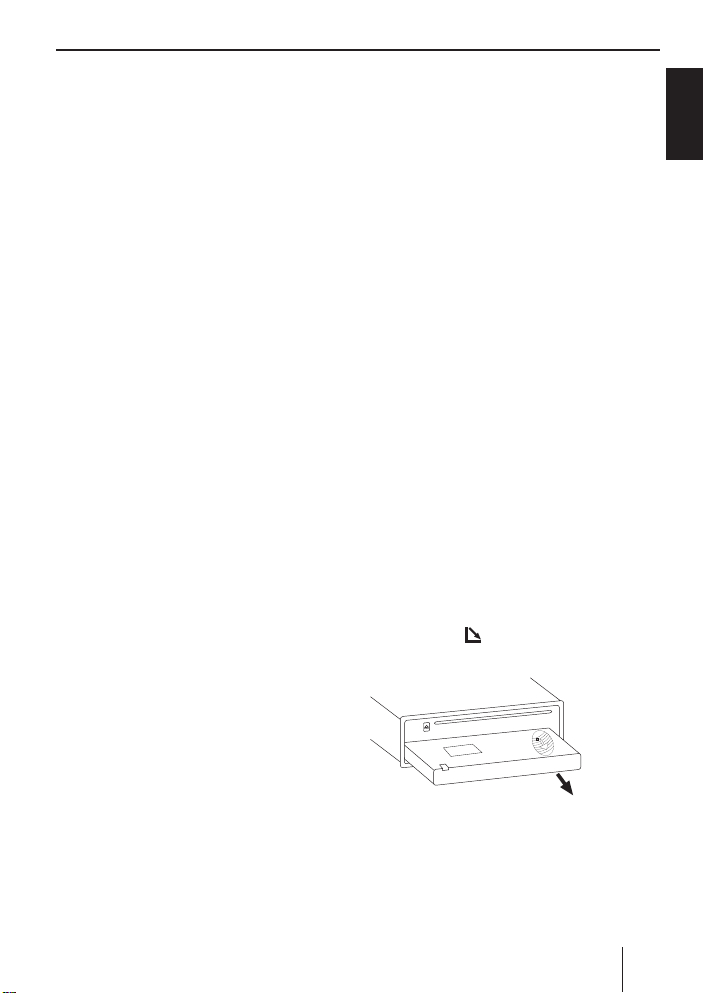
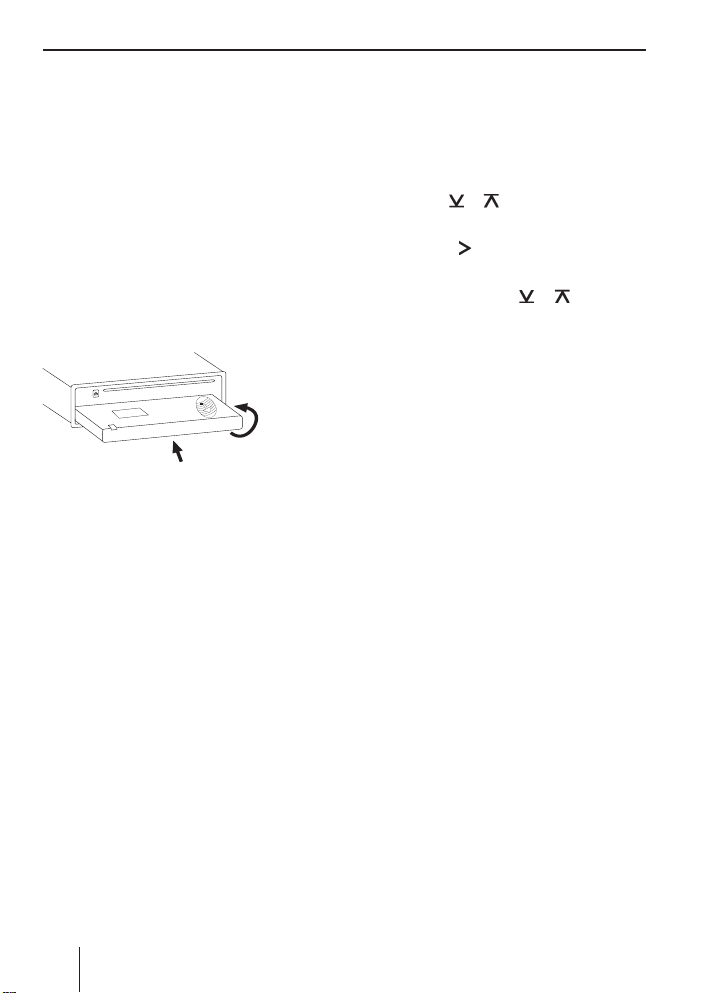
Detaching the control panel
Press the button 1.
쏅
The control panel opens to the bottom.
ENGLISH
Hold the control panel by its right side
쏅
and then pull it straight out of the
bracket.
9
Page 10
Detachable control panel
Notes:
The device is switched off after a time
•
preset by you. For further details,
please read the section "Switch-off
time (OFF TIMER)" in this chapter.
The device remembers the audio
•
source played last for the next switchon.
Any CD already inserted in the device
•
remains there.
Attaching the control panel
2.
1.
Hold the control panel approximately
쏅
at a right angle to the device. (see fi gure, 1.)
Push the control panel into the guides
쏅
at the bottom edge of the device.
Push the control panel carefully into the
쏅
bracket until it clicks into place.
Fold the control panel up into the slot
쏅
and press it gently into place until it
clicks. (see fi gure, 2.)
If the device was still switched on when you
detached the control panel, it will automatically switch on with the last setting activated (radio, CD, CD changer or AUX) when
the panel is replaced.
Switch-off time (OFF TIMER)
After opening the control panel, the device
is switched off after an adjustable time. You
can set this time from 0 to 30 seconds.
Press the MENU•OK button 5.
쏅
Press the
쏅
until the displays shows "OFF TIMER".
Press the
쏅
menu.
Set the time with the
쏅
When you have fi nished making your changes,
press the ESCAPE button <.
쏅
or button 4 repeatedly
button 4 to open the
or button 4.
Timeout function
The device features a time-out function
(time window).
For example, if you press the MENU•OK
button 5 and select a menu item, the device switches back after approx. 8 seconds
after the last button activation. The settings
performed are saved.
10
Page 11

Switching on/off Volume
Switching on/off
There are various ways of switching the device on/off:
Switching on/off with the On/Off button
For switch-on, press the On/Off but-
쏅
ton 6.
The device switches on.
To switch off the device, press and hold
쏅
down the On/Off button 6 for longer
than two seconds.
The device switches off.
Switching on/off using the vehicle
ignition
The device will switch on/off simultaneously with the ignition if the device is correctly connected to the vehicle’s ignition as
shown in the installation instructions and
you did not switch the device off by pressing the On/Off button 6.
Switching the device off using the
detachable control panel
Detach the control panel.
쏅
The devices switches off after the time set
in the "OFF TIMER" menu.
Note:
To protect the vehicle battery, the device will switch off automatically after
one hour if the ignition is off.
Adjusting the volume
You can adjust the volume in increments
from 0 (off) to 66 (maximum).
To increase the volume,
turn the volume control 7 clockwise.
쏅
To decrease the volume,
turn the volume control 7 counter-
쏅
clockwise.
Setting the power-on volume
You can set the power-on volume.
Press the MENU•OK button 5.
쏅
Press the
쏅
edly until "ON VOLUME" appears on the
display.
Press the
쏅
menu item.
Set the desired power-on volume with
쏅
the button
To help you adjust the setting more easily,
the device will increase or decrease the volume as you make your changes.
If you set "LAST VOL" (setting 0 = LAST
VOL), the volume at which you were listening before power-off is activated again.
Note:
To protect your hearing, the power-on
volume is limited to the value "38" for
the setting "LAST VOL". If the volume
was higher before switch-off, the value
is automatically set to "38" at switchon. This prevents an unintentionally
and unexpectedly high volume when
switching on the device.
or button 4 repeat-
button 4 to open the
or 4.
ENGLISH
11
Page 12

Volume
When you have fi nished making your changes,
press the ESCAPE button <.
쏅
Quickly reducing the volume
(MUTE)
You can quickly reduce the volume to a preset level.
쏅
Briefl y press the On/Off button 6.
"MUTE" appears on the display.
Cancelling mute
To return to your previously set volume
level,
쏅
briefl y press the On/Off button 6
again.
Adjusting the mute level
You can adjust the mute level.
쏅
Press the MENU•OK button 5.
쏅
Press the
edly until "MUTE LVL" appears on the
display.
쏅
Press the
menu.
쏅
Set the mute level with the
ton 4.
When you have fi nished making your changes,
쏅
press the ESCAPE button <.
or button 4 repeat-
button 4 to open the
or but-
Telephone Audio/Navigation
Audio
Muting during telephone mode
If your car sound system is connected with
a cell phone or navigation system, "picking"
up the phone or a voice output of the navigation system automatically mutes the car
sound system. The call or the voice output
is played back via the loudspeakers of the
car sound system. For this purpose, the cell
phone or the navigation system must be
connected to the car sound system as described in the installation instructions.
You can fi nd out from your Blaupunkt dealer
which navigation systems can be used with
your car sound system.
If you answer a call or a navigation announcement takes place, the display shows
"PHONE".
Adjusting the volume for telephone
audio/navigation audio
During a telephone call or a voice output of
the navigation, no traffi c announcements
are switched through. The traffi c announcement is not recorded!
You can set the volume level at which the
telephone calls or navigation announcements are mixed in.
쏅
Press the MENU•OK button 5.
쏅
Press the
until "TEL VOL" appears on the display.
쏅
Press the
menu.
쏅
Set the desired volume with the
button 4.
or button 4 repeatedly
button 4 to open the
or
12
Page 13

Volume Radio mode
When you have fi nished making your changes,
press the ESCAPE button <.
쏅
Note:
You can use the volume control 7 to
adjust the volume of telephone calls
and navigation announcements whilst
you are listening to them.
Switching the confi rmation beep
on/off
The system will output a confi rmation beep
for some functions if you keep a button
pressed down for longer than two seconds,
for instance, when assigning a radio station
to a station preset button. You can switch
the beep on or off.
쏅
Press the MENU•OK button 5.
쏅
Press the
until "BEEP ON" or "BEEP OFF" appears
on the display.
쏅
Switch the BEEP ON or OFF with the
or
When you have fi nished making your changes,
press the ESCAPE button <.
쏅
or button 4 repeatedly
button 4.
Radio mode
This device is equipped with an RDS radio
receiver. Many of the receivable FM stations
broadcast a signal that not only carries the
programme but also additional information
such as the station name and programme
type (PTY).
The station name appears on the display as
soon as the tuner receives it.
Adjusting the tuner
To ensure proper functioning of the tuner,
the device must be set for the region in
which it is being operated. You can select
among Europe "EUROPE", America "USA",
Thailand "THAI", and South America "SAMERIKA". The tuner is factory-set to the
region in which it was sold. If you experience problems with your radio reception,
please check this setting.
Note:
The radio functions described in these
operating instructions refer to the tuner setting America (USA).
쏅
Switch off the device by pressing the
On/Off button 6.
쏅
Hold the buttons 1 and 5 9 pressed at
the same time and switch on the device
again with the On/Off button 6.
"TUNER" appears on the display.
쏅
Select your tuner region with the
button 4.
To save the setting,
press the On/Off button 6 to switch
쏅
the device off and on again. The radio
starts playing with the last setting selected (radio, CD, CD changer or AUX).
ENGLISH
or
13
Page 14
Radio mode
Switching to radio mode
If you are in CD, CD changer or AUX mode,
press the BND button =
쏅
or
press the SRC button 2 repeatedly
쏅
until the display shows "FM1", "FM2",
"FMT" or "AM".
Selecting the waveband/memory
bank
This device can be used to receive stations
in the FM and AM frequency bands. There
are three memory banks available for the
FM waveband (FM1, FM2 and FMT) and
one for the AM waveband.
Five stations can be stored in each memory
bank.
To switch between the memory banks FM1,
FM2 and FMT or the AM waveband,
쏅
press the BND button =.
Tuning into a station
There are various ways of tuning into a station.
Automatic station seek tuning
Press the
쏅
The radio tunes into the next receivable station.
Tuning into stations manually
You can also tune into stations manually.
To change the set frequency in small incre-
ments,
쏅
briefl y press the
or button 4.
or button 4.
To change the set frequency quickly,
press and hold down the
쏅
4 for a longer period of time.
or button
Setting the sensitivity of station
seek tuning
You can choose whether the radio should
only tune into stations providing good reception or whether it can also tune into
those with a weak reception.
Press the MENU•OK button 5.
쏅
Press the
쏅
until "SENS HI" or "SENS LO" appears
on the display.
"SENS HI" indicates the highest sensitivity,
"SENS LO" the lowest.
Set the desired sensitivity with the
쏅
button 4.
When you have fi nished making your changes,
press the ESCAPE button <.
쏅
Note:
The device stores the sensitivity value
set in the respective FM and AM waveband.
or button 4 repeatedly
or
Storing stations
Storing stations manually
Select the desired memory bank FM1,
쏅
FM2, FMT or the AM waveband.
Tune into the desired station.
쏅
Press and hold down one of the station
쏅
buttons 1 - 5 9 for longer than two
seconds to assign the station to that
button.
14
Page 15

Radio mode
Storing stations automatically
(Travelstore)
You can automatically store the fi ve strongest stations in the region. The stations are
stored in the FMT or AM memory bank.
Note:
Any stations that were previously
stored in this memory bank are deleted
in the process.
Press and hold down the BND button
쏅
= for longer than 2 seconds.
The storing procedure begins. The display
shows "FM TSTORE" or "AM TSTORE". After
the process has completed, the radio will
play the station that is stored in memory location 1 of the FMT or AM memory bank.
Listening to stored stations
Select the memory bank or waveband.
쏅
Press one of the station buttons 1 - 5
쏅
9.
The stored station is played if it can be received.
Scanning receivable stations
(SCAN)
You can use the scan function to play all the
receivable stations briefl y. You can set the
scanning time in the menu to between 5
and 30 seconds.
Starting SCAN
Press and hold down the MENU•OK
쏅
button 5 for longer than two seconds.
The radio scans the next receivable station.
"SCAN" and the current frequency or the
station name appear intermittently on the
display.
Cancelling the SCAN and continuing to
listen to a station
쏅
Press the MENU•OK button 5.
Scanning stops and the radio continues
playing the station that it tuned into last.
Setting the scanning time
Press the MENU•OK button 5.
쏅
Press the
쏅
edly until "SCAN TIME" appears on the
display.
Press the
쏅
menu.
Set the desired scan time with the
쏅
button 4.
When you have fi nished making your changes,
press the ESCAPE button <.
쏅
Note:
The defi ned scanning time is also applied by the system to scanning carried
out in CD and CD-changer as well as
MP3 mode.
or button 4 repeat-
button 4 to open the
or
Confi guring the display
In radio mode, you can choose between
various display options.
Station name or frequency
•
Memory location and time
•
To switch between the display options,
press the DIS button :.
쏅
ENGLISH
15
Page 16

CD mode
CD mode
You can use this device to play standard
audio CDs, CD-Rs and CD-RWs with a diameter of 12 or 8 cm.
Caution!
Labelled or shaped CDs can damage the CD drive.
Do not insert any shape CDs.
•
Do not attach labels to CDs since the la-
•
bel may detach during operation.
Note:
Label CDs only by using a marker since
it does not contain any caustic materials. Permanent markers can damage
CDs.
To ensure proper functioning, use only CDs
with the Compact-Disc logo. Copy-protected CDs can cause playback problems.
Blaupunkt cannot guarantee the proper
functioning of copy-protected CDs!
Besides being able to play audio CDs on this
device, you can also play CDs containing
MP3/WMA music fi les. For further information, please read the chapter entitled "MP3/
WMA mode".
Switching to CD mode
If there is no CD inserted in the drive,
press the
쏅
The control panel opens.
Gently insert the CD with its printed
쏅
side uppermost into the drive until you
feel some resistance.
button 1.
The drive draws in the CD automatically.
If the CD is not automatically drawn in,
쏅
briefl y press the
You must not hinder or assist the drive as it
draws in the CD.
Gently close the control panel whilst
쏅
exerting a little pressure until you feel
it click into place.
The CD playback starts and "CD" is shown
on the display.
Note:
If the vehicle ignition was switched
off prior to inserting the CD, you must
switch the device on fi rst with the On/
Off button 6 to start the playback.
If a CD is already inserted in the drive,
쏅
press the SRC button 2 repeatedly
until "CD" appears on the display.
Playback begins from the point at which it
was last interrupted.
button ?.
Selecting tracks
Press one of the arrow keys or 4
쏅
or 4 to select the next or pre-
or
vious track.
If you press the
rent track will be played again from the beginning.
button 4 once, the cur-
Fast seek tuning (audible)
To fast search backwards or forwards,
쏅
press and hold down the
4 until fast searching backwards/forwards begins.
or button
16
Page 17

CD mode
Random track play (MIX)
Press the 5 MIX button 9.
쏅
"MIX CD" appears briefl y on the display and
the MIX symbol is displayed. The next randomly selected track will then be played.
Cancelling MIX
쏅
Press the 5 MIX button 9 again.
"MIX OFF" appears briefl y on the display
and the MIX symbol disappears.
Scanning tracks (SCAN)
You can scan (briefl y play) all the tracks on
the CD.
쏅
Press the MENU•OK button 5 for
longer than two seconds.
The next track will then be scanned. "SCAN"
appears on the display and the current track
number is fl ashing.
Note:
You can set the scan time. For further
information, please read the section
entitled "Setting the scanning time" in
the "Radio mode" chapter.
Cancelling Scan and continuing listening
to a track
To end the scanning process,
쏅
press the MENU•OK button 5.
The currently scanned track will then continue to be played normally.
Repeating tracks (REPEAT)
If you want to repeat a track,
쏅
press the 4 RPT button 9.
"RPT TRCK" appears briefl y on the display
and the RPT symbol is displayed. The track
is repeated continuously until you deactivate Repeat.
Cancelling Repeat
If you want to cancel the repeat function,
press the 4 RPT button 9 again.
쏅
"RPT OFF" appears briefl y on the display
and the RPT symbol disappears. Normal
playback is then resumed.
Interrupting playback (PAUSE)
Press the button 3 9.
쏅
"PAUSE" appears on the display.
Cancelling pause
During the pause, press the button 3
쏅
9.
Playback is continued.
Confi guring the display
You can choose from various display options in CD mode:
Track number and playing time
•
Track number and time
•
To switch between the display options,
쏅
press the DIS button :.
Displaying CD text
Some CDs include CD text. The CD text
might contain the names of the artist and
the album.
The CD text is shown as scrolling text on the
display with every track change.
ENGLISH
17
Page 18
CD mode MP3/WMA mode
Switching CD text on/off
Press the MENU•OK button 5.
쏅
Press the
쏅
until "CD TEXT" appears on the display
with the current setting.
Press the
쏅
menu.
Select between the options "TEXT ON"
쏅
(display CD text) or "TEXT OFF" (do not
display CD text) with the
ton 4.
When you have fi nished making your changes,
press the ESCAPE button <.
쏅
or button 4 repeatedly
button 4 to open the
or but-
Ejecting a CD
Press the button 1.
쏅
The control panel opens to the bottom.
Press the button ? next to the CD
쏅
compartment.
The CD is ejected.
Remove the CD and close the control
쏅
panel.
Notes:
If a CD is ejected, the drive will auto-
•
matically draw it back in again after
10 seconds.
You can also eject CDs whilst the de-
•
vice is switched off or whilst another
audio source is activated.
MP3/WMA mode
You can also use this car sound system to
play CD-Rs and CD-RWs that contain MP3
music fi les. You can also play WMA fi les.
This chapters deals only with playing
MP3 fi les since the operation for MP3
and WMA fi les is identical.
Notes:
WMA fi les with Digital Rights
•
Management (DRM) from online music shops cannot be played with this
device.
WMA fi les can only be played back safe-
•
ly if they were created with Windows
Media Player version 8 or later.
Preparing an MP3/WMA CD
The various combinations of CD burners,
CD burning software and CD blanks may
lead to problems arising with the device’s
ability to play certain CDs. If problems occur with your own burned CDs, you should
try another brand of CD blank or choose another colour of CD blank.
The format of the CD must be ISO 9660
Level 1/Level 2 or Joliet. Other formats
cannot be played reliably.
You can create a maximum of 252 directories
on a CD. You can use this device to access
all of these directories individually.
Regardless of the number of directories on
the CD, the device can handle up to 511
MP3 fi les on a single CD, with a maximum of
255 fi les in one directory.
18
Page 19

D01
T001
T002
T003
T004
T005
T006
T007
T008
T009
T010
T011
A
B
D02
D03
T001
T002
T003
T004
T005
T001
T002
T003
T004
T005
T006
D04
A Directories
B Tracks · Files
You can name each directory using a PC.
The device is capable of displaying the directory name. Name the directories and
tracks/fi les using your CD burner software.
The software’s instruction manual will provide details on how to do this.
Notes:
When naming fi les (directories and
•
tracks) you should avoid using accents and special characters.
If you use fi le names with more than
•
16 characters (including ".MP3" or
".WMA"), the maximum number of
tracks and directories is reduced.
MP3/WMA mode
If you like your fi les to be in the specifi c order, save the fi les on the data carrier in the
desired sequence in which you want to play
them later. The devices plays back the fi les
in the order in which they were physically
stored on the data carrier.
To play back fi les in this device, the MP3 fi les
must have the fi le extension ".MP3" and the
WMA fi les the fi le extension ".WMA".
Notes:
To ensure uninterrupted playback:
Do not try changing the fi le extension
•
to ".MP3" of any fi les other than MP3
fi les and then attempt to play them!
The device will ignore these invalid
fi les during playback.
Do not use "mixed" CDs containing
•
both non-MP3 data and MP3 tracks
(the device only reads MP3 fi les during MP3 playback).
Do not use mix-mode CDs containing
•
both CD-audio tracks and MP3 tracks.
If you try playing a mix-mode CD, the
device will only play the CD-audio
tracks.
MP3 ID3 tags
MP3 tracks can contain additional information such as the artist, album and track
name (ID3 tags). This device can display
ID3 tags of version 1 and 2.
ENGLISH
19
Page 20

MP3/WMA mode
Switching to MP3 mode
MP3 mode is activated in the same way as
normal CD mode. For further information,
please read the section entitled "Switching
to CD mode" in the "CD mode" chapter.
Confi guring the display
The following settings require that an MP3
CD is in the device.
Confi guring the default display
You can display various types of information on the current track:
Directory number and track number
•
"DIR-TRCK"
Directory number and time "DIR-CLK"
•
Directory number and playing time
•
"DIR-TIME"
Track number and playing time "TRCK-
•
TIME"
Track number and time "TRCK-CLK"
•
Note:
After the MP3 scrolling text was
scrolled once after a track change, the
information is permanently shown on
the display.
To switch between the different display options,
press the DIS button : once or sev-
쏅
eral times until the desired display appears.
Confi guring the MP3 scrolling texts
One of the following scrolling texts is
shown once on the display with every track
change. Afterwards, the confi gured standard display is shown.
The available scrolling texts are:
•
Directory name ("DIR NAME")
•
Name of the track ("SONG NAME")
•
Name of the album ("
Name of the artist ("ARTIST")
•
File name ("FILE NAME")
•
Note:
Artist, track and album name are part
of the MP3-ID tag of version 1 and can
only be displayed if they have been
saved with the MP3 fi les (for further information, please read the instructions
that came with your PC’s MP3 software
or burner software).
To switch between the different display options,
쏅
press the MENU•OK button 5.
쏅
Press the
edly until "MP3 DISP" appears on the
display.
Press the
쏅
menu.
Select the desired MP3 scrolling text
쏅
with the
When you have fi nished making your changes,
press the ESCAPE button <.
쏅
or button 4.
ALBM NAME
or button 4 repeat-
button 4 to open the
")
20
Selecting a directory
To move up or down to another directory,
press the
쏅
several times.
or button 4 once or
Page 21

MP3/WMA mode
Selecting Tracks/Files
to move up or down to another track/fi le
in the current directory,
press the
쏅
several times.
If you press the
rent track will be played again from the beginning.
or button 4 once or
button 4 once, the cur-
Fast search
To fast search backwards or forwards,
press and hold down the
쏅
4 until fast searching backwards / forwards begins.
or button
Random track play (MIX)
To play the tracks in the current directory in
random order,
briefl y press the 5 MIX button 9.
쏅
"MIX DIR" appears on the display and the
MIX symbol lights up.
To play all the tracks contained on the inserted MP3 CD in random order,
press and hold down the 5 MIX button
쏅
9 for longer than two seconds.
"MIX CD" appears on the display and the
MIX symbol lights up.
Cancelling MIX
To cancel MIX,
briefl y press the 5 MIX button 9.
쏅
"MIX OFF" appears on the display and the
MIX symbol disappears.
Scanning tracks (SCAN)
You can scan (briefl y play) all the tracks on
the CD.
Press and hold down the MENU•OK
쏅
button 5 for longer than two seconds.
The next track will then be scanned.
"TRK SCAN" briefl y appears on the display.
The currently active track number fl ashes.
The titles of the CD are scanned in ascending order.
Note:
You can set the scanning time. For further information on setting the scanning time, please read the section entitled "Setting the scanning time" in the
"Radio mode" chapter.
Cancelling SCAN and continuing
listening to a track
쏅
Briefl y press the MENU•OK button
5.
The currently scanned track will then continue to be played normally.
Repeating individual tracks or
whole directories (REPEAT)
To play the current track repeatedly,
briefl y press the 4 RPT button 9.
쏅
"RPT TRCK" appears briefl y on the display
and RPT lights up.
To repeat the whole directory,
press and hold down the 4 RPT button
쏅
9 for longer than two seconds.
"RPT DIR" appears briefl y on the display.
ENGLISH
21
Page 22

MP3/WMA mode CD-changer mode
Cancelling REPEAT
To stop the current track or current directory from being repeated,
briefl y press the 4 RPT button 9.
쏅
"RPT OFF" appears briefl y on the display
and RPT disappears.
Interrupting playback (PAUSE)
Press the button 3 9.
쏅
"PAUSE" appears on the display.
Cancelling pause
During the pause, press the button
쏅
9.
3
Playback is continued.
CD-changer mode
Note:
Information on handling CDs, inserting
CDs and operating the CD changer can
be found in the operating instructions
supplied with your CD changer.
Switching to CD-changer mode
Press the SRC button 2 repeatedly
쏅
until "CHANGER" appears on the display.
A border appears around the CD changer
symbol.
The device starts playing the fi rst CD that
the CD changer detects.
Selecting CDs
To move up or down to another CD,
press the
쏅
several times.
Note:
The device will ignore empty CD slots
in the changer and slots containing
invalid CDs.
or button 4 once or
22
Selecting tracks
To move up or down to another track on
the current CD,
press the
쏅
several times.
or button 4 once or
Page 23

CD-changer mode
Fast searching (audible)
To fast search backwards or forwards,
press and hold down one of the
쏅
buttons 4 until fast searching backwards / forwards begins.
Confi guring the display
Five options are available for the display in
CD changer mode:
CD number and track number ("CD-
•
TRCK")
CD number and time ("CD-CLK")
•
CD number and playing time ("CD-
•
TIME")
Track number and playing time ("TRCK-
•
TIME")
•
Track number and time ("TRCK-CLK")
To switch between the display options,
쏅
press the DIS button : once or several times until the desired display appears.
Repeating individual tracks or
whole CDs (REPEAT)
To repeat the current track,
briefl y press the 4 RPT button 9.
쏅
"RPT TRCK" appears briefl y and RPT lights
up on the display.
To repeat the current CD,
press and hold down the 4 RPT button
쏅
9 for longer than two seconds.
"RPT DISC" appears briefl y and RPT lights
up on the display.
Cancelling REPEAT
To stop the current track or current CD from
being repeated,
briefl y press the 4 RPT button 9.
쏅
"RPT OFF" appears and RPT disappears on
the display.
Random track play (MIX)
To play the tracks on the current CD in
random order,
briefl y press the 5 MIX button 9.
쏅
"MIX CD" appears briefl y and MIX lights up
on the display.
To play the tracks on all inserted CDs in
random order,
press and hold down the 5 MIX button
쏅
9 for longer than two seconds.
"MIX ALL" appears briefl y and MIX lights up
on the display.
Cancelling MIX
쏅
Briefl y press the 5 MIX button 9.
"MIX OFF" appears and MIX on the display
disappears.
Scanning all tracks on all CDs
(SCAN)
To scan (briefl y play) all the tracks on all the
inserted CDs in ascending order,
press and hold down the MENU•OK
쏅
button 5 for longer than two seconds.
"TRK SCAN" appears on the display and the
number of the current track fl ashes.
ENGLISH
23
Page 24
CD-changer mode Clock – Time
Stopping SCAN
To stop scanning,
briefl y press the MENU•OK button
쏅
5.
The currently scanned track will then continue to be played normally.
Note:
You can set the scanning time. For
further information, please read the
section entitled "Setting the scanning
time" in the "Radio mode" chapter.
Interrupting playback (PAUSE)
Press the button 3 9.
쏅
"PAUSE" appears on the display.
Cancelling pause
During the pause, press the button
쏅
9.
3
Playback is continued.
Clock – Time
Setting the time
To set the time,
press the MENU•OK button 5.
쏅
Press the
쏅
edly until "CLOCK SET" appears on the
display.
쏅
Press the
menu.
The time appears on the display. The minutes are fl ashing and can be adjusted.
쏅
Set the time with the
To switch between hours and minutes,
press the
쏅
When you have fi nished making your changes,
쏅
press the ESCAPE button <.
Selecting 12/24-hour clock mode
Press the MENU•OK button 5.
쏅
Press the
쏅
until "24H MODE" or "12H MODE" appears on the display.
Press the
쏅
between the modes.
When you have fi nished making your changes,
press the ESCAPE button <.
쏅
or button 4 repeat-
button 4 to open the
or button 4.
or button 4.
or button 4 repeatedly
or button 4 to switch
24
Page 25

Clock – Time Sound
Displaying the time continuously
when the device is off and the
ignition is on
To display the time when the device is off
and the vehicle ignition is on,
press the MENU•OK button 5.
쏅
Press the
쏅
until "CLOCK OFF" or "CLOCK ON" appears on the display.
Press the
쏅
the display between CLOCK ON and
CLOCK OFF.
When you have fi nished making your changes,
press the ESCAPE button <.
쏅
or button 4 repeatedly
or button 4 to switch
Sound
You can adjust the sound settings (bass,
middle and treble) separately for each
source (radio, CD, CD changer, AUX, and
telephone/navigation). The volume distribution settings (balance and fader) and
X-BASS apply to all the audio sources except for telephone/navigation. You can adjust the volume distribution settings separately for telephone/navigation.
Note:
The settings of the sound for telephone/
navigation can only be made during a
telephone call/voice output.
Adjusting the bass
You can select 1 of 4 middle frequencies
(60 Hz, 80 Hz, 100 Hz, 200 Hz). In addition, you can adjust the level between
-7 and +7 for the selected bass frequency.
Adjusting bass frequency and level
Press the AUD button >.
쏅
"BASS" appears on the display.
쏅
Press the
the BASS submenu.
Press the
쏅
until the desired bass frequency appears on the display.
쏅
Press the
the level between -7 and +7.
Press the AUD > button twice to exit
쏅
the menu.
button 4 once to reach
or button 4 repeatedly
or button 4 to adjust
ENGLISH
25
Page 26
Sound
Note:
If an Equaliser preset (POP, ROCK,
CLASSIC) is selected, the manual increase of the bass level does not result
in an audible change starting at a certain setting. For further information,
please read the note in the section
entitled "Equaliser presets".
Adjusting the middle
You can select 1 of 4 centre frequencies
(500 Hz, 1 kHz, 2 kHz, 3 kHz). In addition,
you can adjust the level between -7 and +7
for the selected centre frequency.
Adjusting centre frequency and level
Press the AUD button >.
쏅
"BASS" appears on the display.
쏅
Press the
until "MIDDLE" appears on the display.
쏅
Press the
the MIDDLE submenu.
쏅
Press the
until the desired centre frequency appears on the display.
쏅
Press the
the level between -7 and +7.
쏅
Press the AUD > button twice to exit
the menu.
or button 4 repeatedly
button 4 once to reach
or button 4 repeatedly
or button 4 to adjust
Adjusting the treble
You can select 1 of 4 treble frequencies
(10 kHz, 12 kHz, 15 kHz, 17 kHz). In addition, you can adjust the level between
-7 and +7 for the selected treble frequency.
Adjusting treble frequency and level
Press the AUD button >.
쏅
"BASS" appears on the display.
Press the
쏅
until "TREBLE" appears on the display.
Press the
쏅
the TREBLE submenu.
Press the
쏅
until the desired treble frequency appears on the display.
Press the
쏅
the level between -7 and +7.
Press the AUD > button twice to exit
쏅
the menu.
Note:
If an Equaliser preset (POP, ROCK,
CLASSIC) is selected, the manual increase of the treble level does not result in an audible change starting at a
certain setting. For further information, please read the note in the section
entitled "Equaliser presets".
or button 4 repeatedly
button 4 once to reach
or button 4 repeatedly
or button 4 to adjust
26
Page 27

Sound X-Bass
Setting the left/right volume
distribution (Balance)
To adjust the left/right volume distribution
(balance),
press the AUD button >.
쏅
"BASS" appears on the display.
Press the
쏅
until "BAL" appears on the display with
the current setting.
Press the
쏅
the balance (right/left).
Press the AUD > button to exit the
쏅
menu.
or button 4 repeatedly
or button 4 to adjust
Adjusting the front/rear volume
distribution (Fader)
To adjust the front/rear volume distribution
(fader),
press the AUD button >.
쏅
"BASS" appears on the display.
쏅
Press the
ly until "FADER" appears on the display
with the current setting.
쏅
Press the
the volume distribution front/rear.
Press the AUD > button to exit the
쏅
menu.
or button 4 repeated-
or button 4 to adjust
X-BASS
X-Bass allows you to increase the bass at
low volume.
The selected X-Bass setting is effective for
all audio sources (radio, CD, CD changer or
AUX).
The X-BASS increase can be set in increments of 1 to 3.
"XBASS OFF" means that the X-BASS function is switched off.
Adjusting the X-BASS boost
Press the XBASS button 3.
쏅
"X-BASS" appears on the display.
Press the
쏅
menu.
Press the
쏅
until the desired setting appears on the
display.
When you have fi nished making your
changes,
쏅
press the XBASS button 3.
button 4 to open the
or button 4 repeatedly
ENGLISH
27
Page 28
Equalizer presettings Display
Equalizer presettings
(Presets)
This device features an equaliser in which
the settings for the music genres "ROCK",
"POP" and "CLASSIC" are already programmed.
To select an equaliser setting,
press the AUD button >.
쏅
"BASS" appears on the display.
Press the
쏅
until "POP", "ROCK", "CLASSIC" or "EQ
OFF" appears on the display.
Press the
쏅
one of the settings or select "EQ OFF"
to switch off the equalizer.
When you have fi nished making your
changes,
press the AUD button >.
쏅
Note:
Without Equaliser presets, you can adjust the bass and treble up to +7.
If you selected an Equaliser preset
(POP, ROCK, CLASSIC), the adjustment of bass and treble is only limited.
For example, the preset POP only allows for an audible treble adjustment
up to +3.
or button 4 repeatedly
or button 4 to select
Adjusting the display
settings
Adjusting the display brightness
If your car sound system is installed as described in the installation instructions and
your vehicle features the corresponding
connection, the display brightness for day
and night is switched by switching on the
vehicle lighting. The display brightness can
be adjusted separately for day and night in
increments from 1 - 9.
쏅
Press the MENU•OK button 5.
쏅
Press the
until "DIM DAY" or "DIM NIGHT" appears
on the display.
Press the
쏅
menu.
Press the
쏅
between the brightness levels.
When you have fi nished making your
changes,
press the ESCAPE button <.
쏅
Setting the display illumination
colour
For the display illumination, you can mix a
colour from the RGB spectrum (red green
blue) or select a colour during a colour
seek.
or button 4 repeatedly
button 4 to open the
or button 4 to switch
28
Mixing a colour for the display
illumination
To customise the display illumination to suit
your tastes you can mix a colour yourself
using the three primary colours red, green
and blue.
Page 29

Press the MENU•OK button 5.
쏅
Press the
쏅
edly until "DISP COL" appears on the
display.
Press the
쏅
menu.
The menu for mixing your own colour is displayed. "R", "G", and "B" are displayed with
the current values. The setting for "R" is activated.
쏅
Press the
edly until the desired colour value is
displayed.
쏅
Press the
selection marker to the position after
the other colours.
쏅
Adjust the other colour components to
suit your preferences.
When you have fi nished making your
changes,
쏅
press the ESCAPE button <.
Selecting a display illumination during a
colour scan
쏅
Press the MENU•OK button 5.
쏅
Press the
edly until "COL SCAN" appears on the
display.
Press the
쏅
our seek.
The device starts changing the display illumination colour.
To select the currently set colour,
쏅
press the MENU•OK button 5.
To start the seek tuning again,
쏅
press the
or button 4 repeat-
button 4 to open the
or button 4 repeat-
or button 4 to move the
or button 4 repeat-
button 4 to start the col-
button 4.
Display
If you found the desired colour,
press the ESCAPE button <.
쏅
Activating/deactivating demo
mode
In demo mode, the functions of the device
are shown on the display as scrolling text.
The constant colour change demonstrates
the setting options of the display colours.
Pressing any button interrupts the demo
mode for approx. 10 seconds.
Switching on the demo mode
Switch off the device by pressing the
쏅
On/Off button 6.
Hold the buttons 1 9 and DIS :
쏅
pressed at the same time and switch
on the device again with the On/Off
button 6.
"DEMO" briefl y appears on the display.
Switching off the demo mode
Switch off the device by pressing the
쏅
On/Off button 6.
Hold the buttons 1 9 and DIS :
쏅
pressed at the same time and switch
on the device again with the On/Off
button 6.
The demo mode is switched off.
ENGLISH
29
Page 30

External audio sources Specifi cations
External audio sources
External audio sources, such as portable
CD players, MiniDisc players or MP3 players, can be connected to the device via the
rear AUX input (if no CD changer is connected to the device).
Notes:
An adapter cable is needed to con-
•
nect an external audio source via the
rear AUX input. You can obtain this cable (Blaupunkt no.: 7 607 897 093)
from your Blaupunkt dealer.
The rear AUX input can be selected
•
with the SRC button 2. "AUX INPUT"
then appears on the display.
AUX INPUT can be selected only if no
•
CD changer is connected to the device.
Specifi cations
Amplifi er
Output power: 18W RMS x 4ch @ 14.4V
@ 4ohm @ 1% THD
Tuner
Frequency ranges USA:
FM: 87.5 - 107.9 MHz
(200 kHz step)
AM: 530 - 1710 kHz
(10 kHz step)
Frequency ranges Europe:
FM: 87.5 - 108 MHz
(100 kHz step auto/
50 kHz manual)
AM: 531 - 1602 kHz
(9 kHz step)
Frequency ranges Thailand:
FM: 87.5 - 108 MHz
(50 kHz step auto/
25 kHz step manual)
AM: 531 - 1602 kHz
(9 kHz step)
30
Frequency ranges South America:
FM: 87.5 - 107.9 MHz
(100 kHz step auto/
50 kHz step manual)
AM: 530 - 1710 kHz
(10 kHz step)
FM mono sensitivity:
17 dbf
Page 31

FM frequency response:
35 - 16,000 Hz
CD
Frequency response:
20 - 20,000 Hz
Pre-amp out
4 channels: 2 V
Input sensitivity
AUX input: 2 V / 6 kΩ
Tel./Navi input: 10 V / 1 kΩ
Weight approx. 1.36 kg
Specifi cations
ENGLISH
Subject to changes!
31
Page 32

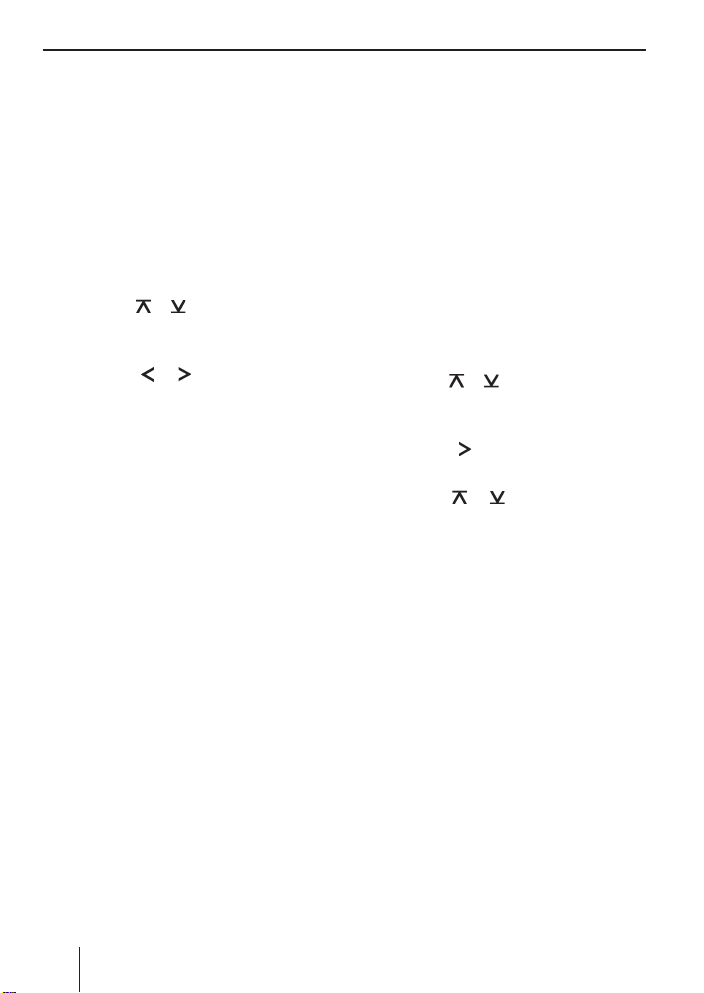
Eléments de commande
1 Touche
Déverrouillage de la face avant détachable (Flip-Release Panel).
2 Touche SRC
Sélection de la source : radio, CD et (si
raccordé et en marche) changeur de
CD et AUX.
3 Touche XBASS
Activation / désactivation et réglage de
X-BA SS.
4 Bloc de touches fl èches
5 Touche MENU•OK
Pression brève : appel du menu pour
les réglages de base et confi rmation
des réglages.
Désactivation de la fonction de balayage (Scan).
Pression prolongée : activation de la
fonction de balayage (Scan).
6 Touche Marche/Arrêt
Pression brève : mise en marche de
l'appareil. En fonctionnement : coupure du son (Mute) de l'appareil.
Pression prolongée : extinction de l'appareil.
7 Bouton de réglage du volume
8 Ecran
9 Bloc de touches 1 - 5
: Touche DIS
Changement des contenus d'affi chage.
; Touche
Affi chage bref de l'heure.
< Touche ESCAPE
Confi rmation de l'option de menu et
retour à l'affi chage du niveau supérieur
dans MENU ou AUDIO.
= Touche BND
Pression brève : sélection des niveaux
de mémoire FM et de la gamme d'ondes AM.
Pression prolongée : activation de la
fonction Travelstore.
> Touche AUD, réglage des graves, des
aiguës, du médium, de la balance et du
fader.
Sélection d'un préréglage de l'égaliseur.
? Touche
(Eject) pour le retrait du CD
de l'appareil.
@ Fente d'insertion du CD
32
Page 33

Sommaire
A propos de cette notice ...................35
Symboles utilisés ........................... 35
Utilisation conforme ....................... 35
Déclaration de conformité ............... 35
Pour votre sécurité ..........................36
Si vous montez vous-mêmes
l'appareil ......................................36
Ce que vous devez respecter ! .......... 36
Instructions de nettoyage ................36
Elimination des anciens appareils .....36
Composition de la fourniture ............37
Accessoires spéciaux (non fournis) .. 37
Télécommande ................................ 37
Garantie.......................................... 38
Service ........................................ 38
Face avant détachable ...................... 38
Protection antivol...........................38
Retrait de la face avant....................38
Mise en place de la face avant ..........39
Temporisation d'arrêt (OFF TIMER) ..39
Fonction de temporisation .............. 39
Mise en marche et arrêt....................40
Réglage du volume sonore ................ 40
Réglage du volume de mise en
marche .........................................40
Abaissement rapide du volume
sonore (MUTE) .............................. 41
Volume sonore pour le téléphone
et le système de navigation .............. 41
Activer/désactiver du bip de
confi rmation ................................. 42
Mode radio ...................................... 42
Réglage du tuner ............................ 42
Activation du mode radio ................ 43
Sélection de la gamme d'ondes/
du niveau de mémoire .................... 43
Réglage des stations....................... 43
Réglage de la sensibilité de la
recherche de stations ..................... 43
Mémorisation de stations ................ 44
Mémorisation automatique de
stations (Travelstore) ..................... 44
Appel d'une station mémorisée ........44
Balayage des stations qui peuvent
être reçues (SCAN) ........................44
Réglage de la durée d'écoute lors
du balayage...................................45
Régler du mode d'affi chage ............. 45
Mode CD ......................................... 45
Activation du mode CD ................... 46
Sélection d'un titre ......................... 46
Recherche rapide (audible) ............. 46
Lecture aléatoire des titres (MIX) ...... 46
Balayage des titres (SCAN) .............. 46
Répétition de titres (REPEAT) .......... 47
Interruption de la lecture (PAUSE) ....47
Réglage du mode d'affi chage ........... 47
Affi chage du texte de CD .................47
Ejection du CD .............................. 48
Mode MP3/WMA ............................. 48
Préparation du CD MP3/WMA .......... 48
Activation du mode MP3 ................. 50
Réglage du mode d'affi chage ........... 50
Sélectionner un répertoire .............. 50
Sélectionner des titres / fi chiers ....... 51
Recherche rapide .......................... 51
Lecture aléatoire des titres (MIX) ...... 51
Lecture des intros (SCAN) ............... 51
Lecture répétée de titres ou
de répertoires entiers (REPEAT) ....... 51
Interruption de la lecture (PAUSE) ....52
FRANÇAIS
33
Page 34

Sommaire
Mode Changeur CD ..........................52
Sélection du mode changeur CD ...... 52
Sélection d'un CD .......................... 52
Sélection d'un titre ......................... 52
Recherche rapide (audible) ............. 53
Réglage du mode d'affi chage ........... 53
Lecture de titres ou de CD entiers
(REPEAT) .....................................53
Lecture aléatoire des titres (MIX) ...... 53
Lecture des intros de tous les CD
(SCAN) ........................................54
Interruption de la lecture (PAUSE) ....54
Clock – Heure .................................. 54
Réglage de l'heure .......................... 54
Sélection du mode d'affi chage
12/24 heures ................................ 54
Affi chage permanent de l'heure,
appareil arrêté et contact mis .......... 55
Son ................................................. 55
Réglage des graves (Bass) ...............55
Réglages des médiums (Middle) ....... 56
Réglage des aiguës (Treble) .............56
Réglage du volume vers la droite /
vers la gauche (Balance) .................57
Réglage du volume vers l’avant /
vers l’arrière (Fader) ....................... 57
X-BASS ...........................................57
Réglage de l'amplifi cation X-BASS .... 57
Préréglages de l'égaliseur (Presets) ... 58
Réglage de l'écran ........................... 58
Réglage de la luminosité de l'écran ... 58
Sélection de la couleur de
l'éclairage de l'écran ....................... 58
Activation/Désactivation du
mode Démo .................................. 59
Sources audio externes .................... 60
Caractéristiques techniques ............. 60
Amplifi cateur ................................60
Tuner ...........................................60
CD ............................................... 61
Sortie préampli ............................. 61
Sensibilité d’entrée ........................61
Notice de montage ........................180
34
Page 35

A propos de cette notice
A propos de cette notice
Cette notice contient des informations importantes pour un montage et une utilisation simples et sûrs de l'appareil.
Lisez cette notice avec soin et intégrale-
•
ment avant d'utiliser l'appareil.
•
Conservez cette notice de façon à ce
qu'elle soit accessible à tout moment à
tous les utilisateurs.
•
Remettez toujours l'appareil à un tiers
avec cette notice.
Tenez également compte des notices jointes aux appareils utilisés conjointement à
celui-ci.
Symboles utilisés
Les symboles suivants sont utilisés dans
cette notice :
ATTENTION !
Avertit de la présence d'un rayon
laser
ATTENTION !
Avertit de la possibilité d'endommager le lecteur de CD
Utilisation conforme
Cet appareil est prévu pour le montage et le
fonctionnement dans un véhicule disposant
d'une tension de bord de 12 V et il doit être
monté dans une baie DIN. Tenez compte
des limites de puissance indiquées dans les
caractéristiques techniques. Confi ez les réparations, et éventuellement le montage, à
un spécialiste.
Déclaration de conformité
Blaupunkt GmbH certifi e que l'appareil
Key West MP38 satisfait aux exigences de
base et aux exigences des autres dispositions
applicables de la directive 89/336/CEE.
FRANÇAIS
Le sigle CE confi rme que les directives UE sont respectées.
Identifi e une action
쏅
Identifi e une énumération
•
35
Page 36

Pour votre sécurité
Pour votre sécurité
L'appareil a été
connaissances techniques actuelles et selon les règles techniques de sécurité reconnues. Vous prenez cependant des risques si
vous ne suivez pas les consignes de sécurité qui se trouvent dans cette notice.
Si vous montez vous-mêmes
l'appareil
Vous n'êtes autorisé à monter l'appareil que
si vous possédez une expérience dans le
montage d'autoradios et disposez de bonnes connaissances en électricité automobile. tenez compte pour cela de la notice de
montage qui se trouve à la fi n de ce mode
d'emploi.
Ce que vous devez respecter !
se 1 qui est susceptible de blesser vos yeux.
N'ouvrez pas l'appareil, n'entreprenez aucu-
ne modifi cation sur celui-ci.
En fonctionnement
Ne manipulez l'appareil que si les condi-
•
tions de circulation le permettent ! Pour
effectuer des manipulations importantes, arrêtez-vous dans un endroit approprié.
Enlevez ou remettez en place la face
•
avant uniquement lorsque le véhicule
est à l'arrêt.
Pour protéger votre ouïe, réglez tou-
•
jours un volume sonore modéré. Si
vous modifi ez le volume sonore pen-
fabriqué en fonction des
ATTENTION
L'appareil comporte un laser de clas-
dant une coupure momentanée du son
(par exemple lors d'un changement de
source audio ou de CD dans le changeur CD ou lors de la recherche des
stations par la fonction Travelstore), la
différence ne sera audible qu'une fois le
son rétabli. N'augmentez pas le volume
sonore pendant la coupure momentanée du son.
•
Ecoutez toujours à volume modéré de
façon à pouvoir toujours entendre les
signaux sonores d'alerte (de la police,
par exemple).
Après utilisation
•
Sans face avant, l'appareil n'a aucune
valeur pour le voleur. Enlevez toujours
la face avant lorsque vous quittez le véhicule.
•
Transportez la face avant de manière
à ce qu'elle soit protégée des coups et
que les contacts ne puissent pas être
encrassés.
Instructions de nettoyage
Les solvants, les produits de nettoyage, les
abrasifs et les produits pour l'entretien du
poste de conduite et du plastique contiennent des substances susceptibles d'attaquer les surfaces de l'appareil.
Pour nettoyer l'appareil, utilisez uniquement
un chiffon sec ou légèrement humide.
Elimination des anciens appareils
Ne jetez pas votre ancien appareil avec
les ordures ménagères !
Utilisez les systèmes mis à votre disposition
pour le renvoi et la collecte des anciens appareils en vue de leur élimination.
36
Page 37

Composition de la fourniture Télécommande
Composition de la
fourniture
La fourniture comprend :
1 autoradio
1 cadre support
2 outils de démontage
1 axes de guidage
3 câbles de raccordement
1 notice d'utilisation
1 télécommande portable RC 12H
Accessoires spéciaux
(non fournis)
Utilisez uniquement les accessoires spéciaux agréés par Blaupunkt.
Télécommande au volant
La télécommande au volant vous permet
d'utiliser confortablement et en toute sécurité les fonctions de base de votre autoradio
sans quitter le volant des mains.
La télécommande ne permet pas de mettre
en marche et d'arrêter l'appareil !
Pour savoir quelles télécommandes peuvent
être utilisées sur votre autoradio, adressezvous à votre revendeur Blaupunkt ou visitez
le site Internet www.blaupunkt.com.
Télécommande
Votre autoradio est livré avec une télécommande portable RC 12H.
Vous pouvez utiliser confortablement et en
toute sécurité les principales fonctions avec
la télécommande.
N'oubliez pas qu'il doit y avoir un contact visuel entre la télécommande et le récepteur
de la télécommande qui se trouve dans la
façade amovible.
La télécommande ne permet pas de mettre
en marche ou d'arrêter l'appareil.
FRANÇAIS
Amplifi cateurs (Amplifi er)
Il est possible d'utiliser tous les amplifi cateurs Blaupunkt et Velocity.
Changeur CD (Changer)
Il est possible de raccorder les changeurs
CD Blaupunkt :
CDC A 03, CDC A 08 et IDC A 09.
37
Page 38

Garantie Face avant détachable
Garantie
Notre garantie constructeur s’étend à tous
nos produits achetés au sein de l’Union
Européenne. Pour les appareils vendus
hors Union européenne, les conditions de
garantie applicables sont celles défi nies
par notre représentant agréé dans le pays.
Service
Dans certains pays, Blaupunkt propose un
service d'enlèvement et de réparation.
Vous pouvez contrôler si ce service est disponible dans votre pays à l'adresse www.
blaupunkt.com.
Si vous souhaites recourir à ce service,
vous pouvez effectuer une demande d'enlèvement de votre appareil par Internet.
Face avant détachable
Protection antivol
Votre autoradio est équipé d'une face avant
détachable (Flip-Release Panel) qui le protège contre le vol. Sans face avant, l'appareil n'a aucune valeur pour le voleur.
Protégez votre appareil contre le vol en enlevant la face avant chaque fois que vous
quittez votre véhicule. Ne laissez jamais la
face avant dans le véhicule, même en la cachant bien.
Remarques :
•
Ne laissez pas tomber la face avant
par terre.
•
N'exposez pas la face avant directement au soleil ou à d'autres sources
de chaleur.
•
Evitez que la peau ne touche directement les contacts de la face avant.
Nettoyer si nécessaire les contacts
avec un chiffon non pelucheux, imprégné d'alcool.
Retrait de la face avant
Appuyez sur la touche 1.
쏅
La face avant bascule vers le bas.
38
Saisissez la face avant par le côté droit
쏅
et tirez-la tout droit en dehors de ses
fi xations.
Page 39

Face avant détachable
Remarques :
L'appareil est mis hors tension
•
après une temporisation préalablement réglée. Lisez à ce sujet la section « Temporisation d'arrêt (OFF
TIMER) » de ce chapitre.
L'appareil retient la dernière source
•
audio écoutée pour la reprendre lors
de la prochaine mise en marche.
Un CD introduit dans l'appareil reste
•
dans celui-ci.
Mise en place de la face avant
2.
1.
Tenez la face avant sensiblement per-
쏅
pendiculaire à l'appareil (voir l'illustration, pos. 1).
Poussez la face avant dans le guide qui se
쏅
trouve sur le bord inférieur du boîtier.
Appuyez avec précaution sur la face
쏅
avant jusqu'à ce qu'elle se verrouille
dans les fi xations.
Relevez la face avant et appuyez légè-
쏅
rement dessus pour la verrouiller. (voir
l'illustration, pos. 2)
Si l'appareil était en marche lorsque vous
avez retiré la face avant, il se remet automatiquement en marche dans le dernier mode
sélectionné (autoradio, CD, changeur CD
ou AUX) au moment où vous remettez la
face avant en place.
Temporisation d'arrêt
(OFF TIMER)
Après que vous avez ouvert la face avant,
l'appareil s'arrête au bout d'un temps réglable. Vous pouvez régler ce temps entre 0 et
30 secondes.
Appuyez sur la touche MENU•OK 5.
쏅
Appuyez sur la touche
쏅
de fois qu'il est nécessaire pour faire apparaître « OFF TIMER » sur l'écran.
Appuyez sur la touche
쏅
le menu.
Réglez le temps avec la touche
쏅
4.
Une fois le réglage effectué,
appuyez sur la touche ESCAPE <.
쏅
ou 4 autant
4 pour ouvrir
ou
Fonction de temporisation
L'appareil dispose d'une fonction de temporisation.
Si vous appuyez par exemple sur la touche
MENU•OK 5 et sélectionnez une option
de menu, l'appareil se remet en marche
environ 8 secondes après le dernier actionnement de touche. Les réglages effectués
sont mémorisés.
FRANÇAIS
39
Page 40

Mise en marche et arrêt Volume sonore
Mise en marche et arrêt
Plusieurs possibilités vous sont offertes pour
mettre en marche ou arrêter l'appareil :
Mise en marche et arrêt avec la touche
marche/arrêt
Pour mettre l'appareil en marche, ap-
쏅
puyez sur le touche Marche/Arrêt 6.
L'appareil se met en marche.
Pour arrêter l'appareil, appuyez sur la
쏅
touche Marche/Arrêt 6 et maintenez-
la appuyée pendant plus de 2 secondes.
L'appareil s'arrête.
Mise en marche et arrêt par
l'intermédiaire du contacteur d'allumage
du véhicule
Si l'autoradio est relié à l'allumage du véhicule, comme indiqué dans la notice de
montage, et s'il n'a pas été arrêté avec la
touche Marche/Arrêt 6, il se met en mar-
che ou s'arrête lorsque le contact est mis ou
coupé.
Arrêt par retrait de la face avant
détachable
Enlevez la face avant.
쏅
L'appareil s'arrête au bout du temps réglé
dans le menu « OFF TIMER ».
Remarque :
Pour protéger la batterie du véhicule,
l'appareil s'éteint automatiquement au
bout d'une heure après le contact a été
coupé.
Réglage du volume sonore
Le volume sonore est réglable de 0 (arrêt) à
66 (maximum).
Pour augmenter le volume sonore,
tournez le bouton de réglage du volume
쏅
7 vers la droite.
Pour diminuer le volume sonore,
tournez le bouton de réglage du volume
쏅
7 vers la gauche.
Réglage du volume de mise en
marche
Le volume sonore à la mise en marche est
réglable.
Appuyez sur la touche MENU•OK 5.
쏅
Appuyez sur la touche
쏅
autant de fois qu'il est nécessaire pour
faire apparaître « ON VOLUME » sur
l'écran.
Appuyez sur la touche
쏅
l'option de menu.
Réglez le volume sonore à la mise en
쏅
marche souhaité avec la touche
4.
Pour faciliter le réglage, le volume sonore
augmente ou diminue en même temps que
vous réglez.
Lorsque vous réglez « LAST VOL » (réglage
0 = LAST VOL), le volume sonore réglé
avant l'arrêt de l'appareil est réactivé.
Remarque :
Pour protéger l'ouïe, le volume sonore à
la mise en marche est limité à la valeur
« 38 » avec le réglage « LAST VOL ». Si
le volume sonore au moment de l'arrêt
était plus élevé, il sera ramené automa-
ou 4
4 pour ouvrir
ou
40
Page 41

Volume sonore
tiquement à la valeur « 38 » lors de la
mise en marche. Cela permet d'éviter
un volume sonore élevé involontaire et
inattendu lors de la mise en marche de
l'appareil.
Une fois le réglage effectué,
쏅
appuyez sur la touche ESCAPE <.
Abaissement rapide du volume
sonore (MUTE)
Vous avez la possibilité d'abaisser rapidement le volume sonore jusqu'à un niveau
que vous avez préalablement défi ni.
Appuyez brièvement sur la touche
쏅
Marche/Arrêt 6.
« MUTE » apparaît sur l'écran.
Annulation de l'abaissement du volume
sonore
Pour réactiver le volume sonore précédent,
쏅
appuyez de nouveau brièvement sur la
touche Marche/Arrêt 6.
Réglage du volume de sourdine (Mute)
Le volume de sourdine (niveau Mute) est
réglable.
쏅
Appuyez sur la touche MENU•OK 5.
쏅
Appuyez sur la touche
de fois qu'il est nécessaire pour faire
apparaître « MUTE LVL » sur l'écran.
Appuyez sur la touche
쏅
le menu.
Réglez le niveau de sourdine souhaité
쏅
avec la touche
Une fois le réglage effectué,
appuyez sur la touche ESCAPE <.
쏅
ou 4 autant
4 pour ouvrir
ou 4.
Volume sonore pour le téléphone
et le système de navigation
Coupure du son en mode téléphone
Lorsque votre autoradio est relié à un téléphone portable ou à un système de navigation, le son est coupé au moment où vous
prenez un appel ou lorsque le système de
navigation sort une instruction vocale. La
communication téléphonique ou la sortie
vocale du système de navigation s'effectuent par l'intermédiaire des haut-parleurs
du système audio. Le téléphone portable
ou le système de navigation doivent pour
cela être reliés à l'autoradio comme indiqué
dans la notice de montage.
Pour connaître les systèmes de navigation
que vous pouvez utiliser avec votre autoradio, n'hésitez pas à contacter votre revendeur Blaupunkt.
Lorsque vous prenez un appel ou que le système de navigation sort une instruction vocale, « PHONE » apparaît sur l'écran.
Réglage du volume sonore pour le
téléphone ou le système de navigation
Aucune information routière n'est diffusée
en cours de communication téléphonique
ou lorsque le système de navigation sort
une instruction vocale. L'information routière n'est pas enregistrée !
Vous pouvez régler le volume sonore pour le
téléphone et le système de navigation :
쏅
Appuyez sur la touche MENU•OK 5.
쏅
Appuyez sur la touche
de fois qu'il est nécessaire pour faire apparaître « TEL VOL » sur l'écran.
쏅
Appuyez sur la touche
le menu.
ou 4 autant
4 pour ouvrir
FRANÇAIS
41
Page 42

Volume sonore Mode radio
Réglez le volume sonore souhaité avec
쏅
la touche
Une fois le réglage effectué,
appuyez sur la touche ESCAPE <.
쏅
Remarque :
Vous pouvez régler le volume sonore
des communications téléphoniques ou
des instructions vocales du système de
navigation au moment où celles-ci sont
diffusées avec le bouton de réglage du
volume 7.
ou 4.
Activer/désactiver du bip de
confi rmation
Lorsque, pour certaines fonctions, vous
appuyez sur une touche pendant plus de
2 secondes, par exemple pour affecter une
station à une touche de présélection, un bip
de confi rmation retentit. Vous pouvez activer ou désactiver le bip.
쏅
Appuyez sur la touche MENU•OK 5.
쏅
Appuyez sur la touche
autant de fois qu'il est nécessaire pour
faire apparaître « BEEP ON » ou « BEEP
OFF » sur l'écran.
Activez (ON) ou désactivez (OFF) le bip
쏅
(BEEP) avec la touche
Une fois le réglage effectué,
appuyez sur la touche ESCAPE <.
쏅
ou 4
ou 4.
Mode radio
Cet appareil est équipé d'un récepteur RDS.
De nombreuses stations FM émettent un signal qui contient, en plus du programme,
des informations telles que le nom de la station et le type de programme (PTY).
Le nom de la station apparaît sur l'écran dès
sa réception.
Réglage du tuner
Pour garantir un fonctionnement sans problème du tuner radio, celui-ci doit être réglé
pour la zone dans laquelle il est utilisé. Vous
pouvez choisir entre Europe « EUROPE »,
Amérique « USA », Thaïlande « THAI » et
Amérique du sud « S-AMERIKA ». En usine,
le tuner est réglé pour la zone dans laquelle
l'appareil est vendu. En cas de problème
avec la réception radio, veuillez vérifi er ce
réglage.
Remarque :
Les fonctions autoradio décrites dans
cette notice d'utilisation se réfèrent au
réglage Amérique (USA) du tuner.
쏅
Arrêtez l'appareil avec la touche
Marche/Arrêt 6.
쏅
Maintenez les touches 1 et 5 9 ap-
puyées simultanément et mettez de
nouveau l'appareil en marche avec la
touche Marche/Arrêt 6.
« TUNER » apparaît sur l'écran.
쏅
Sélectionnez la zone pour le tuner avec
la touche
ou 4.
42
Page 43

Mode radio
Pour enregistrer le réglage,
arrêtez l'appareil avec la touche
쏅
Marche/Arrêt 6 et remettez-le en
marche. L'autoradio se met en marche
sur le dernier mode choisi (radio, CD,
changeur de CD ou AUX).
Activation du mode radio
Lorsque vous vous trouvez dans les modes
CD, changeur de CD ou AUX,
appuyez sur la touche BND =
쏅
ou
appuyez sur la touche SRC 2 autant
쏅
de fois qu'il est nécessaire pour faire
apparaître « FM1 », « FM2 », « FMT »
ou « AM » sur l'écran.
Sélection de la gamme d'ondes/
du niveau de mémoire
Cet autoradio permet d'écouter les émissions des gammes d'ondes FM et AM. La
gamme d'ondes FM dispose de 3 niveaux
de mémoire (FM1, FM2 et FMT) et alors
que la gamme d'ondes AM n'en dispose que
d'un seul.
Cinq stations peuvent être mémorisées sur
chaque niveau de mémoire.
Pour passer d'un niveau de mémoire FM1,
FM2 ou FMT à l'autre ou pour passer sur la
gamme d'ondes AM,
appuyez sur la touche BND =.
쏅
Réglage des stations
Vous avez plusieurs possibilités pour vous
régler une station.
Recherche automatique de stations
Appuyez sur la touche
쏅
L'autoradio se règle sur la station suivante
qui peut être reçue.
Recherche manuelle de stations
Vous avez aussi la possibilité de rechercher
les stations manuellement.
Pour modifi er la fréquence réglée par petits
pas,
쏅
appuyez brièvement sur la touche
4.
Pour modifi er rapidement la fréquence réglée,
maintenez la touche
쏅
puyée.
ou 4.
ou
ou 4 ap-
Réglage de la sensibilité de la
recherche de stations
Vous pouvez régler l'autoradio de manière à
ce qu'il se règle uniquement sur les stations
puissantes ou, au contraire, aussi sur les
stations faibles.
Appuyez sur la touche MENU•OK 5.
쏅
Appuyez sur la touche
쏅
autant de fois qu'il est nécessaire pour
faire apparaître « SENS HI » ou « SENS
LO » sur l'écran.
« SENS HI » correspond à la sensibilité la
plus élevée, « SENS LO » à la plus faible.
ou 4
FRANÇAIS
43
Page 44

Mode radio
Réglez la sensibilité souhaitée avec la
쏅
touche
Une fois le réglage effectué,
appuyez sur la touche ESCAPE <.
쏅
Remarque :
L'appareil mémorise la sensibilité enregistrée dans chaque gamme d'ondes
OUC (FM) et AM.
ou 4.
Mémorisation de stations
Mémorisation manuelle de stations
Sélectionnez le niveau de mémoire
쏅
FM1, FM2 ou FMT souhaité ou la gamme d'ondes AM.
Réglez la station souhaitée.
쏅
Appuyez sur la touche de présélection
쏅
1- 5 9 à laquelle vous souhaitez affecter la station et maintenez-la appuyée
pendant plus de 2 secondes.
Mémorisation automatique de
stations (Travelstore)
Vous avez la possibilité de mémoriser automatiquement les cinq stations FM les plus
puissantes de la région. La mémorisation
s’effectue au niveau de mémoire FMT ou
AM.
Remarque :
Les stations déjà mémorisées sur ce niveau de mémoire seront effacées.
Appuyez sur la touche BND = et main-
쏅
tenez-la appuyée pendant plus de 2 secondes.
La mémorisation commence. « FM TSTORE »
ou « AM TSTORE » apparaît sur l'écran. Une
fois la mémorisation terminée, vous écoutez la station qui fi gure à la première place
du niveau FMT ou AM.
Appel d'une station mémorisée
Sélectionnez le niveau de mémoire ou
쏅
la gamme d'ondes.
Appuyez sur une touche de présélec-
쏅
tion 1 - 5 9.
La station mémorisée est diffusée dans la
mesure où elle peut être reçue.
Balayage des stations qui
peuvent être reçues (SCAN)
La fonction Scan permet d'écouter brièvement toutes les stations qui peuvent être reçues. Vous pouvez régler la durée d'écoute
entre 5 et 30 secondes au niveau du menu.
Démarrage du balayage (SCAN)
Appuyez sur la touche MENU•OK 5
쏅
et maintenez-la appuyée pendant plus
de 2 secondes.
L'autoradio se règle sur la station suivante
qui peut être reçue. « SCAN » et la fréquence ou le nom de la station correspondante
apparaissent à tour de rôle sur l'écran.
Arrêt du balayage (SCAN), écoute de la
station réglée sur le moment
Appuyez sur la touche MENU•OK 5.
쏅
Le balayage des stations s'arrête et la dernière station écoutée reste active.
44
Page 45

Mode radio Mode CD
Réglage de la durée d'écoute lors
du balayage
Appuyez sur la touche MENU•OK 5.
쏅
Appuyez sur la touche
쏅
autant de fois qu'il est nécessaire pour
faire apparaître « SCAN TIME » sur
l'écran.
Appuyez sur la touche
쏅
le menu.
Réglez la durée d'écoute lors du ba-
쏅
layage souhaitée avec la touche
4.
Une fois le réglage effectué,
appuyez sur la touche ESCAPE <.
쏅
Remarque :
La durée d'écoute lors du balayage réglée est également valable pour le balayage (Scan) en mode CD, changeur
CD ou MP3.
ou 4
4 pour ouvrir
ou
Régler du mode d'affi chage
Différents modes d'affi chage vous sont proposés en mode radio :
Nom ou fréquence de la station
•
Emplacement mémoire et heure
•
Pour changer de mode d'affi chage,
쏅
appuyez sur la touche DIS :.
Mode CD
L'appareil permet la lecture de CD audio,
CD-R et CD-RW disponibles dans le commerce, d'un diamètre de 12 ou 8 cm.
Attention !
Les CD sur lesquels une étiquette
est collée ou dont la périphérie
n'est pas circulaire peuvent endommager le
lecteur de CD.
N'introduisez jamais de CD autres que
•
de forme circulaire.
Ne collez jamais d'étiquettes sur les
•
CD. Elles pourraient se détacher en
cours de lecture.
Note :
Ecrivez sur les CD uniquement avec
un crayon prévu pour cela. Ce genre
de crayon ne contient pas de substances qui pourraient attaquer les CD. Les
marqueurs permanents peuvent endommager les CD.
Pour éviter tout problème de fonctionnement,
utilisez uniquement de CD portant le logo
Compact-Disc. Des problèmes de lecture
sont possibles avec les CD équipés d'une protection contre la copie. Blaupunkt ne peut pas
garantir le bon fonctionnement de ses appareils avec des CD protégés contre la copie !
En plus des CD audio, l'appareil vous
permet également de lire des CD contenant des fi chiers de musique MP3/WMA.
Reportez-vous à ce sujet à la section « Mode
MP3/WMA ».
FRANÇAIS
45
Page 46

Mode CD
Activation du mode CD
S'il n'y a pas de CD dans le lecteur,
appuyez sur la touche
쏅
La face avant s'ouvre.
Introduisez le CD, face imprimée tour-
쏅
née vers le haut, sans forcer dans la
fente jusqu'à ce que vous rencontriez
une résistance.
Le CD est ensuite entraîné automatiquement dans le lecteur.
Si le CD n'est pas entraîné automatiquement à l'intérieur,
appuyez brièvement sur la touche
쏅
?.
L'introduction du CD doit s'effectuer sans
entrave et sans intervention de votre part.
Fermez la face avant et appuyez légè-
쏅
rement dessus jusqu'à ce qu'elle de
verrouille.
La lecture du CD commence et « CD » apparaît sur l'écran.
Remarque :
Si le contact du véhicule était coupé
avant l'introduction du CD, vous devez
d'abord mettre l'appareil en marche
avec la touche Marche/Arrêt 6 pour
commencer la lecture.
Si un CD est déjà introduit dans le lecteur,
appuyez sur la touche SRC 2 autant
쏅
de fois qu'il est nécessaire pour faire
apparaître « CD » sur l'écran.
La lecture démarre à l'endroit où elle a été
interrompue.
1.
Sélection d'un titre
Appuyez sur une touche fl èche ou
쏅
4 resp.
le titre suivant ou le titre précédent.
Si vous appuyez une fois sur la touche
le titre actuel est relu depuis le début.
ou 4 pour sélectionner
Recherche rapide (audible)
Pour une recherche rapide de titres précédents ou suivants,
appuyez sur la touche
쏅
maintenez-la appuyée jusqu'à ce que la
recherche rapide en avant ou en arrière
commence.
ou 4 et
Lecture aléatoire des titres
(MIX)
Appuyez sur la touche 5 MIX 9.
쏅
« MIX CD » apparaît sur l'écran pendant un
court instant, le symbole MIX est affi ché. Le
titre qui sera lu ensuite sera sélectionné de
manière aléatoire.
Désactivation de la fonction MIX
Appuyez de nouveau sur la touche
쏅
5 MIX 9.
« MIX OFF » apparaît pendant un court instant sur l'écran, le symbole MIX s'éteint.
Balayage des titres (SCAN)
Vous avez la possibilité d'écouter successivement le début de tous les titres du CD.
Appuyez sur la touche MENU•OK 5 et
쏅
maintenez-la appuyée pendant plus de
2 secondes.
4,
46
Page 47

Mode CD
La lecture du titre suivant commence.
« SCAN » est affi ché sur l'écran et le numéro
du titre actuel clignote.
Remarque :
La durée d'écoute lors du balayage est
réglable. Pour plus de détails concernant le réglage de la durée d'écoute
lors du balayage des titres, consultez
le paragraphe « Réglage de la durée
d'écoute lors du balayage » dans la section « Mode radio ».
Arrêt du balayage (SCAN), écoute du
titre en cours
Pour arrêter le balayage des titres,
appuyez sur la touche MENU•OK 5.
쏅
La lecture du titre en cours continue.
Répétition de titres (REPEAT)
Pour répéter un titre,
appuyez sur la touche 4 RPT 9.
쏅
« RPT TRCK » apparaît sur l'écran pendant
un court instant, le symbole RPT est affi ché.
Le titre est répété jusqu'à ce que la fonction
Repeat soit désactivée.
Désactivation de la fonction Repeat
Pour désactiver la fonction Repeat,
appuyez de nouveau sur la touche
쏅
4 RPT 9.
« RPT OFF » apparaît sur l'affi cheur pendant
un court instant, le symbole RPT s'éteint. La
lecture se poursuit normalement.
Interruption de la lecture (PAUSE)
Appuyez sur la touche 3 9.
쏅
« PAUSE » apparaît sur l'écran.
Annulation de la pause
Pendant la pause, appuyez sur la tou-
쏅
che 3
9.
La lecture se poursuit.
Réglage du mode d'affi chage
En mode CD, plusieurs modes d'affi chage
vous sont proposés :
Numéro du titre et durée de lecture
•
Numéro du titre et heure
•
Pour changer de mode d'affi chage,
쏅
appuyez sur la touche DIS :.
Affi chage du texte de CD
Certains CD proposent un « texte de CD ».
Le texte de CD peut contenir le nom de l'interprète et le nom de l'album.
Le texte de CD défi le à chaque changement
de titre sur l'écran.
Activer/désactiver de la fonction texte
de CD
쏅
Appuyez sur la touche MENU•OK 5.
쏅
Appuyez sur la touche
autant de fois qu'il est nécessaire pour
faire apparaître « CD TEXT » et le réglage actuel sur l'écran.
Appuyez sur la touche
쏅
le menu.
ou 4
4 pour ouvrir
FRANÇAIS
47
Page 48

Mode CD Mode MP3/WMA
Sélectionnez l'option « TEXT ON » (affi -
쏅
cher le texte de CD) ou « TEXT OFF » (ne
pas affi cher le texte de CD) avec la tou-
ou 4.
che
Une fois le réglage effectué,
appuyez sur la touche ESCAPE <.
쏅
Ejection du CD
Appuyez sur la touche 1.
쏅
La face avant bascule vers le bas.
Appuyez sur la touche
쏅
côté de la fente d'introduction du CD.
Le CD sort.
Retirez le CD et fermez la face avant.
쏅
Remarques :
Si vous ne retirez pas le CD, celui-ci
•
est de nouveau entraîné automatiquement dans le lecteur au bout de
10 secondes.
Vous pouvez aussi éjecter le CD lors-
•
que l'appareil est arrêté ou qu'une
autre source audio est active.
? située à
Mode MP3/WMA
Cet autoradio vous permet également de
lire des CD-R et des CD-RW contenant des
fi chiers musicaux MP3. Vous pouvez en
outre lire des fi chiers WMA. Ce chapitre
décrit uniquement la lecture des fi chiers
MP3, celle des fi chiers WMA étant identique.
Remarques :
Les fi chiers WMA avec Digital Rights
•
Management (DRM) venant des
Online-Musicshops (boutiques en ligne) ne peuvent pas être lus par cet
appareil.
Les fi chiers WMA peuvent être lus
•
en toute sécurité uniquement s'ils
ont été créés avec Windows MediaPlayer, version 8 ou plus.
Préparation du CD MP3/WMA
La combinaison « graveur CD », « logiciel de
gravure de CD » et « CD vierge » peut occasionner des problèmes de lecture de CD.
Si des problèmes surviennent avec des CD
gravés, il est conseillé de choisir un autre fabricant de CD vierges ou une autre couleur
de CD vierge.
Le format du CD doit être ISO 9660 level 1 /
level 2 ou Joliet. Les autres formats ne peuvent être lus en toute fi abilité.
Vous pouvez créer un maximum de 252
répertoires sur un CD. Tous les répertoires
peuvent être sélectionnés individuellement
avec cet appareil.
Quel que soit le nombre de répertoires,
vous pouvez gérer jusqu'à 511 fi chiers
MP3 sur un CD, avec un maximum de 255
fi chiers dans un répertoire.
48
Page 49

D01
T001
T002
T003
T004
T005
T006
T007
T008
T009
T010
T011
A
B
D02
D03
T001
T002
T003
T004
T005
T001
T002
T003
T004
T005
T006
D04
A Répertoires
B Titres · Fichiers
Vous pouvez attribuer un nom à chaque
répertoire avec votre PC. Le nom du répertoire peut être affi ché sur l'écran de
l'autoradio. Nommez les répertoires et les
titres/fi chiers conformément au logiciel de
gravure que vous utilisez. Pour de plus amples informations, consultez le guide d'utilisation du logiciel.
Mode MP3/WMA
Si vous attachez une importance à l'ordre
des fi chiers, enregistrez-les sur le support
de données dans l'ordre selon lequel vous
souhaitez les lire ultérieurement. L'appareil
lit les fi chiers dans l'ordre selon lequel ils
ont été enregistrés physiquement sur le
support de données.
Pour la lecture des fi chiers par cet appareil,
les fi chiers MP3 doivent avoir l'extension
« .MP3 » et les fi chiers WMA l'extension
« .WMA ».
Remarques :
Pour garantir une lecture sans problèmes,
n'essayez pas d'ajouter l'extension
•
« .MP3 » à des fi chiers autres que
les fi chiers MP3 et de les lire ! Ces
fi chiers non valides sont ignorés pendant la lecture.
n'utilisez pas de CD « mixtes » conte-
•
nant à la fois des fi chiers non MP3 et
des titres MP3 (seuls les fi chiers MP3
seront reconnus par l'appareil pendant la lecture MP3).
n'utilisez pas de CD mixtes contenant
•
à la fois des fi chiers audio CD et des
titres MP3. Seulement les titres audio
CD d'un CD mixte seront lus.
FRANÇAIS
Remarques :
Il est conseillé de ne pas utiliser de ca-
•
ractères spéciaux (trémas, accents,
etc.) dans les noms des fi chiers.
Si vous utilisez des noms de fi chier
•
de plus de 16 caractères (y compris
l'extension « .MP3 » ou « .WMA »), le
nombre maximal de titres et de répertoires diminue d'autant.
Balises ID3 du MP3
Les titres MP3 peuvent aussi contenir des
informations telles que le nom de l'interprète, le titre et le nom de l'album (balises ID3).
Cet appareil peut affi cher les balises ID3 de
la version 1 et de la version 2 sur l'écran.
49
Page 50

Mode MP3/WMA
Activation du mode MP3
Le mode MP3 est activé comme le mode CD
normal. Pour plus de détails, reportez-vous
à la section « Activation du mode CD » de la
section « Mode CD ».
Réglage du mode d'affi chage
Un CD MP3 doit se trouver dans l'appareil
pour les réglages suivants.
Sélectionner le mode d'affi chage
standard
Vous avez la possibilité de faire affi cher différentes informations concernant le titre
que vous êtes en train d'écouter :
Numéro de répertoire et numéro de ti-
•
tre « DIR-TRCK »
Numéro de répertoire et heure « DIR-
•
CLK »
Numéro de répertoire et durée de lec-
•
ture « DIR-TIME »
Numéro de titre et durée de lecture
•
« TRCK-TIME »
Numéro de titre et heure « TRCK-CLK »
•
Note :
Après le défi lement du texte MP3 suivant le changement de titre, les informations restent affi chées durablement
à l'écran.
Pour passer d'un mode d'affi chage à
l'autre,
쏅
appuyez sur la touche DIS : autant de
fois qu'il est nécessaire pour faire apparaître l'affi chage souhaité sur l'écran.
Réglage des textes MP3
A chaque changement de titre, l'un des
textes suivants défi le une fois à l'écran.
L'affi chage standard est alors utilisé.
Les textes disponibles sont les suivants :
•
Nom du répertoire (« DIR NAME »)
•
Nom du titre (« SONG NAME »)
•
Nom de l'album («
Nom de l'interprète (« ARTIST »)
•
Nom du fi chier (« FILE NAME »)
•
Note :
Interprète, titre et nom de l'album sont
des composants de la balise d'identifi cation MP3 de version 1 et ne peuvent
être affi chés que si vous les avez enregistrés les fi chiers MP3 (reportez-vous
aussi à ce sujet à la notice du logiciel de
votre PC-MP3 ou de votre graveur).
Pour choisir entre les modes d'affi chage,
쏅
appuyez sur la touche MENU•OK 5.
쏅
Appuyez sur la touche
jusqu'à ce que l'écran affi che « MP3
DISP ».
Appuyez sur la touche
쏅
le menu.
Sélectionnez le texte MP3 souhaité à
쏅
l'aide de la touche
Une fois le réglage effectué,
appuyez sur la touche ESCAPE <.
쏅
ALBM NAME
ou 4.
»)
ou 4
4 pour ouvrir
Sélectionner un répertoire
Pour passer à un répertoire précédent ou
suivant,
appuyez sur la touche
쏅
fois ou plusieurs fois de suite.
ou 4, une
50
Page 51

Mode MP3/WMA
Sélectionner des titres / fi chiers
Pour passer à un titre/fi chier précédent ou
suivant du répertoire sélectionné,
appuyez sur la touche
쏅
fois ou plusieurs fois de suite.
Le titre en cours redémarre lorsque vous
pressez une fois la touche
ou 4, une
4.
Recherche rapide
Pour une recherche rapide de titres précédents ou suivants,
maintenez la touche
쏅
cée jusqu'à ce que la recherche rapide
commence en arrière ou en avant.
ou 4 enfon-
Lecture aléatoire des titres (MIX)
Pour que les titres du répertoire sélectionné
soient lus dans un ordre aléatoire,
appuyez brièvement sur la touche
쏅
5 MIX 9.
« MIX DIR » apparaît sur l'affi cheur où le
symbole MIX est maintenant allumé.
Pour écouter tous les titres du CD MP3 inséré dans un ordre aléatoire,
appuyez sur la touche 5 MIX 9 pen-
쏅
dant plus de deux secondes.
« MIX CD » apparaît sur l'affi cheur où le
symbole MIX est maintenant allumé.
Arrêter la fonction MIX
Pour arrêter la fonction MIX,
appuyez brièvement sur la touche
쏅
5 MIX 9.
L'écran affi che « MIX OFF » et le pictogramme MIX s'éteint.
Lecture des intros (SCAN)
Vous avez la possibilité d'écouter successivement toutes les intros du CD pendant
quelques secondes.
Appuyez sur la touche MENU•OK 5
쏅
pen-dant plus de deux secondes. Vous
entendez l'intro suivante.
« TRK SCAN » apparaît brièvement sur
l'écran. Le numéro de titre actuel clignote.
Les titres du CD sont lus dans un ordre
croissant.
Note :
La durée de lecture des intros est réglable. Pour plus de détails concernant le réglage de la durée de lecture,
reportez-vous à la section « Réglage de
la durée de balayage des stations » au
chapitre « Mode Radio ».
Arrêt de la fonction SCAN, écoute d'un
titre
Appuyez brièvement sur la touche
쏅
MENU•OK 5.
Vous continuez d'écouter le titre dont l'intro
est en cours de lecture.
Lecture répétée de titres ou de
répertoires entiers (REPEAT)
Pour répéter le titre en cours,
appuyez brièvement sur la touche
쏅
4 RPT 9.
L'écran affi che brièvement « RPT TRCK » et
RPT s'allume.
Pour répéter le répertoire entier,
appuyez sur la touche 4 RPT 9 pen-
쏅
dant plus de deux secondes.
L'écran affi che « RPT DIR ».
FRANÇAIS
51
Page 52

Mode MP3/WMA Mode changeur CD
Arrêt de la fonction REPEAT
Pour arrêter la répétition du titre en cours
ou du répertoire sélectionné,
appuyez brièvement sur la touche
쏅
4 RPT 9.
L'écran affi che brièvement « RPT OFF » et
RPT s'éteint.
Interruption de la lecture
(PAUSE)
Appuyez sur la touche 3 9.
쏅
« PAUSE » apparaît sur l'affi cheur.
Annulation de la pause
Appuyez sur la touche 3
쏅
la pause.
La lecture se poursuit.
9 pendant
Mode Changeur CD
Note :
Pour toutes informations sur la manipulation des CD, leur insertion et l'utilisation du changeur CD, reportez-vous au
manuel d'utilisation de votre changeur
CD.
Sélection du mode changeur CD
Appuyez sur la touche SRC 2 jusqu'à
쏅
ce que l'écran affi che « CHANGER ».
Un cadre apparaît autour du symbole changeur de CD.
La lecture commence par le premier CD
identifi é par le changeur CD.
Sélection d'un CD
Pour passer à un CD précédent ou suivant,
쏅
appuyez sur la touche
ou plusieurs fois de suite.
Note :
Les emplacements libres du changeur
CD et les emplacements contenant des
CD invalides seront ignorés.
ou 4 une
52
Sélection d'un titre
Pour passer à un tire précédent ou suivant
du CD sélectionné,
쏅
appuyez sur la touche
ou plusieurs fois de suite.
ou 4 une
Page 53

Mode changeur CD
Recherche rapide (audible)
Pour une recherche rapide de titres précédents ou suivants,
maintenez l'une des touches
쏅
enfoncée jusqu'à ce que la recherche
rapide commence en arrière ou en
avant.
4
Réglage du mode d'affi chage
Vous disposez de cinq options pour l'affi chage en mode changeur CD :
Numéro de CD et numéro de titre (« CD-
•
TRCK »)
Numéro de CD et heure (« CD-CLK »)
•
Numéro de CD et durée de lecture
•
(« CD-TIME »)
•
Numéro de titre et durée de lecture
(« TRCK-TIME »)
•
Numéro de titre et heure (« TRCKCLK »)
Pour changer de mode d'affi chage,
쏅
appuyez sur la touche DIS : autant de
fois qu'il est nécessaire pour faire apparaître l'affi chage souhaité sur l'écran.
Lecture de titres ou de CD entiers
(REPEAT)
Pour répéter le titre écouté,
appuyez brièvement sur la touche
쏅
4 RPT 9.
L'écran affi che brièvement « RPT TRCK », le
pictogramme RPT apparaît à l'écran.
Pour répéter le CD sélectionné,
maintenez la touche 4 RPT 9 enfon-
쏅
cée pendant plus de deux secondes.
L'écran affi che brièvement « RPT DISC », le
pictogramme RPT apparaît à l'écran.
Arrêt de la fonction REPEAT
Pour stopper la répétition du titre ou du CD
momentané,
appuyez brièvement sur la touche
쏅
4 RPT 9.
L'écran affi che « RPT OFF » et le pictogramme RPT disparaît de l'écran.
Lecture aléatoire des titres
(MIX)
Pour écouter les titres du CD sélectionné
dans un ordre aléatoire,
appuyez brièvement sur la touche
쏅
5 MIX 9.
« MIX CD » apparaît un court instant sur l'affi cheur, MIX est affi ché.
Pour écouter les titres de tous les CD insérés dans un ordre aléatoire,
maintenez la touche 5 MIX 9 enfon-
쏅
cée pendant plus de deux secondes.
« MIX ALL » apparaît un court instant sur
l'affi cheur, MIX est affi ché.
Arrêter la fonction MIX
Appuyez brièvement sur la touche
쏅
5 MIX 9.
L'écran affi che « MIX OFF » et le pictogramme MIX disparaît de l'écran.
FRANÇAIS
53
Page 54

Mode changeur CD Clock – Heure
Lecture des intros de tous les CD
(SCAN)
Pour écouter les intros de tous les CD insérés dans un ordre croissant,
appuyez sur la touche MENU•OK 5
쏅
pendant plus de deux secondes.
L'écran affi che « TRK SCAN » et le numéro
du titre en cours clignote.
Stopper SCAN
Pour arrêter la lecture des intros,
쏅
appuyez brièvement sur la touche
MENU•OK 5.
Vous continuez d'écouter le titre dont l'intro
est en cours de lecture.
Note :
La durée de lecture des intros est réglable. Pour plus de détails concernant le
réglage de la durée de lecture des intros, reportez-vous à « Défi nir la durée
de balayage des stations » du chapitre
« Mode Radio ».
Interruption de la lecture (PAUSE)
Appuyez sur la touche 3 9.
쏅
« PAUSE » apparaît sur l'affi cheur.
Annulation de la pause
Appuyez sur la touche 3
쏅
la pause.
La lecture se poursuit.
9 pendant
Clock – Heure
Réglage de l'heure
Pour régler l'heure,
appuyez sur la touche MENU•OK 5.
쏅
Appuyez sur la touche
쏅
autant de fois qu'il est nécessaire pour
faire apparaître « CLOCK SET » sur
l'écran.
Appuyez sur la touche
쏅
le menu.
L'heure apparaît sur l'écran. Le nombre des
minutes clignote et il peut être réglé.
Réglez l'heure avec la touche
쏅
4.
Pour commuter entre le nombre des heures
et celui des minutes,
appuyez sur la touche
쏅
Une fois le réglage effectué,
appuyez sur la touche ESCAPE <.
쏅
Sélection du mode d'affi chage
12/24 heures
Appuyez sur la touche MENU•OK 5.
쏅
Appuyez sur la touche
쏅
autant de fois qu'il est nécessaire pour
faire apparaître « 24H MODE » ou
« 12H MODE » sur l'écran.
Appuyez sur la touche
쏅
changer de mode.
Une fois le réglage effectué,
appuyez sur la touche ESCAPE <.
쏅
ou 4
4 pour ouvrir
ou
ou 4.
ou 4
ou 4 pour
54
Page 55

Clock – Heure Son
Affi chage permanent de l'heure,
appareil arrêté et contact mis
Pour affi cher l'heure, l'appareil étant arrêté
et le contact mis,
appuyez sur la touche MENU•OK 5.
쏅
Appuyez sur la touche ou 4
쏅
autant de fois qu'il est nécessaire pour
faire apparaître « CLOCK OFF » ou
« CLOCK ON » sur l'écran.
Appuyez sur la touche
쏅
sélectionner CLOCK ON (activation) ou
CLOCK OFF (désactivation).
Une fois le réglage effectué,
appuyez sur la touche ESCAPE <.
쏅
ou 4 pour
Son
Vous avez la possibilité de défi nir séparément les réglages de son (graves, médium et aiguës) pour chaque mode (Radio,
CD, Changeur de CD, AUX et Téléphone/
Navigation). Les réglages pour la répartition du son (balance et fader) et pour
X BASS sont communs pour toutes les sources audio à l'exception du téléphone/de la
navigation. Pour le téléphone/la navigation,
vous pouvez régler la répartition du volume
sonore différemment.
Remarque :
Les réglages du son pour le téléphone/
la navigation peuvent uniquement être
effectués pendant une communication
téléphonique/la sortie d'une instruction vocale.
Réglage des graves (Bass)
Vous pouvez choisir parmi 4 fréquences
graves (60 Hz, 80 Hz, 100 Hz, 200 Hz). En
outre, vous pouvez régler le niveau entre
-7 et +7 pour la fréquence grave sélectionnée.
Réglage de la fréquence grave et du
niveau
쏅
Pressez la touche AUD >.
« BASS » apparaît sur l'écran.
쏅
Pressez une fois la touche
accéder au sous-menu BASS.
쏅
Pressez la touche
de fois nécessaire pour que la fréquence
grave souhaitée apparaisse sur l'écran.
ou 4 le nombre
4 pour
FRANÇAIS
55
Page 56

Son
Pressez la touche ou 4 pour ré-
쏅
gler le niveau entre -7 et +7.
Pressez deux fois la touche AUD >
쏅
pour quitter le menu.
Remarque :
Si un préréglage de l'égaliseur (POP,
ROCK, CLASSIC) est sélectionné, il arrive qu'en relevant manuellement le niveau
des graves, aucune modifi cation audible
ne s'effectue plus à partir d'un certain
réglage. Lisez pour cela la remarque qui
fi gure dans la section « Préréglages de
l'égaliseur (Presets) ».
Réglages des médiums (Middle)
Vous pouvez choisir parmi 4 fréquences
centrales (500 Hz, 1 kHz, 2 kHz, 3 kHz).
En outre, vous pouvez régler le niveau entre
-7 et +7 pour la fréquence centrale sélectionnée.
Réglage de la fréquence centrale et du
niveau
쏅
Pressez la touche AUD >.
« BASS » apparaît sur l'écran.
쏅
Pressez la touche
de fois nécessaire pour que « MIDDLE »
apparaisse à l'affi chage.
쏅
Pressez une fois la touche
accéder au sous-menu MIDDLE.
쏅
Pressez la touche
bre de fois nécessaire pour que la fréquence centrale souhaitée apparaisse
à l'affi chage.
쏅
Pressez la touche
gler le niveau entre -7 et +7.
Pressez deux fois la touche AUD >
쏅
pour quitter le menu.
ou 4 le nombre
4 pour
ou 4 le nom-
ou 4 pour ré-
Réglage des aiguës (Treble)
Vous pouvez choisir parmi 4 fréquences
aiguës (10 kHz, 12 kHz, 15 kHz, 17 kHz).
En outre, vous pouvez régler le niveau entre
-7 et +7 pour la fréquence aiguës sélectionnée.
Réglage de la fréquence aiguë et du
niveau
Pressez la touche AUD >.
쏅
« BASS » apparaît sur l'écran.
Pressez la touche
쏅
de fois que nécessaire jusqu’à ce que
« TREBLE » apparaisse sur l’écran.
Pressez une fois la touche
쏅
accéder au sous-menu TREBLE.
Pressez la touche
쏅
bre de fois nécessaire pour que la fréquence aiguë souhaitée apparaisse sur
l'écran.
Pressez la touche
쏅
gler le niveau entre -7 et +7.
Pressez deux fois la touche AUD >
쏅
pour quitter le menu.
Remarque :
Si un préréglage de l'égaliseur (POP,
ROCK, CLASSIC) est sélectionné, il
arrive qu'en relevant manuellement
le niveau des aiguës, aucune modifi cation audible ne s'effectue plus à
partir d'un certain réglage. Lisez pour
cela la remarque qui fi gure dans la
section « Préréglages de l'égaliseur
(Presets) ».
ou 4 autant
4 pour
ou 4 le nom-
ou 4 pour ré-
56
Page 57

Son X-Bass
Réglage du volume vers la droite /
vers la gauche (Balance)
Pour régler le volume vers la gauche / la
droite (Balance),
pressez la touche AUD <.
쏅
« BASS » apparaît sur l'écran.
Pressez la touche
쏅
bre de fois nécessaire pour que « BAL »
et le réglage actuel apparaissent à l'affi chage.
Pressez la touche
쏅
gler le volume vers la gauche / vers la
droite.
Pressez la touche AUD > pour quitter
쏅
le menu.
ou 4 le nom-
ou 4 pour ré-
Réglage du volume vers l’avant /
vers l’arrière (Fader)
Pour régler le volume vers l'avant / vers l'arrière (Fader),
pressez la touche AUD >.
쏅
« BASS » apparaît sur l'écran.
Pressez la touche
쏅
de fois nécessaire pour que « FADER »
et le réglage actuel apparaissent à l'affi chage.
Pressez la touche
쏅
gler le volume vers l'avant / l'arrière.
Pressez la touche AUD > pour quitter
쏅
le menu.
ou 4 le nombre
ou 4 pour ré-
X-BASS
La fonction X-Bass vous permet d'amplifi er
les graves à faible volume sonore.
Le réglage X-Bass choisi s'applique à toutes
les sources audio (autoradio, CD, changeur
de CD ou AUX).
L'amplifi cation X-BASS peut être réglée par
paliers de 1 à 3.
« XBASS OFF » indique que la fonction
X-BASS est désactivée.
Réglage de l'amplifi cation
X-BASS
Pressez la touche XBASS 3.
쏅
« X-BASS » apparaît sur l'écran.
Pressez la touche
쏅
menu.
Pressez la touche
쏅
bre de fois nécessaire pour que le réglage souhaité apparaisse à l'affi chage.
Une fois le réglage effectué,
pressez la touche XBASS 3.
쏅
4 pour ouvrir le
ou 4 le nom-
FRANÇAIS
57
Page 58

Préréglages de l'égaliseur Ecran
Préréglages de l'égaliseur
(Presets)
Cet appareil dispose d'un égaliseur, dans
lequel sont déjà programmés les réglages correspondant aux types de musique
« ROCK », « POP » et « CLASSIC ».
Pour choisir un réglage de l'égaliseur,
pressez la touche AUD >.
쏅
« BASS » apparaît sur l'écran.
Pressez la touche
쏅
que l'écran affi che « POP », « ROCK »,
« CLASSIC » ou « EQ OFF ».
Pressez la touche
쏅
sir l'un des réglages ou sélectionnez
« EQ OFF » pour désactiver l'égaliseur.
Une fois le réglage effectué,
pressez la touche AUD >.
쏅
Remarque :
Sans préréglage de l'égaliseur, vous
pouvez relever les graves et les aiguës
jusqu'au niveau +7.
Si vous avez sélectionné un préréglage
de l'égaliseur (POP, ROCK, CLASSIC),
vous ne pouvez plus régler les graves et
les aiguës que de manière limitée. Avec
le préréglage POP par exemple, vous ne
pouvez plus régler un relèvement audible des aiguës que jusqu'à +3.
ou 4 jusqu'à ce
ou 4 pour choi-
Réglage de l'écran
Réglage de la luminosité de
l'écran
Si votre autoradio est raccordé comme décrit dans la notice de montage et que votre
véhicule dispose de la sortie correspondante, la luminosité de l'écran passe de jour à
nuit lorsque vous allumez l'éclairage du véhicule. Il est possible de régler la luminosité
séparément pour la nuit et pour le jour de
1 à 9.
Pressez sur la touche MENU•OK 5.
쏅
Pressez la touche
쏅
bre de fois nécessaire pour que « DIM
DAY » ou « DIM NIGHT » apparaisse à
l'affi chage.
Pressez la touche
쏅
menu.
Pressez la touche
쏅
choisir entre les niveaux de luminosité.
Une fois le réglage effectué,
pressez la touche ESCAPE <.
쏅
Sélection de la couleur de
l'éclairage de l'écran
Pour l'éclairage de l'écran, vous avez la possibilité de mélanger une couleur sur la base
du spectre RVB (rouge-vert-bleu) ou de sélectionner une couleur pendant une recherche de couleur.
ou 4 le nom-
4 pour ouvrir le
ou 4 pour
58
Création d'une couleur pour l'éclairage
de l'écran
Pour personnaliser l'éclairage de votre
écran, vous avez la possibilité de mélanger
une couleur sur la base des trois couleurs
primaires rouge, vert et bleu.
Page 59

Pressez sur la touche MENU•OK 5.
쏅
Pressez la touche
쏅
bre de fois nécessaire pour que « DISP
COL » soit affi ché.
쏅
Pressez la touche
menu.
Un menu apparaît vous permettant de mélanger votre propre couleur. « R », « G » et
« B » sont affi chés avec les valeurs actuelles. La valeur défi nie pour « R » est activée.
쏅
Pressez la touche
bre de fois nécessaire pour que la valeur de couleur souhaitée s'affi che.
쏅
Pressez la touche
placer le point d'insertion derrière les
autres couleurs.
쏅
Spécifi ez les autres composantes de
couleur d'après vos préférences.
Une fois le réglage effectué,
쏅
pressez la touche ESCAPE <.
Sélection de la couleur de l'éclairage
de l'écran pendant une recherche de
couleur
쏅
Pressez sur la touche MENU•OK 5.
쏅
Pressez la touche
bre de fois nécessaire pour que « COL
SCAN » soit affi ché.
쏅
Pressez la touche
la recherche de couleur.
L'autoradio commence à changer la couleur
de l'éclairage de l'écran.
Pour sélectionner la couleur réglée sur le
moment,
쏅
pressez sur la touche MENU•OK 5.
Pour redémarrer la recherche,
쏅
pressez la touche
ou 4 le nom-
4 pour ouvrir le
ou 4 le nom-
ou 4 pour
ou 4 le nom-
4 pour démarrer
4.
Ecran
Lorsque vous avez trouvé la couleur souhaitée,
pressez la touche ESCAPE <.
쏅
Activation/Désactivation du
mode Démo
Dans le mode Démo, les fonctions de l'appareil défi lent sur l'écran. Le changement
permanent de couleur démontre les possibilités de réglage des couleurs de l'écran.
En appuyant sur une touche quelconque,
vous interrompez le mode Démo pendant
env. 10 secondes.
Activation du mode Démo
Arrêtez l'appareil avec la touche
쏅
Marche/Arrêt 6.
Maintenez les touches 1 9 et DIS :
쏅
appuyées simultanément et mettez de
nouveau l'appareil en marche avec la
touche Marche/Arrêt 6.
« DEMO » apparaît brièvement sur l'écran.
Désactivation du mode Démo
Arrêtez l'appareil avec la touche
쏅
Marche/Arrêt 6.
Maintenez les touches 1 9 et DIS :
쏅
appuyées simultanément et mettez de
nouveau l'appareil en marche avec la
touche Marche/Arrêt 6.
Le mode Démo est désactivé.
FRANÇAIS
59
Page 60

Sources audio externes Caractéristiques techniques
Sources audio externes
Des sources audio externes, telles qu'un
lecteur de CD portable, un lecteur de
MiniDisc ou un lecteur MP3, peuvent être
raccordées à l'entrée AUX qui se trouve à
l'arrière de l'appareil (si aucun changeur de
CD n'est raccordé à l'appareil).
Remarques :
Pour raccorder une source audio ex-
•
terne par l'intermédiaire de l'entrée
AUX, vous avez besoin d'un câble
adaptateur. Vous pouvez vous procurer ce câble (réf. Blaupunkt 7 607
897 093) auprès d'un revendeur
Blaupunkt.
L'entrée AUX qui se trouve à l'arrière
•
peut être sélectionnée avec la touche SRC 2. « AUX INPUT » apparaît
alors sur l'écran.
AUX INPUT peut être sélectionnée
•
uniquement si aucun changeur de CD
n'est raccordé à l'appareil.
Caractéristiques
techniques
Amplifi cateur
Puissance de sortie :
18W RMS x 4ch @ 14,4V
@ 4ohm @ 1% THD
Tuner
Plages de fréquences (USA) :
FM: 87,5 - 107,9 MHz
(palier de 200 kHz)
AM: 530 - 1710 kHz
(palier de 10 kHz)
Plages de fréquences (Europe) :
FM: 87,5 - 108 MHz
(palier automatique de
100 kHz/
palier manuel de 50 kHz)
AM: 531 - 1602 kHz
(palier de 9 kHz)
Plages de fréquences (Thaïlande) :
FM: 87,5 - 108 MHz
(palier automatique de
50 kHz /
palier manuel de 25 kHz)
AM: 531 - 1602 kHz
(palier de 9 kHz)
60
Plages de fréquences (Amérique du Sud) :
FM: 87,5 - 107,9 MHz
(palier automatique de
100 kHz /
palier manuel de 50 kHz)
Page 61

AM: 530 - 1710 kHz
(palier de 10 kHz)
Sensibilité mono FM :
17 dbf
Bande passante FM :
35 - 16.000 Hz
CD
Bande passante :
20 - 20.000 Hz
Sortie préampli
4 canaux : 2 V
Sensibilité d’entrée
Entrée AUX : 2 V / 6 kΩ
Entrée Tél/Navi : 10 V / 1 kΩ
Poids env. 1,36 kg
Caractéristiques techniques
FRANÇAIS
Sous réserve de modifi cations !
61
Page 62

Elementos de mando
1 Tecla
para abrir la unidad de mando extraíble
(Flip-Release-Panel).
2 Tecla SRC
Selección de fuente entre radio, CD (si
está conectado o activado), cambiadiscos y AUX.
3 Tecla XBASS
Activar, desactivar y ajustar X-BASS.
4 Bloque de teclas con fl echas
5 Tecla MENU•OK
Pulsación breve: acceso al menú de
ajustes básicos y confi rmación de los
ajustes.
Finalización de la función Scan.
Pulsación prolongada: iniciar la función
Scan.
6 Tecla On/Off
Pulsación breve: conexión del equipo.
En funcionamiento: supresión del sonido (Mute) del equipo.
Pulsación prolongada: desconexión del
equipo.
7 Regulador del volumen
8 Pantalla
9 Bloque de teclas 1 - 5
: Tecla DIS
Cambia el contenido de la pantalla.
; Tecla
Ver la hora.
< Tecla ESCAPE
Confi rmar la opción de menú y volver
a la pantalla de inicio del MENU o de
AUDIO.
= Tecla BND
Pulsación breve: selección de los niveles de memoria FM y de la banda de
ondas AM.
Pulsación prolongada: inicio de la función Travelstore.
> Tecla AUD, ajuste de graves, agudos,
medios, balance y fader.
Selección de los ajustes predeterminados del ecualizador.
-Tecla (Eject) para expulsar el CD del
?
equipo.
@ Ranura del CD
62
Page 63

Contenido
En cuanto a este manual ................... 65
Símbolos utilizados ........................ 65
Uso según las normas ..................... 65
Declaración de conformidad ............65
En cuanto a su seguridad .................. 66
Si instala el equipo usted mismo ...... 66
¡Debe tener esto en cuenta! ............. 66
Indicaciones de limpieza ................. 66
Desecho de equipos antiguos .......... 66
Volumen de suministro ..................... 67
Accesorios especiales
(no incluidos en el suministro) .........67
Mando a distancia ............................ 67
Garantía ..........................................68
Servicio ........................................ 68
Unidad de mando extraíble ............... 68
Seguro antirrobo ........................... 68
Extraer la unidad de mando .............68
Colocar la unidad de mando ............ 69
Tiempo de desconexión
(OFF TIMER) .................................69
Función Time-out ........................... 69
Conectar y desconectar ................... 70
Regular el volumen .......................... 70
Regular el volumen de encendido .....70
Bajar rápidamente el volumen
(MUTE) ........................................ 71
Sonido del teléfono/sistema de
navegación ...................................71
Activar y desactivar tono de
confi rmación ................................. 72
Modo de radio ................................. 72
Ajustar el sintonizador .................... 72
Activar el modo de radio ................. 73
Seleccionar la banda de ondas/
el nivel de memoria ........................73
Sintonizar emisoras ....................... 73
Modifi car la sensibilidad de la
búsqueda de emisora .....................73
Memorizar emisoras ....................... 74
Memorización automática
(Travelstore) ................................. 74
Escuchar emisoras memorizadas ..... 74
Explorar las emisoras que se
pueden sintonizar (SCAN) ............... 74
Seleccionar el tiempo de
exploración ................................... 74
Seleccionar la indicación ................ 75
Modo de CD ..................................... 75
Iniciar el modo de CD ..................... 76
Seleccionar títulos ......................... 76
Búsqueda rápida (audible) .............. 76
Reproducción aleatoria de los
títulos (MIX) .................................. 76
Explorar los títulos (SCAN) .............. 76
Repetir títulos (REPEAT) ................. 77
Interrumpir la reproducción
(PAUSE) .......................................77
Seleccionar la indicación ................ 77
Visualizar el texto del CD ................. 77
Extraer el CD ................................. 78
Modo MP3/WMA ............................. 78
Creación de CD con archivos
MP3/WMA .................................... 78
Iniciar el modo MP3 ....................... 80
Seleccionar la indicación ................ 80
Seleccionar un directorio ................81
Seleccionar títulos/archivos ............81
Búsqueda rápida ........................... 81
Reproducir títulos en orden
aleatorio (MIX) .............................. 81
Explorar los títulos (SCAN) .............. 81
Reproducir repetidamente un título
o un directorio completo (REPEAT) ... 82
Interrumpir la reproducción
(PAUSE) .......................................82
ESPAÑOL
63
Page 64

Contenido
Modo de cambiadiscos (CDC) ...........82
Activar el modo de cambiadiscos ..... 82
Selección del CD ........................... 82
Selección del título......................... 82
Búsqueda rápida (audible) .............. 82
Seleccionar la indicación ................ 83
Repetir títulos o los CD enteros
(REPEAT) .....................................83
Reproducir títulos en orden
aleatorio (MIX) .............................. 83
Explorar todos los títulos de todos
los CD (SCAN) ............................... 83
Interrumpir la reproducción
(PAUSE) .......................................84
Clock – Hora .................................... 84
Ajustar la hora ...............................84
Seleccionar el formato de 12/24 h ...84
Ver la hora de forma permanente
con el equipo desconectado y el
encendido del vehículo conectado.... 85
Sonido ............................................ 85
Ajustar los graves (Bass) ................. 85
Ajustar los tonos medios (Middle) .... 86
Ajustar los agudos (Treble) ..............86
Ajustar la distribución del volumen
a izquierda/derecha (Balance) ......... 87
Ajustar la distribución del volumen
delante/detrás (Fader) ................... 87
X-BASS ...........................................87
Ajustar el realce de la función
X-BASS ........................................87
Ajustes predeterminados del
ecualizador (Presets) ....................... 88
Ajustar la pantalla ............................ 88
Graduar el brillo de la pantalla .......... 88
Ajustar el color de las luces
de la pantalla ................................. 88
Activar y desactivar el modo de
demostración ................................89
Fuentes de sonido externas .............. 90
Datos técnicos ................................. 90
Amplifi cador ................................ 90
Sintonizador ................................. 90
CD ............................................... 91
Salida preamplifi cación .................. 91
Sensibilidad de entrada ..................91
Instrucciones de montaje ............... 180
64
Page 65

En cuanto a este manual
En cuanto a este manual
Este manual contiene información importante para una montaje y un manejo sencillos del equipo.
•
Lea detenidamente y por completo este
manual, antes de utilizar el equipo.
•
Guarde el manual de tal forma que
siempre pueda ser consultado por todos los usuarios.
•
Al proporcionar el equipo a un tercero,
facilíteselo siempre junto con este manual.
Tenga en cuenta además los manuales de
otros dispositivos que vaya a utilizar con el
equipo.
Símbolos utilizados
En este manual se utilizan los siguientes
símbolos:
¡PRECAUCIÓN!
Peligro por radiación láser
¡PRECAUCIÓN!
Peligro de dañar la unidad de CD
Uso según las normas
Este equipo está diseñado para su montaje y utilización en un vehículo con una tensión de red de 12 V y debe montarse en una
ranura de tamaño estándar (según DIN).
Tenga en cuenta los límites de capacidad
que se especifi can en los datos técnicos.
Asegúrese de que las reparaciones y, en
caso necesario, el montaje sean realizados
por un técnico especializado.
Declaración de conformidad
Por la presente, Blaupunkt GmbH declara
que el equipo Key West MP38 cumple los
requisitos básicos y otras prescripciones
relevantes de la Directiva 89/336/UE.
ESPAÑOL
La marca CE confi rma el cumplimiento de las directivas de la UE.
Indica un paso a seguir
쏅
Indica una numeración
•
65
Page 66

En cuanto a su seguridad
En cuanto a su seguridad
El equipo se ha fabricado
estado actual de la técnica y en las normas
de seguridad técnica reconocidas. A pesar
de todo, pueden surgir situaciones de peligro si no tiene en cuenta las indicaciones de
seguridad de este manual.
Si instala el equipo usted mismo
Sólo puede instalar el equipo si tiene experiencia con la instalación de radios de automóviles y conoce bien el sistema eléctrico del vehículo. En este sentido, tenga en
cuenta las instrucciones de instalación que
encontrará al fi nal de este manual.
¡Debe tener esto en cuenta!
PRECAUCIÓN
El equipo incorpora un láser clase
1 que puede ser perjudicial para sus ojos.
No abra el equipo ni realice ningún tipo de
cambio en el mismo.
En funcionamiento
Manipule el equipo únicamente si
•
la situación del tráfi co lo permite.
Deténgase en un lugar apropiado para
realizar ajustes más complejos.
Extraiga o monte la unidad de mando
•
sólo cuando el vehículo esté parado.
Ajuste siempre un volumen moderado
•
para proteger los oídos. En las pausas
de supresión del sonido (por ejemplo,
al cambiar la fuente de sonido o un CD
del cambiadiscos y Travelstore) no se
aprecia el cambio de volumen. No suba
el volumen durante estas pausas.
basándose en el
•
Ajuste siempre volúmenes moderados
para que pueda oír las señales de alarma acústicas (por ejemplo, de la policía).
Tras el funcionamiento
•
Sin la unidad de mando, el equipo no
tiene ningún valor para los ladrones.
Lleve consigo la unidad de mando
cuando abandone el vehículo.
•
Al transportar la unidad de mando, protéjala de los golpes y evite que se ensucien los contactos.
Indicaciones de limpieza
Los disolventes, detergentes y abrasivos,
así como los sprays para el salpicadero y
los productos de limpieza para plásticos
pueden contener productos que dañen la
superfi cie del equipo.
Para la limpieza del equipo, utilice únicamente un paño seco o ligeramente humedecido.
Desecho de equipos antiguos
No deseche los equipos antiguos junto
a los residuos domésticos.
Para desechar los equipos antiguos, utilice
el sistema de recogida y devolución disponible.
66
Page 67

Volumen de suministro Mando a distancia
Volumen de suministro
El volumen de suministro incluye:
1 radio
1 marcos de sujeción
2 herramientas de desmontaje
1 perno de guía
3 cables de conexión
1 manual de instrucciones
1 mando a distancia RC 12H
Accesorios especiales
(no incluidos en el suministro)
Utilice únicamente accesorios especiales
autorizados por Blaupunkt.
Mando a distancia del volante
El mando a distancia del volante permite
ejecutar las principales funciones del equipo desde el volante de forma cómoda y segura.
Ahora bien, el equipo no se puede conectar
ni desconectar con el mando a distancia!
Si desea conocer los mandos a distancia
compatibles con su radio, consulte a su
proveedor Blaupunkt o visite el sitio web
www.blaupunkt.com.
Mando a distancia
Su radio está equipada con un mando a distancia RC 12H.
El mando a distancia permite controlar la
mayoría de las funciones de forma cómoda
y segura.
Tenga en cuenta que debe existir una comunicación óptica entre el mando a distancia
y el receptor de infrarrojos para el mando
que se encuentra en la unidad de mando
extraíble.
Ahora bien, el equipo no se puede conectar
ni desconectar con el mando a distancia.
ESPAÑOL
Amplifi cador (Amplifi er)
Pueden utilizarse todos los amplifi cadores
de la marca Blaupunkt y Velocity.
Cambiadiscos (Changer)
Este equipo es compatible con los siguientes cambiadiscos Blaupunkt:
CDC A 03, CDC A 08 e IDC A 09.
67
Page 68

Garantía Unidad de mando extraíble
Garantía
Para los productos adquiridos dentro de la
Unión Europea, le ofrecemos una garantía
del fabricante. Para los productos adquiridos en un país extracomunitario se aplicarán las condiciones de garantía estipuladas
por nuestro representante en el país en
cuestión.
Servicio
Blaupunkt dispone en algunos países de un
servicio de reparación y recogida.
Consulte la página www.blaupunkt.com
para saber si este servicio está disponible
en su país.
Si desea acceder a este servicio, puede solicitar la recogida de su herramienta a través de internet.
Unidad de mando
extraíble
Seguro antirrobo
Su equipo está dotado de una unidad de
mando extraíble (Flip-Release-Panel) que
sirve de seguro antirrobo. Sin la unidad de
mando, el equipo no tiene ningún valor para
los ladrones.
Asegure su equipo contra los ladrones y lleve consigo la unidad de mando siempre que
salga del vehículo. No la deje en su interior,
ni siquiera escondida.
Notas:
•
No deje caer la unidad de mando.
•
No exponga la unidad de mando a la
luz directa del sol o a otras fuentes de
calor.
•
Evite tocar directamente con la piel
los contactos de la unidad de mando.
En caso necesario, limpie los contactos con un paño impregnado en alcohol limpiador que no suelte pelusa.
Extraer la unidad de mando
Pulse la tecla 1.
쏅
La unidad de mando se abate hacia abajo.
68
Tome la unidad de mando por la parte
쏅
derecha y tire de ella para extraerla del
soporte, sin ladearla.
Page 69

Unidad de mando extraíble
Notas:
El equipo se desconectará una vez
•
transcurrido el tiempo fi jado. Lea el
apartado "Tiempo de desconexión
(OFF TIMER)" que fi gura en este capítulo.
El equipo memoriza la fuente de so-
•
nido sintonizada la última vez para
recuperarla la próxima vez que se
conecte.
En caso de haber un CD en la unidad,
•
éste permanece en ella.
Colocar la unidad de mando
2.
1.
Coloque la unidad de mando perpendi-
쏅
cular al equipo. (Véase la fi gura, 1.)
Introduzca la unidad de mando en la
쏅
guía por el borde inferior de la carcasa.
Empuje la unidad con mucho cuidado
쏅
hasta que quede encajada en los soportes.
Abata la unidad de mando hacia arriba en
쏅
la ranura y presione un poco hasta que
quede encajada. (véase la fi gura, 2.)
Si el equipo estaba conectado al extraer la
unidad de mando, al volver a colocarla se
activarán automáticamente los últimos valores seleccionados (radio, CD, cambiadiscos o AUX).
Tiempo de desconexión
(OFF TIMER)
Una vez abierta la unidad de mando, el
equipo se desconectará al término de un intervalo de tiempo prefi jado. Este intervalo
puede ajustarse entre 0 y 30 segundos.
Pulse la tecla MENU•OK 5.
쏅
Pulse repetidas veces la tecla
쏅
4 hasta que en la pantalla aparezca la
indicación "OFF TIMER".
Pulse la tecla
쏅
Ajuste la hora con la tecla
쏅
Cuando haya terminado la operación de
ajuste,
pulse la tecla ESCAPE <.
쏅
4 para abrir el menú.
o
o 4.
Función Time-out
El equipo dispone de una función Time-out
(interrupción).
Si, por ejemplo, pulsa la tecla MENU•OK
5 y selecciona una opción de menú, el
equipo conmuta de nuevo aprox. 8 segundos después de la última pulsación de tecla. Los ajustes realizados quedan memorizados.
ESPAÑOL
69
Page 70

Conectar y desconectar Volumen
Conectar y desconectar
Para conectar y desconectar el equipo,
Vd. tiene las siguientes posibilidades:
Conectar y desconectar el equipo con la
tecla On/Off
Para conectar el equipo, pulse la tecla
쏅
On/Off 6.
El equipo se conecta.
Para desconectarlo, mantenga pulsa-
쏅
da la tecla On/Off 6 durante más de
2 segundos.
El equipo se desconecta.
Conectar y desconectar el equipo con el
encendido del vehículo
Si el equipo está conectado al encendido
del vehículo, tal y como fi gura en las instrucciones de montaje, y no se desconectó
previamente con la tecla On/Off 6, podrá
conectarlo y desconectarlo con el encendido del vehículo.
Desconectar el equipo con la unidad de
mando extraíble
Extraiga la unidad de mando.
쏅
El equipo se desconecta una vez transcurrido el tiempo que aparece en el menú
"OFF TIMER".
Nota:
Para proteger la batería del vehículo, el
equipo se desconecta automáticamente al cabo de una hora si no está conectado el encendido del vehículo.
Regular el volumen
El volumen se puede regular en pasos de
0 (desactivado) a 66 (máximo).
Para subir el volumen,
gire el regulador del volumen 7 a la
쏅
derecha.
Para bajar el volumen,
gire el regulador del volumen 7 a la
쏅
izquierda.
Regular el volumen de encendido
Puede modifi car el volumen de encendido
si lo desea.
Pulse la tecla MENU•OK 5.
쏅
Pulse la tecla
쏅
la pantalla aparezca la indicación "ON
VOLUME".
Pulse la tecla
쏅
de menú.
Ajuste el volumen de encendido que
쏅
desee con las teclas
Para simplifi car la operación, el volumen se
sube o se baja de acuerdo con los valores
seleccionados.
Si selecciona el valor "LAST VOL" (ajuste
0 = LAST VOL), volverá a activarse el volumen seleccionado antes de desconectar el
equipo.
Nota:
Como protección auditiva, el volumen
de encendido está limitado al valor
"38" con el ajuste "LAST VOL". Si el
último volumen ajustado antes de la
desconexión era más alto, al conectar
o 4 hasta que en
4 para abrir la opción
ó 4.
70
Page 71

Volumen
el equipo se ajustará automáticamente
al valor "38". Así se evitan los típicos
sobresaltos por un volumen inesperadamente alto al conectar el equipo.
Cuando haya terminado la operación de
ajuste,
pulse la tecla ESCAPE <.
쏅
Bajar rápidamente el volumen
(MUTE)
Puede bajar rápidamente el volumen hasta
un valor establecido previamente.
Pulse brevemente la tecla On/Off 6.
쏅
En la pantalla se muestra la indicación
"MUTE".
Desactivar la supresión del sonido
(Mute)
Para volver a activar el volumen anterior,
쏅
vuelva a pulsar la tecla On/Off 6.
Ajustar el volumen de la función Mute
Si lo desea, puede ajustar el volumen de la
función Mute (Mute Level).
쏅
Pulse la tecla MENU•OK 5.
쏅
Pulse repetidas veces la tecla
4 hasta que en la pantalla aparezca
la indicación "MUTE LVL".
Pulse la tecla
쏅
Ajuste el nivel mute deseado con la te-
쏅
o 4.
cla
Cuando haya terminado la operación de
ajuste,
pulse la tecla ESCAPE <.
쏅
4 para abrir el menú.
o
Sonido del teléfono/sistema de
navegación
Supresión del sonido al usar el teléfono
Si la radio está conectada a un teléfono móvil o a un sistema de navegación, al aceptar
una llamada o una indicación de voz de la
navegación, se suprime el sonido del equipo de radio. La conversación telefónica o la
indicación de voz se reproduce a través de
los altavoces de la radio. Para ello es necesario conectar el teléfono móvil o el sistema
de navegación a la radio tal y como se indica
en las instrucciones de montaje.
Para saber qué sistemas de navegación
pueden conectarse a su radio, pregunte a
su proveedor Blaupunkt.
Al aceptar una llamada o cuando se produce una indicación de navegación, la pantalla
muestra la indicación "PHONE".
Ajustar el volumen de sonido del
teléfono/sistema de navegación
Las noticias de tráfi co no se activan durante
las llamadas telefónicas ni durante una indicación de voz del sistema de navegación.
Las noticias de tráfi co no se graban.
Recuerde que puede ajustar el volumen
de las conversaciones telefónicas o de las
indicaciones de voz del sistema de navegación:
쏅
Pulse la tecla MENU•OK 5.
쏅
Pulse repetidas veces la tecla
4 hasta que en la pantalla aparezca la
indicación "TEL VOL".
쏅
Pulse la tecla
4 para abrir el menú.
o
ESPAÑOL
71
Page 72

Volumen Modo de radio
Ajuste el volumen deseado con la tecla
쏅
o 4.
Cuando haya terminado la operación de
ajuste,
pulse la tecla ESCAPE <.
쏅
Nota:
El volumen de las llamadas telefónicas
y recomendaciones habladas también
puede modifi carse con el regulador del
volumen 7 cuando están sonando.
Activar y desactivar tono de
confi rmación
En algunas funciones, cuando se pulsa una
tecla durante más de dos segundos (p. ej.,
para memorizar una emisora en una tecla
de estación), suena un tono de confi rmación (pitido). Puede activar y desactivar el
pitido.
쏅
Pulse la tecla MENU•OK 5.
쏅
Pulse repetidas veces la tecla
4 hasta que en la pantalla aparezca la
indicación "BEEP ON" o "BEEP OFF".
Active (ON) o desactive (OFF) el pitido
쏅
con la tecla
Cuando haya terminado la operación de
ajuste,
pulse la tecla ESCAPE <.
쏅
o 4.
Modo de radio
Este equipo está dotado de un radiorreceptor RDS. Muchas de las emisoras sintonizadas retransmiten una señal que contiene
información como, por ejemplo, el nombre
de la emisora y el tipo de programa (PTY),
además del programa radiofónico.
Si se recibe el nombre de la emisora, éste
se visualiza en la pantalla.
Ajustar el sintonizador
Para garantizar el correcto funcionamiento de la pieza receptora de la radio, es necesario ajustar el equipo a la región en la
que se utiliza. Puede elegir entre Europa
(EUROPE), EE.UU. (USA), Tailandia (THAI)
y América del Sur (S-AMERIKA). El sintonizador viene ajustado de fábrica a la región
en la que se adquiere. En caso de problemas con la calidad de recepción de la radio,
compruebe este ajuste.
o
Nota:
Las funciones de radio descritas en
este manual de instrucciones hacen referencia a los ajustes del sintonizador
para EE. UU. (USA).
쏅
Desconecte el equipo con la tecla On/
Off 6.
쏅
Mantenga pulsadas simultáneamente
las teclas 1 y 5 9 y vuelva a conectar
el equipo con la tecla On/Off 6.
En la pantalla aparece "TUNER".
쏅
Seleccione la gama de frecuencias de
su región con la tecla
o 4.
72
Page 73

Modo de radio
Para guardar los ajustes realizados,
desconecte el equipo con la tecla On/
쏅
Off 6 y vuelva a conectarlo. La radio
se enciende con el último ajuste seleccionado (radio, CD, cambiadiscos o
AUX).
Activar el modo de radio
Si se encuentra en el modo de CD, cambiadiscos o AUX,
pulse la tecla BND =
쏅
o
쏅
pulse la tecla SRC 2 hasta que en la
pantalla aparezca la indicación "FM1",
"FM2", "FMT" o "AM".
Seleccionar la banda de ondas/el
nivel de memoria
Este equipo puede sintonizar programas de
las bandas de frecuencia FM y AM. Para la
banda de ondas FM hay 3 niveles de memoria (FM1, FM2 y FMT) y para la banda de
ondas AM, uno.
En cada nivel de memoria pueden memorizarse 5 emisoras.
Para cambiar entre los niveles de memoria
FM1, FM2 y FMT o la banda de ondas AM,
쏅
pulse la tecla BND =.
Sintonizar emisoras
Existen varias posibilidades de sintonizar
emisoras.
Sintonización manual de emisoras
Vd. también puede sintonizar emisoras manualmente.
Para modifi car gradualmente la frecuencia
ajustada,
쏅
pulse brevemente la tecla
Para modifi car rápidamente la frecuencia
ajustada,
mantenga pulsada la tecla
쏅
durante más tiempo.
o 4.
o 4
Modifi car la sensibilidad de la
búsqueda de emisora
Puede elegirse si se desea sintonizar únicamente emisoras potentes o también emisoras de poca intensidad.
Pulse la tecla MENU•OK 5.
쏅
Pulse repetidas veces la tecla
쏅
4 hasta que en la pantalla aparezca la
indicación "SENS HI" o "SENS LO".
"SENS HI" representa la sensibilidad máxima y "SENS LO", la mínima.
쏅
Ajuste la sensibilidad deseada con la
o 4.
tecla
Cuando haya terminado la operación de
ajuste,
pulse la tecla ESCAPE <.
쏅
Nota:
El equipo memoriza el valor de sensibilidad ajustado para la banda de ondas
FM y AM.
o
ESPAÑOL
Búsqueda automática de emisoras
Pulse la tecla
쏅
La radio sintoniza la primera emisora que
tenga sufi ciente intensidad.
o 4.
73
Page 74

Modo de radio
Memorizar emisoras
Memorización manual de emisora
Seleccione el nivel de memoria FM1,
쏅
FM2, FMT deseado o la banda de ondas AM.
Sintonice la emisora que desea memo-
쏅
rizar.
쏅
Mantenga pulsada durante más de
2 segundos la tecla de estación 1 - 5
9 en la que desee memorizar la emisora.
Memorización automática
(Travelstore)
El usuario puede memorizar automáticamente las cinco emisoras con mayor intensidad de recepción de la región. Las emisoras quedan memorizadas en el nivel FMT o
AM.
Nota:
Las emisoras que ya estén memorizadas en ese nivel se borran.
쏅
Mantenga pulsada la tecla BND = du-
rante más de 2 segundos.
Comienza el proceso de memorización. En
la pantalla se indica "FM TSTORE" o "AM
TSTORE". Al concluir el proceso de memorización, suena la emisora memorizada en
la posición 1 del nivel FMT o AM.
Escuchar emisoras memorizadas
Seleccione el nivel de memoria o la
쏅
banda de ondas.
Pulse una de las teclas de estación 1 - 5
쏅
9.
La emisora memorizada se reproduce si la
recepción es buena.
Explorar las emisoras que se
pueden sintonizar (SCAN)
La función SCAN sirve para explorar todas
las emisoras que se pueden sintonizar. El
tiempo de exploración se puede seleccionar entre 5 y 30 segundos en el menú.
Iniciar la función SCAN
쏅
Mantenga pulsada la tecla MENU•OK
5 durante más de 2 segundos.
La radio sintoniza la primera emisora que
tenga sufi ciente intensidad. En la pantalla aparece de forma alterna la indicación
"SCAN" y la frecuencia actual o el nombre
de la emisora sintonizada.
Finalizar la función Scan, seguir
escuchando una emisora
쏅
Pulse la tecla MENU•OK 5.
El proceso de exploración se da por terminado y sigue sonando la última emisora explorada.
Seleccionar el tiempo de
exploración
Pulse la tecla MENU•OK 5.
쏅
Pulse repetidas veces la tecla
쏅
4 hasta que en la pantalla aparezca la
indicación "SCAN TIME".
Pulse la tecla
쏅
Ajuste el tiempo de exploración desea-
쏅
do con la tecla
4 para abrir el menú.
o 4.
o
74
Page 75

Modo de radio Modo de CD
Cuando haya terminado la operación de
ajuste,
pulse la tecla ESCAPE <.
쏅
Nota:
El tiempo de exploración ajustado también es válido para los procesos de exploración en el modo CD, de cambiadiscos y MP3.
Seleccionar la indicación
En el modo de radio puede seleccionar distintas opciones de indicación:
Nombre de la emisora y/o frecuencia
•
Posición de memoria y hora
•
Para cambiar el tipo de indicación,
pulse la tecla DIS :.
쏅
Modo de CD
Con este equipo puede escuchar los CD de
audio, CD-R y CD-RW de tipo convencional
de 12 o 8 cm de diámetro.
¡Precaución!
Los CD con adhesivos o con formas pueden averiar la unidad de
CD.
No inserte ningún Shape-CD (CD con-
•
torneado o con formas).
No pegue adhesivos a los CD, ya que
•
se podrían soltar durante el funcionamiento.
Nota:
Escriba en los CD sólo con rotuladores
especiales, ya que no contienen substancias corrosivas. Los rotuladores
permanentes pueden dañar los CD.
Para un funcionamiento adecuado, utilice
exclusivamente los CD con el logo CompactDisc. Los CD con protección contra copia
pueden provocar difi cultades durante la reproducción. Blaupunkt no puede garantizar
el funcionamiento correcto de los CD con
protección anticopia.
Además de los CD de audio, este equipo
también es capaz de reproducir los CD con
archivos de música MP3/WMA. Para más
detalles, consulte el capítulo "Modo MP3/
WMA".
ESPAÑOL
75
Page 76

Modo de CD
Iniciar el modo de CD
Si la unidad de CD está vacía,
pulse la tecla
쏅
La unidad de mando se abre.
Inserte el CD en la unidad con la cara
쏅
impresa mirando hacia arriba y empuje
hasta notar cierta resistencia.
El CD entra automáticamente en la unidad.
Si el CD no se ha introducido automática-
mente,
pulse brevemente la tecla
쏅
La introducción del CD no se debe obstaculizar ni apoyar.
Cierre la unidad de mando presionán-
쏅
dola ligeramente de modo que quede
encajada.
Comienza la reproducción del CD y en la
pantalla aparece "CD".
Nota:
Si el encendido del vehículo estaba
apagado antes de introducir el CD, de-
berá conectar primero el equipo con la
tecla On/Off 6 para que se inicie la
reproducción.
Con un disco ya colocado en la unidad de CD:
Pulse repetidas veces la tecla SRC 2
쏅
hasta que en la pantalla aparezca la in-
dicación "CD".
La reproducción comienza en el punto en el
que se interrumpió.
1.
?.
Seleccionar títulos
Pulse una tecla de fl echa ó 4 y/ó
쏅
ó 4 para seleccionar el siguiente
título o el anterior.
Pulse una sola vez la tecla
de nuevo la reproducción del título.
4 para iniciar
Búsqueda rápida (audible)
Para realizar una búsqueda rápida hacia delante o hacia atrás,
mantenga pulsada la tecla
쏅
hasta que comience la búsqueda rápida en sentido descendente o ascendente.
o 4
Reproducción aleatoria de los
títulos (MIX)
Pulse la tecla 5 MIX 9.
쏅
En la pantalla aparece brevemente la indicación "MIX CD" y también se muestra el
símbolo MIX. Comienza a sonar el primer
título elegido de forma aleatoria.
Finalizar la función MIX
Vuelva a pulsar la tecla 5 MIX 9.
쏅
En la pantalla aparece brevemente la indicación "MIX OFF" y el símbolo MIX desaparece.
Explorar los títulos (SCAN)
Es posible reproducir brevemente (explorar) todos los títulos del CD.
Mantenga pulsada la tecla MENU•OK
쏅
5 durante más de 2 segundos.
76
Page 77

Modo de CD
Al hacerlo, comienza a sonar el siguiente
título. En la pantalla aparece "SCAN" y parpadea el número de título actual.
Nota:
Puede modifi car el tiempo de exploración si lo desea. Si desea más información, consulte el apartado "Seleccionar
el tiempo de exploración" en el capítulo
"Modo de radio".
Finalizar la función Scan, seguir
escuchando un título
Para fi nalizar el proceso de exploración,
pulse la tecla MENU•OK 5.
쏅
El título que está sonando sigue reproduciéndose.
Repetir títulos (REPEAT)
Si desea repetir un título,
pulse la tecla 4 RPT 9.
쏅
En la pantalla aparece brevemente la indicación "RPT TRCK" y se muestra el símbolo
RPT. El título se repetirá hasta fi nalizar la
función Repeat.
Finalizar la función Repeat
Si desea fi nalizar la función Repeat,
vuelva a pulsar la tecla 4 RPT 9.
쏅
En la pantalla aparece brevemente la indicación "RPT OFF" y el símbolo RPT desaparece.
La reproducción continúa de forma normal.
Interrumpir la reproducción
(PAUSE)
Pulse la tecla 3 9.
쏅
En la pantalla se muestra la indicación
"PAUSE".
Anular la pausa
Durante la pausa, pulse la tecla 3
쏅
9.
La reproducción continua.
Seleccionar la indicación
En el modo de CD se puede elegir entre
varias opciones para la indicación en pantalla:
Número de título y tiempo de repro-
•
ducción
•
Número de título y hora
Para cambiar el tipo de indicación,
쏅
pulse la tecla DIS :.
Visualizar el texto del CD
Algunos CD disponen del denominado texto
del CD. El texto del CD puede incluir el nombre del intérprete y del álbum.
Cada vez que seleccione un nuevo título podrá ver el texto del CD desplazándose por
la pantalla.
Activar y desactivar el texto del CD
Pulse la tecla MENU•OK 5.
쏅
Pulse repetidas veces la tecla
쏅
4 hasta que en la pantalla aparezca la
indicación "CD TEXT" y el ajuste seleccionado en esos momentos.
o
ESPAÑOL
77
Page 78

Modo de CD Modo MP3/WMA
Pulse la tecla 4 para abrir el menú.
쏅
Seleccione la opción "TEXT ON" (visua-
쏅
lizar el texto del CD) o "TEXT OFF" (no
visualizar el texto del CD) con la tecla
o 4.
Cuando haya terminado la operación de
ajuste,
pulse la tecla ESCAPE <.
쏅
Extraer el CD
Pulse la tecla 1.
쏅
La unidad de mando se abate hacia abajo.
Pulse la tecla ? situada junto a la
쏅
ranura del CD.
El CD es expulsado.
Extraiga el CD y cierre la unidad de
쏅
mando.
Notas:
El equipo vuelve a introducir automá-
•
ticamente el CD expulsado si no se retira en un plazo de 10 segundos.
Los CD también se pueden expulsar
•
cuando el equipo está desconectado
o cuando hay otra fuente de sonido
activada.
Modo MP3/WMA
Con esta autorradio también puede reproducir CD-R y CD-RW con archivos musicales en formato MP3. Asimismo sirve para
los archivos WMA. En este capítulo sólo
se trata la reproducción de los archivos
MP3, ya que el funcionamiento de los archivos MP3 y WMA es idéntico.
Notas:
Los archivos WMA con "Digital Rights
•
Management" (DRM) procedentes de
tiendas de música online no se pueden reproducir con este equipo.
La reproducción segura de archivos
•
WMA solo puede garantizarse si éstos
han sido creados con la versión 8 de
Windows Media Player o posterior.
Creación de CD con archivos
MP3/WMA
Si la combinación de grabadora, software
para grabar los CD y CD virgen no es la apropiada, pueden presentarse problemas a la
hora de reproducir los CD. Si se presenta algún problema con los CD grabados en casa,
le recomendamos cambiar a CD vírgenes de
otro fabricante o de otro color.
El formato del CD tiene que ser ISO 9660
de nivel 1 ó 2 o bien Joliet. Con todos los
demás formatos no hay ninguna garantía de
que los CD se reproduzcan correctamente.
En un CD puede crear un máximo de 252
directorios. Este equipo permite seleccionar de forma individual cada uno de los directorios.
78
Page 79

Modo MP3/WMA
Independientemente del número de directorios, existe la posibilidad de administrar
hasta 511 archivos MP3 en un CD, con un
máximo de 255 archivos en un directorio.
D01
T001
T002
T003
T004
T005
T006
T007
T008
T009
T010
T011
A
B
D02
D03
T001
T002
T003
T004
T005
T001
T002
T003
T004
T005
T006
D04
A Directorios
B Títulos · Archivos
A cada directorio le puede asignar un nombre en el PC. Después, el nombre del directorio puede verse en la pantalla del equipo.
Seleccione el nombre de los directorios y
de los títulos/archivos con el software de
grabación. Para más detalles, consulte el
manual del software.
Notas:
Evite el uso de símbolos especiales a
•
la hora de asignar un nombre a los archivos (directorios y títulos).
Si utiliza nombres de archivo con más
•
de 16 caracteres (incluyendo la terminación ".MP3" o ".WMA"), la capacidad máxima para albergar títulos y
directorios se reduce.
Si desea que los archivos sigan un orden
concreto, guárdelos en el soporte de datos
en el orden en que desee reproducirlos posteriormente. El equipo reproduce los archivos siguiendo el orden físico en el que están
memorizados en el soporte de datos.
Para poderlos reproducir en este equipo,
los archivos deben tener la terminación
".MP3" en los archivos MP3 y la terminación
".WMA" en los archivos WMA.
Notas:
Para disfrutar de una reproducción sin
perturbaciones,
no intente asignar la extensión ".MP3"
•
a archivos de otro formato para reproducirlos en el equipo. El equipo ignorará los archivos no válidos durante la
reproducción.
no utilice CD "mixtos" que contengan
•
datos y títulos de un formato diferente a MP3 (en el modo MP3, el equipo
sólo lee archivos MP3).
no utilice CD en modo mixto que con-
•
tengan títulos de audio CD y títulos
MP3. Si intenta reproducir un CD en
modo mixto, el equipo sólo leerá los
títulos de audio CD.
Etiquetas ID3 de MP3
Los títulos MP3 pueden contener información
adicional como, por ejemplo, el intérprete,
el nombre del título y el álbum (etiquetas
ID3). Este equipo pu de visualizar etiquetas
ID3 de la versión 1 y de la 2 en la pantalla.
79
ESPAÑOL
Page 80

Modo MP3/WMA
Iniciar el modo MP3
El modo MP3 se inicia igual que el modo de
CD normal. Para más detalles, lea el apartado "Iniciar el modo de CD" en el capítulo
"Modo de CD".
Seleccionar la indicación
Para poder realizar los siguientes ajustes,
debe haber un CD de MP3 en el equipo.
Seleccionar la indicación estándar
Existe la posibilidad de visualizar en pantalla diversos datos sobre el título seleccionado.
Número de directorio y de título "DIR-
•
TRCK"
Número de directorio y hora "DIR-CLK"
•
Número de directorio y tiempo de re-
•
producción "DIR-TIME"
Número de título y tiempo de reproduc-
•
ción "TRCK-TIME"
Número de título y hora "TRCK-CLK"
•
Nota:
La información permanece en la pantalla una vez que el texto de MP3 se ha
deslizado por la pantalla tras un cambio
de título.
Para seleccionar el tipo de indicación,
pulse una o varias veces la tecla DIS :
쏅
hasta que en la pantalla aparezca la indicación deseada.
Ajustar los textos de MP3
Cada vez que se reproduce un nuevo título
se muestra una vez el texto de MP3 en la
pantalla. Después se muestra la indicación
estándar seleccionada.
Los textos disponibles son los siguientes:
•
Nombre del directorio ("DIR NAME")
•
Nombre del título ("SONG NAME")
•
Nombre del álbum ("
Nombre del intérprete ("ARTIST")
•
Nombre del archivo ("FILE NAME")
•
Nota:
El intérprete, el título y el nombre del
álbum son parte integrante de las etiquetas ID MP3 de la versión 1, que el
equipo sólo puede mostrar si han sido
guardadas junto con los archivos MP3
(para más detalles, consulte las instrucciones del software MP3 o del software de grabación del PC).
Para seleccionar el tipo de indicación:
쏅
Pulse la tecla MENU•OK 5.
쏅
Pulse la tecla
la pantalla aparezca la indicación "MP3
DISP".
Pulse la tecla
쏅
Seleccione el texto de MP3 que desee
쏅
con la tecla
Cuando haya terminado la operación de
ajuste:
Pulse la tecla ESCAPE <.
쏅
ALBM NAME
o 4 hasta que en
4 para abrir el menú.
o 4.
")
80
Page 81

Modo MP3/WMA
Seleccionar un directorio
Para cambiar a otro directorio de nivel superior o inferior:
Pulse una o varias veces la tecla
쏅
4.
o
Seleccionar títulos/archivos
Para cambiar a otro título/archivo anterior o
siguiente del directorio seleccionado:
Pulse una o varias veces la tecla
쏅
4.
Pulsando una sola vez la tecla
de nuevo la reproducción del título que está
sonando.
o
4 se inicia
Búsqueda rápida
Para realizar una búsqueda rápida hacia delante o hacia atrás:
Mantenga pulsada la tecla
쏅
hasta que comience la búsqueda rápida en sentido descendente o ascendente.
o 4
Reproducir títulos en orden
aleatorio (MIX)
Para reproducir en orden aleatorio todos
los títulos del directorio seleccionado:
Pulse brevemente la tecla 5 MIX 9.
쏅
En la pantalla aparece la indicación "MIX
DIR" y se ilumina el símbolo MIX.
Para reproducir en orden aleatorio todos
los títulos del CD de MP3 introducido:
Pulse la tecla 5 MIX 9 durante más de
쏅
dos segundos.
En la pantalla aparece la indicación "MIX
CD" y se ilumina el símbolo MIX.
Finalizar la función MIX
Para fi nalizar la función MIX:
Pulse brevemente la tecla 5 MIX 9.
쏅
En la pantalla aparece la indicación "MIX
OFF" y el símbolo MIX desaparece.
Explorar los títulos (SCAN)
Es posible reproducir brevemente ("explorar") todos los títulos del CD.
Pulse la tecla MENU•OK 5 durante
쏅
más de dos segundos. Al hacerlo, comienza a sonar el siguiente título.
En la pantalla aparece la indicación "TRK
SCAN" durante unos segundos. El número
de título actual parpadea. Los títulos de los
CD se reproducen en orden sucesivo.
Nota:
Puede modifi car el tiempo de exploración si lo desea. Para más detalles,
lea el punto "Seleccionar el tiempo de
exploración" en el capítulo "Modo de
radio".
FINALIZAR la función Scan, seguir
escuchando un título
Pulse brevemente la tecla MENU•OK
쏅
5.
El título que está sonando sigue reproduciéndose.
ESPAÑOL
81
Page 82

Modo MP3/WMA Modo de cambiadiscos
Reproducir repetidamente un
título o un directorio completo
(REPEAT)
Para repetir el título seleccionado en esos
momentos:
쏅
Pulse brevemente la tecla 4 RPT 9.
En la pantalla aparece brevemente "RPT
TRCK" y se ilumina el símbolo RPT.
Para repetir el directorio entero:
쏅
Pulse la tecla 4 RPT 9 durante más de
dos segundos.
En la pantalla aparece la indicación "RPT
DIR".
Finalizar la función REPEAT
Para fi nalizar la repetición del título o directorio seleccionado:
쏅
Pulse brevemente la tecla 4 RPT 9.
En la pantalla aparece brevemente "RPT
OFF" y desaparece RPT.
Interrumpir la reproducción
(PAUSE)
Pulse la tecla 3 9.
쏅
En la pantalla se muestra la indicación
"PAUSE".
Anular la pausa
쏅
Durante la pausa pulse la tecla 3
9.
La reproducción continua.
Modo de cambiadiscos (CDC)
Nota:
Para más información acerca de la manera de manejar los CD, de colocarlos
en el cambiadiscos y de manejar este
último, consulte las instrucciones del
cambiadiscos.
Activar el modo de cambiadiscos
Pulse SRC 2 hasta que se muestre en
쏅
la pantalla la indicación "CHANGER".
Aparece un marco alrededor del símbolo
del cambiadiscos.
La reproducción comienza con el primer CD
detectado por el cambiadiscos.
Selección del CD
Para cambiar a otro CD anterior o siguiente:
쏅
Pulse la tecla
veces.
Nota:
El equipo ignora las ranuras vacías o
que contienen CD no válidos.
Selección del título
Para cambiar a otro título anterior o siguiente del CD seleccionado:
쏅
Pulse la tecla
veces.
Búsqueda rápida (audible)
Para realizar una búsqueda rápida hacia delante o hacia atrás:
o 4 una o varias
o 4 una o varias
82
Page 83

Mantenga pulsada una de las teclas
쏅
4 hasta que comience la bús-
queda rápida en sentido descendente
o ascendente.
Seleccionar la indicación
Existen cinco opciones para la indicación
en el modo de cambiadiscos (CDC):
Número de CD y de título ("CD-TRCK")
•
Número de CD y hora ("CD-CLK")
•
Número de CD y tiempo de reproduc-
•
ción ("CD-TIME")
Número de título y tiempo de reproduc-
•
ción ("TRCK-TIME")
Número de título y hora ("TRCK-CLK")
•
Para cambiar el tipo de indicación,
pulse una o varias veces la tecla DIS :
쏅
hasta que en la pantalla aparezca la indicación deseada.
Repetir títulos o los CD enteros
(REPEAT)
Para repetir el título seleccionado en esos
momentos:
Pulse brevemente la tecla 4 RPT 9.
쏅
En la pantalla aparece brevemente la indicación "RPT TRCK" y se muestra el símbolo
RPT.
Para repetir el CD seleccionado en esos momentos:
Mantenga pulsada la tecla 4 RPT 9
쏅
durante más de dos segundos.
En la pantalla aparece brevemente la indicación "RPT DISC" y se muestra el símbolo
RPT.
Modo de cambiadiscos
Finalizar la función REPEAT
Para fi nalizar la repetición del título o CD
que está sonando:
쏅
Pulse brevemente la tecla 4 RPT 9.
En la pantalla aparece "RPT OFF" y desaparece RPT.
Reproducir títulos en orden
aleatorio (MIX)
Para reproducir en orden aleatorio todos
los títulos del CD seleccionado:
Pulse brevemente la tecla 5 MIX 9.
쏅
En la pantalla aparece brevemente la indicación "MIX CD" y se indica el símbolo MIX.
Para reproducir en orden aleatorio los títulos de todos los CD:
쏅
Mantenga pulsada la tecla 5 MIX 9
durante más de dos segundos.
En la pantalla aparece brevemente la indicación "MIX ALL" y se indica el símbolo MIX.
Finalizar la función MIX
쏅
Pulse brevemente la tecla 5 MIX 9.
En la pantalla aparece la indicación "MIX
OFF" y MIX desaparece.
Explorar todos los títulos de
todos los CD (SCAN)
Para explorar en orden sucesivo todos los
títulos de todos los CD del cargador:
Pulse la tecla MENU•OK 5 durante
쏅
más de dos segundos.
En la pantalla aparece "TRK SCAN" y el número del título actual parpadea.
ESPAÑOL
83
Page 84

Modo de cambiadiscos Clock – Hora
Finalizar la función SCAN
Para terminar la exploración:
Pulse brevemente la tecla MENU•OK
쏅
5.
El título que está sonando sigue reproduciéndose.
Nota:
Puede modifi car el tiempo de exploración si lo desea. Para más detalles,
lea el punto "Seleccionar el tiempo de
exploración" en el capítulo "Modo de
radio".
Interrumpir la reproducción
(PAUSE)
Pulse la tecla 3 9.
쏅
En la pantalla se muestra la indicación
"PAUSE".
Anular la pausa
Durante la pausa pulse la tecla 3
쏅
9.
La reproducción continua.
Clock – Hora
Ajustar la hora
Para ajustar la hora,
pulse la tecla MENU•OK 5.
쏅
Pulse repetidas veces la tecla
쏅
4 hasta que en la pantalla aparezca la
indicación "CLOCK SET".
쏅
Pulse la tecla
La hora se muestra en la pantalla. Los minutos parpadean, lo que signifi ca que se pueden modifi car.
쏅
Ajuste la hora con la tecla
Para cambiar de horas a minutos,
Pulse la tecla
쏅
Cuando haya terminado la operación de
ajuste,
쏅
pulse la tecla ESCAPE <.
Seleccionar el formato de 12/24 h
Pulse la tecla MENU•OK 5.
쏅
Pulse la tecla
쏅
en la pantalla aparezca la indicación
"24H MODE" o "12H MODE".
Pulse la tecla
쏅
de modo.
Cuando haya terminado la operación de
ajuste,
pulse la tecla ESCAPE <.
쏅
4 para abrir el menú.
o 4.
o 4.
o 4 hasta que
o 4 para cambiar
o
84
Page 85

Clock – Hora Sonido
Ver la hora de forma permanente
con el equipo desconectado
y el encendido del vehículo
conectado
Para ver la hora con el equipo desconectado y el encendido del vehículo conectado,
pulse la tecla MENU•OK 5.
쏅
Pulse repetidas veces la tecla
쏅
4 hasta que en la pantalla aparezca
la indicación "CLOCK OFF" o "CLOCK
ON".
Pulse la tecla
쏅
entre la indicación "CLOCK ON" (hora
activada) o "CLOCK OFF" (hora desactivada).
Cuando haya terminado la operación de
ajuste,
pulse la tecla ESCAPE <.
쏅
o 4 para elegir
o
Sonido
Es posible ajustar los valores del sonido
(graves, medios y agudos) por separado
para cada fuente de sonido (radio, CD,
cambiadiscos, AUX y teléfono/navegación).
Los ajustes para la distribución del volumen
(Balance y Fader) y X-BASS se realizan conjuntamente para todas las fuentes de sonido (excepto teléfono/navegación). La distribución del volumen para las opciones de
teléfono/navegación puede ajustarse por
separado.
Nota:
Los ajustes del sonido para las opciones
de teléfono/navegación sólo se pueden
llevar a cabo mientras esté activa una
llamada o una indicación de voz.
Ajustar los graves (Bass)
Puede elegir una de las 4 frecuencias de
graves (60 Hz, 80 Hz, 100 Hz, 200 Hz).
Además, puede ajustar el nivel de la frecuencia de graves seleccionada entre
-7 y +7.
Ajustar la frecuencia de graves y el nivel
쏅
Pulse la tecla AUD >.
En la pantalla aparece la indicación "BASS".
쏅
Pulse una vez la tecla
der al submenú BASS.
쏅
Pulse repetidas veces la tecla
hasta que en la pantalla aparezca la frecuencia de graves deseada.
쏅
Pulse la tecla
nivel entre -7 y +7.
4, para acce-
o 4
o 4 para ajustar el
ESPAÑOL
85
Page 86

Sonido
Pulse dos veces la tecla AUD > para
쏅
salir del menú.
Nota:
Si hay seleccionado un ajuste predeterminado del ecualizador (POP, ROCK,
CLASSIC), el realce manual del nivel
de graves dejará de ser acústicamente
perceptible al llegar a un cierto ajuste.
Lea al respecto las indicaciones del
apartado "Ajustes predeterminados
del ecualizador (Presets)".
Ajustar los tonos medios
(Middle)
Puede elegir una de las 4 frecuencias de
medios (500 Hz, 1 kHz, 2 kHz, 3 kHz).
Además, puede ajustar el nivel de la frecuencia de medios seleccionada entre
-7 y +7.
Ajustar la frecuencia de medios y el nivel
쏅
Pulse la tecla AUD >.
En la pantalla aparece la indicación "BASS".
쏅
Pulse repetidas veces la tecla
4 hasta que en la pantalla aparezca la
indicación "MIDDLE".
쏅
Pulse una vez la tecla
der al submenú MIDDLE.
쏅
Pulse repetidas veces la tecla
hasta que en la pantalla aparezca la frecuencia de medios deseada.
쏅
Pulse la tecla
nivel entre -7 y +7.
쏅
Pulse dos veces la tecla AUD > para
salir del menú.
4 para acce-
o 4 para ajustar el
o
o 4
Ajustar los agudos (Treble)
Puede elegir una de las 4 frecuencias de
agudos (10 kHz, 12 kHz, 15 kHz, 17 kHz).
Además, puede ajustar el nivel de la frecuencia de agudos seleccionada entre
-7 y +7.
Ajustar la frecuencia de agudos y el nivel
Pulse la tecla AUD >.
쏅
En la pantalla aparece la indicación "BASS".
Pulse repetidas veces la tecla
쏅
4 hasta que en la pantalla aparezca la
indicación "TREBLE".
Pulse una vez la tecla
쏅
der al submenú TREBLE.
Pulse repetidas veces la tecla
쏅
hasta que en la pantalla aparezca la frecuencia de agudos deseada.
Pulse la tecla
쏅
nivel entre -7 y +7.
Pulse dos veces la tecla AUD > para
쏅
salir del menú.
Nota:
Si hay seleccionado un ajuste predeterminado del ecualizador (POP, ROCK,
CLASSIC), el realce manual del nivel
de agudos dejará de ser acústicamente perceptible al llegar a un cierto ajuste. Lea al respecto las indicaciones del
apartado "Ajustes predeterminados
del ecualizador (Presets)".
4 para acce-
o 4 para ajustar el
o
o 4
86
Page 87

Sonido X-BASS
Ajustar la distribución del
volumen a izquierda/derecha
(Balance)
Para regular la distribución del volumen a
izquierda/derecha (Balance),
pulse la tecla AUD >.
쏅
En la pantalla aparece la indicación "BASS".
쏅
Pulse repetidas veces la tecla
4 hasta que en la pantalla aparezca
"BAL" y los ajustes actuales.
쏅
Pulse la tecla
distribución del volumen hacia la derecha/izquierda.
쏅
Pulse la tecla AUD > para salir del
menú.
o 4 para ajustar la
o
Ajustar la distribución del
volumen delante/detrás (Fader)
Para ajustar la distribución del volumen delante/detrás (Fader),
pulse la tecla AUD >.
쏅
En la pantalla aparece la indicación "BASS".
쏅
Pulse repetidas veces la tecla
4 hasta que en la pantalla aparezca
"FADER" y los ajustes actuales.
Pulse la tecla
쏅
distribución del volumen delante/detrás.
Pulse la tecla AUD > para salir del
쏅
menú.
o 4 para ajustar la
o
X-BASS
Con la función X-Bass puede realzar los graves a un volumen reducido.
El ajuste X-Bass seleccionado tendrá efecto
en todas las fuentes de sonido (radio, CD,
cambiadiscos o AUX).
El efecto X-BASS se puede ajustar en pasos
de 1 a 3.
"XBASS OFF" signifi ca que la función
X-BASS está desactivada.
Ajustar el realce de la función
X-BASS
Pulse la tecla XBASS 3.
쏅
En la pantalla aparece la indicación
"X-BASS".
Pulse la tecla
쏅
Pulse repetidas veces la tecla
쏅
4 hasta que en la pantalla aparezca el
ajuste deseado.
Cuando haya terminado la operación de
ajuste,
pulse la tecla XBASS 3.
쏅
4 para abrir el menú.
o
ESPAÑOL
87
Page 88

Ajustes predeterminados del ecualizador Pantalla
Ajustes predeterminados
del ecualizador (Presets)
Este equipo dispone de un ecualizador en el
que hay programados ajustes para los estilos musicales "ROCK", "POP" y "CLASSIC".
Para seleccionar uno de estos ajustes del
ecualizador,
pulse la tecla AUD >.
쏅
En la pantalla aparece la indicación "BASS".
Pulse repetidas veces la tecla
쏅
4 hasta que en la pantalla aparezca la
indicación "POP", "ROCK", "CLASSIC"
o "EQ OFF".
Pulse la tecla
쏅
nar uno de los ajustes o seleccione "EQ
OFF" para desactivar el ecualizador.
Cuando haya terminado la operación de
ajuste,
pulse la tecla AUD >.
쏅
Nota:
Sin un ajuste predeterminado del ecualizador es posible ajustar los graves y
agudos hasta +7.
Si tiene seleccionado un ajuste predeterminado del ecualizador (POP, ROCK,
CLASSIC), las variaciones que realice
en los graves y agudos se verán limitadas. Por ejemplo, con el preset POP el
ajuste será efectivo solo hasta +3.
o 4 para seleccio-
o
Ajustar la pantalla
Graduar el brillo de la pantalla
Si el equipo está conectado tal y como se
indica en las instrucciones de montaje y
el vehículo dispone de la toma necesaria,
el brillo de la pantalla cambiará (de "Brillo
día" a "Brillo noche") al conectar las luces
del vehículo. El brillo de la pantalla se puede regular por separado para el día y la noche en pasos de 1 a 9.
쏅
Pulse la tecla MENU•OK 5.
쏅
Pulse repetidas veces la tecla
4 hasta que en la pantalla aparezca la
indicación "DIM DAY" o "DIM NIGHT".
Pulse la tecla
쏅
Pulse la tecla
쏅
tre los distintos niveles del brillo.
Cuando haya terminado la operación de
ajuste,
pulse la tecla ESCAPE <.
쏅
4 para abrir el menú.
o 4 para elegir en-
Ajustar el color de las luces de la
pantalla
Como color de las luces de la pantalla puede mezclar un color de la gama RGB (rojoverde-azul) o seleccionar un color durante
la búsqueda automática de colores.
Mezclar un color para las luces de la
pantalla
Para adaptar las luces de la pantalla a su
gusto, Vd. tiene la posibilidad de mezclar
un color con los 3 colores básicos, rojo,
verde y azul.
o
88
Page 89

Pantalla
Pulse la tecla MENU•OK 5.
쏅
Pulse repetidas veces la tecla
쏅
4 hasta que en la pantalla aparezca la
indicación "DISP COL".
Pulse la tecla
쏅
En la pantalla se abre el menú para mezclar
un color propio. Se muestran "R", "G" y "B"
con los valores actuales. El ajuste para "R"
está activado.
Pulse repetidas veces la tecla
쏅
4 hasta que en la pantalla aparezca la
gama de color deseada.
Pulse la tecla
쏅
cursor detrás de los otros colores.
Seleccione a su gusto la proporción de
쏅
los demás colores.
Cuando haya terminado la operación de
ajuste,
pulse la tecla ESCAPE <.
쏅
Seleccionar un color para la pantalla
mediante la búsqueda automática de
colores
쏅
Pulse la tecla MENU•OK 5.
쏅
Pulse repetidas veces la tecla
4 hasta que en la pantalla aparezca la
indicación "COL SCAN".
Pulse la tecla
쏅
queda automática de colores.
En el equipo comienza a cambiar el color de
las luces de la pantalla.
Si desea seleccionar el color actual ajustado,
pulse la tecla MENU•OK 5.
쏅
4 para abrir el menú.
o 4 para colocar el
4 para iniciar la bús-
o
o
o
Para reiniciar la búsqueda automática,
pulse la tecla
쏅
Una vez seleccionado el color deseado,
pulse la tecla ESCAPE <.
쏅
4.
Activar y desactivar el modo de
demostración
En el modo de demostración, las funciones
del equipo aparecen en la pantalla como
texto en movimiento. El cambio constante
de color muestra las posibilidades de confi guración de los colores de la pantalla.
Si pulsa cualquier tecla, el modo de demostración se interrumpirá durante aprox. 10
segundos.
Conectar el modo de demostración
Desconecte el equipo con la tecla On/
쏅
Off 6.
Mantenga pulsadas simultáneamen-
쏅
te las teclas 1 9 y DIS : y vuelva a
conectar el equipo con la tecla On/Off
6.
En la pantalla aparece brevemente la indicación "DEMO".
Desconectar el modo de demostración
Desconecte el equipo con la tecla On/
쏅
Off 6.
Mantenga pulsadas simultáneamen-
쏅
te las teclas 1 9 y DIS : y vuelva a
conectar el equipo con la tecla On/Off
6.
El modo de demostración está desactivado.
ESPAÑOL
89
Page 90

Fuentes de sonidos externas Datos técnicos
Fuentes de sonido externas
Las fuentes de sonido externas, como,
p. ej., los reproductores de CD portátiles,
los reproductores de MiniDisc o los reproductores de MP3, pueden conectarse al
equipo a través de la entrada AUX posterior
(si no hay ningún cambiadiscos conectado
al equipo).
Notas:
Es preciso un cable adaptador para
•
conectar una fuente de sonido externa
en la entrada AUX posterior. Este cable (Blaupunkt n.º: 7 607 897 093)
se puede adquirir en el proveedor
Blaupunkt.
Con la tecla SRC 2 puede seleccio-
•
narse la entrada AUX posterior. En la
pantalla se visualizará "AUX INPUT".
AUX INPUT sólo está disponible, si no
•
hay conectado un cambiadiscos en el
equipo.
Datos técnicos
Amplifi cador
Potencia de salida:
18W RMS x 4ch @ 14,4V
@ 4ohm @ 1% THD
Sintonizador
Frecuencias en USA:
FM: 87,5 - 107,9 MHz
(paso de 200 kHz)
AM: 530 - 1710 kHz
(paso de 10 kHz)
Frecuencias en Europa:
FM: 87,5 - 108 MHz
(paso de 100 kHz auto/
50 kHz manual)
AM: 531 - 1602 kHz
(paso de 9 kHz)
Frecuencias en Tailandia:
FM: 87,5 - 108 MHz
(paso de 50 kHz auto/
25 kHz manual)
AM: 531 - 1602 kHz
(paso de 9 kHz)
90
Frecuencias en Sudamérica:
FM: 87,5 - 107,9 MHz
(paso de 100 kHz auto/
50 kHz manual)
AM: 530 - 1710 kHz
(paso de 10 kHz)
Page 91

Sensibilidad FM mono:
17 dbf
Respuesta FM: 35 - 16.000 Hz
CD
Respuesta: 20 - 20.000 Hz
Salida preamplifi cación
4 caneles: 2 V
Sensibilidad de entrada
Entrada AUX: 2 V / 6 kΩ
Entrada tel/navi: 10 V / 1 kΩ
Peso 1,36 kg aprox.
Datos técnicos
ESPAÑOL
¡Salvo modifi caciones
91
Page 92

Elementos de comando
1 Tecla
para abrir o painel frontal destacável
(Flip-Release-Panel).
2 Tecla SRC
Selecção da fonte entre rádio e CD e
(se conectado ou ligado) leitor multiCD e AUX.
3 Tecla XBASS
Ligar/desligar e ajustar X-BASS.
4 Bloco com as teclas de seta
5 Tecla MENU•OK
Toque breve: chamar o menu para os
ajustes básicos e confi rmação de ajustes.
Terminar a função Scan.
Toque longo: iniciar a função Scan.
6 Tecla de ligar/desligar
Toque breve: ligar o aparelho. Durante
o funcionamento: silenciador (Mute)
do aparelho.
Toque longo: desligar o aparelho.
7 Regulador do volume
8 Visor
9 Bloco de teclas 1 - 5
: Tecla DIS
Mudar os conteúdos do visor.
; Tecla
Fazer exibir o relógio.
< Tecla ESCAPE
Confi rmar a opção de menu e regressar
ao visor do nível principal do MENU ou
AUDIO.
= Tecla BND
Toque breve: selecção dos níveis de
memória FM e da banda AM.
Toque longo: iniciar a função
Travelstore.
> Tecla AUD, ajustar os baixos, agudos,
médios, Balance e Fader.
Selecção de um pré-ajuste do equalizador.
? Tecla
(Eject) para retirar o CD do
aparelho.
@ Compartimento para CD
92
Page 93

Índice
Sobre estas instruções ..................... 95
Símbolos utilizados ........................ 95
Utilização de acordo com as
disposições legais .......................... 95
Declaração de conformidade ........... 95
Para sua segurança .......................... 96
Se instalar o aparelho por si
mesmo ......................................... 96
O que deve ter em atenção! ............. 96
Indicações de limpeza .................... 96
Remoção de aparelhos usados ........96
Fornecimento .................................. 97
Equipamento extra (não incluído
no fornecimento) ........................... 97
Telecomando ................................... 97
Garantia ..........................................98
Serviço ........................................ 98
Painel frontal destacável .................. 98
Protecção anti-roubo ...................... 98
Retirar o painel frontal ....................98
Colocar o painel frontal ................... 99
Tempo de desactivação
(OFF TIMER) .................................99
Função Time-out ............................ 99
Ligar/desligar ................................100
Regular o volume ........................... 100
Regular o volume inicial ................ 100
Baixar rapidamente o volume
(MUTE) ...................................... 101
Silenciador do rádio durante um
telefonema/navegação áudio ......... 101
Ligar/desligar o sinal sonoro de
confi rmação ................................ 102
Rádio ............................................ 102
Regular sintonizador .................... 102
Ligar o rádio ................................ 103
Seleccionar a banda e/ou o nível
de memória ................................ 103
Sintonizar as estações .................. 103
Defi nir a sensibilidade de sintonia
automática .................................103
Memorizar as estações ................. 104
Memorizar as estações
automaticamente (Travelstore) ..... 104
Ouvir uma estação memorizada ..... 104
Tocar brevemente as estações
sintonizáveis (SCAN) ....................104
Defi nir o tempo de leitura SCAN .....104
Seleccionar os conteúdos do visor . 105
Modo de CD ................................... 105
Iniciar o modo de CD ....................106
Escolher uma faixa .......................106
Busca rápida (com som) ............... 106
Leitura de faixas numa ordem
aleatória (MIX) ............................ 106
Tocar o início das faixas (SCAN) ..... 106
Repetição de faixas (REPEAT) ........107
Interromper a reprodução (PAUSE).. 107
Ajustar a indicação ....................... 107
Chamar a indicação do texto de CD .. 107
Retirar um CD.............................. 108
Modo de MP3/WMA .......................108
Preparação do CD MP3/WMA ........108
Iniciar o modo MP3 ......................110
Seleccionar os conteúdos do visor ... 110
Escolher um directório..................110
Seleccionar a faixa/fi cheiro ........... 111
Busca rápida ............................... 111
Leitura de faixas numa ordem
aleatória (MIX) ............................ 111
Tocar o início das faixas (SCAN) ..... 111
Repetição de faixas individuais ou
de directórios completos (REPEAT) . 111
Interromper a reprodução (PAUSE).. 112
PORTUGUÊS
93
Page 94

Índice
Modo multi-CD .............................. 112
Iniciar o modo multi-CD ................ 112
Escolher um CD ........................... 112
Escolher uma faixa .......................112
Busca rápida (com som) ............... 113
Seleccionar os conteúdos do visor ... 113
Repetição de faixas individuais ou
de CDs completos (REPEAT) .......... 113
Leitura de faixas numa ordem
aleatória (MIX) ............................ 113
Tocar o início de todas as faixas
de cada CD (SCAN) ...................... 113
Interromper a reprodução (PAUSE).. 114
Clock – relógio .............................. 114
Acertar o relógio ..........................114
Seleccionar o modo do relógio
12/24 horas ............................... 114
Fazer exibir a hora
permanentemente com o aparelho
desligado e a ignição ligada ........... 115
Som .............................................. 115
Regular os baixos (Bass) ............... 115
Regular os médios (Middle) ........... 116
Regular os agudos (Treble) ............ 116
Regular a distribuição do som
entre o canal direito/esquerdo
(Balance) ...................................117
Regular a distribuição do som
entre os canais dianteiro/traseiro
(Fader) .......................................117
X-BASS .........................................117
Regular a acentuação X-BASS ........ 117
Pré-ajustes do equalizador
(Presets) .......................................118
Regular o visor .............................. 118
Regular a luminosidade do visor ..... 118
Defi nir a cor da retro-iluminação
do visor ...................................... 118
Activar/desactivar o modo de
demonstração ............................. 119
Fontes áudio externas .................... 120
Dados técnicos ..............................120
Amplifi cador .............................. 120
Sintonizador ............................... 120
CD ............................................. 121
Saída pré amplifi cada ................... 121
Sensibilidade da entrada .............. 121
Instruções de montagem ............... 180
94
Page 95

Sobre estas instruções
Sobre estas instruções
Estas instruções incluem informações importantes para a montagem e utilização
simples e seguras do aparelho.
•
Leia cuidadosa e totalmente estas instruções antes de utilizar o aparelho.
•
Guarde estas instruções de forma a que
estejam acessíveis a qualquer momento para todos os utilizadores.
•
Entregue sempre o aparelho a terceiros
juntamente com estas instruções.
Além disso, observe as instruções dos aparelhos que utiliza em conjunto com este
aparelho.
Símbolos utilizados
Nestas instruções foram utilizados os seguintes símbolos:
CUIDADO!
Aviso de raios laser
CUIDADO!
Aviso de danos na unidade de CD
A identifi cação CE confi rma o cumprimento das directivas UE.
Utilização de acordo com as
disposições legais
Este aparelho foi concebido para a montagem e utilização num veículo com tensão da
rede de bordo de 12 V e deve ser instalado numa abertura DIN. Observe os limites
de potência nos dados técnicos. Mande
efectuar as reparações e, eventualmente, a
montagem por um técnico especializado.
Declaração de conformidade
A Blaupunkt GmbH confi rma por este meio
que este aparelho Key West MP38 está em
conformidade com as exigências básicas e
outras disposições relevantes da directiva
89/336/CEE.
PORTUGUÊS
Identifi ca um passo de procedimento
쏅
Identifi ca uma enumeração
•
95
Page 96

Para sua segurança
Para sua segurança
Este aparelho foi
os actuais conhecimento tecnológicos e as
regras credenciadas referentes aos regulamentos de segurança. Apesar disso, podem surgir situações perigosas no caso de
não observar as indicações de segurança
presentes nestas instruções.
Se instalar o aparelho por si
mesmo
Só deve efectuar a instalação do aparelho
se tiver experiência na instalação de autorádios e possuir conhecimentos seguros
sobre o sistema eléctrico do veículo. Para o
efeito, observe as instruções de montagem
no fi nal destas instruções.
O que deve ter em atenção!
CUIDADO
No aparelho existe um Laser da
classe 1, que pode lesionar os seus olhos.
Nunca abra o aparelho, nem efectue nele
quaisquer alterações.
Durante o funcionamento
Manipule o aparelho só quando a situa-
•
ção do trânsito o permitir! Pare o veículo num local adequado para manuseamentos mais longos.
Retire ou coloque o painel frontal ape-
•
nas com o veículo parado.
Para proteger a sua audição, regu-
•
le sempre um volume de som médio.
Durante as pausas de silenciamento
fabricado de acordo com
(p. ex. ao mudar de fonte áudio ou de
CD no leitor multi-CD e Travelstore), a
mudança de volume não é audível. Não
aumente o volume durante esta pausa.
•
Regule sempre um volume de som médio, de forma a conseguir ouvir as advertências acústicas (p. ex. da polícia).
Após a utilização
•
Sem o painel frontal, o aparelho não
tem qualquer valor para os ladrões.
Retire sempre o painel frontal quando
abandona o veículo.
•
Transporte o painel frontal de forma a
estar protegido contra choques e a não
sujar os contactos.
Indicações de limpeza
Produtos solventes, de limpeza ou abrasivos, bem como spray para cockpits e produtos de conservação para plásticos podem conter substâncias corrosivas para a
superfície do aparelho.
Para a limpeza do aparelho, utilize apenas
um pano seco ou ligeiramente húmido.
Remoção de aparelhos usados
Não remova o seu aparelho usado jun-
tamente com o lixo doméstico!
Para a remoção do aparelho usado, recorra
por favor aos sistemas de devolução e recolha que estão à sua disposição.
96
Page 97

Fornecimento Telecomando
Fornecimento
Estão incluídos no fornecimento:
1 auto-rádio
1 armação de fi xação
2 ferramentas de desmontagem
1 perno guia
3 cabos de ligação
1 instruções de serviço
1 telecomando manual RC 12H
Equipamento extra
(não incluído no fornecimento)
Utilize apenas os equipamentos extra admitidos pela Blaupunkt.
Telecomando no volante
Com um telecomando no volante, pode
operar as funções básicas do seu auto-rádio confortavelmente e com segurança.
Não é possível ligar e desligar o aparelho
através do telecomando!
Para saber quais o telecomandos que são
compatíveis com o seu auto-rádio, dirija-se
a um revendedor da Blaupunkt ou consulte
a Internet sob www.blaupunkt.com.
Telecomando
O seu auto-rádio está equipado com um telecomando manual RC 12H.
Com o telecomando, pode operar a maioria
das funções confortavelmente e com segurança.
Tenha em atenção que tem de existir uma
ligação visual entre o telecomando e o receptor do telecomando que se encontra no
painel frontal destacável.
Não é possível ligar/desligar o aparelho
através do telecomando.
PORTUGUÊS
Amplifi cador (Amplifi er)
Podem utilizar-se todos os amplifi cadores
Blaupunkt e Velocity.
Leitor multi-CD (Changer)
Podem instalar-se os seguintes leitores
multi-CD da Blaupunkt:
CDC A 03, CDC A 08 e IDC A 09.
97
Page 98

Garantia Painel frontal destacável
Garantia
Concedemos uma garantia relativamente
a todos os produtos comprados na União
Europeia. Para aparelhos comprados fora
da União Europeia, são válidas as condições de garantia apresentadas pelos nossos representantes no respectivo país.
Serviço
Em alguns países, a Blaupunkt disponibiliza
um serviço de reparação e recolha.
Em www.blaupunkt.com, poderá informarse sobre se este serviço está disponível no
seu país.
Caso pretenda recorrer a este serviço, poderá solicitar um serviço de recolha para o
seu aparelho através da Internet.
Painel frontal destacável
Protecção anti-roubo
O seu aparelho está equipado com um painel frontal destacável (Flip Release Panel),
que o protege contra roubo. Sem este painel frontal, o aparelho não tem valor algum
para um ladrão.
Proteja o aparelho contra roubo, levando o
painel frontal sempre consigo ao abandonar o automóvel. Não o deixe no automóvel,
nem mesmo num lugar escondido.
Notas:
•
Não deixe o painel frontal cair ao chão.
•
Não exponha o painel frontal à incidência directa da luz do sol ou outras
fontes de calor.
•
Evite tocar directamente nas superfícies de contacto do painel frontal.
Caso necessário, limpe os contactos
com um pano embebido em álcool de
limpeza e que não largue pêlos.
Retirar o painel frontal
Prima a tecla 1.
쏅
O painel frontal dobra para baixo.
98
Segure o painel frontal no lado direito
쏅
e puxe-o a direito para fora dos encaixes.
Page 99

Painel frontal destacável
Notas:
O aparelho é desligado depois de
•
decorrido um período de tempo
ajustado por si. Para tal, leia o parágrafo "Tempo de desactivação (OFF
TIMER)" neste capítulo.
Na próxima activação, o aparelho tem
•
em consideração a última fonte áudio
escutada.
Existindo um CD no compartimento,
•
este permanece no aparelho.
Colocar o painel frontal
2.
1.
Segure o painel frontal num ângulo
쏅
mais ou menos perpendicular para com
o aparelho. (Consultar a imagem 1.)
Insira o painel frontal na guia, no bordo
쏅
inferior da caixa.
Introduza o painel cuidadosamente nos
쏅
encaixes, até engatar.
Dobre o painel frontal para cima no com-
쏅
partimento e engate-o pressionando ligeiramente. (Consultar a imagem 2.)
Se o aparelho estava ligado no momento
em que se retirou o painel frontal, ele volta a ligar-se automaticamente no modo por
último seleccionado (rádio, CD, leitor multiCD ou AUX) ao voltar a colocar-se o painel
frontal.
Tempo de desactivação
(OFF TIMER)
Depois de abrir o painel frontal, o aparelho
desliga-se num período de tempo ajustável.
Pode ajustar a duração deste período entre
0 e 30 segundos.
Prima a tecla MENU•OK 5.
쏅
Prima as vezes necessárias a tecla
쏅
4, até "OFF TIMER" aparecer
ou
no visor.
Prima a tecla
쏅
Acerte as horas com a tecla
쏅
Uma vez terminado o ajuste,
prima a tecla ESCAPE <.
쏅
4 para abrir o menu.
ou 4.
Função Time-out
O aparelho possui uma função Time-out
(espaço de tempo).
Se, p. ex., premir a tecla MENU•OK 5 e
seleccionar uma opção de menu, o aparelho regressa à posição anterior aprox. 8
segundos após o último accionamento de
tecla. Os ajustes efectuados são guardados
na memória.
PORTUGUÊS
99
Page 100

Ligar/desligar Volume
Ligar/desligar
Há várias possibilidades para ligar e desligar o aparelho:
Ligar/desligar com a tecla de ligar/
desligar
Para ligar, prima a tecla de ligar/desli-
쏅
gar 6.
O aparelho liga-se.
Para desligar, mantenha a tecla de li-
쏅
gar/desligar 6 premida por mais de
2 segundos.
O aparelho desliga-se.
Ligar/desligar através da ignição do
automóvel
Se o aparelho estiver correctamente ligado
à ignição do automóvel, tal como representado nas instruções de montagem, e se não
for desligado com a tecla de ligar/desligar
6, ele liga-se e desliga-se juntamente com
a ignição.
Desligar com o painel frontal destacável
Retire o painel frontal.
쏅
O aparelho desliga-se após o período de
tempo ajustado no menu "OFF TIMER".
Nota:
Quando a ignição está desligada, o aparelho desliga automaticamente passada
uma hora, por forma a proteger a bateria
do automóvel contra uma descarga.
Regular o volume
O volume pode ser regulado em passos de
0 (desligado) a 66 (máximo).
Para aumentar o volume,
rode o regulador 7 para a direita.
쏅
Para baixar o volume,
rode o regulador 7 para a esquerda.
쏅
Regular o volume inicial
O volume inicial pode ser regulado.
Prima a tecla MENU•OK 5.
쏅
Prima as vezes necessárias a tecla
쏅
4, até "ON VOLUME" aparecer
ou
no visor.
Prima a tecla
쏅
de menu.
Regule o volume inicial pretendido com
쏅
a tecla
Por forma a facilitar a regulação, o aparelho
aumenta e reduz o volume conforme a regulação feita.
Se regular "LAST VOL" (ajuste 0 = LAST
VOL), é reactivado o volume escutado no
momento de desactivação.
Nota:
Para proteger a audição, o volume inicial está limitado ao valor "38" no ajuste "LAST VOL". Se o volume antes de
desligar era mais elevado, o valor "38"
é automaticamente ajustado ao ligar.
Desta forma, evita-se um volume involuntária e inesperadamente alto ao ligar
o aparelho.
Uma vez terminado o ajuste,
prima a tecla ESCAPE <.
쏅
4 para abrir a opção
ou 4.
100
 Loading...