

Page 1
Owner's Manual
Instrukcja obsługi
Návod k obsluze
Návod na použitie
Használati útmutató
HR5BR
Home radio with clock and USB/microSD playback
Radioodtwarzacz USB/microSD z zegarem
Domácí rozhlasový přijímač s hodinami a přehráváním z USB/microSD
Domáce rádio s hodinami a možnosťou prehrávania zo zariadení USB a kariet microSD
Otthoni rádió óra funkcióval, illetve USB-/microSD-lejátszással
Page 2

Page 3
HR5BR
IMPORTANT SAFETY INSTRUCTIONS
CAUTION
RIS K OF ELEC TRIC SHOCK
DO NOT O PEN
The m arkin g plate is loca ted at the b ottom o f the app aratu s.
The lightning flash within an equilateral triangle is intended to
alert you to the presence of uninsulated dangerous voltage
within the product's enclosure that may be of sufficient
magnitude to constitute an electric shock to a person or persons.
The exclamation point within an equilateral triangle is intended
to alert you to the presence of important operating and
ENGLISH
1
Page 4

HR5BR
2
Page 5
HR5BR
ENGLISH
3
Page 6
HR5BR
4
Page 7
HR5BR
18.
ENGLISH
NOTICE
This product complies with the radio interference requirements of the
European community.
Your products is designed an manufactured with high quality materials
and components, which can be recycled and reused.
5
Page 8
HR5BR
When this crossed-out wheeled bin symbol is attached to a product it
means that the product is covered by the European Directive 2002/96/EC.
Please inform yourself about the local separate collection system for
electrical and electronic products. Please cat according to your local rules
and do not dispose of your old products with your normal household waste.
Correct disposal of your old product helps to prevent potential negative
consequences for the environment and human health.
Your product contains batteries covered by the European Directive
2006/66/EC, which cannot be dispose with normal household waste. Please
inform yourself about the local rules on separate collection of batteries
because correct disposal helps to prevent negative consequences for the
environmental and human health.
Environmental information
All unnecessary packaging has been omitted. We have tried to make the
packaging easy to separate into three materials: cardboard(box),
polystyrene foam(buffer) and poly ethylene (bags, protective foam sheet).
Your system consists of material which can be recycled and reused if
disassembled by a specialized company. Please observe the local
regulations regarding the disposal of packaging materials, exhausted
batteries and old equipment.
Recording and playback of material might require consent. See Copyright
Act 1956 and The Performer's Protection Acts 1958 to 1972.
6
Page 9
HR5BR
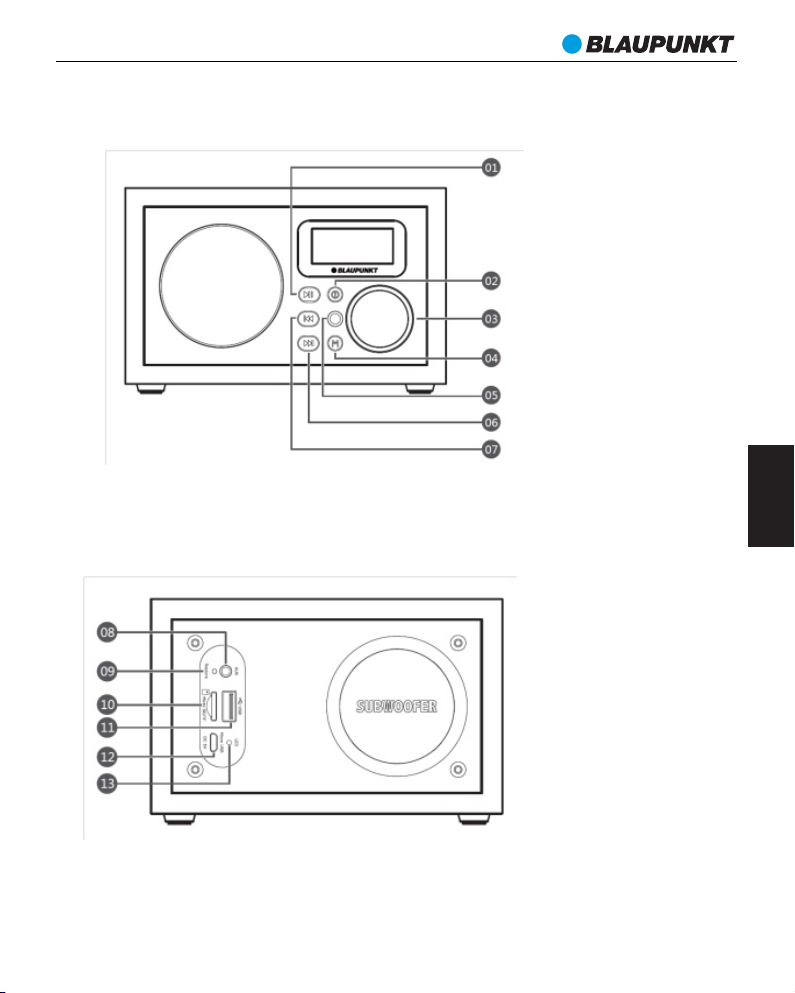
Control locations
01— Play/Pause ke y for play/pa use and m ute fun ction o perat ion.
02— ON/ OFF key for uni t turn on o r off.
03— Volu me knob for volume a djust ment.
04— Mod e key to sw itch the play m ode bet ween cl ock/U SD/mi croSD/FM/ AUX IN mod e.
05— Rem ote control s ensor w indow.
06— Nex t key.
07— Previou s key.
ENGLISH
08— AUX IN jack .
09— Res et
10— MicroSD card s lot.
11— USB p ort.
12— DC 5V p ower jack.
13— Powe r LED ind icator.
7
Page 10
HR5BR
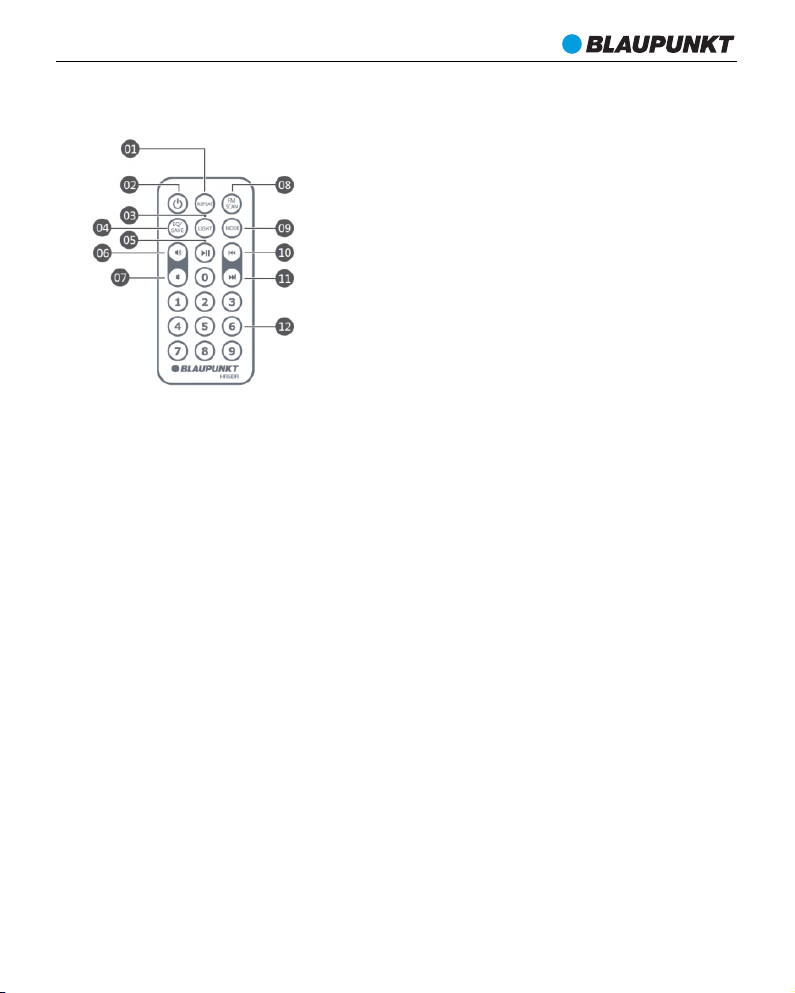
Remote co ntrol
01— Rep eat but ton (Re peat all, ran dom and repea t one).
02— Powe r ON/OF F button.
03— Lig ht button for d isplay backlight br ightness adjus tment.
04— EQ se lecti on butt on(on ly for USB/mi croSD c ard playbac k mode)
05— Play/Pause bu tton.
06— Volu me +.
07— Volu me -.
08— FM auto sca n butto n.
09— Mod e butto n for play source sel ection.
10— Previou s button.
11— Nex t butto n.
12— Dig its but ton (0~9).
Not es:
a. Be fore you u se the re mote contro l, please mak e sure th e CR202 5 battery has install ed insi de
properly accordi ng to the p olari ty indi catio n.
b. Please remov e the power ins ulati on sheet befo re use the remo te control.
c. Please d ispos al the ex haust b atter y in envi ronmental m ethod f riend ly. Plea se reference your
loc al governme nt's re quirement for the deta il.
d. The best op erati on dist ance for remote con trol is withi n 5 meter s witho ut any block. Plea se aim
to th e remote control se nsor on u nit front pan el for op eration.
Uni t insta llmen t and powe r setti ng
Usi ng the s uppli ed USB power cable connect wi th DC ad apter ; and co nnect another termi nal of U SB cable to
the micro USB D C power jack on the back panel of th e unit . Then plug on th e DC adapt er to your househol d
power sou rce. The re d LED power ind icati on will l ight up a fter th e power conne ction s ucces sful.
Press the power but ton in 2 s econd s on the f ront pane l of unit to p ower on/o ff t he unit . Press the powe r
but ton f rom remot e con trol can s tandb y on/ off t he un it. Th e displa y wil l lig ht up after p ower on, a nd th en
you can start other o perat ion.
8
Page 11

HR5BR
Not es:
a. The s uppli ed USB power ca ble inc ludes u niversal US B conne ctor an d micro USB con nector. The univer sal
USB c onnec tor is for DC ada pter co nnect ion, an d the mic ro USB connec tor is fo r DC power USB ja ck
con necti on.
b. Only the s uppli ed power adap ter or sa me rating spe c adapt er is all ow to use for power ope ration.
c. Whe n you pres s off pow er by the power butto n on fron t panel, then t he unit c annot p ower on by remote
control d ue to the p ower is cut off c omple tely. Please p ress th e power butto n on front pane l to power on
the u nit aga in.
Dis play ba ck-light ad justm ent (dimmer )
Press the “ LIG HT” button on re mote co ntrol can adj ust the d ispla y b ack-light b right ness be tween
hig h/mid dle and l ow level.
Time/sl eep set ting
The u nit inc ludes clock time a nd slee p funct ion. Pl ease follow u p below for the o peration.
1. Pow er on the u nit, an d press the “ MODE” but ton on remote c ontrol, or press the “ M” but ton on front
pan el of uni t switch the play mode till the c lock ti me interfa ce show on disp lay. In th e first t ime usi ng this
uni t, the un it will e nter to clock t ime interf ace directly whe n you power on it .
2. Press th e “M” butt on in 3 seconds o n the fro nt pane l of unit t ill the hour digits is flare on displ ay.
3. The n turn th e volume knob to adj ust the d esired hour, a nd shor t press t he “ M” button to confi rm hour
set ting, meanw hile th e digit for min ute is flare on d ispla y.
4. Turn t he volu me knob t o adjus t the min ute setting, and short pres s the “ M” but ton to confir m the set ting.
Then t he unit w ill enter to th e sleep t ime set ting.
5. Turn t he volu me knob t o adjus t the sle ep time b etwee n (off, 15 ,30,6 0,90, 120) . Then shor t press the “M”
but ton to confir m all set ting an d quit th e setti ng mode.
Not es:
a. Du ring US B/SD/ AUX/FM p laying mode , press and hol d the “ 0” digit bu tton from remote co ntrol can che ck
the c urrent time informat ion in 3 se conds ; then resume t o curre nt play mode in terface.
b. If you have set th e sleep t ime on th is unit , the uni t will power of f autom atically when th e sleep count t ime
is on .
Ala rm operatio n
The unit incl udes 2 alarms which can wake up you when the alarm time is being. Pleas e foll ow up below for
the s ettin g operation .
1. Press th e “ M” butto n on front pane l of unit t ill enter to th e clock t ime dis play inter face.
2. Press an d hold th e Play/Pause butt on till t he alar m bell icon flare on displ ay. Turn the v olume k nob can
swi tch the a larm1 to alarm 2.
3. Sh ort press th e “ M” butto n to select the alar m that you want t o set up; t hen tur n the volume knob to
adj ust the a larm ho urs;
4. Sh ort press th e “M” butt on to confirm t he hour s ettin g, and turn the volume knob to ad just th e minut e
set ting.
5. Sh ort press th e “ M” butto n to confirm th e minut e setti ng, then the al arm bel l icon wi ll flare on the d ispla y.
6. Sh ort press th e Play/Pause butt on to switch th e alarm b etwee n on and of f. Then remain th e selec tion.
Aft er 5 seconds, t he disp lay wil l quit from the a larm se tting m ode to cl ock tim e inter face. The rela tive
ala rm bell i con wil l light on display if you se lecte d alarm o n, whic h means t he alar m setti ng is suc cessful.
And t he alar m is work ing now.
7. To set up othe r alarm , pleas e refer to t he above step f or operatio n.
ENGLISH
9
Page 12

HR5BR
Not es:
a. The B uzzer and FM radio ar e allowed to se lect as t he alar m sourc e. If you want to set up the FM radio as
ala rm sour ce, please press th e “ 1” digit button in 3 seconds fro m remote cont rol till the “ ON” show o n
dis play in FM radi o mode; then the cur rent FM ra dio sta tion wi ll set as t he alar m source. To cance l the FM
rad io alar m source, ple ase press the “1” dig it button again ti ll “ OFF ” show o n displ ay. Then the Buzzer will
bec ome the a larm so urce.
b. When the al arm is ri ng up, press any butt on on front pan el or rem ote control c an cancel the a larm so und.
c. On clock time m ode, press an d hold th e Next bu tton on f ront panel ca n turn of f all ala rm sett ing.
d. The durat ion of al arm sou nd is 2 min utes; and the alar m will wa ke up aga in afte r 5 minutes if th ere is no
fur ther opera tion. There wi ll repeat 2 tim es and of f autom atica lly in ca se of nobody in home.
e. When you se t up the al arm, pl ease ma ke sure that yo u have set the cl ock tim e properly.
f. Ple ase mak e sure the DC pow er is remaine d and con necte d with th e unit. O ther wise, the ala rm cannot
wak e up. Plea se doub le chec k the tim e and ala rm sett ing aft er you removed the DC power.
g. The alarm i s workable o n power off mod e(dis play of f), b ut DC power should remai n and con nect with
uni t properly.
FM rad io oper ation
The unit built -in an antenna in side w hich a llows you t o listen th e FM radio s tation. Before lis ten to the r adio,
ple ase try to move the un it next to win dow in order to g et better rad io sign al.
Powe r on the unit, press the “ M” butto n on the fron t pa nel of unit or pres s th e “ MODE” button o n remote
control c an ente r to radio mode .
1. Auto tun e and preset: s hort press t he “ FM SCAN” butt on, or press an d hold “ PLAY/PAUSE” butt on from
remote co ntrol or fron t panel o f unit in 3 s econds, the u nit wil l scan an d save the availabl e stati on
aut omatically. The un it can save up to 50 pres et stat ions.
2. Auto sca n:Press and hol d the “Previous” and ” Nex t” button on fro nt pane l of unit o r remote control ca n
aut o scan th e available s tatio n in upward or downwa rd frequenc y. The unit w ill sto p and play the
available st ation autom atica lly. Press the “ SAVE” button o n remote cont rol can save the current stati on.
3. Ge t a speci fic sta tion: in orde r to get a sp ecifi c frequency stat ion, you can input t he frequenc y directly
by th e digit butto n on remo te control. For example, you wa nt to listen th e radio f requency at “ 104 .3
MHz ”, you ju st need k ey in 1-0 -4-3 by t he digit button of remot e control. Then the un it will s kip and play
the d efine d stati on.
4. Preset s tatio n picki ng up: sh ort pre ss the “ Previous” or “ Next” button on re mote contro l or front pane l
can p ick up th e preset stat ion; Or i nput pr eset statio n numbe r by digi t button on rem ote control for
pic king up. For exampl e, you want to li sten the pres et stat ion num ber 12, please jus t key in 1- 2 by remote
control , then th e related station will b e played.
USB a nd micr oSD card play back operation
Bef ore sta rt the MP3 play back function , plea se make sure the USB or microSD c ard has been ins erted on USB
or m icroS D port of t he uni t rear panel. Also, the MP 3 musi c has b een co pied a nd sto red inside of d evice. The
uni t can sup port up to 32G B capac ity dev ice.
1. Press th e “MOD E” or “ M” butto n enter to the US B or micr oSD card play back mo de, the unit ca n auto de tect
and s tart to play the music af ter sho w the total tra ck's nu mber.
2. Sh ort press th e “ Previous” or “ Next” button can s elect the la st or nex t track ; press h old and r elease the “
Previou s” or “Nex t” button c an fast -forw ard or fa st-rewind t he curr ent playing t rack.
3. Ke y in the relate d numbe r by the di git button on r emote control can f ast pic k up and pl ay the relate d
tra ck.
4. Sh ort press th e “ REPE AT” but ton on remote c ontrol can sw itch th e play mode bet ween re peat al l, repeat
one a nd rand om. Pres s and hol d the “ M” key o n front p anel of unit 3 seconds can get th e same op eration.
5. If y ou want to repe at play a speci fic sec tion of trac k, Press and ho ld the “ REPE AT” but ton 3 sec onds ti ll the
P—A show on d isplay to sel ect the star t point ; then p ress and hold t he “ REPEAT” but ton 3 seconds t ill
dis play show the P--b to s elect the en d point ; The n the uni t will repeat p lay the s elect ed trac k. Press and
hol d the “ REPEAT ” butt on till P---E s howed on disp lay can c ancel a nd quit the specif ic repeat pla ying
fun ction .
6. Du ring th e MP3 pla yback mode, s hort press t he EQ but ton on remote contr ol can ch ange th e equal izer
bet ween NO RMAL/ROCK /POP/ CLASS /JAZZ /BASS .
10
Page 13

HR5BR
Not es:
a. An e xtens ion cab le for USB conn ection pla ying is not rec ommen ded, becaus e that wi ll impa ct the au dio
sig nal transfe r and create no ise out put iss ue.
b. The unit on ly can de tect an d play the musi c when th e USB or mi croSD c ard install ed.
AUX IN /MP3 Li nk oper ation
Usi ng the supplied 3.5m m stere o to 3.5mm audio cable and conne ct the AUX IN j ack on t he rear pane l of uni t
to other player( like MP3 p layer etc.. ). Then the u nit w ill enter to t he AUX IN p layba ck mo de di rectl y. Sel ect
and p lay the music from your pl ayer, the n the sou nd will o utput f rom radio.
Ple ase kindl y note the main control is on your playe r side . The ra dio only can adju st the vol ume, p lay/p ause
fun ction i n AUX IN mode.
Spe cific ation :
Powe r source: DC 5V /1.5A
Out put power: 3 W RMS.
FM freque ncy: 8 7.5~1 08.0MHz.
USB r ating output: 10 0 mA.
Powe r consu mption: 5.5 W
Sta ndby power co nsumption: <0. 7W
Factory d efaul t:
System ti me: 00:00
Time form at: 24h ours.
Sle ep:OF F.
Ala rm dura tion: 2 m inutes
Volu me: 15
( The sp ecifi cation may re vise without pri or noti ce)
Trouble sh ootin g
1. The d isplay cann ot ligh t on.
a. Pl ease ch eck if th e DC power has connected p roper ly.
b. Please p ress and hold t he Power b utton 3 s econds to tur n the uni t on.
c. Please c ontac t the ser vice cente r for support in cas e of the pr oblem remai ns.
2. The radio stat ion sounds not goo d.
a. Pl ease move the u nit nex t to wind ow in order to ge t bette r reception .
b. Please t ry switch to another st ation for lis tenin g.
c. Please c ontac t the ser vice cente r for support in cas e of the pr oblem remai ns.
3. The s ound in U SB or microSD c ard mod e is not good.
a. Pl ease do uble ch eck the USD and microSD ca rd devi ce was inser ted properl y.
b. Please t ry powe r off and p ower on the uni t for playing a gain.
c. Please c ontac t the ser vice cente r for support in cas e of the pr oblem remai ns.
ENGLISH
11
Page 14

HR5BR
12
Page 15
HR5BR
WAŻNE INSTRUKCJE DOTYCZĄCE BEZPIECZEŃSTWA
PRZESTROGA
ZAGR OŻENI E PORAŻ ENIEM
ELE KTRYCZ NYM
NIE OT WIER AĆ
Tabli czka znami onowa zn ajduj e się na sp odzie u rządz enia.
Symbol błyskawicy zakończonej strzałką umieszczonej w trójkącie
równobocznym ostrzega użytkownika przed nieizolowanym
„niebezpiecznym napięciem” w obrębie obudowy urządzenia, które
może osiągnąć wielkość grożącą porażeniem prądem elektr ycznym.
Znak wykrzyknika w trójkącie równobocznym ostrzega użytkownika,
że w tym momencie przedstawione są ważne informacje dotyczące
obsługi i konserwacji sprzętu w dokumentacji, dołączonej do
13
POLISH
Page 16
HR5BR
14
Page 17
HR5BR
POLISH
15
Page 18
HR5BR
16
Page 19
HR5BR
POLISH
17
Page 20
HR5BR
18
Page 21

HR5BR
Położenie elementów sterujących
01— Prz ycisk o dtwar zania/pa uzy/wyci szeni a.
02— Prz ycisk w łącze nia/w yłącz ania ur ządze nia.
03— Pok rętło do regu lacji g łośno ści.
04— Prz ycisk d o przeł ączan ia trybu pra cy — zegar/U SB/mi croUSB/AUX IN.
05— Czu jnik pi lota zd alneg o sterow ania.
06— Prz ycisk k olejn ego utw oru.
07— Prz ycisk p oprze dnieg o utwor u.
POLISH
08— Gni azdo AUX I N.
09— Res et
10— Gni azdo ka rty mi croSD.
11— Por t USB.
12— Wejś cie zas ilani a 5 V prądu st ałego
13— Dio da LED za silan ia.
19
Page 22

HR5BR
Zdalne sterowanie
01— Prz ycisk p owtar zania ( powta rzaj ws zystko, losowo i powta rzaj je den raz ).
02— Prz ycisk w łącza nia i wyłącz ania za silan ia.
03— Prz ycisk L IGHT do r egula cji jasności pod świet lenia .
04— Przyc isk EQ/SAV E wybor u ust awie ń kor ekto ra gr afic znego ( dzia ła tylk o w tr ybi e USB
odt warzania z p amięc i USB/k arty m icroSD).
05— Prz ycisk o dtwar zania/pa uzy.
06— Zwi ększenie gł ośnoś ci.
07— Zmn iejsz enie głośności .
08— Prz ycisk s kanowani a FM.
09— Prz ycisk t rybu pracy do wyboru ź ródła sygna łu.
10— Prz ycisk p oprze dnieg o utwor u.
11— Prz ycisk n astęp nego ut woru.
12— Prz ycisk i numeryczne (0 –9).
Uwagi:
a. Pr zed prz ystąp ienie m do korzystani a z pilot a należ y upewnić się, że za insta lowano w nim ba terię C r2025
z zac howaniem po lary zacji.
b. Należy z djąć folię iz olacy jną przed uż yciem pilot a.
c. Zużyte b ateri e należ y wyrzu cać do pr zezna czonych do te go celu pojem ników. I nform acje na t emat
rec yklingu ba terii m ożna uz yskać w samo rządzie lo kalny m.
d. Zasięg roboczy p ilota zdaln ego ste rowania wynosi 5 m etrów (bez pr zeszk ód międ zy urządze niami ).
Skieru j pilot a na czuj nik zna jdują cy się na p rzedn im pane lu.
Konfigu rowani e oraz wł ączan ie/wy łącza nie urządz enia
Podłącz dostarczony kabel US B do zasila cza sieciowego, a je go dru gi koniec k abla U SB do gniazda mi croUSB
zas ilani a na pan elu tyl nym urządze nia. Na stępn ie podłącz za silac z siec iowy do gniaz dka sie ciowe go. Po
pomyśln ym podł ączeniu na ur ządze niu włą czy się czer wona dioda L ED.
Na ciśnij i p rzy trz yma j pr zez 2 s eku ndy pr zyc isk wł ączeni a/w yłą czen ia n a pa nelu pr zed nim, ab y
włącz yć/wyłączy ć zas ilanie urzą dzeni a. Na ciśnij przy cisk za silania na pilocie, aby włącz yć/w yłączyć
urz ądzen ie. Wyś wietl acz wł ączy się po w łącze niu za silan ia. Mo żna nastę pnie p rzystąpi ć do obsłu gi
urz ądzen ia.
20
Page 23

HR5BR
Uwa gi:
a. Do starc zony kabel USB ma dw ie wtyc zki — uni wersa lną USB i m icroUSB. Un iwersalna w tyczk a USB służy
do po dłącz enia zasilacza s ieciowego, a wtyc zka microUSB do po dłącz enia za silan ia prąd em stał ym do
gni azda w ur ządzeniu.
b. Urządz enie mo żna zas ilać ty lko dos tarczonym razem z n im zasi lacze m lub zas ilaczem o ide ntycz nych
par ametrach znami onowych.
c. Po wyłąc zeniu u rządz enia pr zycis kiem zasil ania na p anelu p rzedn im nie mo żna go ob sługi wać pilotem ,
pon ieważ z asila nie jest całkowicie odłąc zone. Naciś nij pon ownie przy cisk zasilania n a panel u przed nim,
aby w łączyć zas ilani e urząd zenia .
Reg ulacj a podśw ietle nia wyś wietl acza (p rzyci emnie nia)
Nac iśnij przy cisk LIGHT na pilocie, aby dostoso wać poziom jasnoś ci podś wietl enia wy świet lacza ; możn a
wybrać ustaw ienie w ysokie, średni e i niskie.
Ust awieni e czasu /uśpi enia
Urz ądzen ie ma funkcję zegara cz asu r zeczywisteg o i uśpie nia. Postęp uj zg odnie z poniżs zymi instrukc jami,
aby o bsługiwać u rządzenie.
1. Włą cz zasi lanie u rządz enia i na ciska j przycisk MODE n a piloc ie lub pr zycisk M na pa nelu pr zedni m aż do
wyświe tleni a trybu zegara na wyświ etlac zu. Prz y pierwszym użyciu urządzen ia i włąc zeniu zasil ania na
jeg o wyświ etlac zu poja wi się zegar.
2. Na ciśni j i przytrz ymaj pr zez 3 sek undy pr zycisk M na pa nelu pr zedni m, aż zac zną mig ać cyfry godzin .
3. Ob racaj p okręt ło głoś ności , aby ust awić żądaną g odzin ę i krótko nac iśnij p rzycisk M, a by potw ierdzić
ust awienie; zaczn ą migać c yfry m inut.
4. Ob racaj p okręt ło głoś ności , aby ust awić żądane m inuty i krót ko naci śnij pr zycisk M, ab y potwi erdzi ć
ust awienie. Radio odtwa rzacz p rzejd zie do tr ybu ustawi enia uś pieni a.
5. Ob racaj p okręt ło regu lacji g łośno ści, aby usta wić cza s uśpie nia (wy łączo na, 15, 3 0, 60, 90 , 120 minut).
Nac iśnij k rótko p rzycisk M, a by potw ierdz ić wszy stkie usta wieni a i zamkn ąć ten tr yb.
Uwa gi:
a. W trybie odtw arzan ia USB/ SD/AUX IN/FM naci śnij i pr zytr zymaj prz ycisk numer yczny 0 n a piloc ie, aby
spr awdzić bież ącą god zinę (wskazanie prz ez 3 seku ndy); u rządz enie powróc i nastę pnie do b ieżącego
trybu pr acy.
b. Po us tawieniu cz asu uśp ienia u rządz enie wyłąc zy się autom atycznie po o dlicz eniu cz asu uśp ienia .
POLISH
Obs ługa al armu
Ur ząd zen ie o bsługuje 2 alar my z bu dze nie m. Po stę puj zg odn ie z poniżs zymi in str ukc jam i, aby
prz eprowadzi ć ustaw ienie.
1. Na ciśni j i przytrz ymaj pr zycisk M na pa nelu pr zedni m, aż do wy świet lenia z egara .
2. Na ciśni j i przytrz ymaj pr zycisk odt warzania /pauz y, aż na wy świetlaczu zac znie mi gać iko na dzwo nka.
Obróć pokrętło gł ośnoś ci, aby w ybrać alarm od 1 do 2.
3. Na ciśni j krótk o przycisk M , aby wyb rać ala rm, któ ry chcesz us tawić, a nast ępnie o braca j pokrętło
gło śnośc i, aby ustawi ć godzi nę alar mu.
4. Na ciśni j krótk o przycisk M , aby pot wierd zić ust awienie, a na stępn ie obracaj po krętło gło śnośc i, aby
ust awić minuty alar mu.
5. Na ciśni j krótk o przycisk M , aby pot wierd zić ust awienie min ut; na wyświ etlac zu zacz nie mig ać ikona
dzwonk a.
6. Na ciskaj kró tko przyci sk odtwarz ania/ pauzy, aby wł ączyć/wyłąc zyć alarm. N ie naciskaj prz ycisków. Je śli
w cią gu 5 seku nd nie zo stani e wykon ana żad na oper acja, tryb u stawień ala rmu zos tanie a nulow any i
nas tąpi po wrót do wskazani a zegara. Po włącze niu ala rmu upe wnij si ę, że na wy świet laczu w idać ik onę
ala rmu, co oznac za jego p omyślne ustawienie . Alarm d ziała p rawidłowo.
7. Ab y skonf igurować ko lejny alarm , wykonaj pr zedst awione powyżej c zynności .
21
Page 24

HR5BR
Uwa gi:
a. Ja ko źródło alarmu m ożna wy brać ra dio FM i syg nał dźw iękow y. Jeśli c hcesz u stawić radi o FM jako źródł o
ala rmu, na ciśni j i przytrz ymaj pr zez 3 sek undy pr zycisk num eryczny 1 na piloc ie, aż do w yświe tleni a
sym bolu wł ączenia ON w trybie rad ia FM; bieżąc a stacj a radiowa FM zostan ie usta wiona j ako źródło
ala rmu. Aby anul ować ra dio FM jako źródło al armu, n aciśn ij i prz ytrzymaj p onown ie przycis k
num eryczny 1 na piloc ie, aż do w yświe tleni a symbo lu wyłą czeni a OFF. Spowo duje to u stawi enie sygnał u
dźw iękowego ja ko źród ła alar mu.
b. Odtwar zany al arm moż na wyłączyć dowolny m przycisk iem na panel u przed nim lub p iloci e.
c. Gd y jest wy świet lany zegar, na ciśni j i przytrz ymaj pr zycisk nas tępne go utwo ru na panelu przed nim, aby
wyłącz yć wsz ystki e ustaw ienia alarmu.
d. Cz as trwania a larmu w ynosi 2 m inuty ; dźwi ęk będz ie odtw arzan y ponownie za 5 m inut, g dy nie zo stani e
nac iśnię ty żade n przycisk . Alarm zost anie powtór zony 2 razy i wy łączy się automatyc znie, g dy niko go nie
ma w do mu.
e. Przed pr zystąpie niem do u stawi ania al armu na leży up ewnić się, że zegar zost ał popr awnie ustaw iony.
f. Nal eży upe wnić si ę, że zas ilacz s iecio wy jest p odłąc zony do urząd zenia . W innym wy padku a larm ni e
włą czy się. Po odłącz eniu za silac za sieciowe go nale ży sprawdzi ć i ponownie us tawić z egar i alarm.
g. Alarm dział a po wyłą czeni u zasil ania (p rzy wy łączonym wy świet laczu ), ale za silac z sieci owy mus i być cał y
cza s podłą czony do urzą dzeni a.
Obs ługa ra dia FM
Radio ma wbudowaną ant enę do s łucha nia stacj i FM. P rzed przystą pieni em d o sł uchan ia s tacji FM można
ust awić radio w po bliżu o kna, aby uzyskać lep szy odbiór s ygnału radi owego.
Włą cz zasilan ie urządze nia i naci skaj przycisk M na panelu prze dnim lub pr zycis k M ODE na pilocie aż do
wyświe tleni a trybu radi a.
1. Automa tyczne strojeni e i programowanie s tacji : naciś nij kró tko prz ycisk FM SCAN lub na ciśni j i
prz ytrz ymaj przez 3 s ekund y przycisk o dtwarzan ia/pa uzy na piloc ie lub pa nelu pr zedni m, aby rozpoc ząć
aut omatyczne s kanowani e i zapis ywani e stacj i radiowych FM. Urządz enie um ożliw ia zapi sanie
mak symal nie 50 st acji.
2. Automa tyczne skan owanie: nac iśnij i p rzytrzy maj przyci sk popr zedni ego i nas tępne go utwo ru na
pan elu prz ednim l ub pilo cie, aby auto matycznie s kanować do stępn e stacj e w górę lu b w dół pasma.
Urz ądzen ie zatr zyma się i odt worz y automatyc znie do stępn ą stacj ę. Naci śnij pr zycisk SAVE na pilocie,
aby z apisa ć bieżącą stację .
3. Wyw ołani e danej s tacji : aby ustawić s tację o d anej cz ęstotliwo ści, mo żna nac iskać przycis ki
num eryczne na p iloci e. Aby ustawić stację o cz ęstotliwo ści 104 ,3 MHz, n aciśn ij prz ycisk i numer yczne 1 0-4 -3 na pil ocie zdalnego sterow ania. Urządzen ie dost roi się i odtwo rzy tę s tację .
4. Wyb ierani e zapro gramowanyc h stacj i: naci śnij krótk o przycisk p oprze dnieg o lub nas tępne go utworu
na pa nelu pr zedni m lub pil ocie, aby wyb rać zap rogramowa ną stac ję; można też w ybrać stac ję,
nac iskając pr zyciski numer yczne na pil ocie. Aby słu chać za programowanej s tacji n r 12, nac iśnij p rzyciski
num eryczne 1- 2 na pilo cie zdalneg o sterowani a; stac ja zost anie odtworzon a.
Obs ługa od twarz ania z pa mięci U SB/ka rt microSD
Przed przy stąpi eniem do odtwarzan ia MP3 należy spraw dzić, czy p odłąc zono pami ęć USB do por tu USB lub
wło żono kar tę microSD do gniazda z tyłu urządze nia. N a urządze niach pamięci musz ą być skop iowan e plik i
muz yczne MP3. To urządz enie obsługuje p amięc i o pojem ności do 32 GB.
1. Na ciśni j przycisk M ODE lub M , aby prz ełącz yć się w tryb odtwa rzania z pam ięci US B lub kar ty mic roSD.
Urz ądzen ie auto matycznie w ykryje mu zykę i rozpocznie odt warza nie po wyświ etlen iu łącz nej lic zby
pli ków.
2. Na ciśni j krótk o przycisk p oprze dnieg o lub nas tępne go utwo ru, aby w ybrać poprzedn i lub nas tępny
utw ór; nac iśnij i p rzyt rzymaj przyci sk popr zedni ego lub n astęp nego ut woru, a by szyb ko prze wijać u twór
do ty łu lub do p rzodu .
22
Page 25

HR5BR
3. Na ciśni j przycisk i numeryczne na p iloci e, aby sz ybko wy brać i od tworz yć utwór o dan ym nume rze.
4. Na ciśni j krótk o przycisk R EPEAT na pi locie , aby wyb rać tryb pow tarza nia: je dnego u tworu , wszystkich
utw orów lub odtwarz ania lo sowego. Naciśni j i przy trzymaj pr zez 3 sek undy pr zycisk M na pa nelu
prz ednim , aż do uzyskania t ej samej operacj i.
5. Je śli chc esz powtórz yć odt warza nie pew nego fr agmentu utworu, naci śnij i pr zytr zymaj prze z 3 sekun dy
prz ycisk REPE AT aż do wyświet lenia s ymbol u P–A na wyświe tlacz u w celu wy brani a począ tku fra gmentu;
nas tępni e naciś nij i prz ytrz ymaj przez 3 s ekund y przycisk R EPEAT aż do w yświetle nia sym bolu P–b w celu
wybrania końca. U rządz enie bę dzie powtar zać wybran y fragment. N aciśn ij i przytrzymaj przyci sk REPE AT
aż do w yświe tleni a symbo lu P–E na w yświe tlacz u; spowoduj e to anul owanie funk cji pow tarza nia.
6. W tra kcie od twarz ania pl ików MP 3 naciś nij kró tko prz ycisk EQ na pi locie, aby wybra ć ustawieni e
korekto ra graficznego : NORMAL/RO CK/PO P/CLA SS/JA ZZ/BA SS.
Uwa gi:
a. Ni e zalec a się uży wania kabla prz edłuż ającego USB , ponie waż ma to wpływ na jak ość sygnału a udio i
powstaw anie za kłóce ń (szum u).
b. Urządz enie au tomat ycznie odcz yta pliki t ylko po p odłąc zeniu pamię ci USB lu b włoże niu karty m icroSD.
Obs ługa wejści a AUX IN (po łącze nia MP3 )
Podłącz jede n koniec do starczone go kab la stereofonic znego 3,5 m m–3,5 mm do g niazd a AUX IN z na pa nelu
tyl nym urzą dzeni a, a dr ugi koni ec d o od twarz acza zew nętrz nego (np. o dtwar zacza M P3). Tryb pracy
rad ioodt warza cza zmieni się au tomat yczni e na AUX IN. Wyb ierz muzykę w od twarzacz u zewnętrz nym i
rozpocz nij jej o dtwar zanie. Głośnik o dtwor zy muz ykę.
Odt warzacz podłą czony d o wejśc ia AUX IN obsługu je się z a pomocą jego przyciskó w. W trybie AUX IN można
uży wać pok rętła regu lacji g łośności oraz odtwarzan ia/pa uzy.
Dan e techn iczne :
Źródło zasil ania: 5 V, 1,5 A (prą d stały )
Moc w yjściowa: 3 W (RMS)
Czę stotl iwość FM : 87,5~ 108,0 M Hz
Dan e znami onowe inter fejsu U SB: 100 m A
Pobór moc y: 5,5 W
Pobór moc y w tryb ie czuw ania: <0,7 W
POLISH
Fabr yczne u stawi enia do myślne:
Cza s systemowy: 00:00
Format cz asu: 24 g odz.
Uśp ienie : wyłąc zone
Cza s trwania al armu: 2 m inuty
Gło śność : 15
(Wszystkie dan e mogą ul ec zmia nie bez p owiad omienia)
Roz wiązy wanie problemó w
1. Ni e włącz a się wyświe tlacz .
a. Sp rawdź, czy podłą czono p rawidłowo zasilani e prąde m stałym.
b. Naciśn ij i przytrzymaj 3 sek undy przycisk z asila nia, aby włączyć urzą dzeni e.
c. Jeśli problem nie u stąpi , prosi my o kontakt z lo kalny m serwisem .
2. Ni ezado walaj ąca jak ość dźw ięku st acji radiow ej.
a. W cel u uzyskania naj lepszego odbio ru urzą dzeni e należ y postawić w po bliżu o kna.
b. Dostró j się do in nej stacji ra diowej.
c. Jeśli problem nie u stąpi , prosi my o kontakt z lo kalny m serwisem .
23
Page 26

HR5BR
3. Ni ezado walaj ąca jak ość dźw ięku po dczas o dtwar zania z p amięc i USB lub k arty m icroS D.
a. Up ewnij s ię, że pa mięć US B i kart a microSD są do brze po dłącz one/w łożon e.
b. Jeśli problem nad al wyst ępuje, wyłącz i wł ącz zas ilani e radio odtwa rzacz a.
c. Jeśli problem nie u stąpi , prosi my o kontakt z lo kalny m serwisem .
Informacja dla użytkowników o sposobie postępowania
ze zużytym sprzętem elektrycznym i elektronicznym.
Symbol przekreślonego kołowego kontenera na odpady umieszczony na produktach
informuje, że zużytego sprzętu elektrycznego i elektronicznego nie można wyrzucać
wraz z odpadami komunalnymi. Wyrzucając elektrośmieci do kontenera stwarzasz
zagrożenie dla środowiska. Segregując i przekazując do przetworzenia, odzysku,
rec yklingu oraz utylizacji zużyte urządzenia elektr yczne i elektroniczne chronisz
środowisko przed zaniecz yszczeniem i skażeniem, przyczyniasz się do zmniejszenia
stopnia wykorzystania zasobów naturalnych oraz obniżenia kosztów produkcji nowych
urządzeń.
Szczegółowe informacje o najbliższym punkcie zbiórki można uzyskać bezpośrednio od
sprzedawcy lub w firmie Blaupunkt Competence Centre, 2N-Everpol Sp. z o.o., ul.
Puławska 403A, 02-801 Warszawa, tel. +48 22 331 9959, email: info@blaupunkt-audio.pl
24
Page 27

HR5BR
CZECH
25
Page 28

HR5BR
26
Page 29

HR5BR
CZECH
27
Page 30

HR5BR
28
Page 31

HR5BR
CZECH
29
Page 32

HR5BR
30
Page 33

HR5BR
Umístění ovládacích prvků
01— Tla čítko P řehrávání /pauz a pro ovládán í přehr ávání/pau zy a ztišení
02— Tla čítko O N/OFF pro zap nutí a vypnu tí zaří zení
03— Otočný volič p ro nastavení hlasitosti.
04— Tla čítko M ode pro přepí nání re žimu př ehrávání. K d ispoz ici jsou reži my hodiny / USB / M icroS D
/ FM / AUX I N
05— Oké nko sen zoru dálkov ého ovládání
06— Tla čítko D alší
07— Tla čítko P ředchozí
CZECH
08— Kon ektor v nějšího vst upu
09— Res et
10— Slo t pro paměťov é kart y microSD
11— Por t USB.
12— Vstup ste jnosm ěrnéh o napáj ení 5 V DC
13— Ind ikátor nap ájení
31
Page 34

HR5BR
Dálkový ovladač
01— Tla čítko R epeat (Opak ování) (Opa kovat vše, náhodné pře hrávání a opa kovat jednu s kladbu)
02— Tla čítko n apájení
03— Tla čítko L ight (Po dsvíc ení), k terým s e nasta vuje in tenzita pod svíce ní disp leje
04— Tla čítko v ýběru e kvali zace (p ouze pro přeh rávání z USB/ paměť ových k aret mi croSD)
05— Tla čítko p řehrávání /pauz a
06— Zvě tšení hlasitosti
07— Zme nšení h lasitosti
08— Tla čítko a utomatick ého lad ění rozhlas ových s tanic FM
09— Tla čítko M ode (Re žim) pro výběr zdroje přehráván í
10— Tla čítko P ředchozí
11— Tla čítko D alší
12— Čís elná tl ačítk a (0~9)
Pozn ámky:
a. Př ed použ itím dá lkového ovl adače j e do něj nutné správně vlo žit baterii CD20 25 tak, a by byla d održe na
spr ávná polarita.
b. Dříve, než zač nete po užívat dálk ový ovl adač, s ejmět e plastovou i zolační fól ii.
c. Vyb ité baterie l ikvidujte způsobe m, kter ý nezat íží živ otní prostř edí. Podrob né informac e získáte u
mís tních ú řadů.
d. Nejlepší provozní vzd áleno st dálk ového ovlad ače je do 5 m etrů od p řístroje be z překážek . Při pou žití
nas měruj te dálkový ovlad ač k senzoru na p řední s traně p řístroje.
Ins talac e přístroje a n astave ní napá jení
Ke stej nosmě rnému adapté ru přip ojte doda ný n apáje cí kabel USB. Druh ou stra nu kabelu USB připojt e ke
kon ektor u micro USB ste jnosm ěrnéh o napájení na zad ní straně příst roje. Po té stej nosmě rný ada ptér připo jte
k dom ovní sí ťové zásuvce. Po spr ávném p řipoj ení ke zdroji n apáje ní se rozsvít í červený indikátor.
Pří stroj se za píná a vypíná stisknutím a přidrže ním tl ačítk a napájen í na 2 sekundy. S tisknutí m tlač ítka
nap ájení na dá lkovém ovl adači je možné z apnou t či vy pnout poho tovostní r ežim p řístroje. Po zap nutí
nap ájení s e rozsvítí di splej. Poté je možn é začít p řístroj pou žívat .
32
Page 35

HR5BR
Pozn ámky:
a. Do daný napájecí kabel U SB je vyb aven univer zální m konek torem USB a kon ektor em microUSB .
Uni verzá lní kon ektor USB je ur čen pro p řipoj ení stejnosměr ného ad aptéru a konektor microUSB slou ží
pro připojen í ke kone ktoru stejn osměr ného na pájen í na přís troji.
b. K napáje ní přís troje použí vejte p ouze dodaný n apáje cí adaptér ne bo adap tér se st ejnými para metry.
c. Pok ud vypnete n apáje ní pomo cí tlač ítka na p řední m panel u, nelze přís troj za pnout p omocí d álkového
ovl adače, protože je n apáje ní zcela vypnuto. C hcete -li v takovém příp adě pří stroj z novu zapnout,
pou žijte t lačítko napáje ní na pře dním pa nelu.
Úpr ava inte nzity p odsví cení disple je (stm ívač)
Sti skem tla čítka „LIGHT“ (Podsv ícení ) na dá lkovém ovladači je mo žné upra vovat int enzit u po dsvíc ení
dis pleje. K disp ozici j sou vys oké, st řední a nízké nast avení.
Nas tavení č asu/s pánku
Pří stroj je vybaven funkcí čas u a režimem spá nku. Př i použi tí těch to funkcí pos tupuj te násl edovně.
1. Za pněte p řístroj a sti skněte tla čítko „MOD E“ na dál kovém ovlad ači neb o stisk něte tl ačítk o „M“ na př edním
pan elu pří stroje, dok ud se na di splej i nezobrazí h odiny. P ři prvním po užití p řístroje se při za pnutí zobra zí
pří mo rozhraní h odin.
2. St iskněte na 3 s ekund y tlačí tko „M“ n a předn ím pane lu přís troje, doku d nezač nou na di splej i blikat čís lice
hod in.
3. Otáče ním voliče hl asito sti nas tavte požad ovanou hodnotu h odin a po té krát kým sti sknutím tl ačítk a „ M“
hod notu ul ožte. Na disp leji za čnou bl ikat čí slice m inut.
4. Otáče ním voliče hl asito sti upr avte nastavení mi nut a krátký m stisk em tlač ítka „M“ nastav ení pot vrďte.
Pří stroj přejde k nas tavení doby s pánku.
5. Pomocí voliče hla sitosti nas tavte d obu spá nku. K dispoz ici jso u hodno ty vypnuto, 15, 30 , 60, 90, 1 20.
Nak onec krátk ým stis knutím tla čítka „M“ vš echna n astavení po tvrďte a uko nčete režim n astavení.
Pozn ámky:
a. V rež imu pře hrávání USB /SD/AU X/FM lze stis knutím a při držen ím čísl ice „0“ na dál kovém ovlad ači
zob razit na dobu 3 s ekund aktu ální ča s. Poté se na displej zobra zí znov u informace o a ktuál ním rež imu
pře hrávání.
b. Pok ud jste na přístroji nas tavil i čas pro přech od do rež imu spá nku, př ístroj se po up lynut í tohoto času
aut omaticky v ypne.
Použití b udíku
Pří stroj je vyb aven dvěm a budík y, k teré vás probudí , když nastane nastav ený čas. Při nastavování budíků
pos tupuj te následov ně.
1. St isknutím t lačít ka „M“ na předním p anelu p řístroje na d isple ji zobrazte h odiny.
2. St iskněte a př idržt e tlačítko Přehr ávání/pau za , doku d na disp leji ne začne b likat s ymbol z vonečku.
Otáčen ím voliče hla sitos ti je mož né přep ínat mezi bud íkem 1 a bu díkem 2 .
3. Kr átkým stis kem tla čítka „M“ vyber te budík, který chce te nast avit. Po té otáč ením voliče h lasit osti up ravte
nas tavení hodi n budík u.
4. Kr átkým stis kem tla čítka „M“ potvr ďte nas tavení hodi n a otáče ním voliče hlasi tosti uprav te nast avení
min ut.
5. Kr átkým stis kem tla čítka „M“ nasta vení minut po tvrďt e. Na displeji zač ne blik at symb ol zvonečk u.
6. Bu dík se za píná a vy píná krátk ým stis knutím tla čítka přeh rávání/pa uzy. Výb ěr zůstane nastaven. Z a 5
sek und z dis pleje z mizí režim nastavení b udíku a z obrazí se roz hraní hodin. Pokud jst e alarm z apnul i, na
dis pleji s e zobrazí odp ovída jící sy mbol zvone čku, který signa lizuj e úspěš nou akt ivaci b udíku. Nyní je
bud ík funk ční.
7. Ch cete-li na stavit druh ý budík , zopak ujte vý še uvedené kroky.
CZECH
33
Page 36

HR5BR
Pozn ámky:
a. Ja ko zdroj zvuku budíku j e možné z volit b udík a rá dio FM. Po kud chcete ja ko zdroj zvu ku budí ku použ ít
rád io FM, přidrž te na 3 sek undy tl ačítk o „1“ na dá lkovém ovla dači, d okud se v režim u přehr ávání rádia FM
nez obrazí na dis pleji t ext „O N“. Poté se bud e jako zdroj zvuku budí ku použ ívat rádio FM. Chce te-li zruš it
nas tavení rádi a FM jako zdroje zvu ku budí ku, přidržte sti sknuté tlačítko „1“, dokud se n e displ eji
nez obrazí „OF F“. Poté s e zdrojem zv uku bud íku sta ne bzučák.
b. Když nas tane ča s buzení, lze z vuk budíku ztiš it stis knutí m libovolného tl ačítk a na před ním pan elu neb o
na dá lkovém ovla dači.
c. Všechna n astavení bu díků je m ožné vy pnout v režimu zobraze ní hodi n stisk nutím t lačít ka Další na
pře dním pa nelu.
d. Budík zní po do bu 2 minu t. Nebu de-li proveden a žádná č innos t, znovu zazn í za 5 minu t. Tento pos tup se
zop akuje d vakrá t a poté se autom atick y vypne pro př ípad, kdy nik do není d oma.
e. Při použití b udíku j e nutné s právně nast avit ho diny.
f. Ověřte, že je př ístro j připojen ke stejnosměrn ému nap ájecí mu zdroji. V opa čném př ípadě b udík ne zazní .
Pokud jst e dříve odpoj ili ste jnosm ěrné na pájen í, po jeh o obnovení ne zapom eňte zn ovu zkontro lovat
nas tavení času a b udíku .
g. Budík je f unkčn í i v režim u vypnu tí napá jení (d isple j nesví tí), al e příst roj musí zůst at přip ojen ke zdroj i
ste jnosm ěrnéh o napáj ení.
Poslech rozhl asovéh o vysíl ání
Vest avěná anté na přístr oje um ožňuj e poslech rozh lasového vysílání FM. Před pos leche m rozh lasového
vys ílání p řenes te přís troj do blízk osti ok na, abyste získali si lnějš í rozhlasov ý signá l.
Rež im poslechu ro zhlas ového vy sílán í j e po zapnutí příst roje možné aktivovat stisknutím tlačí tka „ M“ na
pře dním pa nelu ne bo stis knutí m tlačí tka „MODE “ na dálk ovém ovl adači .
1. Automa tické la dění a ul ožení s tanic d o pamět i: Krátce sti skněte tla čítko „FM SCAN“ nebo st iskně te a na
3 sek undy př idržt e tlačí tko „PLAY/PAUSE“ na dá lkovém ovla dači či p řední m panel u příst roje. Příst roj
zah ájí lad ění a automat icky uloží n alezené roz hlasové sta nice. Do pamě ti přís troje j e možné uloži t
nej výše 50 r ozhlasových stanic .
2. Automa tické la dění: S tiskněte a p řidrž te tlač ítko „Před chozí “ a „Dalš í“ na pře dním pa nelu přístroje nebo
na dá lkovém ovla dači. Z ahájí s e automatic ké vyhledávání d alší do stupn é stani ce ve vzestup ném neb o
ses tupné m směru. Přístroj se aut omati cky zas taví, j akmile je na lezena dost upná st anice, a souč asně
zač ne její p řehrávání . Stisk nutím tlač ítka „SAVE“ na dál kovém ovlad ači je možné ak tuáln ě nalad ěnou
sta nici ul ožit.
3. Na laděn í konkrétní s tanic e: Chcete-li nal adit st anici n a konkrétn í frekvenci , můžet e frekvenci z adat
pří mo pomo cí číse lných tlačí tek na dálkov ém ovladači . Pokud chcet e napří klad po slouc hat sta nici na
frekvenci „104,3 MHz “, s tačí po mocí čí selných tla čítek n a dálkovém ov ladač i zadat 1-0-4 -3. Pří stroj p oté
pře jde pří mo na požadov anou frekvenci a z ačne př ehrávání.
4. Výb ěr předvole né stanice: K rátký m stisk em tlač ítka „Předcho zí“ neb o „Dalš í“ na dál kovém ov ladač i
neb o předn ím pane lu vybe rte předvo lenou s tanici. Případ ně lze číslo př edvol ené sta nice vy brat stiskem
čís elnéh o tlačí tka na dálkovém ov ladač i. Pokud c hcete n apřík lad pos louch at před volenou stanic i číslo
12, s tačí po mocí dá lkového ovl adače z adat 1-2. Poté začn e přehr ávání této st anice.
Pře hráván í ze zaří zení US B a paměť ové kar ty SD
Pře d zahájen ím pře hrává ní sou borů MP3 zkon trolujte, zda je k portu USB připoj eno paměť ové za řízen í USB,
neb o zda je d o slotu pro paměť ové k arty na zadním pane lu přístroje v ložena k arta micr oSD. Na paměť ové
zař ízení mus í být rovně ž zkopí rována hudba ve form átu MP3. V přístroji lze použ ívat pamě ťová zařízen í s
kapaci tou až 32 G B.
34
Page 37

HR5BR
1. St isknutím t lačít ka „MO DE“ neb o tlačítka „M“ př ejděte do rež imu pře hrávání z USB n ebo karty m icroSD.
Pří stroj zahájí pře hrávání hud by poté, co automat icky zjist í celkový počet st op na pam ěťovém zaří zení.
2. Kr átkým stis knutí m tlačí tka „Před chozí“ nebo „Další“ j e možné v ybrat p ředch ozí nebo násl edují cí stop u.
Sti sknutím a př idrže ním tla čítek „Pře dchoz í“ nebo „Dal ší“ je mo žné akt uálně přehrávanou st opou
procházet rychle vpře d nebo vz ad.
3. Ch cete-li rychl e přehrávat v ybran ou stop u, je možné výb ěr provést čí selným tlačítk em na dál kovém
ovl adači .
4. Kr átkým stis kem tla čítka „REPEAT“ na d álkov ém ovladači j e možné n astavit opa kovan é přehr ávání. K
dis pozic i jsou nastav ení vše, opak ovat jednu sk ladbu a náho dné pře hrávání. St ejné na stavení lze p rovést
sti sknutím a př idrže ním tla čítka „M“ na před ním pan elu na 3 se kundy.
5. Pokud ch cete znovu př ehrát k onkré tní čás t stopy, stisk něte a na 3 seku ndy při držte t lačít ko „REPEAT“,
dok ud se na di splej i nezob razí P-- A pro výb ěr počá teční ho bodu; poté s tiskněte a n a 3 sekun dy přid ržte
tla čítko „REP EAT“, dokud se na dis pleji n ezobrazí P--b pro v ýběr ko ncového bod u. Přís troj bude poté
opa kovaně přeh rávat v ybran ou část s topy. Chcete -li zrušit z adaný režim o pakování př ehráv ání, stiskněte
a při držte t lačít ko „REPEAT“, dokud se na d isple ji nezobraz í P---E.
6. V rež imu pře hrávání sou borů MP 3 lze krá tkým st iskem t lačít ka EQ na dálko vém ovladač i změni t nastavení
ekvali zéru. K dispo zici jsou nastavení NO RMAL / ROCK / POP / CLAS S / JAZZ / BA SS (Nor mální / rock / po p /
klasik a / jazz / bass) .
Pozn ámky:
a. Použit í prodlužov acího k abelu U SB pro př ehrávání se n edopo ručuj e, proto že může negat ivně ov livňovat
pře nos zvukového si gnálu a m ůže způ sobit š um v reproduk ovaném zvuku.
b. Přístroj je schop en detekova t a přehrávat h udbu po uze v případě , že je při pojen o paměť ové zařízen í USB
neb o je vložena karta microSD.
Použití režim u AUX IN/M P3 Link
Pro p řipoj ení vně jšího přehrávače (na př. přehrá vače MP 3 apod.) k př ístroji použijte do daný 3,5mm
ste reofon ní au diokabel, kt erý s e při pojuj e ke kone ktoru AUX IN na zadn í straně přístroje . Přístro j se přep ne
pří mo do režimu p řehrávání z vnější ho za řízení (AU X IN) . Vybe rte n a svém př ehrávači hudbu , kterou chce te
pos louch at, spu sťte její pře hrávání a zv uk bude repro dukován z rád ia.
Upo zorňujeme , že v to mto přípa dě se hlavní f unkce přehrává ní ovláda jí po mocí připo jeného př ehrávače. V
režimu přehráv ání z v nějšího zařízení (AUX IN) je možn é na rádi u pouze nas tavit hlasitost a přehr ávání či
pau zu.
Techn ické údaje:
Ele ktric ké napá jení: 5 V DC / 1,5 A
Výk on: 3 W RMS
Frek vence FM: 87, 5~108 ,0 MHz
Jme novité para metry por tu USB: 100 mA
Pří kon: 5, 5 W
Pří kon v poh otovostní m režimu: <0, 7 W
Vých ozí tovární n astave ní:
Systémo vý čas: 0 0:00
Formát ča su: 24h odinový
Rež im spán ku: Vypn uto
Dob a trvání bud íku: 2 mi nuty
Hla sitos t: 15
(Techni cké úda je se moh ou změn it bez př edchozího u pozor nění. )
CZECH
35
Page 38

HR5BR
Řeš ení pot íží
1. Di splej n efung uje.
a. Zk ontrolujt e správné při pojen í zdroje stej nosmě rného n apáje ní.
b. Stisknutí m a přidr žením t ohoto tlačí tka na 3 sekun dy zapn ěte pří stroj.
c. Jestliže problé m přetr vává, o braťt e se na ser visní stře disko.
2. Kvalit a zvuku rozh lasového vysílání je nízk á.
a. Lepšíh o příjm u dosáh nete př emíst ěním př ístroje do bl ízkos ti okna.
b. Pok uste se k poslechu n aladi t jinou s tanici.
c. Jestliže problé m přetr vává, o braťt e se na ser visní stře disko.
3. Zv uk přehrává ny z paměťového zařízení neb o kart y micro SD je nek valit ní.
a. Zk ontrolujt e, zda je správ ně připojeno pam ěťové zaříz ení USB n ebo kar ta microSD.
b. Pok uste se přístroj v ypnou t a poté opět zap nout.
c. Jestliže problé m přetr vává, o braťt e se na ser visní stře disko.
36
Page 39

HR5BR
SLOVAK
37
Page 40

HR5BR
38
Page 41

HR5BR
SLOVAK
39
Page 42

HR5BR
40
Page 43

HR5BR
SLOVAK
41
Page 44

HR5BR
42
Page 45

HR5BR
Umiestnenie ovládacích prvkov
01— Tla čidlo s pustenia a po zastaveni a prehrávan ia a stlm enia.
02— Tla čidlo n a zapnutie a vypnu tie jed notky.
03— Kol iesko n astavenia h lasit osti.
04— Tla čidlo n a prepínani e medzi r ežimami zob razen ia času a prehr ávania zo zar iaden ia USB, k arty
mic roSD, rá dia a vstupu AUX IN.
05— Okienk o pre snímač di aľkov ého ovládač a.
06— Tla čidlo p rechodu na na sledu júcu po ložku.
07— Tla čidlo p rechodu na pr edchá dzajúcu položk u.
SLOVAK
08— Kon ektor AU X IN.
09— Obn ovenie pôvodných nastavení
10— Zás uvka pre kar tu microSD.
11— Por t USB.
12— Kon ektor n apájania jedno smerným nap ätím 5 V.
13— Ind ikátor LED n apája nia.
43
Page 46

HR5BR
Diaľkový ovládač
01— Tla čidlo R EPEAT (op akovanie vš etkýc h polož iek, pr ehrávanie v n áhodn om pora dí a opakovan ie
jed nej pol ožky) .
02— Vyp ínač na pájan ia.
03— Tla čidlo L IGHT na nastavenie jas u podsv ieten ia displeja.
04— Tla čidlo E Q (len v režime p rehrávani a zo zari adeni a USB alebo karty m icroS D)
05— Tla čidlo s pustenia a po zastaveni a prehrávan ia.
06— Zvý šenie h lasitosti.
07— Zní ženie h lasitosti .
08— Tla čidlo n a automatic ké vyhľadávani e staní c FM.
09— Tla čidlo M ODE na vý ber zdroja pr ehrávania .
10— Tla čidlo p rechodu na pr edchá dzajúcu položk u.
11— Tla čidlo p rechodu na na sledu júcu po ložku.
12— Čís licové kláv esy (0 až 9 ).
Pozn ámky:
a. Pred pou žitím d iaľkového o vláda ča skontrol ujte, či v ňom je v ložená baté ria typu CR2 025 tak , ako je to
vyznač ené v sch éme správne j orien tácie b atérie z hľadisk a jej pol arity.
b. Pre d použitím diaľk ového ovlád ača z neh o odstráňte i zolač ný obal.
c. Vyb itú batériu z likviduj te spôs obom še trným voči ži votnému pro strediu. Podrobnosti náj dete v
pož iadavkách mies tnych úrado v zodpoveda júcich za ochran u životného p rostredia .
d. Optimálna v zdialenos ť pre pou žívan ie diaľ kového ovládača je do 5 me trov bez akýc hkoľv ek prek ážok v
drá he lúča . Pri používa ní mier te na snímač d iaľkového o vláda ča na prednom p aneli j ednot ky.
Inš talác ia jedn otky a na staven ie napá jania
Pripojte dodávaný napája cí kábel USB k adapt éru jednosmer ného napät ia a druhý konie c kábl a USB pripo jte
k napá jacie mu ko nekto ru micro USB pre jedn osmer né napät ie na zadnom paneli j ednot ky. Potom prip ojte
ada ptér je dnosm ernéh o napät ia k zdro ju napájan ia v domácno sti. Po ú spešn om prip ojení k zdro ju napá jania
sa in dikátor LED napájan ia rozsviet i na červeno.
Stl ačení m vypín ača nap ájani a na prednom pa neli na 2 sekun dy môžete zap núť ale bo vypn úť napá janie
jedno tky. St lače ním v ypínača na pája nia na di aľko vom o vlád ači m ôžet e jed notk u pre pnúť do a z
poh otovostné ho reži mu. Po zapnut í napáj ania sa displej rozsvieti a j ednot ku môže te zača ť použí vať na
ďal šie úče ly.
44
Page 47

HR5BR
Pozn ámky:
a. Do dávaný napá jací kábel U SB obsa huje un iverz álny konekt or USB a ko nektor micr o USB. Univer zálny
kon ektor U SB slúži na pripoj enie ad aptéra jedn osmer ného na pätia a k onekt or micro USB je u rčený n a
pri pojen ie napá jacie ho kone ktora USB pre j ednos merné n apäti e.
b. Na účely n apája nia je povole né použ ívať ib a dodávaný ad aptér napáj ania al ebo ada ptér s rovnak ým
men ovitý m výkon om.
c. Po vypnu tí napá jania v ypína čom nap ájani a na pred nom paneli sa jedn otka ne dá zapn úť pomo cou
dia ľkového ovl ádača , pretože napájanie je ú plne od pojené. Ak ch cete znova za pnúť na pájan ie jedn otky,
stl ačte vy pínač n apája nia na prednom pan eli.
Nas taveni e podsv ieten ia disp leja (s tlmen ie jasu )
Stl ačení m tlačidla LIGH T na dia ľkovom ovládač i môžet e nastaviť j as podsvie tenia disp leja na vysokú, stre dnú
a níz ku úroveň.
Nas taveni e času a ul oženi a na spán ok
Jed notka obsahuj e funkcie h odín a u loženia na spán ok. Ak ich c hcete p oužív ať, prečít ajte si pok yny uve dené
niž šie.
1. Za pnite n apájanie jedno tky a stl áčaní m tlači dla MOD E na diaľ kovom ovlád ači ale bo tlač idla M na
prednom pane li jedn otky pr epína jte režimy, ký m sa na dis pleji n ezobrazí ro zhranie čas u hodín . Pri prvom
pou žití te jto jednotk y sa jednotk a priamo pre pne na rozhra nie čas u hodín, keď zapne te jej napája nie.
2. St lačte t lačidlo M na prednom pan eli na 3 se kundy, k ým číslice h odiny na disp leji ne začnú b likať.
3. Potom ot áčaní m kolieska nastavenia hla sitos ti nast avte pož adova nú hodi nu a krát kym stlače ním tla čidla
M pot vrďte n astavenie h odiny. N a displ eji medzitým zač nú blik ať číslice m inút.
4. Otáča ním kol ieska nast avenia hlas itost i potom nasta vte min úty a krá tkym stlač ením tl ačidl a M potvr ďte
svoje nastavenie. Jednotk a potom p rejde k n astavovaniu ulo ženia n a spáno k.
5. Otáča ním kol ieska nast avenia hlas itost i nastavte ho dnotu p re čas uložen ia na spá nok (vy pnuté, 15, 30 ,
60, 9 0, 120) . Krátk ym stla čením t lačid la M poto m potvr ďte všetky nasta venia a ukončite režim
nas tavova nia.
Pozn ámky:
a. V rež ime prehráv ania USB/SD/AUX /FM môžete sk ontrolovať aktuálny čas ta k, že stlačí te a podr žíte kl áves
0 na di aľkovom ovl ádači . Aktuá lny čas sa zobr azí na 3 sekundy a pot om sa znova zob razí rozhra nie režimu
prehráv ania.
b. Ak máte v jednotke na stavený čas ulože nia na sp ánok, n apája nie jed notky sa automat icky v ypne po
dos iahnu tí nast aveného čas u.
Používanie bu díka
Jed notka posk ytuje 2 budí ky, ktor é vás môž u zobudiť v nastavenom č ase bud enia. Pokyny na ic h nasta venie a
pou žívan ie nájd ete nižšie.
1. St láčaj te tlačidlo M na prednom p aneli j ednot ky, kým n eprejdete d o rozhrania z obrazovania času hod ín.
2. St lačte t lačidlo spustenia a pozastave nia prehrávania a podr žte ho st lačen é, kým sa n a displ eji nerozbl iká
iko na budí ka. Otáčaním ko liesk a nasta venia hlasitosti môž ete prepína ť medzi b udíkmi č. 1 až č . 2.
3. Kr átkym stla čením t lačidla M vyberte bud ík, ktorý chcet e nastaviť, a p otom ot áčaní m kolie ska nas tavenia
hla sitos ti nastavte h odinu b udíka.
4. Kr átkym stla čením t lačidla M potvrď te nast avenie hodi ny a otáčaním k olies ka hlasito sti nas tavte minút y
bud íka.
5. Kr átkym stla čením t lačidla M potvrď te nast avenie minú t. Na dis pleji s a rozbliká ikona b udíka.
6. Kr átkym stla čením t lačidla spustenia a pozastave nia prehrávania môžete prepínať med zi zapn utím a
vypnut ím budí ka. Potom chvíľu počkajte. Po uplynut í 5 sekún d sa režim nastavovania budíka ukonč í a
zob razí sa rozhranie času h odín. A k ste vyb rali zapnutie bu díka, i kona pr ísluš ného na staveného budí ka
bud e sviet iť na dis pleji , čo znam ená, že budík j e úspeš ne nast avený a bude zvoniť.
7. Ak c hcete nasta viť dru hý budík, postup ujte po dľa kro kov uvedených vyššie.
SLOVAK
45
Page 48

HR5BR
Pozn ámky:
a. Ak o zdroj budík a je možné vyb rať bzu čiak a rádio FM . Ak chcete ako z droj budíka nast aviť rá dio FM, na 3
sek undy st lačte k láves 1 n a diaľkovom ovládači , kým sa na d isple ji v reži me rádia FM nezobra zí hlás enie
ON, k toré naznač uje, že ako zdr oj budíka je nastavená aktu álna st anica r ádia FM. Ak chc ete zrušiť rá dio FM
ako z droj budíka, zno vu stla čte klá ves 1, ký m sa na dis pleji n ezobrazí hl áseni e OFF. Zdroj om budí ka sa tak
sta ne bzuč iak.
b. Keď sa bud ík rozoz nie, st lačen ím ľubovoľn ého tla čidla n a prednom pan eli ale bo na dia ľkovom ovlá dači
môžete je ho zvuk vypnúť.
c. V režime ča su hodí n môžete vypnúť na stavenie bu díka stlač ením a po držan ím tlač idla pr echod u na
nas leduj úcu pol ožku na p rednom pane li.
d. Zvuk bud íka znie 2 min úty a ak ne vykonáte ž iadnu ďalšiu akc iu, budík sa po 5 m inúta ch znov a rozozn ie.
Toto sa zo pakuj e dvakrát a potom sa b udík au tomat icky vypne p re prípad, že n ikto nie je dom a.
e. Pri nast avovan í budík a skontrol ujte, či máte správ ne nast avené hodiny.
f. Zab ezpeč te, aby sa napá janie j ednos merným napätím n eprerušil o a zosta lo prip ojené k j ednot ke. V
opa čnom pr ípade s a budík n emôže spust iť. Po odpoje ní napá jania j ednos merným napä tím pozorne
sko ntrolujte n astavenie č asu a bud íkov.
g. Budík je f unkčn ý aj v režime vypnut ia napá jania ( vypnu tý displej ), ale na pájan ie jednosmerným napä tím
mus í zosta ť zachované a r iadne p ripoj ené k jed notke.
Používa nie rádia FM
Vo v nútri jednotky je vstav aná antén a, ktorá vám umož ňuje počúvať v ysiel anie na s tanic iach rádi a FM. Pred
poč úvaní m rádia sa pokúste p resunúť jed notku k o knu, aby sa zlepši l príjem signálu.
Zap nite napájan ie jedno tky a stla čením tl ačidl a M na pre dnom paneli ale bo tlač idla MOD E na diaľk ovom
ovl ádači m ôžete pr ejsť do režimu rádia.
1. Automa tické la denie a p redna staven ie: Krátko s tlačte tlač idlo FM SCAN alebo n a 3 sekun dy stla čte a
pod ržte st lačen é tlači dlo spu stenia a poza stavenia pr ehrávania n a diaľk ovom ovláda či aleb o na prednom
pan eli jed notky. J ednot ka automat icky vyhľa dá a ulož í dostu pné sta nice. V jednot ke je mož né uložiť až 50
prednastavených stan íc.
2. Automa tické v yhľad ávanie Stl ačení m a podrž aním tl ačidl a prechodu na predchád zajúc u polož ku
ale bo tlač idla precho du na nas leduj úcu pol ožku na p rednom pane li jedn otky alebo n a diaľk ovom
ovl ádači m ôžete au tomat icky vyhľa dať dos tupnú s tanic u s nižšo u alebo v yššou f rekvenciou. Jednot ka sa
aut omaticky zasta ví a prehráva v ysiel anie do stupn ej stan ice. Stlače ním tla čidla S AVE na diaľkovom
ovl ádači m ôže aktuáln u stani cu uložiť.
3. Sp usten ie konk rétnej stan ice: Ak chcete preh rávať v ysielanie stan ice s určitou k onkré tnou fr ekven ciou,
môžete tú to frek venciu priamo za dať pom ocou číseln ých klá vesov na diaľ kovom ovlád ači. Ak n aprík lad
chc ete naladiť n a stani cu vysiela júcu na f rekvencii 1 04,3 MH z, stačí pos tupne s tlači ť klávesy 1-0-4- 3 na
dia ľkovom ovlá dači. J ednot ka prej de na def inovanú sta nicu a za čne pre hrávať jej vysielanie.
4. Výb er prednast avenej s tanic e: Predn astavenú stani cu môžete vyb rať krátky m stláč aním tl ačidl a
prechodu na predch ádzaj úcu pol ožku al ebo tla čidla p rechodu na na sledu júcu po ložku n a diaľk ovom
ovl ádači a lebo na predn om pane li, prí padne z adaní m čísla p rednastav enej stanice pomocou č íseln ej
klávesnice n a diaľk ovom ovláda či. Ak na príklad ch cete počúva ť prednastavenú stan icu č. 12 , stačí s tlači ť
klávesy 1-2 na d iaľko vom ovládač i a prísl ušná st anica s a začne p rehrávať.
Používa nie zariade ní USB a ka riet mi croSD
Pred spustením fu nkcie preh rávania zvu ku vo form áte M P3 skont rolujte, či zaria denie USB a ka rta micro SD
bol i za sunuté do portu U SB a lebo microSD na zadno m pa neli jedn otky. Overte aj to, či do z ariad enia bola
sko pírovaná a ul ožená hudba v o formáte MP3 . Jedno tka dokáže p odpor ovať zariadeni a s kapac itou do 3 2 GB.
46
Page 49

HR5BR
1. St láčan ím tlač idla MO DE aleb o M prejdite do režimu prehráv ania zo zaria denia U SB aleb o kart y micro SD.
Jed notka dokáže hu dbu automat icky zisti ť a po zobrazen í celkového p očtu sk ladie b ju začn e prehr ávať.
2. Kr átkym stla čením t lačidla pre chodu n a predchádzajú cu položku alebo t lačid la prechodu n a
nas leduj úcu pol ožku môžete v ybrať p redchádzajúc u alebo n asledujúcu skladb u. Stlačení m, podr žaním a
pus tením t ýchto tlači diel mô žete rý chlo prechá dzať do predu a lebo dozadu z a ktuál ne preh rávanej
skladb y.
3. Za daním s úvisi aceho čísla pomo cou číselne j kláve snice n a diaľk ovom ovláda či môžete rýchlo v ybrať a
prehrať p ríslu šnú skladb u.
4. Kr átkym stlá čaním t lačidla REPEAT na di aľkovom ovl ádači m ôžete prepí nať režim pre hrávania na
opa kovanie vše tkých s kladieb, opako vanie jednej skladby a preh rávanie v náh odnom p oradí . Tie i sté
mož nosti b udete mať k dis pozíc ii aj po st lačen í a podrž aní tla čidla M n a prednom pan eli na 3 se kundy.
5. Ak c hcete opako vane prehrá vať kon krétn u časť sk ladby, n a 3 sekun dy stla čte a pod ržte tl ačidl o REPEAT,
kým sa na di splej i nezobrazí v ýzva P—A na vý ber poč iatoč ného bodu. Potom na 3 s ekund y stlač te a
pod ržte tl ačidl o REPEAT, ký m sa na dis pleji n ezobrazí výzva P--b na výber kon cového bodu . Jedno tka
pot om bude o pakovane pr ehrávať vyb ratú sk ladbu. Stlačením a po držan ím tlač idla RE PEAT, kým sa n a
dis pleji n ezobrazí výzva P---E, môž ete zrušiť a uk ončiť k onkrétne o pakované pr ehrávanie.
6. Kr átkym stla čením t lačidla EQ na diaľ kovom ovlád ači v režime pr ehrávania M P3 môžete pre pínať m edzi
režimami ekv alizé ra NORMAL/R OCK/P OP/CL ASS/J AZZ/B ASS.
Pozn ámky:
a. Prehrávani e pri pri pojen í zaria denia U SB s použ itím pr edlžovaci eho kábla sa n eodpo rúča, p retože t o má
vpl yv na pre nos zvukového si gnálu s pôsob uje to problé my so šum om na výs tupe.
b. Jednot ka dok áže zistiť a pr ehrať hudbu iba v pr ípade n ainšt alovania za riade nia USB a lebo kart y microSD.
Prevádzka v rež ime AUX IN / M P3 Link
Pomocou dodá vanéh o ste reofónneh o zv ukového kábla s 3,5 mm k onekt ormi prepo jte kone ktor AUX IN na
zad nom paneli jednot ky k druhé mu prehrávaču (ako je napr íklad prehrávač MP3 atď .). Jednotk a priam o
prejde do režim u prehráv ania AUX IN. Vy berte hu dbu v preh rávači a prehr ávajte ju . Výst up zvuku bu de ce z
rád io.
Upo zorňujeme , že hlavné funkci e prehrávan ia ovlá date prostredníctvom prehrá vača. Po mocou r ádia mô žete
v režime AUX IN iba n astavovať h lasit osť a spú šťať a pozast avovať preh rávanie.
Špe cifik ácie:
Zdroj nap ájani a: Jedn osmer ný prúd (5 V / 1,5 A)
Výstupný výk on: 3 W RMS.
FM frekve ncia: 8 7,5 ~ 108 ,0 MHz
Men ovitý v ýkon výstu pu USB: 1 00 mA.
Spo treba energ ie: 5,5 W
Spo treba v pohotovostno m režime: < 0,7 W
SLOVAK
Výrobné n astave nia:
Systémo vý čas: 0 0 00
Formát ča su: 24- hodinový.
Ulo ženie na spán ok: VYPNUTÉ .
Trvanie b udíka: 2 min úty
Hla sitos ť: 15
(Šp ecifi kácie môžu byť zre vidované be z predc hádza júceho upoz ornen ia)
47
Page 50

HR5BR
Rie šenie p roblé mov
1. Di splej s a nemôže rozsvietiť.
a. Sk ontrolujt e, či je zdroj je dnosm ernéh o napätia správne prip ojený.
b. Stlače ním a pod ržaní m vypínača n apája nia na 3 se kundy z apnite jedn otku.
c. Ak probl ém pret rváva , požiadajte o podporu servisn é stred isko.
2. Ro zhlas ová stanica n emá dob rý zvu k.
a. Um iestn ite jednotku k oknu, aby sa zle pšil pr íjem.
b. Skúste p repnúť na inú s tanic u rádia FM na poč úvani e.
c. Ak probl ém pret rváva , požiadajte o podporu servisn é stred isko.
3. Zv uk v režime zar iaden ia USB al ebo karty m icroSD nie je d obrý.
a. Poz orne sk ontrolujte, či ste zar iaden ie USB al ebo kar tu mic roSD vložil i správne.
b. Skúste v ypnúť a z apnúť n apája nie jed notky a potom znov a prehrávať .
c. Ak probl ém pret rváva , požiadajte o podporu servisn é stred isko.
48
Page 51

HR5BR
HUN GARIA N
49
Page 52

HR5BR
50
Page 53

HR5BR
HUN GARIA N
51
Page 54

HR5BR
52
Page 55

HR5BR
HUN GARIA N
53
Page 56

HR5BR
54
Page 57

HR5BR
Kezelős zervek elhe lyezke dése
01— Lejátsz ás/sz ünet go mb a lejá tszás e lindí tásához/s zünet eltetéséh ez, ill etve né mítás hoz.
02— Fők apcsoló go mb a kész ülék be - és kik apcso lásáh oz.
03— Han gerő- szabá lyozó gomb a ha ngerő b eállításához.
04— Üzemmódkapcso ló gomb a z üzemmódok k özött i váltáshoz : óra/U SB/mi croSD/FM/AUX IN
üze mmód.
05— Távvezér lő érzé kelőj ének ablaka.
06— Követke ző gomb.
07— Elő ző gomb.
HUN GARIA N
08— AUX IN jack b emene t
09— Ala phely zetbe állítás
10— mic roSD- kárt ya nyílása.
11— USB -aljz at.
12— DC 5 V-o s jack al jzat.
13— Tápellát ás LED vi sszaj elzőj e.
55
Page 58

HR5BR
Távve zérlő
01— Ism étlés g omb (ös szes ismétlése, véle tlens zerű lejáts zás, eg y zeneszám is métlé se).
02— Be-/kikapcsoló go mb.
03— Fényerő-sza bályozó gom b a kijel ző-há ttérvilá gítás fényerőss égéne k beáll ításá hoz.
04— Han gszín kivál asztó g omb (cs ak USB- /microSD-kárty a-lej átszási üze mmódb an)
05— Lejátsz ás/sz ünet go mb.
06— Han gerő nö velése.
07— Han gerő cs ökkentése.
08— FM automa tikus k eresése gom b.
09— Üzemmód gomb a l ejátszási forrás kivála sztás ához.
10— Elő ző gomb.
11— Követke ző gomb.
12— Szá mgomb ok (0–9 ).
Meg jegyz ések:
a. A tá vvezérlő haszn álata előtt győz ődjön m eg arról, hog y a CR202 5 típus ú elem me gfelelően , a jelze tt
pol aritá sok sze rint van behe lyezve.
b. A táv vezér lő hasz nálat a előtt t ávolítsa el a s ziget előla pot.
c. A lemerült el emet kö rnyeze tbará t módon s elejtezze l e. Ezzel kapcsol atban k övesse a hely i kormá nyzati
sza bályozáso kat és előír ásoka t.
d. A távvez érlő ha tótávolsá ga 5 méter (akadályok nélkül). A t ávvezérlő h aszná latáh oz irányíts a a távvezérl ő
érz ékelő jét a kés zülék e lőlap jára.
A készülé k üzemb e helyezése és a tápe llátá s csatlakozt atása
A mellék elt USB-tá pkábel egyik végét csatlakoztassa a D C adapt erhez , az USB -kábel másik vé gét pedig
csa tlakoztas sa a készül ék hátuljá n találhat ó micro USB DC tápcsat lakozóhoz , majd csatlakoztas sa a DC-
ada ptert a há lózat i tá paljz athoz. A tápel látás pi ros LED vis szaje lzője vi lágít ani kezd, h a a tápell átást
meg felelően csatl akoztatta .
Tart sa leny omva a ké szülé k előla pján talál ható fő kapcsoló t 2 másodpercig a kész ülék be -/ki kapcsolá sához . A
kés zülék a t ávvez érlőn lévő f őkapc solóv al k apcso lható készenléti üzemmódba. A be kapcsolá st k övetően a
kijelz ő világ ítani kezd, m ajd meg kezdheti a ké szülé k haszn álatá t.
56
Page 59

HR5BR
Meg jegyz ések:
a. A me lléke lt USB- tápkábel e gyik vége egy u niver zális U SB-csatl akozó, m íg a mási k vége eg y micro USB
csa tlakozó. Az u niver zális USB- csatlakoz ót a DC ada pterh ez, a micro USB c satla kozót pedig a D C USB-
táp aljza thoz kell csa tlako ztatni.
b. A működt etéshez csa k a mellé kelt, v agy azz al azon os műszaki adato kkal rende lkező t ápada ptert
has ználj on.
c. Ha az előlapo n lévő fő kapcs olóva l kapcsolj a ki a kész üléke t, az nem k apcsolha tó be a táv vezérlőve l, mivel
a kés zülék t ápell átása telje sen meg szakad. Il yen ese tben a készülék vi sszak apcso lásáh oz hasz nálja a z
elő lapi kapcs olót.
Kij elző há ttérv ilágí tásán ak beál lítás a (fénye rő-szabál yozás)
A távvezérlő „LIGH T” gombjáva l állíth atja be a k ijelz ő háttér világítá sának fény erejét ( magas, k özepes vagy
ala csony fényerősz int).
Idő /alvá sidő be állít ása
A kés zülék i dőkijelzés és alvásidő funkc ióval is rend elkez ik. Has znála tukhoz kövesse a z alább i eljárást.
1. Kapcs olja be a k észül éket, nyomj a meg a táv vezérlő „MODE” gom bját va gy az elő lapi „M” gombo t, amíg a
kijelz őn meg ne m jelen ik az idő k ezelőfelü lete. A készü lék els ő haszn álatakor a készü lék kij elzőj én
aut omatikusan az id ő kezelőfel ülete j elenik meg a bekapcso lásko r.
2. Tart sa lenyomva 3 másod perci g az elől apon lé vő „ M” gombot , amíg az ó ra számjegy ei vill ogni nem
kez denek a k ijelz őn.
3. A ha ngerő -szab ályozó gomb bal áll ítsa be az órát , az „M” gomb rövid megnyomá sával hagyja jóvá a
beá llítá st; ekkor a pe rc számjegy ei kezdenek vill ogni a ki jelző n.
4. A ha ngerő -szab ályozó gomb bal áll ítsa be a perce t, majd a z „M” go mb rövid megnyomá sával hagyj a jóvá a
beá llítá st. Ekkor a ké szülé k az alvásidő -beál lítás ü zemmó dba lép.
5. A ha ngerő -szab ályozó gomb bal áll ítsa be az alvá sidőt ( ki, 15, 30, 60 , 90, 120 ). Nyom ja meg rövide n az „M”
gom bot az ös szes beállítás j óváhagyás ához, é s lépje n ki ebbő l a beáll ítási ü zemmó dból.
Meg jegyz ések:
a. US B/SD/ AUX/FM ü zemmódban a t ávvez érlő „0” számg ombjá nak meg nyomásával elle nőriz heti az a ktuál is
idő t: a kijelző n 3 másod percre megj elenn ek az idő re vonat kozó in formációk , majd a k ijelz ő visszatér a z
akt uális ü zemmód keze lőfel ületére.
b. Ha állít ott be al vási időt, a ké szülé k a beáll ított i dő lejá rta után aut omatikusan kikapcsol.
Ébr eszté s haszn álata
A ké szülé ken 2 é bresz tési idő állít ható be, am ely a m egado tt idő pontb an ébr eszt. Beáll ításu khoz k övesse az
alá bbi elj árást .
1. A ké szülé k előla pján lé vő „ M” gombba l válassza ki az időkij elzés k ezelő felületét .
2. Tart sa lenyomva a leját szás/ szüne t gombo t, amíg a z ébresztés h arang i konja v illogni nem k ezd a kijelz őn.
A han gerő- szabá lyozó gombb al választhat az 1–2. ébresztés k özött.
3. Ny omja me g röviden az „M” gombo t a beáll ítani k ívánt é bresz tés kiv álasz tásáh oz, maj d a hangerő-
sza bályozó gom bbal ál lítsa b e az ébreszté si órát.
4. Ny omja me g röviden az „M” gombo t az óra be állít ásána k jóváhagyá sához , majd a ha ngerő -szabályo zó
gom bbal ál lítsa b e a percet.
5. Az „M” gomb rövid megnyomá sával hagyj a jóvá a pe rc beállítá sát, ek kor az ébresztés h arang i konja
vil logni k ezd a kij elzőn .
6. Az ébreszté s a leját szás/ szüne t gomb rövid me gnyomá sával k apcsolható be és k i. Az éb resztés
kivála sztás ához maradj on az ado tt ébreszté sen. 5 má sodpe rc után a k ijelz ő kilép az ébr esztés beál lítás a
üze mmódb ól, és vissza tér az id ő kezelőfel ületre. Az éb resztés bekapcsol ásako r a megfelelő é bresz tés
har ang iko nja vil ágítani kez d a kijelzőn ; ez jelz i, hogy a z ébresztés b eállí tása si keresen meg történt. A z
ébresztés ek kor akt ív.
7. Má sik ébr esztés beál lítás ához végezze el a fenti lé pések et ismé t.
HUN GARIA N
57
Page 60

HR5BR
Meg jegyz ések:
a. Éb resztési ha ngkén t hangj elzés vagy az F M-rádió állíth ató be. Ha az FM-rádi ót kívánja é bresztési
han gként b eállí tani, nyomj a meg a táv vezérlő „1-es” szá mgomb ját 3 más odpercig, a míg az „ON” felirat
meg n em jele nik a kijelz őn FM-rádió ü zemmó dban; ekkor az aktuál is FM-rádió állom ás kerü l beáll ításra
ébresztési hangként . Ha mégsem az FM -rádi ót kívá nja ébr esztési han gként h aszná lni, nyomja m eg ismé t
az „1-es” számg ombot , amíg az „OFF ” f elirat meg ne m jelen ik a kijelző n. Ekkor a han gjelzés kerül
beá llítá sra ébreszt ési han gként .
b. A fol yamat ban lév ő ébresztés a z előla p vagy a távvez érlő bá rmely g ombjá nak meg nyomásával állí tható
le.
c. Időkijelzés üzemmó dba tar tsa lenyomva az el őlapon lévő Következ ő gombo t az össz es beállíto tt
ébresztés törléséhe z.
d. Az é bresz tés időtartama 2 perc. Ha nem t örtén ik gomb nyomás, az éb resztés 5 per c után ismét megszólal.
Ez 2- szer is métlődik meg, majd az éb resztés aut omati kusan k ikap csol (pl. ha se nki sincs ot thon) .
e. Ébresz tés has ználatakor ügyelje n arra, h ogy a meg felel ő idő legyen be állít va.
f. Gondos kodjo n a készü lék folyama tos DC tápell átásá ról, ellenk ező ese tben az é bresztés ne m szóla l meg.
Ha a DC t ápell átás me gszak ad, vis szaál lása ut án ellenőrizze i smét az i dő és ébreszt és beál lítás át.
g. Az é bresztés ak kor is megsz ólal, ha a kész ülék (v agyis a k ijelző) ki van ka pcsol va, de a DC t ápell átásn ak
folyama tosna k kell le nnie.
FM-rádi ó haszn álata
A kész ülék beépítet t ant ennáj ával foghatók az FM-rá dióál lomás ok. Rádió hallgat ása előt t – a legjob b vét el
érdekében – he lyezze a kész üléke t ablak m ellé.
Kapcso lja be a készülé ket, m ajd az elő lapon lévő „M” go mbbal vagy a távve zérlő „MODE” gombj ával válas sza
ki a rádió ü zemmódot.
1. Automa tikus hango lás és tá rolás : Nyomj a meg az „FM SCAN” gombo t, vagy t artsa lenyomva az elől ap
vag y a távvezérl ő „PLAY/PAUSE” gomb ját 3 más odpercig, e kkor a készü lék automat ikusa n megke resi és
elt árolja az elérhe tő állo mások at. A kés zülék l egfel jebb 50 á llomást tud tárolni.
2. Automa tikus ke resés : Tartsa le nyomva a z előla pon vag y a távvezérl őn lévő „Előző” vag y „K övetkező”
gom bot az el érhet ő állom ások au tomatikus keresésé hez. A ké szülé k autom atiku san meg áll az első
elé rhető á llomá snál, és elkezdi leját szani . Az aktuáli s állom ás a távvezér lő „SAVE” gombj ával menthe tő.
3. Kí vánt állomá s megad ása: A távvezérl ő számgombjaiv al közv etlen ül is meg adhatja a hal lgatn i kívánt
áll omás frekvenci áját. Pé ldául , ha a 104, 3 MHz-en tal álhat ó rádióállo mást kíván ja hall gatni , csak nyo mja
meg a t ávvezérlőn lév ő számg ombok at az alá bbi sor rendb en: 1, 0, 4 , 3. Ekko r a készü lék átu grik a
meg adott á llomá sra, és elkezdi lejáts zani.
táv vezérlőn lévő „Előz ő” vag y „Köve tkező” gombot , vagy a tá vvezérlő számg ombja ival adja meg a t árolt
áll omás me mória helyének számát. Például, ha a 12-es memór iahel yen tárolt állom ást kív ánja ha llgat ni, ű
csa k nyomja meg az 1 -es, ma jd 2-es gomb ot a távv ezérlőn, és el is in dul a meg felelő állo más lej átszá sa.
58
Page 61

HR5BR
USB -eszköz és micro SD-ká rtya leját szása
Az MP3-lejá tszás i fun kció elindítá sa el őtt g yőződ jön meg arról, hogy az USB-eszk öz va gy a microSD- kárt ya
meg felelően va n behe lyezve a kész ülék hátulj án lévő USB- vagy mic roSD- portba. Az MP3 zen eszám ok a
kés zülék m emóri ájába is átmá solha tók és tár olhatók. A készü lék legfelj ebb 32G B k apaci tású eszköz t
tám ogat.
1. A „MODE” vagy az „M” gomb bal válassza ki az USB- v agy mic roSD- lejátszási üzemmódot, a k észül ék
aut omatikus érzék eli és el kezdi leját szani a z zenét , miutá n megje lenítette a z eszkö zön találha tó
zen eszám ok összszámát.
2. Az „Előző” vag y „Következ ő” gom b rövid megnyomás ával ug orhat a z előző vagy kö vetke ző zeneszám ra,
ill etve az „Elő ző” vagy „Köve tkező ” g omb lenyomva tartásá val tekerhet az ak tuáli s zeneszámon bel ül.
3. A tá vvezérlő számg ombja ival egysze rűen kivál aszthatja é s leját szhat ja a kívá nt zene számo t.
4. A tá vvezérlő „REPEAT” gomb jával válth at az „össze s ismét lése”, „ egy zen eszám i smétl ése” és a
„vé letle nszerű lejá tszás” köz ött. Ug yanez a k észül ék elől apján lévő „M” gomb lenyomva tartá sával (3
más odperc) is elvégezhe tő.
5. Ha e gy zene szám egy adott részét kíván ja csak i smételni, t arts a lenyom va a „ REPEAT ” g ombot 3
más odpercig, a míg a kijelz őn meg ne m jelenik a P—A felir at az ind ulási p ont kiv álasz tásáh oz. Ezután
tar tsa lenyomv a a „REPE AT” gom bot 3 más odpercig, a míg a kijelz őn meg ne m jelen ik a P--b fe lirat a
végpont k iválaszt ásához. A művelet elvé gzése után a készü lék csa k a kivál aszto tt részt fogj a ismételni . Ha
ki k íván lépni az i smétl éses le játsz ásból, tar tsa lenyomva a „REPEAT” gom bot, am íg a kijelző n meg nem
jel enik az P---E f elirat.
6. MP 3-lej átszá si üzemmódb an az EQ go mb rövid megn yomásával válth at a külö nböző h angsz ínek között :
NOR MAL/ROCK/POP /CLAS S/JAZZ/BASS.
Meg jegyz ések:
a. US B-kábelh ossza bbító h aszná lata nem java solt a le játszáshoz, ugyani s az befo lyásolja az a udioj el-át vitel t
és za jos han got okozhat .
b. A készül ék csak a kkor érzék eli és já tssza le a zene számo kat, ha az USB -eszköz vagy a microSD-k ártya
csa tlakoztat va van.
AUX IN / M P3 Link ü zemmó d haszn álata
A mellék elt 3,5–3, 5 mm-es sztereo a udiok ábellel csatl akoztatha t külső lejátszót (pl. MP3-le játszó stb. ) a
kés zülék h átulj án lévő AUX IN j ack csa tlakozóho z. Ekkor a készül ék köz vetlenül AUX IN lejáts zási üzemmódba
lép. A zené t a lejátszón k ell kivála sztan ia és lej átszania, a k észül ék pedi g leját ssza a tovább ított a udiót .
Felh ívjuk figyelmét , hogy ilyen ese tben a v ezérlés a leját szóról tör ténik . AUX IN üzem módban a rádión csak a
han gerő- szabá lyozás és a lej átszá s/szü net fun kció használha tó.
Műs zaki ad atok:
Ára mforrás: egyenáram, 5 V / 1,5A
Kim eneti t eljes ítmény: 3 W RMS
FM-frek venci a: 87, 5–108 ,0 MHz
USB t öltési telj esítm ény: 100 m A
Ára mfogyaszt ás: 5,5 W
Ára mfogyaszt ás kész enléti állapot ban: <0,7 W
Gyári ala pbeál lítás ok:
Ren dszer idő: 00: 00
Idő formátum: 24 ó rás
Alv ásidő : KI
Ébresztés időtartama: 2 perc
Han gerő: 15
(A műszaki adatok előze tes bej elentés nél kül vál tozhatnak )
HUN GARIA N
59
Page 62

HR5BR
Hib aelhá rítás
1. A kijel ző nem vi lágít.
a. El lenőr izze, hogy a DC t ápell átást m egfelelőe n csatl akozt atták-e.
b. Tartsa lenyomva a főkapcs oló gom bot 3 más odper cig a kés zülék b ekapc solás ához.
c. Ha a probl éma továbbr a is fennáll, fordu ljon a sz ervizköz ponthoz.
2. A rá dióál lomás h angja nem megfelelő.
a. He lyezze a kész ülék a le hető le gközelebb a z ablak hoz.
b. Pró báljon átha ngoln i egy más ik állo másra .
c. Ha a probl éma továbbr a is fennáll, fordu ljon a sz ervizköz ponthoz.
3. A ha ng nem me gfelelő USB v agy mic roSD- kárt ya üzem módba n.
a. El lenőr izze, hogy az U SB-eszkö zt és a mic roSD- kárt yát meg felelően cs atlak oztat ták-e.
b. Ka pcsolja ki és vissza a ké szülé ket, ma jd próbálja m eg újra a l ejátszást.
c. Ha a probl éma továbbr a is fennáll, fordu ljon a sz ervizköz ponthoz.
60
Page 63

Page 64

Competence Centre Audio
2N-Everpol Sp. z o.o.
ul. Puławska 403A
02-801 Warsaw, Poland
phone: +48 22 331 99 59
e-mail: info@everpol.pl
www.blaupunkt.com
W przypadku pytań lub problemów
prosimy o kontakt z naszym serwisem.
In case of questions or problems
please contact our service.
Tel. 00 48 22 331 99 53
E-mail: info@blaupunkt-audio.pl
Wszelkie prawa zastrzeżone. Wszystkie nazwy marek są zarejestrowanymi
znakami towarowymi należącymi do odpowiednich podmiotów.
Dane i parametry techniczne mogą ulec zmianie bez wcześniejszego uprzedzenia.
All rights reserved. All brand names are registered trademarks of their
respective owners. Specifications are subject to change without prior notice.
 Loading...