

Page 1
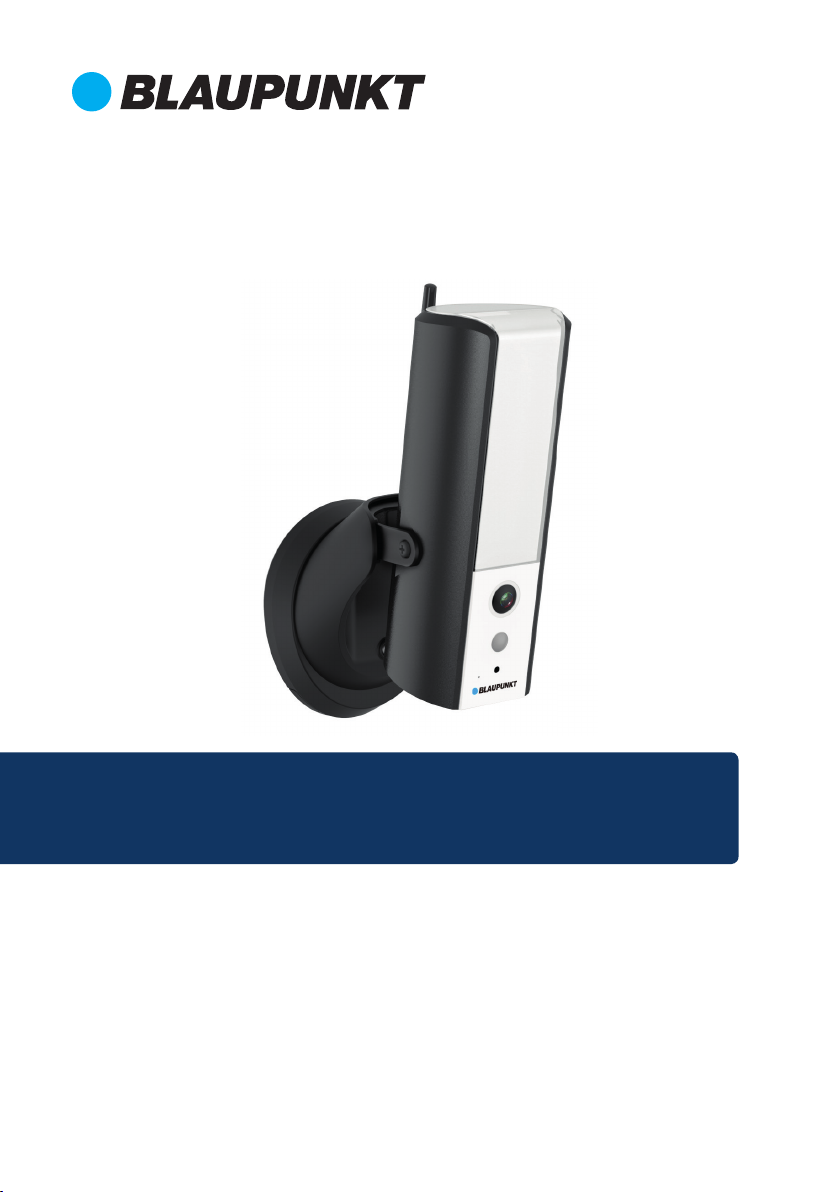
Manual
WiFi LampCam HOS-X20
Enjoy it.
Home Observation System
Page 2

Page 3

EN Manual
WiFi LampCam HOS-X20
4
DE Gebrauchsanleitung
WiFi LampCam HOS-X20
FR Manuel
WiFi LampCam HOS-X20
IT Manuale
WiFi LampCam HOS-X20
ES
PL Instrukcja obsługi
FI Käyttöopas
Manual de usuario
WiFi LampCam HOS-X20
WiFi LampCam HOS-X20
WiFi LampCam HOS-X20
13
22
31
40
49
58
Enjoy it.
Page 4
English
English | Manual
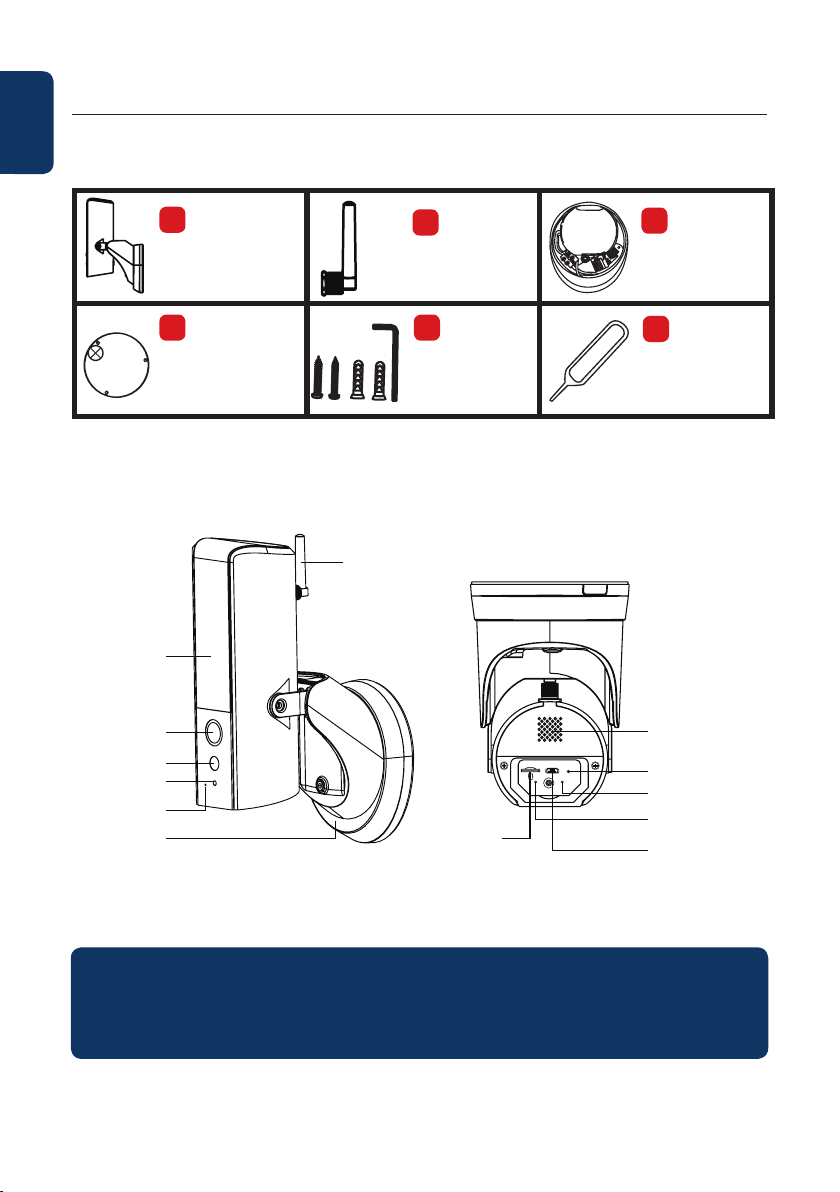
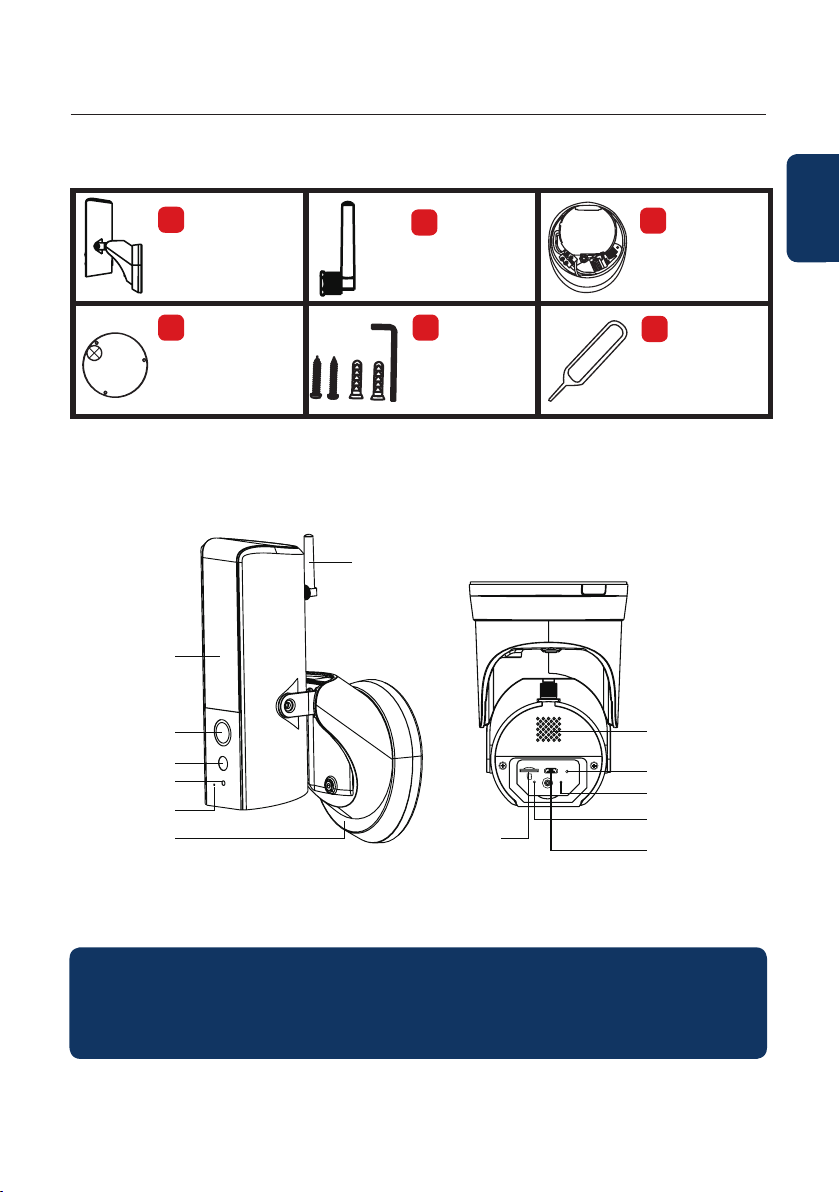
1. Kit Content
a
HOS-X20
LampCam
d
Installation
Positioning Map
2. Product Description
LED Lamp
Camera Lens
PIR Sensor
Microphone
Light sensor
Mounting
Bracket &
Power
Transformer
Antenna
b
Antenna
e
1x Hex Wrench
2x Screws
2x Plastic
Dowels
MicroSD
Card Slot
c
Mounting
Bracket
f
Reset Pin
Speaker
RESET USB
Reset Button
Power LED
Indicator
Network
Indicator
Micro USB
port
NOTE:
This manual explains the installation and 1st time conguration of the HOS-X20.
For any further information or latest updated versions, please visit our website
http://security.blaupunkt-service.com
4
Page 5
3. Installation
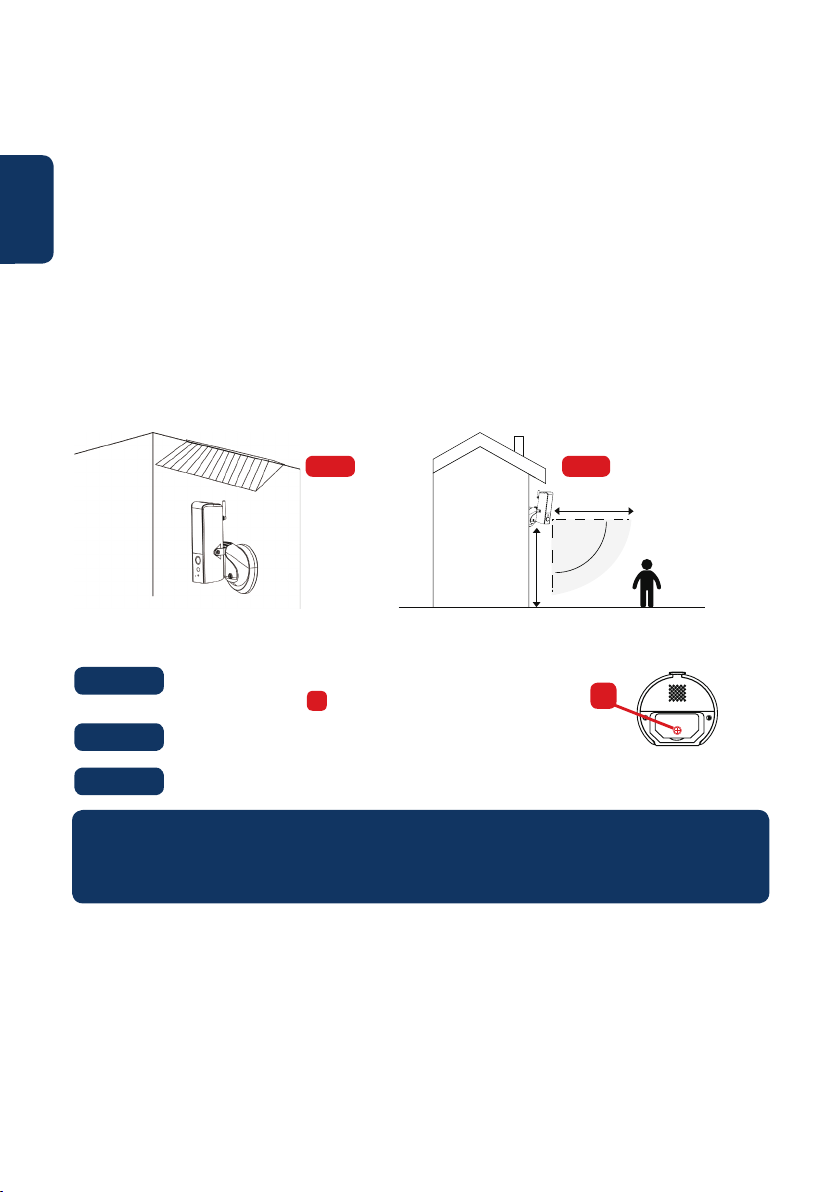
3.1. IMPORTANT – Read before installing
• Before the installation, please make sure the make sure the wall structure / installation surface can at
least support 3x weight of the LampCam.
• Check your Wi-Fi signal strength. To make sure that your LampCam’s connection is as stable as
possible, make sure that the Wi-Fi signal is very strong at the location of your LampCam. The
suggested Internet bandwidth is 1Mbps (upload/download speed).
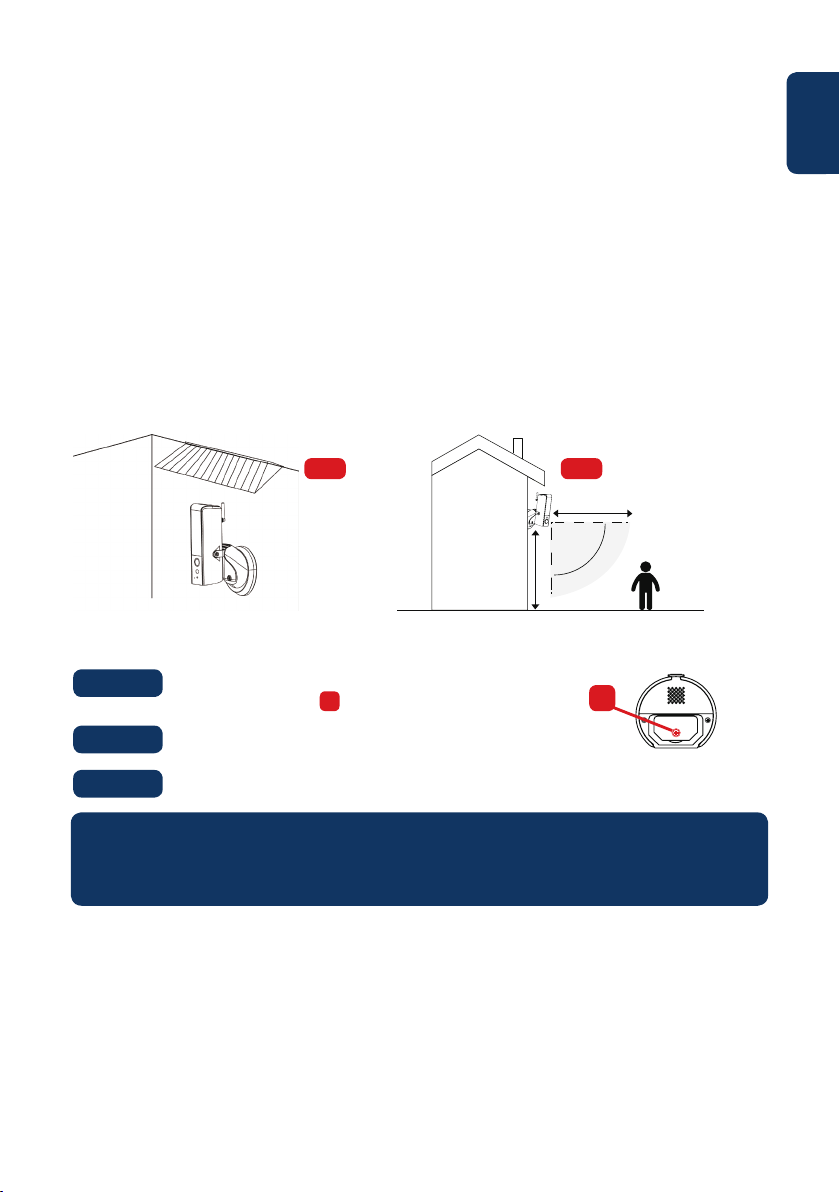
• Recommendation: Avoid the lens aiming directly into the sunshine and if possible install the
LampCam under a roof or eave (Pic.1) or a position which oers a good protection against heavy
rain.
• If you desire to install a microSD card we recommend doing it before the installation process. Please
refer to microSD card installation for more information.
• For best performance, please install the LampCam at a height of 2.5 meters. (Pic.2)
Pic.1 Pic.2
5m PIR Detection Range
Motion Detection 90°
2.5m Hight
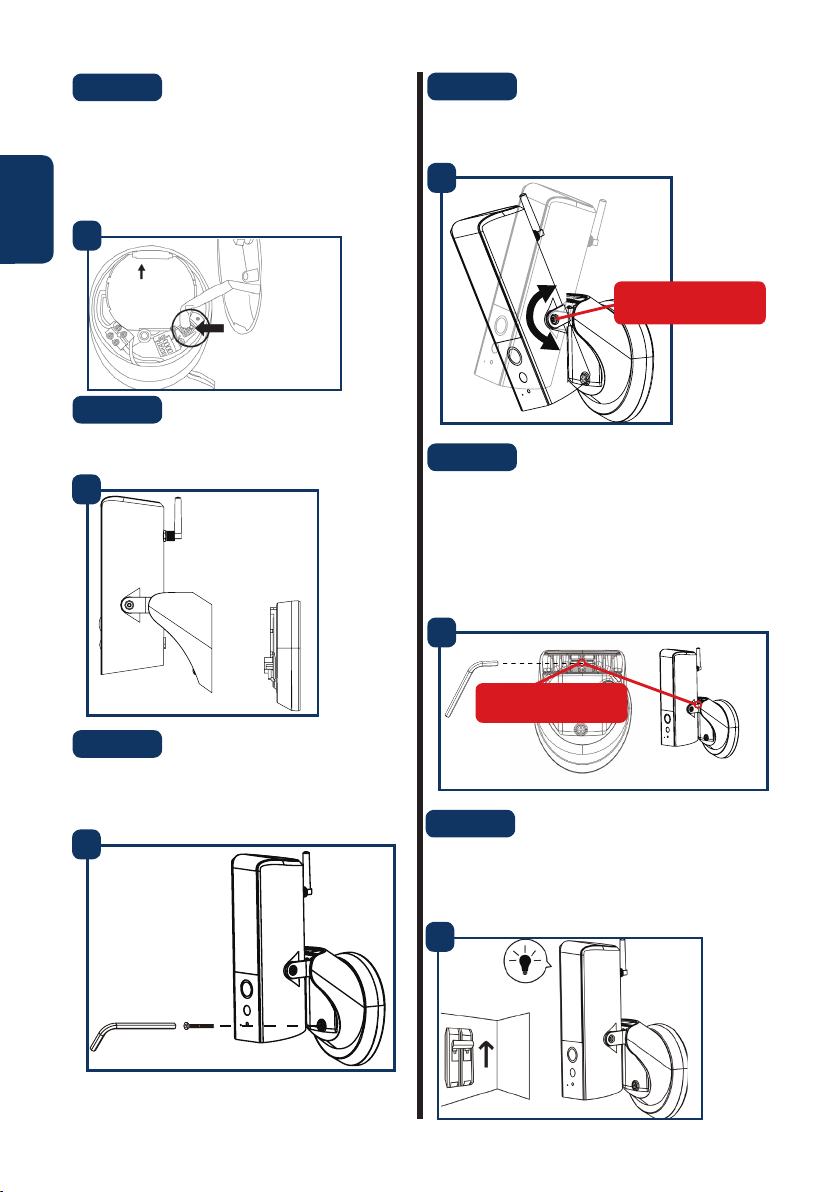
3.2. Micro SD Card installation
Step 1:
At the bottom of the LampCam open the compartment by
unscrewing the screw .
A
A
English
Step 2:
Step 3:
NOTE:
The Micro SD card is mandatory for local recording. Please make sure the MicroSD is CLASS10 rated.
Supported are MicroSD cards from 8GB to 128GB.
Install the SD-Card into the indicated SD-card slot.
Close the compartment by placing the cover and fasting the screw.
3.3. Optional: Pre-Installation testing of the LampCam
Before installing it is possible to turn ON the LampCam via the micro USB port with a power bank or 2A
micro USB power supply. Wait until the LampCam makes a double beep tone and the Blue LED indicator
at the bottom of the LampCam starts ashing. (This process would take around 60 seconds, make sure the
LED is ashing in blue). Then refer to chapter “4.1. Learn in a LampCam”.
Note: The led light of the LampCam won’t turn on when connected via USB.
5
Page 6
English
3.4. LampCam Installation
IMPORTANT:
Setup and installation of the LampCam should
only be performed by a person with adequate
knowledge in handling electricity power.
DO NOT attempt installation if you do not
possess required skill.
Step 1:
Please make sure you have turned OFF the power
from the circuit breaker before this step.
1
O
5
A
Step 6:
Lead the AC wires from the wall through the back
of mounting bracket and connect them in the
following way:
- Phase wire (brown) to terminal block
with brown cable.
- Neutral wire (blue) to terminal block
with blue cable.
- Protective earth wire (Yellow/Green): Leave it
hanging out, it will be connected in Step 8.
Now place the terminal block back into the
mounting bracket.
Step 2:
Find the desired installation location for the
LampCam. The installation location needs to have
220V AC wires (grounding, phase and neutral wire).
(e.g. of a previously installed Outdoor Lamp.)
Step 3:
Place the included installation positioning map on
the wall and mark with a pencil the two holes that
need to be drilled.
Step 4:
Drill the 2 mounting holes on the wall. Take
the plastic dowels included in the installation
accessories set and insert them into the 2 holes that
where just drilled.
Step 5:
Perforate a small hole with a sharp object at
A
position in the rubber pad and lead the AC
wires from the wall through the back of the
mounting bracket to the terminal blocks.
6
6
terminal blocks
Up
Step 7:
Take the screws included in the installation
accessories set and fasten the mounting bracket to
the wall. Make sure that the “UP” sign is at the top.
7
Up
Page 7
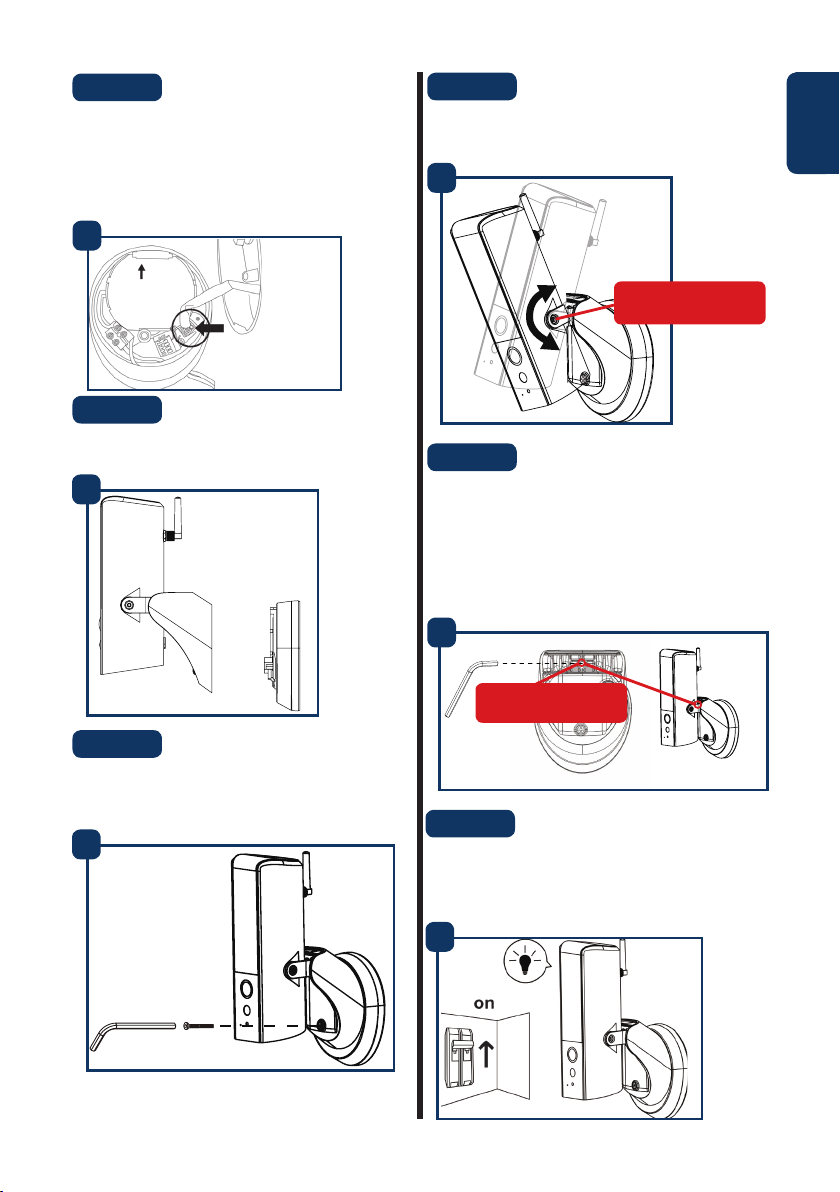
Step 8:
Take the protective earth wire (yellow/green) and
connect it to the green screw with an earth icon at
the back of the camera.
Then connect the cable from the LampCam to the
black junction box located at the mounting bracket.
8
Up
Connect here
Step 9:
Install the LampCam on the mounting bracket.
9
Step 11:
Adjust the tilt angle of the LampCam by fasting the
“adjustment screws”.
English
11
tilt adjusment screws
Step 12:
Adjust the horizontal angle of the LampCam approx
30 degrees to left or right. Loosen the screw on
the back using the hex wrench included in the
installation accessories set. Screw it rmly when you
are done.
12
Step 10:
Fasten the screw to the mounting bracket using the
included hex wrench.
10
pan angle
adjusment screws
Step 13:
Once the installation is completed turn on the
power from the circuit breaker and the led lamp of
the LampCam will power up.
13
7
Page 8
English
4. Usability of LampCam and APP
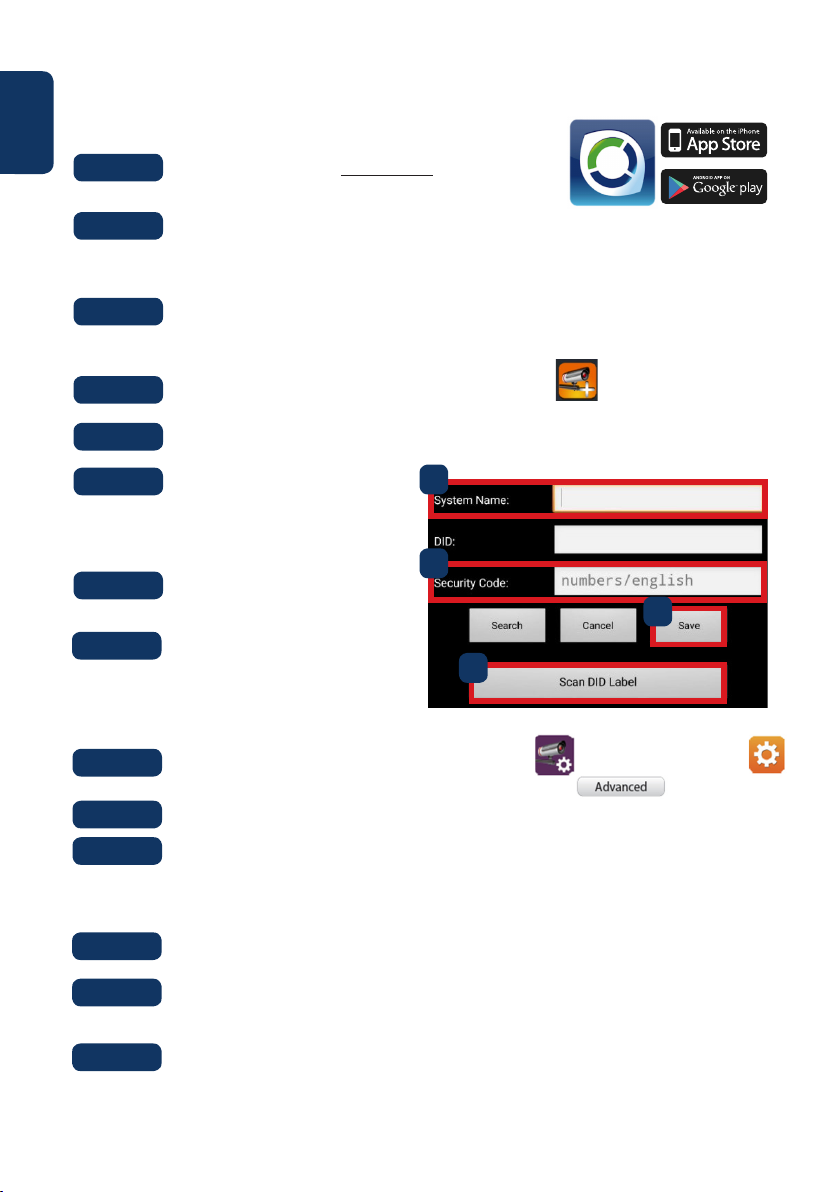
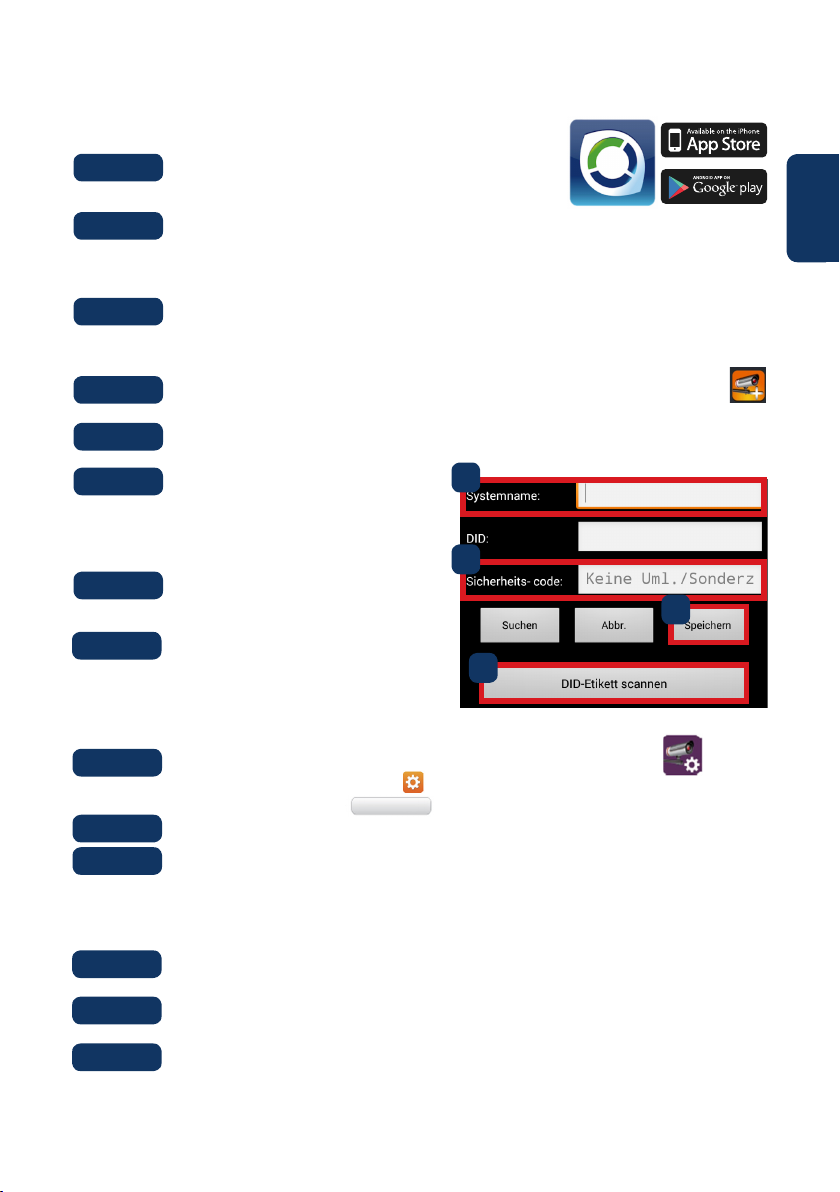
4.1. Learn in a LampCam:
Step 1:
Step 2:
Download and install the “OMGuard HD” APP
to your smartphone.
Take your smartphone, go to your Wi-Fi settings and select the new Wi-Fi Network starting
with HD (example HD-15584) to connect to it. This network is a Wi-Fi created by the
LampCam to enable the setup procedure.
For iOS
and Android
Step 3:
Step 4:
Step 5:
Step 6:
Step 7:
Step 8:
Enter the LampCam Wi-Fi default password 12345678 and save the settings to connect.
You will not have internet connection, but you will be able to continue the LampCam setup
procedure.
Now start the OMGuardHD App and tap the “add camera” button.
At “System Name” type any desired name for your LampCam. E.g. “Front door”
Tap “Scan DID label” for Android) or
the QR icon (for iOS) and scan the QR
code label located at the back of the
LampCam.
At Security code enter the default
Security Code 123456.
Tap “Save”.
4.2. Wi-Fi settings:
Step 1:
Step 2:
Step 3:
On the LampCam menu tap the cong LampCam icon and tap the settings icon
from the desired LampCam. Then tap the “Advanced” button
Enter the “Admin password” (default 123456).
For security reasons the APP will request to modify the default Admin password.
(The Admin password will be used to access the settings menu and to arm / disarm the
LampCam). We recommend to write down this password in a safe place. Otherwise if you
forget it you would need to factory reset the camera.
5
Front door
7
8
6
Step 4:
Step 5:
Step 6:
8
Scroll down to Wi-Fi settings and tap “Manage Wi-Fi network”
Select your home Wi-Fi Access Point from the scroll down menu and input your Wi-Fi
password. Then tap “OK”
The LampCam will be oine for around 60 seconds while rebooting. When the LampCam
connects to the Wi-Fi router correctly, the blue Network Indicator LED will be turned ON
permanently. From now on, you can remotely access to the LampCam at any time and
from any place.
Page 9
5. LampCam conguration
On the LampCam menu list tap the cong LampCam icon and tap the settings icon from the desired
LampCam. Then tap the “Advanced” button to enter the “Advanced Settings Menu”. For security reasons
you will be asked to enter the “Admin password”.
5.1. Sensitivity Setting:
Scroll down to “Sensitivity Setting”. At “Detect Mode” select “PIR” to activate PIR motion detection (factory
default setting). The PIR motion detection has a 5m detection range. To deactivate motion detection
select “OFF” .
5.2. Lighting Setting:
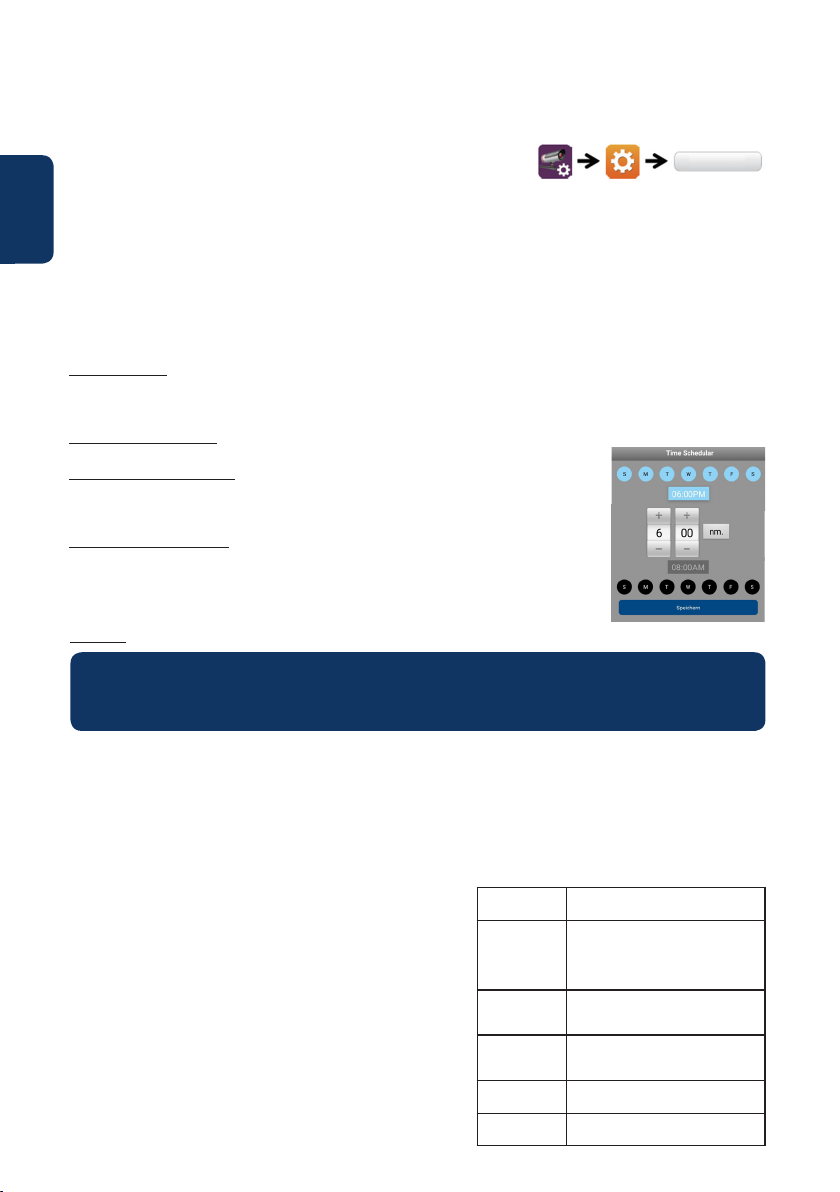
Scroll down to “Lighting Setting” and select the desired “Lighting auto mode”.
By trigger: Select this option to turn the light ON for 1 minute after PIR motion detection. (Please check
in chapter 5.1. that PIR detection is activated) After one minute the light will turn OFF. (PIR needs to be
selected on “Sensitivity Settings”). Light will turn ON only if there is a low environment illumination.
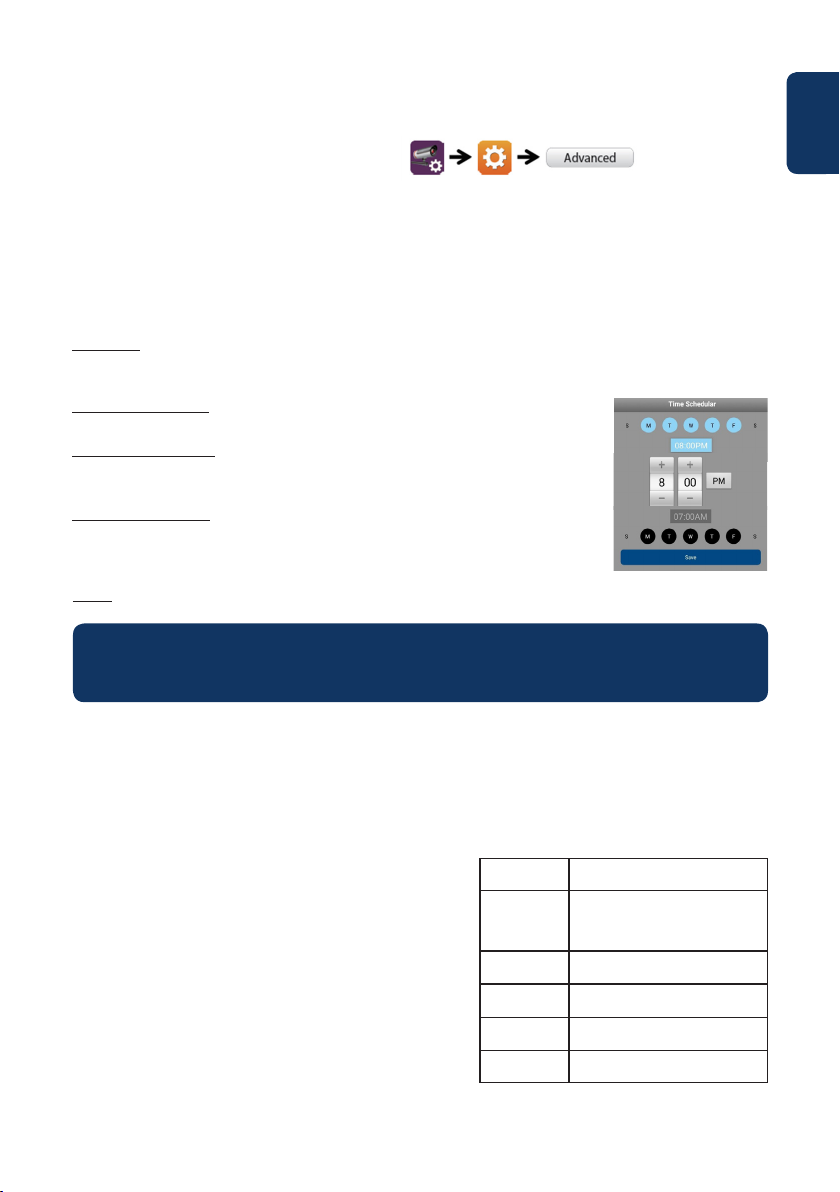
By manual Schedule: Select this option to turn the light ON according to a precongured schedule. To set up a schedule select “Lighting Schedule Modify”.
Select a Starting time: Click the 00:00AM blue button at the top. At the top select
the days of the week to be included. Select the time when the light should be
turned ON. Time format is 12H, select AM or PM to dene the time.
Select a Ending time: Click the 00:00AM black button at the bottom. At the
bottom select the days of the week to be included. Select the time when the light
should be turned OFF. Time format is 12H, select AM or PM to dene the time.
Click the “Save” button at the bottom to save all the settings.
Note: It is mandatory to select the days of the week, otherwise the schedule wont work.
Note:
PIR trigger for motion detection and manual schedule will work only under AUTO mode. Refer to
chapter “6. Live View Functionalities” for more details.
English
5.3. SD Card Setting:
Click “Format SD-Card” to perform a SD-Card format. This will erase all the videos and images on the SDCard. If the “Over write SD-Card” check box is activated the LampCam will overwrite the oldest recording
once the storage is full. If deactivated the LampCam won’t record any event once the storage is full.
5.4. Notications:
Push notications: Scroll down to “Notify Enable”. Enable
/ Disable push notications when movement is detected
under arm mode. (Enabled by default)
Email notications: To enable the same information as push
notications for e-mail, scroll down to “Email Setting” and
click “Set e-mail”. Cong according to the right hand chart.
Note: Ensure that “Two-factor authenticator” is disabled on
your sending e-mail account. (e.g. Google, Outlook365). To
learn more, check instructions from your e-mail provider.
SSL
SMTP Server
SMTP Port
Username
Password
Receiver
Activate / deactivates SSL encryption
Input the server SMTP address.
To learn more, check instructions
from your e-mail provider.
For Gmail use smtp.gmail.com
If SSL is not activated use “25”
If SSL is activated use “465”
The user name of the sender email
account. E.g: username@gmail.com
The password of sender email
account.
Receiver email address
9
Page 10
English
6. Live View Functionality
Step 1:
Step 2:
Step 3:
Step 4:
Launch the OMGuard HD app.
On the LampCam list menu double tap the desired LampCam to access livestream.
For security reasons the rst time you log in to the LampCam the APP will request to
modify the default Security code. (The Security Code is used to establish a communication
between the LampCam and the smartphone. This is not the same as the Admin password).
We recommend to write down this password in a safe place. Otherwise if you forget it you
would need to factory reset the camera.
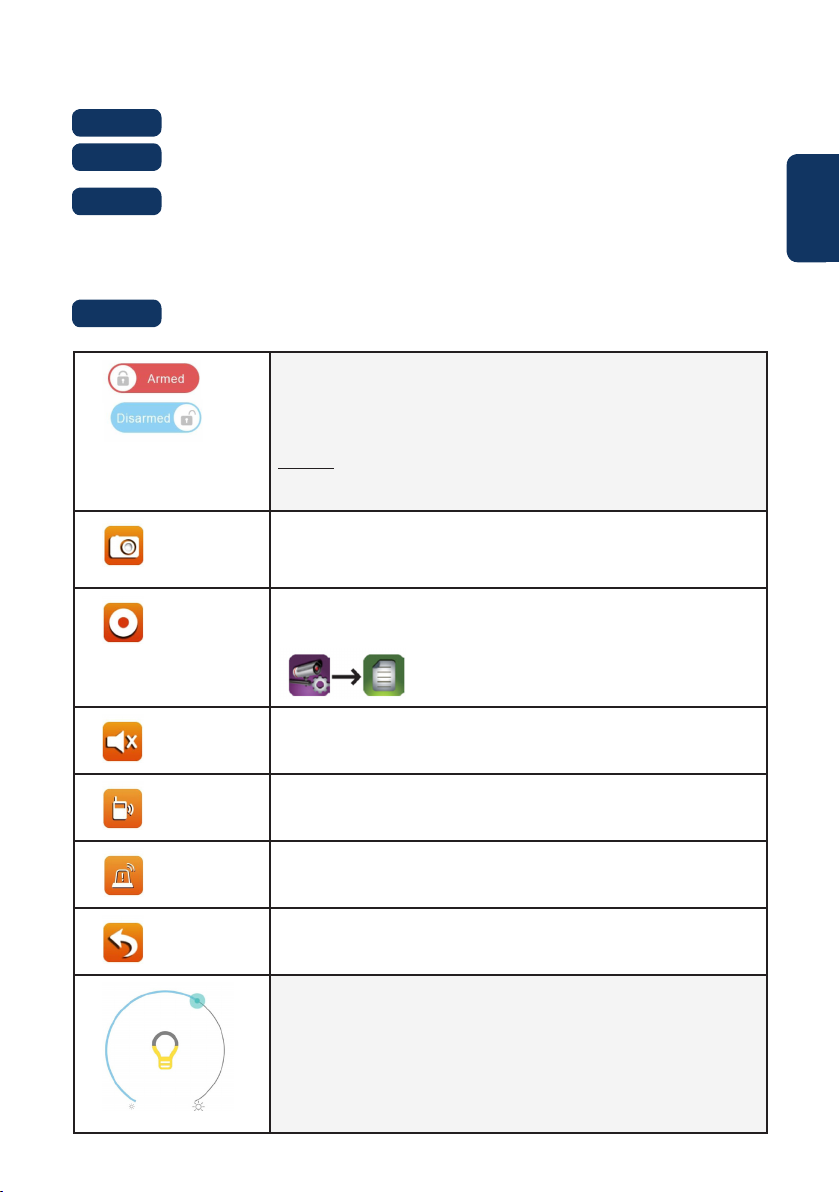
Refer to the bellow table to learn more about the operations that are available on the Live
Stream menu.
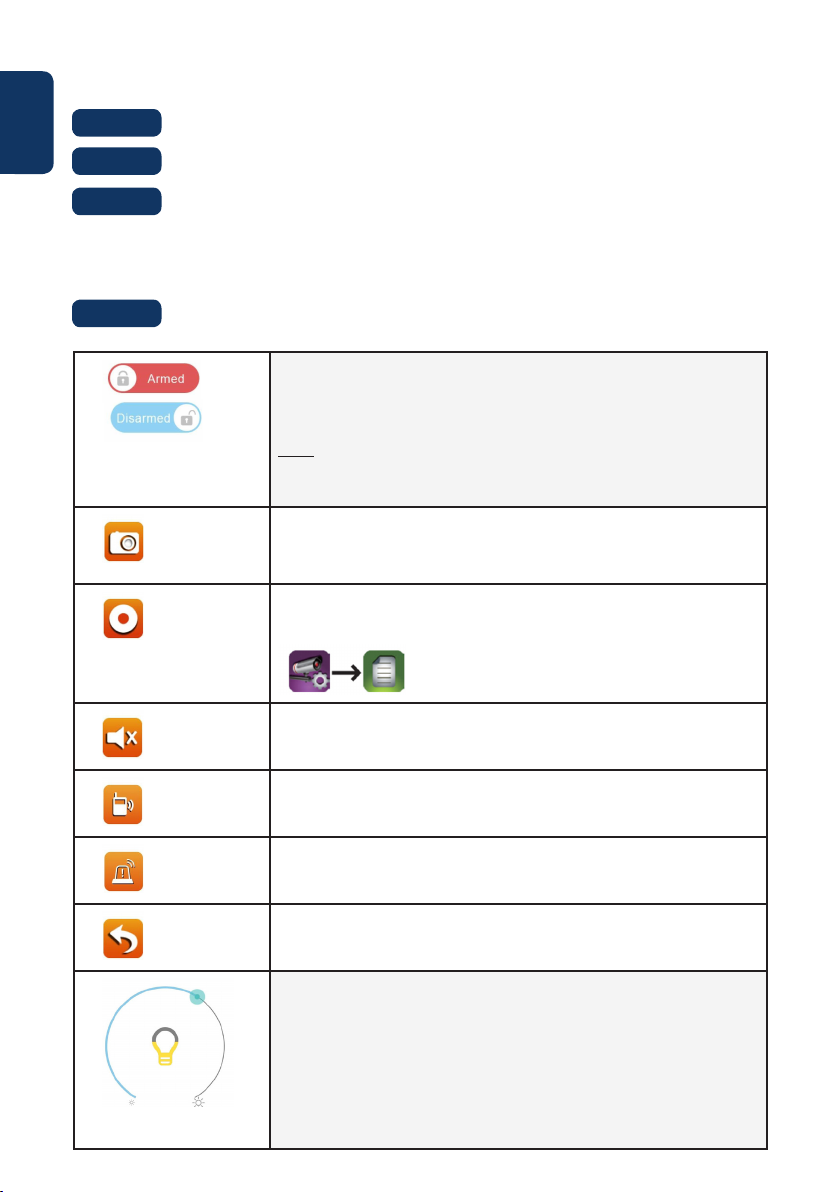
Click on the arm / disarm button to arm or disarm the LampCam.
The App will ask for the admin code to perform this action.
If the camera detects movement during arm mode, it will send a push
notication and start a 60s video recording.
Note: Push notications and PIR motion detection need to remain enabled in advanced settings (enabled by default).
Take a snapshot from the current video stream.
The Snapshot will be stored on the smartphone and can be found on
your smartphone photo gallery.
Start a 60 seconds video recording without pause to the LampCam
micro-SD card. SD-Card Is mandatory for this feature.
To nd the videos please refer to the “Event playback” menu.
10
Activates / deactivates the microphone to listen through LampCam.
Push To Talk button: Push this button and keep pressing to talk from your
Mobile Phone through the LampCam. To stop talking release the button.
Tap this button to launch a 60 seconds siren alarm. It’s possible to stop
the siren by tapping the icon again.
Return to LampCam list menu
Slide the bar to adjust the brightness of the LampCam from 0 to 800lm.
Tap the bulb icon to turn the light ON / OFF or AUTO.
ON: The light of the LampCam will be turned ON permanently.
OFF: The light of the LampCam will be turned OFF.
AUTO: The light will turn ON automatically according to your lighting
trigger setting. see chapter 5.2.
PIR trigger for movement detection and manual schedule will work only
under AUTO.
Page 11

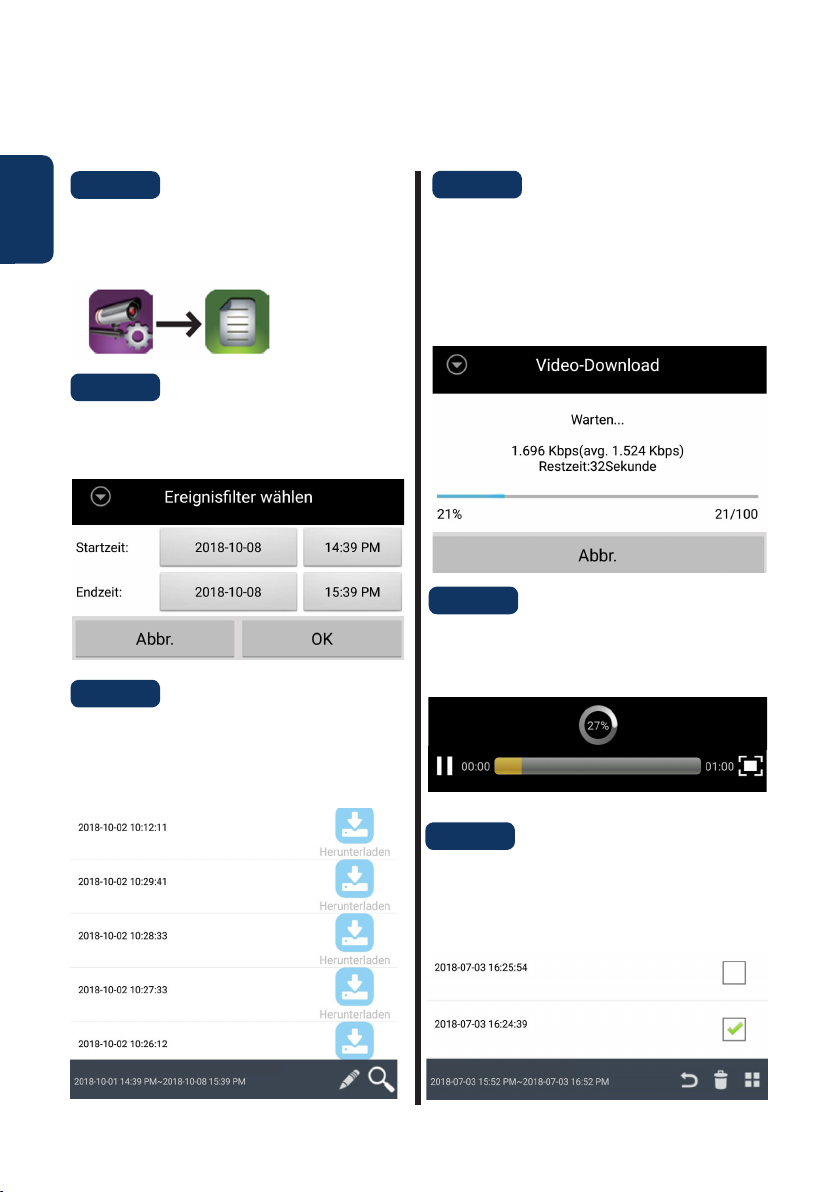
7. Event Playback
Important: For this feature to work it is mandatory to have a micro SD-card installed on the LampCam.
Refer to chapter “3.2. Micro SD Card installation”.
Step 1:
On the LampCam list menu tap the cong
LampCam icon and then tap the notepad icon from
the desired LampCam.
Step 2:
Select a starting and ending point for the LampCam
to search for video recordings. Then click “OK”.
Step 3:
The LampCam will display all the video recordings
from the previous time range. Each video will
display the date and time from when the video was
recorded.
Step 4:
To download a video click the right download
icon from the desired video. The video would be
downloaded to your smartphone and could be
found in your smartphone gallery. A downloaded
video will be displayed with the name in red.
Step 5:
To watch the video without downloading it you can
click on the desired video and the video. Now the
video will be streamed to your smartphone.
English
Step 6:
To delete a video from the micro-SD card select the
pencil icon, then select the video and tap the trash
icon.
11
Page 12
English
8. Maintenance
• Please turn o the power and unplug the power cable, if there is any smoke, disgusting smell, or
noise. Please contact your local retailer or customer service center for help.
• Avoid oil stain and or chemicals tarnishing and damaging the lens surface.
• All the examination and repair work should be done by qualied service engineers. We are not liable
for any problems caused by unauthorized modications or attempted repair.
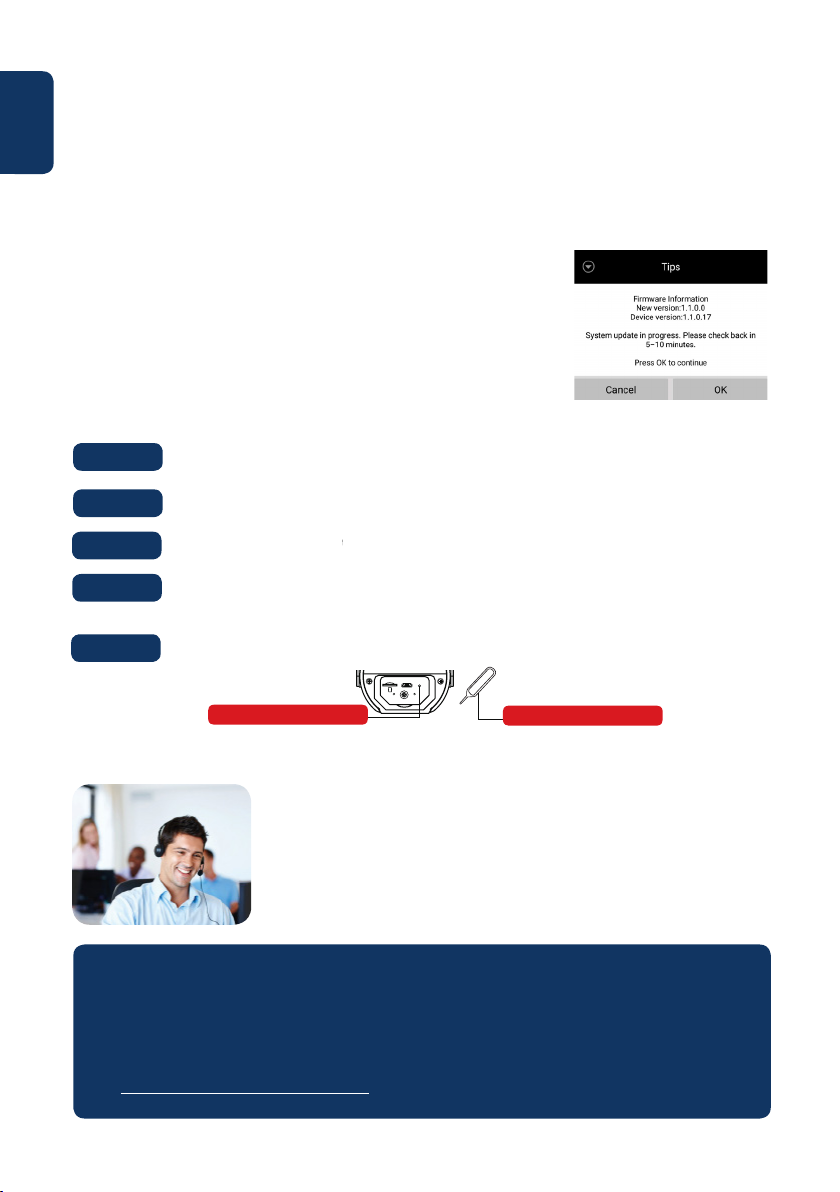
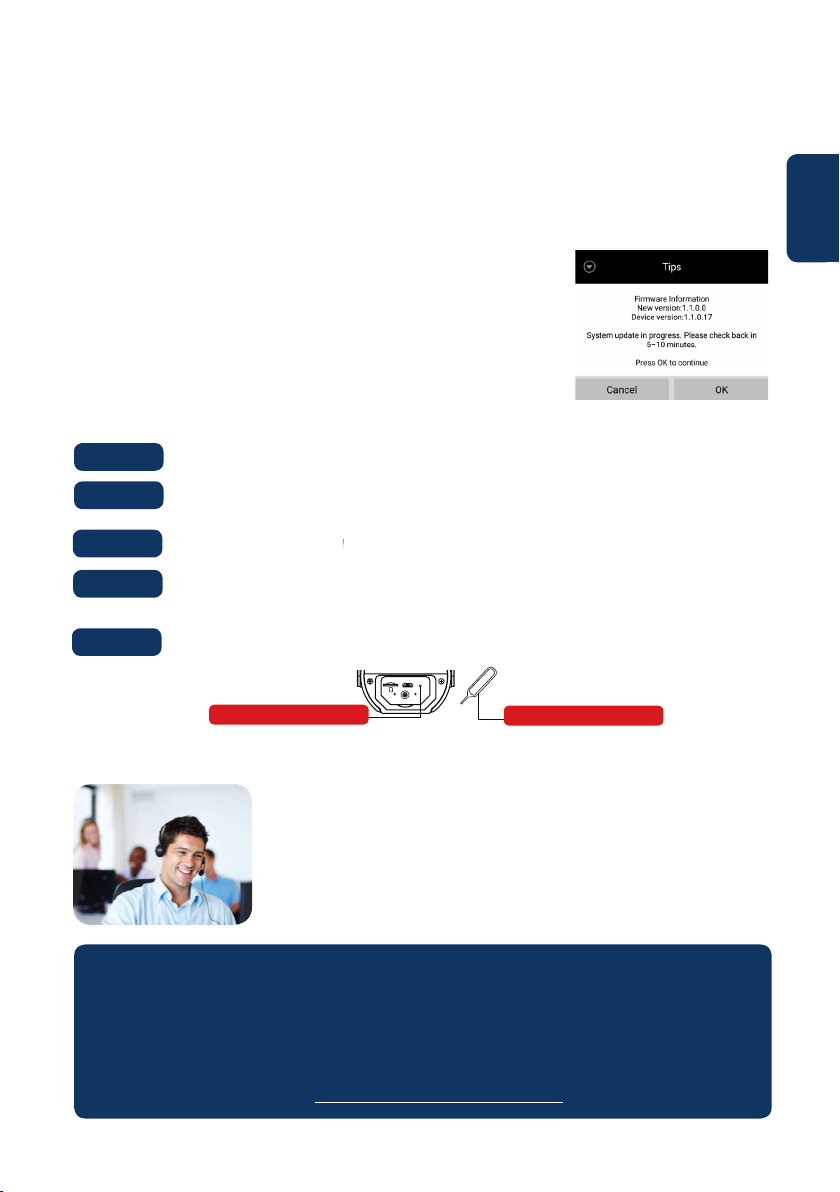
8.1. Firmware Upgrade
The LampCam will look for rmware upgrades automatically. When the
LampCam detects a new rmware it will download it automatically. The
next time the user logs on the LampCam the app will ask if the user want to
upgrade the system. Click “OK” to start the Firmware upgrade. This process
takes around 5 minutes.
8.2. Factory Reset
Step 1:
Step 2:
Step 3:
Step 4:
Step 5:
At the bottom of the LampCam open the compartment by unscrewing the screw.
Use the included reset pin and press the reset button for 10 seconds.
The power LED will starting ashing and factory reset will began.
This process would take around 60 seconds. Wait until the LampCam makes a double beep
tone and the Blue LED indicator starts ashing.
Close the compartment by placing the cover and fasting the screw into it.
RESETU SB
reset button
reset pin
9. Support
For more product information, please visit
www.blaupunkt.com/service
Blaupunkt Competence Center Security & Care
www.blaupunkt.com
Security Brand Pro GmbH
Mondstrasse 2-4
85622 Feldkirchen-München, Germany
© Technical changes and errors excepted
NOTE:
• This manual is for reference only. Slight dierence may be found in the user interface.
• All the designs and software here are subject to change without prior written notice.
• All trademarks and registered trademarks mentioned are the properties of their respective
owners.
• Please visit our website or contact your local service engineer for more information at:
http://security.blaupunkt-service.com
12
Page 13
Deutsch | Gebrauchsanleitung
1. Lieferumfang
a
HOS-X20
LampCam
d
Montageschablone
2. Gerätebeschreibung
LED-Lampe
Kameraobjektiv
PIR-Sensor
Mikrofon
Lichtsensor
Montage-
halterung &
Netzteil
Antenne
Kartensteckplatz
b
Antenne
e
1x Imbusschlüssel
2x Schrauben
2x Kunststoffdübel
MicroSD-
c
Montagehalterung
Deutsch
f
Reset-Nadel
Lautsprecher
RESET USB
Reset-Knopf
Stromindikator
LED
Netzwerkindikator LED
Micro-USBAnschluss
HINWEIS:
In dieser Anleitung wird die Installation und Erstkonguration der HOS-X20 erläutert.
Für weitere Informationen oder neueste aktualisierte Versionen besuchen Sie bitte unsere Website:
http://security.blaupunkt-service.com
13
Page 14
3. Montage
3.1. WICHTIG - Lesen Sie dies vor der Montage
Deutsch
• Bitte stellen Sie vor der Installation sicher, dass die Wandstruktur/ der Montageuntergrund
mindestens das dreifache Gewicht der LampCam tragen kann.
• Überprüfen Sie Ihre WLAN-Signalstärke. Um sicherzustellen, dass Ihre LampCam-Verbindung so
stabil wie möglich ist, vergewissern Sie sich, dass das WLAN-Signal am geplanten Montageort so
stark wie möglich ist. Die empfohlene Internetbandbreite beträgt 1 Mbit/s (Upload- / DownloadGeschwindigkeit).
• Empfehlung: Vermeiden Sie es, die Linse direkt in die Sonne zu richten und installieren Sie die
LampCam wenn möglich unter einem Dach, einer Traufe (Abb.1) oder einer Position, die einen guten
Schutz gegen Starkregen bietet.
• Wenn Sie eine MicroSD-Karte installieren möchten, empfehlen wir, dies vor der Installation zu tun.
Weitere Informationen nden Sie in Abschnitt “3.2. Installation der MicroSD-Karte).
• Für eine optimale Leistung installieren Sie die LampCam in einer Höhe von 2,5 Metern. (Abb.2)
Abb.1 Abb.2
5m PIR Reichweite
Bewegungerkennung 90°
2.5m Höhe
3.2. Installation der MicroSD-Karte
Schritt 1:
Schritt 2:
Schritt 3:
HINWEIS:
Die MicroSD-Karte ist für die lokale Aufzeichnung erforderlich. Bitte stellen Sie sicher, dass es sich um
eine CLASS10 MicroSD handelt. Unterstützt werden MicroSD-Karten von 8 GB bis 128 GB.
An der Unterseite der LampCam önen Sie das Fach durch
Lösen der Schraube .
Setzen Sie die SD-Karte in den angegebenen SD-Kartensteckplatz ein.
Schließen Sie das Fach, indem Sie die Abdeckung anbringen und die Schraube festziehen.
A
A
3.3. Optional: Testen der LampCam vor der Installation
Vor der Installation ist es möglich, die LampCam über den Micro-USB-Anschluss mit einer Power Bank
oder einem 2A Micro-USB-Netzteil einzuschalten. Warten Sie, bis die LampCam einen doppelten
Signalton ausgibt und die blaue LED an der Unterseite der LampCam zu blinken beginnt. (Dieser Vorgang
dauert etwa 60 Sekunden. Stellen Sie sicher, dass die blaue LED blinkt). Informationen zum Einlernen der
Lampcam nden Sie in “Kapitel 4.1. “.
Hinweis: Das LED-Licht der LampCam schaltet sich bei Anschluss über USB nicht ein.
14
Page 15
3.4. Montage der LampCam
HINWEIS:
Die Installation und Montage der LampCam
sollte nur von einer Person durchgeführt
werden, die über ausreichende Kenntnisse im
Umgang mit Strom verfügt. Falls Sie NICHT über
die erforderlichen Fähigkeiten im Umgang mit
Strom verfügen, sollten Sie in keinem Fall die
Installation selbst durchführen.
Schritt 1:
Bitte stellen Sie sicher, dass Sie vor diesem Schritt die
Stromversorgung des Leistungsschalters an Ihrem
Sicherungskasten ausgeschaltet haben.
1
Aus
Schritt 2:
Suchen Sie den gewünschten Installationsort für
die LampCam. Der Installationsort muss über ein
230V Wechselstromkabel (Erdungs-, Phasen- und
Neutralleiter) verfügen. (z. B. von einer zuvor
installierten Außenleuchte.)
5
A
Deutsch
Schritt 6:
Führen Sie die Kabel von der Wand durch die
Rückseite der Halterung und verbinden Sie diese
wie folgt:
- Leiter (braun) an die Anschlussklemme mit
braunem Kabel anschließen.
- Neutralleiter (blau) an die Anschlussklemme mit
blauem Kabel anschließen.
- Schutzleiter (gelb / grün): Lassen Sie diesen
heraushängen, er wird in Schritt 8 angeschlossen.
Setzen Sie die Anschlussklemmen nun wieder in die
Halterung.
6
Anschlussklemmen
Oben
Schritt 3:
Legen Sie die mitgelieferte Montageschablone an
die Wand und markieren Sie mit einem Bleistift die
beiden Löcher, die gebohrt werden müssen.
Schritt 4:
Bohren Sie die 2 Befestigungslöcher in die
Wand. Nehmen Sie die Kunststodübel, die im
Installationszubehörsatz enthalten sind, und führen
Sie diese in die 2 Löcher ein, die gerade gebohrt
wurden.
Schritt 5:
Perforieren Sie ein kleines Loch mit einem spitzen
Gegenstand an Position in der Gummiunterlage
und führen Sie die Kabel von der Wand durch die
Rückseite der Halterung zu den Anschlußklemmen.
A
Schritt 7:
Nehmen Sie die im Lieferumfang des
Installationszubehörs enthaltenen Schrauben und
befestigen Sie die Halterung an der Wand. Stellen
Sie sicher, dass das”Oben-Zeichen” oben steht.
7
Oben
15
Page 16
Schritt 8:
Nehmen Sie den Schutzleiter (gelb / grün) und
verbinden Sie ihn mit der grünen Schraube (mit
einem Erdungssymbol) auf der Rückseite der
Deutsch
Kamera. Verbinden Sie dann das Kabel von der
LampCam mit der schwarzen Anschlussdose an der
Montagehalterung.
8
Schritt 11:
Stellen Sie den Neigungswinkel der LampCam mit
den “Neigungsverstellschrauben” ein.
11
Oben
Hier anschließen
Schritt 9:
Installieren Sie die LampCam an der Montagehalterung.
9
Schritt 10:
Befestigen Sie die Schraube mit dem mitgelieferten
Imbusschlüssel an der Halterung.
10
Neigungsverstell-
schrauben
Schritt 12:
Stellen Sie den horizontalen Winkel der LampCam
um ca. 30 Grad nach links oder rechts ein.
Lösen Sie die Schraube auf der Rückseite mit
dem im Installationszubehörsatz enthaltenen
Inbusschlüssel. Schrauben Sie die Schraube fest
sobald der optimale Winkel eingestellt ist.
12
Einstellschraube
(horizontaler Winkel)
Schritt 13:
Sobald die Installation abgeschlossen ist, schalten
Sie den Strom am Sicherungskasten ein und die
LED-Lampe der LampCam schaltet sich ein.
16
13
An
Page 17
4. Verwendung von LampCam und App
4.1. Einlernen der LampCam:
Schritt 1:
Schritt 2:
Schritt 3:
Downloaden und installieren Sie die “OMGuard HD” App
auf Ihrem Smartphone.
Nehmen Sie Ihr Smartphone, gehen Sie zu Ihren WLAN-Einstellungen und wählen Sie das
neue WLAN-Netzwerk beginnend mit HD (Beispiel HD-15584). Verbinden Sie sich nun
mit diesem WLAN-Netzwerk. Dieses WLAN-Netzwerk ist ein von der LampCam erstelltes
Netzwerk, um den Setup-Vorgang zu ermöglichen.
Geben Sie das LampCam WLAN-Standardkennwort 12345678 ein und speichern Sie die
Einstellungen für die Verbindung. Sie haben keine Internetverbindung, aber Sie können die
LampCam-Einrichtung fortsetzen.
Für iOS
und Android
Deutsch
Schritt 4:
Schritt 5:
Schritt 6:
Schritt 7:
Schritt 8:
Starten Sie nun die OMGuard HD App und drücken Sie auf das Icon “Kamera hinzufügen”
Geben Sie unter “Systemname” einen beliebigen Namen für Ihre LampCam ein, z.B. “Haustür”.
Drücken Sie auf “DID-Etikett
scannen” (für Android) oder das
QR-Symbol (für iOS) und scannen Sie
das QR Code-Label auf der Rückseite
der LampCam.
Geben Sie unter Sicherheitscode
den Standard-Sicherheitscode
123456 ein.
Drücken Sie auf “Speichern”.
4.2. WLAN-Einstellungen:
Schritt 1:
Schritt 2:
Schritt 3:
Schritt 4:
Schritt 5:
Schritt 6:
Drücken Sie im LampCam-Menü auf das LampCam-Symbol der Konguration und
drücken auf das Einstellung-Symbol von der gewünschten LampCam. Drücken Sie dann
auf die Schaltäche “Menü”
Geben Sie das “Admin-Kennwort” ein (Standard 123456).
Aus Sicherheitsgründen wird die App das Standard-Admin-Passwort ändern.
(Das Admin-Passwort wird verwendet, um auf das Einstellungsmenü zuzugreifen und
die LampCam scharf / unscharf zu schalten). Wir empfehlen, dieses Passwort an einem
sicheren Ort aufzuschreiben. Falls Sie das Passwort vergessen haben müssen Sie die
Kamera auf die Werkseinstellungen zurücksetzen.
Scrollen Sie nach unten zu den WLAN-Einstellungen und drücken Sie auf “WLANNetzwerk verwalten”.
Wählen Sie Ihren Heim-WLAN-Zugangspunkt aus dem Dropdown-Menü und geben Sie
Ihr WLAN-Passwort ein. Drücken Sie dann auf “OK”.
Die LampCam ist beim Neustart etwa 60 Sekunden lang oine. Wenn die LampCam
korrekt mit dem WLAN-Router verbunden wird, leuchtet die blaue Netzwerkindikator-LED
dauerhaft auf. Von nun an können Sie jederzeit und von jedem Ort aus auf die LampCam
zugreifen.
Menü
5
Haustür
7
8
6
17
Page 18
5. LampCam Konguration
Drücken Sie in der LampCam-Menüliste auf das LampCam-Symbol und drücken Sie auf das
Einstellungssymbol der gewünschten LampCam. Drücken Sie dann auf die Schaltäche “Menü”, um das
Menü “Erweiterte Einstellungen” aufzurufen. Aus Sicherheitsgründen
Deutsch
werden Sie aufgefordert, das “Admin-Passwort” einzugeben.
5.1. Empndlichkeitseinstellung:
Scrollen Sie nach unten zu “Empndlichkeitseinstellung”. Bei “Erkennungsmodus” wählen Sie “PIR”, um
die PIR-Bewegungserkennung zu aktivieren (Werkseinstellung). Die PIR-Bewegungserkennung hat einen
Erfassungsbereich von 5m. Um die Bewegungserkennung zu deaktivieren, wählen Sie “AUS”.
5.2. Beleuchtungseinstellung:
Scrollen Sie nach unten zu “Beleuchtungseinstellung” und wählen Sie den gewünschten
“Beleuchtungsautomatikmodus”.
Nach Auslöser: Wählen Sie diese Option, um das Licht nach der PIR-Bewegungserkennung eine Minute
lang einzuschalten. (Bitte überprüfen Sie in Kapitel 5.1, dass die PIR-Erkennung aktiviert ist) Nach einer
Minute wird das Licht ausgeschaltet. (PIR muss unter “Empndlichkeit Einstellen” ausgewählt werden). Die
Beleuchtung wird nur eingeschaltet, wenn die Umgebungsbeleuchtung schwach ist.
Nach manuellem Plan: Wählen Sie diese Option, um das Licht gemäß einem vorkongurierten Zeitplan
einzuschalten. Um einen Zeitplan zu erstellen, wählen Sie “Lichtplan ändern”.
Wählen Sie eine Startzeit: Klicken Sie oben auf die blaue Uhrzeit 00:00 AM.
Wählen Sie oben die Wochentage aus, die berücksichtigt werden sollen. Wählen
Sie die Zeit, zu der das Licht eingeschaltet werden soll. Zeitformat ist 12H, wählen
Sie AM oder PM, um die Zeit zu denieren.
Wählen Sie eine Endzeit: Klicken Sie oben auf die schwarze Uhrzeit 00:00 AM.
Wählen Sie am unteren Rand die Wochentage aus, die berücksichtigt werden
sollen. Wählen Sie die Zeit, zu der das Licht ausgeschaltet werden soll. Zeitformat
ist 12H, wählen Sie AM oder PM, um die Zeit zu denieren. Klicken Sie auf die
Schaltäche “Speichern” am unteren Rand, um alle Einstellungen zu speichern.
Hinweis: Es ist zwingend erforderlich, die Wochentage auszuwählen, sonst funktioniert der Zeitplan nicht.
Menü
Hinweis:
Der PIR-Trigger für Bewegungserkennung und der manuelle Zeitplan funktionieren nur im
AUTO-Modus. Siehe Kapitel “6. Live View-Funktionalität“ für weitere Details.
5.3. SD-Karteneinstellung:
Klicken Sie auf “SD-Karte formatieren”, um die SD-Karte zu formatieren. Dadurch werden alle Videos
und Bilder auf der SD-Karte gelöscht. Wenn das Kontrollkästchen “SD-Karte überschreiben” aktiviert
ist, überschreibt die LampCam die älteste Aufzeichnung, sobald der Speicher voll ist. Wenn deaktiviert,
zeichnet die LampCam kein Ereignis mehr auf, sobald der Speicher voll ist.
5.4. Benachrichtigungen:
Push-Benachrichtigungen: Scrollen Sie nach unten zu
“Benachrichtigen aktivieren”. Aktivieren oder deaktivieren
sie Push-Benachrichtigungen, wenn im Scharf-Modus eine
Bewegung erkannt wurde. (Standardmäßig aktiviert)
E-Mail-Benachrichtigungen: Um dieselben Informationen
wie Push-Benachrichtigungen für E-Mails zu aktivieren,
scrollen Sie nach unten zu “E-Mail-Einstellungen” und klicken
Sie auf “E-Mail einstellen”. Kongurieren Sie diese anhand
dem rechten Diagramm. Hinweis: Stellen Sie sicher, dass der
“Zwei-Faktor-Authentikator” in Ihrem sendenden E-MailKonto deaktiviert ist. (z. B. Google, Outlook365). Weitere
Informationen erhalten Sie in den Anweisungen Ihres E-MailAnbieters.
18
SSL nutzen
SMTP-Server
SMTP-Port
Benutzer
Passwort
Empfänger
Aktiviert / deaktiviert die SSL-Verschlüsselung
Geben Sie die SMTP-Adresse des
Servers ein. Weitere Informationen
erhalten Sie in den Anweisungen
Ihres E-Mail-Anbieters. Für Google
Mail verwenden Sie smtp.gmail.com
Wenn SSL nicht aktiviert ist, benutzen Sie “25”, wenn SSL aktiviert ist,
benutzen Sie “465”
Der Benutzername des E-Mail-Accounts des Absenders. Beispiel:
benutzername@gmail.com
Das Passwort des E-Mail-Konto des
Absenders.
E-Mail-Adresse des Empfängers.
Page 19
6. Live View-Funktionalität
Schritt 1:
Schritt 2:
Schritt 3:
Schritt 4:
Starten Sie die OMGuard HD App.
Drücke im LampCam-Listenmenü zweimal auf die gewünschte LampCam, um auf den
Livestream zuzugreifen.
Aus Sicherheitsgründen wird Sie die App bei der ersten Anmeldung an Ihrer LampCam
auordern, den Standard-Sicherheitscode zu ändern. (Der Sicherheitscode wird
verwendet, um eine Kommunikation zwischen der LampCam und dem Smartphone
herzustellen. Dieses ist nicht identisch mit dem Admin-Passwort. Wir empfehlen, dieses
Passwort an einem sicheren Ort aufzuschreiben. Andernfalls müssen Sie die Kamera auf die
Werkseinstellungen zurücksetzen falls Sie dieses vergessen.
In der folgenden Tabelle nden Sie weitere Informationen zu den im Live View-Menü
verfügbaren Funktionen.
Drücken Sie auf die Armed/Disarmed Schaltäche zum scharf / unscharf
schalten der LampCam. Die App fragt nach dem Admin-Code, um diese
Aktion auszuführen. Wenn die Kamera Bewegungen im Scharf-Modus erkennt, sendet sie eine Push-Benachrichtigung und startet eine
60-Sekunden-Videoaufnahme.
Hinweis: Push-Benachrichtigungen und PIR-Bewegungserkennung müssen in den erweiterten Einstellungen aktiviert bleiben (standardmäßig
aktiviert).
Erstellen Sie einen Schnappschuss aus dem aktuellen Videostream.
Der Schnappschuss wird auf dem Smartphone gespeichert und kann in
der Fotogalerie Ihres Smartphones gefunden werden.
Starten Sie eine 60-Sekunden-Videoaufnahme ohne Pause auf die
MicroSD-Karte der LampCam. Eine SD-Karte ist für diese Funktion obligatorisch. Die Videos nden Sie im Menü “Ereigniswiedergabe”.
Deutsch
Aktiviert / deaktiviert das Mikrofon, um durch die LampCam zu hören.
Sprechen-Taste: Drücken Sie die Sprechen-Taste und halten Sie diese
gedrückt, um von Ihrem Mobiltelefon aus über die LampCam zu sprechen. Um mit dem Sprechen aufzuhören, lassen Sie die Taste los.
Klicken Sie auf diese Schaltäche, um einen Sirenenalarm von 60 Sekunden zu starten. Es ist möglich, die Sirene anzuhalten, indem Sie erneut
auf das Symbol drücken.
Wechseln Sie zum LampCam-Listenmenü.
Schieben Sie die Leiste, um die Helligkeit der LampCam von 0 bis 800 lm
einzustellen. Drücken Sie auf das Glühbirnen-Symbol, um das Licht EIN /
AUS oder AUTO zu schalten. EIN: Das Licht der LampCam wird dauerhaft
eingeschaltet. AUS: Das Licht der LampCam wird ausgeschaltet. AUTO:
Das Licht wird entsprechend Ihrer Lichtauslösereinstellung automatisch
eingeschaltet. Siehe Kapitel “5.2. Beleuchtungseinstellung”.
Der PIR-Trigger für die Bewegungserkennung und den manuelle Zeitplan
funktioniert nur unter AUTO.
19
Page 20
7. Ereigniswiedergabe
Hinweis: Damit die Ereigniswiedergabe funktioniert, muss eine MicroSD-Karte in der LampCam installiert
sein. Siehe Kapitel “3.2. Installation der MicroSD-Karte “.
Deutsch
Schritt 1:
Tippen Sie im LampCam-Listenmenü auf das
LampCam Kongurieren-Symbol und anschließend
auf das Notizblock-Symbol der gewünschten
LampCam.
Schritt 2:
Wählen Sie einen Start- und Endpunkt für die
LampCam, um nach Videoaufnahmen zu suchen.
Klicken Sie dann auf “OK”.
Schritt 3:
Die LampCam zeigt alle Videoaufnahmen aus dem
denierten Zeitraum an. Jedes Video zeigt das
Datum und die Uhrzeit ab dem Zeitpunkt an, an
dem das Video aufgenommen wurde.
Schritt 4:
Um ein Video herunterzuladen, klicken Sie auf
das rechte Download-Symbol des gewünschten
Videos. Das Video wird auf Ihr Smartphone
heruntergeladen und bendet sich nun in Ihrer
Smartphone-Galerie. Ein heruntergeladenes Video
wird mit einem roten Namen angezeigt.
Schritt 5:
Um das Video ohne Download zu sehen, können
Sie auf das gewünschte Video klicken. Jetzt wird
das Video auf Ihr Smartphone gestreamt.
20
Schritt 6:
Um ein Video von der MicroSD-Karte zu löschen,
drücken Sie auf das Stift-Symbol und wählen dann
das zu löschende Video aus und tippen daraufhin
auf das Papierkorb-Symbol.
Page 21
8. Wartung
• Bitte schalten Sie das Gerät umgehend aus und ziehen Sie das Netzkabel ab, wenn Rauch,
unangenehmer Geruch oder ungewöhnliche Geräusche auftreten. Bitte wenden Sie sich an Ihren
Händler vor Ort oder an den Kundenservice.
• Vermeiden Sie Ölecken und / oder Chemikalien, die die Linsenoberäche beschädigen.
• Alle Untersuchungs- und Reparaturarbeiten sollten von qualizierten Servicetechnikern
durchgeführt werden. Wir haften nicht für Probleme, die durch nicht autorisierte Änderungen oder
Reparaturen verursacht werden.
8.1. Firmware-Aktualisierung
Die LampCam sucht automatisch nach Firmware-Upgrades. Wenn
die LampCam eine neue Firmware erkennt, wird sie automatisch
heruntergeladen. Wenn sich der Benutzer das nächste Mal an der LampCam
anmeldet, fragt die App, ob der Benutzer das System aktualisieren möchte.
Klicken Sie auf “OK”, um das Firmware-Upgrade zu starten. Dieser Vorgang
dauert ungefähr 5 Minuten.
8.2. Werkseinstellungen zurücksetzen
Deutsch
Schritt 1:
Schritt 2:
Schritt 3:
Schritt 4:
Schritt 5:
An der Unterseite der LampCam önen Sie das Fach durch Lösen der Schraube.
Verwenden Sie die mitgelieferte Reset-Nadel und drücken Sie den Reset-Knopf für
10 Sekunden.
Die Power-LED beginnt zu blinken und der Werksreset wird durchgeführt.
Dieser Vorgang wird ungefähr 60 Sekunden dauern. Warten Sie, bis die LampCam einen
doppelten Signalton ausgibt und die blaue LED zu blinken beginnt.
Schließen Sie das Fach, indem Sie die Abdeckung aufsetzen und die Schraube festziehen.
RESETU SB
Reset-Knopf
Reset-Nadel
9. Support
Für weitere Produktinformationen besuchen Sie:
www.blaupunkt.com/service
Blaupunkt Competence Center Security & Care
www.blaupunkt.com
Security Brand Pro GmbH
Mondstrasse 2-4
85622 Feldkirchen-München, Germany
© Technische Änderungen und Irrtümer vorbehalten
Hinweis:
• Diese Kurzanleitung dient nur als Referenz. Geringfügiger Unterschiede können in der
Benutzeroberfäche gefunden werden. Alle Designs sowie die Software können sich ohne
vorherige schriftliche Ankündigung ändern.
• Alle erwähnten Marken und eingetragenen Warenzeichen sind Eigentum ihrer jeweiligen
Inhaber.
• Bitte besuchen Sie unsere Website oder kontaktieren Sie Ihren lokalen Servicetechniker für
weitere Informationen unter: http://security.blaupunkt-service.com
21
Page 22

Français | Manuel d’utilisation
1. Contenu du kit
a
Français
HOS-X20
LampCam
d
Plaque de
montage
2. Description de l’appareil
LED-Lampe
Objectif
PIR-Sensor
Micro
Capteur
Montage
Support et
Alimentation
Antenne
Logement carte
b
Antenne
e
1x Clé Allen
2x Vis
2x Chevilles
MicroSD
c
Montage
f
Aiguille de
réinitialisation
Haut-parleur
RESET USB
Reset
Courant Témoin
LED
Témoin LED
Réseau
Témoin LED
Micro USB
REMARQUE:
Ce manuel explique l’installation et la conguration initiale du HOS-X20.
Pour plus d’informations ou les dernières versions mises à jour, veuillez consulter notre site Internet :
http://security.blaupunkt-service.
22
Page 23

3. Montage
3.1. IMPORTANT - Lisez ceci avant le montage
• Avant l’installation, veuillez-vous assurer que la structure murale / la surface de montage peut
supporter au moins trois fois le poids de la LampCam.
• Vériez la puissance de votre signal WLAN. Pour garantir une connexion LampCam aussi stable
que possible, assurez-vous que le signal WLAN à l’emplacement prévu est aussi fort que possible.
La bande passante Internet recommandée est de 1 Mbit / s (vitesse d’upload / download).
• Recommandation : Évitez de diriger l’objectif directement vers le soleil et installez la LampCam
sous un toit ou un avant-toit si possible (Fig.1) ou dans une position qui ore une bonne
protection contre la pluie abondante.
• Si vous souhaitez installer une carte microSD, nous vous recommandons de le faire avant de
l’installer. Voir Section “3.2 Installation de la carte microSD” pour plus d’informations.
• Pour des performances optimales, installez la LampCam à une hauteur de 2,5 mètres. (g.2)
g.1 g.2
5m PIR Plage de détection
Détection de
2.5m Hauteur
3.2. Installation de la carte microSD
mouvement 90°
Français
Etape 1:
Etape 2:
Etape 3:
REMARQUE:
La carte Micro SD est nécessaire pour l’enregistrement local. Veuillez-vous assurer qu’il s’agit d’une
carte MicroSD CLASS10. Les cartes MicroSD de 8 Go à 128 Go sont supportées.
An fond de la LampCam, ouvrez le compartiment en
desserrant la vis.
Insérez la carte SD dans le logement prévu à cet eet.
Fermez le compartiment en xant le couvercle et en serrant la vis.
A
A
3.3. Optionnel : Test de la LampCam avant l’installation
Avant l’installation, il est possible d’allumer la LampCam via le connecteur Micro-USB avec un bloc
d’alimentation ou une alimentation Micro-USB 2A. Attendez que la LampCam émette deux bips et que
la LED bleue en bas de la LampCam commence à clignoter. (Ce processus prend environ 60 secondes.
Assurez-vous que la LED bleue clignote). Pour plus d’informations sur l’enseignement dans la Lampcam,
reportez-vous au “Chapitre 4.1 “.
Mention : Le voyant LED de la LampCam ne s’allume pas lorsqu’elle est connectée via USB.
23
Page 24

3.4. Montage de la LampCam
NOTE:
Installation et montage de la LampCam
ne doit être eectuée que par une seule
personne qui a une connaissance susante
de la manipulation de l’électricité. Si vous
n’avez PAS les compétences nécessaires pour
Français
manipuler l’électricité, vous ne devriez jamais
eectuer l’installation vous-même.
Etape 1:
Veuillez-vous assurer que vous avez lu et compris le
L’alimentation du disjoncteur de votre boîte à
fusibles a été débranchée.
1
Désactiv
Etape 2:
Trouvez l’emplacement d’installation souhaité pour
la LampCam. Le lieu d’installation doit être déni par
l’intermédiaire des Câbles 220 V AC (terre, phase et
neutre). (p. ex. à partir d’un éclairage extérieur déjà
installé.).
5
A
Etape 6:
Faites passer les câbles du mur par l’arrière du
support et connectez-le comme suit :
- Raccordez le conducteur (marron) à la borne à
l’aide du câble marron.
- Conducteur neutre (bleu) vers la borne à l’aide
d’un câble bleu.
- Conducteur de protection (jaune / vert) :
accrochez-le, il est connecté à l’étape 8. Replacez
maintenant les bornes de raccordement dans le
support.
6
Blocs de jonction
Haut
Etape 3:
Placez le gabarit de montage fourni sur le mur et
marquez les deux trous à percer avec un crayon.
Etape 4:
Percer les 2 trous de xation dans le mur. Prenez les
chevilles en plastique qui se
trouvent dans et les insérer dans les 2 trous qui
viennent d’être percés.
Etape 5:
Perforez un petit trou avec un objet pointu en
position dans le caoutchouc et faites passer
les câbles depuis le mur à travers l’arrière du
support jusqu’aux bornes.
A
24
Etape 7:
Prenez les vis fournies avec les accessoires
d’installation et xez le support au mur. Assurezvous que le panneau “Haut” est bien en haut.
7
Haut
Page 25

Etape 8:
Prenez le l de terre (jaune / vert) et connectez-le
à la vis verte (avec un symbole de terre) à l’arrière
de l’appareil. Connectez ensuite le câble de la
LampCam à la boîte de jonction noire sur le support
de montage.
8
Etape 11:
églez l’angle d’inclinaison de la LampCam à l’aide
des vis de réglage d’inclinaison
11
Haut
Connectez ici
Etape 9:
Installez la LampCam sur le support de montage.
9
Etape 10:
Fixez la vis au support à l’aide de la clé Allen fournie.
10
Vis de réglage
d’inclinaison
Etape 12:
Réglez l’angle horizontal de la LampCam d’environ
30 degrés vers la gauche ou la droite.
Desserrez la vis à l’arrière à l’aide de la clé Allen
fournie avec le kit de montage. Serrez la vis dès que
l’angle optimal est réglé.
12
Vis de réglage
(angle horizontal)
Etape 13:
Une fois l’installation terminée, allumez la boîte à
fusibles et la LED LampCam s’allumera.
Français
13
Allumer
25
Page 26

4. Utilisation de LampCam et APP
4.1. Enseignement dans la LampCam
Téléchargez et installez l’application “OMGuard HD” sur votre
smartphone.
Prenez votre smartphone, accédez à vos paramètres sans l et sélectionnez le nouveau
réseau sans l commençant par HD (exemple HD-15584). Connectez-vous maintenant à
ce réseau WLAN. Ce réseau WLAN est un réseau créé par la LampCam pour permettre le
processus d’installation.
Entrez le mot de passe par défaut du réseau local sans l LampCam 12345678 et enregistrez
les paramètres de connexion. Vous n’avez pas de connexion Internet, mais vous pouvez
continuer l’installation de LampCam.
Français
Etape 1:
Etape 2:
Etape 3:
Für iOS
und Android
Etape 4:
Etape 5:
Etape 6:
Etape 7:
Etape 8:
Lancez maintenant l’application OMGuardHD et appuyez sur l’icône “Caméra”.
Entrez le nom de votre LampCam sous “Nom du système”, par exemple “Porte d’entrée”.
Appuyez sur le bouton “Scan DID
Label” pour Android ou sur le
bouton QR (pour iOS) et scannez
l’étiquette QR code au dos de la
LampCam.
Sous Code de sécurité, entrez le
code de sécurité par défaut 123456.
Appuyez sur “Enregistrer”.
4.2. Réglages Wlan:
Etape 1:
Etape 2:
Etape 3:
Etape 4:
Dans le menu LampCam, appuyez sur l’icône LampCam de la conguration et appuyez
sur l’icône de paramétrage Appuyez ensuite sur le bouton “Menu”.
Entrez le “Mot de passe administrateur” (par défaut 123456).
Pour des raisons de sécurité, l’APP changera le mot de passe administrateur par défaut.
(Le mot de passe administrateur est utilisé pour accéder au menu Paramètres et activer /
désactiver la lampe). Nous vous recommandons de noter ce mot de passe dans un endroit
sûr. Si vous avez oublié votre mot de passe, vous devrez réinitialiser l’appareil photo aux
réglages d’usine.
Faites déler jusqu’aux paramètres WLAN et appuyez sur “Gérer le réseau WLAN”.
5
Porte d‘entrée
7
8
6
Etape 5:
Etape 6:
26
Sélectionnez le point d’accès WLAN de votre domicile dans le menu déroulant et entrez
votre mot de passe WLAN. Appuyez ensuite sur “OK”.
La LampCam est éteinte pendant environ 60 secondes au redémarrage. Si la LampCam est
correctement connectée au routeur sans l, le voyant lumineux bleu du réseau s’allume
en permanence. Désormais, vous pouvez accéder à la LampCam à tout moment et de
n’importe quel endroit.
Page 27

5. Conguration de la LampCam
Dans la liste du menu LampCam, appuyez sur l’icône LampCam et appuyez sur l’icône de réglage de la
LampCam souhaitée. Appuyez ensuite sur la touche “Menu” pour ouvrir le menu “Paramètres avancés”.
Pour des raisons de sécurité vous serez invité à entrer le
“Mot de passe Admin”.
5.1. Réglage de la sensibilité:
Faites déler vers le bas jusqu’à “Réglage de la sensibilité”. Pour “Detection Mode”, sélectionnez “PIR” pour
activer la détection de mouvement PIR (réglage d’usine). La détection de mouvement PIR a une portée de
détection de 5m. Pour désactiver la détection de mouvement, sélectionnez “OFF”.
5.2. Réglage de l’éclairage:
Faites déler vers le bas jusqu’à “Light Setting” et sélectionnez le “Auto Light Mode” désiré.
Après le déclenchement : Sélectionnez cette option pour allumer la lumière pendant une minute après la
détection de mouvement PIR. (Veuillez vérier au chapitre 5.1 que la détection PIR est activée) Après une
minute, le voyant s’éteint. (PIR doit être sélectionné sous “Adjust Sensitivity”). L’éclairage ne s’allume que
lorsque l’éclairage ambiant est faible.
Selon un plan manuel : Sélectionnez cette option pour allumer l’éclairage selon un horaire préconguré.
Pour créer un planning, sélectionnez “Modier le plan d’éclairage”.
Sélectionnez une heure de début : Cliquez sur l’heure bleue 00:00 AM ci-dessus.
Sélectionnez les jours de la semaine à prendre en compte ci-dessus. Sélectionner
l’heure à laquelle la lumière doit s’allumer. Le format de l’heure est 12H,
sélectionnez AM ou PM pour dénir l’heure.
Sélectionnez une heure de n : Cliquez sur l’heure noire 00:00 AM en haut. En bas,
sélectionnez les jours de la semaine à prendre en compte. Sélectionnez l’heure
à laquelle la lumière doit être éteinte. Le format de l’heure est 12H, sélectionnez
AM ou PM pour dénir l’heure. Cliquez sur le bouton “Enregistrer” en bas pour
enregistrer tous les réglages.
Conseil : Il est obligatoire de sélectionner les jours de la semaine, sinon l’horaire ne fonctionnera pas.
Conseil :
Le déclencheur PIR pour la détection de mouvement et la programmation manuelle ne fonctionnent
qu’en mode AUTO. Voir chapitre “6ème Fonctionnalité Live View” pour plus de détails.
Français
5.3. Réglage de la carte SD:
Cliquez sur “Formater la carte SD” pour formater la carte SD. Ceci eacera toutes les vidéos et images de
la carte SD. Si la case “Écraser la carte SD” est cochée, la LampCam écrase l’enregistrement le plus ancien
lorsque la mémoire est pleine. Si elle est désactivée, la LampCam n’enregistrera plus d’événement une fois
la mémoire pleine.
5.4. Notications:
Notications poussées : Faites déler vers le bas jusqu’à
“Activer la notication”. Active ou désactive les notications
de poussée lorsque le mouvement est détecté en mode de
mise au point. (Activé par défaut)
Notications par e-mail : Pour activer les mêmes informations
que les notications push pour les e-mails, faites déler
vers le bas jusqu’à “Email Settings” et cliquez sur “Set Email”.
Congurez-les à l’aide du diagramme de droite. Note :
Assurez-vous que “l’authenticateur à deux facteurs” est
désactivé dans votre compte de messagerie d’envoi. (P. ex.
Google, Outlook365). Pour plus d’informations, veuillez
consulter les instructions de votre fournisseur de messagerie
électronique.
Avantages
de SSL
Serveur
SMTP
Port SMTP
Utilisateur
Mot de
passe
Receveurs
Active / désactive le cryptage SSL
Entrez l’adresse SMTP du serveur.
Pour plus d’informations, consultez
les instructions de votre fournisseur
de messagerie. Pour Google Mail
utilisez smtp.gmail.com
Si SSL n’est pas activé, utilisez “25”.
Si SSL est activé, utilisez “465”.
Le nom d’utilisateur du compte de
courrier électronique de l’expéditeur.
Exemple: benutzername@gmail.com
Le mot de passe du compte e-mail
de l’expéditeur.
Adresse e-mail du destinataire.
27
Page 28

6. Fonction de visualisation en direct
Français
Etape 1:
Etape 2:
Etape 3:
Etape 4:
Démarrez l’application HD OMGuard.
Dans le menu de la liste LampCam, appuyez deux fois sur la LampCam désirée pour
accéder aux diusions en direct.
Pour des raisons de sécurité, l’APP vous demandera de changer le code de sécurité par
défaut lors de votre première connexion à votre LampCam. (Le code de sécurité est utilisé
pour établir la communication entre la LampCam et le smartphone. Ce n’est pas la même
chose que le mot de passe administrateur. Nous vous recommandons de noter ce mot de
passe dans un endroit sûr. Sinon, vous devrez réinitialiser l’appareil aux réglages d’usine si
vous oubliez de le faire.
Le tableau suivant fournit plus d’informations sur les fonctions disponibles dans le menu
Achage en direct.
Appuyez sur le bouton pour activer / désactiver la LampCam. L’application demande le code administrateur pour eectuer cette action. Lorsque la caméra détecte un mouvement en mode de mise au point, elle
envoie une notication et commence un enregistrement vidéo de 60s.
Remarque : Les notications push et la détection de mouvement PIR
doivent rester activées dans les paramètres avancés (activées par défaut).
Créez un instantané à partir du ux vidéo actuel.
L’instantané est stocké sur votre téléphone et peut être trouvé dans la
galerie de photos de votre téléphone.
Démarrez un enregistrement vidéo de 60 secondes sans faire de pause
sur la carte micro SD de la LampCam. Une carte SD est obligatoire pour
cette fonction. Les vidéos se trouvent dans le menu “Retransmission
d’évènements”.
Active / désactive l’écoute du microphone à travers la LampCam.
28
Bouton de communication : Appuyez sur le bouton de communication
et maintenez-le enfoncé pour parler depuis votre téléphone portable via
la LampCam. Pour arrêter de parler, relâchez le bouton.
Cliquez sur ce bouton pour déclencher une alarme sirène de 60
secondes. Il est possible d’arrêter la sirène en appuyant à nouveau sur
l’icône.
Passez au menu de la liste LampCam.
SFaites glisser la barre pour régler la luminosité de la LampCam de 0
à 800 lm. Appuyez sur l’icône de l’ampoule pour allumer / éteindre la
lumière.
OFF ou AUTO. ON : La lumière de la LampCam est allumée en permanence. OFF : La lumière de la LampCam est éteinte. AUTO : L’éclairage
s’allume automatiquement en fonction de votre réglage de déclenchement de l’éclairage, voir chapitre 5.2.
Le déclencheur PIR pour la détection de mouvement et la programmation manuelle ne fonctionne que sous AUTO.
Page 29

7. Retransmission d’événements
Conseil: Pour que cette fonction fonctionne, une carte Micro SD doit être installée sur la LampCam. Voir
chapitre “3.2 Installation de la carte microSD”.
Etape 1:
Dans le menu de la liste LampCam, appuyez sur
l’icône Congure LampCam, puis appuyez sur
l’icône du bloc-notes de la LampCam souhaitée.
Etape 2:
Sélectionnez un point de départ et un point
d’arrivée pour que la LampCam recherche des
enregistrements vidéo. Cliquez ensuite sur’OK’.
Etape 3:
La LampCam ache tous les enregistrements vidéo
de la période dénie. Chaque vidéo ache la date
et l’heure à partir du moment où la vidéo a été
enregistrée.
Etape 4:
Pour télécharger une vidéo, cliquez sur l’icône de
téléchargement à droite de la vidéo désirée. La
vidéo sera téléchargée sur votre smartphone et se
trouve maintenant dans votre répertoire
Galerie des Smartphones. Une vidéo téléchargée
s’ache avec un nom rouge.
Français
Etape 5:
Pour visionner la vidéo sans la télécharger, vous
pouvez cliquer sur la vidéo désirée. La vidéo est
maintenant diusée sur votre smartphone.
Etape 6:
Pour supprimer une vidéo de la carte microSD,
sélectionnez l’icône crayon, puis sélectionnez la
vidéo et appuyez sur l’icône Corbeille.
29
Page 30

8. Maintenance
• Veuillez éteindre immédiatement l’appareil et débrancher le cordon d’alimentation en cas de fumée,
d’odeur désagréable ou de bruit anormal. Veuillez contacter votre revendeur local ou le service
après-vente.
• Évitez les taches d’huile et/ou les produits chimiques qui pourraient endommager la surface de la
lentille.
• Tous les travaux d’inspection et de réparation doivent être eectués par des techniciens qualiés.
Nous ne sommes pas responsables des problèmes causés par des modications ou des réparations
Français
non autorisées.
8.1. Mise à jour du micrologiciel
La LampCam recherche automatiquement les mises à jour de
rmware. Lorsque la LampCam détecte un nouveau rmware, elle va
automatiquement télécharger. La prochaine fois que l’utilisateur se
connecte à la LampCam, l’application lui demande si l’utilisateur souhaite
mettre à jour le système. Cliquez sur ‘OK’ pour lancer la mise à jour du
rmware. Ce processus dure environ 5 minutes.
8.2. Réinitialisation des réglages
Etape 1:
Etape 2:
Etape 3:
Etape 4:
Etape 5:
En dessous de la LampCam, ouvrez le compartiment en desserrant la vis.
Utilisez l’aiguille de réinitialisation fournie et appuyez sur le bouton de réinitialisation
pendant 10 secondes.
La LED d’alimentation commence à clignoter et la réinitialisation d’usine est eectuée.
Ce processus prendra environ 60 secondes. Attendez que la LampCam émette deux bips et
que la LED bleue commence à clignoter.
ermez le compartiment en remettant le couvercle et en serrant la vis.
RESETU SB
Touche de réinitialisation
Aiguille de réinitialisation
9. Support
Pour de plus amples informations :
www.blaupunkt.com/service
Blaupunkt Competence Center Security & Care
www.blaupunkt.com
Security Brand Pro GmbH
Mondstrasse 2-4
85622 Feldkirchen-München, Germany
© Sous réserve de modications techniques et d’erreurs.
Conseil:
• Ce manuel est à titre de référence seulement. Une diérence mineure peut être trouvée dans
l’interface utilisateur. Tous les designs et logiciels sont sujets à changement sans préavis.
• Toutes les marques déposées mentionnées sont la propriété de leurs dépositaires respectifs.
• Veuillez visiter notre site Web ou contacter votre technicien d’entretien local pour plus
d’informations à l’adresse suivante : http://security.blaupunkt-service.com
30
Page 31

Italiano | Manuale
1. Il kit contiene
a
HOS-X20
LampCam
d
Piantina di
installazione
2. Descrizione del prodotto
Lampada LED
Lenti della videocamera
Sensore PIR
Microfono
Sensore di luce
Supporto e
Trasformatore
Antenna
b
Antenna
e
1x Chiave Esagonale
2x Viti
2x Tasselli di plastica
MicroSD
Card Slot
c
Supporto di
montaggio
f
Chiave per reset
Italiano
Altoparlante
RESET USB
Tasto di Reset
LED Indicatore di
accensione
LED Indicatore
porta di rete
Porta Micro USB
NOTA:
Questa manuale la prima installazione della HOS-X20.
Per ulteriori informazioni o gli ultimi aggiornamenti, siete pregati di visitare il sito
http://security.blaupunkt-service.com
31
Page 32

3. Installazione
3.1. IMPORTANTE - Leggere prima dell’installazione
• Prima dell’installazione, vi preghiamo di assicurarvi che la struttura del muro / la supercie di
installazione possa supportare almeno 3 volte il peso della LampCam.
• Vericare la potenza del segnale Wi-Fi. Per assicurarsi che la connessione della sia il più stabile
possibile, vericare che il segnale Wi-Fi sia molto potente nel luogo di installazione. La larghezza di
banda consigliata è di 1Mbps (velocità di upload/download).
• Raccomandazioni: Evitare di rivolgere le lenti direttamente verso la luce solare e, se possibile,
installarla sotto un tetto sporgente, un cornicione (Fig.1) o in una posizione che ora una buona
Italiano
protezione contro la pioggia battente.
• Se volete inserire una scheda MicroSD, vi consigliamo di farlo prima del processo di installazione.
Per ulteriori informazioni, vi preghiamo di vedere le speciche di installazione della MicroSD.
• Per delle prestazioni ottimali, vi consigliamo di installare la LampCam a un’altezza di 2,5 metri.
Fig.2:
Pic.1
Altezza 2,5m
Pic.2
Portata di rilevamento
del PIR 5m
Rilevazione di
movimento 90º
3.2. Installazione scheda Micro SD
Passo 1:
Passo 2:
Passo 3:
NOTA:
Per le registrazioni locali è obbligatoria la scheda Micro SD.
Assicurarsi che la MicroSD sia del tipo CLASS10. Supporta schede MicroSD da 8GB a 128GB.
Aprire lo scomparto sito sulla base della LampCam,
allentando la vite.
Installare la scheda SD nell’apposita fessura.
Chiudere lo scomparto riposizionando la carcassa e stringendo la vite.
A
A
3.3. Facoltativo: Prova di funzionamento della LampCam
prima dell’installazione
Prima di installare la LampCam, è possibile accenderla tramite la porta micro USB, utilizzando una
batteria portatile o un alimentatore da 2A. Attendere nché la LampCam emetta un doppio bip e
la spia LED di colore blu inizi a lampeggiare. (Questo processo potrebbe durare circa 60 secondi,
assicurarsi che la spia LED lampeggiante sia di colore blu). Quindi, fare riferimento al capitolo “4.1.
Collegare una LampCam”.
NOTA: La spia LED della LampCam non si accenderà quando sarà collegata tramite USB.
32
Page 33

3.4. Installazione della LampCam
IMPORTANTE:
La congurazione e l’installazione della
LampCam devono essere eseguite da una
persona qualicata. NON cercare di eseguire
l’installazione se non possedete le necessarie
competenze.
Passo 1:
Assicurarsi di aver scollegato l’energia elettrica
del contatore, prima di questo passaggio.
1
O
5
A
Passo 6:
Far passare i cavi dal muro attraverso la parte
posteriore del supporto e collegarli come di
seguito:
-Cavo fase (marrone) alla morsettiera con il cavo
marrone.
-Cavo neutro (blu) alla morsettiera con il cavo
blu.
-Cavo messa a terra (giallo/verde):
Si collegherà al passo 8.
Ora riposizionare la morsettiera nel supporto.
Italiano
Passo 2:
Scegliere il luogo di installazione della LampCam.
Il luogo di installazione deve orire dei cavi da
220VCA (messa a terra, fase e neutro).
(Ad es., quelli di un’altra lampada da esterni).
Passo 3:
Posizionare la piantina di installazione in
dotazione sul muro e segnare con una matita i 2
fori da praticare
Passo 4:
Praticare i 2 fori sulla supercie del muro.
Estrarre i tasselli di plastica dal kit degli accessori di
installazione e inserirli nei 2 fori appena praticati.
Passo 5:
Praticare un piccolo foro con un oggetto
appuntito nella posizione sul cuscinetto in
gomma e far passare i cavi dal muro, attraverso
la parte posteriore del supporto, no alla
morsettiera.
A
6
morsettiera
In Alto
Passo 7:
Estrarre le viti dal kit degli accessori di
installazione e avvitare il supporto al muro.
Assicurarsi che l’indicazione “IN ALTO” si trovi nella
parte superiore.
7
In Alto
33
Page 34

Passo 8:
Collegare il cavo di messa a terra (giallo/verde) alla
vite verde, che presenta un’icona della terra, sul retro
della videocamera.
Poi collegare il cavo della LampCam alla scatola nera
di connessione, sita sul supporto.
Installare la LampCam sul supporto.
8
In Alto
Italiano
Collegare qui
Passo 9:
Install the LampCam on the mounting bracket.
9
Passo 11:
Regolare l’angolo di inclinazione della LampCam
stringendo le “viti di regolazione”.
11
Viti di regolazione
Passo 12:
Regolare l’angolo orizzontale della LampCam a circa
30 gradi verso destra o verso sinistra.
Allentare la vite sul retro aiutandosi con la chiave
esagonale, compresa nel kit degli accessori di
installazione. Stringerla accuratamente quando si
termini l’operazione.
12
Passo 10:
Stringere la vite del supporto, aiutandosi con la
chiave esagonale in dotazione.
10
34
Viti di regolazione
Passo 13:
Dopo aver completato l’installazione, ripristinare
la corrente e la lampada LED della LampCam si
accenderà.
13
Page 35

4. Funzioni della LampCam e APP
4.1. Come collegare una LampCam:
Passo 1:
Passo 2:
Scaricare e installare la APP “OMGuard HD” sullo
smartphone
Sullo smartphone, entrare nelle impostazioni Wi-Fi e selezionare la nuova rete Wi-Fi che
inizia con HD (esempio: HD-15584), per collegarsi alla stessa. Questa rete è un Wi-Fi
creato dalla LampCam per consentire il procedimento di congurazione.
For iOS
and Android
Passo 3:
Passo 4:
Passo 5:
Passo 6:
Passo 7:
Passo 8:
Inserire la password per difetto della LampCam, 12345678, e salvare le impostazioni per
collegarsi. Non ci sarà connessione a Internet, ma si potrà continuare il procedimento di
congurazione della LampCam.
Ora avviare la App OMGuardHD e premere sul tasto “aggiungi videocamera”
In “Nome sistema” digitare il nome che si vuole assegnare alla LampCam.
Ad es., “Porta principale”
Premere su “Scansiona marchio
DID” (per Android) o sull’icona QR
(per iOS) e scansionare il marchio
del codice QR, sito sul retro della
LampCam.
In “Codice di Sicurezza” inserire
il codice di sicurezza per difetto
123456.
Premere su “Salva”.
4.2. Impostazioni Wi-Fi:
Passo 1:
Passo 2:
Passo 3:
Passo 4:
Nel menù della LampCam, premere l’icona di congurazione e poi l’icona delle
impostazioni della LampCam prescelta. Poi premere sul tasto “Avanzate”.
Inserire la “Password amministratore” (per difetto 123456).
Per ragioni di sicurezza, la APP richiederà di modicare la password amministratore per
difetto. (La password amministratore si utilizzerà per accedere al menù impostazioni e
per attivare / disattivare la LampCam). Si raccomanda di annotare questa password in
un posto sicuro. In caso contrario, se si dimenticasse, si dovrebbero ripristinare i valori
di fabbrica della videocamera.
Scorrere verso il basso, entrare nelle impostazioni Wi-Fi e premere su “Gestione rete Wi-Fi”.
Italiano
5
Porta principale
7
8
6
Passo 5:
Passo 6:
Selezionare l’Access Point Wi-Fi dal menù a discesa e inserire la password di tale Wi-Fi.
Poi premere su “OK”.
La LampCam sarà oine per circa 60 secondi, mentre si riavvia. Quando la LampCam
si colleghi correttamente al router Wi-Fi, l’indicatore LED della rete, di colore blu,
rimarrà acceso. D’ora in avanti, si può accedere remotamente alla LampCam in qualsiasi
momento e da qualsiasi luogo.
35
Page 36

5. Congurazione della LampCam
Nel menù della LampCam, premere l’icona di congurazione e poi l’icona delle impostazioni della
LampCam prescelta. Quindi, premere sul pulsante “Avanzate” per entrare nel “Menù delle Impostazioni
Avanzate”. Per ragioni di sicurezza, si dovrà inserire la “Password amministratore”
5.1. Impostazioni della sensibilità:
Scorrere verso il basso no a “Impostazioni Sensibilità”. In “Modalità Rilevamento”, selezionare “PIR”
per attivare la rilevazione di movimento PIR (impostazioni predenite di fabbrica). La rilevazione di
movimento PIR possiede una portata di 5m. Per disattivare la rilevazione di movimento, selezionare
“OFF”.
5.2. Impostazioni della luce:
Scorrere verso il basso no a “Impostazioni Luce” e selezionare la “Modalità automatica luce” desiderata.
Mediante azionamento: Selezionare quest’opzione per accendere la luce per 1 minuto dopo la rilevazione
Italiano
di movimento PIR. (Controllare nel capitolo 5.1 che la rilevazione PIR sia attiva). Trascorso il minuto, la luce
si spegnerà. (Si deve selezionare il PIR nelle “Impostazioni Sensibilità”). La luce si accenderà solamente se è
presente illuminazione ambientale.
Mediante programmazione manuale: Selezionare quest’opzione per accendere
la luce in base a un orario programmato. Per congurare l’orario, selezionare
“Modica Programmazione Luce”.
Selezionare un’ora di inizio: Cliccare sul pulsante blu 00:00AM, nella parte alta. In
alto, selezionare i giorni della settimana prescelti. Selezionare l’ora di accensione
della luce. Il formato dell’ora è di 12 ore: selezionare AM o PM per denire il periodo
del giorno.
Selezionare un’ora di termine: Cliccare sul pulsante nero 00:00AM, nella parte
bassa. In basso, selezionare i giorni della settimana prescelti. Selezionare l’ora di
spegnimento della luce. Il formato dell’ora è di 12 ore: selezionare AM o PM per
denire il periodo del giorno.
Cliccare sul pulsante “Salva” in basso per salvare le impostazioni.
Nota: È obbligatorio selezionare i giorni della settimana, altrimenti la programmazione non funzionerà.
Nota:
Il PIR, azionato tramite rilevazione di movimento e programmazione manuale, funzionerà solo
nella modalità AUTOMATICA. Vedere il capitolo “6. Funzioni Live View”, per ulteriori dettagli.
5.3. Impostazioni scheda SD:
Cliccare su “Formatta Scheda-SD” per formattare la scheda SD. Quest’azione cancellerà tutti i video e
le immagini della scheda SD. Se è attiva la casella “Sovrascrivi Scheda-SD”, la LampCam sovrascriverà
le vecchie registrazioni quando la memoria sia piena. Se è disattiva, quando la memoria sia piena la
LampCam non registrerà alcun evento.
5.4. Notiche:
Notiche push: Scorrere verso il basso no a “Attiva
Notiche”. Attiva
Attivare/Disattivare le notiche push quando il
movimento è rilevato nella modalità di attivazione.
(Attivate per difetto)
Notiche e-mail: Per attivare le stesse informazioni
delle notiche push per la e-mail, scorrere verso il
basso no a “Impostazioni e-mail” e cliccare su “Imposta
e-mail”. Congurare in base alla tabella qui a destra.
Nota: Assicurarsi che l’“Autenticazione a due fattori” sia
disattivata nell’account e-mail del mittente. (ad es. Google,
Outlook365). Per saperne di più, vedere le istruzioni del
fornitore di servizi e-mail.
36
SSL
SMTP Server
SMTP Port
Username
Password
Destinatario
Attiva / disattiva la cifratura SSL
Inserire l’indirizzo del server SMTP.
Per saperne di più, vedere le istruzioni
del fornitore di servizi e-mail.
Per Gmail utilizzare smtp.gmail.com
Se SSL non è attiva, utilizzare “25”.
Se SSL è attiva, utilizzare “465”
Il nome utente dell’account e-mail
del mittente. Ad es.: nomeutente@
gmail.com
La password dell’account e-mail del
mittente.
Indirizzo email del destinatario
Page 37

6. Funzioni Live View
Passo 1:
Passo 2:
Passo 3:
Passo 4:
Aprire la App OMGuard HD.
Nel menù della LampCam, premere due volte sulla LampCam prescelta per accedere
alla trasmissione in diretta.
Per ragioni di sicurezza, la prima volta che si accede alla LampCam, la APP richiederà
di modicare il codice di sicurezza per difetto. (Il codice di sicurezza si utilizza per
stabilire la comunicazione fra la LampCam e lo smartphone. È diverso dalla password
amministratore). Si raccomanda di annotare questa password in un posto sicuro. In
caso contrario, se si dimenticasse, si dovrebbero ripristinare i valori di fabbrica della
videocamera.
Vedere la tabella qui sotto per saperne di più riguardo le operazioni disponibili nel
menù Trasmissione in diretta.
Cliccare sul pulsante attiva/disattiva, per attivare o disattivare la
LampCam. Per questa azione, la App richiederà il codice amministratore.
Se la videocamera rileva movimenti durante la modalità di attivazione,
invierà una notica push e avvierà la registrazione di un video per 60
secondi.
Nota: Le notiche push e la rilevazione di movimento PIR devono
rimanere attive nelle impostazioni avanzate (attive per difetto).
Scattare un’istantanea dell’attuale riproduzione video.
L’istantanea sarà memorizzata sullo smartphone e si troverà nella
galleria di foto dello stesso.
Avviare una registrazione video di 60 secondi, senza pausa,
memorizzandola sulla scheda Micro-SD della LampCam.
La scheda SD è obbligatoria per questa caratteristica.
Per trovare i video, vedere il menù “Riproduzione eventi”.
Italiano
Attivare / disattivare il microfono, per ascoltare mediante la LampCam.
Pulsante Push-to-talk: Premere questo pulsate e tenerlo premuto per
parlare, usando il cellulare, attraverso la LampCam.
Per smettere di parlare, rilasciare il pulsante.
Premere questo pulsante per attivare la sirena d’allarme per 60 secondi.
Per arrestare la sirena, preme nuovamente l’icona.
Torna al menù della LampCam
Trascinare la barra per regolare la luminosità della LampCam, da
0 a 800lm. Premere l’icona a forma di lampadina per ACCENDERE/
SPEGNERE o mettere in AUTOMATICO la luce.
ACCESA: La luce della LampCam rimarrà sempre accesa.
SPENTA: La luce della LampCam rimarrà sempre spenta.
AUTOMATICO: La luce si accenderà automaticamente, in base alle
impostazioni dell’attivazione della luce. Vedere capito 5.2.
Il PIR, azionato tramite rilevazione di movimento e programmazione
manuale, funzionerà solo nella modalità AUTOMATICA.
37
Page 38

7. Riproduzione eventi
Importante: Per far funzionare questa caratteristica è necessario che la LampCam abbia installata una
scheda MicroSD. Vedere il capitolo “3.2. Installazione scheda Micro SD”.
Passo 1:
Nel menù della LampCam, premere l’icona di
congurazione e poi l’icona del blocco note della
LampCam prescelta.
Italiano
Passo 2:
Selezionare un punto di inizio e uno di termine,
anché la LampCam cerchi fra le registrazioni
video. Poi premere “OK”.
Passo 3:
La LampCam mostrerà tutte le registrazioni video
comprese nell’intervallo selezionato. Ogni video
mostrerà la data e l’ora di registrazione.
Passo 4:
Per scaricare un video, cliccare sull’icona di
download del video desiderato, sita sulla destra.
Il video si scaricherà nello smartphone e si
troverà nella galleria dello stesso.
Il nome del video scaricato apparirà in rosso.
Passo 5:
Per guardare il video senza scaricarlo, cliccare
sul video desiderato. Ora il video sarà riprodotto
nello smartphone.
38
Passo 6:
Per cancellare un video dalla scheda MicroSD,
selezionare l’icona a forma di matita, selezionare il
video e premere sull’icona del cestino.
Page 39

8. Manutenzione
• Spegnere l’alimentazione e scollegare il cavo elettrico, in caso di fumo, odori sgradevoli o rumore.
Contattare il nostro rivenditore locale o il nostro servizio al cliente per ottenere aiuto.
• Evitare le macchie d’olio e le macchie di prodotti chimici, che potrebbero danneggiare la supercie
delle lenti.
• Tutti i lavori di esame e riparazione devono essere eseguiti da ingegneri qualicati. Non assumiamo
alcuna responsabilità per qualsiasi problema causato da modiche o tentativi di riparazione non
autorizzati.
8.1. Aggiornamento del rmware
La LampCam cercherà automaticamente gli aggiornamenti del
rmware. Quando la LampCam rilevi un nuovo rmware, lo scaricherà
automaticamente. Quando l’utente entri la prossima volta nella
LampCam, la app gli chiederà se vuole aggiornare il sistema. Cliccare su
“OK” per avviare l’aggiornamento del rmware. Il processo durerà circa
5 minuti.
8.2. Factory Reset
Passo 1:
Passo 2:
Passo 3:
Passo 4:
Passo 5:
9. Assistenza
NOTA:
• Questa manuale è solamente un riferimento. Si potrebbero rilevare delle leggere dierenze
nell’interfaccia utente.
• Tutti i design e i software possono cambiare senza preavviso.
• Tutti i marchi commerciali e i marchi commerciali registrati menzionati sono proprietà dei loro
rispettivi titolari.
• Per ulteriori informazioni, vi preghiamo di visitare il nostro sito web o di rivolgervi all’ingegnere del
vostro servizio locale: http://security.blaupunkt-service.com
Aprire lo scomparto sito sulla base della LampCam, allentando la vite.
Utilizzare il perno di reset in dotazione e premere il pulsante reset per 10 secondi.
L’indicatore LED inizierà a lampeggiare e inizierà il ripristino ai valori di fabbrica.
Questo processo durerà circa 60 secondi. Attendere nché la LampCam emetta un
doppio bip e la spia LED di colore blu inizi a lampeggiare.
Chiudere lo scomparto riposizionando la carcassa e stringendo la vite.
RESETU SB
Tasto di reset
Per ulteriori informazioni riguardo il prodotto, vi preghiamo di vistare il sito
www.blaupunkt.com/service
Centro di competenza Blaupunkt Sicurezza e assistenza
www.blaupunkt.com
Security Brand Pro GmbH
Mondstrasse 2-4
85622 Feldkirchen-München, Germany
© Salvo modiche tecniche ed errori
Chiave per reset
Italiano
39
Page 40

Español | Manual de usuario
1. Contenido del Kit
a
HOS-X20
LampCam
d
Mapa de Posición
de la Instalación
Español
2. Product Description
Lampara LED
Lente de Camera
Sensor PIR
Micrófono
Sensor de Luz
Soporte de
Instalación y
Alimentación y
Transformador
Antena
b
Antena
e
1x Llave Hexagonal
2x Tornillos
2x Tacos de Plástico
Tarjeta
MicroSD
c
Soporte de
Instalación
f
Pin para Reinicio
Altavoz
RESET USB
Botón de Reinicio
Indicador LED de
Alimentación
Indicador
de Red
Puerto Micro USB
NOTA:
Esta manual de usuario explica la instalación y como congurar por 1ª vez su HOS-X20.
Para mas información, por favor viste nuestra pagina web:
http://security.blaupunkt-service.com
40
Page 41

3. Instalación
3.1. IMPORTANTE – Lea antes de instalar
• Antes de la instalación, por favor asegúrese de que la supercie o la pared de instalación pueda
aguantar al menos 3 veces el peso de la LambCam.
• Para garantizar que la conexión de su LampCam sea la mas estable posible, compruebe que la
intensidad de la señal Wi-Fi sea muy alta en el lugar de su instalación. El ancho de banda sugerido es
1Mbps (velocidad de carga y descarga)
• Recomendación: Evite que la lente apunte directamente al sol y si es posible sitúela bajo el tejado, un
alero (Foto.1) o cualquier otro sitio donde este protegida de la fuerte lluvia.
• Si desea instalar una microSD, aconsejamos hacerlo antes del proceso de instalación. Por favor
reérase al apartado 3.2 “Instalación de Memoria Micro SD” para mas información.
• Para obtener el mejor rendimiento, por favor instale la LampCamp a una altura de 2.5 metros
(Foto.2).
Foto 1 Foto 2
Rango de Detecció PIR 5m
Detección de movi-
Altura 2.5m
miento 90°
3.2. Instalación de Memoria Micro SD
Paso 1:
Paso 2:
Paso 3:
NOTA:
La memoria Micro SD es necesaria para grabaciones locales. Por favor asegúrese que la memoria
sea de CLASE10. Permite usar tarjetas MicroSD de 8GB a 128GB.
En la parte inferior del LampCam bra el compartimento
ojando el tornillo.
Inserte la memoria Micro SD en la ranura correspondiente
Cierre el compartimento y atornille la tapa.
A
A
3.3. Opcional: Prueba la LampCam antes de Instalar
Antes de realizar la instalación, la LampCam permite encenderlo a traves del puerto micro USB
(alimentación de 2A). Espera hasta que la LampCam pite dos veces y los LED en la parte inferior empiecen
a parpadear. (Este proceso tarda unos 60 segundos, asegúrese de que el LED esté parpadeando en color
azul). Posteriormente vaya al capitulo 4.1 “Añadir LampCam”.
Español
41
Page 42

3.4. Instalación de LampCam
IMPORTANTE:
La Conguración e Instalación de la
LampCam solo debería realizarla alguien con
conocimiento en cuanto al sistema eléctrico.
NO intente la instalación si no posee estos
conocimientos.
Paso 1:
Por favor asegúrese que haya apagado el
interruptor general de la vivienda antes de
continuar.
1
Español
apagado
5
A
Paso 6:
Conecte los cables de la siguiente forma:
- Cable de Fase (marrón) con el cable marrón
de la caja de conexiones.
- Cable neutro (azul) con el cable azul de la
caja de conexiones
-Cable de tierra (amarillo/Verde): Déjelo
colgando, lo conectaremos en el Paso 8
Coloque ahora la caja de conexiones negra en el
soporte de instalación.
Paso 2:
Encuentre la posición deseada para la instalación
de su LampCam. El lugar de instalación debe
disponer de cableado de 220V AC (tierra, fase y
neutro). P.ej. sustituye una lampara exterior por la
LampCam
Paso 3:
Taladre los 2 agujeros en la pared. Inserte los tacos
de plástico que vienen en el kit en los agujeros
realizados.
Paso 4:
Drill the 2 mounting holes on the wall. Take
the plastic dowels included in the installation
accessories set and insert them into the 2 holes that
where just drilled.
Paso 5:
Haga un agujero pequeño con un objeto alado en
la goma en la posición y guíe los cables de la
pared a través de la parte trasera del soporte de
instalación hasta la caja de conexiones.
A
42
6
Caja de conexiones
Up
Paso 7:
Atornille el soporte de instalación en la pared.
Asegúrese de que “UP” este arriba.
7
Up
Page 43

Paso 8:
Conecte el cable de tierra (amarillo/verde) y al
tornillo verde con el icono de tierra en la parte
trasera de la camera.
A continuación conecte el cable de la LampCam
a la caja de conexiones negra en el soporte de
instalación.
8
Paso 11:
Ajuste el ángulo de inclinación de la LampCam
aojando el tornillo de ajuste.
11
Up
Connect here
Paso 9:
Instale la LampCam sobre el soporte de
instalacion.
9
Paso 10:
Atornille la LampCam al soporte de instalación con
la llave hexagonal incluida en el kit.
10
Tornillo de ajuste de
inclinación
Paso 12:
Puede ajustar el ángulo horizontal de la LampCam
aproximadamente 30 grados a izquierda o derecha.
Una vez en la posición deseada, apriete el tornillo
para jar el ángulo.
12
pan angle
adjusment screws
Paso 13:
Una vez terminada la instalación, vuelva a
conectar el interruptor general de la vivienda y la
lampara se encenderá.
Español
13
prendido
43
Page 44

4. Uso del LampCam y la APP
4.1. Añadir LampCam:
Paso 1:
Paso 2:
Descargue e instale la aplicación “OMGuard HD” en
su móvil.
Ve a los ajustes Wi-Fi de su móvil y seleccione la nueva red Wi-Fi cuyo nombre empieza con
HD (p.ej. HD-15584) para conectarse. Esta red es una red Wi-Fi creada por su
LampCam para el proceso de conguración.
For iOS
and Android
Paso 3:
Paso 4:
Español
Paso 5:
Paso 6:
Paso 7:
Paso 8:
4.2. Ajustes Wi-Fi:
Paso 1:
Paso 2:
Paso 3:
Introduzca la contraseña predeterminada 12345678 y guarde los ajustes para
conectarse. No tendrá conexión a Internet pero podrá continuar con el proceso de
conguración de su LampCam
Ahora inicie la app OMGuard HD y seleccione “agregar nuevo sistema”.
En “Nombre del sistema” escriba el nombre deseado para su LampCam , p.ej. “ Puerta Principal”
Pulse “Etiqueta de DVD de
escaneo” (para Android) o el icono
QR (para iOS) y escanee el código
QR en la parte trasera de la LampCam.
5
Puerta principal
7
En “Código de seguridad”
introduzca la contraseña 123456.
Pulse Guardar
8
6
En el Menú de la LampCam pulse el icono de congurar cámara y pulse ajustes
A continuación pulse el botón “Avanzado”
Introduzca la “Contraseña Admin” (por defecto 123456).
Por motivos de seguridad la App solicitará que cambies la contraseña admin
predeterminada. (La contraseña Admin se usa para entrar en el menú de ajustes y para
encender y apagar la alarma. Recomendamos escribir la contraseña y guardarla en un
lugar seguro. Si olvida su contraseña necesitaría restablecer de fabrica el equipo.
Paso 4:
Paso 5:
Paso 6:
44
Busque “Conguración Wi-Fi” y pulse “Administrar red WiFi”
Seleccione el Wi-Fi de su vivienda, introduzca su contraseña Wi-Fi y pulse “OK”
El LampCam se reiniciará y estará inoperativo durante aproximadamente 60 segundos.
Cuando el LampCam conecte con su router Wi-Fi correctamente, el indicador LED azul
de la red se encenderá y permanecerá encendido. De ahora en adelante, podrá acceder
remotamente al LampCam en cualquier momento desde cualquier sitio.
Page 45

5. Conguración de su LampCam
En el menú con la lista de cámaras, pulse el icono de conguración morado y a continuación pulse el
botón de ajustes de la LampCam. Posteriormente pulse el botón “Avanzado” para entrar en el menú de
conguración. Por razones de seguridad, se te pedirá que introduzcas la clave Admin.
5.1. Conguración de Sensibilidad:
Ve a “Conguración de sensibilidad”. En modo de detección seleccione “PIR” para activar la detección
de movimiento PIR (ajuste predeterminado de fábrica). El modo PIR tiene un radio de detección de
5 metros. Para desactivar la detección de movimiento seleccione “Apagado”.
5.2. Lighting Setting:
Ve a “Lighting Setting” y seleccione el modo de iluminación:
Por disparador: Seleccione esta opción para que se encienda la luz durante un minuto después de
detectar movimiento. (Por favor asegúrese de que la detección PIR este activada. - véase el apartado 5.1)
Después de un minuto la luz se apagará. Las luces solo se encenderán si hay poca luminosidad.
Por horario manual: Seleccione esta opción para encender la luz según el horario
establecido. Para establecer un horario seleccione “Lightning Schdule Modify”.
Seleccione hora de inicio: Pulse el botón azul 00:00 y seleccione en la parte
superior los días de la semana que quiere incluir. Seleccione la hora a la cual
quiere que se encienda la luz. EL formato horario es de 12h - seleccione AM o PM
para denir la hora.
Select a Ending time: Pulse el botón negro 00:00AM seleccione en la
parte inferior los días de la semana que quiere incluir. Seleccione la hora a la
cual quiere que se apague la luz. EL formato horario es de 12h - seleccione
AM o PM para denir la hora.
Nota: Es necesario seleccionar al menos un día de la semana, de lo contrario no funcionará el horario.
Nota:
El disparador de la detección de movimiento y el horario manual solo funcionaran en
Modo Auto. Veáse el apartado 6. “Función de Vista en Directo” para mas detalles.
Español
5.3. Ajustes de Memoria SD:
Pulse “Formateo de tarjeta SD” para formatear la tarjeta de memoria SD. Esto eliminará todos los
vídeos y las imágenes de la memoria SD. Si la casilla de vericación “Sobreescribir tarjeta SD”
esta activada, la LampCam sobreescribirá las grabaciones mas antiguas cuando se llene la
memoria. Si esta desactivado, una vez se llene la memoria SD la LampCam dejará de grabar.
5.4. Noticaciones:
Noticaciones Push: Ve a “Noticación habilitado”. para
activar o desactivar las noticaciones Push que recibes
cuando el PIR detecte movimiento estando la alarma
activada (habilitado por defecto).
Noticaciones por correo: Para habilitar la recepción de
noticaciones por correo, ve a “Conguración de email” y
pulse “Establecer correo electrónico”. Congure de acuerdo
con la tabla de la derecha.
Nota: Asegúrese que este deshabilitado la doble
autenticación en su sistema de correo. (p.ej. Google,
Outlook365).
SSL
Servidor
SMTP
Puerto
SMTP
Usuario
Contraseña
Receptor
Activar / desactivar encriptación SSL
Introduzca el servidor SMTP. Para
obtener más información, consulte
con su proveedor de correo.
Para Gmail use smtp.gmail.com
Si SSL no esta activado, use “25”
Si SSL esta activado, “465”
El nombre de usuario de la cuenta
emisora Ej: usuario@gmail.com
La contraseña de la cuenta de
correo emisora (remitente)
Email de la cuenta receptora
45
Page 46

6. Función de “Vista en Directo”
Español
Paso 1:
Paso 2:
Paso 3:
Paso 4:
Abra la app OMGuard HD.
En el menú de la LampCam pulse la cámara deseada para acceder a la vista en directo.
Por motivos de seguridad la primera vez que quieras acceder a la LampCam la App te
pedirá modicar el código de seguridad predeterminado. (El código se usa para establecer
una comunicación entre el LampCam y el Smartphone. No debe confundirse este condigo
con el código Admin). Recomendamos escribir la contraseña y guardarla en un lugar
seguro. Si olvida su contraseña necesitaría restablecer de fabrica el equipo.
Reérase a la tabla inferior para conocer mas sobre las operaciones posibles que ofrece el
Menú de vista en directo.
Pulse el botón arm / disarm para activar o desactivar la LampCam. La
App te preguntara por el código Admin para realizar esta acción.
Si la cámara detecta movimiento estando activado, este mandará un
mensaje push y realizará una grabación de 60 segundos.
Nota: Deben estar activados las noticaciones Push y la detección de
movimiento PIR en los ajustes avanzados. (activados por defecto).
Toma una foto durante la vista en directo.
Las fotos se almacenarán en su smartphone donde podrás
verlas en la galería de fotos.
Haz un vídeo de 60 seg sin pausas que se almacena en la micro
SD. Es necesario tener una tarjeta SD para esta función. Para
encontrar los vídeos por favor reérase al menú de eventos.
46
Activa / desactiva el audio para escuchar a través del LampCam.
Botón para hablar: Pulse y mantenga este botón apretando para
hablar a través de su LampCam desde el móvil. Suelte el botón para
dejar de hablar.
Pulse este botón para iniciar una sirena de 60 segundos. Puede
pararla anticipadamente pulsando de nuevo el botón.
Vuelva al menú de la LampCam
Deslice la barra para ajustar el brillo de la lampara de 0 a 800Im. Pulse el
icono de la bombilla para encender, apagar o ponerlo en AUTO.
ON: Luz encendida de forma permanente.
OFF: Luz apagada de forma permanente.
AUTO: La luz se encenderá automáticamente de acuerdo a la
conguración de la iluminación - vea el apartado 5.2.
La detección de movimiento PIR y el horario manual solo funcionarán
bajo el modo AUTO.
Page 47

7. Reproducción de eventos
Importante: Para que esto funcione debe de haber insertado una memoria micro SD en la LampCam
o no funcionará. Reérase al capitulo 3.2 Instalación de Memoria Micro SD.
Paso 1:
En el menú inicial de la LampCam pulse el
icono de conguración y a continuación pulse
el icono libreta de la LampCam deseada.
Paso 2:
La LampCam mostrará todos los vídeos grabados
en el periodo de búsqueda. Cada vídeo tiene
fecha y hora de la grabación.
Paso 3:
La LampCam mostrara todos los vídeos grabados
en el periodo de búsqueda. Cada vídeo tiene
fecha y hora de la grabación.
Paso 4:
Para descargar el vídeo pulse el icono de
descargar a la derecha del vídeo deseado. El
vídeo se descargará en su móvil y podrá verlo
en su galería de vídeos.
Los vídeos que haya descargado se mostraran
con el nombre en rojo.
Español
Paso 5:
Para ver un vídeo sin descargarlo puede pulsar
sobre el vídeo y lo podrá verlo en su smartphone.
Paso 6:
Para borrar un vídeo de la memoria micro SD
pulse el lapiz y seleccione el vídeo deseado, a
continuación pulse el botón de la papelera.
47
Page 48

8. Maintenance
• Por favor apague el dispositivo y desenchufe el cable de alimentación. Si hay humo, olores
desagradables o ruidos por favor contacte con su vendedor o con el soporte técnico.
• Evite manchas de aceite o productos químicos que dañen la supercie de la lente.
• Todos los controles y las reparaciones solo deben ser realizadas por el personal cualicado. No somos
responsables de los daños o de los problemas causados por las modicaciones no autorizadas.
8.1. Actualización del Firmware
La LampCam buscara actualizaciones de forma automática. Cuando la
LampCam encuentre una nueva actualización lo descargara
automáticamente. La próxima vez que el usuario inicie sesión en la app
se le preguntará si quiere actualizar su sistema. Pulse ok para realizar la
actualización. Este proceso dura unos 5 minutos.
Español
8.2. Restablecimiento de Fabrica
Paso 1:
Paso 2:
Paso 3:
Paso 4:
Paso 5:
En la parte inferior de la LampCam abra el compartimiento aojando el tornillo.
Use el Pin incluido en el kit y pulse el botón de restablecimiento durante 10 segundos.
El LED de alimentación empezara a parpadear y el restablecimiento de Fabrica comenzará.
Este proceso durará unos 60 segundos. Espera a que el equipo pite dos veces y el indicador
LED azul empiece a parpadear.
Cierre el compartimento atornillando la tapa de nuevo.
RESETU SB
Botón de restablecimiento
Pin de restablecimiento
9. Soporte/Ayuda
Para mas informacion de producto, por favor
visite www.blaupunkt.com/service
Blaupunkt Competence Center Security & Care
www.blaupunkt.com
Security Brand Pro GmbH
Mondstrasse 2-4
85622 Feldkirchen-München, Germany
© Cambios técnicos y errores exceptuados
NOTE:
• Este manual de usuario sirve solo como referencia. Podría haber pequeñas diferencias en la
interfaz del usuario.
• Todos los diseños y el software están sujetos a cambios sin previo aviso.
• Todas las marcas comerciales mencionadas son propiedad de sus respectivos propietarios.
• Por favor visite nuestra pagina web o contacte con su servicio técnico local, para más
información: http://security.blaupunkt-service.com.
48
Page 49

Polski | Skrócona instrukcja obsługi
1. Zawartość zestawu
a
HOS-X20
LampCam
d
Instalacja
mapy
pozycjonowania
2. Opis produktu
Lampa LED
Obiektyw aparatu
Czujnik PIR
Mikrofon
Mniejszy czujnik
Montowanie
wspornika
i moc
transformatora
Antena
b
Antena
e
1x klucz sześciokątny
2x śruby
2x Plastikowy
kołek
Wejście
MIcroSD
c
Montowanie
wspornika
f
Zresetuj pin
Polski
Głośnik
RESET USB
Przycisk reset
Dioda zasilania LED
Wskaźnik Sieci
Port MicroUSB
UWAGA:
W przewodniku szybkiego startu objaśniono instalację i pierwszą kongurację urządzenia HOS-X20.
W celu uzyskania dalszych informacji lub najnowszych zaktualizowanych wersji odwiedź naszą stronę
internetową security.blaupunkt-service.com
49
Page 50

3. Instalacja
3.1. WAŻNE – Przeczytaj przed instalacją
• Przed instalacją należy się upewnić, czy powierzchnia montażowa jest w stanie utrzymać 3-krotną
wagę LampCam.
• Sprawdź siłę sygnału Wi-Fi. Aby upewnić się, że połączenie lampy jest stabilne, upewnij się, że sygnał
Wi-Fi jest bardzo silny w miejscu urządzenia LampCam. Sugerowana przepustowość Internetu to 1
Mb / s (prędkość wysyłania / pobierania).
• Zalecenie: Unikaj obiektywu skierowanego bezpośrednio w słońce i jeśli to możliwe zainstaluj
• kamerę pod dachem lub okapem (Rys.1) lub umieść w pozycji, która zapewnia dobrą ochronę przed
ciężkim deszczem.
• Jeśli chcesz zainstalować kartę microSD, zalecamy wykonanie tej czynności przed rozpoczęciem
instalacji. Proszę wrócić do: więcej informacji na temat instalacji karty microSD.
• Aby uzyskać najlepszą wydajność, zainstaluj LampCam na wysokości 2,5 metra.
Pic.1 Pic.2
Polski
2.5m wys
3.2. Instalacja karty Micro SD
5m PIR Zasięg wykrywania
Detekcja ruchu 90°
Krok 1:
Krok 2:
Krok 3:
UWAGA:
Karta Micro SD jest obowiązkowa do nagrywania lokalnego. Upewnij się, że MicroSD ma CLASS10.
Obsługiwane są karty MicroSD od 8 GB do 128 GB.
U dołu lampy LampCam otwórz komorę za pomocą
odkręcenia śruby. .
Zainstaluj kartę SD we wskazanym gnieździe na karty SD.
Zamknij przedział, umieszczając pokrywę i przytrzymując śrubę.
A
A
3.3. Opcjonalnie: Testy LampCam przed instalacją
Przed instalacją można włączyć lampkę za pomocą portu micro USB z zasilaczem lub zasilaczem micro
USB 2A. Poczekaj, aż LampCam wyemituje podwójny sygnał dźwiękowy i zacznie pulsować niebieski
wskaźnik LED w dolnej części lampy. (Ten proces zajmie około 60 sekund, upewnij się, że dioda LED miga
na niebiesko). Następnie zapoznaj się z rozdziałem “4.1. Ucz się w LampCam “.
Uwaga: Lampka led LampCam nie włączy się po podłączeniu przez USB.
50
Page 51

3.4. Instalacja urządzenia
WAŻNE:
Konguracja i instalacja LampCam może być
wykonywana tylko przez osobę z odpowiednią
wiedzą w zakresie obsługi energii elektrycznej.
NIE próbuj instalacji, jeśli tego nie
posiadasz wymaganych umiejętności
Krok 1:
Please make sure you have turned OFF the power
from the circuit breaker before this step.
1
Wyłącz
5
A
Krok 6:
Poprowadzić przewody AC ze ściany przez tylną
część wspornika montażowego i połączyć je do
- Przewód fazowy (brązowy) do listwy zaciskowej
z brązowym kablem.
- Przewód zerowy (niebieski) do listwy zaciskowej
z niebieskim kablem.
- Przewód uziemienia ochronnego (żółty / zielony):
Opuść go
wychodząc, zostanie podłączony w kroku 8.
Teraz umieść blok zacisków z powrotem
w uchwyt montażowy.
Polski
Krok 2:
Znajdź żądaną lokalizację instalacji dla LampCam.
Lokalizacja instalacji musi mieć przewody
prądu przemiennego 220 V (uziemiający,
fazowy i neutralny). Na przykład z poprzednio
zainstalowanej lampy zewnętrznej.
Krok 3:
Zaznacz ołówkiem dwie dziury, które trzeba
wiercić.
Krok 4:
Wywierć 2 otwory montażowe na ścianie.
Weź plastikowe kołki z zestawu akcesoriów
instalacyjnych i umieść je w 2 otworach, które
właśnie zostały wywiercone.
Krok 5:
Zrób ostrym przedmiotem małą dziurkę w
gumowej podstawce i przeprowadź kable ze
ściany do terminala przez uchwyt montażowy.
6
bloki zacisków
W górę
Krok 7:
Przykręć mocowanie do ściany
i upewnij się, że napis UP jest na górze.
7
W górę
51
Page 52

Krok 8:
Weź przewód ochronny (żółty / zielony) i podłącz
go do zielonej śruby z ikoną ziemi z tyłu aparatu.
Następnie podłącz kabel z LampCam do czarnej
skrzynki przyłączeniowej znajdującej się na
wsporniku montażowym.
8
Krok 11:
Dostosuj kąt nachylenia kamery, naciskając przycisk
“Śruby regulacyjne”.
11
W górę
Połącz tutaj
Krok 9:
Zainstaluj LampCam na wsporniku montażowym.
9
Polski
Krok10:
Przykręć śrubę do wspornika montażowego za
pomocą klucza sześciokątnego.
10
śruby regulacji
nachylenia
Step 12:
Dostosuj kąt poziomy kamery, około 30 stopni
w lewo lub w prawo. Poluzuj śrubę z tyłu za
pomocą klucza imbusowego zawartego w zestawie
akcesoriów instalacyjnych. Przykręć mocno, kiedy
skończysz
12
kąt patrzenia
śruby regulacyjne
Krok 13:
Po zakończeniu instalacji włącz zasilanie wyłącznika,
a lampka lampy LampCam włączy się.
52
13
włącz
Page 53

4. Użyteczność LampCam i APP
4.1. Naucz się LampCam:
Krok 1:
Krok 2:
Pobierz i zainstaluj aplikację “OMGuard HD” na smartfonie.
Przejdź do ustawień Wi-Fi na smartfonie i wybierz nową sieć Wi-Fi zaczynającą się od HD
(np. HD-15584), aby się z nią połączyć. Ta sieć to Wi-Fi stworzone przez LampCam, aby
umożliwić procedurę konguracji.
For iOS
and Android
Krok 3:
Krok 4:
Krok 5:
Krok 6:
Krok 7:
Krok 8:
Wprowadź domyślne hasło LampCam Wi-Fi 12345678 i zapisz ustawienia, aby się połączyć.
Nie będziesz mieć połączenia z Internetem, ale będziesz mógł kontynuować procedurę
konguracji LampCam.
Teraz uruchom aplikację OMGuardHD i kliknij przycisk “dodaj kamerę”
W “System Name” wpisz dowolną nazwę swojej kamerze LampCam. Na przykład “Drzwi
wejściowe”.
Wybierz “Skanuj etykietę DID” dla
Androida) lub ikonę QR (dla systemu
iOS) i zeskanuj etykietę kodu QR
znajdującą się z tyłu LampCam.
W polu kod bezpieczeństwa
wprowadź domyślny kod
bezpieczeństwa 123456.
Wybierz “Zapisz”.
4.2. Ustawienia Wi-Fi:
Krok 1:
Krok 2:
Krok 3:
W menu LampCam dotknij ikony konguracji LampCam i wybierz ikonę ustawień
w kamerze LampCam. Następnie naciśnij przycisk “Zaawansowane
Wprowadź “Hasło administratora” (domyślnie 123456).
Ze względów bezpieczeństwa aplikacja poprosi o zmianę domyślnego hasła administratora.
(Hasło administratora będzie używane do uzyskiwania dostępu do menu ustawień i do uzbrajania
/ rozbrajania kamery LampCam). Zalecamy zapisanie tego hasła w bezpiecznym miejscu.
W przeciwnym razie, jeśli go zapomnisz, musisz przywrócić ustawienia fabryczne kamery.
5
7
Front door
Polski
8
6
Krok 4:
Krok 5:
Krok 6:
Przewiń w dół do ustawień Wi-Fi i kliknij “Zarządzaj siecią Wi-Fi”.
Wybierz domowy punkt dostępu Wi-Fi z rozwijanego menu i wprowadź swoje hasło Wi-Fi.
Następnie dotk nij “OK”.
LampCam będzie w trybie oine przez około 60 sekund podczas ponownego
uruchamiania. Gdy LampCam połączy się prawidłowo z routerem Wi-Fi, niebieska dioda
LED Network Indicator zaświeci się na stałe. Odtąd możesz zdalnie uzyskać dostęp do
kamery LampCam w dowolnym momencie i z dowolnego miejsca.
53
Page 54

5. Konguracja LampCam
Na liście menu urządzenia dotknij ikony konguracji LampCam i wybierz ikonę ustawień z wybranej
kamery LampCam. Następnie naciśnij przycisk “Zaawansowane”, aby wejść do “Menu ustawień
zaawansowanych”. Ze względów bezpieczeństwa zostaniesz poproszony o wprowadzenie “hasła
administratora”.
5.1. Ustawienia czujnika:
Przewiń w dół do “Ustawienie czujnika”. W “Trybie wykrywania” wybierz “PIR”, aby aktywować wykrywanie
ruchu PIR (domyślne ustawienie fabryczne). Detekcja ruchu PIR ma zasięg wykrywania 5 metrów. Aby
wyłączyć wykrywanie ruchu, wybierz “WYŁ.”.
5.2. Ustawienie oświetlenia:
Przewiń w dół do “Ustawienie oświetlenia” i wybierz żądany “Tryb automatyczny oświetlenia”.
Za pomocą wyzwalacza: wybierz tę opcję, aby zapalić światło na 1 minutę po wykryciu ruchu PIR.
(Sprawdź w rozdziale 5.1, czy funkcja wykrywania PIR jest aktywna) Po jednej minucie światło zgaśnie.
(PIR należy wybrać w “Ustawieniach czujnika”). Światło włącza się tylko wtedy, gdy oświetlenie jest słabo
oświetlone.
Według harmonogramu: wybierz tę opcję, aby włączyć światło zgodnie ze
wstępnie skongurowanym harmonogramem. Aby ustawić harmonogram,
wybierz “Schemat modykacji oświetlenia”
Polski
Wybierz czas rozpoczęcia: kliknij niebieski przycisk 00:00 na górze. Z góry
wybierz dni tygodnia, które należy uwzględnić. Wybierz czas, w którym powinno
być włączone światło. Format czasu to 12 godzin, wybierz AM lub PM, aby
zdeniować czas.
Uwaga: Obowiązkowe jest wybranie dni tygodnia, w przeciwnym razie harmonogram nie będzie działać.
Uwaga:
Wyzwalacz PIR dla detekcji ruchu i harmonogramu ręcznego będzie działał tylko w trybie AUTO. Patrz
rozdział “6. Funkcje podglądu na żywo “, aby uzyskać więcej informacji.
5.3. Ustawienie karty SD:
Kliknij “Formatuj kartę SD”, aby wykonać format karty SD. Spowoduje to usunięcie wszystkich lmów
i zdjęć na karcie SD. Jeśli zaznaczone jest pole “Over write SD-Card”, urządzenie nadpisze najstarsze
nagranie po zapełnieniu magazynu. W przypadku wyłączenia nie zarejestruje żadnego zdarzenia po
zapełnieniu pamięci.
5.4. Powiadomienia:
Powiadomienia: przewiń w dół do opcji “Powiadom o
włączeniu”. Włączy/ Wyłącz powiadomienia po wykryciu
ruchu w trybie uzbrojenia. (Domyślnie włączone).
Powiadomienia e-mail: Aby włączyć informacje o
powiadomieniach o wiadomościach e-mail, przewiń w dół
do opcji “Ustawienia poczty e-mail” i kliknij “Ustaw e-mail”.
Konguruj zgodnie z wykresem po prawej stronie.
Uwaga: Upewnij się, że “uwierzytelnianie dwuetapowe” jest
wyłączone twoje konto e-mail do wysyłania. (np. Google,
Outlook365).
Dowiedz się więcej, sprawdź instrukcje od swojego dostawcy
poczty e-mail.
54
SSL
SMTP Server
SMTP Port
Nazwa
Hasło
Odbiorca
Aktywuj / dezaktywuj szyfrowanie
SSL
Wprowadź adres SMTP serwera.
Aby dowiedzieć się więcej, sprawdź
instrukcje od twojego dostawcy
poczty e-mail. W Gmailu użyj adresu
smtp.gmail.com
Jeśli SSL nie jest aktywowany, użyj
“25”
Jeśli aktywowano SSL, użyj “465”
Nazwa użytkownika e-maila nadawcy konta. E.g:
nazwa_użytkownika@gmail.com
Hasło e-maila nadawcy
konta
Adres e-mail odbiorcy
Page 55

6. Funkcja podglądu na żywo
Krok 1:
Krok 2:
Krok 3:
Krok 4:
Uruchom aplikację OMGuard HD.
W menu listy urządzenia dwukrotnie dotknij wybranej opcji kamery LampCam, aby
uzyskać dostęp do transmisji na żywo.
Ze względów bezpieczeństwa przy pierwszym logowaniu kamery LampCam aplikacja
poprosi o zmodykowanie domyślnego kodu bezpieczeństwa. (Kod zabezpieczający służy
do nawiązania komunikacji między LampCam i smartfonem. To nie jest to samo co hasło
administratora). Zalecamy zapisanie tego hasła w bezpiecznym miejscu. W przeciwnym
razie, jeśli go zapomnisz, musisz przywrócić ustawienia fabryczne kamery.
Zapoznaj się z poniższą tabelą, aby dowiedzieć się więcej o operacjach dostępnych na
żywo.
Kliknij przycisk uzbrajania / rozbrajania, aby uzbroić lub rozbroić LampCam. Aplikacja poprosi o kod administratora.
Jeśli aparat wykryje ruch w trybie uzbrojenia, wyśle powiadomienie push
i rozpocznie nagrywanie wideo w 60s.
Uwaga: Powiadomienia push i wykrywanie ruchu PIR muszą pozostać
włączone w ustawieniach zaawansowanych (domyślnie włączone).
Zrób zdjęcie z wideo na żywo.
Zdjęcie zostanie zapisane na smartfonie i można ją znaleźć w galerii zdjęć
smartfona.
Rozpocznij 60 sekundowe nagrywanie wideo bez pauzy w kamerze
LampCam. Karty microSD i karta SD są obowiązkowe dla tej funkcji. Aby
znaleźć lmy, zapoznaj się z menu “Odtwarzanie zdarzeń”.
Polski
Aktywuje / dezaktywuje mikrofon w kamerze LampCam.
Przycisk “Naciśnij i mów”: Naciśnij ten przycisk aby rozmawiać z telefonu
komórkowego przez lampkę. Aby przestać mówić, zwolnij przycisk.
Dotknij tego przycisku, aby uruchomić alarm syreny 60 sekund. Możliwe
jest zatrzymanie alarmu przez ponowne dotknięcie ikony.
Wróć do menu listy LampCam.
Przesuń pasek, aby wyregulować jasność kamery od 0 do 800lm.
Dotknij ikonę żarówki, aby włączyć światło WŁ / WYŁ lub AUTO.
WŁĄCZENIE: Lampka urządzenia zostanie włączona na stałe.
WYŁ .: Lampka urządzenia zostanie wyłączona.
AUTO: Światło włącza się automatycznie zgodnie z ustawieniem
wyzwalacza oświetlenia. patrz rozdział 5.2.
Wyzwalacz PIR dla wykrywania ruchu działa tylko w trybie AUTO.
55
Page 56

7. Odtwarzanie zdarzeń
Ważne: Aby ta funkcja działała, konieczne jest zainstalowanie karty micro SD w LampCam. Patrz rozdział
“3.2. Instalacja karty Micro SD“
Krok 1:
W menu listy urządzenia dotknij ikony LampCam
konguracja, a następnie wybierz ikonę notatnika
z wybranej kamerze LampCam.
Krok 2:
Wybierz punkt początkowy i końcowy lampy
LampCam aby wyszukać nagrania wideo.
Następnie k liknij “OK”.
Polski
Krok 3:
LampCam wyświetli wszystkie nagrania wideo
z poprzedniego zakresu czasu. Każdy lm będzie
wyświetlać datę i godzinę, od kiedy wideo było
nagrane.
Krok 4:
Aby pobrać wideo, kliknij odpowiednią ikonę
pobierania z wybranego lmu. Film będzie
pobrany na twój smartfon w galerii. Pobrane
wideo będzie wyświetlane z nazwą na czerwono.
Krok 5:
Aby obejrzeć lm bez jego pobierania, kliknij
wybrane wideo. Teraz wideo zostanie przesłane
strumieniowo do smartfona.
56
Krok 6:
Aby usunąć wideo z karty micro-SD, wybierz
ikonę ołówka, a następnie wybierz wideo i dotknij
ikony kosza.
Page 57

8. Konserwacja
• Wyłącz zasilanie i odłącz kabel zasilający, jeśli jest w nim dym, dziwny zapach lub hałas. Skontaktuj
się z lokalnym sprzedawcą lub centrum obsługi klienta, aby uzyskać pomoc.
• Unikaj plam olejowych i / lub substancji chemicznych matujących i uszkadzających powierzchnię
soczewki obiektywu kamery.
• Wszystkie prace związane z badaniem i naprawą powinny być wykonywane przez
wykwalikowanych inżynierów serwisu. Nie ponosimy odpowiedzialności w przypadku problemów
spowodowanych nieautoryzowanymi modykacjami lub próbami naprawy.
8.1. Aktualizacja oprogramowania
LampCam będzie automatycznie wyszukiwać aktualizacje
oprogramowania. Kiedy urządzenie wykryje nowe oprogramowanie,
pobierze je automatycznie. Następnym razem, gdy użytkownik zaloguje się,
aplikacja zapyta, czy użytkownik chce uaktualnić system. Kliknij “OK”, aby
rozpocząć aktualizację oprogramowania. Ten proces trwa około 5 minut.
8.2. Przywrócenie ustawień fabrycznych
Krok 1:
Krok 2:
Krok 3:
Krok 4:
Krok 5:
Na dole urządzenia otwórz przedział (?) odkręcając śrubę.
Użyj dołączonego kołka resetującego i naciśnij przycisk resetowania przez 10 sekund.
Dioda LED zasilania zacznie migać i rozpocznie się reset ustawień fabrycznych.
Ten proces trwa około 60 sekund. Poczekaj, aż urządzenie wyda podwójny sygnał
dźwiękowy i zacznie migać niebieski wskaźnik LED.
Zamknij klapę, umieszczając pokrywę i wbijając w nią śrubę.
RESETU SB
przycisk reset
pin resetu
9. Wsparcie
Więcej informacji o produkcie można znaleźć na stronie
www.blaupunkt.com/service
Centrum Bezpieczeństwa i Opieki
www.blaupunkt.com
Security Brand Pro GmbH
Mondstrasse 2-4
85622 Feldkirchen-München, Germany
© Zastrzegamy wszelkie zmiany techniczne i błędy
UWAGA:
• Ten krótki przewodnik stworzony jest tylko w celach informacyjnych.
• Wszystkie projekty i oprogramowanie mogą ulec zmianie bez wcześniejszego pisemnego
powiadomienia.
• Wszystkie wymienione znaki towarowe i zastrzeżone znaki towarowe są własnością
odpowiednich podmiotów właściciela.
• Odwiedź naszą stronę internetową lub skontaktuj się z lokalnym serwisem, aby uzyskać więcej
informacji na stronie: http://security.blaupunkt-service.com
Polski
57
Page 58

Suomi | Pikaopas
1. Pakkaussisältö
a
HOS-X20
lamppukamera
d
Asennussapluuna
2. Tuotteen kuvaus
Suomi
LED -valo
Kameran linssi
PIR-anturi
Mikrofoni
Valoanturi
Asennusjalka
ja
virtalähde
Antenni
b
Antenni
e
1x Hex.avain
2x Ruuvit
2x Proppu
MicroSD
-korttipaikka
c
Kiinnitysjalka
f
Reset -työkalu
Kaiutin
RESET USB
Reset-painike
Virtavalo LED
Tietoverkonmerkkivalo
Mikro-USB
-portti
HUOMIO:
Tämä pikaopas kuvaa HOS-X20 asennuksen ja ensimmäisen käyttöönoton.
Lisätietoja sekä päivityksiä löytyy verkkosivuiltamme:
http://security.blaupunkt-service.com
58
Page 59

3. Asennus
3.1. TÄRKEÄÄ – Lue ennen asennusta
• Varmista ennen asennusta että seinä tai muu asennuspinta kestää vähintään kolminkertaisesti
lamppukameran painon.
• Tarkista langattoman verkon kantama. Varmistaaksesi lamppukameralle vakaan yhteyden varmista
että asennuspaikassa on vahva langaton verkkosignaali. Suositeltu internet liittymän nopeus on
vähintään 1Mbps (uploat/download).
• Suositus: Vältä kameran asentamista suoraa kohti voimakasta auringonvaloa ja jos mahdollista
asenna lamppukamera katon tai räystään alle (Pic.1) tai muuhun paikkaan joka suojaa kovalta
sateelta.
• Halutessasi asentaa mikroSD-kortin suosittelemme sen asentamista ennen lamppukameran
asentamista seinään. MikroSD-kortin asennuksesta löytyy lisätietoja kohdasta 3.2.
• Parhaan toiminan takaamiseksi suositellaan lamppukameran asentamista 2.5 metrin korkeuteen.
(Pic.2)
Pic.1 Pic.2
5m PIR Detection Range
Motion Detection 90°
2.5m Hight
3.2. MikroSD-kortin asennus
Kohta 1
Kohta 2
Kohta 3
HUOMIO:
Paikallinen tallennus vaatii mikroSD-kortin toimiakseen. MikroSD-kortin on oltava vähintään luokkaa
10. MikroSD-tuki 8GB -128GB.
Avaa lampun pohjan luukku avaamalla luukun
kiinnitysruuvi. Kuvassa .
Asenna mikroSD-kortti korttipaikkaan.
Sulke luukku ja kiristä ruuvi.
A
A
3.3. Valinnainen: Lamppukameran testaus ennen asennusta
Ennen asennusta lamppukameran voi käynnistää kytkemällä mikro-USB porttiin varavirtalähde tai
kahden ampeerin USB-virtalähde. Odota kunnes lamppukamera piippaa kahdesti ja sininen LED-valo
laitteen pohjassa alkaa vilkkua. (Käynnistyminen kestää noin 60 sekuntia. Varmista että LED-valo vilkuu
sinisenä.) Sen jälkeen katso kohta 4.1 “Lamppukameran käyttöopetus”
HUOMIO: Lampun valaisinvalo ei syty USB-virtalähteellä.
Suomi
59
Page 60

3.4. Lamppukameran asennus
TÄRKEÄÄ:
Lamppukameran asennuksen ja käyttöönoton
saa suorittaa vain henkilö jolla on riittävät tiedot
sähköasennuksista.
ÄLÄ asenna lamppua ilman riittävää osaamista.
Kohta 1
Varmista ettei lampulle tuleviin johtoihin tule virtaa.
Kytke vistä pois sähkökeskuksen sulakkeista.
1
O
5
A
Kohta 6
Vedettyäsi johdot kiinnitysjalan läpi kytke ne
seuraavasti:
- Vaihejohto (ruskea) laiteen ruskeaan johtoon.
- Nollajohto (sininen) laiteen siniseen johtoon.
- Suojamaajohto (Keltainen/Vihreö): Jätä vielä
kytkemättä. Kytketään kohdassa 8.
Laita sokeripalaliitin takaisin paikalleen
kiinnitysjalassa.
Suomi
Kohta 2
Etsi lamppukameralle sopiva asennuskohta. Lamppu
tarvitsee normaalin 230V verkkovirran. Hyvä paikka
on usein vanhan ulkovalaisimen paikka, jossa on
virtajohdot valmiina.
Kohta 3
Aseta sapluuna valittuun asennuspaikkaan ja
merkkaa kynällä kahden porattavan reiän paikat.
Kohta 4
Poraa kaksi asennusreikää seinään. Tarvittaessa käytä
kahta toimitettua muoviproppua poratuissa reiissä.
Kohta 5
Paina sopivalla terävällä työkalulla pieni reikä
A
kohtaan kumissa. Vedä sähköjohdot sisään
kyseisen reiän läpi oheisen kuvan mukaisesti
sokeripala-liittimelle.
6
terminal blocks
Up
Kohta 7
Ruuvaa asennusjalka mukanatoimitetuilla ruuveilla
seinään. Varmista että “UP” -merkki on ylöspäin.
7
Up
60
Page 61

Kohta 8
Kytke suojamaajohto (keltainen/vihreä)
lamppukameran takaosan vihreään
maadoitusruuviin, jossa maadoitusmerkki.
Sitten kytke lamppukameran johto mustaan
liittimeen kiinnitysjalassa.
8
Up
Connect here
Kohta 9
Asenna lammpukamera kiinnitysjalkaan.
9
Kohta11
Säädä lampun kulmaa säätöruuveilla.
11
Säätöruuvit
Kohta12
Kameran kulmaa voi säätää sivuille noin 30-astetta.
Avaa vaakatason säätöruuvia mukanatoimitetulla
avaimella ja säädä sopiva suunta. Kiristä ruuvi
säädöön jälkeen.
Kohta10
Kiristä kiinnitysjalan ruuvit mukanatoimitetulla
avaimella.
10
12
vaakatason
säätöruuvi
Kohta13
Kun asennus on valmis voit kytkeä lamppuun virran
sähkökeskukselta. Lampun LED-valo syttyy.
13
61
Suomi
Page 62

4. Lamppukameran ja sovelluksen ohje
4.1. Lamppukameran käyttöön opettaminen:
Kohta 1
Kohta 2
Lataa ja asenna “OMGuard HD” -sovellus sovelluskaupasta
puhelimeesi.
Liitä puhelimesi uuteen langattomaan verkkoon, jonka lamppukamera on luonut. Verkon
nimi alkaa “HD” (esimerkiksi HD-15584). Tämä verkko mahdollistaan lamppukameran
asetusten määrittelyn.
For iOS
and Android
Lamppukameran langattoman verkon salasana on 12345678. Verkon kauppa ei ole internet
yhteyttä, mutta verkko mahdollistaa lamppukameran asetusten asettamisen.
Käynnistä OMGuard -sovellus ja valitse “add camera” .
Kirjoita “System Name” -kohtaan laitetta kuvaava nimi. Esimerkiksi “Etuovi”
Valitse “Scan DID label” (Android)
tai QR -kuvake (iOS/Apple) ja
skannaa QR-koodi lamppukameran
takaosasta.
Kirjoita kohtaan”Security code”
123456.
Valitse “Save” tallentaaksesi asetukset
Suomi
Kohta 3
Kohta 4
Kohta 5
Kohta 6
Kohta 7
Kohta 8
4.2. Wi-Fi asetukset:
Kohta 1
Kohta 2
Kohta 3
Kohta 4
Lamppukameran valikossa valitse asetukset-kuvake sitten valitse asetukset f
halutulta lamppukameralta. Sitten valitse “Advanced” painike
Anna hallinointisalasana “Admin password” (tehtaalta 123456).
Tietoturvasyistä sovellus pyytää muuttamaan oletussalasanan uuteen.
(Tätä salasanaa käytetään asetuksiin pääsemiseksi sekä lamppukameran hälytys
toiminnan aktivoimiseksi sekä sammuttamiseksi). Suosittelemme salasanan laittamista
muistiin turvalliseen paikkaan. Mikäli salasana unohtuu johdut palauttamaan kameran
tehdasasetuksiin.
Mene kohtaan “Wi-Fi settings” ja valitse “Manage Wi-Fi network”
5
Etuovi
7
8
6
Kohta 5
Kohta 6
62
Valitse langaton verkko jossa haluat kameran toimivan ja anna laitteelle kyseisen verkon
salasana. Sitten valitse “OK”
Lamppukamera on pois verkosta noin 60 sekuntia kun laite käynnistyy uudelleen. Kun
lamppukamera on onnistuneesti liittynyt langattomaan verkkoon laitteen verkko-LEDvalo palaa sinisenä. Nyt voit liittyä kameraan mistä ja koska tahansa.
Page 63

5. Lamppukameran asetukset
Lamppukameran menussa valitse asetuskuvake ruudun alalaidassa. Sitten valitse halutun kameran
asetuskuvake kameran näyttämän kuvan kohdalta (ratas). Sitten valitse “Advanced” päästäksesi “Advanced
settings” -valikkoon. Anna salana.
5.1. Herkkyys asetukset:
Siirry kohtaa “Sensitivity Setting”. Kohdassa“Detect Mode” valitse“PIR” aktivoidaksesi
infrapunaliiketunnistuksen. Liiketunnistimen kantama on noin 5-metriä. Sammuttaaksesi
liiketunnistuksen valitse “OFF” .
5.2. Valoasetukset:
Siirry kohtaan “Lighting Setting” valitse haluttu “Lighting auto mode”-toiminto
“By trigger”: Tämä vaihtoehto sytyttää valon palamaan minuutiksi liikkeen havaitsemisesta. (Tarkista
kohdan 5.1 mukaan onko liiketunnistus päällä) Valo sammuu minuutin päästä liikkeen havaihsemisesta.
(“PIR” pitää olla valittuna kohdan 5.1 mukaan kohdassa “Sensitivity Settings”). Valo syttyy vain hämärässä
ja pimeässä.
“By manual Schedule”: Tämä valinta sytyttää valon asetetun aikataulun
mukaisesti. Muuttaaksesi aikataulua valitse “Lighting Schedule Modify”.
Valitse aloitusaika: Klikkaa sinistä 00:00AM kohtaa yläreunassa.Ihan ylhäällä valitse
halutut päivät. Valitse aika jolloin haluat lampun syttyvän. Aika on 12-tunnin
kellolla, joten valitse AM (aamupäivä tai PM iltapäivä.
Valitse lopputusaika: Klikkaa mustaa 00:00AM ruudun alareunassa . Valitse halutut
viikonpäivät alareunasta. Valitse aika jolloin lamppu sammuu. Valitse “Save”
tallentaaksesi muutokset.
Huomio: Jos ei valitse viikonpäiviä aikataulu ei toimi.
HUOMIO:
Liiketunnistus ja aikataulutus toimii vain “AUTO” -moodissa. Katso kohdasta “6. Live View Functionalities” lisätietoja
5.3. SD-kortin asetukset:
Valitse “Format SD-Card” alustaaksesi MikroSD-kortin. Alustaminen poistaa kaikki muistikortilla
mahdollisesti olevat tiedostot. Jos valitsen “Over write SD-Card” niin muistikortin täyttyessä
Lamppukamera tallentaan vanhimman tallennuksen päälle. Jos päällekirjoitusta ei ole valittuna
lamppukamera ei tallenna muistikortin täytyttyä.
5.4. Ilmoitukset:
Push -ilmoitukset: Siirry kohtaan “Notify Enable”. Enablen
ollessa valittuna saat liikkeestä push -viestin puhelimeesi.
(Viestit ovat oletuksena päällä)
Sähköposti-ilmoitukset: Saadaksesi ilmoitukset sähköpostiin
siirry kohtaan “Email Setting” ja valitse “Set e-mail”. Tee
asetukset oikealla olevan taulukon mukaisesti. HUOMIO:
Varmista että “Two-factor authenticator” on pois päältä
lähettävässä sähköpostissasi (esimerkikisi Google,
Outlook365). Saat lisätietoja sähköpostin tarjoajaltasi.
SSL
SMTP Server
SMTP Port
Username
Password
Receiver
Aktivoi SSL -salauksen
Laita tähän SMTP-serverin osoite. Lisätietoja saat sähköpostin
tarjoajaltasi. Gmail käyttää osoitetta
smtp.gmail.com
Jos SSL ei ole käytössä käytä “25”
Jos SSL on käytössä käytä “465”
Lähettävän sähköpostin käyttäjänimi.
Esimerkiksi : käyttäjä@gmail.com
Lähettävän sähköpostitilin salasana
Vastaanottava sähköposti
Suomi
63
Page 64

6. Live-seuranta
Suomi
Kohta 1
Kohta 2
Kohta 3
Kohta 4
Käynnistä OMGuard HD -sovellus.
Tuplaklikkaa haluamasti kameran kuvaa päästäksesi kyseisen kameran live-seurantaan.
Tietoturvasyistä lamppukamera pyytää muuttamaan turvakoodin ensimmäisellä
käyttökerralla. (Turvakoodia käytetään muodostettaessa yhteys lamppukameran ja
puhelimen välillä. Koodi ei ole sama kuin aikaisemmin annettu hallinointisalasana).
Suositelemme tallentamaan salasanan turvallisesti jonnekin muistiin. Salasanan
unohtuessa on kamera palautettava takaisin tehdasasetuksiin.
Allaolevasta taulukosta selviää live-seurannan eri valinnat ja vaihtoehdot.
Klikkaa/valitse arm / disarm -painiketta laittaakesi hälytyksen päälle.
Sovellus kysyy hallinnointisalasanaa tämän valinnan yhteydessä.
Jos kamera havaitsee liiketta hälytyksen ollessa päällä (Armed), lähettää
kamera push-viestin puhelimeen ja nauhoittaa 60 sekuntia SD-kortin
ollessa asennettuna.
HUOMIO: Push-ilmoitusten ja PIR-liiketunnistuksen on oltava päällä
“advanced settings” valikosta (Oletuksena molemmat ovat päällä).
Ota valokuva nykyisestä näkymästä.
Kuva tallennetaan puhelimelle ja löytyy kameran kuvista/galleriasta
Aloittaa 60 sekunnin tallennuksen lamppukameran mikroSD-kortille.
MikroSD-kortti on asennettava tämän toiminnon mahdollistamiseksi.
Katsoaksesi tallennettu video katso “Event playback” -valikko.
64
Aktivoi / Sammuttaa lemppukameran mikrofonin. Mikrofonilla voit kuunnella lamppukameran lähistön ääniä.
Tangentti-nappi. Pidä nappi pohjassa puhuaksesi lamppukameran kaiuttimen kautta. Päästä nappi kun lopetat puhumisen.
Tämän napauttaminen laukaisee 60 sekunnin sireenihälytyksen. Hälytys
on mahdollista lopettaa napauttamalla kuvaketta uudestaan.
Palaa lamppukameralistaan
Liikuttamalla kuvaketta kehällä säädetään lampun kirkkautta 0 - 800lm.
Napauttamalla lamppukuvaketta voi valita ON / OFF tai AUTO.
ON: Lamppukameran valo on päällä.
OFF: Lamppukameran valo on pois päältä.
AUTO: Lamppu syttyy ja sammuu kohdan 5.2 asetusten mukaisesti.
PIR liiketunnistus ja ajastus toimii vain “AUTO” toiminnolla (5.2)
Page 65

7. Tapahtumien katselu
TÄRKEÄÄ: Nämä minaisuudet toimivat vain jos lamppukameraan on asennettu mikro-SD-kortti.
Ohjeita kohdassa “3.2. MikroSD-kortin asennus”.
Kohta 1
Valitse sovelluksen lamppukameralistalta halutun
kameran asetukset. Sitten valitse muistion kuvake
(kuvakkeet alla).
Kohta 2
Valitse etsityn nauhoituksen aikaväli ja paina “OK”.
Kohta 3
Lamppukamera näyttää kyseisen aikavälin
tallennukset. Jokaisen videon kohdalla näkyy
tallennusajankohta.
Kohta 4
Ladataksesi halutun videon puhelimellesi paina
oikean reunan “Download”-kuvaketta. Video
latautuu puhelimellesi ja löytyy latauksen jälkeen
galleriasta/kuvista/videoista. Ladatut videot
näkyvät listalla punaisella.
Kohta 5
Voit myös katsoa videoita lataamatta niitä
puhelimellesi klikkaamalla halutun videon nimeä.
Suomi
Kohta 6
Poistaaksesi videon mikroSD-kortilta valitse kynäkuvake ruudun alalaidasta. Valitse haluttu video ja
paina roskakori-kuvaketta.
65
Page 66

8. Ylläpito ja huolto
• Havaitessasi savua tai palaneen käryä sammuta laite ja katkaise virransyöttö laitteelle. Ota yhteyttä
laitteen myyjään tai maahantuojaan.
• Vältä öljyn tai muun kemikaalin joutumista kameran linssiin. Tämä tahraa ja pilaa linssin.
• Huollon ja mahdollisen korjaukset voi suorittaa vain pätevä asentaja. Valmistaja ei vastaa
valtuuttamattomista muutoksista tai korjauksista.
8.1. Ohjelmistopäivitys (Firmware Upgrade)
Lamppukamera lataa päivtykset automaattisesti. Kun käyttäjä seuraavan
kerran kirjautuu käyttämään lamppukameraa laite kysyy otetaanko päivitys
käyttöön. Valitse “OK” käynnistääksesi päivittämisen. Päivitys kestää
normaalisti noin viisi minuuttia.
8.2. Tehdasasetusten palautus
Kohta 1
Kohta 2
Kohta 3
Suomi
Kohta 4
Kohta 5
9. Tuotetuki
HUOMIO:
• Muutokset sovelluksessa ja tuotteessa mahdollisia ilman ennakkovaroitusta
• Mainitut tuotemerkit ja niiden oikeudet kuuluvat tuotemerkkien omistajille.
• Lisätietoa ja tuotetukea osoitteesta: http://security.blaupunkt-service.com
Avaa laitteen pohjan luukku avaamalla sen kiinnitysruuvi.
Paina reset-nappia mukana toimitetulla painimella 10 sekunnin ajan.
Virta-LED alkaa vilkkua ja asetusten palautus alkaa.
Asetusten palautus kestää noin 60 sekuntia. Odota kunnes laite piippaa kahdesti ja
sininnen LED alkaa vilkkua.
Sulke luukku ja kiristä luukun kiinnitysruuvi.
RESETU SB
reset-nappi
Lisätietoja tuotteesta:
www.blaupunkt.com/service
Blaupunkt Competence Center Security & Care
www.blaupunkt.com
Security Brand Pro GmbH
Mondstrasse 2-4
85622 Feldkirchen-München, Germany
© Oikeudet muutoksiin pidätetään
painin-työkalu
66
Page 67

Technical Specications
Image sensor: 2 MegaPixel, 1/3” CMOS
Resolution Full HD (1920x1080p)
Video Compression H.264
Field of View 120º
Colour Temperature 3000K
Adjustable Brightness 100 – 950 Lumen
Waterproof certication IP55
Storage Micro-SD card up to 128GB (not included)
Power Input AC 90 – 260V (Adaptor not included)
Audio communication Two-Way audio communication
Internet connection WiFi 802.11b/g/n (2.4GHz)
Security Encryption WEP/WPA/WPA2 (TKIP, 128 bit AES)
Motion detection method PIR up to 5m
Night Vision Up to 8m
Operating conditions -20°C ~ 50°C
Dimensions (W x H ) 63,8 x 180,7 m
Tech Data
67
 Loading...