

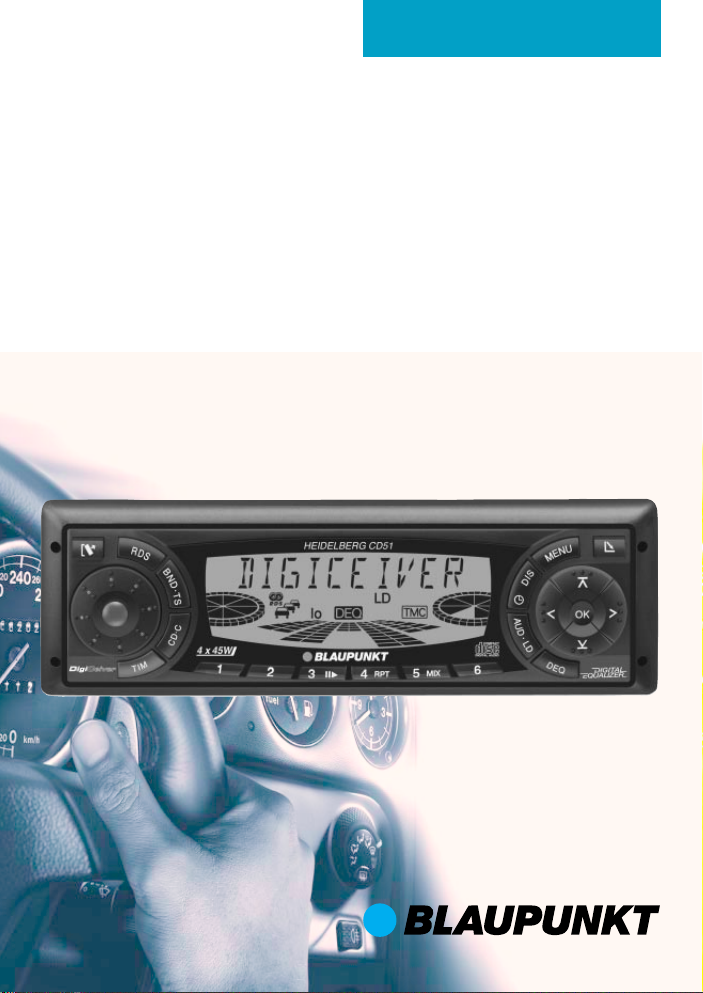
Blaupunkt HEIDELBERG CD51 User Manual
Operating instructions
Radio / CD
Heidelberg CD51

Bitte aufklappen
Open here
Ouvrir s.v .p.
Aprite la pagina
Hier openslaan a.u.b.
Öppna
Por favor, abrir
Favor abrir
2
DEUTSCH
ENGLISH
2
4
1
3
6
5
798
10
11
1213141516
FRANÇAIS
ITALIANO
NEDERLANDS
SVENSKA
ESPAÑOL
PORTUGUÊS
3
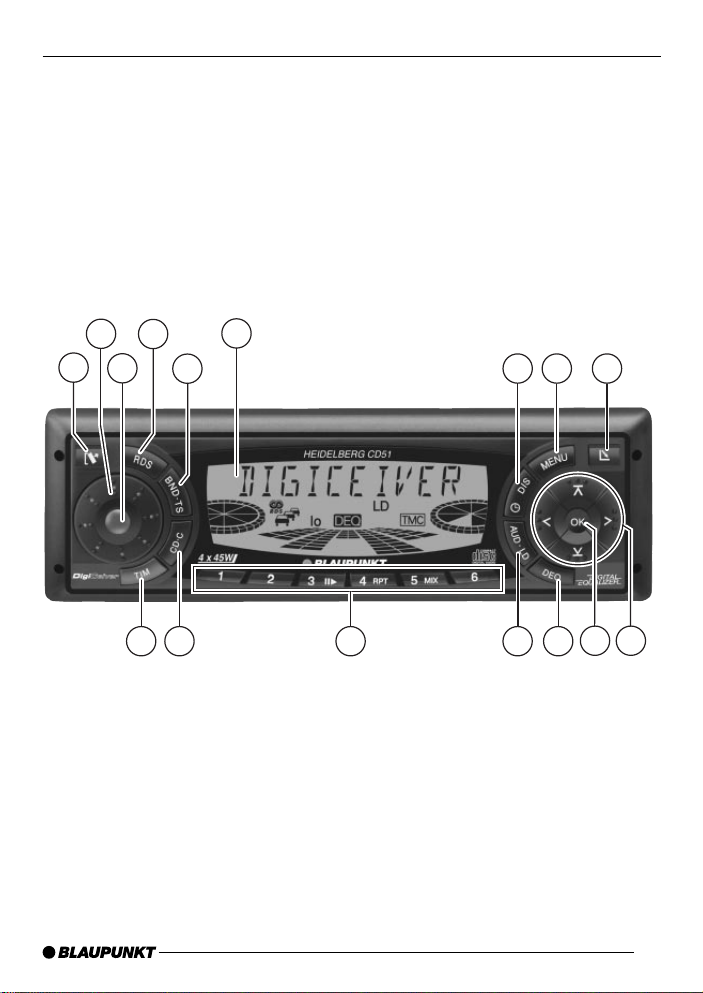
CONTROLS
1 button - unlatches the flip/
release panel
2 Volume control
3 Button - switches the radio and
mute function on/off
4 RDS button - switches RDS con-
venience function on/off (radio
data system).
Selects variable radio texts.
5 BND button (band), source se-
lection for radio mode,
selection of FM memory levels
and the wavebands MW and LW
TS, starts the Travelstore function.
6 Display (display field)
7
button - indicates the time on
the display
DIS, change display contents
8 MENU button - selects the menu
for basic settings
9
button - opens the flip/release
panel
: Arrow-key block
; OK button - confirms menu en-
tries and starts the scan function
< DEQ button (digital equalizer) -
switches the equalizer on/off
= AUD button (Audio) - adjusts
bass and treble, balance and
fader
LD - switches loudness function
on/off (volume adjustment to
comfortable hearing level)
> Key block 1 - 6
? CD•C button - selects between
CD, CD changer (if connected)
and Aux sources
@ TIM button - activates the traffic-
information standby mode and
the TIM function (traffic information memory)
DEUTSCH
ENGLISH
FRANÇAIS
ITALIANO
NEDERLANDS
SVENSKA
31
ESPAÑOL
PORTUGUÊS

TABLE OF CONTENTS
Notes and accessories .......... 33
Road safety ................................... 33
Installation ..................................... 33
Accessories .................................. 33
International telephone information . 33
Flip/release panel .................. 34
Switching on/off .................... 35
Volume adjustment ................ 36
Radio mode ............................ 38
Switching to radio mode ................ 38
RDS function (AF, REG) ................ 38
Selecting the waveband/memory ... 38
Tuning into a station ....................... 39
Setting the sensitivity of the station
search mode ................................. 39
Storing stations ............................. 39
Storing stations automatically
(Travelstore) .................................. 40
Listening to preset stations ............ 40
Scanning receivable stations
(SCAN) ......................................... 40
Setting the scanning time .............. 40
Programme type (PTY) .................. 40
Optimising radio reception............. 42
Selecting radio text display ............ 42
Setting the display ......................... 42
Traffic information.................. 43
Traffic Information Memo
(TIM) ....................................... 44
CD Mode ................................ 45
Starting CD mode ......................... 45
Selecting a track ........................... 46
Fast search (audible) ..................... 46
Random play (MIX) ........................ 46
Scanning tracks (SCAN) ............... 46
Repeating a track (REPEAT) .......... 46
Interrupting play (PAUSE).............. 46
Changing the display ..................... 46
Traffic announcements in CD mode. 47
Naming CDs ................................. 47
Removing a CD ............................. 47
CD changer mode .................. 48
Starting CD changer mode ............ 48
Selecting a CD.............................. 48
Selecting a track ........................... 48
Fast search (audible) ..................... 48
Changing the display ..................... 48
Repeating individual tracks or whole
CDs (REPEAT).............................. 48
Random play (MIX) ........................ 48
Scanning all tracks on all CDs
(SCAN) ......................................... 49
Interrupting Play (PAUSE) ............. 49
Naming CDs ................................. 49
CLOCK - Time ........................ 50
Tone and volume balance ...... 52
Loudness................................ 53
Equalizer ................................ 53
Notes on adjusting the equalizer .... 53
Switching the equalizer on/off ........ 54
Setting the equalizer ...................... 54
Setting the level indicator............... 54
Setting aid for the equalizer ........... 55
External audio sources .......... 56
TMC for dynamic navigation
systems .................................. 56
Technical data ........................ 57
Guarantee .............................. 57
Installation instructions ........ 222
32
NOTES AND ACCESSORIES
Thank you for deciding in favour of a
Blaupunkt product. We wish you a great
deal of pleasure with your new car radio.
Before using your car radio, please read
these instructions carefully. The Blaupunkt editors are constantly working to
make our instruction manuals as clear
and easy to understand as possible.
Should you nonetheless have any questions about how to operate your new car
radio, please contact your specialist
dealer or call the telephone hotline for
your country , the number of which is given on the back page of this manual.
Road safety
Road safety has priority. Only operate your car radio if road and traffic conditions allow. Familiarise yourself with the unit before setting off on
your journey.
You should always be able to hear
police, fire and ambulance sirens in
good time. For this reason, set the
volume of your car radio at a suitable level.
Installation
If you would like to install your car radio
yourself, please read the installation and
connection instructions at the end of the
manual.
Accessories
Please use only Blaupunkt-approved
accessories.
Remote controls
The most important functions can be
selected safely from the steering wheel
using the optional remote controls RC
08 and RC 10.
Amplifiers
All Blaupunkt amplifiers are suitable for
use with the radio.
CD changer
The following Blaupunkt CD changers
can be connected to the radio: CDC
A 06, CDC A 08, CDC A072 and IDC
A 09.
The CD changers CDC A5 and CDC
A 071 can also be connected if you use
an adapter cable (Blaupunkt no.: 7 607
889 093).
International telephone
information
Should you have any questions about
how to use the car radio or require any
further information, please call us!
The telephone information service numbers are printed on the last page of this
manual.
DEUTSCH
ENGLISH
FRANÇAIS
ITALIANO
NEDERLANDS
SVENSKA
ESPAÑOL
33
PORTUGUÊS
FLIP/RELEASE PANEL
Flip/release panel
Theft protection
Your car radio is fitted with a flip/release
panel to guard against theft. Without this
panel, the unit is worthless to the thief.
Protect your unit from theft by taking the
flip/release panel with you every time
you leave the car. Do not leave the panel
behind in the car, even if it is out of sight.
The constructive design of the panel
makes for simple handling.
Note:
● Do not drop the flip/release panel.
● Do not expose the flip/release pan-
el to direct sunshine or other sources of heat.
● Keep the flip/release panel in the
case provided.
● Avoid direct skin contact with the
flip/release panel. Please clean it
when necessary with some white
spirit on a lint-free cloth.
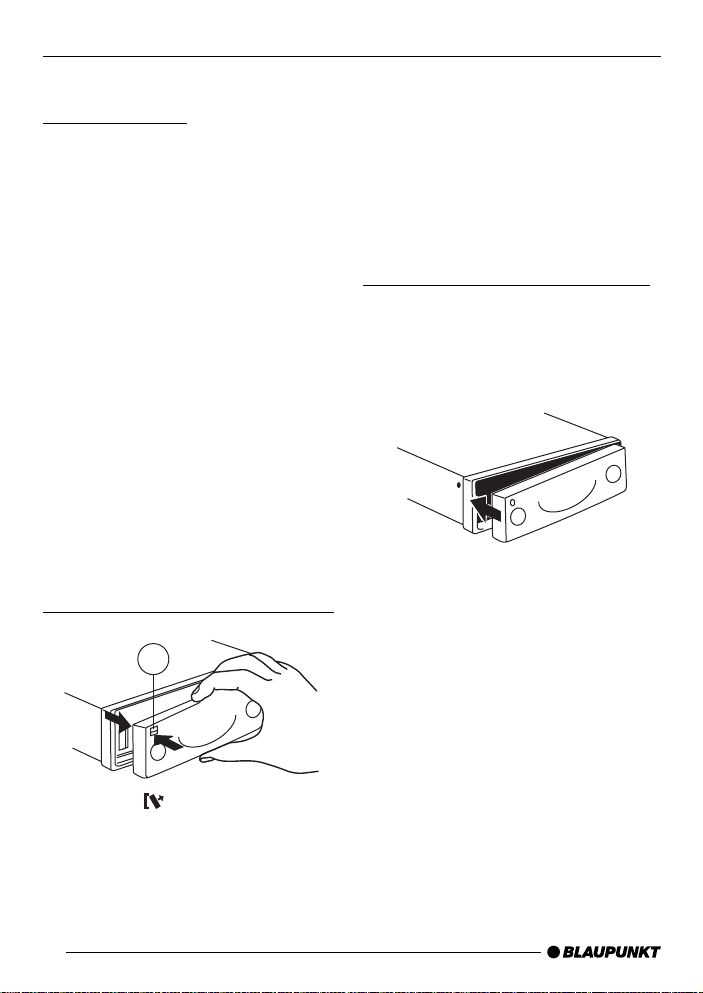
Removing the flip/release panel
1
➮ First pull the flip/release panel
straight and then to the left out of
the unit.
● After removing the flip/release pan-
el, the unit switches itself off.
● All the current settings are saved.
● If there is a CD in the unit, it re-
mains there.
Attaching the flip/release panel
➮ Slide the flip/release panel from left
to right into the unit guide.
➮ Press the left side of the panel into
the unit until it slots into place.
Note:
● Do not press against the display
while attaching the flip/release panel.
If the car radio was switched on when
the flip/release panel was removed, it
comes on again automatically as last
set (radio, CD, CD changer or AUX)
when the panel is replaced.
➮ Press the button 1.
This unlatches the flip/release panel.
34

SWITCHING ON/OFF
Switching on/off
There are various ways of switching the
car radio on and off, as described below.
Switching on/off using the ignition
If the car radio is correctly connected to
the ignition and has not been switched
off using the button 3, it is switched
on/off simultaneously with the ignition.
You can also switch on your car radio
when the vehicle ignition is off.
➮ To do so, press the button 3.
Note:
To protect the vehicle battery, the unit
switches off automatically after one
hour.
Switching on/off using the flip/
release panel
➮ Remove the flip/release panel.
The unit switches itself off.
➮ Replace the flip/release panel once
more.
The car radio is switched on. The last
settings (radio, CD, CD changer or AUX)
are activated.
Switching on/off using the button
3
➮ To switch the unit on, press the but-
ton 3.
➮ To switch the unit off, hold the but-
ton 3 down for more than two
seconds.
The car radio is now switched off.
Switching on by inserting a CD
If there is no CD in the CD compartment when the car radio is switched off,
➮ press the button 9.
This flip/release panel then opens.
➮ Without exerting any force, slide
the CD into the compartment, printed side uppermost, until you feel
some resistance.
The CD is automatically drawn into the
drive.
Do not hinder or assist the drive as it
draws the CD in.
➮ Press the flip/release panel gently
until you feel it slot into place.
The car radio switches itself on and CD
playback begins.
DEUTSCH
ENGLISH
FRANÇAIS
ITALIANO
NEDERLANDS
SVENSKA
ESPAÑOL
PORTUGUÊS
35

VOLUME ADJUSTMENT
Volume adjustment
The system volume can be adjusted in
steps from 0 (off) to 66 (maximum).
➮ To raise the system volume, turn
the volume control 2 to the right.
➮ To lower the system volume, turn
the volume control 2 to the left.
Setting the switch-on volume
You can set the volume at which you
wish the car radio to play when switched
on.
➮ Press the MENU button 8.
➮ Press the button : repeatedly
until “ON VOLUME” appears on
the display .
➮ Use the buttons : to set the
switch-on volume.
If you select the “0” setting, the volume
played before the unit was last switched
off will be reactivated.
Risk of serious injury! If the
switch-on volume is set at the maximum, the volume can be very high
when you switch on your car radio.
If the volume was set on maximum
before the unit was last switched off
and the switch-on volume is set at
“0”, the volume can be very high
when you switch on your car radio.
This may damage your hearing!
➮ When you have completed setting
the volume, press either the MENU
button 8 or OK ;.
Mute setting
This feature enables you to lower the
system volume instantaneously (mute).
➮ Briefly press button 3.
“MUTE” appears on the display.
Activating the mute setting
The unit's mute level is adjustable.
➮ Press the MENU button 8.
➮ Press the button : repeatedly
until “MUTE LEVEL” appears on
the display .
➮ Use the buttons : to set the
mute level.
➮ When you have completed the set-
ting, press either the MENU button
8 or OK ;.
Telephone Audio/Navigation
Audio
If your car radio is connected to a mobile telephone or a navigation system,
the volume will be muted as soon as
you “pick up” the telephone or the radio
relays voice output from the navigation
system and the conversation or voice
output is heard through the radio's loudspeakers. In order for this to work, the
mobile telephone or navigation system
has to be connected to the car radio as
described in the instructions.
To find out which navigation systems are
compatible with your car radio, please
consult your Blaupunkt dealer.
If a traffic announcement is received
during a telephone call or navigationsystem voice output, the traffic an-
36

VOLUME ADJUSTMENT
nouncement will not be heard until the
conversation/voice output is over.
If, during a traffic announcement, a call
is received or there is voice output from
the navigation system, the traffic announcement is relayed. The telephone
conversation/voice output can then be
heard when the traffic announcement
is over.
The volume at which telephone conversations and voice output from the navigation system are switched on is adjustable.
➮ Press the MENU button 8.
➮ Press the button : repeatedly
until “TEL/NAVI VOL” appears on
the display .
➮ Use the buttons : to set the
desired volume.
➮ When you have completed the set-
tings, press either the MENU button 8 or OK ;.
Note:
You can adjust the volume for telephone
conversations and voice output while
they are being heard by using the volume control 2.
➮ Press the button : repeatedly
until “BEEP” appears on the display.
➮ Adjust the volume using the and
buttons :. “0” means the beep
is off, “9” means maximum beep
volume.
➮ When you have completed the set-
ting, press either the MENU button
8 or OK ;.
DEUTSCH
ENGLISH
FRANÇAIS
ITALIANO
NEDERLANDS
SVENSKA
Setting the volume for the
confirmation tone
If you hold down a button for longer than
two seconds when using certain functions, e.g. storing a station on a station
button, a confirmation tone (beep)
sounds. The volume of this beep is adjustable.
➮ Press the MENU button 8.
ESPAÑOL
PORTUGUÊS
37
 Loading...