

Page 1
Operating instructions
Radio / Cassette
Frankfurt C70
Page 2

Bitte aufklappen
Open here
Ouvrir s.v.p.
Aprite la pagina
Hier openslaan a.u.b.
Öppna
Por favor, abrir
Favor abrir
2
Page 3

1 button - opens the operating panel
2 Button - switches the radio and mute
function on/off
3 V olume control
4 Soft keys - the function of the soft
keys depends on the current content
of the display
5 OK button - confirms menu entries
and leaves the menu
6 TIM button - selects the TIM function
7 Multifunction rocker s witch
8 MENU button - selects the menu for
basic settings
9 AUD button - adjusts bass and treble,
balance and fader as well as loudness
: DIS button - changes display contents
; Display
< CC button, to start cassette play
= CDC button - starts CD changer play-
back (only if connected) or
plays an external audio source (only if
connected)
> TUNE button - activates radio mode
Selects the radio function menu (only
possible in radio mode)
CONTROLS
DEUTSCH
ENGLISH
FRANÇAIS
ITALIANO
NEDERLANDS
39
SVENSKA
ESPAÑOL
PORTUGUÊS
Page 4

TABLE OF CONTENTS
Notes ............................................. 41
Road safety........................................... 41
Installation ............................................. 41
Accessories........................................... 41
Guarantee ............................................. 41
International telephone information....... 41
Theft protection, KeyCard ........... 42
Switching on/off ........................... 44
Using your car radio for the first
time................................................ 45
Volume adjustment ...................... 46
Audio settings .............................. 47
Setting the display ....................... 48
Radio mode................................... 49
Switching on radio mode....................... 49
RDS function (AF, REG)........................ 49
Selecting the frequency range/memory 50
Tuning into a station .............................. 50
Selecting short/long-range reception .... 51
Setting the sensitivity of the station
search mode ......................................... 51
Storing stations ..................................... 52
Storing stations automatically
(Travelstore) .......................................... 52
Listening to preset stations ................... 52
Scanning stations.................................. 52
Setting the scanning time...................... 53
Programme type (PTY) ......................... 53
Optimising radio reception .................... 54
Switching between stereo and mono .... 55
Changing the display............................. 55
Selecting radio text display.................... 55
Naming a station ................................... 56
TIM - Traffic Information Memory 57
Switching TIM on/off.............................. 57
Recording traffic announcements ......... 57
Altering TIM record standby time .......... 57
Playback of recorded traffic
announcements..................................... 58
Interrupting TIM record standby
(for the time spent at the car wash)....... 58
Traffic information........................ 59
Cassette mode.............................. 60
Cassette playback................................. 60
Ejecting a cassette ................................ 60
Changing the playing side..................... 60
Skipping tracks (S-CPS) ....................... 60
Repeating tracks ................................... 60
Scanning all tracks on a cassette
(SCAN).................................................. 61
Changing the display............................. 61
Resetting the counter ............................ 61
Fast forward/rewind............................... 61
Switching radio monitor on/off............... 61
Skipping blank sections (Blankskip)...... 61
Dolby* Noise Suppression .................... 62
Traffic announcements in cassette mode... 62
CD changer mode (optional) ....... 62
Switching to CD changer mode............. 62
Selecting a CD ...................................... 62
Selecting a track.................................... 62
Fast search (audible)............................. 63
Changing the display............................. 63
Repeating individual tracks or whole
CDs (REPEAT)...................................... 63
Random play (MIX) ............................... 63
Scanning all tracks on all CDs (SCAN) . 63
Naming CDs.......................................... 64
Programming favourite CD tracks ......... 64
Clock - Time .................................. 66
Equalizer ....................................... 67
Notes on adjusting the equalizer........... 67
Switching the equalizer on/off ............... 67
Setting the equalizer ............................. 68
Setting the quality factor of the filter...... 68
Select sound preset .............................. 68
Setting aid for the equalizer .................. 68
TMC for dynamic navigation
systems......................................... 70
Pre-amplifiers ............................... 70
Subout/subwoofer........................ 71
High-pass filter ............................. 71
External audio sources................ 72
Tec hnical data .............................. 72
Installation instructions............. 278
40
Page 5

NOTES
Thank you for deciding in favour of a Blaupunkt product. We wish you a great deal of
pleasure with your new car radio.
Note
Before using your car radio , please read these
instructions carefully and familiarise yourself
with the unit. Keep these instructions in your
vehicle for later ref erence.
Road safety
Road saf ety has priority . Only operate
your car radio if road and traffic conditions
allow . F amiliarise yourself with the unit before setting off on your journey.
You should alw a ys be ab le to hear police ,
fire and ambulance sirens in good time.
For this reason, set the volume of y our car
radio at a suitable lev el.
Installation
If you would like to install your car r adio yourself, please read the installation and connection instructions at the end of the manual.
Accessories
Please use only Blaupunkt-approved accessories.
Remote controls
The most important functions can be selected safely from the steering wheel using the
optional remote controls RC 08 or RC 10.
Amplifiers
All Blaupunkt amplifiers are suitable for use
with the radio.
CD changer
The following Blaupunkt CD changers can be
connected to the radio: CDC A 06, CDC A
08, CDC A 072 and IDC A 09.
The CD changers CDC A 5 and CDC A 071
can also be connected if you use an adapter
cable (Blaupunkt no.: 7 607 889 093).
Guarantee
The scope of the guarantee complies with the
legal provisions applicable in the country in
which the unit was bought.
Such legal provisions notwithstanding, Blaupunkt grants a 12-month guarantee.
If you have any queries regarding the terms
of the guarantee, please consult your authorised Blaupunkt dealer. The purchase receipt
applies in all cases as your guarantee slip.
International telephone
information
Should you have any questions about ho w to
use the car radio or require any further information, please call us!
The telephone information service numbers
are printed on the last page of this manual.
DEUTSCH
ENGLISH
FRANÇAIS
ITALIANO
NEDERLANDS
SVENSKA
ESPAÑOL
PORTUGUÊS
41
Page 6
THEFT PROTECTION
Theft protection, KeyCard
A KeyCard is supplied along with the radio.
The car radio can also be used with a sec-
ond KeyCard.
If a KeyCard is lost or damaged, y ou can ob-
tain a replacement KeyCard through a Blaupunkt dealer.
If you use two KeyCards, the settings of the
first KeyCard also apply to the second KeyCard. You do, ho wever , have the option of storing the following functions individually:
station-button allocation, traffic-information
volume, beep volume , equaliser setting.
In addition, the last set values for w avelength,
station settings, scanning time and switchon volume remain stored.
This means that you always have your selected basic setting after inserting the KeyCard.
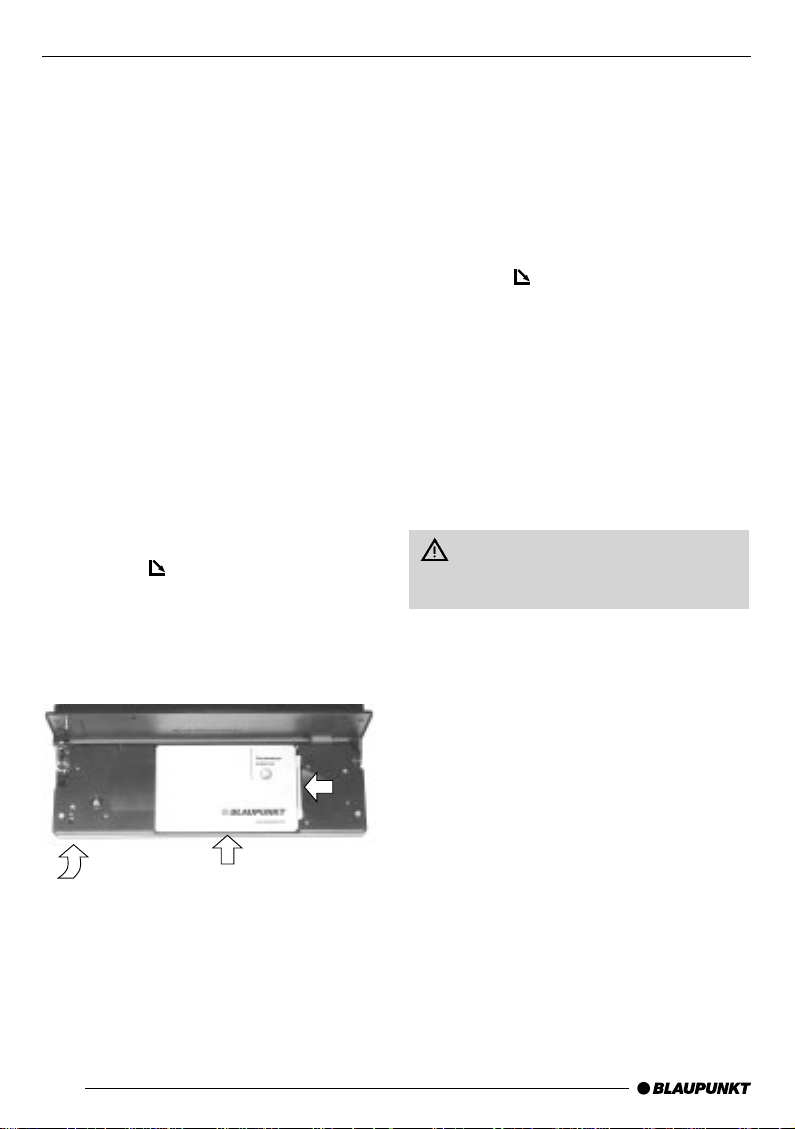
Inserting the KeyCard
➮ Press the button 1.
The operating panel opens.
➮ Insert the KeyCard with the contact sur-
faces facing down as illustrated in the
picture (arrow 1).
2
3
➮ Carefully place the KeyCard on the car-
riage and slide it in as far as it will go in
the direction of the arrow (2).
➮ Close the operating panel (arrow 3).
1
Note:
If a wrong card, e.g. a cash card, is introduced
into the car radio, “Wrong KC” will appear on
the display.
Remove the wrong card and slide in a KeyCard your unit will recognise.
Removing a KeyCard
In order to unlock the operating panel,
➮ press the button 1.
The operating panel then opens.
➮ Place the card on the carriage and slide
as far to the right as it will go.
➮ Pull the card out of the operating panel.
➮ Close the operating panel.
Note:
In order to prevent theft, remo ve the Ke yCard
when you leave the v ehicle and leav e the operating panel open.
For safety reasons , the operating panel
should always be lock ed when the vehicle
is in motion.
Making a second KeyCard “learn”
the code Replacing a KeyCard
Y ou can use the first K eyCard to make a second KeyCard “learn” to be an additional Ke y-
Card when the car radio is in operation.
If you want a second KeyCard to “learn” the
code,
➮ insert the first KeyCard and switch the
radio on;
➮ press the MENU button 8.
➮ press the soft key 4 with the display
allocation “KC”;
➮ press the soft key 4 with the display
allocation “LRN”.
“LEARN KC” appears on the displa y.
42
Page 7

THEFT PROTECTION
➮ Remove the first K eyCard.
“INSERT” appears on the display.
➮ Insert the new KeyCard.
“LEARN OK” appears on the display.
To leave the KeyCard men u,
➮ press the MENU button 8 once or OK
5 repeatedly until the desired menu
appears. The settings are now stored.
You can now use your car radio with the new
KeyCard.
Note:
A maximum of two Ke yCards can be used for
each unit.
If you already have tw o Keycards f or your unit
and you make a third KeyCard “learn”, you
will no longer be able to use the unit with the
KeyCard not used during the “learning” pro-
cess.
Lost or damaged KeyCard
If all KeyCards belonging to the car r adio are
damaged or lost, a new KeyCard must first
be made to “learn” the unit’s master code,
which can be found in your car radio pass .
Always keep your car radio pass in a
safe place, but never in your car.
To find out how to prepare a new Keycard f or
use, please read the section “Making a new
KeyCard “learn” the code/entering the mas-
ter code”.
If necessary, you can use this KeyCard to
make a second KeyCard learn the code. To
find out how to do this, please read the section “Making a second KeyCard “learn”/replac-
ing the KeyCard”.
Y ou can obtain ne w KeyCards from y our specialist dealer.
Making a new KeyCard “learn” the
code/entering the master code
If you no longer have a v alid KeyCard f or your
unit and would like to make a new KeyCard
learn the code:
➮ insert the new KeyCard, which the unit
does not recognise;
➮ close the operating panel;
➮ if necessary, switch off the radio;
➮ Hold down the TUNE button > and the
second soft key from the top on the left
4 at the same time;
➮ switch the unit on using button 2.
“0000” then appears on the display.
Enter the four-digit master code from your car
radio pass as follows:
➮ enter the number of the master code
using the
press the buttons repeatedly until the
desired number appears on the display;
and buttons. To do this,
➮ alter the input position using the
buttons 7;
➮ When the master code is correctly dis-
played, press the OK b utton 5.
The new Ke yCard is accepted when the unit
switches to playbac k..
Optical theft protection display
(LED)
The ON button and the drive-compartment
lights may flash when the unit is switched off
and the KeyCard remo ved. For this, the “LED”
menu setting must be at “on”.
➮ Press the MENU button 8.
➮ Press the soft key 4 with the displa y
allocation “KC”.
➮ Press the soft key 4 with the displa y
allocation “LED”.
The current status “LED ON” or “LED OFF”
appears on the display.
DEUTSCH
ENGLISH
FRANÇAIS
ITALIANO
NEDERLANDS
SVENSKA
ESPAÑOL
PORTUGUÊS
43
Page 8

SWITCHING ON/OFFTHEFT PROTECTION
➮ Press the soft key 4 with the display
allocation “LED” to switch between “LED
ON” and “LED OFF”.
To leave the KeyCard men u,
➮ press the OK button 5 to return to the
previous menu level or the MENU button 8 to leave the men u altogether.
The settings are now stored.
Displaying radio pass data
With the KeyCard supplied with your car radio, you can ha ve the data on your radio pass,
such as name, type number (7 6 ...) and serial number displayed.
➮ Press the MENU button 8.
➮ Press the soft key 4 with the display
allocation “KC”.
➮ Press the soft key 4 with the display
allocation “READ”.
The radio pass data now appear on the display as main text.
To leave the KeyCard men u,
➮ press the MENU button 8 or OK 5.
Taking care of the KeyCard
Y our K eyCard will function perfectly if the contacts are kept free of all foreign particles. Av oid
direct skin contact.
Please clean the KeyCard contacts when
necessary with some white spirit on a lintfree cloth.
Switching on/off
There are various ways of switching the car
radio on and off.
Switching on/off using the button
2
➮ To switch the unit on, press the button
2.
The car radio is now switched on.
➮ To switch the unit off, hold the button 2
down for more than two seconds .
The car radio is now switched off.
Switching on/off using the
ignition
If the car radio is correctly connected to the
ignition and has not been switched off using
the button 2, it is switched on/off sim ultaneously with the ignition.
You can also switch on your car radio when
the vehicle ignition is off.
➮ To do so, press the button 2.
Note:
T o protect the v ehicle battery , the unit switches off automatically after one hour.
Switching on/off using the
KeyCard
You can switch the car radio on or off by inserting and removing the KeyCard if the unit
was previously s witched off using the button
2. You can read about inser ting/removing
the KeyCard in the chapter “Theft protection,
KeyCard”.
44
Page 9

USING YOUR CAR RADIO FOR THE FIRST TIME
Using your car radio for the
first time
If the car radio is being connected for the first
time or the power supply to the unit has been
interrupted, the install menu appears on the
display. Please make the f ollowing settings in
the install menu:
● select an external audio source instead
of a CD changer;
● set the time;
● adjust the tuner accordingly for opera-
tion in the United States or Europe;
● revert to manufacturer’s setting;
● switch the internal amplifier on/off.
You can go to the install menu at any time:
➮ Hold down the MENU 8 button until
the install menu appears on the display.
Entering settings
Selecting an external audio source
➮ Press the soft key 4 with the display
allocation “AUX”.
If “AUX” appears on the display , the input has
already been activated.
➮ Press the or button 7 to switch
“AUX” on or off.
➮ When the settings have been entered,
press the MENU button 8.
Note:
When the AUX input is activated, it can be
selected with the CDC = button.
Setting the clock
➮ Press the soft key 4 with the display
allocation “CLK”.
➮ Set the hours using the or button
7.
➮ Press the button 7.
➮ Set the minutes using the or button
7.
➮ Press the OK button 5.
Setting the tuner
➮ Press the soft key 4 with the displa y
allocation “TUNE”.
➮ Select “EUROPE” or “US” with the
or button 7.
➮ Press the OK button 5.
Switching the internal amplifier on/off
➮ Press the soft key 4 with the displa y
allocation “AMP”.
➮ Select “AMP ON” or “AMP OFF” with
or button 7.
the
➮ press the OK button 5.
Note:
When you set the internal amplifier at “AMP
OFF”, the loudspeaker directly connected to
the unit remains silent. In this case , only an
external amplifier produces sound.
Reverting to the manufacturer’s setting
➮ Press the soft key 4 with the displa y
allocation “NORM”.
“NORMSET” appears on the display. If you
really wish to return to the manufacturer’s
settings,
➮ press the OK button 5.
When you have completed all the settings ,
➮ press the OK button 5.
Leaving the install menu
In order to leave the install menu,
➮ press the OK button 5. The settings
are now stored.
DEUTSCH
ENGLISH
FRANÇAIS
ITALIANO
NEDERLANDS
SVENSKA
ESPAÑOL
PORTUGUÊS
45
Page 10
VOLUME
Volume adjustment
The system volume can be adjusted in steps
from 0 (off) to 50 (maximum).
➮ To raise the system volume, turn the
volume control 3 to the right.
➮ To lower the system volume, turn the
volume control 3 to the left.
Setting the switch-on volume
It is possible to adjust the volume that will pla y
when you switch the radio on.
➮ Press the MENU button 8.
➮ Press the soft key 4 with the display
allocation “VAR”.
➮ Press the soft key 4 with the display
allocation “VOL ”.
➮ Set the volume using volume control 3
or the
If you wish to set the volume active before
the unit was last switched off as the switchon volume,
➮ press the button 7.
“LAST VOL” appears on the display.
volume is set at the maximum, the volume
can be very high when you switch on your
car radio.
or buttons 7.
Risk of serious injury! If the switch-on
➮ Press the OK button 5 to go back to
the previous menu le v el or the MENU
button 8 to leav e the menu altogether.
The settings are now stored.
Mute setting
This feature enables you to lo wer the system
volume instantaneously (mute).
➮ Briefly press the button 2.
“MUTE” appears on the displa y.
Deactivating the mute setting
➮ Briefly press the button 2
or
➮ turn the volume control 3.
Mute during telephone
If your car radio is connected to a mobile telephone, the volume will be muted as soon as
you “pick up” the telephone. In order for this
to work, the mobile telephone has to be connected to the car radio as described in the
instructions.
If a traffic announcement is received during a
telephone call and traffic information priority
has been activated, the traffic announcement
will be relayed via the system’s loudspeak-
ers. For further details, please read the chapter entitled “Traffic information“.
If the volume was set on maximum
before the unit was last switched off and
the switch-on volume is set at “LAST V OL ”,
the volume can be very high when you
switch on your car radio.
In both cases, your hearing may suff er serious damage!
46
Page 11
AUDIO SETTINGSVOLUME
Setting the volume for the
warning tone (beep)
If you hold down a button f or longer than tw o
seconds when using certain functions, e.g.
storing a station on a station button, a warning tone (beep) sounds. The volume of this
beep is adjustable.
➮ Press the MENU button 8.
➮ Press the soft key 4 with the display
allocation “VAR”.
➮ Press the soft key 4 with the display
allocation “BEEP”.
➮ Adjust the volume using the and
buttons.
If you wish to deactivate the beep,
➮ press the button 7.
“BEEP OFF” appears on the display.
➮ Press the OK button 5 to return to the
previous menu level or the MENU button 8 to leave the men u altogether.
The settings are now stored.
Audio settings
Note:
You can adjust the bass, treble and loudness
settings separately for each audio source.
Bass settings
➮ Press the AUD button 9.
“AUDIO 1” appears on the display.
➮ Press the soft key 4 with the displa y
allocation “BASS”.
➮ Press the or button 7 to adjust
the bass.
When the settings have been completed,
➮ press the AUD button 9.
Treble settings
➮ Press the AUD button 9.
“AUDIO 1” appears on the display.
➮ Press the soft key 4 with the displa y
allocation “TREB”.
➮ Press the or button 7 to adjust
the treble.
When the settings have been completed,
➮ press the AUD button 9.
DEUTSCH
ENGLISH
FRANÇAIS
ITALIANO
NEDERLANDS
SVENSKA
Loudness
Loudness means the bass levels are aurally
compensated, i.e. the y are increased at lo wer volume levels.
➮ Press the AUD button 9.
“AUDIO 1” appears on the display.
➮ Press the soft key 4 with the displa y
allocation “LOUD”.
➮ Press the or button 7 to adjust
the loudness.
47
ESPAÑOL
PORTUGUÊS
Page 12

AUDIO SETTINGS DISPLAY
If you want to deactivate the loudness function,
➮ press the button 7.
“LOUD OFF” appears on the display.
When the settings have been completed,
➮ press the AUD button 9.
Setting the right/left balance
➮ To set the balance, press the AUD but-
ton 9.
“AUDIO 1” appears on the display .
➮ Press the soft key 4 with the display
allocation “BAL”.
➮ Press the or button 7 to adjust the
right/left balance.
When the settings have been completed,
➮ press the AUD button 9.
Fader settings, front/back
➮ To set the fader, press the AUD button
9.
“AUDIO 1” appears on the display .
➮ Press the soft key 4 with the display
allocation “FADE”.
➮ Press the or button 7 to adjust the
front/back fader.
When the settings have been completed,
➮ press the AUD button 9.
Setting the display
You can adjust the display to your needs and
the position of the car radio in your vehicle .
Setting the reading angle
➮ Press the MENU button 8.
➮ Press the soft key 4 with the displa y
allocation “DISP”.
➮ Press the soft key 4 with the displa y
allocation “ANGL”.
➮ Set the reading angle using the or
buttons 7.
➮ Press the OK button 5 to return to the
previous menu level or the MENU button 8 to leave the menu altogether.
The settings are now stored.
Setting the display brightness
If your car radio has been connected as described in the instructions, the display brightness will be activated when you turn on the
headlights. The display brightness can be set
separately in stages from 1 - 9 for day and
night.
Display brightness - day
➮ Press the MENU button 8.
➮ Press the soft key 4 with the displa y
allocation “DISP”.
➮ Press the soft key 4 with the displa y
allocation “DA Y”.
➮ Set the brightness using the button
7.
➮ Press the OK button 5 to return to the
previous menu level or the MENU button 8 to leave the menu altogether.
The settings are now stored.
48
Page 13

DISPLAY
RADIO MODE
Display brightness - night
➮ Press the MENU button 8.
➮ Press the soft key 4 with the display
allocation “DISP”.
➮ Press the soft key 4 with the display
allocation “NGHT”.
➮ Set the brightness using the button
7.
➮ Press the OK button 5 to return to the
previous menu level or the MENU button 8 to leave the men u altogether.
The settings are now stored.
Radio mode
This unit is equipped with an RDS radio receiver. Many of the receivable FM stations
transmit a signal that not only carries the programme but also additional inf ormation such
as the station name and programme type
(PTY).
The station name appears on the display as
soon as it is received. The programme type
can be displayed if required. Read the section entitled “Programme Type (PTY)” for further details.
Switching on radio mode
If you are in CD , cassette, MiniDisc (depending on your car radio) or CD changer mode:
➮ Press the TUNE button >.
RDS function (AF, REG)
The RDS functions AF (Alternative Frequency) and REG (Regional) extend your radio’s
range of functions.
● AF: If this RDS function is activated, the
unit automatically carries out a background search for the best receivab le
frequency for the station that is currently
set.
● REG: Some radio stations set aside
some of their broadcasting time for regional programmes that provide different regional content. With the REG
function, your car radio is prev ented
from switching to alternative frequencies
with a different regional content.
DEUTSCH
ENGLISH
FRANÇAIS
ITALIANO
NEDERLANDS
SVENSKA
ESPAÑOL
Note:
REG has to be specially activated/deactivated in the unit’s men u.
49
PORTUGUÊS
Page 14

RADIO MODE
Switching the RDS function on/off
To use the RDS functions AF and REG,
➮ press the TUNE button > when in radio
mode.
The radio function menu appears on the display.
➮ Press the soft key 4 with the display
allocation “RDS”.
The RDS functions are active when “RDS”
lights up on the display.
To return to the basic radio menu,
➮ press the TUNE button > or wait 8 sec-
onds. The settings are now stored.
Switching REG on/off
To use the RDS function REG,
➮ press the TUNE button > when in radio
mode.
The radio function menu appears on the display.
➮ Press the soft key 4 with the display
allocation “NEXT”.
The “second page” of the radio function menu
appears on the display.
➮ Press the soft key 4 with the display
allocation “REG”.
When the REG function is switched on or off,
“REG ON” or “REG OFF” appears on the dis-
play. When the REG function is activ ated, an
arrow symbol lights up alongside “REG”.
➮ Press the TUNE button > or wait
8 seconds. The settings are no w stored.
Selecting the frequency range/
memory
This unit can receive programmes broadcast
over the FM as well as MW and L W (AM) frequency ranges. There are four preset memory levels for the FM range and one each for
the MW and L W ranges .
Six stations can be stored on each memory
level.
Selecting the wavelength
To select the wavelength, FM, MW or L W,
➮ press the TUNE button > when in radio
mode.
The radio function menu appears on the display.
➮ Press the soft key 4 with the displa y
allocation “FM” for the FM wa velength.
➮ Press the soft key 4 with the displa y
allocation “AM” for the MW and LW
wavelengths .
To return to the basic radio menu,
➮ press the TUNE button > or wait 8 sec-
onds. The settings are now stored.
Selecting the FM memory
To switch between the FM memory levels,
FM1, FM2, FM3 or FMT,
➮ press the soft key 4 with the display
allocation “NEXT” repeatedly when in
FM radio mode until the desired memory level appears on the display.
The memory levels are called up in the following order: FM1, FM2, FM3, FMT.
Selecting MW or LW
To select an AM wavelength, MW or L W,
➮ first of all select the AM wavelength;
➮ press the soft key 4 with the display
allocation “NEXT” repeatedly until the
desired wavelength, MW or LW, appears on the display.
Tuning into a station
There are various methods availab le f or tuning into a station.
Automatic station search mode
➮ Press the or button 7.
The unit tunes into the next receivable station.
50
Page 15

RADIO MODE
Tuning into stations manually
You can also tune into stations manually .
➮ Press either the or button 7.
Note:
You can only tune into stations manually if
the RDS function is first deactivated.
Browsing through broadcasting networks
(only FM)
If a radio station provides several programmes, you have the option of browsing
through its so-called “broadcasting network”.
➮ Press the or button 7 to move to
the next station on the broadcasting network.
Note:
If you want to use this feature , the RDS function must first be activated.
You will then only be able to switch to stations that you have receiv ed once already. To
do so, use the Scan or Travelstore function.
Selecting short/long-range
reception
You can choose whether you wish to select
only short-range or also long-range stations.
➮ Press the TUNE button > when in ra-
dio mode.
The radio function menu appears on the display.
➮ Press the soft key 4 with the displa y
allocation “NEXT”.
The “second page” of the radio function menu
appears on the display.
➮ Press the soft key 4 with the displa y
allocation “LOC”.
The current status “LOCAL” (short-range re-
ception) or “DISTANCE” (long-range reception) appears briefly on the display . When “LO-
CAL” is activated, an arrow symbol lights up
alongside “LOC”.
To return to the basic radio menu,
➮ press the TUNE button > or wait 8 sec-
onds. The settings are now stored.
Setting the sensitivity of the
station search mode
You can set the sensitivity of short and longrange reception for AM and FM separately.
Short-range reception sensitivity (S-LO)
➮ Press the MENU button 8.
➮ Press the soft key 4 with the displa y
allocation “TUN”.
➮ Press the soft key 4 with the displa y
allocation “S-LO”.
➮ Use the buttons 7 to choose be-
tween setting the sensitivity for the AM
or FM wavelength.
➮ Press the or buttons 7 to set the
sensitivity.
The display shows the currently set v alue for
sensitivity. “LO 3” denotes maximum sensi-
tivity for short-range reception. “LO 1” is the
minimum.
➮ Press the OK button 5 to return to the
previous menu level or the MENU button 8 to leave the menu altogether.
The settings are now stored.
Long-range reception sensitivity (S-DX)
➮ Press the MENU button 8.
➮ Press the soft key 4 with the displa y
allocation “TUN”.
➮ Press the soft key 4 with the displa y
allocation “S-DX”.
➮ Use the buttons 7 to choose be-
tween setting the sensitivity for wa velength AM or FM.
➮ Press the or buttons 7 to set the
sensitivity.
DEUTSCH
ENGLISH
FRANÇAIS
ITALIANO
NEDERLANDS
SVENSKA
ESPAÑOL
PORTUGUÊS
51
Page 16

RADIO MODE
The display shows the currently set v alue f or
sensitivity. “DX 3” denotes maximum sensi-
tivity for long-range reception. “DX 1” is the
minimum.
➮ Press the MENU button 8 once or OK
5 repeatedly until the desired menu
appears on the display. The settings are
now stored.
Storing stations
Storing stations manually
➮ Select the required FM memory level,
FM1, FM2, FM3, FMT or either wavelength MW or L W.
➮ Tune into the desired station as de-
scribed under “Tuning into a station”.
➮ Hold down one of the six soft keys 4
on which you wish to store the station
for more than two seconds.
Storing stations automatically
(Travelstore)
You can automatically store the six stations
with the strongest reception in the region (only
FM). The stations are stored in the FMT memory .
Note:
Stations that were previously stored in this
memory are deleted in the process.
To use the Travelstore function,
➮ press the TUNE button > when in radio
mode.
The radio function menu appears on the display.
➮ Press the soft key 4 with the display
allocation “TS”.
The automatic station storing procedure begins. “T-STORE” appears on the display. Af-
ter the process is completed, the station
stored in FMT memory location 1 is played.
Listening to preset stations
➮ Select the memory or frequency range
in which the station was stored.
➮ Press the soft key 4 with the displa y
allocation of the name of the desired
station.
Scanning stations
Scanning receivable stations (RadioSCAN)
You can briefly listen in to all receivable stations. The scanning time can be set in the
menu at between 5 and 30 seconds.
Starting Radio-SCAN
To start the Radio-SCAN function,
➮ press the TUNE button > when in radio
mode.
The radio menu function appears on the display.
➮ Press the soft key 4 with the displa y
allocation “SCAN”.
The scanning process begins. The next receivable station is briefly play ed. The stations
are scanned in ascending order.
Scanning stored stations (Preset Scan)
You can listen in to all currently receivable
stations on all memory levels. The scanning
time can be set in the menu at between 5
and 30 seconds.
Starting preset scan
To start preset scan,
➮ press the TUNE button > when in radio
mode.
The radio function menu appears on the display.
➮ Press the soft key 4 with the displa y
allocation “PS”.
The scanning process begins. The memory
levels are scanned consecutively beginning
with memory level FM1. An arrow symbol
52
Page 17

RADIO MODE
lights up alongside the scanned memory position.
Ending SCAN, continuing to listen to a
station
➮ Press the OK button 5.
The scanning process is completed, the station last scanned remains active.
Setting the scanning time
➮ Press the MENU button 8.
➮ Press the soft key 4 with the display
allocation “VAR”.
➮ Press the soft key 4 with the display
allocation “SCAN”.
➮ Press the or button 7 repeatedly
until the desired scanning time appears
on the display.
➮ Press the MENU button 8 once or OK
5 repeatedly until the desired menu
appears on the display. The settings are
now stored.
Note:
The set scanning time also applies to scanning in the CD, cassette, MiniDisc (depending on your car radio) and CD changer mode.
Programme type (PTY)
Besides transmitting the station name, some
FM stations also provide information on the
type of programme they are broadcasting.
This information can be received and displayed b y your car radio.
For example , the prog ramme types can be:
CULTURE TRAVEL JAZZ
SPORT NEWS POP
ROCK CLASSICS
You can use the PTY function to select sta-
tions of a particular programme type.
When a PTY search has been started and
no station has been found, the search is continued in the background. As soon as a sta-
tion of the selected programme type is received, the unit automatically switches from
the current station, CD or CD changer mode
to the station with the selected programme
type.
Switching PTY on/off
To use the PTY function,
➮ press the TUNE button > when in radio
mode.
The radio function appears on the display.
➮ Press the soft key 4 with the displa y
allocation “NEXT”.
The “second page” of the radio function menu
appears on the display.
➮ Press the soft key 4 with the displa y
allocation “PTY”.
“PTY” appears on the display.
➮ Press the TUNE button > or wait
8 seconds. The settings are now stored.
Selecting programme type and starting a
search
➮ Press the or button 7.
The current programme type appears on the
display.
If you would like to select a different programme type,
➮ press the buttons 7 repeatedly
until the desired programme type is displayed.
Or
to select a preset programme type,
➮ press the soft key 4 with the display
allocation of the desired programme
type;
➮ press the or button 7 to start the
search.
The next station corresponding to your selected programme type will be tuned into.
DEUTSCH
ENGLISH
FRANÇAIS
ITALIANO
NEDERLANDS
SVENSKA
ESPAÑOL
PORTUGUÊS
53
Page 18

RADIO MODE
Note:
If no station corresponding to the selected
programme type is found, “NO PTY” appears
briefly on the display. The unit then tunes in
automatically to the station last received.
Storing the programme type on the
station buttons
➮ Use the or button 7 to select a
programme type.
To store a programme type,
➮ hold down for more than one second
one of the soft keys 4 with the display
allocation of a programme type.
The programme type is now stored in the
selected position.
Selecting a PTY language
You can set the language in which you wish
the programme type to appear .
➮ Press the MENU button 8.
➮ Press the soft key 4 with the display
allocation “TUN”.
➮ Press the soft key 4 with the display
allocation “PTY”.
➮ Press the or button 7 repeatedly
until the desired language, “DEUTSCH”,
“ENGLISH” or “FRANCAIS”, appears on
the display.
➮ Press the OK button 5 to return to the
previous menu level or the MENU button 8 to leave the men u altogether.
The settings are now stored.
Optimising radio reception
High-frequency cut-off feature (HICUT)
The HiCut function improves the sound during poor radio reception. If interference occurs, the treble is automatically reduced and
thus also the interference lev el.
Switching HiCut on/off
To switch HiCut on or off,
➮ press the MENU button 8;
➮ press the soft key 4 with the display
allocation “TUN”;
➮ press the soft key 4 with the display
allocation “HCUT”;
➮ press the or button 7.
When HiCut is deactivated, “NO HICUT” ap-
pears on the display.
➮ Press the OK button 5 to return to the
previous menu level or the MENU button 8 to leave the menu altogether.
The settings are now stored.
Setting the HiCut function
➮ Press the MENU button 8.
➮ Press the soft key 4 with the displa y
allocation “TUN”.
➮ Press the soft key 4 with the displa y
allocation “HCUT”.
➮ Press the or button 7 repeatedly
until the desired HICUT reduction appears on the display.
“HICUT 3” denotes the largest automatic treble and interference-le vel reduction.
➮ Press the OK button 5 to return to the
previous menu level or the MENU button 8 to leave the menu altogether.
The settings are now stored.
54
Page 19

RADIO MODE
Interference-related wavelength change
(SHARX)
With the SHARX function you can eliminate
interference from neighbouring stations almost completely. Activate the SHARX function in an area of high transmitter density.
Switching SHARX on/off
To switch SHARX on/off,
➮ press the MENU button 8;
➮ press the soft key 4 with the display
allocation “TUN”;
➮ press the soft key 4 with the display
allocation “SHRX”.
The current status, “SHARX ON” or “NO
SHARX”, appears briefly on the display . When
SHARX is activated, an arrow symbol lights
up on the display alongside “SHRX”.
➮ Press the OK button 5 to return to the
previous menu level or the MENU button 8 to leave the men u altogether.
The settings are now stored.
Switching between stereo and
mono
When radio reception is poor, y ou can select
the mono radio mode. The transition from stereo to mono is gradual and the car radio will
revert to the stereo mode when switched on
once again.
➮ Press the TUNE button > when in ra-
dio mode.
The radio function menu appears on the display.
➮ Press the soft key 4 with the display
allocation “NEXT”.
The “second page” of the radio function menu
appears on the display.
➮ Press the soft key 4 with the displa y
allocation “MONO”.
The current status “MONO” or “STEREO”
appears briefly on the display . When mono is
activated, an arrow symbol lights up alongside “MONO”.
➮ Press the TUNE button > or wait 8 sec-
onds. The settings are now stored.
Changing the display
You can select the content of the display. In
the top display line (lead line) you can s witch
between the station name, frequency, programme type and time. In the bottom display
line (DOT field) you can switch between the
time and the memory level.
➮ Press the DIS button : repeatedly until
the desired information - station name,
frequency, programme type or time - appears in the lead line.
Selecting radio text display
Some radio stations use the RDS signal to
broadcast “main texts”, so-called radio texts.
You can allow or block the display of radio
text.
➮ Press the TUNE button > when in radio
mode.
The radio function menu appears on the display.
➮ Press the soft key 4 with the displa y
allocation “NEXT”.
The “second page” of the radio function menu
appears on the display.
➮ Press the soft key 4 with the displa y
allocation “R TXT”.
➮ Press the TUNE button > or wait 8 sec-
onds. The settings are now stored.
DEUTSCH
ENGLISH
FRANÇAIS
ITALIANO
NEDERLANDS
SVENSKA
ESPAÑOL
PORTUGUÊS
55
Page 20

RADIO MODE
Naming a station
You have the option of giving a preset station
a four-digit name to appear on the display.
➮ Press the MENU button 8.
➮ Press the soft key 4 with the displa y
allocation “TUN”.
➮ Press the soft key 4 with the displa y
allocation “NAME”.
This brings you to the edit mode. If the selected station is still unnamed, four underlines
appear on the display.
The current input position flashes.
➮ Select the station you would like to
name by pressing the soft key 4 with
the display allocation “PREV” or “NEXT”
for the previous or next preset station on
that memory level.
➮ Use the / buttons 7 to select your
characters. If a position remains blank,
you select the underline.
➮ You can change the input position using
or button.
the
➮ Press the OK button 5 to store the
name.
➮ Press the OK button 5 to return to the
previous menu level or the MENU button 8 to leave the menu altogether.
The settings are now stored.
Clearing station names
➮ Press the MENU button 8.
➮ Press the soft key 4 with the displa y
allocation “TUN”.
➮ Press the soft key 4 with the displa y
allocation “NAME”.
This brings you to the edit mode.
➮ Select the station name you would like
to clear by pressing the soft key 4 with
the display allocation “PREV” or “NEXT”
for the previous or next preset station on
that memory level.
➮ Press the soft key 4 with the displa y
allocation “CLR”.
The station name is now cleared.
Resetting station names to RDS names
➮ Press the MENU button 8.
➮ Press the soft key 4 with the displa y
allocation “TUN”.
➮ Press the soft key 4 with the displa y
allocation “NAME”.
This brings you to the edit mode.
➮ Select the station name you would like
to reset by pressing the soft key 4 with
the display allocation “PREV” or “NEXT”
for the previous or next preset station on
that memory level.
➮ Press the soft key 4 with the displa y
allocation “DEF”.
The station name is reset to the abbreviation
of the RDS station name.
56
Page 21

TIM
TIM - Traffic Information
Memory
The unit has a digital voice memory in which
up to four traffic announcements with a duration of max. four minutes in all are automatically recorded.
The oldest announcements are deleted depending on the space needed for the latest
announcement.
If an announcement is longer than four minutes, “Overflow” appears on the displa y at the
end of four minutes to indicate that the entire
announcement could not be recorded.
If a new traffic announcement is made during
playback of the TIM, playback is interrupted
and the new announcement recorded.
Traffic announcements more than four hours
old when the unit is switched on are automatically deleted.
Danger of damage to the remote an-
tenna at the car wash.
An automatic remote antenna stays fully
extended when TIM is activated even when
the car radio is switched off.
Damage can be caused if the remote antenna remains extended at a car wash.
Please read the section “Interrupt TIM
record standby”.
Switching TIM on/off
You can switch the TIM function on and off
when the car radio is on.
➮ Press the TIM button 6 for approx. one
second.
The current status appears briefly on the display:
● “TIM 2H” = TIM is switched on
● “TIM OFF” = TIM is s witched off.
When TIM is switched on, the traffic announcements of a set traffic radio station are
recorded for two hours after the unit is
switched off.
Recording traffic announcements
When the unit is switched on, traffic announcements are automatically recorded if a
traffic information station is tuned in.
When the unit is switched off, tr affic announcements are recorded for two hours if TIM is
switched on and a traffic information station
is tuned in.
If, when you switch on your radio, it is tuned
to a station which does not itself broadcast
traffic information and the TIM function is activated, it will automatically search for a traffic
information station.
Altering TIM record standby time
You can alter the time your unit is on record
standby when switched off from two to 24
hours.
When TIM is activ ated, “TIM 2 H” will alw ays
appear on the display when the car radio is
switched off.
In order to alter the TIM record standb y time
to 24 hours,
➮ press the TIM button 6 when the car
radio is off.
“TIM 24H” will appear briefly on the display.
This indicates that the TIM function has been
set at max 24 hours for one single occasion.
A remote antenna remains extended for as
long as the TIM function is activated.
Each time the car radio is switched off, the
record standby time is reduced to 2 hours, to
protect the vehicle battery.
The connected remote antenna remains extended while the TIM function is
activated.
DEUTSCH
ENGLISH
FRANÇAIS
ITALIANO
NEDERLANDS
SVENSKA
ESPAÑOL
PORTUGUÊS
57
Page 22

TIM
Playback of recorded traffic
announcements
Four traffic announcements can be recorded.
If no announcement has been recorded, “NO
TIM” will appear on the display.
In order to listen to the recorded traffic announcements
➮ press the TIM button 6.
➮ Press the soft key marked f or the de-
sired traffic announcement (“TIM1” to
“TIM4”).
“TIM1” is the latest announcement and will
be played back first. The other traffic announcements then follow in ascending order .
An arrow symbol flashes on the display alongside the traffic announcement currently being played bac k. The name of the station which
transmitted the traffic announcement appears
on the display along with the time of recording.
After the last announcement has been played,
the unit reverts to the previous mode.
In order to continue listening to the last active
audio source without listening to all traffic
announcements,
➮ press the TIM button 6.
In order to deactivate TIM record standb y,
➮ press the TIM button 6 until “TIM OFF”
appears briefly on the display.
TIM record standby is now deactivated and
the antenna is pulled in (make sure to check
this) and remains pulled in until the car radio
is switched on again.
➮ You can now drive into the car wash.
As soon as you switch on the radio, the TIM
function is immediately reactivated and the
remote antenna extended once more.
Note:
To prevent damage, do not switch the radio
on again until you have driven out of the car
wash.
Interrupting TIM record standby
(for the time spent at the car wash)
Before you drive into the car w ash,
➮ switch the radio off .
If the display disappears immediately, TIM
record standby is switched off and the remote
antenna is pulled in.
➮ You can now enter the car wash.
If, after switching off the radio, “TIM 2H” appears briefly on the display , TIM record standby is activated.
58
Page 23

TRAFFIC INFORMATION
Traffic information
Your car radio is equipped with an RDS-EON
reception system.
EON (Enhanced Other Network) stands for
the broadcasting of station information within
a broadcasting network.
When a traffic announcement (TA) is broadcast, your unit will automatically switch, within a broadcasting network, from a station
which does not transmit traffic information to
one that does.
The unit reverts to the programme previously
heard when the traffic announcement is over .
Switching traffic information
priority on/off
➮ Press the soft key 4 with the display
allocation “TA”.
Priority for traffic announcements is activated when “TA” lights up on the display.
Note:
You will hear a warning tone,
● if you leave the reception area of a traf-
fic information station to which you are
currently tuned in;
● if you leave the reception area of a traf-
fic information station when you are listening to a CD , cassette or MiniDisc
(depending on your car radio) and the
subsequent automatic search cannot
find a new traffic information station;
● if you retune the radio from a traffic in-
formation station to one that does not
broadcast traffic information.
Either deactivate the priority for traffic information or switch to a station which broadcasts
traffic information.
Setting the traffic announcement
volume
➮ Press the MENU button 8.
➮ Press the soft key 4 with the displa y
allocation “VAR”.
➮ Press the soft key 4 with the displa y
allocation “TV OL”.
To set the desired volume,
➮ press the or button 7 or turn the
volume control;
➮ press the OK button 5 to return to the
previous menu level or the MENU button 8 to leave the menu altogether.
The settings are now stored.
DEUTSCH
ENGLISH
FRANÇAIS
ITALIANO
NEDERLANDS
SVENSKA
ESPAÑOL
PORTUGUÊS
59
Page 24

CASSETTE MODE
Cassette mode
Cassette playback
● If there is no cassette in the unit yet
➮ press the button 1.
The operating panel opens at the front.
➮ Place the cassette in the compartment
with the open side pointing right.
➮ Close the operating panel.
The cassette begins to play the side that is
facing upwards (SIDE A).
● If there is already a cassette in the unit,
➮ Press the CC button <.
The cassette is played in the direction last
selected.
Ejecting a cassette
➮ Press the button 1.
The operating panel opens to the front.
➮ Press the button on the open operat-
ing panel.
The cassette is ejected.
➮ Remove the cassette
or
➮ place a new cassette in the compartment.
➮ Close the operating panel.
Changing the playing side
In order to change the direction of play between SIDE A and SIDE B,
➮ press the soft key 4 with the display
allocation “REV”.
Skipping tracks (S-CPS)
To choose the next or any other track,
➮ press the button 7 once or several
times until the number of tracks to be
skipped appears on the display after
“CPS FF”.
“CPS FF” appears on the display with the
number of tracks to be skipped. The cassette
is then fast forwarded to the next or corresponding later track.
In order to play a previous track,
➮ press the button 7 once or several
times until the number of tracks to be
skipped appears on the display behind
“CPS FR”.
“CPS FR” appears on the display with the
number of tracks to be skipped. The cassette
is rewound to the beginning of the current or
corresponding previous track.
Repeating tracks
➮ Press the soft key 4 for display alloca-
tion “RPT”.
The current music track is repla yed. “RPT ON”
appears briefly on the display and an arrow
symbol appears alongside “RPT”. While the
tape is being rewound after the end of the
track, “REWIND” appears in the display.
To stop repeating the track,
➮ press the softkey, 4, indicating “RPT”
again.
Playback continues as usual. “RPT OFF” ap-
pears briefly on the display.
Note:
The direction of play changes automatically
at the end of one side (Autoreverse).
60
Page 25

CASSETTE MODE
Scanning all tracks on a cassette
(SCAN)
➮ Press the soft key 4 with display allo-
cation “SCAN”.
“FORWARD” appears on the display . Now you
can listen in briefly to all tracks on the cassette in ascending order.
To stop scanning,
➮ press the soft key 4 with display allo-
cation “SCAN” once again.
The track last scanned then continues to play.
Notes:
● The scanning time is adjustable. Please
read the section “Setting the scanning
time” in the chapter “Radio mode”.
● In order to be able to use the S-CPS,
RPT and SCAN functions, there must
be an interval of at least three seconds
between the individual tracks on the
cassette.
Changing the display
When in cassette mode, you can switch between the various display modes:
● Display of time played (“ELAPSED”);
● Display of remaining play time
(“REMAIN”);
● Tape counter display (“COUNTER”).
● Display of the time (“CLOCK”).
➮ To switch between the display modes,
press the DIS button : repeatedly until
the desired information appears on the
display.
Resetting the counter
To reset the counter,
➮ press the DIS button : for more than
two seconds.
Fast forward/rewind
Fast forward
➮ Press the button 7.
“FORWARD” appears on the display.
Fast rewind
➮ Press the button 7.
“REWIND” appears on the display.
Stopping fast forward/rewind
➮ Press the OK button 5 or the button
for the opposite direction 7.
Playback is resumed.
Note:
During fast forward/rewind, the radio station
last listened to can be heard. F or this , the radio monitor function must activated.
Switching radio monitor on/off
➮ Press the soft key 4 with the displa y
allocation “RM”.
When radio monitor is switched on, “RM” ap-
pears as an inverse displa y.
The current status “RM ON” or “RM OFF”
appears briefly on the display when switched
on or off.
Skipping blank sections
(Blankskip)
If blank sections last longer than ten seconds,
you can have them automatically skipped. To
do this, the blankskip function must be activated.
Activating/deactivating the blankskip
function
➮ Press the soft key 4 with the displa y
allocation “BLS”.
When blankskip is switched on, “BLS” ap-
pears as an inverse displa y. The current status, “BLS ON” or “BLS OFF” appears briefly
on the display when switched on or off .
DEUTSCH
ENGLISH
FRANÇAIS
ITALIANO
NEDERLANDS
SVENSKA
ESPAÑOL
PORTUGUÊS
61
Page 26

CASSETTE MODE
CD CHANGER MODE
Dolby* Noise Suppression
If you are playing a cassette recorded using
the Dolby B system, you should activate the
Dolby function.
➮ Press the soft key 4 with the display
allocation “DLBY”.
When the Dolby function is switched on, an
arrow symbol appears on the display alongside “DLBY”.
* Noise suppression system manufactured under licence from Dolby
Laboratories. The word “Dolby” and the double D symbol are the
trademark of Dolby Laboratories.
Traffic announcements in
cassette mode
With the “TRAFFIC” function (priority for traf-
fic information), your car radio is on standby
for traffic announcements even when a cassette is being played. When a traffic announcement begins, playbac k stops and the
traffic announcement is made. F or further information, please see the chapter “Traffic information”.
CD changer mode
(optional)
To find out which CD changer is compatible
with this unit, please see page 41 of this manual or consult your Blaupunkt dealer .
Note:
Information on handling CDs, inserting CDs
and operating the CD changer can be found
in the operating instructions accompanying
your CD changer.
Switching to CD changer mode
➮ Press the CDC button =.
The CD changer menu appears on the display and playback is resumed at the point
where it was interrupted. If the magazine has
been removed from the CD changer and reinserted, the CD magazine will first be
scanned. Playback then begins with the first
track of the first CD the CD changer recognises.
Selecting a CD
To change up or down to a different CD,
➮ press the soft key 4 with the display
allocation of the desired CD (CD1 CD10). To do this , if necessary press
the soft key 4 with the displa y allocation “NEXT” to access the “second
page” of the basic CD changer menu
or
➮ press the or button 7 repeatedly
until the number of the desired CD appears on the display.
62
Selecting a track
In order to change up or down to another track
on the CD currently being played,
➮ press the or button 7 repeatedly
until the number of the desired track appears on the display.
If the button 7 is pressed once, the current track is play ed again from the beginning.
Page 27

CD CHANGER MODE
Fast search (audible)
For a fast search bac kwards or forwards
➮ keep the or button 7 pressed until
the fast search backw ards or forwards
begins.
Changing the display
In CD changer mode, you can s witch between
the various display modes:
● display of CD number and track
number;
● display of CD number , tr ac k n umber
and playing time;
● display of time and track number.
● display of CD name and track number.
To switch between the different display
modes,
➮ press the DIS button : repeatedly until
the desired information appears on the
display.
Note:
A CD name can only be displayed if a name
has been allocated to the inserted CD. Please
see the section “Naming CDs”.
Repeating individual tracks or
whole CDs (REPEAT)
➮ In CD changer mode, press the CDC
button =.
The CD changer function menu appears on
the display .
➮ Press the soft key 4 with the display
allocation “RPT”.
“RPT TRCK” appears briefly on the displa y.
To repeat play of the entire CD,
➮ press the soft key 4 with the display
allocation “RPT” once again.
“RPT CD” appears briefly on the displa y.
Stopping REPEAT
To stop the repeat function for the current
track or CD,
➮ press the soft key 4 with the display
allocation “RPT” repeatedly until “RPT
OFF” appears briefly on the displa y.
Random play (MIX)
To play the tracks on the current CD in random order,
➮ press the CDC button = while in CD
changer mode.
The CD changer function menu appears on
the display .
➮ Press the soft key 4 with the displa y
allocation “MIX”.
“MIX OFF” appears on the display.
➮ Select “MIX CD” using the button 7.
To play all tracks of all inserted CDs in random order,
➮ select “MIX ALL” with the button 7.
Note:
In the case of CD changers CDC A 08 and
IDC A 09, all CDs and all tracks in the changer are randomly selected. All other changers
first play all the tracks on a CD in random
selection before moving to the ne xt CD in the
changer.
Stopping MIX
➮ Select “MIX OFF” using the button
7.
Scanning all tracks on all CDs
(SCAN)
To listen in briefly to all the tracks on all inserted CDs in ascending order,
➮ press the button CDC button = while in
CD changer mode.
The CD changer menu appears on the display.
DEUTSCH
ENGLISH
FRANÇAIS
ITALIANO
NEDERLANDS
SVENSKA
ESPAÑOL
PORTUGUÊS
63
Page 28

CD CHANGER MODE
➮ Press the soft key 4 with the display
allocation “SCAN”
“SCAN” appears in the display alongside a
flashing arrow symbol.
Stopping SCAN
To stop scanning,
➮ press the soft key 4 with the display
allocation “SCAN” once again.
The track last scanned then continues to be
played.
Note:
You can set the scanning time as required.
Please see the section “Setting the scanning
time” in the “Radio mode” chapter .
Naming CDs
To make it easier for you to recognise your
CDs, the car radio offers an individual name
option for 99 CDs. The names should have a
maximum of seven digits.
If you attempt to allocate more than 99 names,
“FULL” will appear on the display.
Entering/altering CD names
➮ Press the CDC button = when in CD
changer mode.
The CD changer function menu is displayed.
➮ Press the soft key 4 with the display
allocation “NAME”.
➮ Select the CD you wish to name using
/ buttons 7 or the soft keys
the
4 “PREV” (previous) or “NEXT.
This brings you to the edit mode. If the CD
you have selected is not y et known to the unit,
seven underlines appear on the display and
the current input position flashes.
➮ Use the / buttons 7 to choose
your characters. Should a position re-
main blank, you select the underline.
➮ User the or button 7 to change
the input position.
➮ Press the OK button 5 to store the
name.
Clearing a CD name
➮ Press the MENU button 8 when in CD
changer mode.
➮ Press the soft key 4 with the displa y
allocation “CDC”.
➮ Select the CD whose name you wish to
choose using the
the soft keys “PREV” (pre vious) or
“NEXT”.
/ buttons 7 or
➮ Hold down the soft key 4 with the dis-
play allocation “CD” until ”CD CLR” ap-
pears on the display.
The CD name has now been cleared.
➮ Press the OK button 5 to return to the
previous menu level or the MENU button 8 to leave the menu altogether.
The settings are now stored.
Clearing all CD names
➮ Press the MENU button 8 while in CD
changer mode.
➮ Press the soft key 4 with the displa y
allocation “CDC”.
➮ Hold down the soft key 4 with the dis-
play allocation “ALL” until “MEMO CLR”
appears on the display.
All CD names have now been cleared.
➮ Press the OK button 5 to return to the
previous menu level or the MENU button 8 to leave the menu altogether.
The settings are now stored.
Programming favourite CD tracks
With the TPM function (Track Programme
Memory), you can programme, store and pla y
your favourite tracks on a particular CD. No
matter what order the tracks are programmed,
they will always be pla y ed back in ascending
order. When playback of favourite tracks is
activated, only the previously programmed
64
Page 29

CD CHANGER MODE
tracks of the CD in the drive will be played.
Up to 30 CDs with a maximum of 40 tracks
each can be handled in CD mode.
Programming favourite tracks
Proceed as follows to select your favourite
tracks on a CD:
➮ in the CD changer mode, select the CD
from which you wish to select your f a-
vourite tracks;
➮ choose your first fa v ourite track;
➮ press the soft key 4 with the display
allocation “TPM” for more than one sec-
ond.
The track is now included in the list of f avour-
ite tracks for this CD.
➮ Proceed in exactly the same wa y with
all your other favourite tracks on the CD.
Switching playback of favourite tracks
on/off
To call up the preset favourite tracks for the
inserted CD or to switch off playback of the
fav ourite trac ks ,
➮ press the soft key 4 with the display
allocation “TPM”.
The current TPM status (“TPM ON” or “TPM
OFF”) appears briefly on the display. When
playback of favourite tracks is active, an arrow symbol lights up alongside “TPM” on the
display.
Clearing preset of tracks
In order to clear individual tracks from the list
of fav ourite trac ks for a CD,
➮ switch on TPM;
➮ select the track you wish to clear;
➮ hold down the soft key 4 with the dis-
play allocation “CLR” until “TR CLR” ap-
pears on the display.
The track is now cleared from the list.
Clearing the list of favourite tracks for a
CD
You can also clear the entire list of favourite
tracks for a CD. The CD f or which you wish to
clear your favourite tracks must be in play at
the time of clearance.
➮ Switch on TPM.
➮ Hold down the soft key 4 with the dis-
play allocation “CLR” until “CD CLR” ap-
pears briefly on the display.
The list is now cleared.
DEUTSCH
ENGLISH
FRANÇAIS
ITALIANO
NEDERLANDS
SVENSKA
ESPAÑOL
PORTUGUÊS
65
Page 30

CLOCK
CLOCK - Time
Setting the time
The time can be set automatically using the
RDS signal. If no station using this function is
available, the unit attempts to receive the
DCF-77 signal (radio clock) the next time the
unit is switched off. It is also possible for you
to set the clock manually.
Setting the time automatically
To set the time automatically,
➮ press the MENU button 8;
➮ press the soft key 4 with the display
allocation “CLK”;
➮ press the soft key 4 with the display
allocation “SYNC” repeatedly until “AU-
TOSYNC” appears on the display.
Once “AUT OSYNC” has been selected and
a station with the RDS time function (RDSCT) or the DCF-77 signal has been received,
the clock is set automatically.
Or
➮ Hold down the DIS button : f or more
than five seconds when in radio mode.
Note:
If it is not possible to receive a DCF-77 signal, “NO DCF” will appear briefly on the dis-
play.
If you do not wish to set the time automatically (e.g. because y ou wish to set the clock to a
different time zone),
➮ select “SYNC OFF”.
Setting the time manually
To set the time manually,
➮ press the MENU button 8;
➮ press the soft key 4 with the display
allocation “CLK”;
➮ press the soft key 4 with the display
allocation “SET”.
The time appears on the display. The hours
flash and can now be set.
➮ Set the hours using the / buttons
7.
➮ Once the hours have been set, press
button 7.
the
The minutes now flash.
➮ Set the minutes using the / buttons
7.
➮ Press the OK button 5 to return to the
previous menu level or the MENU button 8 to leave the menu altogether.
The settings are now stored.
Selecting the 12/24-hour clock
mode
➮ Press the MENU button 8.
➮ Press the soft key 4 with the displa y
allocation “CLK”.
➮ Press the soft key 4 with the displa y
allocation “MODE”.
➮ Press the buttons 7 to switch be-
tween the 12 and 24-hour mode.
➮ Press the OK button 5 to return to the
previous menu level or the MENU button 8 to leave the menu altogether.
The settings are now stored.
66
Page 31

CLOCK
EQUALIZER
Viewing the clock even when car
radio is switched off
To view the clock when the car radio is
switched off and the ignition is s witched on,
➮ press the MENU button 8;
➮ press the soft key 4 with the display
allocation “CLK”;
➮ press the soft key 4 with the display
allocation “VIEW”;
➮ press the buttons 7 to s witch be-
tween “CLK ON” OR “CLK OFF”;
➮ press the OK button 5 to return to the
previous menu level or the MENU but-
ton 8 to leave the men u altogether.
The settings are now stored.
Equalizer
This car radio is fitted with a parametric digital equalizer. In this case, parametric means
that for each of the two filters, one frequency
can be individually raised or lowered (GAIN
+8 to - 8dB).
The following filters are available:
● LOW EQ 32 - 500 Hz
● High EQ 630- 10 000 Hz
These filters can be set without measuring
equipment. This means that the sound quality inside the vehicle can be greatly influenced.
Notes on adjusting the equalizer
We recommend you use a CD or cassette
you are familiar with (depending on y our car
radio’s capabilities) when adjusting the equal-
izer.
Before adjusting the equalizer, set the tone
and volume balance to zero and deactivate
the loudness function. To do this , please see
the chapter “Tone and volume balance”.
➮ Listen to a CD or cassette (depending
on your car radio’s capabilities).
➮ Evaluate the tone impression according
to your taste.
➮ Now consult the chart “An aid to adjust-
ing the equalizer” under “Sound impres-
sion”.
➮ Set the equalizer values as described
under “What to do”.
DEUTSCH
ENGLISH
FRANÇAIS
ITALIANO
NEDERLANDS
SVENSKA
ESPAÑOL
Switching the equalizer on/off
In order to switch off the equalizer,
➮ press the AUD button 9.
➮ Press the soft key 4 with displa y allo-
cation “DEQ”.
The setting last selected appears on the display.
➮ Press the button 7.
“DEQ OFF” appears on the display.
67
PORTUGUÊS
Page 32

EQUALIZER
➮ Press the AUD button 9.
In order to switch off the equalizer,
➮ press the AUD button 9.
➮ Press the soft key 4 with the display
allocation “DEQ”.
“DEQ OFF” appears on the display.
➮ Press the button 7.
The last active setting appears on the display
before the unit is switched off.
➮ Press the AUD button 9.
Setting the equalizer
➮ Press the AUD button 9.
➮ Press the soft key 4 with the display
allocation “DEQ”.
➮ Press the soft key 4 with the display
allocation “LO W” or “HIGH” f or the cor-
responding filter.
➮ To select the frequency, press the
or button 7.
➮ Set the level using the or button
7.
➮ To select the other filter, press the soft
key 4 with the corresponding display
allocation.
➮ When all the settings have been selec-
ted, press the AUD button 9.
Setting the quality factor of the
filter
➮ Press the AUD button 9.
➮ Press the soft key 4 with the displa y
allocation “DEQ”.
➮ Press the soft key 4 with the displa y
allocation “LO Q” or “Hi Q” to select the
quality factor for the LOW or HIGH filter.
➮ To select the quality, press the or
button 7.
➮ To select the other quality factor, press
the soft key 4 with the corresponding
display allocation.
➮ When all settings have been selected,
press the AUD button 9.
Select sound preset
You can preselect sound settings for the following musical styles:
● ROCK
● POP
● JAZZ
● CLASSIC
● VOCAL
The settings for these musical styles are preprogrammed.
➮ Press the AUD button 9.
➮ Press the soft key 4 with the displa y
allocation “DEQ”.
➮ Press the soft key 4 with the displa y
allocation “EQ”.
➮ Select the desired sound preset using
or button 7.
the
➮ When all the settings have been selec-
ted, press the AUD button 9.
68
Page 33

Setting aid for the equalizer
Sound impression/problem
EQUALIZER
What to do
Bass reproduction too weak
Impure bass
Booming
Disagreeable pressure
Sound very dominant,
aggressive, no stereo effect
Muffled reproduction
Low transparency
No instrumental brilliance
Raise bass with
frequency: 32 to 160 Hz, filter: “LOW”
level: +4 to +6 dB
Reduce lower mid-section with
frequency: 400 Hz, filter: “LOW”
level: approx. -4 dB
Reduce mid-section with
frequency: 1,000 to 2,500 Hz, filter: “HIGH”,
level: -4 to -6 dB
Raise tweeter range with
frequency: 6,300 to 10,000 Hz, filter: “HIGH”,
level: +2 to +4 dB
DEUTSCH
ENGLISH
FRANÇAIS
ITALIANO
NEDERLANDS
SVENSKA
69
ESPAÑOL
PORTUGUÊS
Page 34

PRE-AMPLIFIERSTMC
TMC for dynamic
navigation systems
TMC denotes “Traffic Message Channel”. T raffic announcements are transmitted digitally
via TMC and can theref ore b y used b y suitable navigation systems f or route planning. Your
car radio has one TMC output f or connection
to Blaupunkt navigation systems. Your Blaupunkt dealer will tell you which navigation
systems can be used with your car radio .
When a navigation system is connected and
a TMC station received, “TMC” lights up on
the display.
Pre-amplifiers
External pre-amplifiers and a subwoofer can
be connected via the appropriate lines of your
car radio.
We recommend the use of matching products from the Blaupunkt or Velocity ranges.
Switch-on delay for external preamplifier
You can define a switch-on delay for pre-amplifiers connected to the pre-amp output line.
The switch-on delay can be set at between
250 ms (“DELAY 1”) to 2.25 seconds (“DE-
LAY 9”).
➮ Press the MENU button 8.
➮ Press the soft key 4 with the displa y
allocation “VAR”.
➮ Press the soft key 4 with the displa y
allocation “DLAY”.
➮ Press the or button 7 to set the
switch-on delay.
➮ Press the OK button 5 to return to the
previous menu level or the MENU button 8 to leave the menu altogether.
The settings are now stored.
70
Page 35

HIGH-PASS FILTERSUBOUT/SUBWOOFER
Subout/subwoofer
Setting the frequency and level
for the subwoofer
You can set the frequency and amplifier level
for a connected subwoofer. The settings y ou
make depend on the hifi system in your car
and the power of your subwoof er. Experiment
to find your ideal setting.
➮ Press the AUD button 9.
➮ Press the soft key 4 with the display
allocation “NEXT”.
➮ Press the soft key 4 with the display
allocation “SUB”.
➮ Press the or button 7 to select
between the frequencies “80 Hz” and
“100 Hz”.
➮ Set the desired amplifier level using the
or button 7.
➮ Press the OK button 5 to return to the
previous menu level or the MENU but-
ton 8 to leave the men u altogether.
The settings are now stored.
High-pass filter
Setting the high-pass filter
If a subwoofer is connected to your car radio ,
you can use a high-pass filter (HP-F) to suppress the output of lower frequencies through
the internal final amplifier and an external preamplifier that may be connected. This filter
has five adjustment levels. The settings depend on the unit installed in your car . Experiment to find your ideal setting.
➮ Press the AUD button 9.
➮ Press the soft key 4 with the displa y
allocation “NEXT”.
➮ Press the soft key 4 with the displa y
allocation “HP-F”.
➮ Press the or button 7 to switch
the high-pass filter on/off.
When the high-pass filter is activated,
➮ select the desired amplifier filter, “FIL-
TER1” - “FILTER5” using the
button 7.
➮ Press the OK button 5 to return to the
previous menu level or the MENU button 8 to leave the menu altogether.
The settings are now stored.
or
DEUTSCH
ENGLISH
FRANÇAIS
ITALIANO
NEDERLANDS
SVENSKA
71
ESPAÑOL
PORTUGUÊS
Page 36

TECHNICAL DATAEXTERNAL AUDIO SOURCES
External audio sources
Instead of the CD changer, you can also connect up a different external audio source with
a line output. Such sources can be , for example, portable CD players, MiniDisc pla y ers or
MP3 players.
The AUX output has to be s witched on in the
install menu.
To connect up an external audio source, you
will need an adapter cable, obtainable from
any Blaupunkt dealer.
Switching the AUX input on/off
➮ Hold down the MENU button 8 until
the install menu appears on the display.
➮ Press the soft key 4 with the display
allocation “AUX”.
When “AUX” appears on the display, the in-
put is already activated.
➮ Press the or button 7 to switch
AUX on or off.
➮ Press the OK button 5 to return to the
previous menu level or the MENU but-
ton 8 to leave the men u altogether.
The settings are now stored.
Note:
When the AUX input is s witched on, it can be
selected using the CDC button =.
Technical data
Amplifier
Output power: 4 x 25 watts sine in
accordance with
DIN 45 324 at 14.4V,
4 x 45 watts max.
power
Tuner
Frequency ranges:
FM : 87,5 – 108 MHz
MW : 531 – 1 602 kHz
L W : 153 – 279 kHz
FM transmission range:
30 - 15 000 Hz
Cassette
Transmission range:
30 - 20 000 Hz
Pre-amp output
4 channels: 5 V / 10 kΩ
AUX input
Input sensitivity: 1,2 V / 10 kΩ
72
Subject to changes!
 Loading...