

Page 1
Radio / Cassette
Daytona Beach C34 7 643 190 510
Operating and installation instructions
Notice d’emploi et de montage
Instrucciones de manejo e instalación
Instruções de serviço e de montagem
http://www.blaupunkt.com
http://www.blaupunkt.com
Page 2

Open here
Ouvrir s.v.p.
Por favor, abrir
Favor abrir
2
Page 3
11
1
11
22
2
22
;;
;
;;
33
3
33
::
:
::
44
4
44
99
9
99
55
5
55
88
8
88
66
6
66
77
7
77
ENGLISH
FRANÇAIS
ESPAÑOL
PORTUGUÊS
3
Page 4
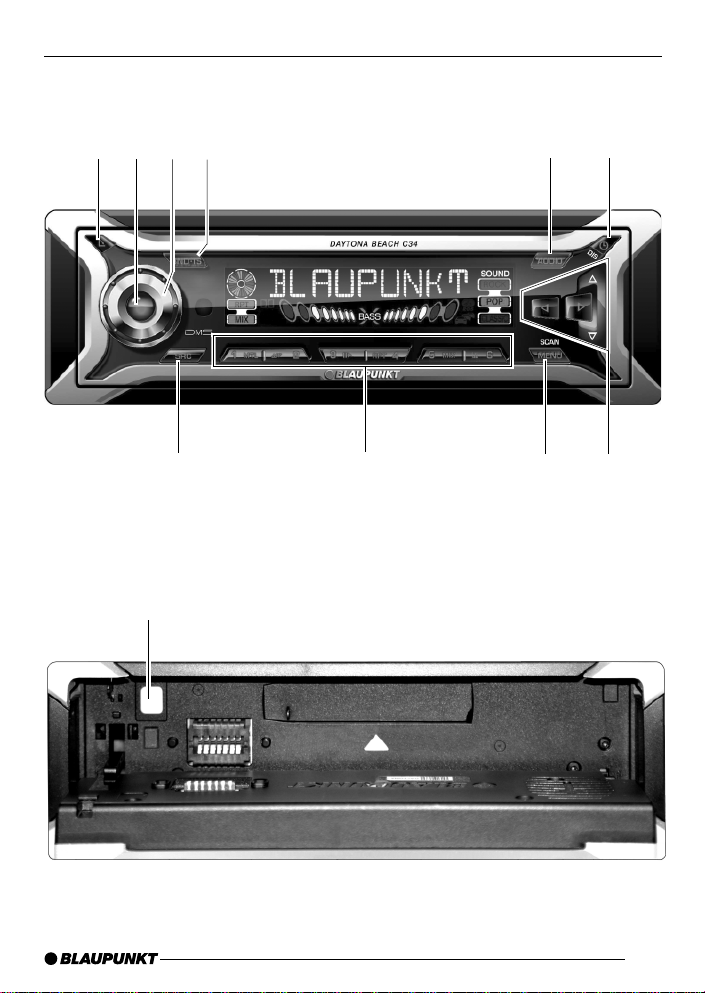
CONTROLS
1 button to open and release
the control panel.
2 Button to switch the unit on/off
and to mute the unit.
3 Volume control
4 Short press: BND button, to
select the FM memory bank
and the AM waveband, source
selection to radio mode.
Long press: TS, to start the
Travelstore function.
5 AUDIO button, to adjust the
bass, treble, balance and fader
settings, X-Bass, Sound Preset
EQ.
6 Short press:
the time.
Long press: to change the
display priority.
7 Arrow buttons.
8 Short press: MENU button, to
open the basic settings menu.
Long press: SCAN, to start scan
function.
9 Keys 1 - 6
: SRC button, to select the
Cassette, radio and CD changer
(AUX) sources.
; Eject button 0 (which can only
be seen after flipping the control
panel).
button, to display
4
Page 5

CONTENTS
Notes and accessories ............ 6
Road safety ..................................... 6
Installation ....................................... 6
Accessories .................................... 6
International telephone information ... 6
Removable control panel ......... 7
Theft protection ............................... 7
Detaching the control panel ............. 7
Attaching the control panel .............. 7
Off timer .......................................... 8
Switching on/off ...................... 8
Adjusting the volume ............... 9
Setting the power-on volume ........... 9
Instantaneously reducing the volume
(mute) ........................................... 10
Mute while telephoning .................. 10
Confirmation beep ......................... 10
Radio mode ............................ 11
Switching to radio mode ................ 11
Setting the tuner ............................ 11
Selecting the frequency band/
memory bank................................. 11
Tuning into a station ....................... 11
Setting the sensitivity of station
seek tuning .................................... 11
Storing station presets................... 12
Storing stations automatically
(Travelstore) .................................. 12
Listening to station presets ............ 12
Scanning receivable stations (SCAN)
Setting the scanning time .............. 13
Setting the display ......................... 13
.. 12
Cassette mode ....................... 13
Cassette Play ................................ 13
Cassette Ejection .......................... 13
Changing Direction of Play ............ 14
Skipping Tracks (S-CPS) .............. 14
Playing a Track Repeatedly ............ 14
Sampling All the Tracks on a
Cassette (SCAN) .......................... 14
Fast Winding ................................. 14
Pausing During Play ...................... 15
Switching the Radio Monitor
On/off ........................................... 15
Skipping Blank Tape ...................... 15
Selecting Tape Type ...................... 15
Dolby* B Noise Reduction ............. 15
Changing the display ..................... 16
CD changer mode .................. 16
Switching to CD changer mode ..... 16
Selecting CDs ............................... 16
Selecting tracks ............................ 16
Fast searching (audible) ................ 16
Changing the display ..................... 17
Repeating individual tracks or
whole CDs (REPEAT).................... 17
Random track play (MIX) ............... 17
Scanning all tracks on all
CDs (SCAN) ................................. 17
Pausing playback (PAUSE)............ 17
Clock - Time ........................... 18
Displaying the time ........................ 18
Setting the clock ........................... 18
Selecting 12/24-hour clock mode .. 18
Displaying the time continuosly when
the unit is off and the ignition is on . 18
Briefly displaying the time when the
unit is switched off......................... 18
Tone and volume distribution .. 19
Adjusting the bass ......................... 19
Adjusting the treble ....................... 19
Setting the volume distribution
left/right (balance) ......................... 19
Setting the volume distribution
front/rear (fader) ............................ 19
Equalizer and X-BASS ........... 20
X-BASS ........................................ 20
Selecting preset sound effect (EQ) ..
20
Setting the level display ......... 21
External audio sources .......... 21
Switching the AUX input on/off ....... 21
Specifications ........................ 22
ENGLISH
FRANÇAIS
ESPAÑOL
PORTUGUÊS
5
Page 6

NOTES AND ACCESSORIES
Thank you for deciding to use a
Blaupunkt product. We hope you enjoy
using this new piece of equipment.
Please read these operating instructions
before using the equipment for the first
time. The Blaupunkt editors are
constantly working on making the
operating instructions clearer and easier
to understand. However, if you still have
any questions on how to operate the
equipment, please contact your dealer
or the telephone hotline for your country.
You will find the hotline telephone
numbers printed at the back of this
booklet.
Road safety
Road safety has absolute
priority. Only operate your radio unit
if the road and traffic conditions allow
you to do so. Familiarize yourself with
the unit before setting off on your
journey.
You should always be able to hear
police, fire and ambulance sirens
from far. For this reason, set the
volume of the program you are
listening to at a reasonable level.
Installation
If you want to install your car radio by
yourself, please read the installation and
connection instructions that follow these
operating instructions.
Accessories
Only use accessories approved by
Blaupunkt.
Remote control
You can conveniently access the most
important functions of your car radio
6
from the steering wheel via the optional
RC08 or RC10.
Alternately, enjoy the convenience of
accessing these functions from
anywhere in the vehicle via the optional
RC-12H.
Amplifier
All Blaupunkt and Velocity amplifiers can
be used.
CD changer
The Blaupunkt CD changers CDC A 08,
IDC A09 and CDC A03 can be
connected to the unit.
Compact Drive MP3
As an alternative to a CD changer, you
can connect a Compact Drive MP3 to
access MP3 music tracks. If you
connect a Compact Drive MP3, you will
first need to use a computer to store the
MP3 music tracks on the Microdrive™
hard disk inside the Compact Drive
MP3. Then, when the Compact Drive
MP3 is connected to the car radio, you
can play the tracks like normal CD music
tracks. The Compact Drive MP3 is
operated in the same way as a CD
changer. Most of the CD changer
functions can also be used with the
Compact Drive MP3.
International telephone
information
If you have any questions regarding the
operation of your car radio or if you
require further information, please do
not hesitate to call us!
The information hotline numbers are
printed on the last page of these
instructions.
Page 7
REMOVABLE CONTROL PANEL
Removable control panel
Theft protection
As a way of protecting your equipment
against theft, the unit is equipped with
a detachable control panel (release
panel). Without this control panel, the
car radio is worthless to a thief.
Protect your equipment against theft by
taking the control panel with you every
time you leave your vehicle. Do not
leave the control panel in your vehicle not even in a hidden place.
The control panel has been designed
to be easily use.
Note:
● Never drop the control panel.
● Never expose the control panel to
direct sunlight or other heat
sources.
● Avoid making direct skin contact
with the control panel’s contacts. If
necessary, clean the contacts with
a lint-free cloth and some alcohol.
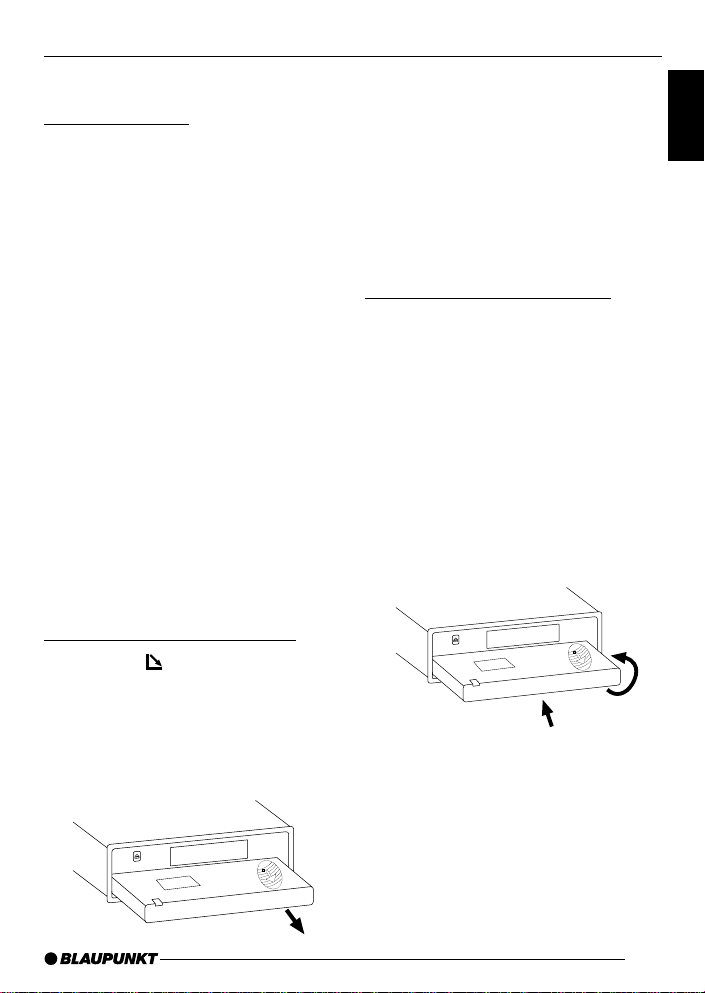
Detaching the control panel
➮ Press the button 1.
The control panel locking mechanism
opens.
➮ Pull the control panel straight off
the unit, by holding the right hand
side of the control panel.
Notes:
● The unit may only switch off after a
few seconds, depending upon the
“OFF TIMER” setting in the MENU
as described later.
● All current settings of the radio are
saved.
● Cassette already inserted in the
unit remains there.
Attaching the control panel
There are various ways of attaching the
control panel but the following method
is recommended:
➮ Hold the control panel
perpendicular to the unit.
➮ Slide the control panel into the
unit’s guides, located at the lower
left and right sides, until it clicks
into place.
➮ Push the control panel gently in
upward direction until it clicks into
its place.
2
Note:
● When attaching the control panel,
make sure you do not press on the
display.
If the unit was still switched on when
you removed the control panel, the unit
will automatically switch back on with
the last settings activated i.e. radio,
Cassette or CD changer (AUX) when
the panel is reinserted.
1
ENGLISH
FRANÇAIS
ESPAÑOL
PORTUGUÊS
7
Page 8

REMOVABLE CONTROL PANEL
SWITCHING ON/OFF
Off timer
After opening the control panel, the unit
will switch off after a pre-adjusted time
between 0 to 30 seconds.
➮ Press the MENU button 8.
➮ Press the fi button 7 twice to
display “OFF TIMER”.
➮ Set the time using the @ or #
buttons 7.
When you have finished making your
changes,
➮ press the MENU button 8 twice.
Note:
● If the OFF TIMER is set to 0
second, the unit switches off
immediately after opening the
control panel.
Switching on/off
There are various ways of switching the
unit on/off:
Switching on/off using the vehicle
ignition
If the unit is correctly connected to the
vehicle’s ignition and it was not switched
off using ON/OFF button 2, it will
switch on/off simultaneously with the
ignition.
Switching on/off using the
removable control panel
➮ Remove the control panel.
The unit switches off.
A delay in switching off is expected if
the “OFF TIMER” setting is not “0”.
➮ Attach the control panel again.
The unit switches on. The last settings
(radio, cassette, CD changer or AUX)
will be reactivated.
Switching on/off using button 2
➮ To switch the unit on, press button
2.
➮ To switch the unit off, press button
2 for longer than two seconds.
The unit switches off.
Note:
● If you switch on the unit when the
ignition is off, the unit will switch off
automatically after one hour to
prevent draining of the vehicle
battery.
8
Page 9

SWITCHING ON/OFF
ADJUSTING THE VOLUME
Switching on by inserting a cassette
If the unit is off and there is no cassette
inserted in the drive,
➮ press the button 1.
The control panel opens.
➮ Gently insert the cassette into the
cassette slot with the open side to
the right.
➮ Close the control panel.
The unit switches on and starts playing
the side that is facing upwards.
Note:
● The unit will remain off if the
ignition is off. To turn it on, press
button 2 once.
Adjusting the volume
The volume can be adjusted in steps
from 0 (mute) to 66 (maximum).
To increase the system volume,
➮ turn the volume control 3
clockwise.
To decrease the volume,
➮ turn the volume control 3 anti-
clockwise.
Setting the power-on volume
You can set the unit’s default power-on
volume.
➮ Press the MENU button 8.
➮ Keep pressing the fi or % button
7 until “ON VOLUME” appears in
the display.
➮ Set the power-on volume using the
@ and # buttons 7.
To help you adjusting the volume more
easily, the audible volume level will
increase or decrease accordingly as you
make your changes.
If you select “LAST VOL”, the volume
played before the unit was last switched
off will be reactivated.
Note:
● To protect your hearing, the
maximum switch-on volume under
the “LAST VOL” setting is “38”. If
the volume was higher before the
unit was switched off and “LAST
VOL” has been selected, the
volume will be set at “38” the next
time the radio is switched on.
ENGLISH
FRANÇAIS
ESPAÑOL
PORTUGUÊS
9
Page 10

ADJUSTING THE VOLUME
When you have finished making your
changes,
➮ press the MENU button 8 twice.
Instantaneously reducing the
volume (mute)
You can instantaneously reduce the
volume (mute) to a level preset by you.
➮ Briefly press button 2.
“MUTE” appears in the display.
To restore the volume,
➮ press button 2 again.
Setting the mute level
You can set the unit’s mute volume level.
➮ Press the MENU button 8.
➮ Keep pressing the fi or % button
7 until “MUTE LVL” appears in
the display.
➮ Set the mute level using the @ and
# buttons 7.
When you have finished making your
changes,
➮ press the MENU button 8 twice.
Confirmation beep
For some functions you will hear a
confirmation beep if you keep a button
pressed for longer than two seconds.
For instance, after storing a radio station
to a station button you will hear a
confirmation beep. The beep can be
switched on/off.
➮ Press the MENU button 8.
➮ Keep pressing the % or fi button
7 until “BEEP” appears in the
display.
➮ Use the @ and # buttons 7 to
switch between the options.
“OFF” means beep off, “ON” means the
beep is switched on.
➮ Press the MENU button 8.
Mute while telephoning
If your unit is connected to a mobile
telephone, the car radio’s volume will
be muted as soon as you “pick up” the
telephone. “PHONE” shows in the
display.
This requires the mobile telephone be
connected to the car radio as described
in the installation instructions.
The volume will be reduced to the
configured mute volume level.
10
Page 11

RADIO MODE
Radio mode
Switching to radio mode
If you are listening to Cassette or CD
changer (AUX) mode,
➮ press the BND-TS button 4.
or
➮ keep pressing the SRC : button
until “FM” or “AM” (“MW”) appears
in the display.
Setting the tuner
In order to guarantee the perfect
functioning of the radio element, the unit
must be set for the region in which you
are located. You can choose between
Europe (EUROPE), America (USA),
Thailand (THAI) and South America
(S-AMERICA). The tuner comes from
the factory set for the region in which
the unit was sold. Should you encounter
problems with radio reception, please
check this setting.
➮ Press the MENU button 8.
➮ Press the fi button 7 repeatedly
until “TUNER” appears on the
display.
➮ Keep pressing the @ or
7 until the desired region appears
in the display.
When you have finished making your
changes,
➮ press the MENU button 8 twice.
# button
Selecting the frequency band/
memory bank
This unit can receive programs
broadcast over the FM, AM (MW) and
LW frequency band. There are three
preset memory bank for the FM range
and one for the AM (MW) and one for
the LW range. Six stations can be stored
on each memory bank.
Note:
● LW is not available for the “USA”
and “THAI” tuner settings.
Selecting the FM memory level or
the AM (MW) and LW frequency
ranges respectively
➮ Keep pressing the BND-TS button
4 to switch between the FM
memory levels (FM1, FM2 and
FMT) and the AM (MW) and LW
frequency ranges respectively.
Tuning into a station
There are various ways of tuning to a
station.
Automatic seek tuning
➮ Press the fi or % button 7.
The unit tunes to the next receivable
station.
Setting the sensitivity of station
seek tuning
You can choose whether to tune only
to strong reception stations or to also
tune to those with a weak reception.
➮ Press the MENU button 8.
➮ Keep pressing the fi or % button
7 until “SENS HI” or “SENS LO”
appears in the display
11
ENGLISH
FRANÇAIS
ESPAÑOL
PORTUGUÊS
Page 12

RADIO MODE
“SENS HI” means that the tuner is set
to high sensitivity. “SENS LO” means it
is set to the lower sensitivity setting.
➮ Set the required sensitivity using
the @ or # buttons 7.
When you have finished making your
changes,
➮ press the MENU button 8.
Note:
● Different seek tuning sensitivities
can be set separately for FM and
AM (including LW) respectively.
Tuning into stations manually
You can also tune into stations manually.
➮ Press the @ or # button 7.
Storing station presets
Storing stations manually
➮ Select the required memory bank
(FM1, FM2 or FMT) or the AM
(MW) or the LW waveband
respectively.
➮ Tune into the station.
➮ Press one of the station buttons
1 - 6 9 for longer than two
seconds to store the station in that
preset memory.
Storing stations automatically
(Travelstore)
You can automatically store the six
stations with the strongest reception in
the region. The stations are stored in
the FMT, AM (MW) or LW memory
depending on the selected frequency
band.
Note:
● Any stations that were previously
stored on this memory bank are
deleted in the process.
➮ Press and hold the BND-TS button
4 until seek tuning begins.
The station storing procedure begins.
“TSTORE” appears in the display. After
the process is completed, the station
that is stored in location 1 of the
respective memory level will be played.
Listening to station presets
➮ Select the memory bank on which
the station was stored.
➮ Press the preset station button
1 - 6 9 of the station you want to
listen to.
Scanning receivable stations
(SCAN)
You can briefly listen in to all receivable
stations by activating the scan function.
The scanning time can be set in the
menu at between 5 and 30 seconds.
Starting SCAN
➮ Hold down the MENU button 8 for
more than two seconds.
The scanning process begins. “SCAN”
appears briefly on the display, followed
by the current frequency, which flashes.
12
Page 13
RADIO MODE
CASSETTE MODE
Ending SCAN, continuing to listen
to a station
➮ Press the MENU button 8.
The scanning process is ended, the
station last scanned remains active.
Setting the scanning time
➮ Press the MENU button 8.
➮ Press the fi button 7 repeatedly
until “SCAN TIME” appears on the
display.
➮ Use the @# buttons 7 to set the
desired scanning time.
When you have finished making your
changes,
➮ press the MENU button 8 twice.
Note:
● The set scantime also applies to
scanning in Cassette and CD
changer mode.
Setting the display
You can choose to continuous display
one of the followings:
● Time
● Frequency
➮ Hold down the DIS button 6
until the desired display appears on
the display.
Cassette Operation
Cassette Play
● If there is no cassette in the device
➮ press the button 1.
The flip-release panel opens.
➮ Insert the cassette into the cassette
slot with the open side to the right.
➮ Close the control panel.
The cassette starts playing with the side
that is facing upwards.
● If there is already a cassette in the
device and it is playing Radio or
CD changer (AUX) mode.
➮ Press the SRC button : until
“CASSETTE” appears in the
display.
The cassette is played in whichever
direction was last selected.
Cassette Ejection
➮ Press the button 1.
The flip-release panel opens.
➮ Press the 0 button ; located beside
the cassette slot
➮ Remove the cassette and close the
release panel
or
➮ Insert a new cassette and close the
release panel.
ENGLISH
FRANÇAIS
ESPAÑOL
PORTUGUÊS
13
Page 14

CASSETTE MODE
Changing Direction of Play
To change between SIDE A and SIDE B
➮ Press button 2 %fi 9.
Note:
● At the end of the tape, the direction
of play is automatically reversed
(auto-reverse).
Skipping Tracks (S-CPS)
To skip to the next or a later track
➮ Press the % button 7 one or more
times.
“CPS FF” and the number of tracks to
be skipped appear in the display. The
tape fast forwards to the next track or
the chosen later track.
To skip track backwards
➮ Press the fi button 7 one or more
times.
“CPS FR” and the number of tracks to
be skipped appear in the display. The
tape is rewound to the start of the
present track or the desired earlier track.
Playing a Track Repeatedly
➮ Press button 4 RPT 9.
The present track is repeated. RPT
shows in the display. While the tape is
being rewound after the end of the track,
“RPT TRCK” appears in the display.
To stop repeating the track
➮ Press button 4 RPT 9 again.
Play continues as normal. RPT
disappears from the display.
14
Sampling All the Tracks on a
Cassette (SCAN)
➮ Hold down the MENU button 8 for
longer than two seconds.
“CAS SCAN” appears in the display.
Samples from all the tracks on the tape
are played in ascending order.
To stop the scan
➮ Press the MENU button 8 a
second time.
The track that is currently being sampled
will continue playing.
Note:
● The scan duration can be adjusted.
Refer to the section on “Setting the
scanning time” under the “Radio
mode”.
● To use the S-CPS, RPT and SCAN
functions, there must be a pause of
at least three seconds between the
tracks on the cassette.
Fast Winding
Fast forward
➮ Press the # button 7.
“FORWARD” appears in the display.
Fast rewind
➮ Press the @ button 7.
“REWIND” appears in the display.
Stopping fast winding
➮ Press any arrow button 7.
Play continues.
Note:
● While the tape is being fast wound,
the last radio station tuned in can
Page 15

CASSETTE MODE
be listened to. This requires the
“Radio monitor” function to be
switched on.
Pausing During Play
To interrupt tape play
➮ Press button 3 E 9.
Play is interrupted and “PAUSE”
appears in the display.
➮ Press button 3 E 9 again to
resume play.
Switching the Radio Monitor
On/off
Note:
● The radio monitor can only be set if
a cassette is being played.
➮ Press the MENU button 8.
➮ Press the % or fi button 7 until
“RM ON” or “RM OFF” appears in
the display.
➮ Press the # or @ button 7 to
switch the radio monitor on or off.
When you have finished making your
changes,
➮ press the MENU button 8 once.
Skipping Blank Tape
You can automatically skip sections of
blank tape that last longer than 10
seconds. This requires the blank skip
function to be activated.
Note:
● The blank skip can only be set if a
cassette is being played.
Switching Blank Skip On/Off
➮ Press the MENU button 8.
➮ Press the % or fi button 7 until
“BLK SKIP” appears in the display.
➮ Press the # or @ button 7 to
switch the blank skip function on or
off.
When you have finished making your
changes,
➮ press the MENU button 8 twice.
Selecting Tape Type
If you are playing a Metal or CrO2 tape,
you should set the tape type selector to
“METAL ON”.
To select the tape type
➮ Press button 1 MTL 9.
Either “METAL ON” or “METAL OFF” will
appear briefly in the display.
Dolby* B Noise Reduction
You should switch on the Dolby function
whenever you play tapes recorded
using the Dolby B process.
➮ Press button 6 9.
“DOLBY ON” appears briefly in the
display.
When the Dolby function is switched on,
shows in the display.
➮ To switch Dolby function off, press
button 6
*Noise reduction system manufactured
under licence from Dolby Laboratories. The
word Dolby and the double-D symbol are
trademarks of Dolby Laboratories.
9 again.
ENGLISH
FRANÇAIS
ESPAÑOL
PORTUGUÊS
15
Page 16

CASSETTE MODE
CD CHANGER MODE
Changing the display
While cassette is playing, you may
choose to set one of the following
options as your preferred display:
● Only the playing side e.g. "SIDE A",
or
● Include clock as part of the display.
➮ To set the display differently from
what is being shown currently, hold
down the Clock
until the display changes.
DIS button 6
CD changer mode
Note:
● Information on handling CDs,
inserting CDs and operating the
CD changer can be found in the
operating instructions supplied with
your CD changer.
Switching to CD changer mode
➮ Press the SRC button :
repeatedly until the display shows
“CHANGER”.
Playback will resume from where it was
last played previously.
Selecting CDs
➮ To move up/down from one CD to
another, press the % or fi button
7 once or several times.
➮ An empty CD magazine slot will be
skipped in the CD selection
process.
Selecting tracks
➮ To move up/down from one track to
another on the current CD, press
the # or @ button 7 once or
several times.
16
Fast searching (audible)
To fast search backwards or forwards,
➮ keep one of the @ # buttons 7
pressed until fast reversing/fast
forwarding begins.
Page 17
CD CHANGER MODE
Changing the display
5 options are available:
● Track number and play time
● Track number and clock
● CD number and track number
● CD number and clock
● CD number and play time
➮ Press the button 6 once or
several times for longer than two
seconds until the required display
appears.
Repeating individual tracks or
whole CDs (REPEAT)
➮ If you wish to repeat the current track,
briefly press button 4 RPT 9.
“RPT TRCK” appears briefly and RPT
lights up in the display.
➮ If you wish to repeat the current
CD, press button 4 RPT 9 longer
than two seconds.
“RPT DISC” appears briefly and RPT
lights up in the display.
Cancelling repeat
➮ If you want to stop the repeat
function for the current track or CD,
press button 4 RPT 9 briefly and
“RPT OFF” appears briefly in the
display and RPT disappears.
Random track play (MIX)
➮ To play all the tracks on the current
CD in random order, briefly press
button 5 MIX 9.
“MIX CD” appears briefly and MIX lights
up in the display.
➮ To play the tracks on all the
inserted CDs in random order,
press button 5 MIX 9 longer than
two seconds.
“MIX ALL” appears briefly and MIX lights
up in the display.
Stopping MIX
➮ Press button 5 MIX 9 briefly and
“MIX OFF” appears briefly in the
display and MIX disappears.
Scanning all tracks on all CDs
(SCAN)
➮ To briefly play all the tracks on all
inserted CDs in ascending order,
press the MENU button 8 for
longer than two seconds.
“TRK SCAN” appears briefly follows by
blinking the track number of the CD
track being scanned.
Stopping SCAN
➮ To stop scanning, briefly press the
MENU button 8.
The current track will then continue to
be played.
Note:
● You can set the scantime. For
further details, please read the
section entitled “Setting the
scantime” in the “Radio mode”
chapter.
Pausing playback (PAUSE)
➮ Press button 3
“PAUSE” appears in the display.
Cancelling pause
➮ Press button 3
pause mode.
Playback is continued.
EE
E 9.
EE
EE
E 9 while in
EE
17
ENGLISH
FRANÇAIS
ESPAÑOL
PORTUGUÊS
Page 18

CLOCK - TIME
CLOCK - Time
Displaying the time
To display the time,
➮ briefly press the button 6.
Setting the clock
➮ Press the MENU button 8.
➮ Keep pressing the fi or % button
7 until “CLOCK SET” appears in
the display.
➮ Press the # button 7.
The time appears in the display. The
minutes flash on and off and can be
adjusted.
➮ Adjust the minutes using the %/fi
buttons 7.
Once the minutes are set,
➮ press the @ button 7.
The hours flash on and off.
➮ Adjust the hours using the %/fi
buttons 7.
When you have finished making your
changes,
➮ press the MENU button 8 twice.
Selecting 12/24-hour clock
mode
➮ Press the MENU button 8.
➮ Keep pressing the % or fi button
7 until “12H MODE” or “24H
MODE” appears in the display.
➮ Press the @ or # button 7 to
switch between the modes.
When you have finished making your
changes,
➮ press the MENU button 8.
Displaying the time continuously
when the unit is off and the
ignition is on
“CLOCK ON” setting in the menu allows
you to display the clock continuously
when the unit is off and the ignition is
on,
➮ press the MENU button 8 .
➮ Keep pressing the % or fi button
7 until “CLOCK OFF” or “CLOCK
ON” appears in the display.
➮ Press the @ or # button 7 to
switch between the displays.
When you have finished making your
changes,
➮ press the MENU button 8.
Briefly displaying the time when
the unit is switched off
To briefly display the time when the unit
is off,
➮ press the /DIS button 7.
The time is displayed for eight seconds.
18
Page 19

TONE AND VOLUME DISTRIBUTION
Tone and volume balance
You can adjust the tone settings (bass
and treble) settings for each source
separately (radio, Cassette, CD changer
and AUX). The volume distribution
settings apply to all the audio sources.
Adjusting the bass
➮ Press the AUDIO 5 button.
“BASS” appears on the display.
➮ Press the fi or % button 7 to set
the bass.
➮ Press the AUDIO 5 button once
you have completed the setting.
Adjusting the treble
➮ Press the AUDIO 5 button.
“BASS” appears on the display.
➮ Press the # button 7 repeatedly
until “TREB” appears on the
display.
➮ Press the fi or % button 7 to set
the treble.
➮ Press the AUDIO 5 button once
you have completed the setting.
Setting the volume distribution
left/right (balance)
➮ To set the volume distribution left/
right (balance), press the AUDIO
5 button.
“BASS” appears on the display.
➮ Press the # button 7 repeatedly
until “BAL” appears on the display.
➮ Press the fi or % button 7 to set
the volume distribution left/right.
➮ Press the AUDIO 5 button once
you have completed the setting.
Setting the volume distribution
front/rear (fader)
➮ To set the volume distribution front/
rear (fader), press the AUDIO 5
button.
“BASS” appears on the display.
➮ Press the # button 7 repeatedly
until “FADER” appears on the
display.
➮ Press the fi or % button 7 to set
the volume distribution front/rear.
➮ Press the AUDIO 5 button once
you have completed the setting.
ENGLISH
FRANÇAIS
ESPAÑOL
PORTUGUÊS
19
Page 20

EQUALIZER AND X-BASS
Equalizer and X-BASS
X-BASS
X-Bass means increased bass at low
volumes.
Note:
● X-BASS can be adjusted
separately for each audio source
(radio, Cassette, CD-changer and
AUX).
➮ To set the X-BASS, press the
AUDIO 5 button.
“BASS” appears on the display.
➮ Press the # button 7 repeatedly
until “XBASS ON” or “XBASS OFF”
appears on the display.
➮ Press the fi
choose between “XBASS ON” and
“XBASS OFF”.
➮ Press the AUDIO 5 button once
you have completed the setting.
or
% button 7 to
Selecting preset sound effect
(EQ)
You can select preset sound effect for
the following styles of music:
● ROCK
● POP
● CLASSIC
The settings for these music styles have
already been programmed.
To select one of the sound presets,
➮ press the AUDIO 5 button.
“BASS” appears on the display.
➮ Press the # button 7 repeatedly
until one of the sound presets
appears on the display.
➮ Press the fi or % button 7 to
choose between the presets.
If you want to deactivate the sound
preset,
➮ choose “EQ OFF” from the menu.
➮ Press the AUDIO 5 button once
you have completed the setting.
Note:
● The selected preset sound effect is
applied to all audio sources.
20
Page 21

LEVEL DISPLAY
EXTERNAL SOURCES
Setting the level display
The level display briefly provides a
symbolic display of the volume and the
audio control settings whilst you are
adjusting them.
When settings are not being made, the
level display indicates the music level
of the car radio.
You can switch on or off the music level
display in the menu.
➮ Press the MENU button 8.
“MENU” appears on the display.
➮ Press the fi
repeatedly until “PEAK LVL”
appears on the display.
➮ Press the @
choose between “PEAK ON” and
“PEAK OFF”.
When you have finished making your
changes,
➮ press the MENU button 8 twice.
or
% button 7
or
# button 7 to
External audio sources
In place of the CD changer it is also
possible to connect other external audio
sources to the line output. These
sources can include a portable CD
player, MiniDisc player or MP3 player.
The AUX output has to be switched on
in the install menu.
To connect up an external audio source,
you will need an adapter cable
(Blaupunkt no.: 7 607 897 093),
obtainable from any authorised
Blaupunkt dealer.
Switching the AUX input on/off
➮ Press the MENU button 8.
“MENU” appears on the display.
➮ Press the fi or % button 7
repeatedly until “AUX OFF” or
“AUX ON” appears on the display.
➮ Press the # or @ button 7 to
switch AUX on or off.
When you have finished making your
changes,
➮ press the MENU button 8.
Note:
When the AUX input is switched on, it
can be selected using the SRC button
: and it is shown as “AUX INPUT” in
the display.
ENGLISH
FRANÇAIS
ESPAÑOL
PORTUGUÊS
21
Page 22

SPECIFICATIONS
Amplifier
Output power: 4 × 18W RMS @ 10% THD
Tuner
Frequency ranges USA:
FM: 87.5 – 107.9 MHz (200 kHz step)
AM: 530 – 1710 kHz (10 kHz step)
Frequency ranges Europe:
FM: 87.5 – 108 MHz (100 kHz step auto/50 kHz manual)
MW: 531 – 1602 kHz (9 kHz step)
LW: 153 – 279 kHz (9 kHz step auto/1 kHz step manual)
Frequency ranges Thailand:
FM: 87.5 – 108 MHz (50 kHz step auto/25 kHz step manual)
AM: 531 – 1602 kHz (9 kHz step)
Frequency ranges South America:
FM: 87.5 – 107.9 MHz (100 kHz step auto/50 kHz step manual)
AM: 530 – 1710 kHz (10 kHz step)
FM mono sensitivity:
17 dBf
FM frequency response:
35 - 16,000 Hz
Cassette
Frequency response:
30 - 18,000 Hz
Pre-Amp Out
4 channels: 2 V
Input sensitivity
AUX input: 2 V / 6 kΩ
Subject to changes!
22
Page 23

MEMO
ENGLISH
FRANÇAIS
ESPAÑOL
PORTUGUÊS
23
Page 24

ELÉMENTS DE COMMANDE
1 Touche pour ouvrir et libérer
le tableau de commande.
2 Touche pour allumer / fermer
l’unité et la mettre en sourdine.
3 Bouton de réglage du volume.
4 Pression courte: touche BND,
pour sélectionner le bloc
mémoire FM et la gamme
d'ondes AM, mettre la source
sur mode radio.
Pression longue: TS, pour
activer la fonction Travelstore.
5 Touche AUDIO, pour régler les
graves, les aigus, la balance et
l’équilibreur, X-Bass et les
réglages sonores préétablis EQ.
6 Pression courte: touche
afficher l’heure.
Pression longue: pour modifier
la priorité d’affichage.
7 Pavé de touches flèche.
8 Pression courte: touche MENU,
pour ouvrir le menu des
réglages de base.
Pression longue: SCAN, pour
activer la fonction survol.
9 Touches 1 - 6
: Touche SRC, pour sélectionner
les sources cassette, radio et
changeur de CD (AUX).
; Touche Eject 0 (qui n’est visible
qu’après avoir ouvert le tableau
de commande).
, pour
24
Page 25

TABLE DES MATIÈRES
Remarques et accessoires .... 26
Sécurité routière............................ 26
Montage........................................ 26
Accessoires .................................. 26
Répertoire téléphonique international .. 26
Tableau de commande amovible ..
Protection antivol ........................... 27
Détacher le tableau de commande .. 27
Rattacher le tableau de commande .... 27
Minuterie d’arrêt ............................ 28
27
Allumer/éteindre .................... 28
Régler le volume .................... 29
Régler le volume de démarrage ..... 29
Baisse instantanée du volume
(sourdine) ...................................... 30
Sourdine en cours d’appel
téléphonique.................................. 30
Bip de confirmation ....................... 30
Mode radio ............................. 31
Mise en marche de la radio............ 31
Régler le syntoniseur ..................... 31
Choisir la gamme de fréquences/le
bloc mémoire ................................ 31
Choisir une station ........................ 31
Régler la sensibilité de la
recherche de stations .................... 31
Mémoriser des stations .................. 32
Mémorisation automatique
(Travelstore) .................................. 32
Écouter des stations préréglées .... 32
Survoler les stations captables (SCAN)
Régler la durée de balayage .......... 33
Configurer l’affichage .................... 33
.. 32
Mode Cassette ....................... 33
Lecture de cassettes ..................... 33
Éjection de cassettes .................... 33
Changement du sens de la lecture .. 34
Saut de pistes (S-CPS) ................. 34
Répétition d’une piste .................... 34
Survol de toutes les pistes d’une
cassette (SCAN) ........................... 34
Bobinage rapide ............................ 34
Pause en cours de lecture ............. 35
Activer/désactiver la surveillance radio ..
Sauter les bouts vierges ................ 35
Choisir un type de bande............... 35
Réduction du bruit Dolby* B .......... 35
Modification de l’affichage ............. 36
35
Mode changeur de CD ........... 36
Passer au mode changeur de CD .. 36
Choix d’un CD .............................. 36
Choix de pistes ............................. 36
Recherche rapide (audible)............ 36
Modification de l’affichage ............. 37
Répétition de pistes individuelles
ou de CD complets (REPEAT) ....... 37
Lecture aléatoire de pistes (MIX) ... 37
Survol de toutes les pistes sur
chaque CD (SCAN) ...................... 37
Interruption de la lecture (PAUSE)... 37
Clock — Heure ...................... 38
Affichage de l’heure ...................... 38
Réglage de l’horloge ..................... 38
Sélection du mode 12/24 heures ... 38
Affichage permanent de l’heure
quand l’unité est éteinte et que le
contact est mis ............................... 38
Affichage momentané de l’heure
quand l’unité est éteinte ................. 38
Tonalite et repartition du
volume .................................... 39
Régler les graves........................... 39
Régler les aigus............................. 39
Répartir le volume vers la gauche/
la droite (balance) .......................... 39
Répartir le volume vers l’avant/
l’arrière (équilibreur) ...................... 39
Égaliseur et X-BASS .............. 40
X-BASS ........................................ 40
Choisir un effet sonore préréglé (EQ) ..
40
Configurer l’affichage de
niveau sonore ........................ 41
Sources audio externes ......... 41
Allumer/éteindre l’entrée AUX ......... 41
Caracteristiques techniques .. 42
25
ENGLISH
FRANÇAIS
ESPAÑOL
PORTUGUÊS
Page 26
REMARQUES ET ACCESSOIRES
Nous vous remercions d’avoir porté votre
choix sur un produit Blaupunkt et nous
espérons que ce nouvel autoradio vous
donnera toute satisfaction.
Prenez soin de lire ce mode d’emploi avant
d’utiliser l’appareil pour la première fois.
Les rédacteurs de Blaupunkt s’efforcent
constamment de rédiger les modes
d’emploi de la manière la plus claire et la
plus compréhensible possible. Si vous
avez toutefois des questions concernant
l’utilisation de l’appareil, n’hésitez pas à
contacter votre revendeur Blaupunkt ou
le service d’assistance téléphonique de
votre pays. Les numéros de téléphone
figurent au dos de ce fascicule.
Sécurité routière
La sécurité routière est
impérative. Utilisez uniquement votre
appareil si la situation routière le
permet. Familiarisez-vous avec
l’appareil avant de prendre la route.
Les avertisseurs sonores de la police,
des sapeurs-pompiers et des services
de secours doivent être perçus à temps
dans le véhicule. Soyez donc toujours
à l’écoute de votre programme à un
volume adéquat.
Montage
Si vous voulez monter vous-même
l’autoradio, reportez-vous aux consignes de montage et de branchement à
la fin du mode d’emploi.
Accessoires
Utilisez uniquement les accessoires
autorisés par Blaupunkt.
Remote control
Vous pouvez commodément accéder
aux plus importantes fonctions de votre
26
autoradio depuis le volant grâce aux
télécommandes RC08 ou RC10
optionnelles.
Quant à elle, la RC-12H optionnelle
pratique vous donne accès à ces
fonctions de n’importe où dans le
véhicule.
Amplificateur
Tous les amplificateurs Blaupunkt et
Velocity peuvent servir.
Changeur de CD
Les changeurs de CD Blaupunkt CDC
A08, IDC A09 et CDC A03 peuvent être
branchés à l’unité.
Lecteur compact MP3
Plutôt qu’un changeur de CD, vous
pouvez brancher un lecteur compact
MP3 pour écouter des pistes musicales
MP3. En premier lieu, il vous faudra
alors utiliser un ordinateur pour stocker
les pistes musicales MP3 sur le disque
dur Microdrive™ à l’intérieur du lecteur
compact MP3. Une fois le lecteur
compact MP3 connecté à l’autoradio,
vous pouvez lire les MP3 comme des
pistes de CD ordinaires. Le lecteur
compact MP3 se commande de la
même façon qu’un changeur de CD. La
plupart des fonctions de changeur de
CD s’emploient aussi avec le lecteur
compact MP3.
Répertoire téléphonique international
Si vous avez des questions
quelconques sur le fonctionnement de
votre autoradio ou si vous avez besoin
de renseignements supplémentaires,
n’hésitez surtout pas à nous appeler !
Les numéros d’assistance téléphonique
figurent à la dernière page du présent
mode d’emploi.
Page 27
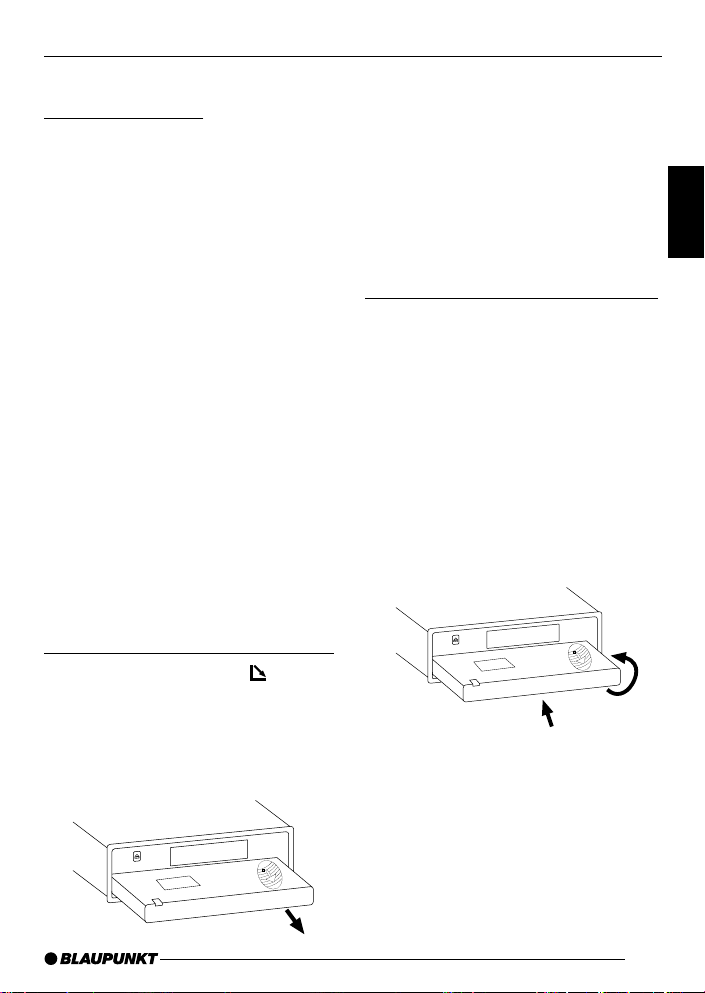
TABLEAU DE COMMANDE AMOVIBLE
Tableau de commande amovible
Protection antivol
Afin de protéger votre équipement
contre le vol, l’unité est munie d’un
tableau de commande détachable
(démontable). Sans ce tableau de
commande, l’autoradio ne vaut rien aux
yeux d’un voleur.
Prévenez les vols en prenant le tableau
de commande avec vous chaque fois
que vous quittez votre véhicule. Ne le
laissez pas dans votre véhicule – même
pas dans une cachette.
Le tableau de commande est fait pour
être convivial.
Note:
● Ne laissez jamais tomber le
tableau de commande.
● Ne l’exposez jamais à la lumière
directe du soleil ou à d’autres
sources de chaleur.
● Évitez de toucher directement ses
contacts avec la peau. Au besoin,
nettoyez les contacts avec un tissu
non pelucheux et un peu d’alcool.
Détacher le tableau de commande
➮ Appuyez sur la touche 1.
Le verrou du tableau de commande
s’ouvre.
➮ Tirez pour séparer le tableau de
l’unité en tenant le côté droit du
tableau de commande.
Note:
● L’unité ne s’éteindra peut-être
qu’après quelques secondes, selon
le réglage “OFF TIMER” du MENU,
décrit plus loin.
● Tous les réglages courants de la
radio sont préservés.
● Un cassette qui est déjà dans
l’unité reste là.
Rattacher le tableau de commande
Il y a diverses façons de rattacher le
tableau de commande, mais la méthode
suivante est recommandée:
➮ Tenez le tableau de commande
perpendiculairement à l’unité.
➮ Glissez le tableau dans les guides
de l’unité, aux coins gauche et droit
inférieurs, jusqu’à ce qui
s’enclenche.
➮ Poussez doucement le tableau de
commande vers le haut jusqu’à ce
qui clique.
2
Note:
● Quand vous rattachez le tableau,
prenez soin de ne pas peser sur
l’afficheur.
Si l’unité était en marche quand vous
avez enlevé le tableau de commande,
elle se rallumera automatiquement avec
les derniers réglages activés – radio,
cassette ou changeur de CD (AUX) –
quand vous le replacerez.
1
ENGLISH
FRANÇAIS
ESPAÑOL
PORTUGUÊS
27
Page 28

TABLEAU DE COMMANDE AMOVIBLE
ALLUMER /ÉTEINDRE
Minuterie d’arrêt
Suivant l’ouverture du tableau de
commande, l’unité s’éteindra au bout
d’un délai préétabli de 0 à 30 secondes.
➮ Appuyez sur la touche MENU 8.
➮ Frappez la touche fi 7 deux fois
pour afficher “OFF TIMER”.
➮ Réglez l’heure à l’aide des touches
@ ou # 7.
Quand vous avez fini vos modifications,
➮ frappez la touche MENU 8 deux
fois.
Note:
● Si le OFF TIMER est réglé sur 0
seconde, l’unité s’éteindra dès
l’ouverture du tableau de
commande.
Allumer/ éteindre
Il y a diverses façons d’allumer/
d’éteindre l’unité:
Allumer/éteindre avec l’allumage
du véhicule
Si l’unité est bien reliée à l’allumage du
véhicule et qu’elle n’a pas été éteinte
avec la touche ON/OFF 2 , elle
s’activera ou se désactivera en même
temps que l’allumage.
Allumer/éteindre avec le tableau de
commande amovible
➮ Retirez le tableau de commande.
L’unité s’éteint.
Un délai dans la mise sous tension est
prévu si le réglage “OFF TIMER” n’est
pas sur “0”.
➮ Rattachez le tableau de
commande.
L’unité s’allume. Les derniers réglages
(radio, cassette, changeur de CD ou
AUX) seront réactivés.
Allumer/ éteindre avec la touche 2
➮ Pour allumer l’unité, appuyez sur la
touche 2.
➮ Pour éteindre l’unité, tenez la
touche 2 enfoncée plus de deux
secondes.
L’unité s’éteint.
Note:
● Si vous allumez l’unité quand le
contact est coupé, l’appareil
s’éteindra automatiquement au
bout d’une heure pour éviter que la
batterie du véhicule ne se vide.
28
Page 29

ALLUMER / ÉTEINDRE
RÉGLER LE VOLUME
Allumer en insérant un cassette
Si l’unité est éteinte et qu’il n’y a pas de
cassette dans le lecteur,
➮ appuyez sur la touche 1.
Le tableau de commande s’ouvre.
➮ Insérez délicatement la cassette
dans la fente pour cassette, côté
ouvert à droite.
➮ Fermez le tableau de commande.
L’unité s’allume et amorce la lecture par
la face du dessus.
Note:
● L’unité restera éteinte si le contact
est coupé. Pour l’allumer, frappez
la touche 2 une fois.
Régler le volume
Le volume se règle en incréments de 0
(silence) à 66 (maximum).
Pour lever le volume de l’appareil,
➮ tournez le bouton de réglage du
volume 3 dans le sens des
aiguilles d’une montre.
Pour baisser le volume,
➮ tournez le bouton de réglage du
volume 3 dans le sens contraire
des aiguilles d’une montre.
Régler le volume de démarrage
Vous pouvez définir le volume de
démarrage par défaut de l’unité.
➮ Appuyez sur la touche MENU 8.
➮ Tenez la touche fi ou % 7
enfoncée jusqu’à ce que “ON
VOLUME” apparaisse sur l’afficheur.
➮ Réglez le volume de démarrage à
l’aide des touches @ et # 7.
Pour faciliter l’ajustement, le volume
audible s’élèvera ou s’abaissera au fur
et à mesure que vous effectuerez vos
modifications.
Si vous sélectionnez “LAST VOL”, le
volume que vous aviez à l’arrêt de
l’autoradio sera réactivé.
Note:
● Pour protéger votre ouïe, le volume
de démarrage maximal sous le
réglage “LAST VOL” est de “38”. Si
le volume dépassait “38” à l’arrêt
de l’unité et que “LAST VOL” a été
sélectionné, le volume sera fixé à
“38” la prochaine fois que la radio
sera mise en marche.
ENGLISH
FRANÇAIS
ESPAÑOL
PORTUGUÊS
29
Page 30

RÉGLER LE VOLUME
Quand vous avez fini vos modifications,
➮ frappez la touche MENU 8 deux
fois.
Baisse instantanée du volume
(sourdine)
Vous pouvez ramener instantanément
(assourdir) le volume à un niveau que
vous avez prédéfini.
➮ Pressez brièvement la touche 2.
“MUTE” s’affiche.
Pour restaurer le volume,
➮ pressez à nouveau la touche 2.
Régler le niveau de sourdine
Vous pouvez définir le volume de la
sourdine.
➮ Appuyez sur la touche MENU 8.
➮ Tenez la touche fi ou % 7
enfoncée jusqu’à ce que “MUTE
LVL” apparaisse sur l’afficheur.
➮ Réglez le niveau de sourdine à
l’aide des touches @ et # 7.
Quand vous avez fini vos modifications,
➮ frappez la touche MENU 8 deux
fois.
Il faut toutefois que le téléphone mobile
soit raccordé à l’autoradio conformément
aux consignes d'installation.
Le volume descendra au niveau de
sourdine configuré.
Bip de confirmation
Avec certaines fonctions, un bip de
confirmation se fera entendre si vous
tenez une touche enfoncée plus de
deux secondes. Par exemple, après
avoir associé une station de radio avec
une touche de station, vous entendrez
un bip de confirmation. Le bip peut être
activé / désactivé.
➮ Appuyez sur la touche MENU 8.
➮ Tenez la touche % ou fi 7
enfoncée jusqu’à ce que “BEEP”
apparaisse sur l’afficheur.
➮ Utilisez les touches @ et # 7
pour commuter entre les options.
“OFF” signifie que le bip est inactif, et
“ON” qu’il est actif.
➮ Appuyez sur la touche MENU 8.
Sourdine en cours d’appel
téléphonique
Si votre unité est branchée à un
téléphone mobile, le volume de
l’autoradio sera mis en sourdine dès que
vous décrocherez le téléphone.
“PHONE” s’affiche.
30
Page 31

MODE RADIO
Mode Radio
Mise en marche de la radio
Si vous êtes en mode Cassette ou
changeur de CD ou (AUX),
➮ appuyez sur la touche BND-TS 4
ou
➮ tenez la touche SRC : enfoncée
jusqu’à ce que “FM” ou “AM”
(“MW”) apparaisse sur l’afficheur.
Régler le syntoniseur
Pour assurer la marche parfaite de
l’élément radio, l’unité doit être
configurée pour votre lieu
géographique. Vous pouvez choisir
entre Europe (EUROPE), Amérique
(USA), Thaïlande (THAI) et Amérique
du Sud (S-AMERICA). Le syntoniseur
a été réglé en usine pour la région où
l’unité a été vendue. Si la réception radio
laisse à désirer, vérifiez ce paramètre.
➮ Appuyez sur la touche MENU 8.
➮ Frappez la touche fi 7 jusqu’à ce
que “TUNER” apparaisse sur
l’afficheur.
➮ Tenez la touche @ ou # 7
enfoncée jusqu’à ce que la région
voulue apparaisse sur l’afficheur.
Quand vous avez fini vos modifications,
➮ frappez la touche MENU 8 deux
fois.
Choisir la gamme de
fréquences/le bloc mémoire
Cette unité peut capter des émissions
de radio sur les gammes de fréquences
FM, AM (MW) et LW. Il y a trois blocs
mémoire préétablis pour la gamme FM,
un pour la AM (MW) et un pour la
gamme LW. Six stations peuvent être
introduites dans chaque bloc mémoire.
Note:
● Il n’y a pas de LW avec les
réglages de syntoniseur “USA” et
“THAI”.
Choisir le niveau de mémoire FM
ou la plage de fréquences AM
(MW), selon le cas
➮ Tenez la touche BND-TS 4
enfoncée pour commuter entre les
niveaux de mémoire FM (FM1,
FM2 et FMT) et les plages de
fréquences AM (MW) et LW, selon
ce qui s’applique.
Choisir une station
Plusieurs possibilités vous sont offertes
pour vous mettre à l’écoute d’une station.
Recherche automatique de stations
➮ Appuyez sur la touche fi ou % 7.
L’autoradio se règle sur la station suivante qu’il est en mesure de capter.
Régler la sensibilité de la
recherche de stations
Vous pouvez décider si la radio
s’accordera sur les stations à réception
nette seulement ou sur les stations à
réception faible aussi.
➮ Appuyez sur la touche MENU 8.
➮ Tenez la touche fi ou % 7
enfoncée jusqu’à ce que “SENS
HI” ou “SENS LO” apparaisse sur
l’afficheur.
31
ENGLISH
FRANÇAIS
ESPAÑOL
PORTUGUÊS
Page 32

RADIO MODE
“SENS HI” désigne un syntoniseur très
sensible. “SENS LO” décrit le réglage
basse sensibilité.
➮ Définissez la sensibilité requise
grâce aux touches @ ou # 7.
Quand vous avez fini vos modifications,
➮ appuyez sur la touche MENU 8.
Note:
● On peut définir séparément des
sensibilités de recherche de
stations différentes pour la FM et
l’AM (LW incluse).
Syntonisation manuelle
L’accord manuel est également possible.
➮ Appuyez sur la touche @ ou # :.
Mémoriser des stations
Mémorisation manuelle
➮ Choisissez le bloc mémoire (FM1,
FM2 ou FMT) ou la gamme
d'ondes AM (MW) ou LW qui
s’applique.
➮ Syntonisez la station voulue.
➮ Pressez l’une des touches de
station 1 - 6 9 pendant plus de
deux seconde pour enregistrer la
station dans cette mémoire
préétablie.
Mémorisation automatique
(Travelstore)
Vous pouvez automatiquement
mémoriser les six stations avec la
réception la plus nette de la région. Les
stations sont stockées dans la mémoire
FMT, AM (MW) ou LW selon la plage
de fréquences sélectionnée.
Note:
● Les stations mémorisées
auparavant sur ce niveau seront
automatiquement effacées.
➮ Tenez la touche BND-TS 4
enfoncée jusqu’à ce que la
recherche de stations débute.
La mémorisation s’amorcera.
“TSTORE” s’affichera. À la fin du
processus, la station enregistrée au
point 1 du niveau de mémoire concerné
se fera entendre.
Écouter des stations préréglées
➮ Choisissez le niveau de mémoire
où la station sera introduite.
➮ Pressez la touche 1 - 6 9
préréglée sur la station que vous
voulez écouter.
Survoler les stations captables
(SCAN)
Il est possible de faire jouer brièvement
toutes les stations captables en activant
la fonction survol. Vous pouvez régler
la durée de balayage entre 5 et 30
secondes depuis le menu.
Lancer le survol
➮ Tenez la touche MENU 8
enfoncée plus de deux secondes.
Le balayage s’amorce. “SCAN” s’affiche
brièvement, suivi par la fréquence
actuelle, qui clignote.
32
Page 33

MODE RADIO
MODE CASSETTE
Interrompre le survol, et rester à
l’écoute d’une station
➮ Appuyez sur la touche MENU 8.
Le balayage prend fin, et la dernière
station syntonisée reste active.
Régler la durée de balayage
➮ Appuyez sur la touche MENU 8.
➮ Tenez la touche fi 7 enfoncée
jusqu’à ce que “SCAN TIME”
apparaisse sur l’afficheur.
➮ Utilisez les touches @# 7 pour
définir la durée de balayage.
Quand vous avez fini vos modifications,
➮ frappez la touche MENU 8 deux
fois.
Note:
● La durée de balayage fixée
s’applique aussi au survol en mode
Cassette et changeur de CD.
Configurer l’affichage
Vous pouvez choisir d’afficher en
continu l’un des renseignements
suivants:
● Heure
● Fréquence
➮ Tenez la touche DIS 6
enfoncée jusqu'à ce que l'affichage
voulu apparaisse.
Emploi de cassettes
Lecture de cassettes
● S’il n’y a pas de cassette dans
l’appareil,
➮ appuyez sur la touche 1.
Le tableau démontable à bascule
s’ouvre.
➮ Insérez la cassette dans la fente pour
cassette, côté ouvert à droite.
➮ Fermez l’unité de commande.
La lecture de la cassette s’amorce par
la face du dessus.
● S’il y a déjà une cassette dans
l’appareil et que ce dernier joue en
mode radio ou changeur de CD
(AUX).
➮ tenez la touche SRC : enfoncée
jusqu’à ce que “CASSETTE”
apparaisse sur l’afficheur.
La bande tourne dans la dernière
direction sélectionnée.
Éjection de cassettes
➮ Appuyez sur la touche 1.
Le tableau démontable à bascule
s’ouvre.
➮ Pesez sur la touche 0 ; située à
côté de la fente pour cassette
➮ Retirez la cassette, et fermez le
tableau démontable
ou
➮ Insérez une nouvelle cassette, et
fermez le tableau démontable.
ENGLISH
FRANÇAIS
ESPAÑOL
PORTUGUÊS
33
Page 34

MODE CASSETTE
Changement du sens de la
lecture
Pour commuter entre la face A et la face B
➮ Appuyez sur la touche 2 %fi 9.
Note:
● À la fin de la bande, le sens de la
lecture s’inverse automatiquement
(retour automatique).
Saut de pistes (S-CPS)
Pour sauter une ou des pistes vers
l’avant
➮ Frappez la touche % 7 une fois
ou plus.
“CPS FF” et le nombre de pistes à
omettre s’affichent. La bande avance
rapidement à la prochaine piste choisie.
Pour sauter une ou des pistes vers
l’arrière
➮ Frappez la touche fi 7 une fois
ou plus.
“CPS FR” et le nombre de pistes à
omettre s’affichent. La bande recule
jusqu’au début de la piste actuelle ou
de la piste antérieure désirée.
Répétition d’une piste
➮ Appuyez sur la touche 4 RPT 9.
La piste actuelle se répète. RPT
s’affiche. Tandis que la bande tourne
pour revenir au début de la piste, on
peut lire “RPT TRCK” sur l’afficheur.
Pour cesser de répéter la piste
➮ Pressez à nouveau la touche 4
RPT 9.
La lecture continue normalement. RPT
s’efface de l’afficheur.
34
Survol de toutes les pistes
d’une cassette (SCAN)
➮ Tenez la touche MENU 8
enfoncée plus de deux secondes.
“CAS SCAN” s’affiche. Des échantillons
de chaque piste du ruban sont lus en
ordre ascendant.
Pour arrêter le balayage
➮ Pressez la touche MENU 8 une
deuxième fois.
La piste en cours de balayage
continuera de jouer.
Note:
● La durée de balayage peut être
ajustée. Consultez la section
“Régler la durée de balayage” sous
“Mode radio”.
● Pour utiliser les fonctions S-CPS,
RPT et SCAN, il doit y avoir une
pause d’au moins trois secondes
entre les pistes sur la cassette.
Bobinage rapide
Avance rapide
➮ Appuyez sur la touche # 7.
“FORWARD” s’affiche.
Retour rapide
➮ Appuyez sur la touche @ 7.
“REWIND” s’affiche.
Arrêter le bobinage rapide
➮ Appuyez sur la touche flèche 7
opposée.
La lecture se poursuit.
Note:
● Pendant le bobinage rapide de la
Page 35

CASSETTE MODE
bande, la dernière station de radio
syntonisée peut être entendue.
Pour cela, il faut que la fonction
“Surveillance radio” soit activée.
Pause en cours de lecture
Pour interrompre la lecture
➮ Appuyez sur la touche 3 E 9.
La lecture s’arrête, et “PAUSE” s’affiche.
➮ Pressez à nouveau la touche 3 E
9 pour reprendre la lecture.
Activer/désactiver la
surveillance radio
Note:
● La surveillance radio ne peut être
réglée qu’avec une cassette en
cours de lecture.
➮ Appuyez sur la touche MENU 8.
➮ Tenez la touche % ou fi 7
enfoncée jusqu’à ce que “RM ON” ou
“RM OFF” apparaisse sur l’afficheur.
➮ Appuyez sur la touche # ou @ 7
pour activer / désactiver la
surveillance radio.
Quand vous avez fini vos modifications,
➮ Appuyez sur la touche MENU 8
une fois.
Sauter les bouts vierges
Vous pouvez automatiquement passer
les bouts de bande vierge de plus de
10 secondes. Pour cela, il faut que la
fonction saut de silences soit activée.
Note:
● Le saut de silences ne peut être
réglé qu’avec une cassette en
cours de lecture.
Activer/désactiver le saut de silences
➮ Appuyez sur la touche MENU 8.
➮ Tenez la touche % ou fi 7
enfoncée jusqu’à ce que “BLK
SKIP” apparaisse sur l’afficheur.
➮ Appuyez sur la touche # ou @ 7
pour activer/désactiver la fonction
saut de silences.
Quand vous avez fini vos modifications,
➮ frappez la touche MENU 8 deux
fois.
Choisir un type de bande
Si vous lisez une bande Métal ou CrO2,
réglez le sélecteur de type de bande sur
“METAL ON”.
Pour sélectionner le type de bande
➮ Appuyez sur la touche 1 MTL 9.
“METAL ON” ou “METAL OFF”
s’affichera brièvement.
Réduction du bruit Dolby* B
Il est bon d’activer la fonction Dolby pour
lire toute bande enregistrée grâce au
processus Dolby B.
➮ Appuyez sur la touche 6 9.
“DOLBY ON” s’affiche momentanément.
Quand la fonction Dolby est activée,
s’affiche.
➮ Pour désactiver la fonction Dolby,
pressez à nouveau la touche 6
9.
*Réducteur de bruit fabriqué sous licence de
Dolby Laboratories. Le mot Dolby et le
symbole du double D sont des marques de
commerce de Dolby Laboratories.
35
ENGLISH
FRANÇAIS
ESPAÑOL
PORTUGUÊS
Page 36

CASSETTE MODE
MODE CHANGEUR DE CD
Modification de l’affichage
Pendant que la cassette joue, vous
pouvez configurer votre affichage
favori grâce aux options suivantes:
● Seulement la face en cours de
lecture, p. ex. “SIDE A”,
ou
● Horloge incluse dans l’affichage.
➮ Pour modifier l’affichage actuel,
tenez la touche d’horloge
6 enfoncée jusqu’à ce qu’il
change.
DIS
Mode changeur de CD
Note:
● Pour savoir comment manipuler et
insérer les CD et comment utiliser
le changeur de CD, consultez le
mode d’emploi fourni avec votre
changeur de CD.
Passer au mode changeur de CD
➮ Frappez la touche SRC : jusqu’à
ce que “CHANGER” s’affiche.
La lecture reprendra à partir du point
où elle s’est arrêtée.
Choix d’un CD
➮ Pour monter / descendre vers un
autre CD, appuyez sur la touche %
ou fi 7 une ou plusieurs fois.
➮ Une fente pour CD vide sera
passée au cours du processus de
sélection de CD.
Choix de pistes
➮ Pour monter / descendre vers une
autre piste du CD actuel, appuyez
sur la touche # ou @ 7 une ou
plusieurs fois.
36
Recherche rapide (audible)
Pour une recherche rapide vers l’avant
ou vers l’arrière,
➮ tenez l’une des touches @ # 7
enfoncée jusqu’à ce que l’avance
ou le retour rapide s’amorce.
Page 37

MODE CHANGEUR DE CD
Modification de l’affichage
5 options sont offertes:
● Numéro de piste et durée de
lecture
● Numéro de piste et horloge
● Numéros de CD et de piste
● Numéro de CD et horloge
● Numéro de CD et durée de lecture
➮ Faites une ou plusieurs pressions de
plus de 2 secondes sur la touche
6 jusqu’à ce que l’affichage voulu
apparaisse.
Répétition de pistes
individuelles ou de CD complets
(REPEAT)
➮ Si vous voulez que la piste actuelle
se répète, pressez brièvement la
touche 4 RPT 9.
“RPT TRCK” s’affiche brièvement, et
RPT s’allume dans l’afficheur.
➮ Si vous voulez que le CD actuel se
répète, pressez la touche 4 RPT
9 plus de deux secondes.
“RPT DISC” s’affiche brièvement, et
RPT s’allume dans l’afficheur.
Mettre fin à la répétition
➮ Pour que la piste actuelle ou le
présent CD cesse de rejouer,
appuyez brièvement sur la touche
4 RPT 9; “RPT OFF” apparaît
momentanément sur l’afficheur, et
RPT s’efface.
Lecture aléatoire de pistes (MIX)
➮ Pour lire toutes les pistes du CD
actuel au hasard, appuyez
brièvement sur la touche 5 MIX 9.
“MIX CD” s’affiche un instant, et MIX
s’allume dans l’afficheur.
➮ Pour lire les pistes de tous les CD
insérés au hasard, pressez la touche
5 MIX 9 plus de deux secondes.
“MIX ALL” s’affiche un instant, et MIX
s’allume dans l’afficheur.
Arrêter la lecture aléatoire
➮ Pressez brièvement la touche 5
MIX 9; “MIX OFF” s'affiche
momentanément, et MIX s’efface.
Survol de toutes les pistes sur
chaque CD (SCAN)
➮ Pour lire momentanément toutes les
pistes de chaque CD inséré en ordre
ascendant, pressez la touche MENU
8 pendant plus de deux secondes.
“TRK SCAN” s’affiche brièvement, puis
le numéro de la piste de CD balayée
clignote.
Interrompre le survol
➮ Pour arrêter le balayage, appuyez
brièvement sur la touche MENU 8.
La piste actuelle continuera de jouer.
Note:
● Vous pouvez régler la durée de
balayage. Pour en savoir davantage,
reportez-vous à la section “Régler la
durée de balayage” du chapitre
“Mode radio”.
Interruption de la lecture (PAUSE)
➮ Appuyez sur la touche 3
“PAUSE” s’affiche.
Mettre fin à la pause
➮ Appuyez sur la touche 3
mode pause.
La réécoute est continuée.
EE
E 9.
EE
EE
E 9 en
EE
37
ENGLISH
FRANÇAIS
ESPAÑOL
PORTUGUÊS
Page 38

CLOCK — HEURE
CLOCK — Heure
Affichage de l’heure
Pour afficher l’heure,
➮ appuyez brièvement sur la touche
6.
Réglage de l’horloge
➮ appuyez sur la touche MENU 8.
➮ Tenez la touche fi ou % 7
enfoncée jusqu’à ce que “CLOCK
SET” apparaisse sur l’afficheur.
➮ Appuyez sur la touche # 7.
L’heure s’affiche. Les minutes clignotent
et se prêtent à modification.
➮ Ajustez les minutes avec les
touches %/fi 7.
Une fois les minutes entrées,
➮ appuyez sur la touche @ 7.
Les heures clignotent.
➮ Ajustez les heures avec les
touches %/fi 7.
Quand vous avez fini vos modifications,
➮ frappez la touche MENU 8 deux
fois.
Sélection du mode 12/24
heures
➮ Appuyez sur la touche MENU 8.
➮ Tenez la touche % ou fi 7
enfoncée jusqu’à ce que “12H
MODE”ou “24H MODE”
apparaisse sur l’afficheur.
➮ Appuyez sur la touche @ ou # 7
pour commuter entre les modes.
Quand vous avez fini vos modifications,
➮ appuyez sur la touche MENU 8.
Affichage permanent de l’heure
quand l’unité est éteinte et que
le contact est mis
Le réglage “CLOCK ON” du menu vous
permet d’afficher l’horloge en continu
quand l’appareil mais pas le contact est
en arrêt,
➮ appuyez sur la touche MENU 8.
➮ Tenez la touche % ou fi 7
enfoncée jusqu’à ce que “CLOCK
OFF” ou “CLOCK ON” apparaisse
sur l’afficheur.
➮ Appuyez sur la touche @ ou # 7
pour commuter entre les
affichages.
Quand vous avez fini vos modifications,
➮ appuyez sur la touche MENU 8.
Affichage momentané de l’heure
quand l’unité est éteinte
Pour afficher brièvement l’heure quand
l’appareil est en arrêt,
➮ appuyez sur la touche /DIS 6.
L’heure s’affiche huit secondes.
38
Page 39

TONALITÉ ET RÉPARTITION DU VOLUME
Tonalité et dosage du
volume
Les réglages de tonalité (graves et
aigus) de chaque source s’ajustent
séparément (radio, cassette, changeur
de CD et AUX). Les réglages de
répartition du volume s’appliquent à
toutes les sources audio.
Régler les graves
➮ Appuyez sur la touche AUDIO 5.
“BASS” s’affiche.
➮ Appuyez sur la touche fi ou % 7
pour ajuster les graves.
➮ Pressez la touche AUDIO 5 une
fois le réglage effectué.
Régler les aigus
➮ Appuyez sur la touche AUDIO 5.
“BASS” s’affiche.
➮ Frappez la touche # 7 jusqu’à ce
que “TREB” apparaisse sur
l’afficheur.
➮ Appuyez sur la touche fi ou % 7
pour ajuster les aigus.
➮ Pressez la touche AUDIO 5 une
fois le réglage effectué.
Répartir le volume vers la
gauche/la droite (balance)
➮ Pour la répartition gauche-droite du
volume (balance), appuyez sur la
touche AUDIO 5.
“BASS” s’affiche.
➮ Frappez la touche # 7 jusqu’à ce
que “BAL” apparaisse sur
l’afficheur.
➮ Appuyez sur la touche fi ou % 7
pour ajuster la répartition gauchedroite du volume.
➮ Pressez la touche AUDIO 5 une
fois le réglage effectué.
Répartir le volume vers l’avant/
l’arrière (équilibreur)
➮ Pour la répartition avant-arrière du
volume (équilibreur), appuyez sur
la touche AUDIO 5.
“BASS” s’affiche.
➮ Frappez la touche # 7 jusqu’à ce
que “FADER” apparaisse sur
l’afficheur.
➮ Appuyez sur la touche fi ou % 7
pour ajuster la répartition avantarrière du volume.
➮ Pressez la touche AUDIO 5 une
fois le réglage effectué.
ENGLISH
FRANÇAIS
ESPAÑOL
PORTUGUÊS
39
Page 40

ÉGALISEUR ET X-BASS
Égaliseur et X-BASS
X-BASS
X-Bass désigne l’amplification des
graves à faible volume.
Note:
● La fonction X-BASS de chaque
source audio s’ajuste séparément
(radio, Cassette, changeur de CD
et AUX).
➮ Pour configurer X-BASS, appuyez
sur la touche AUDIO 5.
“BASS” s’affiche.
➮ Frappez la touche # 7 jusqu’à ce
que “XBASS ON” ou “XBASS
OFF” apparaisse sur l’afficheur.
➮ Appuyez sur la touche fi ou % 7
pour choisir entre “XBASS ON” et
“XBASS OFF”.
➮ Pressez la touche AUDIO 5 une
fois le réglage effectué.
Choisir un effet sonore préréglé
(EQ)
Vous pouvez adopter un effet sonore
préréglé pour les styles musicaux
suivants :
● ROCK
● POP
● CLASSIQUE
Les réglages convenant à ces styles
musicaux ont déjà été programmés.
Pour activer l’un des réglages sonores
préétablis,
➮ appuyez sur la touche AUDIO 5.
“BASS” s’affiche.
➮ Frappez la touche # 7 jusqu'à ce
que l'un des réglages sonores
préétablis s'affiche.
➮ Appuyez sur la touche fi ou % 7
pour choisir entre les présélections.
Pour désactiver le réglage sonore
préétabli,
➮ choisissez “EQ OFF” parmi les
options offertes.
➮ Pressez la touche AUDIO 5 une
fois le réglage effectué.
Note:
● L’effet sonore préréglé choisi
s’applique à toutes les sources
audio.
40
Page 41

AFFICHAGE DE NIVEAU SONORE
SOURCES EXTERNES
Configurer l’affichage de
niveau sonore
L’affichage de niveau sonore fournit
momentanément une représentation
symbolique du volume et des réglages
audio pendant que vous les ajustez.
Quand vous n’effectuez aucun réglage,
l’affichage de niveau sonore indique le
niveau de la musique de l’autoradio.
Vous pouvez aussi désactiver
l’affichage de niveau sonore.
➮ Appuyez sur la touche MENU 8.
“MENU” s’affiche.
➮ Frappez la touche fi ou % 7
jusqu’à ce que “PEAK LVL”
apparaisse sur l’afficheur.
➮ Appuyez sur la touche @ ou # 7
pour choisir entre “PEAK ON” et
“PEAK OFF”.
Quand vous avez fini vos modifications,
➮ frappez la touche MENU 8 deux
fois.
Sources audio externes
Au lieu d’un changeur de CD, vous
pouvez aussi brancher d’autres sources
audio externes à la sortie de ligne, par
exemple un lecteur CD portable, un
lecteur MiniDisc ou un lecteur MP3.
La sortie AUX doit être activée dans le
menu d'installation.
Pour connecter une source audio
externe, vous aurez besoin d'un câble
adapteur (réf. Blaupunkt 7 607 897 093),
en vente chez tout revendeur Blaupunkt
autorisé.
Allumer/éteindre l’entrée AUX
➮ Appuyez sur la touche MENU 8.
“MENU” s’affiche.
➮ Frappez la touche fi ou % 7
jusqu’à ce que “AUX OFF” ou
“AUX ON” apparaisse sur
l’afficheur.
➮ Appuyez sur la touche # ou @ 7
pour allumer/éteindre AUX.
Quand vous avez fini vos modifications,
➮ appuyez sur la touche MENU 8.
Note:
Si l’entrée AUX est activée, on peut la
sélectionner en pressant la touche
SRC :; elle est indiquée par “AUX
INPUT” sur l’afficheur.
ENGLISH
FRANÇAIS
ESPAÑOL
PORTUGUÊS
41
Page 42

CARACTÉRISTIQUES TECHNIQUES
Amplificateur
Puissance de sortie: 4 × 18W RMS @ 10% THD
Tuner
Plages de fréquences USA:
FM: 87,5 – 107,9 MHz (palier de 200 kHz)
AM: 530 – 1710 kHz (palier de 10 kHz)
Plages de fréquences Europe:
FM: 87,5 – 108 MHz (palier automatique de 100 kHz/manuel de
50 kHz)
MW: 531 – 1602 kHz (palier de 9 kHz)
LW: 153 – 279 kHz (palier automatique de 9 kHz/manuel de
1 kHz)
Plages de fréquences Thaïlande:
FM: 87,5 – 108 MHz (palier automatique de 50 kHz / palier
manuel de 25 kHz)
AM: 531 – 1602 kHz (palier de 9 kHz)
Plages de fréquences Amérique du Sud:
FM: 87,5 – 107,9 MHz (palier automatique de 100 kHz / palier
manuel de 50 kHz)
AM: 530 – 1710 kHz (palier de 10 kHz)
Sensibilité mono FM:
17 dbf
Bande passante FM:
35 - 16.000 Hz
Cassette
Bande passante:
30 - 18.000 Hz
Sortie préampli
4 canaux : 2 V
Sensibilité d’entrée
Entrée AUX: 2 V / 6 kΩ
Sous réserve de modifications!
42
Page 43

LE MÉMO
ENGLISH
FRANÇAIS
ESPAÑOL
PORTUGUÊS
43
Page 44

ELEMENTOS DE MANDO
1 botón para abrir y soltar el
panel de control.
2 Botón para encender y apagar el
equipo para dejarlo en silencio.
3 Regulador del volumen.
4 Pulsación breve: Botón BND,
para seleccionar el banco de
memoria FM y la banda AM,
selección de fuente a modo de
radio.
Pulsación larga: TS, para activar
la función Travelstore.
5 Botón AUDIO, para ajustar los
graves, agudos, el balance y el
fundido, X-Bass, el ecualizador
de sonidos predefinidos.
6 Pulsación breve: botón
visualizar la hora.
Pulsación larga: para cambiar la
prioridad de la pantalla.
7 Bloque de teclas con flechas.
8 Pulsación breve: botón MENU,
para abrir el menú de ajustes
básicos.
Pulsación larga: SCAN, para
iniciar la función de exploración.
9 Teclas 1 - 6
: Botón SRC, para seleccionar las
fuentes de cassette, radio y
cargador de CD (AUX).
; Botón Eject 0 (sólo visible tras
abatir el panel de control).
, para
44
Page 45

Indicaciones y accesorios...... 46
Seguridad durante la conducción .. 46
Instalación ..................................... 46
Accesorios .................................... 46
Información telefónica internacional ..
Panel de control desmontable ..
Protección antirrobo ...................... 47
Separación del panel de control .... 47
Colocación del panel de control .... 47
Programador de apagado .............. 48
46
47
Encendido/apagado .............. 48
Ajuste del volumen ................ 49
Ajuste del volumen power-on ......... 49
Reducción instantánea del
volumen (mute) .............................. 50
Silencio durante las llamadas
telefónicas ..................................... 50
Pitido de confirmación ................... 50
Modo de radio ........................ 51
Activación del modo de radio ......... 51
Ajuste del sintonizador ................... 51
Selección de la frecuencia/
banco de memoria ......................... 51
Sintonizar emisoras ....................... 51
Ajuste de la sensibilidad para la
sintonización de búsqueda de
emisoras ....................................... 51
Memorización de las emisoras ....... 52
Memorización automática
(Travelstore) .................................. 52
Escuchar emisoras presintonizadas ..
Exploración de emisoras con
posibilidad de recepción (SCAN)
Ajuste del tiempo de exploración ... 53
Ajustes del visor ............................ 53
52
....... 52
MODO DE CASSETE .............. 53
Reproducción de cintas de cassette ..
Expulsión de la cinta ...................... 53
Cambio de la dirección de
reproducción ................................. 54
Saltar pistas (S-CPS) .................... 54
Reproducción de una pista
repetidamente ............................... 54
Muestreo de todas las pistas de
una cinta de cassette (SCAN) ....... 54
Rebobinado rápido ........................ 54
53
CONTENIDOS
Pausa durante la reproducción ...... 55
Activación/desactivación de Radio
Monitor ......................................... 55
Salto de cinta en blanco ................ 55
Selección del tipo de cinta ............. 55
Reducción de ruidos Dolby* B ....... 55
Cambio del visor ........................... 56
Cambio a modo de cargador
de CD ..................................... 56
Cambio a modo de cargador de CD .. 56
Selección de un CD ...................... 56
Selección de las pistas .................. 56
Búsqueda rápida (audible) ............. 56
Cambio del visor ........................... 57
Repetición de pistas individuales o
directorios completos (REPEAT) .... 57
Reproducción aleatoria (MIX) ........ 57
Exploración de todas las pistas de
todos los discos (SCAN) ............... 57
Pausa en la reproducción (PAUSE).... 57
RELOJ - Hora .......................... 58
Visualización de la hora.................. 58
Ajuste del reloj............................... 58
Selección de modo de reloj
12/24 horas .................................. 58
Visualización continua de la hora con el
aparato apagado y el encendido en ON ..
Breve visualización de la hora
con el aparato apagado ................. 58
DISTRIBUCIÓN DE TONO Y
VOLUMEN ............................... 59
Ajuste de graves............................ 59
Ajuste de agudos .......................... 59
Ajuste de la distribución de volumen
a derecha/izquierda (balance) ........ 59
Ajuste de la distribución de volumen
delante/detrás (fader) .................... 59
Ecualizador y X-BASS ............ 60
X-BASS ........................................ 60
Selección de efecto de sonido
preseleccionado (EQ) .....................
Ajustes del visor de nivel ....... 61
Fuentes externas de audio .... 61
Encendido/apagado de la entrada AUX ..
Datos técnicos ....................... 62
58
60
61
45
ENGLISH
FRANÇAIS
ESPAÑOL
PORTUGUÊS
Page 46

INDICACIONES Y ACCESORIOS
Muchas gracias por haberse decidido
por un producto de la marca Blaupunkt.
Esperamos que disfrute de su nuevo
equipo.
Antes de usarlo, lea detenidamente el
manual de instrucciones. Los
redactores de Blaupunkt han puesto
todo su empeño en crear un manual de
instrucciones claro y comprensible. No
obstante, si tiene alguna duda, póngase
en contacto con su proveedor o llame
a la línea de atención al cliente de su
país. El número de teléfono lo
encontrará al final de este manual.
Seguridad durante la conducción
¡La seguridad vial tiene prioridad
absoluta! Maneje su equipo de radio
únicamente si la situación del tráfico
lo permite. Familiarícese con él y con
la forma de manejarlo antes de
comenzar el viaje.
Las señales de alarma de la policía,
de los bomberos o de los equipos
de salvamento han de poder
escucharse a tiempo dentro del
vehículo. Por ello, escuche su
programa a un volumen moderado
cuando esté circulando.
Instalación
Si Vd. mismo desea realizar la instalación de su radio, lea las instrucciones
de instalación y conexión que se encuentran al final de este manual.
Accesorios
Utilice únicamente accesorios autorizados por Blaupunkt.
Controles en el volante
Puede acceder a las funciones más
46
importantes de su radio desde el volante
a través del RC08 o RC10 opcionales.
De forma alternative, disfrute del acceso
a estas funciones desde cualquier parte
del vehículo a través del RC-12H
opcional.
Amplificador
Se pueden utilizar todos los
amplificadores Blaupunkt y Velocity.
Cargador de CD
Se pueden conectar al equipo todos los
cargadores Blaupunkt CDC A 08, IDC
A09 y CDC A03.
Compact Drive MP3
Como alternativa al cargador de CD,
puede conectar un Compact Drive MP3
para escuchar música en formato MP3.
Si conecta un Compact Drive MP3, en
primer lugar deberá utilizar un
ordenador para guardar las pistas de
música en MP3 en el disco duro
Microdrive™ en el interior del Compact
Drive MP3. Entonces, cuando se
conecte el Compact Drive MP3 a la
radio del vehículo, podrá escuchar la
música como las pistas de un CD
normal. El Compact Drive MP3 se utiliza
del mismo modo que un cargador de
CD. La mayor parte de las funciones
del cargador de CD también pueden
utilizarse con el Compact Drive MP3.
Información telefónica internacional
Si desea realizar alguna consulta en
relación con su aparato de radio o si
necesita información adicional, no dude
en llamarnos!
Los números de información están
impresos en la última página de estas
instrucciones.
Page 47

PANEL DE CONTROL DESMONTABLE
Panel de control desmontable
Protección antirrobo
Para proteger su equipo contra el robo,
se ha equipado con un panel de control
desmontable. Sin este panel de control,
el aparato de radio no tiene ningún valor
para los ladrones.
Proteja su equipo contra los robos
llevándose el panel de control con usted
cuando abandone el vehículo. No deje
el panel de control en el vehículo,
aunque lo oculte.
El panel de control es de fácil utilización.
Nota:
● No deje caer el panel de control.
● No deje el panel de control
expuesto a la luz solar directa u
otras fuentes de calor.
● Evite el contacto directo de la piel
con los contactos del panel de
control. Si es necesario, limpie los
contactos con un paño sin pelusa y
alcohol.
Separación del panel de control
➮ Pulse el botón 1.
Se abre el mecanismo de bloque del
panel de control.
➮ Separe el panel de control sin
inclinarlo, sujetando su lado
derecho.
Nota:
● El equipo sólo puede apagarse tras
unos segundos, dependiendo del
ajuste “OFF TIMER” en el MENÚ,
según se describe más adelante.
● Se guardan todos los ajustes
actuales de la radio.
● El Cassette ya introducido en el
equipo permanece en el interior.
Colocación del panel de control
Existen diferentes formas de colocar el
panel de control, pero se recomienda
el método siguiente:
➮ Sujete el panel de control
perpendicular a la unidad.
➮ Deslice el panel de control en las
guías de la unidad, situadas los lados
inferiores derecho e izquierdo,
hasta que encaje en su posición.
➮ Tire suavemente del panel de
control hacia arriba hasta que
encaje en su posición.
2
Nota:
● Al colocar el panel de control,
asegúrese de no presionar sobre
el visor.
Si el equipo estaba todavía encendido
cuando retiró el panel de control por
última vez, se encenderá
automáticamente con los últimos ajustes
activados, es decir, radio, Cassette o
cargador de CD (AUX), cuando vuelva
a colocar el panel de control.
1
47
ENGLISH
FRANÇAIS
ESPAÑOL
PORTUGUÊS
Page 48

PANEL DE CONTROL DESMONTABLE
ENCENDIDO/APAGADO
Programador de apagado
Una vez abierto el panel de control, la
unidad se apagará tras un tiempo
predefinido entre 0 a 30 segundos.
➮ Pulse el botón MENU 8.
➮ Pulse el botón fi 7 dos veces
para visualizar “OFF TIMER”.
➮ Seleccione el tiempo utilizando los
botones @ o # 7.
Cuando haya terminado de realizar los
cambios,
➮ pulse el botón MENU 8 dos
veces.
Nota:
● Si se pone OFF TIMER en 0
segundos, la unidad se apaga
automáticamente tras abrirse el
panel de control.
48
Encendido/apagado
Existen varios modos de encender/
apagar el equipo:
Encendido/apagado con el
encendido del vehículo
Si el equipo está conectado
correctamente al encendido del
vehículo y no se ha apagado utilizando
el botón ON/OFF 2, se encenderá/
apagará de forma simultánea con el
encendido del vehículo.
Encendido/apagado utilizando el
panel de control desmontable
➮ Retire el panel de control.
La unidad se apaga.
Se prevé un retardo en el apagado si el
ajuste “OFF TIMER” está en “0”.
➮ Coloque de nuevo el panel de
control.
La unidad se enciende. Se reactivan los
últimos ajustes (radio, Cassette,
cargador de CD o AUX).
Encendido/apagado utilizando el
botón 2
➮ Para encender pulse el botón 2.
➮ Para apagar el equipo, pulse el
botón 2 durante más de dos
segundo.
La unidad se apaga.
Nota:
● Si enciende la unidad con el
encendido del vehículo en OFF,
este equipo se apagará
automáticamente después de una
hora, para evitar que se agote la
batería del vehículo.
Page 49

ENCENDIDO/APAGADO AJUSTE DEL VOLUMEN
Encendido al introducir un cassette
Si el equipo está apagado y no hay un
cassette introducido en la unidad,
➮ pulse el botón 1.
Se abre el panel de control.
➮ Introduzca suavemente la cinta en
la ranura para cassette con el lado
abierto hacia la derecha.
➮ Cierre el panel de control.
El aparato se enciende y comienza a
reproducirse el lado colocado hacia
arriba.
Nota:
● El aparato permanecerá apagado
si el encendido está en OFF: Para
encenderlo pulse el botón 2.
Ajuste del volumen
El volumen se puede ajustar en pasos
de 0 (mute) a 66 (máximo).
Para subir el volumen,
➮ gire el mando del volumen 3 en
la dirección de las agujas del reloj.
Para bajar el volumen,
➮ gire el mando del volumen 3 en
la dirección opuesta a las agujas
del reloj.
Ajuste del volumen power-on
Puede ajustar el volumen power-on por
defecto en la unidad.
➮ Pulse el botón MENU 8.
➮ Mantenga pulsado el botón fi o %
7 hasta que se muestre “ON
VOLUME” en el visor.
➮ Ajuste el volumen power-on
utilizando los botones @ y # 7.
Para ayudarle a realizar el ajuste con
mayor facilidad, el volumen subirá /
bajará según usted realice los cambios.
Si selecciona “LAST VOL”, se reactivará
el volumen utilizado antes de apagar el
equipo por última vez.
Nota:
● Para proteger sus oídos, el volumen
power-on máximo bajo el ajuste
“LAST VOL” es “38”. Si el volumen
era más alto antes de apagar el
equipo y se ha seleccionado “LAST
VOL”, el volumen se ajustará en “38”
la próxima vez que encienda el
equipo.
ENGLISH
FRANÇAIS
ESPAÑOL
PORTUGUÊS
49
Page 50

ADJUSTING THE VOLUME
Cuando haya terminado de realizar los
cambios,
➮ pulse el botón MENU 8 dos veces.
Reducción instantánea del
volumen (mute)
Se puede reducir de forma instantánea
el volumen (mute) a un nivel
preseleccionado por el usuario.
➮ Pulse brevemente el botón 2.
Se muestra “MUTE” en el visor.
Para recuperar el volumen,
➮ pulse el botón 2 de nuevo.
Ajuste del nivel de silencio
Puede ajustar el volumen de silencio de
la unidad.
➮ Pulse el botón MENU 8.
➮ Mantenga pulsado el botón fi o %
7 hasta que se muestre “MUTE
LVL” en el visor.
➮ Seleccione el nivel de silencio
utilizando los botones @ y # 7.
Cuando haya terminado de realizar los
cambios,
➮ pulse el botón MENU 8 dos
veces.
Es necesario que el teléfono móvil esté
conectado al equipo de audio, según
se describe en las instrucciones de
instalación.
El volumen se reducirá al nivel de
silencio configurado.
Pitido de confirmación
Para algunas funciones, podrá oír un
pitido de confirmación si mantiene
pulsado un botón durante más de dos
segundos. Por ejemplo, tras memorizar
una emisora de radio, oirá un pitido de
confirmación. Este sonido puede
activarse o desactivarse.
➮ Pulse el botón MENU 8.
➮ Mantenga pulsado el botón % o fi
7 hasta que se muestre “BEEP”
en el visor.
➮ Utilice los botones @ y # 7 para
cambiar entre las dos opciones.
“OFF” significa apagado, “ON” significa
que el pitido está activado.
➮ Pulse el botón MENU 8.
Silencio durante las llamadas
telefónicas
Si su equipo está conectado a un
teléfono móvil, quedará en silencio
cuando conteste al teléfono. Se muestra
“PHONE” en el visor.
50
Page 51

MODO DE RADIO
Modo de radio
Activación del modo de radio
Si está escuchando un Cassette, o está
en el modo de cargador de CD (AUX),
➮ pulse el botón BND-TS 4
o
➮ mantenga pulsado el botón SRC
: hasta que se muestre “FM” o
“AM” (“MW”) en el visor.
Ajuste del sintonizador
Para garantizar un perfecto
funcionamiento de la radio, el equipo
debe estar sintonizado para la región
en la que se encuentre. Puede elegir
entre Europa (EUROPE), Estados
Unidos (USA), Tailandia (THAI) y
Sudamérica (S-AMERICA). El
sintonizador se entrega de fábrica
configurado para la región en la que se
ha vendido. Si encuentra algún
problema con la recepción de radio,
compruebe este ajuste.
➮ Pulse el botón MENU 8.
➮ Pulse el botón fi 7 repetidamente
hasta que se muestre “TUNER” en
el visor.
➮ Mantenga pulsado el botón @ o
7 hasta que aparezca la región
deseada en el visor.
Cuando haya terminado de realizar los
cambios,
➮ pulse el botón MENU 8 dos
veces.
#
Selección de la frecuencia/
banco de memoria
Este equipo puede recibir programas
emitidos en FM, AW (MW) y LM. Hay
dos bancos de memorias
presintonizadas para FM, uno para AM
(MW) y uno para LW. Se pueden
memorizar seis emisoras en cada
banco de memoria.
Nota:
● LW no está disponible para los
ajustes de sintonizador “USA” y
“THAI”.
Selección del nivel de memoria FM o
de la frecuencia AM (MW) y LW
respectivamente
➮ Mantenga pulsado el botón BND-
TS 4 para cambiar entre los
niveles de memoria de FM (FM1,
FM2 y FMT) y la frecuencia AM
(MW) y LW, respectivamente.
Sintonizar emisoras
Existen varias posibilidades de sintonizar emisoras.
Sintonización automática
➮ Pulse el botón fi o % 7.
La radio sintoniza la primera emisora
que tenga suficiente intensidad.
Ajuste de la sensibilidad para la
sintonización de búsqueda de
emisoras
Puede elegir entre la sintonización de
emisoras de señal potente o sintonizar
aquellas con una recepción débil.
➮ Pulse el botón MENU 8.
ENGLISH
FRANÇAIS
ESPAÑOL
PORTUGUÊS
51
Page 52

MODO DE RADIO
➮ Mantenga pulsado el botónfi o %
7 hasta que se muestre “SENS
HI” o “SENS LO” en el visor.
“SENS HI” significa que el sintonizador
tiene una alta sensibilidad. “SENS LO”
significa que el ajuste de sensibilidad
es el más bajo.
➮ Seleccione la sensibilidad deseada
utilizando los botones @ o # 7.
Cuando haya terminado de realizar los
cambios,
➮ pulse el botón MENU 8.
Nota:
● Se pueden seleccionar por
separado diferentes sensibilidades
de exploración para FM y AM
(incluido LW), respectivamente.
Sintonización manual de las emisoras
También se pueden sintonizar las
emisoras manualmente.
➮ Pulse el botón @ o # 7.
Memorización de las emisoras
Memorización manual de las
estaciones
➮ Seleccione el banco de memoria
deseado (FM1, FM2 o FMT) o la
banda AM (MW) o LW,
respectivamente.
➮ Sintonice la emisora.
➮ Pulse uno de los botones de
emisora 1 - 6 9 durante más de
dos segundos para memorizar la
emisora en la memoria.
Memorización automática
(Travelstore)
Puede memorizar automáticamente las
seis emisoras con la señal de recepción
más potente en la región. Las emisoras
se memorizan en la memoria FMT, AM
(MW) o LW dependiendo de la
frecuencia seleccionada.
Nota:
● Las emisoras que ya estén memo-
rizadas en ese nivel se borran.
➮ Mantenga pulsado el botón BND-
TS 4 hasta que comience la
búsqueda.
Comienza el procedimiento de
memorización de emisoras. Se muestra
“TSTORE” en el visor. Una vez completado
el proceso, se escuchará la emisora que
se haya memorizado en la ubicación 1 de
nivel de memoria respectivo.
Escuchar emisoras
presintonizadas
➮ Seleccione el nivel de memoria en
el que se ha memorizado la
emisora.
➮ Pulse el botón de emisora
preseleccionada 1 - 6 9 de la
emisora que desee escuchar.
Exploración de emisoras con
posibilidad de recepción (SCAN)
Puede escuchar brevemente todas las
emisoras con señal de recepción
activando la función de exploración. El
tiempo de exploración se puede
seleccionar en el menú entre 5 y 30
segundos.
52
Page 53

MODO DE RADIO
MODO DE CASSETE
Inició de SCAN (exploración)
➮ Pulse el botón MENU 8 durante
más de dos segundos.
Comienza el proceso de exploración.
Se mostrará brevemente “SCAN” en el
visor seguido por la frecuencia actual,
parpadeando.
Final de la exploración y continuar
escuchando una emisora
➮ Pulse el botón MENU 8.
Una vez completado el proceso de
exploración, permanece activa la última
emisora explorada.
Ajuste del tiempo de exploración
➮ Pulse el botón MENU 8.
➮ Mantenga pulsado el botón fi 7
hasta que se muestre “SCAN
TIME” en el visor.
➮ Utilice los botones @# 7 para
ajustar el tiempo de exploración
deseado.
Cuando haya terminado de realizar los
cambios,
➮ pulse el botón MENU 8 dos veces.
Nota:
●
El tiempo de exploración seleccionada
también se aplica al modo de Cassette
y al de cargador de CD.
Ajustes del visor
Puede elegir la visualización continua
de uno de los siguientes:
● Tiempo
● Frecuencia
➮ Mantenga pulsado el botón DIS
6 hasta que se muestre en el
visor la pantalla deseada.
Funcionamiento del
cassette
Reproducción de cintas de
cassette
● Si no hay ningún cassette
introducido en el aparato
➮ Pulse el botón 1.
Se abre el panel.
➮ Introduzca la cinta en la ranura para
cassette con el lado abierto a la
derecha.
➮ Cierre la unidad de control.
Se comenzará a escuchar el cassette
en la cara situada hacia arriba.
● Si ya hay un cassette introducido y
está en el modo de Radio o de
Cargador de CD (AUX).
➮ Pulse el botón SRC : hasta que
se muestre “CASSETTE” en el
visor.
La cinta de cassette se reproduce en la
dirección seleccionada por última vez.
Expulsión de la cinta
➮ Pulse el botón 1.
Se abre el panel.
➮ Pulse el botón 0 ; situado junto a
la ranura del cassette
➮ Introduzca una nueva cinta de
cassette.
o
➮ Introduzca una nueva cinta de
cassette y cierre el panel.
53
ENGLISH
FRANÇAIS
ESPAÑOL
PORTUGUÊS
Page 54

MODO DE CASSETE
Cambio de la dirección de
reproducción
Para cambiar entre CARA A y CARA B
➮ Pulse el botón 2 %fi 9.
Nota:
● Al final de la cinta, se invierte
automáticamente la dirección de
reproducción (auto-reverse).
Saltar pistas (S-CPS)
Para saltar a la pista siguiente u otra
posterior
➮ Pulsa el botón % 7 uno o más
veces.
Se mostrará en el visor “CPS FF” y el
número de pistas ya omitidas. La cinta
avanza rápidamente hasta la siguiente
pista o hasta la pista posterior elegida.
Para salta cintas hacia atrás
➮ Pulsa el botón fi 7 uno o más
veces.
Se mostrará en el visor “CPS FR” y el
número de pistas ya omitidas. La cinta
se rebobina hasta el inicio de la pista
actual o el inicio de la pista deseada.
Reproducción de una pista
repetidamente
➮ Pulse el botón 4 RPT 9.
Se repite la pista actual. Se muestra
RPT en el visor. Mientras la cinta se está
rebobinando tras su finalización, se
muestra “RPT TRCK” en el visor.
Para detener la repetición de la pista
➮ Pulse el botón 4 RPT 9 de nuevo.
La reproducción continúa en el modo
normal. Desaparece RPT del visor.
54
Muestreo de todas las pistas de
una cinta de cassette (SCAN)
➮ Mantenga pulsado el botón MENU
8 durante más de dos segundos.
Se muestra “CAS SCAN” en el visor.
Se reproducen en orden ascendente
muestras de todos las pistas de la cinta.
Para detener la exploración
➮ Pulse el botón MENU 8 una
segunda vez.
Se continuará reproduciendo la pista
que se esté explorando en ese
momento.
Nota:
● Se puede ajustar la duración de la
exploración. Consulte la sección
“Ajuste del tiempo de exploración”,
bajo “Modo de radio”.
● Para utilizar las funciones S-CPS,
RPT y SCAN, debe existir una
pausa no inferior a tres segundos
entre las pistas de la cinta de
cassette.
Rebobinado rápido
Avance rápido
➮ Pulse el botón # 7.
Se muestra “FORWARD” en el visor.
Rebobinado rápido
➮ Pulse el botón @ 7.
Se muestra “REWIND” en el visor.
Parada del rebobinado rápido
➮ Pulse la flecha opuesta del botón
7.
Continúa la reproducción.
Page 55

MODO DE CASSETE
Nota:
● Durante el rebobinado rápido de la
cinta, se puede escuchar la última
emisora de radio sintonizada. Esto
requiere que la función “Radio
monitor” esté activa.
Pausa durante la reproducción
Para interrumpir la reproducción de una
cinta
➮ Pulse el botón 3 E 9.
Se interrumpe la reproducción y se
muestra “PAUSE” en el visor.
➮ Pulse el botón 3 E 9 de nuevo
para reanudar la reproducción.
Activación/desactivación de
Radio Monitor
Nota:
● La función Radio Monitor sólo se
puede seleccionar si se está
reproduciendo una cinta de cassette.
➮ Pulse el botón MENU 8.
➮ Pulse el botón % o fi 7 hasta que
se muestren “RM ON” o “RM OFF”
en el visor.
➮ Pulse el botón # o @ 7 para
cambiar activar y desactivar Radio
Monitor.
Cuando haya terminado de realizar los
cambios,
➮ pulse el botón MENU 8.
Salto de cinta en blanco
Se pueden saltar automáticamente las
secciones en blanco de una cinta de
una duración superior a 10 segundos.
Esto requiere que la función BLANK
SKIP esté activada.
Nota:
● La función Blank Skip sólo se puede
seleccionar si se está reproduciendo
una cinta de cassette.
Activación/desactivación de la
función Blank Skip
➮ Pulse el botón MENU 8.
➮ Pulse el botón % o fi 7 hasta que
se muestre “BLK SKIP” en el visor.
➮ Pulse el botón # o @ 7 para
activar y desactivar Blank Skip.
Cuando haya terminado de realizar los
cambios,
➮ pulse el botón MENU 8 dos veces.
Selección del tipo de cinta
Si está reproduciendo una cinta de tipo
Metal o CrO2, ajuste el selector de tipo
de cinta a “METAL ON”.
Para seleccionar el tipo de cinta
➮ Pulse el botón 1 MTL 9.
Se mostrará “METAL ON” o “METAL
OFF” brevemente en el visor.
Reducción de ruidos Dolby* B
Active la función Dolby para la
reproducción de cintas grabadas
utilizando el proceso Dolby B.
➮ Pulse el botón 6 9.
Se muestra “DOLBY ON” en la pantalla.
Cuando la función Dolby está activa, se
muestra
en el visor.
➮ Para desactivar la function Dolby,
pulse el botón 6
*Sistema de reducción de ruidos fabricado
bajo licencia de Dolby Laboratories. Dolby y
el símbolo Doble D son marcas comerciales
de Dolby Laboratories.
9 de nuevo.
55
ENGLISH
FRANÇAIS
ESPAÑOL
PORTUGUÊS
Page 56

MODO DE CASSETE
CAMBIO A MODO DE CARGADOR DE CD
Cambio del visor
Durante la reproducción de un
cassette, puede elegir una de las
siguientes opciones de visualización
de la pantalla:
● Sólo la cara que se está
reproduciendo, por ejemplo,
“CARA A”,
o
● Incluir el reloj como parte de la
pantalla.
➮ Para mostrar la pantalla en un
modo diferente al actual, mantenga
pulsado el botón
que cambie la pantalla.
DIS 6 hasta
Cambio a modo de
cargador de CD
Nota:
● La información para el manejo de
CDs, introducción de CDs y
funcionamiento del cargador de
CDs se puede encontrar en las
instrucciones de utilización que se
incluyen con el cargador de CDs.
Cambio a modo de cargador de
CD
➮ Pulse el botón SRC :
repetidamente hasta que se
muestre “CHANGER”.
La reproducción se reanudará donde se
haya detenido anteriormente hasta que
cambie la pantalla.
Selección de un CD
➮ Pasar subir/bajar de un CD a otro,
pulse el botón % o fi 7 una o
varias veces.
➮ En el proceso de selección, se
saltarán las ranuras vacías en el
cargador de CD.
56
Selección de las pistas
➮ Para subir/bajar de una pista a otra
en el CD actual, pulse el botón # o
@ 7 una vez o varias veces.
Búsqueda rápida (audible)
Para la búsqueda rápida adelante o
atrás,
➮ mantenga pulsado uno de los
botones @ # 7 hasta que
comience al búsqueda rápida
adelante/atrás.
Page 57

CAMBIO A MODO DE CARGADOR DE CD
Cambio del visor
Se dispone de 5 opciones:
● Número de pista y tiempo de
reproducción
● Número de pista y reloj
● Número de CD y número de pista
● Número de CD y reloj
● Número de CD y tiempo de
reproducción
➮ Pulse el botón 6 una o varias veces
más de dos segundos hasta que
aparezca la visualización deseada.
Repetición de pistas individuales
o directorios completos (REPEAT)
➮ Si desea repetir la pista actual, pulse
brevemente el botón 4 RPT 9.
Se mostrará “RPT TRCK” brevemente en
el visor y se iluminará el símbolo RPT.
➮ Si desea repetir el CD actual, pulse
el botón 4 RPT 9 más de dos
segundos.
Se mostrará “RPT DISC” brevemente en
el visor y se iluminará el símbolo RPT.
Cancelación de repetición
➮ Si desea detener la función de
repetición para la pista o CD actuales,
pulse el botón 4 RPT 9 brevemente
y se mostrará “RPT OFF” en el visor,
desapareciendo RPT.
Reproducción aleatoria (MIX)
➮ Para reproducir todas las pistas del
CD actual en orden aleatorio, pulse
brevemente el botón 5 MIX 9.
Se mostrará “MIX CD” brevemente en
el visor y se iluminará el símbolo MIX.
➮ Para reproducir las pistas de todos
los CDs introducidos en orden
aleatorio, pulse el botón 5 MIX 9
más de dos segundos.
Se mostrará “MIX ALL” brevemente en
el visor y se iluminará el símbolo MIX.
Parada de MIX
➮ Pulse el botón 5 MIX 9
brevemente y se mostrará “MIX
OFF” brevemente en el visor y
desaparecerá MIX.
Exploración de todas las pistas
de todos los discos (SCAN)
➮ Para reproducir brevemente todas
las pistas de todos los CDs
introducidos en orden ascendente,
pulse el botón MENU 8 durante
más de dos segundos.
Aparecerá “TRK SCAN” brevemente y
parpadeará el número de pista del CD
que se está explorando.
Detención de SCAN
➮ Para detener la exploración pulse
el botón MENU 8.
Se continuará reproduciendo la pista
actual.
Nota:
● Se puede seleccionar el tiempo de
exploración. Para más detalles, lea
la sección titulada “Ajuste del
tiempo de exploración” en el
capítulo “Modo de radio”.
Pausa en la reproducción (PAUSE)
➮ Pulse el botón 3
Se muestra “PAUSE” en el visor.
Cancelación de la pausa
➮ Pulse el botón 3
modo de pausa.
Se continúa la reproducción.
EE
E 9.
EE
EE
E 9 en el
EE
57
ENGLISH
FRANÇAIS
ESPAÑOL
PORTUGUÊS
Page 58

RELOJ - HORA
RELOJ - Hora
Visualización de la hora
Para visualizar la hora,
➮ pulse brevemente el botón 6.
Ajuste del reloj
➮ Pulse el botón MENU 8.
➮ Mantenga pulsado el botón fi o %
7 hasta que se muestre “CLOCK
SET” en el visor.
➮ Pulse el botón # 7.
Se muestra la hora en el visor. Pueden
ajustarse los minutos, que ahora
parpadean.
➮ Ajuste los minutos utilizando los
botones %/fi 7.
Cuando haya seleccionada los minutos,
➮ pulse el botón @ 7.
Parpadean las horas.
➮ Ajuste las horas utilizando los
botones %/fi 7.
Cuando haya terminado de realizar los
cambios,
➮ pulse el botón MENU 8 dos veces.
Selección de modo de reloj
12/24 horas
➮ Pulse el botón MENU 8.
➮ Mantenga pulsado el botón % o fi
7 has que se muestre en el visor
“12H MODE” o “24H MODE”.
➮ Pulse el botón @ o # 7 para
cambiar entre los modos.
Cuando haya terminado de realizar los
cambios,
➮ pulse el botón MENU 8.
Visualización continua de la
hora con el aparato apagado y el
encendido en ON
El ajuste “CLOCK ON” del menú le
permite visualizar el reloj de forma
continua cuando el equipo está
apagado y el encendido del vehículo en
ON,
➮ pulse el botón MENU 8.
➮ Mantenga pulsado el botón % o fi
7 hasta que se muestre “CLOCK
OFF” o “CLOCK ON” en el visor.
➮ Pulse el botón @ o # 7 para
cambiar entre ON/OFF.
Cuando haya terminado de realizar los
cambios,
➮ pulse el botón MENU 8.
Breve visualización de la hora
con el aparato apagado
Para visualizar la hora con el aparato
apagado,
➮ pulse el botón /DIS 6.
Se visualiza la hora durante ocho
segundos.
58
Page 59

DISTRIBUCIÓN DE TONO Y VOLUMEN
Balance de tono y volumen
Puede regular los ajustes de tono
(graves y agudos) para cada fuente por
separado (radio, cassette, cargador de
CD y AUX). Los ajustes de distribución
de volumen se aplican a todas las
fuente de audio.
Ajuste de graves
➮ Pulse el botón AUDIO 5.
Se muestra “BASS” en el visor.
➮ Pulse el botón fi o % 7 para
ajustar los graves.
➮ Pulse el botón AUDIO 5 cuando
haya completado el ajuste.
Ajuste de agudos
➮ Pulse el botón AUDIO 5.
Se muestra “BASS” en el visor.
➮ Pulse el botón # 7
repetidamente hasta que se
muestre “TREB” en el visor.
➮ Pulse el botón fi o % 7 para
ajustar los agudos.
➮ Pulse el botón AUDIO 5 cuando
haya completado el ajuste.
Ajuste de la distribución de
volumen a derecha/izquierda
(balance)
➮ Para ajustar el volumen al lado
derecho/izquierdo (balance), pulse
el botón AUDIO 5
Se muestra “BASS” en el visor.
➮ Pulse el botón # 7
repetidamente hasta que se
muestre “BAL” en el visor.
➮ Pulse el botón fi o % 7 para
ajustar el balance (derecha/
izquierda).
➮ Pulse el botón AUDIO 5 cuando
haya completado el ajuste.
Ajuste de la distribución de
volumen delante/detrás (fader)
➮ Para ajustar el volumen al lado
derecho/izquierdo (balance), pulse
el botón AUDIO 5
Se muestra “BASS” en el visor.
➮ Pulse el botón # 7
repetidamente hasta que se
muestre “FADER” en el visor.
➮ Pulse el botón fi o % 7 para
ajustar la distribución de volumen
(delante/detrás).
➮ Pulse el botón AUDIO 5 cuando
haya completado el ajuste.
ENGLISH
FRANÇAIS
ESPAÑOL
PORTUGUÊS
59
Page 60

ECUALIZADOR Y X-BASS
Ecualizador y X-BASS
X-BASS
X-Bass significa incremento de los
graves con volúmenes bajos.
Nota:
● X-BASS se puede ajustar por
separado para cada fuente de
audio (radio, Cassette, cargador de
CD y AUX).
➮ Para el ajuste de X-BASS, pulse el
botón AUDIO 5.
Se muestra “BASS” en el visor.
➮ Pulse el botón # 7
repetidamente hasta que se
muestre “XBASS ON” o “XBASS
OFF” en el visor.
➮ Pulse el botón fi
elegir entre “XBASS ON” y
“XBASS OFF”.
➮ Pulse el botón AUDIO 5 cuando
haya completado el ajuste.
o
% 7 para
Selección de efecto de sonido
preseleccionado (EQ)
Puede seleccionar un efecto de sonido
para los siguientes estilos de música:
● ROCK
● POP
● CLASICA
Los ajuste para estos estilos de música
han sido programados.
Para seleccionar uno de ellos,
➮ pulse el botón AUDIO 5.
Se muestra “BASS” en el visor.
➮ Pulse el botón # 7
repetidamente hasta que aparezca
una de las opciones de sonido en
el visor.
➮ Pulse el botón fi
cambiar entre los efectos.
Si desea desactivar esta función,
o
% 7 para
➮ elija “EQ OFF” de las opciones
disponibles.
➮ Pulse el botón AUDIO 5 cuando
haya completado el ajuste.
Nota:
● El efecto de sonido predefinido
seleccionado se aplica a todas las
fuentes de audio.
60
Page 61

VISUALIZACIÓN DE NIVEL
FUENTES EXTERNAS
Ajustes del visor de nivel
El visor de nivel le proporciona una
pantalla simbólica del volumen y de los
ajustes del control de audio mientras
usted los está seleccionando.
Cuando no está realizando ningún
ajuste, la pantalla indicará el nivel de
música de la radio.
También puede la pantalla de nivel de
música.
➮ Pulse el botón MENU 8.
Se muestra “MENU” en el visor.
➮ Pulse el botón fi
repetidamente hasta que se
muestre “PEAK LVL” en el visor.
➮ Pulse el botón @
cambiar entre “PEAK ON” y “PEAK
OFF”.
Cuando haya terminado de realizar los
cambios,
➮ pulse el botón MENU 8 dos
veces.
o
% 7
o
# 7 para
Fuentes externas de audio
En lugar del cargador de CD también
se pueden conectar otras fuentes de
audio externas a la salida de línea.
Estas fuentes pueden incluir un
reproductor de CD portátil, reproductor
MiniDisc o reproductor MP3.
Debe activarse la salida AUX en el
menú de instalación.
Para conectar una fuente de audio
externa necesitará un cable adaptador
(Blaupunkt no.: 7 607 897 093), que
puede adquirir en su distribuidor
Blaupunkt autorizado.
Encendido/apagado de la
entrada AUX
➮ Pulse el botón MENU 8.
Se muestra “MENU” en el visor.
➮ Pulse el botón fi o % 7
repetidamente hasta que se
muestre “AUX OFF” o “AUX ON”
en el visor.
➮ Pulse el botón @ o # 7 para
cambiar activar y desactivar AUX.
Cuando haya terminado de realizar los
cambios,
➮ pulse el botón MENU 8.
Nota:
Si la entrada AUX está activada, se
puede seleccionar pulsando el botón
SRC : y se muestra “AUX INPUT”
en el visor.
ENGLISH
FRANÇAIS
ESPAÑOL
PORTUGUÊS
61
Page 62

DATOS TÉCNICOS
Amplificador
Potencia de salida: 4 × 18W RMS @ 10% THD
Sintonizador
Frecuencias en USA:
FM: 87,5 – 107,9 MHz (paso de 200 kHz)
AM: 530 – 1710 kHz (paso de 10 kHz)
Frecuencias en Europa:
FM: 87,5 – 108 MHz (paso de 100 kHz auto/50 kHz manual)
MW: 531 – 1602 kHz (paso de 9 kHz)
LW: 153 – 279 kHz (paso de 9 kHz auto/1 kHz manual)
Frecuencias en Tailandia:
FM: 87,5 – 108 MHz (paso de 50 kHz auto/25 kHz manual)
AM: 531 – 1602 kHz (paso de 9 kHz)
Frecuencias en Sudamérica:
FM: 87,5 – 107,9 MHz (paso de 100 kHz auto/50 kHz manual)
AM: 530 – 1710 kHz (paso de 10 kHz)
Sensibilidad FM mono:
17 dbf
Respuesta FM:
35 - 16.000 Hz
Cassette
Respuesta:
30 - 18.000 Hz
Salida preamplificación
4 caneles: 2 V
Sensibilidad de entrada
Entrada AUX: 2 V / 6 kΩ
¡Salvo modificaciones!
62
Page 63

EL MEMORÁNDUM
ENGLISH
FRANÇAIS
ESPAÑOL
PORTUGUÊS
63
Page 64

ELEMENTOS DE COMANDO
1 Tecla para abrir e soltar o
painel de comandos.
2 Tecla para ligar e desligar o
aparelho e para desligar o som
do aparelho.
3 Regulador do volume.
4 Pressão breve: a tecla BND,
para seleccionar o banco de
memória FM e a banda de
ondas AM, selecção do modo
rádio.
Pressão longa: TS, para iniciar a
função de memorização
automática de estações
(Travelstore).
5 Tecla AUDIO, para regular os
graves, os agudos, o equilíbrio,
a distribuição do volume entre
os canais dianteiro e traseiro
(fader), X-Bass, predefinição do
som e EQ.
6 Pressão leve: tecla
visualizar a hora.
Pressão longa: para mudar a
prioridade de visão.
7 Bloco das teclas de seta.
8 Pressão breve: tecla MENU,
para abrir o menu de regulações
básicas.
Pressão longa: SCAN para
começar a função de percorrer.
9 Teclas 1 - 6
: Tecla SRC, para seleccionar a
fonte entre: Cassete, rádio e
carregador de CD (AUX).
; Tecla Eject (retirar) 0 (que pode
ser visto somente depois de ter
aberto o painel de comandos).
, para
64
Page 65

Informações e acessórios ..... 66
Segurança na estrada ................... 66
Montagem ..................................... 66
Acessórios .................................... 66
Informações internacionais por
telefone ......................................... 66
Painel de comandos extraível 67
Protecção contra furto ................... 67
Soltar o painel de comandos ......... 67
Colocar o painel de comandos ...... 67
Timer para desligar ........................ 68
Ligar e desligar ...................... 68
Regular o volume ................... 69
Regular o volume inicial ................. 69
Baixar imediatamente o volume
(mudo) .......................................... 70
Mudo quando telefonar .................. 70
“Bip” de confirmação .................... 70
Modo do rádio ........................ 71
Ligar o modo do rádio ................... 71
Regular o rádio .............................. 71
Seleccionar a banda de
frequência/banco de memória ....... 71
Sintonizar as estações ................... 71
Regulação da sensibilidade da sintonia
de estações mediante busca ......... 71
Guardar estações na memória ....... 72
Memorizar as estações
automaticamente (Travelstore) ....... 72
Ouvir estações guardadas na
memória ........................................ 72
Percorrer as estações captadas
(SCAN) ......................................... 72
Regular o tempo das paragens ...... 73
Regular o visor .............................. 73
MODO DE CASSETE .............. 73
Tocar uma fita cassete ................... 73
Retirar a cassete ........................... 73
Mudar a direcção de leitura ........... 74
Ignorar Faixas (S-CPS) ................. 74
Tocar repetidamente uma faixa....... 74
Amostra de Todas as Faixas
de uma Cassete (SCAN) ............... 74
Bobinar Rápido ............................. 74
Pausa Durante a Leitura ................ 75
ÍNDICE
Ligar e desligar o monitor rádio ..... 75
Ignorar partes não gravadas das
fitas ............................................... 75
Seleccionar o Tipo de Fita ............. 75
Redução de Ruído Dolby* B .......... 75
Mudar o visor ................................ 76
Modo do Carregador de CD... 76
Passar para o modo de
Carregador de CD ........................ 76
Seleccionar um CD ....................... 76
Seleccionar faixas ......................... 76
Busca rápida (a escutar) ............... 76
Mudar o visor ................................ 77
Repetir uma única faixa ou um
CDs inteiro (REPEAT) ................... 77
Tocar faixas em ordem casual (MIX) ... 77
Percorrer todas as faixas de
todos os CDs (SCAN) .................. 77
Pausa na leitura (PAUSE) .............. 77
Relógio – Hora ....................... 78
Visualização da hora ...................... 78
Acertar a hora ............................... 78
Seleccionar relógio nos modo
12 ou 24 horas .............................. 78
Visualizar constantemente a hora com o
aparelho desligado mas a ignição ligada .
Visualizar rapidamente a hora
com o aparelho desligado .............. 78
Equilíbrio do tom e do volume ... 79
Regular os graves ......................... 79
Regular os agudos ........................ 79
Regular a distribuição do volume à
direita e à esquerda (balance) ........ 79
Regulação da distribuição do
volume entre os canais dianteiro
e traseiro (fader) ............................ 79
Igualizador e X-BASS ............ 80
X-BASS ........................................ 80
Seleccionar os efeitos sonoros
predefinidos (EQ) ...........................
Regular a visualização do
nível ........................................ 81
Fontes sonoras externas ....... 81
Ligar/desligar a entrada AUX .......... 81
Dados técnicos ...................... 82
78
80
65
ENGLISH
FRANÇAIS
ESPAÑOL
PORTUGUÊS
Page 66

INFORMAÇÕES E ACESSÓRIOS
Muito obrigado por ter escolhido um
produto da Blaupunkt. Desejamos-lhe
muito prazer com o seu aparelho novo.
Antes de utilizar o aparelho pela
primeira vez, queira ler estas instruções
de serviço. Os redactores da Blaupunkt
procuram aperfeiçoar constantemente
as instruções de serviço, com vista a
torná-las bem acessíveis e
compreensíveis. Se, mesmo assim,
continuar com dúvidas acerca do
comando do aparelho, queira dirigir-se
a um revendedor especializado ou
contacte a linha azul no seu país.
Encontrará o número de telefone no
verso deste caderno.
Segurança na estrada
A segurança na estrada tem
prioridade máxima. Manipule o seu
auto-rádio só quando a situação do
trânsito o permitir. Familiarize-se
com o funcionamento do aparelho
antes de iniciar a viagem.
Terá que estar em condições de
ouvir, a tempo, os sinais da polícia,
dos bombeiros e das ambulâncias a
bordo do seu veículo. Por
conseguinte, durante a viagem, ouça
o programa sempre num volume
adequado à situação.
Montagem
Se pretender instalar você mesmo o seu
auto-rádio, leia as instruções de
instalação e de ligação no fim destas
instruções.
Acessórios
Utilize apenas os acessórios admitidos
pela Blaupunkt.
Controlo remoto
É possível um acesso conveniente às
funções mais importantes do auto-rádio
66
no volante do automóvel, mediante o
RC08 ou o RC10.
Ou então, aproveite a conveniência do
acesso a estas funções de qualquer
parte da viatura mediante um RC-12H
opcional.
Amplificador
Qualquer dos amplificadores da
Blaupunkt ou da Velocity pode ser
utilizado.
Carregador de CD
Os carregadores de CD: CDC A08, IDC
A09 e CDC A03 da Blaupunkt podem
ser ligados ao aparelho.
Leitor compacto de MP3
Em vez de um Carregador de CD, é
possível ligar um Leitor compacto de MP3
para ouvir trechos musicais MP3. Para
ligar um Leitor compacto de MP3,
primeiro é necessário usar um
computador para guardar os trechos
musicais MP3 no disco rígido
Microdrive™ interior do Leitor compacto
de MP3. Depois disso, quando o Leitor
compacto de MP3 for ligado ao autorádio, será possível tocá-lo como se fosse
um CD com música normal. O Leitor
compacto de MP3 funciona da mesma
maneira que um Carregador de CD. A
maioria das funções do Carregador de
CD também existem no Leitor compacto
de MP3.
Informações internacionais por
telefone
Se houver qualquer dúvida em relação
ao funcionamento deste auto-rádio ou
se desejar maiores informações, entre
em contacto connosco!
Os números das linhas directas para
informações estão impressos na última
página deste manual de instruções.
Page 67

PAINEL DE COMANDOS EXTRAÍVEL
Painel de comandos extraível
Protecção contra furto
Para proteger o equipamento contra
furto, o mesmo é equipado com um
painel de comandos extraível (painel
que se solta). Sem este painel de
comandos, o auto-rádio não tem
qualquer valor para o ladrão.
Proteja o equipamento contra furto,
retire o painel de comandos e leve-o
consigo todas as vezes que sair do
automóvel. Não deixe o painel de
comandos dentro do automóvel – nem
mesmo escondido.
Este painel de comandos foi concebido
para ser fácil de usar.
Observação:
● Nunca deixe o painel de comandos
cair.
● Nunca exponha o painel de
comandos à luz directa do sol nem
a outras fontes de calor.
● Evite contacto directo da pele com os
contactos do painel de comandos.
Quando for necessário limpar os
contactos, passe um pano não
felpudo com um pouco de álcool.
Soltar o painel de comandos
➮ Prima a tecla 1.
Abre-se o mecanismo que prende o
painel de comandos.
➮ Puxe o painel de comandos recto
para fora a segurar o lado direito
do painel de comandos.
Observação:
● Pode ser que este aparelho
desligue-se somente depois de
alguns segundos, dependendo da
regulação de “OFF TIMER” no
MENU da maneira descrita a seguir.
● Todas as regulações correntes do
rádio são guardadas na memória.
● Se houver um Cassete dentro do
aparelho, permanecerá lá.
Colocar o painel de comandos
É possível prender o painel de
comandos de várias maneira, mas
recomendamos o seguinte método:
➮ Segure o painel de comandos
perpendicularmente ao aparelho.
➮ Engate o painel de comandos nos
encaixes do aparelho, situados
embaixo do lado esquerdo e do
direito, até ouvir que se encaixou
no lugar.
➮ Empurre delicadamente o painel
de comandos para cima, até ouvir
que se encaixou no lugar.
2
Observação:
● Ao encaixar o painel de comandos,
preste atenção para não exercer
pressão no visor.
Se o aparelho estiver ligado quando o
painel de comandos foi retirado, quando
o painel for novamente colocado, ligase automaticamente de novo da
maneira que estava a funcionar, por
exemplo: rádio, Cassete ou Carregador
de CD (AUX).
1
67
ENGLISH
FRANÇAIS
ESPAÑOL
PORTUGUÊS
Page 68

PAINEL DE COMANDOS EXTRAÍVEL
LIGAR E DESLIGAR
Timer para desligar
Depois de ter aberto o painel de
comandos, o aparelho desliga-se
depois de um prazo preestabelecido
entre 0 a 30 segundos.
➮ Prima a tecla MENU 8.
➮ Prima duas vezes a tecla fi 7
para visualizar “OFF TIMER”.
➮ Para regular o tempo prima nas
tecla @ ou # 7.
Quando tiver terminado as mudanças
na regulação,
➮ prima duas vezes a tecla MENU
8.
Observação:
● Se OFF TIMER (Timer para
desligar) estiver regulado em 0
segundos, o aparelho desliga-se
assim que o painel de comandos
for aberto.
Ligar e desligar
Há várias maneiras de ligar e desligar
o aparelho:
Ligar e desligar com a ignição do
automóvel
Se o aparelho estiver ligado
correctamente no sistema eléctrico do
automóvel e não tiver sido desligado
pela tecla ON/OFF 2, será ligado e
desligado simultaneamente com a
ignição.
Ligar e desligar pelo painel de
comandos extraível
➮ Retire o painel de comandos.
O aparelho desliga-se.
Haverá uma demora para desligar-se
se “OFF TIMER” não estiver regulado
no “0”.
➮ Coloque novamente o painel de
comandos.
O aparelho liga-se; com as últimas
regulações (rádio, Cassete, Carregador
de CD ou AUX) activadas.
Ligar e desligar mediante a tecla 2
➮ Para ligar o aparelho, prima a tecla
2.
➮ Para desligar o aparelho, prima
mais de dois segundos a tecla 2.
O aparelho desliga-se.
Observação:
● Se ligar o aparelho quando a
ignição desligada, o aparelho se
desligará automaticamente depois
de uma hora, para evitar
descarregar a bateria da viatura.
68
Page 69

LIGAR E DESLIGAR
REGULAR O VOLUME
Ligar colocando um Cassete
Se o aparelho for ligado mas não
houver um Cassete colocado dentro do
leitor,
➮ prima a tecla 1.
O painel de comandos.
➮ Coloque delicadamente a cassete
na fenda do leitor, com o lado
aberto virado para a direita.
➮ Feche o painel de comandos.
O aparelho liga-se e começa a tocar o
lado de cima.
Observação:
● O aparelho permanece desligado
se a ignição estiver desligada.
Para ligá-lo prima uma vez a tecla
2.
Regular o volume
O volume pode ser regulado em passos
de 0 (mudo) a 66 (máximo).
Para aumentar o volume,
➮ gire o regulador do volume 3
para a direita.
Para baixar o volume,
➮ gire o regulador do volume 3
para a esquerda.
Regular o volume inicial
É possível regular qual deve ser o
volume quando ligar o aparelho.
➮ Prima a tecla MENU 8.
➮ Prima as vezes que for necessário
a tecla fi ou % 7 até aparecer
escrito “ON VOLUME” no visor.
➮ Regule com as tecla @ e # 7
qual deve ser o volume quando
ligar o aparelho.
Para ajudar a regular o volume mais
facilmente, o volume sonoro aumentará
ou baixará a medida que a regulação
for mudada.
Se seleccionar “LAST VOL”, volta-se
para o volume em que o aparelho
estava a tocar quando foi desligado.
Observação:
● Para proteger o seu ouvido, o
volume inicial máximo da selecção
do “LAST VOL” é “38”. Se o
volume estava mais alto quando o
aparelho foi desligado, e for
seleccionado “LAST VOL”, a
próxima vez que o aparelho for
ligado o volume estará no nível
“38”.
ENGLISH
FRANÇAIS
ESPAÑOL
PORTUGUÊS
69
Page 70

REGULAR O VOLUME
Quando tiver terminado de realizar as
mudanças,
➮ prima duas vezes a tecla MENU
8.
Baixar imediatamente o volume
(mudo)
Este recurso possibilita baixar
imediatamente o volume (mudo) até um
nível que pode ser predefinido.
➮ Prima brevemente a tecla 2.
Aparece “MUTE” escrito no visor.
Para ligar novamente o volume,
➮ prima 2 de novo.
Regular o nível do mudo
É possível regular o nível do volume
mudo do aparelho.
➮ Prima a tecla MENU 8.
➮ Prima as vezes que for necessário
a tecla fi ou % 7 até aparecer
“MUTE LVL” escrito no visor.
➮ Regule o nível de mudo mediante
as teclas @ e # 7.
Quando tiver terminado de realizar as
mudanças,
➮ prima duas vezes a tecla MENU
8.
Para tanto é necessário o telemóvel
estar ligado ao auto-rádio da maneira
descrita nas instruções de instalação.
O volume baixará até o nível de ‘mudo’
que estiver regulado.
“Bip” de confirmação
Para algumas das funções ouve-se um
‘bip’ de confirmação se mantiver mais
de dois minutos a tecla pressionado.
Por exemplo, depois de ter guardado
na memória uma estação de rádio,
ouve-se um ‘bip’ de confirmação. É
possível activar/desactivar este “bip”.
➮ Prima a tecla MENU 8.
➮ Mantenha premido a tecla % ou fi
7 até aparecer “BEEP” escrito no
display.
➮ Use as teclas @ e # 7 para
comutar entre as opções.
“OFF” significa “bip” desactivado, “ON”
significa “bip” activado.
➮ Prima a tecla MENU 8.
Mudo quando telefonar
Se o aparelho estiver ligado a um
telemóvel, o volume do auto-rádio será
desligado assim que pegar no
telemóvel. Aparecerá “PHONE” escrito
no visor.
70
Page 71

MODO DO RÁDIO
Modo do rádio
Ligar o modo do rádio
Se estiver a ouvir um Cassete, o
carregador de CD ou no modo AUX,
➮ prima a tecla BND-TS 4
ou
➮ prima as vezes que for necessário
a tecla SRC : até aparecer “FM”
ou “AM” (“MW”) escrito no visor.
Regular o rádio
Para garantir um funcionamento perfeito
do componente rádio, é necessário o
aparelho estar regulado para a região em
que se estiver. É possível escolher entre
Europa (EUROPE), América do Norte
(USA), Tailândia (THAI) ou América do Sul
(S-AMERICA). O rádio é entregue pela
fábrica regulado para a região em que
será comercializado. Se houver
problemas na recepção rádio, verifique
esta regulação.
➮ Prima a tecla MENU 8.
➮ Prima as vezes que for necessário
a tecla fi 7 até aparecer
“TUNER” escrito no visor.
➮ Prima as vezes que for necessário
a tecla @ ou # 7 até aparecer no
visor a região que desejar.
Quando tiver terminado de realizar as
mudanças,
➮ prima duas vezes a tecla MENU
8.
Seleccionar a banda de
frequência/banco de memória
Este aparelho pode receber emissões
de programas nas bandas de
frequência FM, AM (MW) (ondas
médias) e LW (ondas longas). Há dois
bancos de memória preestabelecidos
para a banda FM, um para a banda AM
(MW) e um para a banda LW. Em banco
de memória podem ser guardadas seis
estações emissoras.
Observação:
● As ondas longas (LW) não estão
disponíveis na regulação dos
aparelhos “USA” e “THAI”.
Seleccionar o nível da memória FM
ou a banda de frequência AM (MW)
e LW
➮ Prima as vezes que for necessário
a tecla BND-TS 4 para comutar
entre os níveis de memória FM
(FM1, FM2 e FMT) e AM (MW) e a
banda de frequência LW.
Sintonizar as estações
Há várias possibilidades para sintonizar as estações emissoras.
Sintonia automática de estações
➮ Prima a tecla fi ou % 7.
O aparelho sintoniza a próxima estação
emissora que conseguir captar.
Regulação da sensibilidade da
sintonia de estações mediante
busca
É possível escolher para sintonizar-se
somente em estações com recepção
forte ou então para também sintonizarse nas estações com recepção fraca.
71
ENGLISH
FRANÇAIS
ESPAÑOL
PORTUGUÊS
Page 72

MODO DO RÁDIO
➮ Prima a tecla MENU 8.
➮ Prima as vezes que for necessário
a tecla fi ou % 7 até “SENS HI”
ou “SENS LO” aparecer escrito no
visor.
“SENS HI” significa que o rádio terá uma
sensibilidade alta. “SENS LO” significa
que o rádio esta regulado para uma
sensibilidade mais baixa.
➮ Regule a sensibilidade que desejar
mediante as teclas @ ou # 7.
Quando tiver terminado de realizar as
mudanças,
➮ prima a tecla MENU 8.
Observação:
● É possível definir sensibilidades de
sintonia diferentes para FM e AM
(inclusive LW).
Sintonizar numa estação manualmente
Também é possível sintonizar estações
manualmente.
➮ Prima a tecla @ ou # 7.
Guardar estações na memória
Guardar estações na memória
manualmente
➮ Seleccione o banco de memória
que desejar (FM1, FM2 ou FMT)
ou as bandas de ondas AM (MW)
ou LW.
➮ Sintonize numa estação.
➮ Prima mais de 2 segundos uma
das tecla de 1 - 6 9 para guardar
a estação na memória
correspondente a esta tecla.
Memorizar as estações
automaticamente (Travelstore)
É possível guardar na memória
automaticamente as seis estações com
a recepção mais forte da região. As
estações serão guardadas na memória
FMT, AM (MW) ou LM dependendo da
banda de frequência seleccionada.
Observação:
● As estações guardadas
anteriormente neste nível da
memória serão apagadas.
➮ Prima a tecla BND-TS 4 e
mantenha-a pressionada até o
rádio começar a percorrê-la.
Começará o processo de guardar
estações na memória. “TSTORE”
aparece escrito no visor. Depois que
este processo tiver terminado, tocará a
estação que estiver guardada na
posição 1 do nível de memória.
Ouvir estações guardadas na
memória
➮ Seleccione o nível de memória em
que a estação foi guardada.
➮ Prima a tecla em que a estação
que desejar ouvir estiver guardada
na memória 1 - 6 9.
Percorrer as estações captadas
(SCAN)
É possível ouvir brevemente a todas as
estações que for possível captar, se
estiver activada a função para percorrêlas [Scan]. É possível percorrer o tempo
que se pára em cada estação entre 5 e
30 segundos no menu.
72
Page 73

MODO DO RÁDIO
MODO DE CASSETE
Começar a percorrer
➮ Mantenha mais de 2 segundos a
tecla MENU 8 pressionada.
Começará o processo de percorrer.
Aparecerá rapidamente “SCAN” escrito
no visor seguido pela frequência actual
intermitente.
Parar de percorrer e continuar a
escutar uma estação
➮ Prima a tecla MENU 8.
Pára de percorrer e toca a última
estação em que tiver parado.
Regular o tempo das paragens
➮ Prima a tecla MENU 8.
➮ Prima as vezes que for necessário
a tecla fi 7 até aparecer “SCAN
TIME” escrito no visor.
➮ Regule o tempo para parar nas
estações percorridas mediante as
teclas @# 7.
Quando tiver terminado de realizar as
mudanças,
➮ prima duas vezes a tecla MENU 8.
Observação:
● O tempo regulado para parar nas
estações percorridas também
serve quando percorrer um
Cassete ou um carregador de CD.
Regular o visor
É possível escolher a visualização
contínua de um dos seguintes:
● Hora
● Frequência
➮ Mantenha premida a tecla DIS
6 até a visualização que desejar
aparecer no visor.
Funcionamento com
Cassete
Tocar uma fita cassete
● Se não houver uma fita cassete
dentro do aparelho
➮ Prima a tecla 1.
A aba do painel frontal abre-se.
➮ Coloque uma fita cassete no
compartimento com o lado aberto
virado à direita.
➮ Feche o compartimento.
A fita cassete começará a tocar pelo
lado virado para cima.
● Se já houver uma fita cassete
dentro do aparelho e o rádio
estiver a tocar ou estiver no modo
de carregador de CD (AUX).
➮ Prima a tecla SRC : até aparecer
“CASSETTE” escrito no visor.
A fita cassete começará a tocar na
direcção que estava a tocar a última
vez.
Retirar a cassete
➮ Prima a tecla 1.
A aba do painel frontal abre-se.
➮ Prima a tecla 0 ;; situada ao lado
da fenda para colocar cassetes
➮ Retire a cassete e feche o
compartimento
ou
➮ Coloque outra fita cassete e feche o
painel extraível.
73
ENGLISH
FRANÇAIS
ESPAÑOL
PORTUGUÊS
Page 74

MODO DE CASSETE
Mudar a direcção de leitura
Para passar de um lado para o outro
(SIDE A) e (SIDE B).
➮ Prima a tecla 2 %fi 9.
Observação:
● No final de uma fita, a direcção de
leitura muda automaticamente
(inversão automática).
Ignorar Faixas (S-CPS)
Para ignorar a faixa seguinte ou as
seguintes
➮ Prima uma ou mais vezes a tecla
% 7.
Aparecem no visor “CPS FF” e o
número de faixas a ser ignoradas. A fita
avançará rapidamente até a faixa
sucessiva ou a escolhida mais além.
Para ignorar faixas anteriores
➮ Prima uma ou mais vezes a tecla
fi 7.
Aparecem no visor “CPS FR” e o
número de faixas a ser ignoradas. A fita
será rapidamente rebobinada até o
começo da faixa actual ou de outra faixa
anterior escolhida.
Tocar repetidamente uma faixa
➮ Prima a tecla 4 RPT 9.
A faixa actual será repetida. Aparecerá
RPT no visor. Enquanto a fita é
rebobinada, depois de ter terminado a
faixa, aparece “RPT TRCK” escrito no
visor.
Para de repetir a faixa
➮ Prima novamente a tecla 4 RPT 9.
Continuará a tocar normalmente. RPT
desaparecerá do visor.
74
Amostra de Todas as Faixas de
uma Cassete (SCAN)
➮ Mantenha premida mais de dois
segundos a tecla MENU 8.
Aparecerá “CAS SCAN” escrito no visor.
Tocarão amostras de todas as faixas
da fita, em ordem crescente.
Para parar de percorrer as estações
➮ Prima outra vez a tecla MENU 8.
A faixa que estiver a tocar continuará.
Observação:
● O tempo das paragens nas
estações captadas pode ser
regulado. Consulte a secção
“Regular o tempo da paragem” no
capítulo “Modo de rádio”.
● Para usar as funções S-CPS, RPT e
SCAN, é necessário que haja uma
pausa de pelo menos três segundos
entre as faixas da cassete.
Bobinar Rápido
Avançar rápido
➮ Prima a tecla # 7.
Aparecerá “FORWARD” escrito no
visor.
Rebobinar rápido
➮ Prima a tecla @ 7.
Aparecerá “REWIND” escrito no visor.
Parar de bobinar
➮ Prima a seta da direcção contrária
a tecla 7.
Continuará a tocar.
Observação:
● Enquanto a fita estiver a bobinar-
Page 75

MODO DE CASSETE
se rapidamente, será possível
ouvir a última estação de rádio a
ter sido sintonizada. Para tanto é
necessário a função “Monitor do
rádio monitor” estar activada.
Pausa Durante a Leitura
Para interromper a leitura
➮ Prima a tecla 3 E 9.
Pára de tocar a aparecerá “PAUSE” no
visor.
➮ Prima outra vez a tecla 3 E 9
para recomeçar a tocar.
Ligar e desligar o monitor rádio
Observação:
● Será possível regular o monitor
rádio somente se uma cassete
estiver a tocar.
➮ Prima a tecla MENU 8.
➮ Prima a tecla % ou fi 7 até
aparecer “RM ON” ou “RM OFF”
escrito no visor.
➮ Prima a tecla # ou @ 7 para ligar
ou desligar o monitor rádio.
Quando tiver terminado de realizar as
mudanças,
➮ prima a tecla MENU 8.
Ignorar partes não gravadas das
fitas
É possível ignorar automaticamente as
partes de uma fita não gravadas de
mais de 10 segundos. Para tanto é
necessário estar activada a função de
ignorar as partes não gravadas.
Observação:
● Será possível regular para ignorar
partes não gravadas somente se
houver uma cassete a tocar.
Activar e Desligar para Ignorar
Partes não Gravadas
➮ Prima a tecla MENU 8.
➮ Prima a tecla % ou fi 7 até
aparecer “BLK SKIP” escrito no visor.
➮ Prima a tecla # ou @ 7 para
activar ou desactivar para ignorar
partes não gravadas.
Quando tiver terminado de realizar as
mudanças,
➮ prima duas vezes a tecla MENU 8.
Seleccionar o Tipo de Fita
Se for tocar uma fita Metal ou CrO2, será
necessário colocar o selector de tipo de
fita em “METAL ON”.
Para seleccionar o tipo de fita
➮ Prima a tecla 1 MTL 9.
Aparecerá “METAL ON” ou “METAL
OFF” rapidamente no visor.
Redução de Ruído Dolby* B
Deve-se activar a função Dolby sempre
que for tocar fitas gravadas com o
processo Dolby B.
➮ Prima a tecla 6 9.
“DOLBY ON” aparecerá brevemente no
visor.
Quando a função a Dolby estiver
activada, aparecerá no visor.
➮ Para desligar a função Dolby,
prima outra vez a tecla 6
*Sistema de redução de ruído
manufacturado com licença da Dolby
Laboratories. A palavra Dolby e o símbolo
com o D duplo são marcas registadas da
Dolby Laboratories.
9.
75
ENGLISH
FRANÇAIS
ESPAÑOL
PORTUGUÊS
Page 76

MODO DE CASSETE
MODO DO CARREGADOR DE CD
Mudar o visor
Enquanto estiver a tocar uma fita
cassete, será possível definir uma das
seguintes opções como a
visualização preferida:
● Somente do lado que estiver a
tocar, p. ex. o LADO A,
ou
● Também mostrar a hora no visor.
➮ Para mudar a visualização,
mantenha premida a tecla Clock
DIS 6 até chegar à
visualização que desejar.
Modo do Carregador de CD
Observação:
● Há informações acerca do
manuseio de CDs, da colocação
de CDs e do funcionamento do
carregador de CD no manual de
instruções fornecido juntamente
com o Carregador de CD.
Passar para o modo de
Carregador de CD
➮ Prima as vezes que for necessário
a tecla SRC : até aparecer
“CHANGER” no visor.
Recomeçará a tocar do ponto em que
estava.
Seleccionar um CD
➮ Para passar de um CD para o
seguinte ou antecedente, prima as
vezes que for necessário a tecla %
ou fi 7.
➮ Se uma gaveta de CD do carregador
estiver vazia, será ignorada no
processo de selecção de CDs.
Seleccionar faixas
➮ Para passar para a faixa seguinte
ou antecedente, prima as vezes
que for necessário uma das teclas
# ou @ 7.
76
Busca rápida (a escutar)
Para procurar rapidamente uma faixa,
para trás ou para frente,
➮ mantenha uma das teclas @ # 7
pressionada até começar a voltar
para trás ou avançar rapidamente.
Page 77

MODO DO CARREGADOR DE CD
Mudar o visor
Há 5 opções a disposição:
● Número da faixa e tempo de leitura
● Número da faixa e hora
● Número do CD e número da faixa
● Número do CD do hora
● Número de CD e tempo de leitura
➮ Prima mais de dois segundos as
vezes que for necessário a tecla
6 até chegar à visualização que
desejar.
Repetir uma única faixa ou um
CDs inteiro (REPEAT)
➮ Se desejar tocar repetidamente a
faixa actual, prima rapidamente a
tecla 4 RPT 9.
Aparecerá “RPT TRCK” rapidamente
no visor e o símbolo RPT se acenderá
no visor.
➮ Se desejar repetir o CD actual,
carregue mais de dois segundos a
tecla 4 RPT 9.
Aparecerá “RPT DISC” rapidamente no
visor e o símbolo RPT se acenderá no
visor.
Desactivar a repetição
➮ Se desejar parar de repetir a faixa
actual ou o CD actual, prima
rapidamente a tecla 4 RPT 9,
aparecerá “RPT OFF” rapidamente
e o símbolo “RPT” desaparecerá.
Tocar faixas em ordem casual (MIX)
➮ Para tocar todas as faixas do CD
actual em ordem casual, prima
rapidamente a tecla 5 MIX 9.
Aparecerá “MIX CD” rapidamente e o
símbolo “MIX” se acenderá no visor.
➮ Para tocar todas as faixas de todos
CDs em ordem casual, prima mais
de dois segundos a tecla 5 MIX 9.
Aparecerá “MIX ALL” rapidamente e o
símbolo “MIX” se acenderá no visor.
Parar de tocar em ordem casual
➮ Prima rapidamente a tecla 5 MIX
9 até aparecer “MIX OFF”
rapidamente no visor e o MIX
apagar-se.
Percorrer todas as faixas de
todos os CDs (SCAN)
➮ Para tocar rapidamente o início de
todas as faixas de todos os CDs
colocados, em ordem crescente;
prima mais de dois segundos a
tecla MENU 8.
“TRK SCAN” aparecerá rapidamente a
piscar seguido do número do CD cujos
inícios de faixas estiverem a ser
tocadas.
Parar de percorrer
➮ Para parar de percorrer, prima
rapidamente a tecla MENU 8.
A faixa actual continuará a tocar.
Observação:
● É possível estabelecer quando
tempo do início da faixa será
tocado. Para maiores pormenores
consulte a secção chamada
“Regular o tempo da paragem” no
capítulo “Modo de rádio”.
Pausa na leitura (PAUSE)
➮ Prima a tecla 3
Aparecerá “PAUSE” escrito no visor.
Desactivar uma pausa
➮ Prima a tecla 3
pausa.
O aparelho recomeçará a tocar.
EE
E 9.
EE
EE
E 9 no modo de
EE
77
ENGLISH
FRANÇAIS
ESPAÑOL
PORTUGUÊS
Page 78

RELÓGIO – HORA
Relógio – Hora
Visualização da hora
Para visualizar a hora,
➮ prima rapidamente a tecla 6.
Acertar a hora
➮ Prima a tecla MENU 8.
➮ Prima as vezes que for necessário
a tecla fi ou % 7 até aparecer
“CLOCK SET” escrito no visor.
➮ Prima a tecla # 7.
Aparecerá a hora no visor. Os minutos
estarão acessos intermitentes e
poderão ser acertados.
➮ Para acertar os minutos use as
teclas %/fi 7.
Depois de ter acertado os minutos,
➮ prima a tecla @ 7.
As horas se acenderão intermitentes.
➮ Para acertar a hora use as teclas
%/fi 7.
Quando tiver terminado de realizar as
mudanças,
➮ prima duas vezes a tecla MENU
8.
Seleccionar relógio nos modo
12 ou 24 horas
➮ Prima a tecla MENU 8.
➮ Prima as vezes que for necessário
a tecla % ou fi 7 até aparecer
“12H MODE” ou “24H MODE” no
visor.
➮ Prima a tecla @ ou # 7 para
passar de um modo para o outro.
Quando tiver terminado de realizar as
mudanças,
➮ prima a tecla MENU 8.
Visualizar constantemente a
hora com o aparelho desligado
mas a ignição ligada
A regulação “CLOCK ON" do menu
define para aparecer a hora no visor
sempre, mesmo se o aparelho estiver
desligado, desde que a ignição esteja
ligada,
➮ prima a tecla MENU 8.
➮ Prima as vezes que for necessário
a tecla % ou fi 7 até aparecer
“CLOCK OFF” ou “CLOCK ON”
escrito no visor.
➮ Prima a tecla @ ou # 7 para
activar ou desactivar esta
visualização.
Quando tiver terminado de realizar as
mudanças,
➮ prima a tecla MENU 8.
Visualizar rapidamente a hora
com o aparelho desligado
Para visualizar rapidamente a hora
mesmo com o aparelho desligado,
➮ prima a tecla /DIS 6.
A hora será mostrada oito segundos.
78
Page 79

EQUILÍBRIO DO TOM E DO VOLUME
Equilíbrio do tom e do
volume
É possível ajustar o equilíbrio do tom
(agudos e graves) para cada uma das
origens separadamente (rádio,
cassete, carregador de CD e AUX). A
regulação do equilíbrio do volume será
a mesma para todas as fontes sonoras.
Regular os graves
➮ Prima a tecla AUDIO 5.
Aparecerá “BASS” no visor.
➮ Prima a tecla fi ou % 7 para
regular os graves.
➮ Prima a tecla AUDIO 5 depois de
terminar a regulação.
Regular os agudos
➮ Prima a tecla AUDIO 5.
Aparecerá “BASS” no visor.
➮ Prima as vezes que for necessário
a tecla # 7 até aparecer “TREB”
escrito no visor.
➮ Prima a tecla fi ou % 7 para
regular os agudos.
➮ Prima a tecla AUDIO 5 depois de
terminar a regulação.
Regular a distribuição do
volume à direita e à esquerda
(balance)
➮ Para regular a distribuição do
volume à direita e à esquerda
(balance), prima a tecla AUDIO
5.
Aparecerá “BASS” no visor.
➮ Prima as vezes que for necessário
a tecla # 7 até aparecer “BAL”
escrito no visor.
➮ Prima a tecla fi ou % 7 para
regular o equilíbrio à direita e à
esquerda.
➮ Prima a tecla AUDIO 5 depois de
terminar a regulação.
Regulação da distribuição do
volume entre os canais dianteiro
e traseiro (fader)
➮ Para regular a distribuição do
volume (fader), prima a tecla
AUDIO 5.
Aparecerá “BASS” no visor.
➮ Prima as vezes que for necessário
a tecla # 7 até “FADER”
aparecer escrito no visor.
➮ Prima a tecla fi ou % 7 para
regular a distribuição do volume
entre os canais dianteiro e traseiro.
➮ Prima a tecla AUDIO 5 depois de
terminar a regulação.
ENGLISH
FRANÇAIS
ESPAÑOL
PORTUGUÊS
79
Page 80

IGUALIZADOR E X-BASS
Igualizador e X-BASS
X-BASS
X-Bass significa aumentar os graves
com volume baixo.
Observação:
● X-BASS pode ser regulado
separadamente para cada fonte
separadamente (rádio, Cassete,
Carregador de CD e AUX).
➮ Para regular X-BASS, prima a
tecla AUDIO 5.
Aparecerá “BASS” escrito no visor.
➮ Prima as vezes que for necessário
a tecla # 7 até aparecer “XBASS
ON” ou “XBASS OFF” no visor.
➮ Prima a tecla fi
ou desligar este recurso “XBASS
ON” e “XBASS OFF”.
➮ Prima a tecla AUDIO 5 depois de
ter terminado esta regulação.
ou
% 7 para ligar
Seleccionar os efeitos sonoros
predefinidos (EQ)
É possível seleccionar os efeitos
sonoros predefinidos para os seguintes
tipos de música:
● ROCK
● POP
● CLASSICA
Os efeitos sonoros predefinidos para
estes tipos de música já foram
programados.
Para seleccionar um dos efeitos
sonoros predefinidos,
➮ prima a tecla AUDIO 5 .
Aparecerá “BASS” no visor.
➮ Prima quantas vezes for
necessário a tecla # 7 até uma
das predefinições do som aparecer
no visor.
➮ Prima a tecla fi
escolher uma das predefinições.
Se desejar desactivar os efeitos
sonoros predefinidos,
ou
% 7 para
➮ seleccione “EQ OFF” dentre as
opções disponíveis.
➮ Prima a tecla AUDIO 5 depois de
ter terminado esta regulação.
Observação:
● O efeito sonoro predefinido
seleccionado será aplicado a todas
as fontes sonoras.
80
Page 81

VISUALIZAÇÃO DO NÍVEL
FONTES EXTERNAS
Regular a visualização do
nível
A visualização rápida do nível indica
rapidamente mediante símbolos as
regulações do volume e dos comandos
sonoros enquanto estiver a regulá-los.
Quando não estiver a efectuar
regulações, no display do nível indica o
nível da música auto-radio.
É possível activar também a
visualização do nível da música.
➮ Prima a tecla MENU 8.
Aparecerá “MENU” escrito no visor.
➮ Prima as vezes que for necessário
a tecla fi
“PEAK LVL” no visor.
➮ Prima a tecla @
activar ou desactivar esta
visualização “PEAK ON” e “PEAK
OFF”.
Quando tiver terminado de realizar as
mudanças,
➮ prima duas vezes a tecla MENU
8.
ou
% 7 até aparecer
ou
# 7 para
Fontes sonoras externas
Em vez de ligar um Carregador de CD,
também é possível ligar outra fonte
sonora equipada de linha de saída.
Estas fontes sonoras poderão ser, por
exemplo, um leitor de CDs portátil, um
leitor de MiniDiscs ou um leitor de MP3.
A entrada AUX deve ser activada no
menu de instalação.
Se desejar ligar uma fonte sonora
externa, será necessário um cabo
adaptador (Blaupunkt n.°: 7 607 897
093) que pode ser obtido do seu
fornecedor autorizado Blaupunkt.
Ligar/desligar a entrada AUX
➮ Prima a tecla MENU 8.
Aparecerá “MENU” escrito no visor.
➮ Prima as vezes que for necessário
a tecla fi ou % 7 até aparecer
“AUX OFF” ou “AUX ON” no visor.
➮ Prima a tecla # ou @ 7 para ligar
ou desligar a entrada AUX.
Quando tiver terminado de realizar as
mudanças,
➮ prima a tecla MENU 8.
Observação:
Se a entrada AUX estiver activada,
poderá ser seleccionada se premir a
tecla SRC : e aparecerá “AUX
INPUT” no visor.
ENGLISH
FRANÇAIS
ESPAÑOL
PORTUGUÊS
81
Page 82

DADOS TÉCNICOS
Amplificador
Potência de saída: 4 × 18W RMS @ 10% THD
Sintonizador
Gama de frequências Estados Unidos da América:
FM: 87,5 – 107,9 MHz (passos de 200 kHz)
AM: 530 – 1710 kHz (passos de 10 kHz)
Gama de frequências Europa:
FM: 87,5 – 108 MHz (passos de 100 kHz automático / 50 kHz
manual)
MW: 531 – 1602 kHz (passos de 9 kHz)
LW: 153 – 279 kHz (passos de 9 kHz automático / 1 kHz manual)
Gama de frequências Tailândia:
FM: 87,5 – 108 MHz (50 kHz step auto/25 kHz step manual)
AM: 531 – 1602 kHz (passos de 9 kHz)
Gama de frequências América do Sul:
FM: 87,5 – 107.9 MHz (100 kHz step auto/50 kHz step manual)
AM: 530 – 1710 kHz (passos de 10 kHz)
Sensibilidade mono FM:
17 dbf
Resposta em frequência FM:
35 - 16.000 Hz
Cassete
Resposta em frequência:
30 - 18.000 Hz
Saída pré amplificada
4 canais: 2 V
Sensibilidade da entrada
Entrada AUX: 2 V / 6 kΩ
Reservado o direito a alterações!
82
Page 83

MEMORANDO
ENGLISH
FRANÇAIS
ESPAÑOL
PORTUGUÊS
83
Page 84

Installation instructions • Notice de montage •
Instrucciones de instalación • Instruções de montagem
GB
Safety instructions
When carrying out installation work
and making connections please
observe the following safety
instructions:
- Disconnect the negative terminal of
the battery! When doing so, please
observe the vehicle manufacturer’s
safety instructions.
- Make sure you do not damage vehi-
cle components when drilling any
holes.
- The cross sections of the positive
and negative cables must not be less
than 1.5 mm
2
.
- Do not connect the vehicle’s plug
connectors to the radio!
- You can obtain the adapter cable re-
quired for your vehicle type from any
BLAUPUNKT dealer.
- Depending on the model, your vehi-
cle may differ from the description
provided here. We accept no responsibility for any damages due to incorrect installation or connection or for
any consequential damages.
If the information provided here is not
suitable for your specific installation
requirements, please contact your
Blaupunkt dealer, your vehicle manufacturer or our telephone hotline.
When installing an amplifier or
changer, you must first connect the
device earth connections before connecting the plugs for the line-in or lineout jacks.
F
Consignes de sécurité
Respecter les consignes de sécurité
suivantes pendant la durée du
montage et du branchement.
- Débrancher le pôle (-) de la batterie !
Respecter les consignes de sécurité
du constructeur automobile !
- Veiller à n’endommager aucune pièce du véhicule en perçant des trous.
- La section du câble (+) et (-) ne doit
pas dépasser 1,5 mm
2
.
- Ne pas brancher les connecteurs
du véhicule sur la radio !
- Les câbles d’adaptation nécessaires
pour le type de véhicule sont disponibles auprès des revendeurs BLAUPUNKT.
- En fonction du modèle, votre véhicule peut différer de cette description.
Nous déclinerons toute responsabilité en cas de dommages causés par
des erreurs de montage ou de connexion et en cas de dommages consécutifs.
Si les indications décrites ici ne s’appliquent au montage que vous voulez effectuer, adressez-vous à votre
revendeur Blaupunkt, votre constructeur automobile ou notre service
d’assistance téléphonique.
Pour le montage d’un amplificateur ou
changeur, les masses d’appareil doivent être d’abord connectées avant de
connecter les fiches pour les connecteurs Line IN ou Line Out.
EA
Page 85

E
Normas de seguridad
Durante el montaje y la conexión es
imprescindible observar las siguientes
normas de seguridad.
- Desemborne el polo negativo de la
batería. Observe las normas de seguridad dadas por el fabricante del vehículo.
- Al perforar agujeros, asegúrese de no
dañar ninguna pieza del vehículo.
- La sección transversal del cable positivo y del cable negativo no debe ser
menor de 1,5 mm
2
.
- ¡No conecte a la radio los conecto-
res ubicados en el vehículo!
- Los cables adaptadores necesarios
para su vehículo los encontrará en el
comercio especializado en artículos
de la marca BLAUPUNKT.
-
Dependiendo del modelo, es posible
que su vehículo varíe un poco con respecto a la descripción aquí dada. Tenga en cuenta que no asumimos ninguna responsabilidad por los daños debidos a un montaje o conexión incorrectos ni por los daños resultantes.
Si las instrucciones aquí dadas no
son aptas para el montaje en su vehículo, póngase en contacto con su
proveedor de artículos Blaupunkt o
con el fabricante del vehículo, o llame
a nuestro teléfono de atención al
cliente.
En caso de montar un amplificador o
un cambiadiscos, es necesario conectar la puesta a tierra de las unidades
antes de establecer el contacto de los
conectores para las hembrillas Line-In
y Line-Out.
P
Instruções de segurança
Durante a montagem e a ligação do
aparelho, queira respeitar as
seguintes instruções de segurança.
- Separar o pólo negativo da bateria ! Respeitar ao mesmo tempo as
instruções de segurança do fabricante do automóvel.
- Quando se procede à furagem de
buracos, prestar atenção para não
serem danificadas quaisquer partes do veículo.
- As secções transversais dos cabos
positivo e negativo não devem ser
inferiores a 1,5 mm
2
.
- Não ligar as fichas existentes do
lado do automóvel ao auto-rádio!
- Os cabos adaptadores necessários
para o seu automóvel podem ser
adquiridos nos revendedores da
BLAUPUNKT.
- O seu veículo pode divergir desta
descrição em função do modelo.
Não assumimos qualquer responsabilidade por erros de montagem
ou de ligação nem por danos daí
decorrentes.
Caso as presentes instruções não
sejam adequadas para a montagem no seu veículo, dirija-se ao revendedor da Blaupunkt, ao fabricante do seu veículo ou à nossa linha verde.
No caso de montagem de um amplificador ou leitor multi-CD, é imprescindível ligar primeiro os aparelhos
à terra antes de se conectar as fichas
às tomadas Line In ou Line Out.
EA
ENGLISH
FRANÇAIS
ESPAÑOL
PORTUGUÊS
Page 86

Supplied Mounting Hardware
Materiel de montage fourni
Ferretería de montaje
suministrada
Elementos de fixação fornecidos.
1.
A
12V
B
D
C
2.
E
G
H
F
D
C
182
53
165
1-20
A
EA
Page 87

3.
4.
Removal, Démontage,
Desmontaje, Desmontagem
ENGLISH
A
1.
FRANÇAIS
7 607 621 . . .
Car-specific adapter cable which is
available at your dealer.
Câble adaptateur spécifique au
véhicule, disponible dans le
commerce.
Adaptador específico del vehículo, el
cual se puede adquirir en el comercio
especializado.
Cabo de adaptação específico do
automóvel que pode ser adquirido no
comércio especializado.
B
2.
3.
3.
2.
B
8 601 910 003
ESPAÑOL
PORTUGUÊS
5.
12V
EA
Page 88

6.
C-1 C-2 C-3
14
C
2
B
A
6
3
58
1
3
2
4
345
1
2
7
10 131619
9
12
11
5
6
8
6
7
7
8
14 17
15
18
20
AB
1 nc 1 Speaker out RR+
2 Radio/Tel. mute 2 Speaker out RR3 nc 3 Speaker out RF+
4 Permanent +12V 4 Speaker out RF5 Aut. antenna 5 Speaker out LF+
6 nc 6 Speaker out LF7 Kl.15/Ignition 7 Speaker out LR+
8 Ground 8 Speaker out LR-
C
C1 C2 C3
1 Line Out LR 7 nc 13 CDC-Data - In
2 Line Out RR 8 nc 14 CDC-Data - Out
3 Line Out / Ground 9 nc 15 Permanent +12V
4 Line Out LF 10 RC +12V 16 +12V
5 Line Out RF 11 Remote Control 17 Bus / GND
6 +12V Amplifier 12 RC - GND 18 AF / GND
19 Line In - L
20 Line In - R
Equalizer Amplifier
EA
Remote
Control
CD-Changer
Page 89

7.
G
ENGLISH
F
LR
LF
RF
RR
10A
E
Radio/Tel. mute (low)
+12V
(max. 150 mA)
+
4 Ohm
-
+
4 Ohm
-
+
4 Ohm
-
+
4 Ohm
-
Relais
Kl. 15 +12V
7
5
3
1
8
6
4
2
12V
FRANÇAIS
ESPAÑOL
PORTUGUÊS
This information is subject to change without notice!
Sous réserve de modifications!
Modificaciones reservadas!
Sob reserva de alterações!
EA
Page 90

Service numbers / Numéros du service après-vente /
Números de servicio / Número de serviço
Country: Phone: Fax: WWW:
Germany (D) 0180-5000225 05121-49 4002 http://www.blaupunkt.com
Austria (A) 01-610 390 01-610 393 91
Belgium (B) 02-525 5454 02-525 5263
Denmark (DK) 44 898 360 44-898 644
Finland (FIN) 09-435 991 09-435 99236
France (F) 01-4010 7007 01-4010 7320
Great Britain (GB) 01-89583 8880 01-89583 8394
Greece (GR) 0030 210 57 85 350 0030 210 57 69 473
Ireland (IRL) 01-4149400 01-4598830
Italy (I) 02-369 6331 02-369 6464
Luxembourg (L) 40 4078 40 2085
Netherlands (NL) 023-565 6348 023-565 6331
Norway (N) 66-817 000 66-817 157
Portugal (P) 01-2185 00144 01-2185 11111
Spain (E) 902-120234 916-467952
Sweden (S) 08-7501500 08-7501810
Switzerland (CH) 01-8471644 01-8471650
Czech. Rep. (CZ) 02-6130 0441 02-6130 0514
Hungary (H) 01-333 9575 01-324 8756
Poland (PL) 0800-118922 022-8771260
Turkey (TR) 0212-3350677 0212-3460040
USA (USA) 800-2662528 708-6817188
Brasil
(Mercosur) (BR) +55-19 3745 2769 +55-19 3745 2773
Malaysia
(Asia Pacific) (MAL) +604-6382 474 +604-6413 640
Blaupunkt GmbH
11/03 CM/PSS 8 622 403 879
 Loading...