

Page 1

Monitor
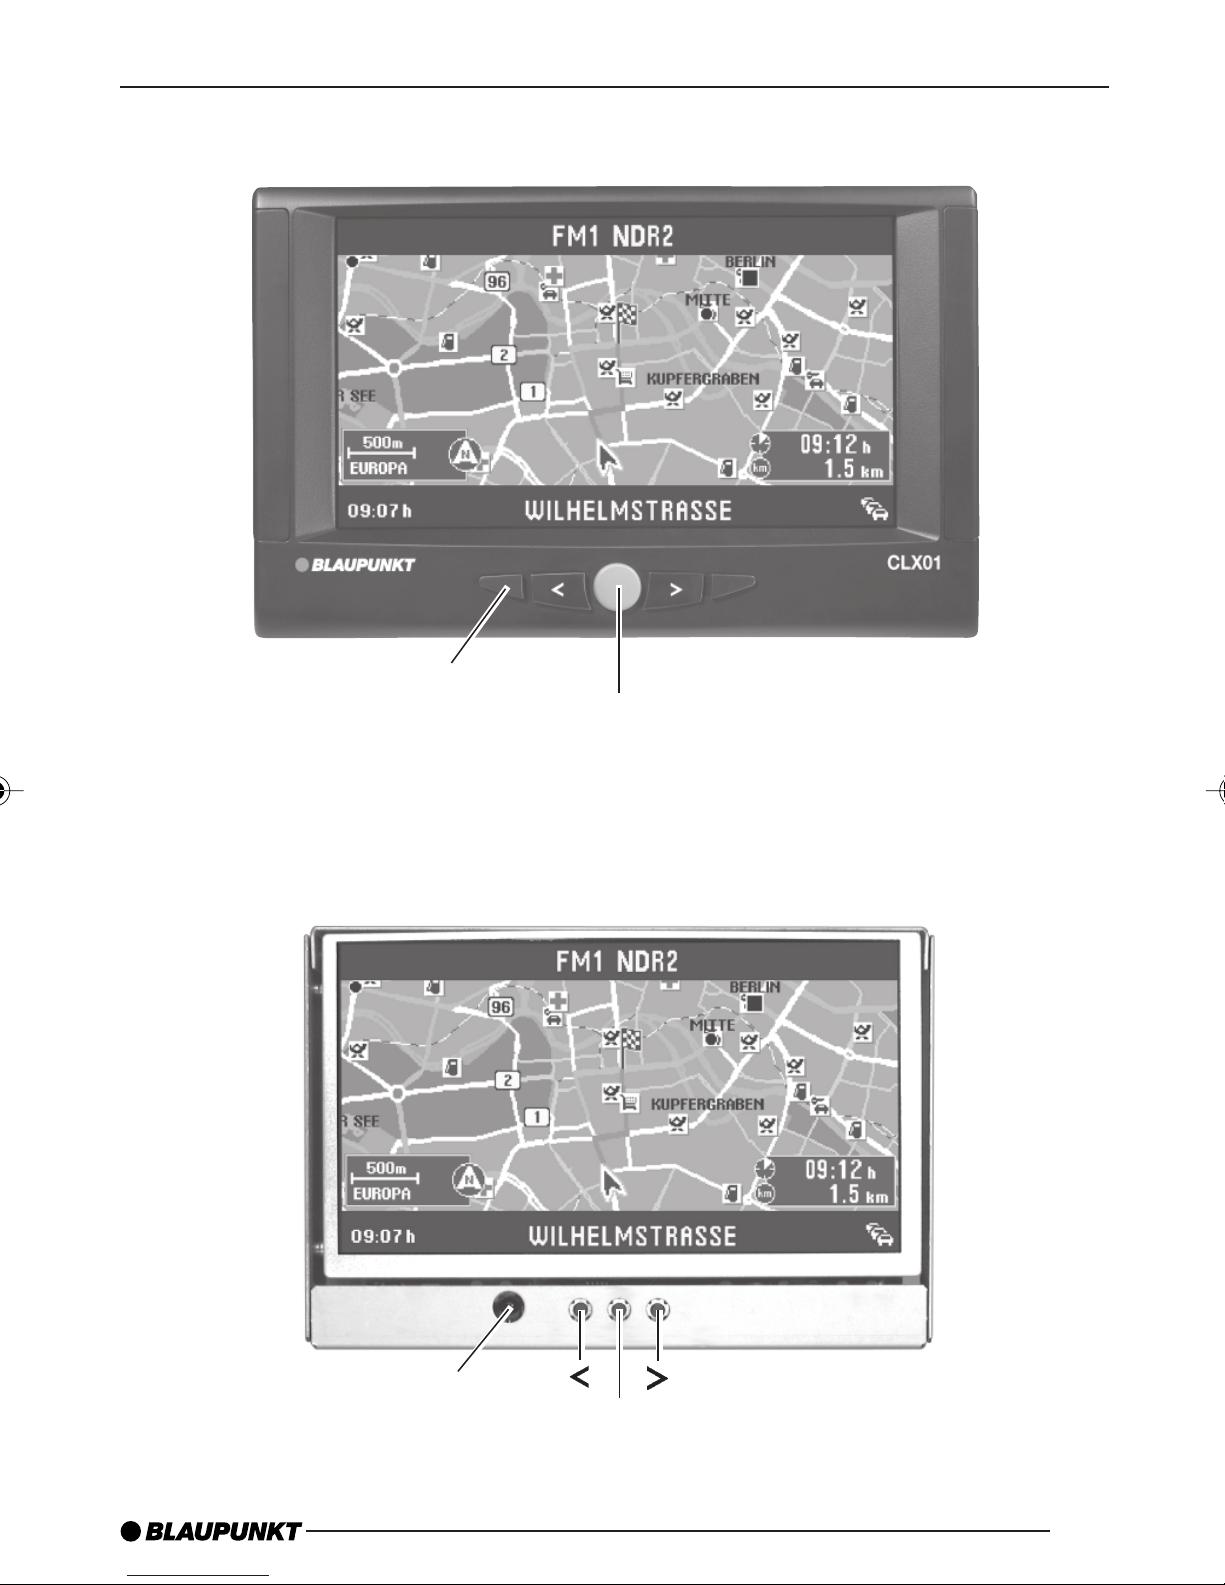
CLX 01
Bedienungsanleitung
Operating instructions
Mode d’emploi
Instrucciones de manejo
Kullanma k∂lavuzu
Page 2

2
Bitte aufklappen
Open here
Ouvrir s.v.p.
Por favor, abrir
Lütfen aç∂n∂z
Page 3
Monitor • Écran • Monitör 7 607 275 027 / 037
DEUTSCH
ENGLISH
FRANÇAIS
ESPAÑOL
IR
Infrared
Infrarouge
IR (Enfraruj)
Menü
Menu
Menu
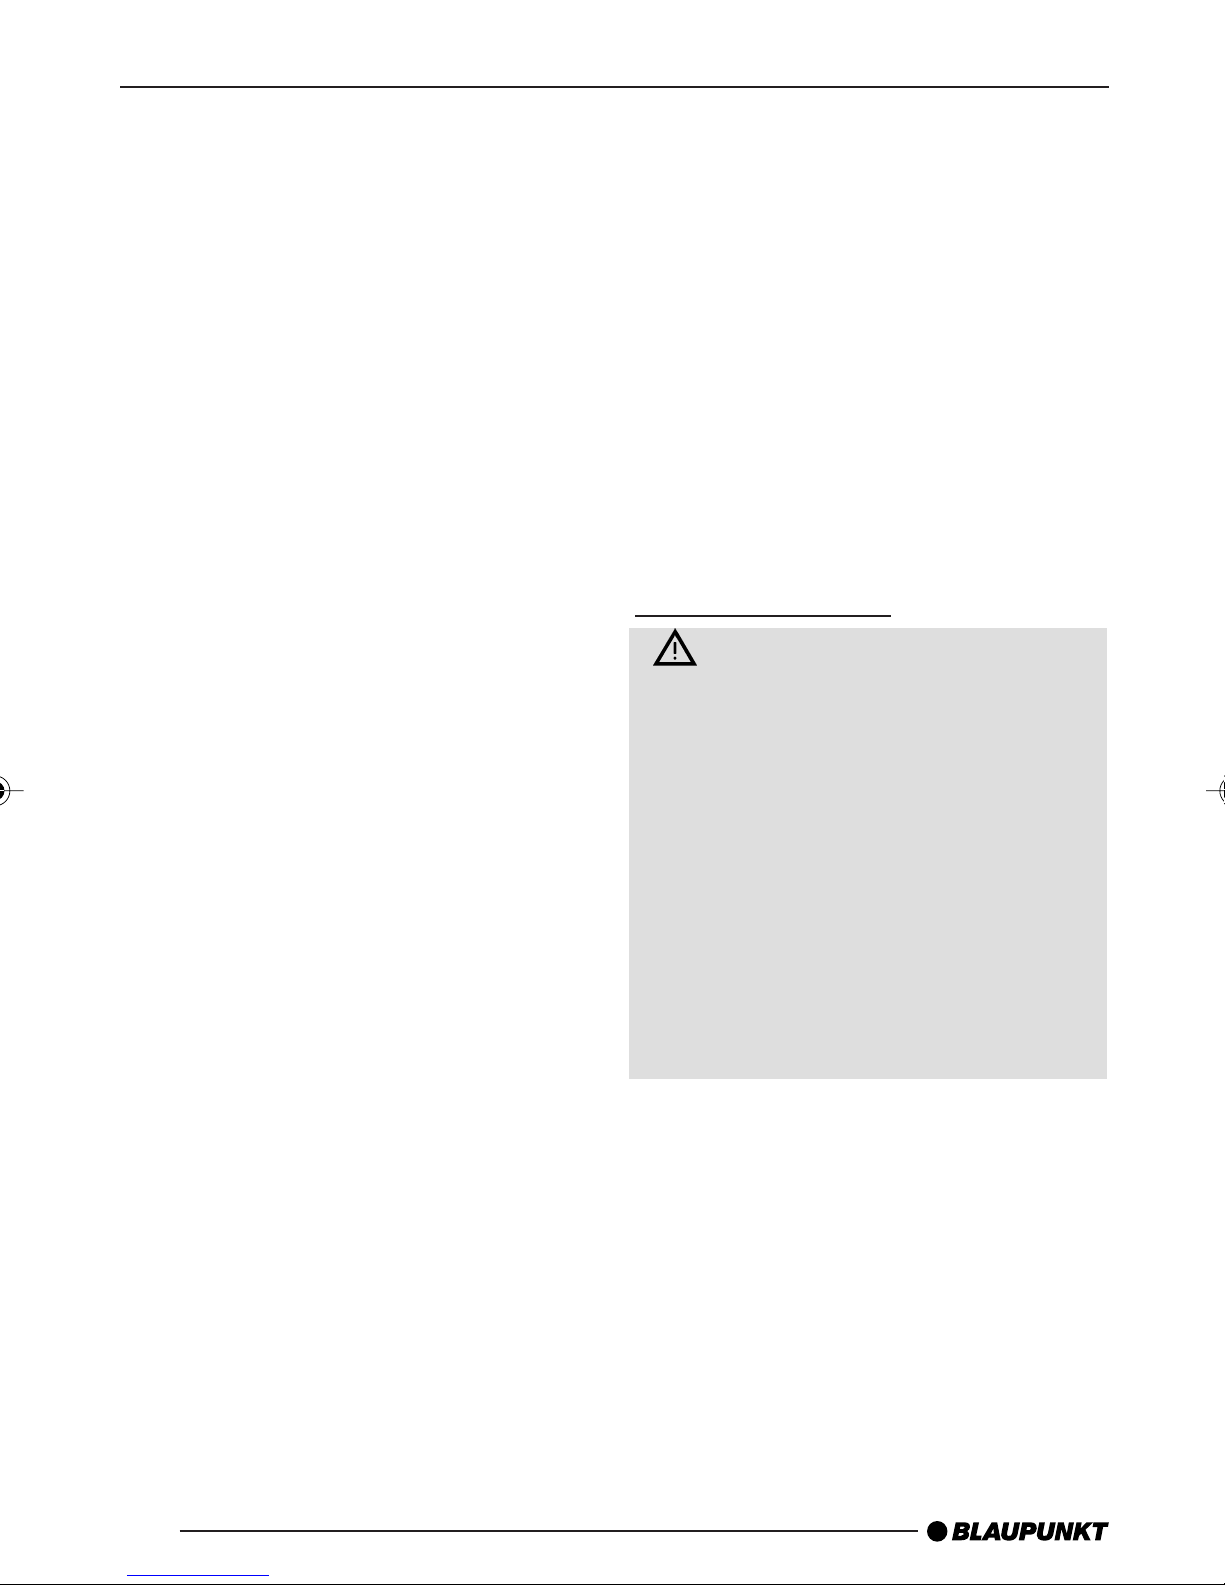
Monitor • Écran • Monitör 7 607 275 020
x
x
x
x
x
Infrared
Infrarouge
IR (Enfraruj)
IR
Menü
Menu
Menu
x
x
3
Page 4
INHALTSVERZEICHNIS
ALLGEMEINE HINWEISE
Allgemeine Hinweise ............... 4
Verkehrsicherheit ............................. 4
Allgemeines zum Monitor ................. 5
Bedienung und Einstellung ...... 5
Ein- und Ausschalten ....................... 5
Quellenumschaltung
Cockpit-Monitor (CLX01) ................ 5
Quellenumschaltung
im Cabin-Bereich ............................ 6
Menü-Einstellungen ......................... 6
Tag/Nacht-Einstellung ...................... 7
Systemeinstellungen ........................ 7
Technische Daten ............................ 7
Einbauhinweise ...................... 24
Allgemeine Hinweise
Bevor Sie den Monitor in Betrieb nehmen, lesen Sie diese Anleitung sorgfältig und machen Sie sich mit dem Gerät
vertraut. Bewahren Sie diese Anleitung
für spätere Fragen im Fahrzeug auf.
Sollten Sie dennoch Fragen zur Bedienung des Gerätes oder zum Service haben, so wenden Sie sich bitte an die
Telefon-Hotline Ihres Landes (je nach
Land evtl. kostenpflichtig). Die Rufnummer und die E-Mail-Adresse finden Sie
auf der Rückseite dieses Heftes.
Verkehrsicherheit
Die Verkehrssicherheit ist ober-
stes Gebot. Bedienen Sie Ihr Gerät
nur, wenn es die Verkehrslage
zulässt. Machen Sie sich vor Fahrtantritt mit dem Gerät vertraut. Akustische Warnsignale von Polizei,
Feuerwehr und Rettungsdiensten
müssen Sie im Fahrzeug rechtzeitig wahrnehmen können.
4
Auf dem Cockpit-Monitor darf aus
Verkehrssicherheitsgründen nur bei
stehendem Fahrzeug Video angeschaut werden.
Page 5

ALLGEMEINE HINWEISE
BEDIENUNG UND
EINSTELLUNG
Allgemeines zum Monitor
Der CLX 01 ist ein 6,5" LCD-Monitor,
der für den Betrieb mit dem CCU 01
oder als Einzelgerät konzipiert wurde.
Das Gerät arbeitet mit einer Betriebsspannung von 12 V oder 24 V (Bordnetz). Die Stromversorgung erfolgt über
KL. 30, das Einschalten (Netzteil) über
KL. 15R.
Der CLX 01 hat ein Bildschirmformat
von 16:9. Je nach Quelle erfolgt eine
automatische Umschaltung (4:3
16:9).
Auf dem Monitor können FBAS-Signale vom Video- und DVD-Player, vom TVTuner und von Kameras, und das RGBSignal vom TravelPilot (Coach Professional), abgebildet werden. Die Signalverarbeitung ist als Multinorm ausgelegt, wodurch PAL, SECAM und NTSCSignale automatisch synchronisiert
werden.
–
Bedienung und Einstellung
Ein- und Ausschalten
Der CLX01 schaltet mit der Fahrzeugzündung (KL. 15R) ein. Nach dem Einschalten erscheint die TravelPilot-Karte.
Wird die MENÜ-Taste (mittlere Taste)
länger als 2 sek. gedrückt, schaltet der
CLX01 aus. Durch nochmaliges drükken der Menütaste wird der CLX01 wieder eingeschaltet. Der CLX01 kann
auch wieder eingeschaltet werden,
wenn Sie am CCU01 eine andere Quelle anwählen (umschalten auf Video,
TravelPilot oder Kamera).
Der CLX01 kann außerdem über das
TravelPilot-Menü „Einstellungen-Bild-
schirm-AUS“ abgedunkelt werden (siehe auch TravelPilot-Bedienungsanleitung). Durch Drücken einer beliebigen
Remote-Taste am CCU01 schaltet der
CLX01 wieder ein.
DEUTSCH
ENGLISH
FRANÇAIS
ESPAÑOL
x
x
An den CLX 01 können drei Überwachungskameras und eine Rückfahrkamera angeschlossen werden. Die
Stromversorgung der Kameras erfolgt
vom CLX 01.
Am Monitor können Helligkeit und Kontrast allgemein und Farbsättigung und
Bildschärfe im Video- und KameraMode eingestellt werden.
Über eine IR-Schnittstelle kann der
TravelPilot fernbedient werden.
Quellenumschaltung CockpitMonitor (CLX01)
Auf dem CLX01 können Sie das Signal
des TravelPilot, Kameras, und bei ausgeschalteter Zündung Videosignale
vom Video- oder DVD-Player darstellen.
Das TravelPilot-Signal wird abgebildet,
wenn Sie am CCU01 eine der Tasten
COCKPIT, CC CD, CDC oder Radio
und die NAV-Taste drücken.
Mit der Taste VIDEO am CCU01 können Sie den CLX01 auf die Video-Quelle (DVD- oder Videoplayer) umschalten.
Die Zündung muß sich in der Radiostellung befinden (Motor aus).
x
x
x
x
x
5
Page 6
BEDIENUNG UND EINSTELLUNG
Zum Anwählen der Kameras
➮ drücken Sie die Taste CAM am
CCU01 so oft, bis die gewünschte
Kamera dargestellt wird.
Die Reihenfolge ist:
CAM1>CAM2>CAM3.
Wird die Taste CAM noch einmal ge-
drückt, wird wieder das Ausgangssignal
(Video oder Travel-Pilot) dargestellt.
Quellenumschaltung im CabinBereich
Im Cabin-Bereich kann auf den Monitoren das Video-Signal (Videoplayer,
DVD), die TravelPilot-Kartendarstellung
und das Bild der Aussichts-Kamera (Kamera 3) dargestellt werden.
Zum Einschalten der Monitore
Menü-Einstellungen
Die CLX01-Bildeinstellungen können
separat für den Video-Modus (Kamera,
Videoquelle) und den TravelPilot-Modus
vorgenommen werden.
Im Video-Modus können Helligkeit,
Kontrast, Farbe, Bildschärfe, Format
und System eingestellt werden, im
TravelPilot-Modus Helligkeit, Kontrast
Format und System.
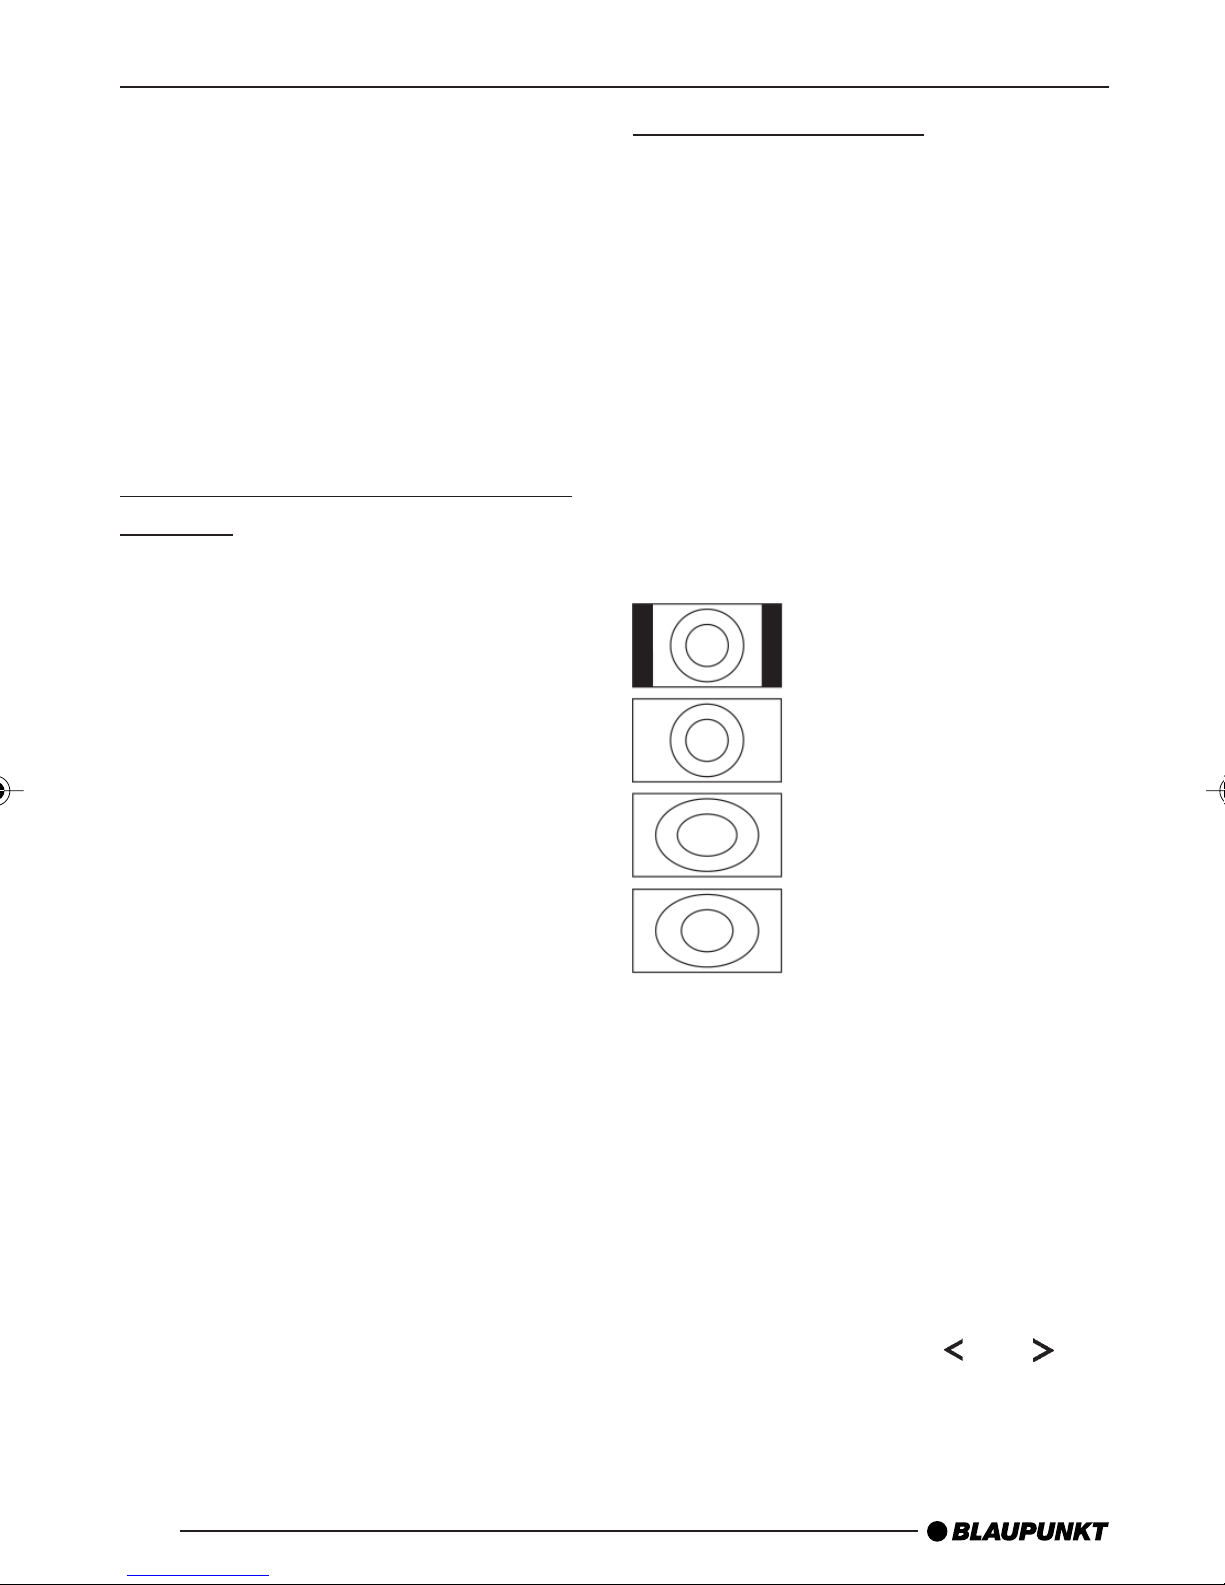
Im Menüpunkt FORMAT können Sie
wählen zwischen NORMAL,CINEMA,
FULL und WIDE.
NORMAL
Input 4:3
CINEMA
Input 16:9
➮ drücken Sie am CCU01 die Taste
CABIN VIDEO oder MAP.
Zum Umschalten zwischen Video und
Kartendarstellung
➮ drücken Sie am CCU01 die Taste
MAP.
Das Umschalten auf die Aussichts-Kamera erfolgt mit einem separat montierten Schalter, der am Stecker III,
Pin 4 (5 V - 24 V) angeschlossen wird.
Hinweis:
Die Kamera 3 hat Vorrang vor Video und
der Kartendarstellung.
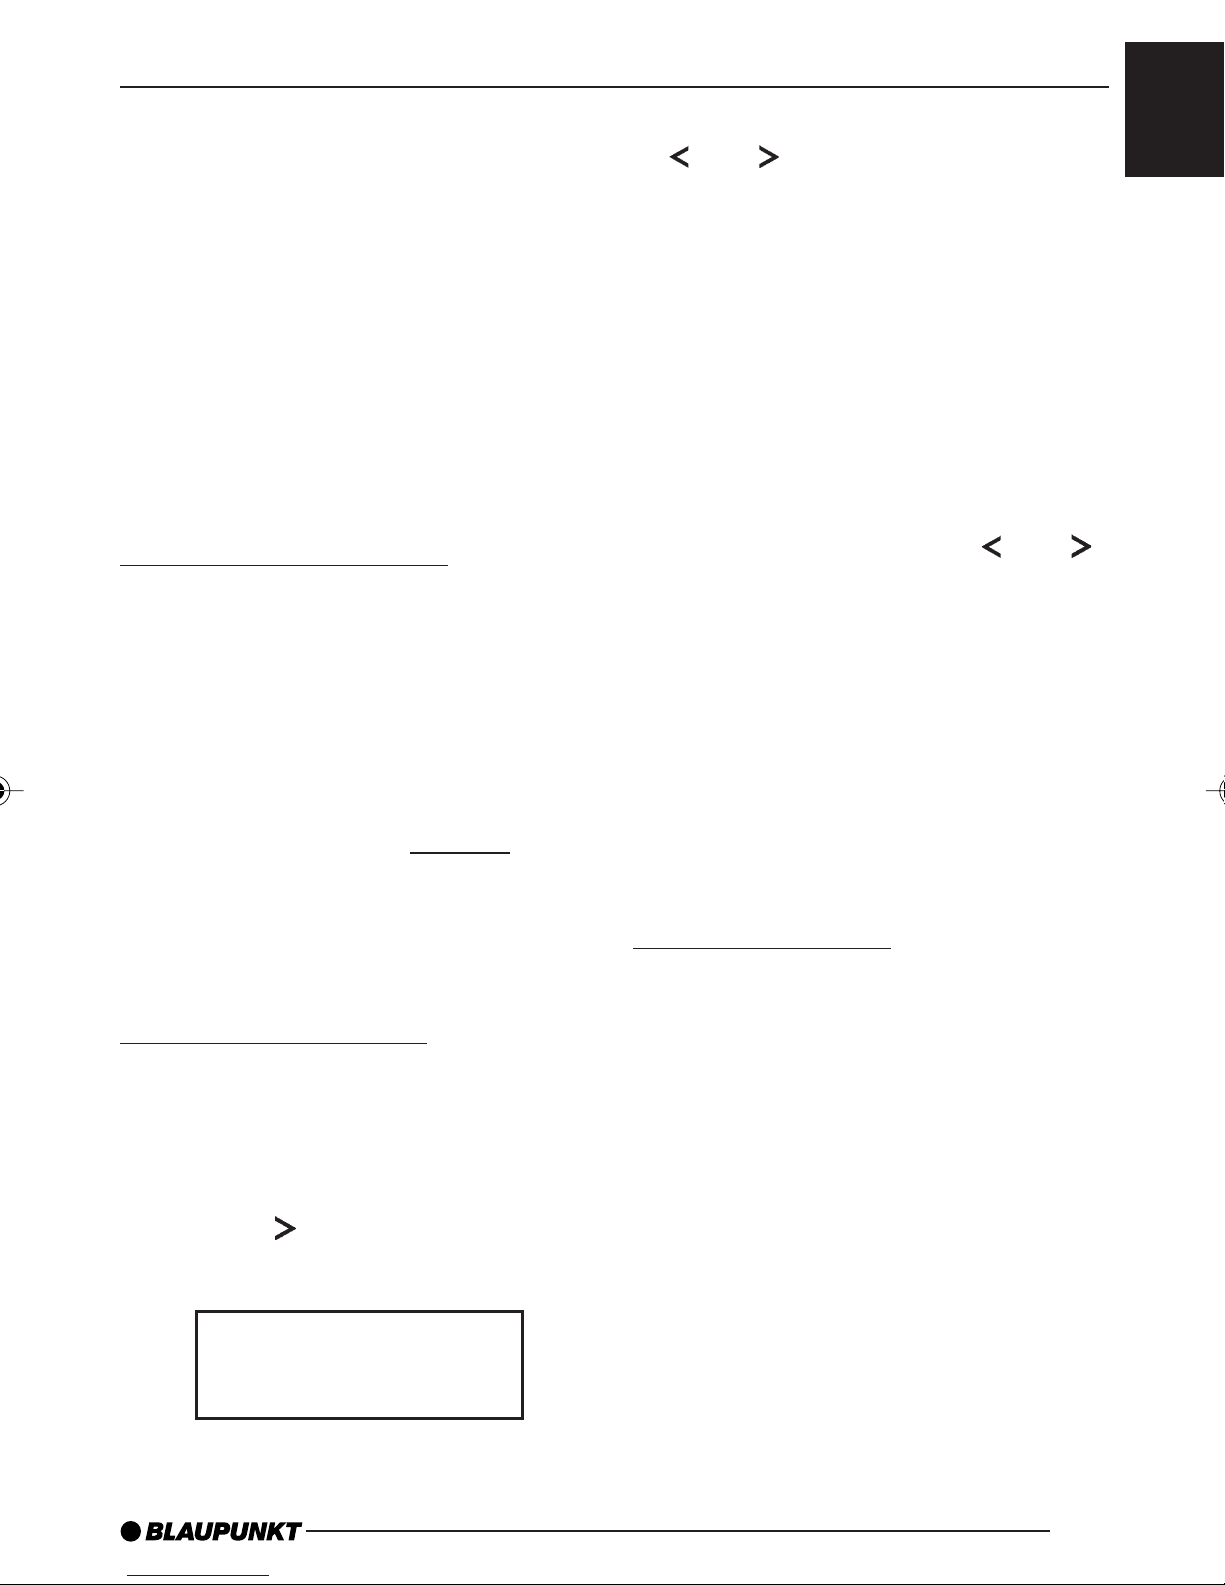
FULL
Input 4:3
WIDE
Input 4:3
Einstellungen im Video Modus
➮ Schalten Sie am CCU01 auf
COCKPIT VIDEO oder CAM.
Zum Anwählen einer Funktion
➮ drücken Sie die Taste MENÜ so
oft, bis der gewünschte Menüpunkt
erscheint.
Zum Einstellen der Funktion
➮ drücken Sie die Taste bzw.
6
am Monitor.
Page 7
BEDIENUNG UND EINSTELLUNG
Mit der Taste MENÜ wird der eingestell-
te Wert gespeichert und auf den nächsten Menüpunkt geschaltet.
Wird etwa 8 Sek. keine der Monitortasten gedrückt, wird das Menü verlassen und alle eingestellten Werte sind
gespeichert.
Einstellungen im TravelPilot Modus
➮ Schalten Sie am CCU01 auf
TravelPilot. Die Einstellungen erfolgen wie im Video-Modus.
Tag/Nacht-Einstellung
Wird das Fahrzeuglicht eingeschaltet,
so wird die Helligkeit des Monitors in den
Nacht-Mode geschaltet. Hierzu muss
der DIM-Display-Anschluss des Monitors (Stecker III/Pin 3) mit + von Klemme 58 verbunden werden.
Die Bildeinstellungen Helligkeit und
Kontrast können jeweils
und Nacht und für den Video- und
TravelPilot-Mode eingestellt werden.
Die eingestellten Werte werden beim
Verlassen des Menüs gespeichert.
getrennt für Tag
➮ Wählen Sie nun mit der Taste
bzw. die gewünschte Kamera-
konfiguration.
Hinweis:
Nur die ausgewählten Kameras können
eingeschaltet werden.
Zum Anwählen der Rückfahrkamera
➮ drücken Sie die Taste MENÜ, um
in den REAR VIEW CAMERAMode zu gelangen.
➮
Wählen Sie mit der Taste
bzw.
INVERTED, wenn das Signal der
Rückfahrkamera gespiegelt dargestellt werden soll oder
NORMAL für ein nicht gespiegeltes Bild.
Beim Verlassen des Menüs werden die
vorgenommenen Einstellungen gespeichert.
Technische Daten
Betriebsspannung: 12 V - 24 V
DEUTSCH
ENGLISH
FRANÇAIS
ESPAÑOL
x
x
x
Systemeinstellungen
➮ Drücken Sie die Taste MENÜ am
CLX01 so oft, bis auf dem Display
SYSTEM +>>> erscheint.
➮ Drücken Sie anschließend
die Taste
Im Display erscheint
CAM1+CAM2+CAM3
.
CAMERA SETUP
Ruhestrom: 30 mA
Standby Strom: < 1 mA
Ausgangs-
spannung Kameras: 12 V /
200 mA
Änderungen vorbehalten!
x
x
x
x
7
Page 8
CONTENTS
GENERAL INFORMATION
General information ................ 8
Road and traffic safety .................... 8
General information on the monitor . 9
Controls and settings .............. 9
Switching on/off ............................. 9
Switching source on the cockpit
monitor (CLX01) ............................ 9
Switching source in the cabin ....... 10
Menu settings............................... 10
Day/night setting .......................... 11
System settings ............................ 11
Specifications............................... 11
Installation notes.................... 24
General information
Before using the monitor, please read
these instructions carefully and
familiarize yourself with the device.
Keep these instructions in your vehicle
for later reference. However, if you still
have any questions on how to operate
the device or on service, please contact
the telephone hotline for your country
(depending on the country, the call may
be charged). You will find the telephone
number and e-mail address printed at
the back of this booklet.
Road and traffic safety
Road and traffic safety has ab-
solute priority. Only operate the device if the road and traffic conditions
allow you to do so. Familiarise yourself with the device before setting off
on your journey. When inside your
vehicle, you should always be able
hear police, fire fighter and ambulance sirens in time.
8
For reasons of road and traffic safety,
you must only watch video on the
cockpit monitor whilst the vehicle is
stationary.
Page 9

GENERAL INFORMATION
CONTROLS AND
SETTINGS
General information on the
monitor
The CLX 01 is a 6.5" LCD monitor designed for use with the CCU 01 or as a
stand-alone device.
The device operates at a voltage of 12V
or 24 V (on-board power supply). Power
is supplied through terminal 30 and the
device is switched on (power supply
unit) through terminal 15R.
The CLX 01 has a 16:9 screen format.
The picture format is changed automatically (4:3 - 16:9) depending on the
source.
The monitor can display FBAS signals
from the video and DVD player, the TV
tuner and cameras, as well as the RGB
signal from the TravelPilot (Coach
Professional). The device is equipped
with multi-standard signal processing,
whereby PAL, SECAM and NTSC
signals are synchronised automatically.
Three surveillance cameras and a
reversing camera can be connected to
the CLX 01. The cameras are supplied
with power from the CLX 01.
General brightness and contrast
settings can be adjusted on the monitor
as well as tint and picture sharpness in
video and camera mode.
The TravelPilot can be controlled
remotely through an IR interface, and
additional information from.
Controls and settings
Switching on/off
The CLX01 switches on with the vehicle
ignition (terminal 15R). The TravelPilot
map appears after the device switches
on.
If the MENU button (middle button) is
pressed for longer than 2 seconds, the
CLX01 switches off. The CLX01
switches back on if the menu button is
pressed again. The CLX01 can also be
switched on again if you select another
source on the CCU01 (i.e. if you switch
to video, TravelPilot or camera mode).
Furthermore, the CLX01 can be
dimmed in the TravelPilot’s „Display
OFF settings“ menu (see also the
TravelPilot’s operating instructions). The
CLX01 will switch back on if you press
any remote button on the CCU01.
Switching source on the cockpit
monitor (CLX01)
On the CLX01, you can display the
signal from the TravelPilot, cameras
and, if the ignition is off, video signals
from the video or DVD player.
The TravelPilot signal will be displayed
if you press one of the COCKPIT, CC
CD, CDC or Radio buttons on the
CCU01 and the NAV button.
Using the VIDEO button on the CCU01,
you can switch the CLX01 to the video
source (DVD or video player). The
ignition must be in the radio position
(engine off).
DEUTSCH
ENGLISH
FRANÇAIS
ESPAÑOL
x
x
x
x
x
x
x
9
Page 10

CONTROLS AND SETTINGS
To select the cameras
➮ keep pressing the CAM button on
the CCU01 until the required
camera is displayed.
The order is as follows:
CAM1>CAM2>CAM3.
If the CAM button is pressed once more,
the initial signal (video or TravelPilot) will
be displayed again.
Switching source in the cabin
The video signal (video and DVD
player), the TravelPilot map and the
picture from the observation camera
(camera 3) can be displayed on the
monitors in the cabin.
Menu settings
Picture settings on the CLX01 can be
adjusted separately for the video mode
(camera, video source) and the
TravelPilot mode.
In video mode, you can adjust brightness, contrast, colour, picture sharpness, format and system; and in
TravelPilot mode, brightness, contrast,
format and system.
In the FORMAT menu, you can choose
between NORMAL, CINEMA, FULL
and WIDE.
NORMAL
Input 4:3
To switch on the monitors
➮ on the CCU01, press the CABIN
VIDEO or MAP button.
To switch between video and map
display
➮ press the MAP button on the
CCU01.
The source is switched to the
observation camera using a separately
installed switch that is connected to Plug
III, Pin 4 (5 V - 24 V).
Note:
Camera 3 has priority over the video and
the map display.
CINEMA
Input 16:9
FULL
Input 4:3
WIDE
Input 4:3
Settings in video mode
➮ On the CCU01, switch to COCK-
PIT VIDEO or CAM.
To select a function
➮ Keep pressing the MENU button
until the required menu item
appears.
10
To adjust the function
➮ press the or button on the
monitor.
Page 11

CONTROLS AND SETTINGS
Press the MENU button to store the set
value and to switch to the next menu
item.
If none of the monitor buttons are
pressed for approx. 8 seconds, the
menu is closed and all the set values
are stored.
Settings in TravelPilot mode
➮ On the CCU01, switch to
TravelPilot. The settings are
changed in the same way as in
video mode.
Day/night setting
If the vehicle lights are turned on, the
monitor’s brightness will switch to night
mode. For this feature to work, the
monitor’s DIM display connection (Plug
III/Pin 3) must be connected to the + of
terminal 58.
The brightness and contrast picture settings can each be adjusted
separately
for day and night and for video mode
and TravelPilot mode. The set values
are stored when the menu is closed.
System settings
➮ Press the or button to select
the required camera configuration.
Note:
Only the selected cameras can be
switched on.
To select the reversing camera
➮ press the MENU button to access
REAR VIEW CAMERA mode.
➮ Press the or button to select
INVERTED, if you want to display
a mirror image of the reversing
camera signal or
NORMAL for a non-mirror image.
When you close the menu, any changes
that you made to the settings will be
stored.
Specifications
Operating voltage: 12 V - 24 V
Closed-circuit current: 30 mA
Stand-by current: < 1 mA
Output voltage
for cameras: 12 V / 200 mA
DEUTSCH
ENGLISH
FRANÇAIS
ESPAÑOL
x
x
x
➮ Keep pressing the MENU button
on the CLX01 until SYSTEM +>>>
appears in the display.
➮ Next, press the button.
The following appears in the
display
CAM1+CAM2+CAM3
CAMERA SETUP
x
x
x
Subject to changes!
x
11
Page 12

TABLE DES MATIÈRES
REMARQUES GÉNÉRALES
Remarques générales ............ 12
Sécurité routière ............................ 12
Généralités concernant l’écran ...... 13
Commande et réglage ........... 13
Allumer / Éteindre.......................... 13
Changement de source sur
l’écran du cockpit (CLX01)............ 13
Changement de source dans
la zone des passagers ................... 14
Menu « Réglages » ........................ 14
Réglage Jour/Nuit .......................... 15
Réglages du système .................... 15
Caractéristiques techniques .......... 15
Consignes de montage .......... 24
Remarques générales
Avant de mettre l’écran en service, lisez
attentivement le présent mode d’emploi
et familiarisez-vous avec son utilisation.
Conservez le mode d’emploi dans le
véhicule pour pouvoir le consulter à tout
moment. Si vous avez des questions
concernant la commande de l’écran ou
le service après-vente, n’hésitez pas à
vous adresser au service d’assistance
téléphonique de votre pays (service
gratuit ou payant en fonction du pays).
Les numéros de téléphone et les
adresses e-mail figurent au dos de cette
brochure.
Sécurité routière
Familiarisez-vous avec
l’appareil avant de prendre la route.
Les avertisseurs sonores de la
police, des sapeurs-pompiers et des
services de secours doivent être
perçus à temps dans le véhicule.
Soyez donc toujours à l’écoute de
votre programme à un volume
adéquat.
Pour des raisons de sécurité, la
vidéo ne peut être regardée sur
l’écran du cockpit qu’à l’immobilisation du véhicule.
12
Page 13

REMARQUES GÉNÉRALES
COMMANDE ET
RÉGLAGE
Généralités concernant l’écran
Le CLX 01 est un écran LCD de 6,5"
conçu pour fonctionner avec la CCU 01
ou en tant qu’appareil individuel.
L’écran fonctionne à une tension de
service de 12 V ou 24 V (réseau de
bord). Il est alimenté via la borne 30,
mis en marche (bloc d’alimentation) via
la borne 15R.
Le CLX 01 a un format d’écran de 16:9.
Le changement de format (4:3 - 16:9) a
lieu automatiquement en fonction de la
source sélectionnée.
L’écran est en mesure de visualiser les
signaux FBAS du magnétoscope et du
lecteur DVD, du tuner TV et des
caméras, ainsi que le signal RVB du
TravelPilot (Coach Professional). Le
traitement des signaux est multinorme,
les signaux PAL, SECAM et NTSC étant
automatiquement synchronisés.
Trois caméras de surveillance et une
caméra de marche arrière peuvent être
raccordées au CLX 01. Les caméras
sont alimentées depuis le CLX 01.
Commande et réglage
Allumer / Éteindre
Vous allumez le CLX01 en mettant le
contact du véhicule (borne 15R). Une
fois l’écran allumé, la carte du
TravelPilot apparaît.
Pour éteindre le CLX01, pressez la
touche MENU (touche du milieu)
pendant plus de 2 secondes. Pressez
de nouveau la touche Menu pour le
rallumer. Vous pouvez remettre le
CLX01 en marche en sélectionnant une
autre source sur l’unité de commande
CCU01 (passage au mode vidéo,
TravelPilot ou caméra).
Le CLX01 peut être également obscurci
via le menu Réglage-Écran-Arrêt du
TravelPilot (se reporter pour cela au
manuel d’utilisation du TravelPilot).
Pressez une touche quelconque de la
CCU01 pour remettre le CLX01 en
marche.
Changement de source sur
l’écran du cockpit (CLX01)
DEUTSCH
ENGLISH
FRANÇAIS
ESPAÑOL
x
x
x
Vous avez la possibilité de régler sur
l’écran la luminosité et le contraste ainsi
que la saturation et la netteté de l’image
en mode vidéo et caméra.
Via une interface infrarouge, il est possible de commander le TravelPilot à distance.
Le CLX01 permet de visualiser le signal
du TravelPilot, de la caméra, et après
coupure du contact, les signaux vidéo
du magnétoscope ou du lecteur DVD.
Pour visualiser le signal du TravelPilot,
pressez l’une des touches COCKPIT
CC CD, CDC ou Radio et NAV sur la
CCU01.
La touche VIDEO de la CCU01 permet
de régler le CLX01 sur vidéo
(magnétoscope ou lecteur DVD). Le
contact doit être mis en position radio
(arrêt du moteur).
13
x
x
x
x
Page 14

COMMANDE ET REGLAGE
Pour sélectionner les caméras,
➮ pressez la touche CAM de la
CCU01 autant de fois que
nécessaire jusqu’à ce que l’image
de la caméra voulue soit visible sur
l’écran.
L’ordre est :
CAM1>CAM2>CAM3.
Pressez de nouveau la touche CAM
pour visualiser de nouveau le signal de
sortie (vidéo ou Travel-Pilot).
Changement de source dans la
zone des passagers
Dans la zone des passagers, les écrans
peuvent visualiser le signal vidéo
(magnétoscope, lecteur DVD), le mode
Carte du TravelPilot et l’image de la
caméra panoramique (caméra 3).
Menu « Réglages »
L’image du CLX01 peut être réglée
séparément pour le mode vidéo
(caméra, source vidéo) et le mode
TravelPilot.
En mode vidéo, il est possible de régler
la luminosité, le contraste, la netteté , le
format et le système, en mode
TravelPilot la luminosité, le contraste,
le format et le système.
La fonction FORMAT offre les options
NORMAL, CINEMA, FULL et WIDE.
NORMAL
Input 4:3
CINEMA
Input 16:9
Pour allumer les écrans,
➮ pressez sur la CCU01 la touche
CABIN VIDEO ou MAP.
Pour passer entre le mode vidéo et
Carte
➮ pressez sur la CCU01 la touche
MAP.
Le passage à la caméra panoramique
se fait à l’aide d’un commutateur séparé
qui est raccordé au connecteur III,
broche 4 (5 V - 24 V).
Note :
La caméra 3 a priorité sur le mode Vidéo
et Carte du TravelPilot.
FULL
Input 4:3
WIDE
Input 4:3
Réglages en mode vidéo
➮ Passez sur la CCU01 à COCKPIT
VIDEO ou CAM.
Pour sélectionner une fonction,
➮ pressez la touche MENU autant de
fois que nécessaire jusqu’à ce que
l’option voulue apparaisse.
Pour régler la fonction,
➮ pressez la touche ou sur
14
l’écran.
Page 15

COMMANDE ET REGLAGE
Pour mémoriser la valeur choisie et
passer à la fonction suivante, pressez
la touche MENU.
Si vous n’appuyez sur aucune touche
de l’écran pendant 8 secondes, vous
quittez le menu et les valeurs que vous
venez de définir sont mémorisées.
Réglages en mode TravelPilot
➮ Passez sur la CCU01 au mode
TravelPilot. Les réglages
s’effectuent comme en mode
vidéo.
Réglage Jour/Nuit
Dès que les feux du véhicule sont allumés, l’écran passe en mode Nuit. Pour
cela, le connecteur DIM de l’écran (connecteur III/broche 3) doit être relié avec
+ de la borne 5.
La luminosité et le contraste peuvent
être réglés séparément aussi bien pour
le jour et la nuit que pour le mode vidéo
et TravelPilot. Les valeurs que vous
définissez sont mémorisées quand vous
quittez le menu.
Réglages du système
➮ Pressez sur le CLX01 la touche
MENU autant de fois que
nécessaire jusqu’à ce que
SYSTEM +>>> apparaisse.
➮ Pressez ensuite la touche .
➮ Choisissez maintenant une confi-
guration de caméra au moyen de
la touche
ou .
Note :
Seulement les caméras sélectionnées
peuvent être mises en marche.
Pour sélectionner une caméra de marche arrière,
➮ pressez la touche MENU pour
passer au mode REAR VIEW
CAMERA.
➮ Choisissez l’option
INVERTED au moyen de la touche
ou pour que l’image de la caméra de marche arrière soit inversée sur l’écran ou l’option
NORMAL pour obtenir une image
non inversée.
Les fonctions et options sélectionnées
sont mémorisées quand vous quittez le
menu.
Caractéristiques techniques
Tension de service : 12 V - 24 V
Courant de repos : 30 mA
Veille : < 1 mA
Tension de
sortie caméras : 12 V / 200 mA
DEUTSCH
ENGLISH
FRANÇAIS
ESPAÑOL
x
x
x
x
x
Sur l’afficheur apparaît :
CAM1+CAM2+CAM3
CAMERA SETUP
x
Sous réserve de modifications !
x
15
Page 16

INDICE
GENERALIDADES
Generalidades ........................ 16
Seguridad vial ............................... 16
Generalidades sobre el monitor ..... 17
Manejo y ajuste ...................... 17
Encender y apagar el equipo ......... 17
Cambiar la fuente de sonido en el
monitor del salpicadero (CLX01) ... 17
Cambiar la fuente de sonido en
la cabina........................................ 18
Ajustes del menú ........................... 18
Ajuste día/noche ........................... 19
Ajustes del sistema........................ 19
Datos técnicos .............................. 19
Instrucciones de montaje ...... 24
Generalidades
Antes de poner en funcionamiento el
monitor, lea atentamente estas
instrucciones y familiarícese con él.
Guarde estas instrucciones dentro del
vehículo para posteriores consultas. Si
tiene alguna duda relacionada con el
manejo del equipo o con el servicio
técnico, llame al teléfono de atención
al cliente de su país (que puede ser no
gratuito, según de qué país se trate).
El número de teléfono y la dirección de
correo electrónico los encontrará al final
de este manual.
Seguridad vial
¡La seguridad vial tiene prioridad
absoluta! Maneje su equipo
únicamente si la situación del tráfico
lo permite. Familiarícese con él y con
la forma de manejarlo antes de
comenzar el viaje. Las señales de
alarma de la policía, de los
bomberos o de los equipos de
salvamento, han de poder
escucharse a tiempo dentro del
vehículo.
16
Por motivos de seguridad vial, sólo
se debe ver vídeo en el monitor del
salpicadero cuando el vehículo está
estacionado.
Page 17

GENERALIDADES
MANEJO Y AJUSTE
Generalidades sobre el monitor
El CLX 01 es un monitor LCD de 6,5"
concebido para funcionar como equipo
independiente o con la unidad CCU 01.
El equipo funciona con una tensión de
empleo de 12 V ó 24 V (red de a bordo).
El suministro eléctrico se lleva a cabo a
través del borne 30, el encendido
(fuente de alimentación) a través del
borne 15R.
El CLX 01 tiene un formato de pantalla
de 16:9. Dependiendo de la fuente, se
conmuta automáticamente (4:3 - 16:9).
El monitor puede procesar señales
FBAS procedentes de equipos como
vídeos y reproductores de DVD,
televisores y cámaras, y la señal RGB
del TravelPilot (Coach Professional). El
procesamiento de señales está
concebido como multinorma, con lo que
se pueden sincronizar automáticamente señales PAL, SECAM y
NTSC.
Manejo y ajuste
Encender y apagar el equipo
El CLX01 se enciende cuando se
introduce la llave de contacto (borne
15R). Una vez encendido, se visualiza
el mapa del TravelPilot.
Si se mantiene pulsada la tecla MENU
(tecla central) durante más de 2
segundos, se apaga el CLX01.
Pulsando de nuevo dicha tecla, se
vuelve a encender el CLX01. También
se puede volver a encender el CLX01
seleccionando otra fuente en el CCU01
(conmutar a vídeo, TravelPilot o
cámara).
Por otro lado, existe la posibilidad de
oscurecer el CLX01 con el menú
“Ajustes-Pantalla-OFF” del TravelPilot
(consulte el manual de instrucciones del
TravelPilot). Pulsando cualquier tecla
Remote en el CCU01, se vuelve a
encender el CLX01.
DEUTSCH
ENGLISH
FRANÇAIS
ESPAÑOL
x
x
En el CLX 01 se pueden conectar tres
cámaras de vigilancia y una de marcha
atrás. El suministro eléctrico de las
cámaras se lleva a cabo desde CLX 01.
En general, en el monitor se pueden
regular el brillo y el contraste; en el
modo vídeo y cámara pueden regularse
también la tonalidad y la nitidez de
imagen.
El TravelPilot puede manejarse a
distancia a través de una interfaz de
infrarrojos.
Cambiar la fuente de sonido en
el monitor del salpicadero
(CLX01)
Vd. puede visualizar en el CLX01 la
señal del TravelPilot, de las cámaras y,
si el encendido del vehículo está
desconectado, las señales del equipo
de vídeo o del reproductor de DVD.
La señal del TravelPilot se muestra si
Vd. pulsa en el CCU01 una de las teclas
COCKPIT, CC CD, CDC o Radio y la
tecla NAV.
Con la tecla VIDEO del CCU01 puede
conmutar el CLX01 a la fuente de vídeo
(reproductor de DVD o equipo de
x
x
x
x
x
17
Page 18

MANEJO Y AJUSTE
vídeo). Para ello, el encendido del
vehículo debe hallarse en la posición
de radio (motor apagado).
Para seleccionar las cámaras,
➮ pulse repetidas veces la tecla CAM
en el CCU01 hasta que en la
pantalla se visualice la cámara
deseada.
El orden es:
CAM1>CAM2>CAM3.
Si se pulsa de nuevo la tecla CAM, se
vuelve a mostrar la señal de salida
(vídeo o TravelPilot).
Cambiar la fuente de sonido en
la cabina
En los monitores situados en la cabina
se puede visualizar la señal de vídeo
(vídeo, DVD), el mapa del TravelPilot y
la imagen de la cámara panorámica
(cámara 3).
Para encender los monitores,
Ajustes del menú
Los ajustes de imagen del CLX01
pueden realizarse por separado para el
modo vídeo (cámara, fuente de vídeo)
y el modo TravelPilot.
En el modo de vídeo se pueden regular
el brillo, el contraste, el color, la nitidez
de la imagen, el formato y el sistema,
mientras que en el modo TravelPilot se
pueden regular el brillo, el contraste, el
formato y el sistema.
En la opción de menú FORMAT, puede
seleccionar entre NORMAL, CINEMA,
FULL y WIDE.
NORMAL
Input 4:3
CINEMA
Input 16:9
FULL
Input 4:3
➮ pulse en el CCU01 la tecla CABIN
VIDEO o MAP.
Para conmutar entre vídeo y mapa,
➮ pulse la tecla MAP en el CCU01.
La conmutación a la cámara
panorámica se lleva a cabo con un
interruptor que va montado aparte y
unido al conector III, pin 4 (5 V - 24 V).
Nota:
La cámara 3 tiene preferencia sobre el
vídeo y el mapa.
WIDE
Input 4:3
Ajustes para el modo de vídeo
➮ Conmute en el CCU01 a COCKPIT
VIDEO o CAM.
Para seleccionar una función,
➮ pulse repetidas veces la tecla
MENU hasta que aparezca la
opción deseada.
Para ajustar la función,
➮ pulse la tecla o en el monitor.
18
Page 19

MANEJO Y AJUSTE
Con la tecla MENU se memoriza el valor
ajustado y se pasa a la siguiente opción.
Si durante aprox. 8 segundos no se
pulsa ninguna tecla del monitor, se sale
del menú y todos los valores ajustados
quedan memorizados.
Ajustes para el modo TravelPilot
➮ Conmute en el CCU01 a
TravelPilot. Los ajustes se realizan
de la misma forma que en el modo
de vídeo.
Ajuste día/noche
Si se enciende la luz del vehículo, el
brillo del monitor conmuta
automáticamente al modo Noche. Para
ello, la conexión de pantalla DIM del
monitor (conector III/pin 3) debe estar
conectada con el polo positivo del borne
58.
➮ Seleccione la configuración más
adecuada para la cámara con la
tecla
o .
Nota:
Recuerde que sólo se pueden encender
las cámaras seleccionadas.
Para seleccionar la cámara de marcha
atrás,
➮ pulse la tecla MENU para acceder
al modo REAR VIEW CAMERA.
➮ Con la tecla o seleccione
INVERTED, para ver invertida la
imagen de la cámara o
NORMAL para ver la imagen
normal.
Los ajustes realizados se memorizan
al salir del menú.
DEUTSCH
ENGLISH
FRANÇAIS
ESPAÑOL
x
x
El brillo y el contraste pueden regularse
por separado para día y noche y para
los modos de vídeo y TravelPilot. Los
valores ajustados se memorizan al salir
del menú.
Ajustes del sistema
➮ Pulse repetidas veces la tecla
MENU del CLX01 hasta que en la
pantalla aparezca la indicación
SYSTEM +>>>.
➮ Después, pulse la tecla .
En la pantalla aparece
CAM1+CAM2+CAM3
CAMERA SETUP
Datos técnicos
Tensión de empleo: 12 V - 24 V
Corriente de reposo: 30 mA
Corriente en
disponibilidad
(standby): < 1 mA
Tensión de salida
de las cámaras: 12 V/200 mA
x
x
x
x
¡Salvo modificaciones!
x
19
Page 20

∑Ç∑NDEK∑LER
GENEL B∑LG∑LER
Genel bilgiler ........................ 20
Trafik güvenliπi ............................. 20
Monitör ile ilgili genel bilgiler ........ 21
Kullan∂lmas∂ ve ayarlanmas∂ 21
Açma ve kapatma ........................ 21
Kaynak deπiµtirme Cockpit monitörü
(CLX01) ........................................ 21
Kabin bölümünde kaynak deπiµtirme
22
Menü ayarlar∂ ............................... 22
Gündüz/Gece ayar∂ ...................... 23
Sistem ayarlar∂ ............................. 23
Teknik veriler ................................ 23
Montaj bilgileri ...................... 24
Genel bilgiler
Monitörü çal∂µt∂rmaya baµlamadan
önce, bu kullanma k∂lavuzunu itinayla
okuyunuz ve cihaz∂ iyice tan∂y∂n∂z.
Kullanma k∂lavuzunu, sonradan ortaya
ç∂kabilecek sorular için araç içinde
muhafaza ediniz. Yine de cihaz∂n
kullan∂m∂ veya servis ile ilgili sorular∂n∂z
olursa , ülkenizdeki müµteri dan∂µma
hatt∂n∂ aray∂n∂z (ülkeye baπl∂ olarak, bu
telefon görüµmesi ücretli olabilir). Telefon numaralar∂n∂ ve E posta adresini,
bu kitapç∂π∂n arka yüzünde
bulabilirsiniz.
Trafik güvenliπi
Trafik güvenliπi her µeyden
daha önemlidir. Cihaz∂n∂z∂ sadece
yol ve trafik koµullar∂n∂n izin verdiπi
durumlarda kullan∂n∂z. Yola
ç∂kmadan önce cihaz∂n∂z∂
tan∂y∂n∂z. Polis, itfaiye ve kurtarma
hizmetlerinin sesli uyar∂ sinyallerini
arac∂n∂zda zaman∂nda
duyabilmelisiniz.
20
Cockpit monitöründe, trafik
güvenliπinden dolay∂ sadece araç
dururken video seyredilebilir.
Page 21

GENEL B∑LG∑LER
KULLAN∑LMAS∑ VE
AYARLANMAS∂
Monitör ile ilgili genel bilgiler
CLX 01, CCU 01 ile veya tek baµ∂na
kullan∂lmak üzere tasarlanm∂µ bir 6,5"
LCD monitörüdür. Cihaz, 12 V veya 24
V iµletme gerilimi (araç elektrik
µebekesi) ile çal∂µ∂r. Elektrik ak∂m∂
beslemesi TERM. 30 üzerinden, cihaz∂n
aç∂lmas∂ ise (güç kaynaπ∂) TERM. 15R
üzerinden yap∂l∂r.
CLX 01‘in görüntü ebat∂ 16:9
boyutundad∂r. Kullan∂lan kaynaπa göre,
otomatik olarak deπiµir (4:3
Monitörde, video ve DVD çalardan, TVTuner cihaz∂ndan ve kameralardan
gelen FBAS sinyalleri ve TravelPilot
(Coach Professional) cihaz∂ndan gelen
RGB sinyalleri görüntülenebilir. Sinyal
iµlenmesi çok normlu olarak
tasarlanm∂µt∂r; böylelikle PAL, SECAM
ve NTSC sinyalleri otomatik olarak
senkronize edilir.
CLX 01‘e üç denetleme kameras∂ ve bir
geri sürme baπlanabilir. Kameralar∂n
elektrik ak∂m∂ beslemesi CLX 01
üzerinden saπlan∂r.
Monitörde parlakl∂k ve kontras genel
olarak, renk doyumu ve görüntü netliπi
ise video ve kamera modunda
ayarlanabilir.
Bir IR (enfraruj) arabirimi üzerinden
TravelPilot uzaktan kumanda edilebilir.
– 16:9).
Kullan∂lmas∂ ve ayarlanmas∂
Açma ve kapatma
CLX01, arac∂n kontaπ∂ (TERM. 15R)
üzerinden aç∂l∂r. Aç∂ld∂ktan sonra
TravelPilot kart∂ gösterilir.
MENÜ tuµuna (orta tuµ) 2 saniyeden
daha uzun bir süre bas∂l∂rsa, CLX01
kapan∂r. Menü tuµuna tekrar bas∂l∂nca,
CLX01 yine aç∂l∂r. CCU01 ünitesinde
baµka bir kaynak seçtiπiniz zaman da
CLX01 aç∂labilir (video, TravelPilot veya
kamera moduna geçildiπinde).
Ayr∂ca CLX01, „Ayarlar-Ekran-KAP-
ALI“ TravelPilot menüsü üzerinden
karart∂labilir (TravelPilot kullanma
klavuzuna da bak∂n∂z). CCU01
üzerindeki herhangi bir tuµa bas∂larak,
CLX01 tekrar aç∂l∂r.
Kaynak deπiµtirme Cockpit
monitörü (CLX01)
CLX01 üzerinde TravelPilot ve kamera
sinyallerini ve ayr∂ca kontak kapal∂yken
video veya DVD çalar∂n video
sinyallerini görüntüleyebilirsiniz.
TravelPilot sinyali, CCU01 üzerinde
COCKPIT, CC CD, CDC veya radyo ve
NAV tuµuna bas∂l∂nca görüntülenir.
CCU01‘deki VIDEO tuµu ile CLX01‘in
video kaynaπ∂na (DVD veya video çalar)
geçmesini saπlayabilirsiniz. Arac∂n
kontaπ∂ radyo konumunda olmal∂d∂r
(motor kapal∂).
DEUTSCH
ENGLISH
FRANÇAIS
ESPAÑOL
TÜRKÇE
x
x
x
x
x
x
21
Page 22

KULLANILMASI VE AYARLANMASI
Kameralar∂n seçilmesi için
➮ ∑stediπiniz kamera gösterilinceye
kadar, CCU01 ünitesinde CAM
tuµuna bas∂n∂z.
Kamera s∂ras∂ µöyledir:
CAM1>CAM2>CAM3.
CAM tuµuna tekrar bas∂l∂rsa, yine
baµlang∂ç sinyali (video veya Travel-Pilot) gösterilir.
Kabin bölümünde kaynak
deπiµtirme
Kabin bölümünde, monitörlerde video
sinyali (video çalar, DVD), TravelPilot
harita görüntüsü ve izleme kameras∂n∂n
(kamera 3) görüntüsü gösterilebilir.
Menü ayarlar∂
CLX01 görüntü ayarlar∂, video modu
(kamera, video kaynaπ∂) ve TravelPilot
modu için ayr∂ ayr∂ yap∂labilir.
Video modunda parlakl∂k, kontrast, renk,
görüntü netliπi, format ve sistem
ayarlanabilir, TravelPilot modunda ise
parlakl∂k, kontrast, format ve sistem
ayarlanabilir.
FORMAT menü maddesinde, NORMAL, CINEMA, FULL ve WIDE
aras∂nda seçim yapabilirsiniz.
Video modundaki ayarlar
NORMAL
Input 4:3
Monitörleri açmak için
➮ CCU01‘de CABIN VIDEO veya
MAP tuµuna bas∂n∂z.
Video ve harita görüntüsü aras∂nda
geçiµ yapmak için
➮ CCU01‘de MAP tuµuna bas∂n∂z.
∑zleme kameras∂na geçiµ, III fiµinin 4
numaral∂ pimine (5 V - 24 V) baπlanan,
ayr∂ monte edilmiµ bir µalter ile yap∂l∂r.
Uyar∂:
Kamera 3, video ve harita görüntüsüne
k∂yasla önceliklidir.
CINEMA
Input 16:9
FULL
Input 4:3
WIDE
Input 4:3
➮ CCU01‘de COCKPIT VIDEO veya
CAM fonksiyonuna geçiniz.
Bir fonksiyonu seçmek için
➮ ∑stediπiniz menü maddesi
gösterilinceye kadar, MENÜ tuµuna
bas∂n∂z.
Fonksiyon ayarlamak için
22
➮ Monitörde ya da tuµuna
bas∂n∂z.
Page 23

KULLANILMASI VE AYARLANMASI
MENÜ tuµu ile, ayarlanm∂µ olan deπer
kaydedilir ve bir sonraki menü
maddesine geçilir.
Yaklaµ∂k 8 saniye boyunca herhangi bir
monitör tuµuna bas∂lmazsa, menü terk
edilir ve ayarlanm∂µ olan tüm deπerler
kaydedilmiµ olur.
TravelPilot modundaki ayarlar
➮ CCU01‘de TravelPilot moduna
geçiniz. Ayarlar video modundaki
gibi yap∂l∂r.
Gündüz/Gece ayar∂
Araç farlar∂ aç∂l∂rsa, monitörün parlakl∂π∂
gece moduna geçer. Bunun için
monitörün DIM ekran baπlant∂s∂ (fiµ III/
Pim 3) 58 terminalinin + ucuna
baπlanmal∂d∂r.
Parlakl∂k ve kontrast görüntü ayarlar∂,
gündüz ve gece için ve video modu ve
TravelPilot modu için ayr∂ ayr∂
ayarlanabilir.
➮ Ωimdi ya da tuµu ile istediπiniz
kamera konfigürasyonunu seçiniz.
Uyar∂:
Sadece seçilmiµ olan kameralar
aç∂labilir.
Geri sürüµ kameras∂n∂ seçmek için
➮ REAR VIEW CAMERA moduna
ulaµmak için, MENÜ tuµuna
bas∂n∂z.
➮ Geri sürüµ kameras∂n∂n sinyalinin
ters (ayna görüntüsü)
gösterilmesini istiyorsan∂z,
tuµu ile
INVERTED fonksiyonunu seçiniz
veya ters olmayan (ayna görüntüsü
deπil) görüntü için
NORMAL fonksiyonunu seçiniz.
Menü terk edildiπi zaman, yap∂lm∂µ olan
ayarlar kaydedilir.
ya da
DEUTSCH
ENGLISH
FRANÇAIS
ESPAÑOL
TÜRKÇE
x
Ayarlanan deπerler, menü terk edilince
kaydedilir.
Sistem ayarlar∂
➮ Ekranda SYSTEM +>>>
görününceye kadar, CLX01‘de
MENÜ tuµuna arka arkaya bas∂n∂z.
➮ Ard∂ndan tuµuna bas∂n∂z.
Ekranda µu görüntü belirir:
CAM1+CAM2+CAM3
CAMERA SETUP
Teknik veriler
∑µletme gerilimi: 12 V - 24 V
Dinlenme ak∂m∂: 30 mA
Stand-by elektrik ak∂m∂: < 1 mA
Kameralar∂n ç∂k∂µ
gerilimi: 12 V /
200 mA
Deπiµiklikler olabilir!
x
x
x
x
x
23
Page 24

EINBAUHINWEISE • INSTALLATION NOTES • CONSIGNES DE
117
0,5
187,5
0,5
18,5
0,5
MONTAGE • INSTRUCCIONES DE MONTAJE • MONTAJ B∑LG∑LER∑
7 607 275 027 / 037
0,5
-
+
18,5
0,5
-
+
117
187,5
+
0,5
-
Steckerfreiraum
Clearance required for plugs
Espace libre connecteur
Espacio libre para el conector
Fiµ boµluπu
24
Montageausschnitt
Mounting Cutout
Ajour pour montage
Muesca para montaje de closés
Montaj boµluπu
Ø entsprechend Schraube und Material
Ø according to screw and material
Ø en fonction de la vis et du matériau
Ø conforme a tornillo y material
Ø C∂vataya ve malzemeye uygun
Page 25

DEUTSCH
ENGLISH
FRANÇAIS
ESPAÑOL
x
x
x
x
x
x
x
EINBAUHINWEISE • INSTALLATION NOTES • CONSIGNES DE MONTAGE • INSTRUCCIONES DE MONTAJE • MONTAJ B∑LG∑LER∑
25 26
Anschlusszeichnung 7 607 275 020 / ... 027 / ... 037
Diagram of connections 7 607 275 020 / ... 027 / ... 037
Schéma de branchement 7 607 275 020 / ... 027 / ... 037
7 607 271 021/027
1
2
Video In
Video Out
21
Esquema de conexiones 7 607 275 020 / ... 027 / ... 037
Baπlant∂ çizimi 7 607 275 020 / ... 027 / ... 037
EA CLX01, S. 25+26 23.07.2004, 11:27 Uhr25
Page 26

EINBAUHINWEISE • INSTALLATION NOTES • CONSIGNES DE
MONTAGE • INSTRUCCIONES DE MONTAJE • MONTAJ B∑LG∑LER∑
7 607 275 020
DEUTSCH
ENGLISH
FRANÇAIS
ESPAÑOL
M4 (4 )
*
135
x
x
+
0,5
-
0,5
-
+
8
0,5
-
+
68
x
x
x
Steckerfreiraum
Clearance required for plugs
Espace libre connecteur
Espacio libre para el conector
Fiµ boµluπu
Molex Serie MicroFit 3.0
Molex Serisi MicroFit 3.0
Stecker, Connector,
Connecteur, Conector,
Fiµ
x
x
27
Page 27

Service-Nummern • Service numbers • Numéros du service
après-vente • Números de servicio • Servis telefon
numaralar∂
Country: Phone: E-mail:
Germany (D) 0180-5255 666 michael.schulz@dlze.de
Austria (A) +43-1-610 390 abc@ABC-Service.co.at
Belgium (B) +32 (0)2 525 54 47 Philip.Claus@be.bosch.com
Denmark (DK) +45-4489 8376 blaupunkt@dk.bosch.com
Finland (FIN) +358-9-560 505 30 tuomo.pihlajamaa@shp.fi
France (F) +33-1 60 03 69 84 alain.bravard@electronic2010.fr
Great Britain (GB) +44-1274-688 990 keith.ellis@autosound.ltd.uk
Greece (GR) +30-1-5127335 moschuvivi@yahoo.gr
Ireland (IRL) +353-1-872 6644 carradio@eircom.net
Italy (I) +39 02 36 96-331 Elio.Magistrelli@it.bosch.com
Luxembourg (L) +32 (0)2 525 54 47 Philip.Claus@be.bosch.com
Netherland (NL) +31 (0)23 56 56 309 Philip.Claus@be.bosch.com
Norway (N) +47 66 81 71 36 stein.johannessen@no.bosch.com
Portugal (P) +351 21 851 01 44 pedro.pinto@pt.bosch.com
Spain (E) +34-972-860 576 aec@eservinet.com
Sweden (S) +46-8-750 1850 blaupunkt@se.bosch.com
Switzerland (CH) 041-2499750 fgluzern@fgluzern.ch
Turkey (TR) +90-212-335 0677 sabuncu@ixir.com
USA (USA) +1-800-266-2528 support@blaupunktusa.com
Blaupunkt GmbH
07/04 CM/PSS 8 622 403 233
/
 Loading...