

Page 1

Installation and Operation Manual
Blackmagic Cintel
October 2015
Page 2

Welcome!
Thanks for purchasing your new Cintel scanner!
Your new Cintel scanner runs film in real time so you can transfer film much faster
than a traditional scanner that runs non real time using a constant start-stop
motion. However it’s important to understand that your Cintel scanner is not a
telecine and it does not transfer film to video, as it transfers film direct to DaVinci
Resolve where you have the power to edit the film rolls back together and the
scans can be color graded, reframed, noise reduced and the audio extracted.
Using DaVinci Resolve to operate the scanner means you have much more
creative control than a simple telecine because DaVinci Resolve has many more
features than is possible to do in hardware. Plus because the Cintel scanner
takes advantage of the power of the DaVinci Resolve system and the GPU’s in
the host computer, this scanner itself does not need to be cluttered with bulky
expensive electronics assemblies.
This means the Cintel scanner is smaller, lighter and has more value engineered
into the parts of the scanner that result in better quality film scans, such as
precision mechanical film handling components, optics, high intensity defuse
light source and the built in camera.
The Cintel scanning workflow is simple as all you need to do is scan your film to
intermediate Cintel RAW files and then once you have joined the film rolls back
together in the timeline, added noise reduction, color grading and reframing,
you can use DaVinci’s deliver page to render out files to any format you like.
You might need to render to DPX frames to use third party film restoration
software or you might want to render to DNX or ProRes files for use in editing
software. You can even render out digital cinema package files if you want to
digitally project the film!
Your Cintel scanner is designed to work in conjunction with DaVinci Resolve
so you get incredible power and amazing quality, so please read through this
manual carefully so you can learn all about how to use your new scanner.
Of course with all the power of DaVinci Resolve available with your scanner, it’s
also important to check out the DaVinci Resolve manual and tutorials available.
There are also some great customer tutorial videos on using DaVinci Resolve
as well as high quality training available from third party vendors to help you
get the most out of your DaVinci Resolve system.
Grant Petty
CEO Blackmagic Design
Page 3

Contents
Blackmagic Cintel
Getting Started 4
Unpacking and Mounting Cintel 4
Getting Started with Blackmagic Cintel 5
Using Cintel 8
Wind Types 8
Switching to 16mm 9
Playback Controls 11
Standby Mode 12
Servicing 12
Specifications 13
Help 14
Safety 15
Limited Warranty 15
Page 4
Getting Started
Unpacking and Mounting Cintel
Blackmagic Cintel’s architecturally inspired design allows
it to serve as an aesthetic feature in your studio, but it is
also a large, heavy professional tool. As such, care should
be taken when unpacking and mounting your Cintel unit.
Once you have opened Blackmagic Cintel’s road case, you
will see that spaces have been cut in the foam padding to
give you a sturdy grip on your scanner.
Please note that Cintel weighs over 130 pounds and is too
heavy to be unpacked by one person. Unpacking should
be undertaken by 2 people using correct lifting techniques.
1
1
Bend your knees, keep a straight back and lift with careful,
controlled movements.
Once you have gently removed your scanner from its road
case, place it upright on a flat surface capable of supporting
its weight and follow the getting started procedure in the
‘getting started with Blackmagic Cintel’ section.
Blackmagic Cintel’s wall mounts conform to industry
standard television mounting hardware and any television
mount rated higher than 130 pounds will allow you to mount
your scanner securely to your studio wall.
13
13
12
12
2
2
11
4
4
3
3
5
5
6
6
7
7
9 10
9 10
8
8
11
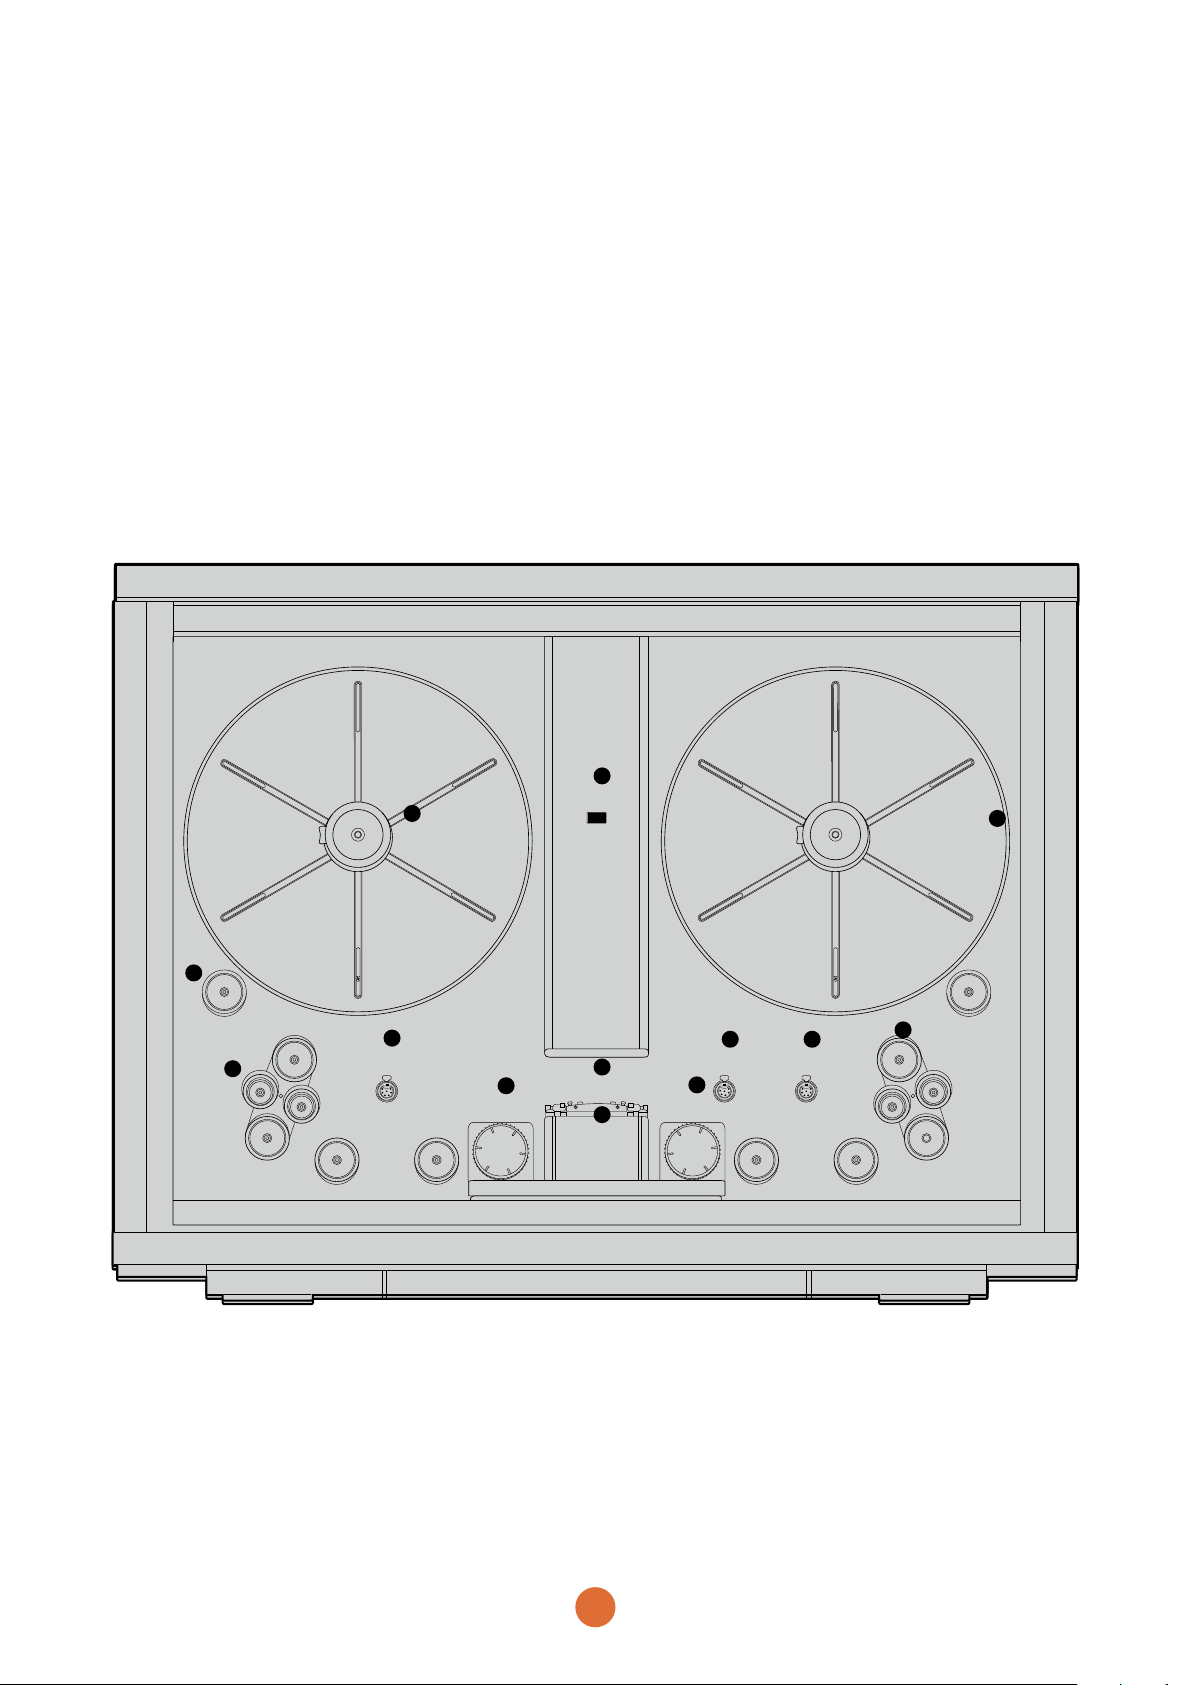
1. Core clamp 2. Roller 3. Particle transfer roller 4. Left options interface 5. Tensioner sprocket wheel
6. Skid plate 7. Light source 8. Drive sprocket wheel 9. Pin registration expansion port
10. Right options interface 11. Compliance arm 12. Spooler backplate 13. Focus wheel
4
Page 5
Getting Started
Getting Started with Blackmagic Cintel
Getting started is as simple as plugging in power, connecting
to your computer via Thunderbolt, launching Blackmagic
DaVinci Resolve, and lacing your film. If you just want to
get started previewing your scan, you can load film,
manually tension it, and output it to a HDMI monitor using
the ‘lacing film,’ and ‘playback controls’ section of this
manual. Capture controls for Blackmagic Cintel are located
in DaVinci Resolve’s Cintel scanner palette, therefore, the
first thing you’ll need to do when you’re ready to scan is
make sure DaVinci Resolve is installed.
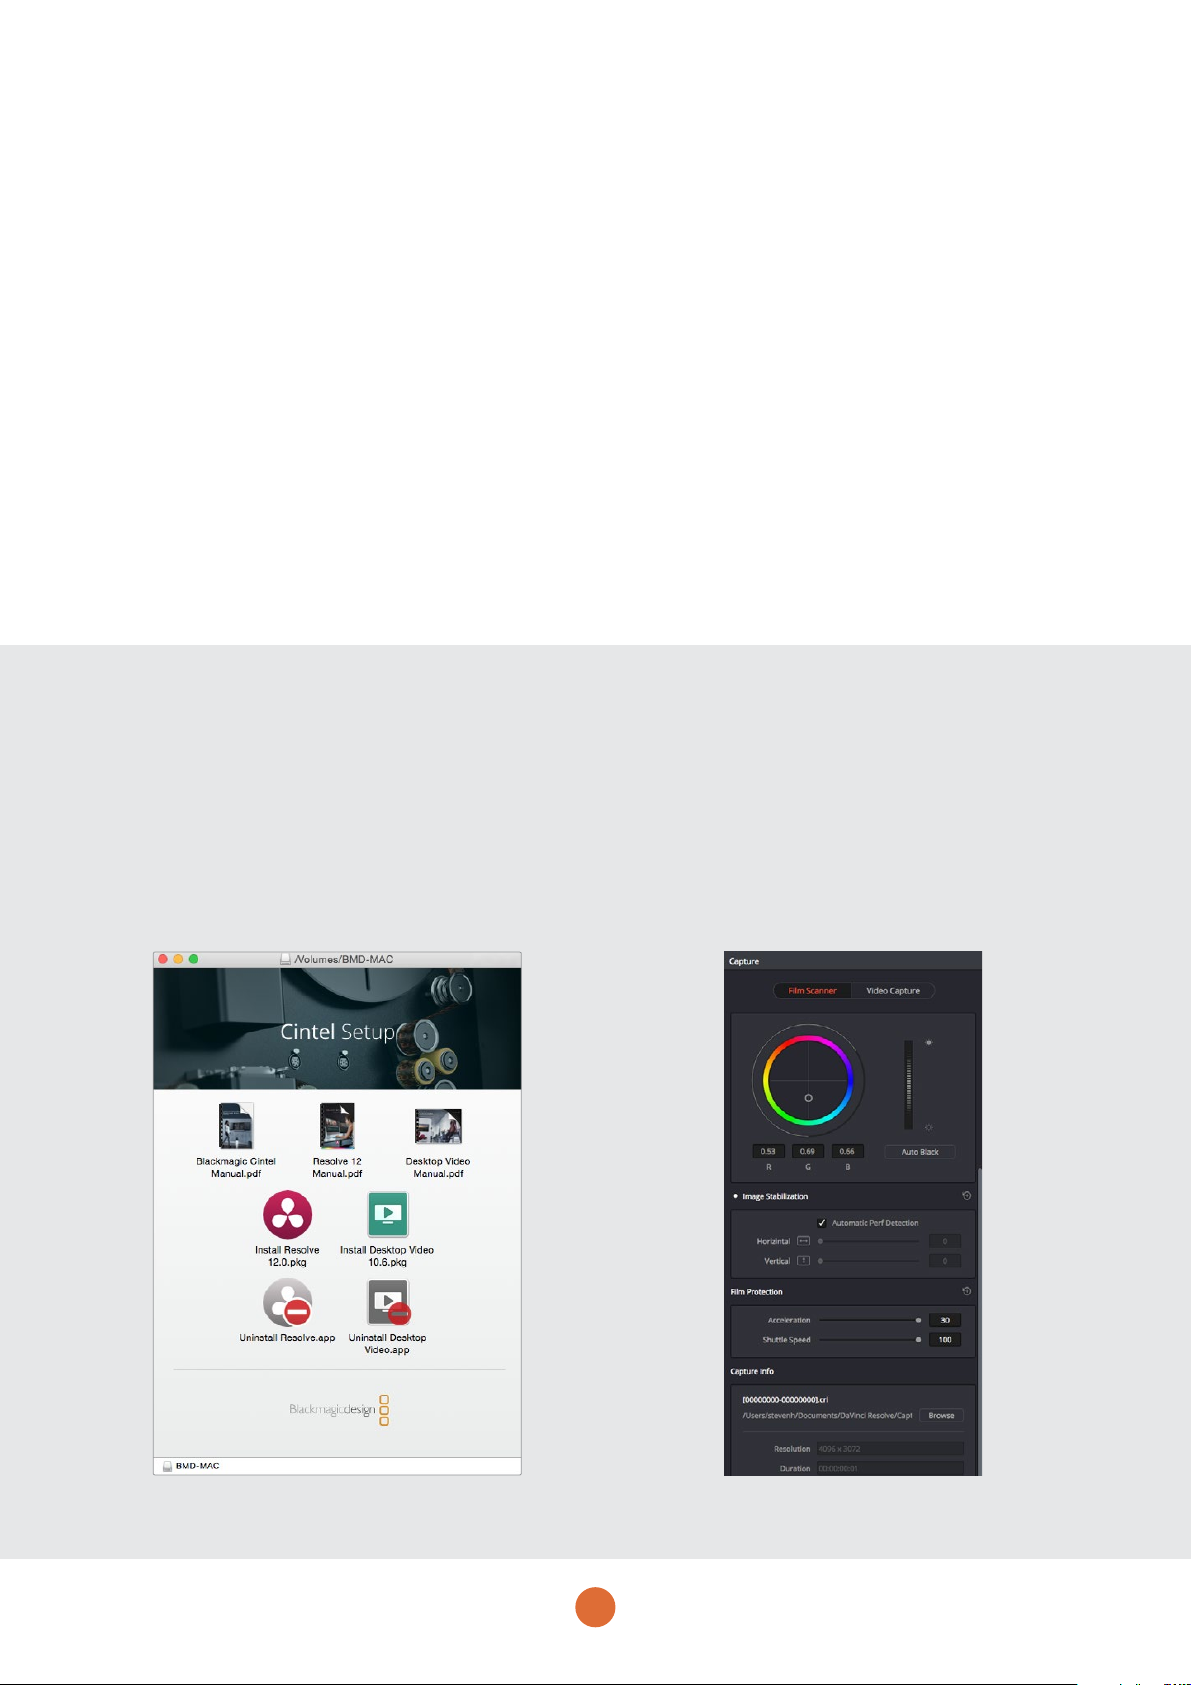
Your scanner comes with Cintel Installer software comprising
Blackmagic Desktop Video and DaVinci Resolve, as well
as a DaVinci dongle allowing you to use the full version of
DaVinci Resolve.
You can use the packaged installer to get started, however,
we recommend downloading the latest versions of the
Cintel Installer from the Blackmagic Design support center
at: www.blackmagicdesign.com/support
Step 1. Turning your scanner on
Power Blackmagic Cintel by connecting a standard IEC
cable to the AC power socket on the lower right side
of the back panel. Your scanner’s power indicator LED
should glow green.
Step 2. Connecting your scanner to your computer
Connect Blackmagic Cintel to your Mac OS X or
Windows computer via the Thunderbolt port on
your scanner’s lower right side.
Once your download has completed, unzip the file and run
the installer within the uncompressed folder. Simply follow
the prompts in the installer app and DaVinci Resolve and
Blackmagic Desktop Video will soon be available on
your system.
As the scanner will capture a large amount of image data
you should select in Resolve where you wish to record the
captured files. This is easily done by first launching DaVinci
Resolve, clicking on preferences in the DaVinci Resolve
menu bar and then clicking on the ‘plus’ icon in the ‘media
storage’ tab. Browse to and select a drive or folder path,
click ‘save’, and restart DaVinci Resolve.
Now that DaVinci Resolve is installed on your computer,
we can get started using Blackmagic Cintel.
You won’t need to do anything further with Blackmagic
Desktop Video, it simply allows DaVinci to communicate
with your scanner.
You can also connect to an external monitor via
your scanner’s HDMI port for focusing or preview
purposes.
Step 3. Launching DaVinci Resolve
Launch DaVinci Resolve, select the Media page and
then open the Cintel palette by clicking on the ‘capture’
button at the top right of the screen. If you have
additional capture devices installed on your computer,
click the Cintel tab to switch to the correct palette.
The Cintel palette in DaVinci Resolve controls
5
all capture settings.
Page 6

Getting Started
Lacing Film
Now that Blackmagic Cintel and DaVinci Resolve are
communicating with each other, it’s time to lace up your film.
Step 1. Accessing the scanner
Open Blackmagic Cintel’s sliding doors.
On the internal front panel you’ll see a feeding spool on
the left, and a taking spool on the right. The feeding spool
holds the film to be scanned, and the taking spool collects
the scanned film.
Step 2. Setting film wind
Set the ‘wind type’ so the spools turn in the appropriate
direction. Go to DaVinci Resolve’s Cintel scanner palette
and set the ‘wind type’ to B/A by clicking ’B’ and ‘A’ on the
‘feed’ and ‘take up’ buttons, respectively.
B/A is your scanner’s default wind type which has the
feeding spool traveling in a clockwise direction and the
taking spool traveling counter clockwise. Refer to the ‘wind
types’ section in this manual for more information.
This is also a good time to make sure that your settings
are appropriate for your film type and size.
You can select from positive, negative, interpositive and
internegative in DaVinci Resolve’s Cintel palette, as well
as 16mm, 35mm and various perforation layouts.
Step 3. Preparing the take up spool
Slide the supplied 75mm spool core and core clamp onto
your scanner’s taking spindle. To apply the core clamp,
hold in the clamp’s button and push it onto the spindle until
you feel resistance, then release the button and push the
clamp on the rest of the way until you hear a ‘click.’
Step 4. Loading film
Load your film reel or core onto the feeder spindle following
the same procedure in step 3. Note that the procedure
differs slightly depending on if your film is on a core or a
reel, and whether it is 35 or 16mm.
For example, when loading a core, you’ll need to insert the
provided backing plate, whereas loading a reel only requires
the use of spacers.
Step 5. Lacing film
Gently lace several feet of the film leader through your
scanner’s rollers following the illustration below.
The sprockets on the sprocket wheels are designed to fit
16mm and 35mm film. It’s important that your film is laced
over the appropriate sprockets so it glides smoothly over
the skid plate, and that the sprockets are engaged cleanly
with the film perforations to ensure gentle film loading.
Step 6. Tensioning film
To secure your film to the taking spool, insert the end of
your film into the small notch provided in the spool, or tape
it down; then gently hand wind the spool a few times to
hold the film in place.
You can begin tensioning by pressing the ‘load button,’ or
by manually turning the feeding and taking spools
simultaneously.
Cintel’s default B/A wind loads from the bottom of the feeding
spool and onto the top of the taking spool.
6
When loading film on a spool, the
supplied backing plate is required.
When loading film reels, the backing
plate is not required, simply use the
spacers provided.
Page 7

Getting Started
Manual Tensioning
For manual tensioning, turn the feeding spool and taking
spool counter clockwise for a B/A wind.
You’ll notice the compliance arms below each spool begin
to move as you manually introduce tension as in the diagram
below. Once these are about a third of the way through
their range of motion, hold the spools in place for a second
or two. Your scanner will detect secured film on the taking
spool, and its tensioning feature will automatically activate,
taking up the rest of the slack.
If at any point in a manual or automatic load you notice a
problem, you can cancel the load procedure by pressing
the ‘load’ button again or firmly holding the feeding or
taking spool. Your scanner will recognise either action and
abort the load.
Step 7. Inspect your film
Check that the film is laced properly by pressing the ‘play’
button on your scanner or clicking the ‘play’ button in the
Cintel Palette in DaVinci Resolve. If you see your film image
playing in the Cintel palette preview window on your
computer or on an external HDMI monitor, if attached, you’ll
know your scanner is working.
Depending on the wind type you’ve used, you may find
that the image is flipped horizontally or vertically. You can
fix this by selecting the appropriate film type. For instance,
negative f ilm may appear flipped left to right until the
‘negative’ setting is selected. If you can’t fix this by selecting
your film type, you may need to reload your film using a
different wind type.
Step 8. Focusing
This is easily done by selecting ‘workspace’ on the DaVinci
Resolve menu bar and then selecting ‘video scopes’ and
turning the scopes on. Keep an eye on the red, green, and
blue scopes as you scroll your scanner’s focus wheel. Your
image will be in perfect focus when the red, green, and
blue scopes are ‘peaking,’ or displaying the maximum
amount of information. As you approach perfect focus, the
readout on each scope will become taller, before shrinking
as you move away from the optimal point.
You can also make quick focal adjustments by previewing
your film on an Ultra HD external monitor with your scanner’s
HDMI output. A good way to dial in focus this way is to pay
attention to the edges of your film’s perforations. When
these are sharp, your film should be in focus.
Step 9. Closing the doors
As the top of film is quite shiny it may reflect any spotlights in
the roof of your scanning room that are located in the vicinity
of the scanner. These can show up as black blotches in your
scan. Your scanner’s high quality light source eliminates light
pollution in all but the most brightly lit workspaces, but for the
best quality scan we recommend closing the sliding doors
just in case. The scanner doors are designed to block the
light from the film gate area and closing them will stop any
light getting in. Your scanner has a spring loaded door that
will gently complete the closing procedure once the doors
are nearly shut.
Your film is now laced and ready to be captured!
Please refer to the Cintel section of the DaVinci Resolve
reference manual for details on calibrating the light source,
setting the stabiliser, and the capture palette settings for
capturing images.
Focus your film using DaVinci Resolve’s RGB Parade scope
to achieve perfect focus.
The reference manual also details how to sync optical audio
and manage the large number of files you will generate when
capturing from your scanner.
A B C
A When manually tensioning film, you only need to apply enough tension to move the compliance arms into the ‘sweet spot’
of their movement range - a lit tle under half way. Cintel will automatically take up any additional slack.
B When loading 35mm film, use the outer sprockets on the sprocket wheels.
C Use DaVinci Resolve’s video scopes to achieve perfect focus. The scope on top represents and out of focus frame,
while the scope below shows the same frame in focus. Note the taller peaks in the focused image.
7
Page 8

Using Cintel
Taking spoolFeeding spool
Wind Types
The ‘wind type’ refers to the loading and unloading position,
as well as the turn direction of film on your scanner’s feeding
and taking spools. As you can see in the diagram below,
an ‘A’ wind refers to film loading/unloading from the top of
the spool, while a B type loads or unloads from the bottom.
This is true for both the feeding and taking spools. Wind
type affects which direction each spool turns, the position
of the audio information and perforations, and whether
your film travels across the skid plate emulsion side up or
down, so it is important to use the appropriate combination
for your project.
Feeding spool
Select the appropriate wind type in DaVinci Resolve’s Cintel
scanner settings.
The default wind type for your scanner is a B/A wind,
meaning the feeding spool unloads from the bottom and
the taking spool loads across the top. If the film you are
working with has been wound a different way, other
combinations of A and B winds are supported; simply select
the appropriate wind type via the ‘feed’ and ‘take up’
buttons in DaVinci Resolve’s Cintel scanner palette.
Taking spool
‘A’ wind
‘B’ wind
An easy way to remember the difference bet ween A and B winds is that A winds unload and
take up film from the top of the reel or spool, while B winds do the same from the bottom.
8
Page 9

Using Cintel
Switching to 16mm
The optional 16mm kit contains all the parts you’ll require and the changes to your scanner’s setup are minimal.
16mm skid plate
Outer spacer
Inner spacer
The 16mm kit contains a 16mm skid plate, two inner spacers and two outer spacers.
9
Page 10

Using Cintel
Switching to 16mm scanning is easy:
Step 1. Swapping the skid plate
Swap the 35mm skid plate with the 16mm skid plate by
opening the retention levers on the front of the plate,
removing the outgoing plate and inserting the 16mm plate.
When fitting a skid plate, make sure that the retention levers
are lifted all the way up before turning them inwards, or
the plate may not seat properly.
Step 1.1: When removing the skid plate
you will need to turn the retention
levers outward.
Step 1.2: Removing the 35mm skid plate. Step 1.3: To secure a skid plate lift
Step 2. Inserting the 16mm spacer
Insert the rubber 16mm spacer at the base of the feeding
and taking spools. The 16mm spacer goes on grooved side
inwards prior to a backing plate, spool or reel.
Step 3. Additional spacers (optional)
Depending on if you are using a spool with a backing plate
or a reel, you may need to insert additional 1mm rubber
spacers to align your film with your scanner’s rollers. These
are included with your scanner. Additional 1mm spacers
are included with the 16mm kit.
the retention levers all the way up and
turn them inward.
Step 4. Mounting your film
After mounting your 16mm core or reel to the feeding spool,
and a backing plate and core to the taking spool, you’ll
need to install the outer 16mm spacer to secure the spools.
This spacer has both a notch and a rubber ring on its inside
edge to secure it to cores or reels, respectively. Once this
is in place, secure the spools as you would normally.
Step 4: Loading a 16mm reel. Shown from spindle outwards:
inner 16mm spacer, 1mm spacers, 16mm reel,
outer 16mm spacer, and core clamp
Step 5. Lacing
Complete the lacing procedure as you would for 35mm
film, with the exception of lacing your 16mm film through
the inner sprockets on the sprocket wheels. Before pressing
‘load’ or manually tensioning your 16mm film, make sure
that the film is properly threaded over the sprocket wheels’
teeth, as otherwise these teeth can damage the film.
Step 5: When loading 16mm f ilm, make sure that f ilm’s
perforations are threading cleanly over the
sprockets on the sprocket wheels.
10
Page 11

Using Cintel
Playback Controls
The following playback controls are available in DaVinci Resolve and on Blackmagic Cintel itself.
Cintel has built in controls for loading, unloading, and previewing scans.
Load
Pressing ‘load’ will tension the film loaded onto your
scanner’s feeding and taking spools as described in the
section ‘lacing film.’
Pressing load once your film is properly tensioned will
unload the film by returning the compliance arms to their
slack position.
Rewind
Press rewind to wind your film back onto the feeding
spool. Pressing this button once will rapidly rewind your
film until it reaches the threshold of a fully loaded 75mm
spool, at which point it will stop. Press rewind again to
slowly wind the the rest of your film all the way onto the
feeding spool and unload your scanner.
If you are using a 50mm spool, your scanner will still
stop at the 75mm threshold. Pressing rewind a second
time will slowly rewind until the point a 75mm spool
should have been fully rewound. If your scanner detects
that there is still film loaded at this point, it will resume
rewinding quickly until reaching the 50mm threshold,
where it will stop again. Press ‘rewind’ a third time to
completely rewind a 50mm spool.
Due to the rarity of 100mm spools, Cintel is not
programmed to stop prior to hitting the 100mm threshold.
If you are using a 100mm spool, take care with your
method of loading film onto the taking spool. It is
important to use the provided notch, rather than tape to
ensure that film unloads cleanly.
Step back
Rewinds the film one frame.
Stop
Stops playback, fast forward and rewind commands.
Play
Plays the film at either Cintel’s default 24 fps, or a frame
rate selected in the Cintel palette in DaVinci Resolve.
Step forward
Advances the film one frame.
Fast forward
Rapidly advances the film onto the taking spool. This acts
in the same way as rewind with regards to 50, 75 and
100mm spools.
11
Page 12

Using Cintel
Standby Mode
When inactive, your scanner will enter standby mode to
preserve the longevity of the light source. This happens
after 15 minutes when connected via Thunderbolt, or 1.5
minutes when not connected. Your scanner will signal that
it is entering standby mode by flashing the light source green.
Servicing
To ensure optimal scan quality, it is important to keep your
scanner clean and dust free. This is easily done by regularly
cleaning the particle transfer rollers and using an air duster
to clean the rest of your scanner’s contact surfaces.
Cleaning the particle transfer rollers
Cleaning the particle transfer rollers, or PTRs, should be
done after every film run. To clean the rollers, simply remove
the O-ring at the end of each PTR spindle and slide off the
roller. Wash the rollers in warm, soapy water using household
dishwashing detergent and allow them to air dry. We don’t
recommend towel or blow drying as this can deposit new
particles on the rollers or heat deform them. Once dry,
simply slide the rollers and O-ring back on and you’re
ready to scan.
You can easily bring your scanner out of standby mode by
initiating any movement of the feeding or taking spool,
by manually moving the spools, for instance, pressing
‘load’ or so on.
If you find your particle transfer rollers losing stickiness
even after washing, or difficult to mount and remove, you
can purchase new rollers from the Blackmagic Design
website www.blackmagicdesign.com
Dusting
Dusting your scanner should be performed daily. This is
as easy as using an air duster to remove any particles from
your scanner’s skid plate, sprocket wheels and any other
film contact surface. This is best performed with the skid
plate removed.
You may occasionally wish to clean the lens over your
scanner’s RGB light source. This can be done with a clean
cloth and a small amount of isopropyl alcohol.
Both air dusters and isopropyl alcohol are available at
most electronics stores.
Removing the particle transfer rollers for cleaning.
12
Page 13

Specifications
1055mm
2010mm
Weight : 132lbs / 6 0kg. Dimensio ns wall mo unted: ( H) 785m m, (D) 265mm
Scanner
Features
Film Stocks
- Print, Negative, Interpositive,
Internegative.
- Mono and Colour.
Film Gauges
- 35mm: 2, 3, 4 perforations
- Super 35mm: 2, 3, 4
perforations
- 16mm, Super 16mm
Native Resolution
- 4096 x 3072
Effective Resolutions
- 3840 x 2880 - Super 35
- 3390 x 2864 - Standard 35
- 3390 x 2465 - Anamorphic 35
- 1903 x 1143 - Super 16
- 1581 x 1154 - Standard 16
360mm
880mm
HDMI Formats
3840 x 2160 Ultra HD or
1920 x 1080 HD, auto selected
to match monitor resolution.
Audio
- Extraction from
scanned image.
Dirt and Scratch Reduction
- Diffuse light source
- Cleaning Rollers
Mounting Options
- Desk Mount
- Wall mount
Transport
Features
Continuous Motion
- Run speed: 1 - 30 fps
- Shuttle: 1 - 100 fps (35mm),
1 - 200 fps (16mm)
Acceleration
5 - 30 fps/s
Connections HDMI Video Output
1 x HDMI 1.4 10-bit 4:2:2
for preview purposes only
Computer Interface
Thunderbolt 2 port for capture
of image and audio.
Accessories 16mm accessory pack
Power
Requirements
Ideal Film
Conditions
Voltage Range
90 - 240V AC
Operating Temperature
18 - 28C
Film Shrinkage Tolerance
Up to 2% guaranteed, more
may be possible if user
care is taken.
Options Interface
- Programmable sync output
- Balanced line level
Analog Audio In
- AES Digital Audio In
Power
200W
Relative Humidity
Maximum 65% non - condensing
Capacity
2000ft (35mm)
13
Page 14

Help
The fastest way to obtain help is to go to the Blackmagic
Design online support pages and check the latest support
material available for your Cintel film scanner.
Blackmagic Design Online Support Pages
The latest manual, software and support notes can
be found at the Blackmagic Design support center at
www.blackmagicdesign.com/support.
Contacting Blackmagic Design Support
If you can’t find the help you need in our support material,
please use the ‘send us an email’ button on the support
page to email a support request. Alternatively, click on the
‘find your local support team’ button on the support page
and call your nearest Blackmagic Design support office.
Checking the Software Version Currently
Installed
To check which version of DaVinci Resolve is installed on
your computer, open DaVinci Resolve.
On Mac OS X, open ‘DaVinci Resolve’ within your
‘applications’ folder. The software version number
appears by clicking on the ‘About DaVinci Resolve’
menu heading under the ‘DaVinci Resolve’ menu.
On Windows 7, click the ‘start’ button>all
programs>DaVinci Resolve>DaVinci Resolve and click
the DaVinci application. The software version number
appears by clicking on the ‘About DaVinci Resolve’
menu heading under the ‘DaVinci Resolve’ menu.
To check which version of Blackmagic Desktop Video
Utility software is installed on your computer, open
Blackmagic Desktop Video Utility.
On Mac OS X, open ‘Blackmagic Desktop Video
Utility’ within your ‘applications’ folder. The software
version number appears by clicking on the ‘about
Blackmagic Desktop Video Utility’ menu heading.
On Windows 7, click the ‘start’ button>all
programs>Blackmagic Design>Desktop Video
and click the Blackmagic Desktop Video Utility
application. The software version number appears
by clicking on the ‘about Blackmagic Desktop Video
Utility’ menu heading.
On Windows 8, from the ‘start’ page type ‘Blackmagic’
and then click the Blackmagic Desktop Video Utility
application. The software version number appears
by clicking on the ‘about Blackmagic Desktop Video
Utility’ menu heading.
How to Get the Latest Updates
After checking the versions of DaVinci Resolve and
Blackmagic Desktop Video Utility installed on your
computer, please visit the Blackmagic Design support
center at www.blackmagicdesign.com/support to check
for the latest updates. While it is advisable to run the latest
updates, you should avoid updating software when in the
middle of an important project.
On Windows 8, from the ‘start’ page type ‘DaVinci
Resolve’ and then click the DaVinci Resolve
application. The software version number appears
by clicking on the ‘About DaVinci Resolve’ menu
heading under the ‘DaVinci Resolve’ menu.
14
Page 15

Safety
User interaction is required to operate Cintel, and the film
loading process is inherently hands on. However, it is still
important to be aware that moving parts can be hazardous.
Limited Warranty
Blackmagic Design warrants that this product will be free
from defects in materials and workmanship for a period of
12months from the date of purchase. If a product proves
to be defective during this warranty period, Blackmagic
Design, at its option, either will repair the defective product
without charge for parts and labor, or will provide a
replacement in exchange for the defective product.
In order to obtain service under this warranty, you the
Customer, must notify Blackmagic Design of the defect
before the expiration of the warranty period and make
suitable arrangements for the performance of service. The
Customer shall be responsible for packaging and shipping
the defective product to a designated service center
nominated by Blackmagic Design, with shipping charges
pre paid. Customer shall be responsible for paying all
shipping charges, insurance, duties, taxes, and any other
charges for products returned to us for any reason.
This warranty shall not apply to any defect, failure or damage
caused by improper use or improper or inadequate
maintenance and care. Blackmagic Design shall not be
obligated to furnish service under this warranty: a) to repair
damage resulting from attempts by personnel other than
Blackmagic Design representatives to install, repair or
service the product, b) to repair damage resulting from
improper use or connection to incompatible equipment, c)
to repair any damage or malfunction caused by the use of
non Blackmagic Design parts or supplies, or d) to service
a product that has been modified or integrated with other
products when the effect of such a modification or integration
increases the time or difficulty of servicing the product.
Be sure to keep fingers and other body parts clear of your
scanner when film is scanning.
THIS WARRANTY IS GIVEN BY BLACKMAGIC DESIGN IN
LIEU OF ANY OTHER WARRANTIES, EXPRESS OR IMPLIED.
BLACKMAGIC DESIGN AND ITS VENDORS DISCLAIM ANY
IMPLIED WARRANTIES OF MERCHANTABILITY OR FITNESS
FOR A PARTICULAR PURPOSE. BLACKMAGIC DESIGN’S
RESPONSIBILITY TO REPAIR OR REPLACE DEFECTIVE
PRODUCTS IS THE WHOLE AND EXCLUSIVE REMEDY
PROVIDED TO THE CUSTOMER FOR ANY INDIRECT,
SPECIAL, INCIDENTAL OR CONSEQUENTIAL DAMAGES
IRRESPECTIVE OF WHETHER BLACKMAGIC DESIGN OR
THE VENDOR HAS ADVANCE NOTICE OF THE POSSIBILIT Y
OF SUCH DAMAGES. BLACKMAGIC DESIGN IS NOT LIABLE
FOR ANY ILLEGAL USE OF EQUIPMENT BY CUSTOMER.
BLACKMAGIC IS NOT LIABLE FOR ANY DAMAGES
RESULTING FROM USE OF THIS PRODUCT. USER
OPERATES THIS PRODUCT AT OWN RISK.
© Copyright 2015 Blackmagic Design. All rights reserved. ‘Blackmagic Design’
and ‘Cintel’, are regi stered trademarks in the US and other countries. A ll other
compan y and product n ames may be trade marks of their respec tive compan ies
with which they are associated.
Thunderbolt and the Thunderbolt logo are trademarks of Intel Corporation in
the U.S. and/or other countries.
15
 Loading...