

Page 1
UK
Ireland
Australia
New Zealand
Page 2
2
Page 3

Intended use
Your Black & Decker battery charger is designed to charge
lead-acid batteries. This product is intended for household,
consumer use only.
Safety instructions
Warning! When using mains-powered appliances, basic safety
precautions, including the following, should always be followed
to reduce the risk of fire, electric shock, personal injury and
material damage.
X Read all of this manual carefully before using the
appliance.
X The intended use is described in this manual. The use of
any accessory or attachment or the performance of any
operation with this appliance other than those
recommended in this instruction manual may present a risk
of personal injury.
X Retain this manual for future reference.
Using your appliance
Always take care when using the appliance.
X This appliance is not intended for use by young or infirm
persons without supervision.
X The appliance is not to be used as a toy.
X Use in a dry location only. Do not allow the appliance to
become wet.
X Do not immerse the appliance in water.
X Do not open body casing. There are no user-serviceable
parts inside.
X Do not operate the appliance in explosive atmospheres,
such as in the presence of flammable liquids, gases or
dust.
X To reduce the risk of damage to plugs and cords never pull
the cable to remove the plug from a socket outlet.
After use
X When not in use, the appliance should be stored in a dry,
well ventilated place out of the reach of children.
X Children should not have access to stored appliances.
X When the appliance is stored or transported in a vehicle it
should be placed in the boot or restrained to prevent
movement following sudden changes in speed or direction.
Inspection and repairs
X Before use, check the appliance for damaged or defective
parts. Check for breakage of parts, damage to switches
and any other conditions that may affect its operation.
X Do not use the appliance if any part is damaged or
defective.
X Have any damaged or defective parts repaired or replaced
by an authorised repair agent.
X Never attempt to remove or replace any parts other than
those specified in this manual.
Power cord safety
Warning! Never alter the ac power cord or plug. If it will not fit,
have a proper outlet installed by a qualified electrician. Improper
connection may result in an electric shock.
Specific safety instructions for battery chargers
The following symbols are marked on the appliance:
This appliance is double insulated; therefore no
earth wire is required. Always check that the
power supply corresponds to the voltage on the
rating plate.
Read these instructions before use:
X If the supply cord is damaged, it must be replaced by the
manufacturer or an authorised Black & Decker Service
Centre in order to avoid a hazard.
X Never attempt to charge non-rechargeable batteries.
X Have defective cords replaced immediately.
X Do not expose the battery charger to water.
X Do not open the battery charger.
X Do not probe the battery charger.
X Never allow the red and black battery clamps (4) to touch
each other or another common metal conductor. This could
cause damage to the appliance and/or create a spark/
explosion hazard.
X Always store the battery clamps (4) in the storage provided
when not in use.
Batteries
Warning! Never attempt to charge a frozen battery.
X Under extreme conditions, battery leakage may occur.
When you notice liquid on the batteries, carefully wipe the
liquid off using a cloth. Avoid skin contact.
X In case of skin or eye contact, follow the instructions below.
Warning! Battery fluid is a diluted sulphuric acid and may cause
personal injury or damage to property. In case of skin contact,
immediately rinse with water. If redness, pain or irritation occurs
seek medical attention. In case of eye contact, rinse
immediately with clean water and seek immediate medical
attention.
X When disposing of batteries, follow the instructions given in
the section "Protecting the environment".
X Add distilled water in each cell until the battery acid reaches
the level specified by the battery manufacturer. This helps
to purge excess gas from the cells. Do not overfill. For a
battery without cell caps (maintenance free), carefully
follow the manufacturer's charging instructions.
X Study all the battery manufacturer's specific precautions,
such as removing or not removing cell caps while charging,
and the recommended charging rates.
3
Page 4

X Make sure that the initial charging rate does not exceed the
battery manufacturer's requirement.
Warning! Risk of explosive gas mixtures. Working in the vicinity
of a lead-acid battery is dangerous. Batteries generate
explosive gases during normal battery operation. For this
reason, it is of utmost importance that each time, before using
your battery charger, you read this manual and follow the
instructions exactly.
X Use of an attachment not recommended or sold by Black &
Decker may result in a risk of fire, electric shock, or injury to
persons.
X An extension cord should not be used unless absolutely
necessary. Use of an improper extension cord could result
in a risk of fire and electric shock, and will void the warranty.
Personal safety
Wear complete eye protection and suitable clothing to give
protection from contact with battery fluid.
Avoid touching the eyes while working with a battery. Acid,
acid particles or corrosion may get into the eyes.
Remove personal metal items such as rings, bracelets,
necklaces and watches when working with a lead-acid
battery. A lead-acid battery can produce a short circuit
current high enough to cause a severe burn.
Be extra cautious to reduce the risk of dropping a metal
object onto the battery. This might cause sparks or shortcircuit the battery or other electrical part, which can cause an
explosion.
Preparation before charging
The appliance must only be connected to a 12 V lead-acid
battery. Before charging, confirm that the voltage of the
battery is 12 V by referring to the label on the battery or from
the information available relating to its application e.g. car
user manual.
Do not use the appliance for charging dry-cell batteries that
are commonly used with home appliances. These batteries
may burst and cause injury to persons and damage to
property.
Warning! Explosive gas may be vented from lead acid batteries
when charging. Make sure that the area is well ventilated and
remove any sources of ignition when conducting charging
procedures.
X Position the battery charger as far away from the battery as
the leads will allow. The battery charger contains switches
that may create a spark.
X Do not place the battery charger above or stand the battery
charger on top of the battery.
X Explosive gases may collect near the ground. Locate the
battery charger as high as possible above ground level.
X Do not use power tools in the charging area.
X Do not smoke or have naked flames in the charging area.
X Follow the instructions for connecting and disconnecting
the battery charger leads or battery terminals.
A marine (boat) battery must be removed and charged on
shore. To charge it on board requires equipment specially
designed for marine use. This appliance is NOT designed for
such use.
Vehicles may have electrical and electronic systems (e.g.
engine management systems, mobile phones) that may be
damaged if subjected to high starting voltages and voltage
peaks. Before connecting the appliance to the vehicle, read
the vehicle's owner's manual to confirm that external
charging is allowed.
X Follow these instructions and those published by the
battery manufacturer and vehicle manufacturer.
X Only connect and disconnect the dc output clamps after
removing the supply cord from the electric outlet. Never
allow clamps to touch each other.
X Check the polarity of the vehicle battery terminals before
connecting the appliance. Always disconnect the negative
(black) cable first: followed by the positive (red) cable.
When charging a battery installed in the circuit follow the
manufacturers instructions for accessing the battery and the
following:
X Do not charge the battery while the engine is operating.
X Be aware that engine components e.g. the coolant fan may
start automatically. Keep hands and body away from
engine components and position the battery charger and
cables to prevent contact.
X Make sure that the battery charger and the cables are
located to prevent damage from closure of doors and
engine compartment covers.
X Make sure that the connections can be made without
touching the metal body or components adjacent to the
battery.
X When using this appliance in proximity to the vehicle's
battery and engine, stand the appliance on a flat, stable
surface and be sure to keep all clamps, cords, clothing and
body parts away from moving parts of the vehicle.
X If it is necessary to remove the battery from the vehicle to
charge or to clean the terminals, make sure that all
accessories in the vehicle are switched off, so as not to
cause a spark.
X To reduce the risk of electric shock, disconnect the
appliance from any power source before attempting
maintenance or cleaning. Turning off controls without
disconnecting the appliance will not reduce this risk.
Connecting the battery charger
When all the preparations for charging and personal safety
have been completed, proceed as follows:
4
Page 5

X For most automotive and similar applications the battery
charger may be connected to the battery while it is
connected to the dc circuit. If this is acceptable follow the
instructions given in "Charging a battery installed in the
circuit".
X If the battery must be disconnected from the circuit before
charging, follow the instructions given in "Charging a
battery disconnected from the circuit".
Warning! A marine (boat) battery must be removed and
charged on shore. To charge it on-board requires equipment
specially designed for marine use.
Charging a battery installed in the circuit.
Incorrect connection, battery short circuit, location of battery
and location of the battery charger may create a hazard.
Make sure that adequate preparation has been made before
proceeding.
Warning! If the battery posts cannot be accessed or the battery
charger clamps will contact the bodywork or components
adjacent to the battery, the battery must be removed before
charging. Follow the manufacturer's instructions to remove the
battery.
Check the polarity of the battery posts. A positive (POS, P,
+) battery post usually has a larger diameter than the
negative (NEG, N, -) battery post.
Follow the manufacturers' instructions to remove any
insulating covers from the battery posts.
Connect the positive (red) clamp from the battery charger to
the positive (POS, P, +) post of the battery.
Connect the negative (black) clamp from the battery charger
to the negative (NEG, N, -) post of the battery.
When disconnecting the battery charger from the battery,
always:
X Switch off and unplug the battery charger.
X Remove the negative clamp first.
X Remove the positive clamp last.
X Refit any insulating covers to the battery posts.
Charging a battery disconnected from the circuit.
Warning! Incorrect connection, battery short circuit, location of
battery and location of the battery charger may create a hazard.
Make sure that adequate preparation has been made before
proceeding.
If the battery is not already removed from the circuit, follow
the manufacturers' instructions to remove the battery before
charging.
Check the polarity of the battery posts. A positive (POS,P, +)
battery post usually has a larger diameter than the negative
(NEG, N, -) battery post.
Connect the positive (red) clamp from the battery charger to
the positive (POS, P, +) post of the battery.
Connect the negative (black) clamp from the battery charger
to the negative (NEG, N, -) post of the battery.
When disconnecting the battery charger from the battery,
always:
X Switch off and unplug the battery charger.
X Remove the negative clamp first.
X Remove the positive clamp last.
X Refit any insulating covers to the battery posts.
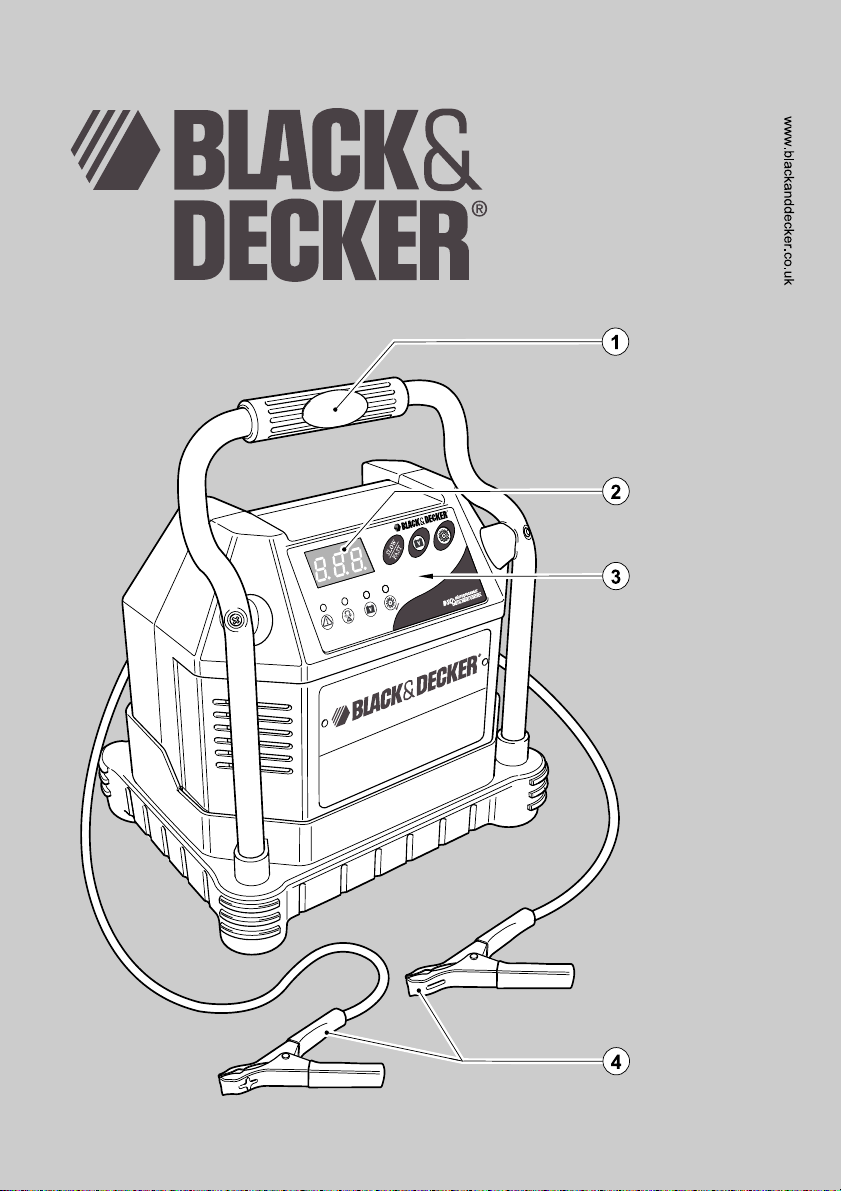
Features
1. Carry handle
2. Digital display
3. Control panel
4. Battery clamps
Use
Overview of the battery charger (fig. B)
The Black & Decker battery charger has a fast-charge rate
of up to 10 A, and a slow rate of 2 A. It is designed for
charging 12 V lead-acid batteries only, i.e. conventional
automotive, maintenance-free, marine deep cycle and gel
batteries as used in cars, trucks, farm equipment, boats,
lawn mowers/garden tractors, motorcycles and various other
applications.
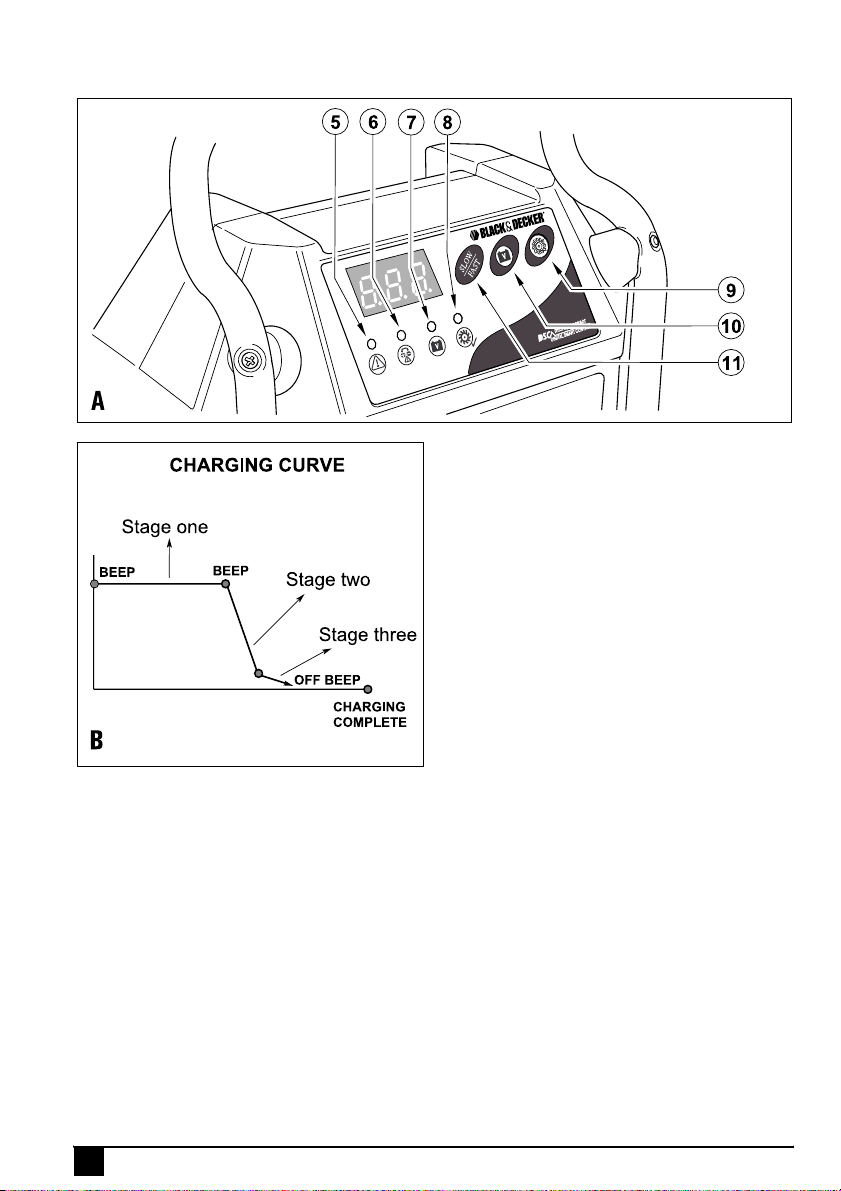
The battery charger features 3-stage high-efficiency
charging technology using built-in microprocessor control
which ensures fast, safe and complete charging of
serviceable batteries.
Stage 1 - rapid start charge
Stage 1 is a rapid start charge at 10 A to deliver maximum
charging amperage to "wake up" any serviceable 12 V
battery and allows for quick engine starting. When the
battery reaches a maximum safe predetermined voltage, the
battery charger will beep and begin stage 2 of the charging
process.
Stage 2 - absorption charge
Stage 2 is an absorption charge which maintains the
maximum possible charge at a constant, safe,
predetermined voltage. During this phase, the charging
voltage remains constant, while the charging current is
reduced to allow for the maximum proper internal chemical
energy transfer.
At the end of stage 2, the battery charger will automatically
begin stage 3 of the charging process.
5
Page 6

Stage 3 - top-off charge
Stage 3 is a top-off charge. The voltage is automatically
regulated and is reduced to a predetermined level while the
current is adjusted for a safe, effective battery charge. At the
conclusion of stage 3, the appliance will beep, signalling the
completion of the charging cycle.
Function pushbuttons (fig. A)
The function pushbuttons on the control panel (3), from left
to right, are:
SLOW/FAST pushbutton (11) (charge rate
selector step 2). This pushbutton allows the user
to select the charge rate based on the battery
size. This selection and the actual battery charge
rate are monitored by the microprocessor. The
battery charger will stop charging if the rate is too
fast or too slow for the battery size or condition.
Battery voltage pushbutton (10). This pushbutton
enables a check to measure the battery voltage.
Alternator check pushbutton (9). This pushbutton
enables a five-second check that measures the
battery voltage. This check is repeated at various
electrical load levels and the tests allow the user
to determine if the alternator can keep up with
the loads. It can indicate whether an alternator
service may be required.
Control panel LEDs (fig. A)
The following icons are shown on your battery charger:
Fault LED (5). Lights when any of several faults
are detected, see F01 through F05 Codes as
!
described in the "Troubleshooting" section, later
in this manual.
Reverse polarity LED (6) - lights when the battery
clamps (4) are incorrectly connected to the
battery terminals.
Battery voltage LED (7) - lights when the battery
voltage pushbutton (10) is pressed.
Alternator good LED (8) - lights when load or no
load checks show that the alternator is keeping
up with the electrical load.
Charge rate selection (fig. A)
X This appliance has two charge rate settings, accessed by
the SLOW/FAST pushbutton (11):
- 2 amps: smaller batteries, as in lawn mowers,
motorcycles, etc.
- 10 amps: automobiles and light trucks.
X After the battery clamps (4) are correctly connected, plug in
the battery charger to a 230 Vac outlet. The battery charger
will show a circulating pattern on the digital display (2), to
indicate that power has been applied. Select the proper
charge current rate based on battery size.
Charging the battery (fig. A)
X Press the SLOW/FAST pushbutton (11), the appliance
sounds a beep and displays the charging rate. The battery
charger starts charging at 2 amps automatically if the
SLOW/FAST pushbutton (11) is not pressed within 3
minutes after applying AC power.
X The battery charger will occasionally sound a beep and
display 0.0 during self-test or during the charging stage
changes.
X Pressing the SLOW/FAST pushbutton (11) again will
advance the charge rate to fast rate and displays FAS.
Pressing the pushbutton (11) again will turn OFF the
battery charger output and the digital display (2) will show
000.
Note: This selection and the actual battery charge rate are
monitored by the microprocessor and the unit will stop
charging if the selected rate is too fast or too slow for battery
size or condition.
X As the battery nears full charge capacity, the unit's output
will automatically drop to a lower charge rate.
X The digital display (2) shows the charge current. To view
the battery voltage, press the battery voltage pushbutton
(10). The battery charger will sound a beep and display the
battery voltage.
X Press the battery voltage pushbutton (10) again to display
the charge current.
X The digital display (2) shows FUL when the battery is fully
charged.
X Disconnect the ac power cord first, then the negative
clamp, and finally the positive clamp.
Automatic float charging (fig. A)
The automatic float charge feature is ideal for maintaining a
battery. It automatically tops off the battery as required to
keep the battery fully charged all the time.
X Keep the ac power and battery connected when the battery
has been fully charged.
X The battery charger monitors the battery and tops it off as
needed.
X The digital display (2) shows FLO when topping off the
battery and returns to FUL when completed.
X To view the battery voltage, press the battery voltage
pushbutton (10).
Warning! If the battery size is not known, charge at the 2 A rate.
DO NOT overcharge batteries.
Alternator check (fig. A)
Warning! Check only 12 Vdc systems.
6
Page 7

Part 1 (no load)
X Make sure that there is no load on the alternator by turning
off all the vehicle's accessories.
X The battery must be fully charged before testing the
alternator.
X Run the engine long enough to achieve normal idle speed
and verify that there is a no-load voltage.
X Press the alternator check pushbutton (9) to start the
check.
X The alternator good LED (8) will light to indicate that the
alternator is good, or the fault LED (5) will display to indicate
that the alternator is out of typical voltage range.
X Press the alternator check pushbutton (9) again to stop the
test.
Part 2 (under load)
X Load the alternator by turning on as many accessories as
possible, except for air-conditioning and defrost.
X Press the alternator check pushbutton (9) to start the test.
X The alternator good LED (8) will light to indicate that the
alternator is good, or the fault LED (5) will light to indicate
that the alternator is out of typical voltage range.
X Press the alternator check pushbutton (9) again to stop the
test.
If the first alternator check indicates a good alternator and
the second indicates the alternator is not good, the problem
could be caused by any of the following:
X Loose fan belts.
X An intermittent diode failure.
X Bad connections between the battery and alternator and/or
ground.
Note: The battery voltage pushbutton (10) is disabled in the
alternator check mode.
Note: The fault LED (5) may display because a number of
extra accessory loads have been added to the charging
system, thereby increasing current demand from the
alternator. Make sure that the alternator is rated to support
the application.
Note: This check may not be accurate for every make,
manufacturer and model of vehicle.
Approximate charging times
The battery charger will automatically adjust the charge rate
as the battery becomes charged and stop charging when the
battery is fully charged. Deep cycle batteries may require
longer charging times.
For estimates of the time it takes to charge a battery, refer to
the following table:
% of charge in the battery
Rate 75% 50% 25% 0%
2A 7 hrs 14 hrs NR* NR*
6A 2.5 hrs 4.7 hrs 7 hrs 9.2 hrs
10A 1.4 hrs 2.8 hrs 4.2 hrs 5.5 hrs
*NR = Not recommended at 2 A - use a higher charge rate.
The times shown in the table above are approximate and
refer to a 50 Ah automotive battery.
Example
A 50 Ah, 12 Vdc battery is discharged (50%). To determine
the time it takes to charge at the 10 A rate, see the chart
above under "50%" and "at 10 A rate".
The battery charging times will vary depending on the size,
age and condition of the battery. Smaller batteries should be
charged at a slower rate (SLO) and an extra hour added to
the charge time.
Maintenance
Your Black & Decker tool has been designed to operate over
a long period of time with a minimum of maintenance.
Continuous satisfactory operation depends upon proper tool
care and regular cleaning.
Warning! Before performing any maintenance or cleaning on
the appliance, unplug the appliance.
X From time to time wipe the appliance with a damp cloth. Do
not use any abrasive or solvent-based cleaner. Do not
immerse the appliance in water.
X After each use, clean the battery clamps (4) and be sure to
remove any battery fluid that will cause corrosion of the
clamps (4).
X Clean the outside case of the battery charger with a soft
cloth and, if necessary, mild soap solution.
X Do not allow liquid to enter the battery charger. Do not
operate when the battery charger is wet.
X Keep the battery charger cords loosely coiled during
storage to prevent damage to the cords.
Troubleshooting
Display indications, common problems and possible
solutions:
No Functions
X Make sure that the battery charger is plugged into a live
230 Vac outlet.
X Follow the steps outlined in the "Connecting the battery
charger" at the front of this manual.
7
Page 8

F01 - Internal shorted cell battery
If the battery being charged has an internal shorted cell, F01
will be displayed. We recommend taking your battery to a
certified automotive service centre for evaluation.
F02 - Bad battery connection or battery voltage too low to
accept a charge
When F02 is displayed, the most common cause is a poor
connection to the battery.
X Follow the steps outlined in "Safety instructions" at the front
of this manual to disconnect the ac power cord and the
battery clamps (4), clean the battery terminals and
reconnect the battery charger.
X If the situation persists, we recommend taking your battery
to a certified automotive service centre for evaluation.
F03 - Internal open cell
X Have the battery checked by a certified automotive service
center.
F04 - Overtime condition
F04 is displayed when the charging time exceeds 18 hours.
You may be using a charging rate that is too low for the size
of the battery. Select a higher charging rate to charge the
battery.
F05 - Overheated condition
F05 is displayed to indicate that the battery charger is
overheating. The ventilation grill that prevents the air from
flowing in and out of the battery charger may be blocked.
X Follow the steps outlined in "Safety instructions" at the front
of this manual to disconnect the ac power cord and the
battery clamps (4), allow the appliance to cool for 30
minutes and reconnect.
X Make sure that there is ample ventilation before resuming
operation.
Charging a very cold battery
If the battery to be charged is very cold i.e., in temperatures
below freezing (0°C/ 32°F), it cannot accept a high rate of
charge. The initial charge rate will be low. The charge rate
will increase as the battery warms. Never attempt to charge
a frozen battery.
Mains plug replacement (U.K. & Ireland only)
If a new mains plug needs to be fitted:
X Safely dispose of the old plug.
X Connect the brown lead to the live terminal in the new plug.
X Connect the blue lead to the neutral terminal.
Warning! No connection is to be made to the earth terminal.
Follow the fitting instructions supplied with good quality plugs.
Recommended fuse: 3 A.
Protecting the environment
Should you find one day that your appliance needs
replacement, or if it is of no further use to you, think
of the protection of the environment. Black &
Decker repair agents will accept old Black &
Decker tools and ensure that they are disposed of
in an environmentally safe way.
Separate collection of used products and
packaging allows materials to be recycled and
used again. Re-use of recycled materials helps
prevent environmental pollution and reduces the
demand for raw materials.
Local regulations may provide for separate collection of
electrical products from the household, at municipal waste
sites or by the retailer when you purchase a new product.
Black & Decker provides a facility for the collection and
recycling of Black & Decker products once they have
reached the end of their working life. To take advantage of
this service please return your product to any authorised
repair agent who will collect them on our behalf.
You can check the location of your nearest authorised repair
agent by contacting your local Black & Decker office at the
address indicated in this manual. Alternatively, a list of
authorised Black & Decker repair agents and full details of
our after-sales service and contacts are available on the
Internet at: www.2helpU.com.
Lead acid batteries can be recharged many times.
At the end of their useful life, discard batteries with
due care for our environment:
X Do not dispose of the battery in fire, as this may result in an
explosion.
X Lead acid (Pb) batteries are recyclable. They must not be
disposed of with household waste. The battery must be
removed and disposed of in accordance with local
regulations.
X Do not short-circuit the battery terminals.
X Be aware that the battery is heavy.
X If possible, operate the appliance to run the battery down
completely.
Place the battery in a suitable packaging to ensure that the
terminals cannot be short-circuited.
Take the battery to your service agent or a local recycling
station. Collected batteries will be recycled or disposed of
properly.
8
Page 9

Technical data
BDV1084
Input voltage Vac 230
Rated input W 180
Output voltage Vdc 12
Output current A 2/6/10
Weight kg 1.93
EC declaration of conformity
BDV1084
Black & Decker declares that these products conform to:
Standards & Legislation.
EN60335-2-29, EN60598-2-4, EN55014-1, EN55014-2,
EN61000-3-2, EN61000-3-3
Kevin Hewitt
Director of Consumer
Engineering
Spennymoor, County Durham
DL16 6JG,
United Kingdom
15-06-2007
Guarantee
Black & Decker is confident of the quality of its products and
offers an outstanding guarantee. This guarantee statement
is in addition to and in no way prejudices your statutory
rights. The guarantee is valid within the territories of the
Member States of the European Union and the European
Free Trade Area.
If a Black & Decker product becomes defective due to faulty
materials, workmanship or lack of conformity, within 24
months from the date of purchase, Black & Decker
guarantees to replace defective parts, repair products
subjected to fair wear and tear or replace such products to
make sure of the minimum inconvenience to the customer
unless:
X The product has been used for trade, professional or hire
purposes.
X The product has been subjected to misuse or neglect.
X The product has sustained damage through foreign
objects, substances or accidents.
X Repairs have been attempted by persons other than
authorised repair agents or Black & Decker service staff.
To claim on the guarantee, you will need to submit proof of
purchase to the seller or an authorised repair agent. You can
check the location of your nearest authorised repair agent by
contacting your local Black & Decker office at the address
indicated in this manual. Alternatively, a list of authorised
Black & Decker repair agents and full details of our aftersales service and contacts are available on the Internet at:
www.2helpU.com
Please visit our website www.blackanddecker.co.uk to
register your new Black & Decker product and to be kept up
to date on new products and special offers. Further
information on the Black & Decker brand and our range of
products is available at www.blackanddecker.co.uk.
9
Page 10

10
Page 11

11
Page 12

$XVWUDOLD
%ODFN'HFNHU$XVWUDOLD3W\/WG 7HO
)OHWFKHU5RDG0RRURROEDUN )D[
9LFWRULD
1HZ=HDODQG
%ODFN'HFNHU 7HO
7H$SXQJD3ODFH )D[
0W:HOOLQJWRQ
$XFNODQG
8QLWHG.LQJGRP
%ODFN'HFNHU 7HO
%DWK5RDG )D[
6ORXJK%HUNVKLUH6/<' +HOSOLQH
90507187
06/07
 Loading...