

Page 1
User’s Manual
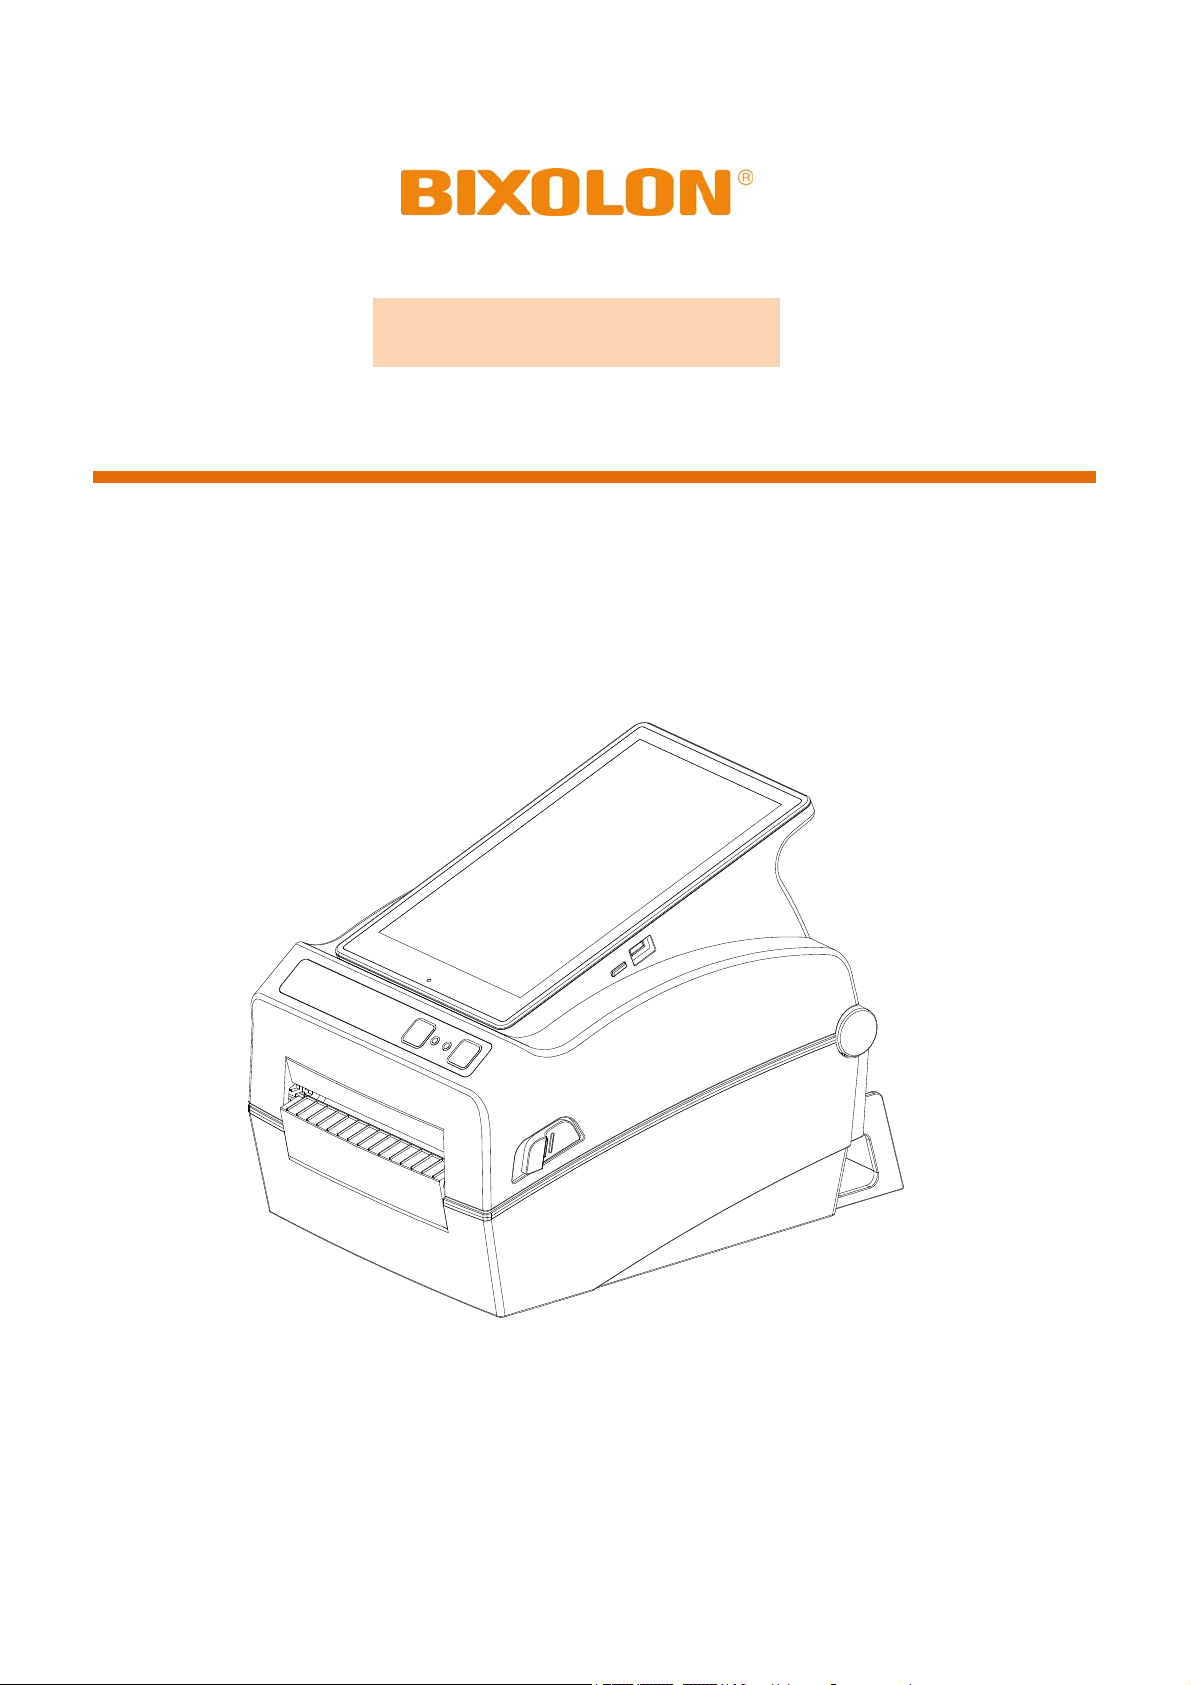
XQ-840 Series
THERMAL LABEL PRINTER
Ver. 1.00
http://www.bixolon.com
Page 2

XQ-840 Series
Introduction
The XQ-840 series printer is an All-in-One printing solution which offers various printing
applications and can be customized to meet the customer's requirements.
※ The main features of the printer are as follows
1. XQ-840 : Maximum 152mm/s(Max 6ips) printing speed
XQ-843 : Maximum 100mm/s(Max 4ips) printing speed
2. 4inch THERMAL LABEL PRINTER
3. 194 x 273 x 212 (W x D x H)
4. Support for multiple interfaces
(Standard: Ethernet, USB A-Type(USB Host), Bluetooth, Wi-Fi)
5. Easy media loading
6. Can print a range of barcodes
7. Option : Peeler, Auto Cutter
8. Tablet model (Android OS, 8inch, 800 x 1280)
It is advisable to read the contents of this manual carefully before using the printer for the first
time.
※ Use only authorized supplies that can be trusted!
- We are not responsible for quality and service for damage caused by the use of
unauthorized products (or recycled ones).
Ver. 1.00
- 2 -
Page 3
XQ-840 Series
Safety Information
Warning: Warnings must be heeded carefully in order to prevent serious
physical harm.
Caution: Cautions must be heeded in order to prevent minor injuries, equipment
damage, or data loss.
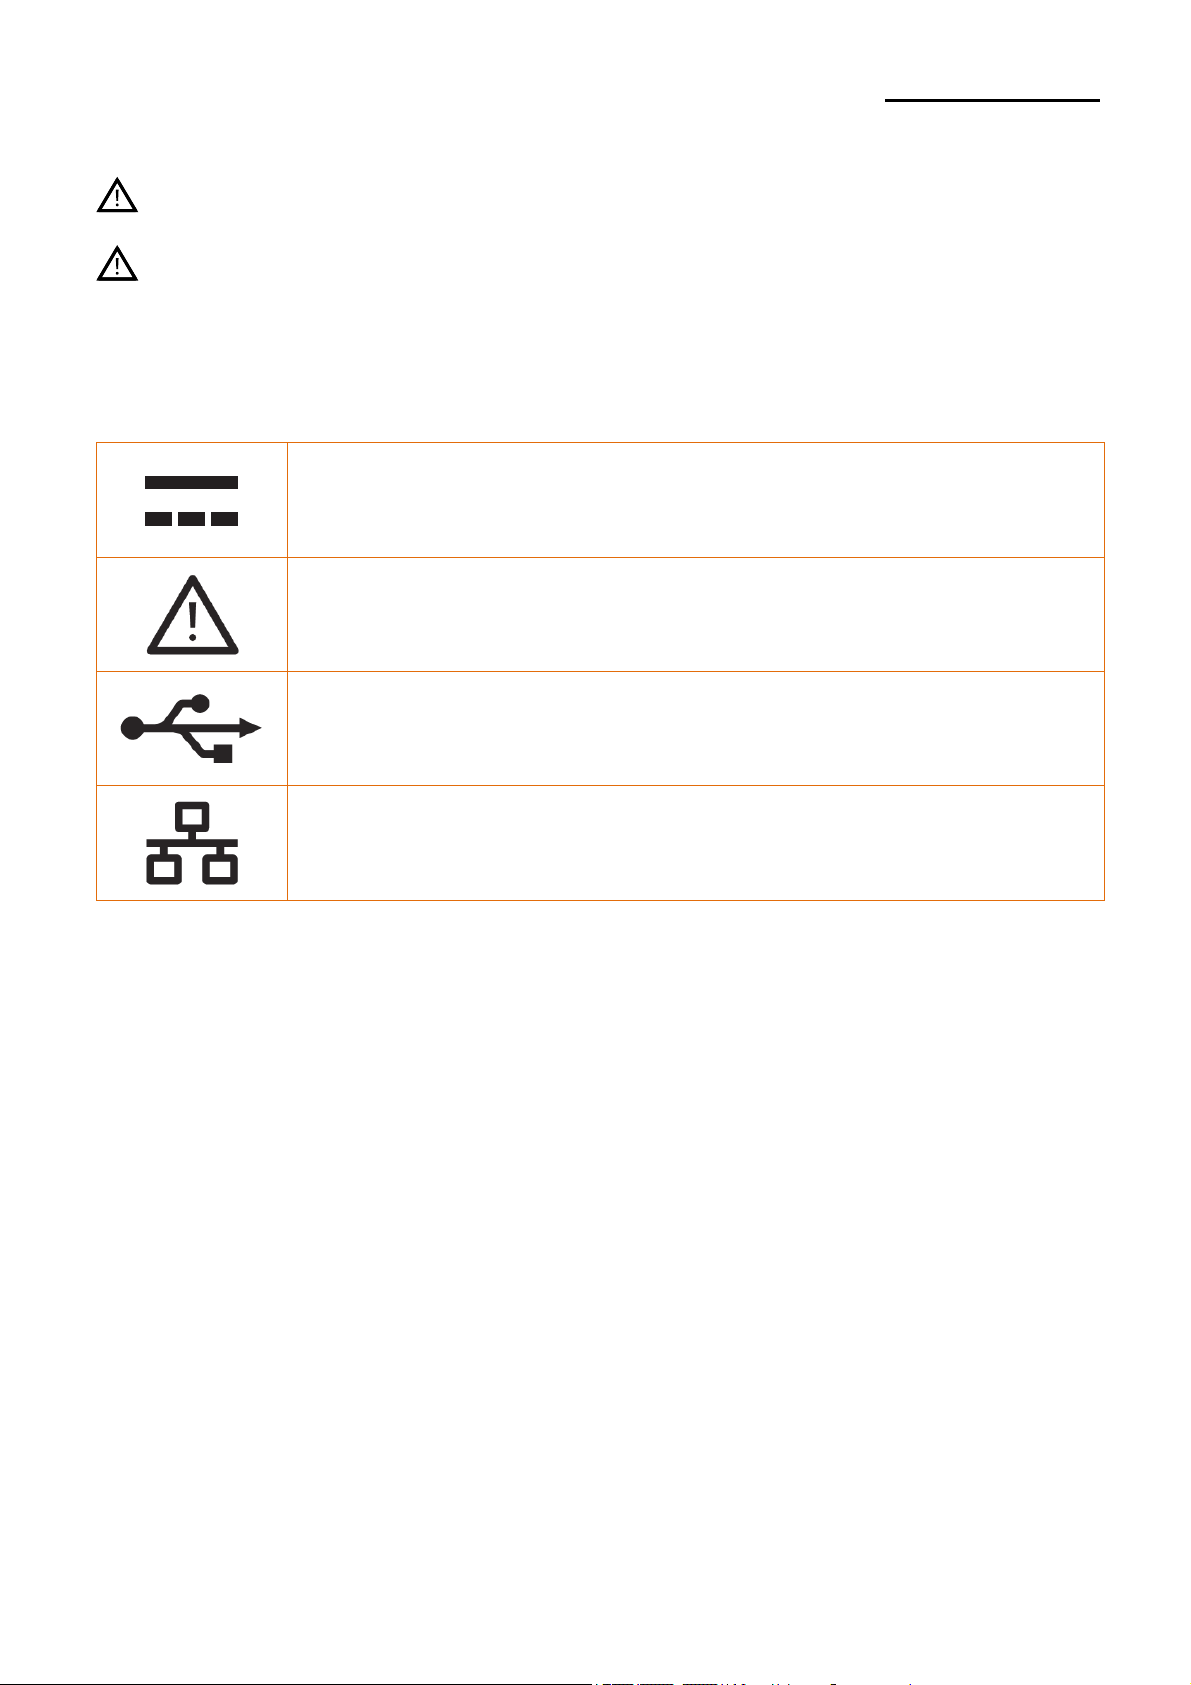
Symbol Information
DC (Direct current)
Warning, Caution
USB
LAN (Ethernet)
Ver. 1.00
- 3 -
Page 4

XQ-840 Series
Table of Contents
1. Content Confirmation .......................................................................................................... 9
2. Product Part Names ........................................................................................................... 10
3. Installation & Usage ........................................................................................................... 12
3-1 Printer Installation Placings ............................................................................................. 12
3-2 Power Connection ........................................................................................................... 13
3-3 Interface .......................................................................................................................... 15
3-4 Interface Setting .............................................................................................................. 17
3-4-1 Ethernet .............................................................................................................. 17
3-4-2 Bluetooth ............................................................................................................. 18
3-4-3 Wi-Fi .................................................................................................................... 19
3-5 Media Installation ............................................................................................................ 20
3-6 Button & LED .................................................................................................................. 22
3-6-1 Button Operations ............................................................................................... 22
3-6-2 LED Indicator For Various Printer Statuses ......................................................... 23
4. Self-test ............................................................................................................................... 24
5. Detailed Features ............................................................................................................... 25
5-1 Stand-alone Configuration Mode ..................................................................................... 25
5-1-1 Start Stand-alone Configuration Mode and execute each function ...................... 25
5-1-2 Function List Of Stand-alone Configuration Mode ............................................... 25
5-2 Pause/Cancel .................................................................................................................. 26
5-2-1 Pause/Resume Function ..................................................................................... 26
5-2-2 Print Cancellation ................................................................................................ 26
5-3 Media Calibration ............................................................................................................ 27
5-3-1 About Media Calibration ...................................................................................... 27
5-3-2 When Is Media Calibration Required? ................................................................. 27
5-3-3 How To Perform Media Calibration ...................................................................... 27
5-4 Smart Media Detection .................................................................................................... 2 8
5-5 Gap Sensor Auto Calibration Mode ................................................................................. 28
5-6 B/M Sensor Auto Calibration Mode ................................................................................. 29
5-7 Cover Closing Mode ........................................................................................................ 29
5-7-1 About Cover Closing Mode ................................................................................. 29
5-7-2 How to switch the printer from Cover Close Mode to Print Standby Mode .......... 29
5-8 Data Dump Mode ............................................................................................................ 30
5-9 Factory Reset .................................................................................................................. 30
5-10 Media Installation Method of Peeler(Option) Model ...................................................... 31
5-11 Using Fan-fold ............................................................................................................... 34
5-11-1 Printer Preparation ............................................................................................ 34
5-11-2 When Using Fan-fold Media .............................................................................. 35
5-12 Auto Cutter (Option) ...................................................................................................... 36
6. Cleaning Printer .................................................................................................................. 37
6-1 Cleaning Head ................................................................................................................ 37
6-2 Replacing Roller .............................................................................................................. 38
6-3 Cleaning Sensors, Roller or/and media Path .................................................................. 39
Ver. 1.00
- 4 -
Page 5

XQ-840 Series
7. Appendix ............................................................................................................................. 40
7-1 Specifications .................................................................................................................. 40
7-2 Label Types ..................................................................................................................... 40
Ver. 1.00
- 5 -
Page 6

XQ-840 Series
Manual Information
This user’s guide contains basic information for product usage as well as for emergency
measures that may be required.
※ The following separate manuals provide more detailed content on various technological
issues and areas.
1. Programming (SLCS) Manual
This manual provides information on label printer commands.
2. mPrint Manual
This manual provides information on printing PDF file, image and Web page via
Android devices.
3. Label Artist Mobile Manual
This manual provides information on printing custom Label and Template.
4. Food Safety Label App Manual
This manual provides information on printing MRD(Made Ready Discard) Label.
Ver. 1.00
- 6 -
Page 7
XQ-840 Series
Safety Precautions
In using the present appliance, please keep the following safety regulations in order to
prevent any hazard or material damage.
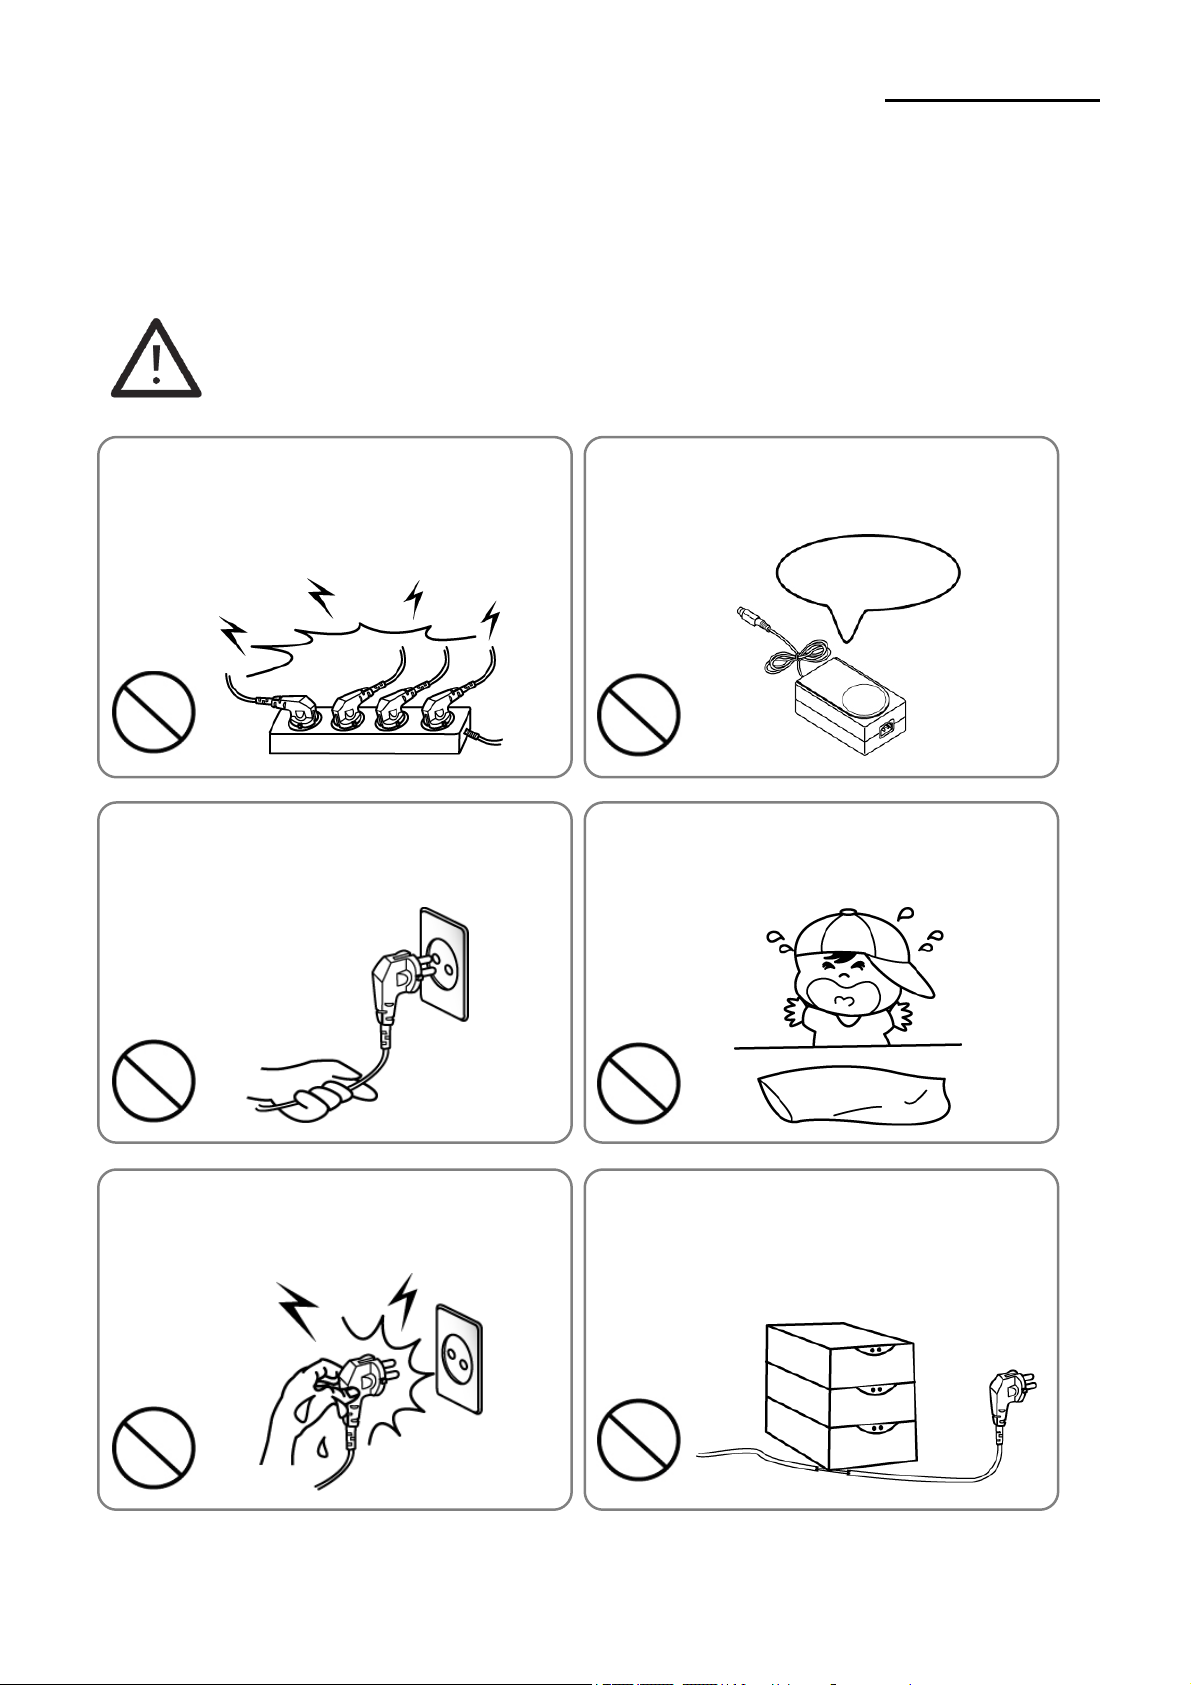
WARNING
Warnings must be heeded carefully in order to prevent serious physical harm.
Do not plug several products in one multi-outlet.
• This can provoke over-heating and a fire.
• If the plug is wet or dirty, dry or wipe it before usage.
• If the plug does not fit perfectly with the outlet, do not plug in.
• Be sure to use only standardized multi-outlets.
PROHIBIT
Do not pull the cable to unplug.
• This can damage the cable, which is the origin of a fire or a
breakdown of the printer.
PROHIBIT
You must use only the supplied adapter.
• It is dangerous to use other adapters.
ONLY SUPPLIED ADAPTER
PROHIBIT
Keep the plastic bag out of children’s reach.
• If not, a child may put the bag on his head.
PROHIBIT
Do not plug in or unplug with your hands wet.
• You can be electrocuted.
PROHIBIT
Ver. 1.00
Do not bend the cable by force or leave it under any
heavy object.
• A damaged cable can cause a fire.
PROHIBIT
- 7 -
Page 8
XQ-840 Series
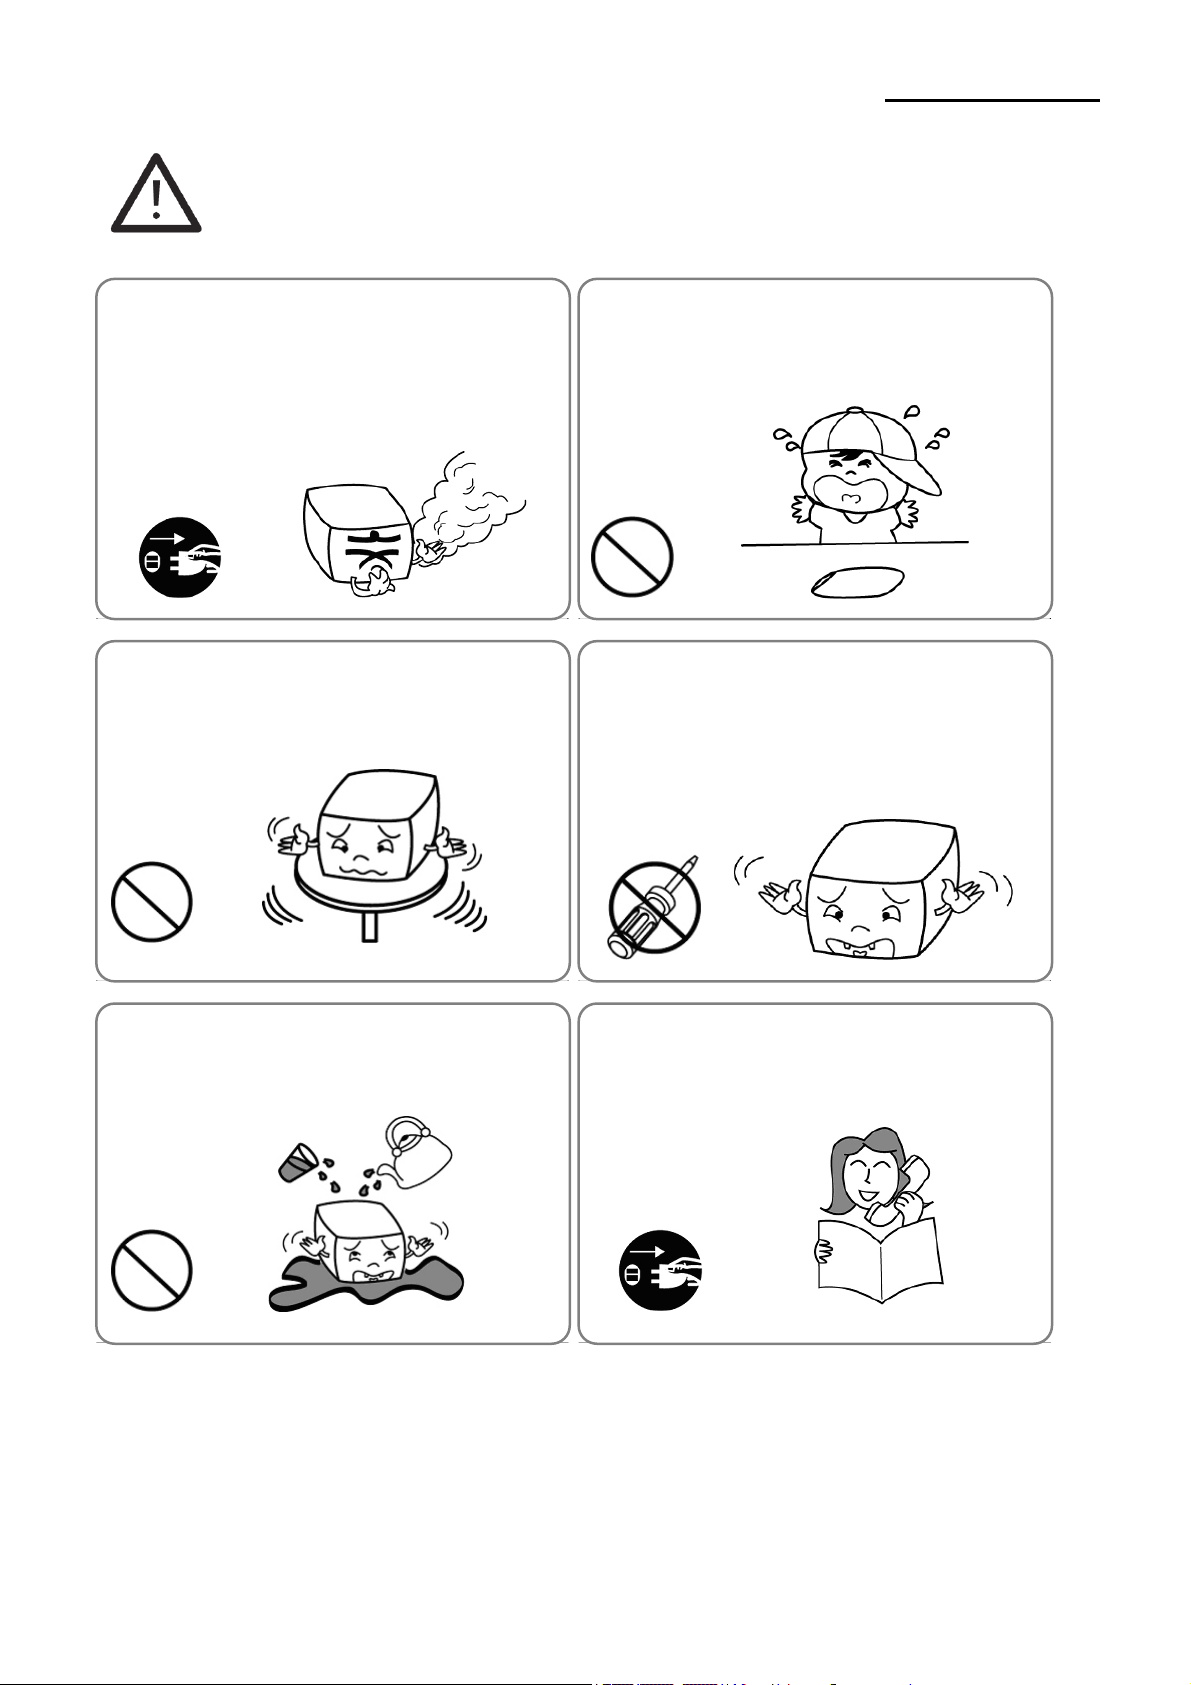
CAUTION
Cautions must be heeded in order to prevent minor injuries, equipment
damage, or data loss.
If you observe a strange smoke, odor or noise from
the printer, unplug it before taking following
measures.
• Switch off the printer and unplug the set from the mains.
• After the disappearance of the smoke, call your dealer to
repair it.
TO UNPLUG
PRINTER
Install the printer on the stable surface.
• If the printer falls down, it can be broken and you can hurt
yourself.
PRINTER
PROHIBIT
Keep the desiccant out of children’s reach.
• If not, they may eat it.
PROHIBIT
Use only approved accessories and do not try to
disassemble, repair or remodel it for yourself.
• Call your dealer when you need these services.
• Do not touch the blade of auto cutter.
DISASSEMBLING
PROHIBITED
PRINTER
Do not let water or other foreign objects in the
printer.
• If this happened, switch off and unplug the printer before
calling your dealer.
PROHIBIT
PRINTER
Do not use the printer when it is out of order. This
can cause a fire or an electrocution.
• Switch off and unplug the printer before calling your dealer.
TO UNPLUG
PRINTER
DEALER
Ver. 1.00
- 8 -
Page 9
XQ-840 Series
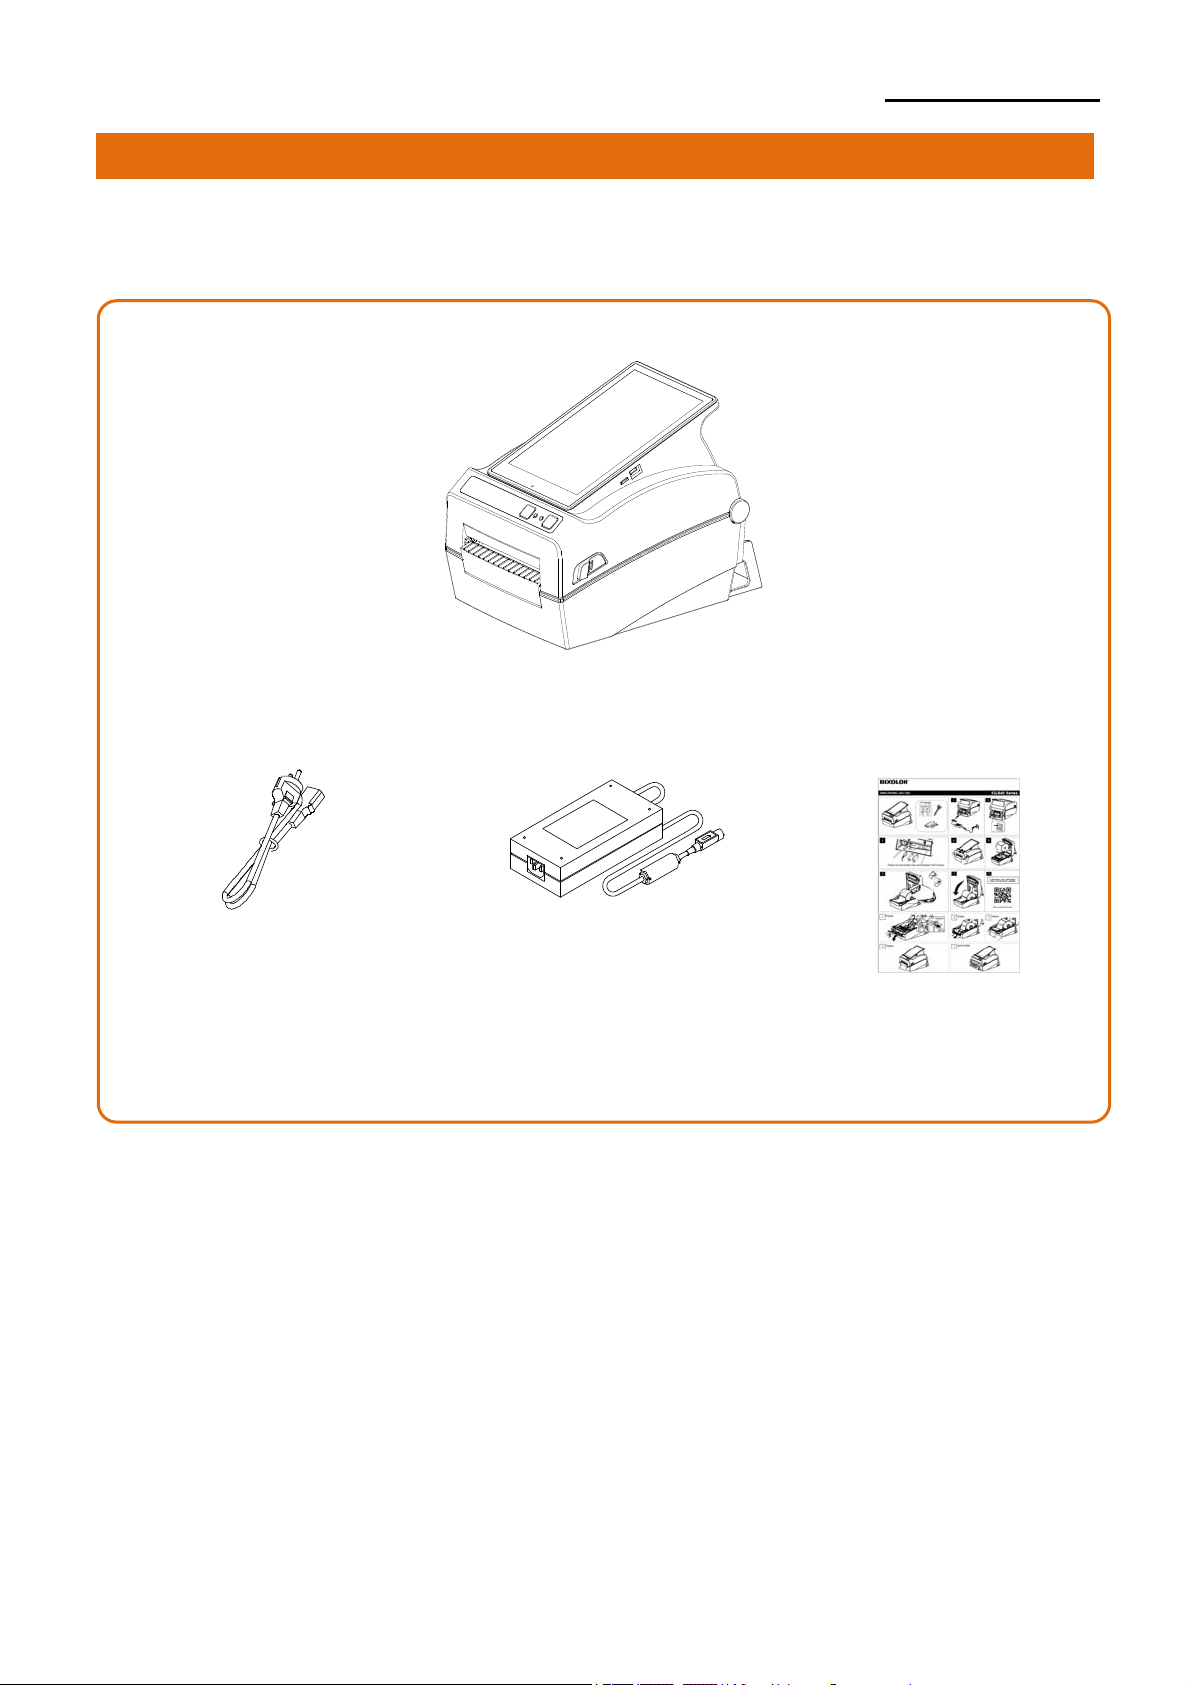
1. Content Confirmation
The following items should all be contained in the printer package.
Contact the dealer from which the purchase was made if any item is damaged and/or missing.
XQ-840 Series
Power Cord
AC/DC Adapter
Quick Manual
Ver. 1.00
- 9 -
Page 10
XQ-840 Series
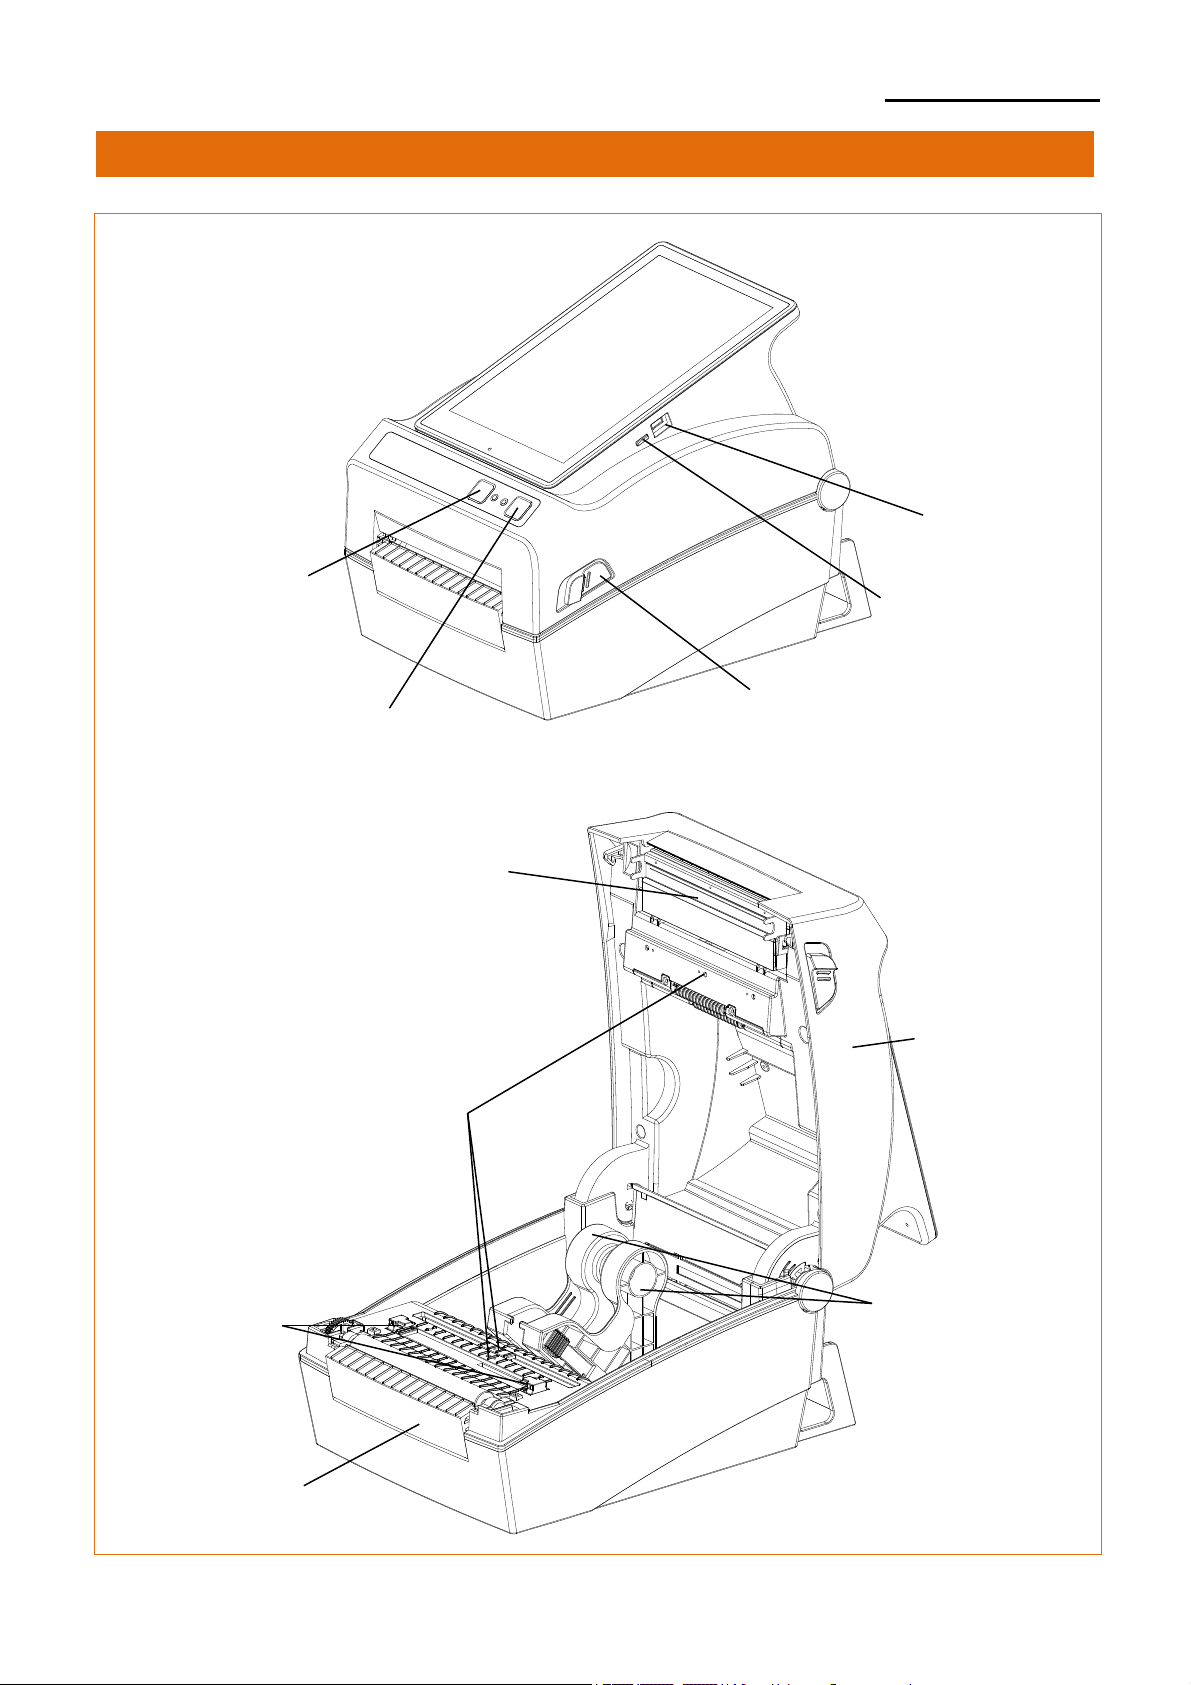
2. Product Part Names
Micro USB
Pause Button
Tablet Power Button
Cover Lever
Feed Button
Printer Head
Media Cover
Sensor
Media Guide
Ver. 1.00
Media Holder
Cover STD
- 10 -
Page 11
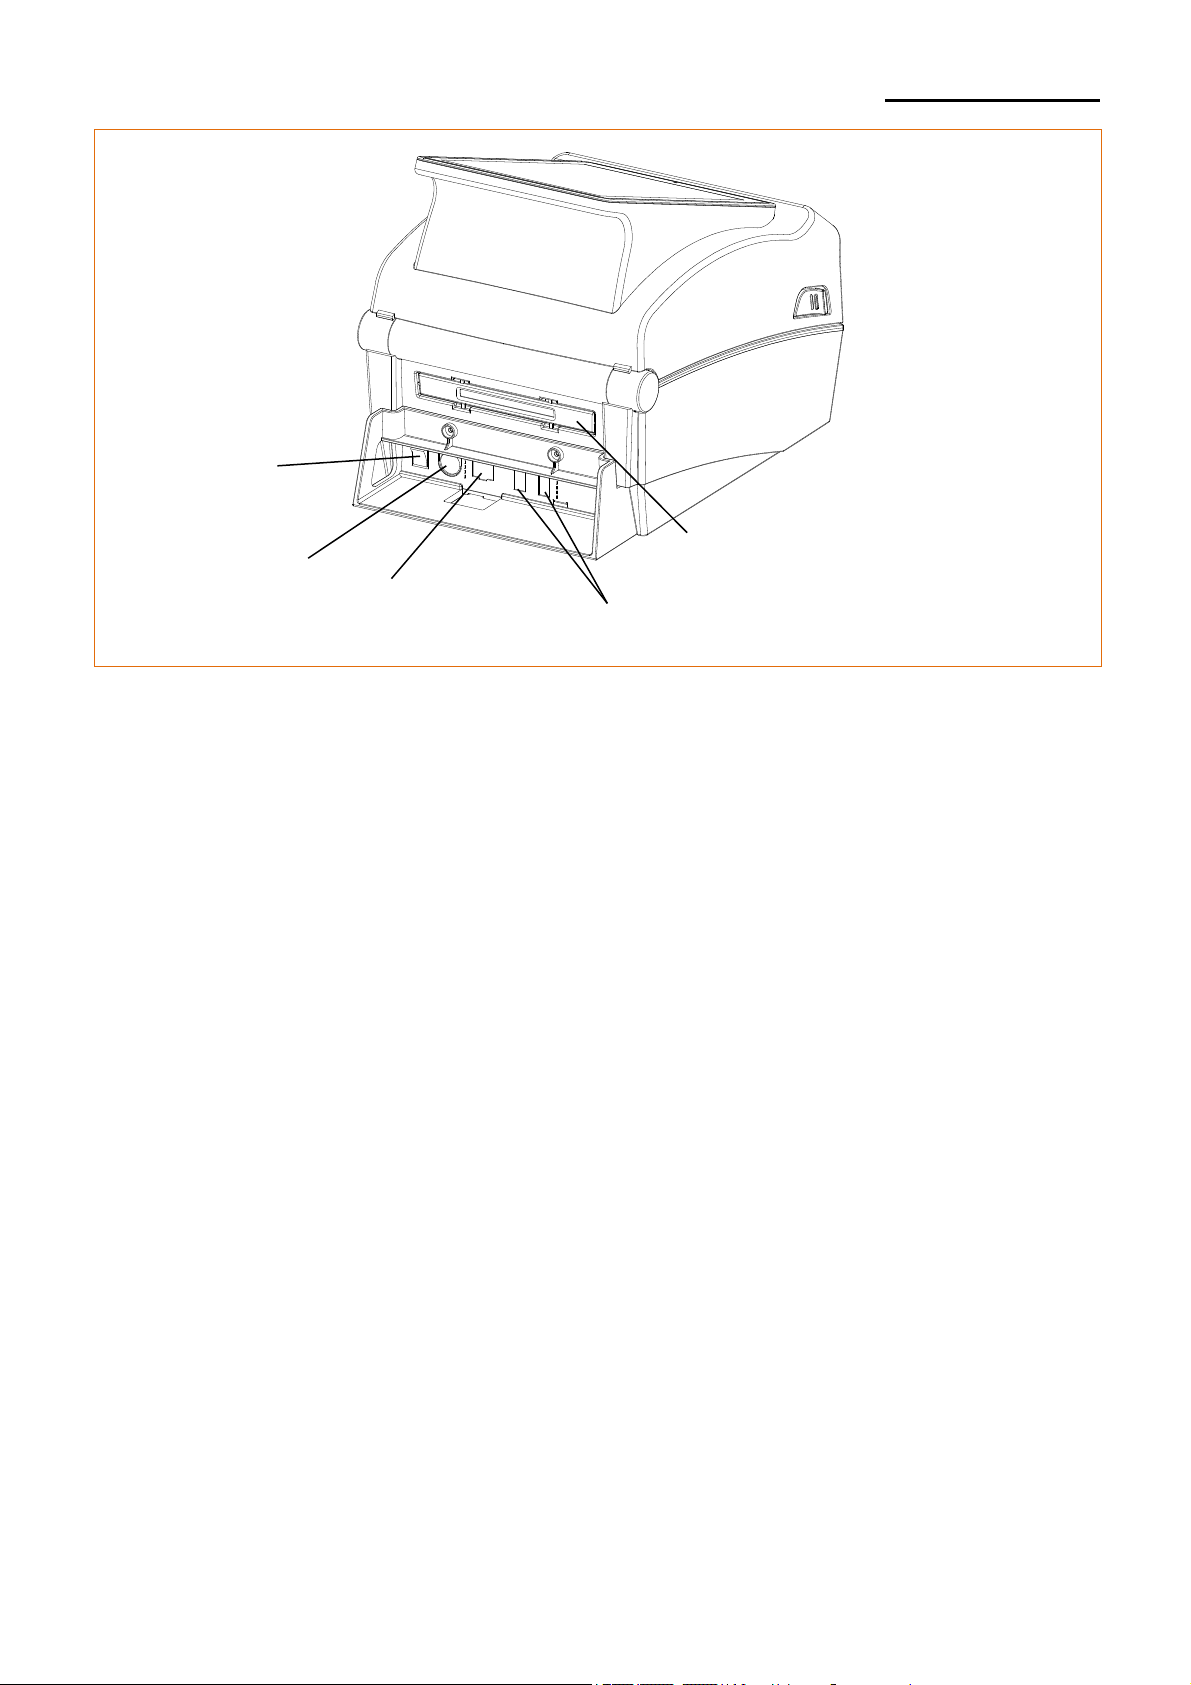
Power Switch
XQ-840 Series
Fan-Fold Media Cover
Power Jack
LAN
(Ethernet)
USB A-Type
Ver. 1.00
- 11 -
Page 12

XQ-840 Series
3. Installation & Usage
3-1 Printer Installation Placings
• Install the printer in a location that meets the following conditions.
- Allow sufficient space around the printer for proper ventilation.
- Install the printer on a flat and level surface.
- Avoid humid environment.
Ver. 1.00
- 12 -
Page 13
r
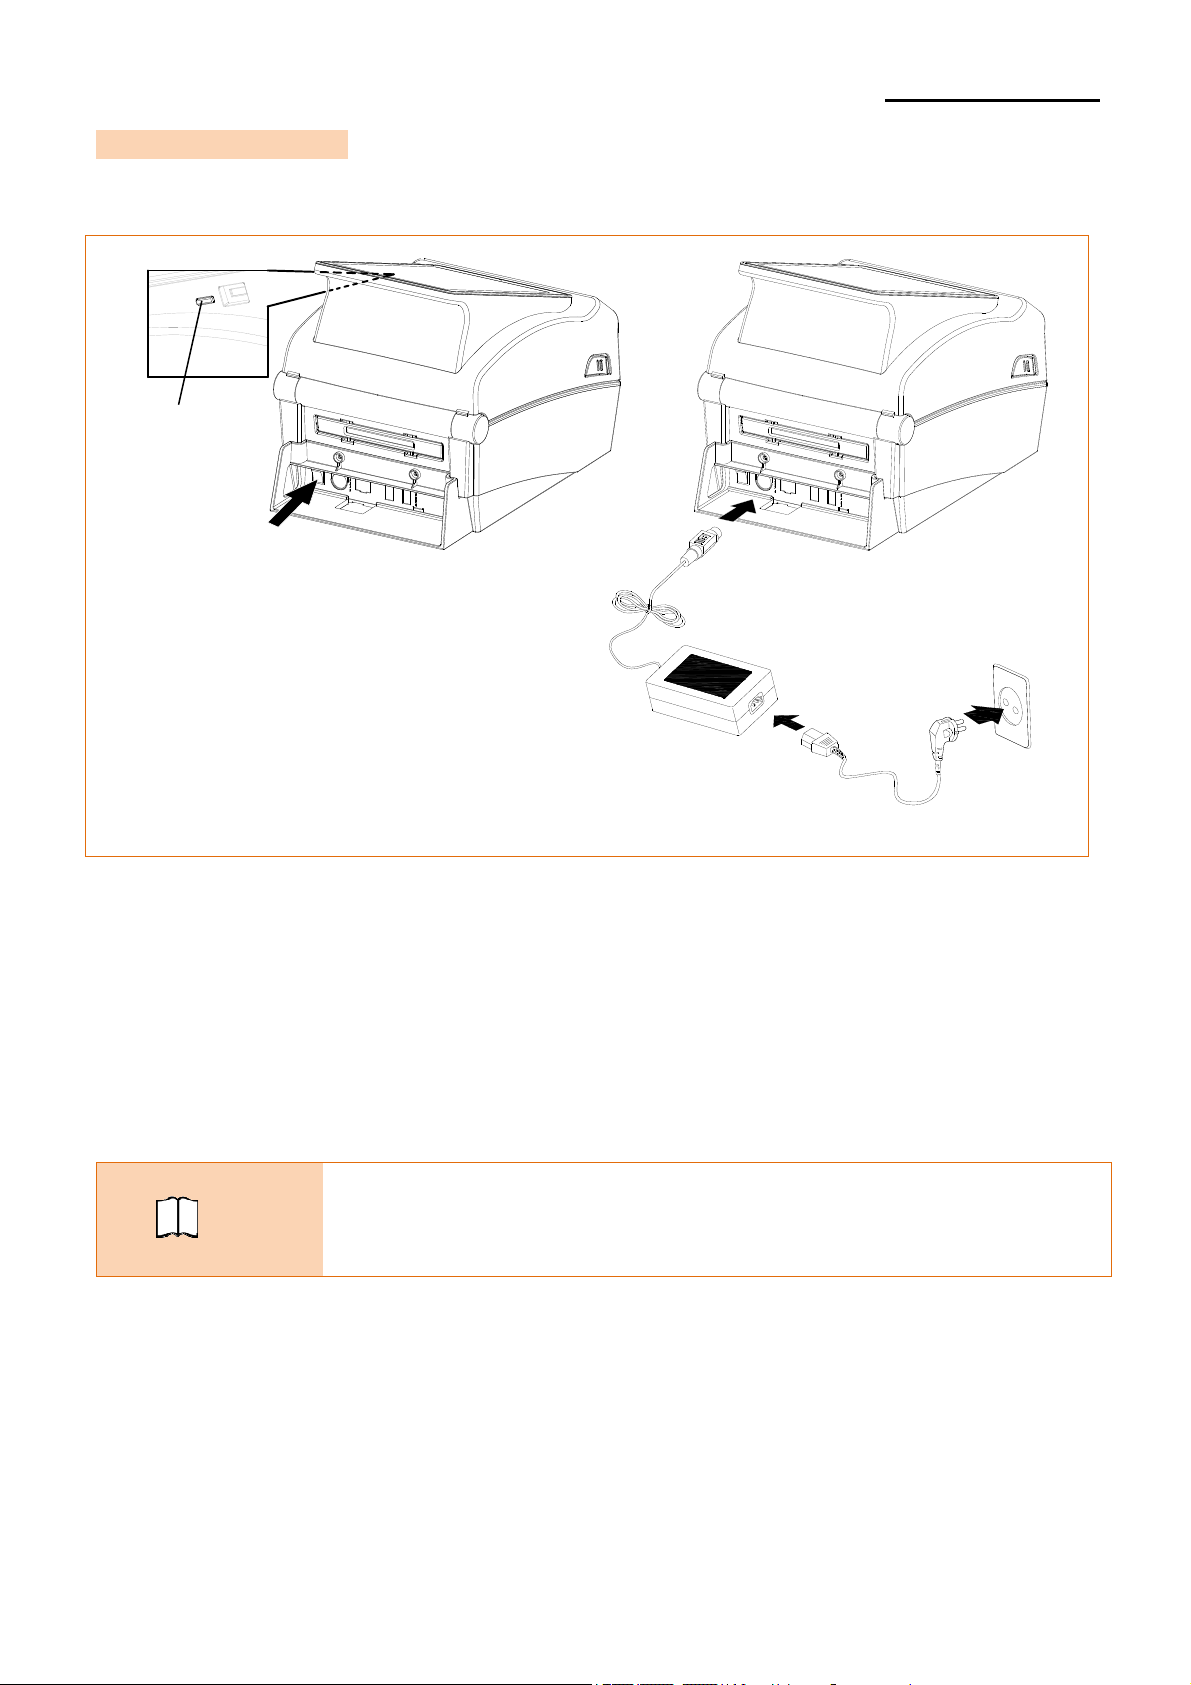
3-2 Power Connection
• Connect power to the printer as shown below.
Tablet Power Button
Power Switch OFF
XQ-840 Series
AC/DC Adapte
Power Cord
1) Turn off the printer power switch.
2) Check to see that the AC/DC adapter voltage matches that of the power source.
3) Connect the AC/DC adapter jack to the printer power connector.
4) Connect the power cord to the AC/DC adapter.
5) Connect the power cord to a power source/outlet.
- When the power cord is connected, the tablet device will turn on
regardless of the position of the power switch.
Note
- By using the power button on your tablet device, you can turn the
device on or off independently.
Ver. 1.00
- 13 -
Page 14
XQ-840 Series
- Only use a power supply provided by BIXOLON.
BIXOLON shall bear no responsibility for damage caused
by using a third-party power supply.
- Check the power supply’s label to check its electronic specs.
- For the safety of people and equipment, please use the appropriate
power cord for your country or region.
- When removing the power supply, make sure you have a firm
grasp of the plug terminal of the power cable and the printer and pull
horizontally.
- Pay attention to the direction in which you insert the power cable.
Caution
- Be sure to turn off the printer before connecting the power cord
to the printer connector. This can cause serious electrical
damage and bodily injury.
- Do not operate the printer and power supply in a humid
Warning
environment. This can cause serious electrical damage and
bodily injury.
- Do not connect an input voltage beyond the specifications of
the power supply. This may result in product damage and fire.
O
X
Ver. 1.00
- 14 -
Page 15

3-3 Interface
Note
Caution
Warning
XQ-840 Series
Shielded cables must be used to prevent radiation and reception of
electrical noise. Use the shortest possible communication cable to
minimize the detection of electrical noise in the cable.
- LAN(Ethernet) Cable (3m or less, CAT-5 or higher UTP Cable)
- Connecting unshielded communication cables is in violation of EMC
standards. Use the cable approved by us.
- Do not bundle the communication cable with objects that may cause
electrical noise and interference. The printer may be damaged.
After turning off the power switch of printer, connect and
disconnect the communication cable.
This can cause serious electrical damage and bodily injury.
Ver. 1.00
- 15 -
Page 16

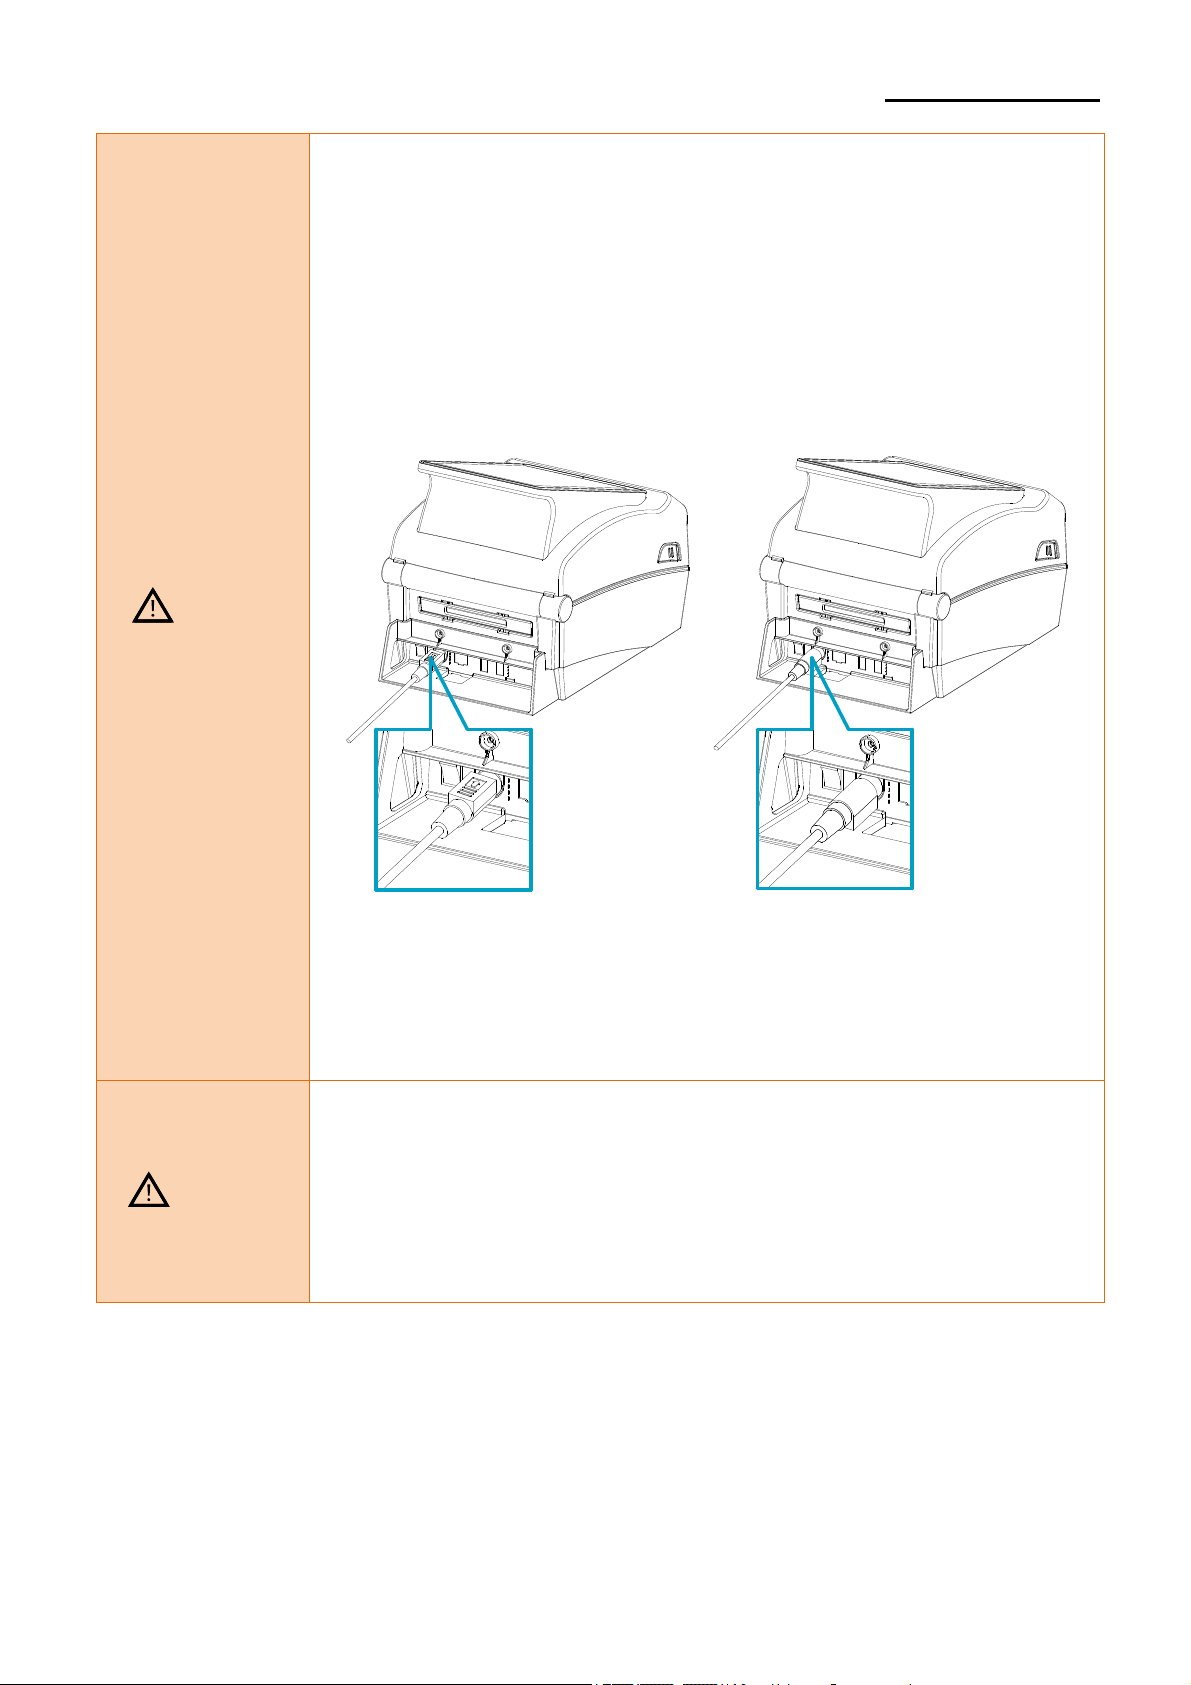
Connect the interface cable as shown below.
This printer supports the following communications interface standards.
- LAN (Ethernet) Cable
- USB A-Type (USB HOST, Mouse, Keyboard, Bar Cord Scanner, etc.)
- Micro USB (For development purposes)
- Bluetooth, Wi-Fi
XQ-840 Series
Micro USB Cable
LAN(Ethernet) Cable
USB A-Type
1) Turn off the power switch.
2) Connect the communication cable to the printer communication port to be used.
- Connect LAN(Ethernet) cable to the Ethernet port.
Be aware that the product's electronic components may be damaged
Caution
due to discharging of electrostatic energy that accumulates on the
surface of the body or other objects.
Ver. 1.00
- 16 -
Page 17

XQ-840 Series
3-4 Interface Setting
• Configure the communication settings
3-4-1 Ethernet
1) Open the settings app and go to the Settings.
2) Select Ethernet and switch it on.
3) Select Ethernet configuration to configure the settings.
4) Connect the Ethernet cable and check the connection icon on the top right.
Ethernet Off / On
on your tablet device.
Touch
Touch
Ver. 1.00
- 17 -
Page 18

3-4-2 Bluetooth
1) Open the settings app and go to the settings.
2) Select Bluetooth and switch it on.
3) Select the device you wish to pair with.
4) After authentication process, check that the device is connected.
Bluetooth Off / On
Touch
XQ-840 Series
Ver. 1.00
- 18 -
Page 19

3-4-3 Wi-Fi
1) Open the settings app and go to the settings.
2) Select Wi-Fi and switch it on.
3) Select a device to connect.
4) After authentication process, check whether the device is connected.
XQ-840 Series
Wi-Fi Off / On
Touch
Ver. 1.00
- 19 -
Page 20

3-5 Media Installation
1) Pull the cover levers on both sides
of the media cover and open
the media cover.
Media Cover
XQ-840 Series
2) Spread the media holder and insert
media as shown.
Cover Lever
Media Holder
3) Feed the paper between the Media Guide and Media Holder Guide on both side.
* Whether the media is rolled outside or inside, the printed side must face up.
Ver. 1.00
Media Guide
Media Holder Guide
- 20 -
Page 21

XQ-840 Series
4) After Installation the paper, lift the media and manually set the sensor(Black-Mark &
Notch Sensor) to the correct position
Black Mark &
Notch Sensor
- When opening or closing the cover, be careful not to pinch your
fingers.
- Do not open the print head levers while the printer is printing.
Caution
The printer may be damaged.
- Change the media when the printer is not receiving data, or data may
be lost.
While the printer is operating, the print head gets very hot,
Warning
so turn off the power and let it cool down completely.
The hot print head can cause serious burns.
Ver. 1.00
- 21 -
Page 22

3-6 Button & LED
XQ-840 Series
3-6-1 Button Operations
Printer
Button
state
before
operation
Feed/
Cancel
Power
Press -
OFF
Print
Press -
Standby
Print
- Press
Standby
Pause
LED 1
Pause Button
LED 2
Feed/Cancel Button
Operation procedure Printer operation mode
• Apply power while
pressing the button
(Hold the button until the
Self-test Printing Mode.
printer starts self-test
printing)
• Press the button softly
Feed Mode
and release it immediately
• Press the button for two
Stand-alone
seconds and continue to
Configuration Mode
hold
During
Printing
During
Printing
Print
Pause
Mode
Ver. 1.00
- Press
Press -
Press -
• Press the button softly
Print Pause Mode
and release it immediately
• Press the button for two
seconds and continue to
Print Cancel Mode
hold
• Press the button softly
and release it immediately Print Cancel Mode
- 22 -
Page 23

3-6-2 LED Indicator For Various Printer Statuses
XQ-840 Series
LED 1 LED 2
Color Status Color Color
Printer Operation
Status
Green On Red On Print Standby Mode Print Standby Mode
Green On Red Blink Print Cancel Mode Wait For Button Input
Print Is Paused
Green Blink Red On
Wait For Button Input
Temporarily
Green Blink Green Blink Cover Close Mode Wait For Button Input
Orange On Orange On Mode Switching Mode Switching Notification
Paper Jam (gap/black mark is
Red On Orange On Error Mode
not recognized)
Red On Green Blink Error Mode Printer Head Overheating
Red On Orange Blink Error Mode No Media
Red On Red Blink Error Mode Media Cover Open
Red On - Off Error Mode Media Calibration Failure
Red Blink Red Blink Error Mode Auto-Cutter Error
Ver. 1.00
- 23 -
Page 24

XQ-840 Series
4. Self-test
The self-test checks whether the printer has any problems.
(Remove the printed label from peeler before using the self-test if using the printer’s label
peeler option.)
The self-test checks the following;
1) Make sure that the media roll has been installed properly.
2) Turn on the power while holding down the feed button. The self-test begins.
(It takes about 10 seconds before starting self-test)
3) The self-test prints the current printer configuration information.
4) After the self-test results are printed out, a printer enters into print standby state.
Caution
If the printer does not function properly, contact an authorized dealer.
Ver. 1.00
- 24 -
Page 25

XQ-840 Series
5. Detailed Features
5-1 Stand-alone Configuration Mode
• Various modes can be executed using buttons and LED only.
5-1-1 Start Stand-alone Configuration Mode and execute each function
1) The printer mode is set to Printer Setting Mode when the Pause button is pressed
for two seconds while in Print Standby Mode.
2) Both LEDs will change to orange color and the printer will be set to Stand-alone
Configuration Mode.
3) When the printer enters into this mode, the status of LED 1 and LED 2 are changed
sequentially.
4) When the Feed button is pressed at specific LED color combination, the
corresponding printer operation will be selected.
5-1-2 Function List Of Stand-alone Configuration Mode
Sequence
Number
1
2 Orange
3 Red
4
5 Orange
6 Red
7
8 Orange
9 Red
LED 1 LED 2
Color Status Color Status
Green
Green On
Blink
4 times
Blink
4 times
Blink
4 times
Green
Orange On
Blink
4 times
Blink
4 times
Blink
4 times
Green
Red On
Blink
4 times
Blink
4 times
Blink
4 times
Print Configuration Info
Print File List
Factory Reset
Gap Sensor Auto Calibration
B/M Sensor Auto Calibration
Data Dump Mode
Demo Mode
Reserved
Download Items Delete
* This information can be printed out by printer self-test.
Printer Operation
Caution
Ver. 1.00
Contact the customer center if the printer does not enter
stand-alone configuration mode.
- 25 -
Page 26

XQ-840 Series
5-2 Pause/Cancel
• During multiple-page print jobs, the Pause and Cancel button can be used to temporarily
cease printing and cancel the print job altogether, respectively.
LED 1
Pause Button
LED 2
Feed/Cancel Button
5-2-1 Pause/Resume Function
1) When printing labels, pressing the Pause button
2) The printer will pause after finishing the current label printing and the status of LED will
be as follows.
- LED 1 : Green Blink
- LED 2 : Red On
3) While the print job is paused, press the Pause button again to resume printing.
5-2-2 Print Cancellation
1) During label printing and/or pause mode, pressing the Cancel button enters the print
cancellation mode.
2) The following processes occur in the print cancellation mode.
- All label printing cancelled
- All data received in the printer communications buffer deleted.
- All received data deleted.
3) The LED Status in the print cancellation mode can be as follows.
- LED 1 : Green On
- LED 2 : Red Blink
4) While in the print cancellation mode, press the Cancel button again to return to print
standby mode.
Caution
Ver. 1.00
Contact the customer center if the printer does not execute
pause/resume function.
- 26 -
Page 27

XQ-840 Series
5-3 Media Calibration
• This printer has been designed to recognize the gaps with most print papers, but sometimes
it may not recognize the gap and keep feeding paper if a special type of paper is used. In
this case, run Auto Calibration function so that the printer can recognize the gap. BIXOLON
printer provides various media calibration methods in order to accommodate various special
paper types.
5-3-1 About Media Calibration
• This function is for adjusting the sensitivity of the paper detection sensor for accurate
printing position control and measuring actual length of paper.
• Sensor sensitivity adjustment
- The purpose is to detect the identifier (gap/black mark/groove) of installed label
• Paper length measurement
- Accurate length is required to rotate the printing orientation.
- The purpose is to detect the change of paper type.
5-3-2 When Is Media Calibration Required?
• When the printer is installed first time
• When the newly installed paper is a different paper type
• When printer position is not accurate or printer does not stop in the right position
5-3-3 How To Perform Media Calibration
• The following three methods of media calibration can be used depending on the
conditions.
- Smart Media Detection
- Gap Sensor Auto Calibration Mode
- Black Mark Sensor Auto Calibration Mode
• Why are several calibration methods provided?
- Multiple labels should be scanned for media calibration and more accurate
sensitivity calibration can be performed when more labels are scanned.
- The number of labels to scan for sensor sensitivity adjustment depends on various
conditions such as label paper material, color, surface status, thickness, gap length,
pre-printed pattern, etc.
- Three different media calibration modes are provided for compromise between
prevention of excessive use of paper and accuracy of sensor sensitivity adjustment.
- Smart media detection mode that allows for adjustment of sensitivity with minimum
amount of scanning should be good enough for most cases with general labels.
Ver. 1.00
- 27 -
Page 28

XQ-840 Series
5-4 Smart Media Detection
• Printer executes this function when necessary without user input and media
configuration can be completed with Smart Media Detection function for most print papers.
Papers with gap and black mark can be identified without separate settings.
3~5 pages of labels will be used depending on the type of paper.
Smart Media Detection function is executed in the followings cases
- When the printer is installed first time, it is executed through Feed button or print
command.
- When change paper length is detected during feeding or printing.
- When the paper type entered by command is different from the configured paper type.
- After reset with factory settings
Contact the customer center if the printer does not execute
Caution
Smart media detection function.
5-5 Gap Sensor Auto Calibration Mode
• Gap sensor auto calibration mode is used when the printer does not detect a gap on the
label media correctly.
Generally a printer is set to detect most types of gap but sometimes it fails to detect and keep
feeding the media without a stop when special media used. In such case, use gap sensor
auto calibration mode function for a proper detection.
1) Make sure that media roll has been installed properly.
2) Use stand-alone configuration mode, sequence number 4 (refer to 5-1)
- Sequence number 4: Gap sensor auto calibration mode
Caution
Ver. 1.00
Contact the customer center if the printer does not execute
gap sensor auto calibration mode function.
- 28 -
Page 29

XQ-840 Series
5-6 B/M Sensor Auto Calibration Mode
• Black mark sensor auto calibration mode is used when the printer does not detect a black
mark on the label media correctly.
Generally a printer is set to detect most types of black mark but sometimes it fails to detect
and keep feeding the media without a stop when special media used. In such case, use black
mark sensor auto calibration mode function for a proper detection.
1) Make sure that media roll has been installed properly.
2) Use stand-alone configuration mode, sequence number 5 (refer to 5-1)
- Sequence number 5: Black mark sensor auto calibration mode
Contact the customer center if the printer does not execute
Caution
black mark sensor auto calibration mode function.
5-7 Cover Closing Mode
5-7-1 About Cover Closing Mode
• The printed area may become out of range of paper if the paper is not in the accurate
printing position when the cover is opened and closed.
• The printer is put into Cover Closing Mode instead of Print Standby Mode when the
cover is closed in order to prevent this problem, and it waits for user input.
• The status of LEDS are as follows in this mode.
- LED 1 : Green Blink
- LED 2 : Green Blink
• The data received during Cover Close Mode is not printed until the printer recovers to
Print Standby Mode.
5-7-2 How to switch the printer from Cover Close Mode to Print Standby Mode
• Press the Pause button to switch to Print Standby Mode without feeding any paper.
• Press the Feed button to feed one page to align the paper position and switch to the
Print Standby Mode.
Contact the customer center if the printer does not execute
Caution
cover closing mode function.
Ver. 1.00
- 29 -
Page 30

XQ-840 Series
5-8 Data Dump Mode
• This function can be used to diagnose the communication issues when the printer does not
work correctly.
In this mode, the received data will be printed in hex format.
Use stand-alone configuration mode, sequence number 6(refer to 5-1) to start data dump
mode.
Turn the printer off and on to recover to the print standby mode.
Contact the customer center if the printer does not enter
Caution
data dump mode function.
5-9 Factory Reset
• This function is used to reset the printer settings to factory default settings.
1) Make sure that media roll has been installed properly.
2) Press the Feed Button for two seconds during Pint Standby Mode.
3) Both LEDs will be changed to orange color and the printer will enter Stand-alone
Configuration Mode.
4) Press the Feed button at the third sequence(LED1 Green / LED2 Red blink 4 times) reset
the printer to factory setting and execute Smart Media Detection.
The printer will restart when it is reset to factory default settings.
Contact the customer center if the printer does not enter
Caution
factory reset function.
Ver. 1.00
- 30 -
Page 31

5-10 Media Installation Method of Peeler(Option) Model
• Use a peeler to automatically separate the printed media from the liner.
For peeler model, install media in the following ways:
1) Open the media cover.
2) Open the peeler cover.
XQ-840 Series
3) Set the peeler switch to the ‘ON’ position and check to see that the LED has turned on
LED
ON
Peeler Switch
Ver. 1.00
- 31 -
Page 32

4) Remove the media and insert the media through the slot.
Remove
XQ-840 Series
5) Close the peeler cover.
( O )
6) Close the media cover until a click sound is heard.
( X )
Ver. 1.00
- 32 -
Page 33

XQ-840 Series
- When opening or closing the cover, be careful not to pinch your
fingers.
- Do not open the print head levers while the printer is printing.
The printer may be damaged.
- Change the media when the printer is not receiving data, or data may
Caution
be lost.
- The peeler function is only available for label media.
- When the peeler is switched on, the next label will not be printed
unless the printed label is removed from the peeler.
- When the peeler is switched off, the peeler does not work.
While the printer is operating, the print head gets very hot, so turn
Warning
off the power and let it cool down completely.
The hot print head can cause serious burns.
Ver. 1.00
- 33 -
Page 34

XQ-840 Series
5-11 Using Fan-fold
• Supplying media to the printer externally is done as follows.
5-11-1 Printer Preparation
Remove the rear media supply cover on the back side of the printer with a knife or other
cutting instrument.
Remove
Take care not to injure the hands and/or any other part of the body
Caution
when performing this step
Ver. 1.00
- 34 -
Page 35

XQ-840 Series
5-11-2 When Using Fan-fold Media
1) Insert the media at the rear of the printer as shown below and open the media cover.
2) Adjust media holders to the media width by using the fix tool.
Media Holder
Fix Tool
Caution
Ver. 1.00
- Do not open the print cover while the printer is operating,
otherwise the printer may be damaged.
- To prevent data loss, replace media only when the printer is
not receiving any data.
- 35 -
Page 36

XQ-840 Series
5-12 Auto Cutter (Option)
• For auto paper cutting, products equipped with auto cutter are available.
Auto-Cutter can be controlled by command.
※ The paper installation method is the same as paper with no auto cutter.
Ver. 1.00
- 36 -
Page 37

XQ-840 Series
6. Cleaning Printer
Printing quality might be degraded by dust, foreign substance, adhesive substance, or other
pollution materials stuck in the printer head or inside the printer.
When dirty, clean the print head as follows
6-1 Cleaning Head
1) Open the media cover and then use the cleaning pen to clean the head in the direction
from the center of the head to the edges.
2) After cleaning the head, do not use the printer until the alcohol used for cleaning
evaporates completely. (1~2 min)
Note
Caution
Warning
Ver. 1.00
Perform the cleaning process each time the media roll is replaced to
prevent print quality deterioration.
- Be sure to clean after turning the printer off.
- Be careful not to leave scratches in the print head.
The printer may be damaged.
- Print head is very hot while the printer is printing, so clean the printer
after cooling it sufficiently with power off.
Do not touch heated area of print–head when cleaning.
Personal injury may result from static electricity, etc.
- 37 -
Page 38

r
6-2 Replacing Roller
1) Open the media cover and remove the media.
2) Pull the roller holders and separate the roller assembly.
Roller Holde
XQ-840 Series
Roller Assembly
3) Assemble new roller assembly in reverse order.
Caution
Make sure to turn the printer power off prior to cleaning.
Ver. 1.00
- 38 -
Page 39

XQ-840 Series
6-3 Cleaning Sensors, Roller or/and media Path
1) Open the media cover and remove the media.
2) Remove any dust or foreign substance using dry cloth or cotton swab.
3) Soak the cloth or cotton swab in alcohol for medical use and use it to remove adhesive
foreign substances or other pollution materials.
Printer Head
Head Cover
Media Cover
Platen Roller
Peeler Sensor
Caution
Sensor
Media Holder
Media Guide
Ridges
Ridges
Peeler Roller
- Clean the parts when there is a degradation of performance in printing
quality or media detection.
- After cleaning the parts, do not use the printer until the alcohol
evaporates completely (1~2 min) and the printer has completely dried.
Ver. 1.00
- 39 -
Page 40

XQ-840 Series
7. Appendix
7-1 Specifications
Item Description
Printing Method Direct Thermal Printing
XQ-840 : 203 dpi (8 dot/mm)
XQ-843 : 300 dpi (11.8 dot/mm)
XQ-840 : Max. 108 mm (Max. 4.25”)
XQ-843 : Max. 105.7 mm(Max. 4.16”)
XQ-840 : Max. 152 mm/sec (Max. 6ips)
XQ-843 : Max. 100 mm/sec (Max. 4ips)
AC 100 - 240V
DC 24V ±5%
2.5A
0 ~ 40 ℃ (Operating)
-20 ~ 60 ℃ (Storage)
10 ~ 80 % RH (Operating)
10 ~ 90 % RH (Storage)
Adapter
Conditions
Printer
Display
Media
AC
Usage
Dot Density
Printing Width
Printing Speed
OS Android 7.0
Size 8inch
Resolution 800 × 1280
Roll Width 15 ~ 118 mm (0.59 ~ 4.64”)
Roll Max 130 mm (Max. 5.12”)
Core 25.4 ~ 38.1 mm (1” ~ 1.5”)
SMPS Input
Voltage
Frequency 50/60 Hz
SMPS Output
Voltage
SMPS Output
Current
Temperature
Humidity
(except for
media)
Print speed may vary depending on the data transfer speed and the
Note
combination of command.
- In case of danger, turn off the power to cut the connection.
Caution
- The power cord must be grounded to ensure safety and reduce
electromagnetic interference
7-2 Label Types
• The label types used with this printer are as follows.
• Control Labels: PET
• Other Labels: PET
Ver. 1.00
- 40 -
Page 41

XQ-840 Series
Copyright
© BIXOLON Co., Ltd. All rights reserved.
This user manual and all property of the product are protected under copyright law.
It is strictly prohibited to copy, store, and transmit the whole or any part of the manual and
any property of the product without the prior written approval of BIXOLON Co., Ltd.
The information contained herein is designed only for use with this BIXOLON product.
BIXOLON is not responsible for any direct or indirect damages, arising from or related to use
of this information.
• The BIXOLON logo is the registered trademark of BIXOLON Co., Ltd.
• All other brand or product names are trademarks of their respective companies or
organizations.
BIXOLON Co., Ltd. maintains ongoing efforts to enhance and upgrade the functions and
quality of all our products.
In the following, product specifications and/or user manual content may be changed without
prior notice.
Caution
Some semiconductor devices are easily damaged by static electricity. You should turn the
printer “OFF”, before you connect or remove the cables on the rear side, in order to guard the
printer against the static electricity. If the printer is damaged by the static electricity, you
should turn the printer “OFF”.
Electronics, such as printers, are prone to damage by static electricity. Therefore, to protect
the printer from static electricity, be sure to turn off the printer before connecting or
disconnecting the cable to the rear of the printer. If the printer is damaged by static electricity,
contact your local dealer.
When the printer is operating with the media cover open, do not wear anything that can touch
the drive, such as clothing, necklaces, rings, watches, or employee certificates close to it.
Also, keep yourself away from the printer as it is dangerous for some parts of the body to
come into contact with it. If an object or part of your body touches the drive, immediately
disconnect the power cord or turn off the power switch on the back of the product.
If the battery is not replaced correctly, there is a risk of explosion. Replace only with the same
model or equivalent product specified by the manufacturer. When the battery is used up, be
sure to tape the terminals and insulate them and dispose at the designated place in
accordance with the relevant laws and ordinances set by the state.
Ver. 1.00
- 41 -
Page 42

XQ-840 Series
Mise en garde
Les appareils électroniques, tels que les imprimantes, risquent d'être endommagés par
l'électricité statique. Par conséquent, pour protéger l’imprimante de l’électricité statique,
veillez à l’éteindre avant de connecter ou de déconnecter le câble situé à l’arrière de celle-ci.
Si l'imprimante est endommagée par l'électricité statique, contactez votre revendeur local
Lorsque l'imprimante fonctionne avec le capot ouvert, ne portez rien qui puisse entrer en
contact avec le mécanisme, tel que des vêtements, des colliers, des bagues, des montres ou
des certificats d'employé à proximité. Éloignez-vous également de l’imprimante car il est
dangereux que certaines parties du corps entrent en contact avec celle-ci. Si un objet ou une
partie de votre corps entre en contact avec le mécanisme, débranchez immédiatement le
câble d'alimentation ou éteignez l’interrupteur situé à l'arrière du produit.
Si la batterie n'est pas remplacée correctement, il existe un risque d'explosion. Remplacez-la
uniquement avec le même modèle ou un produit équivalent approuvé par le fabricant.
Lorsque la batterie est épuisée, veillez à coller du ruban adhésif sur les bornes, à l’isoler et à
la jeter de manière adéquate, conformément aux lois et réglementations locales et nationales
en vigueur.
Ver. 1.00
- 42 -
Page 43

XQ-840 Series
Compliance information
This device complies with Part 15 of the FCC Rules. Operation is subject to the following two
conditions: (1) This device may not cause harmful interference, and (2) This device must
accept any interference received, including interference that may cause undesired operation.
This device contains licence-exempt transmitter(s)/receiver(s) that comply with Innovation,
Science and Economic Development Canada’s licence-exempt RSS(s). Operation is subject
to the following two conditions:
(1) This device may not cause interference.
(2) This device must accept any interference, including interference that may cause undesired
operation of the device.
Le présent appareil est conforme aux CNR d'Industrie Canada applicables aux appareils
radio exempts de licence. L'exploitation est autorisée aux deux conditions suivantes : (1)
l'appareil ne doit pas produire de brouillage, et (2) l'utilisateur de l'appareil doit accepter tout
brouillage radioélectrique subi, même si le brouillage est susceptible d'en compromettre le
fonctionnement
This equipment has been tested and found to comply with the limits for a Class A digital
device pursuant to Part 15 of the FCC Rules. These limits are designed to provide reasonable
protection against harmful interference when the equipment is operated in a commercial
environment. This equipment generates uses, and can radiate radio frequency energy and, if
not installed and used in accordance with the instruction manual, may cause harmful
interference to radio communications. Operation of this equipment in a residential area is
likely to cause harmful interference in which case the user will be required to correct the
interference at his own expense.
Caution: Exposure to Radio Frequency Radiation.
To comply with FCC RF exposure compliance requirements, a separation distance of at least
20 cm must be maintained between the antenna of this device and all persons.
Caution: Any Changes or modifications not expressly approved by the manufacturer could
void the user's authority to operate the equipment.
Attention: Tout changement ou modification non expressément approuvé par le fabricant peut
annuler le droit de l'utilisateur à utiliser l'équipement.
Class A Digital Device : Wired Device
This Apparatus complies with class “A” limits for radio interference as specified in the
Canadian department of communications radio interference regulations.
This Class A digital apparatus complies with Canadian ICES-003.
Appareil numérique de classe A: appareil filaire
Get appareil est conforme aux normes class “A” d’interference radio tel que specifier par
ministre canadien des communications dans les reglements d’interference radio.
Cet appareil numérique de la classe A est conform à la norme NMB-003 du Canada.
Ver. 1.00
- 43 -
Page 44

XQ-840 Series
Waste Electrical and Electric Equipment (WEEE)
This marking shown on the product or its literature, indicates that is should not be
disposed with other household wastes at the end of its working life, To prevent
possible harm to the environment or human health from uncontrolled waste
disposal, please separate this from other types of wastes and recycle it
responsibly to promote the sustainable reuse of material resources. Household
users should contact either the retailer where they purchased this product, or their local
government office, for details of where and how they can take this item for environmentally
safe recycling. Business users should contact their supplier and check the terms and
conditions of the purchase contract. This product should not be mixed with other commercial
wastes for disposal.
Revision History
Ver. Date Page Description
1.00 23.07.19 - New
Ver. 1.00
- 44 -
 Loading...