

Page 1

50-L4PVA-01
Page 2
All-in-One LCD PC
User's Manual
Page 3

Product features and specifications described in this manual are
subject to change without notice.
Manufacturer shall not be liable for any damages, or for the loss of
information resulting from the performance or use of the information
contained herein.
All product names and logos referenced herein are trademarks
and/or service marks or registered trademarks and/or service marks.
Microsoft, Windows, Windows XP, MS-DOS are either trademarks or
registered trademarks of Microsoft Corporation.
Intel and Pentium are registered trademarks of Intel Corporation.
Other product and company names mentioned herein may be
trademarks and/or service marks of their respective owners.
All contents of this manual are copyrighted.
The information contained herein is the exclusive property of
manufacturer and shall not be copied, transferred, photocopied,
translated on paper, film, electronic media, or computer-readable
form, or otherwise reproduced in any way, without the express
written permission.
Overview
Page 4

This equipment has been tested and found to comply with the
limits for a Class B digital device, pursuant to Part 15 of the
FCC rules. These limits are designed to provide reasonable
protection against harmful interference in a residential
installation.
Any changes or modification made to this equipment voids the
user's authority to operate this equipment.
This equipment generates, uses, and radiate radio frequency
energy and, if not installed and used in accordance with the
instructions, may cause harmful interference to radio
communications. However, there is no guarantee that
interference will not occur in a particular installation. If this
equipment does cause harmful interference to radio or
television reception, which can be determined by turning the
equipment off and on, the user is encouraged to try to correct
the interference by one or more of the following measures:
Reorient or relocate the receiving antenna.
Increase the separation between the equipment and receiver.
Connect the equipment into an outlet on a circuit different
from that to which the receiver is connected.
Consult the dealer or an experienced radio/TV technician for
help.
All external cables connecting to this basic unit must be
shielded.
Canadian D.O.C. Statement
This digital apparatus does not exceed the Class B limits for
radio noise emissions from digital apparatus as set out in the
radio interference regulations or the Canadian Department of
Communications.
Cet appareil numérique n'excède pas les limites de catégorie B
pour des émissions radio depuis un appareil numérique,
comme défini dans les réglementations d'interférence radio du
Ministère Canadien des Communications.
CE CE Mark
This equipment is in conformity with the EMC directive.
The FCC wants you to know
Page 5

Table of the Content
Section 1
Introduction
1.1 Introducing All-In-One LCD-PC
1.2 Unpacking & Checking the Equipments
1.3 Identifying Parts of Your LCD-PC
1.4 Installation and Initial Setup
Basic Operations
2.1 Adjusting the Display
2.2 Controlling the Audio
2.3 Using Optical Drives
2.4 Using PC Camera
2.5 Turning off Your LCD-PC
Connections
3.1 Connecting Peripheral Devices
3.2 Connecting USB Devices
3.3 Connecting IEEE 1394 Devices
3.4 Connecting Audio Equipment
3.5 Connecting Modem
3.6 Connecting LAN
3.7 Connecting Printer
Drivers and Utility
4.1 Installing Drivers and Utility
Trouble Shooting
5.1 Before You Start..
5.2 System Does Not Start
5.3 RF Keyboard and Mouse Problem
5.4 USB Problem
5.5 Software Problem
5.6 The LCD Display Problem
5.7 PC Camera Problem
Taking care of your LCD-PC
6.1 Caring for Your LCD-PC
6.2 Safe Use of This System
Section 2
Section 3
Section 4
Section 5
Section 6
2
3
4
4
8
10
10
13
16
18
19
20
21
22
23
24
26
30
31
32
33
34
35
36
38
40
Page 6
Section 1
d
u
c
o
t
r
i
o
t
n
n
I
Page 7

Congratulations on your new purchase, and welcome to the new era of All-in-One LCD
PC! You will experience a digital life that you have never had before. All-in-One
LCD PC is a fully integrated LCD computer that brings the latest personal
computing power and most updated technology. It has state-of-the-art
ergonomics, and sophisticated design to provide you a personal computer
that is compact, powerful, and easy to use.
As an owner of an all-in-one LCD-PC, you need not to worry about many
common "add-on" problems, nor do you have to study the subjects like
slots, device addresses or interrupts, for example, LAN, modem, VGA
and sound.
An LCD-PC, just like how it is called, is built around an LCD panel,
which is space saving and twice as sharp, bright, and contrasting as
the CRT monitor. In addition, LCD display does not tire the viewing
eyes. Thus, allowing you to focus on the display longer than CRT
monitor does.
This LCD-PC provides plentiful support for expansion of external
devices for additional functions. There are, conveniently located,
interfaces and ports - including 4 USB 2.0 ports and one IEEE 1394
port. Users can easily connect their digital devices such as digital
camera, digital camcorder, printer, scanner, etc., on their desks instead
of cramming under and inhaling the dust stirred up in the air. These
ports also ensure your LCD-PC to stay on the job well into the future.
This manual explains the features that will enrich your digital life. In
addition, it will assist you in learning to operate, configure, and troubleshoot
the LCD-PC. With this easy to use and understand guide, you will be able to
quickly familiarize yourself with the aspects of using an LCD-PC.
2
Introducing All-In-One LCD-PC
1.1
Page 8
3
Chapter 1
1.2
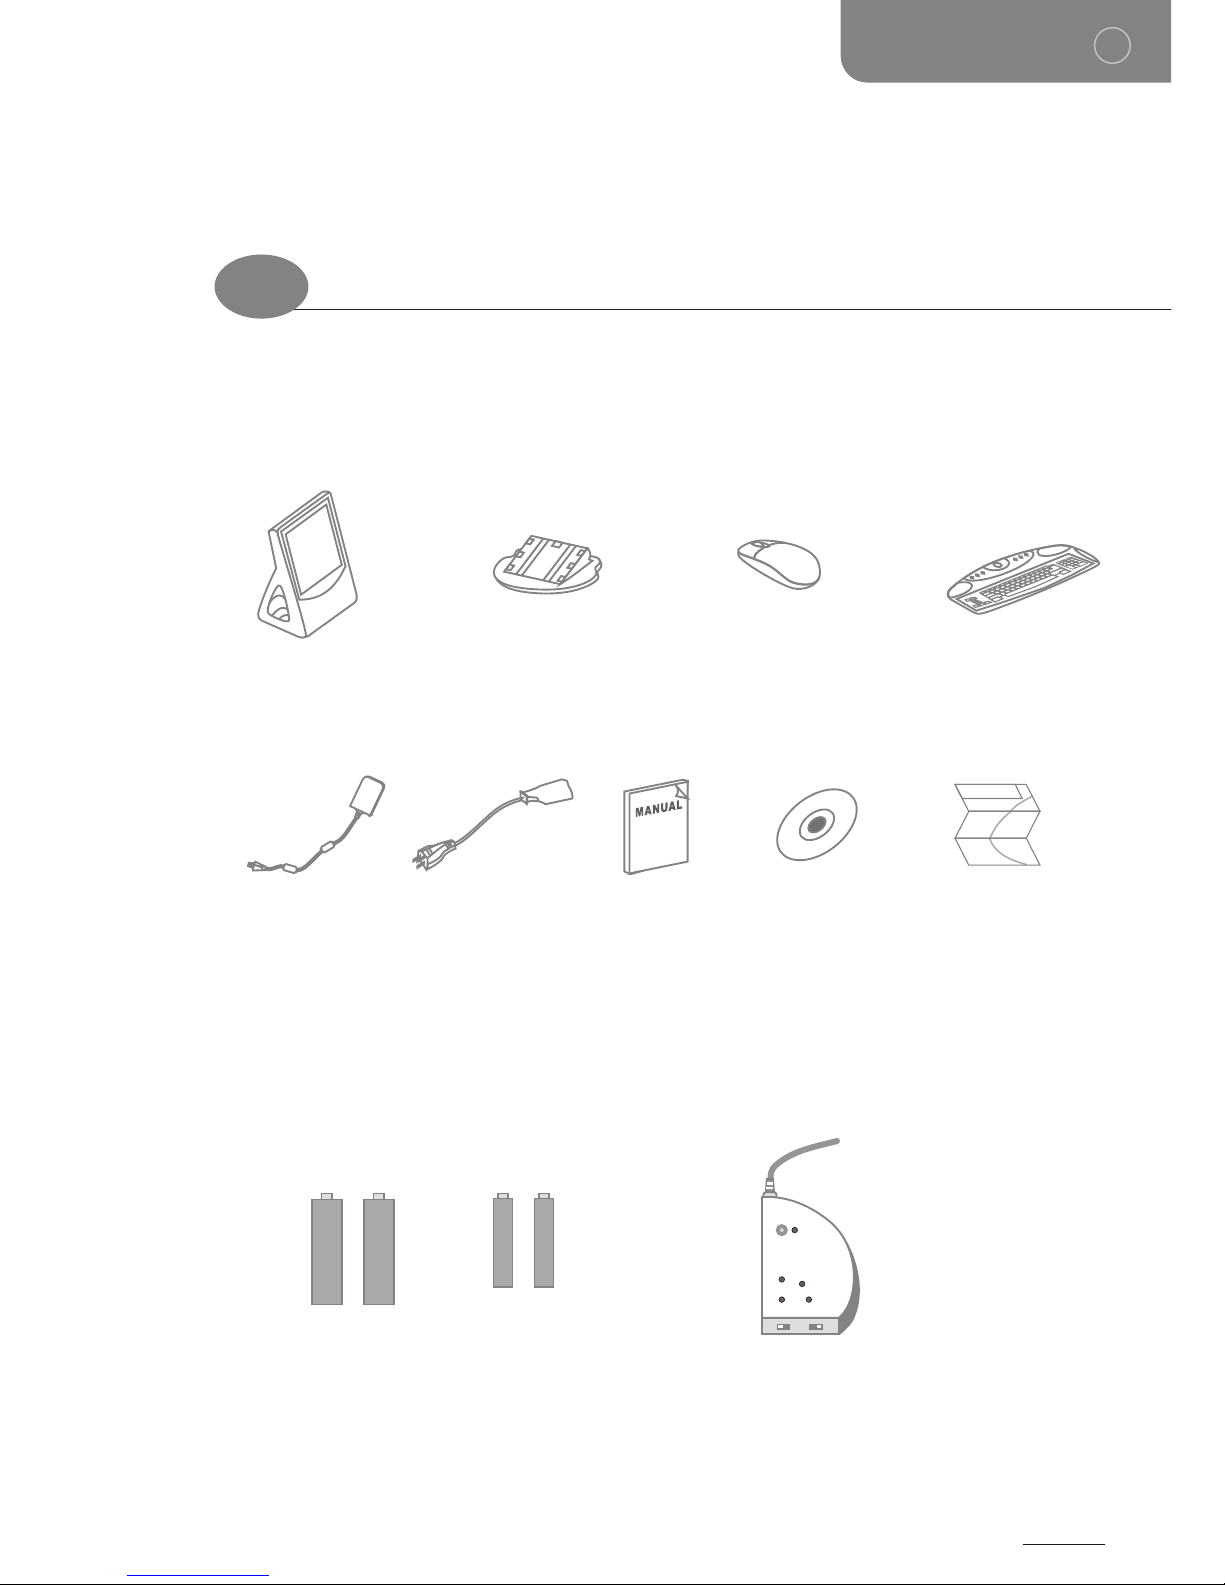
Unpacking & Checking the Equipments
1
Before unpacking, prepare a clean stable surface on which to place the contents of your LCDPC container. Altogether, you should find the following items in the container.
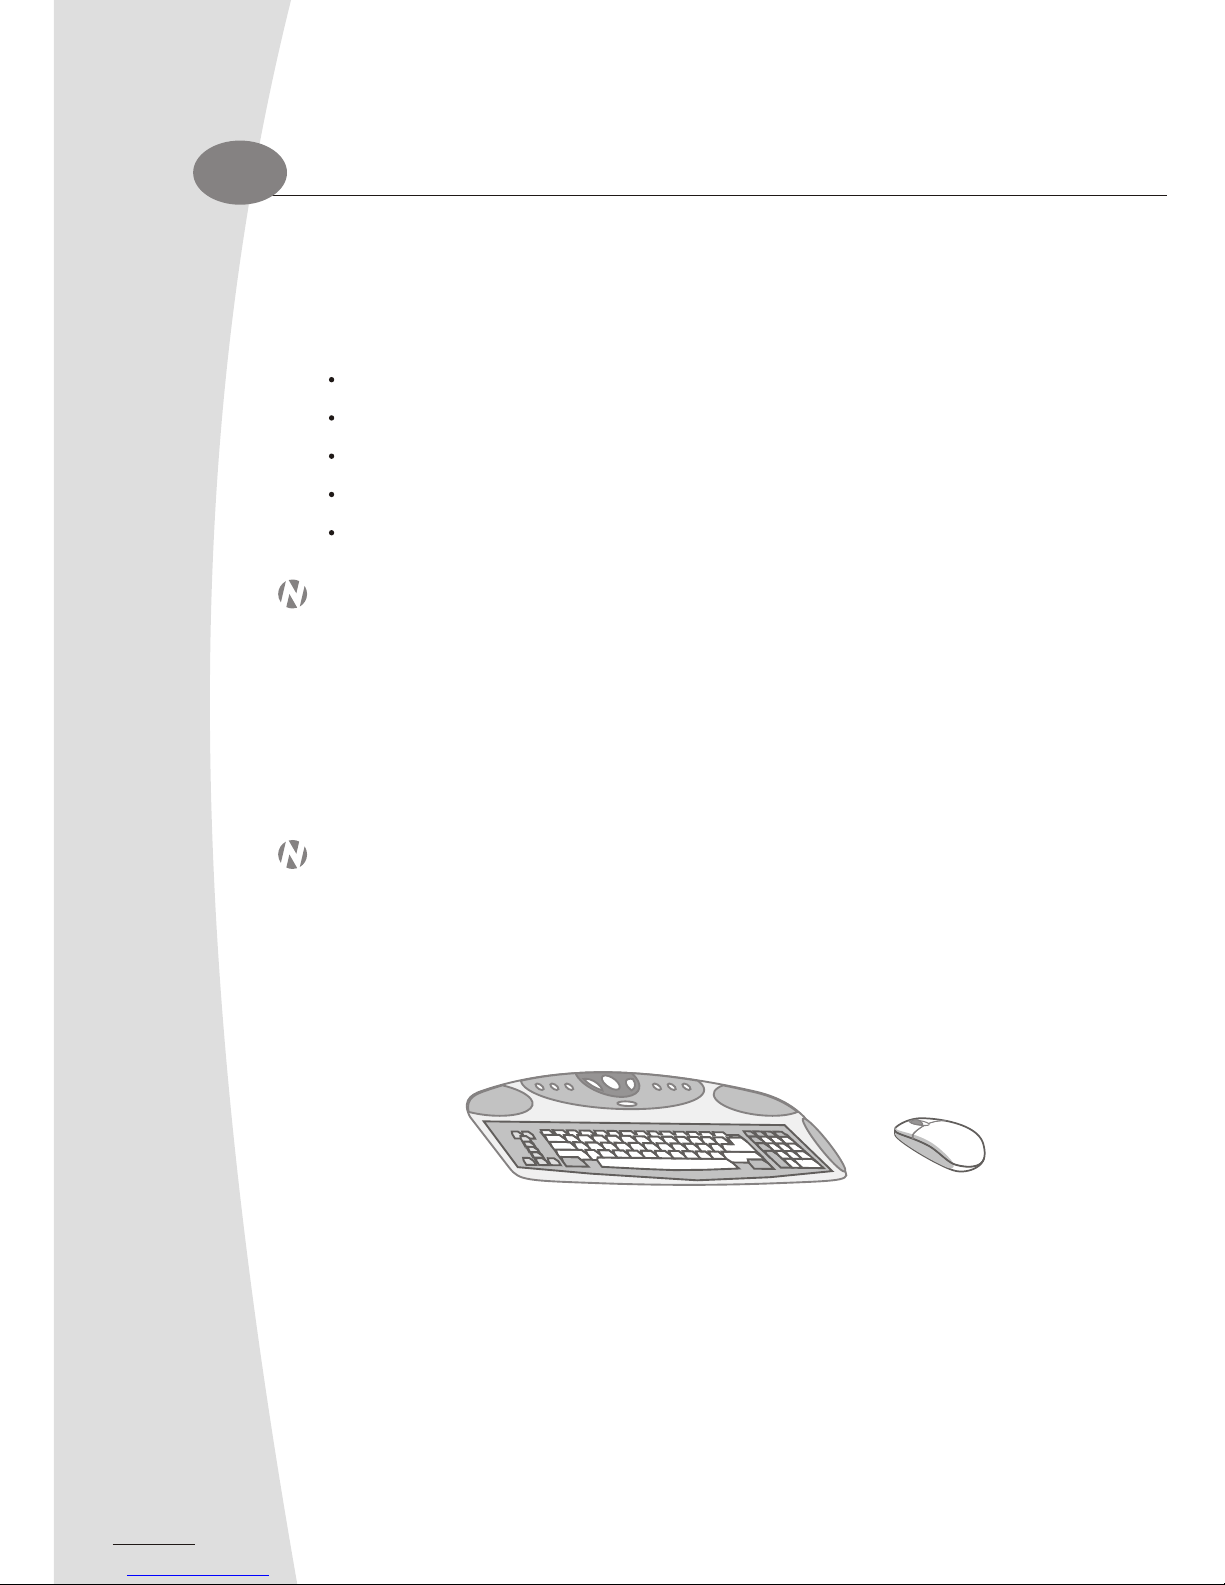
If your LCD-PC is equipped with wireless RF keyboard,
and mouse, you should have:
Remove all the items from the container. If anything is missing or broken, inform your
dealer immediately. You should save the packaging. If you ever need to ship your system or
send it in for service, the shipping container will be useful for protecting your LCD-PC from
damage during shipping.
2A X 22A X 2
3A X 23A X 2
112211
22
An LCD-PC
An LCD-PC stand
A mouse
An AC adapter A power cord
Driver and utility CD
User's manual
A keyboard
Quick Set-up Guide
Quick Set-up Guide
RF receiver
2 AAA batteries
for RF mouse
2 AA batteries
for RF keyboard
Page 9
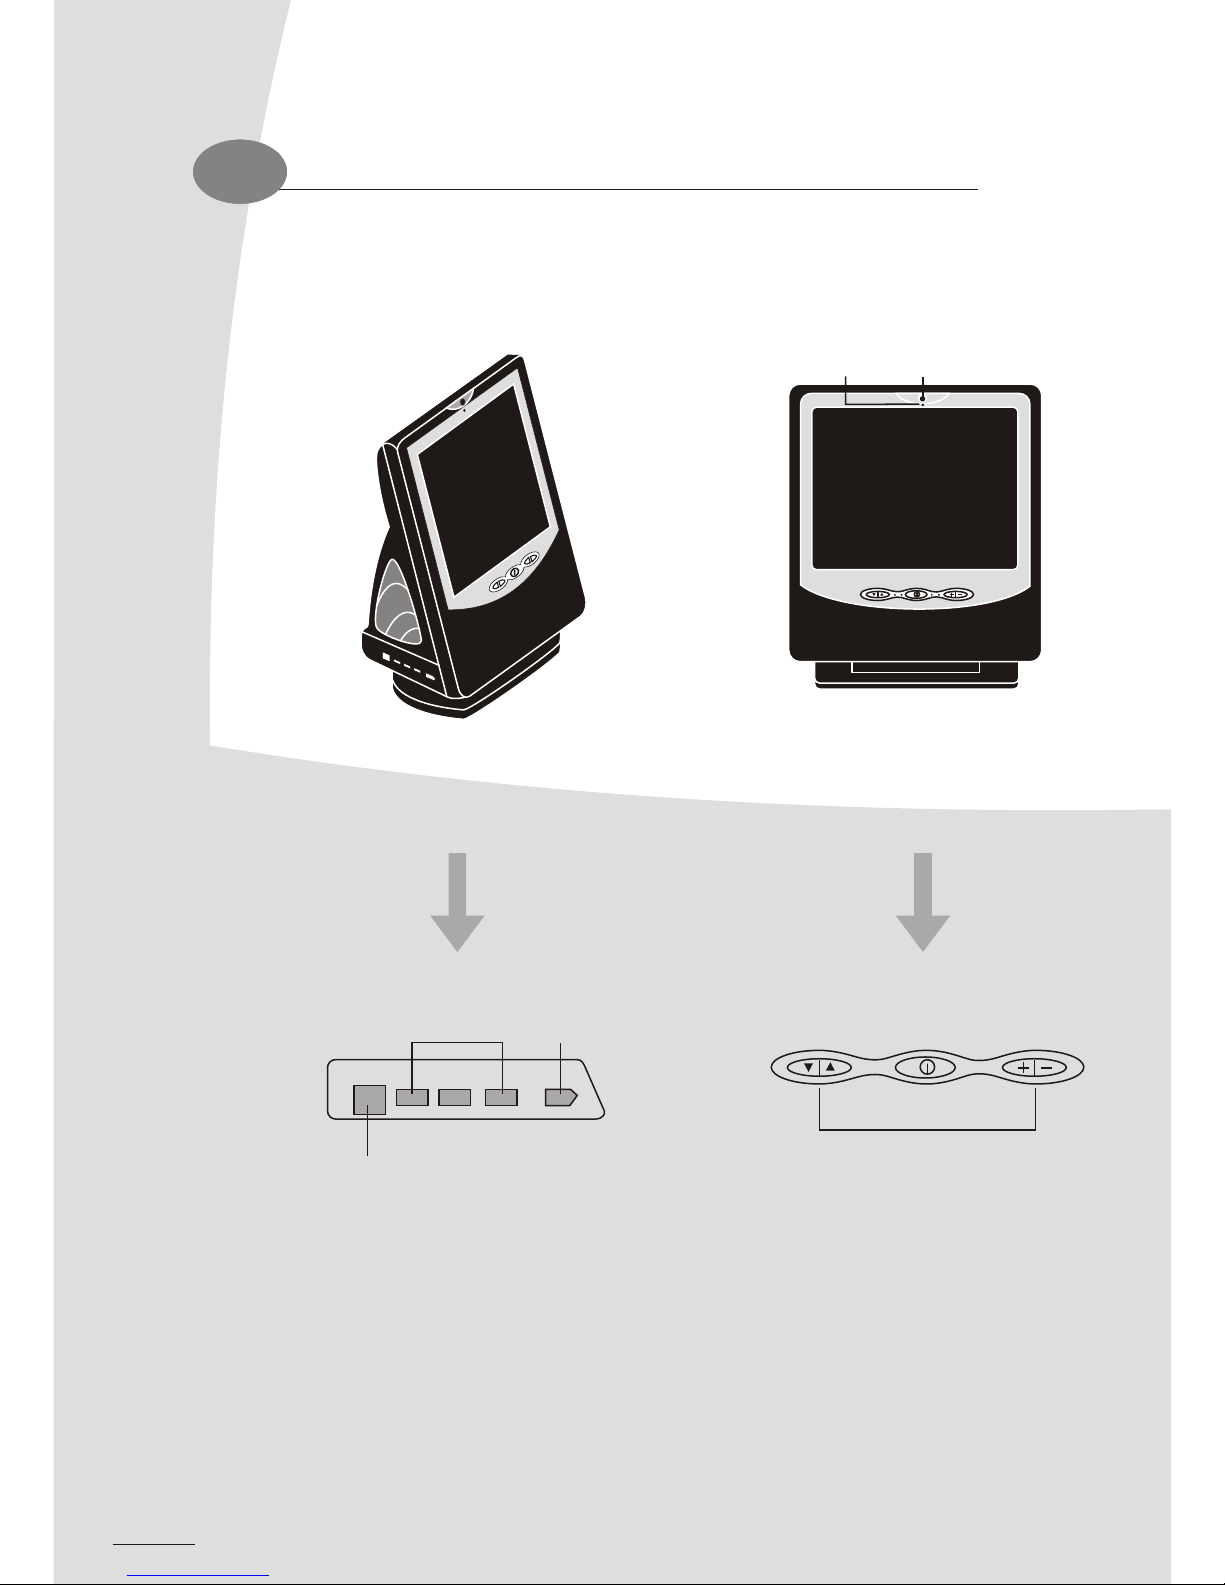
Identifying parts of your LCD-PC
1.3
Left side view
Identifying parts of your LCD-PC
1.3
Front view Rear view
USB 2.0 IEEE 1394
Modem
Microphone
Power button
Display control
Digital camera
44 5
Page 10
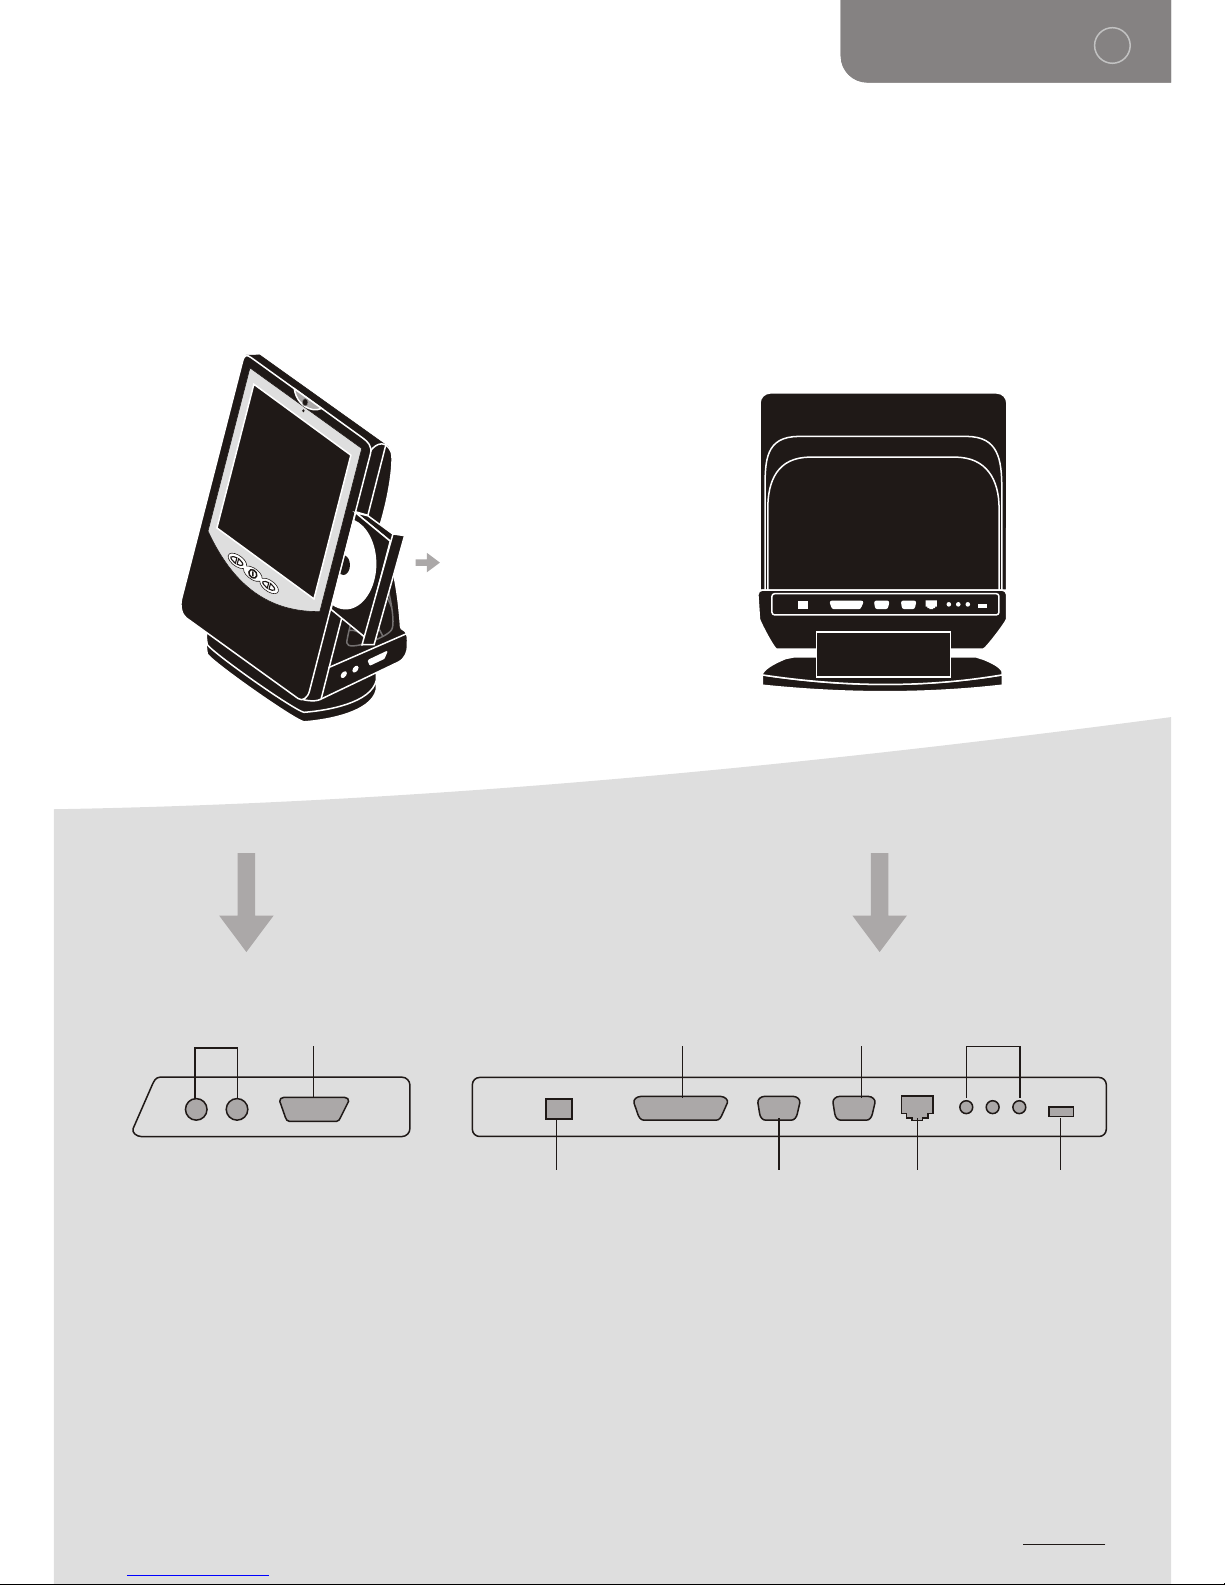
DVD/CD-R/CD ROM
Right side view
Chapter 1
1
PS/2 Midi/game port Printer port VGA-out
Audio ports
DC-in Serial port LAN USB 2.0
* Audio ports: Audio-in, Audio-out, Mic-in (Supports 5.1 channel audio)
Page 11
6
1.4
Installation and Initial Setup
Installing the LCD-PC Stand
The LCD-PC comes with a stand that allows you to tilt the LCD panel. Follow the next steps to install it
into your system.
Place a thick layer of soft cloth on a stable desk
Place the unit face down with the soft cloth to prevent the LCD panel from possible scratches.
Pick up the stand with the arrow marking towards the down (LCD panel side) end.
Insert the 6 quick joint hooks on the stand into the quick joint insertion.
Push the stand up (towards the back I/O end) to lock the quick joints in place.
Note: To uninstall the stand, just push the quick joint hook on the bottom of the unit to slide out
the stand.
*for picture illustrated steps please refer to quick set-up guide
Connecting the Mouse and Keyboard
Note: To start your computer, you first need to connect the mouse and keyboard that are shipped
with your LCD PC.
The mouse and keyboard PS/2 ports and cable connectors are color-coded. The green PS/2 port is
designated for mouse, and the purple one is for keyboard.
RF Wireless Keyboard, and Mouse owners, please refer to the RF keyboard and mouse quick start
guide that comes with the system.
Connecting Power
Caution!
only! You may damage your LCD-PC if you use one that is not approved for this system.
from the electrical socket. Do not unplug the power from the outlet by pulling on the cord.
1.Connect the power cord to the AC adapter.
2.Plug the power cord into a suitable power outlet. The green power indicator on the power adapter
will turn on when you connect AC power.
3.Plug the cable from the AC adapter into the AC adapter jack on the rear side of the computer.
4.Press the power switch located on the front panel of the screen display. The blue LED will turn on to
indicate the LCD-PC is turned on. (If the system switches to standby mode, the
indicator will start flashing.)
Page 12

7
Chapter 1
1
Connecting Power
Caution!
Please use the AC adapter that is supplied to you with your computer or by your computer vendor
only! You may damage your LCD-PC if you use one that is not approved for this system.
When unplugging the AC power cord from an electrical outlet, please grip the plug and remove it
from the electrical socket. Do not unplug the power from the outlet by pulling on the cord.
1.Connect the power cord to the AC adapter.
2.Plug the power cord into a suitable power outlet. The green power indicator on the power adapter
will turn on when you connect AC power.
3.Plug the cable from the AC adapter into the AC adapter jack on the rear side of the computer.
4.Press the power switch located on the front panel of the screen display. The blue LED will turn on to
indicate the LCD-PC is turned on. (If the system switches to standby mode, the
indicator will start flashing.)
Page 13

Section 2
Basic Operations
8
Page 14
Section 2
Basic Operations
Page 15
10
2.1
Adjusting the Display
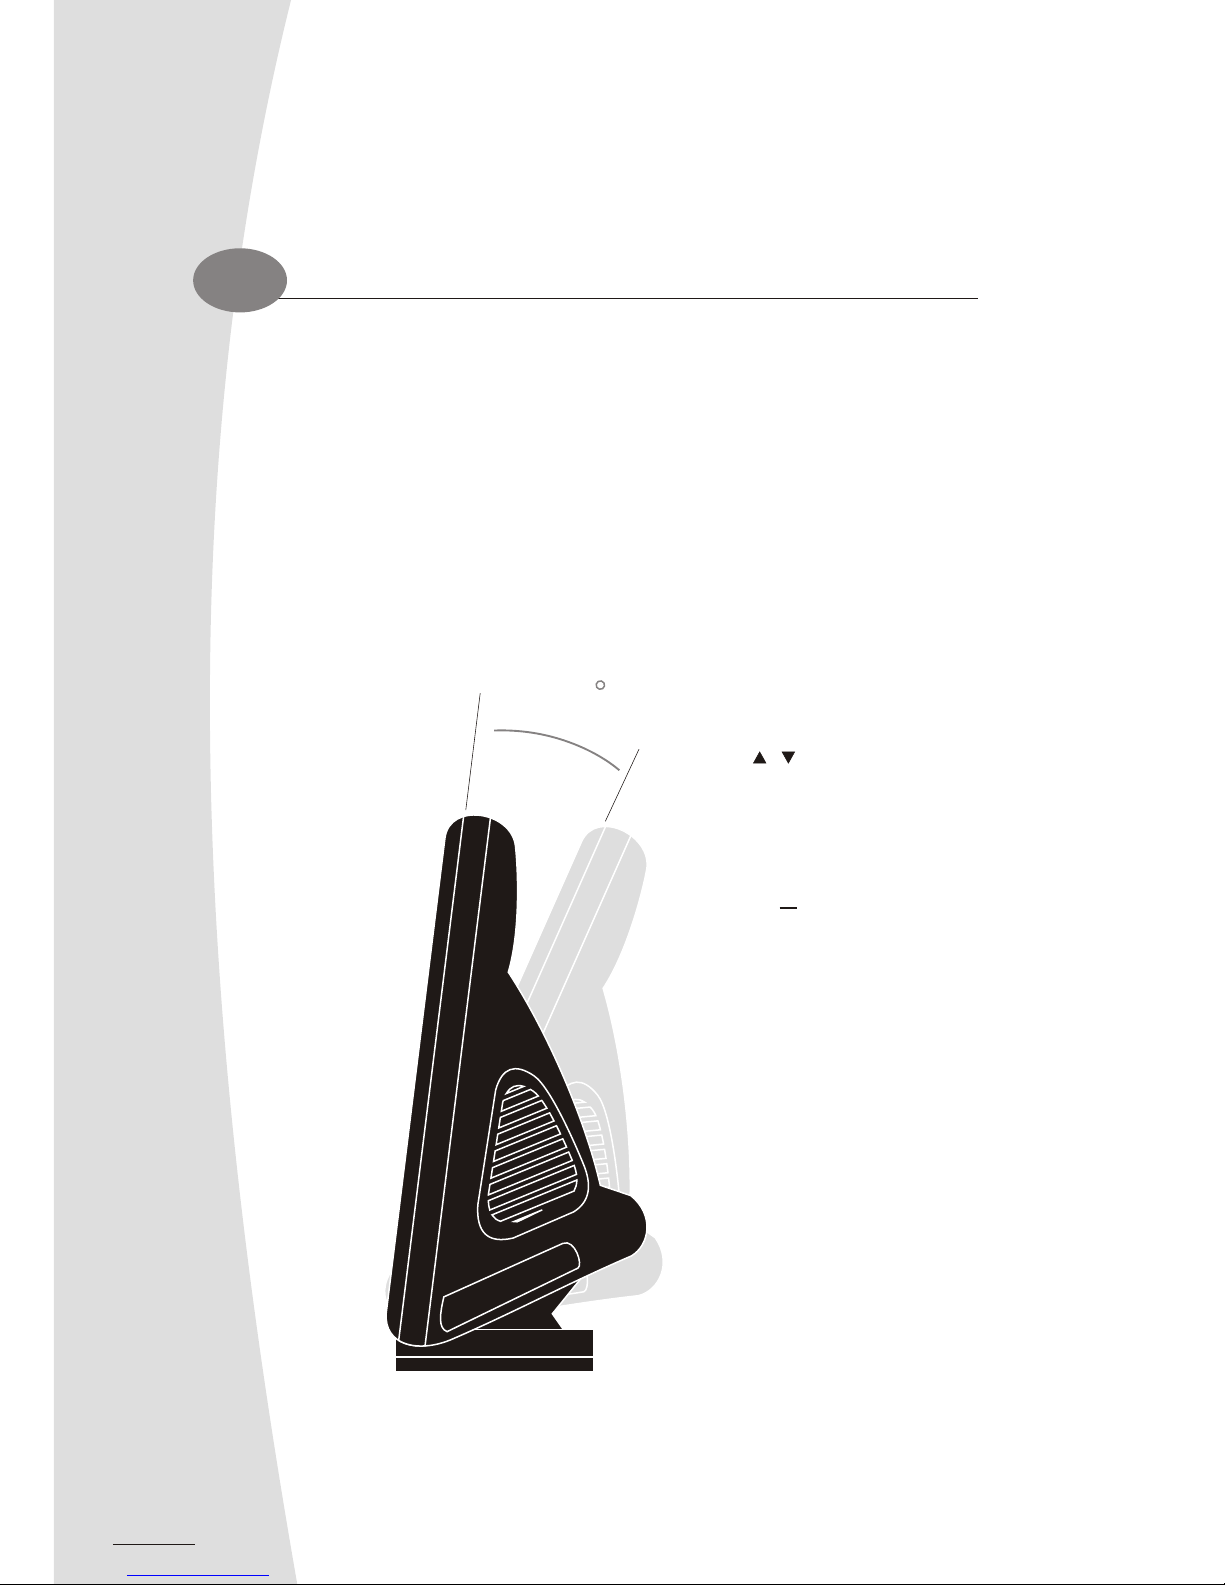
Adjusting Angle
You may notice that the LCD display contrast decreases if you look at it from a wide angle above,
below, or from side to side. The best way to obtain the optimal viewing of the display is adjusting the
angle.
Adjusting the Display
: Press these buttons on the front of
the LCD-PC to navigate the menu,
and select the options that display
on the screen.
: Press these buttons to adjust the
option you have chosen from the
display menu.
+
Display Control Options:
Brightness
Contrast
Zoom
H. Position / Size
V. Position / Size
Pincushion / Pin Balance
Trapezoid / Parallel
Tilt
3
0
To adjust the viewing angle, hold on to the
display on both sides and tilt it up or down. Do
not apply excessive pressure to the display.
Changing the Display Properties
You can make numerous changes to the display appearance via "Windows Display Properties" window.
To adjust the display property, follow the next steps:
Background, Screen Saver, Appearance, Effects, Web, and Settings.
You can play around with the settings, where you can change resolution, and color setting. For the
settings in advance mode, please refer to Windows user's guide. Always press "Cancel" if you do not
want to implement the setting.
Page 16

11
Changing the Display Properties
You can make numerous changes to the display appearance via "Windows Display Properties" window.
To adjust the display property, follow the next steps:
Right click the mouse on an empty area of the Windows desktop to access a pull down menu.
Click on Properties to open the Display properties window.
Use the tabs on the Display Properties window to select the following display properties:
Background, Screen Saver, Appearance, Effects, Web, and Settings.
You can play around with the settings, where you can change resolution, and color setting. For the
settings in advance mode, please refer to Windows user's guide. Always press "Cancel" if you do not
want to implement the setting.
Chapter 2
2
Page 17

2.3
Using Optical Drive
Controlling the Audio
2.2
Your computer is installed with built-in speakers and a built-in microphone. You can
use various Windows media applications to play CDs, record messages and sound,
and play computer games with sound tracks, etc.
You can change the windows volume by following steps:
Double click on the speaker icon on the lower right corner of the screen of
the task-bar
Windows will prompt a volume control window
Adjust the volume to your liking
Close the window
You can also adjust volume by moving the volume tab on the audio program that
you are using.
Overview:
The CD-ROM, DVD-ROM, or Combo drive let you read information from CD/DVD. Your computer
identifies it as drive D, if you didn't divide the hard drive to smaller drives. It is a read-only drive,
unless you have Combo drive as your optical drive. Using Windows Entertainment Accessories, you
can also use the CD/DVD-ROM drive to play audio and video disks.
Note: Please refer to the combo drive manual that comes with your LCD-PC if you have combo drive
installed.
Using the CD/DVD-ROM Drive
1.Locate and identify the three features on the front of the drive; the eject tray button, the recessed
manual eject button, and drive activity indicator.
12
If you are playing games and need to adjust volume, you should be able to find the volume control in
the option menu.
1.Press the eject tray button to eject the tray for the CD/DVD-ROM disk.
2.Place the CD/DVD on the tray. Do not apply excessive force on the disk tray.
3.Press the tray back into the CD/DVD-ROM drive until it clicks locked.
4.To remove a CD/DVD, wait until the activity indicator shows that the disk in the drive is not being read. Press
the eject tray button and remove the disk from the tray.
Page 18

If you are playing games and need to adjust volume, you should be able to find the volume control in
the option menu.
1.Press the eject tray button to eject the tray for the CD/DVD-ROM disk.
2.Place the CD/DVD on the tray. Do not apply excessive force on the disk tray.
3.Press the tray back into the CD/DVD-ROM drive until it clicks locked.
4.To remove a CD/DVD, wait until the activity indicator shows that the disk in the drive is not being read. Press
the eject tray button and remove the disk from the tray.
13
Chapter 2
2
Page 19

14
Removing CD/DVD disk while the computer is turned off:
To remove a CD/DVD disk from the drive while the computer is turned off, insert the end of a paper
clip, or similar, into the manual tray eject button. It will unlock the tray and let you open the tray.
Playing DVD movie
The Driver/Utility CD includes a DVD
playing program called Power DVD.
To play DVD movies, you will have to
install the program. Please consult
section 4.1 to install the program. The
basic operation of Power DVD can be
found and downloaded from the web.
The URL for Power DVD:
http://www.gocyberlink.com/english/index.jsp
NOTE: Most of the DVD titles in today's markets
are governed by a regional code that divides the
world into six separate regions. The six regions are:
1.USA, and Canada
2.Western Europe, Japan, and South Africa
3.SE Asia
4.Australia, and S. America
5.Russia, Eastern Europe, and Africa
6.China
It is especially important to know that you may only switch the region 5 times with any DVD drive on
the market today. If you exceed the permitted switching times, the DVD player will refuse to play
other region's DVD titles. This limit will ensure the maximization of revenues for motion picture
studios' theatrical and home releases, which times and dates vary from region to region.
Page 20

15
Your LCD-PC may have a built-in PC camera on board. Before using the PC Camera, please make sure
the required software has been installed.
With the PC Camera and either Yahoo! Messenger or MSN Messenger, you will be able to call and see people
face-to-face over the Internet.
In the explanations below, we will use the Imaging (for Windows 98, 2000 & ME users) and Windows
Movie Maker (for Windows XP users) applications with Windows operating system as an example for
setting configurations.
View Your First Image
Start the image editing or video software to ensure that everything is properly set up.
1.For Windows 98, 2000 and ME users, to do this:
Click on the Start menu button.
Click on the Programs menu item.
Click on the Accessories menu item.
Click on Imaging to open Imaging program.
Click on File/Select to choose 'PC Camera'.
Click on File/Acquire
The Imaging program will launch and live pictures will begin to show in the viewing
window in a few seconds.
2.4
Using PC Camera
Chapter 2
2
Page 21

2.For Windows XP users, to do this:
Click on the Start menu button.
Click on the All Programs menu item.
Click on the Accessories menu item.
Click on Windows Movie Maker to open Windows Movie Maker program.
Click on File/Record
From the Record menu bar, choose Video and audio or Video Only.
The Windows Movie Maker program will launch and live pictures will begin to
show in the viewing window in a few seconds.
If you cannot see an image on your computer screen, consult the
Troubleshooting section at the end of this manual.
Meet People Over The Internet
There are some freewares that could be used with the PC Camera, such as
Yahoo! Messenger and MSN Messenger (NetMeeting), are widely used for
Internet Video Chat for free. You may try either of them to see people face-toface over the Internet.
3.For Yahoo! Messenger user, to do this:
Apply a Yahoo! ID from the website: www.yahoo.com
Download 'Yahoo! Messenger' from messenger.yahoo.com and install it.
Invite your friend to get a Yahoo! ID, download and install 'Yahoo!
Messenger.'
16
other from 'Yahoo! Messenger'.
Note: For detailed information, check on
http://help.yahoo.com/help/mesg/ about 'Yahoo!
Messenger' and
http://help.yahoo.com/help/us/mesg/webcams/index.html
for 'Yahoo! Messenger Webcams'.
4.For MSN Messenger user, to do this:
from 'MSN Messenger'.
For more detailed information on using MSN messenger, check
http://messenger.microsoft.com/support/helphome.asp
Page 22

After both your friend and you installing 'Yahoo! Messenger', you will be able to call and see each
other from 'Yahoo! Messenger'.
Note: For detailed information, check on
http://help.yahoo.com/help/mesg/ about 'Yahoo!
Messenger' and
http://help.yahoo.com/help/us/mesg/webcams/index.html
for 'Yahoo! Messenger Webcams'.
4.For MSN Messenger user, to do this:
Apply an MSN ID from the website: www.msn.com.
Download 'MSN Messenger' from messenger.microsoft.com and install it.
Invite your friend to get an MSN ID, download and install 'MSN Messenger.'
After both you and your friend install 'MSN Messenger', you will be able to call and see each other
from 'MSN Messenger'.
For more detailed information on using MSN messenger, check
http://messenger.microsoft.com/support/helphome.asp
17
Chapter 2
2
Page 23

18
Turning Off Your LCD PC
2.5
To turn off your computer:
1.Click the Start Button in the Taskbar.
2.Select Turn off Computer from the Start menu.
3.In the Turn off Computer dialog box, click the Turn Off button.
NOTE: If you have not closed a program that still have file unsaved, a dialog box will appear
prompting you to save the file.
Caution!
Don't turn off your computer if status indicators show that the computer is still accessing data on
the hard disk drive, the floppy disk drive or the CD-ROM drive. Data may be lost or damaged.
After turning off the computer, do not turn the computer back on immediately; please wait for 5
seconds. Turning the computer off and on immediately may cause damages to your system.
Section 3
Connections
Page 24

Section 3
Connections
Section 3
Connections
Page 25

20
Connecting Peripheral Devices
3.1
Your LCD-PC has various I/O ports to support any of your computer peripheral devices. As these
devices are manufactured by third-parties, be sure that they function correctly when connected to your
LCD PC before you purchase them. Your computer vendor would be able to recommend reliable brands
that are compatible with your system.
IF your devices support USB and IEEE 1394 connection:
Please refer to section 3.2 and section 3.3 for the instruction.
For devices that must be connected via parallel, serial, and game/midi ports:
Turn off the computer and the peripheral device.
Read the instructions on the manual or guide provided by the device manufacturer carefully.
Insert the connector that comes from the device manufacturer to the proper I/O port.
MP3 player
Printer
Digital camera
MP3 player
Printer
Digital camera
Digital camcorderDigital camcorder
PDA
Scanner
PDA
Scanner
Page 26

21
3.2
Connecting USB Devices
Your LCD-PC is equipped with 4 Universal Serial Bus (USB) 2.0 connectors. The USB 2.0 connector is
backward compatible with the Universal Serial Bus Specification 1.0. Your LCD-PC supports any
devices that use the USB standard.
Have the symbol of USB connector facing up.
Insert the connector to the USB port
Your OS will start running and install the driver for the device.
If the OS does not have the driver for your device, install the driver from the driver CD that is
provided by the device manufacturer.
NOTE: The USB devices support "hot plugging", which eliminate the need to power down or restart
the computer when attaching a new peripheral.
Install the drivers or other software that's required for the device so they will function. Make
sure you turn off the computer and the peripheral device before connecting them.
Restart the computer if you are asked to.
Note: Some devices have to be turned on after the computer is turned on.
Chapter 3
3
Page 27

22
Connecting IEEE 1394 Devices
3.3
The IEEE 1394 devices also support "hot plugging," eliminate the need to power down or restart the
computer when attaching a new peripheral like USB devices. For additional ease of use, they also
feature automatic configuration, no device IDs or terminators, and simple-to-use cables. The Driver
CD that comes with your LCD-PC has the driver for IEEE 1394 port.
Match the shape of the IEEE 1394 connector to the IEEE 1394 port located to the left side of your
LCD-PC.
Insert the connector, and make sure that it is connected.
Your OS will start running and install the driver for the device.
If the OS does not have the driver for your device, install the driver from the driver CD that is
provided by the device manufacturer.
NOTE: The 1394 port can supply power directly to attach peripherals.
Page 28

3.4
Connecting Audio Equipment
To apply this function, you have to install the audio driver in the Driver CD as well as an audio
application supporting 5.1 Channel. Picture below represents the standard location of all speakers in
5.1 Channel sound track.
Connect the plug of your front speakers to the green "Speaker out" port
Rear speakers' plug to the blue "Line in" port
Both of the center and subwoofer speakers to the red "MIC in" port.
23
Chapter 3
3
Page 29

24
Connecting Modem
3.5
To use your LCD-PC's MODEM, you must first connect a phone line to the RJ-11 Fax/MODEM port.
To connect a phone line to the Fax/MODEM port, follow the instructions listed below:
Test the line first with a telephone to make sure there is a dial tone.
Connect the phone line to the Fax/MODEM port.
Install the Fax/MODEM device driver to activate the Fax/MODEM Module. The Fax/MODEM device
driver is located on the Driver/Utility CD. Please refer to section 4 for the instruction to install
drivers and utilities.
Page 30

25
3.6
Connecting LAN
You can create a network with your computer and another one, or get on broadband Internet
connection by using the LAN port.
Connect your LCD PC to a network as follows:
The LAN jack is located on the back of your LCD-PC. (See picture below)
Plug an RJ-45 network cable in the LAN jack.
The other end should be connected to a network hub or switch, or to a peer computer.
Chapter 3
3
Page 31

26
Connecting Printer
3.7
Some printers connect through the parallel port, which is located on the rear on the back of your LCD
PC. However, many printers are now using USB as their input connector.
Connecting the printer port
Match the pins and the shape of the printer connector to the printer port
Plug it in firmly
Tighten it up with the locking screw on the connector
Install the driver from the driver CD or diskette provided by the printer manufacturer
Restart the computer if asked to.
Connecting the printer via USB port
Plug the USB connector to one of the USB port on your LCD-PC
Your OS should start running and install the printer driver for you. However, if your OS does not
have the driver, please install it from the driver CD or diskette that is provided by the printer
manufacturer.
Note: To install the printer driver, please refer to the guide your printer provides for you.
Page 32

Section 4
Drivers and Utility
Page 33

28
Installing Drivers and Utilities
4.1
Driver Setup
We provide an installation wizard, Driver CD Installation Utility (SETUP.EXE), located in the root of
Driver CD to let users install some common used drivers conveniently.
The Wizard can automatically detect OS and switch to the proper page, so you don't need to worry
about installing the wrong drivers. You can simply put Driver CD into the optical drive (CD-ROM, DVD
ROM, or Combo depends on your configuration) and the Installation Utility will auto run or you can
launch the Driver CD Installation Utility manually.
There are two kinds of Installation Procedure:
Automatically Install drivers from CD by using CD Installation
Utility:
1.Simply place Driver CD into optical drive.
2.The Installation wizard will auto run and show the name of the main board on the upper left of the
menu. (See figure 4.1)
3.Use the mouse cursor to click the Driver option on the page.
4.Driver setup utility will search for the device you have.
5.The utility will start a page with the drivers you may need.
figure 4.1
Page 34

29
6.Click on the driver you want to install.
7.The utility will invoke other applications to complete the rest of installation.
8.Follow the installing instructions to finish the installation.
9.Click on the next driver you want to install.
10.Repeat steps 6 to 8 until you have installed all the drivers the utility has for you.
If the Driver and utility installation CD does not auto run, please
follow the next steps after you place the CD into the optical
drive.
1.Place the Driver CD into the optical drive.
2.Double click on My Computer.
3.Double click on your optical drive to browse the CD.
4.Double click the Setup.exe file to run the utility manually.
5.Use the mouse cursor to click the Driver option on the page.
6.Driver setup utility will search for the device you have.
7.The utility will start a page with the drivers you may need.
8.Click on the driver you want to install.
9.The utility will invoke other applications to complete the rest of installation.
10.Follow the installing instructions to finish the installation.
11.Click on the next driver you want to install.
12.Repeat steps 8 to 10 until you have installed all the drivers the utility has for you.
Chapter 4
4
Page 35

30
Installing Utilities
We also provide you some very useful utilities to enhance the experience of you LCD-PC. Just like
installing drivers for your LCD-PC, you can follow the steps for installing driver until the menu of
figure 4.1 shows up. Then, please go through the following steps.
1.Click Software and Update Utility option.
2.Click on the software you want to install.
3.The installation utility will start the installation wizard for the software you choose.
4.Follow the instruction steps of the wizard.
5.Repeat steps 2 to 4 if you want to install more.
6.When you are done, simply close the Installation Utility.
Page 36

Section 5
Page 37

32
Before you start...
5.1
Sometime during the life of your LCD-PC you might do something seems harmless, yet it
causes headaches. We have created this section for you to trouble shoot and solve the
problem when the unfortunate happens.
Attempting to troubleshoot your own LCD-PC can be as easy as a walk in the park.
However, correct mind set is very important before trying to troubleshoot. You must
keep a few things in mind:
An LCD-PC is just a collection of parts. Do not panic. Chances are that your
problem is pretty simple.
What has changed since it last worked? Sometimes, some small upgrade
that seems unrelated to the problem, yet in reality it caused the problem to
begin with.
There are also some things that you should think about:
Beta software: Remember if the software you have is beta, so it may
contain bugs. Some problems may result from it.
Viruses: Scan for viruses. Some of them can do some nasty things to your
computer.
If it is still under warranty, let the technicians of your vendor do it.
Page 38

33
Follow the steps in this section if your LCD-PC will not turn on. The LED does not light up. There
is no fan or hard drive noise, and the screen is completely black.
1.Make sure that the electrical outlet works by plugging in a different device, or plug the
computer into a different outlet.
2.Check the power cord. Use a known good power cord.
3.Check the connection of the power cord on both ends. Make sure that the plug is securely
plugged into both the electrical outlet and the back of the computer.
4.Disconnect the keyboard, mouse, and all other peripherals such as speakers.
5.If you still can't get the unit to turn on, contact your LCD-PC dealer for Authorized Service.
5.2
System Does Not Start
Chapter 5
5
Page 39

34
5.3
RF Keyboard and Mouse Problem
If you have RF Keyboard and Mouse that come with the LCD-PC and encounter some problem, please
go through the following steps.
Note: Please make sure that you have follow the instructions from the keyboard and mouse guide
to set up RF mouse and keyboard properly. In addition, make sure that the RF receiver is
connected on the PS/2 port.
The mouse pointer does not move when you move the mouse or when you type on an office
application but nothing happened.
1.Check if the LED light on the receiver is blinking when you move the mouse or type.
-If not, check the battery installed in the mouse. Change new batteries or make sure they have good
contact with the metal plate.
- If yes, check the channel setting for you mouse, and make sure the channel setting on the RF mouse
and the receiver is on the same frequency setting. The same procedure goes for the RF keyboard.
Page 40

35
5.4
USB Problem
Very rarely you will encounter USB problem. Always check if your USB device are properly connected
to the USB ports first. However, if you ever encounter USB problem, most likely it is a driver issue.
For example, when you plug in any USB device, it shows up as an unknown device in the Device
Manager and you never get a chance to install the drivers for it. Follow the next steps to correct it:
1.Install the driver for your USB device from the diskette or CD the device manufacturer provided.
2.Plug in your USB device
If it still does not work, it may be wrongly set up. Please contact your system vendor and have the
technician correct it for you.
Chapter 5
5
Page 41

36
Software Problem
5.5
If you have installed new software, but it is not compatible with the operating system you are
using, please follow the next steps.
1.Check if there is any new update or patch for the software from the website of the
software vendor.
Download the newest update and patch to fix the problem the old version may
cause.
Open/execute the update patch to fix the problem.
2.If the problem still exists, uninstall the program you have installed.
3.If uninstalling still causes problems, run your anti- virus program to scan for
virus.
4.If above solution still do not work, and you are using Windows XP, run
"System Restoration" function.
The "System Restoration" function allows you to restore the state of the
computer back to the last time you saved.
Follow the instruction from Windows XP for system restoration.
5.If the problem occurs and you are not using Windows XP, please contact
your system vendor.
NOTE: Windows XP's System Restoration is a very
powerful tool which allows you to "turn back
the clock" after you mess up your computer.
Please remember to save the state of the
computer before you install any software.
If you have the problem of dark or no image on the display, more than likely, the screen contrast or
brightness controls are improperly adjusted. Please adjust it with the guide on section 2.1.
Maybe you have accidentally put your LCD-PC into "Suspend Mode" by pressing the Suspend/Resume
switch. Press the button again or the power switch to wake up your computer and reactivate the
screen.
Note: Suspend mode: Suspend-to-RAM (STR) occurs when a
system enters a low-power state. Information on system
configuration, open applications, and active files is stored
in main memory (RAM), while most of the system's other
components are turned off. A system in STR can use as little
as 5 watts of power, with most of it going to main memory
for data maintenance.
Page 42

37
5.6
The LCD Display Problem
If you have the problem of dark or no image on the display, more than likely, the screen contrast or
brightness controls are improperly adjusted. Please adjust it with the guide on section 2.1.
Maybe you have accidentally put your LCD-PC into "Suspend Mode" by pressing the Suspend/Resume
switch. Press the button again or the power switch to wake up your computer and reactivate the
screen.
Note: Suspend mode: Suspend-to-RAM (STR) occurs when a
system enters a low-power state. Information on system
configuration, open applications, and active files is stored
in main memory (RAM), while most of the system's other
components are turned off. A system in STR can use as little
as 5 watts of power, with most of it going to main memory
for data maintenance.
Chapter 5
5
Page 43

38
PC Camera
5.7
Your LCD-PC may include a PC Camera. It is a great feature for you to chat with your loved ones via
broadband Internet connection. If you ever encounter any problem with the PC camera, please follow
the following steps to trouble shoot it.
No Image
Make sure that your video software has been properly installed
Make sure that your driver is installed
Make sure that your lens are free from obstructions and that it is pointing in the appropriate
direction
Dark Pictures
Check if there is sufficient light for the camera. Alternatively, you may want to adjust the
Brightness or Contrast settings in the software you are using.
Ensure that there is no strong light source behind the object or person being viewed by the PC
Camera.
Make sure that the lens is clean.
Page 44

of
y
o
e
r
u
a
r
c
L
C
g
D
n
i
-
P
k
C
a
T
Section 6
Page 45

40
Caring for your LCD-PC
6.1
General Maintenance
The best maintenance is the preventive one. Keep the following in mind and perform the
maintenance at least once a month.
Keep the LCD-PC clean regularly.
Avoid transporting or using the computer in dirty or dusty environments. Use a clean container
when you transport the computer.
Avoid getting dirt and dust in the optical drive.
Avoid spilling liquids on the computer.
You can clean the keyboard with a small computer vacuum to remove dust buildup that can
impede key motion.
You can occasionally use a vacuum to clean the ports.
Make sure that the computer is turned off before unplugging it.
When you disconnect cords, remember to pull them by the plugs and not by the cords themselves.
This will prevent damage to the cords, plugs, ports, and jacks.
Perform system maintenance regularly. Windows provides tools for you to keep your LCD-PC
automatically.
Cleaning The LCD-PC
Cleaning The Case
If the LCD-PC case becomes dirty, you can clean it. Always make sure that the LCD-PC is turned off
and the AC adapter is disconnected before you do anything else. You can clean the case with a soft,
preferably lint-free, cloth. If necessary, you may use mild detergent.
Avoid any cleaner that contains abrasives, and DO NOT use cleaning solvents such as thinner,
benzene or isopropy1 alcohol-based products.
Never spray cleaner directly onto the computer.
Always spray the cleaner onto a cloth and then wipe the LCD-PC with the cloth. After cleaning,
allow 30 minutes drying time.
Page 46

41
Caring for and Cleaning The LCD Display
LCD screens are delicate devices that need careful handling. Please pay attention to the following
advice:
When you are not using the LCD-PC, please keep it clean regularly just as you were using it.
Do not put your fingers or sharp objects directly on the surface and never spray any cleaner directly
onto the display.
Do not press the LCD display with large amount of force to prevent it from breaking.
The LCD display panel is covered with glass. If the glass gets dirty, you can clean it the same way
you would clean a computer monitor screen. Wipe the LCD surface gently with a clean, soft tissue
or a lint-free cloth, and if necessary apply some commercially available LCD cleaner on to the
tissue or cloth.
Warning!
Do not clean the screen with a cleaner that contains alcohol or acetone. Use a cleaner intended for
use with an LCD. Never spray cleaner directly onto the screen. Liquid could drip inside the computer
and cause an electrical shock.
Chapter 6
6
Page 47

40
Safe Use of This System
6.2
Safety Precautions
Follow these steps and you will increase the working lifetime of your LCD-PC. You will also reduce the
chance of damage to your LCD-PC and personal injury to yourself.
Be aware of all cautions and follow the instructions that may be marked on the LCD-PC.
Except as described elsewhere in this manual, refer all servicing to qualified personnel.
Immediately shut off the LCD-PC and refer for servicing under the following conditions:
- When the power cord or plug is damaged or frayed
- If liquid spills on the LCD-PC
- If the LCD-PC is dropped or the chassis is damaged
Never push any objects of any kind into chassis openings. They may touch dangerous voltage
points or short parts, which could result in fire or electrical shock.
Turn off the LCD-PC before installing or removing a peripheral device, except USB, or IEEE 1394
devices.
Turn off the LCD-PC and unplug it before cleaning.
Do not expose the LCD-PC to direct sunlight.
Keep the LCD-PC away from any magnetic devices or TVs.
Do not use the LCD-PC in a dusty or dirty working area. Dust can damage and/or cause
contamination of the unit, which can result in malfunction.
Do not use your LCD-PC on an unstable working surface to prevent your LCD-PC from being
knocked over and damaged.
Keep all liquids away from the LCD-PC and its accessories.
Page 48

Page 49

Page 50

 Loading...