

Page 1

PROTEAN Plus
™
Dodeca™Cell
Instruction Manual
Catalog Numbers
165-4150
165-4151
For Technical Service Call Your Local Bio-Rad Office or in the U.S. Call 1-800-4BIORAD (1-800-424-6723)
Page 2

Table of Contents
Page
Section 1 General Information.........................................................................................1
1.1 Introduction............................................................................................................1
1.2 Safety .....................................................................................................................2
Section 2 Setting up the PROTEAN plus Dodeca Cell for the first time ................3
2.1 Unpack the cell ......................................................................................................3
2.2 Components ...........................................................................................................3
2.3 Setting up the buffer recirculation pump ................................................................5
2.4 Additional required components ............................................................................7
Section 3 Preparing for Electrophoresis
........................................................................7
3.1 Buffer preparation ..................................................................................................7
3.2 Gel preparation.......................................................................................................8
3.3 IPG Strips preparation and loading.........................................................................9
3.4 Cell assembly .............................................................................................10
3.5 Starting the electrophoresis run............................................................................12
3.6 Removing the gel .................................................................................................12
Section 4 Maintenance
.....................................................................................................13
Section 5 Troubleshooting Guide
..................................................................................14
Section 6 Product Information and Accessories
........................................................15
Section 7 Warranty Information
...................................................................................17
Page 3

Section 1
General Information
1.1 Introduction
The PROTEAN Plus Dodeca Cell* is a multi-cell for polyacrylamide gel electrophoresis.
It is primarily intended to run immobilized pH gradient (IPG) strips for the second dimension
of 2-D electrophoresis. It runs one to twelve large format gels simultaneously. The
PROTEAN Plus Dodeca cell system includes the Buffer Recirculation Pump that aids in
maintaining a constant temperature during the electrophoresis experiment. This system uses
the new PROTEAN Plus hinged spacer plates. These plates are strategically sealed at one
side with a silicon strip to create a hinged cassette. The hinge is required to prevent current
leakage and to achieve optimal results.
Specifications of the PROTEAN Plus Dodeca Cell
Tank and lid Acrylic
Anode Platinum-coated titanium plate electrode
Cathode Stainless steel plate electrode
Drain line Braided PVC
Drain line connectors Polypropylene
Cooling core Ceramic
Cooling core connector tubing Braided PVC
Manifold tubing Tygon tubing 1/4" ID (required for PROTEAN II
precast and handcast gels)
Buffer coil Acrylic
Gaskets Silicone rubber
Maximum buffer volume 22.5 liters (plate width: 27cm)
Minimum buffer volume 16.8 liters (plate width: 20cm)
Overall size (LxHxW)
Tank and lid 39.5 x 34.5 x 34.5 cm
Pump 19.5 x 12 x 17.5 cm
Precast gel compatibility PROTEAN II Ready gel precast gels with IPG comb
Handcast gel compatibility PROTEAN Plus hinged spacer plates
PROTEAN II 20 x 20 cm glass plates
Hinged spacer plate dimensions 26.8 x 22.5 cm; 26.8 x 20.5 cm
Slab gel dimension 25 x 20.5 cm; 20 x 20.5 cm; 18.5 x 20 cm; or
18.3 x 19.3 cm
Power safety limits 1000V, 250W
Weight 17.5 kg
*Patent pending
1
Page 4

2
Specifications of the Buffer Recirculation Pump
Number of channels 1
Flow rate range 0 - 1.5 liters/min, as measured with 3/8" tubing and
water. Flow rate will vary with tubing diameter,
buffer viscosity, and line voltage.
Maximum counterpressure ~ 10 psi
Motor Self-priming oscillating pump
Power requirements 120 VAC, 60 Hz
220 VAC, 50 Hz
Maximum ambient temperature limit 40
°C
Fuses required 100/120 V use .25 A type T
220/240 V use .125 A type T
Dimensions 19 cm x 12.7 cm x 18 cm (W x D x H)
Weight 2.9 kg
Note: Dodeca cell components are not compatible with acetone or ethanol. Use of organic
solvents voids all warranties.
1.2 Safety
Power to the PROTEAN Plus Dodeca cell is supplied by an external DC voltage power
supply (not included). The output of the power supply must be isolated from external ground
to insure that the DC voltage output floats with respect to ground. All Bio-Rad power supplies
meet this important safety requirement. Regardless of the power supply used, the maximum
specified operating parameters for the PROTEAN Plus Dodeca cell are as follows:
1000 VDC voltage limit
250 watts power limit
40 °C ambient temperature limit
The current to the cell enters the unit through the lid assembly that provides a safety interlock
to the user. Always turn off the power supply before removing the lid. Do not attempt to use the
cell without the safety lid.
Important: This Bio-Rad product is designed and certified to meet *EN61010-1 safety standards.
Certified products are safe to use when operated in accordance with the instruction manual. This
instrument should not be modified or altered in any way. Alteration of this instrument will
• Void the warranty
• Void the EN61010-1 certification, and
• Create a potential safety hazard
Bio-Rad is not responsible for any injury or damage caused by use of this instrument for
purposes other than those for which it is intended or by modifications of the instrument not
performed by Bio-Rad or an authorized agent.
*EN61010-1 is an internationally accepted electrical safety standard for laboratory instruments.
Page 5
Section 2
Setting up PROTEAN Plus Dodeca Cell for the first time
2.1 Unpack the cell
The complete PROTEAN Plus Dodeca Cell arrives in two boxes: The tank, lid, instructions
and all required tubing are in one box, and the buffer recirculation pump is in a separate box.
PROTEAN Plus hinged spacer plates and combs are ordered separately and are
individually packaged.
Carefully remove all components and inspect for damage.
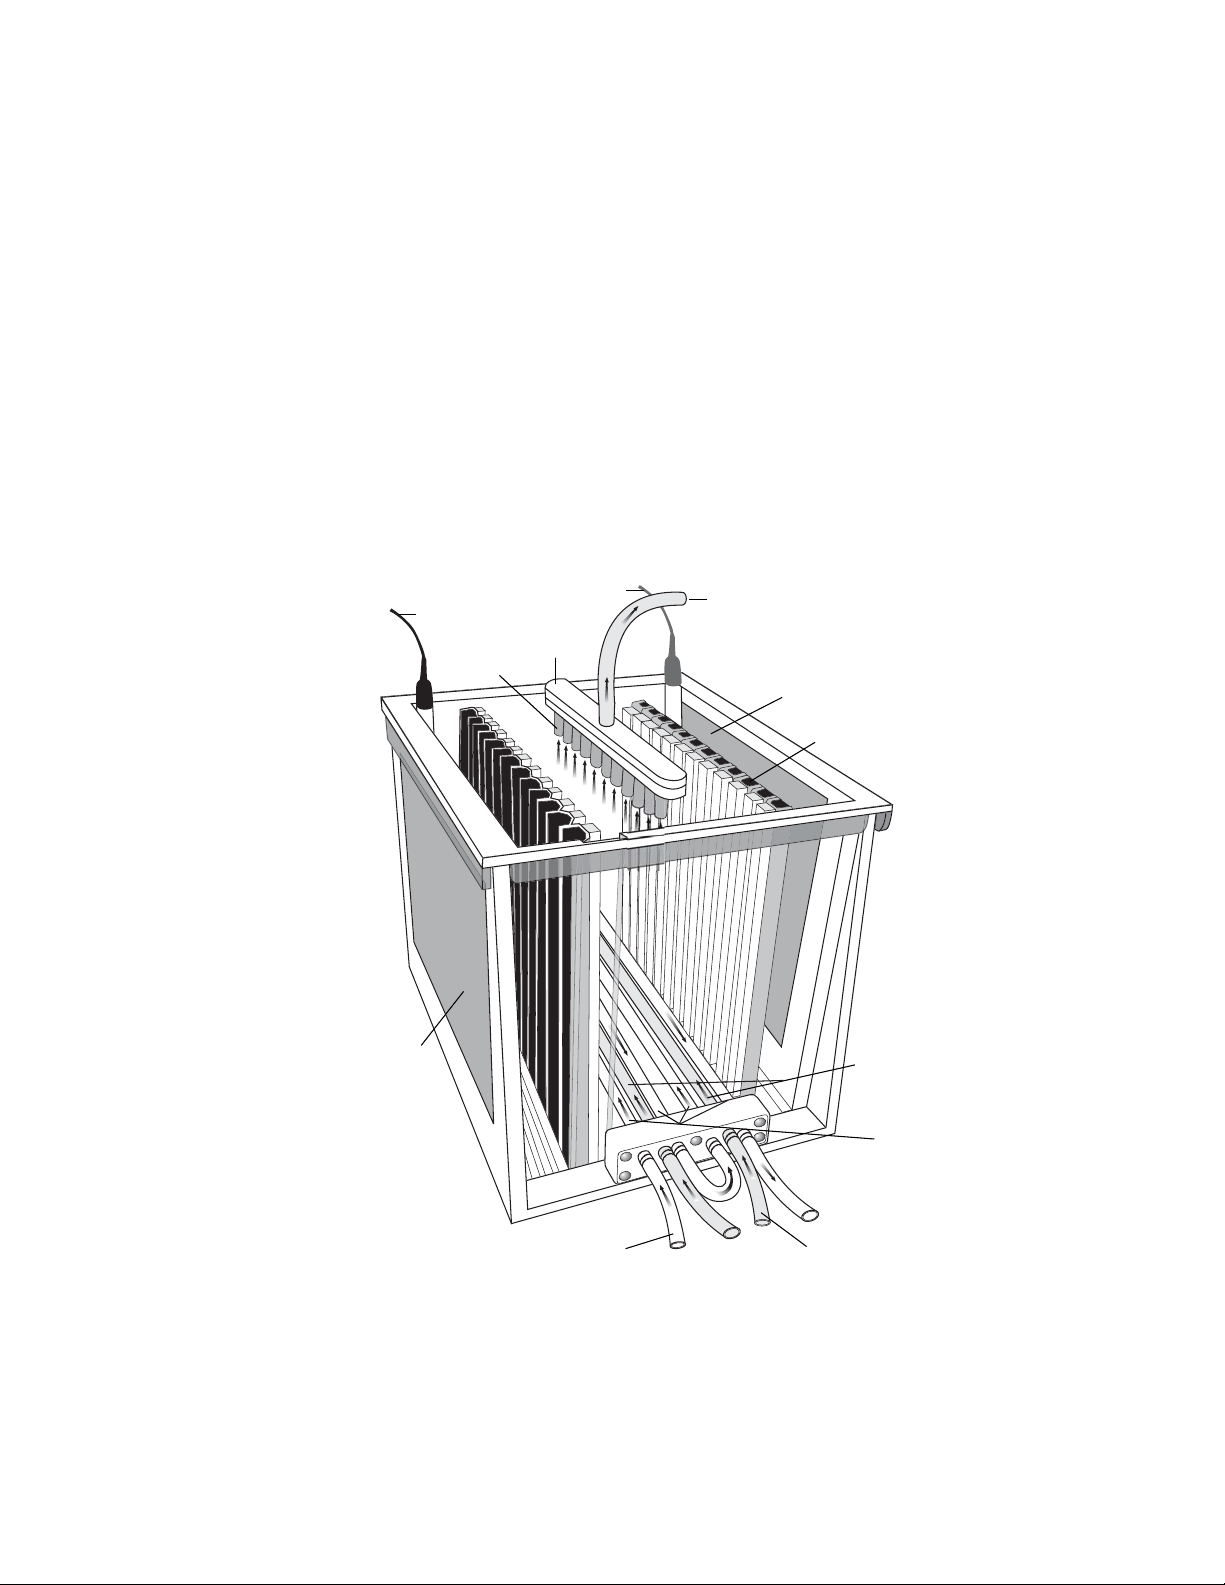
2.2 Components
To get the best performance from your PROTEAN Plus Dodeca cell, familiarize yourself
with the components by assembling and disassembling the cell before using it.
Buffer tank and lid The buffer tank and lid combine to fully enclose
the inner chamber during electrophoresis. The
lid cannot be removed without disrupting the
electrical circuit.
3
ELECTRODE
CARD
(CATHODE)
CATHODE
MANIFOLD
TUBING
MANIFOLD
ANODE
BUFFER EXHAUST TUBE
ELECTRODE CARD
(ANODE)
GASKET ASSEMBLY
BUFFER COIL
CERAMIC
COOLING
CORE
REFRIGERATED
CIRCULATOR
PATH
BUFFER
RECIRCULATION
PUMP PATH
Page 6

Ceramic cooling core Coolant from a refrigerated circulator passes
through the ceramic cooling core to cool the
buffer during the electrophoresis run. An
ethylene glycol:water (20:80) solution is
recommended as coolant.
Buffer Recirculation Pump The self-priming oscillating pump pulls buffer
from the top of the cell and refills from the
bottom of the cell through the buffer coil to
maintain a constant temperature in the cell.
Buffer coil The buffer coil sits on the bottom of the
Dodeca Cell. The small holes in the coil
release buffer around the ceramic cooling cores
and into the Dodeca Cell.
Buffer exhaust tube The buffer exhaust tube connects to the lid of
the Dodeca Cell via a quick-connect fitting.
The other end connects to the inlet of the
Buffer Recirculation Pump.
Electrode cards Plate electrodes are attached to the electrode
cards for easy removal. The anode is made
of platinum-coated titanium and the cathode
is made of stainless steel. DO NOT reverse
the direction of the current, as this will
damage the electrode.
Gasket Assembly This assembly contains the rubber gaskets that
hold the gel cassettes in position. The rubber
gaskets are mounted on an acrylic support for
easy removal. The tank has three positions for
the gasket assemblies: a single position on the
anode side and two positions on the cathode
side to accommodate different gel sizes.
Manifold The manifold in the lid is part of the buffer
recirculation system.
Manifold tubing The manifold tubing is required for proper buffer
recirculation. The manifold tubing is eleven
pieces of Tygon tubing that attach to the black
fittings of the manifold in the lid of the Dodeca
cell. The manifold tubing is necessary when
running Ready Gel precast gels or handcast gels
in PROTEAN II plates. These plates are shorter
and therefore the buffer level is lower in the tank.
Since the buffer level does not reach the black
fittings, the manifold tubing is required to extend
into the buffer so it can be properly recirculated.
Note: ALL eleven pieces of tubing must be used
when running any number of precast or handcast
PROTEAN II gel cassettes.
4
Page 7

5
PROTEAN Plus hinged spacer plate The hinged spacer plates close to form a gel
cassette. The hinge is necessary to seal the
bottom edge of the gel cassette so that the
current pathway runs effectively through the
gel.
Caution: Glass plates and glass spacers are
sharp.
Gel releaser The green gel releaser tool is used to open the
cassette after electrophoresis and to separate the
gel from the bonded spacers.
2.3 Setting up the Buffer Recirculation Pump
Carefully remove the Buffer Recirculation Pump from the shipping box. The pump
includes a power cord and spare fuses. The Buffer Recirculation Pump is the key component
of the Buffer Recirculation Pathway (BRP). The proper set up of the BRP is shown below in
a schematic drawing (Figure 2.3A). The buffer exhaust tube connects from the the lid to the
pump. The other end of the pump connects into the bottom of the cell. The BRP pulls buffer
up through the lid and it flows down through the pump and back into the cell at the bottom of
the tank through the acrylic tubes. Setting up the BRP in the inverse direction will result in
inadequate buffer recirculation and the temperature throughout the tank will not be uniform.
This will cause distortions in the protein resolution patterns in the gels.
Fig. 2.3A. Proper Set-up of the Buffer Recirculation Pathway (BRP).
2.3.1 Voltage conversion
The Buffer Recirculation Pump is shipped in its 120 V or 220 V version. To operate at
other voltages, refer to the procedure below. Warning: Failure to follow this procedure may
result in damage to the unit and invalidation of the warranty.
Power is supplied to the Buffer Recirculation Pump via a power entry module consisting of:
• On/off switch: A two-position rocker switch is located on the rear panel. “I” is ON,
“O” is OFF.
• Power cord receptacle: Grounded three-pin receptacle for the power cord
• Fuse holder/line voltage selector: Four-position line voltage selector and fuse holder.
Page 8
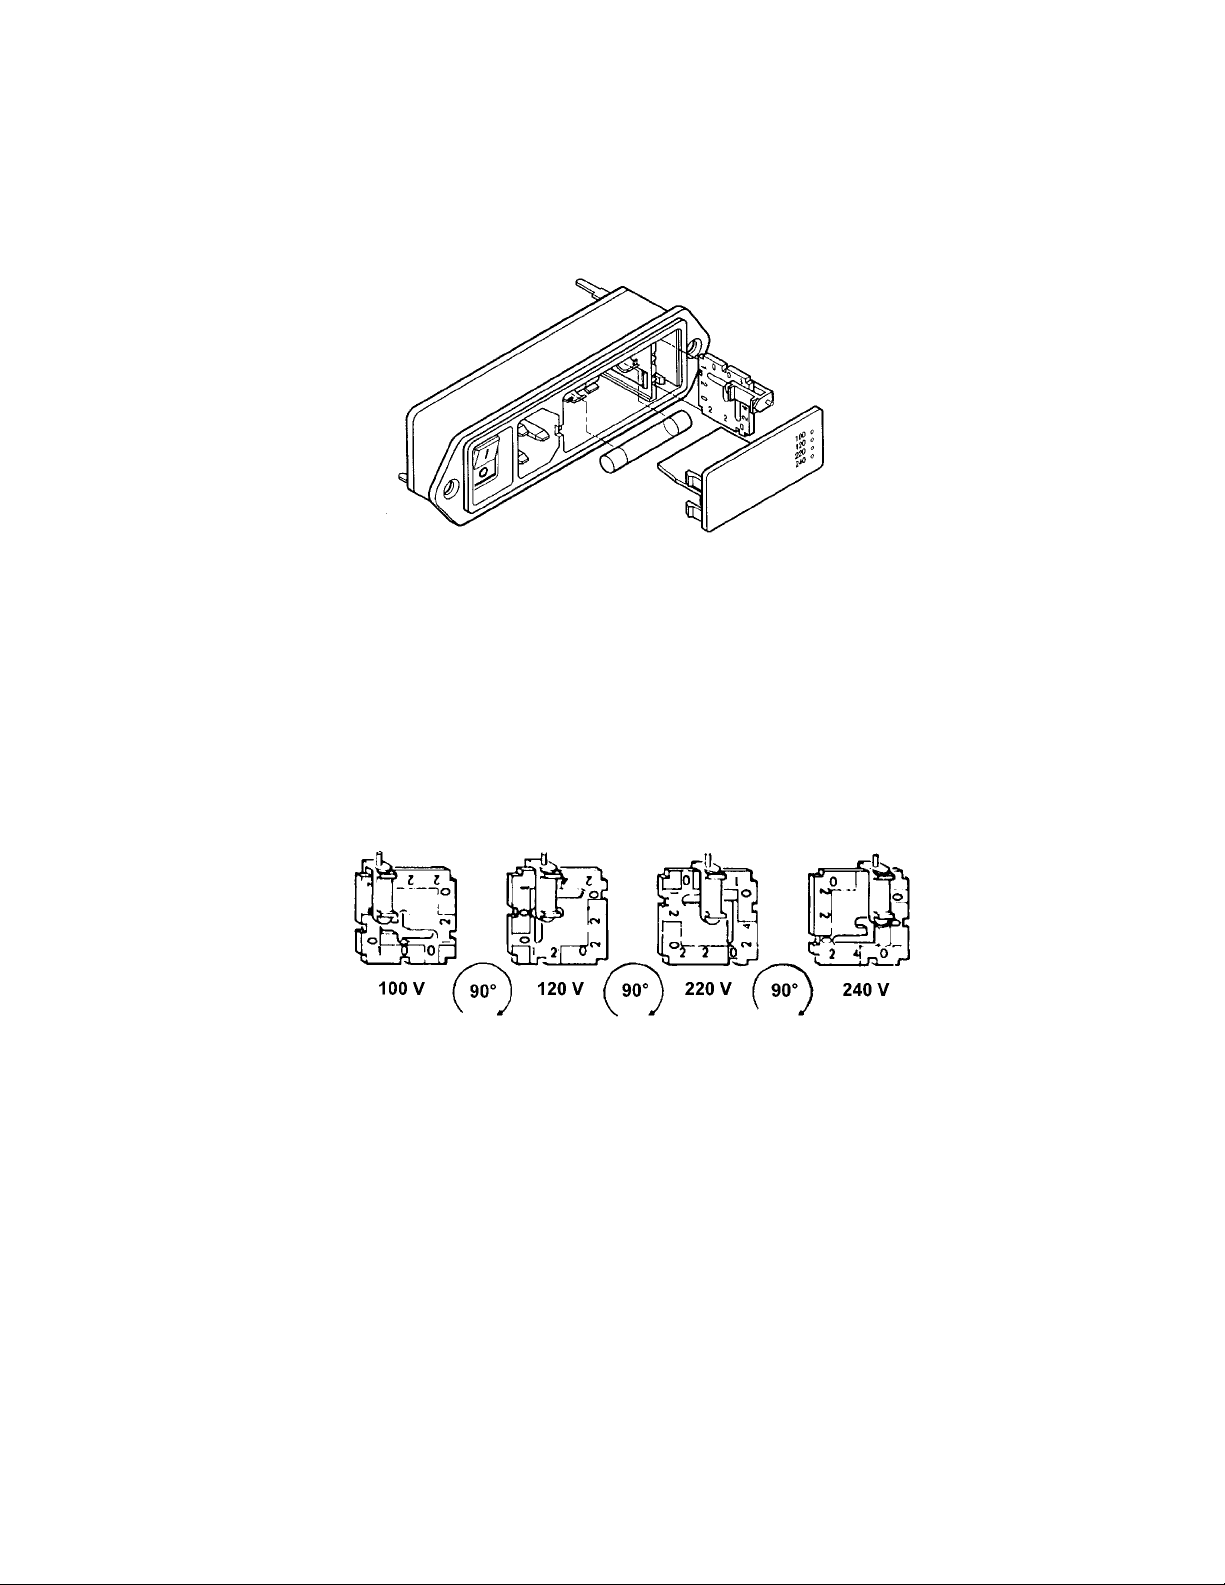
Prior to connecting the power cord to the power entry module and wall outlet, verify that the
voltage indicated on the power entry module matches your line voltage. If it does not, follow this
procedure to make the conversion.
Using a screwdriver or similar tool, pry open the fuse holder cover. If necessary, replace
the fuses with ones having the correct current rating. For 100 V and 120 V operation, ensure
that two 0.25 A fuses are inserted in the upper and lower fuse holders. For 220 V and 240 V
operation, insert two 0.125 A fuses into the fuse holders.
Pull the voltage selector card located at the end opposite the power switch straight
out from the housing. Do not damage the plastic indicator pin or the metal contacts on
the selector card. The indicator pin can be moved across the slot located on the voltage
selector card. To set the required operating voltage of the pump, orient the selector card
so that the desired voltage is readable at the bottom. Orient the indicator pin to point
upwards when desired voltage is readable at the bottom.
The indicator pin must slide into the notch located on the outside edge of the voltage
selection card. Insert voltage selector card into the housing, with the edge specifying desired
voltage first and the printed side facing the on/off switch. Replace the cover, and verify that
the indicator pin shows the desired voltage.
2.3.2 Operation
To operate the Buffer Recirculation Pump, plug the pump into an appropriate grounded
power source.
The pump is shipped with tubing attached. Note the specified direction of the pump
outlet tubing flow. Connect the pump outlet tubing to the Dodeca Cell buffer inlet, found on
the back of the Dodeca Cell. (Refer to diagram on page 3.) Connect the other end, the pump
inlet tubing, to the buffer exhaust tube on the lid of the Dodeca Cell. Set the dial to 100 (maximum flow rate).
6
Page 9

Note: Do not turn on the pump. Wait until the lid is attached to the cell, and you are ready to
start the run.
2.4 Additional required components
Refrigerated circulator
The PROTEAN Plus Dodeca Cell requires a refrigerated circulator for optimal results.
The refrigerated circulator works in conjunction with the buffer recirculation system to
provide efficient cooling. The PROTEAN Plus Dodeca cell has a built-in ceramic cooling
core that must be connected to a refrigerated circulator. The refrigerated circulator must
be able to maintain the buffer temperature of 18–20ºC during electrophoresis (see note
below). Tubing with 3/8" ID connects the Dodeca cell to the refrigerated circulator. Insert
the male quick-connect fittings (included with the Dodeca cell) into the inlet and outlet
tubing on the refrigerated circulator. The buffer coil in the Dodeca cell has no specific
orientation, so direction of flow is not specified. An ethylene glycol:water (20:80) solution is recommended as coolant.
The recommended minimum cooling capacity of the refrigerated circulator is 240W
and pump flow rate is 4 liters/ minute. A specific refrigerated circulator is not required, any
refrigerated circulator with a similar flow rate and cooling capacity is sufficient to use
with the Dodeca Cell. Some recommended chillers include the Model RTE-111 and RTE-101
from Thermo NESLAB and the Model WKL 26 from Thermo Haake.
Vacuum grease
Dow Corning high vacuum grease (Dow Corning part number 1597418) is suggested.
Grease is required when using unhinged glass plate cassettes.
Multi-casting chamber
The PROTEAN Plus multi-casting chamber is required if gels are handcast. Product
information is available in section 6.
Gradient former
The Model 495 Gradient Former is required if gradient gels are handcast. Product
information is available in section 6.
Section 3
Preparing for Electrophoresis
3.1. Buffer preparation
Prepare 17–23 liters of electrophoresis buffer to fill the buffer tank. The minimum
volume is required to run twelve 18 x 20 cm gels; the maximum volume is required to run
twelve 25 x 20.5 cm gels.
Note: The refrigerated circulator used during development of the Dodeca cell (Forma Scientific Model 2006 Bath and circulator) was
set to 15°C and had a flow rate of 3.8 liters per minute. Under these conditions the buffer temperature during electrophoresis was
maintained at 18–20°C.
7
Page 10

Standard running buffer formulations:
Tris/Glycine/SDS
25mM Tris-Base (M.W. 121.1), 192mM Glycine (M.W. 75.07), 0.1% SDS, pH 8.3
(Do not adjust the pH with acid or base. If the pH is not accurate remake the buffer).
Tris/Tricine/SDS
100mM Tris-Base (M.W. 121.1), 100mM Tricine (M.W. 179.2), 0.1% SDS, pH 8.3
(Do not adjust the pH with acid or base. If the pH not accurate remake the buffer).
Premixed buffers are available (see section 6). Mix 1 liter of the premixed 10x buffer
with 9 liters of distilled water to prepare 10 liters of 1x running buffer.
3.2 Gel Preparation
All gels in a single electrophoresis experiment must use the same electrophoresis buffer
system. If running gels with different % acrylamide, run times between gels may vary slightly.
Please refer to the PROTEAN Plus multi-casting chamber and the Model 495 Gradient Former
instruction manuals for instructions on handcasting gels in the PROTEAN Plus hinged spacer
plates.
Reminder: 16 x 16 cm gels are not recommended to run in the PROTEAN Plus Dodeca Cell.
3.2.1 Orientation of gels inside the cell
Orientation inside the Dodeca Cell is identical, regardless of which type of plate is used.
With the PROTEAN Plus Dodeca Cell, the gel cassette is rotated 90° so that the hinged side
sits near the bottom of the tank. If PROTEAN II Ready Gel precast or handcast gels are run,
the greased side sits near the bottom of the tank.
8
SPACERS
_
INSERT INTO
BUFFER T ANK
+
HINGE or
GREASE
Page 11

3.2.2 PROTEAN Plus gel cassette preparation
Cast gels in the PROTEAN Plus hinged spacer plates as directed in the PROTEAN Plus
Multi-Casting Chamber and Model 495 Gradient Former instruction manuals.
3.2.3 PROTEAN II Ready Gel precast gel and PROTEAN II glass plate
Preparation
The PROTEAN II Ready Gels with
the IPG comb and the 20 x 20 cm
PROTEAN II glass plates are compatible
with the PROTEAN Plus Dodeca cell. To
prevent current leaks, the side of the gel
placed at the bottom of the tank MUST be
greased with high vacuum grease. Prior to
loading an IPG strip, dry the edge of the
cassette and then heavily coat the entire
edge of the glass plates and spacer with
high vacuum grease using a spatula
(Figure 3.2.3A).
For further information on precast
gels refer to the PROTEAN II Ready Gel
user manual for complete precast gel
instructions.
Fig. 3.2.3A. Applying grease to PROTEAN II handcast
or Ready Gel precast gel cassettes.
3.3 IPG Strips Preparation and Loading
See the Ready Strip™IPG strips instruction manual for proper first-dimension
preparation.
Position the slab gel cassette so that it is leaning slightly backwards at a small angle, the
6-row AnyGel Stand was designed for this application (Catalog # 165-5131). The best way
to apply a standard lane is using a piece of filter paper, the precut electrode wicks
(Catalog # 165-4071) that are used with the PROTEAN IEF cell work well. Pipette 10 µl of
Precision unstained protein standards (Catalog # 161-0363) onto a single wick and allow the
liquid to dry. Using forceps place the wick on the slab gel, either in a reference well or just
sitting on top of the slab gel, make sure to leave enough room for the strip. Prepare a 50–100 ml
graduated cylinder filled with running buffer, then while holding the IPG strip vertically with
forceps, dip the IPG strip into the buffer. Place the IPG Strip onto the long plate with the
plastic backing against the plate. Slide the strip down in between the plates using a thin
spatula and pushing against the plastic backing. Be careful not to damage the gel with the
spatula. Make sure the IPG strip is positioned directly on top of the slab gel. To secure the strip
in place overlay with 1.0% agarose prepared in SDS-PAGE running buffer (a small amount
of Bromophenol Blue can be added to the agarose overlay in order to track the ion front).
Bubbles may form under or behind the strip when adding the agarose overlay, these may
9
Page 12
disturb the protein resolution pattern and need to be removed. Immediately after overlaying, use
the spatula and tap on top of the strip against the plastic backing to remove any bubbles. Allow
the agarose to fully set prior to loading the gel at a 90° angle into the PROTEAN Plus Dodeca
cell.
3.4 Cell Assembly
Before the cell is used for the first time, remove the gasket assembly and rinse the gasket
assembly and the cell thoroughly with distilled water to remove residual powder. Replace the
gasket assembly in its proper orientation, with the rivets to the inside and the rubber gaskets
flaring towards the plate electrodes (Figure 3.4A). Check after each use to make sure the gaskets are not torn or wrinkled.
Pour some buffer directly over
the gaskets assemblies to prewet
the rubber gaskets. This allows the
gel cassettes to slide into the tank
more easily and it helps prevent
the gaskets from tearing.
Attach the refrigerated circulator
to the PROTEAN Plus Dodeca cell.
The refrigerated circulator must be
able to maintain the buffer temperature
of 18-20ºC during electrophoresis.
Tubing with 3/8" ID connects the
Dodeca cell to the refrigerated
circulator. Insert the male quickconnect fittings (included with the
Dodeca cell) into the inlet and
outlet tubing on the refrigerated
circulator. The buffer coil in the
Dodeca cell has no specific orientation, so direction of flow is not specified. An
ethylene glycol:water (20:80) solution is recommended as coolant.
Using two hands, insert the gel cassettes into the tank hinge side down (PROTEAN
Plus hinged spacer plates) or greased side down (PROTEAN II handcast or Ready Gel
precast gel cassettes).
Note: Do not bump or scratch the electrodes with the corners of the glass plates.
For Laemmli buffer system applications, the top of the gel is positioned next to the
cathode (negative/ black electrode card) so that the sample migrates toward the anode
(positive/ red electrode card).
Note: Be sure the gasket is flared out toward the electrode. Check to make sure the gasket
is not torn or wrinkled.
Fill the tank with the remaining buffer so that the level of the buffer is set just below
(about 3mm) the height of the plates. The level of the buffer is very important to obtaining
excellent results. If the buffer level is too high and the gels are completely immersed in buffer,
there will be a significant current leak on the top part of the gels and the results will be
negatively affected. The results will illustrate a "smiling effect" on that side of the gels. If the
buffer level is too low, the buffer will not be recirculated properly and the top portion of the
gels will get warmer and run faster. The results will illustrate a "frowning effect" on that side
of the gels.
10
Fig. 3.4A. Proper orientation for the gasket assembly.
Rubber
gasket
Rivet
Page 13
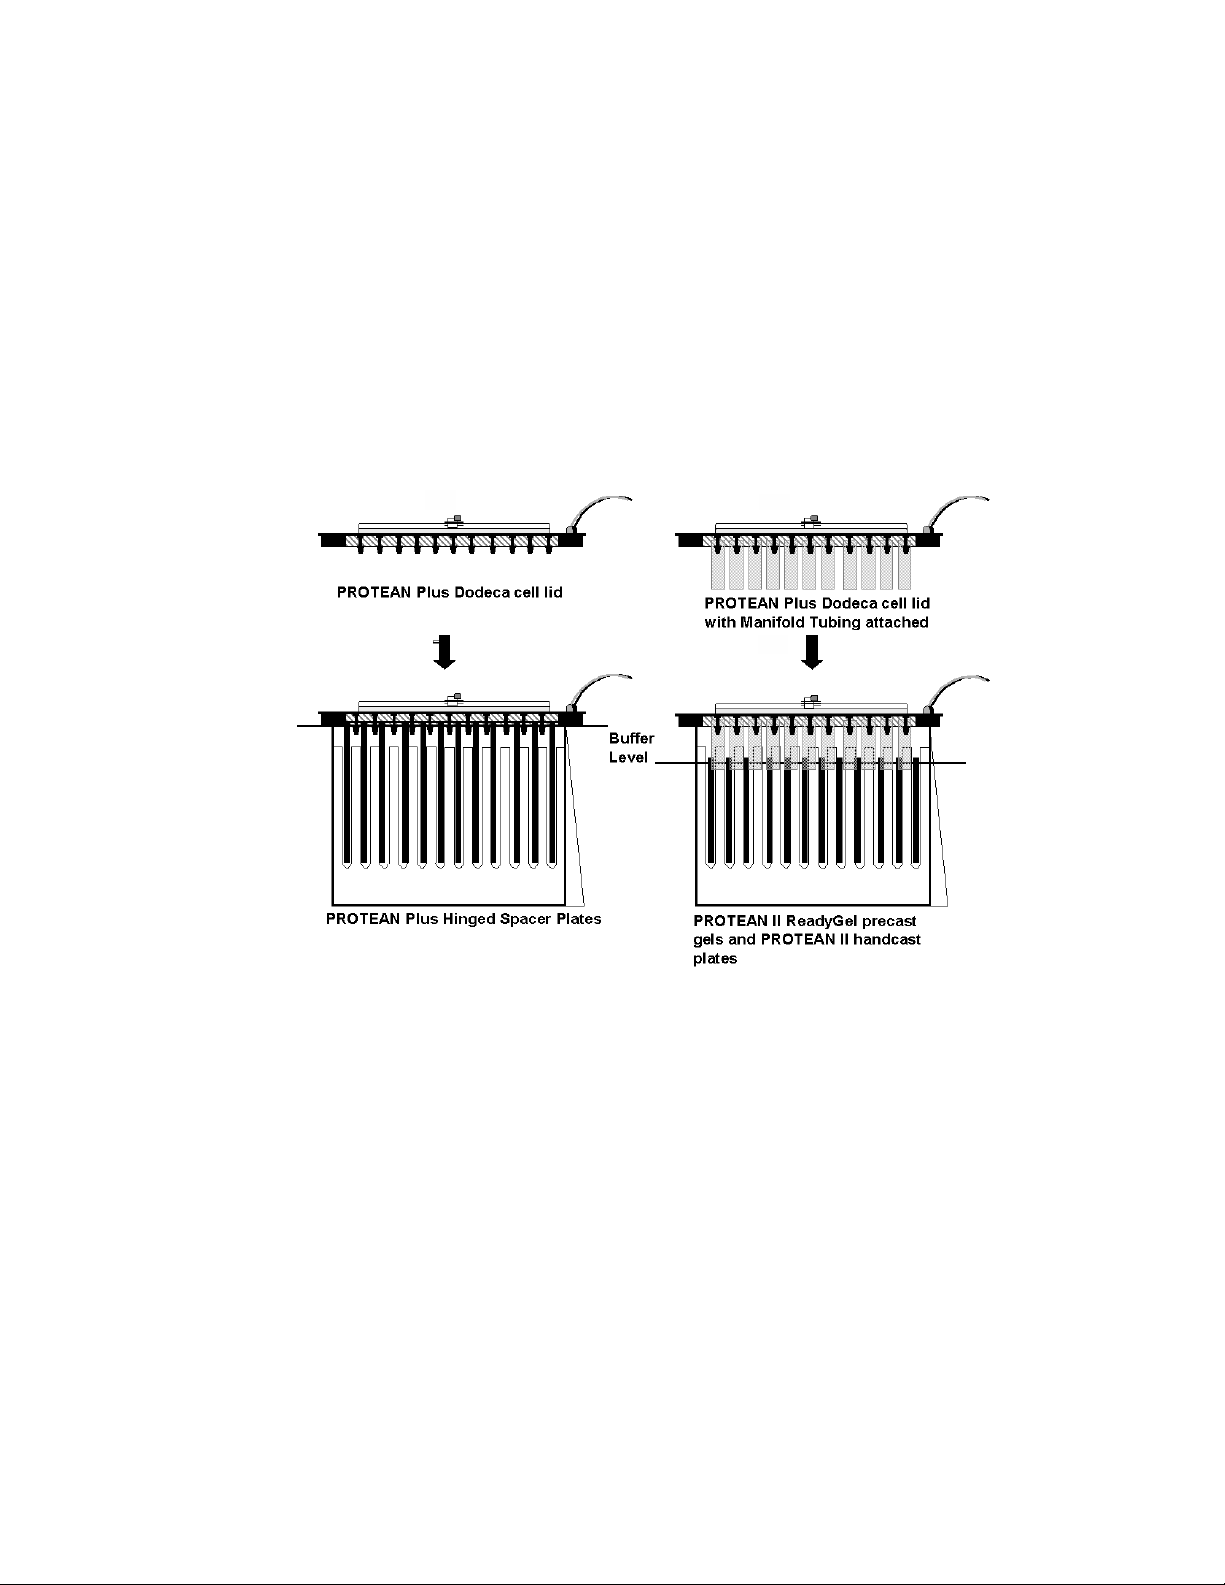
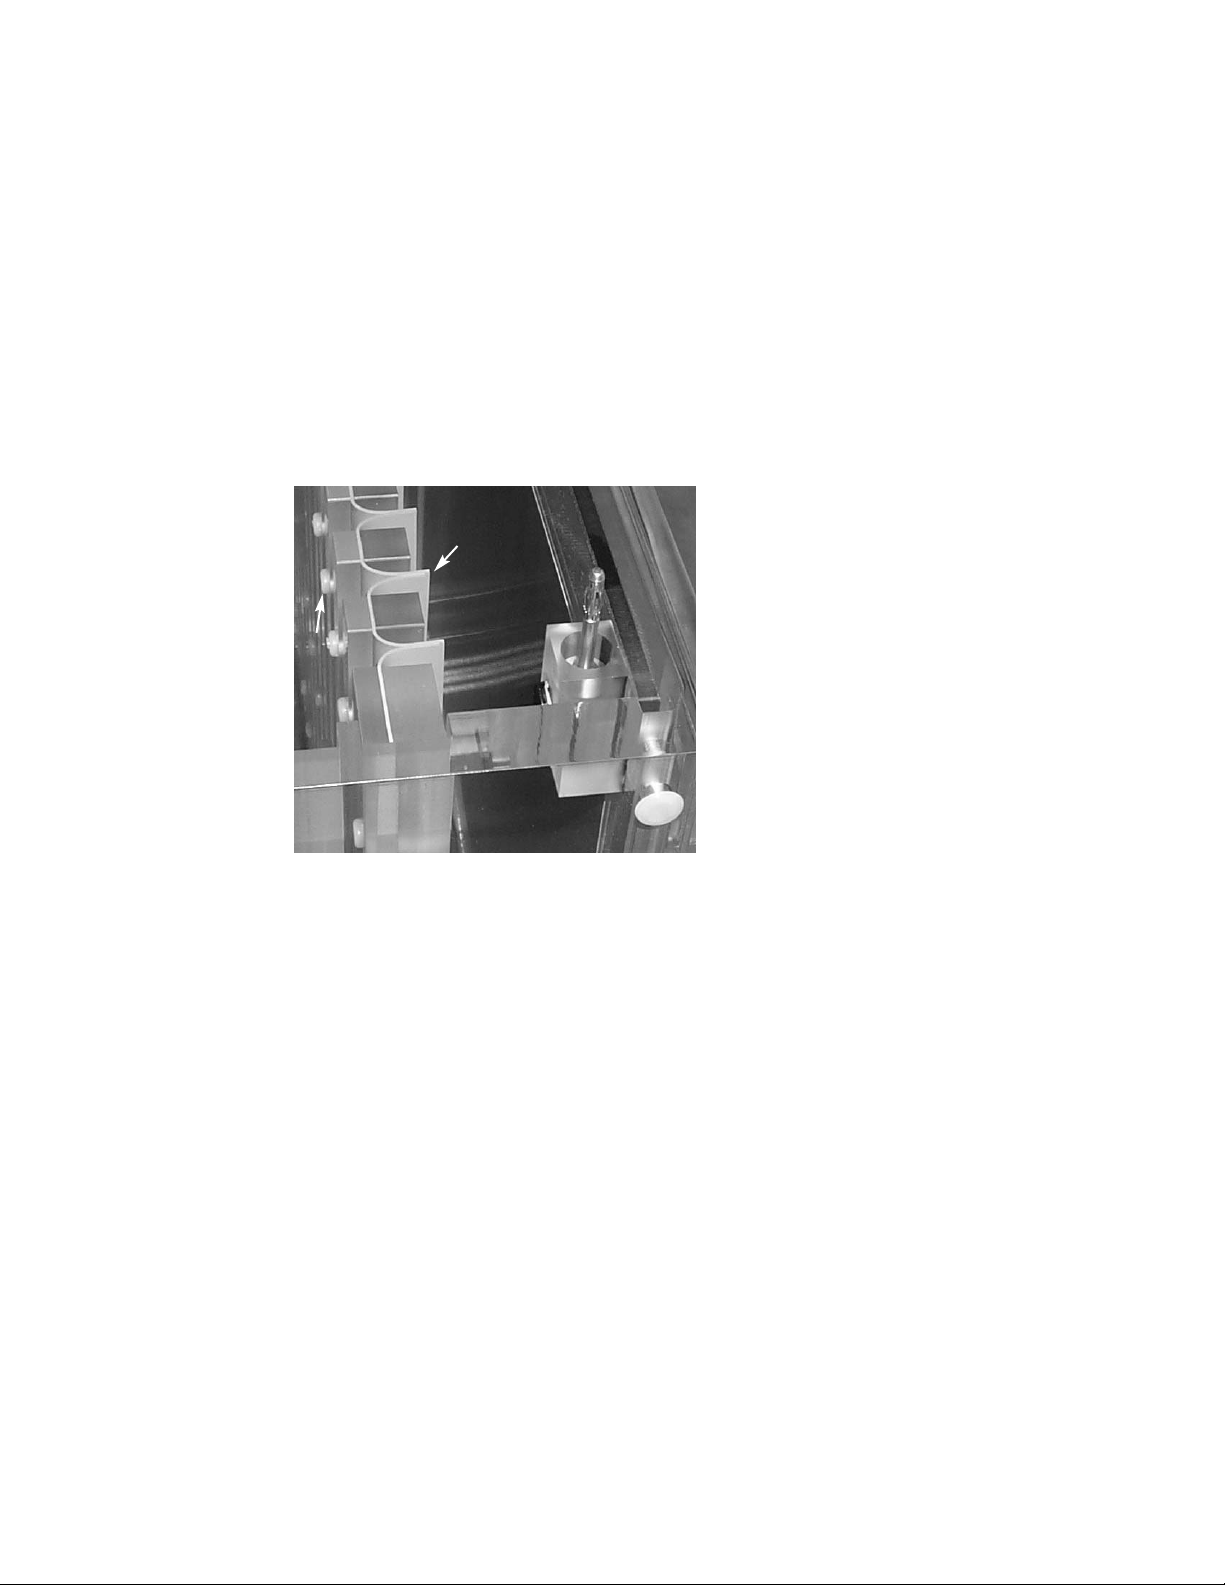
When running PROTEAN II Ready Gels or 20 x 20 cm PROTEAN II gels, install the
eleven pieces of manifold tubing onto the black fittings in manifold in the lid. The manifold
tubing is not required when running the PROTEAN Plus hinged spacer plates, or other large
plates (greater than 26.5 cm wide), because these plates reach the height of the black fittings.
Once the manifold tubing is attached position the pieces of tubing in between the gel cassettes
so that it extends into the buffer (Figure 3.4B).
Note: ALL eleven pieces of tubing must be used when running any number of precast or
handcast PROTEAN II gel cassettes. Using less than eleven pieces of tubing may decrease the
cooling efficiency of the system and adversely affect the results.
Fig. 3.4B. Schematic diagram illustrating the proper use of the manifold tubing.
Place the lid on the tank and make sure the recirculation pump tubing is connected to the
manifold in the lid via the quick connect fitting. Set the Buffer Recirculation Pump to the
maximum setting (100) and turn it on. Check to make sure all the quick connect fittings are
tight and secure and that no buffer is leaking out.
11
Page 14

3.5 Starting the electrophoresis run
Be sure to check the following:
• The gel is placed in the tank with the hinged side down. If you are using unhinged
PROTEAN II Ready Gel precast gels, be sure the greased side is down.
• The top of the gel is positioned next to the cathode (negative/black electrode card).
• The level of buffer in the tank is set just below (about 3 mm) the top of the plates. Make
certain the entire gel area is submerged in buffer.
Connect the Dodeca Cell to the PowerPac 200 power supply.
Recommended Running Conditions
200 V constant
~6 hours*
*The PowerPac 200 power supply may be at its power limit at the start of the run for the
25 cm gel size. Typically, within 30–60 minutes the current drops and the voltage
reaches 200 V.
Good laboratory practice: When running an application at constant current, a power or
voltage limit should be set. This also applies when running at constant voltage: set a current
or power limit. This will prevent extreme power conditions.
3.6 Removing the Gel
After the electrophoresis run is complete, turn off the power supply, the Buffer
Recirculation Pump and the refrigerated circulator, and remove a glass cassette from the
buffer tank using two hands.
Note: Do not bump or scratch the electrodes.
Place the gel cassette on the benchtop, short plate facing upward and the hinge to the left.
Insert the gel releaser between the short and long plate at the top right corner. Pull the gel
releaser up, lifting the short plate (Figure 3.6A).
Continue lifting the short plate until it is opened completely (180°). Do not open the
cassette past 180°, as this will strain the polymer hinge. In most cases the gel sticks to the
spacer plate.
Fig. 3.6A. Open the gel cassette.
Fig. 3.6B. Run gel releaser along each spacer to
loosen gel.
12
Run the gel releaser along each spacer to
release the gel from the spacer and prevent the
gel from tearing (Figure 3.6B).
Page 15

Pick up the gel by gently lifting the bottom of the gel first with two hands and then
slowly continue lifting upward until the gel is completely off the plate (Figure 3.6C).
Transfer the gel to a
staining container.
Alternatively, a clean
and dry separation sheet
can be used to help lift the
gel from the plate. Place a
separation sheet on top of
the gel. Press down
Fig. 3.6C. Gently lift the gel from the plate.
on the separation sheet so that the gel sticks to the sheet.
Start at one of the bottom corners and slowly lift up the corner
of the separation sheet and gel. Hold the corner of the gel
against the corner of the separation sheet and then roll the
two together diagonally towards the opposite upper corner
(Figure 3.6D) the plate continue lifting the remainder of the
gel straight off the plate and transfer the gel to a staining
container.
Fig. 3.6D. Use a separation
sheet to lift the gel from the
plate.
Section 4
Maintenance
The PROTEAN Plus Dodeca Cell tank, gaskets, electrode cards and lid should be rinsed
after each use. For long term storage, flush all parts thoroughly with water to completely
remove any residual buffer.
For best performance, fresh buffer should be prepared for each run.
13
Page 16

Section 5
Troubleshooting Guide
Problem Cause Solution
1. Smile effect– band pattern a. Center of the gel running a. Improper cooling.
curves upward at both sides hotter than either end The cooling coil and
of the gel refrigerated circulator
MUST be used in order
to maintain buffer
temperature at
approximately 20 ºC.
Measure the buffer
temperature and adjust
the refrigerated
circulator settings.
b. Power conditions are b. Decrease voltage from
excessive 200 V to 150 V or
make sure buffer is
filled to correct level.
c. Plate not greased properly c. Apply an excess amount
causing current leaks. (If of grease along the
using non-hinged cassettes). entire edge of the dry
plate. Do not remove
the plate from the tank
once it is inserted down
into position until the
run is complete. This
could loosen the grease
and cause it to fall out.
2. Frowning effect–band a. The buffer is not a. Check the Buffer
pattern curves downward recirculated properly recirculation set-up
at one or both sides of the and the edges of the gel (see Section 2.3). Make
gel. are getting warmer then sure the black fittings
the middle of the gel. or manifold tubing in
the lid are extending
just past the buffer
level. The black fittings
or manifold tubing cannot extend too far into
the buffer; otherwise
the buffer at the very
top will not be
recirculated properly.
3. Run takes unusually long a. Ion depletion in running a. Prepare and use fresh
time. buffer buffer.
b. Running buffer too b. Check buffer protocol
concentrated and dilute buffer if
necessary.
4. Changes in protein mobility a. Ion depletion in running a. Prepare and use fresh
or band sharpness. buffer buffer.
b. Gels running too hot. b. Same as #1 solution a
and b.
Problem Cause Solution
14
Page 17

Problem Cause Solution
5. SDS is precipitating. a. Running buffer is too cold. a. Set the refrigerated
circulator to maintain a
buffer temperature of
approximately 20 ºC.
6. Agarose slides out a. The agarose is less a. Carefully measure the
of the cassette then 1.0%. agarose powder to 1.0%.
inside the cell.
7. Buffer in the anode side a. An electrochemical a. We recommend using
of the tank turns yellow reaction is taking place– fresh buffer for each run.
after a few runs. a component in the
Tris buffer is oxidized.
This reaction always
occurs during
electrophoresis, but
with the Dodeca cell
the large surface area of
the plate electrodes
intensifies this reaction
and thus causes the
buffer to turn yellow
very quickly.
Section 6
Product Information and Accessories
PROTEAN Plus Dodeca Cell
Catalog
Number Description
165-4150 PROTEAN Plus Dodeca Cell, 100/120V, includes tank and lid,
buffer recirculation pump with tubing.
165-4151 PROTEAN Plus Dodeca Cell, 220/240V,,includes tank and lid,
buffer recirculation pump with tubing.
165-4153 Replacement Tubing Kit, complete, includes all tubing required to
set up the buffer recirculation pathway.
165-4154 Replacement Gasket Assembly
165-4155 Electrode Card: ANODE
165-4156 Electrode Card: CATHODE
165-4157 Replacement Lid
165-4166 Manifold tubing, qty 11
165-4167 Buffer Exhaust Tubing, includes quick-connect fittings.
165-4158 Buffer Recirculation Pump, 100/120V
165-4159 Buffer Recirculation Pump, 220/240V
165-3320 Gel Releaser Tool, 5
Tygon is a registered trademark of Norton Co.
15
Page 18

PROTEAN Plus Multi-Casting Chamber
Catalog
Number Description
165-4160 PROTEAN Plus Multi-Casting Chamber, includes chamber,
sealing plate, silicone gasket, tapered luer connector, leveling
bubble, acrylic blocks (1 each of 1.5 mm, 3 mm, 6 mm; and 5 of
12 mm), separation sheets, gel releasers, stopcock, tubing
165-4161 Replacement acrylic block, 1.5 mm, 1
165-4162 Replacement acrylic block, 3 mm, 1
165-4163 Replacement acrylic block, 6 mm, 1
165-4164 Replacement acrylic block, 12 mm, 1
165-4165 Separation Sheets, for the PROTEAN Plus Dodeca Cell, 15
165-4170 PROTEAN Plus hinged spacer plate, 20 X 20.5 cm, 1.0 mm, 1
165-4171 PROTEAN Plus hinged spacer plate, 20 X 20.5 cm, 1.5 mm, 1
165-4172 PROTEAN Plus hinged spacer plate, 20 X 20.5 cm, 2.0 mm, 1
165-4173 PROTEAN Plus hinged spacer plate, 25 X 20.5 cm, 1.0 mm, 1
PROTEAN Plus Multi-Casting Chamber (Continued)
Catalog
Number Description
165-4174 PROTEAN Plus hinged spacer plate, 25 X 20.5 cm, 1.5 mm, 1
165-4175 PROTEAN Plus hinged spacer plate, 25 X 20.5 cm, 2.0 mm, 1
165-4176 PROTEAN Plus comb, 2-D (1 reference well), 20 cm, 1.0 mm, 1
165-4177 PROTEAN Plus comb, 2-D (1 reference well), 20 cm, 1.5 mm, 1
165-4178 PROTEAN Plus comb, 2-D (1 reference well), 20 cm, 2.0 mm, 1
165-4179 PROTEAN Plus comb, 2-D (1 reference well), 25 cm, 1.0 mm, 1
165-4180 PROTEAN Plus comb, 2-D (1 reference well), 25 cm, 1.5 mm, 1
165-4181 PROTEAN Plus comb, 2-D (1 reference well), 25 cm, 2.0 mm, 1
Model 495 Gradient Former
Catalog
Number Description
165-4121 Model 495 Gradient Former, includes body with valve stem and
tubing connection kit
165-2005 Exponential Piston
16
Page 19

Power supply
Catalog
Number Description
165-5052 PowerPac 200 power supply, 100/120 V
165-5053 PowerPac 200 power supply, 220/240 V
165-5062 PowerPac shelf; attaches to the underside of a shelf and holds the
PowerPac 200 power supply
Premixed electrophoresis buffers
Catalog
Number Description
161-0772 10x Tris/Glycine/SDS, 5 L
161-0757 10x Tris/Glycine, 5 L
Section 7
Warranty Information
The PROTEAN Plus Dodeca cell is warranted for 1 year against defects in materials and
workmanship. If any defects should occur during this warranty period, Bio-Rad Laboratories
will replace the defective parts without charge. However, the following defects are specifically
excluded:
• Defects caused by improper operation
• Repairs or modifications performed by anyone other than Bio-Rad Laboratories or their
authorized agent.
• Damage caused by accidental misuse
• Damage caused by disaster
• Common replacement parts including platinum wire and power cables
• Damage caused by the use of organic solvents
For inquiries or to request repair service, contact your local Bio-Rad office
Warranty Information
Model
Catalog Number
Date of Delivery
Serial Number
Invoice Number
Purchase Order Number
17
Page 20

S
cience
p
3
Bio-R
ad
.
e
US
a
02 99
800
a
(01)
385 55
ce
g
aIsrael
a
555
S
9555
000
4006203 Rev C
Laboratories, Inc
Life
Grou
Web sit
Fran
Italy
i
witzerland1 717-
A(800) 4BIORAD Australi
Hong Kon
Taiwan
8862) 2578-7189/2578-7241 United Kingdom
14 2
Austri
-877 89 01 Belgium09-
Indi
20 8328 2
11 Brazil 55 21 507 6191
03 951 4127
Portugal 351-21-472-7700
12700
Sig 060
 Loading...