

Page 1
®
PROTEAN
II xi Cell
PROTEAN II xi 2-D Cell
Instruction Manual
For Technical Service, call your local Bio-Rad office or in the U.S. call 1-800-424-6723
Page 2

Page 3

Note
To insure best performance from the PROTEAN® II xi cell, become fully acquainted with these operating
instructions before using the cell to separate samples. Bio-Rad recommends that you first read these
instructions carefully. Then assemble and disassemble the cell completely without casting a gel. After these
preliminary steps, you should be ready to cast and run a gel.
Bio-Rad also recommends that all PROTEAN II xi cell components and accessories be cleaned with a
suitable laboratory cleaner (such as Bio-Rad Cleaning Concentrate, catalog #161-0722) and rinsed
thoroughly with distilled water, before use.
Model
Catalog No.
Date of Delivery
Warrant Period
Serial No.
Warranty
Bio-Rad Laboratories warrants the PROTEAN II xi cell against defects in materials and workmanship for 1 year.
If any defects occur in the instrument during this warranty period, Bio-Rad Laboratories will repair or replace
the defective parts free. The following defects, however, are specifically excluded:
1. Defects caused by improper operation.
2. Repair or modification done by anyone other than Bio-Rad Laboratories or an authorized agent.
3. Use of fittings or other spare parts supplied by anyone other than Bio-Rad Laboratories
4. Damage caused by accident or misuse.
5. Damage caused by disaster.
6. Corrosion due to use of improper solvent or sample.
7. This warranty does not apply to parts listed below:
• Platinum wire
• Glass plates
For any inquiry or request for repair service, contact Bio-Rad Laboratories after confirming the model and
serial number of your instrument.
Nonidet is a trademark of Shell International Petroleum Company. Parafilm is a trademark of American National Can
Company. Triton is a trademark of Dow Chemical Company. Tygon is a trademark of Norton Company.
i
Page 4

Page 5

Table of Contents
Section 1 General Information ............................................................................... 1
1.1 Introduction .............................................................................................. 1
1.2 Specifications ........................................................................................... 1
1.3 Safety ...................................................................................................... 2
Section 2 Description of Major Parts ..................................................................... 3
2.1 Central Cooling Core ................................................................................ 3
2.2 Sandwich Clamps .................................................................................... 3
2.3 Casting Stand .......................................................................................... 3
2.4 Upper Buffer Chamber ............................................................................. 4
2.5 Lower Buffer Chamber ............................................................................. 4
2.6 Lid ........................................................................................................... 4
2.7 Tube Gel Adaptor ..................................................................................... 4
2.8 Alignment Card ........................................................................................ 4
Section 3 Assembling the Glass Plate Sandwiches.............................................. 4
3.1 Assembling Single Sandwiches ................................................................ 4
3.2 Assembling Multiple or “Double-up” Gel Sandwiches ............................... 8
Section 4 Casting the Gels ..................................................................................... 9
4.1 Casting Discontinuous (Laemmli) Gels ...................................................... 9
4.2 Casting Continuous Gels .......................................................................... 11
4.3 Casting Gradient Gels .............................................................................. 11
4.4 Casting Agarose Gels ............................................................................... 13
Section 5 Assembling the Upper Buffer Chamber ................................................ 15
5.1 Assembly ................................................................................................. 15
5.2 Use of the Buffer Dam .............................................................................. 17
Section 6 Loading the Samples ............................................................................. 18
6.1 Loading of Sample Wells .......................................................................... 18
6.2 Loading a Single Sample Per Gel ............................................................. 18
6.3 Gels as Samples ...................................................................................... 18
Section 7 Running the Gel...................................................................................... 19
Section 8 Set-up Options ....................................................................................... 19
8.1 Buffer Recirculation .................................................................................. 19
8.2 Cooling Options ....................................................................................... 20
Section 9 Removing the Gels ................................................................................. 21
Section 10 Two-Dimensional Electrophoresis ......................................................... 22
10.1 Sequence of Steps for 2-D Protocol ......................................................... 22
10.2 Protocol for IEF First Dimension................................................................ 22
Page 6

Section 11 Maintenance of Equipment ................................................................... 28
Section 12 Troubleshooting Guide -
Section 13 Equipment and Accessories .................................................................. 31
13.1 PROTEAN II xi Cell - Slab Configurations .................................................. 31
13.2 Accessories ............................................................................................. 31
13.3 PROTEAN II xi Cell - 2-D Configuration .................................................... 34
13.4 Accessories ............................................................................................. 34
13.5 Electrophoresis Chemicals ....................................................................... 35
13.6 Power Supplies ........................................................................................ 36
Section 14 Appendix ................................................................................................ 37
14.1 Reagents and Gel Preparation for SDS-PAGE Slab Gels .......................... 37
14.2 Separating Gel Preparation ...................................................................... 38
14.3 Stacking Gel Preparation .......................................................................... 38
14.4 Running Conditions .................................................................................. 39
14.5 Comparison of Coomassie Blue and Silver Staining.................................. 39
14.6 2-D Stock Solutions ................................................................................. 39
14.7 Running Conditions .................................................................................. 40
Section 15 Bibliography ........................................................................................... 41
15.1 General ................................................................................................... 41
15.2 Native Gel Systems ................................................................................. 41
15.3 SDS Gel Systems .................................................................................... 41
15.4 Urea Gel Systems ................................................................................... 42
15.5 Two-Dimensional IEF / SDS-PAGE Gel Systems ...................................... 42
15.5 References .............................................................................................. 42
PAGE, SDS-PAGE, 2-D IEF/SDS-PAGE
........... 29
Page 7

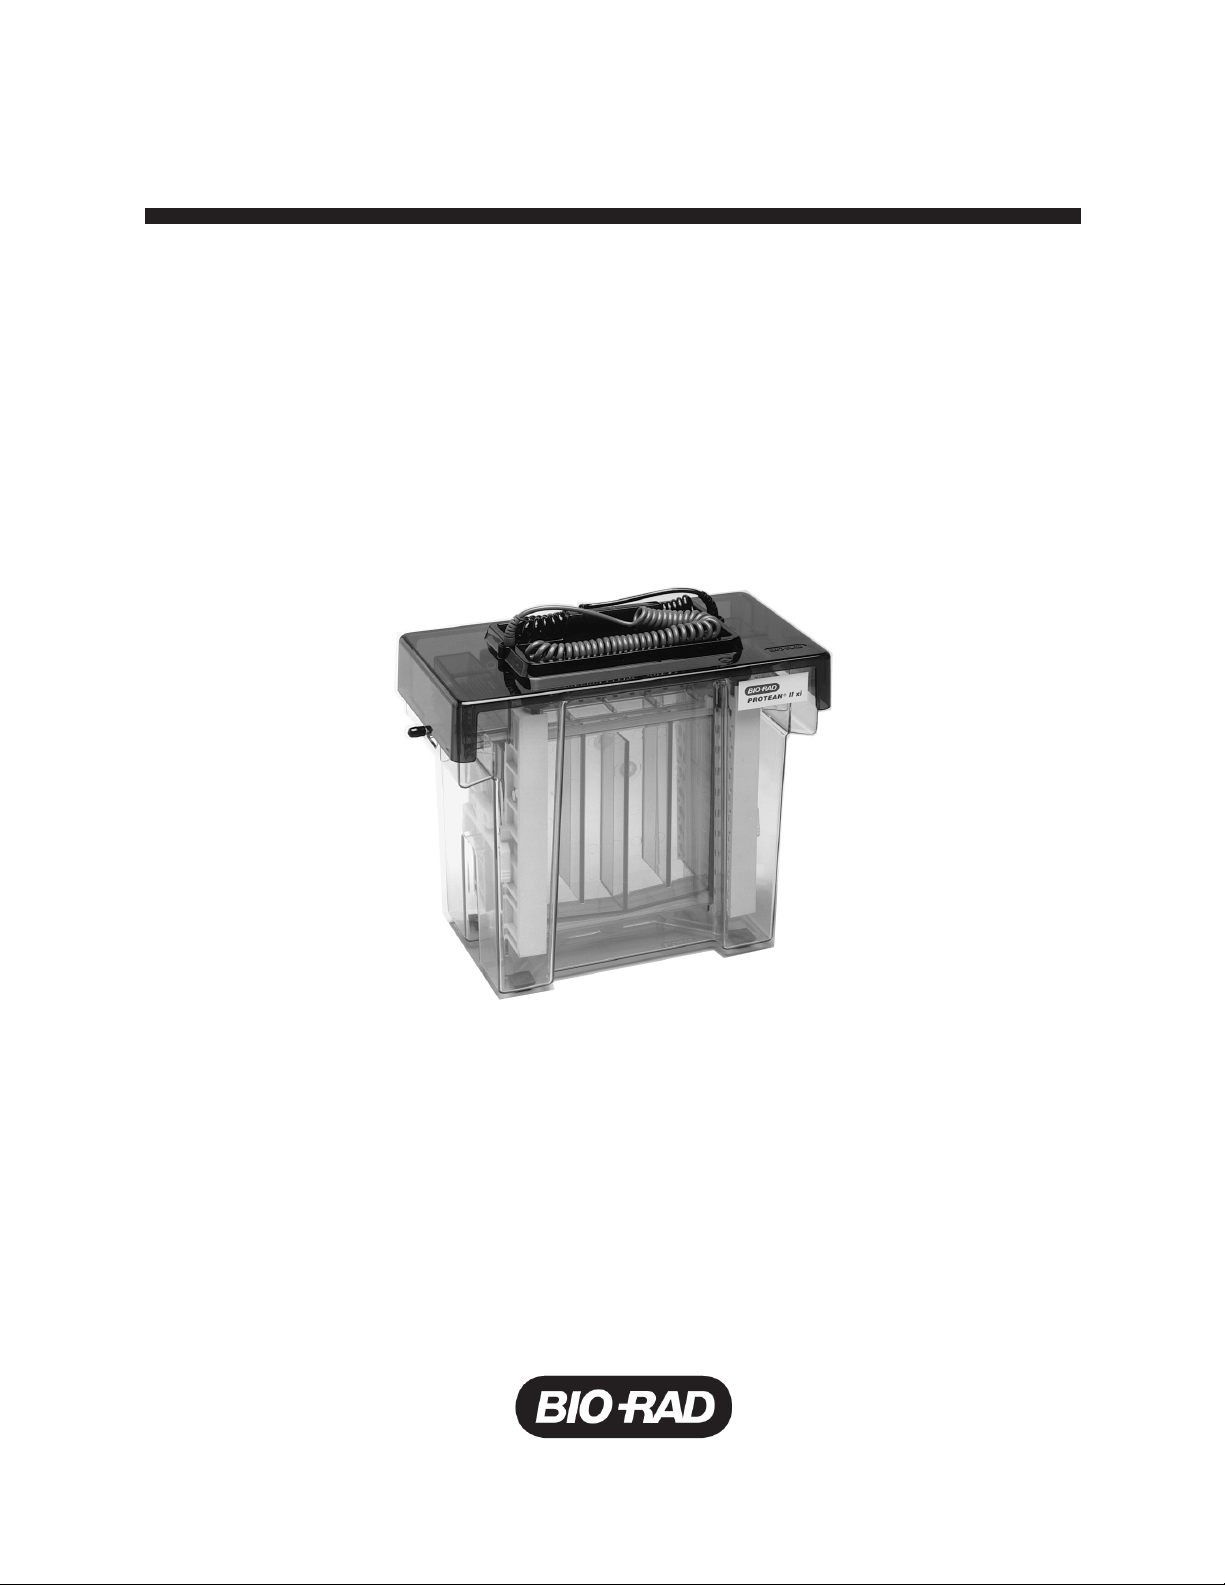
Section 1
General Information
1.1 Introduction
The PROTEAN
When used with the various combs, spacers, and accessories available, the PROTEAN II xi cell is suitable for
most common electrophoretic techniques, including SDS electrophoresis, two-dimensional (2-D) electrophoresis,
native electrophoresis, and agarose gel electrophoresis. The PROTEAN II xi cell can run up to 4 slab gels or
16 tube gels simultaneously. The basic unit accommodates gels 16 or 20 cm long. The 20 cm gels offer
increased resolution capability, which is especially useful in 2-D applications.
The central cooling core of the PROTEAN II xi cell assures even heat distribution over the entire gel length,
permitting excellent resolution with minimal band distortion. Only 1.5 liters of buffer are required. The raised
electrode position insures safe operation even with extended overnight runs.
The unique single-screw sandwich clamps allow rapid assembly of the gel sandwiches, while providing even
pressure distribution along the entire gel length. This even pressure minimizes the risk of breaking the glass
plates, a common problem with multi-screw clamps. The PROTEAN II xi alignment card helps keep spacers
upright during sandwich alignment. The combination of the clamps, alignment card, and the casting stand
permits assembly and casting of gels in minutes, with little effort. After casting, the completed gel sandwich
attaches to the central cooling core with a single motion.
The PROTEAN II xi cell is the instrument of choice for 2-D electrophoresis. With the optional tube adaptors,
one can run the first dimension IEF tube gel, and then overlay this gel onto the second dimension SDS slab
gel. Thus, the complete 2-D procedure can be done with one dedicated instrument.
®
II xi cell is a vertical slab electrophoresis instrument which combines versatility with practicality.
1.2 Specifications
Construction:
Cooling core and
tube gel adaptor molded polysulfone
Lid and lower buffer
chamber molded polycarbonate
Clamps, casting glass and Polytetrafluoroethylene (PTFE)-filled
stand, and cams molded poly-carbonate
Electrical leads flexible, coiled
Electrodes platinum, 0.010 inch diameter
(0.254 mm)
Shipping weight 11 kg (24 lb, 3 oz)
Overall size 26 cm (L) x 19 cm (W) x 30 cm (H)
Gel size 16 x 16 cm slab or 16 x 20 cm slab
1 to 6 mm diameter tube gels
Glass plate sizes 16 cm cell: 16 x 20 cm (inner plate)
18.3 x 20 cm (outer plate)
Cooling core, maximum
flow rate 2 liter/min
Maximum coolant temperature Do not exceed 50°C
Voltage limit 1,000 volts DC
1
Page 8
Note: PROTEAN II xi cell components are not compatible with ethanolamine, ethylene diamine, chlorinated
hydrocarbons (e.g., chloroform), aromatic hydrocarbons (e.g., toluene, benzene), or acetone. Use of such
organic solvents voids all warranties. Cyanoacrylate and other adhesives will also attack the cell components.
Contact your local Bio-Rad office for compatibility information before using any adhesive or organic solvent
with this cell.
1.3 Safety
Power to the PROTEAN II xi cell and PROTEAN II xi 2-D cell is to be supplied by an external DC
voltage power supply. This power supply must be ground isolated in such a way that the DC
voltage output floats with respect to ground. All of Bio-Rad's power supplies meet this
important safety requirement. Regardless of which power supply is used, the maximum specified
operating parameters for these cells are:
1000 VDC maximum voltage limit
80 Watts maximum power limit
50 °C maximum ambient temperature limit
Current to the cell, provided from the external power supply, enters the unit through the lid
assembly, providing a safety interlock to the user. Current to the cell is broken when the lid is
removed. Do not attempt to circumvent this safety interlock, and always turn the power
supply off before removing the lid, or when working with the cell in any way.
Important
This Bio-Rad instrument is designed and certified to meet IEC1010-1* safety standards. Certified products are
safe to use when operated in accordance with the instruction manual. This instrument should not be modified
or altered in any way. Alteration of this instrument will:
• Void the manufacturer's warranty
• Void the IEC1010-1 safety certification
• Create a potential safety hazard
Bio-Rad is not responsible for any injury or damage caused by the use of this instrument for purposes other
than for which it is intended or by modifications of the instrument not performed by Bio-Rad or an authorized
agent.
*IEC 1010-1 is an internationally accepted electrical safety standard for laboratory instruments.
2
Page 9
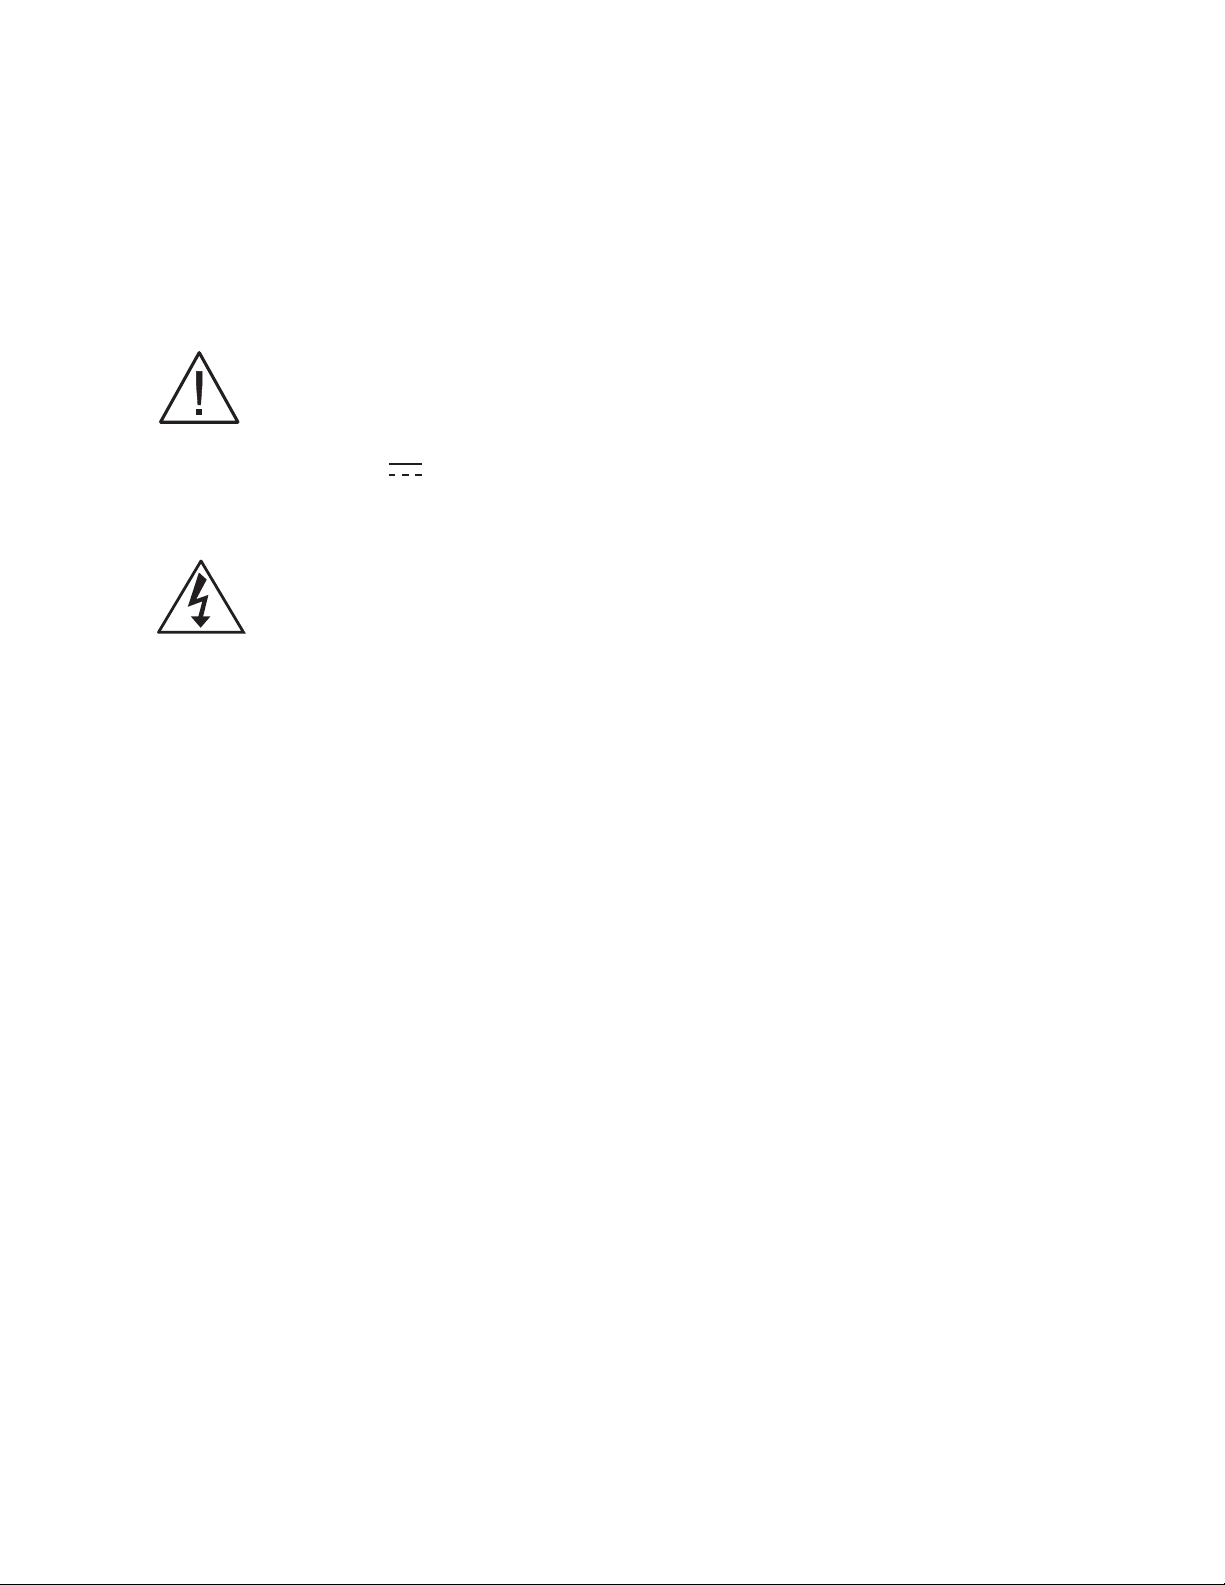
Section 2
Description of Major Parts
8
2
3
1
4
Fig. 1. PROTEAN® II xi 2-D cell including tube adaptor. 1. Lower buffer chamber, 2. Lid with electrical leads in place,
3. Cooling core with glass plate sandwich attached and core caps in place, 4. Casting stand with glass plate sandwich in
alignment slot, 5. Tube gel adaptor, 6. Sandwich clamps, 7. Buffer dam, 8. Alignment card.
6
7
5
2.1 Central Cooling Core
The central cooling core provides the cooling capability which prevents thermal band distortion during
electrophoretic separations. The cooling core can be connected to any circulating cooling source. The
serpentine flow pattern assures even heat distribution over the entire gel area. An ethylene glycol:water (20:80)
solution is recommended as coolant. Other coolants may damage the plastic during extended exposure. If a
circulating bath is not available, the core can be connected to a tap water line, or simply filled with 1.8 liters of
coolant and plugged to act as a heat sink during electrophoresis.
The central cooling core has a raised upper electrode which is housed in a protective casing, and the lower
electrode is recessed to prevent accidental damage.
2.2 Sandwich Clamps
The unique PROTEAN II xi sandwich clamps consist of a single screw mechanism which makes assembly,
alignment, and disassembly of the gel sandwich an effortless task. The clamps exert an even pressure over
the entire length of the glass plates, providing a leak-proof seal and preventing plate damage due to uneven
pressure. Each pair of clamps consists of a left clamp and a right clamp. The sandwich clamps can
accommodate up to two 1.5 mm thick gels.
2.3 Casting Stand
The casting stand is separate from the PROTEAN II xi cell so that two gel sandwiches can be cast while others
are being run. The one-piece molded unit has two casting slots and one alignment slot. Gel sandwiches are
assembled, aligned, and cammed into the stand quickly, without the use of grease.
Double gels may also be cast. Two 1.5 mm (or thinner) gels may be cast in each sandwich, so that up to four
1.5 mm gels can be run at once.
3
Page 10

2.4 Upper Buffer Chamber
The completed gel sandwich attaches to the central cooling core so that the outer plate of the sandwich forms
the side of the upper buffer chamber. The inner plate is clamped against a rubber gasket on the central cooling
core to provide a greaseless, leak-free seal for the upper buffer. Each sandwich forms one side of the cathode
chamber. Tube gel adaptors also snap onto the central cooling core to form the upper buffer chamber walls
(one adaptor per side). If only one gel is to be run, an upper buffer dam is attached to the core to form the
complete upper buffer chamber. The upper buffer chamber will hold approximately 350 ml of buffer when full.
2.5 Lower Buffer Chamber
The lower buffer chamber of the PROTEAN II xi cell encloses the unit and provides stability during electrophoresis.
The molded unit requires a minimum buffer volume of only 1.1 liters for 20 cm plates, while providing excellent
heat exchange through the central cooling core.
2.6 Lid
Combined with the lower buffer chamber, the lid acts to fully enclose the PROTEAN II xi cell during electrophoresis,
thus providing electrical insulation. The lid cannot be removed without disconnecting the electrical circuit. It
can be placed on the lower chamber in only one alignment, so that the anode and cathode connections cannot
be accidentally reversed. The lid also holds the coiled electrical leads when not in use.
2.7 Tube Gel Adaptor
The tube gel adaptor clamps onto the central cooling core in one easy motion and provides a leak-proof seal
for the upper buffer chamber at voltages up to 1,000 V (especially useful for 2-D applications). The molded
construction produces a lightweight, yet durable adaptor unit, which has a gel tube locator at the bottom to
hold the tubes in a vertical orientation. Each adaptor can hold up to 8 tubes (from 1.0 mm ID to 6 mm ID); 16
tube gels can be run at once using two tube adaptors.
Note: The upper buffer dam may not be used opposite a tube gel adaptor.
2.8 Alignment Card
The alignment card greatly simplifies sandwich assembly by keeping the spacers upright during sandwich
alignment. A sandwich is assembled by placing two spacers on top of the large outer plate. The alignment
card is placed between the two spacers, and the shorter inner plate is then placed on top. Following attachment
of the clamps, the sandwich assembly is transferred to the alignment slot of the casting stand for final
adjustments.
4
Page 11
Section 3
Assembling the Glass Plate Sandwiches
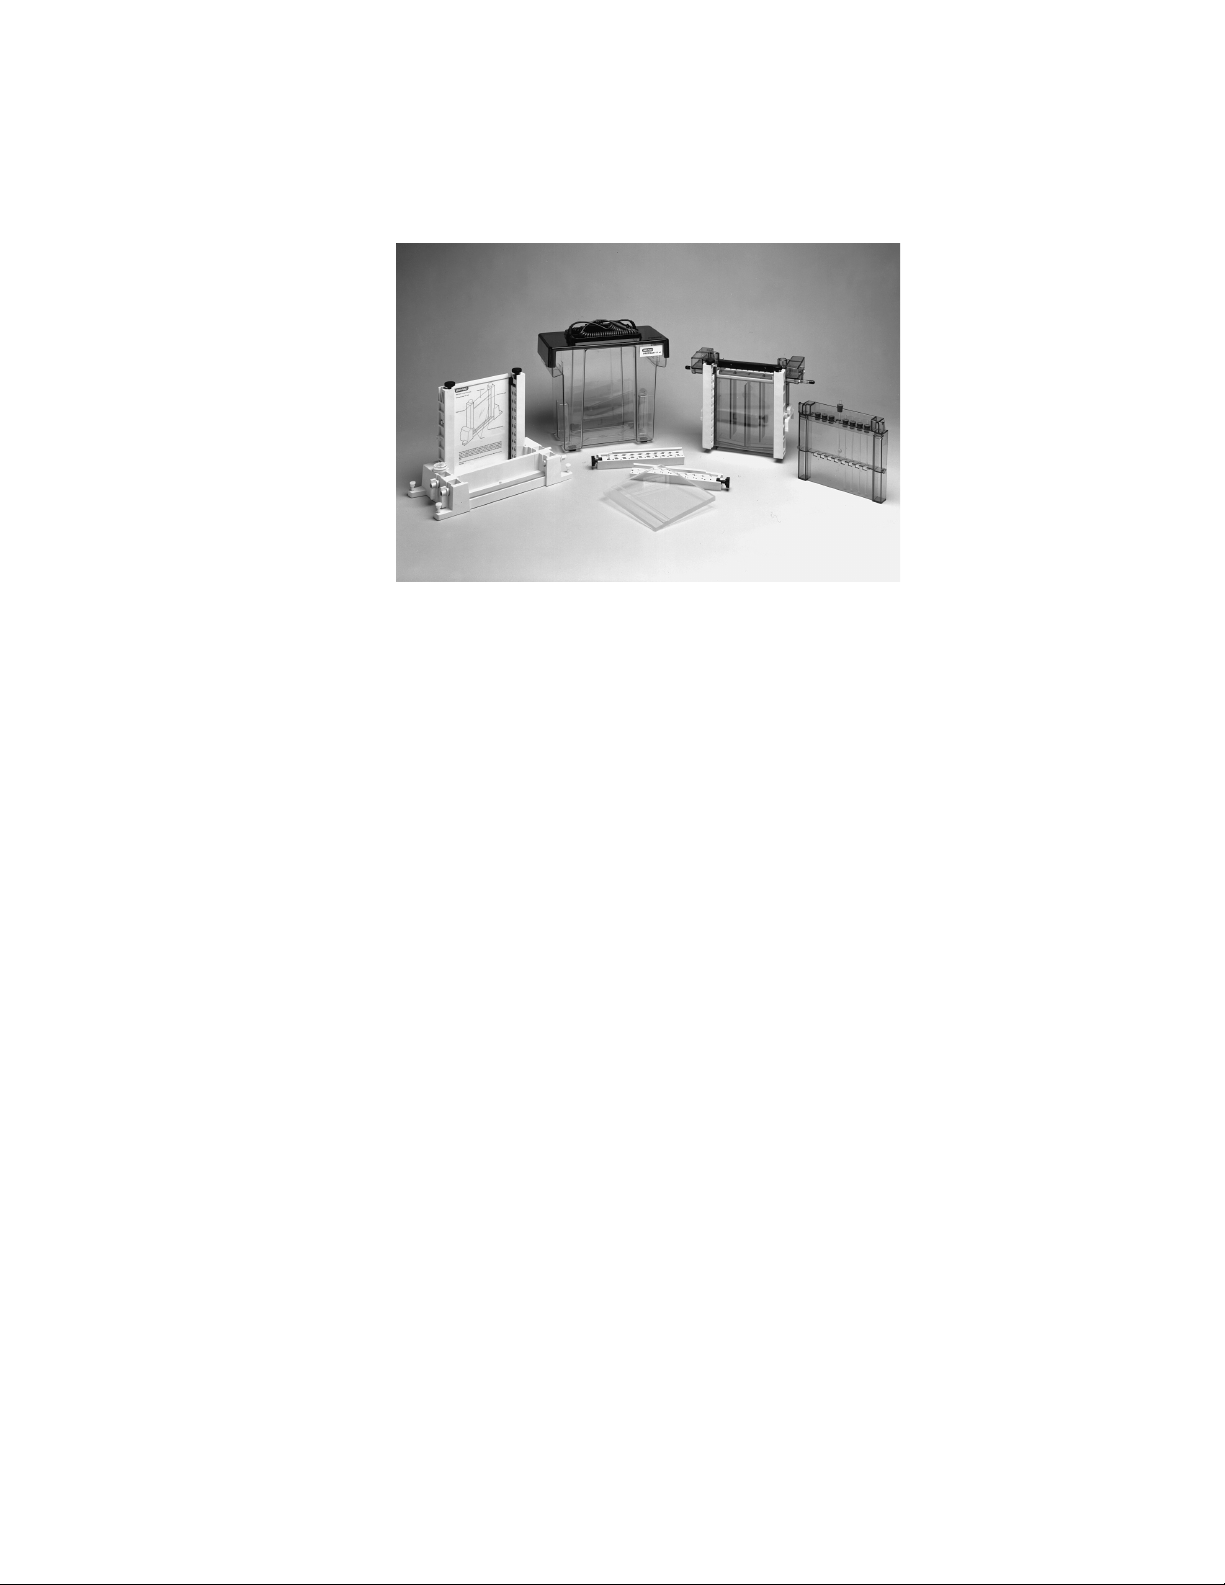
3.1 Assembling Single Sandwiches
Note: Instructions for assembling 16 cm and 20 cm sandwiches are identical, except, of course, for the lengths
of the components. To insure proper alignment, make sure all plates and spacers are clean and dry before
assembly. The PROTEAN® II xi plate washer/holder simplifies glass plate washing and also makes an ideal
storage system for clean, dry glass plates. Each plate holder will accommodate up to 8 PROTEAN II xi plates
or up to 18 Mini-PROTEAN® II plates.
1. Assemble the gel sandwich on a clean surface. Lay the long rectangular plate down first, then place two
spacers of equal thickness along the long edges of the rectangular plate. Next, place a short plate on top
of the spacers so that it is flush with one end of the long plate.
2. Locate both the right and left sandwich clamps, and loosen the single screw of each by turning
counterclockwise. Place each clamp by the appropriate side of the glass plate stack, with the locating
arrows facing up and toward the glass plates.
3. Grasp the whole glass plate sandwich firmly with your right hand. With your left hand guide the left clamp
onto the sandwich so that the long and short plates fit the appropriate notches in the clamp. Tighten the
single screw enough to hold plates in place.
4. Place the right clamp on the right side of the plates, and tighten the clamp screw.
5
Page 12

5. Level the casting stand on a flat surface with the alignment slot facing you. Check to see that gaskets are
clean and free of residual acrylamide to insure a good seal. Place a flat, grey, silicone gasket in each casting
slot.
Note: Always use the alignment slot to properly orient the gel sandwich. Failure to use this slot for alignment
can result in casting leaks while pouring the gel or buffer leaks during the run.
6. Place the assembled gel sandwich in the alignment slot of the casting stand. Loosen the clamp screws,
and allow the plates and spacers to align at the surface of the alignment slot. Insert a PROTEAN II xi
alignment card between the two glass plates to keep the spacers upright while additional alignment
adjustments are made. As an alternative, the alignment card can be positioned between the glass plates
when the sandwich is first assembled as in step 1.
7. Simultaneously push inward on both clamps at the locating arrows, and tighten both clamp screws just
enough to hold the sandwich in place. Pushing inward on both clamps at a point below the locating
arrows will insure that the spacers and glass plates are flush against the sides of the clamps.
6
Page 13

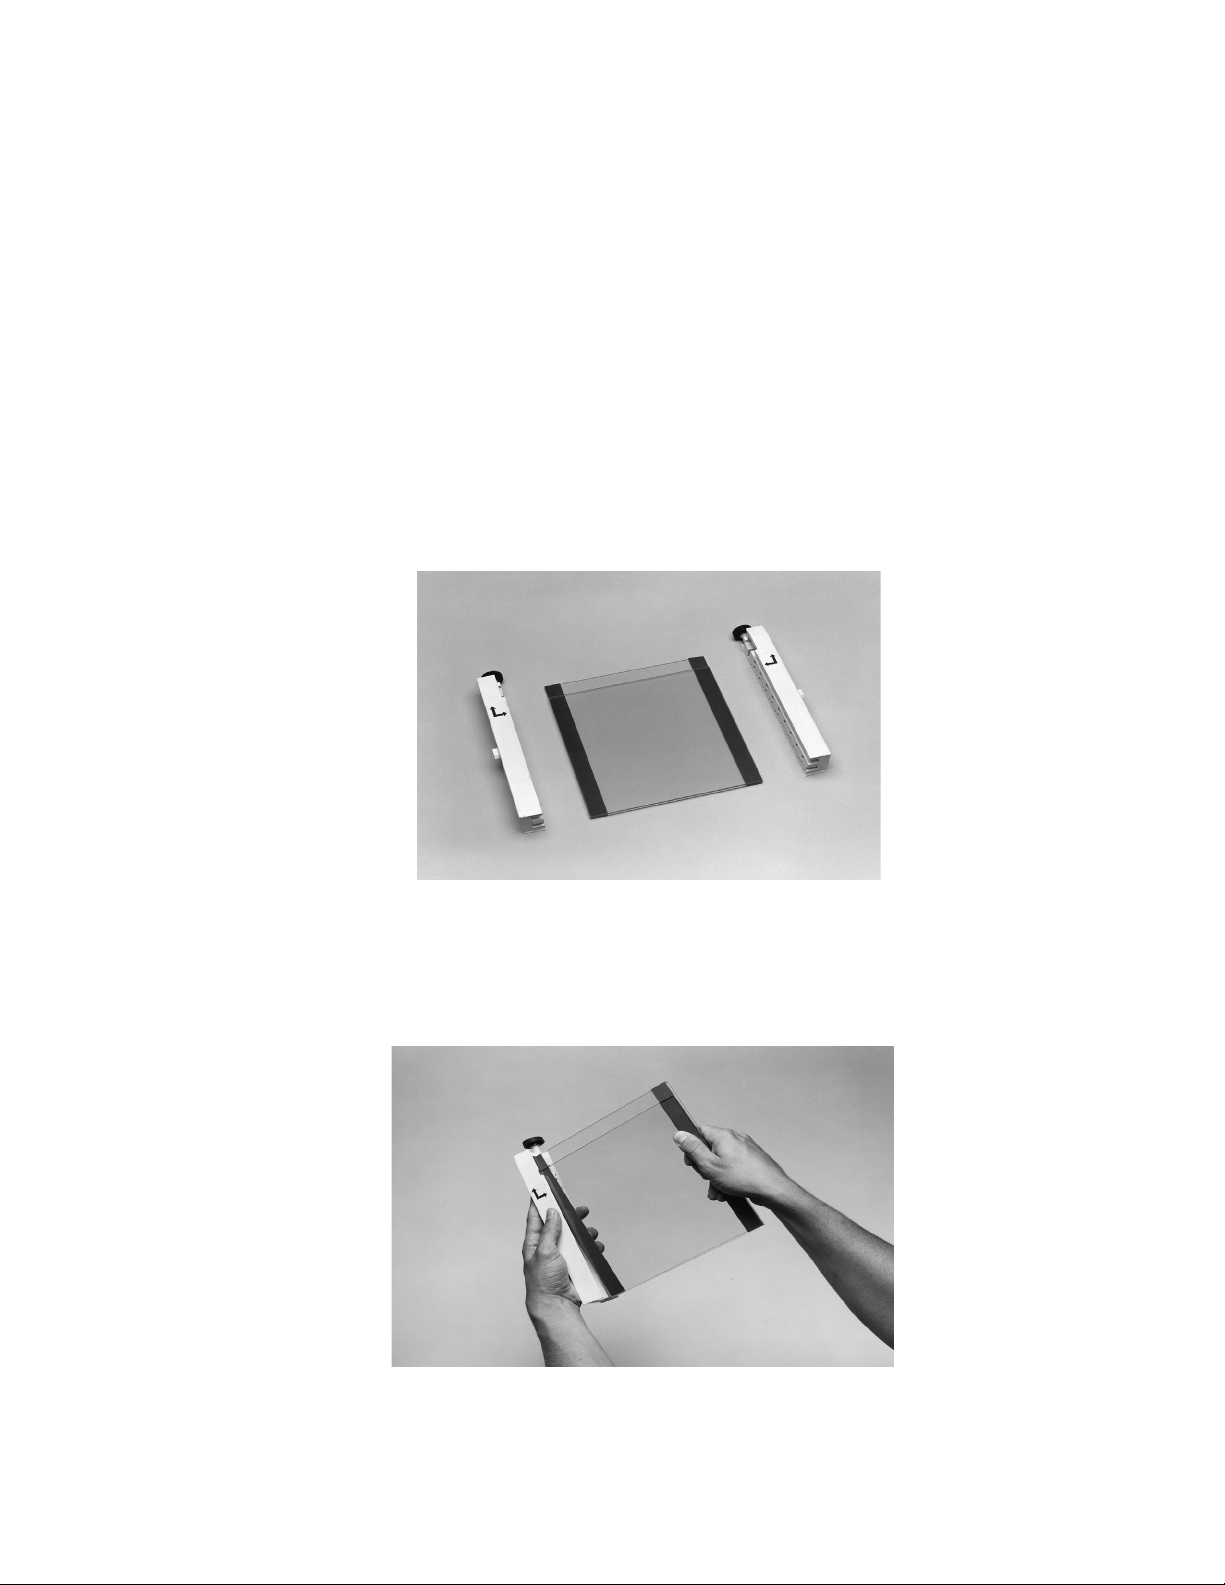
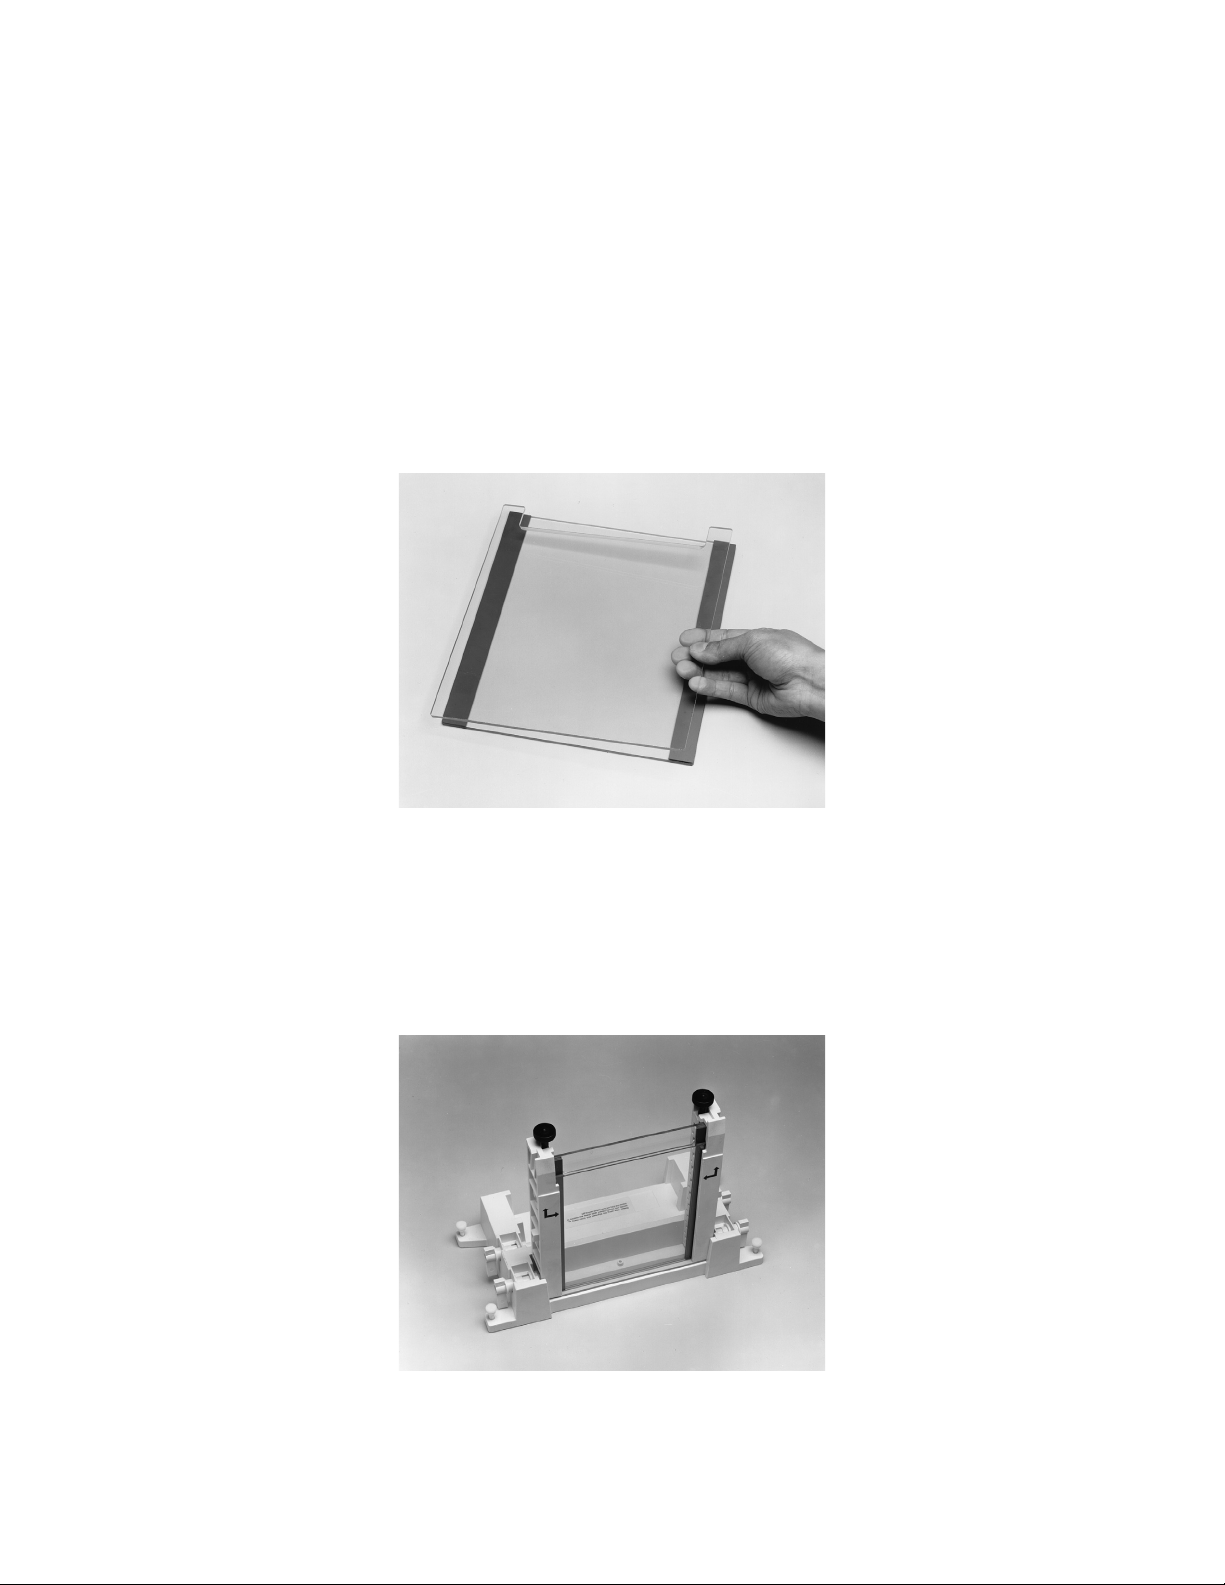
8. Loosen one clamp screw slightly. While pushing down on the spacer with one finger, tighten the clamp
screw finger-tight with the other hand (see photo). This will insure proper sealing when solution is
poured. Tighten the other clamp screw in the same manner. It is important to visually inspect the
sandwich while it is in the alignment slot to insure that there are no gaps between the glass plates and
the surface of the alignment slot.
9. Remove the alignment card. Pull the gel sandwich from the alignment slot. Check that the plates and
spacers are flush at the bottom. If not, realign the gel sandwich as in steps 6-8.
Note: The easiest way to check for proper alignment is to run a fingernail across the contact area between
the glass plates and spacer. If your fingernail catches or drops as you move from plate to spacer to plate,
you must realign the sandwich before proceeding to step 10.
7
Page 14
10. The cams on the casting stand should be handle up and pulled out. Place the aligned sandwich into one
of the casting slots with the longer plate facing you (and the arrows on the clamp facing away from you).
When the sandwich is placed correctly, push the cams in, and turn them 180° so that the handles of the
cams point downward. The sandwiches are now ready for gel casting.
3.2 Assembling Multiple or “Double-up” Gel Sandwiches
Up to four gels can be run at one time by doubling up gel sandwiches (i.e., 2 gels/side). Double gels are
assembled, aligned, and cammed in a manner very similar to that described for single gels.
Note: In order to run four gels instead of two, it is necessary to order two notched inner glass plates and a
set of four spacers of equal length.
1. Lay down a long rectangular plate, two spacers, and a notched inner plate.
2. Place two more spacers on top of the notched inner plate.
Place the short inner glass plate on top of this set of spacers to form the complete double sandwich.
3. Apply the sandwich clamps as described in Section 3.1, steps 3-4. Insert two alignment cards between
each of the sandwiches to keep the spacers upright during sandwich alignment. Align, and then cam
the whole assembly into the casting stand. The sandwiches are now ready for gel casting.
8
Page 15

Section 4
Casting the Gels
4.1 Casting Discontinuous (Laemmli) Gels
Discontinuous gels consist of a resolving or separating (lower) gel and a stacking (upper) gel. The stacking
gel acts to concentrate large sample volumes, resulting in better band resolution than is possible using the
same volumes on a gel without a stack. Molecules are then completely separated in the resolving gel. The
most popular discontinuous buffer system is that of Laemmli. This formulation is included in the Appendix.
1. Prepare the monomer solution by combining all reagents except ammonium persulfate (APS) and
TEMED (see Section 14.1 for formulations). Deaerate the solution under vacuum for at least 15 minutes.
2. Place a comb completely into the assembled gel sandwich. With a marker pen, place a mark on the
glass plate 1-2 cm below the teeth of the comb. This will be the level to which the separating gel is
poured. Remove the comb.
3. Add APS and TEMED to the deaerated monomer solution, and pour the solution to the mark, using a
glass pipet and bulb. The easiest way to pour is to flow the solution down the middle of the outside
plate of the gel sandwich. Another way to pour is to flow the solution down the side of one of the
spacers. An alternative method is to use a syringe and Tygon tubing to load the solution from near the
bottom of the sandwich. In all cases, pour the solution smoothly to prevent it from mixing with air.
4. Immediately overlay the monomer solution with water, water-saturated isobutanol, or t-amyl alcohol. The
advantage of using isobutanol or t-amyl alcohol is that the overlay solution can be applied rapidly with a
Pasteur pipet and bulb because very little mixing will occur. If water is used to overlay, it must be done
using a needle and syringe, using a steady, even rate of delivery to prevent mixing.
5. Allow the gel to polymerize for 45 minutes to 1 hour. Rinse off the overlay solution completely with
distilled water. This is especially important with alcohol overlays. Do not allow alcohols to remain on the
gels more than 1 hour, or dehydration of the top of the gel will occur.
Note: It is sometimes convenient to cast the separating portion of a discontinuous gel the afternoon
before casting the stacking gel and running the gel. If the stacking gel is to be cast the following day,
place approximately 5 ml of 1:4 diluted stock solution B (see Section 14.1) on top of each separating gel
after rinsing with deionized water. This will prevent dehydration of the separating gel during overnight
storage a room temperature.
9
Page 16

6. Prepare the stacking gel monomer solution. Combine all reagents except APS and TEMED, and
deaerate under vacuum at least 15 minutes.
7. Dry the area above the separating gel completely with filter paper before pouring the stacking gel.
8. Place a comb in the gel sandwich, and tilt it so that the teeth are at a slight (~10°) angle. This will prevent
air from being trapped under the comb teeth while pouring the monomer solutions.
9. Add APS and TEMED to the degassed monomer solution, and pour the solution down the spacer
nearest the upturned side of the comb. Pour until all the teeth have been covered by solution. Then
properly align the comb in the sandwich, and add monomer to fill completely.
Generally, an overlay solution is not necessary for polymerization when a comb is in place.
10. Allow the gel to polymerize 30-45 minutes. Remove the comb by pulling it straight up slowly and gently
11. Rinse the wells completely with distilled water. The gels are now ready to be attached to the central
cooling core, the sample loaded, and the gels run.
10
Page 17

4.2 Casting Continuous Gels
Continuous gels are ones in which the entire gel is of one composition. This type of gel is often used in nondenaturing (native) buffer systems.
1. Prepare the monomer solution. Combine all reagents except APS and TEMED. Degas under vacuum for
at least 15 minutes.
2. Place a comb in the glass sandwich so that the teeth are tilted at approximately a 10° angle.
3. Add APS and TEMED to the degassed monomer solution, and use a pipet and bulb to pour the solution
down the spacer nearest to the upturned side of the comb. Pour until the bottoms of all the teeth are
covered. Then adjust the comb to its proper position. Add monomer solution to fill the sandwich
completely. No overlay solution is necessary
4. Let the gel polymerize for 45 minutes to 1 hour. The gel is now ready to load and run. Remove the
comb, and rinse thoroughly with distilled water.
4.3 Casting Gradient Gels
Polyacrylamide concentration gradients, made with an external gradient former (Model 385, catalog
#165-2000), can be introduced into the PROTEAN® II xi gel sandwich assembly either from the bottom or
from the top. A peristaltic pump is required for introduction from the bottom. Introduction from the top can
be done by gravity flow or with a peristaltic pump. Follow the gradient former instructions for formulating the
gradient. If gradients are pumped into the gel sandwich from the bottom, the low density solution (low
percent monomer) must enter first. If the gradient enters from the top, the high density solution (high percent
monomer) enters first.
Pouring Gradient Gels from the Bottom
1. After assembling the gel sandwich as described in Section 4, attach the gradient former tubing to a
gradient pouring needle (catalog #165-2007).
2. Cam the gel sandwich to the casting stand, turn the casting stand on its side, locate the bottom filling ports
directly under the space in the sandwich, and insert the botom-fill needle through the rubber gasket, so
that it protrudes about 2 mm into the sandwich. Make sure the needle opening faces one of the glass
plates.
11
Page 18

3. Stand the casting stand up on a level surface, add APS and TEMED to the monomer solutions, and
begin pumping the gradient monomer solution.
4. Once the gradient is poured (this should take no more than 10 minutes from the time the initiators are
added to the first monomer solution), withdraw the needle from the gasket, and immediately clean the
gradient former, tubing, and needle by pumping distilled water through them.
5. Overlay the monomer solution (see Section 4.1), or insert the comb (see Section 4.2), depending on
whether the gel is discontinuous or continuous, respectively.
Pouring Gradient Gels by Top-Filling
1. Attach the gradient maker tubing to a needle (catalog number 165-1943), a long cannula, or a piece of
tubing that will fit between the glass plates of the gel sandwich.
2. Insert the needle, cannula, or tubing as far as possible into the sandwich, and center it.
3. Add APS and TEMED to the monomer solution, and begin pumping the gradient. As the monomer level
in the sandwich approaches the tip of the needle, withdraw the needle slowly, so that it always stays
above the monomer level.
4. Immediately rinse any remaining monomer out of the needle by pumping water through the gradient
former and out the needle.
5. Overlay the gel, or insert the comb, as outlined in Sections 4.1 and 4.2, respectively.
12
Page 19

4.4 Casting Agarose Gels
Agarose gels in vertical apparatus may slide down between the glass plates. To prevent this, one of the two
plates used to form the agarose gel sandwich should be a frosted inner plate (catalog number 165-1825 for
16 cm gels and catalog number 165-1826 for 20 cm gels).
1. Assemble the glass plate sandwich as outlined in Section 3, using one frosted plate and one regular clear
plate. The frosted plate should be the shorter inner plate (the plate on the inside during running). This will
allow visualization of the tracking dye during the run. Make sure that the frosted side of the plate is on the
inside of the gel sandwich.
2. Place the sandwich assembly in a warm air incubator (50°C) for 5-10 minutes before casting the gel.
This will prevent premature gelling of the agarose.
3. Cam the warm assembly to the casting stand.
4. Immediately pour the molten (55 to 60°C) agarose. One convenient method of pouring is to tilt the
sandwich assembly and pour agarose directly down the long rectangular glass plate.
Note: If an incubator is not available, molten (75 to 85°C) agarose can be poured into a room
temperature sandwich assembly. This temperature is high enough to prevent premature gelling of the
agarose, yet low enough to prevent cracking of the glass plates.
5. Insert the prewarmed comb carefully.
6. Allow the agarose to cool to ambient temperature before use.
13
Page 20

7. Remove the comb very slowly to avoid tearing the gel.
Note: There are some special tricks to properly remove a comb from a vertical agarose gel. The most
important point is to introduce water or buffer under the comb while it is being removed. To introduce buffer
or water, use a squirt bottle or a needle and syringe to force fluid under the teeth of the comb while it is
slowly removed from the gel. Another option is to insert the comb only partway into the gel. This can easily
be done with the aid of comb conversion screws (catalog number 165-1859). The three standard screws on
the comb are replaced with the three large head comb conversion screws, with the protruding head of the
conversion screws resting on top of the longer outer glass plate. The well depth of the comb is limited to 10
mm instead of the standard 25 mm well depth.
A, Comb conversion screw B, Standard comb screw.
14
Page 21

Section 5
Assembling the Upper Buffer Chamber
5.1 Assembly
1. Lay the central cooling core down flat on a lab bench. Make sure the core caps are in place on the
cooling core ports.
2. Seat the white U-shaped gasket onto the core with the flat (non-stepped) side down.
Note: To help insure a good upper buffer seal with your gaskets for the PROTEAN® II xi cell, lubricate
the entire front of the gaskets (the shaded portion) with water or upper buffer prior to attaching the gel
sandwich to the central cooling core. This will allow the glass plate sandwich to slide onto the gasket
properly.
3. After the gel is cast and the comb is removed (if applicable), release the gel sandwich from the casting
stand by turning the cams to the “up” position and pulling them outward. Pull the gel sandwich straight
out of the stand.
15
Page 22

4. With the short glass plate facing the cooling core (and the locating decal on the clamps facing the core),
position the gel sandwich so that the grooves in the upper portion of the clamps are fitted onto the locating
pins on the central cooling core.* The gel sandwich should be positioned at an angle of ≤20° with the
cooling core. Keeping this angle to a minimum and lubricating the gasket will prevent distortion of the
gasket while the sandwich slides into place.
*Note: The locating pins on the central cooling core must be tightly secured in place to insure optimal
pressure during operation. If these pins are vibrated loose during transport or repeated use, the decrease
in pressure on the clamp can be enough to allow the cell to leak. If the pins are loose, they can be gently
tightened using a coin or screwdriver.
5. With your fingers below the latch on the cooling core and your thumbs resting on the clamps, gently push
the gel sandwich onto the cooling core with one simple motion. The upper edge of the short inner glass
plate should be butted against the notches of the U-shaped gasket, and the tabs of each clamp should
be held securely against the latch assemblies on both sides of the cooling core.
16
Page 23

6. Turn the central cooling core to its other side, and repeat steps 1 through 5 to attach the second gel
sandwich to it.
Note: When the gel sandwich has been properly installed, the shorter inside glass plate will be forced
against the notch in the U-shaped gasket to create a leak-proof seal. Always inspect the contact between
the gasket and glass plate to make sure the glass plate is butted against the notch in the gasket and is
not resting on top of or below this notch. Improper installation of the gel sandwich can result in buffer leakage during the run. As a standard procedure, pour buffer into the upper buffer compartment, and check
for buffer leaks prior to a run. In addition, we recommend marking the level of the upper buffer on the glass
plates prior to electrophoresis. Checking this level after 1-2 hours will show whether a slow leak is occurring. This is especially important when the electrophoresis cell is being used for overnight experiments.
5.2 Use of the Buffer Dam
If only one gel is to be run, the acrylic buffer dam must be attached to the cooling core on the other side to
form the complete upper buffer chamber. Position the acrylic plate between two clamps by matching the
notches on the clamps to the notches on the acrylic plate (as in Section 3.1, steps 2-3), and then slide the
dam up each clamp as far as possible. No further alignment is necessary. The acrylic buffer dam fits both 16
and 20 cm clamps.
Note: We do not recommend the use of the acrylic buffer dam at elevated temperatures as the block may warp
and cause buffer leaks.
Note: Failure to slide the dam up completely to the top of the clamp will result in an upper buffer leak.
17
Page 24

Section 6
Loading the Samples
Sample loading can be done in one of three ways. The most common method is to load liquid samples into
wells formed by casting a gel with a well-forming comb. The second method uses the entire gel surface as a
single well for liquid samples. The third method involves placing a tube gel or gel strip over the entire gel
surface, as in 2-D procedures.
6.1 Loading of Sample Wells
The approximate sample volumes that each well will hold for all available combs is included in
Section 13.2.
1. Prepare 1.5 liters of electrode buffer. Set aside 350 ml for the upper buffer chamber.
2. Pour 325-350 ml of electrode buffer into the upper buffer chamber. At this point, check the integrity of the
upper buffer seal. If the buffer appears to be leaking, remove the gel sandwich assemblies, re-lubricate the
gasket, and then re-attach the gel sandwich assemblies (as in Section 5).
3. Place the remainder of the electrode buffer into the lower buffer chamber. Lower the central cooling core
into the lower buffer chamber at a slight angle to prevent air entrapment under the gel sandwich. A few,
isolated bubbles under the gel will not affect the run. With 16 cm plates, it is necessary to dilute the lower
buffer with distilled water to a level of 1 cm above the bottom of the gel plates. Be sure to mix the lower
buffer well with a stir bar on a magnetic stirrer.
Note: Dilution of the lower buffer by up to 1:2 with dH2O will have no detrimental effect on resolution. Dilution
of the upper buffer is not recommended.
4. Load the samples into the wells under the electrode buffer with a Hamilton syringe. Insert the syringe to
about 1-2 mm from the well bottom before delivery. Disposable pieces of plastic tubing may be attached
to the syringe to eliminate the need for rinsing the syringe between samples.
Note: The sample buffer must contain either 10% sucrose or glycerol in order to underlay the sample in
the well without mixing.
5. An easier method of sample loading is to use an Eppendorf-like pipettor and disposable tips. To accomplish
this successfully, use the optional beveled short plate (catalog number 165-1827 for 16 cm and 165-1828
for 20 cm) so that you can insert the pipet tip further into the well before sample delivery. This will prevent
inter-well mixing of samples. Or, use the Bio-Rad Prot/Elec™ tips (catalog number 223-9915 or 223-9917),
which are designed for loading samples into wells.
6.2 Loading a Single Sample Per Gel
In this procedure, a gel is cast without using a comb, forming a flat gel surface. This gel is cast with an
overlay solution. This type of sample application can be used for preparative pur poses, but it is most often
used in blotting applications. After electrophoresis, the sample is transferred electrophoretically to a
membrane, which then can be cut into several identical strips for analysis. Follow the instructions for casting
the separating portion of a discontinuous gel (Section 4.1), except pour the gel nearly to the top of the
sandwich. Allow just enough room for sample loading. (A stacking gel may also be added to this type of gel.)
1. Prepare electrode buffer, and add to lower reservoir as in Section 6.1. Place the central cooling core in the
lower chamber, and add electrode buffer to the upper reservoir chamber.
2. The sample may be loaded with an Eppendorf-type pipettor, with a needle and syringe, or with a Hamilton
syringe. Start at one end of the gel, and deliver the sample gently and evenly over the entire length of the
gel. Layer the sample as closely as possible (1-2 mm) to the surface of the gel.
6.3 Gels as Samples
All two-dimensional techniques involve this variation of sample loading. Either a cylindrical gel or a strip of a
slab gel may be placed on top of a slab gel for separation into a second dimension. This procedure is described
in detail in Section 10.
18
Page 25

Section 7
Running the Gel
1. Place the lid on top of the lower buffer chamber to enclose the PROTEAN® II xi cell fully. Note that the lid
can be placed only in one orientation, so that the anode and cathode connections cannot be reversed.
2. Attach the electrical leads to a suitable power supply, such as those in Section 13.6, with the proper
polarity (this connection could accidently be reversed).
3. Apply power to the PROTEAN II xi cell and begin electrophoresis. As a safety precaution, always set voltage, current, and power limits when possible. See the Appendix (Section 14.4) for specific running conditions.
Section 8
Set-up Options
8.1 Buffer Recirculation
Buffer recirculation is sometimes necessary for extended electrophoretic runs or for use with certain weak
buffer systems.
To recirculate electrode buffer from the lower to the upper chambers, a few simple modifications have to be
made to the PROTEAN II xi cell.
1. Locate the recirculation port tabs on the lid of the cell. The tab directly above the upper buffer chamber
and one of the tabs directly above the lower buffer chamber must be removed. Remove by grasping with
a pair of pliers and twisting the tab until it breaks off (see photo).
2. Locate the punch out tab in the upper right corner on both sides of the central cooling core.
Carefully bore one of the thin membrane tabs with a drill and 1/4 in (6 mm) bit.
3. Insert a section of tubing down through the port above the lower buffer chamber and to the bottom of
the lower buffer chamber.
4. Run this tubing through a peristaltic pump and into the upper buffer chamber through its port.
19
Page 26

5. Buffer is then pumped from the lower to the upper buffer chamber. As the upper chamber fills, buffer will
overflow through the port on the core back into the lower buffer chamber.
The buffer flowing through the tubing and pump is electrically active. For this reason, handle the
tubing carefully when the power supply is on. Do not touch any exposed liquid with the power
supply on. Tube connections should be made with the power supply turned off. Both the
recirculation pump and the recommended power supplies must be ground isolated by design
to minimize the potential for shock hazard. However, working around high voltage equipment in
a laboratory environment is potentially dangerous. As a result, it is the user's responsibility to
always exercise care in setting up and running electrophoresis instruments. If a liquid leak
occurs, always turn off the power supply before correcting the problem.
Note: Recirculation can only be used with continuous buffer systems (i.e., systems in which the
anode buffer and cathode buffer are the same).
8.2 Cooling Options
The cooling core may be used in any of the following ways:
1. The core can be connected to any circulating cooler. Any common anti-freeze or ethylene:glycol (20:80)
may be circulated through the core. Do not use ethanol or methanol for coolant. For most SDS-PAGE
and 2-D applications temperature should be set between 10 and 15°C. For some specialized
applications employing native or non-denaturing gel systems, in which temperature sensitive enzymes or
other labile proteins are to be separated, the system can be cooled to 2-4°C. For these applications,
greatest heat transfer efficiency is achieved by circulating coolant through the core at 2°C and filling the
lower buffer chamber to the top of the slab gels. The lower buffer is continually circulated by stirring.
2. The core may be filled with coolant and the circulation ports plugged off with the core caps. The coolant
will act as a heat sink during electrophoresis. This option works especially well for SDS-PAGE.
3. Distilled tap water may be circulated through the core.
4. Temperature of the coolant can be monitored by placing a thermometer through one of the ports in the
lid of the PROTEAN II xi cell. The temperature of the upper and lower buffers will equilibrate to the
temperature of the coolant in about 1/2 hour. Remove the tab in the lid as in Section 8.1, step 1.
5. During periods of non-use, the cooling core can be left filled with coolant or water and capped.
20
Page 27

Section 9
Removing the Gels
1. After electrophoresis is complete, turn off the power supply, and disconnect the electrical leads
2. Disconnect coolant hoses from the core (if applicable), and plug off the ports.
3. Remove the cell lid, and carefully pull the central cooling core out of the lower chamber. Pour off the
upper buffer.
4. Lay the central cooling core on its side, and remove the sandwich assembly in the following manner:
With your index fingers below the sandwich clamps and your thumbs resting on the latches in the
cooling core, gently remove the assembly by pulling up toward you (in a manner opposite to the way it
was attached in Section 5). Pull the sandwich assembly off the locating pins on the top of the cooling
core.
5. Loosen the single screw of each clamp, and remove the clamps from the glass plates.
6. Push one of the spacers of the sandwich out to the side of the plates without removing it.
7. Gently twist the spacer so that the upper glass plate pulls away from the gel.
8. Remove the gel by gently grasping two corners of the gel and lifting off, or alternatively, place the gel
and glass plate under fixative solution, and agitate gently until the gel separates from the glass plate.
9. If the gel is to be stained later, place it in a suitable container with fixative solution (e.g., 40%
methanol/10% acetic acid). See Section 14.5 for staining formulations. If the proteins on the gel are to
be electrophoretically transferred to a membrane, place the gel in equilibration buffer (do not put in
fixative).
Note: The Model 556 Gel Destainer (catalog number 165-2010) is ideal for rapid destaining (less than 1
hour) of Coomassie blue stained gels.
21
Page 28

Section 10
Two-Dimensional Electrophoresis
Two-dimensional electrophoresis can provide exceptionally high resolution of the protein components in a
complex sample. It is capable of resolving several thousand individual protein species. Based on the method
of O’Farrell (O'Farrell 1975), the first dimension is isoelectric focusing (IEF), during which proteins are
separated according to their isoelectric points. The second dimension is SDS-polyacrylamide gel
electrophoresis, in which proteins are separated on the basis of their molecular size. Since O’Farrell’s original
work, many variations of the 2-D procedure have been reported which may also be used. The following
procedure is based on the work of Dr. Denis Hochstrasser (Hochstrasser et al. 1986, Hochstrasser et al.
1988). The flow chart (Section 10.1) outlines in sequence the essential steps of 2-D electrophoresis and
refers to the solution protocols in Section 14.
Note: This section focuses on 2-D electrophoresis. The PROTEAN II xi cell may also be used for onedimensional tube gel electrophoresis. One can adapt this protocol to any of the common electrophoretic
techniques, using either continuous or discontinuous buffer systems, by following the instructions for
casting, loading, and running tube gels.
10.1 Sequence of Steps for 2-D Protocol
Step Time Interval
Day 1
1. Pour tube gels polymerize 2 hours
2. Prepare electrolytes, prepare and load samples
3. Electrophorese at 200 V constant voltage 2 hours
4. Electrophorese at 500 V constant voltage 2 hours
5. Electrophorese at 800 V constant voltage 16 hours (overnight)
6. Cast slab gels for second dimension gels while
first dimension gels are running 1 hour
7. Prepare second dimension running buffer 10 minutes
1
⁄2 hour-1 hour
Day 2
8. Disassemble tube apparatus 2 minutes
9. Extrude gels from tubes and overlay tube gels
onto slab gels 25 minutes
10. Electrophorese the second-dimension SDS gel 4-41⁄2 hours
10.2 Protocol for IEF First Dimension
Casting IEF Tube Gels
For reproducible 2-D gels, it is essential that the IEF tube gels be precisely the same length and that
polymerization be identical from day to day. Care must be taken in pouring the gels to the same height so that
the polymerization height will be the same from tube to tube. An overlay step is not necessary in IEF first
dimension tube gels. The meniscus formed on top of the gel will not influence the pH gradient or the resolution
of the bands. The advantage of not overlaying is the formation of gels of more uniform length and composition.
Stock solutions and formulations for first dimension tube gels are given in Section 14.
22
Page 29

1. Mark the capillary tubes (1.5 mm ID, 6.0 mm OD, 180 mm, catalog number 165-3138) with a laboratory
marker 14.0 cm from one end.
2. Connect each capillary tube to a 1 ml syringe using a small piece of Tygon tubing 3⁄16" ID x 1⁄4" OD,
and approximately 2 cm in length (not included). Fill either a test tube rack or a level casting stand, such
as Bio-Rad’s Model 225 Tube Gel Casting Stand (catalog number 165-2020) with a disposable 12 x 75
mm test tube for each capillary tube. Insert a capillary tube/syringe assembly into each test tube.
3. Prepare the first dimension monomer solution and degas well. (The removal of molecular oxygen by
degassing is essential for reproducible polymerization.)
Warning: Always wear gloves to prevent exposure to acrylamide.
4. Add the APS and TEMED, and swirl 8 to 10 times. Working quickly, pipet 1 ml of acrylamide solution into
each test tube. Using the syringe, pull up the liquid in each tube to the 14.0 cm mark. Let the capillary
tubes sit undisturbed, with syringes attached, for 2 hours at room temperature to allow complete
polymerization to occur.
5. After polymerization is completed, remove the capillary tubes from each test tube. Remove the syringe and
Tygon tubing. Press and rotate the bottom of the capillary tube squarely down on a piece of Parafilm to
remove excess acrylamide. Wipe off the excess acrylamide.
6. Inspect the gels before loading; bubbles within the gel prevent focusing and these gels should be discarded.
Note: Alternative methods for filling capillary tubes can be used, such as wrapping the bottom end of the
capillary tube with two layers of Parafilm laboratory film and filling using a syringe and fine gauge cannula
(gel tube loading needle, 165-1943). The cannula should be long enough to reach the bottom of the tube.
Slowly inject the acrylamide solution into the bottom of the tube, withdrawing the cannula as the acrylamide
enters the tube. Fill to the mark on the tube.
Sample Preparation and Loading
Sample preparation prior to isoelectric focusing is one of the most important steps for obtaining reproducible
two-dimensional electrophoresis gels. There is no method which is optimal for every sample, and it may be
necessary to experiment with different protein solubilization methods to determine which is best.
1. Prepare the first dimension running solutions as described in Section 14.
2. Prepare the IEF sample concentrate solution A and/or iso-urea solution E as described in Section 14.
These solutions should be prepared fresh, or frozen in aliquots.
Note: Sample loads above 400 µg total protein may cause loss of resolution in the second dimension
slab gel.
3. Replace the notched white gaskets with the tube adaptor gaskets specifically designed for use during
the first dimension of 2-D electrophoresis. Do not lubricate or wet the red tube adaptor gaskets.
Note: Tube gels have a much higher resistance than slab gels due to their small diameter. Since current
seeks the path of least resistance, a current leak may occur if there is an alternative path of conductance
such as a wet gasket. A current leak is a safety hazard to the researcher as well as the equipment.
4. Attach the tube gel adaptor to the cooling core in the same manner that a slab gel sandwich is attached
(see Section 5.1). Sandwich clamps are not needed to attach the tube adaptor to the core. Finish
assembling the upper buffer chamber with a second tube gel adaptor. Because of the higher voltages
required for focusing, we recommend always using two tube gel adaptors and not the buffer dam for
focusing.
23
Page 30

Note: Buffer leakage during isoelectric focusing can result in damage to the cooling core. It is important
to check for buffer leaks by monitoring both the current and the upper buffer level. During the course of a
normal IEF run, the current decreases as the resistance of the gel increases, the pH gradient is established,
and the upper buffer level is maintained. If a buffer leak should occur, the current will increase, and the level
of upper buffer may decrease. Do not exceed 1,000 V as the maximum focusing voltage.
5. Insert the tube gels into the tube gel adaptor, using the gel tube locator at the bottom of the unit to align
the tubes. Plug any unused tube holes with a stopper.
6. Prepare the sample just before loading. The amount of denaturing sample solution A and/or iso-urea
solution E will depend upon the protein concentration of sample and upon the type of sample. An initial
starting ratio of 1 µl IEF sample concentrate for every 10µl sample can be used. For denaturing, samples are heated at 95 °C for 5 minutes then cooled for 2 minutes at room temperature before loading or
before adding iso-urea solution.
7. Load the samples with a Hamilton syringe, or with a Drummond pipet tip. (Generally, 15 to 30 µl of final
diluted sample is loaded.)
8. Carefully overlay the sample with upper electrolyte (20 mM NaOH).
24
Page 31

Running the IEF Gels
1. Fill the central cooling core with water or coolant. Cap the inlet and outlet port with the caps provided.
2. Fill the lower buffer chamber with ~4.5 liters of lower running electrolyte (see Section 14). Place on a
level surface or leveling table.
3. Lower the cooling core/tube apparatus into the lower chamber of the PROTEAN® II xi cell. Lower
carefully so as not to introduce any air bubbles under the gel tubes. All bubbles must be removed from
the bottom of the tubes to insure proper electrical contact.
4. Pour 325-350 ml freshly degassed upper running electrolyte (see Section 14) into the upper buffer
chamber, put the lid on, and attach the power cables to the power supply.
5. Run the first dimension gels at room temperature with a constant voltage of 200 volts for 2 hours,
followed by 500 volts for 2 hours, and then 800 volts overnight (16 hours). As a safety precaution,
always set voltage, current, and power limits when possible.
Note: Phycocyanin is a colored protein found in Bio-Rad’s IEF standards (catalog number 161-0310).
Although these standards cannot be used for pI calibration in 2-D procedures, because denaturation in
urea produces too many peptide spots, the phycocyanin is excellent for monitoring the first dimension
IEF. It retains its blue color and will focus in a tight blue band when focusing is finished. Loading one
tube with the focusing standards is an easy way to monitor the progress of the focusing run.
6. Cast the second dimension SDS slab gel during the running of the first dimension (see Section 4).
Note: This protocol does not use a stacking gel. However, if a stacking gel is required for a particular
application, it should be cast on a level surface. It is important that the same amount of monomer be
used for each stacking gel to insure stacking gels of identical depth. If a comb is not used, as in most
2-D applications, then the stacking gel should be overlaid with 1.0 ml of water saturated sec-butanol.
After polymerization is complete, drain off the overlay (or remove the combs), and rinse the gel surface
briefly with distilled deionized water.
Extruding Tube Gels
1. After electrophoresis, remove the tube gels from the tube gel adaptor. Rinse both the top and bottom of
each gel thoroughly with distilled water. Failure to rinse before extrusion will result in residual base
(NaOH) or acid (phosphoric) on the gel that will interfere with measurement of the pH gradient. Place the
tubes, in order, into the tube rack, and fill each tube to the top with distilled water.
2. Attach a long (at least 2 inch), fine (at least 26 gauge), beveled needle (such as catalog #165-1944) to a 3
ml plastic syringe. Rim the upper and lower few mms of the gel by inserting the needle between the gel
and the glass tube (point against the glass wall to prevent tearing of the gel) while forcing distilled water
through the syringe and needle. Turn the gel tubes so that the entire circumference is rimmed (see photo).
Often tube gels may be extruded without rimming, using water pressure as below.
25
Page 32

®®
3. Attach a piece of silicone tubing to a 1 ml syringe and to the outside wall of the glass tubes on the top
end of the tube. Using the syringe filled with distilled water, apply a firm, even pressure to start the gel
extruding from the tubes. As the gel moves further out of the tube, apply less pressure so that rate of
extrusion remains constant. Care must also be taken not to extrude too quickly. Only slight pressure is
required to remove the last 1-2 cm of gel from the tube.
4. It is convenient to extrude the gels onto longitudinally folded pieces of Parafilm or plastic sheets.
5. Pipet 150 ml of transfer solution along the length of the extruded gel.
26
Page 33

Embedding of First Dimension onto Second Dimension
Note: When handling gels, it is advisable to wear gloves. First dimension gels tend to be sticky to the touch
and will tear easily.
1. Use of a beveled short glass plate (catalog number 165-1827 for 16 cm cell and
165-1828 for 20 cm cell) in the second dimension slab sandwich will greatly improve the ease of
embedding the tube gel on top of the slab gel. Rinse the top of the completed second dimension SDS
slab gel thoroughly with distilled water, and drain off excess water. Attach clamp assemblies to cooling
core.
2. Using a spatula, direct the gel from the Parafilm to the bevel at the top of the inner glass plate, starting
at one side and proceeding across the gel. Place a few drops of SDS electrode buffer along the top of
the tube gel.
3. Use a spatula to seat the tube gel on the slab gel. Check that the tube gel is in contact with the slab gel
over its entire length. Be sure to remove all air bubbles that are between the tube gel and the slab gel.
By placing the tube gel directly on top of the second dimension slab gel, between the glass plates, no
agarose overlay is necessary. If the tube gel diameter is greater than the second dimension slab gel
thickness, an agarose overlay may be necessary to insure good contact and to prevent the tube gel
from slipping off the slab gel. The agarose overlay is 1% agarose in 1x stacking gel buffer, diluted 1:4
(see Section 14.1, solution C).
Note: If you would like to apply molecular weight standards to the second dimension, we recommend
using a 2-D comb for casting the stacking gel. As an alternative, if a stacking gel is not desired, you can
make a tube gel with a mixture of agarose and Bio-Rad standards. Then simply cut the agarose into
pieces, and load a piece directly on top of the second dimension slab gel in tandem with the IEF tube gel.
4. Electrophorese the SDS slab gel as in Section 7.
5. Remove the gels as in Section 9.
6. Stain the gels as in Section 14.5.
Note: Tube gels may be frozen for future use or applied directly to a second dimension slab gel. To
freeze a tube gel, place the gel lengthwise in a stoppered tube in an EtOH:dry ice bath. Once frozen,
gels can be stored at -20°C.
27
Page 34

Section 11
Maintenance of Equipment
PROTEAN II® xi cell chamber, core, clamps Rinse thoroughly with distilled water after
every use.
Glass plates, spacers, combs Wash with a laboratory detergent (catalog
number 161-0722), then rinse thoroughly
with distilled water.
Glass plates (if more stringent cleaning is
required)
Glass tubes After use, rinse with laboratory detergent
Warning: Exercise extreme caution for acid cleaning wear safety glasses, a lab coat, and rubber gloves.
Keep a container of NaCO3 nearby to neutralize spills.
Soak in a strong acid solution (chromic
acid/sulfuric acid cleaning solution) for ≥30
minutes, and then rinse thoroughly with
distilled water. A less toxic alternative is 5%
KOH in 100% methanol.
solution, scrub out if possible, then rinse with
distilled H2O. Store glass tubes in chromic/
sulfuric acid solution until next use. Then
rinse thoroughly with distilled water and dry
in forced air or vacuum oven before use.
28
Page 35

Section 12
Troubleshooting Guide – PAGE, SDS-PAGE, 2-D IEF/SDS-PAGE
Problem Cause Solution
1. “Smile” effect — band pattern
curves upward at both sides
of the gel.
2. Diffuse tracking dye. • Decomposition of sample
3. Vertical streaking of protein. • Sample overload
4. Horizontal streaking (2-D
gels).
5. Broad or diffuse protein
bands or spots (2-D).
6. Lateral band spreading. • Diffusion out of the wells prior
• Center of the gel running
hotter than either side
• Power conditions excessive
solution and/or buffer stock
solutions
• Diffusion
• Sample precipitation
• Incomplete solubilization prior
to first dimension
• Interfering nucleic acids in
sample
• Diffusion due to slow
migration
• Chemical changes due to
ionic contaminants in urea
to turning on the current
• Diffusion during migration
through the stacking gel
• Fill inner core with coolant
• Circulate coolant at
10-15 °C
• Decrease power setting
• Prepare fresh reagents —
maximum shelf life of aqueous solutions is 30 days at
4 °C for buffer and monomer
stocks
• If protein bands are diffuse as
well as to the tracking dye,
increase current by 25–50%
and/or increase % T of
resolving gel*
• Dilute sample, selectively
remove predominant protein
in the sample, or reduce
current by about 25% to
minimize streaking
• Centrifuge sample or decrease % T of resolving gel*
• If urea/nonionic detergent is
not sufficient, use SDS as in
Ref. 15.5-2. Centrifugation
of sample may be necessary
(up to 100,000 x g for
30 minutes) to remove
undissolved particulates
• Treat sample with DNase or
RNase as in Ref. 15.5-1
• Increase current by 20%
• Deionize urea
• Minimize the time between
sample application and
power start-up
• Increase % T of stacking gel
to 4.5% or 5% T, or increase
current by 25% during
stacking*
29
Page 36

Troubleshooting Guide (continued)
Problem Cause Solution
7. Skewed or distorted bands. • Poor polymerization around
sample wells
• Salts in sample
• Uneven gel interface
8. Run taking unusually long
time.
9. Run too fast, poor resolution. • Buffer too dilute
10. Doublets observed where
a single protein species is
expected (SDS-PAGE).
11. Observe fewer bands than
expected and one heavy
band at dye front.
12. Nonlinear pH gradient (at
basic end).
• Buffers too concentrated
• Low current
• Current too high
• A portion of the protein may
have been re-oxidized during
the run or may not have been
fully reduced prior to run
• More than one band migrating at the dye front
• Upper electrolyte depleted • Increase the concentration of
• Degas stacking gel solution
thoroughly prior to casting;
increase ammonium
persulfate and TEMED
concentrations by 25%, or
add riboflavin phosphate to
5 μg/ml in addition to the
usual catalyst levels in the
stacking gel
• Remove salts by dialysis,
desalting column, etc.
• Increase reaction rate, overlay
carefully
• Check buffer protocol, dilute if
necessary
• Increase current by 25–50%
• Check buffer protocol, dilute if
necessary
• Decrease current by 25–50%
• Prepare fresh sample buffer
solutions if over 30 days old;
increase b-mercaptoethanol
concentration in the sample
buffer
• Increase % T of resolving gel*
upper electrolyte to 100 mM
*Polyacrylamide gels are described by reference to two characteristics:
1. The total monomer concentration (%T)
2. The crosslinking monomer concentration (%C)
gm Acrylamide + gm Bis-Acrylamide
%T =
Total Volume
%C =
gm Acrylamide + gm Bis-Acrylamide
gm Bis-Acrylamide
x 100
x 100
30
Page 37

Section 13
Equipment and Accessories
13.1 PROTEAN II® xi Cell Configurations
Catalog
Product Description Number
PROTEAN II xi Cells
PROTEAN II xi 16 cm Cell* 165-1801
1.5 mm spacer (4), 15 well comb (2) 165-1802
1.0 mm spacer (4), 15 well comb (2) 165-1803
0.75 mm spacer (4), 15 well comb (2) 165-1804
PROTEAN II xi 20 cm Cell* 165-1811
1.5 mm spacer (4), 15 well comb (2) 165-1812
1.0 mm spacer (4), 15 well comb (2) 165-1813
0.75 mm spacer (4), 15 well comb (2) 165-1814
All PROTEAN II xi cells include the central cooling core with gaskets and core caps, lower buffer chamber, lid
with power cables, 2 sets of glass plates, 4 sandwich clamps, 4 spacers, 2 combs, an upper buffer dam, a
casting stand with gaskets, a leveling bubble, alignment card, and instructions.
*Cells contain all of the above except spacers and combs (order separately).
13.2 Accessories
Catalog Number
Product Description 16 cm cell 20 cm cell
Glass Plates*
Inner Plate (2) 165-1821 165-1823
Outer Plate (2) 165-1822 165-1824
†Frosted Inner Plate (2) (agarose gels) 165-1825 165-1826
†Beveled Inner Plate (2) (2-D procedures) 165-1827 165-1828
**Notched Inner Plate (1) (double-up 165-1832 165-1833
procedures)
*Note: One complete gel sandwich consists of 1 outer (long) plate, 1 inner (short) plate, and 2 spacers.
** One complete “double-up” sandwich (2 gels/side) consists of 1 outer plate, 1 inner plate, 1 notched inner
plate, and 4 spacers. See Section 3.2 for assembly.
†Used in conjunction with regular outer plate.
PROTEAN II Plate Washer/Holder
Plate Washer System, includes: Plate Holders (2), 165-1991
Tank and Lid
Plate Holder (1) 165-1992
31
Page 38

Equipment and Accesorries (continued)
Catalog Number
Product Description 16 cm cell 20 cm cell
Spacers (set of 4)
0.5 mm 165-1841 165-1846
0.75 mm 165-1842 165-1847
1.0 mm 165-1843 165-1848
1.5 mm 165-1844 165-1849
3.0 mm 165-1845 165-1850
Sandwich Clamps
16 cm Set (one left, one right) 165-1901
20 cm Set (one left, one right) 165-1902
Optional and Replacement Parts
Central Cooling Core, with gaskets 165-1806
Lower Buffer Chamber 165-1807
Cell Lid, with safety cables 165-1808
Upper Buffer Dam (1) 165-1909
Slab Casting Stand, with gaskets 165-1911
Replacement Gaskets, for casting stand (2) 165-1912
Gradient Pouring Needle (for bottom filling) (2) 165-2007
Replacement Gaskets, central cooling core (2) 165-1913
Alignment Card 165-2029
32
Page 39

Equipment and Accesorries (continued)
Catalog
Product Description Number
Combs (each)
25 well x 0.75 mm, 60 µl volume 165-1861
25 well x 1.0 mm, 80 µl volume 165-1862
25 well x 1.5 mm, 120 µl volume 165-1863
20 well x 0.5 mm, 54 µl volume 165-1865
20 well x 0.75 mm, 82 µl volume 165-1866
20 well x 1.0 mm, 110 µl volume 165-1867
20 well x 1.5 mm, 164 µl volume 165-1868
20 well x 3.0 mm, 328 µl volume 165-1869
15 well x 0.5 mm, 74 µl volume 165-1870
15 well x 0.75 mm, 110 µl volume 165-1871
15 well x 1.0 mm, 147 µl volume 165-1872
15 well x 1.5 mm, 221 µl volume 165-1873
15 well x 3.0 mm, 442 µl volume 165-1874
10 well x 0.5 mm, 114 µl volume 165-1875
10 well x 0.75 mm, 172 µl volume 165-1876
10 well x 1.0 mm, 229 µl volume 165-1877
10 well x 1.5 mm, 343 µl volume 165-1878
10 well x 3.0 mm, 687 µl volume 165-1879
5 well x 1.0 mm, 522 µl volume 165-1882
5 well x 1.5 mm, 783 µl volume 165-1883
5 well x 3.0 mm, 1.57 ml volume 165-1884
3 well x 1.5 mm, 1.37 ml volume 165-1888
Blank x 0.75 mm, 2.44 ml volume 165-1891
Blank x 1.0 mm, 3.26 ml volume 165-1892
Blank x 1.5 mm, 4.88 ml volume 165-1893
Blank x 3.0 mm, 9.76 ml volume 165-1894
2-D x 1.0 mm, 1 ref. well, 28 µl (ref. well) volume 165-1897
2-D x 1.5 mm, 1 ref. well, 42 µl (ref. well) volume 165-1898
2-D x 3.0 mm, 1 ref. well, 84 µl (ref. well) volume 165-1899
* To convert any PROTEAN II xi comb with a standard 25 mm well depth to
a 10 cm well depth. May be used for agarose or acrylamide gels.
33
Page 40

Equipment and Accesorries (continued)
Glass Tubes
Product Description
ID OD Length Pkg. Catalog
mm mm mm Qty. Number
1.0 5.0 180 24 165-3136
1.5 6.0 150 24 165-3137
1.5 6.0 180 24 165-3138
2.0 6.5 180 24 165-3139
2.4 4.0 160 24 165-3155
3.0 5.0 125 24 165-3150
5.0 7.0 125 24 165-3122
13.3 PROTEAN II xi 2-D Cells
Catalog
Product Description Number
PROTEAN II xi 2-D Cell, 1.0 mm, 16 cm 165-1931
PROTEAN II xi 2-D Cell, 1.5 mm, 16 cm 165-1932
PROTEAN II xi 2-D Cell, 1.0 mm, 20 cm 165-1933
PROTEAN II xi 2-D Cell, 1.5 mm, 20 cm 165-1934
PROTEAN II xi 2-D cells include central cooling core, lower buffer chamber, lid with power cables, 2 sets of
glass plates (with bevel), 4 sandwich clamps, 24 glass tubes (tube diameter = spacer thickness), 2 tube gel
adaptors, 16 stoppers, 16 grommets, 2 2-D combs, 4 spacers, 1 upper buffer dam, slab casting stand, leveling
bubble, alignment card, and instructions.
13.4 Accessories
Catalog
Product Description Number
Tube Gel Adaptor, with a complete set of grommets 165-1940
(4-8 mm O.D. tubes) and stoppers
Tube Gel Adaptor Replacement Gaskets, 2 165-1947
Stoppers, 8 165-1941
Grommets and Stoppers for 4-5 mm OD Tubes, 12 165-1984
Grommets and Stoppers for 6–7 mm OD Tubes, 12 165-1985
Gel Tube Loading Needle, 18 cm, 22 gauge, blunt tip, 165-1943
Luer hub (for casting monomer in small diameter
tubes)
Gel Tube Extrusion Needle, 9 cm, 26 gauge, beveled 165-1944
tip, Luer hub (for removing gels from tubes)
PROTEAN II xi Multi-Gel Casting Chamber 165-2025
34
Page 41

13.5 Electrophoresis Chemicals
Quantity per Catalog
Product Description Package Number
Acrylamide, 99.9% 100 g 161-0100
Acrylamide, 99.9% 500 g 161-0101
Acrylamide, 99.9% 1 kg 161-0107
Acrylamide, 99.9% 2 kg 161-0103
Preweighed Acrylamide/Bis, 37.5:1 mixture 30 g 161-0122
Preweighed Acrylamide/Bis, 37.5:1 mixture 150 g 161-0125
Bis (N,N’-Methylene-bis acrylamide) 5 g 161-0200
Bis (N,N’-Methylene-bis acrylamide) 50 g 161-0201
Piperazine di-Acrylamide (PDA) 10 g 161-0202
Tris 500 g 161-0716
Tris 1 kg 161-0719
Glycine 250 g 161-0717
Glycine 1 kg 161-0718
Boric Acid 500 g 161-0750
Boric Acid 1 kg 161-0751
SDS (Sodium dodecylsulfate) 25 g 161-0300
SDS (Sodium dodecylsulfate) 100 g 161-0301
SDS (Sodium dodecylsulfate) 1 kg 161-0302
Ammonium Persulfate 10 g 161-0700
Dithiothreitol 1 g 161-0610
Dithiothreitol 5 g 161-0611
2-mercaptoethanol 25 ml 161-0710
TEMED 5 ml 161-0800
TEMED 50 ml 161-0801
Agarose, Standard Low – mr 100 g 162-0100
CHAPS 1 g 161-0460
CHAPSO 1 g 161-0465
Agarose, Standard Low – mr 500 g 162-0102
SDS-PAGE Standards, 14,400 -97,400 MW 161-0304
SDS-PAGE Standards, 45,000-200,000 MW 161-0303
Prestained SDS-PAGE Standards, low range 161-0305
Prestained SDS-PAGE Standards, high range 161-0309
2-D SDS-PAGE Standards 161-0302
Silver Stain SDS-PAGE Standards, low range 161-0314
Silver Stain SDS-PAGE Standards, high range 161-0315
Silver Stain Plus™ Kit, includes fixative enhancer concentrate, 161-0449
silver complex solution, reduction moderator solution, image
development reagent, development accelerator reagent,
complete instructions and Material Safety Data Sheets
35
Page 42

Electrophoresis Chemicals (continued)
Quantity per Catalog
Product Description Package Number
Coomassie Blue R-250 10 g 161-0400
Bromophenol Blue 10 g 161-0404
Triton X-100 500 ml 161-0407
Urea 250 g 161-0730
Urea 1 kg 161-0731
Bio-Lyte® Ampholytes
Bio-Lyte 3/10 Ampholyte, 40% 10 ml 163-1112
Bio-Lyte 3/5 Ampholyte, 20% 10 ml 163-1132
Bio-Lyte 4/6 Ampholyte, 40% 10 ml 163-1142
Bio-Lyte 5/7 Ampholyte, 40% 10 ml 163-1152
Bio-Lyte 6/8 Ampholyte, 40% 10 ml 163-1162
Bio-Lyte 7/9 Ampholyte, 40% 10 ml 163-1172
Bio-Lyte 8/10 Ampholyte, 20% 10 ml 163-1182
Large Volume Ampholytes
Bio-Lyte 3/10 Ampholyte, 40% 25 ml 163-1113
Bio-Lyte 4/6 Ampholyte, 40% 25 ml 163-1143
Bio-Lyte 5/7 Ampholyte, 40% 25 ml 163-1153
Bio-Lyte 5/8 Ampholyte, 40% 25 ml 163-1193
Bio-Lyte 6/8 Ampholyte, 40% 25 ml 163-1163
AG® 501-X8 Mixed Bed Ion Exchange Resin 100 g 143-7424
13.6 Power Supplies
Catalog
Product Description Number
PowerPac™ 3000, 100/120 VAC 165-5056
PowerPac 3000, 220/240 VAC 165-5057
Model 1000/500 Power Supply, 100/120 VAC 165-4710
Model 1000/500 Power Supply, 220/240 VAC 165-4711
36
Page 43

Section 14
Appendix
14.1 Reagents and Gel Preparation for SDS-PAGE Slab Gels (Laemmli buffer
system)
Stock Solutions
A. Acrylamide/Bis (30% T, 2.67% C)
146 g acrylamide (29.2 g/100 ml)
4 g N’N’-Bis-methylene-acrylamide (0.8 g/100 ml)
Make to 500 ml with distilled water. Filter and store at 4°C in the dark (30 days maximum).
Or substitute Bio-Rad’s Preweighed Acrylamide/Bis
37.5:1 mixture (Catalog No. 161-0112, 30 g)
(Catalog No. 161-0106, 200 g)
150 g Acrylamide/Bis (30 g/100 ml) to 500 ml with dH2O
B. 1.5 M Tris-HCl, pH 8.8
54.45 g Tris base (18.15 g/100 ml)
~150 ml distilled water
Adjust to pH 8.8 with 1 N HCl. Make to 300 ml with distilled water and store at 4°C.
C. 0.5 M Tris-HCl, pH 6.8
6 g Tris base
~ 60 ml distilled water
Adjust to pH 6.8 with 1 N HCl. Make to 100 ml with distilled water and store at 4°C.
D. 10% SDS
Dissolve 10 g SDS in water with gentle stirring and bring to 100 ml with dH2O.
E. Sample Buffer (SDS reducing buffer) (store at room temperature)
Distilled water 3.8 ml
0.5 M Tris-HCl, pH 6.8 1.0 ml
Glycerol .80 ml
10% (w/v) SDS 1.6 ml
2 b-mercaptoethanol 0.4 ml
0.05% (w/v) bromophenol blue 0.4 ml
8.0 ml
Dilute the sample at least 1:4 with sample buffer, and heat at 95°C for 4 minutes.
F. 5X Electrode (Running) Buffer, pH 8.3 (enough for 10 runs)
Tris base 45 g (15 g/l)
Glycine 216 g (72 g/l)
SDS 15 g (5 g/l)
to 3 liters with dH2O
Store at 4°C. Warm to 37°C before use if precipitation occurs.
Dilute 300 ml 5X stock with 1,200 ml dH2O for one electrophoresis run.
Do not adjust the pH with acid or base.
37
Page 44

14.2 Separating Gel Preparation - 0.375 M Tris, pH 8.8
12%a 7.5%
Distilled water 33.5 ml 48.5 ml
1.5 M Tris-HCl, pH 8.8 25.0 ml 25.0 ml
10% (w/v) SDS stock
(store at room temperature) 1.0 ml 1.0 ml
Acrylamide/Bis (30% stock)
(Degas for ≥15 minutes at room
temperature) 40.0 ml 25.0 ml
*10% ammonium persulfate
(fresh daily) 500 µl 500 µl (0.05%)
TEMED 50 µl 50 µl (0.05%)
TOTAL MONOMER+ 100 ml 100 ml
* To make the 10% ammonium persulfate solution, dissolve 100 mg APS in 1 ml dH2O.
+ One can prepare any desired volume of monomer solution by using multiples of the 100 ml recipes.
a. For SDS treated proteins in the approximate molecular weight range between 10 and 100 K Daltons.
Use Bio-Rad’s Low MW Standards (catalog number 161-0304) for 12% separating gel.
b. For SDS treated proteins in the approximate molecular weight range of 40 –250 K Daltons. Use in con-
junction with Bio-Rad High MW SDS-PAGE Standards (catalog number 161-0303).
Calculated Volumes* (in ml) Required Per Gel Slab
Spacer Thickness 16 cm Length 20 cm Length
0.5 mm 12.8 ml 16 ml
0.75 mm 19.2 ml 24 ml
1.0 mm 25.6 ml 32 ml
1.5 mm 38.4 ml 48 ml
3.0 mm 76.8 ml 96 ml
b
*Volume required to completely fill gel sandwich to top of plates. Amounts may be adjusted depending on
application (with or without comb, with or without stacking gel, etc.).
14.3 Stacking Gel Preparation - 4.0% gel, 0.125 M Tris, pH 6.8
16 cm 20 cm
Distilled water 6.1 ml 12.2 ml
0.5 M Tris-HCl, pH 6.8 2.5 ml 5 ml
10% (w/w) SDS 100 µl 200 µl
Acrylamide/Bis (30% stock) (Degas
for 15 minutes at room temperature) 1.3 ml 2.6 ml
10% ammonium persulfate
(fresh daily) 50 µl 100 µl (.05%)
TEMED 10 µl 20 µl (0.1%)
TOTAL STOCK MONOMER 10 ml* 20 ml**
*Enough for two 0.75 mm or 0.50 mm gels.
**Enough for two 1.5 or 1.0 mm gels.
38
Page 45

1. To prepare the monomer solutions, combine all reagents, except the APS and TEMED, and deaerate
under vacuum for ≥15 minutes. To initiate polymerization, add the APS and TEMED, and swirl gently to
mix.
2. Follow the instructions in Sections 3 and 4 for set-up and casting of the gels.
14.4 Running Conditions*
We recommend that gels be run under constant current conditions with an appropriate power supply, such as
the PowerPac 3000 or Model 1000/500 power supply (see Section 13.6 for ordering information).
Current Conditions mA per gel
Gel Thickness Stacking Gel Separating Gel
0.5 8 12
0.75 13 18
1.0 16 24
1.5 25 35
3.0 50 70
Run time is between 4 and 5 hours, depending on length of gel. Under constant current conditions, voltage
will gradually increase during the run. As a safety precaution, always set voltage, current, and power limits when
possible.
*Recommended power conditions for optimal resolution with minimal distortion.
14.5 Comparison of Coomassie Blue and Silver Staining
Coomassie Blue Silver Stain
Procedure: Sensitivity: Stain 1/2 hour with 0.1%
Coomassie Blue R-250 in
fixative (40% MeOH,
10% HOAc).
Destain with 40%
MeOH/10% HOAc to
remove background (usually
1 to 3 hrs).
14.6 2-D Stock Solutions
First Dimension IEF Tube Gels
Detergent Solution
0.3 g CHAPS
100 µl Nonidet P-40
900 µl ddH20
Dissolve CHAPS in water, then add Nonidet P-40 (NP-40).
39
Page 46

First Dimension Capillary Tube Gel Monomer Solution
11 g urea (9.2 M final concentration)
3 ml acrylamide/bis stock (4.5% total monomer)
Stir to dissolve the urea. This step is done slowly without heating or with very gentle heating only.
0.2 ml Bio-Lyte® 5/7 ampholyte
0.8 ml Bio-Lyte 3/10 ampholyte
1 ml detergent solution (CHAPS/NP-40) from above
Add deionized water to 20 ml.
Mix and degas.
Add 20 µl TEMED after degassing to avoid evaporation.
Add 40 µl 10% (w/v) APS, swirl 8-10 times and cast the gels.
This makes 20 ml total volume, enough to cast one set of gels using the casting tube.
Sample Solution A
1.0 g SDS
0.232 g DTT or DTE
Dissolve in ddH2O to a final volume of 10 ml. Store in aliquots at -70 °C. Iso-Urea Solution E
0.1 g DTT
0.4 g CHAPS
5.4 g urea
500 µl Bio-Lyte 3/10 ampholyte
6 ml ddH2O
Electrolytes
First Dimension Upper Running Electrolyte-Cathode (20 mM NaOH)
Dissolve 0.4 g NaOH in 500 ml deionized water and degas thoroughly for 30 minutes.
First Dimension Lower Running Electrolyte-Anode (10 mM H3PO4)
Dilute 1.8 ml concentrated H3PO4 in 2.6 liters deionized water and degas thoroughly for 30 minutes.
Transfer Solution
40 ml 0.5 M Tris-HCl, pH 8.8
80 ml 10% SDS
8 ml 0.05% bromophenol blue
150 ml ddH2O
14.7 Running Conditions
IEF is carried out at 200 volts constant voltage for 2 hours, followed by 500 volts constant voltage for 2 hours,
and finally 800 volts constant voltage for 16 hours (overnight).
40
Page 47

Section 15
Bibliography
15.1 General
Gordon AH (1975). Laboratory Techniques in Biochemistry and Molecular Biology Vol. 1, Part 1
(Amsterdam-London: North Holland Publishing Company).
Maurer HR (1971). Disc Electrophoresis and Related Techniques of Polyacrylamide Gel Electrophoresis
(Berlin-New York: de Gruyter).
15.2 Native Gel Systems
Blattler DP (1972). Quantitative electrophoresis in polyacrylamide gels of 2–40%. J Chromatog 64,
147–155.
Jeppesen PG (1974). A method for separating DNA fragments by electrophoresis in polyacrylamide
concentration gradient slab gels. Anal Biochem 58, 195–207.
Margolis J and Kenrick KG (1968). Polyacrylamide gel electrophoresis in a continuous molecular sieve
gradient. Anal Biochem 25, 347–362.
Ornstein L (1964). Disc electrophoresis. I. Background and theory. Ann N Y Acad Sci 121, 321–349.
Reisfeld RA et al. (1962). Disk electrophoresis of basic proteins and peptides on polyacrylamide gels.
Nature 195, 281–283.
Ritchie RF et al. (1966). Refinements of acrylamide electrophoresis. J Lab Clin Med 68, 842–850.
15.3 SDS Gel Systems
Ames GF (1974). Resolution of bacterial proteins by polyacrylamide gel electrophoresis on slabs.
Membrane, soluble, and periplasmic fractions. J Biol Chem 249, 634–644.
Fairbanks G et al. (1971). Electrophoretic analysis of the major polypeptides of the human erythrocyte
membrane. Biochemistry 10, 2606–2617.
Laemmli UK (1970). Cleavage of structural proteins during the assembly of the head of bacteriophage
T4. Nature 227, 680–685.
Neville DM Jr (1971). Molecular weight determination of protein-dodecyl sulfate complexes by gel
electrophoresis in a discontinuous buffer system. J Biol Chem 246, 6328–6334.
O'Farrell PZ et al. (1973). The identification of prereplicative bacteriophage T4 proteins. J Biol Chem
248, 5499–5501.
Shapiro AL et al. (1967). Molecular weight estimation of polypeptide chains by electrophoresis in SDSpolyacrylamide gels. Biochem Biophys Res Commun 28, 815–820.
Studier FW (1973). Analysis of bacteriophage T7 early RNAs and proteins on slab gels. J Mol Biol 79,
237–248.
Weber K and Osborn M (1969). The reliability of molecular weight determinations by dodecyl sulfatepolyacrylamide gel electrophoresis. J Biol Chem 244, 4406–4412.
Yamada KM and Weston JA (1974). Isolation of a major cell surface glycoprotein from fibroblasts. Proc
Natl Acad Sci U S A 71, 3492–3496.
41
Page 48

15.4 Urea Gel Systems
Jakes K et al. (1974). Purification and properties of colicin E3 immunity protein. J Biol
Chem 249, 438–444.
Kaltschmidt E and Wittmann HG (1970). Ribosomal proteins. VII. Two-dimensional
polyacrylamide gel electrophoresis for fingerprinting of ribosomal proteins. Anal
Biochem 36, 401–412.
Mets LJ and Bogorad L (1974). Two-dimensional polyacrylamide gel electrophoresis:
An improved method for ribosomal proteins. Anal Biochem 57, 200–210.
Sherton CC and Wool IG (1974). A comparison of the proteins of rat skeletal muscle
and liver ribosomes by two-dimensional polyacrylamide gel electrophoresis.
Observations on the partition of proteins between ribosomal subunits and a description
of two acidic proteins in the large subunit. J Biol Chem 249, 2258–2267.
Swank RT and Munkres KD (1971). Molecular weight analysis of oligopeptides by
electrophoresis in polyacrylamide gel with sodium dodecyl sulfate. Anal Biochem 39,
462–477.
15.5 Two-Dimensional IEF/SDS-PAGE Gel Systems
Ames GF and Nikaido K (1976). Two-dimensional gel electrophoresis of membrane
proteins. Biochemistry 15, 616–623.
Anderson L and Anderson NG (1977). High resolution two-dimensional electrophoresis
of human plasma proteins. Proc Natl Acad Sci U S A 74, 5421–5425.
Garrels JI (1979). Two dimensional gel electrophoresis and computer analysis of
proteins synthesized by clonal cell lines. J Biol Chem 254, 7961–7977.
Hochstrasser DF et al. (1986). Immobilized pH gradients in capillary tubes and twodimensional gel electrophoresis. Electrophoresis 7, 505–511.
Hochstrasser DF et al. (1988). Methods for increasing the resolution of two-dimensional
protein electrophoresis. Anal Biochem 173, 424–435.
O'Farrell PH (1975). High resolution two-dimensional electrophoresis of proteins.
J Biol Chem 250, 4007–4021.
O'Farrell PZ et al. (1977). High resolution two-dimensional electrophoresis of basic as
well as acidic proteins. Cell 12, 1133–1141.
15.6 References
Hochstrasser DF et al. (1986). Immobilized pH gradients in capillary tubes and twodimensional gel electrophoresis. Electrophoresis 7, 505–511.
Hochstrasser DF et al. (1988). Methods for increasing the resolution of twodimensional protein electrophoresis. Anal Biochem 173, 424–435.
Laemmli UK (1970). Cleavage of structural proteins during the assembly of the head
of bacteriophage t4. Nature 227, 680–685.
O'Farrell PH (1975). High resolution two-dimensional electrophoresis of proteins.
J Biol Chem 250, 4007–4021.
42
Page 49

Page 50

Page 51

Page 52

Life Science
Group
Sig 1212M1651801 Rev C US/EG
Bio-Rad
Laboratories, Inc.
Web site www.bio-rad.com USA 80 0 424 6723 Australia 61 2 9914 2800 Austria 01 877 89 01 Belgium 09 385 55 11 Braz il 55 11 504 4 5699
Canada 905 364 343 5 China 86 21 6169 850 0 Czech Republic 420 241 430 532 D enmark 44 52 10 00 Finland 09 804 22 00
France 01 47 95 69 65 German y 089 31 884 0 Greece 30 210 9532 220 Hong Kong 8 52 2789 33 00 Hungary 36 1 459 6100 India 91 124 4029300
Israel 03 963 6050 Italy 39 02 216 091 Japan 03 6361 7000 Kor ea 82 2 3473 4460 Mex ico 52 555 488 7670 The Netherlands 0318 540666
New Zealand 64 9 415 2280 N orway 23 38 41 30 Poland 48 22 331 99 99 Portugal 351 21 472 7700 Russia 7 495 721 14 04
Singapore 65 6415 3188 South Africa 27 861 246 723 Spain 34 91 590 520 0 Sweden 08 555 12700 Switzerland 026 674 55 0 5
Taiwan 886 2 2578 7189 Thailand 800 88 22 88 United Kingdom 020 8 328 2000
 Loading...