

Binatone Speakeasy 200 User Manual

USER GUIDE
Speakeasy 200
Before operating this set,
please read these instructions carefully.

1 Binatone Help Line : 0845 345 9677
If you need help …
The Binatone Help Line is available from 9.00am-5.00 pm,
Monday to Friday, on 0845 345 9677 (BT Local Call rate)
Or visit our website: http://www.binatoneonline.com/
IMPORTANT – Your handset is not supplied with a SIM
card. The Speakeasy GSM will work on all UK GSM
mobile networks except “3”, and you will need to insert a
SIM card for the handset to work correctly.
Network Services – The Speakeasy GSM is approved for
use on the GSM900 and DCS1800 networks. Check with
your mobile phone service provider to see if you can use
the Dual-band feature or other Network Services
described in this guide. Some networks may not support
all language dependent characters and/or services.
Unpacking your Speakeasy GSM Mobile
In the box are:
the mobile handset
a mains power adaptor
the handset back cover and card
a rechargeable battery pack
this user guide
a charger pod (optional extra not always supplied)
Keep the packing materials for future use.
Keep your sales receipt - it is your guarantee.

http://www.binatoneonline.com 2
Where to find it…………………..…………..………… 3
Symbols on the display ………..………………….… 4
Menu Operation …………….…..………………..…… 5
Read these notes first……....……….………….…… 6
Installation and setup………………………..….…… 6
Switching On and Off …………………..……..…..… 10
Making & answering calls…………………………… 11
Using the Phone Book & Fast keys (M1-M3)…..… 13
Call log……………………………………………….…. 15
SMS text messaging……………………………….… 16
Settings…………………………..…………………..… 19
Phone (Language, Display, Security, Reset)… 19
Clock ………………………..……………………. 19
Network ……………………..…………………. 20
Call ……………………………………………… 20
Sound profiles……………………………………………. 20
Alarm Clock…………………………..……………….. 21
SOS Button……………………..…………………….. 22
Troubleshooting……………………………………… 24
Guarantee and Service information……………….. 25
Battery Information…………………………………… 26
Additional Safety Information………………………. 27
Technical Data………….……………………………… 29
Declaration of Conformity………….……………….. 30
Contents
3 Binatone Help Line : 0845 345 9677
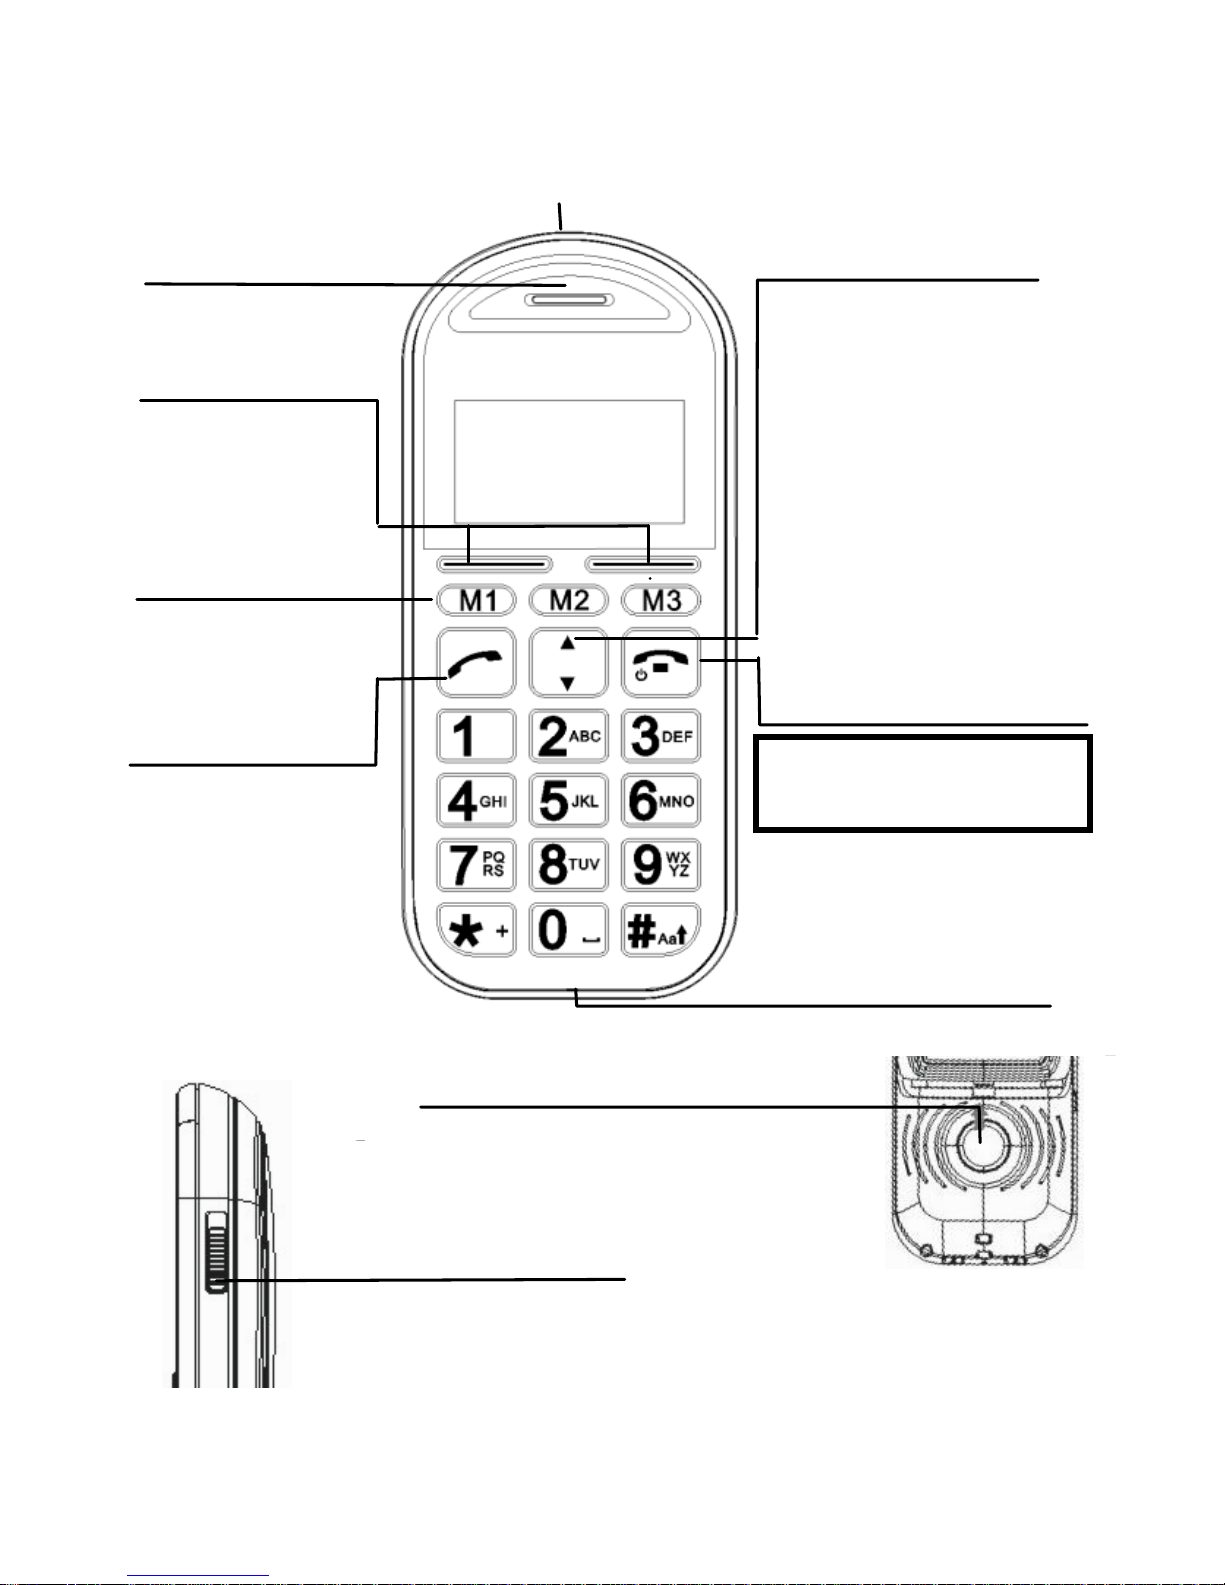
Where to find it
Earpiece
Press to end or reject a call.
Press to return to standby
mode
End Call / Power On-Off
button
Slide up to unlock and
down to lock the keypad
Key Lock/Unlock button
Visual Ringer
Select buttons
(Left/Right soft keys)
Perform functions
indicated by the
display text above
Talk button
Press to answer a
phone call.
Press to enter
redial list
Press to dial a
number
Slide up to unlock and
down to lock the keypad
Key Lock/Unlock button
Memory buttons
(M1, M2, M3)
3 fast key memory
locations for direct
dial out
Up/Down buttons
Press to adjust receiving
volume in talk and
speakerphone modes.
Press to step through
names, phone numbers,
menus and settings.
Standby mode shortcuts:
Up - to Sound Profiles
Down - to Phonebook
Press and hold to switch
the phone on or off
Wrist strap holes
Press and hold 3sec to
start SOS call procedure
SOS button
Slide up to unlock and
down to lock the keypad
Key Lock/Unlock button
http://www.binatoneonline.com 4
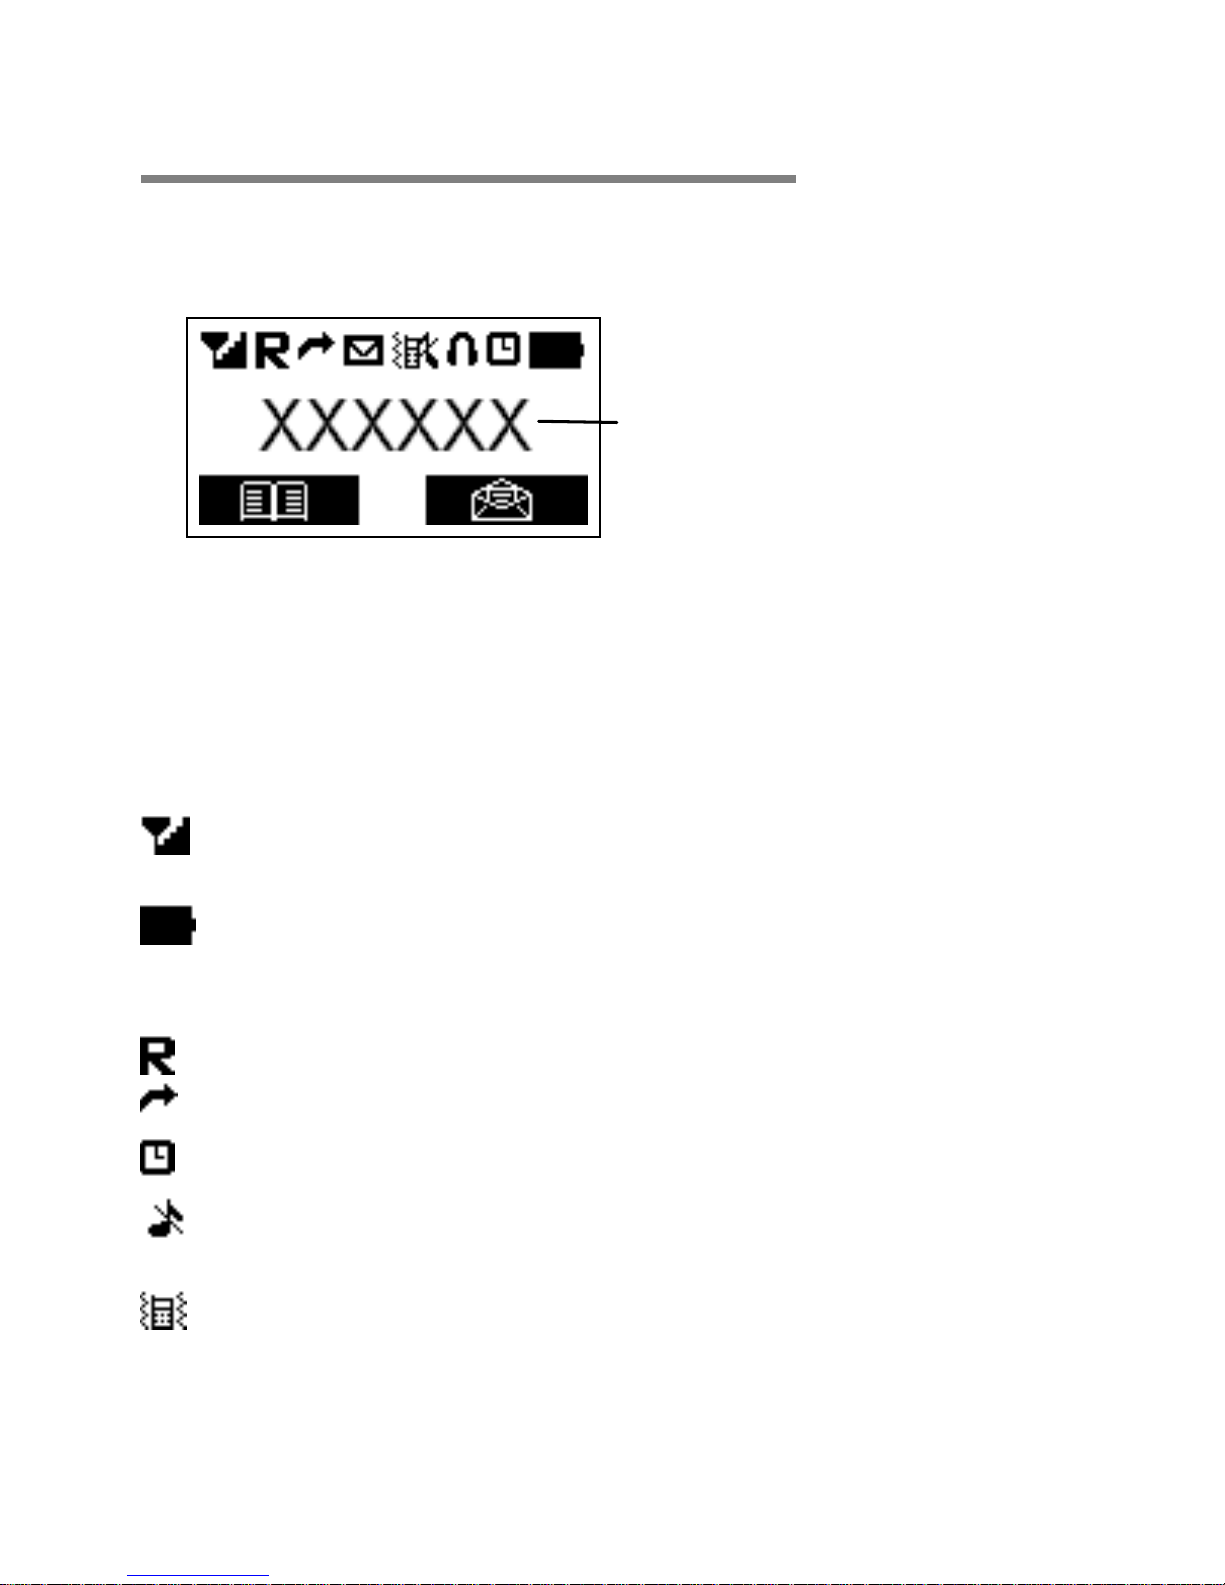
Symbols on the display
The default idle screen shows the clock. Press the End
Call key to show the operator name idle screen, as
below, for a few seconds.
1 - The left selection key in the idle mode is Menu.
2 - The right selection key in the idle mode is SMS.
The Soft keys change to different functions in other modes.
[Note: Symbols and positions on the display may vary.]
Radio link/signal level - On steady when linked
and shows the signal strength.
Battery charge level - Charge handset as soon as
possible if it shows nearly empty. While the
batteries are being charged, this blinks.
Roaming - On if roaming to other mobile network.
Call Divert - On if call divert unconditional is set.
Alarm - On if an alarm is set.
Ringer off & vibrator off- On if handset's ringer
and vibrator are both turned off.
Ringer on & vibrator on - On if handset's ringer
and vibrator are both turned on.
The network name in service
(If display option set)
1
2
5 Binatone Help Line : 0845 345 9677
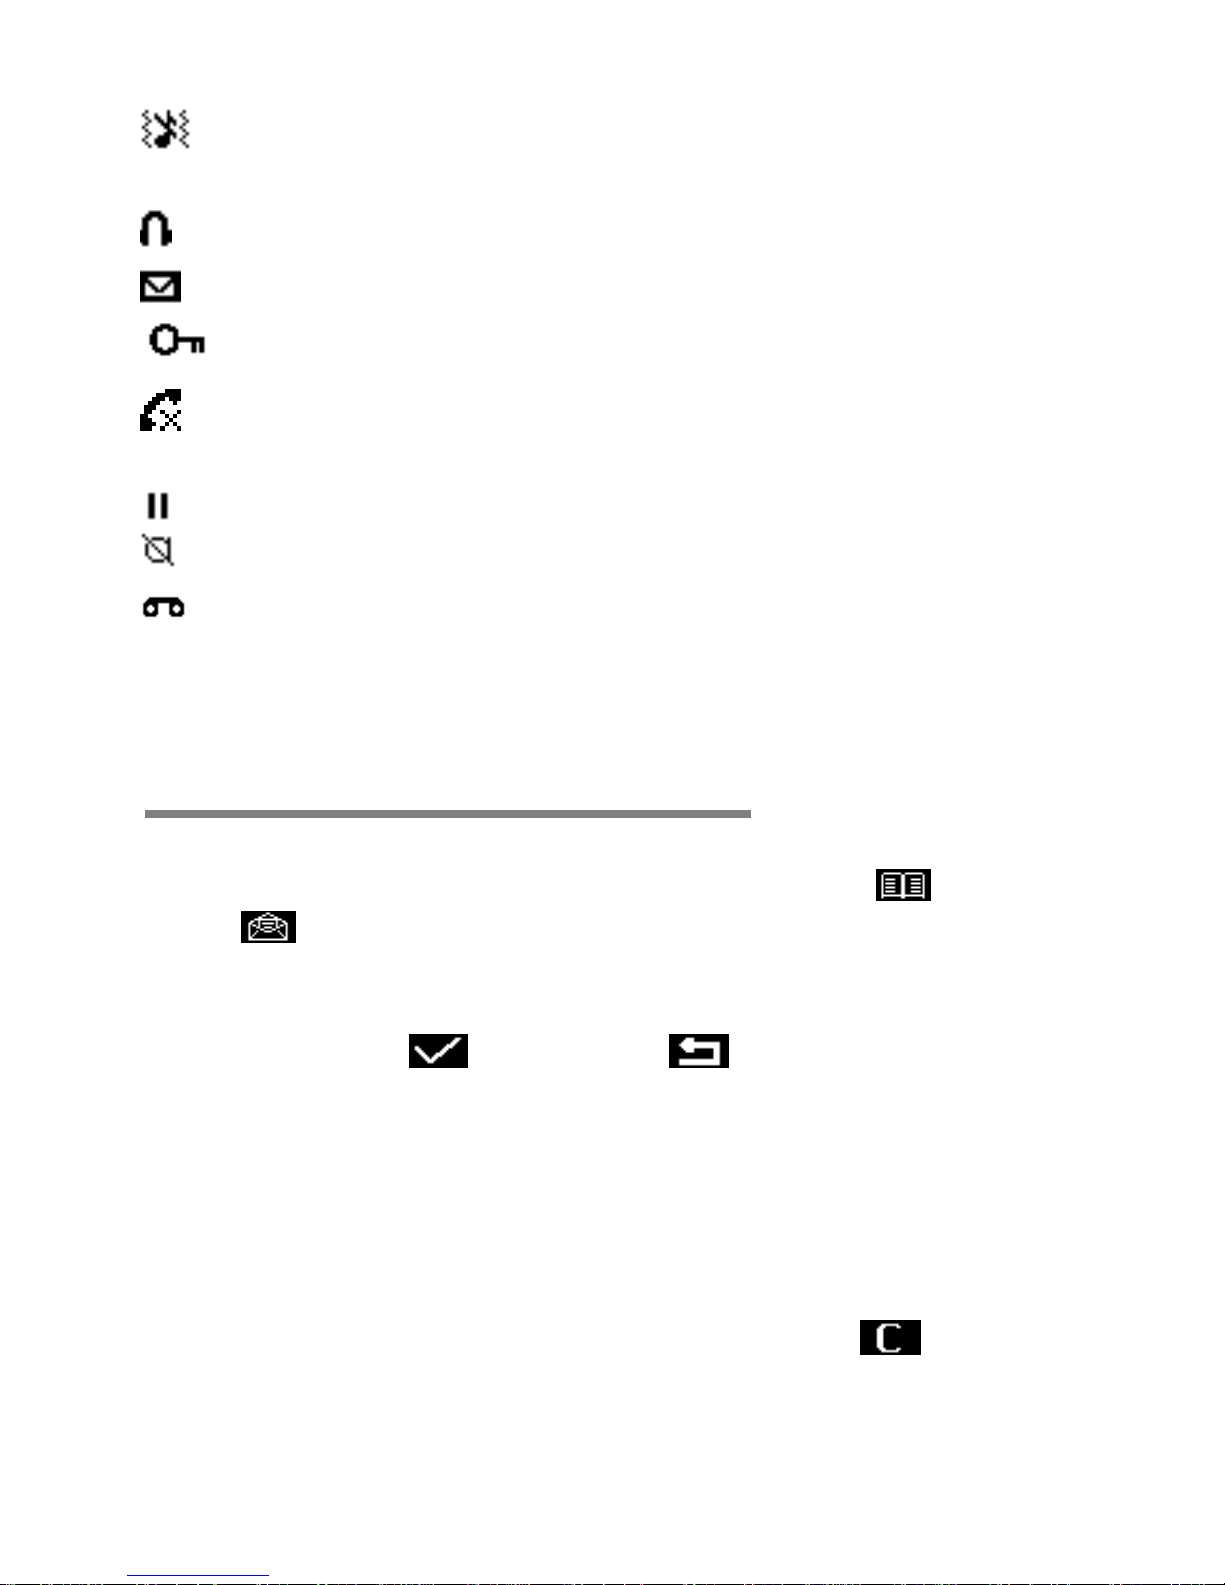
Ringer off & vibrator on - On if handset's ringer is
turned off and vibrator is turned on.
Headset - On when a headset is plugged in.
New SMS - Indicates you have new text messages.
Lock - On when the handset's keypad is locked.
Missed Call - On if you have new missed Call
records.
Call held - On if a call is on hold.
Mute - On if the handset microphone is muted.
New Voice Mail - Indicates you have a new voice
message. To listen to messages, dial your network
provider’s voicemail number.
Menu Operation
Menu lists are used for set up and operation.
The left and right soft keys initially are Menu ( ) and
SMS ( ). (Note: symbols not displayed if the analogue
style clock is set for idle mode.)
Press Menu and the display changes and the soft keys
become Select ( ) and Back ( ).
Use Up or Down to move up or down menu lists, and
Select or Back for the next or previous display.
When writing text, use the # key to switch cases:
Upper case (ABC), Title case (Abc), Lower case (abc) or
Numerals (123).
Use Up or Down to move the cursor, Clear ( ) to
delete letters and the * key for symbols/punctuation.
http://www.binatoneonline.com 6
Read these notes first
Your phone is an electronic product and should be treated
with care to meet any warranty and safety obligations.
SWITCH ON SAFELY – Don’t use if mobile phones
are prohibited or may cause interference or danger.
HEARING AID COMPATIBILITY –This phone is
hearing aid compatible (M3) . Mobile phone may
interfere with some hearing aids, please contact with
your hearing aid provider
WATER-RESISTANCE – Keep it dry. The phone is
not water-resistant.
TEMPERATURE RANGE – Operating 0°C to 40°C.
Storage -20°C to 60°C.
CARE & CLEANING - Do not drop or knock the phone
excessively, and keep it clean using a damp cloth if
necessary - do not use chemicals, cleaning solvents,
or strong detergents.
Installation and setup
Before operating the Speakeasy GSM a SIM card must be
installed. Keep the SIM card out of reach of small children.
The SIM card and its contacts can be damaged easily by
scratches or bending, so handle the card carefully.
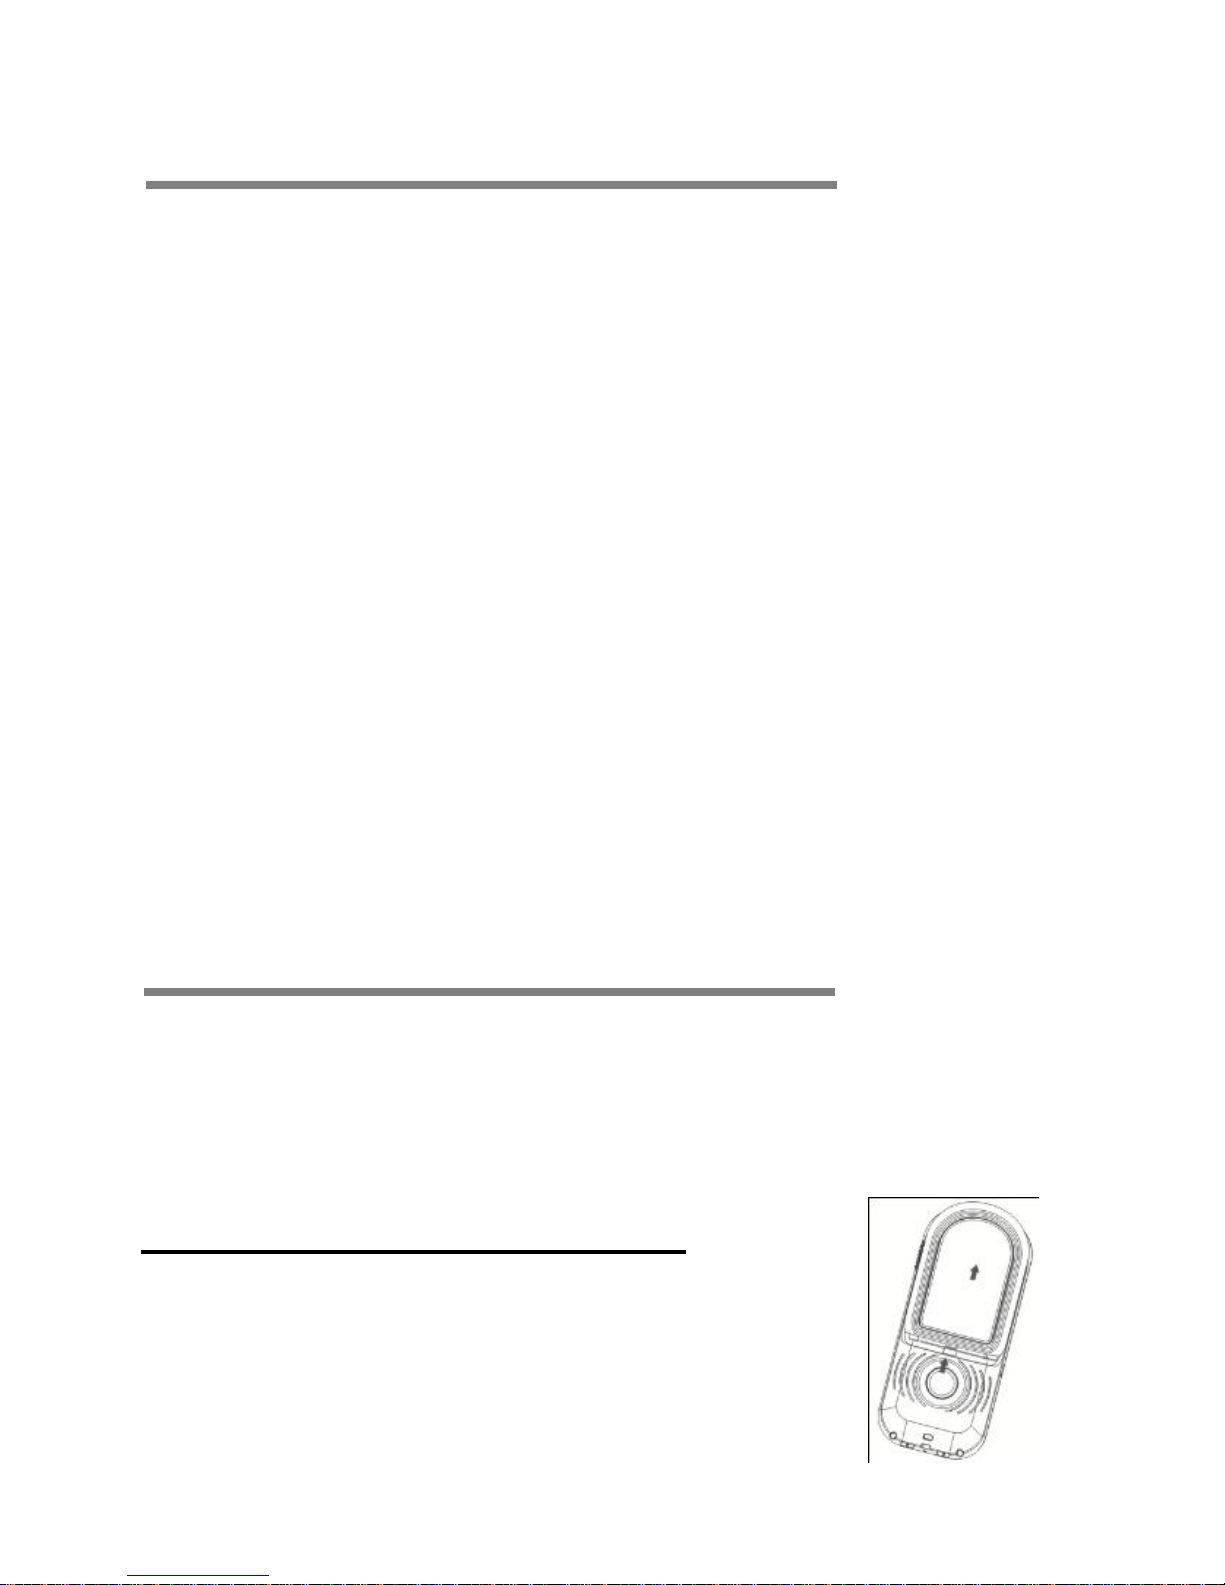
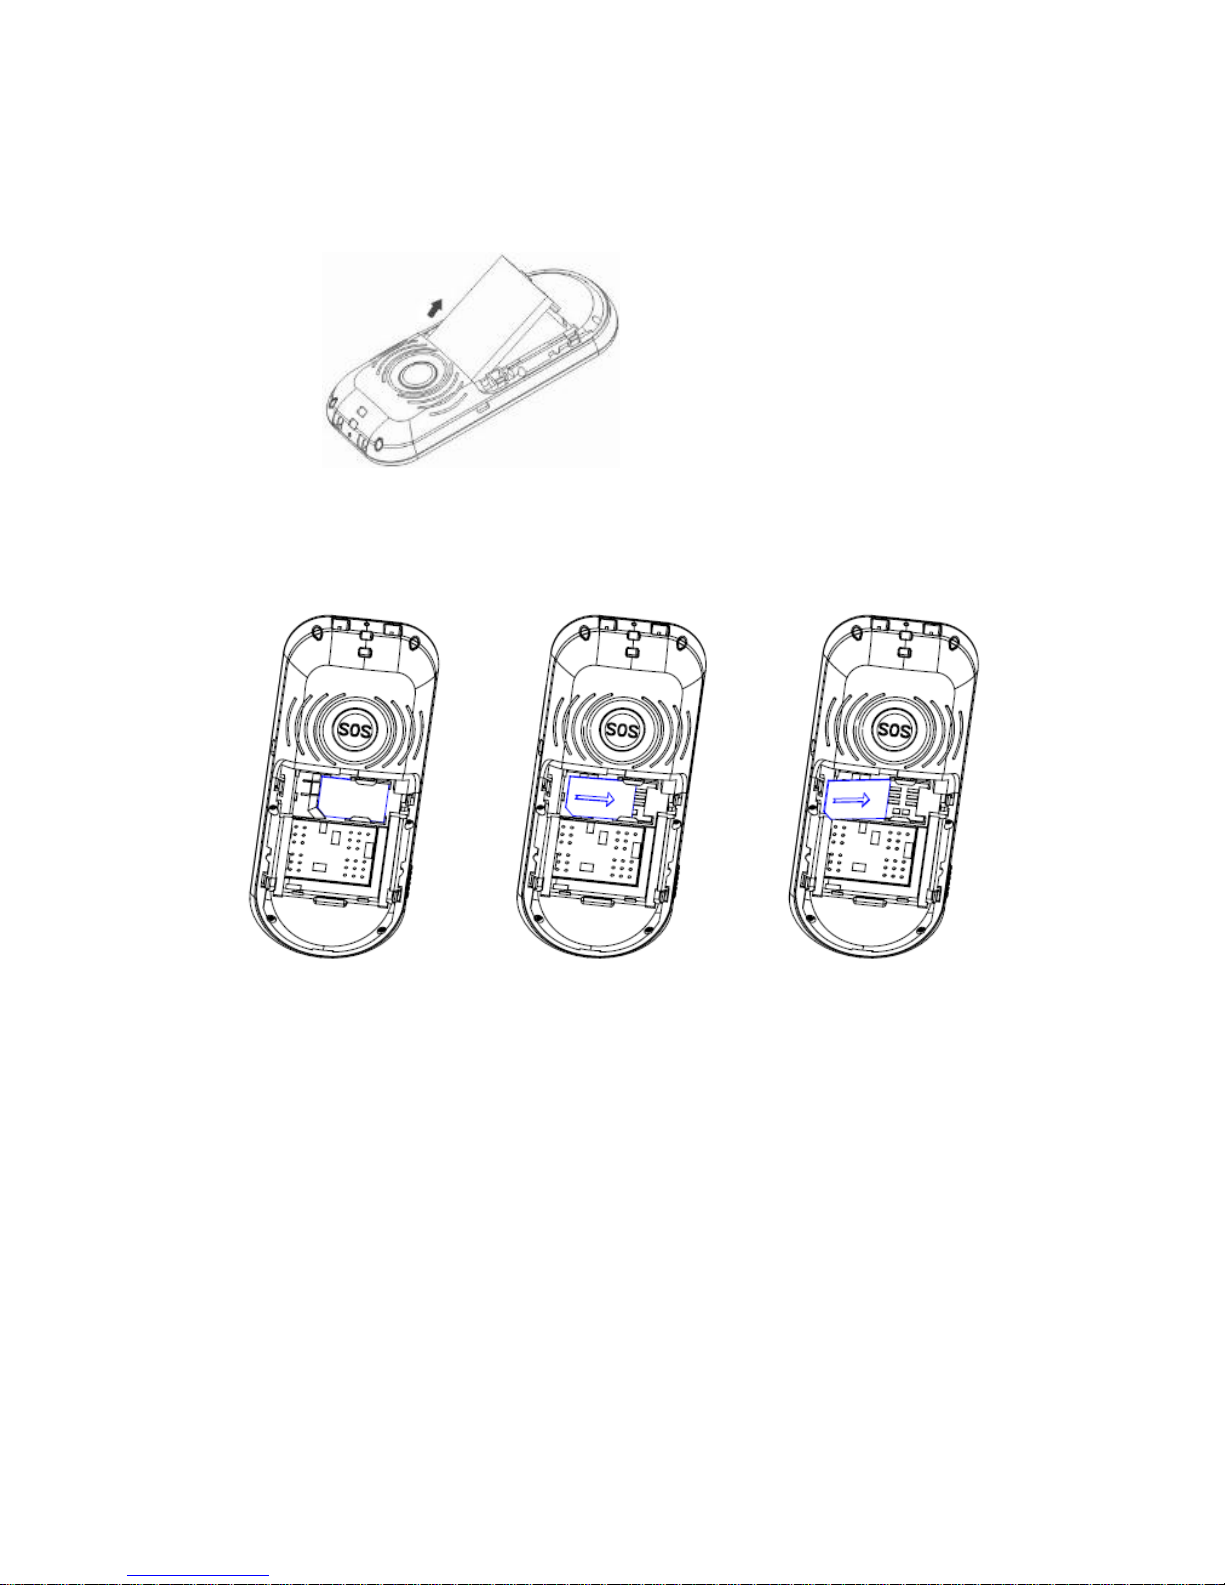
Install the SIM card and battery
1. Switch off the phone, disconnect the
power adaptor and remove the battery.
7 Binatone Help Line : 0845 345 9677
2. To remove the back cover push on the top of the back
cover and slide the cover up.
3. Remove the battery by lifting the top edge.
4. Carefully slide the SIM card into the holder with the gold
connectors face down and angled corner lower left, as
shown.
5. Replace the battery by aligning the gold connectors on
the battery with those on the phone, and push the top of
the battery down until it clicks into place.
6. Replace the back cover by placing it flat on the back of
the handset and sliding down until it clicks into place.

http://www.binatoneonline.com 8
Insert the memo index card
1. Remove the handset back cover, as (2) above.
2. The index card slides between the clear lens and back
cover. Ensure the card is pushed right in up to the end.
3. Replace the back cover, as (6) above.
Charge the battery
Warning! Use only batteries and chargers supplied with
or approved by Binatone for this model. Use of others will
invalidate approvals or warranty and may be dangerous.
Do not charge the battery with the back cover removed.
1. Connect the charger lead firmly into the socket on the
side of the handset. Or place the handset directly in the
charger pod (if provided as an option).
2. Plug the charger into an AC mains socket. A large
battery indicator bar scrolls on the display.
3. Charging the battery may take up to 5 hours.
4. If “charging…“ is not displayed, disconnect the charger,
and retry. If charging still fails, contact the helpline.
5. The battery is fully charged when “Full Charged” is
displayed. Disconnect the charger from the phone and
the AC outlet.
9 Binatone Help Line : 0845 345 9677
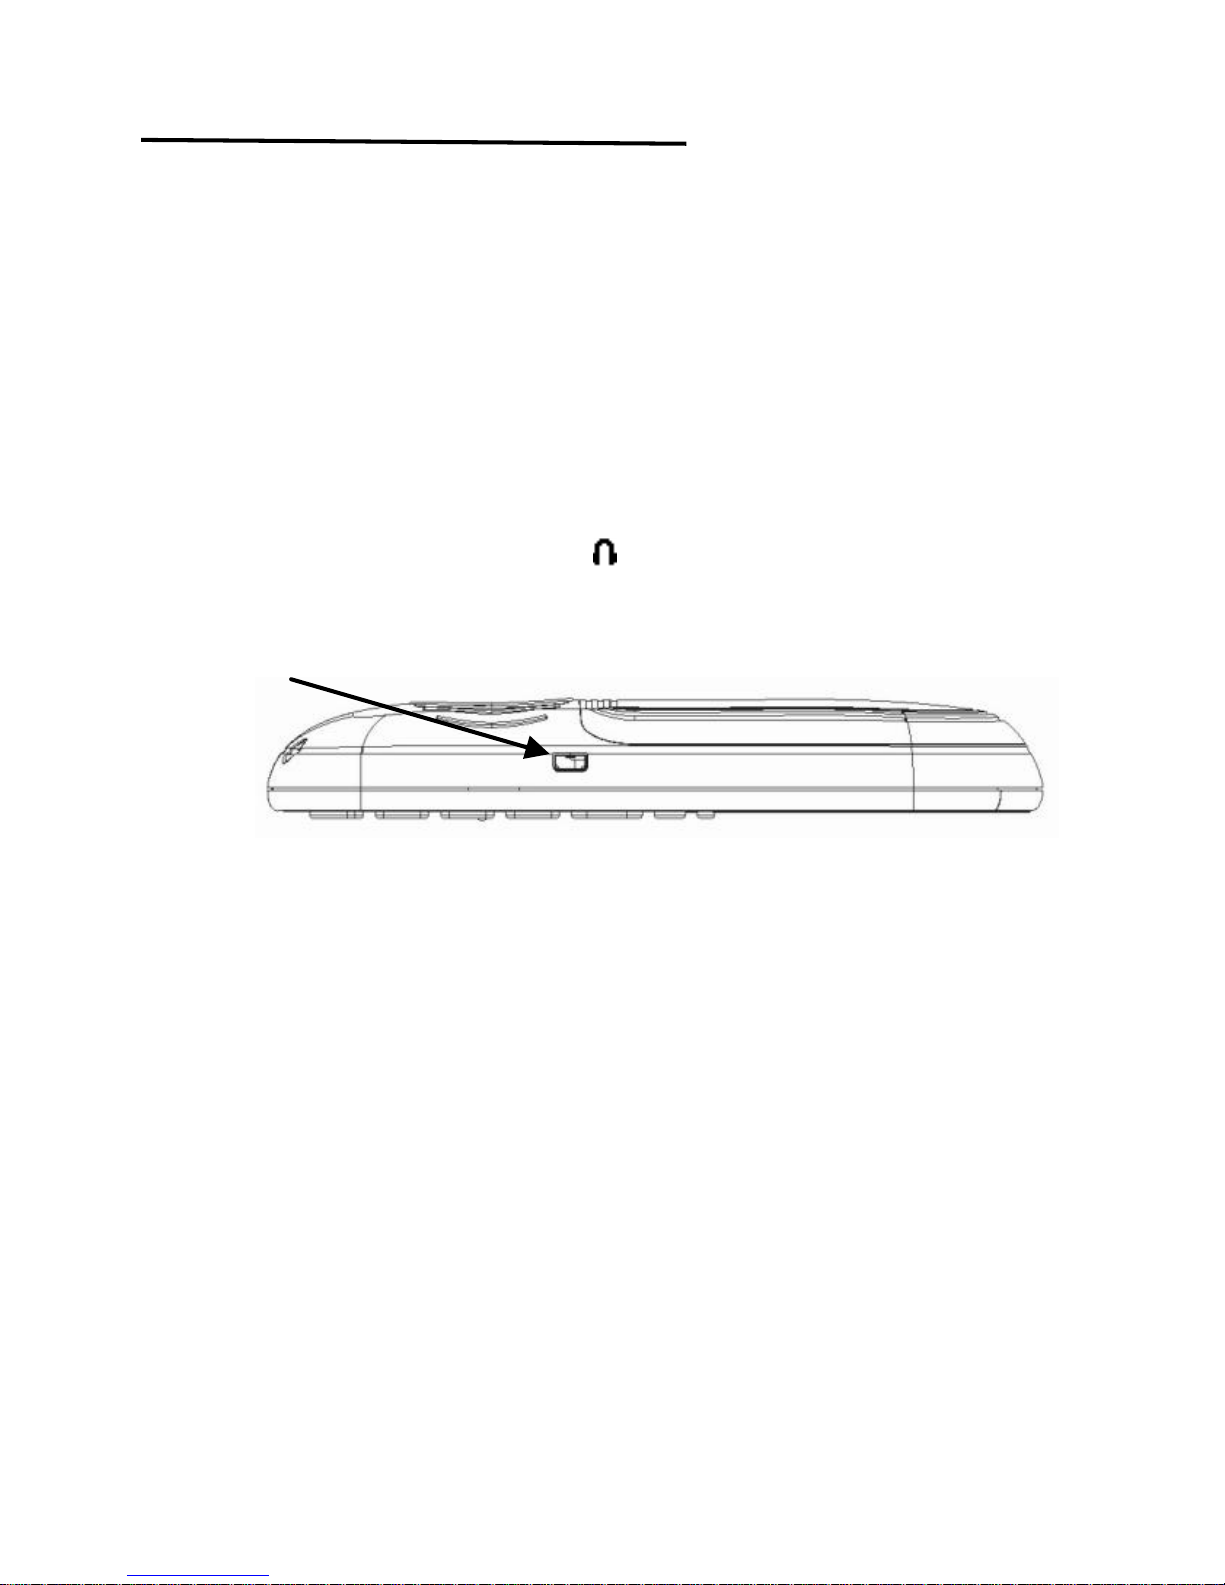
Connect an optional headset
You can use a headset (not supplied) with the same
micro-USB type as your charger, plugged into the
Power/Headset socket on the left side of the handset.
When using headsets, including Binatone approved ones,
pay attention to volume levels and read its user guide for
safety instructions. Do not connect incompatible products.
When correctly inserted the headset icon is shown.
Headset / Charging Connector
Plug in power adapter to charge battery.
Plug in headset accessory (not supplied) for headset use.
 Loading...