

Binatone Smart 64 User Manual
USER GUIDE
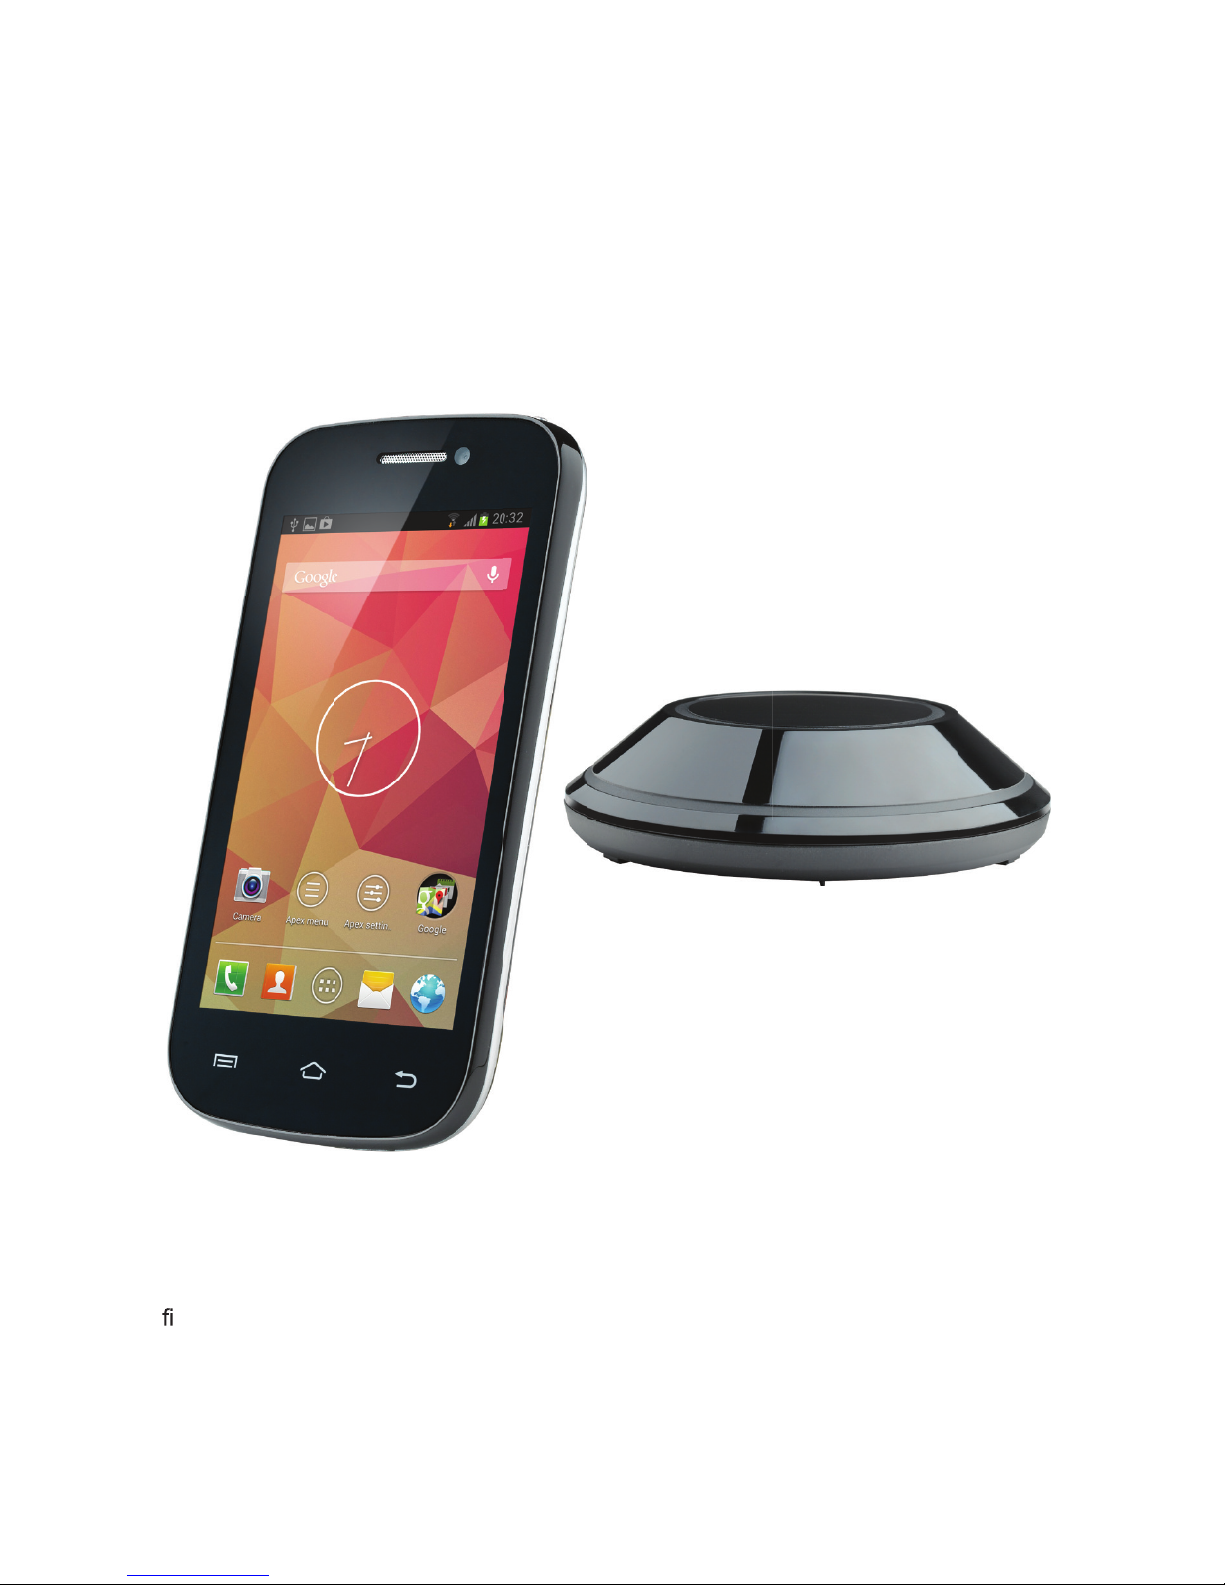
Smart 64
Android Smart Home Phone
Images not to scale.
Warning: Before operating this unit, please read these instructions carefully.
www.binatoneglobal.com
For product-related questions, please call the Binatone (UK) Helpline*
Tel: 0844 557 9677
Of
ce hours: Monday to Friday between 8:00am to 8:00pm.
Saturday between 8:30am to 2:00pm.
*Calls will be charged at 4.255p per minute from a BT landline, but other landline and
mobile operators may charge more. (Price correct as at 30/9/2013).

2
Table of Contents
TABLE OF CONTENTS
1 WELCOME 3
2 IMPORTANT AND SAFETY 4
3 CARE AND MAINTENANCE 4
4 GETTING TO KNOW YOUR PHONE 5
5 SETTING UP 11
6 KEYBOARD 17
7 WI-FI® SETTINGS 19
8 DATE, TIME, & DISPLAY 20
9 PERSONALISING YOUR HANDSET 21
10 DECT SETTINGS 24
11 USING THE PHONE FUNCTIONS 24
12 CONTACTS (ADDRESS BOOK) 27
13 INTERNET FUNCTION 32
14 BLUETOOTH SETUP 33
15 USING THE WEB BROWSER 34
16 EMAIL 37
17 PHOTOS & VIDEO 41
18 SOUND RECORDER 43
19 FM RADIO (NOT AVAILABLE IN ALL COUNTRIES) 43
20 MUSIC 44
21 PLAY STORE 47
22 GALLERY 48
23 CLOCK 49
24 CALENDAR 52
25 TODO 54
26 CALCULATOR 54
27 FILE MANAGER 55
28 INSTALL / UNINSTALL APPS 56
29 SYSTEM SETTINGS 57
30 TROUBLESHOOTING 59
31 GENERAL INFORMATION 61
32 GUARANTEE AND SERVICE 63
33 TECHNICAL SPECIFICATIONS 65
34 DECLARATION OF CONFORMITY 66

3
1 WELCOME
Congratulations on purchasing your new Smart 64 Android Smart Home
Phone.
This User Guide provides you with all the information you need to get the most from
this device.
Before making your rst call or using the Internet,
follow the simple instructions in
‘Getting to Know Your Phone’ over the next few pages.
General Features
• Colour Touch Screen
• Wi-Fi® 802.11b/g/n Connectivity
• Auto Screen Rotation
• Take Photos and Record Videos
• Listen to Music
• Internet Access
• Email
• Handsfree Speakerphone
• 1000 Contacts Phonebook
• Up to 500 Calls Log
• Up to 32GB, Micro SD Memory Card Support (not supplied)
• 4 GB Internal Storage Space
Inside the Box
• 1 x Base Unit
• 1 x AC Power Adaptor for Base Unit
• 1 x Telephone Line Cord
• 1 x Handset Unit
• 1 x User Guide
• 1 x Quick Start Guide
• 1 x Micro USB Cable
• 1 x AC Power Adaptor with USB Socket
• 1 x Battery
• 1 x Headphones
• 1 x Charger Pod
Warranty Information
Please keep the original dated sales receipt in a safe place, you will need to provide
it for warranty service.
Product Support
Binatone Helpline: 0844 557 9677 in UK.
Welcome

4
2 IMPORTANT AND SAFETY
This equipment is not designed to make emergency telephone calls in the event of
power failure. Alternative arrangements should be made to access emergency
services under these conditions.
You are advised to keep a basic phone that does not require mains power for normal
operation.
WARNING!
• Avoid sources of noise and heat, such as motors, uorescent lighting, microwave
ovens, heating appliances and direct sunlight.
• Avoid areas of excessive dust, moisture, and low or high temperature.
• This product complies with all relevant standards regarding electromagnetic elds
and is, when handled as described in this User’s Guide, safe to use. Therefore,
read the instructions in this User’s Guide carefully before using the device.
• Adult assembly is required. Keep small parts away from children when assembling.
• This product is not a toy, do not allow children to play with it.
• Use of this product requires responsible adult supervision.
• Only use the charger and power adapters provided.
• Only use the telephone line cable supplied with this product.
•
Do not place the phone unit in the bathroom or other humid areas.
• Properly dispose of used batteries.
• Unauthorised disassembly of the product in any manner may damage the device,
and is not covered by warranty.
• Properly dispose of used batteries.
• At the end of the product life cycle, dispose of the device according to your local
authority instructions.
3 CARE AND MAINTENANCE
• This product is a precision electronic device. Handle it with care as the screen
may become damaged if dropped.
• To clean the handset display and/or remove ngerprints or smudges, wipe the
LCD screen gently with a soft, clean, dry, lint-free cloth.
• DO NOT use cleaning solutions unless they are designed specically for LCD
screens.
• To clean other parts of the handset or the base, use a damp cloth, if necessary,
and DO NOT use solvent cleaners as they may cause damage which is not
covered by the guarantee.
Important and Safety, Care and Maintenance
5
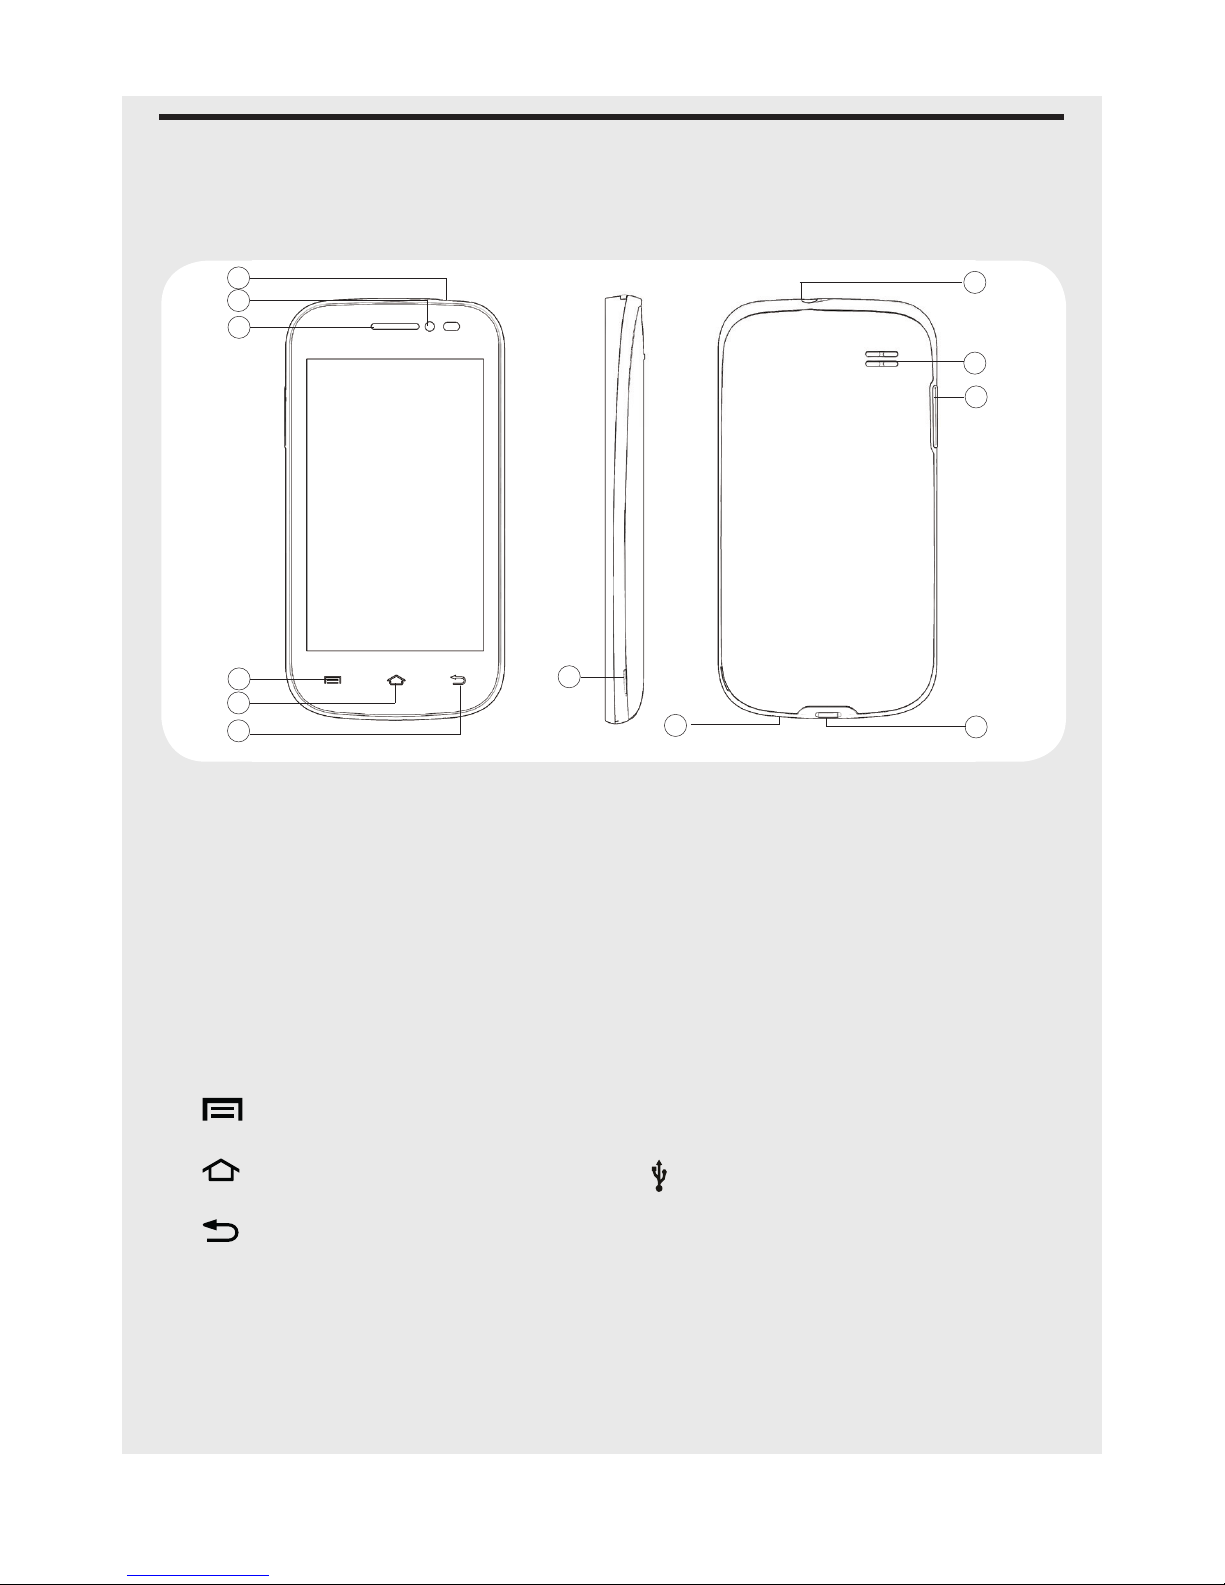
4 GETTING TO KNOW YOUR PHONE
4.1 Overview of the Handset
Getting to Know Your Phone
1
2
3
4
5
6
12
7
9
11
8
10
1 Power Button
Press and hold to turn the handset
power on / off.
Press brie y to put the handset in to or
out of sleep mode.
2 Camera
Front facing camera lens.
3 Earpiece
Place your ear against this when
making normal phone calls.
4 Menu
Tap to access menus and sub-menus.
5 Home
Tap to return to the Home screen.
6 Back
Tap to return to the previous screen.
Tap to hide the on-screen keyboard,
dialogue box, menu, or noti cation
panel.
7 Remove Back Cover
Use this slot to help take the back
cover off.
8 Microphone
9 Earphone Socket
Plug in a headset with 3.5mm jack
plug to listen through earphones.
10 Loudspeaker
Used in Speakerphone mode and
when playing music or videos.
11 Volume
Adjust the volume up + / down - .
12 Micro USB / Charging Port
Connect your handset to your
computer to transfer les.
Connect a 5V DC micro-USB socket
AC Adaptor to charge the phone.
6
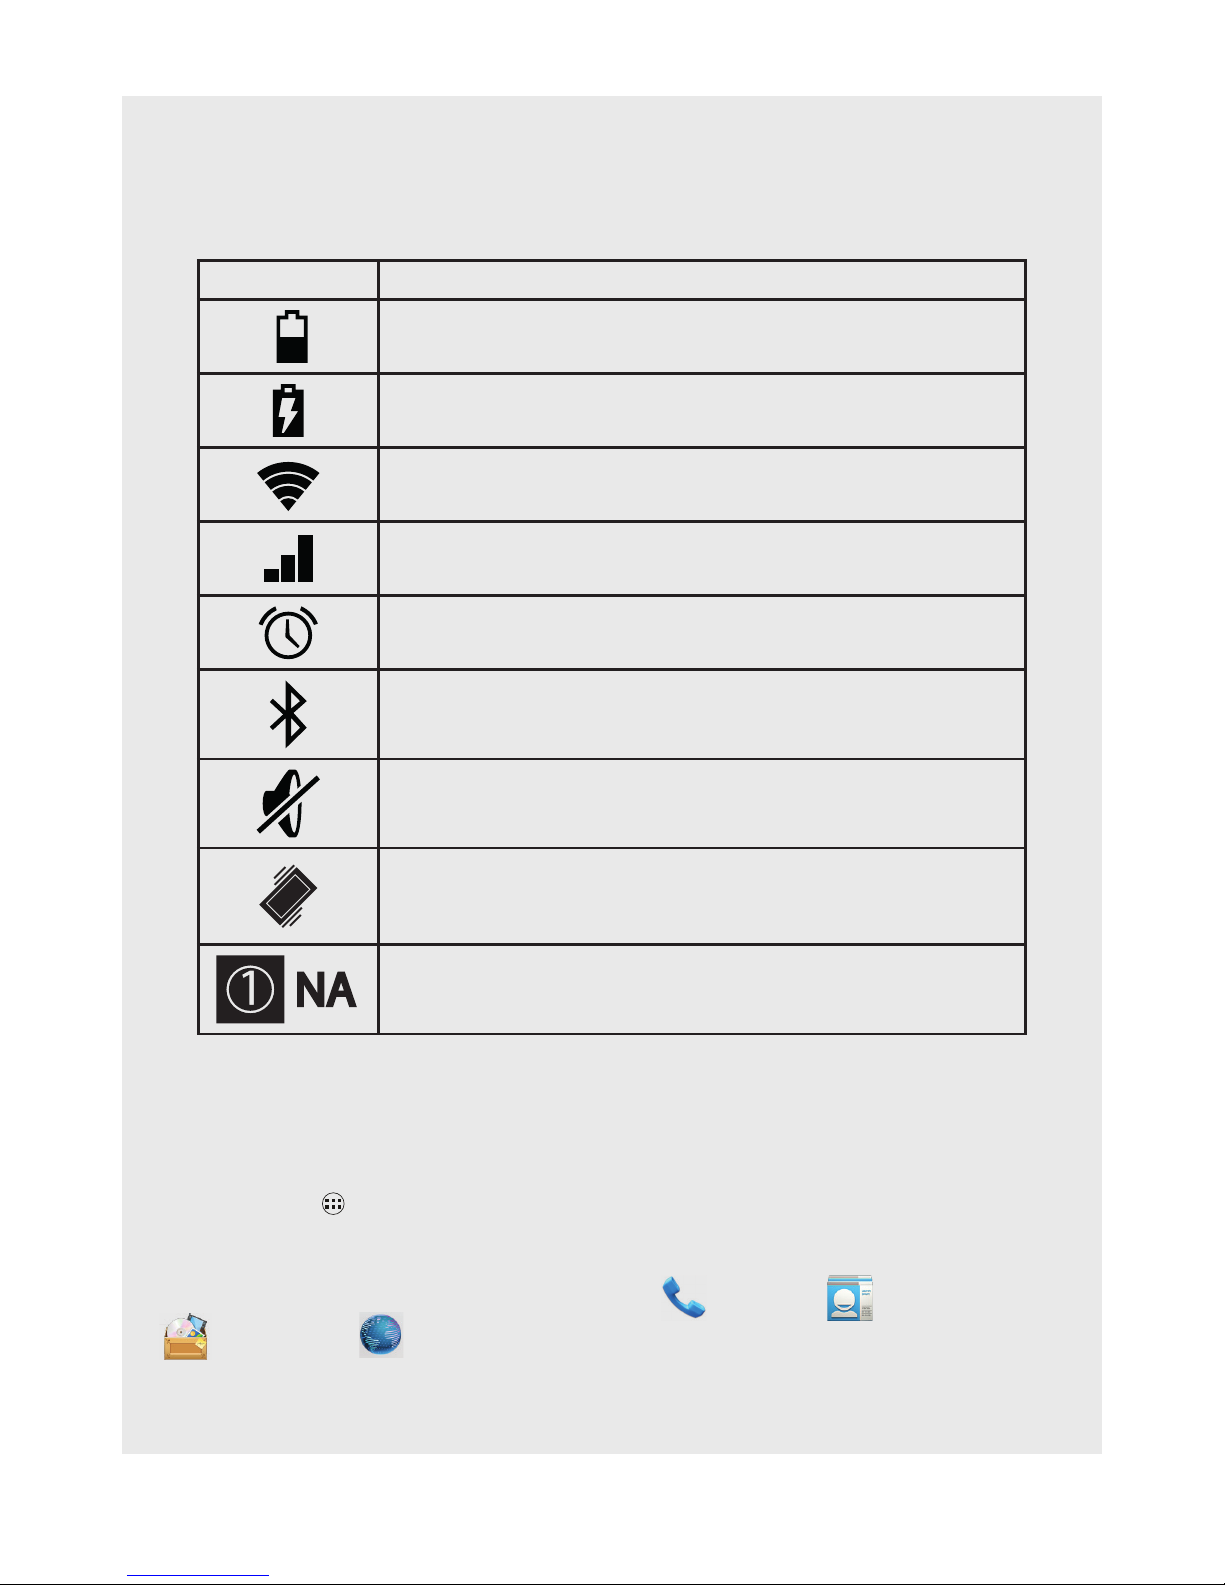
4.2 Handset LCD Display
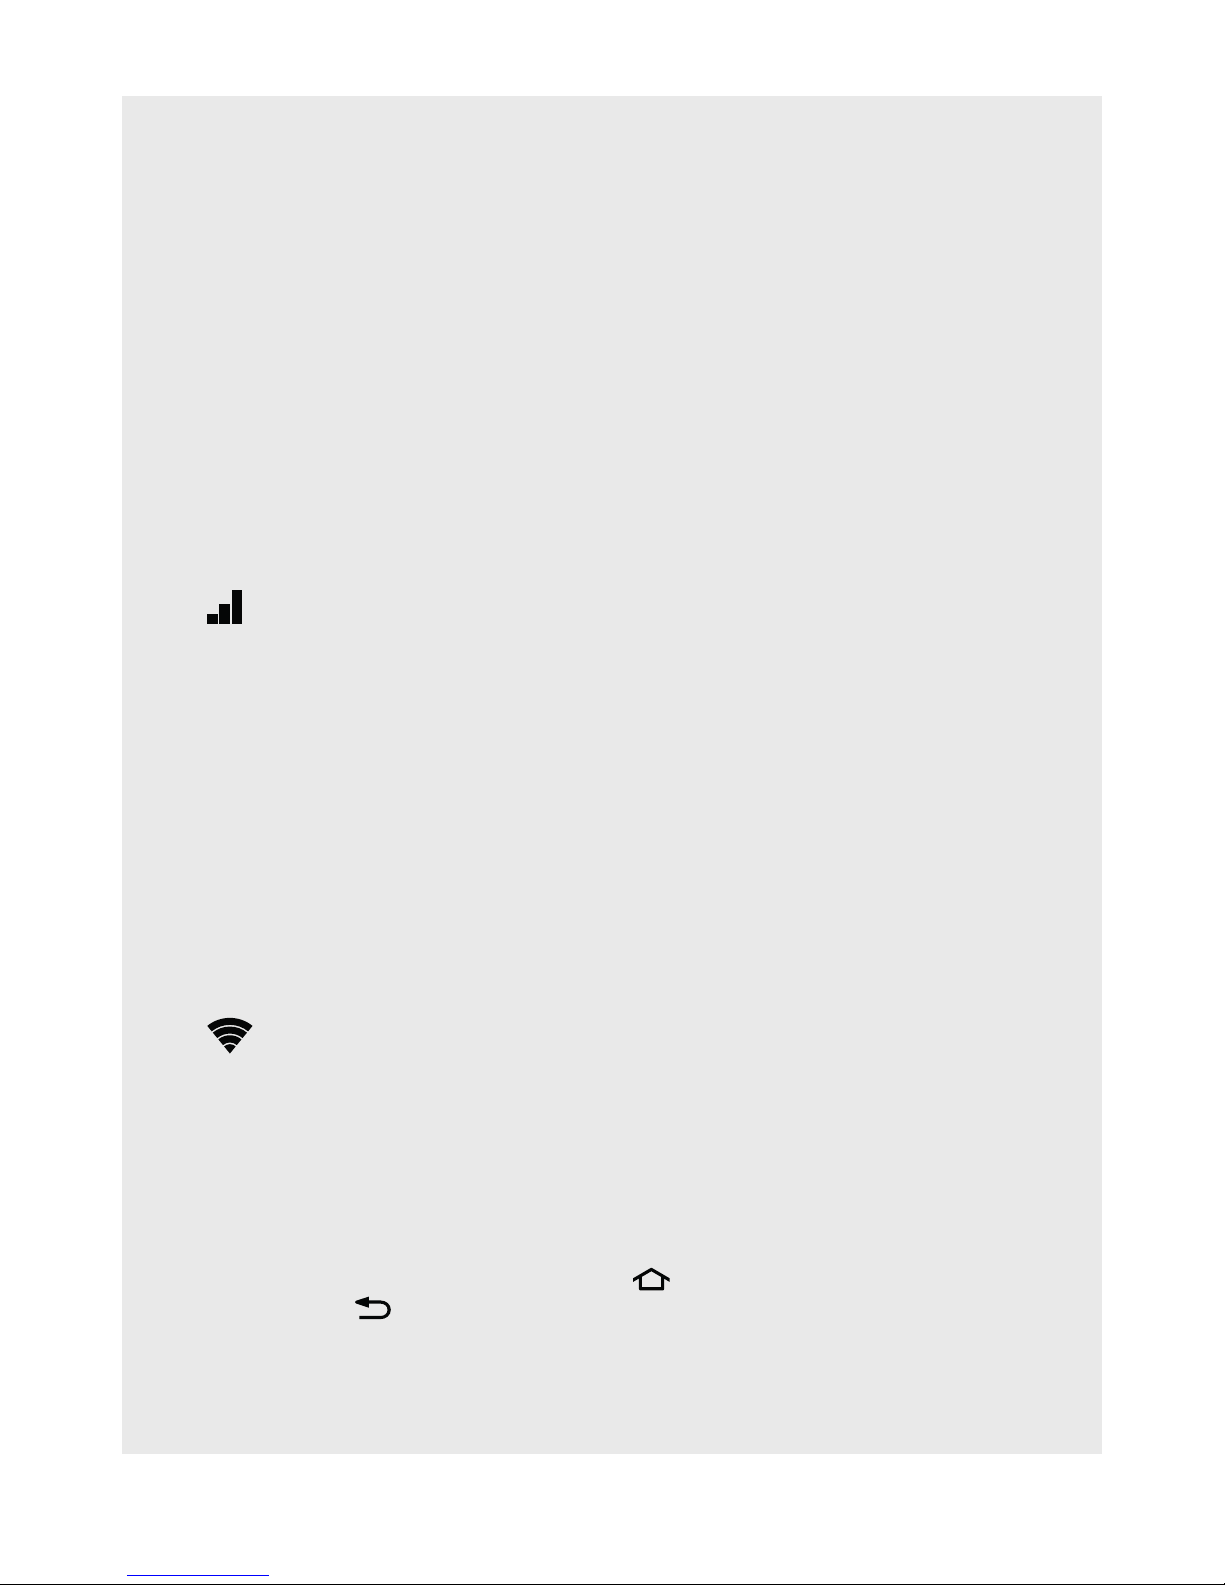
The status bar at the top of the screen displays the time, handset status, and
noti cations.
Icon Status
Battery is low.
Battery is charging.
Wi-Fi® connection on / signal strength.
DECT signal strength.
Alarm clock set.
Bluetooth function on.
Silent only mode set.
Vibrate only mode set.
Handset number or NA.
4.3 Program Launcher
The Program Launcher icon is at the bottom of the screen. Tap the Program
Launcher icon
to access your APPS and WIDGETS.
Four APPS are pre-installed on your home screen on either side of the program
launcher, to provide quick access to the Phone
, Contacts
, File Manager
and Browser .
Getting to Know Your Phone
7
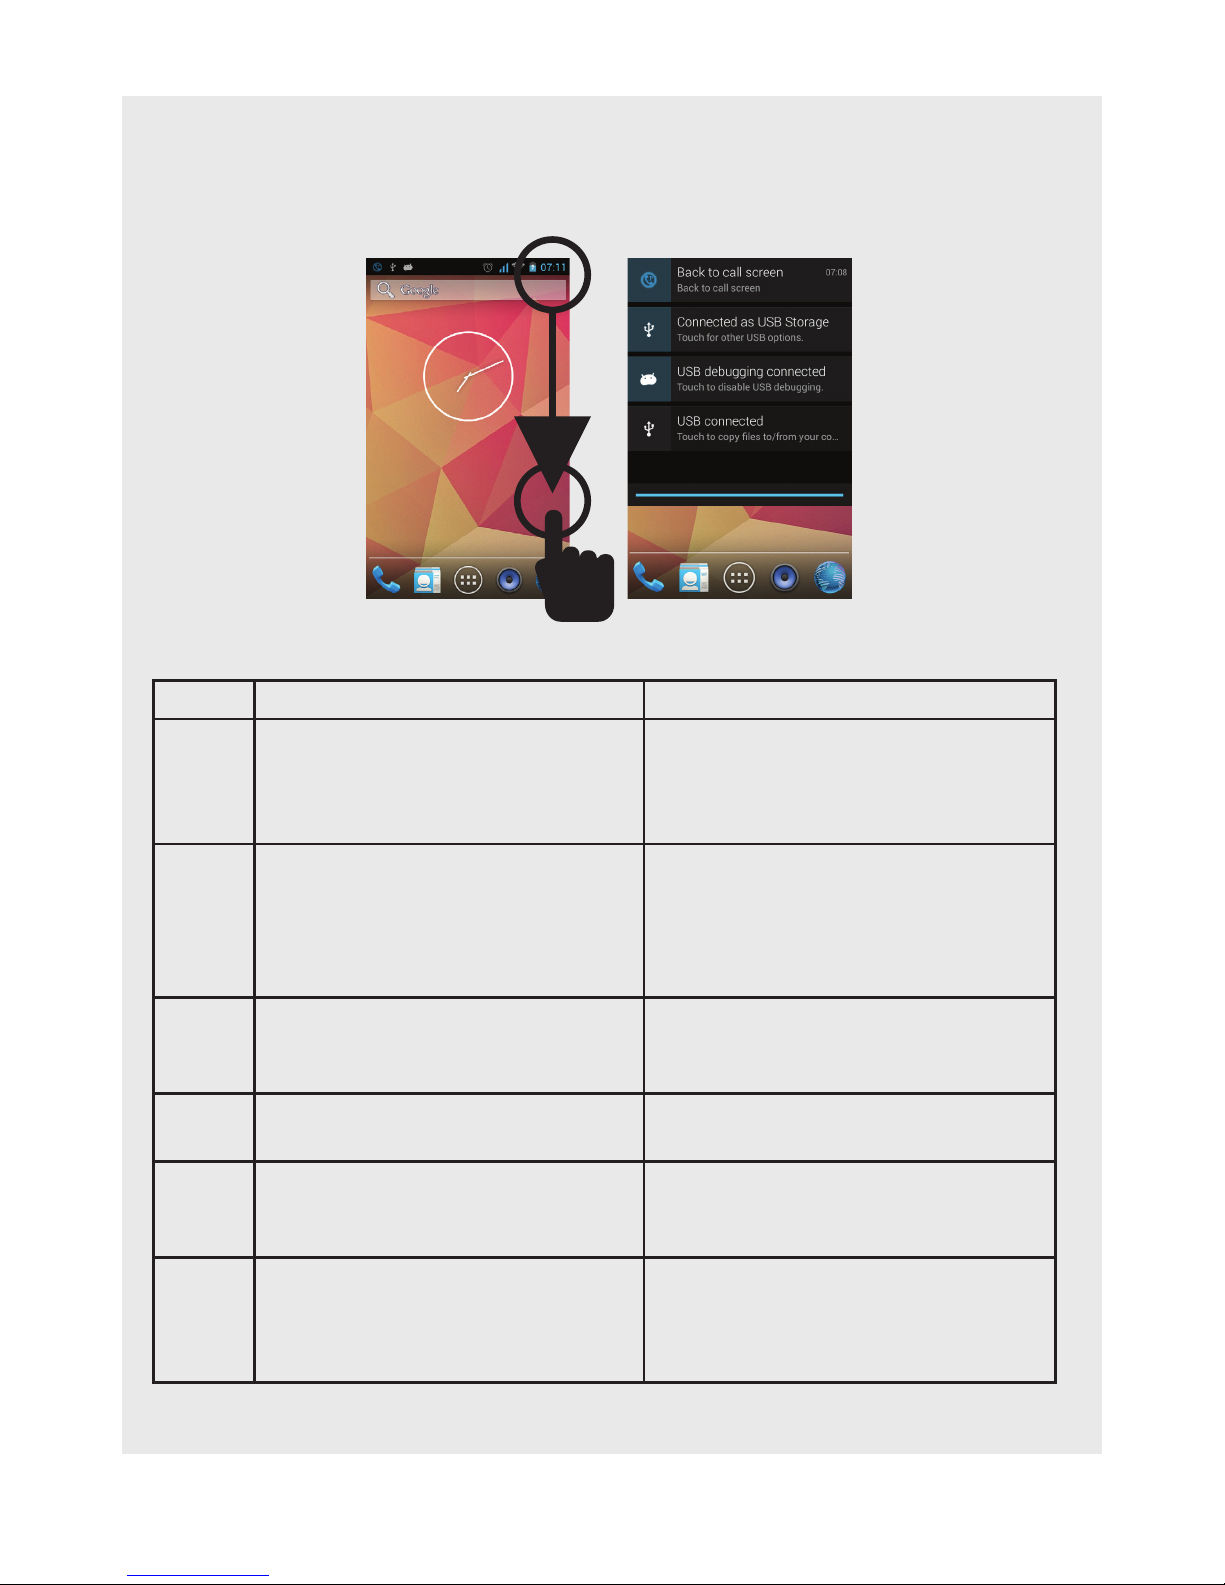
4.4 Handset Noti cations Panel
When the status bar at the top of the screen displays a status icon, tap and hold the
status bar and slide downward to open the noti cations panel.
4.5 Using the Touchscreen
Action Function Operation
Tap
Select on-screen items such as
applications and settings icons.
Select on-screen buttons. Type
using the on-screen keyboard.
Gently tap an item on the screen
to select the item that you wish to
activate.
Tap &
Hold
Open other options for an item, for
example, tap and hold a contact or
a link on a web page. Think of this
as using the right-click button on
a mouse.
Tap an item on the screen then hold
in place for 2 ~ 3 seconds.
Drag
Move items on screen or switch
between screens.
Tap an item on the screen then hold
in place for 2 ~ 3 seconds, then slide
it to desired position.
Slide
Move vertically or horizontally
across the screen.
Slide nger across screen.
Flick
Quickly browse a list of items in a
vertical direction.
Flick is similar to slide, except that
ick involves swiping the screen in
lighter and quicker strokes.
Zoom
Zoom in or out of the screen to
view a larger or smaller part of the
image.
When viewing photos or a web
page, use two ngers on the screen
and pinch together to zoom out or
spread apart to zoom in.
Getting to Know Your Phone
8 8
4.6 Handset Range
The Smart 64 Android Smart Home Phone achieves optimum reception for telephone
calls when there is clear line of sight between the base and handset.
Any obstruction between the base and handset will reduce the range signicantly.
With the base indoors and handset either indoors or outdoors, the range will normally
be up to 50 metres. The maximum range with no interference or obstructions will
normally be up to 300 metres.
The Smart 64 Android Smart Home Phone achieves optimum reception for internet
use when there is a clear line of sight between the handset and your Wi-Fi router.
Any obstruction or interference between the router and the handset will reduce the
range and performance.
4.7 Handset Signal Strength
The on your handset indicates when you are in range of the base.
When out of range of the base the signal strength indicator will show no bars, and if
you are on a call the line will hang up. If this happens, move back within range. The
handset will automatically re-connect to the base, and you will have to set up the call
again.
Note
• If you have difculty reconnecting, see section 10.1 to re-register the handset to
the base.
• Thick stone walls, large metal objects, such as refrigerators, mirrors or ling
cabinets, or other electrical equipment may lower your signal strength.
4.8 Wi-Fi® Function
The on your handset indicates when you are connected to, and in range of
your Wi-Fi router. When out of range or not connected to a Wi-Fi signal, the signal
strength indicator will not be shown. If this happens, move the handset closer to your
Wi-Fi router.
See section 13 for how to connect to a Wi-Fi signal.
4.9 Handset Home Screen
To return to the Home screen at anytime tap . You can also return to the Home
screen by tapping multiple times.
Getting to Know Your Phone
9
4.10 Handset Extended Home Screens
Extended Home screens let you organise apps (applications) and widgets on your
handset. You can conveniently access them from the Home screen.
1. Slide horizontally across the screen (left or right).
2. A slider bar at the bottom of the screen indicates which screen you are viewing.
3. To add apps or widgets to your Home screen tap
> APP / WIDGETS tab.
4. Tap and drag to desired location.
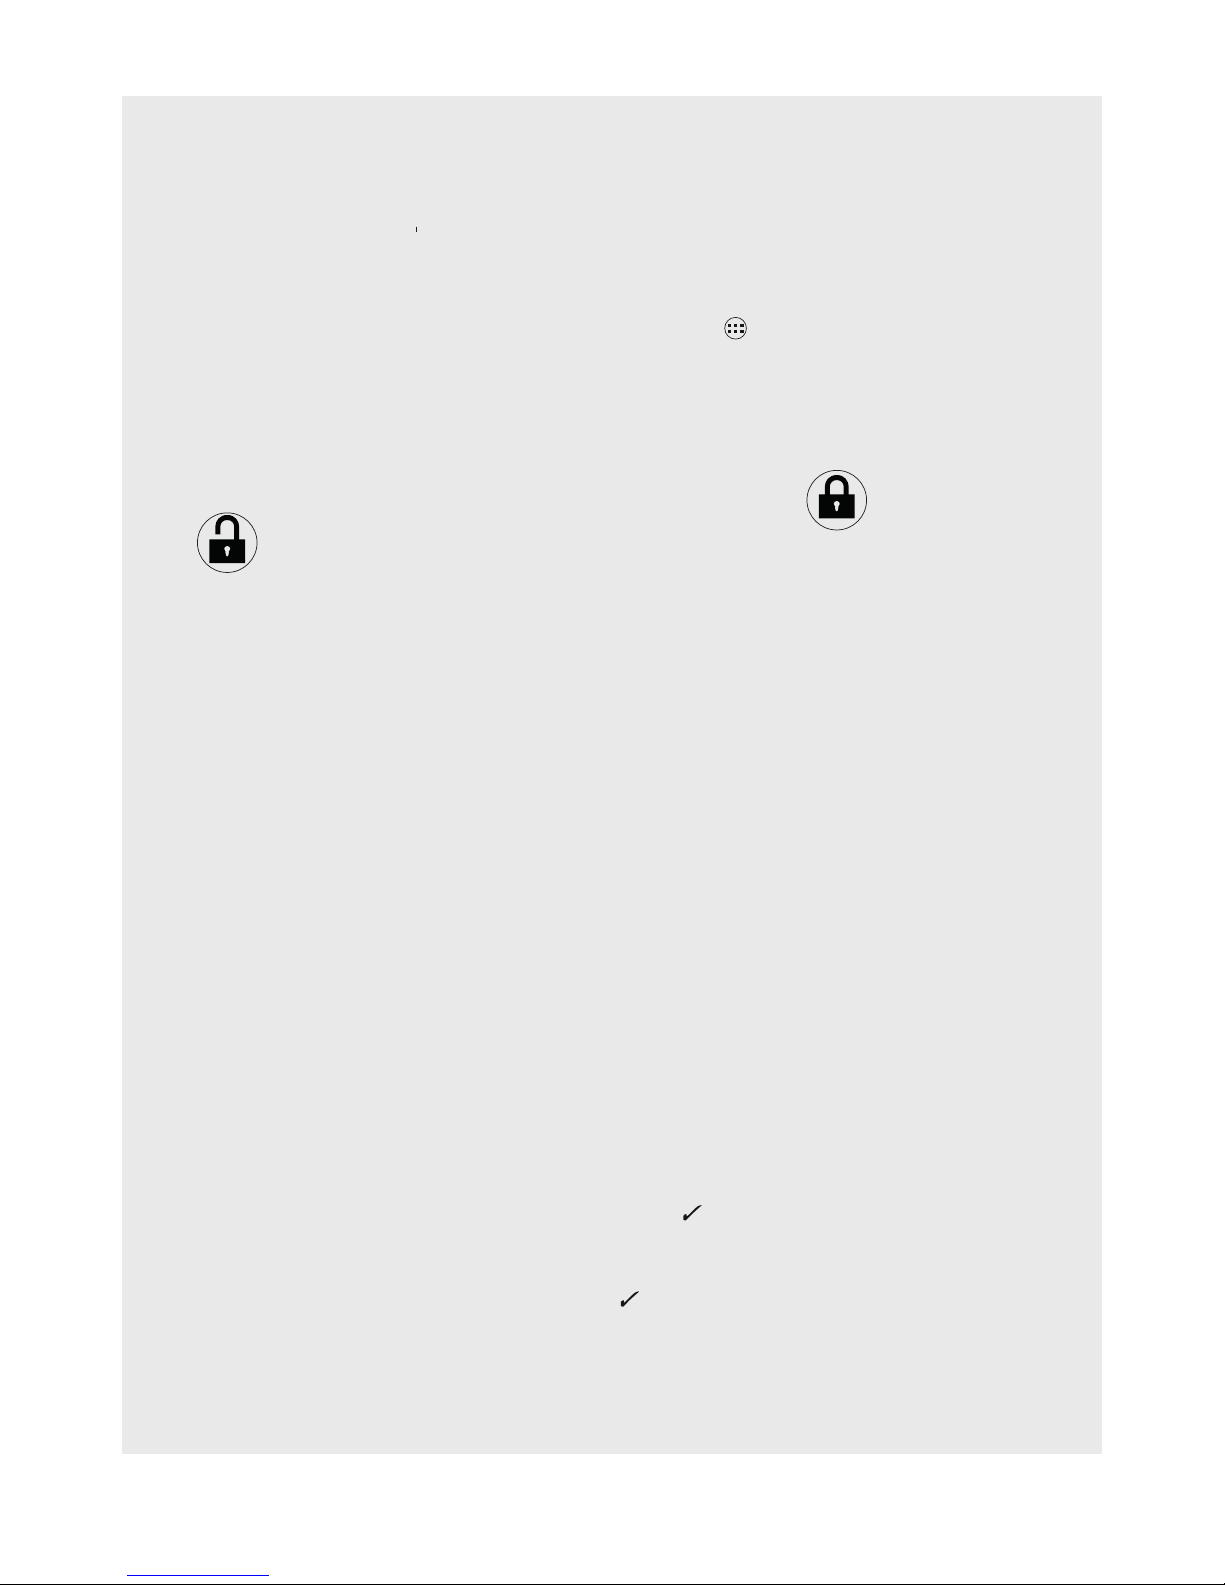
4.11 Handset Lock Screen
1. By default, the phone screen will be locked, tap and slide to the right until
shows, then release.
2. The Home screen will be displayed.
4.12 Wake Up the Handset
The LCD screen dims and turns off to conserve battery power when not in use. Press
the power button once to turn the screen back on then unlock the screen to return to
the last page you were viewing.
Your handset is set by default to sleep after 1 minute of inactivity. You can change
this by going to Settings > Display > Sleep > then select the time.
Note
While using the handset, you can put the screen into sleep mode at any time by
simply pressing the power button to turn off the screen, and then wake it up again, as
above, when required.
4.13 Handset Screen Rotation
The handset has a tilt / orientation sensor, which detects if you are holding it in
portrait or landscape mode. By default, automatic screen rotation will be turned on.
1. Turn ON automatic screen rotation: Settings > Display > Auto-rotate screen.
• Automatic screen rotation is ON when the shows.
2. Turn OFF automatic screen rotation: Settings > Display > Auto-rotate screen.
• Auto-rotate screen is OFF when the disappears.
Note
• The Home screen and the phone screens can only be displayed in portrait mode.
Getting to Know Your Phone

10
4.14 Overview of the Base
1 2 3
1 Paging / Register Button
Press this to page all handsets registered to the base.
Press and hold to register a new handset to the base (see Section 5.3 or 10.1).
2 Power Line In
Connect to the Micro-USB plug base power adaptor
3 Phone Line In
Plug your telephone line cord into this socket.
Getting to Know Your Phone

11
5 SETTING UP
5.1 Insert the Handset Battery
To access the battery compartment, carefully remove the cover by lifting from the
small cut-out in the bottom corner, as shown, and running your ngernail along the
edge, then carefully insert the battery into position and replace the cover.
5.2 Connecting the Power Cable and Telephone Line
Cord
IMPORTANT
To make or receive telephone calls, the base must be plugged into an electrical outlet
at all times, although the handset will still be able to access Wi-Fi without the base
unit. Only use the adapter and telephone line cord supplied with the product.
1. Plug the end of the power cable into Power Line In, and the mains adapter plug
into a mains power socket.
2. Plug one end of the phone line cable into Phone Line In, and the other end into a
telephone wall socket.
Setting Up
12
5.3 Registering Handset to Base
1. Press and hold the Register Button on the base for at least 5 seconds.
2. On the handset screen tap
> Settings > DECT manager > Handset
Registration > OK.
Note: Your Smart 64 Android Smart Home Phone Handset has been pre-registered
to the Base and should not need to be registered again. Handset registration is only
necessary when you buy extra handsets or if a handset has become faulty.
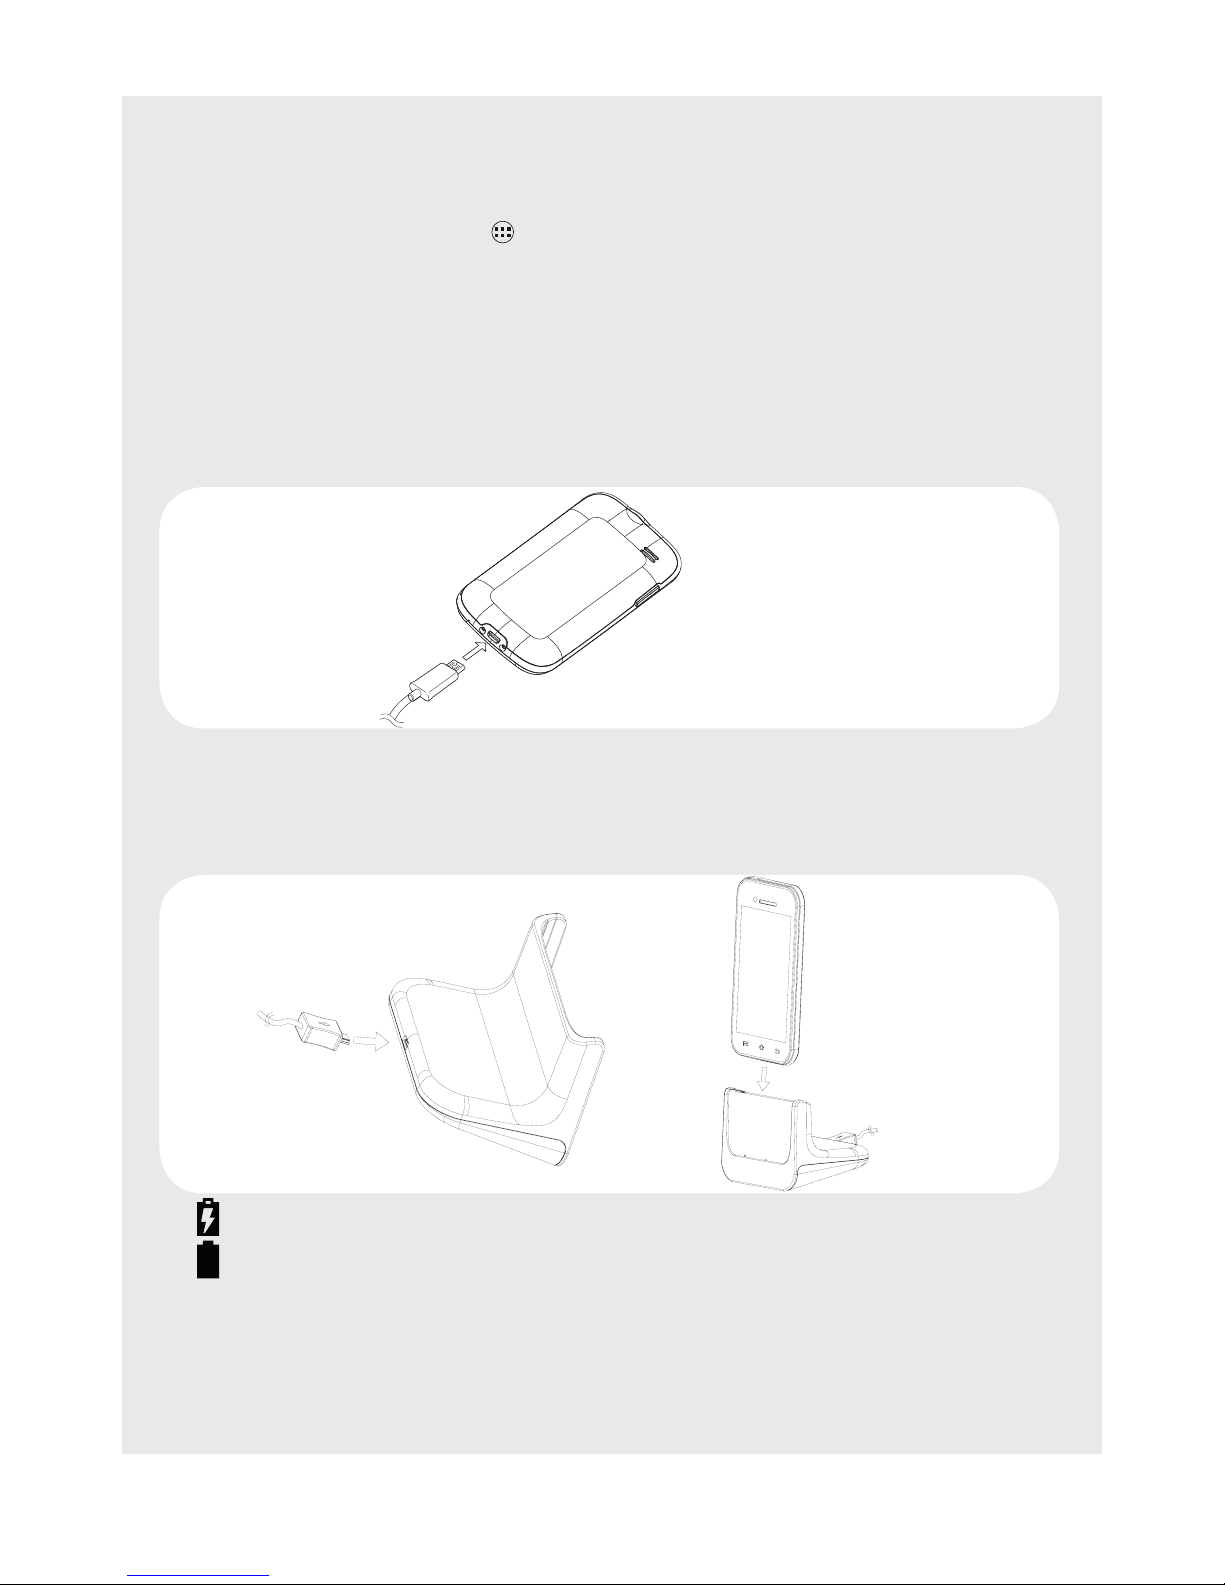
5.4 Charge the Handset Battery
When using your Smart 64 Android Smart Home Phone for the rst time, connect the
supplied power cord to the handset or stand the handset in a charger pod (if supplied), and charge for at least 6 hours.
• Means the battery is still charging.
•
Means the battery is fully charged.
IMPORTANT
Only use the supplied 5V DC USB power adapter with the USB-to-Micro USB cable
to charge the handset directly or via a charger pod.
Setting Up
13
Setting Up
5.5 Low Battery Warning
If the " Connect charger" message appears on the display, you should charge the
handset.
Tip: Tap
> Settings > Battery to see how your battery power is being used.
5.6 Battery Performance
When the battery is used for the rst time, it will not reach full capacity until it has
been fully discharged and recharged during normal use over several days. To keep
your battery in good condition, leave the handset charging for a few hours at a time.
Draining the battery completely at least once a month before recharging will help
prolong battery life.
Note: Battery life will also depend on your pattern of use. It is normal for your battery
to become slightly warm during use.
To help increase the battery operating time:
• Reduce screen brightness.
• Turn Wi-Fi off when not in use.
• Reduce the display sleep settings.
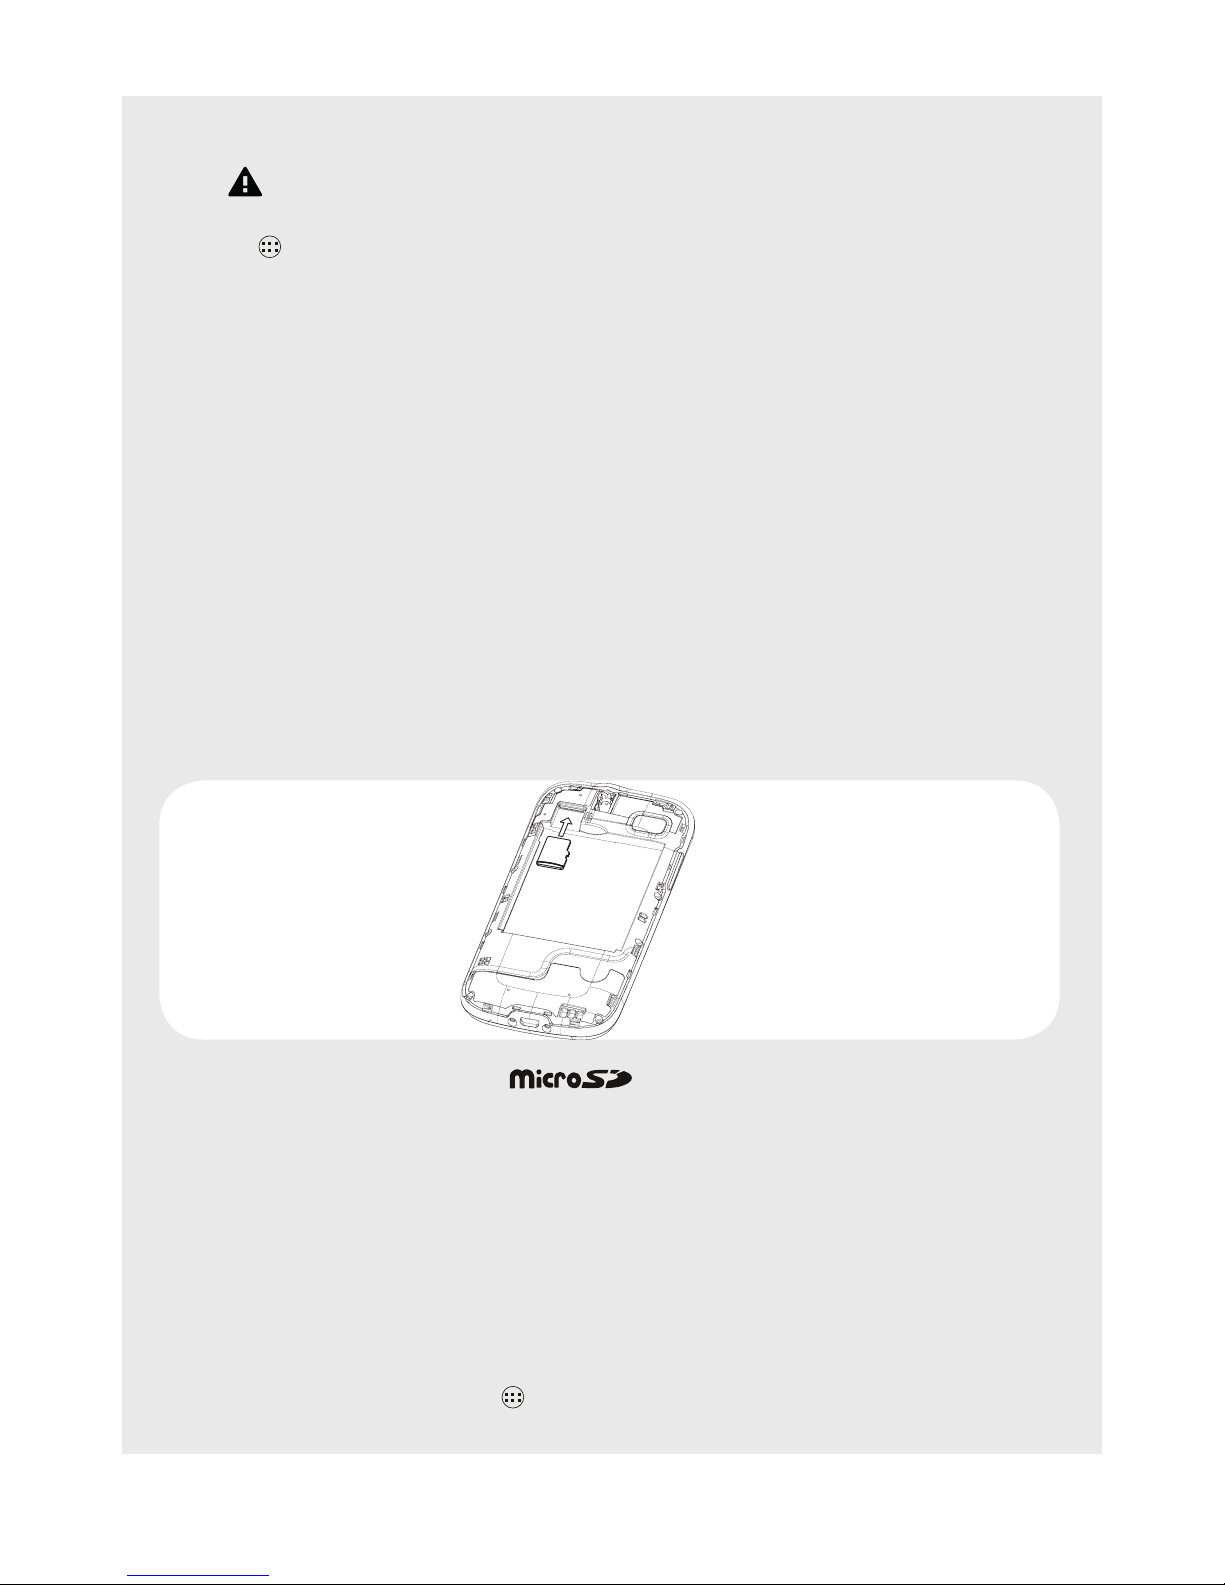
5.7 Inserting a Memory Card
Your handset supports micro SD cards up to 32GB. You can store music,
pictures, les and applications on a memory card and access them on the handset.
1. Turn your phone off.
2. To access the memory card slot, open the back case see "Inserting the handset
battery" and remove the battery.
3. Insert the memory card by sliding the card rmly into the memory card slot as
shown in the diagram.
4. Insert the battery and put the cover back on.
5. Turn the phone on.
Note: If the SD card fails to mount on the handset, check it is properly tted in the
memory card slot, and then, tap
> Settings > Storage > Mount SD card.

14
Setting Up
5.8 Removing the Memory Card
To remove the memory card:
1. Turn your phone off.
2. To access the memory card slot, open the back case see "Inserting the handset
battery".
3. Remove the battery.
4. Remove the memory card by sliding the card out of the memory card slot.
5. Insert the battery and put the cover back on.
6. Turn the phone on.
5.9 Switching Your Phone On
1. Press and hold Power on the top of the handset until the startup image appears.
It takes about one minute for the handset to power up completely.
2. By default, the phone screen will be locked, tap and slide the Lock Icon to the
right to unlock.
3. The Home screen will be displayed.
5.10 Switching Your Phone Off
1. Press and hold the Power button.
2. Tap Power Off.
3. Tap OK to conrm.
15
Setting Up
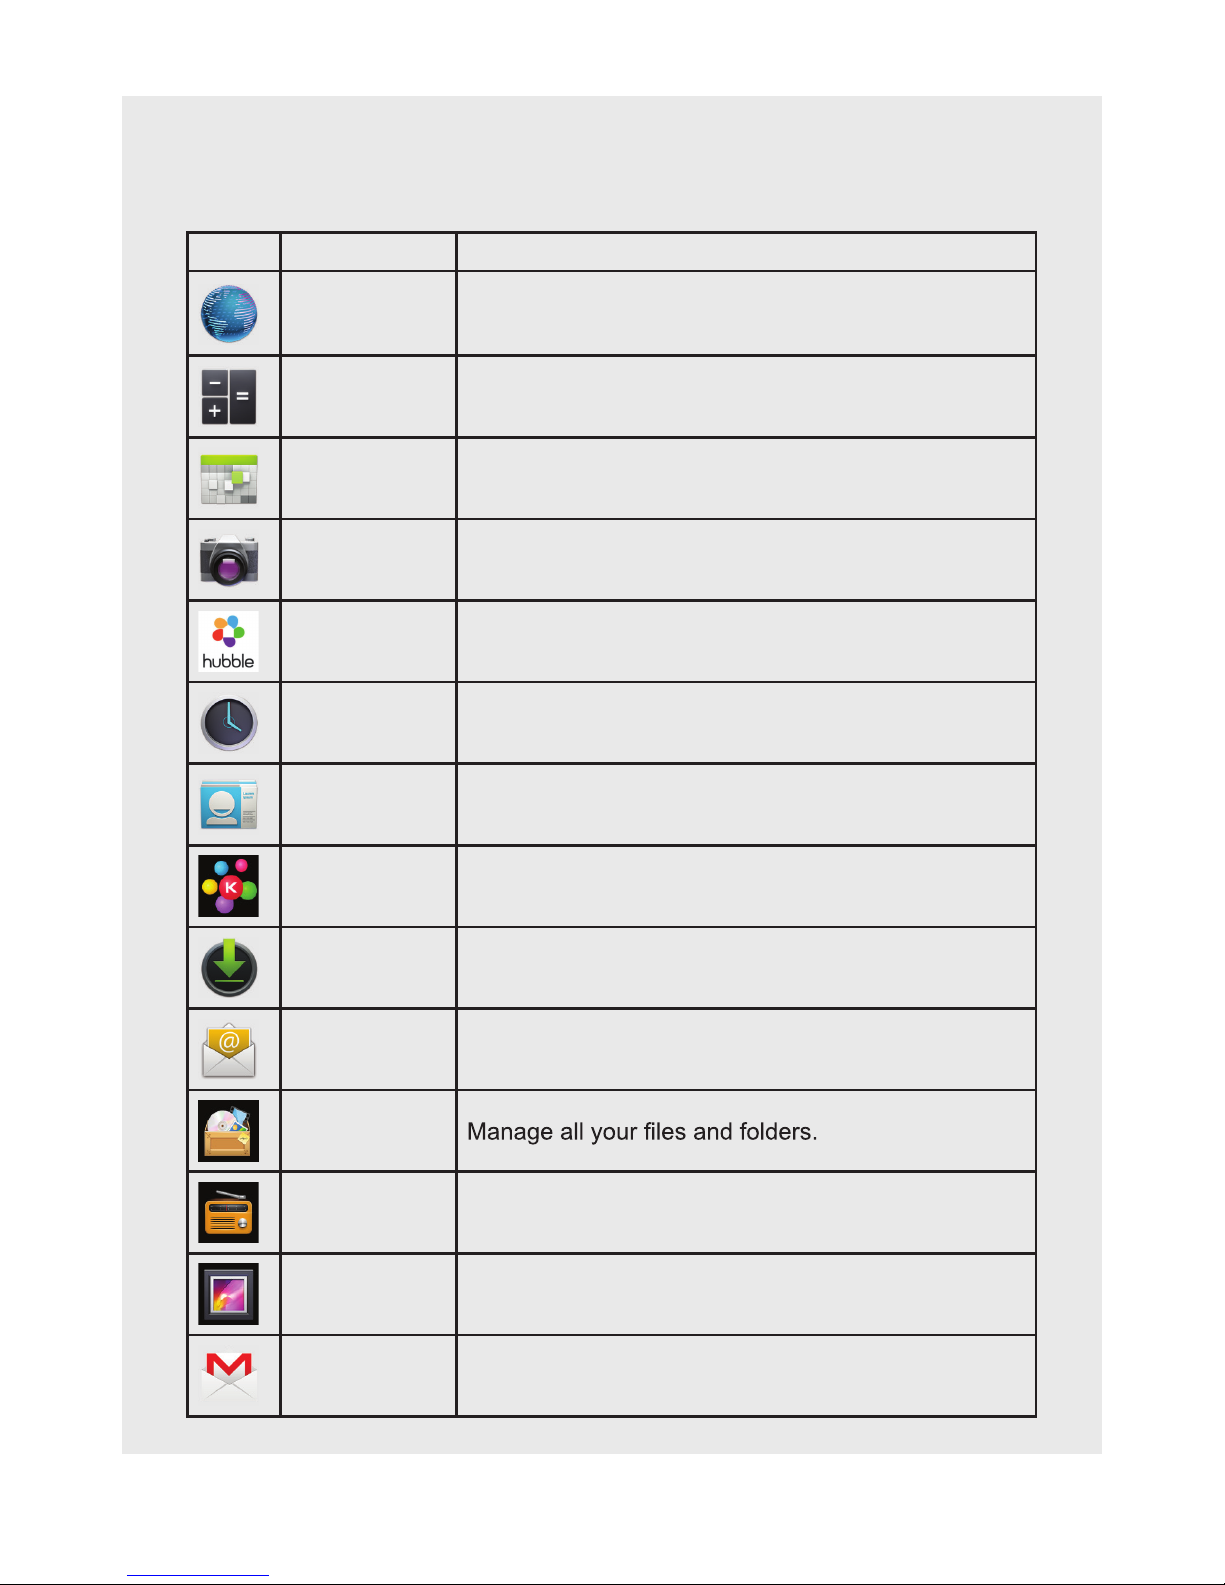
5.11 Bundled Applications
Your Smart 64 Android Smart Home Phone comes bundled with some applications.
Icon Application Description
Browser Browse the internet over Wi-Fi.
Calculator Perform arithmetic operations on numbers.
Calendar
Create events, manage meetings, and
appointments.
Camera Capture images and shoot video.
Hubble Home
Application supports Camera and Monitor working
on Hubble platform.
Clock View the time and set alarms.
Contacts Manage your contacts / phone book
DECT
Manager
Register your handset to the base.
Downloads Keep track of all your downloads.
Email General e-mail application.
File
Manager
FM Radio
Listen to your favourite radio station. FM radio is not
supported for some countries. Earphones required.
Gallery View all your images and videos.
Gmail Send and receive Google Mail.
61
Setting Up
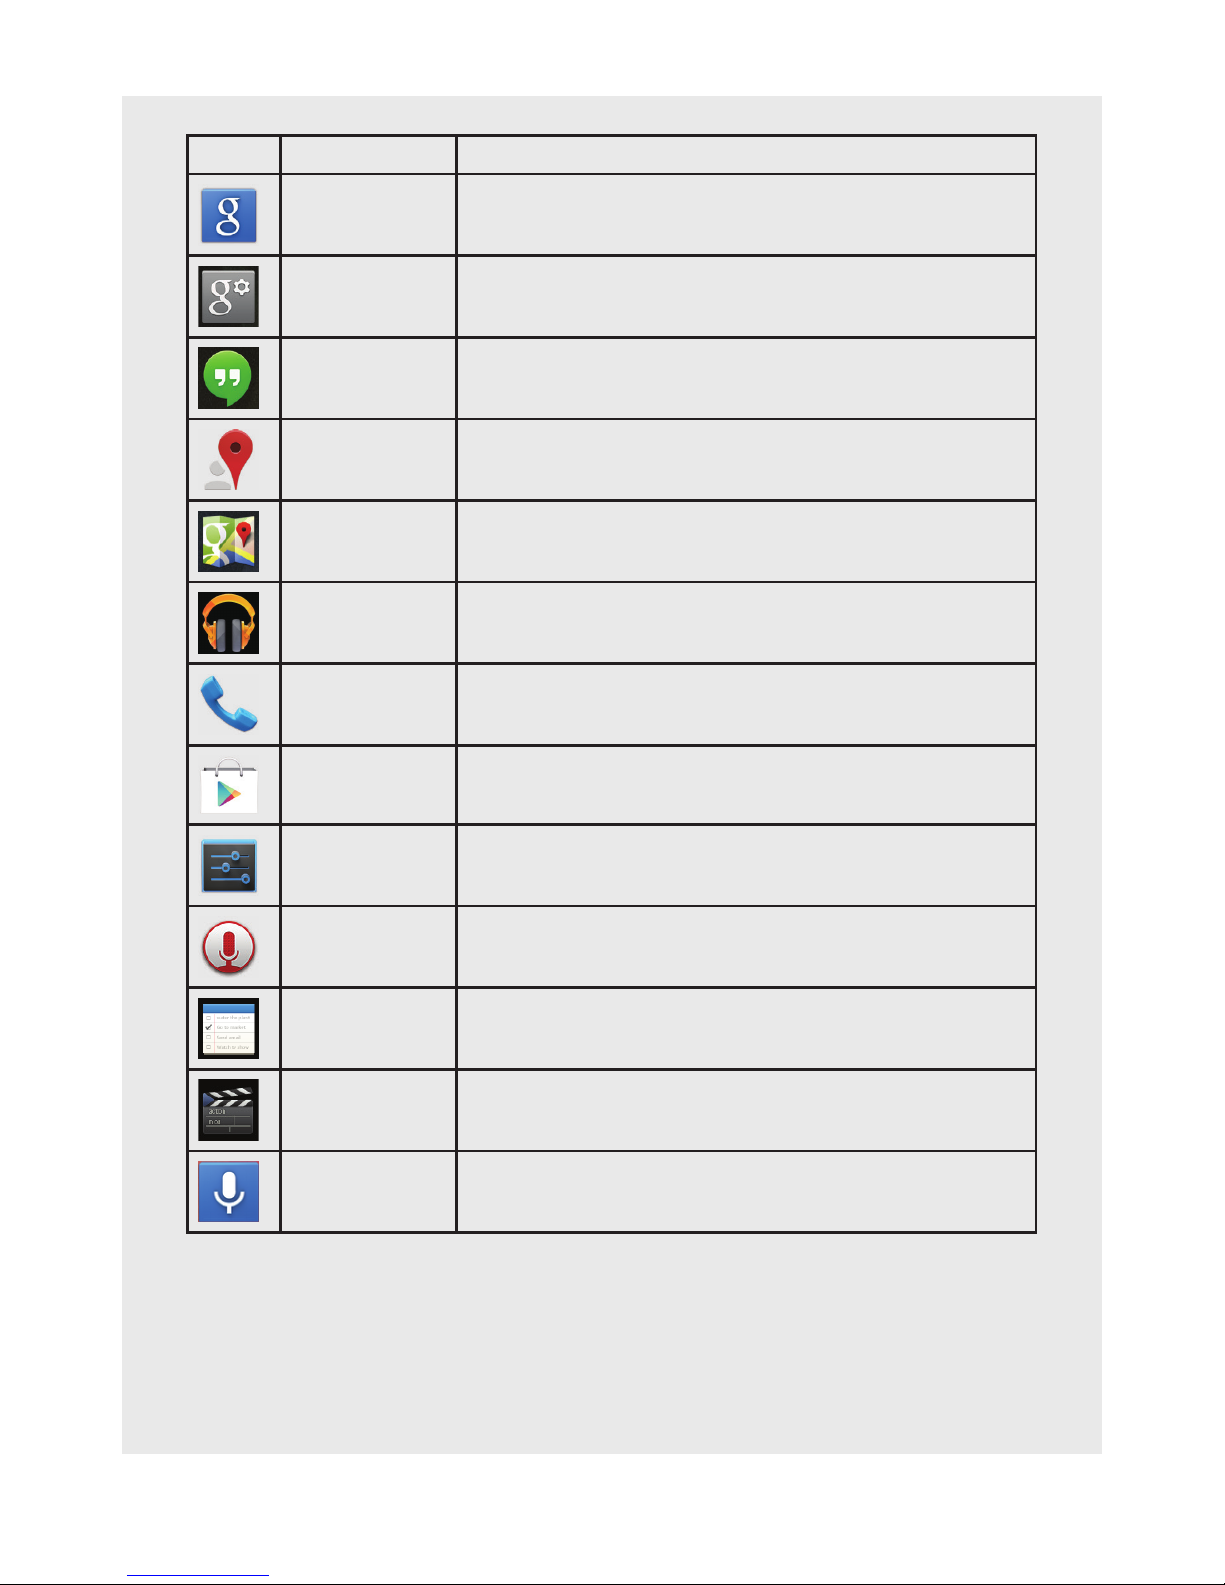
Icon Application Description
Google A Google search application.
Google
Settings
To set Google options.
Hangouts A Google application.
Local A Google maps application.
Maps To open Google maps.
Music Play music.
Phone Make and receive telephone calls.
Play Store To access the Google Play Store.
Settings
Access Wi-Fi & networks, device, personal, and
system settings.
Sound
Recorder
Record sounds.
ToDo Create and manage lists.
Video Player Watch video.
Voice Search To search on the handset using voice commands.

17
Keyboard
6 KEYBOARD
Your handset features an on-screen Qwerty keyboard, which has the same key
arrangement as that of a standard computer keyboard. The on-screen keyboard lets
you enter text such as contact information and email messages.
The keyboard appears automatically when you launch certain applications or when
you tap on a text or number eld.
Tip
To hide the on-screen keyboard tap .
6.1 Entering Text and Numbers
Tap on a text or number eld to bring up the keyboard. When entering text or
numbers, each letter or number will appear above the keyboard.
Tip
• Tap and hold a character to bring up accented versions.
• If the tilt orientation sensor is switched on, turn your handset to landscape mode
for a larger keypad.
6.2 Switch Between Input Modes
• Tap ABC/?123 to switch between letters, numbers or symbols
• Ta p
Ç
to switch between lower or upper case letters, or tap ?123 > =/< for more
symbol options.
• Tap and hold Ç to change to Ç for repeated upper case letters.
6.3 Change the Display Language
1. From the Home screen, tap .
2. Tap Settings > Language & input > Language.
3. Scroll to your preferred display language and tap to select.
The display will return to the previous menu screen, but in your selected language.
6.4 Modify Keyboard Settings
1. From the Home screen, tap .
2. Tap Settings > Language & input > Android keyboard
.
3. Tap to select or de-select desired settings, tap to return to the previous menu.

18
Keyboard
6.5 Add Words to User Dictionary
1. From the Home screen, tap .
2. Tap Settings > Language & input > Personal Dictionary.
3. Tap + .
4. Enter word in the edit box and tap Add to dictionary.
5. Tap
to return to the previous menu.
Tip
To edit a word in the Personal dictionary, tap the word, then modify it. To delete a
word, tap the
symbol at the bottom of the screen when in edit mode.
6.6 Accept or Reject Dictionary Suggestions
Depending on the application you are using, the phone dictionary will suggest
corrections or complete the word you are typing.
To accept the suggested word, simply tap on the suggested entry. To reject the
suggested word, simply continue typing.
For the dictionary to suggest changes, Spelling correction must rst be turned on
and set to the correct language.
1. Tap Settings > Language & input.
2. Tap the checkbox beside Spell checker.
• will appear to indicate that Spelling correction is on.
3. Tap
, then select Android spell checker or Google Spell Checker, and tap
its Globe
.
4. Select a language.
Tip
Words in your User Dictionary are included in this function, and can be added or
removed in Settings > Language & input > Personal Dictionary.
6.7 Edit Text
Tap and hold on the word you have typed to activate Edit text options and tap to
select an option.
19
Wi-Fi Settings
7 WI-FI® SETTINGS
The handset Wi-Fi can be accessed at any time using the settings menu.
To use Wi-Fi, you must rst make sure it is turned on.
1. From the Home screen, tap
> Settings.
2. Slide the bar next to Wi-Fi to the ON position.
3. Tap Wi-Fi and select a network you want to connect to.
• If the network is secured, you will be prompted to enter a password.
• If your Wi-Fi network is not shown on the menu, try scanning for it by tapping
> Scan.
4. Tap on the Password edit box to launch the on-screen keyboard.
5. Enter the Wi-Fi network password and tap Done.
6. Tap Connect.
• The handset will search for the IP address of the network you have selected.
This may take a few minutes.
• When connected,
appears on the status bar of the handset.
20
Date, Time, & Display
8 DATE, TIME, & DISPLAY
When using the phone for the rst time, or if the battery has been left uncharged, you
may need to set the time and date.
8.1 Set Date
1. From the Home screen, tap .
2. Tap Settings > Date & time > Set date.
3. Tap or slide each entry up or down to set Day, Month and Year.
4. Tap Done to conrm.
8.2 Set Time
1. Tap Settings > Date & time > Set time.
2. Tap or slide each entry up or down to set hour and minutes.
3. Tap to select AM or PM (only if 24-hour format is not selected).
4. Tap Done to conrm.
8.2.1 Set Time Zone
1. Tap Settings > Date & time > Select time zone.
2. Scroll to your time zone and tap it to select.
8.2.2 Select 24-Hour Format
Tap Settings > Date & time > Use 24-hour format to enable it, tap again to disable.
The 24-hour format is activated when appears next to the option.
8.2.3 Choose Date Format
1. Tap Choose date format to show the options.
2. Tap to select your preferred date format.
8.3 Display
1. Tap Settings > Display > Brightness.
• Slide the brightness control bar right or left to increase or decrease the screen
brightness.
2. Tap OK to conrm.
3. Adjust any other display settings, such as Font size, Auto-rotate screen or
Wallpaper..
• Tap to return to the settings list.
• Tap
to return to the Home screen.
Tip
Conserve battery life by reducing brightness levels.
 Loading...