


5
PRENSA ELÉCTRICA PARA GALLETAS
PRESSA ELETTRICA PER BISCOTTI
KOMPERNASS GMBH · BURGSTRASSE 21 · D-44867 BOCHUM
www.kompernass.com
ID-Nr.: KH1191-06/08-V1
KH 1191
PRENSA ELÉCTRICA PARA GALLETAS
Instrucciones de uso
PRESSA ELETTRICA PER BISCOTTI
Istruzioni per l'uso
ELECTRIC PASTRY PRESS
Operating instructions
ELEKTRISCHE GEBÄCKPRESSE
Bedienungsanleitung
KH 1191
qw
e
r
t
y
d
u
i
o
a
s

ÍNDICE PÁGINA
Indicaciones de seguridad 2
Uso conforme a lo previsto 2
Volumen de suministro 2
Datos técnicos 2
Descripción de aparatos 3
Antes de usarlo por primera vez 3
Montaje de la pistola repostera 3
Llenado del depósito 4
Formación de las galletas 4
Creación de adornos decorativos 5
Rellenado de masa para galletas o crema para decoración 5
Desmontaje de la pistola repostera 6
Consejos 6
Limpieza y cuidado 6
Evacuación 7
Garantía y servicio 7
Importador 7
Recetas 8
¡Guardar estas instrucciones para preguntas posteriores – e, igualmente entregar éstas, en caso de dar el
aparato a terceras personas!
- 1 -

PRENSA ELÉCTRICA
PARA GALLETAS
KH 1191
Indicaciones de seguridad
Para evitar riesgo de muerte por
descarga eléctrica:
• La tensión de la fuente de alimentación deberá
concordar con las indicaciones que aparecen
en la placa de características.
• En caso de una clavija de red dañada o cable
de red dañado, encomiende su sustitución a personal técnico autorizado o al servicio de
posventa con el fin de evitar riesgos.
• No exponga el aparato a lluvia ni lo utilice
jamás en entornos mojados o húmedos. Preste
atención de que no se moje o se humedezca
nunca el cable del aparato.
Para evitar que se genere riesgo de
incendio e impedir que se produzcan
lesiones:
• No permita utilizar el aparato a personas (incluidos los niños) cuyas facultades físicas, sensoriales o mentales, así como su falta de conocimientos o de experiencia, les impida hacer un uso
seguro del mismo si no están bajo vigilancia
por una persona encargada de su seguridad o
hayan sido instruidos como utilizar el aparato
correctamente
• Los niños deben estar bajo vigilancia para
asegurarse de que no juegan con el aparato.
• Procure que la clavija de red esté fácilmente
accesible y que el cable no se convierta en
una trampa donde tropezar.
Para actuar de manera segura:
• En caso de peligro desenchufe inmediatamente
el aparato.
• No usar el aparato para otros fines.
• No utilice el aparato al aire libre.
• ¡Esté siempre alerta! Esté siempre atento a lo
que hace y actúe con sentido común. De ningún
modo utilice el aparato si está desconcentrado
o
se siente indispuesto.
• Asegúrese de que el aparato se halla montado
totalmente y de forma correcta antes de ponerlo
en funcionamiento.
• Desenchufe el aparato si no lo está usando,
cuando desmonte sus com-ponentes y antes de
lavarlo.
Uso conforme a lo previsto
La pistola repostera KH 1191 se ha diseñado para
dar forma a galletas y decorar tartas y similares. Su
propósito se restringe exclusivamente al ámbito particular: el aparato no puede utilizarse con propósitos
comerciales.
Volumen de suministro
Pistola repostera eléctrica KH 1191
12 Plantillas
8 Boquilla
Instrucciones de uso
Datos técnicos
Tensión de red: 220 - 240 V ~50Hz
Potencia: 12 W
Tiempo FC: 1 minuto
Clase de protección: II
- 2 -
Periodo KB
Con el periodo KB (funcionamiento por un corto
periodo de tiempo) se indica durante cuánto tiempo puede funcionar un aparato sin que el motor se
sobrecaliente ni se dañe. Tras el periodo KB indicado deberá apagarse el aparato hasta que el motor
se haya enfriado.
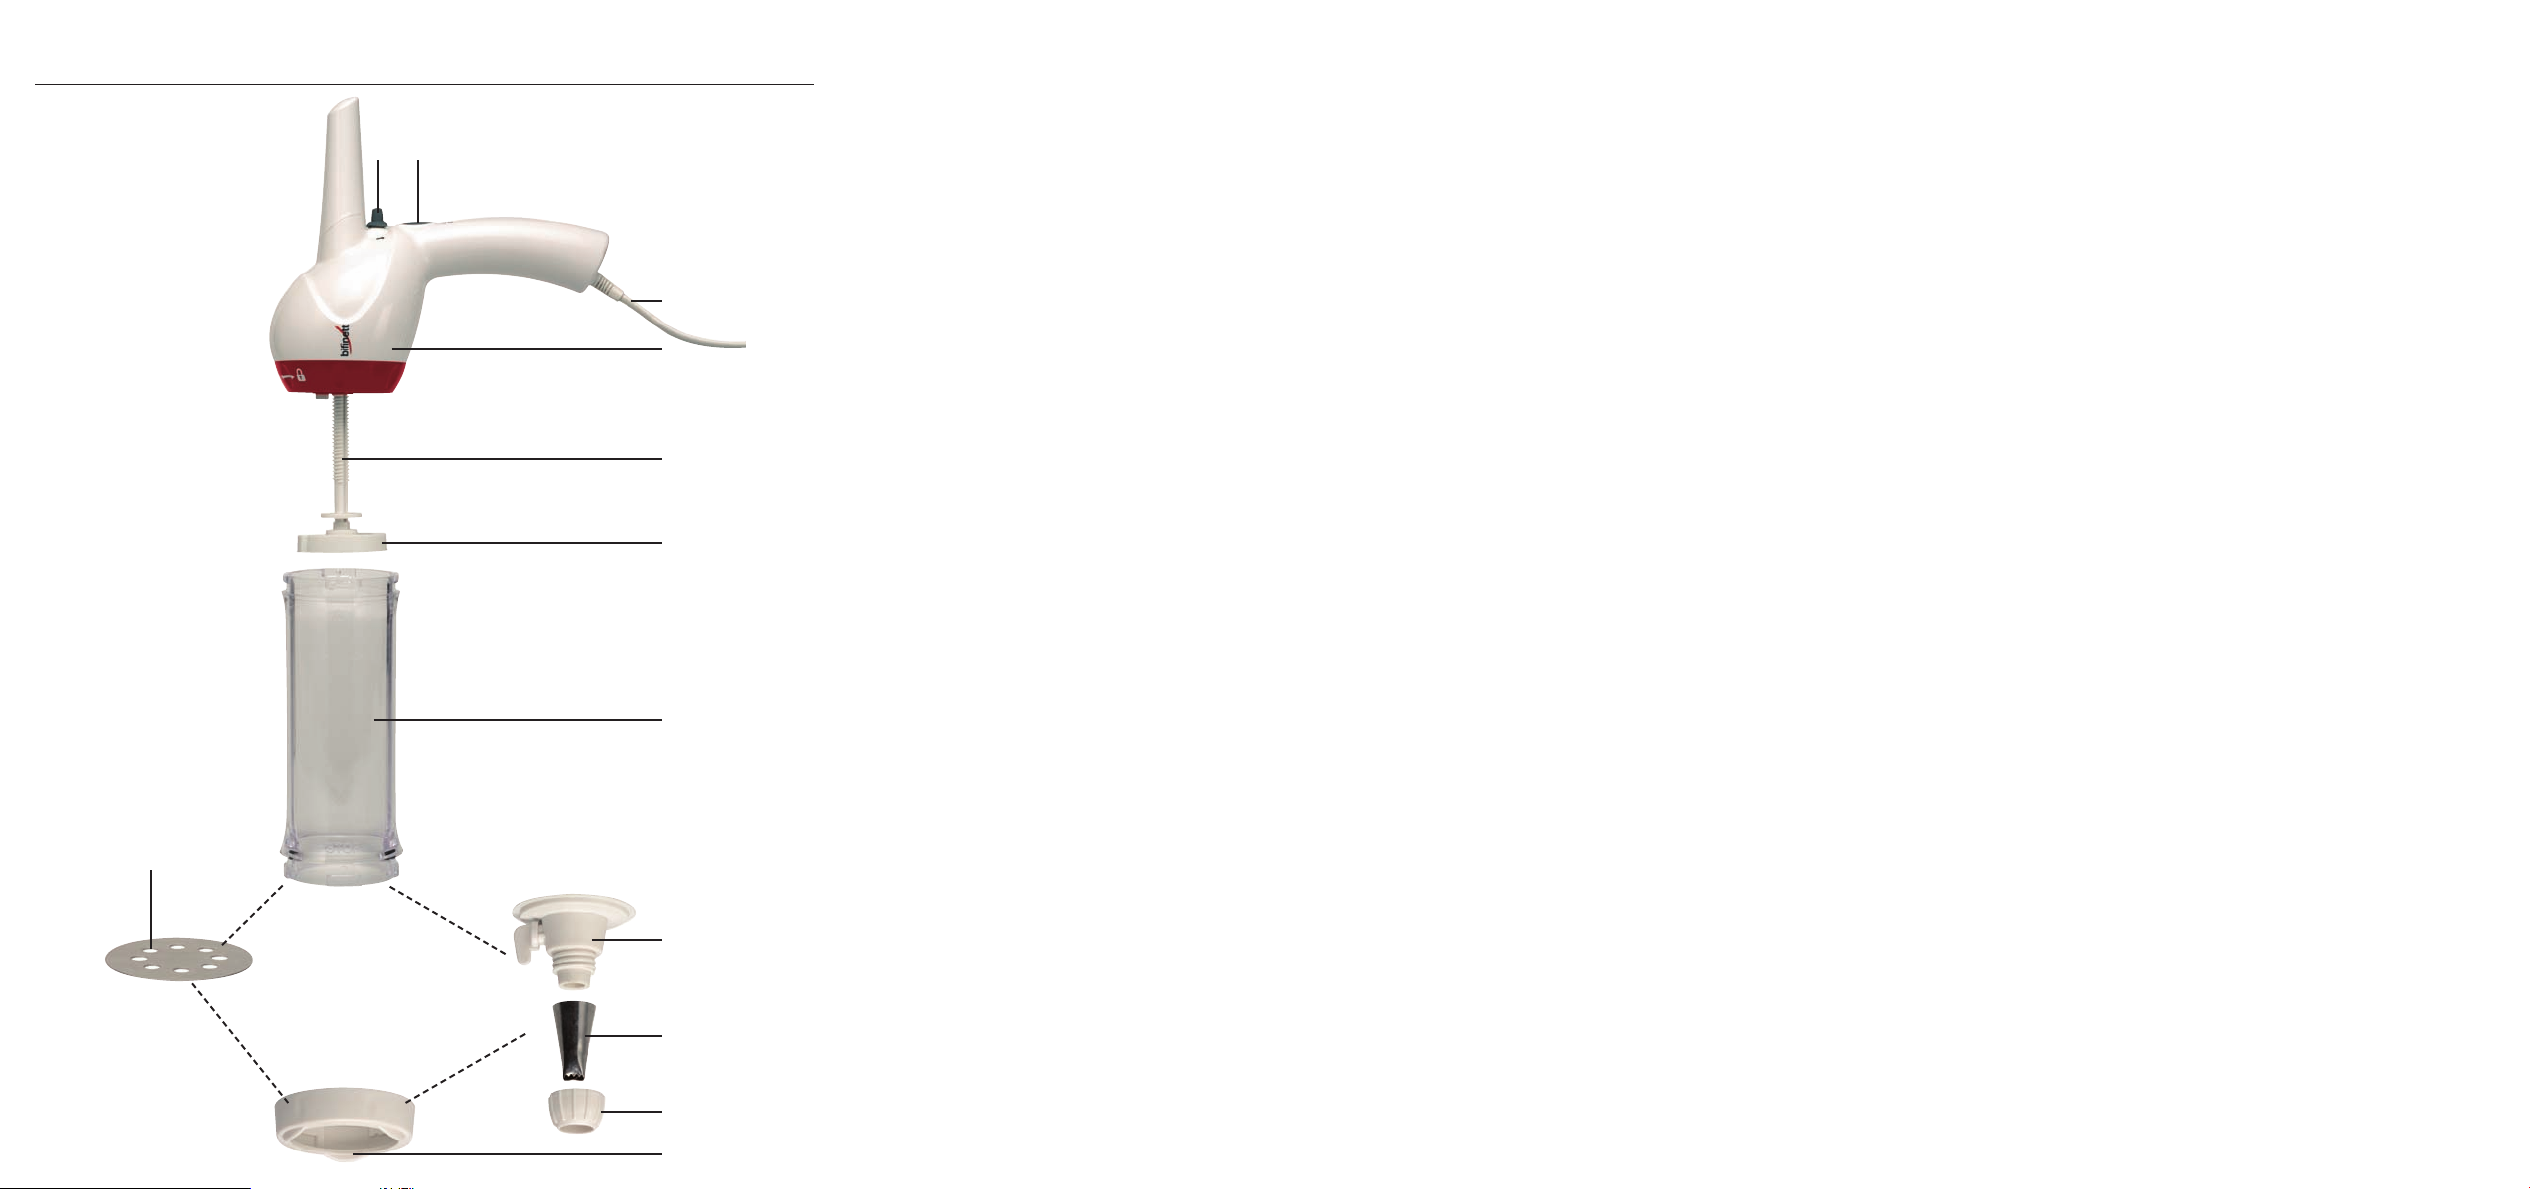
Descripción de aparatos
Interruptor de dirección
q
Botón de encendido
w
Cable de alimentación con clavija de red
e
Unidad de motor
r
Varilla de rosca
t
Disco
y
Depósito
u
Adaptador de boquilla con cierre
i
Boquilla
o
Conexión de adaptador
a
Aro de cierre
s
Plantillas
d
Antes de usarlo por primera
vez
Retire la pistola repostera y todos los accesorios del
paquete y deseche la totalidad del material de
embalaje.
Limpie todos los accesorios tal y como se describe
en la sección "Limpieza y cuidados".
Montaje de la pistola repostera
ADVERTENCIA:
Desenchufe el aparato eantes de montar los
componentes.
Colocar la varilla de rosca con el disco
1. Coloque el extremo de la varilla de rosca ten
la unidad de motor
pestañas del interior de la unidad de motor
encajen en el carril de guía de la varilla t.
2. Introduzca la varilla de rosca
en la unidad de motor rhasta que encaje.
Montaje del depósito
Indicación:
¡Para que funcione la pistola repostera es necesario
montar el depósito
1. Deslice el contenedor
modo que los carriles del interior del contenedor
se agarren a las muescas del disco y.
u
2. Inserte el depósito
de forma que la flecha del contenedor
te al candado abierto de la unidad de
motor
3. Gire el depósito
al candado cerrado de la unidad motor
4. Introduzca la clavija de red
enchufe.
5. Coloque el interruptor de dirección
flecha hacia abajo .
6. Presione la tecla de conexión
disco
7. Extraiga la clavija de red
enchufe.
.
r
se haya retirado hasta la marca MAX.
y
. Asegúrese de que las
r
con el disco
t
!
u
sobre el disco y, de
u
en la unidad de motor r,
u
hasta que la flecha apunte
u
en una base de
e
q
hasta que el
w
de la base de
e
r
apun-
u
r
sobre la
y
.
- 3 -
Montaje de las plantillas
Cuando el disco yy el depósito uestén
montados:
1. Seleccione la plantilla
2. Coloque la plantilla
3. Ponga el aro de cierre
depósito
4. Gire el aro de cierre
flecha hasta que encaje .
u
.
deseada.
d
en el aro de cierre s.
d
con la plantilla den el
s
en el sentido de la
s
3. Haga un rollo con la masa de galletas / crema
para decorar. De esta forma es más fácil llenar
el depósito. Llene el depósito
masa.
con el rollo de
u
ADVERTENCIA:
Llene el depósito ucomo máximo hasta la marca
de MAX. Utilice rápidamente la masa que ha introducido.
Montaje de la boquilla
Cuando el disco yy el depósito uestén
montados:
1. Ponga el adaptador de boquilla
cierre
2. Ponga el aro de cierre
el depósito
3. Gire el aro de cierre
flecha hasta que encaje .
4. Elija una boquilla
5. Coloque la boquilla
6. Enrosque el aro del adaptador
boquilla
7. Coloque el cierre del adaptador de boquilla
en la posición „CLOSE“.
. La rosca debe estar hacia afuera.
s
con la plantilla ien
s
.
u
en el sentido de la
s
.
o
en el adaptador i.
o
en el adaptador de boquilla i.
o
en el aro de
i
sobre la
a
Llenado del depósito
La masa a trabajar debe estar a temperatura
ambiente. Si está demasiado blanda, déjela un
rato en el frigorífico.
1. Gire el depósito
candado abierto .
2. Retire el depósito
Deje la varilla de rosca
unidad de motor
, hasta que la flecha apunte al
u
de la unidad de motor r.
u
con el disco y en la
t
.
r
4. Coloque el depósito
, como se describe en el capítulo „Montar el
r
depósito“.
5. Enchufe
La pistola repostera está lista para funcionar.
el aparato.
e
en la unidad de motor
u
Formación de las galletas
Nota:
• Para crear las galletas utilice única y exclusiva-
mente las plantillas
• Forre la placa del horno con papel de hornear.
i
No utilice teflón, aceite ni papel engrasado, ya
que de hacerlo las galletas perderían la forma.
• Asegúrese que el aro de cierre
bien montado sobre el depósito
pósito
motor
1. Coloque el interruptor de dirección
flecha hacia arriba .
2. Sostenga un momento la pistola repostera sobre
la bandeja del horno.
3. Presione el botón
primera galleta.
está bien encajado con la unidad de
u
al encender el aparato.
r
suministradas.
d
hasta que se forme la
w
se encuentra
s
y que el de-
u
q
sobre la
Consejo:
Si es necesario, humedezca el interior del depósito
con agua antes de introducir la masa. De este
u
modo puede evitar que la masa se pegue a los
lados del depósito
u
.
- 4 -
4. Suelte el botón de conexión wy sostenga la
pistola repostera en otro lugar.
El tiempo que debe tener pulsado el botón
depende también del grosor y la forma que quiera
dar a las galletas.
Si presiona el botón
una galleta pequeña. Cuanto más tiempo tenga
pulsado el botón
galleta.
5. Repita el proceso hasta que haya formado el
número de galletas que desee.
brevemente, formará
w
, más grande será la
w
w
ADVERTENCIA:
Si la masa es demasiado pegajosa, introdúzcala
15 minutos en el frigorífico.
Creación de adornos
decorativos
ADVERTENCIA:
Si el disco yse bloquea durante el uso de la pistola,
puede deberse a que la crema o la masa sea demasiado dura. Retírela y añádale un poco de líquido, si es el
caso, en la totalidad de la masa o crema.
Rellenado de masa para galletas o crema para decoración
1. Coloque el interruptor de dirección qsobre la
flecha hacia abajo .
2. Presione la tecla de conexión whasta que la
varilla de rosca llegue a la marca MAX
PELIGRO:
Desenchufe eel aparato antes de proceder a rellenar la pistola de masa de galletas o de crema para
decorar.
y
.
Nota:
• Utilice la boquilla o exclusivamente para dar
forma a masas cremosas, como nata montada,
por ejemplo.
• La crema de decoración debe presentar una consistencia blanda y cremosa, ya que de otro modo
atascará la boquilla
• Para empezar, presione el botón de inicio
vemente para probar cómo responde la crema. La
crema puede tardar unos segundos en empezar
a salir.
1. Coloque el interruptor de dirección
flecha hacia arriba .
2. Coloque el cierre del adaptador de boquilla
en la posición „OPEN“.
3. Sostenga la pistola ligeramente inclinada.
4. Presione el botón de inicio
5. En el momento en que la crema de decoración
empiece a salir por la boquilla
stola para darle la forma decorativa que desee.
o
.
bre-
w
sobre la
q
i
.
w
, mueva la pi-
o
ADVERTENCIA:
Si la varilla de rosca tno retrocede, extraiga primero el aro de cierre
varilla de rosca
mantiene presionado el botón de encendido
3. Desenrosque el aro de cierre
w
y a continuación mueva la
s
ligeramente hacia atrás mientras
.
s
ADVERTENCIA:
Si es necesario, retire el depósito uy saque la masa
restante.
Si es el caso, retire también los restos de masa que
hayan podido acumulado detrás del disco
y
PELIGRO:
La unidad de motor rno puede sumergirse en
líquidos. Si es necesario limpiarla, utilice un paño
húmedo.
- 5 -
.
t
.

4. Si es preciso, limpie las piezas sucias de masa y
séquelas bien. (ver sección "Limpieza y
cuidados")
5. Vuelva a introducir la masa de galletas o la crema
para decorar en la pistola tal y como se ha descrito
y retome el proceso.
Desmontaje de la pistola
repostera
1. Coloque el interruptor de dirección qsobre la
flecha hacia arriba .
2. Presione la tecla de conexión
varilla de rosca
salga completamente.
t
PELIGRO:
Desenchufe eel aparato antes de proceder a rellenar
la pistola de masa de galletas o de crema para decorar.
3. Desenrosque el aro de cierre
4. Gire el depósito
apunte sobre el candado abierto .
5. Suelte el depósito
dad de motor
la varilla de rosca
, de manera que la flecha
u
de la uni-
u
. Ahora también puede retirar
r
con disco y.
t
hasta que la
w
.
s
• Si la masa es demasiado espesa para la pistola,
añádale una yema de huevo o un poco de
líquido.
• La masa de galletas guardada en el frigorífico
puede estar demasiado dura para trabajar con
ella.
• Si la masa para hacer galletas está demasiado
blanda para trabajar con ella, introdúzcala
unos 15 minutos en el frigorífico o añádale un
poco más de harina.
• Si la masa para hacer galletas contiene ingredientes finamente rallados (por ejemplo, nueces
o almendras), escoja una plantilla
grandes.
• Con algunas masas y algunas plantillas es conveniente trabajar rápido; con otras, es mejor
demorarse.
• Haga varias pruebas hasta dar con la técnica
que le permita crear las galletas que desea.
• Si quiere utilizar diferentes plantillas / boquillas,
utilice la misma hasta que se haya terminado la
masa / crema del depósito. Aproveche el momento de rellenado para cambiar la plantilla /
boquilla.
de orificios
d
Limpieza y cuidado
Consejos
• Retire de la pistola la masa que pueda haber sobrado con un cuchillo, una espátula o similar.
• La consistencia de la masa o de la crema debe
permitir que salga con facilidad por las aberturas de las plantillas
pero que al mismo tiempo mantenga la forma
una vez en el papel de hornear o en forma de
adorno decorativo.
• Si el aparato no se enciende, puede ser que la
masa o la crema sea demasiado espesa o que
la unidad de motor
correctamente sobre el depósito
o por la boquilla o,
d
no esté colocada
r
.
u
PELIGRO:
Extraiga la clavija de red ede la base de enchufe, antes de limpiar el aparato.
Como los restos de masa reseca son difíciles de eliminar, no se olvide de limpiar la pistola y las plantillas
que haya utilizado inmediatamente después de su
d
uso.
PELIGRO:
La unidad de motor rno puede sumergirse en
líquidos. Si es necesario limpiarla, utilice un paño
húmedo.
- 6 -
Para limpiar el aparado no utilice objetos puntiagudos ni cortantes. No utilice productos de limpieza
agresivos ni de acción química.
Desmonte por completo la pistola repostera.
Puede limpiar todas las piezas en el lavavajillas o
bien solución jabonosa suave, exceptuando la unidad de motor
dad de motor
. Todas las piezas excepto la uni-
r
, son aptas para lavavajillas.
r
Evacuación
En ningún caso deberá tirar el aparato
a la basura doméstica. Este producto
está sometido a la directiva europea
2002/96/EC.
Elimine el aparato a través de una empresa de
evacuación de basuras autorizada o por medio del
centro de evacuación de basuras municipal.
Tenga en cuenta las normativas actuales en vigor.
En caso de duda póngase en contacto con el
centro de evacuación de basuras.
El material de embalaje debe desecharse
de forma respetuosa con el medio
ambiente.
Garantía y servicio
Con este aparato recibe usted 3 años de garantía
desde la fecha de compra. El aparato ha sido fabricado cuidadosamente y ha sido probado antes de
su entrega. Guarde el comprobante de caja como
justificante de compra. Si necesitara hacer uso de
la garantía, póngase en contacto por teléfono con
su punto de servicio habitual. Éste es el único
modo de garantizar un envío gratuito.
La garantía cubre los defectos de fabricación o del
material, pero no las piezas sujetas a desgaste y
los daños sufridos por las piezas frágiles. Este producto ha sido diseñado exclusivamente para el uso
particular y no para el uso industrial.
En caso de manipulación indebida e incorrecta, uso
de la fuerza y en caso de abrir el aparato personas
extrañas a nuestros centros de asistencia técnica
autorizados, la garantía pierde su validez. Esta garantía no reduce en forma alguna sus derechos
legales.
Kompernass Service España
C/Invención 7
Polígono Industrial Los Olivos
28906 Getafe – Madrid
Tel.: 902/430758
Fax: 91/6652551
e-mail: support.es@kompernass.com
Importador
KOMPERNASS GMBH
BURGSTRASSE 21
44867 BOCHUM, GERMANY
www.kompernass.com
- 7 -

Recetas
Galletas 2
Puede utilizar las masas preparadas que encontrará
en los mercados con la pistola repostera.
Galletas 1
Ingredientes:
150 g de mantequilla
100 g azúcar fino
1 sobrecito de vainilla azucarada
1 clara de huevo
200 g de harina
1 pellizco de sal
• Batir la mantequilla hasta que adquiera una consistencia cremosa, añadir el azúcar, la sal, la vainilla en polvo y las yemas enteras y batir la
masa con las varillas durante 8 minutos.
• Agregar la harina, introducir la masa en la pistola repostera.
• Forrar la placa del horno con papel de hornear.
Formar galletas de pequeñas dimensiones con
la pistola repostera sobre la placa.
• Hornear 12-15 minutos a 175-190 ˚C con el
ventilador.
• Retirar del horno cuando los bordes de las galletas estés dorados. Deje que las galletas se enfríen sobre la propia placa.
Ingredientes:
125 g de mantequilla
125 g de azúcar fino
1 sobrecito de vainilla azucarada
1 huevo
1 clara de huevo
250 g de harina
1 pellizco de sal
• Mezclar la mantequilla, el azúcar, la vainilla
azucarada, la sal, el huevo y
la clara hasta que adquieran una consistencia
cremosa, agregar y mezclar la harina.
• Forrar la placa del horno con papel de hornear.
Formar galletas de pequeñas dimensiones con
la pistola repostera sobre la placa.
• Hornear 12-15 minutos a 175-190 ˚C con el
ventilador.
• Sumergir las galletas en la crema
fundida de cobertura.
Consejo: Si desea dar un toque oscuro
a las galletas, sustituya el sobrecito de vainilla azucarada por 30 g de cacao. Elimine la sal y añada
en su lugar 1 cucharada de agua.
El tiempo de horneado puede variar en funci-
ón de las dimensiones de las galletas.
Consejo: Funda chocolate negro de repostería al
baño María. Vierta encima de cada galleta 1 cucharada de chocolate fundido y decore con mitades de nueces.
El tiempo de horneado puede variar en funci-
ón de las dimensiones de las galletas.
- 8 -

INDICE PAGINA
Avvertenze di sicurezza 10
Uso conforme 10
Fornitura 10
Dati tecnici 10
Descrizione dell'apparecchio 11
Prima del primo impiego 11
Montaggio della siringa elettrica per pasticceria 11
Riempimento del contenitore 12
Produzione dei pasticcini 12
Applicazione delle decorazioni 13
Aggiunta di impasto o pasta per decorazioni 13
Smontaggio della siringa elettrica per pasticceria 14
Consigli 14
Pulizia e cura 14
Smaltimento 15
Garanzia e assistenza 15
Importatore 15
Ricette 16
Conservare le presenti istruzioni per consultarle in futuro; in caso di cessione dell'apparecchio a terzi,
consegnare anche le istruzioni!
- 9 -

PRESSA ELETTRICA PER
BISCOTTI KH 1191
Avvertenze di sicurezza
Per evitare il pericolo di morte per
scossa elettrica:
• La tensione della presa di corrente deve corrispondere ai dati indicati sulla targhetta dell'apparecchio.
• Fare sostituire immediatamente la spina o il cavo
di rete danneggiato da personale specializzato
autorizzato o dal centro di assistenza ai clienti,
per evitare possibili danni.
• Non esporre l'apparecchio alla pioggia e non
utilizzarlo mai in ambienti umidi o bagnati. Impedire che il cavo elettrico si inumidisca o si bagni
durante l'utilizzo.
Per un utilizzo sicuro:
• In caso di pericolo staccare immediatamente la
spina dalla presa di corrente.
• Non utilizzare mai l'apparecchio per scopi non
conformi alla destinazione d'uso.
• Non utilizzare l'apparecchio all'aperto.
• Agire con costante attenzione! Riflettere sempre
su ciò che si sta facendo e agire in modo razionale. Non utilizzare mai l'apparecchio senza la
massima concentrazione o in caso di malessere
fisico.
• Assicurarsi che l'apparecchio sia stato montato
correttamente e completamente prima di metterlo
in funzione.
• Estrarre la spina dalla presa di corrente in caso
di inutilizzo dell'apparecchio, prima di smontare
dei pezzi e prima della pulizia.
Uso conforme
Per evitare il pericolo di incendio
e lesioni:
• Questo apparecchio non è indicato per l'uso
da parte di persone (inclusi bambini) con limitate
capacità fisiche, sensoriali o mentali o prive
dell'esperienza e/o della conoscenza necessaria,
a meno che tali persone non vengano sorvegliate
da un responsabile per la sicurezza o abbiano
ricevuto indicazioni sull'impiego dell'apparecchio.
• Sorvegliare i bambini per assicurarsi che non
giochino con l'apparecchio.
• Collocare la spina di rete in un luogo facilmente
accessibile in caso di pericolo e collocare il cavo
in modo che non costituisca un elemento di
intralcio.
La siringa elettrica per pasticceria KH 1191 è stata
progettata per creare pasticcini e decorare torte e
simili. Essa è prevista esclusivamente per l'uso privato
e non per scopi commerciali.
Fornitura
Siringa elettrica per pasticceria KH 1191
12 dischi di decorazione
8 beccucci
Istruzioni per l'uso
Dati tecnici
Tensione di rete: 220 - 240 V ~50 Hz
Potenza: 12 W
Tempo di funzionamento
abbreviato: 1 minuto
Classe di protezione: II
- 10 -

Tempo di funzionamento abbreviato
Il tempo di funzionamento abbreviato indica il tempo
di funzionamento dell'apparecchio senza pericolo
di surriscaldamento e di guasti al motore. Dopo l'uso
per il tempo di funzionamento abbreviato indicato,
l'apparecchio dev'essere spento fino al completo
raffreddamento del motore.
Descrizione dell'apparecchio
Commutatore di direzione
q
Tasto di avvio
w
Cavo di rete con spina di rete
e
Unità motore
r
Asta filettata
t
Disco pressore
y
Contenitore
u
Adattatore per beccucci con blocco
i
Beccucci
o
Chiusura dell'adattatore
a
Anello di chiusura
s
Dischi di decorazione
d
Prima del primo impiego
Prelevare la siringa elettrica per pasticceria e tutti
gli accessori dalla confezione ed eliminare tutto il
materiale di imballaggio.
Pulire tutti gli accessori come descritto al capitolo
"Pulizia e manutenzione".
Montaggio della siringa elettrica
per pasticceria
Suggerimento:
estrarre la spina edalla presa di rete prima di
montare i pezzi.
Inserire l'asta filettata con il disco
pressore
1. Inserire l'estremità dell'asta filettata tnell'unità
motore
motore
2. Spingere l'asta filettata
fino all'arresto nell'unità motore r.
. Fare rientrare i perni all'interno dell'unità
r
nelle guide dell'asta filettata t.
r
con il disco pressore
t
y
Montaggio del contenitore
Il contenitore udev'essere montato, altrimenti
la siringa elettrica per pasticceria non funzionerà!
1. Spingere il contenitore usul disco pressore
facendo in modo che le guide all'interno del
contenitore
pressore
2. Inserire il contenitore
cendo in modo che la freccia sul contenitore
sia rivolta verso il lucchetto aperto dell'unità
motore
3. Ruotare il contenitore
freccia in direzione del lucchetto chiuso dell'unità motore
4. Inserire la spina
5. Impostare il commutatore di direzione
freccia verso il basso .
6. Premere il tasto di avvio
pressore
MAX.
7. Staccare la spina
si aggancino alle tacche del disco
u
.
y
sull'unità motore rfa-
u
.
r
fino a posizionare la
u
.
r
nella presa di corrente.
e
fino a quando il disco
w
sarà tornato indietro alla marcatura
y
dalla presa di corrente.
e
q
y
u
sulla
Montaggio dei dischi di decorazione
Dopo aver montato il disco pressore ye il contenitore
:
u
1. Selezionare il disco di decorazione desiderato
2. Collocare il disco di decorazione
di chiusura
3. Collocare l'anello di chiusura
decorazione
4. Ruotare l'anello di chiusura
freccia, fino all'innesto .
.
s
sul contenitore u.
d
d
con il disco di
s
in direzione della
s
d
nell'anello
.
- 11 -

Montaggio dei beccucci
Dopo aver montato il disco pressore ye il contenitore
:
u
1. Collocare l'adattatore per i beccucci
di chiusura
verso l'esterno.
2. Collocare l'anello di chiusura
per i beccucci
3. Ruotare l'anello di chiusura
freccia, fino all'innesto .
4. Selezionare un beccuccio
5. Collocare il beccuccio
beccucci
6. Avvitare la chiusura dell'adattatore
cuccio
7. Impostare il blocco dell'adattatore per i beccucci
. La filettatura dev'essere rivolta
s
s
sul contenitore u.
i
s
.
o
sull'adattatore per i
o
.
i
sull'adattatore per i beccucci i.
o
su „CLOSE“.
i
nell'anello
i
con l'adattatore
in direzione della
sul bec-
a
Riempimento del contenitore
L'impasto da lavorare dev'essere a temperatura
ambiente. Se risultasse troppo morbido, collocarlo per breve tempo in frigorifero.
1. Ruotare il contenitore
sia rivolta verso il lucchetto aperto .
2. Prelevare il contenitore
Lasciare l'asta filettata
nell'unità motore r.
y
Suggerimento:
inumidire eventualmente l'interno del contenitore
con acqua, prima di inserire l'impasto. In tal modo
è possibile evitare che l'impasto si attacchi alle pareti
del contenitore
3. Sagomare l'impasto / la pasta per decorazioni
a forma di rotolo. In tal modo, sarà più facile
eseguirne l'inserimento nell'apparecchio. Riempire
il contenitore
u
.
u
in modo che la freccia
u
dall'unità motore r.
u
con il disco pressore
t
con questo rotolo.
u
Suggerimento:
riempire il contenitore unon oltre la marcatura
MAX. Elaborare subito l'impasto inserito.
4. Collocare il contenitore ucome descritto al
capitolo „Montaggio del contenitore“, sull'unità
motore
5. Inserire la spina
La siringa elettrica per pasticceria è ora pronta per
l'uso.
r
.
nella presa di corrente.
e
Produzione dei pasticcini
Suggerimenti:
• Per produrre biscotti utilizzare esclusivamente
i dischi di decorazione
• Preparare la piastra da forno con la carta da
forno. Non utilizzare Teflon, olio o carta oleata,
altrimenti i pasticcini si deformeranno.
• Controllare che l'anello di chiusura
mente posizionato sul contenitore
nitore
motore
1. Impostare il commutatore di direzione
freccia verso l'alto .
2. Tenere la siringa elettrica per pasticceria sospesa
brevemente sulla piastra da forno.
3. Premere sul tasto di avvio
primo biscotto.
4. Rilasciare il tasto di avvio
elettrica per pasticceria su un altro punto.
Il tempo di pressione del tasto di avvio
anche dallo spessore e dalla forma desiderata
per il biscotto. Premendo brevemente il tasto di
avvio
si preme il tasto di avvio
grande.
5. Ripetere tali fasi fino a ottenere un numero sufficiente di biscotti.
sia collocato correttamente sull'unità
u
, prima di accendere l'apparecchio.
r
, si forma un biscotto piccolo. Più a lungo
w
.
d
s
, e il conte-
u
, fino a ottenere il
w
e spostare la siringa
w
w
più il biscotto diventa
w
sia salda-
sulla
q
dipende
- 12 -

Suggerimento:
se l'impasto risultasse troppo appiccicoso, tenerlo
per 15 minuti in frigorifero.
Applicazione delle decorazioni
Aggiunta di impasto o pasta
per decorazioni
1. Impostare il commutatore di direzione qsulla
freccia verso il basso .
2. Premere il tasto di avvio
pressore
sarà arrivato alla marcatura MAX.
y
fino a quando il disco
w
Suggerimenti:
• Utilizzare i beccucci o esclusivamente per la
lavorazione di sostanze cremose, come ad es.
la panna.
• La pasta decorativa deve avere una consistenza
morbida e cremosa, altrimenti il beccuccio
otturerà.
• Inizialmente, premere brevemente il tasto di avvio
per vedere come si comporterà la pasta.
w
La pasta potrebbe eventualmente continuare a
fuoriuscire per un po'.
1. Impostare il commutatore di direzione
freccia verso l'alto .
2. Impostare il blocco dell'adattatore per i beccucci
su „OPEN“.
i
3. Tenere la siringa elettrica per pasticceria in posizione leggermente inclinata.
4. Premere il tasto di avvio POWER
5. Non appena la pasta di decorazione fuoriesce
dal beccuccio
per pasticceria in modo da creare la decorazione
desiderata.
, spostare la siringa elettrica
o
w
.
q
o
sulla
si
Suggerimento:
se il disco pressore ysi blocca durante l'uso, potrebbe significare che la pasta o l'impasto è troppo
solido. Rimuovere la pasta o l'impasto e aggiungere
eventualmente del liquido.
Pericolo
estrarre la spina edalla presa di corrente prima di
aggiungere l'impasto o la pasta per decorazioni.
:
Suggerimento:
se l'asta filettata tnon torna indietro, prelevare
prima l'anello di chiusura
avvio
verso l'interno.
3. Rimuovere l'anello di chiusura
spingere leggermente l'asta filettata
w
, e premendo il tasto di
s
.
s
t
Suggerimento:
se necessario, rimuovere anche il contenitore ue
prelevare il resto dell'impasto. Se necessario, rimuovere anche i resti di impasto raccoltisi dietro il disco
pressore
l'unità motore rnon dev'essere immersa in liquidi.
Pulirla se necessario con un panno umido.
4. Pulire le parti eventualmente sporche di impasto
5. Riempire la siringa elettrica per pasticceria, ri-
.
y
Pericolo
e asciugarle accuratamente. (v. capitolo „Pulizia
e cura“)
montare la siringa elettrica per pasticceria come
descritto e proseguire.
:
- 13 -

Smontaggio della siringa elettrica
per pasticceria
1. Impostare il commutatore di direzione qsulla
freccia verso l'alto .
2. Premere il tasto di avvio
estrazione dell'asta filettata
Pericolo
estrarre la spina edalla presa di corrente prima di
smontare l'apparecchio.
3. Avvitare l'anello di chiusura s.
4. Ruotare il contenitore
sia rivolta verso il lucchetto aperto .
5. Svitare il contenitore
È quindi possibile rimuovere l'asta filettata
con il disco pressore y.
:
fino alla completa
w
.
t
in modo che la freccia
u
dall'unità motore r.
u
t
• Se l'impasto contiene ingredienti finemente macinati (ad es. noci o mandorle), selezionare un disco
di decorazione
• Con certi impasti e dischi di decorazione, è necessario lavorare rapidamente, mentre con altri
è necessario lavorare lentamente, per ottenere
risultati ottimali.
• Eseguire delle prove, fino a ottenere il risultato
desiderato.
• Se si desidera utilizzare vari dischi di decorazione /
beccucci, lavorare prima l'impasto o la pasta
inserita nella siringa. Cambiare il disco di decorazione / beccuccio, solo al momento di riempire
nuovamente la siringa.
con aperture più grandi.
d
Pulizia e cura
Consigli
• Rimuovere eventualmente la pasta con un coltello,
una spatola o simili dalla siringa elettrica per pasticceria.
• La consistenza dell'impasto o della pasta dev'essere tale da consentirne la facile fuoriuscita dai
dischi di decorazione
l'aderenza alla carta da forno o alla base da
decorare.
• Se non si riuscisse ad accendere l'apparecchio,
ciò potrebbe dipendere dalla consistenza eccessiva dell'impasto o della pasta, o dal fatto che
l'unità motore
cata sul contenitore
• Qualora l'impasto sia troppo solido per consentirne la lavorazione, aggiungere un tuorlo d'uovo
o del liquido.
• L'impasto precedentemente collocato in frigorifero potrebbe essere troppo solido per consentirne
la lavorazione.
• Qualora l'impasto sia troppo liquido per consentirne la lavorazione, collocarlo in frigo per
circa 15 minuti o aggiungervi un po' di farina.
r
o dai beccucci o, e
d
non è stata correttamente collo-
.
u
Pericolo
prima di pulire l'apparecchio, disinserire la spina
dalla presa.
Poiché è più difficile rimuovere i resti di impasto essiccati, pulire la siringa elettrica per pasticceria e i dischi
di decorazione
Pericolo
l'unità motore rnon dev'essere immersa in liquidi.
Pulirla se necessario con un panno umido.
Non utilizzare oggetti acuminati o taglienti per la
pulizia. Non utilizzare detergenti aggressivi o chimici.
Smontare completamente la siringa elettrica per
pasticceria.
Tutti i pezzi, esclusa l'unità motore r, possono essere lavati in lavastoviglie o in una soluzione detergente delicata. Tutti i pezzi, esclusa l'unità motore
, sono idonei al lavaggio in lavastoviglie.
r
:
utilizzati subito dopo l'uso.
d
:
e
- 14 -

Smaltimento
Importatore
Non smaltire per alcun motivo l'apparecchio insieme ai normali rifiuti domestici. Il presente prodotto è conforme
alla direttiva europea 2002/96/CE.
Smaltire l'apparecchio presso un'azienda autorizzata
o presso l'ente comunale di smaltimento.
Rispettare le prescrizioni attualmente in vigore. In caso
di dubbi, mettersi in contatto con l'ente di smaltimento
competente.
Smaltire tutti i materiali dell'imballaggio in
modo ecologicamente conforme.
Garanzia e assistenza
Questo apparecchio è garantito per tre anni a partire dalla data di acquisto. L'apparecchio è stato
prodotto con cura e debitamente collaudato prima
della consegna. Conservare lo scontrino come prova
d'acquisto. Nei casi contemplati dalla garanzia,
mettersi in comunicazione telefonicamente con il
centro di assistenza più vicino. Solo in tal modo è
possibile garantire una spedizione gratuita della
merce.
La garanzia copre solo i difetti del materiale o di
fabbricazione. Il prodotto è destinato esclusivamente
all'uso domestico e non a quello commerciale.
La garanzia decade in caso di impiego improprio
o manomissione, uso della forza e interventi non
eseguiti dalla nostra filiale di assistenza autorizzata.
Questa garanzia non costituisce alcun limite ai diritti
legali del consumatore.
KOMPERNASS GMBH
BURGSTRASSE 21
44867 BOCHUM, GERMANY
www.kompernass.com
Kompernass Service Italia
Corso Lino Zanussi 11
33080 Porcia (PN)
Tel.: 0434/1851001
Fax: 0434/1851001
e-mail: support.it@kompernass.com
- 15 -

Ricette
Biscotti di pasta frolla 2
Con la siringa elettrica per pasticceria è possibile
lavorare impasti pronti reperibili in commercio.
Biscotti di pasta frolla 1
150 g di burro
100 g zucchero a velo
1 pacchetto di zucchero vanigliato
1 albume
200 g di farina (tipo 405)
1 pizzico di sale
• Montare il burro, aggiungere lo zucchero, il sale,
lo zucchero vanigliato e l'albume non sbattuto,
e lavorare l'impasto con il frullino a mano per
circa 8 minuti.
• Aggiungere la farina, e inserire l'impasto nella
siringa elettrica per pasticceria.
• Preparare la piastra da forno con la carta da
forno. Con la siringa elettrica per pasticceria
formare dei biscotti sulla piastra.
• Infornare per 12-15 minuti a 175-190˚ C con
forno ventilato.
• I margini dei biscotti devono assumere un colore
bruno-dorato. Fare raffreddare i biscotti sulla piastra.
Suggerimento: fondere a bagnomaria una glassa
di cioccolato fondente . Distribuire 1 cucchiaino di
glassa su ogni biscotto raffreddato e decorare con
gherigli di noce divisi a metà.
Ingredienti:
125 g di burro
125 g zucchero a velo
1 pacchetto di zucchero vanigliato
1 uovo
1 albume
250 g di farina (tipo 405)
1 pizzico di sale
• Montare a neve il burro, lo zucchero, lo zucchero
vanigliato, il sale, l'uovo e l'albume, aggiungere
quindi la farina.
• Preparare la piastra da forno con la carta da
forno. Con la siringa elettrica per pasticceria
formare dei biscotti sulla piastra.
• Infornare per 12-15 minuti a 175-190˚ C con
forno ventilato.
• Immergere i biscotti nella glassa fusa
Suggerimento: sostituire 1 pacchetto di zucchero
vanigliato con 30 g di cacao in polvere per ottenere
biscotti più scuri. Eliminare il sale e aggiungere invece
1 cucchiaio di acqua.
Il tempo di cottura varia a seconda delle dimensioni dei biscotti.
Il tempo di cottura varia a seconda delle dimensioni dei biscotti.
- 16 -

CONTENT PAGE
Safety instructions 18
Intended usage 18
Package contents 18
Technical data 18
Appliance description 19
Before the first use 19
Assembling the Biscuit Shaper 19
Filling the container 20
Shaping biscuits 20
Adding decorations 21
Refilling with pastry or decorative mixture 21
Disassembly of the Biscuit Shaper 22
Tips 22
Cleaning and care 22
Disposal 23
Warranty & Service 23
Importer 23
Recipes 24
Read the operating instructions carefully before using the appliance for the first time and preserve this
booklet for later reference. Pass the manual on to whomsoever might acquire the appliance at a later date.
- 17 -

ELECTRIC PASTRY PRESS
KH 1191
Safety instructions
To avoid potentially fatal electric
shocks:
• The voltage of the power source must match the
details given on the plate affixed to the
appliance.
• Arrange for defective power plugs and/or
cables to be replaced at once by qualified technicians or our Customer Service Department.
• Do not expose the appliance to rain and never
use it in a humid or wet environment. Ensure that
the cable never gets damp or wet while the
appliance is in use.
Tips for safety:
• In cases of danger, immediately remove the
electrical plug from the socket.
• Never use the appliance for purposes other than
those for which it was designed.
• Do not use the appliance outdoors.
• Always be attentive! Always pay attention to
what you are doing and act with common sense.
Never use the appliance when you are distracted or don’t feel well.
• Ensure that the appliance is correctly and completely assembled before taking it into use.
• Remove the plug from the socket if the appliance
is not being used, when removing components
and for cleaning.
Intended usage
To avoid the risks of fire or injuries:
• This appliance is not intended for use by persons
(including children) with reduced physical, sensorial or mental cabilities, or lack of experience
and knowledge, unless they have been given
supervision or instruction concerning use of the
appliance by a person responsible for their
safety.
• Children should be supervised to ensure that
they do not play with the appliance.
• Ensure that the power plug is quickly accessible
in cases of danger, and that there is no danger
of tripping over the cable.
The Biscuit Shaper KH 1191 is intended for the
shaping of biscuits and for decorating cakes etc. It is
intended exclusively for private, not commercial,
applications.
Package contents
Electrical Biscuit Shaper KH 1191
12 Motif discs
8 Nozzles
Operating instructions
Technical data
Mains voltage: 220 - 240 V ~50Hz
Power rating: 12 W
Continuous
operating time: 1 Minute
Protection class: II
- 18 -

CO Time
The CO Time (Continuous Operation Time) details
how long an appliance can be operated without
the motor overheat-ing and becoming damaged.
After the appliance has run for this period it must be
switched off until the motor has cooled itself down.
Inserting the threaded rod with pusher
1. Place the end of the threaded rod tin the
motor unit
motor unit
threaded rod
2. Slide the threaded rod
far as it will go into the motor unit
. Ensure that the pins inside the
r
engage with the guide rails on the
r
.
t
with the pusher yas
t
.
r
Appliance description
Direction switch
q
Start switch
w
Power cable with power plug
e
Motor unit
r
Threaded rod
t
Pusher
y
Container
u
Nozzle adapter with seal
i
Nozzles
o
Adapter lock
a
Lock ring
s
Motif discs
d
Before the first use
Take the Biscuit Shaper and all accessories from the
packaging and remove all packaging material.
Clean all of the components as described in the section
„Cleaning and care“.
Assembling the Biscuit Shaper
Note:
Remove the power plug efrom the wall socket before assembling accessories.
Assembling the container
Note:
The container umust be fitted, otherwise the
Biscuit Shaper will not function!
1. Slide the container uover the pusher ysuch
that the guide rails inside the container
ge in the in notches on the pusher
2. Place the container
that the arrow on the container
open lock on the motor unit
3. Turn the container
container points to the closed lock on the
motor unit
4. Insert the power plug
5. Place the direction switch
pointing downwards .
6. Press and hold the start button
pusher
marking.
7. Remove the power plug
.
r
has returned itself to the MAX
y
on the motor unit rso
u
u
r
until the arrow on the
u
into a wall socket.
e
onto the arrow
q
w
from the wall socket.
e
enga-
u
.
y
points to the
.
until the
Assembling motif discs
When the pusher yand container uare
assembled:
1. Select the desire motif disc
2. Place the motif disc
3. Place the lock ring
the container
4. Turn the lock ring
until it engages .
d
with the motif disc donto
s
.
u
in the direction of the arrow
s
.
d
into the lock ring s.
- 19 -

Assembling the nozzles
When the pusher yand container uare
assembled:
1. Place the nozzle adaptor
. The thread must point outwards.
s
2. Place the lock ring
onto the container u.
i
3. Turn the lock ring
until it engages .
4. Select a nozzle
5. Place the nozzle
6. Screw the adapter lock
on the nozzle adapter i.
7. Adjust the lock device on the nozzle adaptor
to "CLOSE".
o
s
s
.
o
into the lock ring
i
with the nozzle adaptor
in the direction of the arrow
on the nozzle adapter i.
over the nozzle
a
o
Filling the container
The pastry to be processed must be at room
temperature. If it is too soft, place it in the refrigerator for a short time.
1. Turn the container
the open lock .
2. Remove the container
Leave the threaded rod
the motor unit
Tip:
If need be, moisten the inner surface of the container
with water before filling it with pastry. Doing
u
so helps avoid having the pastry stick to the inner
surfaces of the container
3. Shape the pastry / decorating mixture to a roll.
This permits easier filling. Fill the container
with this pastry roll.
so that the arrow points to
u
from the motor unit r.
u
with the pusher y in
t
.
r
.
u
u
Note:
Fill the container uat the most to the MAX
marking. Process the pastry straight away.
4. Place the container uonto the motor unit ras
described in the chapter "Assembling the
container".
5. Insert the power plug
The Biscuit Shaper is now ready for use.
into a wall socket.
e
Shaping biscuits
i
Tips:
• se exclusively the motif discs dfor shaping the
biscuits.
• Line the baking tray with baking paper. Do not use
Teflon, fats or oil paper, as the biscuits then do
not keep their shape.
• Ensure that the lock ring
tainer
mounted on the motor unit
the appliance on.
1. Place the direction switch qonto the arrow
pointing upwards .
2. Direct the biscuit shaper over the baking tray.
3. Press on the start switch
has been formed.
4. Release the start switch
shaper at another position.
How long you must press the start switch
dependant on the desired size and shape of the
biscuit. If you press the start switch
ly, you will form a small biscuit. The longer you press
the start switch
5. Repeat the steps until you have shaped a sufficient
number of biscuits.
and that the container uis correctly
u
, the larger the biscuit will be.
w
sits firmly on the con-
s
before you switch
r
until the first biscuit
w
and direct the biscuit
w
only short-
w
w
is
Note:
Should the pastry be too sticky, place it in the refrigerator for 15 minutes.
- 20 -

Adding decorations
Refilling with pastry or
decorative mixture
Tips:
• Use the nozzles o exclusively for shaping
fluid-like substances, such as whipped cream.
• The decoration substance must have a soft and
creamy consistency, otherwise it will block the
nozzle
• Press the start switch
to see how the substance responds. It can happen
that the substance may continue to flow out for a
short time.
1. Place the direction switch
pointing upwards .
2. Place the lock device on the nozzle adaptor
onto "OPEN".
3. Hold the Biscuit Shaper at a slight angle.
4. Press the start switch
5. As soon as the decorative substance starts to flow
from the nozzle
accord with the decorative design you wish to
create.
o
.
only shortly to start with,
w
q
.
w
, move the Biscuit Shaper in
o
onto the arrow
i
Note:
Should the pusher yblock during use, it could be
that the substance or the pastry is too firm. Remove
all of the substance resp. the pastry and, if possible,
blend some fluids into it.
1. Place the direction switch qonto the arrow
pointing downwards .
2. Press and hold the start button
pusher
marking.
has returned itself to the MAX
y
w
until the
Danger!:
Remove the plug efrom the wall socket before
refilling the container.
Note:
Should the threaded trod not retract, first remove
the lock ring
pressed down, lightly push the threaded rod
w
to the rear.
3. Remove the lock ring
and, whilst holding the start switch
s
.
s
t
Note:
If need be, dismantle the container uand remove
the remaining pastry. If necessary, also remove any
pastry that may have collected behind the
pusher
y
.
Danger!:
The motor unit rmay NOT be submerged in water.
If necessary, it can be wiped clean with a moist
cloth.
4. Clean the parts that may be covered with pastry
and dry them well. (see chapter "Cleaning and
care")
5. Fill the Biscuit Shaper with pastry or the decorative substance, reassemble the Biscuit Shaper as
described and continue.
- 21 -

Disassembly of the Biscuit
Shaper
1. Place the direction switch qonto the arrow
pointing upwards .
2. Press and hold the start button
threaded rod
itself outwards.
has completely extended
t
Danger!:
Remove the power plug efrom the wall socket
before disassembling the appliance.
w
until the
• With some pastries and motif discs it is better to
work quickly, with others, better to work slowly.
• Simply use trial and error until you can produce
biscuits that match your expectations.
• If you want to use various motif discs and nozzles, first of all use all of the currently filled pastry
or decorative substance. Change the motif discs
and nozzles when you refill the Biscuit Shaper.
Cleaning and care
3. Unscrew the lock ring s.
4. Turn the container
directed at the open lock .
5. Loosen the container
The threaded rod
also be dismantled.
so that the arrow is
u
from the motor unit r.
u
with pusher ycan now
t
Tips
• If need be, remove residues from the Biscuit
Shaper with a knife, pastry scraper or similar.
• The consistency of the pastry or the decorative
substance should be such that it easily flows from
the motif discs
affixed onto the baking paper or the item being
decorated.
• Should the appliance refuse to start, it could be
that the pastry or the decorative substance is too
firm or that the container
attached to the motor unit
• If the pastry is too firm to be processed, knead in
some egg yolk or mix in some fluids.
• Biscuit pastry that has lain in the re-frigerator can
become too firm for processing.
• Should the pastry to be processed be too soft,
lay it in the refrigerator for approx. 15 minutes
or knead in a little more flour.
• If the biscuit pastry contains finely ground constituents (e.g. nuts or almonds), select a motif disc
with larger openings.
d
or nozzles oand remains
d
is not correctly
u
.
r
Danger!:
Remove the plug efrom the wall socket before
cleaning the appliance.
As it is difficult to remove dried-on pastry remains,
always clean the Biscuit Shaper and the motif discs
employed
directly after use.
d
Danger!:
The motor unit rmay NOT be submerged in
water. If necessary, this can be wiped clean with
a moist cloth.
Do not use sharp or abrasive objects for cleaning.
Do not use aggressive or chemical cleaning agents.
Dismantle the Biscuit Shaper completely.
You can clean all parts, except the motor unit r, in
the dishwasher or in a mild soapy water. All parts,
except the motor unit
, are dishwasher proof.
r
- 22 -

Disposal
Do not dispose of the appliance in your
normal domestic waste. This product is
subject to the European guideline
2002/96/EC.
Dispose of the appliance through an approved disposal centre or at your community waste facility.
Observe the currently applicable regulations.
In case of doubt, please contact your waste disposal
centre.
Dispose of all packaging materials in an
environmentally responsible manner.
Warranty & Service
DES Ltd
Units 14-15
Bilston Industrial Estate
Oxford Street
Bilston
WV14 7EG
Tel.: 0870/787-6177
Fax: 0870/787-6168
e-mail: support.uk@kompernass.com
Irish Connection
Harbour view
Howth
Co. Dublin
Tel: 00353 (0) 87 99 62 077
Fax: 00353 18398056
e-mail: support.ie@kompernass.com
The warranty for this appliance is for 3 years from
the date of purchase. This appliance has been
manufactured with care and meticulously examined
before delivery. Please retain your receipt as proof
of purchase date. Should a claim need to be made
under the warranty, please make contact by telephone with our service department. Only in this
way can a post-free despatch for your goods be assured.
The warranty covers ONLY claims for material and
maufacturing defects, not for wearing or consumable or for damage to fragile components. This product is for private use only and is not intended for
commercial applications.
The warranty will become void in the event of abusive and improper handling, use of force and internal
tampering not carried or approved by our authorized service branch. Your statutory rights are not
restricted in any way by this warranty.
Importer
KOMPERNASS GMBH
BURGSTRASSE 21
44867 BOCHUM, GERMANY
www.kompernass.com
- 23 -

Recipes
Biscuits 2
You can process commercially available readymade pastry with the Biscuit Shaper.
Biscuits 1
Ingredients:
150 g butter
100 g powdered sugar
1 Pkt vanilla sugar
1 egg white
200 g plain flour (Type 405)
1 pinch salt
• Whip the butter until foamy, blend
in the sugar, vanilla sugar and the unbeaten egg
white, then stir the mixture with a hand mixer for about 8 minutes.
• Blend in the flour, then fill the pastry into the Biscuit Shaper.
• Cover a baking tray with baking paper. Make
small biscuits on the tray with the Biscuit Shaper.
• Bake in a convection oven for 1215 minutes at 175-190 ˚C.
• The edges should be golden brown. Allow the
biscuits to cool on the
baking tray.
Ingredients:
125 g butter
125 g powdered sugar
1 Pkt vanilla sugar
1 egg
1 egg white
250 g plain flour (Type 405)
1 pinch salt
• Whip the butter, sugar, vanilla sugar, salt, egg
and egg white until foamy, blend in the flour.
• Cover a baking tray with baking paper. Make
small biscuits on the tray with the Biscuit Shaper.
• Bake in a convection oven for 1215 minutes at 175-190 ˚C.
• Dip the biscuits in molten cooking chocolate.
Tip: For darker biscuits, substitute 30 gr of cocoa
for the vanilla sugar. Dispense with the salt and add
1 dessertspoon of water instead.
Depending on the size of the biscuits, the baking
times can vary.
Tip: Melt some plain cooking chocolate in a bainmarie. Spread a teaspoonful of chocolate onto the
cooled biscuits and decorate them with a half of a
walnut.
Depending on the size of the biscuits, the baking
times can vary.
- 24 -

INHALTSVERZEICHNIS SEITE
Sicherheitshinweise 26
Bestimmungsgemäßer Gebrauch 26
Lieferumfang 26
Technische Daten 26
Gerätebeschreibung 27
Vor dem ersten Gebrauch 27
Gebäckpresse zusammensetzen 27
Behälter füllen 28
Gebäck formen 28
Verzierungen anbringen 29
Teig oder Verzierungsmasse nachfüllen 29
Gebäckpresse zerlegen 30
Tipps 30
Reinigen und Pflegen 30
Entsorgen 31
Garantie und Service 31
Importeur 32
Rezepte 32
Lesen Sie die Bedienungsanleitung vor der ersten Verwendung aufmerksam durch und heben Sie diese für
den späteren Gebrauch auf. Händigen Sie bei Weitergabe des Gerätes an Dritte auch die Anleitung aus.
- 25 -

ELEKTRISCHE
GEBÄCKPRESSE
KH 1191
Sicherheitshinweise
Um Lebensgefahr durch elektrischen
Schlag zu vermeiden:
• Die Spannung der Stromquelle muss mit den
Angaben auf dem Typenschild des Gerätes
übereinstimmen.
• Lassen Sie beschädigte Netzstecker oder
Netzkabel sofort von autorisiertem Fachpersonal
oder dem Kundenservice austauschen, um
Gefährdungen zu vermeiden.
• Setzen Sie das Gerät nicht dem Regen aus und
benutzen Sie es auch niemals in feuchter oder
nasser Umgebung. Achten Sie darauf, dass das
Gerätekabel während des Betriebs niemals nass
oder feucht wird.
Um Brandgefahr und Verletzungen
zu vermeiden:
• Dieses Gerät ist nicht dafür bestimmt, durch
Personen (einschließlich Kinder) mit eingeschränkten, physischen, sensorischen oder
geistigen Fähigkeiten oder mangels Erfahrung
und/oder mangels Wissen benutzt zu werden,
es sei denn, sie werden durch eine für ihre
Sicherheit zuständige Person beaufsichtigt oder
erhielten von ihr Anweisungen, wie das Gerät
zu benutzen ist.
• Kinder sollten beaufsichtigt werden, um sicherzustellen, dass sie nicht mit dem Gerät spielen.
• Sorgen Sie dafür, dass der Netzstecker bei
Gefahr schnell erreichbar ist und das Kabel
nicht zur Stolperfalle werden kann.
So verhalten Sie sich sicher:
• Ziehen Sie bei Gefahr sofort den Netzstecker
aus der Steckdose.
• Verwenden Sie das Gerät niemals
zweckentfremdet.
• Verwenden Sie das Gerät nicht im Freien.
• Seien Sie stets aufmerksam! Achten Sie immer
darauf was Sie tun und gehen Sie stets mit Vernunft vor. Benutzen Sie das Gerät in keinem Fall,
wenn Sie unkonzentriert sind oder sich unwohl
fühlen.
• Stellen Sie sicher, dass das Gerät korrekt und
vollständig zusammengesetzt worden ist, bevor
Sie es in Betrieb nehmen.
• Ziehen Sie den Netzstecker, wenn das Gerät
nicht benutzt wird oder wenn Sie Teile entfernen
und vor dem Reinigen.
Bestimmungsgemäßer
Gebrauch
Die Gebäckpresse KH 1191 ist zum Formen von
Gebäck und zum Verzieren von Torten o.ä.
konzipiert. Sie ist ausschließlich für den privaten
Gebrauch bestimmt, nicht für gewerbliche Zwecke.
Lieferumfang
Elektrische Gebäckpresse KH 1191
12 Motivscheiben
8 Tüllen
Bedienungsanleitung
Technische Daten
Netzspannung: 220 - 240 V ~50Hz
Leistung: 12 W
KB-Zeit: 1 Minute
Schutzklasse: II
- 26 -

KB-Zeit
Die KB-Zeit (Kurzzeitbetrieb) gibt an, wie lange
man ein Gerät betreiben kann, ohne dass der Motor überhitzt und Schaden nimmt. Nach der angegebenen KB-Zeit muss das Gerät solange ausgeschaltet werden, bis sich der Motor abgekühlt hat.
Gerätebeschreibung
Richtungsschalter
q
Starttaste
w
Netzkabel mit Netzstecker
e
Motoreinheit
r
Gewindestab
t
Schieber
y
Behälter
u
Tüllenadapter mit Verriegelung
i
Tüllen
o
Adapterverschluss
a
Verschlussring
s
Motivscheiben
d
Vor dem ersten Gebrauch
Nehmen Sie die Gebäckpresse und sämtliche
Zubehörteile aus der Verpackung und entfernen
Sie sämtliches Verpackungsmaterial.
Reinigen Sie sämtliche Zubehörteile wie im Kapitel
„Reinigen und Pflegen“ beschrieben.
Gebäckpresse zusammensetzen
Gewindestab mit Schieber einsetzen
1. Setzen Sie das Ende des Gewindestabes tin
die Motoreinheit
Stifte im Inneren der Motoreinheit
rungsschiene des Gewindestabes
2. Schieben Sie den Gewindestab
Schieber
Motoreinheit
y
. Achten Sie darauf, dass die
r
r
t
t
bis zum Anschlag in die
.
r
in die Füh-
fassen.
mit dem
Behälter montieren
Der Behälter umuss montiert sein, ansonsten
funktioniert die Gebäckpresse nicht!
1. Schieben Sie den Behälter uso über den
Schieber
Behälters
fassen.
2. Stecken Sie den Behälter
reinheit
auf das geöffnete Schloss der Motoreinheit
zeigt.
r
3. Drehen Sie den Behälter
auf das geschlossene Schloss der
Motoreinheit
4. Stecken Sie den Netzstecker
Netzsteckdose.
5. Stellen Sie den Richtungsschalter
Pfeil nach unten .
6. Drücken Sie die Starttaste
Schieber
zurückgefahren ist.
7. Ziehen Sie den Netzstecker
Netzsteckdose.
, dass die Schienen im Inneren des
y
in die Kerben am Schieber
u
so auf die Moto-
u
, dass der Pfeil auf dem Behälter
r
so weit, bis der Pfeil
u
zeigt.
r
in eine
e
q
so lange, bis der
w
bis zur MAX-Markierung
y
aus der
e
y
u
auf den
Hinweis:
Ziehen Sie den Netzstecker eaus der Steckdose,
bevor Sie Teile aufsetzen.
Motivscheiben montieren
Wenn Schieber yund Behälter umontiert sind:
1. Wählen Sie die gewünschte Motivscheibe
2. Legen Sie die Motivscheibe
Verschlussring
3. Setzen Sie den Verschlussring
Motivscheibe
4. Drehen Sie den Verschlussring
Pfeilrichtung, bis er einrastet .
- 27 -
.
s
auf den Behälter u.
d
d
s
in den
mit der
in
s
d
.

Tüllen montieren
Wenn Schieber yund Behälter umontiert sind:
1. Legen Sie den Tüllenadapter
schlussring
außen zeigen.
2. Setzen Sie den Verschlussring
Tüllenadapter
3. Drehen Sie den Verschlussring
tung, bis er einrastet .
4. Wählen Sie eine Tülle
5. Setzen Sie die Tülle
.
i
6. Schrauben Sie den Adapterverschluss
die Tülle
7. Stellen Sie die Verriegelung am Tüllenadapter
auf „CLOSE“.
i
. Das Gewinde muss nach
s
auf den Behälter u.
i
o
auf den Tüllenadapter
o
auf den Tüllenadapter i.
o
aus.
in den Ver-
i
mit dem
s
in Pfeilrich-
s
a
über
Behälter füllen
Der zu verarbeitende Teig muss Zimmertemperatur haben. Ist er zu weich, stellen Sie ihn für
kurze Zeit in den Kühlschrank.
1. Drehen Sie den Behälter
auf das offene Schloss zeigt.
, so dass der Pfeil
u
Hinweis:
Füllen Sie den Behälter uhöchstens bis zur MAXMarkierung. Verarbeiten Sie den eingefüllten Teig
sofort.
4. Setzen Sie den Behälter
„Behälter montieren“ beschrieben auf die
Motoreinheit
5. Stecken Sie den Netzstecker
Netzsteckdose.
Die Gebäckpresse ist nun betriebsbereit.
r
.
wie im Kapitel
u
in eine
e
Gebäck formen
Hinweise:
• Benutzen Sie zum Formen von Plätzchen
ausschließlich die Motivscheiben
• Legen Sie das Backblech mit Backpapier aus.
Benutzen Sie kein Teflon, Öl oder öliges Papier,
da die Gebäckform dann nicht hält.
• Achten Sie darauf, dass der Verschlussring
fest auf dem Behälter u, und der Behälter
korrekt auf der Motoreinheit rsitzt, wenn Sie
das Gerät einschalten.
d
.
s
u
2. Nehmen Sie den Behälter uvon der Motoreinheit
ab. Belassen Sie den Gewindestab
r
mit dem Schieber y in der Motoreinheit r.
t
Tipp:
Feuchten Sie ggf. die Innenseite des Behälters
mit Wasser an, bevor Sie den Teig einfüllen. So können Sie vermeiden, dass der Teig an den Wänden
des Behälters
3. Formen Sie den Teig / die Verzierungsmasse zu
einer Rolle. So lässt dieser sich leichter einfüllen.
Befüllen Sie den Behälter
u
anklebt.
mit dieser Teigrolle.
u
u
1. Stellen Sie den Richtungsschalter qauf den
Pfeil nach oben .
2. Halten Sie die Gebäckpresse kurz über das
Backblech.
3. Drücken Sie solange auf die Starttaste
sich das erste Plätzchen formt.
4. Lassen Sie die Starttaste
die Gebäckpresse an eine andere Stelle.
Wie lange Sie die Starttaste
hängt auch von der gewünschten Dicke und
Form der Plätzchen ab. Drücken Sie die Starttaste
kurz, formen Sie ein kleines Plätzchen. Je
w
länger Sie die Starttaste
größer wird das Plätzchen.
- 28 -
los und halten Sie
w
drücken müssen,
w
drücken, desto
w
w
, bis

5. Wiederholen Sie die Schritte solange, bis Sie
ausreichend Plätzchen geformt haben.
Teig oder Verzierungsmasse
nachfüllen
Hinweis:
Sollte der Teig zu klebrig sein, stellen Sie ihn für
15 Minuten in den Kühlschrank.
Verzierungen anbringen
Hinweise:
• Benutzen Sie die Tüllen o ausschließlich zum
Formen von cremigen Massen, wie zum Beispiel
Sahne.
• Die Verzierungsmasse muss eine weiche,
cremige Konsistenz haben, da sonst die Tülle
verstopft.
• Drücken Sie die Starttaste
und probieren Sie aus, wie sich die Masse
verhält. Die Masse kann ggf. eine Weile
nachfließen.
1. Stellen Sie den Richtungsschalter
Pfeil nach oben .
2. Stellen Sie die Verriegelung am Tüllenadapter
auf „OPEN“.
i
3. Halten Sie die Gebäckpresse leicht schräg.
4. Drücken Sie auf die Starttaste
5. Sobald die Verzierungsmasse aus der Tülle
austritt, bewegen Sie die Gebäckpresse so, wie
Sie die Verzierungen anbringen wollen.
Hinweis:
Sollte der Schieber ywährend des Gebrauchs
blockieren, kann es sein, dass die Masse bzw. der
Teig zu fest ist. Entnehmen Sie die Masse bzw. den
Teig und rühren ggf. etwas Flüssigkeit in die
gesamte Menge.
zunächst nur kurz
w
auf den
q
.
w
o
1. Stellen Sie den Richtungsschalter qauf den
Pfeil nach unten .
2. Drücken Sie die Starttaste
Schieber
ist.
bis zur MAX-Markierung gefahren
y
so lange, bis der
w
Gefahr:
Ziehen Sie den Netzstecker eaus der Steckdose,
bevor Sie Teig oder Verzierungsmasse nachfüllen.
Hinweis:
Wenn der Gewindestab tnicht zurückfährt, nehmen Sie den Verschlussring
ben Sie, während Sie die Starttaste
o
Gewindestab
3. Nehmen Sie den Verschlussring
leicht nach hinten.
t
zuerst ab und schie-
s
Hinweis:
Nehmen Sie, wenn nötig, den Behälter uab und
entnehmen Sie den restlichen Teig. Entfernen Sie
ggf. auch Teigreste, die sich hinter dem Schieber
angesammelt haben können.
Gefahr:
Die Motoreinheit rdarf nicht in Flüssigkeit
getaucht werden. Wischen Sie diese bei Bedarf
mit einem angefeuchteten Tuch ab.
4. Reinigen Sie ggf. teigverschmierte Teile und
trocknen Sie sie gut ab. (siehe Kapitel „Reinigen
und Pflegen“)
5. Füllen Sie Teig oder Verzierungsmasse in die
Gebäckpresse, setzen Sie die Gebäckpresse
wie beschrieben wieder zusammen und fahren
fort.
drücken, den
w
ab.
s
y
- 29 -

Gebäckpresse zerlegen
1. Stellen Sie den Richtungsschalter qauf den
Pfeil nach oben .
2. Drücken Sie die Starttaste
Gewindestab
ganz heraus gefahren ist.
t
so lange, bis der
w
Gefahr:
Ziehen Sie den Netzstecker eaus der Steckdose,
bevor Sie das Gerät auseinander nehmen.
3. Schrauben Sie den Verschlussring sab.
4. Drehen Sie den Behälter
auf das offene Schloss zeigt.
5. Lösen Sie den Behälter
. Der Gewindestab tmit Schieber ylassen
r
sich nun auch abnehmen.
, so dass der Pfeil
u
von der Motoreinheit
u
Tipps
• Nehmen Sie die Masse ggf. mit einem Messer,
Teigschaber o.ä. von der Gebäckpresse ab.
• Die Konsistenz des Teiges bzw. der Masse sollte
so sein, dass er leicht aus den Öffnungen der
Motivscheiben
auf dem Backpapier oder dem Verziergut haften
bleibt.
• Sollte sich das Gerät nicht einschalten lassen,
kann es daran liegen, dass der Teig bzw. die
Masse zu fest ist oder die Motoreinheit
korrekt auf dem Behälter
• Falls der Teig für die Verarbeitung zu fest ist,
kneten Sie ein Eigelb unter oder geben etwas
Flüssigkeit hinzu.
• Plätzchenteig, der im Kühlschrank gelegen hat,
kann für die Verarbeitung zu fest sein.
• Falls der Teig für die Verarbeitung zu weich ist,
legen Sie ihn ca. 15 Minuten in den Kühlschrank
oder kneten Sie etwas Mehl unter.
oder den Tüllen oaustritt und
d
r
sitzt.
u
nicht
• Wenn der Plätzchenteig fein gemahlene Zutaten
(z.B. Nüsse oder Mandeln) enthält, wählen Sie
eine Motivscheibe
• Bei manchen Teigen und Motivscheiben ist es
besser, wenn man schnell arbeitet, bei anderen,
wenn man langsam arbeitet.
• Probieren Sie einfach solange aus, bis die Plätzchen so aussehen, wie Sie es wünschen.
• Wenn Sie verschiedene Motivscheiben / Tüllen
verwenden möchten, verarbeiten Sie zunächst
den eingefüllten Teig bzw. die Verzierungsmasse.
Wechseln Sie die Motivscheibe / Tülle erst, wenn
Sie die Gebäckpresse nachfüllen.
mit großen Öffnungen.
d
Reinigen und Pflegen
Gefahr:
Ziehen Sie den Netzstecker eaus der Steckdose,
bevor Sie das Gerät reinigen.
Da angetrocknete Teigreste schwer zu entfernen sind,
reinigen Sie die Gebäckpresse und die verwendeten
Motivscheiben
Gefahr:
Die Motoreinheit rdarf nicht in Flüssigkeit
getaucht werden. Wischen Sie sie bei Bedarf
mit einem angefeuchteten Tuch ab.
Verwenden Sie zur Reinigung keine spitzen oder
kratzenden Gegenstände. Verwenden Sie keine
scharfen oder chemischen Reinigungsmittel.
Bauen Sie die Gebäckpresse komplett auseinander.
Sie können alle Teile, bis auf die Motoreinheit
der Spülmaschine oder in milder Seifenlauge reinigen. Alle Teile, außer der Motoreinheit
maschinengeeignet.
direkt nach dem Gebrauch.
d
sind spül-
r
r
, in
- 30 -

Entsorgen
Garantie und Service
Werfen Sie das Gerät keinesfalls in den
normalen Hausmüll. Dieses Produkt
unterliegt der europäischen Richtlinie
2002/96/EG.
Entsorgen Sie das Gerät über einen zugelassenen
Entsorgungsbetrieb oder über Ihre kommunale
Entsorgungseinrichtung.
Beachten Sie die aktuell geltenden Vorschriften.
Setzen Sie sich im Zweifelsfall mit Ihrer Entsorgungseinrichtung in Verbindung.
Führen Sie alle Verpackungsmaterialien
einer umweltgerechten Entsorgung zu.
Sie erhalten auf dieses Gerät 3 Jahre Garantie ab
Kaufdatum. Das Gerät wurde sorgfältig produziert
und vor Anlieferung gewissenhaft geprüft. Bitte bewahren Sie den Kassenbon als Nachweis für den
Kauf auf. Bitte setzen Sie sich im Garantiefall mit
Ihrer Servicestelle telefonisch in Verbindung. Nur so
kann eine kostenlose Einsendung Ihrer Ware
gewährleistet werden.
Die Garantieleistung gilt nur für Material- oder Fabrikationsfehler, nicht aber für Verschleißteile oder
für Beschädigungen an zerbrechlichen Teilen, z. B.
Schalter oder Akkus. Das Produkt ist lediglich für
den privaten und nicht für den gewerblichen
Gebrauch bestimmt.
Bei missbräuchlicher und unsachgemäßer Behandlung, Gewaltanwendung und bei Eingriffen, die
nicht von unserer autorisierten Service-Niederlassung vorgenommen wurden, erlischt die Garantie.
Ihre gesetzlichen Rechte werden durch diese
Garantie nicht eingeschränkt.
Schraven
Service- und Dienstleistungs GmbH
Gewerbering 14
47623 Kevelaer, Germany
Tel.: +49 (0) 180 5 008107
(14 Ct/Min. aus dem dt. Festnetz ggf. abweichende Preise
aus dem Mobilfunknetz)
Fax: +49 (0) 2832 3532
e-mail: support.de@kompernass.com
Kompernaß Service Österreich
Rittenschober KG
Gmundner Strasse 10
A-4816 Gschwandt
Tel.: +43 (0) 7612 6260516
Fax: +43 (0) 7612 626056
e-mail: support.at@kompernass.com
- 31 -

Importeur
Spritzgebäck 2
KOMPERNASS GMBH
BURGSTRASSE 21
44867 BOCHUM, GERMANY
www.kompernass.com
Rezepte
Sie können handelsüblichen Fertigteig mit der
Gebäckpresse verarbeiten.
Spritzgebäck 1
150 g Butter
100 g feinster Zucker
1 Pck Vanillezucker
1 Eiweiß
200 g Mehl (Type 405)
1 Prise Salz
• Butter schäumig rühren, den Zucker, das Salz,
Vanillezucker und das ungeschlagene Eiweiß
beifügen und die Masse mit dem Handrührer
etwa 8 Minuten rühren.
• Das Mehl beimengen, den Teig in die
Gebäckpresse füllen.
• Legen Sie ein Backblech mit Backpapier aus.
Formen Sie mit der Gebäckpresse kleine
Plätzchen auf das Blech.
• 12-15 Minuten bei 175-190 ˚C Umluft backen.
• Die Ränder sollten goldbraun sein. Lassen Sie
die Plätzchen auf dem Blech abkühlen.
Zutaten:
125 g Butter
125 g feinster Zucker
1 Pck. Vanillezucker
1 Ei
1 Eiweiß
250 g Mehl (Type 405)
1 Prise Salz
• Butter, Zucker, Vanillezucker, Salz, Ei und Eiweiß
schäumig rühren, das Mehl unterrühren.
• Legen Sie ein Backblech mit Backpapier aus.
Formen Sie mit der Gebäckpresse kleine
Plätzchen auf das Blech.
• 12-15 Minuten bei 175-190 ˚C Umluft backen.
• Die Plätzchen in geschmolzene Kuvertüre
tauchen
Tipp: Tauschen Sie für dunkles Spritzgebäck 1
Päckchen Vanillinzucker gegen 30 g Kakao aus.
Lassen Sie das Salz weg und geben stattdessen
1 EL Wasser hinzu.
Die Backzeit kann je nach Größe der
Plätzchen variieren.
Tipp: Schmelzen Sie Zartbitter-Kuvertüre im Wasserbad. Auf die ausgekühlten Plätzchen je 1 Tl. Kuvertüre träufeln und mit Wallnusshälften dekorieren.
Die Backzeit kann je nach Größe der
Plätzchen variieren.
- 32 -
 Loading...