

Page 1
LR 310
DE
Luftreiniger
Gebrauchsanweisung ............. 2
EN
Air purifi er
Instructions for use ............... 13
FR
Purifi cateur d’air
Mode d´emploi ...................... 23
ES
Limpiador de aire
Instrucciones de uso ............. 34
IT
Depuratore d’aria
Istruzioni per l’uso ................. 45
TR
Hava temizleyici
Kullanım kılavuzu .................. 56
RU
Воздухоочиститель
Инструкция по
применению ........................ 66
PL
Oczyszczacz powietrza
Instrukcja obsługi .................. 78
Page 2
D
EUTSCH
Lesen Sie diese Gebrauchsanweisung sorgfältig durch, bewahren
Sie sie für den späteren Gebrauch auf, machen Sie sie anderen
Benutzern zugänglich und beachten Sie die Hinweise.
WARNUNG
•
Dieses Gerät kann von Kindern ab 8 Jahren und darüber sowie von Personen
mit verringerten physischen, sensorischen oder mentalen Fähigkeiten oder
Mangel an Erfahrungen und Wissen benutzt werden, wenn sie beaufsichtigt
oder bezüglich des sicheren Gebrauchs des Gerätes unterwiesen wurden und
die daraus resultierenden Gefahren verstehen.
•
Kinder dürfen nicht mit dem Gerät spielen.
•
Reinigungs- und Benutzer-Wartung dürfen nicht von Kindern ohne Beaufsichtigung durchgeführt werden.
•
Trennen Sie das Gerät während dem Reinigen vom Netz.
•
Reinigen Sie das Gerät nur in der angegebenen Weise. Es darf keinesfalls Flüssigkeit in die Ventilatoreinheit eindringen.
•
Verwenden Sie keine lösungsmittelhaltigen Reiniger.
•
Wenn die Netzanschlussleitung dieses Geräts beschädigt wird, muss sie entsorgt werden. Ist sie nicht abnehmbar, muss das Gerät entsorgt werden.
Sehr geehrte Kundin, sehr geehrter Kunde,
vielen Dank, dass Sie sich für eines unserer Produkte entschieden haben. Unser Name steht für hochwertige
und eingehend geprüfte Qualitätsprodukte aus den Bereichen Wärme, Sanfte Therapie, Blutdruck/Diagnose,
Gewicht, Massage, Beauty, Luft und Baby.
Mit freundlicher Empfehlung
Ihr Beurer-Team
Zum Kennenlernen
Der Mensch verbringt den größten Teil seiner Zeit in geschlossenen Räumen. Oft ist diese Luft mit Staubpartikeln, Pollen, Tierhaaren, Gerüchen, schädlichen Gasen sowie diversen Bakterien und Viren belastet. Der
Luftreiniger LR 310 reinigt die Raumluft mit Hilfe eines dreischichtigen Filtersystems und eines eingebauten
UV-C-Lichts.
Der Luftreiniger LR 310
•
filtert die Luft mit einem Kombifilter (Aktivkohlefilter gegen schädliche Gase und unangenehme Gerüche,
HEPA-Filter H 13
•
verfügt über ein eingebautes UV-C-Licht (zur Keimvernichtung),
•
arbeitet geräuscharm mit drei Leistungsstufen,
•
besitzt eine Timer-Funktion (zwei, vier oder acht Stunden),
•
besitzt einen Feinstaubpartikelsensor,
•
eignet sich für Raumgrößenbis zu 54 m² (gem. NRCC-54013-2011),
•
ist energiesparend,
•
schaltet sich automatisch ab, wenn die Gehäuseabdeckung abgenommen wird.
gegen Partikel wie Bakterien, Viren, Milben, Pollen und Feinstaub),
2
Page 3

Prinzip der Luftreinigung
PAP
1. Der Ventilator des Luftreinigers saugt die verschmutzte Luft an.
2. Der Vorfilter filtert größere Partikel wie Staub, Schmutz und Haare.
3.
Anschließend werden durch den Aktivkohlefilter Formaldehyde, Benzol und andere giftige Gase und Gerüche
aus der Raumluft gefiltert.
4. Zuletzt werden durch den HEPA-Filter kleine Partikel wie Pollen, Bakterien oder Viren gefiltert.
5.
Das zuschaltbare UV-C-Licht im Gehäuseinneren
eliminiert Keime und Gerüche (verursacht durch Tiere,
Küche oder Tabakrauch).
6.
Die gereinigte Luft wird über den Luftauslass an der Oberseite des Luftreinigers an die Raumluft abgegeben.
Die Filterleistung des HEPA H 13 Filters beträgt ≥ 99,95 %. Das heißt 99,95 % der Partikel (z.B. Bakterien, Viren und Feinstaub) können herausgefiltert werden.
Verunreinigte, ungefilterte Luft kann folgende Auswirkungen haben:
•
Infektionen und Erkrankungen der Atemwege werden begünstigt,
•
Beeinträchtigung der Gesundheit durch schädliche Gase.
Inhaltsverzeichnis
1. Lieferumfang .............................................. 3
2. Zeichenerklärung ...................................... 3
3. Warn- und Sicherheitshinweise ...............4
4. Bestimmungsgemäßer Gebrauch ............ 5
5. Gerätbeschreibung ....................................5
6. Inbetriebnahme .......................................... 6
6.1 Luftreiniger entnehmen .........................6
6.2 Luftreiniger aufstellen ............................ 6
7. Anwendung ................................................ 7
7.1 Luftreiniger einschalten ........................7
7.2 Automatikfunktion ................................ 7
7.3 Lüftergeschwindigkeit ..........................7
7.4 UV-C-Licht ............................................7
7.5 Timer-Funktion ...................................7
7.6 Filterwechsel ....................................... 7
8. Reinigung und Pflege .............................. 8
8.1 Filter reinigen ....................................... 8
8.2 Feinstaubpartikelsensor reinigen ......... 9
8.3 Gehäuse reinigen ...............................10
8.4 Aufbewahrung ................................... 10
9. Zubehör- und Ersatzteile .....................10
10. Was tun bei Problemen? ....................... 10
11. Entsorgung .............................................11
12. Technische Angaben ............................11
13. Garantie / Service .................................. 11
1. Lieferumfang
•
1x Luftreiniger
•
1x Kombifilter (Aktivkohle / HEPA-Filter Klasse H 13)
•
1x Vorfilter
•
1x Diese Gebrauchsanweisung
2. Zeichenerklärung
Folgende Symbole werden in dieser Gebrauchsanweisung verwendet:
WARNUNG
Warnhinweis auf Verletzungsgefahren oder
Gefahren für Ihre Gesundheit
Achtung
Sicherheitshinweis auf mögliche Schäden an
Gerät/Zubehör
Produktinformation
Hinweis auf wichtige Informationen
20
3
Hersteller
CE-Kennzeichnung
Dieses Produkt erfüllt die Anforderungen der geltenden europäischen und nationalen Richtlinien.
Verpackung umweltgerecht entsorgen
Page 4
Zertifizierungszeichen für Produkte, die in die
Anweisung lesen
Entsorgung gemäß Elektro- und Elektronik-Altgeräte EG-Richtlinie WEEE (Waste Electrical and
Electronic Equipment)
Russische Föderation und in die Länder der GUS
exportiert werden
"Geprüfte Sicherheit"-Sicherheitszeichen
3. Warn- und Sicherheitshinweise
Lesen Sie die Hinweise sorgfältig! Ein Nichtbeachten der nachfolgenden Hinweise kann Personen- oder
Sachschäden verursachen.
WARNUNG
Halten Sie Kinder von Verpackungsmaterial fern. Es besteht Erstickungsgefahr.
Stromschlag
WARNUNG
Wie jedes elektrische Gerät ist auch dieser Luftreiniger vorsichtig und umsichtig zu gebrauchen, um Gefahren
durch elektrische Schläge zu vermeiden.
• Betreiben Sie das Gerät deshalb
– nur mit der auf dem Gerät notierten Netzspannung (Typenschild befindet sich auf der Unterseite des Geräts),
– nie, wenn das Gerät oder Zubehör sichtbare Schäden aufweist,
– nicht während eines Gewitters.
•
Schalten Sie das Gerät im Falle von Defekten oder Betriebsstörungen sofort aus und trennen Sie das Gerät
vom Stromanschluss. Ziehen Sie nicht am Stromkabel oder am Gerät um den Stecker aus der Steckdose
zu ziehen. Halten oder tragen Sie das Gerät niemals am Netzkabel. Halten Sie Abstand zwischen den Ka
beln und warmen Oberflächen.
•
Schalten Sie das Gerät immer aus, bevor Sie den Netzstecker ziehen.
•
Ziehen Sie den Netzstecker niemals mit nassen oder feuchten Händen heraus.
•
Halten Sie das Gerät von Wärmequellen fern, da das Gehäuse schmelzen und ein Feuer auslösen könnte.
•
Stellen Sie sicher, dass die Önungen des Geräts und die Netzleitung nicht mit Wasser, Dampf oder anderen Flüssigkeiten in Berührung kommen.
•
Verwenden Sie das Gerät nicht in der Nähe von brennbaren oder explosiven Gasgemischen.
•
Greifen Sie keinesfalls nach einem Gerät, das ins Wasser gefallen ist. Ziehen Sie sofort den Netzstecker.
•
Benutzen Sie das Gerät nicht, wenn Gerät oder Zubehör sichtbare Schäden aufweisen.
Reparatur
-
WARNUNG
•
Reparaturen an Elektrogeräten dürfen nur von Fachkräften durchgeführt werden. Durch unsachgemäße
Reparaturen können erhebliche Gefahren für den Benutzer entstehen. Wenden Sie sich bei Reparaturen
an den Kundenservice oder an einen autorisierten Händler.
•
Die Ventilatoreinheit darf nicht geönet werden.
•
Es ist nicht vorgesehen, die UV-C-Lampe auszutauschen. Dem Benutzer ist nicht erlaubt, einen solchen
Austausch vozunehmen.
Brandgefahr
WARNUNG
Bei nicht bestimmungsgemäßem Gebrauch bzw. Missachtung der vorliegenden Gebrauchsanweisung besteht
unter Umständen Brandgefahr!
Betreiben Sie den Luftreiniger deshalb
•
nie unter einer Abdeckung, wie z.B. Decke, Kissen, etc.
•
nie in der Nähe von Benzin oder anderen leicht entflammbaren Stoen.
4
Page 5
Handhabung
ACHTUNG
Nach jedem Gebrauch und vor jeder Reinigung ist das Gerät auszuschalten und auszustecken.
•
Stecken Sie keine Gegenstände in Geräteönungen oder in die rotierenden Teile. Achten Sie darauf, dass
die beweglichen Teile sich immer frei bewegen können.
•
Stellen Sie keine Gegenstände auf dem Gerät ab.
•
Schützen Sie das Gerät vor hohen Temperaturen.
•
Schützen Sie das Gerät vor Sonnenstrahlen und Stößen und lassen Sie es nicht fallen.
•
Schütteln Sie niemals das Gerät.
•
Stellen Sie das Gerät auf eine feste, waagerechte und wasserfeste Unterlage.
4. Bestimmungsgemäßer Gebrauch
Dieser Luftreiniger ist ausschließlich zur Reinigung der Luft in Innenräumen bestimmt.
WARNUNG
Wenn Sie an einer schweren Krankheit der Atemwege oder Lunge leiden, befragen Sie vor der Benutzung
des Luftreinigers Ihren Arzt.
Verwenden Sie dieses Gerät nur für den Zweck für den es entwickelt wurde und auf die in der Gebrauchsanweisung angegebene Art und Weise. Jeder unsachgemäße Gebrauch kann gefährlich sein. Der Hersteller kann
nicht für Schäden haftbar gemacht werden, die durch unsachgemäßen oder leichtsinnigen Gebrauch entstehen.
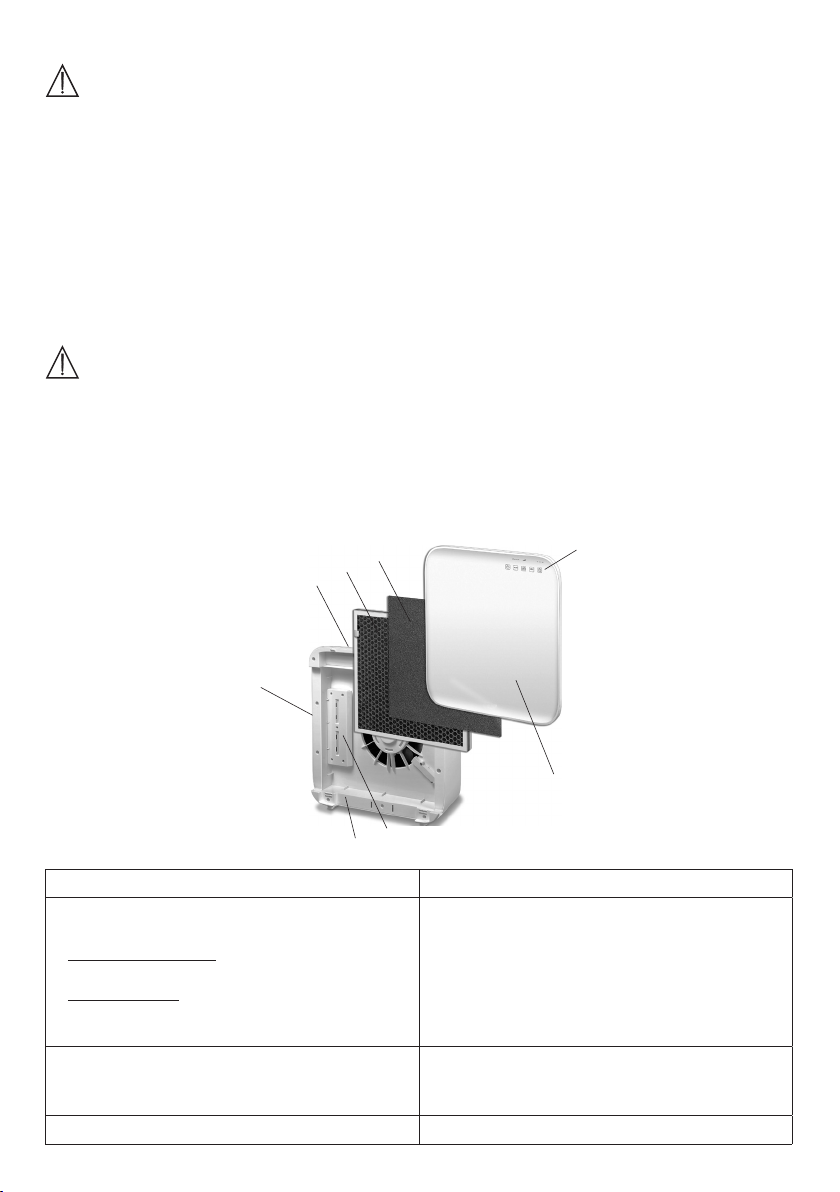
5. Gerätbeschreibung
3
2
1
8
6
7
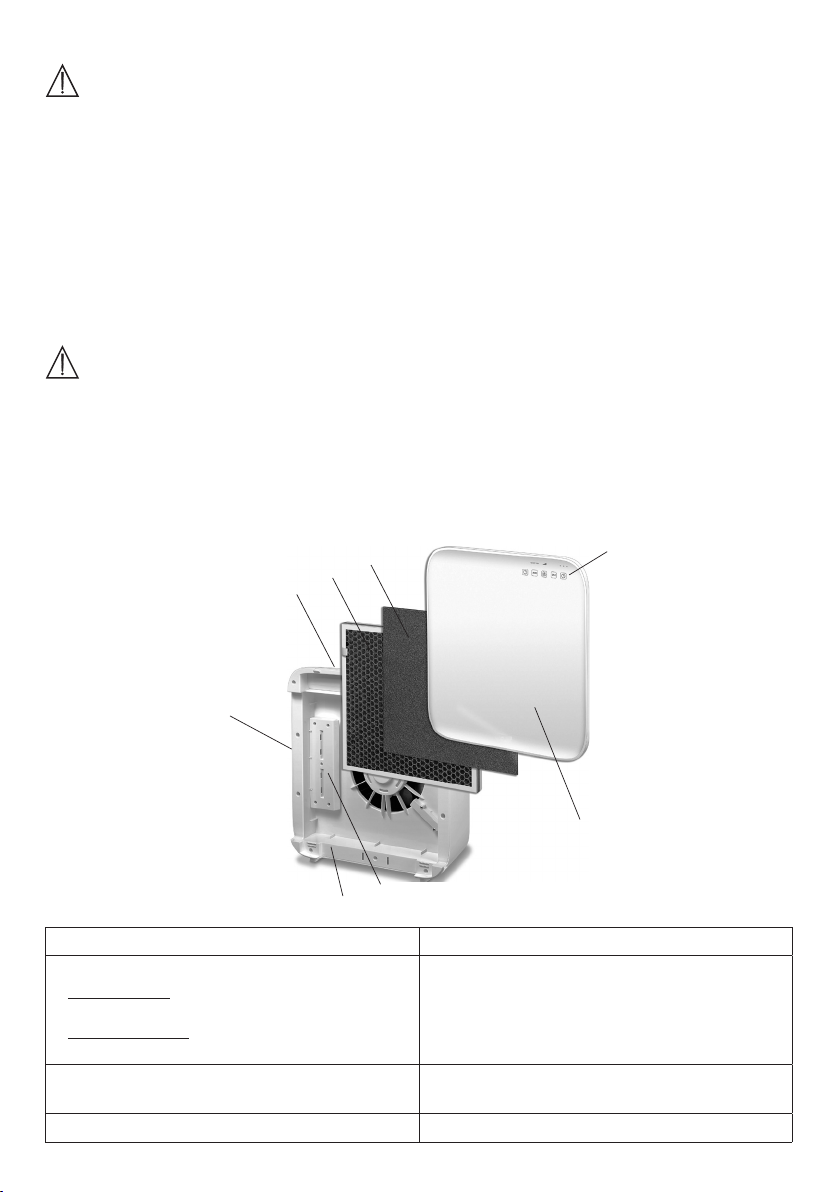
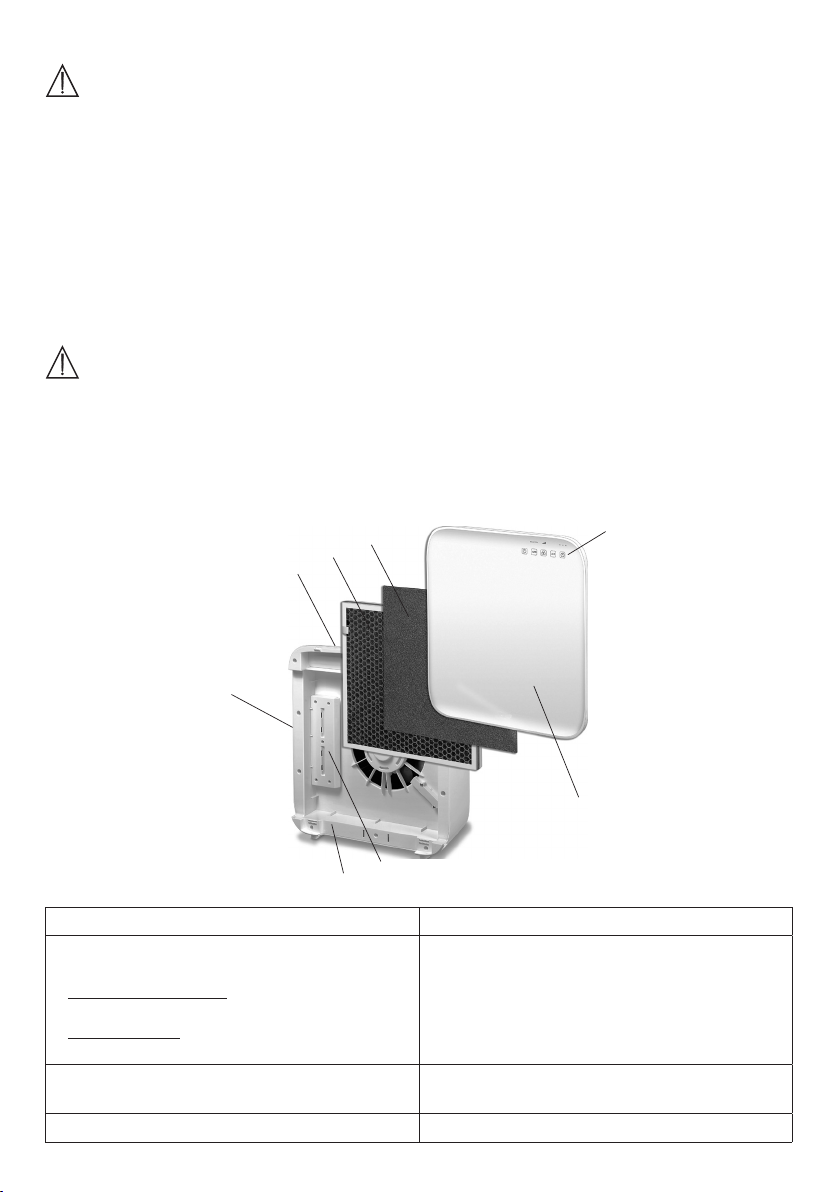
1. Luftauslass
2.
Kombifilter (Aktivkohlefilter / HEPA-Filter H 13)
Aktivkohlefilter: Gegen schädliche Gase und unangenehme Gerüche
HEPA-Filter H 13: Filtert Partikel wie Bakterien,
Viren, Milben, Pollen und Feinstaub
3. Vorfilter
Filtert groben Staub und Schmutz, wie z.B. Haare
4. Bedienpanel 8. Lufteinlass
5. Gehäuseabdeckung
6. UV-C-Licht
Eliminiert im Gehäuseinneren
(verursacht durch Tiere, Küche oder Tabakrauch)
7. Gehäuse
4
5
Keime und Gerüche
5
Page 6
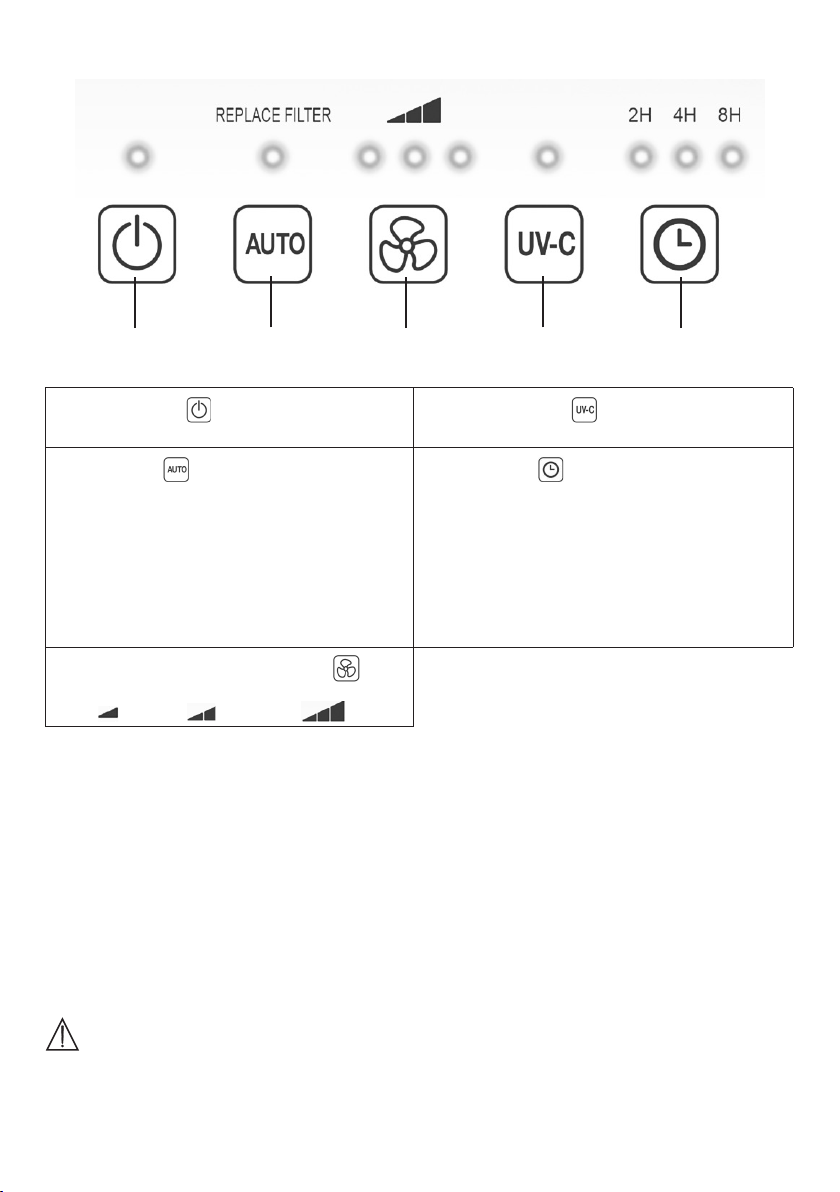
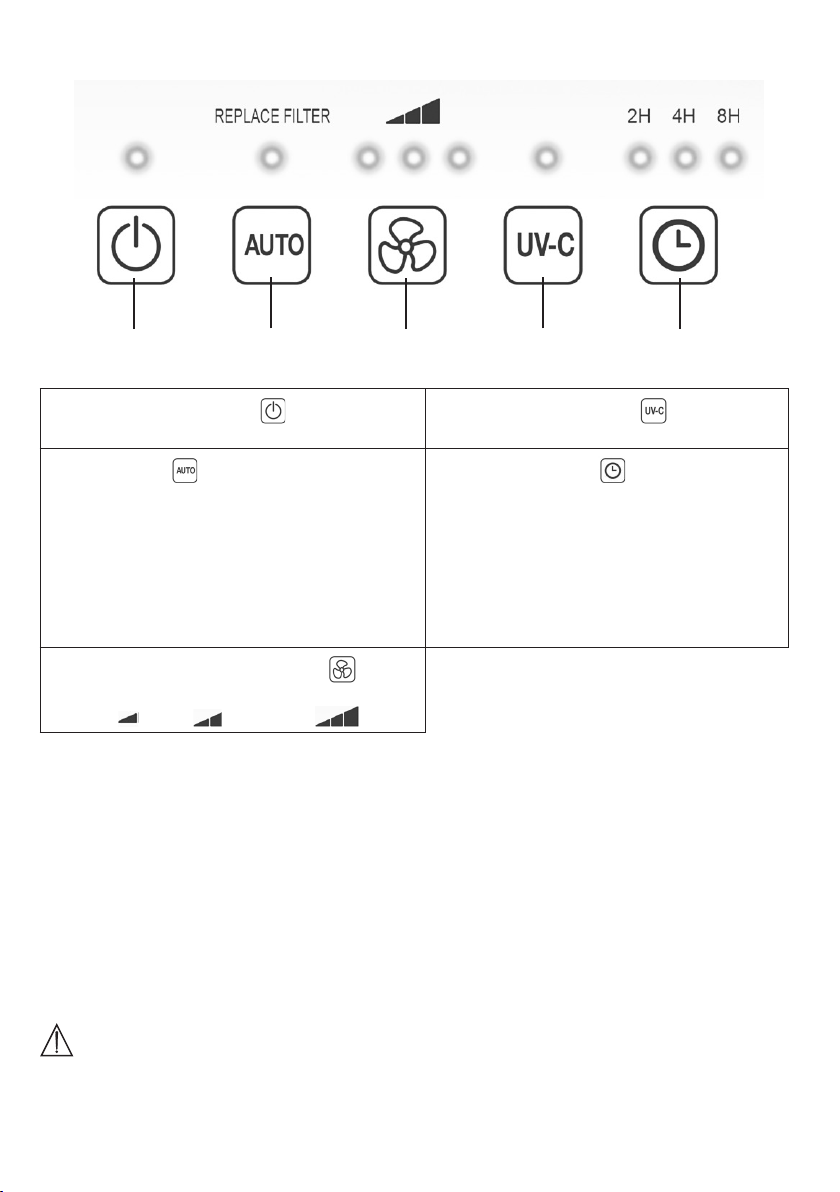
Display und Tasten
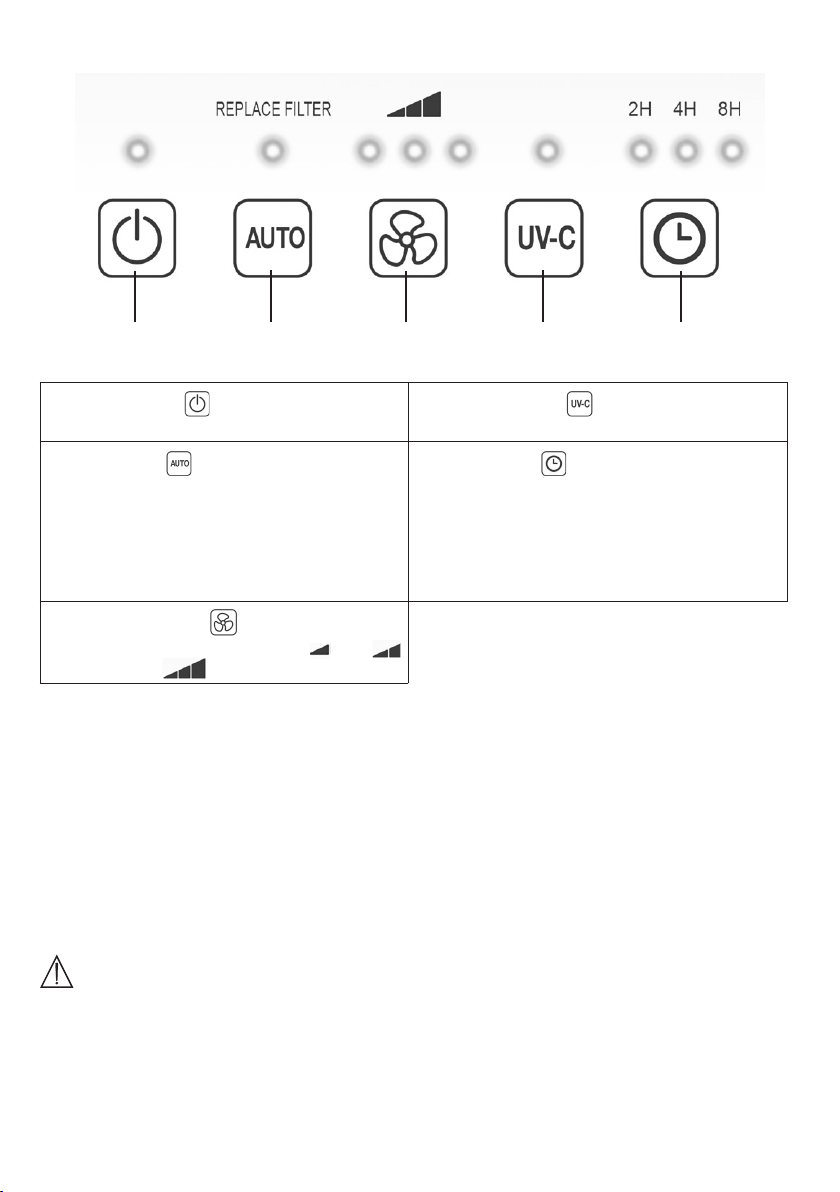
1
1 EIN/AUS-Taste
Ein/Ausschalten des Geräts
2 AUTO-Taste
Aktiviert die Automatikfunktion (Lüftergeschwindigkeit passt sich automatisch an die Qualität der
Umgebungsluft an und LED leuchtet dauerhaft).
Wenn das Licht unterhalb von „Replace Filter“
blinkt, wechseln sie den Filter. Nachdem Sie den
Filter gewechselt haben, halten Sie die AUTO-Taste gedrückt, um den automatischen Zähler für den
Filterwechsel wieder zurückzusetzen.
3 LÜFTERGESCHWINDIGKEIT-Taste
Der Luftreiniger besitzt drei Lüftergeschwindigkeiten: (niedrig), (mittel) und (hoch).
2
3
4 UV-C-Licht-Taste
Ein/Ausschalten des UV-C-Lichts
5 TIMER-Taste
Der Luftreiniger besitzt eine Timer-Funktion mit
der Sie festlegen können, in wie vielen Stunden
sich der Luftreiniger selbstständig ausschalten soll.
Der Luftreiniger besitzt drei Timer-Zeiten: 2H (zwei
Stunden), 4H (vier Stunden) und 8H (acht Stunden).
4
5
6. Inbetriebnahme
6.1 Luftreiniger entnehmen
1. Önen Sie die Kartonverpackung.
2. Lassen Sie den Folienbeutel verschlossen und nehmen Sie das Gerät nach oben heraus.
3. Entfernen Sie nun alle Folien. Entnehmen Sie den Kombifilter aus dem Gerät (siehe Kapitel „Filterwech
sel“) und nehmen Sie ihn aus der Folie heraus. Setzen Sie den Kombifilter anschließend wieder in das
Gerät ein.
4. Überprüfen Sie Gerät, Netzstecker und Kabel auf Beschädigungen.
-
6.2 Luftreiniger aufstellen
Stellen Sie den Luftreiniger auf einen ebenen, festen Untergrund, um Vibrationen und Lärm zu vermeiden.
1.
ACHTUNG
Wenn Sie den Luftreiniger neu positionieren möchten, tragen Sie ihn ausschließlich am Haltegri auf der
Geräterückseite.
2. Stellen Sie den Luftreiniger so auf, dass um das Gerät herum 30 cm Freiraum zu allen Seiten besteht.
3. Achten Sie darauf, dass Lufteinlass und Luftauslass niemals blockiert sind.
6
Page 7
7. Anwendung
7.1 Luftreiniger einschalten
1. Befolgen Sie die Anweisungen aus Kapitel „Inbetriebnahme“.
2. Stecken Sie den Netzstecker in die Steckdose. Verlegen Sie das Kabel stolpersicher.
3. Um den Luftreiniger einzuschalten, drücken Sie die EIN/AUS-Taste (
Hinweis
Bei der ersten Inbetriebnahme ist der Luftreiniger auf der mittleren Lüftergeschwindigkeit eingestellt.
7.2 Automatikfunktion
Der Luftreiniger besitzt eine Automatikfunktion. Ist die Automatikfunktion eingeschaltet, passt sich die
Lüftergeschwindigkeit automatisch an die Qualität der Umgebungsluft an. Das heißt, je schlechter die Qualität
der Umgebungsluft, desto höher stellt der Luftreiniger automatisch die Lüftergeschwindigkeit ein.
1.
Um die Automatikfunktion einzuschalten, drücken Sie am eingeschalteten Luftreiniger die AUTO-Taste
( ). Sobald die Automatikfunktion aktiv ist, leuchtet ein Licht oberhalb der AUTO-Taste auf.
2.
Um die Automatikfunktion auszuschalten, drücken Sie erneut die
der AUTO-Taste erlischt.
Hinweis
Wenn das Licht oberhalb der AUTO-Taste blinkt, müssen Sie den Filter auswechseln. Beachten Sie hierzu
die Anweisungen im Kapitel „Filterwechsel“.
7.3 Lüftergeschwindigkeit
Der Luftreiniger besitzt drei Lüftergeschwindigkeiten: (niedrig), (mittel) und (hoch).
•
Um zwischen den einzelnen Lüftergeschwindigkeiten zu wechseln, drücken Sie die LüftergeschwindigkeitTaste
. Im Bedienpanel leuchtet die aktuell eingestellte Lüftergeschwindigkeit auf.
7.4 UV-C-Licht
Das UV-C-Licht eliminiert in der Luft enthaltene Keime. Hierbei aktiviert das UV-C Licht Titaniumoxide, die die
übelriechenden Geruchsmoleküle (verursacht durch Tabakrauch, Küche oder Tiere) zersetzt.
1.
Um das
Sobald das
2.
Um das
UV-C-Taste erlischt.
7.5 Timer-Funktion
Der Luftreiniger besitzt eine Timer-Funktion, mit der Sie festlegen können, in wie vielen Stunden sich der
Luftreiniger selbstständig ausschalten soll. Der Luftreiniger besitzt drei Timer-Zeiten: 2H (zwei Stunden), 4H
(vier Stunden) und 8H (acht Stunden).
•
Um zwischen den einzelnen Timer-Zeiten zu wechseln, drücken Sie die TIMER-Taste
leuchtet die aktuell eingestellte TIMER-Zeit auf. Der Luftreiniger schaltet sich nun automatisch nach Ablauf
des eingenstellten Stundenwerts aus.
•
Um den Timer auszuschalten, drücken Sie so oft die TIMER-Taste ( ), bis kein Licht mehr über der
Timer-Taste aufleuchtet. Der Luftreiniger reinigt nun kontinuierlich.
UV-C-Licht
UV-C-Licht
UV-C-Licht
einzuschalten, drücken Sie am eingeschalteten Luftreiniger die UV-C-Taste ( ).
aktiv ist, leuchtet ein Licht oberhalb der UV-C-Taste auf.
auszuschalten, drücken Sie erneut die
UV-C-Taste ( ). Das Licht oberhalb der
).
AUTO-Taste ( ). Das Licht oberhalb
( )
. Im Bedienpanel
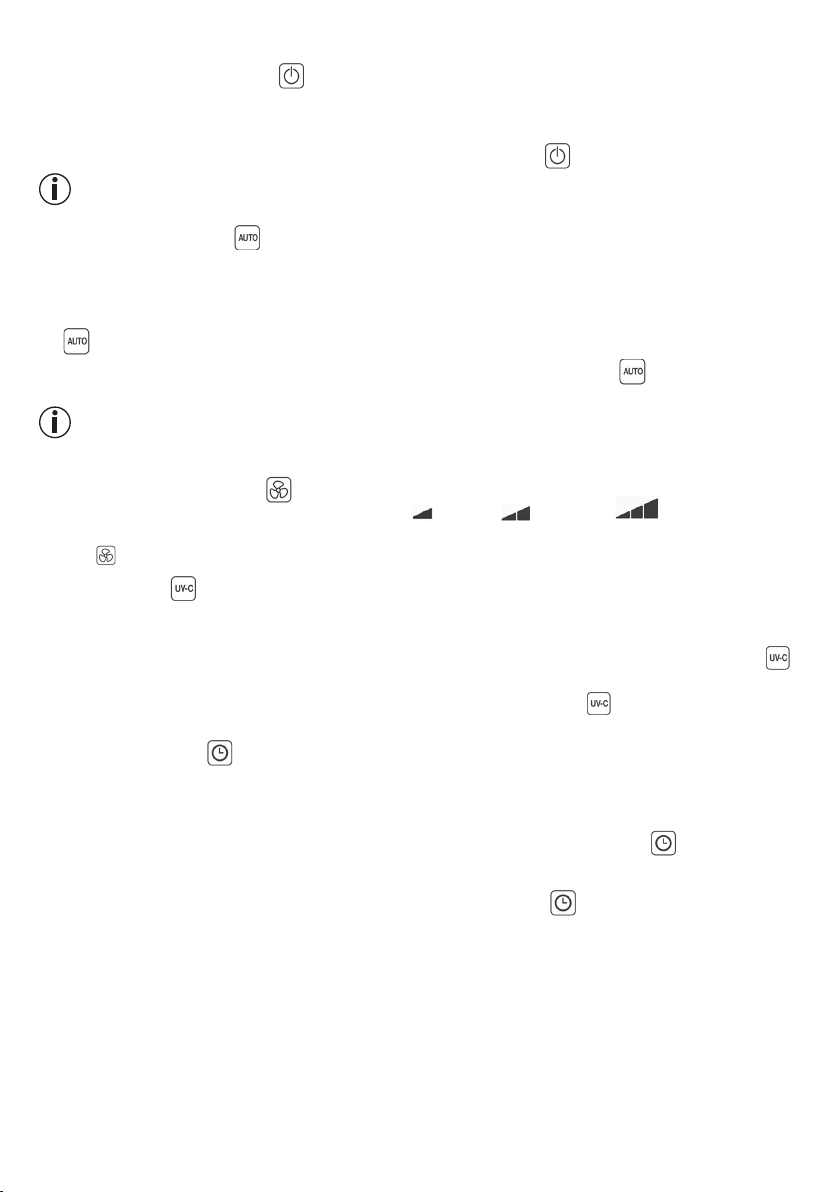
7.6 Filterwechsel
Sie sollten den dreischichtigen Filter nach 4320 Betriebsstunden durch einen Neuen ersetzen. Nach 4320
Betriebsstunden blinkt oberhalb der AUTO-Taste eine blaue LED. Um den Filter zu wechseln, gehen Sie wie
folgt vor:
7
Page 8
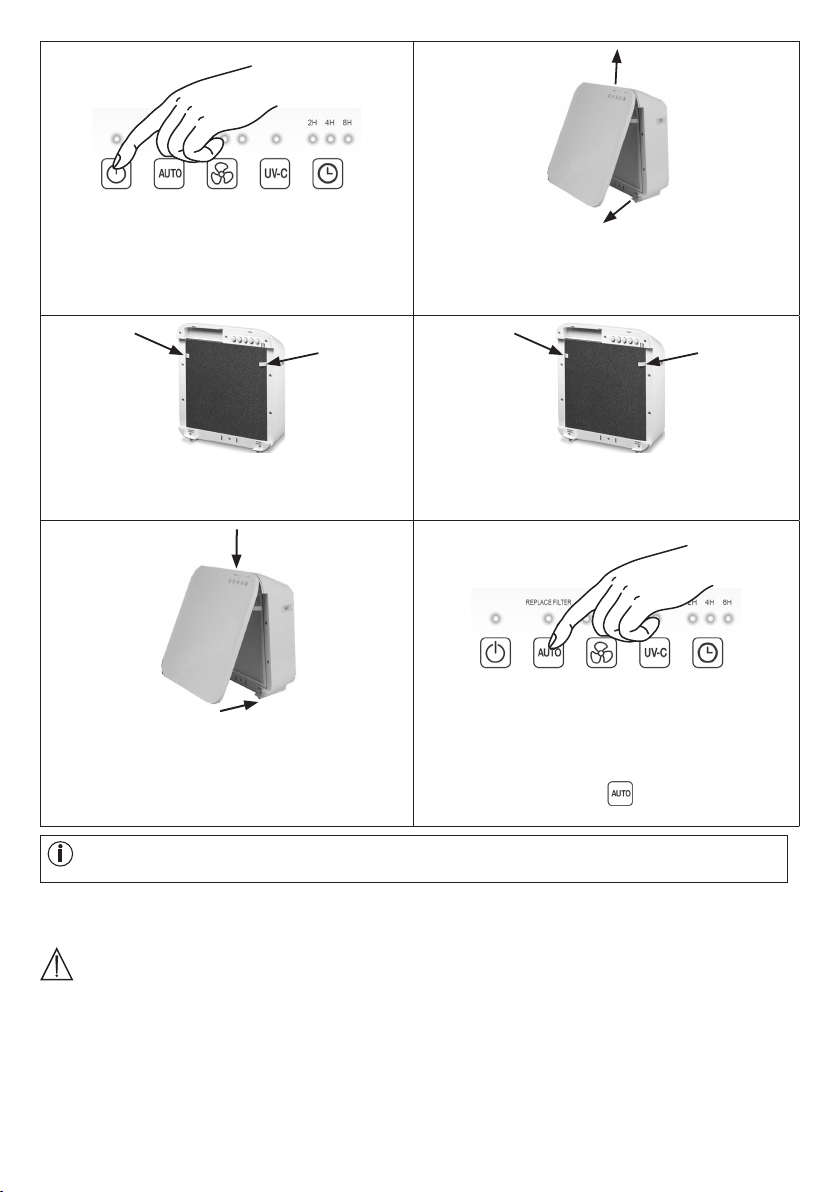
1.
Drücken Sie auf die EIN/AUS-Taste, um den
Luftreiniger auszuschalten und trennen Sie ihn
von der Steckdose.
3.
Ziehen Sie den Vorfilter ab. Um nun den Kombifilter abzuziehen, ziehen Sie vorsichtig an den
seitlichen Laschen.
1.
2.
1.
2. Nehmen Sie die Gehäuseabdeckung wie abge
bildet ab (Magnetverschluss). Hängen Sie den
Magnetverschluss zuerst unten und anschließend oben aus.
4. Setzen Sie einen neuen Kombifilter ein. Um den
Kombifilter richtig einzusetzen, orientieren Sie
sich an den seitlichen Laschen wie abgebildet.
Platzieren Sie den Vorfilter darüber.
-
2.
5.
Setzen Sie die Gehäuseabdeckung wie abgebildet wieder ein, bis sie hör- und spürbar einrastet
(Magnetverschluss). Hängen Sie den Magnetverschluss zuerst oben und anschließend unten ein.
Wenn Sie den Kombifilter in bestimmten persönlichen Zeitrhythmen wechseln möchten (z.B. alle 6 Monate), befindet sich auf der oberen Kante des Kombifilters ein Sticker, auf dem Sie ein Datum eintragen
können.
6. Stecken Sie den Netzstecker in die Steckdose.
Verlegen Sie das Kabel stolpersicher. Halten
Sie die AUTO-Taste ( ) für fünf Sekunden gedrückt.
Der Betriebsstundenzähler ist nun wieder
auf 0 zurückgestellt.
8. Reinigung und Pflege
WARNUNG
Vergewissern Sie sich vor jeder Reinigung, dass der Netzstecker des Luftreinigers ausgesteckt ist!
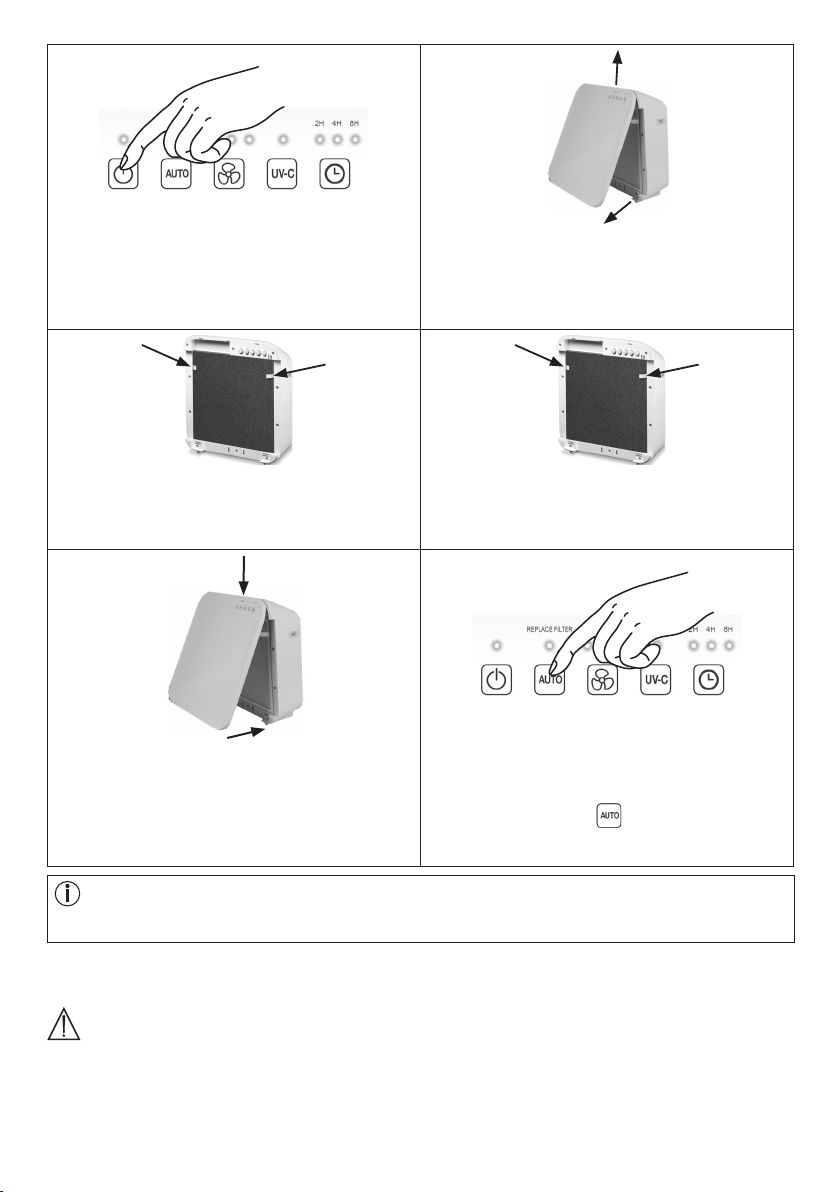
8.1 Filter reinigen
Eine regelmäßige Reinigung des Filters (einmal im Monat) ist Voraussetzung für einen hygienischen,
störungsfreien Betrieb.
8
Page 9
•
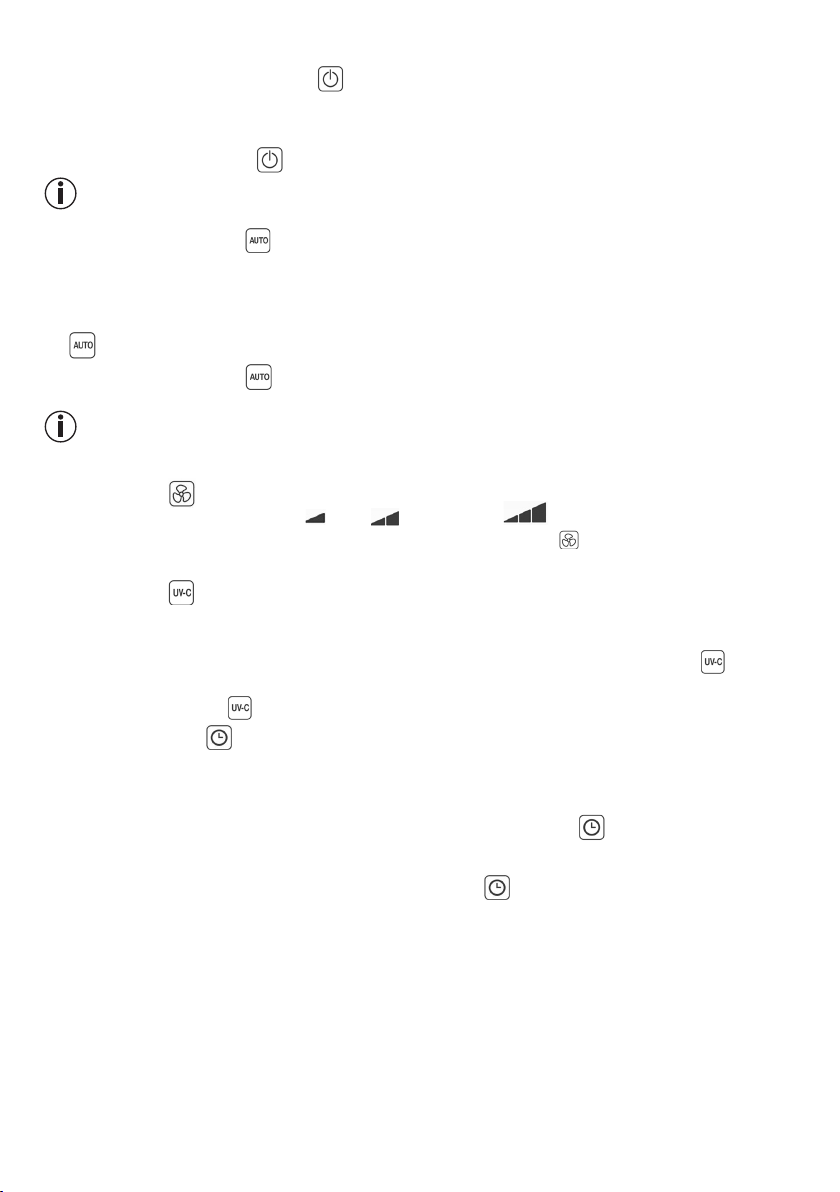
Reinigen Sie den dreischichtigen Filter mit dem Bürstenaufsatz eines Staubsaugers. Um eine gründliche
Reinigung durchzuführen, ziehen Sie den Vorfilter ab und reinigen Sie den dahinter befindlichen Aktivkohlefilter und den auf der Rückseite befindlichen HEPA-Filter ebenfalls mit dem Bürstenaufsatz eines
Staubsaugers. Setzen Sie anschließend den Vorfilter wieder auf den HEPA-Filter.
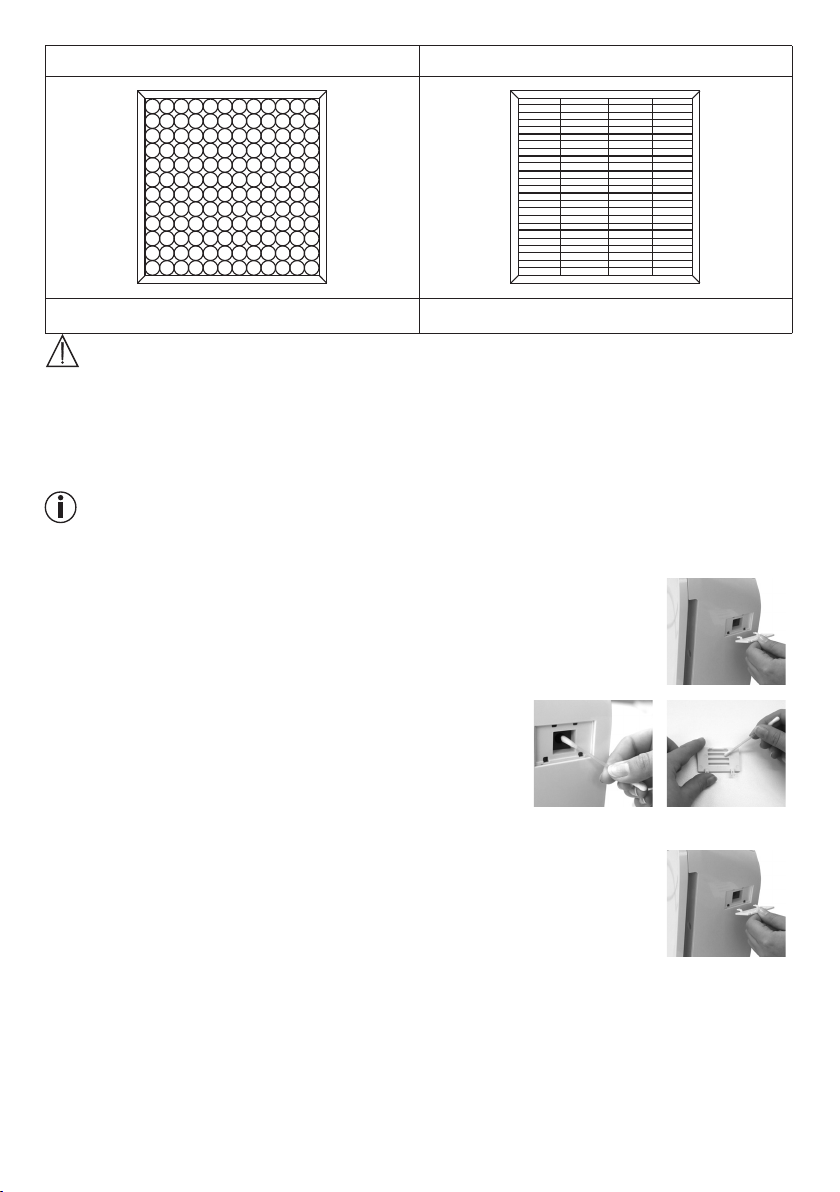
Aktivkohlefilter HEPA-Filter H 13
Vorderseite Rückseite
ACHTUNG
Der dreischichtige Filter sollte nach 4320 Betriebsstunden gewechselt werden (siehe Kapitel „Filterwechsel“).
Der dreischichtige Filter kann nicht gewaschen werden.
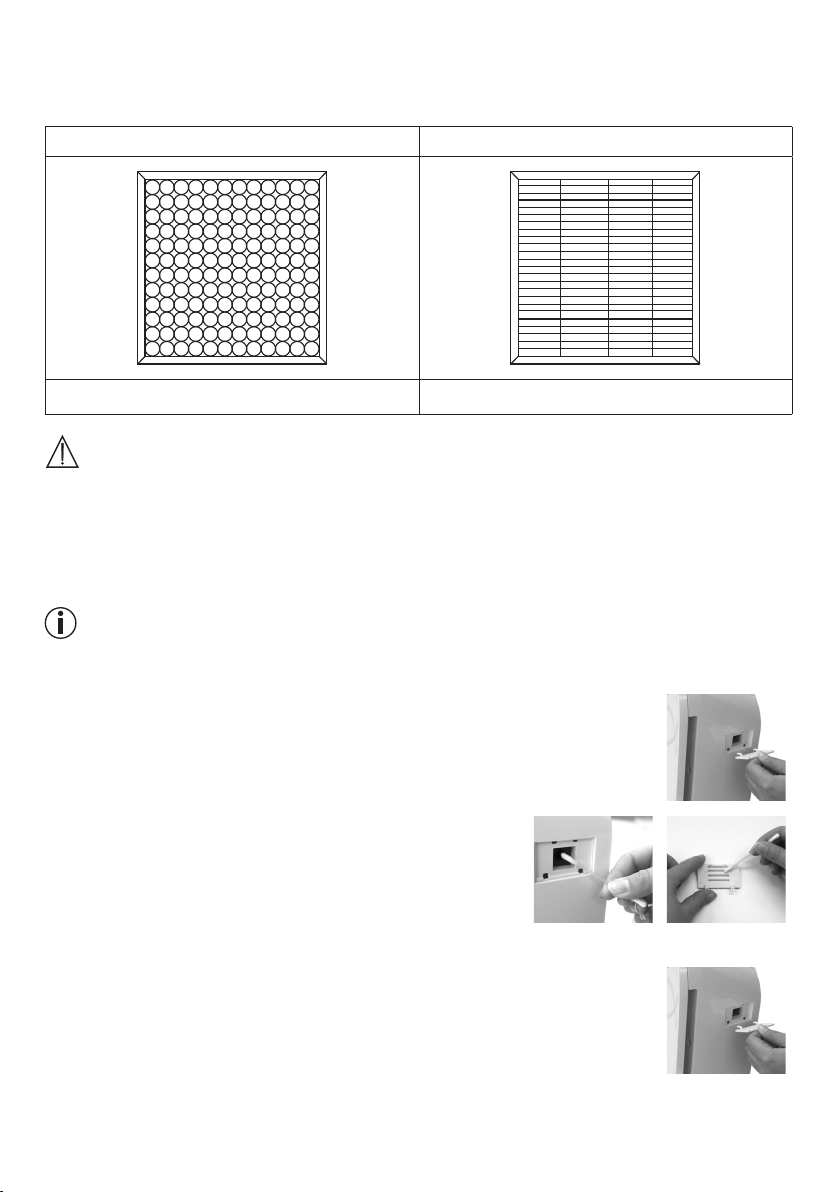
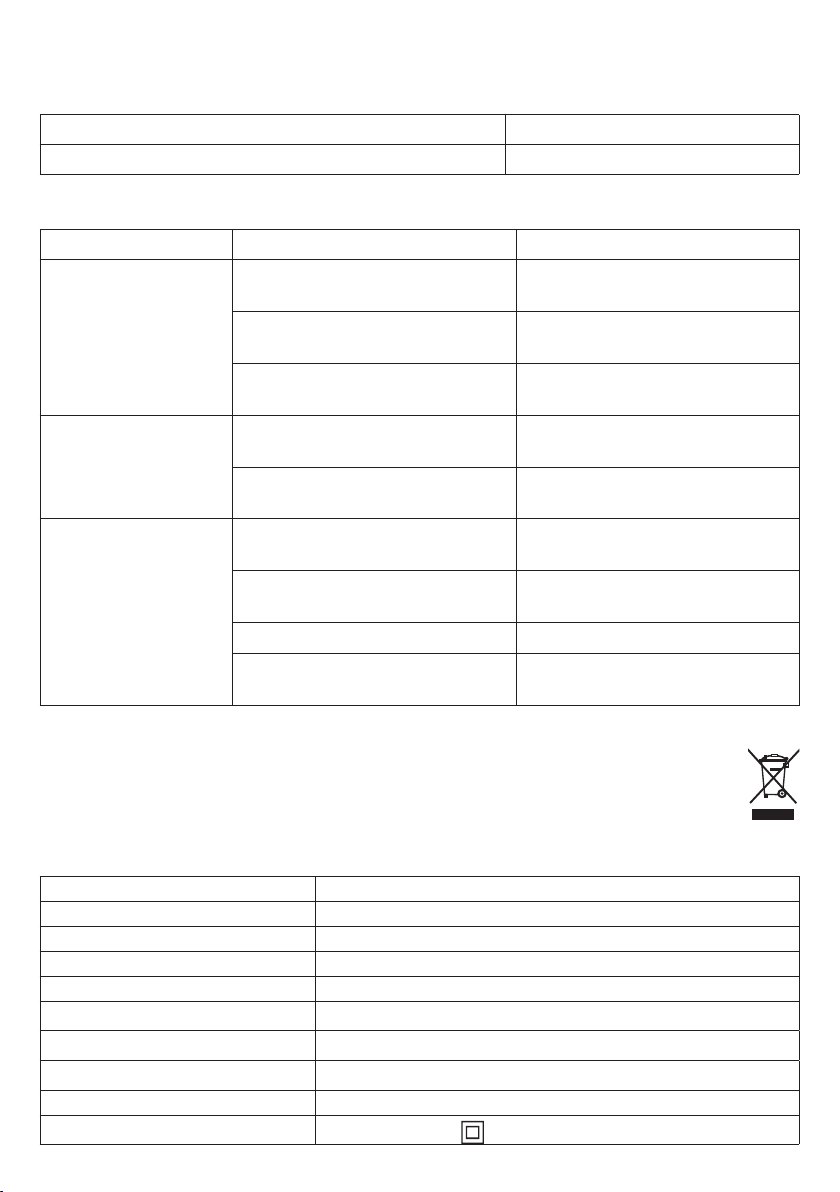
8.2 Feinstaubpartikelsensor reinigen
Der Feinstaubpartikelsensor sollte alle 2 Monate gereinigt werden.
Hinweis
Wenn der Luftreiniger in einer staubigen Umgebung verwendet wird, muss er möglicherweise öfter
gereinigt werden.
Um den Sensor zu reinigen, schalten Sie den Luftreiniger aus und
ziehen Sie den Netzstecker aus der Steckdose. Önen Sie die Abdeckung an der Gehäuseseite und nehmen Sie die Abdeckung ab.
Reinigen Sie den Sensor, sowie den Luftein- und auslass mit einem
feuchten Wattestäbchen.
Trocknen Sie danach alle gereinigten Teile mit einem trockenen Wattestäbchen.
Bringen Sie die Abdeckung des Feinstaubpartikelsensors wieder an.
9
Page 10
8.3 Gehäuse reinigen
Reinigen Sie das Gehäuse des Luftreinigers mit einem leicht angefeuchteten Tuch (Wasser oder eine milde
Reinigungslösung). Verwenden Sie keine Lösungs- oder andere aggressive Reinigungs- oder Scheuermittel,
da die Oberfläche beschädigt werden könnte.
8.4 Aufbewahrung
Wenn Sie das Gerät längere Zeit nicht verwenden, empfehlen wir Ihnen, es gereinigt in der Originalverpackung
in trockener Umgebung und ohne Beschwerung aufzubewahren.
9. Zubehör- und Ersatzteile
Die Ersatz- und Verschleißteile sind über die jeweilige Serviceadresse (laut Serviceadressliste) erhältlich.
Geben Sie die entsprechende Bestellnummer an.
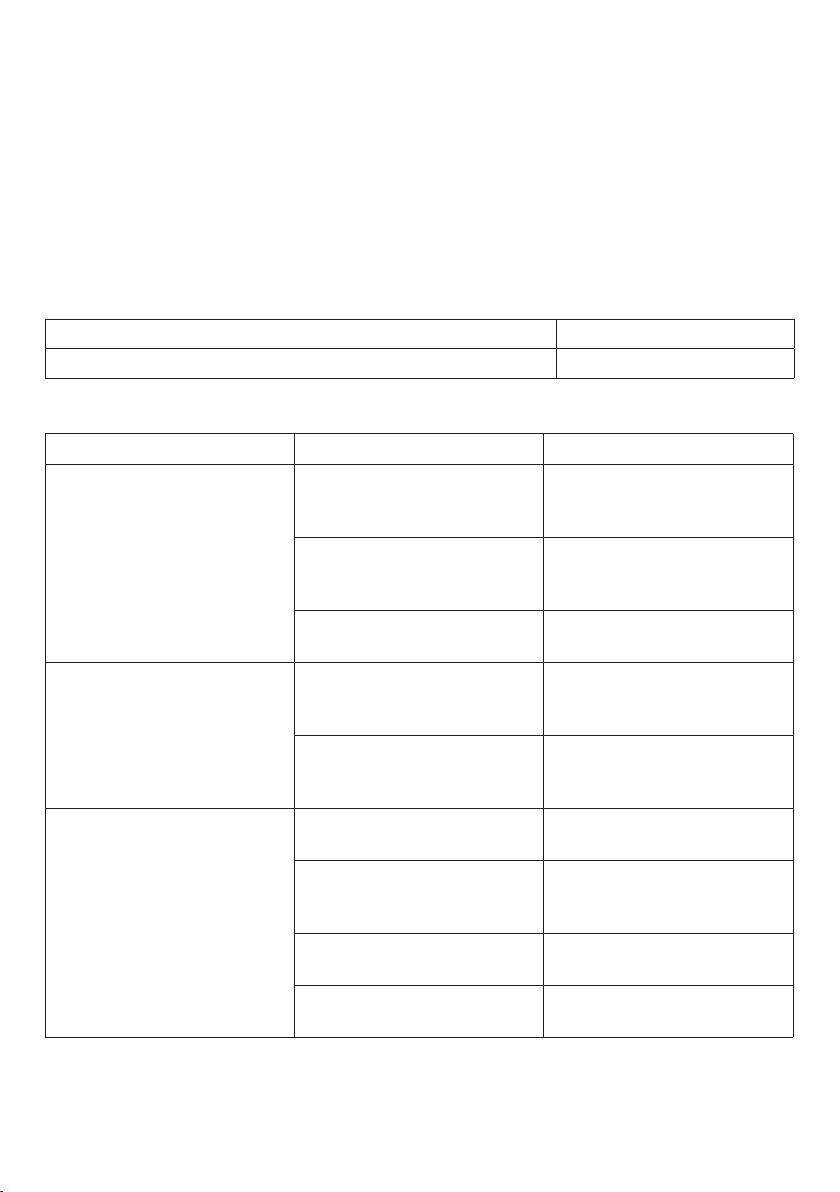
Bezeichnung Artikel- bzw. Bestellnummer
Vorfilter, Kombifilter (HEPA + Aktivkohle) 693.02
10. Was tun bei Problemen?
Problem Ursache Behebung
Der Luftreiniger lässt sich nicht
einschalten.
Unzureichender Luftdurchlass Die Filter sind verschmutzt. Reinigen Sie die Filter (siehe Ka
Luftreiniger ist sehr laut Es befindet sich ein Fremdkör
Die Gehäuseabdeckung ist nicht
korrekt eingesetzt.
Der dreischichtige Filter ist nicht
korrekt eingesetzt.
Das Steckernetzteil ist nicht ein
gesteckt.
Der Lufteinlass /-auslass ist blo
ckiert.
per im Lufteinlass /-auslass.
Die Filter sind verstopft. Reinigen Sie die Filter (siehe Ka
Die Filter sind nicht korrekt eingesetzt.
Der Luftreiniger ist auf einer un
ebenen Oberfläche positioniert.
Vergewissern Sie sich, dass die
Gehäuseabdeckung korrekt eingesetzt ist.
Vergewissern Sie sich, dass der
dreischichtige Filter korrekt eingesetzt ist.
Stecken Sie das Steckernetzteil
in eine geeignete Steckdose.
pitel „Reinigung und Instandhaltung“).
Vergewissern Sie sich, dass der
Lufteinlass /-auslass nicht blockiert ist.
-
Entfernen Sie den Fremdkörper
aus dem Lufteinlass /-auslass.
pitel „Reinigung und Instandhaltung“).
Setzen Sie die Filter korrekt ein.
-
Positionieren Sie den Luftreiniger
auf einer ebenen Oberfläche.
-
-
10
Page 11
11. Entsorgung
Im Interesse des Umweltschutzes darf das Gerät am Ende seiner Lebensdauer nicht mit dem Hausmüll
entsorgt werden. Die Entsorgung kann über entsprechende Sammelstellen in Ihrem Land erfolgen.
Entsorgen Sie das Gerät gemäß der Elektro- und Elektronik Altgeräte EG-Richtlinie – WEEE (Waste
Electrical and Electronic Equipment). Bei Rückfragen wenden Sie sich an die für die Entsorgung zu
ständige kommunale Behörde.
-
12. Technische Angaben
Modell LR 310
Netzspannung siehe Typschild am Gerät
Leistung 50 W
Maße (L x B x H) 388 x 145 x 428 mm
Leergewicht 4,5 kg
UV-Licht Wellenlänge 254 nm; Lebensdauer ca. 20.000 Stunden
Geeignet für Raumgrößen bis zu 54 m
Lautstärke ca. 56 dB (Stufe 3)
Zul. Betriebsbedingungen +5°C bis +40°C, ≤90% relative Luftfeuchte (nicht kondensierend)
Schutzklasse
Schutzklasse II /
2
13. Garantie / Service
Die Beurer GmbH, Söflinger Straße 218, D-89077 Ulm (nachfolgend „Beurer“ genannt) gewährt unter den nachstehenden Voraussetzungen und in dem nachfolgend beschriebenen Umfang eine Garantie für dieses Produkt.
Die nachstehenden Garantiebedingungen lassen die gesetzlichen Gewährleistungsverpflichtungen des
Verkäufers aus dem Kaufvertrag mit dem Käufer unberührt.
Die Garantie gilt außerdem unbeschadet zwingender gesetzlicher Haftungsvorschriften.
Beurer garantiert die mangelfreie Funktionstüchtigkeit und die Vollständigkeit dieses Produktes.
Die weltweite Garantiezeit beträgt 3 Jahre ab Beginn des Kaufes des neuen, ungebrauchten Produktes durch
den Käufer.
Diese Garantie gilt nur für Produkte, die der Käufer als Verbraucher erworben hat und ausschließlich zu per
sönlichen Zwecken im Rahmen des häuslichen Gebrauchs verwendet.
Es gilt deutsches Recht.
Falls sich dieses Produkt während der Garantiezeit als unvollständig oder in der Funktionstüchtigkeit als man
gelhaft gemäß der nachfolgenden Bestimmungen erweist, wird Beurer gemäß diesen Garantiebedingungen
eine kostenfreie Ersatzlieferung oder Reparatur durchführen.
Wenn der Käufer einen Garantiefall melden möchte, wendet er sich zunächst an den Beurer Kunden
service:
Beurer GmbH, Servicecenter
Tel: +49 731 3989-144
Für eine zügige Bearbeitung nutzen Sie bitte unser Kontaktformular auf der Homepage www.beurer.com un
ter der Rubrik ‚Service‘.
11
-
-
-
-
Page 12

Der Käufer erhält dann nähere Informationen zur Abwicklung des Garantiefalls, z.B. wohin er das Produkt
kostenfrei senden kann und welche Unterlagen erforderlich sind.
Eine Inanspruchnahme der Garantie kommt nur in Betracht, wenn der Käufer
- eine Rechnungskopie/Kaufquittung und
- das Original-Produkt
Beurer oder einem autorisierten Beurer Partner vorlegen kann.
Ausdrücklich ausgenommen von dieser Garantie sind
- Verschleiß, der auf normalem Gebrauch oder Verbrauch des Produktes beruht;
- zu diesem Produkt mitgelieferte Zubehörteile, die sich bei sachgemäßen Gebrauch abnutzen bzw. verbraucht werden (z.B. Batterien, Akkus, Manschetten, Dichtungen, Elektroden, Leuchtmittel, Aufsätze, Inhalatorzubehör);
- Produkte, die unsachgemäß und/oder entgegen der Bestimmungen der Bedienungsanleitung verwendet,
gereinigt, gelagert oder gewartet wurden sowie Produkte, die vom Käufer oder einem nicht von Beurer
autorisierten Servicecenter geönet, repariert oder umgebaut wurden;
- Schäden, die auf dem Transportweg zwischen Hersteller und Kunde bzw. zwischen Servicecenter und
Kunde entstehen
- Produkte, die als 2.Wahl-Artikel oder als gebrauchte Artikel gekauft wurden;
- Folgeschäden, welche auf einem Mangel dieses Produktes beruhen (es können für diesen Fall jedoch An
sprüche aus Produkthaftung oder aus anderen zwingenden gesetzlichen Haftungsbestimmungen bestehen).
Reparaturen oder ein Komplettaustausch verlängern in keinem Fall die Garantiezeit.
-
12
Irrtum und Änderungen vorbehalten
Page 13

E
NGLISH
Read these instructions for use carefully and keep them for
later use, be sure to make them accessible to other users and
observe the information they contain.
WARNING
•
This device may be used by children over the age of eight and by people with
reduced physical, sensory or mental skills or a lack of experience or knowledge,
provided that they are supervised or have been instructed on how to use the
device safely, and are fully aware of the consequent risks of use.
•
Children must not play with the device.
•
Cleaning and user maintenance must not be performed by children unless
supervised.
•
Disconnect the device from the mains supply during cleaning.
•
Clean the device using only the methods specified. Under no circumstances
must liquid enter the fan unit.
•
Do not use any solvent-based cleaning products.
•
If the mains connection cable of this device is damaged, it must be disposed
of. If it cannot be removed, the device must be disposed of.
Dear customer,
Thank you for choosing one of our products. Our name stands for high-quality, thoroughly tested products
for applications in the areas of heat, gentle therapy, blood pressure/diagnosis, weight, massage, beauty, air
and babycare.
With kind regards,
Your Beurer team
Getting to know your device
Humans spend a large proportion of their time indoors. The air indoors is often polluted with dust particles,
pollen, animal hair, odours, harmful gases as well as various bacteria and viruses. The LR 310 air purifier cleans
the ambient air using a three-layered filter system and an in-built UV-C light.
The LR 310 air purifier
•
Filters air with a combi filter (activated carbon filter against harmful gases and unpleasant odours,
HEPA filterH 13
•
Has an in-built UV-C light (to kill germs)
•
Operates quietly with three output levels
•
Has a timer function (two, four or eight hours)
•
has a fine dust particle sensor
•
is suitable for rooms up to 54 m² (according to NRCC-54013-2011),
•
Energy-saving
•
Switches o automatically when the housing cover is removed.
against particles such as bacteria, viruses, mites, pollen and fine dust)
13
Page 14
Principle of air cleaning
PAP
1. The air purifier’s fan sucks in the contaminated air.
2. The pre-filter filters larger particles such as dust, dirt and hairs.
3. Next, the activated carbon filter filters formaldehyde, benzene and other poisonous gases and odours out
of the ambient air.
4. Lastly, the HEPA filter filters out small particles such as pollen, bacteria or viruses.
5. The switchable UV-C light inside the housing
eliminates germs and odours (caused by animals, cooking or
tobacco smoke).
6. The cleaned air is emitted into the ambient air via the air outlet on top of the air purifier.
The HEPA H 13 filter has a filter performance of ≥ 99.95%. That means that 99.95% of particles
(e.g.bacteria, viruses and fine dust) can be filtered out.
Contaminated, unfiltered air can have the following eects:
•
Infections and respiratory diseases are more likely to occur
•
Damage to health through harmful gases
Table of contents
1. Included in delivery ................................. 14
2. Signs and symbols .................................. 14
3. Warnings and safety notes ....................15
4. Intended use ............................................ 16
5. Device description ................................... 16
6. Initial use .................................................. 17
6.1 Removing the air purifier ..................... 17
6.2 Setting up the air purifier ..................... 17
7. Usage ........................................................ 18
7.1 Switching on the air purifier ................ 18
7.2 Automatic function ............................. 18
7.3 Fan speed ........................................... 18
7.4 UV-C light ........................................... 18
7.5 Timer function .................................. 18
7.6 Filter change ...................................... 18
8. Cleaning and maintenance ..................19
8.1 Cleaning the filter ..............................19
8.2 Cleaning the fine dust
particle sensor ................................... 20
8.3 Cleaning the housing ......................... 20
8.4 Storage .............................................. 20
9. Accessories and replacement parts ...21
10. What to do if there are problems? .......21
11. Disposal .................................................. 21
12. Technical specifications .......................21
13. Warranty / Service ................................. 22
1. Included in delivery
•
1x air purifier
•
1x combi filter (activated carbon/HEPA filter class H 13)
•
1x pre-filter
•
1x set of instructions for use
2. Signs and symbols
The following symbols appear in these instructions for use:
WARNING
Warning instruction indicating a risk of injury or
damage to health
IMPORTANT
Safety note indicating possible damage to the
device/accessory
Product information
Note on important information
14
Manufacturer
CE labelling
This product satisfies the requirements of the
applicable European and national directives.
Dispose of packaging in an environmentally
20
friendly manner
Page 15
Certification symbol for products that are ex-
Read the instructions
Disposal in accordance with the Waste Electrical
and Electronic Equipment EC Directive – WEEE
ported to the Russian Federation and members
of the CIS
"Geprüfte Sicherheit" safety mark
3. Warnings and safety notes
Read the notes carefully! Non-observance of the following information may result in personal injury or material
damage.
WARNING
Keep packaging material away from children to avoid danger of suocation.
Electric shock
WARNING
As with every electrical device, use this air purifier carefully and cautiously, in order to avoid hazards due to
electric shock.
• Therefore, observe the following instructions for use:
– do not operate the device at voltages other than those indicated on the device (the type plate is located
underneath the device)
– never if it or its accessories show visible signs of damage
– not during a thunderstorm
•
In the event of defects or operational faults, switch the device o immediately and disconnect it from themains
socket. Do not pull on the mains cable or on the device to disconnect the plug from the socket. Never hold
or carry the device by the mains cable. Keep the cables away from hot surfaces.
•
Always switch o the device before disconnecting it from the mains.
•
Never disconnect the mains plug with wet or damp hands.
•
Keep the device away from sources of heat as the housing could melt and trigger a fire.
•
Ensure that the openings of the device and the mains cable do not come into contact with water, steam or
other liquids.
•
Do not use the device in close proximity to flammable or explosive gas mixtures.
•
Never reach for a device that has been submerged in water. Disconnect it from the mains plug immediately.
•
Do not use the device if it or its accessories are visibly damaged.
Repairs
WARNING
•
Only specialist personnel may perform repairs on electrical devices. Improper repairs may subject users to
considerable danger. For repairs, please contact Customer Services or an authorised retailer.
•
Do not open the fan unit.
•
It is not intended to replace the UV-C lamp. It is not permitted for the user to perform the replacement.
Risk of fire
WARNING
There is a risk of fire if the device is used improperly or these instructions for use are ignored.
Therefore, observe the following instructions for using the air purifier:
•
Never use underneath a cover, such as a blanket, pillow etc.
•
Never use near petrol or other highly flammable substances.
15
Page 16
Handling
IMPORTANT
The device must be switched o and disconnected from the mains after every use and before cleaning.
•
Do not place any objects in device openings or in rotating parts. Ensure that the moving parts can move
freely at all times.
•
Do not place any objects on the device.
•
Do not expose the device to high temperatures.
•
Protect the device against sunlight and impacts and do not drop it.
•
Never shake the device.
•
Place the device on a firm, level and water-resistant surface.
4. Intended use
This air purifier is intended exclusively for cleaning the air indoors.
WARNING
If you suer from severe respiratory or lung disease, consult your doctor before using the air purifier.
This device must only be used for the purpose for which it was designed and in the manner specified in the
instructions for use. Improper use can be dangerous. The manufacturer is not liable for damage resulting from
improper or careless use.
5. Device description
3
2
1
8
6
7
1. Air outlet
2.
Combi filter (activated carbon filter/HEPA filter
H 13)
Activated carbon filter: To counter harmful gases
and unpleasant smells
HEPA filter H 13: Filters particles such as bacteria,
viruses, mites, pollen and fine dust
3. Pre-filter
Filters coarse dust and dirt, such as hairs
4. Control panel 8. Air inlet
5. Housing cover
6. UV-C light
Eliminates
cooking or tobacco smoke) inside the housing
7. Housing
16
4
5
germs and odours (caused by animals,
Page 17
Display and buttons
1
1 ON/OFF button
Switches the device on/o
2 AUTO button
Activates the automatic function (fan speed auto
matically adapts to the ambient air quality and the
LED is lit continuously). If the light below "Replace
Filter" is flashing, change the filter. After changing
the filter, hold down the AUTO button to reset the
automatic counter for the filter change.
3 FAN SPEED button
The air purifier has three fan speeds: (low),
(medium) and (high).
2
3
4 UV-C light button
Switches the UV-C light on/o
5 TIMER button
-
The air purifier features a timer function that you
can use to determine the number of hours the
air purifier should run for before it automatically
switches itself o. The air purifier has three timer
periods: 2H (two hours), 4H (four hours) and 8H
(eight hours).
4
5
6. Initial use
6.1 Removing the air purifier
1. Open the cardboard packaging.
2. Remove the device from the top of the box without opening the film bag.
3. Now remove all plastic films. Remove the combi filter from the device (see "Filter change" section) and
take it out of the plastic film. Then re-insert the combi filter into the device.
4. Check the device, mains plug and cable for damage.
6.2 Setting up the air purifier
1. Place the air purifier on a firm, level surface to prevent vibrations and noise.
IMPORTANT
If you wish to reposition the air purifier, only carry it by the handle on the rear of the device.
2. Set up the air purifier in such a way that provides 30 cm clearance on all sides.
3. Make sure that the air inlet and air outlet are never blocked.
17
Page 18
7. Usage
7.1 Switching on the air purifier
1. Always follow the instructions in chapter "Initial use".
2. Insert the mains plug into the socket. Ensure that the cable does not pose a trip hazard.
3. Press the ON/OFF button (
Note
When the air purifier is used for the first time it is set to the middle fan speed.
7.2 Automatic function
The air purifier has an automatic function. When the automatic function is switched on, the fan speed
automatically adapts to the ambient air quality. This means that, the poorer the quality of the ambient air, the
higher the fan speed automatically set by the air purifier.
1. To switch on the automatic function, press the AUTO button while the air purifier is switched on
( ). As soon as the automatic function is active, a light goes on above the AUTO button.
2.
Press the
button goes out.
AUTO button ( ) again to switch o the automatic function. The light above the AUTO
Note
If the light above the AUTO button is flashing, you must replace the filter. To do this, follow the instructions
in the "Filter change" section.
7.3 Fan speed
The air purifier has three fan speeds: (low), (medium) and (high).
•
To switch between the individual fan speeds, press the fan speed button . The fan speed that is currently
set lights up on the control panel.
7.4 UV-C light
The UV-C light eliminates germs contained in the air. Here the UV-C light activates titanium oxides that break
down the foul-smelling odour molecules (caused by tobacco smoke, cooking smells or animals).
1.
To switch on the
as the
UV-C light
2.
Press the
UV-C light
is active, a light goes on above the UV-C button.
UV-C button
7.5 Timer function
The air purifier features a timer function that you can use to determine the number of hours the air purifier
should run for before it automatically switches itself o. The air purifier has three timer periods: 2H (twohours),
4H (four hours) and 8H (eight hours).
•
To switch between the individual timer periods, press the TIMER button
currently set lights up on the control panel. The air purifier will now automatically switch o after the set
number of hours has passed.
•
To switch o the timer, repeatedly press the TIMER button ( ), until the light above the TIMER button
goes out. The air purifier now cleans continuously.
) to switch on the air purifier.
, press the UV-C button on the air purifier while it is switched on ( ). Assoon
( ) again to switch o the
UV-C light. The light above the UV-C button goes out.
( )
The TIMER period that is
7.6 Filter change
The three-layered filter should be replaced with a new one after 4320 operating hours. After 4320 operating
hours, a blue LED flashes above the AUTO button. To change the filter, proceed as follows:
18
Page 19
1.
Press the ON/OFF button to switch o the air
purifier, and unplug it from the socket.
3.
Pull out the pre-filter. Now, to pull out the combi
filter, pull carefully on the side tabs.
1.
2.
1.
Remove the housing cover as shown (magnetic
2.
fastening). Firstly detach the magnetic fastening
at the bottom, and then at the top.
4. Insert a new combi filter. To insert the combi filter
correctly, align it with the side tabs as shown. Po
sition the pre-filter above it.
-
2.
5.
Re-insert the housing cover as shown until
yousee and hear it click into place (magnetic
fastening). First attach the magnetic fastening
at the top, and then at the bottom.
If you wish to change the combi filter at specific personal intervals (e.g. every six months), there is a
sticker on the upper edge of the combi filter on which a date can be entered.
6. Insert the mains plug into the socket. Ensure that
the cable does not pose a trip hazard. Press and
hold the AUTO button (
operating hours counter now resets to 0.
) for five seconds.
8. Cleaning and maintenance
WARNING
Before cleaning, always ensure that the mains plug of the air purifier has been properly disconnected.
8.1 Cleaning the filter
Regular cleaning of the filter (once a month) is a prerequisite for hygienic and fault-free operation.
•
Clean the three-layered filter using the brush attachment of a vacuum cleaner. To carry out a thorough clean,
pull out the pre-filter and clean the activated carbon filter located behind it and the HEPA filter located at the
rear, also using the brush attachment from a vacuum cleaner. Then replace the pre-filter on the HEPA filter.
19
The
Page 20
Activated carbon filter HEPA filter H 13
Front Rear
IMPORTANT
The three-layered filter should be changed after 4320 operating hours (see "Filter change" section).
The three-layered filter cannot be washed.
8.2 Cleaning the fine dust particle sensor
The fine dust particle sensor should be cleaned every 2 months.
Note
If the air purifier is used in a dusty environment, it may need to be cleaned more often.
To clean the sensor, switch o the air purifier and pull the mains plug
out of the socket. Open the cover on the side of the housing, and
remove the cover.
Clean the sensor, along with the air inlet and outlet using a moistened cotton bud.
Afterwards, dry all of the cleaned parts using a dry cotton bud.
Attach the fine dust particle sensor cover again.
8.3 Cleaning the housing
Clean the housing of the air purifier with a damp cloth (water or a mild cleaning solution). When cleaning, do
not use any solvents or other aggressive or abrasive cleaning agents, as the surface may become damaged.
8.4 Storage
If you do not plan to use the device for a long period of time, we recommend that you clean it and store it in
the original packaging in a dry environment, ensuring it is not weighed down by additional items.
20
Page 21
9. Accessories and replacement parts
Replacement parts and wearing parts are available from the corresponding service address (according to the
service address list). Please state the corresponding order number.
Designation Item number and/or order number
Pre-filter, combi filter (HEPA + activated carbon) 693.02
10. What to do if there are problems?
Problem Cause Solution
The air purifier will not
switch on
Insucient passage of
air
Air cleaner is very loud There is a foreign body in the air in
The housing cover is not correctly in
stalled.
The three-layered filter is not correct
ly inserted.
The mains part plug is not plugged in.
The filters are dirty
The air intake/air outlet is blocked. Ensure that the air intake/air outlet is
-
take/air outlet.
The filters are clogged.
The filters are not correctly inserted. Insert the filters correctly.
The air purifier is positioned on an un-
even surface.
-
Ensure that the housing cover is cor
rectly installed.
Ensure that the three-layered filter is
correctly inserted.
Plug the mains part plug into asuitable socket.
Clean the filters (see "Maintenance
and cleaning" section).
not blocked.
Remove the foreign body from the air
intake/air outlet.
Clean the filters (see "Maintenance
and cleaning" section).
Position the air purifier on a level sur
face.
-
-
11. Disposal
For environmental reasons, do not dispose of the device in the household waste at the end of its
useful life. Dispose of the unit at a suitable local collection or recycling point. Dispose of the device in
accordance with EC Directive – WEEE (Waste Electrical and Electronic Equipment). If you have any
questions, please contact the local authorities responsible for waste disposal.
12. Technical specifications
Model LR 310
Mains voltage See type plate on the device
Output 50 W
Dimensions (L x W x H) 388 x 145 x 428 mm
Weight when empty 4.5 kg
UV light Wave length 254 nm; service life approx. 20,000 hours
Suitable for rooms approx. 54 m
Volume approx. 56 dB (Level 3)
Permissible operating conditions +5°C to +40°C, ≤ 90% relative humidity (non-condensing)
Protection class
Protection class II /
2
21
Page 22

13. Warranty / Service
Beurer GmbH, Söflinger Straße 218, 89077 Ulm, Germany (hereinafter referred to as “Beurer”) provides a
warranty for this product, subject to the requirements below and to the extent described as follows.
The warranty conditions below shall not aect the seller’s statutory warranty obligations which ensue
from the sales agreement with the buyer.
The warranty shall apply without prejudice to any mandatory statutory provisions on liability.
Beurer guarantees the perfect functionality and completeness of this product.
The worldwide warranty period is 3 years, commencing from the purchase of the new, unused product from
the seller.
The warranty only applies to products purchased by the buyer as a consumer and used exclusively for per
sonal purposes in the context of domestic use.
German law shall apply.
During the warranty period, should this product prove to be incomplete or defective in functionality in accor
dance with the following provisions, Beurer shall carry out a repair or a replacement delivery free of charge,
in accordance with these warranty conditions.
If the buyer wishes to make a warranty claim, they should approach their local retailer in the first in
stance: see the attached “International Service” list of service addresses.
The buyer will then receive further information about the processing of the warranty claim, e.g. where they
can send the product and what documentation is required.
A warranty claim shall only be considered if the buyer can provide Beurer, or an authorised Beurer partner, with
- a copy of the invoice/purchase receipt, and
- the original product.
The following are explicitly excluded from this warranty:
- deterioration due to normal use or consumption of the product;
- accessories supplied with this product which are worn out or used up through proper use (e.g. batteries,
rechargeable batteries, cus, seals, electrodes, light sources, attachments and nebuliser accessories);
- products that are used, cleaned, stored or maintained improperly and/or contrary to the provisions of the
instructions for use, as well as products that have been opened, repaired or modified by the buyer or by
a service centre not authorised by Beurer;
- damage that arises during transport between manufacturer and customer, or between service centre and
customer;
- products purchased as seconds or as used goods;
- consequential damage arising from a fault in this product (however, in this case, claims may exist arising
from product liability or other compulsory statutory liability provisions).
-
-
-
Repairs or an exchange in full do not extend the warranty period under any circumstances.
22
Subject to errors and changes
Page 23
F
RANÇAIS
Lisez attentivement cette notice, conservez-la pour un usage
ultérieur, mettez-la à disposition des autres utilisateurs et
suivez les consignes qui y figurent.
AVERTISSEMENT
•
Cet appareil peut être utilisé par les enfants à partir de 8ans ainsi que les
personnes sourant d'un handicap physique, sensoriel ou mental et celles ayant
peu de connaissances ou d'expérience à la condition qu'elles soient surveillées
ou sachent comment l'utiliser en toute sécurité et en comprennent les risques.
•
Les enfants ne doivent pas jouer avec cet appareil.
•
Le nettoyage et l'entretien ne doivent pas être eectués par des enfants sans
surveillance.
•
Débranchez l'appareil pendant son nettoyage.
•
Nettoyez l'appareil en suivant rigoureusement les instructions. Aucun liquide ne
doit pénétrer dans le ventilateur.
•
N'utilisez pas de produit nettoyant contenant des solvants.
•
Si le câble d’alimentation électrique de l’appareil est endommagé, il doit être mis
au rebut. S’il n’est pas détachable, l’appareil doit être mis au rebut.
Chère cliente, cher client,
Nous vous remercions d’avoir choisi l’un de nos produits. Notre société est réputée pour l’excellence de ses
produits et les contrôles de qualité approfondis auxquels ils sont soumis dans les domaines suivants: chaleur,
thérapie douce, diagnostic de pression artérielle, contrôle de poids, massage, beauté, purification d’air et bébé.
Sincères salutations,
Votre équipe Beurer
Familiarisation avec l’appareil
Nous passons la plus grande partie de notre temps dans des pièces fermées. L’air contenu dans ces pièces est
souvent chargé de particules de poussières, pollen, poils d’animaux, odeurs, gaz nocifs, ainsi que de bactéries
et de virus. Le purificateur d’air LR310 nettoie l’air ambiant à l’aide d’un système de filtre à trois couches et
d’une lampe à UV-C intégrée.
Le purificateur d’air LR310
•
filtre l’air à l’aide d’un filtre combiné (filtre au charbon actif contre les gaz nocifs et les odeurs désagréables,
filtre HEPA H 13
de pollen),
•
comprend une lampe à UV-C intégrée (pour la destruction des germes),
•
est silencieux et comporte trois niveaux de puissance,
•
dispose d’une fonction minuteur (deux, quatre ou huit heures),
•
dispose d’un capteur de particules fines;
•
convient à des pièces jusqu’à 54 m² (conf. NRCC-54013-2011),
•
consomme peu d’énergie,
•
s’éteint automatiquement dès que le couvercle du boîtier est retiré.
contre les particules telles que les bactéries, les virus, les acariens et les poussières fines
23
Page 24
Principe de fonctionnement du purificateur d’air
1. Le ventilateur du purificateur d’air aspire l’air pollué.
2. Le pré-filtre filtre les grosses particules telles que la poussière, la saleté et les cheveux.
3.
Le formaldéhyde, le benzol et autres gaz nocifs, de même que les odeurs, sont ensuite filtrés de l’air ambiant
grâce à un filtre au charbon actif.
4. Enfin, les particules fines telles que le pollen, les bactéries et les virus sont filtrées par le filtre HEPA.
5.
La lampe à UV-C activable, située à l’intérieur du boîtier,
élimine les germes et les odeurs (émis par les
animaux, la cuisine ou la fumée de tabac).
6. L’air nettoyé est rejeté dans l’air ambiant par la sortie d’air située sur le dessus du purificateur d’air.
Les performances de filtrage du filtre HEPA H 13 sont ≥ 99,95%. En d'autres termes, 99,95% des particules (par exemple les bactéries, les virus et les poussières fines) peuvent être filtrées.
L’air pollué non filtré peut avoir les eets suivants:
•
il peut provoquer des infections et maladies des voies respiratoires,
•
il a un impact négatif sur la santé à cause des gaz nocifs.
Table des matières
1. Contenu .................................................... 24
2. Symboles utilisés .................................... 24
3. Consignes d’avertissement et
de mise en garde ....................................25
4. Utilisation conforme aux
recommandations ...................................26
5. Description de l'appareil ......................... 26
6. Mise en service ........................................ 27
6.1 Sortir le purificateur d'air ..................... 27
6.2 Installer le purificateur d'air ................. 27
7. Utilisation ................................................. 28
7.1 Allumer le purificateur d'air .................28
7.2 Fonction automatique .........................28
7.3 Vitesse de ventilation ..........................28
7.4 Lampe à UV-C .................................. 28
7.5 Fonction minuteur .............................28
7.6 Changement du filtre ......................... 29
8. Nettoyage et entretien..........................30
8.1 Nettoyer le filtre ................................. 30
8.2 Nettoyer le capteur de
particules fines .................................. 30
8.3 Nettoyer le boîtier .............................. 31
8.4 Stockage ...........................................31
9. Accessoires et pièces de rechange ....31
10. Que faire en cas de problèmes? .........31
11. Élimination ............................................. 32
12. Caractéristiques techniques ................32
13. Garantie / Maintenance.........................32
1. Contenu
•
1purificateur d’air
•
1filtre combiné (charbon actif / filtre HEPA classe H 13)
•
1pré-filtre
•
1 exemplaire du mode d’emploi
2. Symboles utilisés
Voici les symboles utilisés dans ce mode d’emploi:
AVERTISSEMENT
Ce symbole vous avertit des risques de blessures ou des dangers pour votre santé
ATTENTION
Ce symbole vous avertit des éventuels
dommages au niveau de l’appareil ou d’un
accessoire
Fabricant
Signe CE
Ce produit répond aux exigences des directives
européennes et nationales en vigueur.
24
Page 25
Information sur le produit
PAP
Indication d’informations importantes
Lire les consignes
Élimination conformément à la directive européenne WEEE (Waste Electrical and Electronic
Equipment) relative aux déchets d’équipements
électriques et électroniques
Éliminer l’emballage dans le respect de l’environ-
20
nement
Marque de certification pour les produits qui sont
exportés en Fédération de Russie et dans les pays
de la CEI
Marque de sécurité «Geprüfte Sicherheit»
3. Consignes d’avertissement et de mise en garde
Lisez attentivement ces remarques! Le non-respect des instructions suivantes est susceptible d'entraîner des
dommages corporels ou matériels.
AVERTISSEMENT
Maintenez les emballages hors de la portée des enfants. Ils pourraient s'étouer.
Choc électrique
AVERTISSEMENT
Comme tout appareil électrique, ce purificateur d'air doit être utilisé avec précaution et prudence afin d'éviter
les dangers dus aux chocs électriques.
• Conditions d'utilisation de l'appareil à respecter:
– utilisez-le uniquement à la tension indiquée sur l'appareil (la plaque signalétique se trouve en dessous de
l'appareil),
– ne l'utilisez jamais quand l'appareil ou les accessoires sont visiblement endommagés,
– ne l'utilisez pas pendant un orage.
•
En cas de défaut ou de panne, éteignez immédiatement l'appareil et débranchez l'alimentation. Ne tirez pas
sur le câble d'alimentation ou sur l'appareil pour retirer la fiche de la prise électrique. Ne tenez ou ne portez
jamais l'appareil par le câble d'alimentation. Gardez les câbles éloignés des surfaces chaudes.
•
Éteignez toujours l'appareil avant de débrancher la prise.
•
Ne débranchez jamais la prise avec les mains humides ou mouillées.
•
Conservez l'appareil éloigné des sources de chaleur afin d'éviter que le boîtier ne fonde et ne cause un
incendie.
•
Assurez-vous que l'ouverture de l'appareil et le câble d'alimentation n'entrent pas en contact avec de l'eau,
de la vapeur ou d'autres liquides.
•
N'utilisez pas l'appareil à proximité de mélanges gazeux inflammables ou explosifs.
•
Ne saisissez jamais un appareil qui est tombé dans l'eau. Débranchez immédiatement l'appareil.
•
N'utilisez pas l'appareil si ce dernier ou ses accessoires présentent des dommages apparents.
Réparation
AVERTISSEMENT
•
Seul un spécialiste peut réparer des appareils électriques. Toute réparation inappropriée peut engendrer un
danger important pour l'utilisateur. Pour toute réparation, adressez-vous au service client ou à un revendeur
agréé.
•
Le ventilateur ne doit pas être ouvert.
•
Il n’est pas destiné à remplacer la lampe UV-C. L’utilisateur n’est pas autorisé à eectuer un tel remplacement.
Risque d'incendie
AVERTISSEMENT
Toute utilisation inappropriée ou non conforme au présent mode d'emploi peut entraîner un risque d'incendie!
Par conséquent, n'utilisez jamais le purificateur d'air
•
lorsqu'il est recouvert par exemple par une couverture, des coussins, etc.
•
lorsqu'il est à proximité d'essence ou d'autres matières inflammables.
25
Page 26
Utilisation
ATTENTION
L'appareil doit être éteint et débranché après chaque utilisation et avant chaque nettoyage.
•
N'insérez aucun objet dans les ouvertures de l'appareil ou dans les pièces rotatives. Assurez-vous que les
parties mobiles sont toujours libres de mouvement.
•
Ne posez aucun objet sur l'appareil.
•
N'exposez pas l'appareil à des températures élevées.
•
Évitez d'exposer l'appareil aux rayons du soleil ou de le heurter ou le faire tomber.
•
Ne secouez pas l'appareil.
•
Posez l'appareil sur une surface solide, horizontale et résistante à l'eau.
4. Utilisation conforme aux recommandations
Ce purificateur d’air est conçu exclusivement pour le nettoyage de l’air intérieur.
AVERTISSEMENT
Si vous sourez d’une maladie grave des voies respiratoires ou des poumons, consultez votre médecin avant
d’utiliser le purificateur d’air.
N’utilisez cet appareil qu’aux fins pour lesquelles il a été conçu et conformément aux indications données
par ce mode d’emploi. Toute utilisation inappropriée peut être dangereuse. Le fabricant ne peut être tenu
responsable des dommages causés par une utilisation inappropriée ou non conforme.
5. Description de l'appareil
3
2
1
4
8
6
7
1. Sortie d'air
2.
filtre combiné (filtre au charbon actif / filtre
HEPA H 13)
Filtre au charbon actif: Contre les gaz nocifs et les
odeurs désagréables
Filtre HEPA H 13: Filtre les particules telles que les
bactéries, les virus, les acariens et les poussières
fines de pollen
3. Pré-filtre
Filtre les poussières et les saletés grossières, par
exemple les cheveux
4. Panneau de service 8. Entrée d'air
5. Couvercle du boîtier
6. Lampe à UV-C
Élimine les germes et les odeurs
boîtier (provoqués par les animaux, la cuisine ou
la fumée de tabac)
7. Boîtier
26
5
à l'intérieur du
Page 27
Écran et touches
1
1 Touche MARCHE/ARRÊT
Activation/désactivation de l'appareil
2 Touche AUTO
Activation de la fonction automatique (la vitesse de
ventilation est automatiquement adaptée à la qua
lité de l'air ambiant et la LED s'allume en continu).
Lorsque le voyant situé en dessous de «Replace
Filter» clignote, remplacez le filtre. Une fois que
vous avez remplacé le filtre, maintenez la touche
AUTO enfoncée pour remettre à zéro le compteur
automatique du changement de filtre.
3 Touche VITESSE DE VENTILATION
Le purificateur d'air dispose de trois vitesses de ventilation: (faible), (moyenne) et (élevée).
2
3
4 Touche de lampe à UV-C
Activation/désactivation de la lampe à UV-C
5 Touche MINUTEUR
Le purificateur d'air dispose d'une fonction
minuteur grâce à laquelle vous pouvez détermi-
ner le nombre d'heures après lequel l'appareil
doit s'arrêter. Le purificateur d'air dispose de
trois durées de minuteur: 2H (deux heures), 4H
(quatre heures) et 8H (huit heures).
4
5
6. Mise en service
6.1 Sortir le purificateur d'air
1. Ouvrez l'emballage en carton.
2. Sortez l'appareil vers le haut en laissant les films de protection.
3.
Retirez à présent l'ensemble des films de protection. Retirez le filtre combiné de l'appareil (voir le chapitre
«Changement du filtre») et sortez-le du film de protection. Insérez à nouveau le filtre combiné dans
l'appareil.
4. Vérifiez que l'appareil, la prise et le câble ne sont pas endommagés.
6.2 Installer le purificateur d'air
1. Posez le purificateur d'air sur une surface plane et solide afin d'éviter les vibrations et les bruits.
ATTENTION
Si vous souhaitez déplacer le purificateur d'air, portez-le uniquement au moyen de la poignée de maintien
située à l'arrière de l'appareil.
2. Laissez un espace d'environ 30cm autour du purificateur d'air.
3. Assurez-vous que les entrées et sorties d'air ne soient jamais bloquées.
27
Page 28

7. Utilisation
7.1 Allumer le purificateur d'air
1. Suivez les instructions du chapitre «Mise en service».
2. Branchez la prise sur le secteur. Placez le câble de manière à ne pas trébucher dessus.
3. Pour allumer le purificateur d'air, appuyez sur la touche MARCHE/ARRÊT (
Remarque
Lors de la première utilisation, le purificateur d'air est réglé sur la vitesse de ventilation moyenne
7.2 Fonction automatique
Le purificateur d'air dispose d'une fonction automatique. Lorsque la fonction automatique est activée, la
vitesse de ventilation s'adapte automatiquement à la qualité de l'air ambiant. En d'autres termes, plus la qualité
de l'air ambiant est mauvaise, plus la vitesse de ventilation du purificateur d'air augmente automatiquement.
1.
Pour activer la fonction automatique, appuyez sur la touche AUTO du purificateur d'air
Dèsque la fonction automatique est activée, le voyant situé au-dessus de la touche AUTO s'allume.
2.
Pour désactiver la fonction automatique, appuyez à nouveau sur la
de la touche AUTO s'éteint.
Remarque
Lorsque le voyant situé au-dessus de la touche AUTO clignote, changez le filtre. Pour cela, suivez les
instructions du chapitre «Changement du filtre».
touche AUTO ( ). Le voyant au-dessus
7.3 Vitesse de ventilation
Le purificateur d'air dispose de trois vitesses de ventilation: (faible), (moyenne) et (élevée).
•
Pour passer d'une vitesse de ventilation à une autre, appuyez sur la touche VITESSE DE VENTILATION .
L'indicateur de la vitesse de ventilation actuellement configurée est allumé sur le panneau de commande.
7.4 Lampe à UV-C
La lampe à UV-C élimine les germes contenus dans l'air. La lampe à UV-C active de l'oxyde de titane qui
décompose les molécules odorantes (émises par la fumée de tabac, la cuisine ou les animaux).
1. Pour activer
que la
2.
Pour désactiver la
au-dessus de la touche de la lampe UV-C s'éteint.
7.5 Fonction minuteur
Le purificateur d'air dispose d'une fonction minuteur grâce à laquelle vous pouvez déterminer le nombre
d'heures après lequel l'appareil doit s'arrêter. Le purificateur d'air dispose de trois durées de minuteur:
2H(deux heures), 4H (quatre heures) et 8H (huit heures).
•
Pour passer d'une durée de minuteur à une autre, appuyez sur la touche MINUTEUR
de la durée de minuteur actuellement configurée est allumé sur le panneau de commande. Le purificateur
d'air s'éteint alors automatiquement après le nombre d'heures défini.
•
Pour désactiver le minuteur, appuyez sur la touche MINUTEUR ( ) jusqu'à ce que plus aucun voyant
au-dessus de la touche ne soit allumé. Le purificateur d'air nettoie alors l'air en continu.
la lampe à UV-C
lampe UV-C
, appuyez sur la touche de la lampe UV-C du purificateur d'air ( ). Dès
est activée, le voyant situé au-dessus de la touche de la lampe UV-C s'allume.
lampe UV-C
, appuyez à nouveau sur la touche de la
).
( ).
lampe UV-C ( ). Le voyant
( )
. L'indicateur
28
Page 29

7.6 Changement du filtre
Vous devez remplacer le filtre à trois couches après 4320heures d'utilisation. La LED bleue située au-dessus
de la touche AUTO clignote après 4320heures d'utilisation. Procédez comme suit pour remplacer le filtre:
2.
1.
1.
Appuyez sur la touche MARCHE/ARRÊT pour
éteindre le purificateur d'air et débranchez-le.
3.
Retirez le pré-filtre. Pour enlever le filtre combiné,
tirez avec précaution sur les languettes latérales.
1.
Retirez le couvercle du boîtier comme indiqué (fer
2.
meture magnétique). Décrochez d'abord la fermeture magnétique en bas, puis en haut.
4.
Insérez un nouveau filtre combiné. Pour insérer
correctement le filtre combiné, orientez-vous vers
les languettes latérales comme indiqué. Placez le
pré-filtre au-dessus.
-
2.
5.
Replacez le couvercle du boîtier comme indiqué
jusqu'à encliquetage audible et sensible (fermeture magnétique). Accrochez d'abord la fermeture magnétique en haut, puis en bas.
Branchez la prise sur le secteur. Placez le câble
6.
de manière à ne pas trébucher dessus. Maintenez la touche AUTO ( ) enfoncée pendant 5secondes.
Le compteur des heures d'utilisation est
alors remis à 0.
Si vous souhaitez changer le filtre combiné à un rythme défini personnellement (par exemple tous les
6mois), vous pouvez utiliser l'autocollant situé sur le bord supérieur du filtre combiné pour noter la date.
29
Page 30

8. Nettoyage et entretien
AVERTISSEMENT
Avant de nettoyer l'appareil, vérifiez que l'alimentation du purificateur d'air est bien débranchée.
8.1 Nettoyer le filtre
Il est nécessaire de nettoyer régulièrement le filtre (une fois par mois) pour une utilisation ecace et hygiénique.
•
Nettoyez le filtre à trois couches avec l'embout de brosse d'un aspirateur. Pour un nettoyage complet, retirez
le pré-filtre, puis nettoyez le filtre au charbon actif situé derrière et le filtre HEPA situé sur la face arrière avec
l'embout de brosse d'un aspirateur. Replacez ensuite le pré-filtre sur le filtre HEPA.
Filtre au charbon actif Filtre HEPA H13
Face avant Face arrière
ATTENTION
Le filtre à trois couches doit être remplacé après 4320heures d'utilisation (voir le chapitre «Changement
du filtre»).
Le filtre à trois couches ne peut pas être lavé.
8.2 Nettoyer le capteur de particules fines
Le capteur de particules fines doit être nettoyé tous les 2mois.
Remarque
Si le purificateur d’air est utilisé dans un environnement poussiéreux, il peut être nécessaire de le nettoyer plus souvent.
Pour nettoyer le capteur, éteignez le purificateur d’air et déconnec
tez la fiche de la prise. Ouvrez le couvercle sur le côté du boîtier et
retirez-le.
Nettoyez le capteur ainsi que l’entrée et la sortie d’air à l’aide d’un
coton-tige humide.
Séchez ensuite tous les éléments nettoyés avec un coton-tige sec.
30
-
Page 31

Replacez le couvercle du capteur de particules fines.
8.3 Nettoyer le boîtier
Nettoyez le boîtier du purificateur d'air avec un chion légèrement humide (avec de l'eau ou une solution de
nettoyage douce). N'utilisez pas de diluant ou d'autres produits de nettoyage agressifs ou abrasifs, car la
surface pourrait être endommagée.
8.4 Stockage
Si vous n'utilisez pas l'appareil pendant une période prolongée, nous vous recommandons de le ranger nettoyé
dans son emballage d'origine sans rien poser dessus.
9. Accessoires et pièces de rechange
Les pièces de rechange et les consommables sont disponibles à l’adresse du service après-vente concerné
(cf. la liste des adresses du service après-vente). Précisez la référence appropriée.
Désignation Numéro d'article ou référence
Pré-filtre, filtre combiné (HEPA + charbon actif) 693.02
10. Que faire en cas de problèmes?
Problème Cause Solution
Impossible d'allumer le purificateur d'air.
Le passage d'air est insusant Les filtres sont encrassés.
Le purificateur d'air est très
bruyant
Le couvercle du boîtier n'est pas
installé correctement.
Le filtre à trois couches n'est pas
installé correctement.
L'adaptateur secteur n'est pas
branché.
L'entrée/la sortie d'air est
bloquée.
Un corps étranger est situé
dans l'entrée/la sortie d'air.
Les filtres sont bouchés.
Les filtres ne sont pas installés
correctement.
Le purificateur d'air est posé sur
une surface irrégulière.
Assurez-vous que le couvercle
du boîtier est placé correctement.
Assurez-vous que le filtre à trois
couches est correctement positionné.
Branchez l'adaptateur secteur
sur une prise secteur adaptée.
Nettoyez les filtres (voir le chapitre «Entretien et nettoyage»).
Assurez-vous que l'entrée/la sortie d'air n'est pas bloquée.
Retirez le corps étranger de
l'entrée/la sortie d'air.
Nettoyez les filtres (voir le chapitre «Entretien et nettoyage»).
Positionner correctement les
filtres.
Placez le purificateur d'air sur
une surface plane.
31
Page 32

11. Élimination
Dans l’intérêt de la protection de l’environnement, l’appareil ne doit pas être jeté avec les ordures
ménagères à la fin de sa durée de service. L’élimination doit se faire par le biais des points de collecte
compétents dans votre pays. Veuillez éliminer l’appareil conformément à la directive européenne
– WEEE (Waste Electrical and Electronic Equipment) relative aux appareils électriques et électro
niques usagés. Pour toute question, adressez-vous aux collectivités locales responsables de l’élimination et
du recyclage de ces produits.
-
12. Caractéristiques techniques
Modèle LR310
Tension consultez la plaque signalétique de l'appareil
Puissance 50 W
Dimensions (L/l/H) 388 x 145 x 428 mm
Poids à vide 4,5 kg
Lampe à UV Longueur d'onde 254nm; durée de vie 20000heures environ
Adapté aux grandes pièces env. 54m
Volume sonore env. 56 dB (Niveau 3)
Conditions de fonctionnement adm. +5°C à +40°C, ≤ 90% d'humidité relative de l'air (sans conden
Classe de sécurité
sation)
Classe de sécurité II /
2
-
13. Garantie / Maintenance
La société Beurer GmbH, sise Söflinger Straße 218, 89077 Ulm, Allemagne, (ci-après désignée « Beurer
») propose une garantie pour ce produit dans les conditions suivantes et dans la mesure prévue ci-après.
Les conditions de garantie suivantes n’aectent en rien les obligations de garantie du vendeur découlant du contrat de vente conclu avec l’acheteur.
La garantie s’applique également sans préjudice de la responsabilité légale obligatoire.
Beurer garantit le bon fonctionnement et l’intégrité de ce produit.
La période de garantie mondiale est de 3 ans à compter de la date d’achat par l’acheteur du produit neuf
et non utilisé.
Cette garantie ne s’applique qu’aux produits achetés par l’acheteur en tant que consommateur et utilisés
uniquement à des fins personnelles dans le cadre d’une utilisation domestique.
Le droit allemand s’applique.
Si, au cours de la période de garantie, ce produit s’avère incomplet ou défectueux conformément aux dispositions suivantes, Beurer s’engage à proposer gratuitement un remplacement ou une réparation conformément aux présentes Conditions de garantie.
Si l’acheteur souhaite faire valoir la garantie, il doit d’abord s’adresser au revendeur local : cf. liste «
Service client à l’international » ci-jointe pour connaître les adresses du service après-vente.
L’acheteur recevra ensuite des informations complémentaires concernant le déroulement de la demande de
garantie, par exemple, l’adresse à laquelle envoyer le produit et les documents requis.
32
Page 33

Une demande de garantie ne peut être prise en compte que si l’acheteur présente
- une copie de la facture/du reçu et
- le produit d’origine
à Beurer ou à un partenaire autorisé de Beurer.
La présente Garantie exclut expressément
- toute usure découlant de l’utilisation ou de la consommation normale du produit ;
- les accessoires fournis avec le produit qui s’usent ou qui sont consommés dans le cadre d’une utilisation
normale du produit (par exemple, piles, piles rechargeables, manchettes, joints, électrodes, ampoules, em
bouts et accessoires pour inhalateur) ;
- les produits utilisés, nettoyés, stockés ou entretenus de manière inappropriée et/ou contraire aux conditions
d’utilisation, ainsi que les produits ouverts, réparés ou modifiés par l’acheteur ou par un service client non
agréé par Beurer ;
-
les dommages survenus lors du transport entre le fabricant et le client ou entre le service client et le client ;
- les produits achetés en tant qu’article de second choix ou d’occasion ;
- les dommages consécutifs qui résultent d’une défaillance du produit (dans ce cas, toutefois, des réclama
tions peuvent être soulevées relatives à la responsabilité du fait des produits ou à d’autres dispositions légales obligatoires relatives à la responsabilité).
Les réparations ou le remplacement complet ne prolongent en aucun cas la période de garantie.
-
-
33
Sous réserve d'erreurs et de modifications
Page 34

E
SPAÑOL
Lea atentamente estas instrucciones de uso, consérvelas para
su futura utilización, póngalas a disposición de otros usuarios
y respete las indicaciones.
ADVERTENCIA
•
Este aparato puede ser utilizado por niños mayores de 8 años, así como por
personas con facultades físicas, sensoriales o mentales limitadas, o con poca
experiencia o conocimientos, siempre que estén vigilados o se les indique
cómo usarlo de forma segura y entiendan los peligros que conlleva.
•
Los niños no deberán jugar nunca con el aparato.
•
Las tareas de limpieza y de mantenimiento ordinario no deberán ser realizadas
por niños sin supervisión.
•
Desconecte el aparato de la red durante la limpieza.
•
Limpie el aparato únicamente de la forma indicada. Bajo ningún concepto
deben entrar líquidos en la unidad del ventilador.
•
No use limpiadores que contengan disolventes.
•
Si el cable de alimentación de red de este aparato se daña, deberá sustituirse.
Si el cable no se puede extraer, el aparato deberá sustituirse.
Estimada clienta, estimado cliente:
Muchas gracias por haberse decidido por uno de nuestros productos. Nuestro nombre es sinónimo de
productos de calidad de primera clase sometidos a un riguroso control en los ámbitos del calor, las terapias
no agresivas, la presión arterial/el diagnóstico, el peso, los masajes, la belleza, el aire y el bebé.
Atentamente,
El equipo de Beurer
Información general
El ser humano pasa la mayor parte del tiempo en espacios cerrados. A menudo, el aire de estos espacios
contiene partículas de polvo, polen, pelos de animales, olores, gases nocivos y diversas bacterias y virus.
El limpiador de aire LR 310 limpia el aire de la habitación con ayuda de un sistema de filtrado de tres capas
y luz UV C integrada.
El limpiador de aire LR 310
•
filtra el aire con un filtro combinado (filtro de carbón activo contra gases nocivos y olores desagradables,
filtro HEPA H 13
•
dispone de luz UV C integrada (para aniquilar gérmenes);
•
funciona de modo silencioso en sus tres niveles de potencia;
•
dispone de una función de temporizador (dos, cuatro u ocho horas);
•
dispone de un sensor de partículas de polvo fino;
•
resulta apropiado para habitaciones de hasta 54 m² (según NRCC-54013-2011),
•
ahorra energía;
•
se apaga automáticamente al retirar la cubierta de la carcasa.
contra partículas, bacterias, virus, ácaros y polen);
34
Page 35

Principio de la limpieza del aire
PAP
1. El ventilador del limpiador de aire aspira el aire sucio.
2. El prefiltro filtra partículas de mayor tamaño, como polvo, suciedad y pelos.
3. A continuación se filtran los formaldehídos, bencenos y otros gases y olores tóxicos del aire por medio
del filtro de carbón activo.
4. Por último, se filtran pequeñas partículas como polen, bacterias o virus por medio del filtro HEPA.
5. La luz UV C activable del interior del aparato
elimina gérmenes y olores (causados por animales, la cocina
o el humo del tabaco).
6. Elaire limpio se emite al aire de la habitación por la salida de aire situada en el lado superior del limpiador
de aire.
La eficacia de filtrado del filtro HEPAH 13 es del ≥ 99,95 %. Es decir, se puede filtrar el 99,95% de las
partículas (por ejemplo, bacterias, virus y partículas finas).
Un aire sucio no filtrado puede tener las siguientes consecuencias:
•
se favorece la aparición de infecciones y dolencias de las vías respiratorias;
•
daños en la salud por gases nocivos.
Índice
1. Artículos suministrados .......................... 35
2. Explicación de los símbolos ................... 35
3. Indicaciones de advertencia y
de seguridad ...........................................36
4. Uso correcto ............................................ 37
5. Descripción del aparato ..........................37
6. Puesta en funcionamiento ...................... 38
6.1 Extraer el limpiador de aire .................. 38
6.2 Colocar limpiador de aire .................... 38
7. Aplicación ................................................. 39
7.1 Encender el limpiador de aire .............39
7.2 Función automática ............................ 39
7.3 Velocidad del ventilador ..................... 39
7.4 Luz UV C ............................................ 39
7.5 Función de temporizador .................39
7.6 Cambio de filtro ................................. 39
8. Limpieza y cuidado ...............................40
8.1 Limpiar el filtro ................................... 41
8.2 Limpiar el sensor de partículas
de polvo fino ...................................... 41
8.3 Limpiar la carcasa .............................42
8.4 Conservación .................................... 42
9. Accesorios y piezas de repuesto.........42
10. Resolución de problemas ..................... 42
11. Eliminación ............................................. 43
12. Datos técnicos ....................................... 43
13. Garantía / Asistencia ............................. 43
1. Artículos suministrados
•
1x Limpiador de aire
•
1x Filtro combinado (carbón activo/filtro HEPA clase H 13)
•
1x Prefiltro
•
1x Estas instrucciones de uso
2. Explicación de los símbolos
En estas instrucciones de uso se utilizan los siguientes símbolos:
AVERTISSEMENT
Ce symbole vous avertit des risques de blessures ou des dangers pour votre santé
ATTENTION
Ce symbole vous avertit des éventuels
dommages au niveau de l’appareil ou d’un
accessoire
Information sur le produit
Indication d’informations importantes
35
Fabricant
Signe CE
Ce produit répond aux exigences des directives
européennes et nationales en vigueur.
Éliminer l’emballage dans le respect de l’en-
20
vironnement
Page 36

Marque de certification pour les produits qui
Lire les consignes
Élimination conformément à la directive européenne WEEE (Waste Electrical and Electronic
Equipment) relative aux déchets d’équipements
électriques et électroniques
sont exportés en Fédération de Russie et dans
les pays de la CEI
Marca de seguridad "Geprüfte Sicherheit"
3. Indicaciones de advertencia y de seguridad
¡Lea detenidamente estas indicaciones! La inobservancia de las siguientes indicaciones podría ocasionar
daños personales o materiales.
ADVERTENCIA
No deje que los niños se acerquen al material de embalaje. Existe peligro de asfixia.
Descarga eléctrica
ADVERTENCIA
Como todos los aparatos eléctricos, este limpiador de aire debe utilizarse con extremo cuidado para prevenir
el riesgo de descargas eléctricas.
• Por ello, utilice el aparato
– únicamente con la tensión de red indicada en el aparato (la placa de características se encuentra en la
parte inferior del aparato);
– no lo utilice nunca si él o sus accesorios presentan daños;
– no lo utilice durante una tormenta eléctrica.
•
Apague el aparato inmediatamente en caso de detectar defectos o fallos de funcionamiento y desenchúfelo de la toma de corriente. No tire del cable de corriente o del aparato para desenchufarlo. No sujete
ni transporte el aparato cogiéndolo por el cable de red. Mantenga los cables alejados de las superficies
calientes.
•
Apague siempre el aparato antes de extraer el conector de red.
•
No extraiga nunca el conector de red con las manos mojadas o húmedas.
•
Mantenga el aparato alejado de fuentes de calor, ya que la carcasa se podría fundir y se podría desencadenar un incendio.
•
Asegúrese de que los orificios del aparato y el cable de red no entren en contacto con agua, vapor u otros
líquidos.
•
No utilice el aparato cerca de mezclas gaseosas inflamables o explosivas.
•
No toque nunca un aparato que se haya caído al agua. Extraiga inmediatamente el conector de red.
•
No use el aparato si este o sus accesorios muestran daños visibles.
Reparación
ADVERTENCIA
•
Las reparaciones de los aparatos eléctricos solo debe llevarlas a cabo personal especializado, ya que una
reparación inadecuada puede originar peligros considerables para el usuario. Para llevar a cabo las repa
raciones, diríjase al servicio de atención al cliente o a un distribuidor autorizado.
•
La unidad del ventilador no debe abrirse.
•
No está previsto sustituir la lámpara UV-C. El usuario no está autorizado a realizar una sustitución de este tipo.
Peligro de incendio
ADVERTENCIA
En determinadas circunstancias, el uso indebido del aparato o el incumplimiento de las presentes instrucciones pueden ocasionar peligro de incendio.
Por ello, no utilice nunca el limpiador de aire
•
cubriendo el aparato, por ejemplo con una manta, cojines, etc.
•
cerca de gasolina o de otras sustancias fácilmente inflamables.
36
-
Page 37

Manejo
ATENCIÓN
Se deberá desconectar y desenchufar el aparato después de cada utilización y antes de cada limpieza.
•
No introduzca ningún objeto en las aberturas del aparato ni en las piezas rotatorias. Asegúrese de que las
piezas móviles se puedan mover bien.
•
No coloque objetos sobre el aparato.
•
Proteja el aparato de las temperaturas elevadas.
•
Proteja el aparato de los rayos del sol y de golpes y no deje que se caiga.
•
No sacuda nunca el aparato.
•
Coloque el aparato sobre una superficie firme, horizontal y resistente al agua.
4. Uso correcto
Este limpiador de aire ha sido diseñado exclusivamente para limpiar el aire en interiores.
ADVERTENCIA
Si padece alguna enfermedad grave de las vías respiratorias o los pulmones, consulte a su médico antes
de utilizar el limpiador de aire.
Utilice este aparato únicamente para el fin para el que ha sido diseñado y del modo indicado en las instrucciones de uso. Todo uso inadecuado puede ser peligroso. El fabricante no se responsabiliza de los daños
derivados de un uso indebido o irresponsable.
5. Descripción del aparato
3
2
1
8
6
7
1. Salida de aire
2.
Filtro combinado (filtro de carbón activo/filtro
HEPA clase H 13)
Filtro de carbón activo: contra gases nocivos y
olores desagradables
Filtro HEPA H 13: filtra partículas como, bacterias,
virus, ácaros y polen
3. Prefiltro
filtra polvo grueso y suciedad, por ejemplo, pelos
4. Panel de mando 8. Entrada de aire
5. Cubierta de la carcasa
6. Luz UV C
elimina
gérmenes y olores (causados por animales, la cocina o el humo del tabaco) en el interior
del aparato
7. Carcasa
37
4
5
Page 38

Pantalla y botones
1
1 Botón de encendido y apagado
Encendido y apagado del aparato
2 Botón AUTO
Activa la función automática (la velocidad del ventilador se adapta automáticamente a la calidad
del aire y el LED se ilumina de forma permanente).
Si la luz situada debajo de "Replace Filter" parpadea, cambie el filtro. Una vez que haya cambiado
el filtro, mantenga pulsado el botón AUTO para
volver a establecer el contador automático del
cambio de filtro.
3 Botón de VELOCIDAD DEL VENTILADOR
El limpiador de aire dispone de tres velocidades
de ventilador: (baja), (media) y
( alta).
2
3
4 Botón de la luz UV C
Encendido y apagado de la luz UV C
5 Botón TIMER
El limpiador de aire dispone de una función de
temporizador con la que se puede establecer en
cuántas horas se apagará automáticamente el limpiador de aire. El limpiador de aire dispone de tres
tiempos: 2H (dos horas), 4H (cuatro horas) y 8H
(ocho horas).
4
5
6. Puesta en funcionamiento
6.1 Extraer el limpiador de aire
1. Abra el embalaje de cartón.
2. Deje la bolsa de plástico cerrada y extraiga el aparato tirando de él hacia arriba.
3.
Retire ahora todas las láminas de plástico. Retire el filtro combinado del aparato (véase el capítulo "Cambio de
filtro") y extráigalo de la lámina de plástico. A continuación vuelva a colocar el filtro combinado en el aparato.
4. Compruebe que el aparato, el enchufe y el cable no presenten daños.
6.2 Colocar limpiador de aire
1. Coloque el limpiador de aire sobre una superficie lisa y estable para evitar vibraciones y ruido.
ATENCIÓN
Si desea cambiar de posición el limpiador de aire, sujételo solo del asidero de la parte trasera del aparato.
2. Coloque el limpiador de aire de forma que por todos los lados alrededor del aparato quede un espacio
libre de 30 cm.
3. Asegúrese de que la entrada y la salida de aire no estén nunca bloqueadas.
38
Page 39

7. Aplicación
7.1 Encender el limpiador de aire
1. Siga las instrucciones del capítulo "Puesta en funcionamiento".
2. Conecte el conector de red a la toma de corriente. Coloque el cable de forma que no se pueda tropezar
con él.
3. Para encender el limpiador de aire pulse la tecla de encendido y apagado (
Nota
La primera vez que se pone en funcionamiento, el limpiador de aire está ajustado a la velocidad media
del ventilador
7.2 Función automática
El limpiador de aire dispone de una función automática. Si la función automática está activada, la velocidad
del ventilador se adapta automáticamente a la calidad del aire. Es decir, cuanto peor sea la calidad del aire,
más alta ajustará automáticamente el limpiador de aire la velocidad del ventilador.
1. Para activar la función automática, pulse el botón AUTO con el limpiador de aire encendido
En cuanto la función automática se activa, se ilumina una luz encima del botón AUTO.
2. Para desactivar la función automática, vuelva a pulsar el botón
se apaga.
Nota
Si la luz encima del botón AUTO parpadea, debe cambiar el filtro. Respete en este caso las instrucciones
del capítulo "Cambio de filtro".
AUTO ( ). La luz encima del botón AUTO
7.3 Velocidad del ventilador
El limpiador de aire dispone de tres velocidades de ventilador: (baja), (media) y (alta).
•
Para cambiar entre los distintos niveles de velocidad del ventilador, pulse el botón de velocidad del ventilador
. En el panel de manejo se ilumina la velocidad del ventilador ajustada en ese momento.
7.4 Luz UV C
La luz UV C elimina los gérmenes que contiene el aire. Para ello, la luz UV C activa óxido de titanio, el cual
descompone las moléculas de olores desagradables (causados por el humo del tabaco, la cocina o animales).
1. Para encender
UV C
se activa, se ilumina una luz encima del botón UV C.
2. Para
apagar
7.5 Función de temporizador
El limpiador de aire dispone de una función de temporizador con la que se puede establecer en cuántas horas
se apagará automáticamente el limpiador de aire. El limpiador de aire dispone de tres tiempos: 2H(doshoras),
4H (cuatro horas) y 8H (ocho horas).
•
Para cambiar entre los distintos tiempos del temporizador, pulse el botón TIMER
se ilumina el tiempo del temporizador ajustado en ese momento. El limpiador de aire se apaga automáticamente una vez transcurrido el valor de hora ajustado.
•
Para apagar el temporizador, pulse el botón TIMER ( ) repetidamente hasta que se apague la luz situada
encima del botón Timer. Ahora el limpiador de aire limpia de forma continua.
la luz UV C
la luz UV C
, pulse la tecla UV C con el limpiador de aire encendido ( ). En cuanto
vuelva a pulsar el botón
UV C ( ). La luz encima del botón UV C se apaga.
).
( )
. En el panel de manejo
( ).
la luz
7.6 Cambio de filtro
Debería sustituir el filtro de tres capas después de 4320 horas de funcionamiento por uno nuevo. Después
de 4320 horas de funcionamiento parpadeará un LED azul encima del botón AUTO. Para cambiar el filtro,
proceda del siguiente modo:
39
Page 40

1.
Pulse el botón de encendido y apagado para
apagar el limpiador de aire y desconéctelo de la
toma de corriente.
3.
Tire del prefiltro. Para a continuación tirar del filtro
combinado, tire con cuidado de las lengüetas
laterales.
1.
2.
1.
Retire la cubierta de la carcasa como se muestra
2.
en la imagen (cierre magnético). Desenganche
el cierre magnético primero abajo y a continuación arriba.
4.
Coloque un nuevo filtro combinado. Para colocar el filtro combinado correctamente, guíese
por laslengüetas laterales como se muestra en
la imagen. Coloque el prefiltro encima.
2.
5. Vuelva a colocar la cubierta de la carcasa como
se muestra en la imagen, hasta que note y oiga
que encaja (cierre magnético). Enganche el cierre
magnético primero arriba y a continuación abajo.
Si desea cambiar el filtro combinado cada determinado periodo de tiempo personal (por ejemplo, cada
6 meses), encontrará una etiqueta adhesiva en el borde superior del filtro combinado donde podrá
anotar la fecha.
6.
Conecte el conector de red a la toma de corriente. Coloque el cable de forma que no se pueda tropezar con él. Mantenga pulsado el botón
AUTO (
horas de funcionamiento se ha vuelto a reponer
a 0.
) durante 5 segundos.
El contador de
8. Limpieza y cuidado
ADVERTENCIA
Antes de cada limpieza, asegúrese de que el conector de red del limpiador de aire esté desenchufado.
40
Page 41

8.1 Limpiar el filtro
Una limpieza regular del filtro (una vez al mes) resulta esencial para un funcionamiento higiénico y sin errores.
•
Limpie el filtro de tres capas con el accesorio de cepillado de un aspirador. Para poder limpiarlo en
profundidad, tire del prefiltro y limpie el filtro de carbón activo situado detrás, así como el filtro HEPA situado
en la parte posterior, con el accesorio de cepillado de un aspirador. A continuación vuelva a colocar el
prefiltro sobre el filtro HEPA.
Filtro de carbón activo Filtro HEPA H 13
Parte delantera Parte trasera
ATENCIÓN
El filtro de tres capas debería cambiarse después de 4320 horas de funcionamiento (véase el capítulo
"Cambio de filtro").
El filtro de tres capas no se puede lavar.
8.2 Limpiar el sensor de partículas de polvo fino
El sensor de partículas de polvo fino debe limpiarse cada 2 meses.
Nota
Si el purificador de aire se utiliza en un entorno polvoriento, posiblemente deberá limpiarse con más
frecuencia.
Para limpiar el sensor, apague el purificador de aire y desenchúfelo de
la toma de corriente. Abra la tapa en el lado de la carcasa y retírela.
Limpie el sensor y la entrada y salida de aire con un bastoncillo de
algodón húmedo.
Seque después todas las piezas con un bastoncillo de algodón seco.
Vuelva a colocar la tapa del sensor de partículas de polvo fino.
41
Page 42

8.3 Limpiar la carcasa
Limpie el limpiador de aire con un paño ligeramente humedecido (agua o una solución de limpieza suave).
Noutilice limpiadores con disolventes u otros productos de limpieza abrasivos, ya que podrían dañar la
superficie.
8.4 Conservación
Si no va a utilizar el aparato durante un largo período de tiempo, le recomendamos que, una vez limpio,
loguarde en su embalaje original en un ambiente seco y sin soportar cargas.
9. Accesorios y piezas de repuesto
Las piezas de repuesto y de desgaste pueden adquirirse a través de la correspondiente dirección de servicio
técnico (indicada en la lista de direcciones de servicios técnicos). Indique el número de pedido correspondiente.
Denominación Número de artículo o de pedido
Prefiltro, filtro combinado (HEPA + carbón activo) 693.02
10. Resolución de problemas
Problema Causa Solución
El limpiador de aire no se puede
encender.
Salida del aire insuficiente Los filtros están sucios. Limpie los filtros (véase el
El limpiador de aire es muy
ruidoso
No se ha colocado correcta
mente la cubierta de la carcasa.
No se ha colocado correctamente el filtro de tres capas.
El bloque de alimentación no
está enchufado.
La entrada/salida de aire está
bloqueada.
Hay un cuerpo extraño en la
entrada/salida de aire.
Los filtros están obstruidos. Limpie los filtros (véase el
No se han colocado correcta
mente los filtros.
El limpiador de aire está
posicionado sobre una
superficie irregular.
-
Asegúrese de que la cubierta
de la carcasa se haya colocado
correctamente.
Asegúrese de que el filtro de
tres capas se haya colocado
correctamente.
Enchufe el bloque de alimentación en una toma de corriente
adecuada.
capítulo "Limpieza y manteni
miento").
Compruebe que la entrada/
salida de aire no esté
bloqueada.
Elimine el cuerpo extraño de la
entrada/salida de aire.
capítulo "Limpieza y manteni
miento").
-
Coloque los filtros correcta
mente.
Coloque el limpiador de aire
sobre una superficie plana.
-
-
-
42
Page 43

11. Eliminación
A fin de preservar el medio ambiente, cuando el aparato cumpla su vida útil no lo tire con la basura
doméstica. Se puede desechar en los puntos de recogida adecuados disponibles en su zona. Deseche
el aparato según la Directiva europea sobre residuos de aparatos eléctricos y electrónicos (RAEE).
Para más información, póngase en contacto con la autoridad municipal competente en materia de
eliminación de residuos.
12. Datos técnicos
Modelo LR 310
Tensión de red véase la placa de características del aparato
Potencia 50 W
Medidas (largo x ancho x alto) 388 x 145 x 428 mm
Peso sin carga 4,5 kg
Luz ultravioleta Longitud de onda 254 nm; vida útil aprox. 20.000 horas
Adecuado para habitaciones de aprox. 54 m
Volumen aprox. 56 dB (Nivel 3)
Condiciones de funcionamiento
admisibles
Clase de protección
+5°C a +40°C, ≤90% de humedad relativa del aire (sin conden
sación)
Clase de protección II /
2
-
13. Garantía / Asistencia
Beurer GmbH, Söflinger Straße 218, D-89077 Ulm (en lo sucesivo, «Beurer») concede una garantía para este producto. La garantía está sujeta a las siguientes condiciones y el alcance de la misma se describe a continuación.
Las siguientes condiciones de garantía no afectan a las obligaciones de garantía que la ley prescribe
para el vendedor y que emanan del contrato de compra celebrado con el comprador.
La garantía se aplicará además sin perjuicio de las normas legales preceptivas.
Beurer garantiza el perfecto funcionamiento y la integralidad de este producto.
La garantía mundial tiene una validez de 3 años a partir de la fecha de compra del producto nuevo y sin utili
zar por parte del comprador.
Esta garantía se ofrece solo para productos que el comprador haya adquirido en tanto que consumidor con
fines exclusivamente personales en el marco de una utilización privada en el hogar.
Se aplica la legislación alemana.
En el caso de que, durante el periodo de garantía, este producto resultara estar incompleto o no funcionara
correctamente conforme a lo dispuesto en las siguientes disposiciones, Beurer se compromete a sustituir el
producto o a repararlo según las presentes condiciones de garantía.
Cuando el comprador desee recurrir a la garantía lo hará dirigiéndose en primera instancia al distribuidor local: véase la lista adjunta «Servicio internacional» que contiene las distintas direcciones de
servicio técnico.
A continuación, el comprador recibirá información pormenorizada sobre la tramitación de la garantía, como el
lugar al que debe enviar el producto y qué documentos deberá adjuntar.
43
-
Page 44

El comprador solo podrá invocar la garantía cuando pueda presentar:
- una copia de la factura o del recibo de compra y
- el producto original
a Beurer o a un socio autorizado por Beurer.
Quedan excluidos explícitamente de la presente garantía
- el desgaste que se produce por el uso o el consumo normal del producto;
- los accesorios suministrados con el producto que se desgastan o consumen durante un uso normal (p.
ej., pilas, baterías, brazaletes, juntas, electrodos, luminarias, cabezales y accesorios de inhalación);
- productos cuyo uso, limpieza, almacenamiento o mantenimiento sea indebido o vaya contra lo dispuesto
en las instrucciones de uso, así como productos que hayan sido abiertos, reparados o modificados por
el comprador o por un centro de servicio técnico no autorizado por Beurer;
- daños que se hayan producido durante el transporte entre las instalaciones del fabricante y las del cliente
o bien entre el centro de servicio técnico y el cliente;
- productos que se hayan adquirido como productos de calidad inferior o de segunda mano;
- daños derivados que resulten de una falta del producto. En este caso, podrían invocarse eventualmente
derechos derivados de la normativa de responsabilidad de productos o de otras disposiciones de responsabilidad legal preceptiva.
Las reparaciones o la sustitución del producto no prolongarán en ningún caso el periodo de garantía.
44
Salvo errores y modificaciones
Page 45

I
TALIANO
Leggere attentamente le presenti istruzioni per l'uso, conservarle
per impieghi futuri, renderle accessibili ad altri utenti e attenersi
alle indicazioni.
AVVERTENZA
•
Questo apparecchio può essere utilizzato da ragazzi di età superiore a 8 anni e
da persone con ridotte capacità fisiche, percettive o mentali, o non in possesso
della necessaria esperienza e conoscenza, esclusivamente sotto supervisione
oppure se sono stati istruiti in merito alle misure di sicurezza e comprendono
i rischi ad esse correlati.
•
I bambini non devono giocare con l'apparecchio.
•
La pulizia e la manutenzione a cura dell'utente non devono essere eseguite da
bambini, a meno che non siano sorvegliati.
•
Scollegare l'apparecchio dalla rete elettrica durante le operazioni di pulizia.
•
Pulire l'apparecchio solo nel modo indicato. Non deve in nessun caso penetrare liquido nell'unità di ventilazione.
•
Non utilizzare detergenti contenenti solventi.
•
Se il cavo di alimentazione dell’apparecchio è danneggiato, è necessario smaltirlo. Nel caso non sia rimovibile, è necessario smaltire l’apparecchio.
Gentile cliente,
grazie per avere scelto uno dei nostri prodotti. Il nostro marchio è garanzia di prodotti di elevata qualità,
controllati nei dettagli, relativi ai settori calore, terapia dolce, pressione/diagnosi, peso, massaggio, bellezza,
aria e baby.
Cordiali saluti
Il team Beurer
Introduzione
L’uomo trascorre la maggior parte del proprio tempo in ambienti chiusi. Spesso l’aria è inquinata da particelle
di polvere, pollini, peli di animali, odori, gas nocivi e vari batteri e virus. Il depuratore dell’aria LR 310 purifica
l’aria dell’ambiente grazie al sistema di filtro a tre strati e alla lampada UV-C integrata.
Il depuratore dell’aria LR 310
•
filtra l’aria attraverso un filtro combinato (filtro a carbone attivo contro i gas nocivi e gli odori sgradevoli,
filtro HEPA di classe H 13
•
è dotato di una lampada UV-C integrata (per l’eliminazione dei germi),
•
è silenzioso e lavora su tre livelli di regolazione,
•
dispone di una funzione timer (due, quattro o otto ore),
•
è dotato di sensore di particelle di polveri sottili,
•
è adatto ad ambienti di dimensioni fino a 54 m² (secondo NRCC-54013-2011),
•
è a basso consumo energetico,
•
si spegne automaticamente quando il coperchio del corpo viene rimosso.
contro particelle quali batteri, virus, acari e pollini),
45
Page 46

Principio della depurazione dell’aria
PAP
1. Il ventilatore del depuratore dell’aria aspira l’aria sporca.
2. Il pre-filtro filtra le particelle più grosse quali polvere, sporco e peli.
3. In seguito, attraverso il filtro a carbone attivo vengono rimossi dall’aria formaldeide, benzolo e altri odori
e gas tossici.
4. Infine, tramite il filtro HEPA vengono filtrate le particelle più piccole quali pollini, batteri e virus.
5. La lampada UV-C attivabile presente all’interno del corpo
elimina i germi e gli odori (provenienti da animali,
cucina o fumo da sigaretta).
6.
L’aria così ripulita viene immessa nell’aria ambiente attraverso l’uscita aria situata sul lato superiore del
depuratore.
L'ecienza di filtro del filtro HEPA H 13 è pari a ≥ 99,95%. Ciò significa che viene filtrato il 99,95% delle particelle (come batteri, virus e polveri sottili).
L’aria inquinata e non filtrata può avere i seguenti eetti:
•
Infezioni e malattie delle vie respiratorie
•
Danneggiamento della salute a causa di gas nocivi
Sommario
1. Fornitura ................................................... 46
2. Spiegazione dei simboli .......................... 46
3. Avvertenze e indicazioni di sicurezza ...47
4. Uso conforme .......................................... 48
5. Descrizione dell'apparecchio ................. 48
6. Messa in funzione .................................... 49
6.1 Estrazione del depuratore dell'aria ...... 49
6.2 Posizionamento del depuratore
dell'aria .............................................. 49
7. Utilizzo ...................................................... 50
7.1 Accensione del depuratore dell'aria ... 50
7.2 Funzione automatica ..........................50
7.3 Velocità di ventilazione ....................... 50
7.4 Lampada UV-C ...................................50
7.5 Funzione timer ................................. 50
7.6 Sostituzione del filtro ......................... 51
8. Pulizia e cura .........................................52
8.1 Pulizia del filtro ..................................52
8.2 Pulire il sensore di particelle
di polveri sottili .................................. 52
8.3 Pulizia del corpo ................................ 53
8.4 Conservazione ................................... 53
9. Accessori e parti di ricambio ...............53
10. Che cosa fare in caso di problemi? ..... 53
11. Smaltimento ........................................... 54
12. Dati tecnici ............................................. 54
13. Garanzia / Assistenza............................54
1. Fornitura
•
1 depuratore dell’aria
•
1 filtro combinato (carbone attivo/HEPA classe H 13)
•
1 pre-filtro
•
Le presenti istruzioni per l’uso
2. Spiegazione dei simboli
Nelle presenti istruzioni per l’uso vengono utilizzati i seguenti simboli:
AVVERTENZA
Avvertimento di pericolo di lesioni o di pericoli
per la salute
ATTENZIONE
Indicazione di sicurezza per possibili danni
all’apparecchio/agli accessori
Informazioni sul prodotto
Indicazione di informazioni importanti
20
46
Produttore
Marchio CE
Il presente prodotto soddisfa i requisiti
delle direttive europee e nazionali vigenti.
Smaltire la confezione nel rispetto dell‘ambiente
Page 47

Leggere le istruzioni
Smaltimento secondo la direttiva europea sui
rifiuti di apparecchiature elettriche ed elettroniche (RAEE)
Marchio di certificazione per i prodotti esportati
nella Federazione Russa e nei paesi CSI
Marchio "Geprüfte Sicherheit"
3. Avvertenze e indicazioni di sicurezza
Leggere attentamente le presenti indicazioni. Il mancato rispetto delle seguenti indicazioni può provocare
danni alle persone e alle cose.
AVVERTENZA
Tenere lontani i bambini dal materiale d'imballaggio. Pericolo di soocamento.
Scossa elettrica
AVVERTENZA
Come qualsiasi apparecchio elettrico, anche questo depuratore dell'aria deve essere maneggiato con attenzione e cautela al fine di evitare il rischio di scosse elettriche.
•
Pertanto:
– utilizzare l'apparecchio esclusivamente con la tensione di rete indicata (la targhetta si trova sul lato infe
riore dell'apparecchio),
– non azionare mai l'apparecchio, se l'apparecchio stesso o gli accessori presentano danni visibili,
– non utilizzare l'apparecchio durante un temporale.
•
In caso di difetti o malfunzionamenti, spegnere immediatamente l'apparecchio e staccarlo dalla corrente.
Non tirare il cavo o l'apparecchio per estrarre la spina dalla presa. Non usare il cavo di alimentazione né
per tenere l'apparecchio né per trasportarlo. Tenere i cavi lontano dalle superfici calde.
•
Spegnere sempre l'apparecchio prima di estrarre la spina.
•
Non estrarre mai la spina quando si hanno mani bagnate o umide.
•
Tenere l'apparecchio lontano da fonti di calore, in quanto il corpo potrebbe fondersi e provocare un incendio.
•
Accertarsi che le aperture dell'apparecchio e il cavo di alimentazione non entrino in contatto con acqua,
vapore o altri liquidi.
•
Non utilizzare l'apparecchio in prossimità di miscele gassose infiammabili o esplosive.
•
Non recuperare in nessun caso un apparecchio che è caduto in acqua. Estrarre subito la spina.
•
Non utilizzare l'apparecchio o gli accessori se presentano danni visibili.
Riparazione
-
AVVERTENZA
•
Le riparazioni degli apparecchi elettrici devono essere eettuate esclusivamente da personale specializzato. Riparazioni non conformi possono provocare danni consistenti per gli utilizzatori. Per le riparazioni
rivolgersi al Servizio clienti o a un rivenditore autorizzato.
•
Non aprire l'unità di ventilazione.
•
La sostituzione della lampada UV-C non è prevista. All’utente non è consentito eettuare la sostituzione.
Pericolo d'incendio
AVVERTENZA
In caso di uso non conforme o mancato rispetto delle presenti istruzioni per l'uso sussiste pericolo d'incendio!
Pertanto non utilizzare il depuratore dell'aria:
•
se è coperto ad es. da una coperta, un cuscino o altro,
•
in prossimità di benzina o altre sostanze facilmente infiammabili.
Impiego
ATTENZIONE
Dopo ogni uso e prima delle operazioni di pulizia, spegnere l'apparecchio e staccare la spina.
•
Non infilare alcun oggetto nelle aperture dell'apparecchio o nelle parti rotanti. Accertarsi che le parti mobili
siano sempre libere.
47
Page 48

•
Non posizionare oggetti sull'apparecchio.
•
Proteggere l'apparecchio dalle temperature elevate.
•
Proteggere l'apparecchio dai raggi del sole e non farlo cadere.
•
Non scuotere l'apparecchio.
•
Posizionare l'apparecchio su una base solida, orizzontale e impermeabile.
4. Uso conforme
Questo depuratore dell’aria è concepito esclusivamente per la purificazione dell’aria negli ambienti chiusi.
AVVERTENZA
Consultare il proprio medico prima di utilizzare il depuratore dell’aria in caso di patologie polmonari o delle
vie respiratorie.
Utilizzare questo apparecchio solo per lo scopo per il quale è stato concepito e descritto nelle presenti istruzioni per l’uso. Qualsiasi uso non conforme comporta un pericolo. Il produttore non è da ritenersi responsabile
in caso di danni riconducibili a uso non conforme o sconsiderato.
5. Descrizione dell'apparecchio
3
2
1
8
6
7
1. Fuoriuscita aria
2.
Filtro combinato
(carbone attivo/HEPA classe H 13)
Filtro a carbone attivo: contro gas nocivi e odori
sgradevoli
Filtro HEPA H 13: filtra le particelle quali batteri,
virus, acari e pollini
3. Pre-filtro
Filtra particelle grosse di polvere e sporco, come
i peli
4. Pannello di comando 8. Ingresso aria
5. Coperchio del corpo
6. Lampada UV-C
Elimina all'interno del corpo
( provenienti da animali, cucina o fumo da sigaretta)
7. Corpo
4
5
i germi e gli odori
48
Page 49

Display e pulsanti
1
1 Pulsante ON/OFF
Accensione/spegnimento dell'apparecchio
2 Pulsante AUTO
Attiva la funzione automatica (la velocità di
ventilazione si adatta automaticamente alla
qualità dell'aria ambiente e il LED è acceso
fisso). Quando la luce sotto "Replace Filter"
lampeggia, è necessario sostituire il filtro. Dopo
aver sostituito il filtro, tenere premuto il pulsante
AUTO per reimpostare il contatore automatico per
la sostituzione del filtro.
3 Pulsante VELOCITÀ DI VENTILAZIONE
Il depuratore dell'aria dispone di tre velocità di ventilazione: (bassa), (media) e (alta).
2
3
4 Pulsante Lampada UV-C
Accensione/spegnimento della lampada UV-C
5 Pulsante TIMER
Il depuratore dell'aria è dotato di una funzione
timer grazie alla quale è possibile stabilire dopo
quante ore l'apparecchio si spegne automaticamente. Il depuratore dell'aria dispone di tre orari
per il timer: 2H (due ore), 4H (quattro ore) e 8H
(otto ore).
4
5
6. Messa in funzione
6.1 Estrazione del depuratore dell'aria
1. Aprire l'involucro di cartone.
2. Non togliere l'involucro di cellophane ed estrarre l'apparecchio tirandolo verso l'alto.
3.
A questo punto, rimuovere tutti gli involucri. Rimuovere il filtro combinato dall'apparecchio (vedere il
capitolo "Sostituzione del filtro") ed estrarlo dal cellophane. Infine reinserire il filtro combinato nell'apparecchio.
4. Controllare la presenza di danni sull'apparecchio, la spina e il cavo.
6.2 Posizionamento del depuratore dell'aria
1. Posizionare il depuratore dell'aria su una base piana e solida per evitare vibrazioni e rumori.
ATTENZIONE
Se è necessario riposizionare il depuratore dell'aria, aerrarlo e spostarlo esclusivamente con la maniglia
posta sul retro dell'apparecchio.
2. Posizionare il depuratore dell'aria in modo che vi sia uno spazio libero di 30 cm su tutti i lati.
3. Fare in modo che l'ingresso e l'uscita aria non rimangano mai bloccati.
49
Page 50

7. Utilizzo
7.1 Accensione del depuratore dell'aria
1. Attenersi alle istruzioni contenute nel capitolo "5. Messa in funzione".
2. Inserire la spina nella presa. Posare il cavo di alimentazione in modo che nessuno possa inciampare.
3. Per accendere il depuratore dell'aria, premere il pulsante ON/OFF (
Nota
Alla prima messa in funzione, il depuratore dell'aria è impostato sulla velocità di ventilazione media.
7.2 Funzione automatica
Il depuratore dell'aria è dotato di una funzione automatica. Se è attiva, la velocità di ventilazione si adatta automaticamente alla qualità dell'aria dell'ambiente, vale a dire, che più la qualità dell'aria è scarsa, maggiore è
la velocità di ventilazione.
1. Per attivare la funzione automatica, premere il pulsante AUTO
acceso. Quando la funzione automatica è attiva, si accende una luce sopra il pulsante AUTO.
2. Per disattivare la funzione automatica, premere di nuovo il pulsante
AUTO viene spenta.
Nota
Quando la luce sopra il pulsante AUTO lampeggia, è necessario sostituire il filtro. A tale scopo, attenersi
alle indicazioni del capitolo "Sostituzione del filtro".
7.3 Velocità di ventilazione
Il depuratore dell'aria dispone di tre velocità di ventilazione: (bassa), (media) e (alta).
•
Per commutare tra le singole velocità di ventilazione, premere il pulsante Velocità di ventilazione .
Nel pannello di comando si accende la velocità di ventilazione attualmente impostata.
7.4 Lampada UV-C
La lampada UV-C elimina i germi contenuti nell'aria attivando il biossido di titanio che distrugge le molecole dei
cattivi odori (provenienti da fumo di sigaretta, cucina o animali).
1. Per accendere la
Quando la lampada
2. Per spegnere la
viene spenta.
7.5 Funzione timer
Il depuratore dell'aria è dotato di una funzione timer grazie alla quale è possibile stabilire dopo quante ore
l'apparecchio si spegne automaticamente. Il depuratore dell'aria dispone di tre orari per il timer: 2H (due ore),
4H (quattro ore) e 8H (otto ore).
•
Per commutare tra i singoli orari del timer, premere il pulsante TIMER
cende l'orario timer attualmente impostato. Il depuratore dell'aria si spegne automaticamente al raggiungimento del valore impostato.
•
Per disattivare il timer, premere il pulsante TIMER ( ) finché la luce sopra il pulsante TIMER non si spegne.
Il depuratore dell'aria funzionerà quindi in modo continuo.
lampada UV-C
UV-C
è attiva, si accende una luce sopra il pulsante UV-C.
lampada UV-C
, premere il pulsante UV-C ( ) quando il depuratore dell'aria è acceso.
, premere di nuovo il pulsante
UV-C ( ). La luce sopra il pulsante UV-C
).
( ) quando il depuratore dell'aria è
AUTO ( ). La luce sopra il pulsante
( )
. Nel pannello di comando si ac-
50
Page 51

7.6 Sostituzione del filtro
Dopo 4320 ore di esercizio è necessario sostituire il filtro a tre strati. Dopo tale periodo di tempo sopra il
pulsante AUTO lampeggia un LED blu. Per sostituire il filtro, procedere nel modo seguente:
2.
1.
1.
Premere il pulsante ON/OFF per spegnere il
depuratore dell'aria e scollegarlo dalla presa.
3.
Rimuovere il pre-filtro. Per rimuovere il filtro combinato, tirare delicatamente le linguette laterali.
1.
Rimuovere il coperchio del corpo come mostrato
2.
in figura (chiusura magnetica). Sganciare la chiusura magnetica prima dal basso e poi dall'alto.
4.
Inserire un nuovo filtro combinato. Per inserirlo in
modo corretto, orientarsi con le linguette laterali
come mostrato in figura. Posizionare il pre-filtro.
2.
5.
Rimontare il coperchio del corpo come mostrato
in figura finché non scatta in posizione (chiusura
magnetica). Agganciare la chiusura magnetica
prima dall'alto e poi dal basso.
Inserire la spina nella presa. Posare il cavo di
6.
alimentazione in modo che nessuno possa inciampare. Tenere premuto il pulsante AUTO ( )
per cinque secondi.
Il contatore di ore di esercizio
è reimpostato su 0.
Se si desidera sostituire il filtro combinato a intervalli di tempo personalizzati (ad es. ogni 6 mesi), sopra
il bordo superiore del filtro combinato è disponibile un adesivo su cui è possibile apporre una data.
51
Page 52

8. Pulizia e cura
AVVERTENZA
Prima della pulizia, accertarsi che la spina del depuratore dell'aria non sia collegata alla presa!
8.1 Pulizia del filtro
Una pulizia regolare del filtro (una volta al mese) è la premessa indispensabile per garantire l'igiene e il perfetto
funzionamento.
•
Pulire il filtro a tre strati con l'accessorio spazzola di un aspirapolvere. Per eettuare una pulizia profonda,
rimuovere il pre-filtro e pulire anche il filtro a carbone attivo che si trova dietro di esso e il filtro HEPA sul
retro con l'accessorio spazzola di un aspirapolvere. Al termine, reinserire il pre-filtro sul filtro HEPA.
Filtro a carbone attivo Filtro HEPA H 13
Lato anteriore Lato posteriore
ATTENZIONE
Dopo 4320 ore di esercizio è necessario sostituire il filtro a tre strati (vedere il capitolo "Sostituzione del filtro").
Non è possibile lavare il filtro a tre strati.
8.2 Pulire il sensore di particelle di polveri sottili
Il sensore di particelle di polveri sottili deve essere pulito ogni 2 mesi.
Nota
Se il depuratore d‘aria viene utilizzato in un ambiente polveroso, dovrà probabilmente essere pulito
più frequentemente.
Per pulire il sensore, spegnere il depuratore d‘aria e staccare la spi
na dalla presa. Aprire la copertura sul lato dell‘involucro e togliere
il coperchio.
Pulire il sensore nonché l‘ingresso e l‘uscita dell‘aria con un cotton
fioc umido.
Asciugare poi tutte le parti pulite con un cotton fioc asciutto.
52
-
Page 53

Riposizionare il coperchio del sensore di particelle di polveri sottili.
8.3 Pulizia del corpo
Pulire il corpo del depuratore dell'aria con un panno leggermente inumidito (con acqua o una soluzione
detergente delicata). Per la pulizia non utilizzare solventi né altri detergenti aggressivi o prodotti abrasivi che
potrebbero danneggiare la superficie.
8.4 Conservazione
Se l'apparecchio non viene usato a lungo, si consiglia di conservarlo pulito nell'imballo originale in un ambiente
secco senza sovrapporvi carichi.
9. Accessori e parti di ricambio
I pezzi di ricambio e le parti soggette a usura sono disponibili presso il proprio centro assistenza (vedere elenco
indirizzi centri assistenza). Indicare il relativo codice ordine.
Denominazione Cod. articolo o cod. ordine
Pre-filtro, Filtro combinato (HEPA + carbone attivo) 693.02
10. Che cosa fare in caso di problemi?
Problema Causa Soluzione
Il depuratore dell'aria non si
accende.
Flusso dell'aria insuciente I filtri sono sporchi.
Il depuratore dell'aria è molto
rumoroso
Il coperchio del corpo non è
installato correttamente.
Il filtro a tre strati non è installato
correttamente.
L'alimentatore non è inserito.
L'ingresso/uscita aria è bloccato.
È presente un corpo estraneo
nell'ingresso/uscita aria.
I filtri sono otturati.
I filtri non sono installati correttamente.
Il depuratore dell'aria è posizionato su una superficie non piana.
Accertarsi che il coperchio del
corpo sia installato correttamente.
Accertarsi che il filtro a tre strati
sia installato correttamente.
Inserire l'alimentatore in una presa di corrente adeguata.
Pulire i filtri (vedere il capitolo
" Pulizia e conservazione").
Accertarsi che l'ingresso/uscita
aria non sia bloccato.
Rimuovere il corpo estraneo
dall'ingresso/uscita aria.
Pulire i filtri (vedere il capitolo
" Pulizia e conservazione").
Installare i filtri correttamente.
Posizionare il depuratore dell'aria
su una superficie piana.
53
Page 54

11. Smaltimento
Per motivi ecologici, l’apparecchio non deve essere smaltito tra i normali rifiuti quando viene buttato
via. Lo smaltimento deve essere eettuato negli appositi centri di raccolta. Smaltire l’apparecchio secondo la direttiva europea sui rifiuti di apparecchiature elettriche ed elettroniche (RAEE). Per eventuali
chiarimenti, rivolgersi alle autorità comunali competenti per lo smaltimento.
12. Dati tecnici
Modello LR 310
Tensione di rete Vedere targhetta sull'apparecchio
Potenza 50 W
Dimensione (Lungh. x Largh. x Alt.) 388 x 145 x 428 mm
Peso netto 4,5 kg
Lampada UV Lunghezza d'onda 254 nm; ciclo di vita ca. 20.000 ore
Dimensione stanza ca. 54 m
Volume Ca. 56 dB (Livello 3)
Condizioni di funzionamento ammes-
se
Classe di protezione
Tra +5°C e +40°C, ≤ 90% umidità relativa (senza condensa)
Classe di protezione II /
2
13. Garanzia / Assistenza
Beurer GmbH, Söflinger Strasse 218, D-89077 Ulm (di seguito denominata „Beurer“) ore una garanzia per
questo prodotto, nel rispetto delle seguenti condizioni e nella misura descritta di seguito.
Le seguenti condizioni di garanzia lasciano invariati gli obblighi di garanzia di legge del venditore sta
biliti nel contratto di acquisto con l‘acquirente.
La garanzia si applica inoltre fatte salve le prescrizioni di legge obbligatorie in materia di responsabilità.
Beurer garantisce la perfetta funzionalità e la completezza di questo prodotto.
La garanzia mondiale è di 3 anni a partire dall‘acquisto del prodotto nuovo, non usato, da parte dell‘acquirente.
Questa garanzia copre solo i prodotti che l‘acquirente ha acquistato come consumatore e che utilizza esclusivamente a scopo personale, in ambito domestico.
Vale il diritto tedesco.
Nel caso in cui il prodotto, durante il periodo di garanzia, si dimostrasse incompleto o presentasse difetti di
funzionamento in linea con le seguenti disposizioni, Beurer provvederà a sostituire o riparare gratuitamente il
prodotto in base alle presenti condizioni di garanzia.
Per segnalare un caso di garanzia, l‘acquirente deve rivolgersi innanzitutto al proprio rivenditore locale:
vedere l‘elenco „Service International“ in cui sono riportati gli indirizzi dei centri di assistenza.
L‘acquirente riceverà quindi informazioni più dettagliate sulla gestione del caso di garanzia, ad esempio dove
deve inviare il prodotto e quali documenti sono necessari.
L‘attivazione della garanzia viene presa in considerazione solo se l‘acquirente può presentare
- una copia della fattura/prova d‘acquisto e
- il prodotto originale
a Beurer o a un partner Beurer autorizzato.
54
-
Page 55

Sono espressamente esclusi dalla presente garanzia
- l‘usura dovuta al normale utilizzo o al consumo del prodotto;
- gli accessori forniti assieme a questo prodotto che, in caso di utilizzo conforme, si consumano o si esauris
cono (ad es. batterie, batterie ricaricabili, manicotti, guarnizioni, elettrodi, lampadine, accessori e accessori
per inalatore);
- i prodotti che sono stati utilizzati, puliti, conservati o sottoposti a manutenzione in modo improprio e/o senza
rispettare le disposizioni riportate nelle istruzioni per l‘uso, nonché i prodotti che sono stati aperti, riparati o
smontati e rimontati dall‘acquirente o da un centro di assistenza non autorizzato da Beurer;
- i danni occorsi nel trasporto dal produttore al cliente o tra il centro di assistenza e il cliente;
- i prodotti acquistati come articoli di seconda scelta o usati;
- i danni conseguenti che dipendono da un difetto del prodotto (in questo caso possono tuttavia esistere
diritti derivanti dalla responsabilità per i prodotti o da altre disposizioni di legge obbligatorie in materia di
responsabilità).
Le riparazioni o la sostituzione completa non prolungano in alcun caso il periodo di garanzia.
55
Salvo errori e modifiche
Page 56

T
ÜRKÇE
Lütfen bu kullanım kılavuzunu dikkatle okuyun, ileride
kullanmak üzere saklayın, diğer kullanıcıların erişebilmesini
sağlayın ve içindeki yönergelere uyun.
UYARI
•
Bu cihaz, 8 yaş ve üzeri çocuklar ve fiziksel, algısal ve akli becerileri kısıtlı veya
tecrübesi ve bilgisi yetersiz olan kişiler tarafından ancak gözetim altında veya
cihazın emniyetli kullanımı hakkında bilgilendirilmiş olmaları ve cihazın kullanımı
sonucu ortaya çıkabilecek tehlikelerin bilincinde olmaları koşuluyla kullanılabilir.
•
Çocuklar cihazla oynamamalıdır.
•
Temizlik ve kullanıcı bakımı, gözetim altında olmadıkları sürece çocuklar tarafından yapılmamalıdır.
•
Temizlemeden önce cihazın fişini elektrik prizinden çıkarın.
•
Cihazı yalnızca belirtilen şekilde temizleyin. Fan ünitesine kesinlikle sıvı girmemelidir.
•
Çözücü maddeler içeren temizlik malzemeleri kullanmayın.
•
Bu cihazın elektrik bağlantı kablosu hasar gördüğünde bertaraf edilmelidir. Çıkarılamıyorsa, cihaz bertaraf edilmelidir.
Sayın müşterimiz,
Ürünlerimizden birini seçtiğiniz için teşekkür ederiz. Isı, yumuşak terapi, kan basıncı/diyagnoz, ağırlık, masaj,
güzellik, hava ve bebek konularında değerli ve titizlikle test edilmiş kaliteli ürünlerimiz, dünyanın her tarafında
tercih edilmektedir.
Yeni cihazınızı iyi günlerde kullanmanızı dileriz.
Beurer Ekibiniz
Ürün özellikleri
İnsanlar zamanlarının çoğunu kapalı alanlarda geçirirler. Bu hava sıklıkla toz parçacıkları, polen, hayvan tüyü,
koku, zararlı gazlar ve çeşitli bakteriler ve virüsler içerir. LR 310 hava temizleyici oda havasını üç katmanlı bir
filtre sistemiyle ve entegre bir UV-C ışıkla temizler.
LR 310 hava temizleyici:
•
Havayı bir kombi filtreyle süzer (zararlı gazlara ve kötü kokulara karşı aktif karbon filtre, bakteri, virüsler,
akarlar ve ince polen tozu gibi partiküllere karşı
•
Entegre UV-C ışığa sahiptir (patojenlerin yok edilmesi için),
•
Üç kademesiyle sessiz olarak çalışır,
•
Zamanlama özelliği vardır (iki, dört veya sekiz saat),
•
Bir ince toz parçacığı sensörü bulunur,
•
54 m²’ye kadar oda büyüklükleri için uygundur (NRCC-54013-2011 uyarınca),
•
Enerji tasarrufludur,
•
Gövde kapağı çıkarıldığında otomatik olarak kapanır.
H 13 sınıfı HEPA filtre
56
),
Page 57

Hava temizleme prensibi
PAP
1. Hava temizleyicinin vantilatörü kirli havayı emer.
2. Ön filtre toz, kir ve kıl gibi kaba parçacıkları süzer.
3. Ardından aktif karbon filtre sayesinde formaldehitler, benzol ve diğer zehirli gazlar ve kokular oda havasın
-
dan süzülür.
4. Son olarak HEPA filtre aracılığıyla polenler, bakteriler veya virüsler gibi küçük parçacıklar süzülür.
5.
Gövde içinde bulunan ve ayrıca devreye alınabilir olan UV-C ışık
patojenleri ve kokuları (hayvanlardan, mutfaktan
veya tütün dumanından kaynaklanan kokuları) yok eder.
6. Temizlenen hava, hava temizleyicinin üst tarafındaki hava çıkışından oda havasına verilir.
HEPA H 13 filtrenin filtreleme kapasitesi ≥ %99,95 düzeyindedir. Yani parçacıkların (örn. bakteriler, virüsler ve ince toz) %99,95 i hava içinden filtrelenebilmektedir.
Kirli, filtre edilmemiş hava şunlara yol açabilir:
•
Solunum yolları enfeksiyonları ve hastalıklarına yakalanmak kolaylaşır,
•
Zararlı gazlar sebebiyle sağlık olumsuz etkilenebilir.
İçindekiler
1. Teslimat kapsamı ..................................... 57
2. İşaretlerin açıklaması .............................. 57
3. Uyarılar ve güvenlik bilgileri ...................58
4. Amacına uygun kullanım ......................... 59
5. Cihaz açıklaması ...................................... 59
6. İlk çalıştırma ............................................. 60
6.1 Hava temizleyiciyi ambalajından
çıkarma .............................................. 60
6.2 Hava temizleyiciyi yerleştirme .............60
7. Kullanım ....................................................61
7.1 Hava temizleyici açma ........................61
7.2 Otomatik fonksiyonu ..........................61
7.3 Fan hızı ...............................................61
7.4 UV-C ışık .............................................61
7.5 Zamanlayıcı fonksiyonu .................... 61
7.6 Filtre değişimi .................................... 61
8. Temizlik ve bakım .................................62
8.1 Filtrenin temizlenmesi ........................ 62
8.2 İnce toz parçacığı sensörünü
temizleme .......................................... 63
8.3 Gövdeyi temizleme ............................ 63
8.4 Saklama ............................................. 63
9. Aksesuarlar ve yedek parçalar ............64
10. Sorunların giderilmesi ........................... 64
11. Bertaraf etme ......................................... 64
12. Teknik veriler .......................................... 64
13. Garanti / Servi ........................................ 65
1. Teslimat kapsamı
•
1 x hava temizleyici
•
1 x kombi filtre (aktif karbon / HEPA filtre sınıf H 13)
•
1 x ön filtre
•
1 x bu kullanım kılavuzu
2. İşaretlerin açıklaması
Kullanım kılavuzunda aşağıdaki simgeler kullanılmıştır:
UYARI
Yaralanma tehlikelerine veya sağlığınızla ilgili
tehlikelere yönelik uyarı
DİKKAT
Cihazdaki ve aksesuarlarındaki olası hasarlara
yönelik güvenlik uyarısı
Ürün bilgisi
Önemli bilgilere yönelik uyarı
57
Üretici
CE işareti
Bu ürün gerekli Avrupa direktiflerinin ve ulusal
direktiflerin gerekliliklerini karşılar.
Ambalaj çevreye zarar vermeyecek şekilde
20
bertaraf edilmelidir
Page 58

Talimatı okuyun
Elektrikli ve elektronik atık cihazlarla ilgili AB direktifine (WEEE - Waste Electrical and Electronic
Equipment) uygun şekilde bertaraf edilmelidir
Rusya Federasyonu’na ve BDT ülkelerine ihraç
edilen ürünler için sertifikasyon işareti
"Geprüfte Sicherheit" güvenlik işareti
3. Uyarılar ve güvenlik bilgileri
Notları dikkatle okuyun! Aşağıdaki notların dikkate alınmaması, kişisel yaralanmaya veya maddi hasara neden olabilir.
UYARI
Çocukları ambalaj malzemesinden uzak tutun. Boğulma tehlikesi vardır.
Elektrik çarpması
UYARI
Elektrik çarpmasından kaynaklanan tehlikeleri önlemek için, her elektrikli cihaz gibi bu hava temizleyicinin de
dikkatle ve sağduyuyla kullanılması gerekir.
• Bu yüzden cihazı
– sadece cihaz üzerinde belirtilen şebeke gerilimi ile kullanın (tip levhası cihazın altı tarafından bulunur),
– üzerinde veya aksesuarlarında görünür bir hasar varsa kesinlikle kullanmayın,
– fırtına sırasında kullanmayın.
•
Arıza veya işlev bozukluğu durumunda cihazı hemen kapatın ve cihazın fişini prizden çekin. Fişi prizden
çekerken elektrik kablosundan veya cihazdan tutarak çekmeyin. Cihazı elektrik kablosundan tutmayın veya
bu şekilde taşımayın. Kablo ve sıcak yüzeyler arasında mesafe bırakın.
•
Elektrik fişini çekmeden önce her zaman cihazı kapatın.
•
Elektrik fişini asla ıslak veya nemli elinizle çekmeyin.
•
Cihazı ısı kaynaklarından uzakta tutun; aksi halde gövdesi eriyebilir ve yangına yol açabilir.
•
Cihazın açıklıklarının ve elektrik kablosunun su, buhar veya başka sıvılara temas etmemesine dikkat edin.
•
Cihazı alev alabilir veya patlayabilir gaz karışımlarının yakınında kullanmayın.
•
Suya düşmüş bir cihaza kesinlikle dokunmayın. Hemen fişi çekin.
•
Cihazda veya aksesuarda görünür bir hasar varsa, cihazı kullanmayın.
Onarım
UYARI
•
Onarımlar sadece kalifiye elemanlar tarafından yapılabilir. Nizami olmayan onarımlar kullanıcı için ciddi
tehlikeler oluşturabilir. Onarım için müşteri servisi veya yetkili bir satıcıya başvurun.
•
Fan ünitesinin açılmasına izin verilmez.
•
UV-C lambası değiştirilmek üzere düşünülmemiştir. Kullanıcı bu tip bir değişikliği yapmaya yetkili değildir.
Yangın tehlikesi
UYARI
Amacına uygun olmayan kullanım veya bu kullanım kılavuzunun dikkate alınmaması gibi durumlar yangın
tehlikesine yol açar!
Bu nedenle hava temizleyiciyi
•
asla örn. battaniye, yastık vs. gibi bir örtünün altında
•
asla benzin veya benzeri kolay alev alabilen maddelerin yakınında çalıştırmayın.
58
Page 59

Kullanım
DİKKAT
Her kullanımdan sonra ve her temizlikten önce cihaz kapatılmalı ve fişi prizden çıkarılmalıdır.
•
Cihazın açıklıklarına veya dönen parçalarının içine herhangi bir nesne sokmayın. Hareketli parçaların her zaman serbest hareket edebilir durumda olmasına dikkat edin.
•
Cihazın üzerine hiçbir nesne koymayın.
•
Cihazı yüksek sıcaklıklardan koruyun.
•
Cihazı güneş ışınlarından ve darbelerden koruyun ve düşürmeyin.
•
Cihazı asla sallamayın.
•
Cihazı sağlam, yatay ve suya dayanıklı bir zemine yerleştirin.
4. Amacına uygun kullanım
Bu hava temizleyici yalnızca iç mekan havasının temizlenmesi için tasarlanmıştır.
UYARI
Solunum yollarında veya akciğerlerinizde ciddi bir rahatsızlığınız varsa, hava temizleyiciyi kullanmadan önce
doktorunuza danışın.
Cihazı sadece geliştirilme amacına uygun ve bu kullanım kılavuzunda belirtilen şekilde kullanın. Amacına uygun
olmayan her türlü kullanım tehlikeli olabilir. Nizami olmayan ve dikkatsiz kullanımdan ötürü oluşacak hasarlardan
üretici firma sorumlu değildir.
5. Cihaz açıklaması
3
2
1
8
6
7
1. Hava çıkışı
2.
Kombi filtre (aktif karbon filtre / HEPA H 13 filtre)
Aktif karbon filtre: Zararlı gazlara ve hoş olmayan
kokulara karşı
HEPA H 13 filtre: Bakteriler, virüsler, akarlar ve ince
polen tozu gibi parçacıkları filtreler
3. Ön filtre
Kaba tozları ve örn. kıllar gibi kirleri filtreler
4. Kumanda paneli 8. Hava girişi
5. Gövde kapağı
6. UV-C ışık
Gövde içinde
dan, mutfaktan veya tütün dumanından kaynaklanan kokuları) yok eder
7. Gövde
4
5
patojenleri ve kokuları (hayvanlar-
59
Page 60

Ekran ve düğmeler
1
1 AÇMA/KAPAMA düğmesi
Cihazın açılması/kapatılması
2 AUTO düğmesi
Otomatik fonksiyonu etkinleştirir (vantilatör hızı
ortam havasının kalitesine göre otomatik olarak
ayarlanır ve LED sürekli yanar). “Replace Filter”
yazısı altındaki ışık yanıp söndüğünde filtreyi değiştirin. Filtreyi değiştirdikten sonra, otomatik filtre
değişimi sayacını sıfırlamak için AUTO düğmesini
basılı tutun.
3 FAN HIZI düğmesi
Hava temizleyicinin üç fan hızı vardır: (düşük),
(orta) ve (yüksek).
2
3
4 UV-C ışık düğmesi
UV-C ışığın açılması/kapatılması
5 ZAMANLAYICI düğmesi
Hava temizleyicinin, kaç saat sonra kendiliğinden
kapanacağını ayarlayabileceğiniz bir zamanlayıcı
fonksiyonu bulunur. Hava temizleyicinin üç zamanlayıcı zamanı vardır: 2H (iki saat), 4H (dört saat) ve
8H (sekiz saat).
4
5
6. İlk çalıştırma
6.1 Hava temizleyiciyi ambalajından çıkarma
1. Karton ambalajı açın.
2. Folyo kılıfı kapalı bırakın ve cihazı yukarıya doğru çekerek çıkarın.
3. Şimdi bütün folyoları çıkarın. Kombi filtreyi cihazdan çıkarın (bkz. “Filtre değişimi” bölümü) ve onu fol
yodan çıkarın. Ardından kombi filtreyi yeniden cihazın içine yerleştirin.
4. Cihazda, fişte ve kabloda hasar olup olmadığını kontrol edin.
-
6.2 Hava temizleyiciyi yerleştirme
1. Titreşimi ve gürültüyü önlemek için hava temizleyiciyi düz, sağlam bir zemin üzerine yerleştirin.
DİKKAT
Hava temizleyicinin konumunu değiştirmek istiyorsanız onu yalnızca arka tarafındaki tutamaktan tutarak taşıyın.
2. Hava temizleyiciyi yanlarında 30 cm boşluk kalacak şekilde yerleştirin.
3. Hava girişinin ve çıkışının hiçbir zaman bloke edilmemesine dikkat edin.
60
Page 61

7. Kullanım
7.1 Hava temizleyici açma
1. Çalıştırma bölümündeki yönergelere uyun
2. Fişi prize takın. Kabloyu, takılıp düşmeye yol açmayacak şekilde yerleştirin.
3. Hava temizleyiciyi açmak için AÇMA/KAPAMA (
Not
İlk çalıştırmada hava temizleyici orta fan hızı kademesine ayarlanmıştır.
7.2 Otomatik fonksiyonu
Hava temizleyicinin otomatik fonksiyonu vardır. Otomatik fonksiyonu açıksa, fan hızı otomatik olarak ortam
havasının kalitesine uyum sağlar. Yani ortam havasının kalitesi ne kadar kötüyse, hava temizleyici fan hızını
otomatik olarak o derece yüksek ayarlar.
1. Otomatik fonksiyonunu açmak için, hava temizleyici açık haldeyken AUTO düğmesine
Otomatik fonksiyonu etkin olduğunda AUTO düğmesinin üzerinde bir ışık yanar.
2.
Otomatik fonksiyonunu kapatmak için yeniden AUTO düğmesine
ışık söner.
Not
AUTO düğmesi üzerindeki ışık yanıp sönüyorsa filtreyi değiştirmelisiniz. “Filtre değişimi” bölümündeki
talimatları dikkate alın.
7.3 Fan hızı
Hava temizleyicinin üç fan hızı vardır: (düşük), (orta) ve (yüksek).
•
Fan hızı kademeleri arasında geçiş yapmak için fan hızı düğmesine basın. Kumanda panelinde ayarlanmış
olan güncel fan hızı ışıklı olarak gösterilir.
7.4 UV-C ışık
UV-C ışık havada bulunan patojenleri yok eder. Bunun için UV-C ışığı titanyum oksitleri aktive eder, bunlar da (tütün dumanı, mutfak veya hayvanlardan kaynaklanan) kötü kokulu koku moleküllerini parçalar.
1. UV-C ışığı
ğunda
2. UV-C ışığı
7.5 Zamanlayıcı fonksiyonu
Hava temizleyicinin, kaç saat sonra kendiliğinden kapanacağını ayarlayabileceğiniz bir zamanlayıcı fonksiyonu bulunur. Hava temizleyicinin üç zamanlayıcı zamanı vardır: 2H (iki saat), 4H (dört saat) ve 8H (sekiz saat).
•
Zamanlayıcı süreleri arasında geçiş yapmak için zamanlayıcı düğmesine
ayarlanmış olan güncel zamanlayıcı süresi ışıklı olarak gösterilir. Ayarlanan süre bittiğinde hava temizleyici
otomatik olarak kapanır.
•
Zamanlayıcıyı kapatmak için, zamanlayıcı düğmesi üzerinde hiçbir ışık yanmayıncaya kadar zamanlayıcı düğmesine ( ) basın. Hava temizleyici şimdi kesintisiz olarak çalışır.
açmak için, hava temizleyici açık haldeyken UV-C düğmesine ( ) basın. UV-C ışık
UV-C düğmesinin üzerinde bir ışık yanar.
kapatmak için yeniden
UV-C düğmesine ( ) basın. UV-C düğmesi üzerindeki ışık söner.
) tuşuna basın.
( ) basın. AUTO düğmesi üzerindeki
( ) basın.
( )
basın. Kumanda panelinde
etkin oldu-
7.6 Filtre değişimi
Her 4320 çalışma saatinden sonra üç katmanlı filtreyi yenisiyle değiştirmeniz gerekir. 4320 çalışma saatinden
sonra AUTO düğmesi üzerinde mavi renkli LED yanıp söner. Filtreyi değiştirmek için yapmanız gerekenler:
61
Page 62

1.
Hava temizleyiciyi kapatmak için Açma/Kapama
düğmesine basın ve fişini prizden çekin.
2.
1.
Cihaz kapağını şekilde gösterildiği gibi çıkarın
2.
(mıknatıslı kilit). Mıknatıslı kilidi önce alttan ve
sonra üstten yerinden çıkarın.
3. Ön filtreyi çekip çıkarın. Kombi filtreyi çıkarmak
için yandaki çıkıntılardan dikkatle çekin.
1.
2.
5.
Gövde kapağını duyulur ve hissedilir şekilde
yerine oturacak şekilde (mıknatıslı kilit) şekilde
gösterildiği gibi yerine oturtun. Mıknatıslı kilidi
önce üstten ve sonra alttan yerine takın.
Kombi filtreyi kendinize özel zaman periyotlarıyla (örn. 6 ayda bir) değiştirmek istiyorsanız, kombi filtrenin üst kenarında, üzerine tarih yazabileceğiniz bir etiket bulunmaktadır.
4.
Yeni bir kombi filtre takın. Kombi filtreyi doğru
yerleştirmek için şekilde gösterildiği gibi yandaki kulaklara dikkat edin. Ön filtreyi onun üzerine
yerleştirin.
Fişi prize takın. Kabloyu, takılıp düşmeye yol
6.
açmayacak şekilde yerleştirin. AUTO düğme
sini ( ) beş saniye basılı tutun.
sayacı sıfırlanır.
Çalışma saati
8. Temizlik ve bakım
UYARI
Her temizleme işleminden önce hava temizleyicinin fişinin prizden çıkarılmış olduğundan emin olun!
8.1 Filtrenin temizlenmesi
Hijyenik, arızasız çalışma için filtrenin düzenli olarak (ayda bir kez) temizlenmesi şarttır.
•
Üç katmanlı filtreyi elektrik süpürgesinin fırçalı başlığıyla temizleyin. Özenli bir temizlik için ön filtreyi çıkarın
ve arkasında bulunan aktif karbon filtreyi ve arka tarafta bulunan HEPA filtreyi de elektrik süpürgesinin fırçalı
başlığıyla temizleyin. Bunun ardından ön filtreyi yeniden HEPA filtre üzerine yerleştirin.
-
62
Page 63

Aktif karbon filtre HEPA H 13 filtre
Ön taraf Arka taraf
DİKKAT
Üç katmanlı filtre 4320 çalışma saatinden sonra değiştirilmelidir (bkz. “Filtre değişimi” bölümü).
Üç katmanlı filtre yıkanamaz.
8.2 İnce toz parçacığı sensörünü temizleme
İnce toz parçacığı sensörü 2 ayda bir temizlenmelidir.
Not
Hava temizleyici tozlu bir ortamda kullanılıyorsa daha sık temizlenmelidir.
Sensörü temizlemek için hava temizleyiciyi kapatın ve elektrik fişini
prizden çekin. Gövdenin yanındaki kapağı açın ve kapağı çıkarın.
Sensörü, hava girişini ve çıkışını nemli bir pamuklu çubukla temizleyin.
Ardından temizlenen tüm parçaları kuru bir pamuklu çubukla kurulayın.
İnce toz parçacığı sensörünün kapağını tekrar takın.
8.3 Gövdeyi temizleme
Hava temizleyicinin gövdesini hafif nemlendirilmiş bir bezle silin (su veya yumuşak bir temizleme maddesiyle).
Yüzeyi zarar görebileceği için çözücü veya başka aşındırıcı temizleme veya ovalama maddeleri kullanmayın.
8.4 Saklama
Cihazı uzun süre kullanmayacaksanız, cihazı temizlenmiş halde orijinal ambalajı içinde, kuru bir ortamda ve
üzerinde ağırlık olmadan muhafaza etmenizi öneririz.
63
Page 64

9. Aksesuarlar ve yedek parçalar
Yedek parçalar ve yıpranan parçalar ilgili servis adresinden (servis adresleri listesine bakınız) tedarik edilebilir.
Uygun sipariş numarasını belirtin.
Tanım Ürün veya sipariş numarası
Ön filtre, kombi filtre (HEPA + aktif karbon) 693.02
10. Sorunların giderilmesi
Sorun Neden Çözüm
Hava temizleyici açılmıyor.
Hava geçirimi yetersiz Filtreler kirlenmiştir.
Hava temizleyici çok gürültülü
çalışıyor
Gövde kapağı doğru takılmamıştır.
Üç katmanlı filtre doğru takılma
mıştır.
Fişli elektrik adaptörü takılmamıştır.
Hava girişi/çıkışı tıkanmıştır.
Hava girişi/çıkışı içinde yabancı
cisim vardır.
Filtreler tıkanmıştır.
Filtreler doğru takılmamıştır. Filtreleri doğru şekilde takın.
Hava temizleyici engebeli yüzey
üzerine yerleştirilmiştir.
Gövde kapağının doğru takıldığından emin olun.
-
Üç katmanlı filtrenin doğru takıl
dığından emin olun.
Fişli elektrik adaptörünü uygun
bir prize takın.
Filtreleri temizleyin (bkz. “Temizlik
ve saklama” bölümü).
Hava girişi/çıkışının tıkanmamış
olduğundan emin olun.
Hava girişi/çıkışı içindeki yabancı
cismi uzaklaştırın.
Filtreleri temizleyin (bkz. “Temizlik
ve saklama” bölümü).
Hava temizleyiciyi düz bir yüzeye
yerleştirin.
-
11. Bertaraf etme
Çevreyi korumak için, kullanım ömrü dolan cihazı evsel atıklarla beraber elden çıkarmayın. Cihaz,
ülkenizdeki uygun atık toplama merkezleri üzerinden bertaraf edilebilir. Cihazı hurda elektrikli ve
elektronik eşya direktifine – WEEE (Waste Electrical and Electronic Equipment) uygun olarak bertaraf
edin. Bertaraf etme ile ilgili sorularınızı, ilgili yerel makamlara iletebilirsiniz.
12. Teknik veriler
Model LR 310
Şebeke gerilimi bkz. cihaz üzerindeki tip etiketi
Güç 50 W
Ölçüler (U x G x Y) 388 x 145 x 428 mm
Boş ağırlık 4,5 kg
UV ışık Dalga boyu 254 nm; kullanım ömrü yakl. 20.000 saat
Uygun olduğu oda boyutu yakl. 54 m
Ses düzeyi yakl. dB (Kademe 3)
İzin verilen kullanım şartları +5°C ila +40°C, ≤%90 bağıl hava nemi (yoğuşmayan)
Koruma sınıfı
Koruma sınıfı II /
2
64
Page 65

13. Garanti / Servi
Beurer GmbH, Söflinger Straße 218, D-89077 Ulm (aşağıda „Beurer“ olarak anılacaktır) bu ürün için aşağıdaki
koşullar çerçevesinde ve aşağıda açıklanan kapsamda bir garanti sunmaktadır.
Aşağıdaki garanti koşulları, satıcının müşteri ile yaptığı satış sözleşmesinden doğan yasal garanti yü
kümlülüklerini etkilemez.
Garanti, yasalarla zorunlu kılınan sorumlulukların kapsamında herhangi bir kısıtlamaya neden olmaksızın
geçerlidir.
Beurer, bu ürünün kusursuz bir şekilde çalıştığını ve eksiksiz olduğunu garanti eder.
Yeni ve kullanılmamış bir ürünün müşteri tarafından satın alınmasıyla başlayan ve dünya genelinde geçerli olan
garanti süresi 3 yıldır.
Bu garanti sadece tüketici olarak müşteri tarafından satın alınan ve bireysel amaçlarla sadece evde kullanılan
ürünler için geçerlidir.
Alman yasaları geçerlidir.
Bu ürünün garanti süresi içinde aşağıda belirtilen hükümler uyarınca eksiksiz olmadığı veya çalışma açısından
kusurlu olduğu saptanırsa, Beurer bu garanti koşulları kapsamında ücretsiz bir ikame ürün teslimatı veya onarım
gerçekleştirmekle yükümlüdür.
Müşteri bir garanti talebinde bulunmak istediğinde önce yerel satıcıya başvuracaktır: Servis adreslerinin
olduğu ekteki „Uluslararası Servis“ listesini inceleyin.
Bu durumda müşteriye, garanti işlemlerinin yürütülmesiyle ilgili olarak örneğin ürünün nereye gönderileceği ve
hangi belgelerin gerekli olduğu gibi ayrıntılı bilgiler verilecektir.
Garanti talebi ancak müşterinin
- faturanın/satın alma belgesinin bir kopyasını ve
- orijinal ürünü
yetkili bir Beurer iş ortağına sunabilmesi halinde işleme konabilir.
-
Aşağıdaki durumlar kesinlikle bu garanti kapsamının dışındadır:
- Ürünün normal kullanımından veya tüketiminden kaynaklanan aşınmalar ve yıpranmalar;
- Bu ürün ile birlikte teslim edilen ve usulüne uygun kullanıldığında da yıpranabilecek veya tükenebilecek ak
sesuar parçaları (örneğin piller, şarj edilebilir piller, manşetler, contalar, elektrotlar, aydınlatma malzemeleri,
başlıklar ve nebulizatör aksesuarları);
- Kullanım kılavuzundaki bilgiler dikkate alınmadan ve/veya usulüne uygun olmayan bir şekilde kullanılan, te
mizlenen, depolanan veya bakımı yapılan ürünler ve Beurer tarafından yetkilendirilmemiş bir servis merkezi
veya müşterinin kendisi tarafından açılan, onarılan veya üzerinde değişiklik yapılan ürünler;
- Ürünün üreticiden müşteriye nakliyesi sırasında oluşan hasarlar;
- İkinci kalite ürün veya kullanılmış ürün olarak satın alınan ürünler;
- Bu üründeki bir kusurdan kaynaklanan müteakip hasarlar (ancak bu durumda ürün sorumluluğu veya yasal
zorunlu sorumluluk hükümleri uyarınca tüketici hakları olabilir).
Onarım veya komple değişim garanti süresini hiçbir şekilde uzatmaz.
65
-
-
Hata ve değişiklik hakkı saklıdır
Page 66

Р
УССКИЙ
Внимательно прочтите данную инструкцию, сохраните ее
для последующего использования, храните ее вместе,
доступном для других пользователей, иследуйте ее
указаниям.
ПРЕДОСТЕРЕЖЕНИЕ
•
Данный прибор может использоваться детьми старше 8 лет, атакже
лицами сограниченными физическими, сенсорными или умственными
способностями или снедостаточными знаниями иопытом втом случае,
если они находятся под присмотром взрослых или проинструктированы
обезопасном применении прибора ивозможных опасностях.
•
Непозволяйте детям играть сприбором.
•
Очистка итехническое обслуживание детьми допускается только под
присмотром взрослых.
•
Передочисткой отсоединяйте прибор отсети.
•
Очищайте прибор только указанным способом. Вода ни в коем случае не
должна попадать в вентиляторный блок.
•
Неиспользуйте чистящие средства, содержащие растворитель.
•
Если провод сетевого питания прибора поврежден, его необходимо
заменить. Если же он несъемный, то необходимо утилизировать сам
прибор. Сам провод и работа по его замене платная услуга.
Уважаемый покупатель!
Мы благодарим Вас завыбор продукции нашей фирмы. Мы производим современные, тщательно
протестированные, высококачественные изделия для обогрева, легкой терапии, измерения кровяного давления/диагностики, измерения массы, а также для массажа, косметологии, очистки воздуха
и ухода за детьми.
Снаилучшими пожеланиями,
компания Beurer
Для ознакомления
Большую часть времени человек проводит в закрытых помещениях. Нередко воздух в таких
помещениях бывает загрязнен частицами пыли, цветочной пыльцой, шерстью животных, запахами,
вредными газами, а также различными бактериями и вирусами. Воздухоочиститель LR310 очищает
воздух в помещениях с помощью трехуровневой системы фильтров и встроенного источника ультрафиолетового излучения.
Воздухоочиститель LR310:
•
чистит воздух с помощью комбинированного фильтра (фильтр из активированного угля удаляет
вредные газы и неприятные запахи, а H
а также от бактерий, вирусов, клещей и цветочной пыльцы);
•
оснащен встроенным источником ультрафиолетового излучения (для уничтожения микробов);
•
работает тихо, имеет три режима мощности;
•
снабжен функцией таймера (на два, четыре или восемь часов);
EPA-фильтр класса H 13
66
защищает от вредоносных частиц,
Page 67

•
оснащен датчиком частиц мелкой пыли;
• подходит для помещений площадью до 54 м² (согласно NRCC-54013-2011).
•
экономит электроэнергию;
•
автоматически отключается при снятии крышки корпуса.
Принцип очистки воздуха
1. Вентилятор воздухоочистителя всасывает загрязненный воздух.
2. Фильтр грубой очистки задерживает более крупные частицы, например пыль, грязь и волоски.
3. Затем фильтр с активированным углем очищает воздух от паров формальдегида, бензола и от других
вредных газов и неприятных запахов.
4. После этого HEPA-фильтр удаляет такие вредоносные частицы, как пыльца, бактерии или вирусы.
5. Дополнительно подключаемый источник ультрафиолетового излучения во внутренней части корпуса
удаляет микробы и запахи (исходящие от животных, из кухни или от табачного дыма).
6. Очищенный воздух выходит в помещение через отверстие для выпуска воздуха на верхней стороне
воздухоочистителя.
Эффективность фильтрования фильтра HEPA H 13 составляет ≥ 99,95 %. Это означает,
что отфильтровывается 99,95% частиц (например, бактерий, вирусов и мелкой пыли).
Неочищенный, нефильтрованный воздух может иметь различные последствия, среди которых:
•
возникновение благоприятных условий для инфекций и заболеваний дыхательных путей;
•
опасность для здоровья в результате вредного воздействия опасных газов.
Содержание
1. Комплект поставки ................................67
2. Пояснения к символам ......................... 68
3. Предостережения иуказания
потехнике безопасности ..................... 68
4. Использование поназначению ........... 69
5. Описание прибора ................................. 70
6. Подготовка кработе .............................71
6.1 Извлечение воздухоочистителя из
упаковки ........................................... 71
6.2 Установка воздухоочистителя .......... 71
7. Применение ............................................ 72
7.1 Включение воздухоочистителя .......72
7.2 Функция автоматической работы ....72
7.3 Скорость вентилятора ..................... 72
7.4 Ультрафиолетовый свет ................... 72
7.5 Функция таймера ............................ 73
7.6 Замена фильтра ............................... 73
8. Очистка иуход......................................74
8.1 Очистка фильтра .............................74
8.2 Очистка датчика частиц
мелкой пыли ..................................... 75
8.3 Очистка корпуса .............................. 75
8.4 Хранение .......................................... 75
9. Аксессуары изапасные детали ......... 75
10. Что делать при возникновении
проблем? ............................................... 76
11. Утилизация ............................................ 76
12. Технические данные ............................ 77
13. Гарантия/сервисное обслуживание . 77
1. Комплект поставки
•
1 воздухоочиститель
•
1 комбинированный фильтр (активированный уголь/HEPA-фильтр класс
•
1 фильтр грубой очистки
•
1 инструкция поприменению
67
H 13
)
Page 68

2. Пояснения к символам
PAP
Внастоящей инструкции по применению используются следующие символы.
ПРЕДОСТЕРЕЖЕНИЕ
Предупреждает об опасности травмирования
или ущерба для здоровья
ВНИМАНИЕ
Указывает на возможные повреждения прибора/принадлежностей
Информация об изделии
Обращает внимание на важную информацию
Прочтите инструкцию
Утилизация прибора в соответствии с
директивой ЕС по отходам электрического и
электронного оборудования— WEEE (Waste
Electrical and Electronic Equipment)
Изготовитель
Знак СЕ
Это изделие соответствует требованиям
действующих европейских инациональных
директив.
Утилизируйте упаковку всоответствии
20
спредписаниями поохране окружающей
среды
Сертификационный знак для изделий,
экспортируемых вРоссийскую Федерацию
истраны СНГ
Geprüfte Sicherheit (GS) — знак безопасности
3. Предостережения иуказания потехнике безопасности
Внимательно прочтите указания! Несоблюдение нижеследующих указаний может привести
кматериальному ущербу или травмам.
ПРЕДОСТЕРЕЖЕНИЕ
Недавайте упаковочный материал детям. Существует опасность удушения.
Удар электрическим током
ПРЕДОСТЕРЕЖЕНИЕ
Воизбежание поражения электрическим током используйте данный воздухоочиститель осторожно
иаккуратно, как илюбой другой электрический прибор.
• В частности:
— эксплуатируйте прибор только при указанном на нем напряжении (типовая табличка расположена
на нижней стороне прибора);
— убедитесь в отсутствии видимых повреждений прибора и принадлежностей;
— неиспользуйте прибор вовремя грозы.
•
Вслучае появления дефектов инеполадок вработе немедленно отключите прибор иотсоедините
его отсети. Никогда не тяните за сетевой кабель или за прибор, чтобы вынуть вилку из розетки.
Никогда неперемещайте прибор, держа его засетевой кабель. Кабели должны быть удалены от
горячих поверхностей.
•
Всегда выключайте прибор, прежде чем извлечь сетевую вилку из розетки.
•
Не извлекайте сетевую вилку влажными или мокрыми руками.
•
Прибор должен быть расположен вдали от источников тепла, иначе корпус может расплавиться
истать причиной возгорания.
•
Убедитесь в том, что отверстия прибора и сетевой провод не контактируют с водой, паром или
другими жидкостями.
•
Не используйте прибор вблизи горючих или взрывоопасных газовых смесей.
•
Ни вкоем случае непытайтесь взять прибор вруки, если он упал вводу. Немедленно выньте вилку
из розетки.
•
Не используйте прибор или его принадлежности при наличии видимых повреждений.
68
Page 69

Ремонт прибора
ПРЕДОСТЕРЕЖЕНИЕ
•
Ремонт электрических приборов должен производиться только специалистами. Неквалифицированное выполнение ремонта влечет засобой значительную опасность для пользователя. Если прибор
нуждается времонте, обратитесь всервисную службу или кавторизованному торговому представителю.
•
Запрещено открывать вентиляторный блок.
•
Замена лампы UV-C непредусмотрена. Пользователь неимеет права осуществлять замену.
Опасность пожара
ПРЕДОСТЕРЕЖЕНИЕ
Использование прибора непо назначению или несоблюдение правил, указанных вданном руководстве,
при определенных обстоятельствах может привести кпожару!
Поэтому никогда:
•
не накрывайте работающий прибор, например, одеялом, подушкой и т.п.;
•
неставьте его вблизи отемкостей сбензином или другими легковоспламеняющимися веществами.
Применение прибора
ВНИМАНИЕ
После каждого применения иперед очисткой прибор необходимо отключать иотсоединять отсети.
•
Не втыкайте никакие предметы в отверстия на приборе и не вставляйте ничего между его вращающимися частями. Следите за тем, чтобы подвижные части не были зажаты.
•
Неставьте никакие предметы наприбор.
•
Берегите прибор отвысоких температур.
•
Берегите прибор отсолнечных лучей, ударов ипадений.
•
Не встряхивайте прибор.
•
Установите прибор на устойчивую горизонтальную водостойкую поверхность.
4. Использование поназначению
Воздухоочиститель предназначен исключительно для очистки воздуха в помещениях.
ПРЕДОСТЕРЕЖЕНИЕ
При тяжелых заболеваниях дыхательных путей или легких перед применением воздухоочистителя
проконсультируйтесь у врача.
Используйте прибор только втех целях, для которых он был разработан, итолько тем способом, который
описан вданной инструкции поприменению. Любое применение не по назначению может быть опасным.
Производитель ненесет ответственности заущерб, причиненный вследствие использования прибора
непо назначению или халатного обращения сним.
69
Page 70

5. Описание прибора
3
2
1
8
6
7
1. Отверстие для выпуска воздуха
2.
Комбинированный фильтр (фильтр с активи-
рованным углем/HEPA-фильтр H 13)
Фильтр с активированным углем: защищает от
вредоносных газов и неприятных запахов
HEPA-фильтр H 13: отфильтровывает частицы,
среди которых бактерии, вирусы, клещи
ицветочная пыльца
3. Фильтр грубой очистки
Отфильтровывает крупные частицы пыли
игрязи, например волоски
4. Панель управления 8. Воздухозаборник
5. Крышка корпуса
6. Ультрафиолетовый свет
Уничтожает во внутренней части корпуса
микробы и запахи (исходящие от животных,
изкухни или от табачного дыма)
7. Корпус
4
5
70
Page 71

Дисплей и кнопки
1
1 Кнопка ВКЛ./ВЫКЛ.
Включение/выключение прибора
2 Кнопка AUTO
Активирует функцию автоматической работы
(скорость вентилятора регулируется автоматически в зависимости от качества воздуха в
помещении, светодиод горит постоянно). Если
индикатор под надписью «Замените фильтр»
мигает, фильтр следует заменить. После замены
фильтра следует некоторое время удерживать
кнопку AUTO нажатой, чтобы обнулить показания
автоматического счетчика выработки фильтра.
3 Кнопка СКОРОСТЬ ВЕНТИЛЯТОРА
Для воздухоочистителя предусмотрены три
скоростных режима вентилятора:
скорость),
( высокая скорость).
(средняя скорость) и
2
(низкая
3
4 Кнопка управления
ультрафиолетовым светом
Включение/выключение ультрафиолетового
света
5 Кнопка Таймера
В воздухоочистителе предусмотрена функция
таймера, с помощью которой можно настроить,
через сколько часов воздухоочиститель должен
отключиться самостоятельно. Для воздухоочистителя предусмотрено три возможности
установки времени таймера: 2H (два часа), 4H
(четыре часа) и 8H (восемь часов).
4
5
6. Подготовка кработе
6.1 Извлечение воздухоочистителя из упаковки
1. Вскройте картонную упаковку.
2. Не открывая пакет, извлеките прибор.
3. Удалите все пленки. Извлеките комбинированный фильтр из прибора (см. раздел «Замена фильтра»)
и снимите с него пленку. Затем правильно установите комбинированный фильтр обратно в прибор.
4. Убедитесь в том, что прибор, сетевая вилка и кабель не повреждены.
6.2 Установка воздухоочистителя
1. Установите воздухоочиститель на ровную и устойчивую поверхность, чтобы избежать вибраций и
шума.
71
Page 72

ВНИМАНИЕ
При установке воздухоочистителя держите его исключительно за ручку на задней стенке прибора.
2. Установите воздухоочиститель так, чтобы вокруг него оставалось свободное пространство
радиусом 30см.
3. Следите за тем, чтобы воздухозаборник и отверстие для выпуска воздуха никогда не закрывались.
7. Применение
7.1 Включение воздухоочистителя
1. Следуйте указаниям из раздела «Ввод в эксплуатацию».
2. Вставьте сетевую вилку в розетку. Положите кабель так, чтобы об него нельзя было споткнуться.
3. Для включения воздухоочистителя нажмите кнопку ВКЛ./ВЫКЛ. ( ).
Указание
При первом вводе в эксплуатацию воздухоочиститель необходимо установить на средний уровень
скорости вентилятора.
7.2 Функция автоматической работы
Для воздухоочистителя предусмотрена функция автоматической работы. Если эта функция активирована, то скорость вентилятора автоматически регулируется в зависимости от качества воздуха в
помещении. Это означает, что чем ниже качество воздуха в помещении, тем выше автоматически
устанавливаемая воздухоочистителем скорость вентилятора.
1. Для активации функции автоматической работы нажмите на включенном воздухоочистителе
кнопку AUTO
индикатор над кнопкой AUTO.
2. Чтобы отключить функцию автоматической работы, снова нажмите на кнопку
дикатор над кнопкой AUTO погаснет.
Указание
Если светоиндикатор над кнопкой AUTO мигает, значит, требуется заменить фильтр. Внимательно
следуйте указаниям в разделе «Замена фильтра».
( ). Как только функция автоматической работы активируется, загорается свето-
AUTO ( ). Светоин-
7.3 Скорость вентилятора
Для воздухоочистителя предусмотрены три скоростных режима вентилятора: (низкая скорость),
(средняя скорость) и (высокая скорость).
•
Чтобы выбрать одну из скоростей вентилятора, нажмите кнопку скорости вентилятора ( ). Установленная на данный момент скорость вентилятора отображается на панели управления.
7.4 Ультрафиолетовый свет
Ультрафиолетовый свет уничтожает находящиеся в воздухе микробы. При этом ультрафиолетовый
свет активирует оксид титана, разлагающий молекулы неприятных запахов (табачного дыма, кухни или
домашних животных).
1. Для того чтобы включить
кнопку управления ультрафиолетовым светом ( ). Как только функция
активируется, загорается светоиндикатор над кнопкой управления ультрафиолетовым светом.
2. Чтобы отключить функцию
фиолетовым светом ( ). Светоиндикатор над кнопкой управления ультрафиолетовым светом
погаснет.
ультрафиолетовый свет,
ультрафиолетового света,
72
нажмите при включенном воздухоочистителе
ультрафиолетового света
снова нажмите на кнопку
управления ультра-
Page 73

7.5 Функция таймера
В воздухоочистителе предусмотрена функция таймера, с помощью которой можно настроить, через
сколько часов воздухоочиститель должен отключиться самостоятельно. Для воздухоочистителя
предусмотрено три возможности установки времени таймера: 2H (два часа), 4H (четыре часа) и 8H
(восемь часов).
•
Чтобы выбрать время таймера, нажмите кнопку TIMER
таймера отображается на панели управления. Воздухоочиститель отключается автоматически по
истечении установленного значения времени.
•
Чтобы отключить таймер, несколько раз нажмите кнопку TIMER ( ), пока над ней не погаснет светоиндикатор. После этого воздухоочиститель будет работать непрерывно.
( )
. Установленное на данный момент время
7.6 Замена фильтра
Трехслойный фильтр необходимо заменять через каждые 4320часов работы. Через 4320часов
работы над кнопкой AUTO загорается синяя светодиодная лампа. Для замены фильтра выполните
следующие действия.
2.
1.
1.
Нажмите на кнопку ВКЛ./ВЫКЛ., чтобы
выключить воздухоочиститель, и отсоедините
его от сети.
Снимите крышку корпуса, открыв замок
2.
на магните, как показано на иллюстрации.
Чтобы открыть замок на магните, потяните
сначала вниз, а затем вверх.
3.
Извлеките фильтр грубой очистки. Затем
осторожно оттяните боковые защелки, чтобы
извлечь комбинированный фильтр.
4.
Установите новый комбинированный фильтр.
Чтобы правильно установить комбинированный фильтр, учитывайте положение
относительно боковых защелок, как показано
на рисунке. Затем разместите поверх него
фильтр грубой очистки.
73
Page 74

1.
2.
5.
Закройте крышку корпуса допоявления ощутимого ислышимого щелчка (замка на магните). Потяните замок на магните сперва вверх,
а затем вниз.
Если Вы хотите устанавливать комбинированный фильтр по собственному расписанию (например, каждые 6 месяцев), используйте размещенную у верхнего края комбинированного фильтра
наклейку, чтобы указывать дату замены.
Вставьте сетевую вилку в розетку. Положите
6.
кабель так, чтобы об него нельзя было споткнуться. Удерживайте кнопку AUTO (
жатой в течение пяти секунд.
работы сбросится до 0.
Счетчик часов
) на-
8. Очистка иуход
ПРЕДОСТЕРЕЖЕНИЕ
Перед каждой очисткой необходимо убедиться в том, что сетевой штекер воздухоочистителя
извлечен из розетки!
8.1 Очистка фильтра
Регулярная очистка фильтра (один раз в месяц) является главным условием его бесперебойной работы
и соблюдения гигиены.
•
Трехслойный фильтр рекомендуется очищать с помощью насадки-щетки от пылесоса. Для глубокой
очистки снимите фильтр грубой очистки и насадкой-щеткой от пылесоса очистите находящийся за
ним фильтр с активированным углем, а также размещенный на задней стороне HEPA-фильтр. Затем
установите фильтр грубой очистки обратно на HEPA-фильтр.
Фильтр с активированным углем HEPA-фильтр H13
Передняя сторона прибора Обратная сторона
ВНИМАНИЕ
Трехслойный фильтр следует заменять через каждые 4320 часов работы (см. раздел «Замена фильтра»).
Запрещается мыть трехслойный фильтр.
74
Page 75

8.2 Очистка датчика частиц мелкой пыли
Очистку датчика частиц мелкой пыли необходимо проводить каждые 2 месяца.
Указание
Если воздухоочиститель используется в запыленных местах, рекомендуется очищать его как
можно чаще.
Для очистки датчика выключите воздухоочиститель и извлеките
сетевой штекер изрозетки. Откройте крышку на корпусе и
снимите ее.
Очистите датчик, а также воздухозаборник/отверстие для
выпуска воздуха ватной палочкой, смоченной в воде.
Затем промокните очищенные детали сухой ватной палочкой.
Установите крышку датчика частиц мелкой пыли на место.
8.3 Очистка корпуса
Очищайте корпус воздухоочистителя влажной салфеткой (смоченной водой или слабым раствором
для очистки). Не используйте растворители, а также другие агрессивные очистители или абразивные
чистящие средства, поскольку они могут повредить поверхность прибора.
8.4 Хранение
Если прибор не используется длительное время, мы рекомендуем хранить его в очищенном виде всухом
месте в оригинальной упаковке. При этом не следует класть на прибор какие-либо предметы.
9. Аксессуары изапасные детали
Запасные детали идетали, подверженные быстрому износу, можно приобрести всоответствующих
сервисных центрах (согласно списку сервисных центров). Укажите соответствующий номер для заказа.
Наименование предмета Артикульный номер или номер
Фильтр грубой очистки,
комбинированный фильтр ( HEPA + активированный уголь)
75
заказа
693.02
Page 76

10. Что делать при возникновении проблем?
Проблема Причина Меры поустранению
Воздухоочиститель не включается
Недостаточный поток воздуха Фильтры загрязнены.
Воздухоочиститель работает
слишком громко
Неправильная установка
крышки корпуса.
Трехслойный фильтр установлен неправильно.
Сетевой адаптер не подключен
к розетке.
Заблокирован воздухозаборник/отверстие для выпуска
воздуха.
В воздухозаборник/отверстие
для выпуска воздуха попало
твердое тело.
Фильтры засорены.
Неправильная установка фильтров.
Воздухоочиститель находится
на неровной поверхности.
Убедитесь, что крышка корпуса
установлена правильно.
Убедитесь, что трехслойный
фильтр установлен правильно.
Вставьте сетевой адаптер
вподходящую розетку.
Очистите фильтр (см. главу
«Ремонт и очистка»).
Убедитесь втом, что воздухозаборник/отверстие для выпуска воздуха незаблокировано.
Извлеките твердое тело из воздухозаборника/отверстия для
выпуска воздуха.
Очистите фильтр (см. главу
«Ремонт и очистка»).
Установите фильтры правильно.
Установите воздухоочиститель
на ровную поверхность.
11. Утилизация
В интересах охраны окружающей среды категорически запрещается выбрасывать прибор
по завершении срока его службы вместе с бытовыми отходами. Утилизация должна производиться через соответствующие пункты сбора в Вашей стране. Прибор следует утилизировать
согласно Директиве ЕС по отходам электрического и электронного оборудования – WEEE
(Waste Electrical and Electronic Equipment). В случае вопросов обращайтесь в местную коммунальную
службу, ответственную за утилизацию отходов.
76
Page 77

12. Технические данные
Модель LR310
Напряжение сети Cм. типовую табличку прибора
Мощность 50Вт
Размеры (Д x Ш x В) 388 x 145 x 428 мм
Масса без воды 4,5кг
Ультрафиолетовый свет Длина волн 254нм; срок службы ок.20000часов
Подходит для помещений пло-
щадью
Громкость ок. 56 dB (Уровень 3)
Допустимые условия эксплуатации
Класс защиты
Ок. 54 м
От +5 до +40°C, относительная влажность воздуха ≤90 %
(безобразования конденсата)
Класс защиты II /
2
13. Гарантия/сервисное обслуживание
Более подробная информация по гарантии/сервису находится в гарантийном/сервисном талоне,
который входит в комплект поставки.
77
Возможны ошибки и изменения
Page 78

P
OLSKI
Należy dokładnie przeczytać i zachować niniejszą instrukcję
obsługi, przechowywać ją w miejscu dostępnym dla innych
użytkowników i przestrzegać podanych w niej wskazówek.
OSTRZEŻENIE
•
Dzieci od 8 roku życia oraz osoby z ograniczoną sprawnością fizyczną, ruchową i umysłową lub brakiem doświadczenia i wiedzy mogą obsługiwać urządzenie tylko wtedy, gdy znajdują się pod nadzorem lub zostały im przekazane
instrukcje dotyczące bezpiecznego korzystania z urządzenia i są świadome
zagrożeń wynikających z jego użytkowania.
•
Dzieciom nie wolno bawić się urządzeniem.
•
Dzieci nie mogą bez nadzoru czyścić ani konserwować urządzenia.
•
Przed czyszczeniem należy odłączyć urządzenie od sieci.
•
Urządzenie należy czyścić tylko w podany sposób. W żadnym wypadku do
jednostki wentylatora nie powinna dostać się ciecz.
•
Nie używać środków czyszczących zawierających rozpuszczalnik.
•
Jeśli kabel zasilający urządzenia ulegnie uszkodzeniu, należy go zutylizować.
Jeśli nie ma możliwości wyjęcia kabla, należy zutylizować urządzenie.
Szanowna Klientko, szanowny Kliencie!
Serdecznie dziękujemy za zakup naszego produktu. Nasza marka jest znana z wysokiej jakości produktów
poddawanych surowej kontroli, przeznaczonych do ogrzewania, łagodnej terapii, pomiaru ciśnienia i bada
nia krwi, pomiaru ciężaru ciała, masażu, zabiegów upiększających, uzdatniania powietrza oraz ułatwiających
opiekę nad dziećmi.
Z poważaniem,
zespół Beurer
Informacje ogólne
Człowiek spędza większość czasu w zamkniętych pomieszczeniach. Często panujące w nich powietrze jest
zanieczyszczone cząstkami kurzu, pyłkami, sierścią zwierząt, zapachami, szkodliwymi gazami oraz różnymi
bakteriami i wirusami. Oczyszczacz powietrza LR 310 oczyszcza powietrze w pomieszczeniu za pomocą
trójwarstwowego systemu filtrów i wbudowanego światła UV-C.
Oczyszczacz powietrza LR 310
•
odfiltrowuje z powietrza cząstki, takie jak bakterie, wirusy, roztocza i drobne pyłki za pomocą filtra kombinowa
nego (filtra z węglem aktywnym klasy
•
dysponuje wbudowanym światłem UV-C (do niszczenia drobnoustrojów),
•
pracuje cicho na trzech stopniach mocy,
•
jest wyposażony w funkcję timera (dwie, cztery lub osiem godzin),
•
jest wyposażony w czujnik drobnych cząsteczek pyłu,
•
nadaje się do pomieszczeń o powierzchni do 54 m² (zgodnie z NRCC-54013-2011),
•
jest energooszczędny,
•
wyłącza się automatycznie, gdy ściągana jest pokrywa obudowy.
HEPA H 13
przeciwko szkodliwym gazom i nieprzyjemnym zapachom),
78
-
-
Page 79

Zasada działania
1. Wentylator oczyszczacza powietrza zasysa zabrudzone powietrze.
2. Filtr wstępny oddziela większe cząstki, takie jak kurz, brud i włosy.
3. Następnie filtrowane są przez filtr z węglem aktywnym formaldehydy, benzol i inne trujące gazy i zapachy
z powietrza w pomieszczeniu.
4. Na koniec filtr HEPA separuje małe cząstki, takie jak pyłki, bakterie lub wirusy.
5. Osobno włączane światło UV-C we wnętrzu obudowy
eliminuje drobnoustroje i zapachy (pochodzące od
zwierząt, z kuchni czy dymu tytoniowego).
6.
Oczyszczone powietrze jest przekazywane przez znajdujący się w górnej części oczyszczacza otwór
wylotowy powietrza do pomieszczenia.
Wydajność filtra HEPA H 13 wynosi ≥ 99,95 %. Oznacza to, że można odfiltrować 99,95 % cząsteczek
(np.bakterie, wirusy i drobny pył).
Zanieczyszczone i niefiltrowane powietrze może mieć następujące negatywne skutki:
•
rozwój infekcji i chorób dróg oddechowych,
•
negatywny wpływ na zdrowie spowodowany działaniem szkodliwych gazów.
Spis treści
1. Zawartość opakowania ...........................79
2. Objaśnienie symboli ................................ 79
3. Ostrzeżenia i wskazówki dotyczące
bezpieczeństwa......................................80
4. Użytkowanie zgodne z
przeznaczeniem .......................................81
5. Opis urządzenia ....................................... 81
6. Uruchomienie ........................................... 82
6.1 Wyjmowanie oczyszczacza
powietrza ........................................... 82
6.2 Ustawianie oczyszczacza powietrza ... 82
7. Zastosowanie...........................................83
7.1 Włączanie oczyszczacza powietrza ... 83
7.2 Funkcja automatyczna .......................83
7.3 Prędkość wentylatora ......................... 83
7.4 Światło UV-C .................................... 83
7.5 Funkcja timera ..................................83
7.6 Wymiana filtra .................................... 84
8. Czyszczenie i konserwacja ..................85
8.1 Czyszczenie filtra ............................... 85
8.2 Czyszczenie czujnika drobnych
cząsteczek pyłu ................................. 85
8.3 Czyszczenie obudowy ....................... 86
8.4 Przechowywanie ................................86
9. Akcesoria i części zamienne ...............86
10. Postępowanie w przypadku
problemów ............................................. 86
11. Utylizacja ................................................ 87
12. Dane techniczne .................................... 87
13. Gwarancja / Serwis ............................... 87
1. Zawartość opakowania
•
1 x Oczyszczacz powietrza
•
1 x Filtr kombinowany (węgiel aktywny / klasa HEPA H 13)
•
1 x Filtr wstępny
•
1 x Instrukcja obsługi
2. Objaśnienie symboli
W instrukcji obsługi zastosowano następujące symbole:
OSTRZEŻENIE
Wskazówka ostrzegająca przed niebezpieczeństwem odniesienia obrażeń lub zagrożenia
zdrowia
UWAGA
Zasada bezpieczeństwa odnosząca się do
ewentualnych uszkodzeń urządzenia/akcesoriów.
79
Producent
Oznakowanie CE
Niniejszy produkt spełnia wymagania obowiązujących dyrektyw europejskich i krajowych.
Page 80

Informacja o produkcie
PAP
Wskazówka z ważnymi informacjami.
Należy przeczytać instrukcję
Utylizacja zgodnie z dyrektywą WE o zużytych
urządzeniach elektrycznych i elektronicznych – WEEE (Waste Electrical and Electronic
Equipment).
Opakowanie zutylizować w sposób przyjazny dla
20
środowiska.
Oznakowanie certyfikacyjne produktów eksportowanych do Federacji Rosyjskiej oraz krajów WNP.
Znak bezpieczeństwa "Geprüfte Sicherheit"
3. Ostrzeżenia i wskazówki dotyczące bezpieczeństwa
Należy dokładnie przeczytać wskazówki! Nieprzestrzeganie poniższych wskazówek może doprowadzić do
obrażeń ciała i szkód materialnych.
OSTRZEŻENIE
Opakowanie należy przechowywać w miejscu niedostępnym dla dzieci. Istnieje ryzyko uduszenia.
Porażenie prądem elektrycznym
OSTRZEŻENIE
Jak z każdego urządzenia elektrycznego z oczyszczacza należy korzystać ostrożnie, aby uniknąć porażenia
prądem elektrycznym.
• Dlatego:
– urządzenie można eksploatować wyłącznie przy napięciu sieciowym o wartości umieszczonej na urządze-
niu (tabliczka znamionowa znajduje się na spodzie urządzenia),
– nie wolno użytkować urządzenia lub akcesoriów, jeśli mają widoczne uszkodzenia,
– nie wolno korzystać z urządzenia podczas burzy.
•
W razie uszkodzeń lub niewłaściwego działania urządzenie należy natychmiast wyłączyć i odłączyć od zasilania. Wyciągając wtyczkę z gniazdka, nie wolno ciągnąć za kabel lub urządzenie. Nie wolno trzymać ani
przenosić urządzenia, trzymając je za kabel zasilania. Kable należy ułożyć z dala od gorących powierzchni.
•
Przed wyjęciem wtyczki z gniazdka należy zawsze wyłączyć urządzenie.
•
Nie należy wyjmować wtyczki mokrymi lub wilgotnymi rękami.
•
Urządzenie należy trzymać z dala od źródeł ciepła. Jego obudowa mogłaby się stopić, co stworzyłoby
zagrożenie pożarem.
•
Należy pamiętać o tym, aby otwory urządzenia i przewód sieciowy nie miały kontaktu z wodą, parą ani
innymi cieczami.
•
Nie należy korzystać z urządzenia w pobliżu palnych lub wybuchowych mieszanek gazowych.
•
Nie wolno w żadnym wypadku sięgać po urządzenie, jeśli wpadło do wody. Należy natychmiast wyjąć
wtyczkę z gniazda.
•
W przypadku widocznych uszkodzeń nie należy używać urządzenia ani akcesoriów.
Naprawa
OSTRZEŻENIE
•
Naprawy urządzeń elektrycznych mogą być przeprowadzane wyłącznie przez fachowców. Nieodpowiednio przeprowadzona naprawa może spowodować poważne zagrożenia dla użytkownika. W celu naprawy
należy zwrócić się do serwisu lub autoryzowanego dystrybutora.
•
Nie wolno otwierać jednostki wentylatora.
•
Nie przewiduje się wymiany lampy UV-C. Nie wolno użytkownikowi przeprowadzać takiej wymiany.
Zagrożenie pożarowe
OSTRZEŻENIE
W przypadku użycia niezgodnego z przeznaczeniem lub nieprzestrzegania niniejszej instrukcji obsługi może
dojść do zagrożenia pożarowego!
Dlatego nie należy eksploatować urządzenia
•
pod przykryciem, np. pod kocem, poduszką itp.
•
w pobliżu benzyny lub innych materiałów łatwopalnych.
80
Page 81

Obsługa
UWAGA
Po każdym użyciu i przed każdym czyszczeniem wyłączyć urządzenie i wyciągnąć wtyczkę.
•
Nie wkładać żadnych przedmiotów do otworów urządzenia lub pomiędzy obracające się części. Zwrócić
uwagę, aby zapewnić dostateczne miejsce umożliwiające swobodny ruch części ruchomych.
•
Nie stawiać na urządzeniu żadnych przedmiotów.
•
Chronić urządzenie przed wysoką temperaturą.
•
Chronić urządzenie przed promieniami słonecznymi, uderzeniem oraz upadkiem.
•
Nie potrząsać urządzeniem.
•
Ustawić urządzenie na twardym, poziomym i odpornym na działanie wody podłożu.
4. Użytkowanie zgodne z przeznaczeniem
Ten oczyszczacz powietrza jest przeznaczony wyłącznie do oczyszczania powietrza w pomieszczeniach
wewnętrznych.
OSTRZEŻENIE
Osobom, które cierpią na ciężką chorobę dróg oddechowych lub płuc zaleca się skonsultowanie korzystania
z urządzenia z lekarzem.
Urządzenie należy stosować tylko w celu, dla którego zostało zaprojektowane i w sposób określony w niniejszej
instrukcji obsługi. Każde niewłaściwe użycie może być niebezpieczne. Producent nie ponosi odpowiedzialności za szkody wynikłe z nieprawidłowego lub lekkomyślnego użytkowania.
5. Opis urządzenia
3
2
1
4
8
6
7
1. Wylot powietrza
2.
Filtr kombinowany (węgiel aktywny / klasa HEPA
H 13)
filtr z węglem aktywnym: Przeciwko szkodliwym
gazom i nieprzyjemnym zapachom
filtr HEPA-H 13: Odfiltrowuje takie cząsteczki jak
bakterie, wirusy, roztocza i drobne pyłki
3. Filtr wstępny
Odfiltrowuje grubszy kurz i brud, jak np. włosy
4. Panel obsługi 8. Wlot powietrza
5. Pokrywa obudowy
6. Światło UV-C
Eliminuje we wnętrzu obudowy
i zapachy (pochodzące od zwierząt, z kuchni czy
dymu tytoniowego)
7. Obudowa
81
5
drobnoustroje
Page 82

Wyświetlacz i przyciski
1
1 Przycisk włączania/wyłączania
Włączanie/wyłączanie urządzenia
2 Przycisk AUTO
Aktywuje funkcję automatyki (prędkość wentylatora dostosowuje się automatycznie do jakości powietrza otoczenia, a lampka LED świeci w
sposób ciągły). Jeśli światło pod opcją „Replace
Filter” miga, należy wymienić filtr. Po wymianie
filtra proszę przytrzymywać przycisk AUTO, aby
cofnąć automatyczny licznik wymiany filtra.
3 Przycisk PRĘDKOŚĆ WENTYLATORA
Oczyszczacz powietrza posiada trzy opcje
ustawiania prędkości wentylatora:
(średnia) i (duża).
2
(mała),
3
4 Przycisk światła UV-C
Włączanie/wyłączanie światła UV-C
5 Przycisk TIMER
Oczyszczacz powietrza posiada funkcję timera, dzięki której można ustalić, po ilu godzinach
urządzenie powinno się samoczynnie wyłączyć.
Oczyszczacz powietrza posiada trzy opcje ustawiania timera: 2H (dwie godziny), 4H (cztery godziny) i 8H (osiem godzin).
4
5
6. Uruchomienie
6.1 Wyjmowanie oczyszczacza powietrza
1. Otworzyć opakowanie z kartonu.
2. Pozostawić woreczek foliowy zamknięty i wyjąć urządzenie do góry.
3.
Zdjąć wszystkie folie. Wyciągnąć filtr kombinowany z urządzenia (patrz rozdział „wymiana filtra”) i wyjąć
go z folii. Następnie należy umieścić filtr kombinowany w urządzeniu.
4. Sprawdzić, czy urządzenie, wtyczka sieciowa i kabel nie są uszkodzone.
6.2 Ustawianie oczyszczacza powietrza
1. Proszę ustawić oczyszczacz powietrza na płaskim i twardym podłożu, aby uniknąć wibracji i hałasu.
UWAGA
Jeśli chcą Państwo umieścić oczyszczacz powietrza w nowej pozycji, proszę go przenosić wyłącznie trzymając za uchwyt znajdujący się na odwrocie urządzenia.
2. Zapewnić wolną przestrzeń wokół urządzenia wynoszącą ok. 30 cm.
3. Pamiętać o tym, aby otwory wlotowy i wylotowy powietrza nie zostały zakryte.
82
Page 83

7. Zastosowanie
7.1 Włączanie oczyszczacza powietrza
1. Należy stosować się do wskazówek zawartych w rozdziale „Uruchomienie”.
2. Proszę włożyć wtyczkę do gniazda zasilania. Ułożyć kabel tak, aby nie można było się o niego potknąć.
3. Aby włączyć oczyszczacz powietrza, należy nacisnąć przycisk włączania/wyłączania (
Wskazówka
Przy pierwszym uruchomieniu oczyszczacz powietrza jest ustawiony na średnią prędkość wentylatora
7.2 Funkcja automatyczna
Oczyszczacz powietrza posiada funkcję automatyczną. Jeśli funkcja automatyczna jest włączona, prędkość
wentylatora dostosowuje się automatycznie do jakości powietrza otoczenia. Oznacza to, że im gorsza jest ja
kość powietrza otoczenia, tym większą prędkość wentylatora oczyszczacz powietrza ustawia automatycznie.
1. Aby włączyć funkcję automatyki, proszę na włączonym oczyszczaczu powietrza wcisnąć przycisk
AUTO
( ). Kiedy funkcja automatyki jest aktywna, zapala się światło nad przyciskiem AUTO.
2.
Aby wyłączyć funkcję automatyki, proszę ponownie nacisnąć
skiem AUTO gaśnie.
Wskazówka
Jeśli światło nad przyciskiem AUTO miga, trzeba wymienić filtr. Należy przestrzegać wskazówek znaj
dujących się w rozdziale „Wymiana filtra”.
przycisk AUTO ( ). Światło nad przyci-
7.3 Prędkość wentylatora
Oczyszczacz powietrza posiada trzy opcje ustawiania prędkości wentylatora: (mała), (średnia) i
(duża).
•
Aby zmieniać poszczególne prędkości wentylatora, należy nacisnąć przycisk prędkości wentylatora .
Napanelu obsługi zapala się aktualnie ustawiona prędkość wentylatora.
7.4 Światło UV-C
Światło UV-C eliminuje zawarte w powietrzu drobnoustroje. Światło UV-C aktywuje przy tym tlenki tytanu, które
rozkładają cząstki nieprzyjemnych zapachów (pochodzące od zwierząt, z kuchni czy dymu tytoniowego).
1. Aby włączyć
Kiedy
2.
Aby
UV-C gaśnie.
7.5 Funkcja timera
Oczyszczacz powietrza posiada funkcję timera, dzięki której można ustalić, po ilu godzinach urządzenie powinno
się samoczynnie wyłączyć. Oczyszczacz powietrza posiada trzy opcje ustawiania timera: 2H (dwie godziny),
4H (cztery godziny) i 8H (osiem godzin).
•
Aby zmieniać poszczególne ustawienia timera, należy nacisnąć przycisk TIMER
zapala się aktualnie ustawiony czas timera. Oczyszczacz wyłączy się automatycznie po upływie ustawionego czasu.
•
Aby wyłączyć timer, proszę naciskać przycisk TIMER ( ), dopóki nie zgaśnie światło nad przyciskiem Timer. Oczyszczacz powietrza pracuje teraz stale.
światło UV-C
światło UV-C
wyłączyć światło UV-C,
, proszę nacisnąć na włączonym oczyszczaczu powietrza przycisk UV-C ( ).
jest aktywne, zapala się światło nad przyciskiem UV-C.
proszę nacisnąć ponownie
przycisk UV-C ( ). Światło nad przyciskiem
( )
).
-
-
. Na panelu obsługi
83
Page 84

7.6 Wymiana filtra
Trójwarstwowy filtr kombinowany należy wymieniać po 4320 godzinach pracy urządzenia na nowy. Po 4320
godzinach pracy urządzenia nad przyciskiem AUTO zacznie migać niebieska dioda LED. Aby wymienić filtr,
należy wykonać następujące czynności:
2.
1.
1.
Nacisnąć przycisk włączania/wyłączania, aby
wymienić oczyszczacz powietrza i odłączyć go
od gniazdka.
3.
Zdjąć filtr wstępny. Aby zdjąć filtr kombinowany,
proszę ostrożnie zdjąć boczną klapkę.
1.
Zdjąć pokrywę obudowy jak przedstawiono
2.
narysunku (zamknięcie magnetyczne). Wypiąć
zamknięcie magnetyczne najpierw na dole,
a następnie na górze.
4. Proszę włożyć nowy filtr kombinowany. Aby właściwie włożyć filtr kombinowany, proszę się kierować oznaczeniem bocznych klapek pokazanych
na ilustracji. Proszę umieścić filtr ponad nimi.
2.
5.
Proszę ponownie nałożyć pokrywę obudowy,
jak przedstawiono na rysunku, aż zablokuje się
w sposób słyszalny i widoczny (zamknięcie magnetyczne). Proszę zawiesić zamknięcie magnetyczne najpierw na górze, a następnie na dole.
Proszę włożyć wtyczkę do gniazda zasilania.
6.
Ułożyć kabel tak, aby nie można było się o niego potknąć. Następnie należy przytrzymać przez
5 sekund wciśnięty przycisk AUTO ( ).
godzin pracy jest ponownie wyzerowany.
Jeśli chcieliby Państwo wymieniać filtr kombinowany w ustalonym, spersonalizowanym rytmie czasu
(np. co 6 miesięcy), na górnej krawędzi filtra kombinowanego znajduje się naklejka, na której można
wpisać datę.
84
Licznik
Page 85

8. Czyszczenie i konserwacja
OSTRZEŻENIE
Przed czyszczeniem należy upewnić się, że wtyczka sieciowa oczyszczacza powietrza jest wyjęta
zgniazdka!
8.1 Czyszczenie filtra
Regularne czyszczenie filtra (raz w miesiącu) to warunek higienicznej i bezusterkowej pracy urządzenia.
•
Proszę oczyścić trójwarstwowy filtr nasadką szczotki odkurzacza. W celu przeprowadzenia gruntownego
czyszczenia proszę zdjąć filtr wstępny i również oczyścić nasadką szczotki odkurzacza znajdujący się za
nim filtr z węglem aktywnym i znajdujący się na odwrocie filtr HEPA. Następnie proszę nałożyć filtr wstęp
ny na filtr HEPA.
Filtr z węglem aktywnym Filtr HEPA-H 13
Strona przednia Spód
UWAGA
Trójwarstwowy filtr powinien być wymieniany po 4320 godzinach pracy (patrz rozdział „Wymiana filtra”).
Nie można myć trójwarstwowego filtra.
-
8.2 Czyszczenie czujnika drobnych cząsteczek pyłu
Należy czyścić czujnik drobnych cząsteczek pyłu co 2 mies.
Wskazówka
W przypadku stosowania oczyszczacza powietrza w zakurzonym miejscu może być konieczne częstsze czyszczenie.
W celu wyczyszczenia czujnika należy wyłączyć oczyszczacz pow
ietrza i wyjąć wtyczkę z gniazdka. Otworzyć osłonę po stronie obudowy i wyjąć osłonę.
Wyczyścić czujnik oraz wlot i wylot powietrza za pomocą wilgotnej
pałeczki kosmetycznej.
Następnie osuszyć wszystkie wyczyszczone części za pomocą suchej pałeczki kosmetycznej.
85
-
Page 86

Ponownie zamocować osłonę czujnika drobnych cząsteczek pyłu.
8.3 Czyszczenie obudowy
Obudowę oczyszczacza powietrza należy czyścić ściereczką lekko zwilżoną wodą lub delikatnym roztworem
czyszczącym. Nie należy używać w tym celu rozpuszczalników bądź innych agresywnych środków czyszczących lub szorujących.
8.4 Przechowywanie
Jeśli urządzenie nie jest używane przez dłuższy czas, należy je przechowywać w oryginalnym opakowaniu
w suchym miejscu. Na opakowaniu nie należy kłaść innych przedmiotów.
9. Akcesoria i części zamienne
Części zamienne i części ulegające zużyciu dostępne są pod wskazanym adresem serwisu (wg listy adresowej serwisów). W zamówieniu należy podać odpowiedni numer katalogowy.
Nazwa
Filtr wstępny, filtr kombinowany (HEPA + węgiel aktywny) 693.02
Nr artykułu lub nr katalogowy
10. Postępowanie w przypadku problemów
Problem Przyczyna Rozwiązanie
Nie można włączyć oczyszczacza powietrza.
Niedostateczny przepływ powietrza
Oczyszczacz powietrza pracuje
bardzo głośno
Pokrywę obudowy założono nieprawidłowo.
Trójwarstwowy filtr założono nieprawidłowo.
Zasilacz wtyczkowy nie jest
umieszczony w gniazdku.
Filtry są zabrudzone.
Wlot/wylot powietrza jest zablo
kowany.
We wlocie/wylocie powietrza
znajduje się ciało obce.
Filtry są zapchane.
Filtry założono nieprawidłowo. Proszę prawidłowo założyć filtry.
Oczyszczacz powietrza ustawio-
no na nierównej powierzchni.
Proszę się upewnić, czy pokrywę
obudowy założono prawidłowo.
Proszę się upewnić, czy trójwar
stwowy filtr założono prawidłowo.
Umieścić zasilacz wtykowy
w odpowiednim gniazdku.
Proszę wyczyścić filtry (patrz
rozdział „Czyszczenie i konser
wacja”).
Proszę się upewnić, czy wlot/
wylot powietrza nie jest zablo
kowany.
Proszę usunąć ciało obce z wlo
tu/wylotu powietrza.
Proszę wyczyścić filtry (patrz
rozdział „Czyszczenie i konser
wacja”).
Proszę ustawić oczyszczacz po
wietrza na równej powierzchni.
-
-
-
-
-
-
86
Page 87

11. Utylizacja
Ze względu na ochronę środowiska naturalnego po zakończeniu okresu eksploatacji urządzenia nie
należy go wyrzucać wraz ze zwykłymi odpadami domowymi. Utylizację należy zlecić w odpowied
nim punkcie zbiórki w danym kraju. Urządzenie należy zutylizować zgodnie z dyrektywą o zużytych
urządzeniach elektrycznych i elektronicznych – WEEE (Waste Electrical and Electronic Equipment).
W razie pytań należy zwrócić się do odpowiedniej instytucji odpowiedzialnej za utylizację.
-
12. Dane techniczne
Model LR 310
Napięcie sieciowe patrz tabliczka znamionowa na urządzeniu
Moc 50 W
Wymiary (dł. x szer. x wys.) 388 x 145 x 428 mm
Masa pustego urządzenia 4,5 kg
Światło UV Długość fal 254 nm; żywotność ok. 20000 godzin
Zastosowanie w pomieszczeniach o
powierzchni
Głośność ok. 56 dB (Poziom 3)
Dop. warunki eksploatacji
Klasa bezpieczeństwa
ok. 54 m
Od +5°C do +40°C, ≤90% względnej wilgotności powietrza
(bezskraplania)
Klasa bezpieczeństwa II /
2
13. Gwarancja / Serwis
Firma Beurer GmbH, Söflinger Straße 218, D-89077 Ulm (zwana dalej „Beurer”) udziela gwarancji na ten produkt na następujących warunkach i w poniżej opisanym zakresie.
Poniższe warunki gwarancji nie naruszają ustawowych zobowiązań gwarancyjnych sprzedającego wynikających z umowy kupna zawartej z kupującym.
Gwarancja obowiązuje również w sposób nienaruszający bezwzględnie obowiązujących przepisów
dot. odpowiedzialności.
Firma Beurer gwarantuje bezawaryjne działanie oraz kompletność niniejszego produktu.
Obowiązujący na całym świecie okres gwarancji obejmuje 3 lata/lat, licząc od zakupu nowego, nieużywanego
produktu przez kupującego.
Niniejsza gwarancja dotyczy tylko produktów nabytych przez kupującego jako konsumenta wyłącznie w celach
prywatnych w ramach użytku domowego.
Obowiązuje prawo niemieckie o ile jest to prawnie dopuszczalne.
Jeśli w okresie obowiązywania gwarancji produkt zostanie uznany za niekompletny lub wadliwy w działaniu
zgodnie z poniższymi postanowieniami, firma Beurer bezpłatnie wymieni go lub naprawi zgodnie z niniejszymi
warunkami gwarancji.
Jeśli kupujący chce zgłosić reklamację gwarancyjną, najpierw kontaktuje się z lokalnym dealerem: patrz załączona lista „Service International” z adresami serwisowymi.
Następnie kupujący otrzymuje dalsze informacje dot. rozpatrywania reklamacji gwarancyjnej, np. gdzie wysłać
produkt i jakie dokumenty są wymagane.
87
Page 88

Roszczenie z tytułu gwarancji będzie rozpatrywane tylko wtedy, gdy kupujący może przedłożyć
- kopię faktury/paragon zakupu oraz
- oryginalny produkt
firmie Beurer lub autoryzowanemu partnerowi firmy Beurer.
Niniejsza gwarancja wyraźnie nie obejmuje:
- zużycia wynikającego z normalnego użytkowania lub zużywania się produktu;
- dostarczanych z tym produktem akcesoriów, które zużywają się lub ulegają zużyciu podczas prawidłowego użytkowania (np. baterii, akumulatorów, mankietów, uszczelek, elektrod, źródeł światła, nakładek i
akcesoriów inhalatora);
- produktów, które były używane, czyszczone, przechowywane lub konserwowane w niewłaściwy sposób i/
lub niezgodnie z treścią instrukcji obsługi, a także produktów, które zostały otwarte, naprawione lub zmodyfikowane przez kupującego lub centrum serwisowe nieautoryzowane przez firmę Beurer;
- uszkodzeń powstałych podczas transportu między producentem a klientem lub między centrum serwisowym a klientem;
- produktów, które zostały zakupione jako artykuły grupy B („B-Ware”) lub jako artykuły używane;
- szkód następczych, które wynikają z wady tego produktu (w tym przypadku mogą jednak istnieć roszczenia
z tytułu odpowiedzialności za produkt lub wynikające z innych bezwzględnie obowiązujących przepisów
prawa dot. odpowiedzialności).
Naprawy lub całkowita wymiana w żadnym wypadku nie przedłużają okresu gwarancji.
BEURER GmbH • Söflinger Str. 218 • 89077 Ulm (Germany) • www.beurer.com
www.beurer-gesundheitsratgeber.com • www.beurer-healthguide.com
88
Prawo do pomyłek i zmian zastrzeżone
660.19_LR310_2020-04-22_02_IM1_BEU
 Loading...