

Bernina L 450 operation manual
BERNINA L 460 | L 450
Instruction Manual


Safety Instructions 2
Reading Instructions 4
Front view L 450 / L 460 6
Side view L 450 / L460 7
L 450 7
⦁
Accessory 8
Accessory storage in the looper cover 8
Other accessory 8
⦁
Machine Setup 9
Foot control and power cord 9
Cut-offs bin 9
Extension Table (L 450 optional) 10
Retractable Top Thread Guide 10
Spool Stabilizer 11
Operating Instructions 12
⦁
Control elements 12
Power switch 12
Looper cover 12
Sewing table 12
Foot control 13
Needle up/down (L 460) 13
Safety LED L 460 13
Handwheel and handwheel position indicator window 14
Two step presser foot lifter with front foot lift 14
Changing the presser foot 14
FHS Free hand system L 460 15
Changing the needle 15
Needle Inserter 16
Needle Threader 16
Needle pad 16
Knife 17
Thread cutter 17
Seam Guide right 17
⦁
Needle and Thread 18
Needle 18
Needle condition 18
Needle, thread and application table 18
Needle and thread matching 19
Thread selection 19
Adjusting and Setting 20
Stitch length 20
Cutting width 20
Knife suspension 20
mtc Thread control (Micro Thread Control) 21
Presser foot pressure 21
⦁
Differential Feed adjustment 22
Gathering 22
Stretching 22
Threading and Sewing 23
⦁
Stitch overview 23
⦁
Threading - General information 24
Threading preparation 24
Thread pretension 24
Replacing thread spools 24
⦁
4-/3-thread overlock (Stitch No. 1, 3-8, 30) 25
Threading the upper looper (blue) 25
Threading the lower looper (red) 26
Threading the right needle (green) 27
Threading the left needle (yellow) 28
3-thread overlock 29
⦁
Upper looper converter (Stitches 2, 9-15) 29
L 460
L 450
Contents
⦁
Narrow seam, Rolled Hem and Picot stitch
(Stitch 7, 8, 13, 30) 30
recommended thread 30
⦁
Test sewing 31
⦁
Adjusting thread tensions 32
4-/3-thread overlock 32
⦁
Sewing examples 33
Securing a Seam 33
Seam begin 33
Seam end 33
Securing the thread chain 34
Undoing stitches 34
Sewing corners 34
Decorative Effects 35
Differential feed applications 36
Sewing in cord / tape 36
Maintenance 37
⦁
Replacing the upper knife 37
⦁
Cleaning and Oiling 37
⦁
Troubleshooting Guide 38
Optional Accessories 39
⦁
Blind stitch foot 39
⦁
Elasticator Foot 40
⦁
Multi-purpose Foot 41
Piping 41
Pearls along the fabric edge 41
Pearls along a fabric fold. 41
⦁
Gathering foot 42
Appendix 43
⦁
Technical Summary 43
L 450 43
L 460 43
Thread Chart 45
⦁
3-thread overlock (LN) 47
⦁
3-thread overlock (RN) 48
⦁
3-thread flatlock (LN) 49
⦁
3-thread flatlock (RN) 50
⦁
3-thread narrow seam 51
⦁
3-thread rolled hem 52
⦁
2-thread overlock (LN) 53
⦁
2-thread overlock (RN) 54
⦁
2-thread flatlock (LN) 55
⦁
2-thread flatlock (RN) 56
⦁
2-thread rolled hem 57
⦁
2-thread overlock (LN) 58
⦁
2-thread overlock (RN) 59
⦁
3-thread picot stitch 60
1
L 460
L 450
Safety Instructions
Safety Instructions
IMPORTANT INFORMATION
Precautions should always be followed, including
the following:
Read all the instructions before using this machine.
In general when the machine is not in use, it
should be disconnected from the electricity
supply.
DANGER!
As a protection against electrical shock:
1. The machine should never be left unattended
when plugged in.
2. Always unplug this machine from the electrical
outlet after using and before cleaning.
3. LED Radiation. Do not view directly with optical
instruments. Class 1M LED product.
WARNING!
As a protection against burns, fire, electric shock or
injury to persons:
1. Use this machine only for purposes as
described in this manual. Use only attach
ments, accessories and parts recommended
by the manufacturer.
2. Do not allow this machine to be used as a toy.
Close attention is necessary when this machine
is used by or near children. The machine is not
intended for use by persons (and children) with
reduced physical, sensory or mental capabili
ties or lack of experience and knowledge.
Unless they have been given supervision or
instruction concerning use of the machine by a
person responsible for their safety. To ensure
children do not play with the machine they
must be supervised.
Never operate this machine if:
⦁
the cord or the plug are damaged,
⦁
it is not working properly,
⦁
it has been dropped or damaged,
⦁
it has fallen into water.
-
-
3. Return the machine to your local authorized
BERNINA dealer for examination or repair.
4. Never operate the machine with any air open
ings blocked. Keep ventilation openings of the
machine free from the accumulation of lint,
dust and loose cloth.
5. Keep fingers away from all moving parts. Spe
cial care is required around the sewing needle
and the knife.
6. Never insert any objects into any openings on
the machine.
7. Do not use the machine outdoors.
8. Do not operate the machine where aerosol
products (sprays) or oxygen are being used.
9. Do not pull or push the fabric while stitching.
This can result in needle breakage.
10. Switch the machine off «0» when making any
adjustments in the needle area, such as
threading the needle, changing the needle,
threading the looper, or changing the presser
foot.
11. Always unplug the machine from the electrical
outlet when removing covers, when covers are
opened to raise the knife or thread the loopers,
when lubricating or when making any other
user servicing adjustments mentioned in the
instruction manual.
12. Do not use bent needles.
13. Always use the original BERNINA stitch plate.
The wrong stitch plate can cause
needle breakage.
14. This machine is provided with double insula
tion (except for USA and Canada). Use only
original spare parts. See instructions for ser
vicing of double-insulated products.
-
-
-
-
2
Safety Instructions
SERVICING DOUBLEINSULATED PRODUCTS
L 460
L 450
In a double-insulated product two systems of insulation are provided instead of grounding. No
grounding means is provided on a double-insulated
product, nor should a means for grounding be
added to the product. Servicing a double-insulated
product requires extreme care and knowledge of
the system and should be done only by qualified
service personnel. Replacement parts for a dou
ble-insulated product must be identical to the original parts in the product. A double-insulated product
is marked with the words: «Double insulation» or
«Double insulated».
The symbol
may also mark such a product.
-
LIABILITY
No liability will be assumed for any possible damage which arises from misuse of this machine.
This machine is intended for household use only.
This machine meets the European Standard
2004/108/EC concerning the electromagnetic toler
ance.
-
Environmental Protection
BERNINA is committed to the protection
of the environment. We strive to minimize
the environmental impact of our products
by continuously improving product design
and our technology of manufacturing.
When your machine won't be used any
more, dispose this product in an environmentally responsible way according to
the national directive. Do not throw away
this product with your household waste.
In case of doubt, please contact your
local BERNINA dealer.
If the machine is stored in a cold room, it
should be brought to a warm room about
one hour before use.
-
Please find the latest version of your
instruction manual at www.bernina.com
KEEP THESE INSTRUCTIONS SAFE!
3
L 460
L 450
Reading Instructions
DANGER!
Very important!
Risk of injury!
Tips and hints!
L 460
L 450
The tag is not always at the top of the page but
also at the top of the description!
Reading Instructions
Hint for L 450 users
All pictures show the L 460 except for specifically
marked ones.
The operation of the L 450 is identical to the L 460
unless it is specified otherwise.
Hint for US customers
Overlockers as referred to in this manual are widely
called "sergers" in the USA.
All rights reserved
For technical and product improvement reasons, the machine's features, parts and accessory are subject to unannounced
changes and alterations at any time. The included accessories can differ from country to country.
4

L 460
L 450
Welcome
Dear BERNINA customer
Congratulations on your decision to buy the BERNINA overlocker/serger!
It is made to the highest standards and we hope it will give you countless hours of satisfying sewing time. Whether your project is garment sewing, home decoration or even patchwork/quilting, by cutting, sewing and neatening in one fast and smooth operation your
BERNINA overlocker/serger will give your work a professional look.
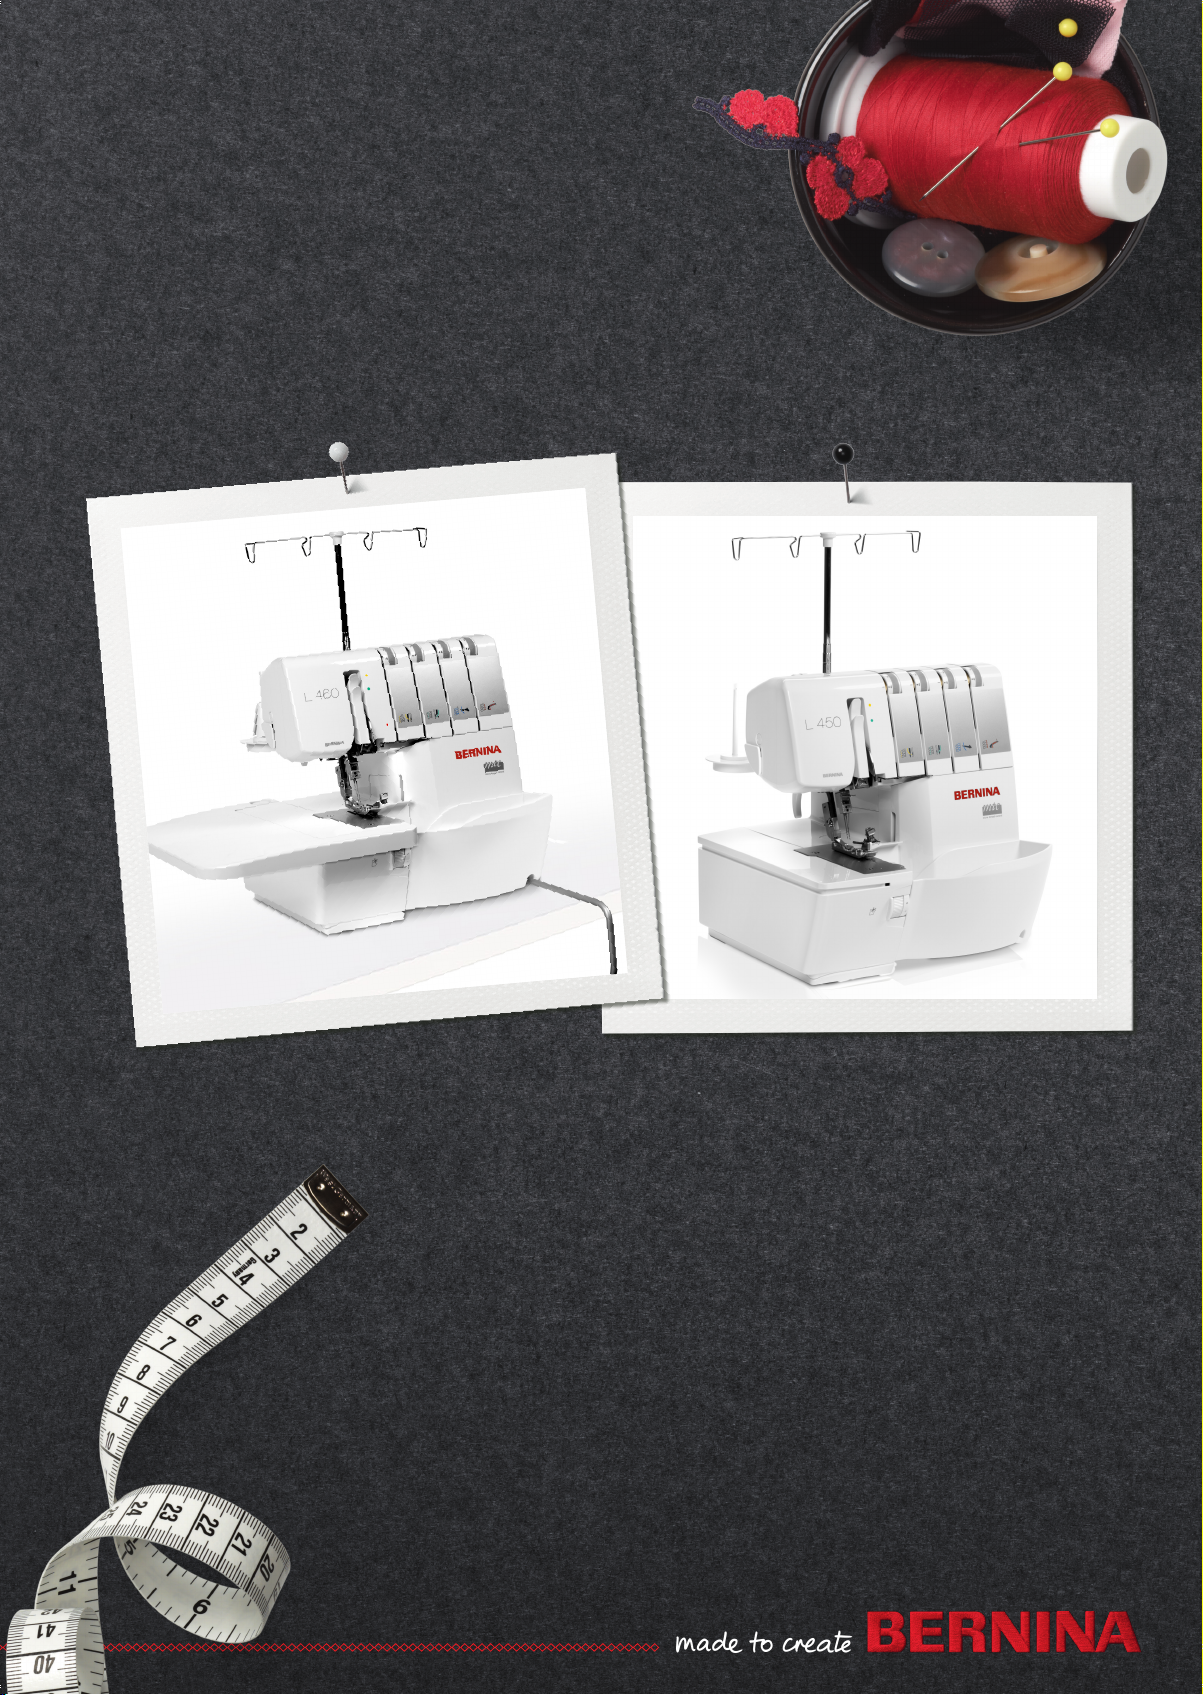
Your BERNINA L 460 / L 450 is a 4-/3-/2-thread overlocker/serger particularly well suited
for sewing stretch and thin fabrics. Buying a BERNINA overlocker/serger not only allows
you to perform these basic functions to perfection, but furthermore you are supplemented
with many exclusive BERNINA features, making your sewing experience even more joyful. Depending on the actual model such features are the BERNINA Free-Hand System,
electronic motor control for precise sewing, an automatic needle stop and last but not least
the patented "mtc" Micro Thread Control.
Make sure to study this instruction manual in order to get full benefit of all these functions.
Should you require further assistance, your BERNINA dealer will be a good choice to visit.
He also carries a selection of optional accessories, which extends the application range
of your BERNINA overlocker/serger even further. We are happy to welcome you in the
BERNINA sewing family and wish you many hours of happy overlocking/serging and
wonderful sewing experiences with your BERNINA L 460 / L 450.
Peter Horisberger, Product Manager,
BERNINA International AG – CH-8266 Steckborn / Switzerland
5

L 460
L 450
Machine overview
Front view L 450 / L 460
28
25
26
27
987
10
6
5
3
4
3
2
11
12
13
14
15
16
17
1
1 Sewing table
2 Presser foot release lever
3 Needle holder
4 Presser foot lifter
5 Thread Cutter
6 Dual LED Sewing Light
7 Presser foot pressure regulator
8 Retractable Top Thread Guide
9 Thread tension adjustments (yellow)
10 Thread tension adjustments (green)
11 Thread tension adjustments (blue)
12 Thread tension adjustments (red)
13 Thread Guide
14 Threading Chart
15 Thread Guide Looper
16 Handwheel Position Indicator
22
2324
17 Needle Pad
18 Looper Cover
19 Accessories Storage
20 Safety indicator
21 Upper looper
22 Cutting Width dial
23 Presser Foot
24 Stitch Plate
25 Thread Guide Needle Holder
26 Needle Checking Window
27 Set screw
28 Thread Guide
29 Micro Thread Control lever
30 Rolled Hem Selection lever
31 Knife guard
32 Knife
2021
19
33 Lower looper
34 Thread pretension
35 SpoolStabilizer
36 Thread Stand
37 Stitch Length dial
38 Differential dial
39 Power switch
40 Power/Foot Control Socket
41 Handwheel
42 Looper Cover
43 Lower looper threader lever
44 Knife on/off
45 Cutting Width Indicator
46 Power Control Socket
47 Foot Control Socket
48 Kneelifter Socket
18
6
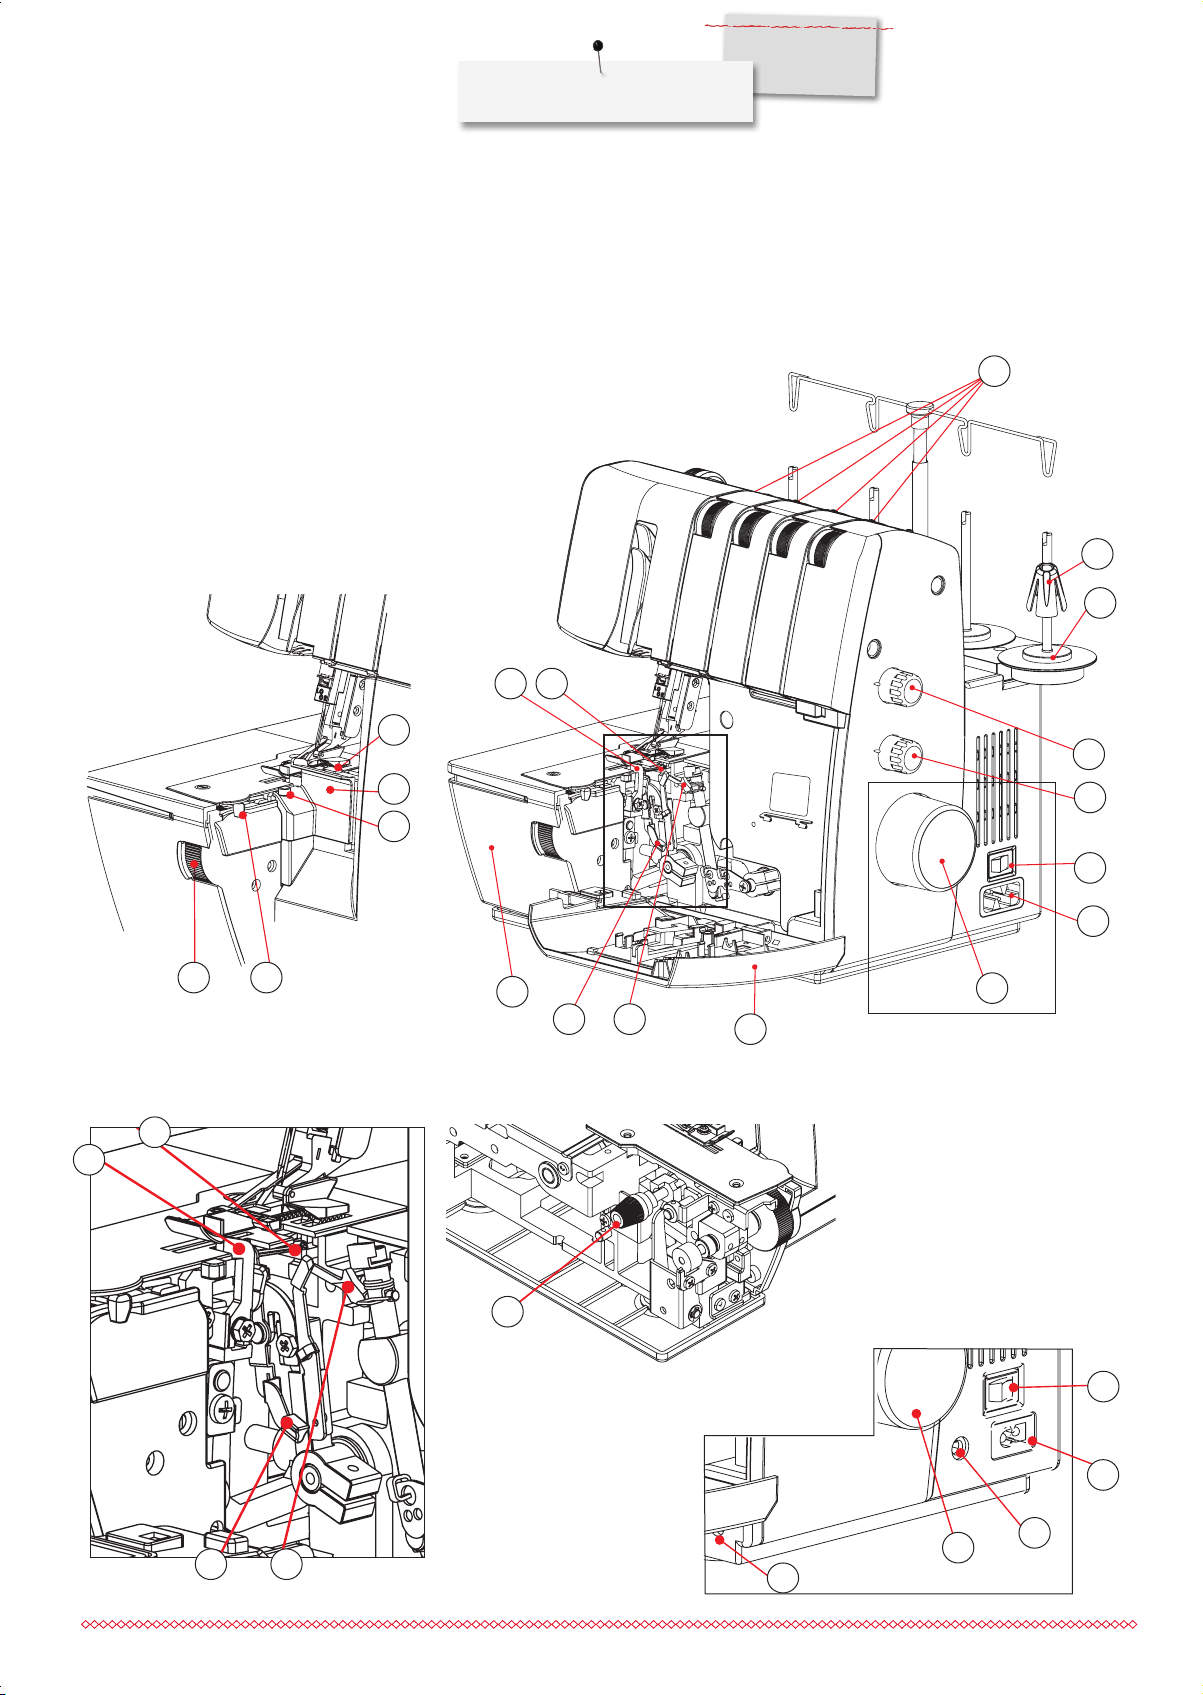
Side view L 450 / L460
L 460
L 450
Machine overview
34
35
36
32
33
22
29
45
31
30
32
33
37
38
39
40
1
2143
42
L 450
41
44
39
L 460
46
2143
48
41
47
7
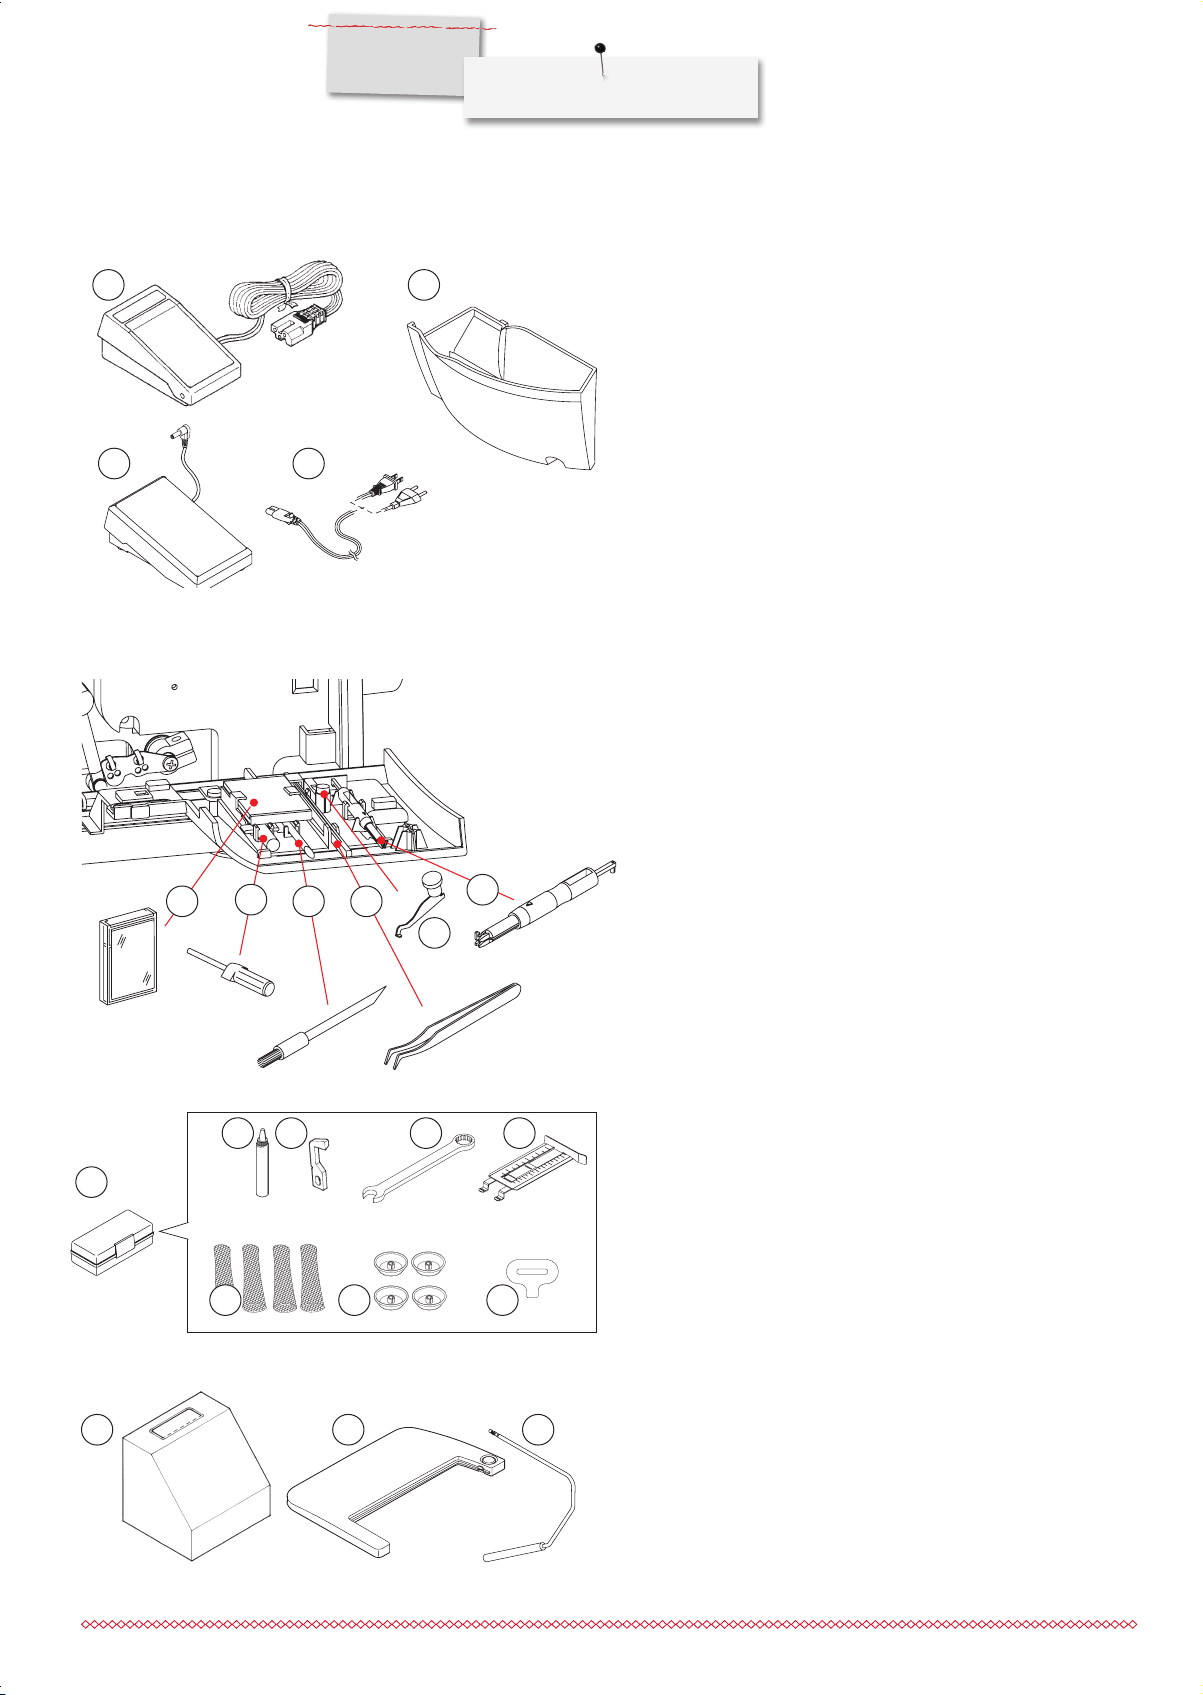
Accessory
L 460
L 450
Machine overview
1
4
1 Foot Control / Power Cord (L 450)
(Typ YC-483N for 230V or YC 482E for 120V)
2 Foot Control (L 460 - BERNINA Typ LV 1)
3 Power Cord (L 460)
4 Cut-offsbin
2
3
Accessory storage in the looper cover
5 Needle set 130/705H (2x No.70, 3x No.80)
6 Hexagon screw driver (1.5 mm)
7 Brush
8 Tweezers
9 Upper looper converter
10 Needle Threader / -Inserter
6
7
5
1312 14
11
16
19 20 21
8
17
10
9
15
18
Other accessory
11 Accessory box
12 Oiler
13 Spare knife
14 Screw driver
15 Seam Guide right
16 Spool net (4x)
17 Thread cap (4x)
18 Screw driver
19 Dust cover
20 Extension Table (L 450 optional)
21 Kneelifter (FHS) (L 460)
8

Machine Setup
Foot control and power cord
L 460
L 460
L 450
Machine Setup
Connection for L 460
⦁
3
2
1
Insert the plug of the foot control into the respective sockets (1).
⦁
Insert the plug of the power cord into the respective sockets (2).
⦁
The power switch (3) turns the machine and the sewing light
on/off.
1 Foot Control Socket
2 Power Control Socket
3 Power switch
L 450
Cut-offs bin
3
Connection for L 450
⦁
Insert the plugs of the foot control / power cord into the respective sockets (4).
⦁
4
Insert the power plug into the wall outlet.
⦁
The power switch (3) turns the machine and the sewing light
on/off.
3 Power switch
4 Power/Foot Control Socket
Polarized plug information (Canada/USA only)
Polarized plug information (Canada/USA only) This appliance has
a polarized plug (one blade wider than the other). This plug will fit
in a polarized outlet only one way to reduce the risk of electrical
shock. If the plug does not fit fully in the outlet, reverse the plug. If
it still does not fit, contact a qualified electrician to install the proper
outlet. Do not modify the plug in any way.
A
Make sure that the looper cover is closed before
you attach the cut-offs bin.
1
Clip the cut-offs bin into the openings on the looper cover. It
catches the cutoff fabric as you sew. This keeps your working area
B
C
2
neat and tidy.
⦁
Position the connection bar (2) in the opening (C). Insert the
two pins (1) into the respective openings (A,B) and let it snap
into place.
⦁
When storing the machine, leave the cut-offs bin attached for
storing the foot control.
1 Upper pins
2 Lower pin
9
L 460
L 450
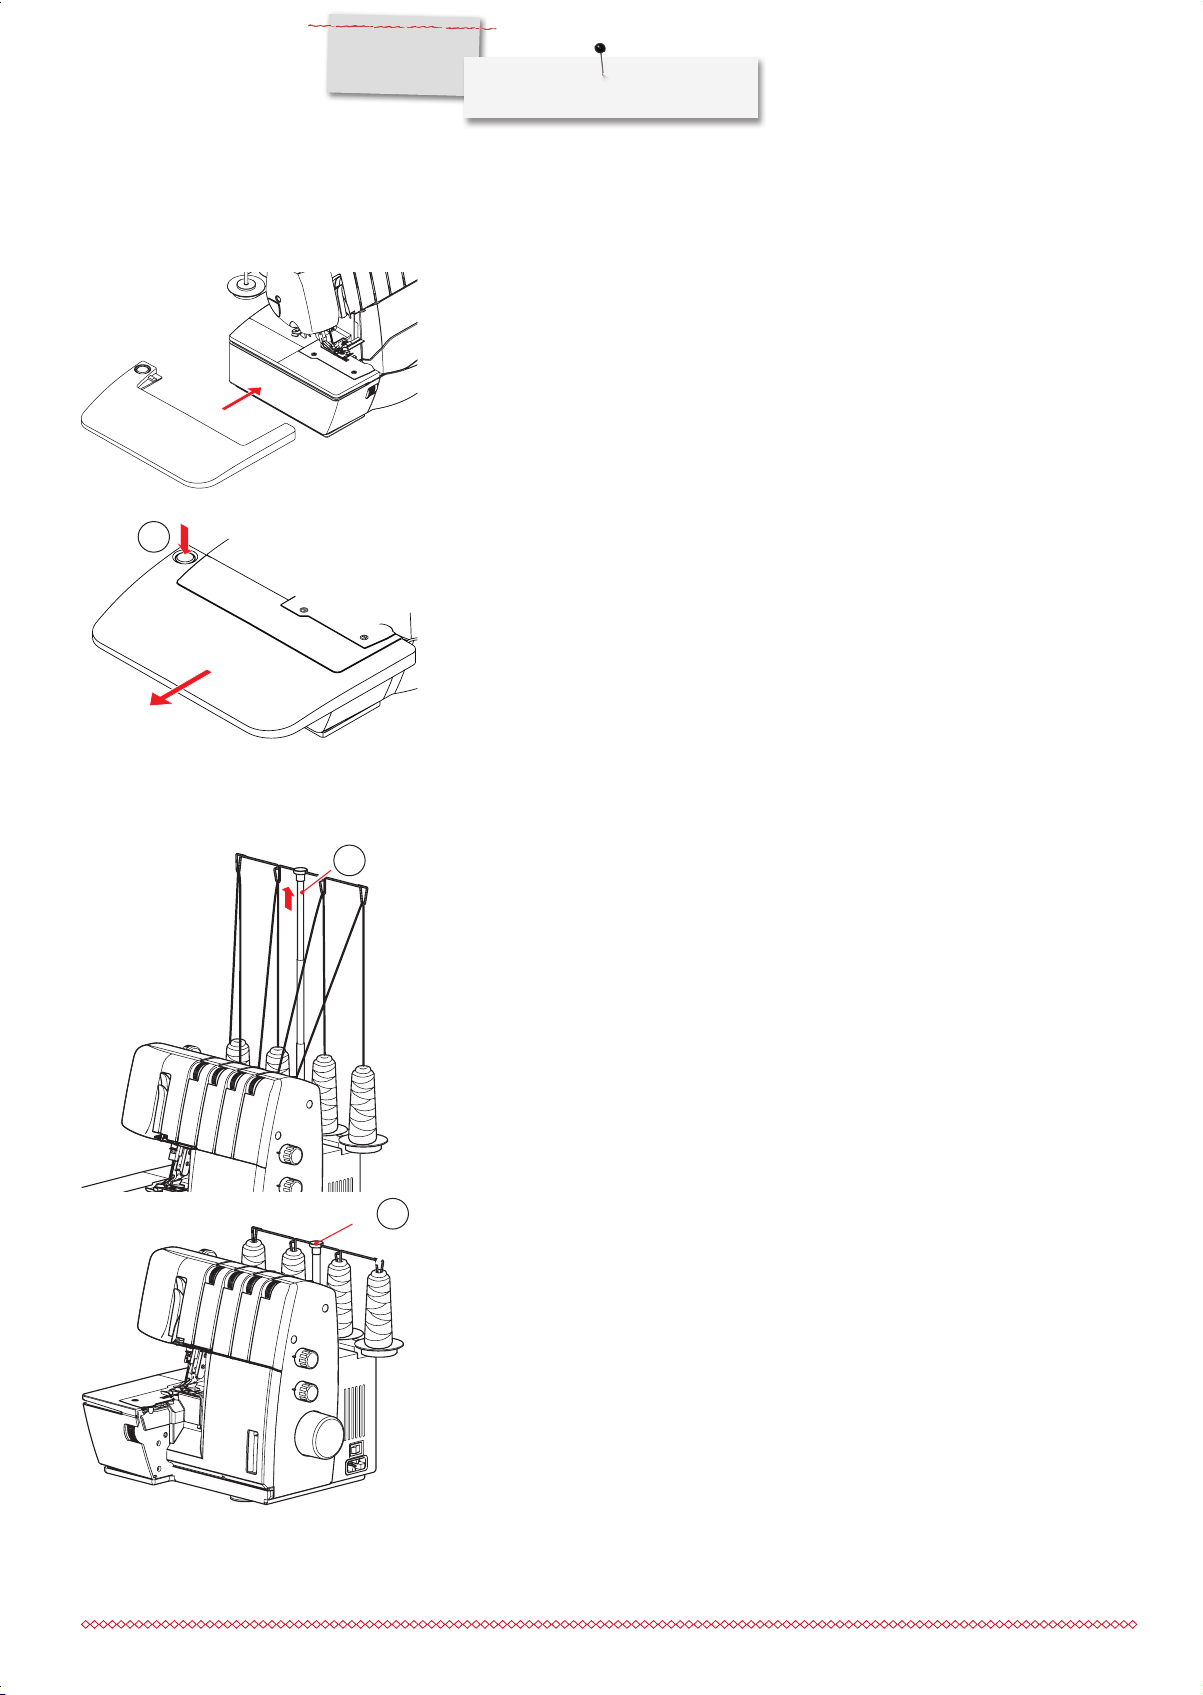
Extension Table (L 450 optional)
1
Machine Setup
The extension table provides a large working surface for your sewing projects.
⦁
To attach, slide the extension table from the left side horizontally along the ditch until
it engages.
⦁
To remove, slide the table to the left side while pushing the release button at the back
of the table.
1 Release button
Retractable Top Thread Guide
1
⦁
⦁
⦁
⦁
1 Thread Guide
1
Pull up the retractable thread stand fully, turning it slightly until the two positioning pins
engage. This will align the Thread Guide (1) parallel to the Thread Stand.
Make sure the lower part of the telescopic support rod (2) is pulled out of the housing
all the way to achieve the optimum height.
When storing the overlock machine, the base of the retractable thread stand can be
pushed back into the housing.
For transportation the thread guides hold the thread spools in place by bringing down
the stand as illustrated.
10
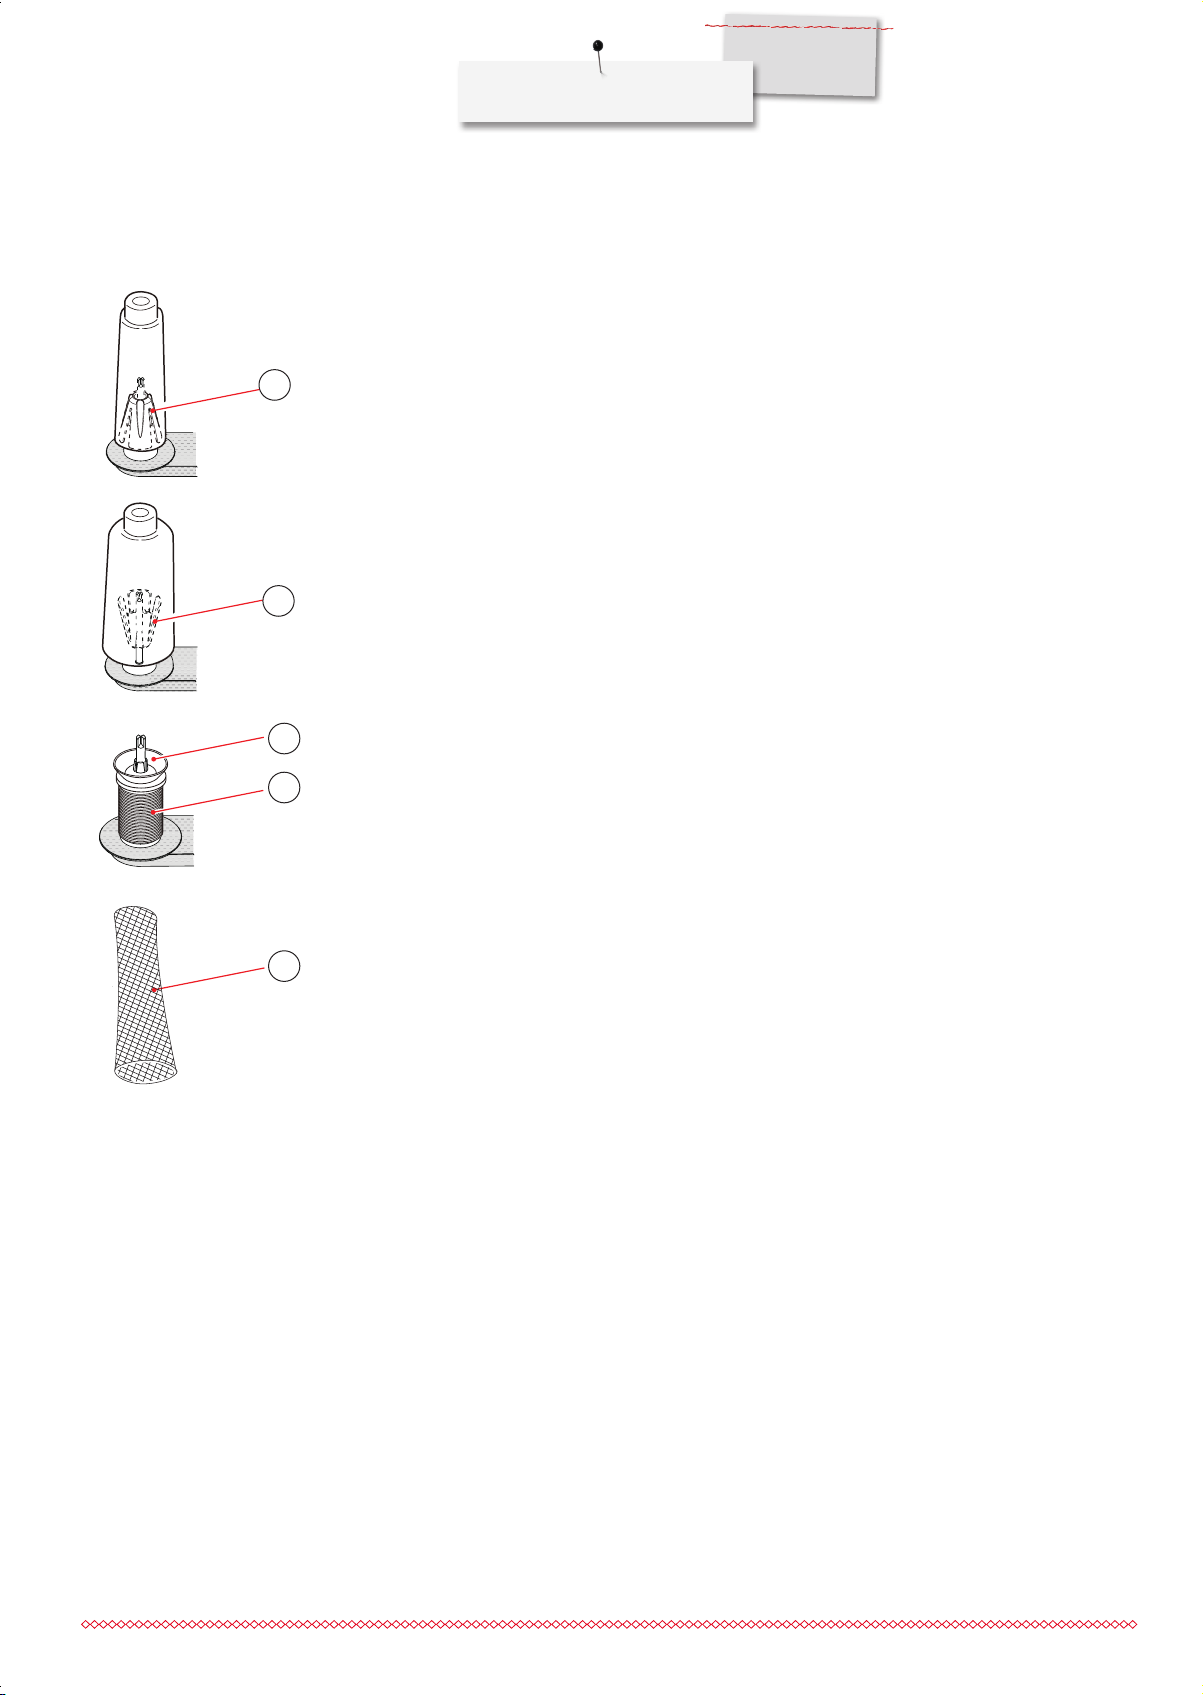
Spool Stabilizer
L 460
L 450
Machine Setup
Spool stabilizer for cones
With small cones the Spool stabilizer (1) is used with the narrow end upwards.
With large cones the Spool stabilizer (2) is used with the narrow end downwards.
1
2
3
4
Spool caps for domestic type spools
For standard type spools, use the spool cap (3).
Spool net
Polyester or bulky nylon threads become loose while unwinding. To keep consistent feeding of such threads, pull the spool net over the spool.
1 small thread cone with Spool stabilizer
2 large cone with Spool stabilizer upside down
3 Spool cap
4 Thread spool
5 Spool net
5
11
L 460
L 450
Operating Instructions
Control elements
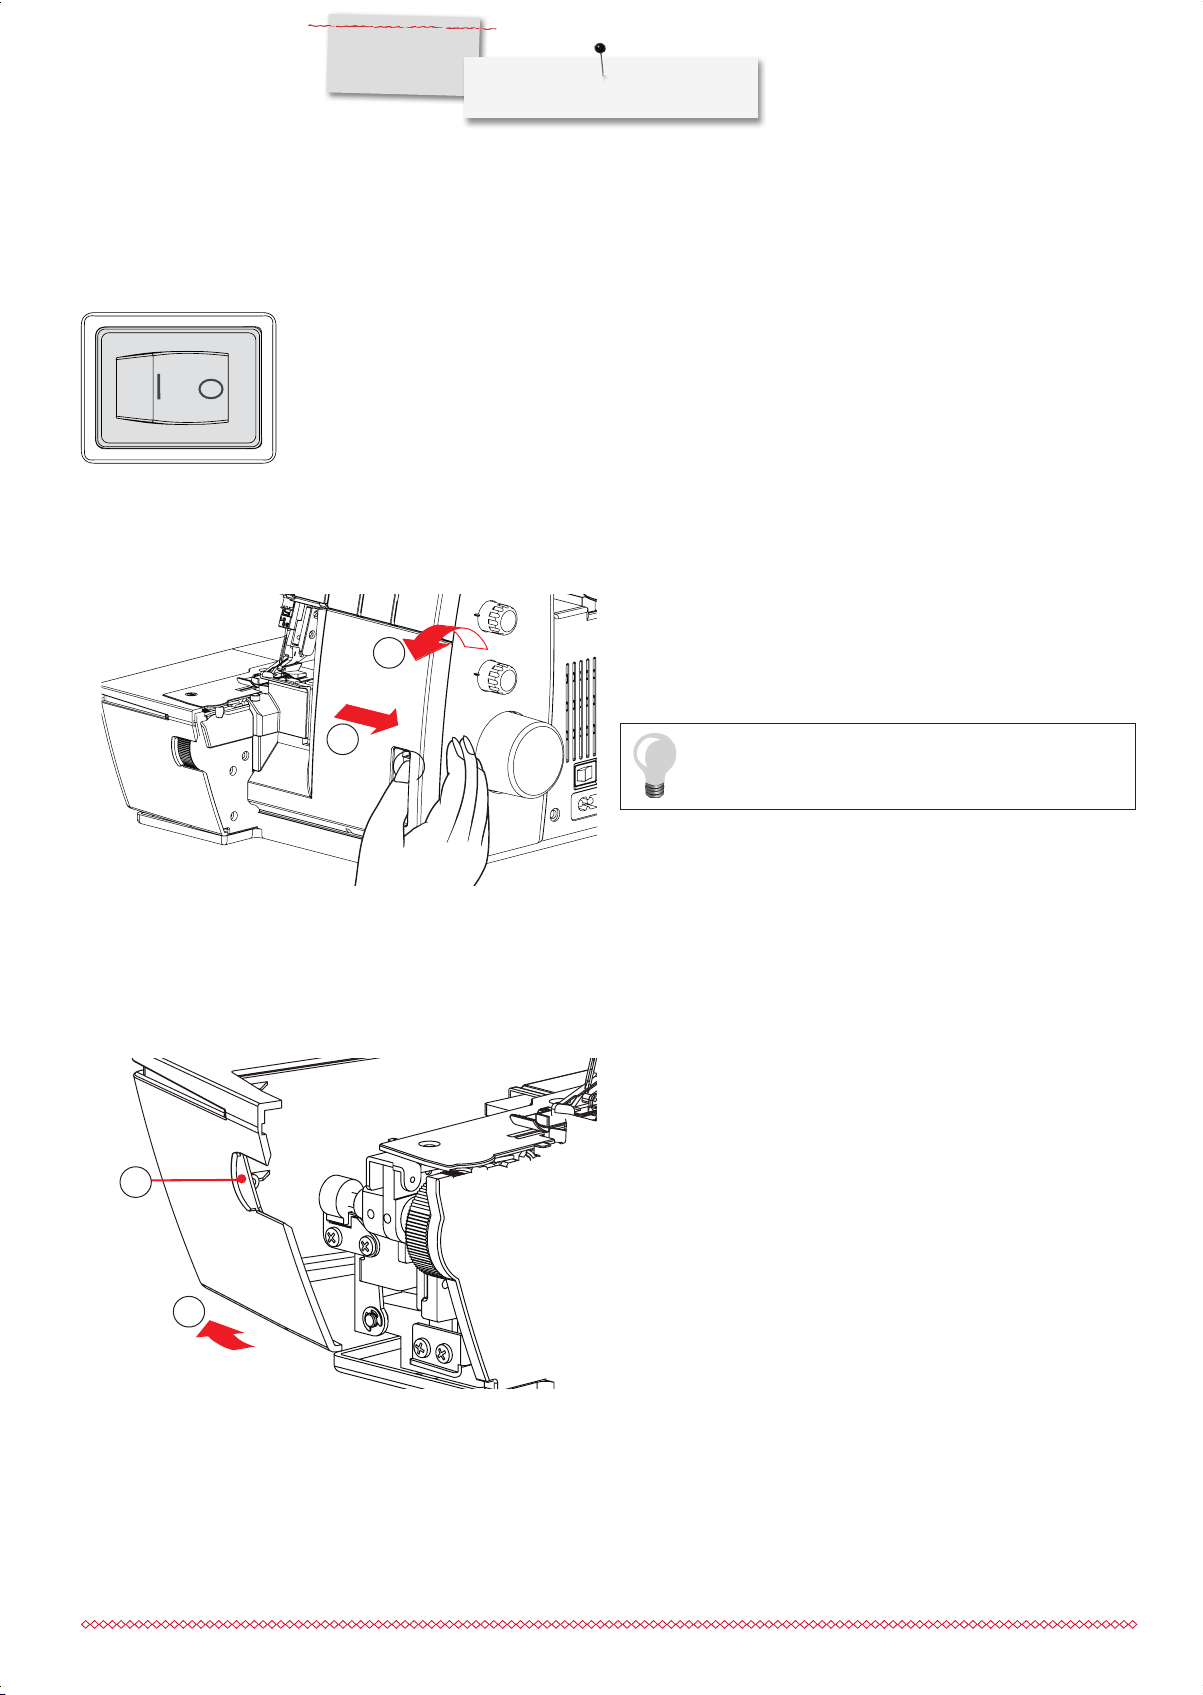
Power switch
Looper cover
Operating Instructions
The power switch controls both the machine power and the sewing light. When leaving the
machine unattended, or servicing the machine, switch the machine off, and remove the
power cord from the wall outlet.
⦁
To open the looper cover, pull it to the right and flip it downwards.
2
⦁
To close the looper cover, flip it upwards and push it to the left.
It engages automatically.
Sewing table
1
2
1
1
1 Grip on the sewing table
2 Opening the sewing table
The cut-offs bin needs to be removed before the looper
cover is opened.
⦁
To open the sewing table, hold onto the grip near the cutting
width dial (1) and push it to the left (2).
⦁
To close the sewing table, swivel it to the right until it engages.
12

Foot control
Needle up/down (L 460)
L 460
L 450
Operating Instructions
⦁
The pressure on the foot control regulates the sewing speed.
L 460
Safety LED L 460
L 460
After sewing, the needle always stops at its highest position.
⦁
Adjust the up/down position of the needle by sinking the heel back on the foot control.
When the Safety LED is activated, the machine will not run.
Reasons and actions:
►
The looper cover is open.
⦁
Make sure that the looper cover is closed properly.
►
The sewing table is open.
⦁
Make sure that the sewing table is closed properly.
►
The presser foot is up
⦁
Make sure that the presser foot is lowered properly. Do not lift the presser foot
while the machine is in operation.
If overheating should occour, the motor will be cut off and the Safety LED will flash.
►
Switch off the machine for 10 - 15 Minutes to cool down. Afterwards sewing can be
continued.
13
L 460
L 450
Operating Instructions
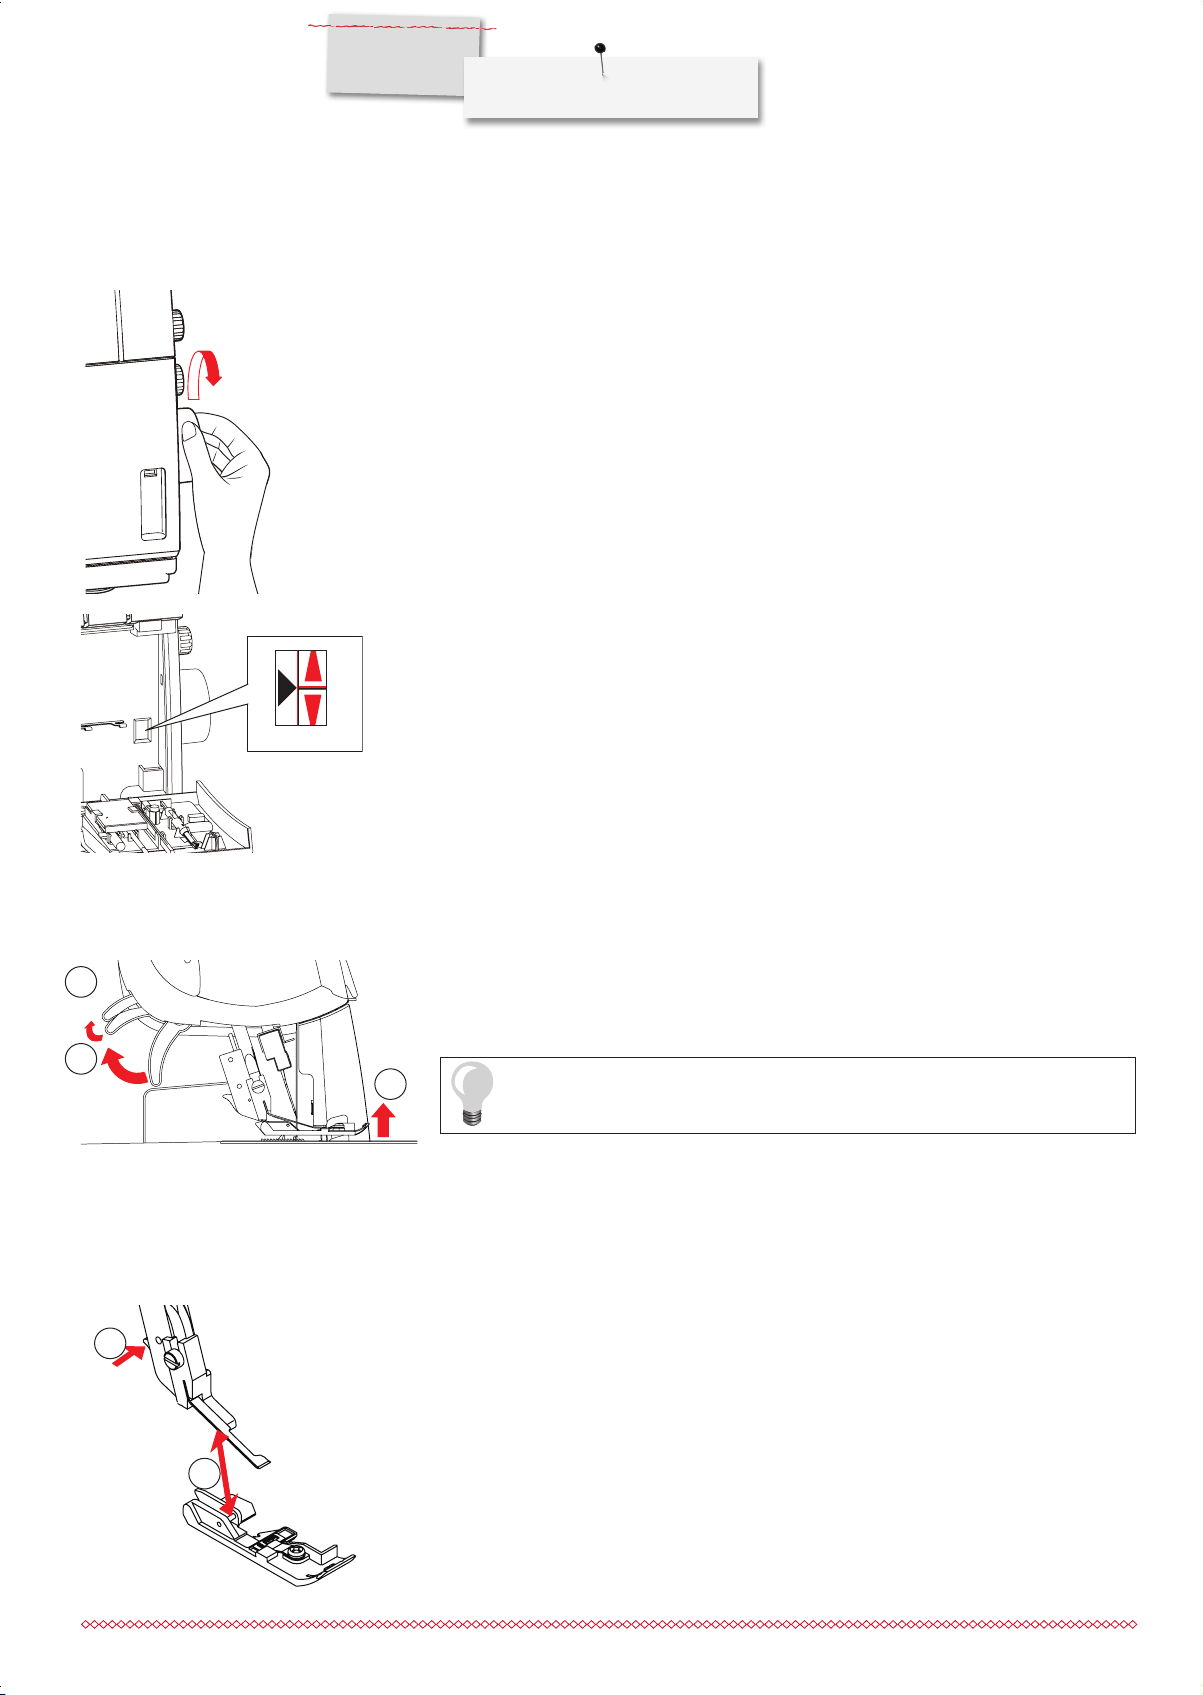
Handwheel and handwheel position indicator window
⦁
The handwheel turns counter-clockwise.
⦁
Open the looper cover to check the handwheel position indicator. Then set the handwheel to threading position.
►
With the L 460, the needle stops at threading position automatically after sewing.
⦁
The needle and the looper are at the threading position (high), when the red bar on
the handwheel is aligned with the black triangle in the handwheel position indicator.
Two step presser foot lifter with front foot lift
⦁
2
1
3
To raise the presser foot, push up the presser foot lifter until it engages (1).
⦁
Press the presser foot lifter even further (2) for an extra raise of the presser foot and
to lift the tip (front foot lift).
1 Lifter position 1
2 Lifter position 2
3 Front foot lift
As soon as the presser foot is lifted, the thread tension discs release automatically and allow safe threading.
Changing the presser foot
4
5
14
Make sure that the needle is in the highest position.
⦁
Raise the presser foot.
⦁
Press the presser foot release lever (4) to release the presser foot and remove it.
⦁
To attach the foot, place it under the shaft.
⦁
The groove in the shaft must line up exactly with the presser foot pin (5).
⦁
Lower the shank and the presser foot engages.
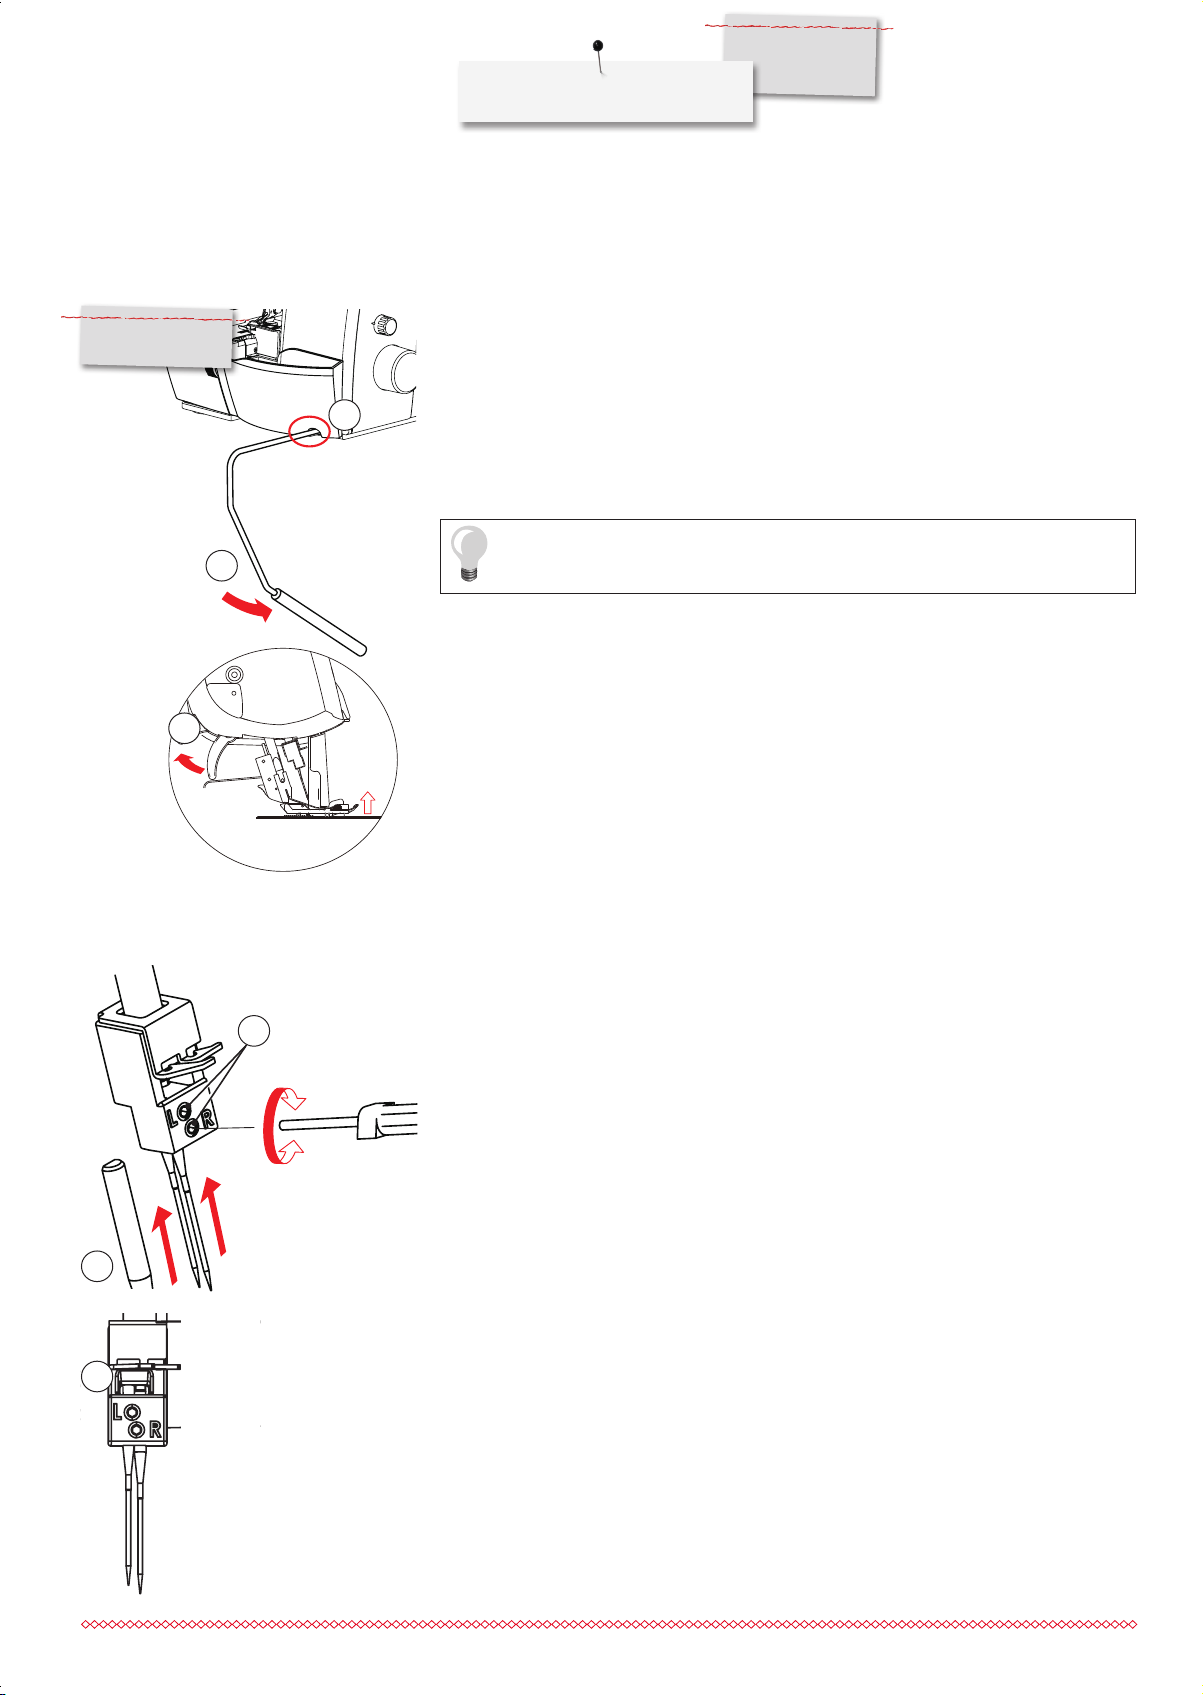
FHS Free hand system L 460
L 460
2
L 460
L 450
Operating Instructions
The Free Hand System lever allows raising the presser foot without using the hands.
⦁
Insert the FHS lever into the FHS Connection (1).
⦁
Pushing the FHS lever to the right with the knee (2) raises the presser foot.
⦁
Wurde der Nähfuss mit dem Nähfussheber angehoben (3), kann er mit dem Kniehebel
gesenkt werden, in dem dieser ganz nach rechts gedrückt und langsam losgelassen
1
wird.
Die seitliche Position des Kniehebels kann durch ein BERNINA-Fachgeschäft
etwas angepasst werden.
3
Changing the needle
1
1 Kneelifter Socket
2 Operating direction
3 Raising the presser foot
⦁
Lower the presser foot.
⦁
Raise the needle bar to its highest position by turning the handwheel counter-clockwise.
⦁
Loosen the needle set screw and remove the needle. In doing so, use the 1.5mm hex
screw driver which is provided in the looper cover.
⦁
Insert the new needle (flat side to the back) into the needle holder and push it all the
way up. Use the needle checking window (3) to check the needle position.
⦁
Tighten the set screw.
1 Set screws
2 Needle (flat side to the back)
3 Needle checking window
2
3
Use needles of the system 130/705H. „Needle and Thread“ see page 18.
15
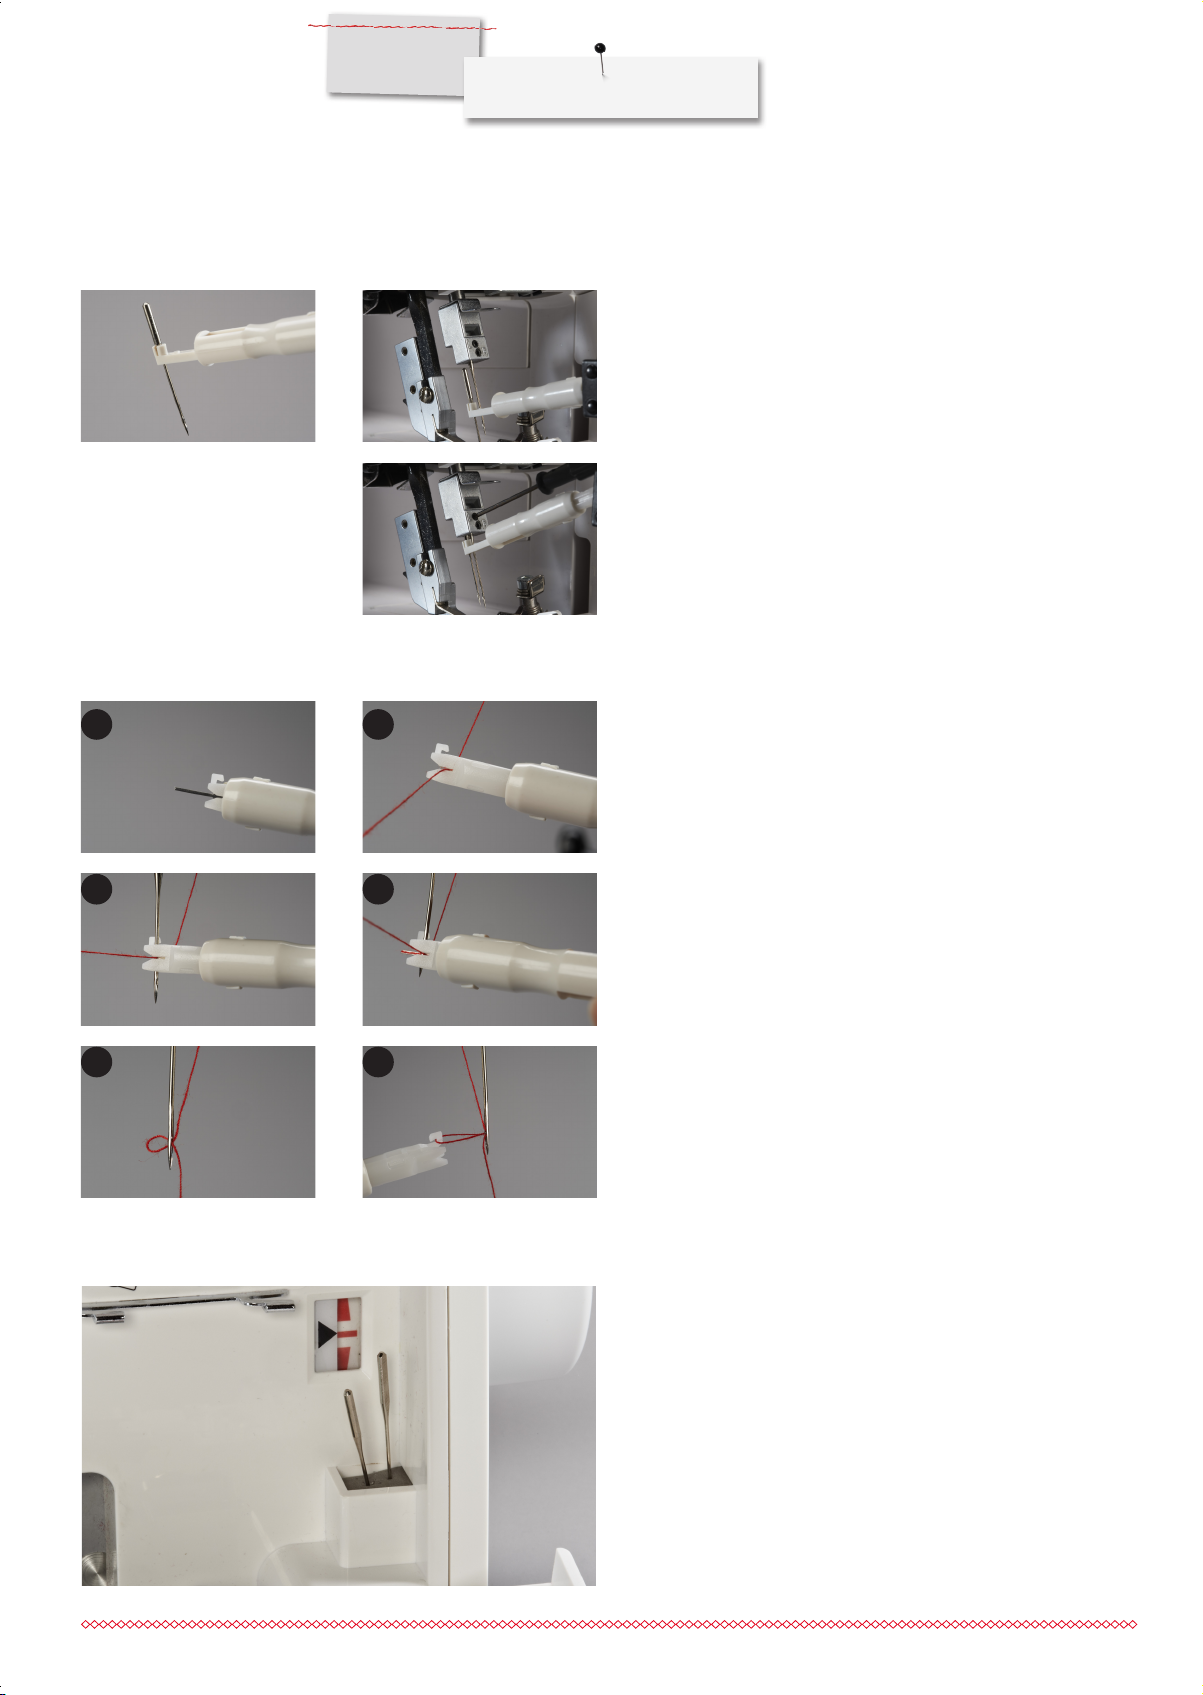
Needle Inserter
L 460
L 450
Operating Instructions
To handle the needle conveniently use the Needle Threader /
-Inserter which is provided in the Accesssories Storage.
⦁
Sliding the Needle Inserter over the needle before loosening
the set screw avoids dropping the needle.
⦁
The new needle is held in place by the Needle Inserter while
inserting and tightening the screw.
Needle Threader
C D
E F
BA
Threading the needle
A Metal rod in Y-shaped threader
B Hold the needle threader with the triangle shaped mark
upwards and guide the thread horizontally through the
Y-shaped slot.
C While gently pulling the thread end, push the nose of the nee-
dle threader onto the needle shaft and start sliding down.
Please Note: Push the Threader only gently towards the needle in order not to damage the metal rod.
D When having reached the needle eye, push, so that the metal
rod slides through the eye, taking along the thread.
E By slowly retracting the needle threader, a thread loop will be
left behind the needle.
F Pull the thread end completely through the eye and place the
thread end under the presser foot.
Needle pad
16
In the convenient needle pad you can store needles temporarily if
only one of them is used or if special needles are inserted.

Knife
1
L 460
L 450
Operating Instructions
Deactivating the knife
⦁
Open the sewing table and the looper cover.
⦁
Press the knife activating knob on/off (1) und turn clockwise (2) until the knife engages
at the lower position.
⦁
Close the sewing table and the looper cover.
2
3
Activating the knife
⦁
Open the sewing table and the looper cover.
⦁
Press the knife activating knob on/off (1) und turn counter-clockwise (2) until the knife
engages at the upper position.
⦁
Close the sewing table and the looper cover.
When working with lowered knife, make sure that the fabric edge is not wider
than the selected cutting width. Otherwise the upper looper and the needle can
be damaged.
Thread cutter
Seam Guide right
⦁
After sewing, bring the thread up and pull it over the cutter from back to front.
⦁
Pull the thread down to cut it.
⦁
The chain of thread will be clamped in the thread cutter to be ready for the next piece
of fabric.
⦁
Open the sewing table.
⦁
Attach the Seam Guide by adjusting the two hooks on the right
side to the Stitch Plate and then push the Seam Guide down to
the left.
⦁
Sliding the fabric along the right side of the guide provides
constant a cutting distance from the raw edge of the fabric.
⦁
The cutout (3) in the center of the lower mounting bar indicates
the position of the left needle. Scales are provided in mm (1)
and inches (2).
1
1 Scale in mm
2 Scale in inches
2
3
3 Cutout
17
Needle and Thread
Needle
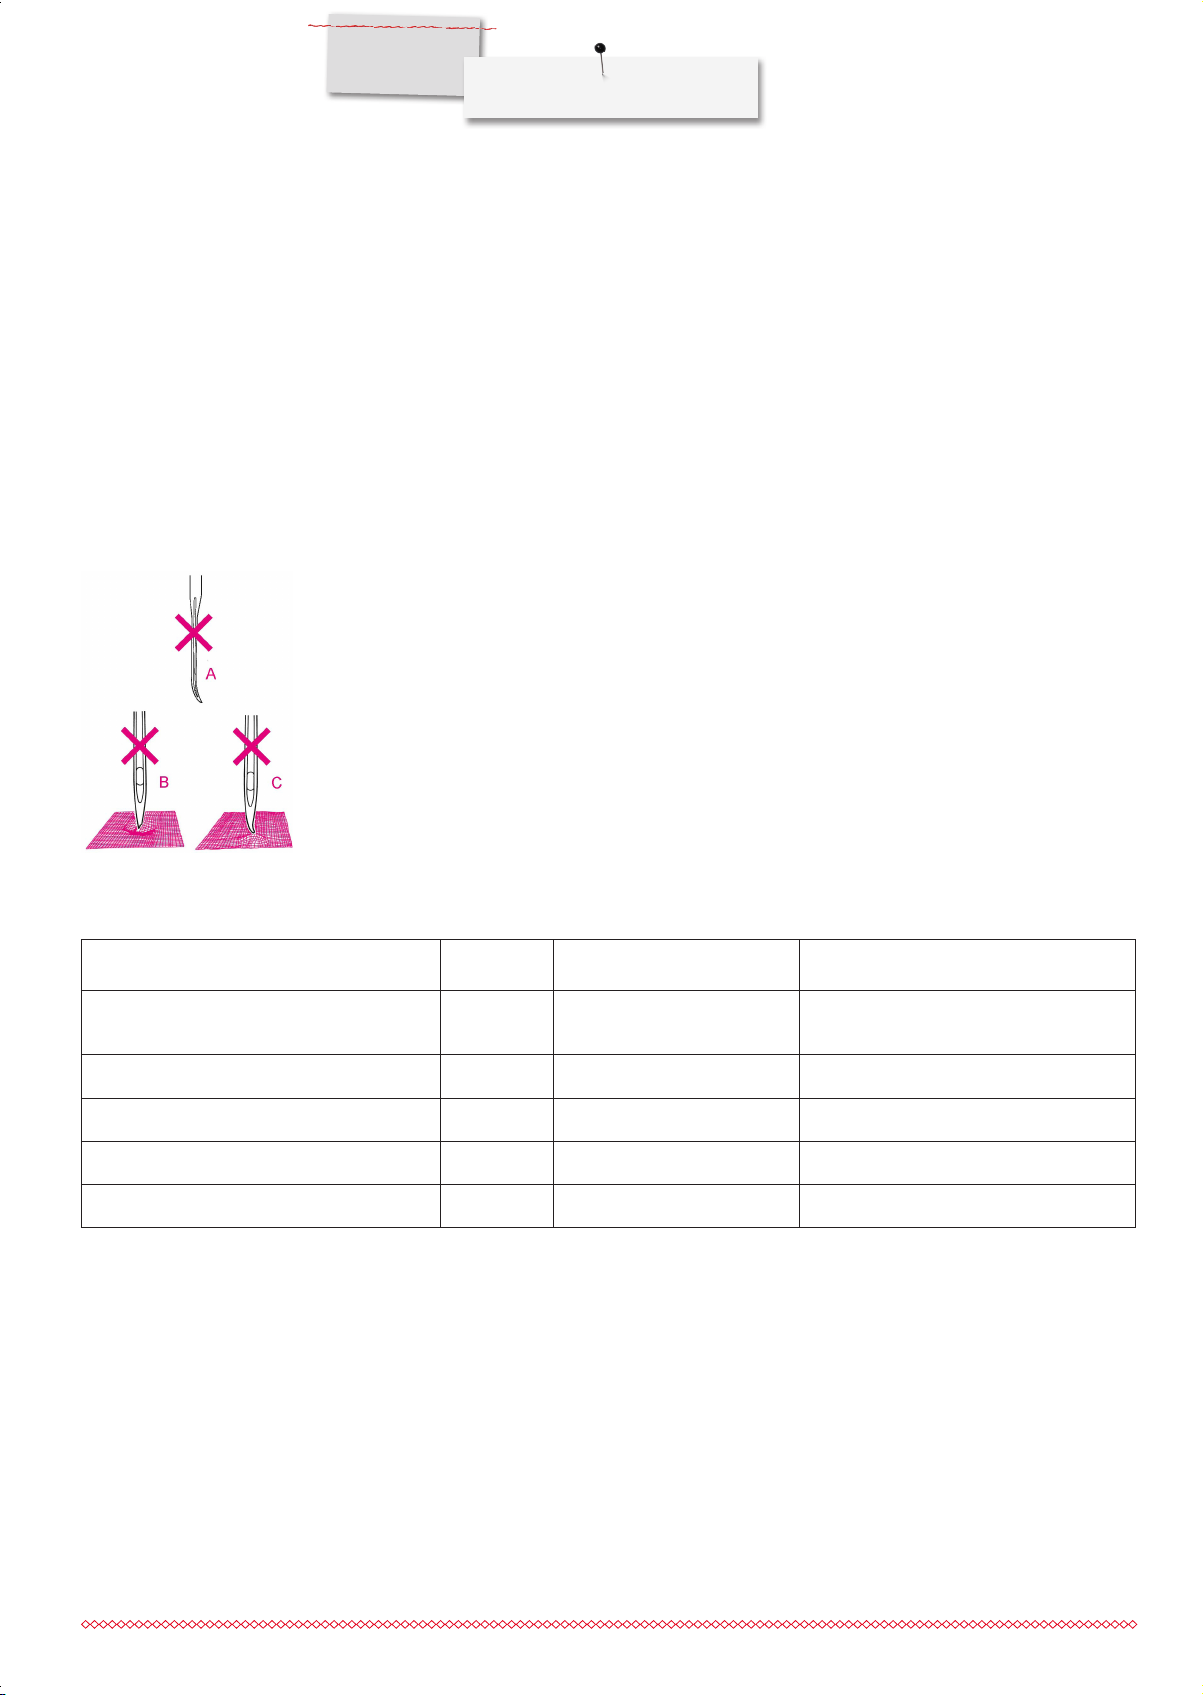
Needle condition
L 460
L 450
Operating Instructions
This overlocker is prepared to hold needles of the system 130/705H (standard household
needles, equivalent to HAx1 of the system 15x1 H).
For standard applications use universal needles of the sizes No.70-90 (equivalent to
10-14 in the US).
For fine jersey or delicate stretchy fabric use medium ballpoint needles 130/705 H-S or
SUK (equivalent to HAx1SP, JLx2 or ELx705).
Needles must be in perfect condition to achieve best sewing results. Please check the
needles before each sewing project. Defective needles may not only damage the sewing
project, but can also damage the overlocker.
Needles must not be:
A bent or crooked
B damaged or blunt
C have hooked points
Needle, thread and application table
Thread Needle Where Application
All purpose overlock thread
120/2 (polyester)
Polyester sewing thread 80-90 Needles and loopers Seam in all fabrics
Spun polyester Loopers only Neatening edges
Bulked threads (Wooly Nylon) Loopers only Soft seams in knits, rolled hems
Embroidery/darning and decorative threads Loopers only Neatening edges, rolled hems, flatlocks
70-90 Needles and loopers For all overlock stitches
18
 Loading...