

Page 1

Joybook S52 Series User’s Manual
Welcome
Page 2

Copyright
Copyright 2005 by BenQ Corporation. All rights reserved. No part of this publication may be reproduced, transmitted, transcribed, stored in a retrieval system or
translated into any language or computer language, in any form or by any means,
electronic, mechanical, magnetic, optical, chemical, manual or otherwise, without
the prior written permission of this company.
Disclaimer
BenQ Corporation makes no representations or warranties, either expressed or
implied, with respect to the contents hereof and specifically disclaims any warranties,
merchantability or fitness for any particular purpose. Further, BENQ Corporation
reserves the right to revise this publication and to make changes from time to time in
the contents hereof without obligation of this company to notify any person of such
revision or changes.
Windows, Internet Explorer and Outlook Express are trademarks of Microsoft Corporation. Others are copyrights of their respective companies or organizations.
is a trademark of SRS Labs, Inc. SRS technology is incorporated under
license from SRS Labs, Inc.
Joybook Models Covered by This
Manual
This manual contains the information about the following Joybook models:
• Joybook S52 series
Please note that the actual hardware or software capabilities will vary according to
the model you purchased. To determine your Joybook model, please refer to the label
on the packing box, or the printi n g on your Joybook .
Page 3

Table of Contents
Touring Your Joybook................. .....................................................................1
Left Side View.............................................................................................2
Right Side View ..........................................................................................3
Rear View.................................................................................................... 4
Front Panel.................................................................................................5
Function Hotkeys....................................................................................... 6
Getting Started with Windows XP...................................................................8
Using the Q-Media Bar.....................................................................................10
Setting Up QMedia Bar..............................................................................10
Sending and Receiving E-mail................................................................... 11
Getting Online............................................................................................ 12
Using the Built-In Wireless LAN Function..............................................13
Using Bluetooth ......................................................................................... 14
Initializing Bluetooth Connection ..................................................... 14
Using the Bluetooth Services of the Connected Device....................16
Quick Connection............................................................................... 16
Searching for a Bluetooth Device.......................................................16
Configuring Bluetooth Services on Your Joybook............................ 16
Performing Advanced Bluetooth Configurations .............................17
Listening to Music and Creating Custom Music Collections.................. 18
QMusic Workspace.....................................18
Playing a Music CD............................................................................. 18
Creating a Playlist................................................................................ 18
Converting CD Music into MP3 Format...........................................19
Creating an MP3 Music CD ...............................................................19
Viewing Digital Photographs, Creating Slide Shows and Calendars....... 20
Photo Explorer Workspace................................................................. 20
Viewing Images ...................................................................................20
Creating a Slide Show or Screensaver................................................20
Making a Calendar..............................................................................21
Watching DVD/VCD Movies.................................................................... 22
Power DVD Control Panel.................................................................22
Region Code Settings ..........................................................................23
Basic Operations.................................................................................. 23
Making Your Own Movies ........................................................................ 24
PowerDirector Workspace..................................................................24
The Movie-Making Process ................................................................25
Step 1: Loading Clips into the Library................................................25
Step 2: Managing Clips in the Workspace..........................................25
Step 3: Working with Effects...............................................................25
Step 4: Producing a Movie Disc..........................................................26
Burning CDs Using Nero Express ............................................................. 27
Using QCamera..........................................................................................30
QCamera Workspace ..........................................................................30
Capturing Videos.................................................................................31
Capturing Photos.................................................................................31
Applying Special Effects to Photos and Videos..................................31
Creating a New Album........................................................................31
Adding Photos to an Album ...............................................................31
Burning Albums onto a CD................................................................31
Using QPower.............................................................................................33
Launching QPower..............................................................................33
Checking Battery Level........................................................................33
Selecting a Power Profile.....................................................................33
Setting up a Power Profile...................................................................33
Associating Application Programs with Power Profiles....................34
Removing the Association Between Programs and Power Profiles..35
QPresentation.............................................................................................36
BenQ Surround ..........................................................................................36
SmartAudio.................................................................................................36
Attaching External Display Devices .................................................................37
Attaching an External Display Device.......................................................37
Installing Additional Memory..........................................................................38
Recovering Your System ...................................................................................41
Using the Windows System Restore Tool.................................................41
Using the Quick Recovery Function..........................................................41
Using the Recovery CDs.............................................................................42
Reinstalling Software or Driver...........................................................42
FAQ and Troubleshooting........................................... .............. .......................43
General........................................................................................................43
Battery and Power ......................................................................................43
Table of Contents i
Page 4

Connection .................................................................................................44
System .........................................................................................................45
Display.........................................................................................................47
Information on Safety, Cleaning, and Battery Maintenance..........................49
Safety...........................................................................................................49
Battery Maintenance ..................................................................................49
Cleaning Your Joybook..............................................................................49
Service and Support.......................................................................................... 50
BenQ Joybook Global Online Service .......................................................50
Joybook Online Registration......................................................................50
Appendix........................................................................................................... 51
Table of Contentsii
Page 5
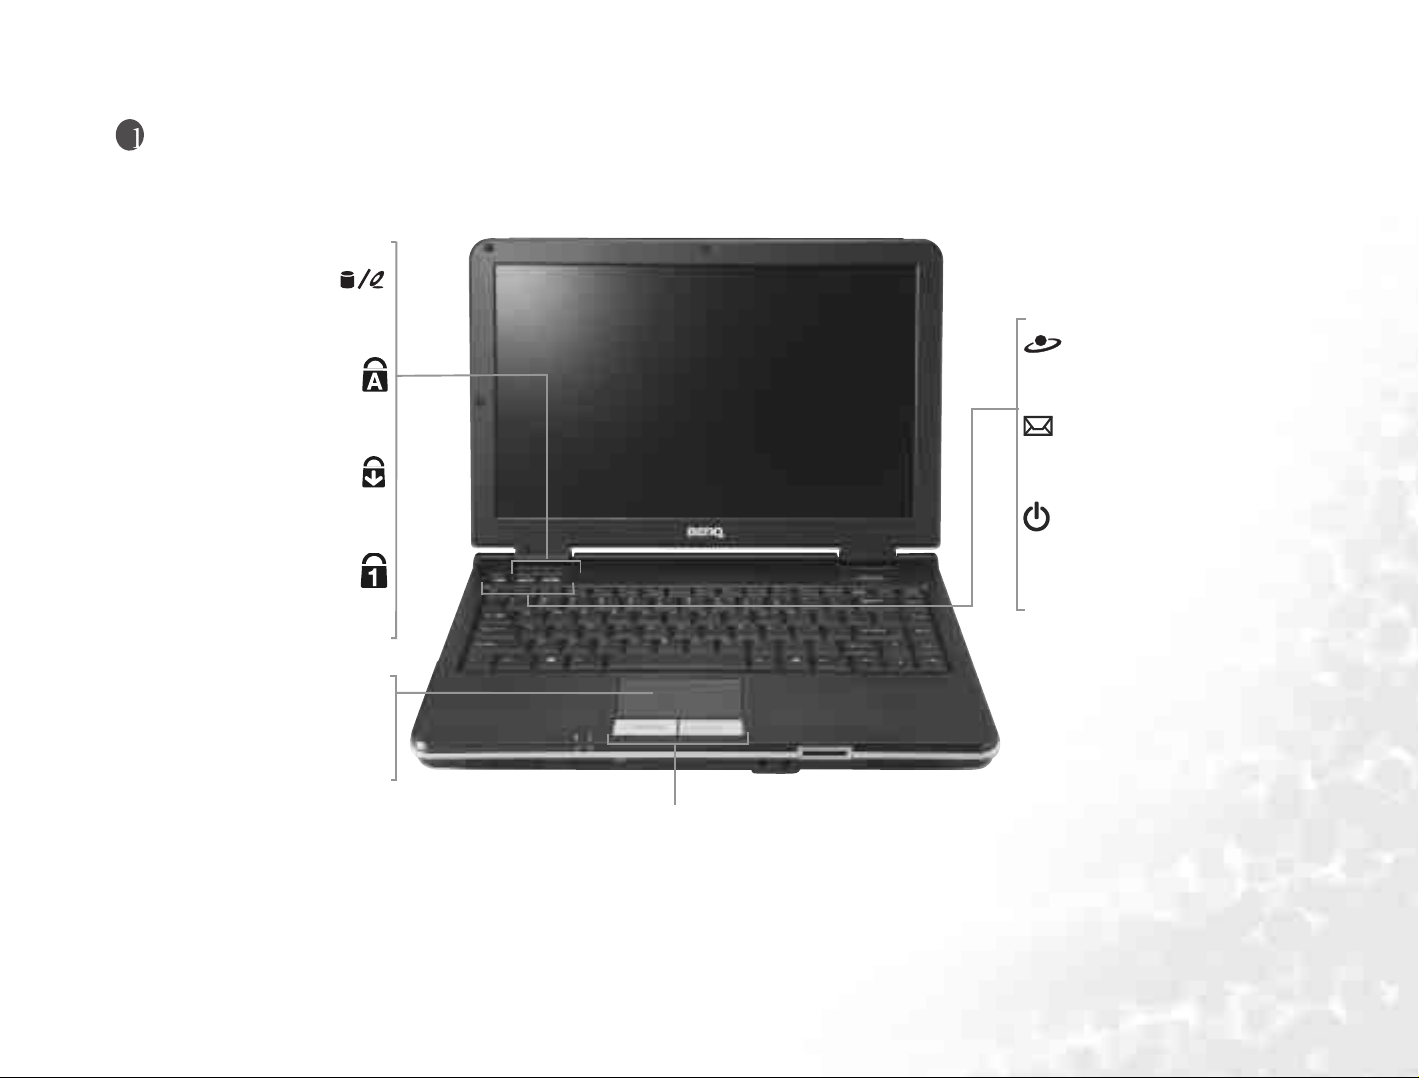
Touring Your Joybook
Hard Disk / Optical Drive Activity
Indicator
Lights up in blue when Joybook S52 is
accessing hard disk or optical drive.
Caps Lock Indicator
Lights up in blue when the Caps Lock
is activated.
Scroll Lock Indicator
Interne t Ho t key
Starts up the Internet Explorer Web
browser.
E-Mail Hotkey
Starts up the Outlook Express e-mail client.
Lights up in blue when the Scroll
Lock is activated.
Num Lock Indicator
Lights up in blue when the Num Lock
is activated.
Touch Pad
For controlling the on-screen cursor.
Can be activated and deactivated by
pressing the Fn + F6 hotkey combina-
tion.
Power Switch
Turns Joybook S52 on or off.
Left and Right Buttons
Equivalent to the left and right buttons on a mouse.
Touring Your Joybook 1
Page 6
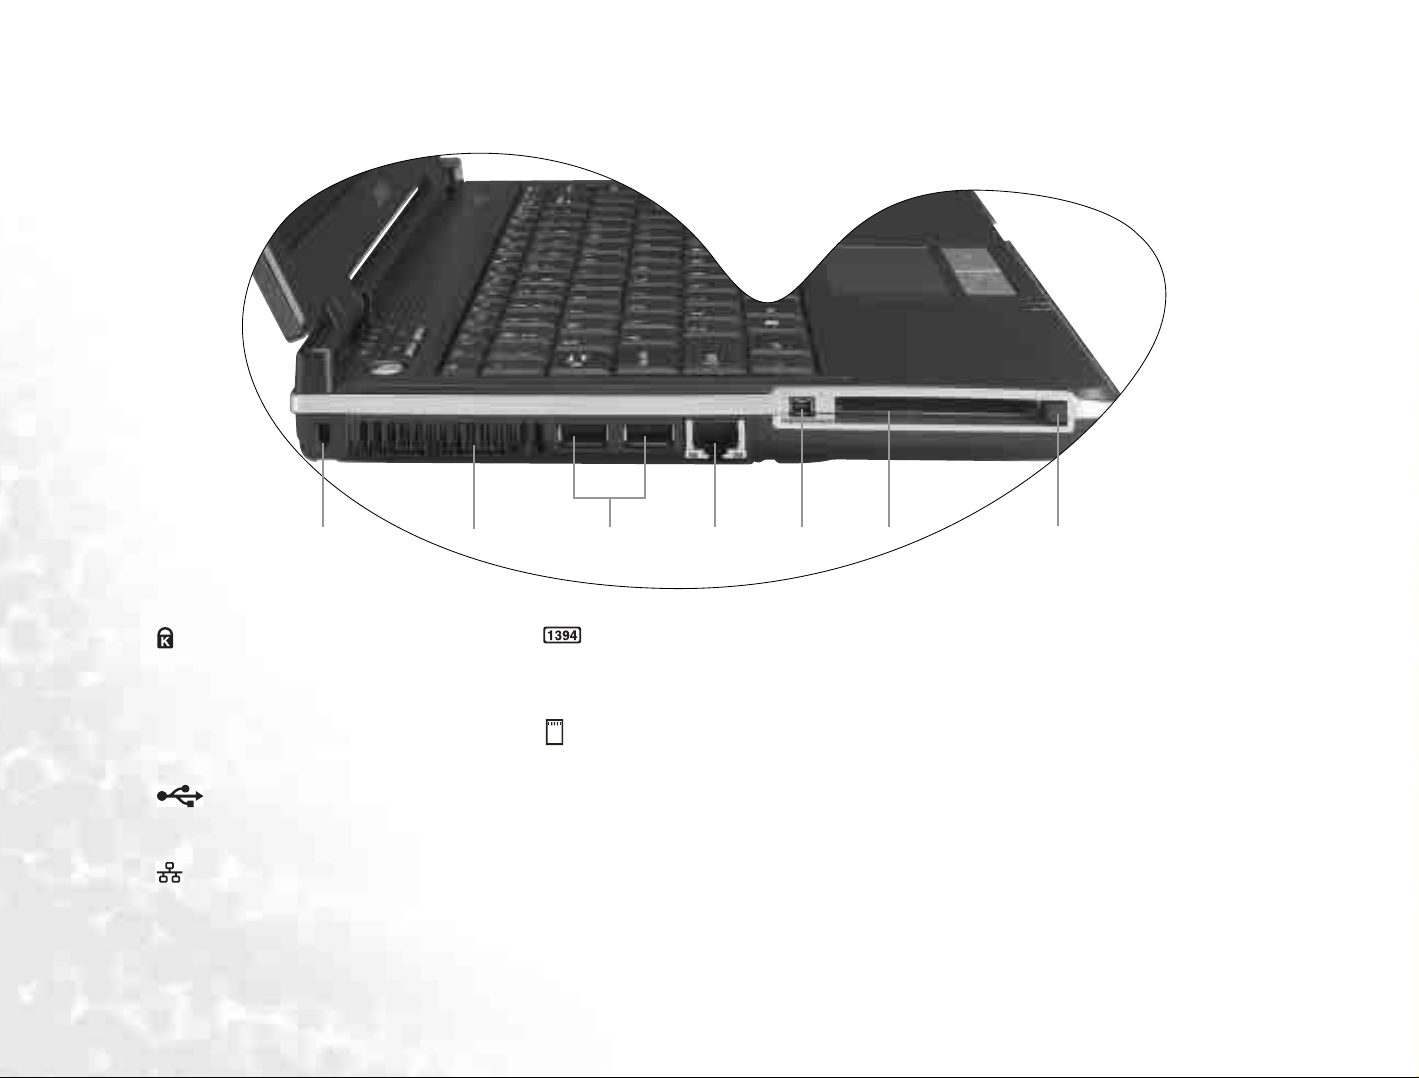
Left Side View
(1)
(1) Kensington Lock Hole
You can attach a Kensington -t ype lock a n d c abl e to t his
hole to prevent theft.
(2) Ventilation Holes
For dissipating heat and keeping the computer at an
optimal temperature.
(3) USB 2.0 Ports
For connecting peripherals such as mice, digital cameras and MP3 players that use the USB interface.
(4)
LAN (Ethernet) Port
Allows Joybook to connect to a 10/100Mbps Ethernet
network.
Touring Your Joybook2
(2) (3) (4) (5) (6)
(5) IEEE 1394 (FireWire) Port
For connecting high-speed pe ripherals such as digital
video cameras a nd other consumer elect ronics devices
that use the IEEE 1394 (FireWire) interface.
(6)
PC Card Slot
This PC Card slot accepts one Type-II PC Card. You can
use it and various PC Cards on the market to further
expand the capabilities of your Joybook.
Insert the PC Card into the slots following the direction
indicated on the card and complete related driver settings.
(7)
(7) PC Card Ejection Button
You can use this button to eject an inserted PC Card. To
eject a PC Card:
1. Quit all PC Card applications and shut down all PC
Card functions.
2. Press and then release the PC Card ejection button,
causing it to pop out.
3. When the button has popped out, push it in again to
eject the PC Card.
Page 7
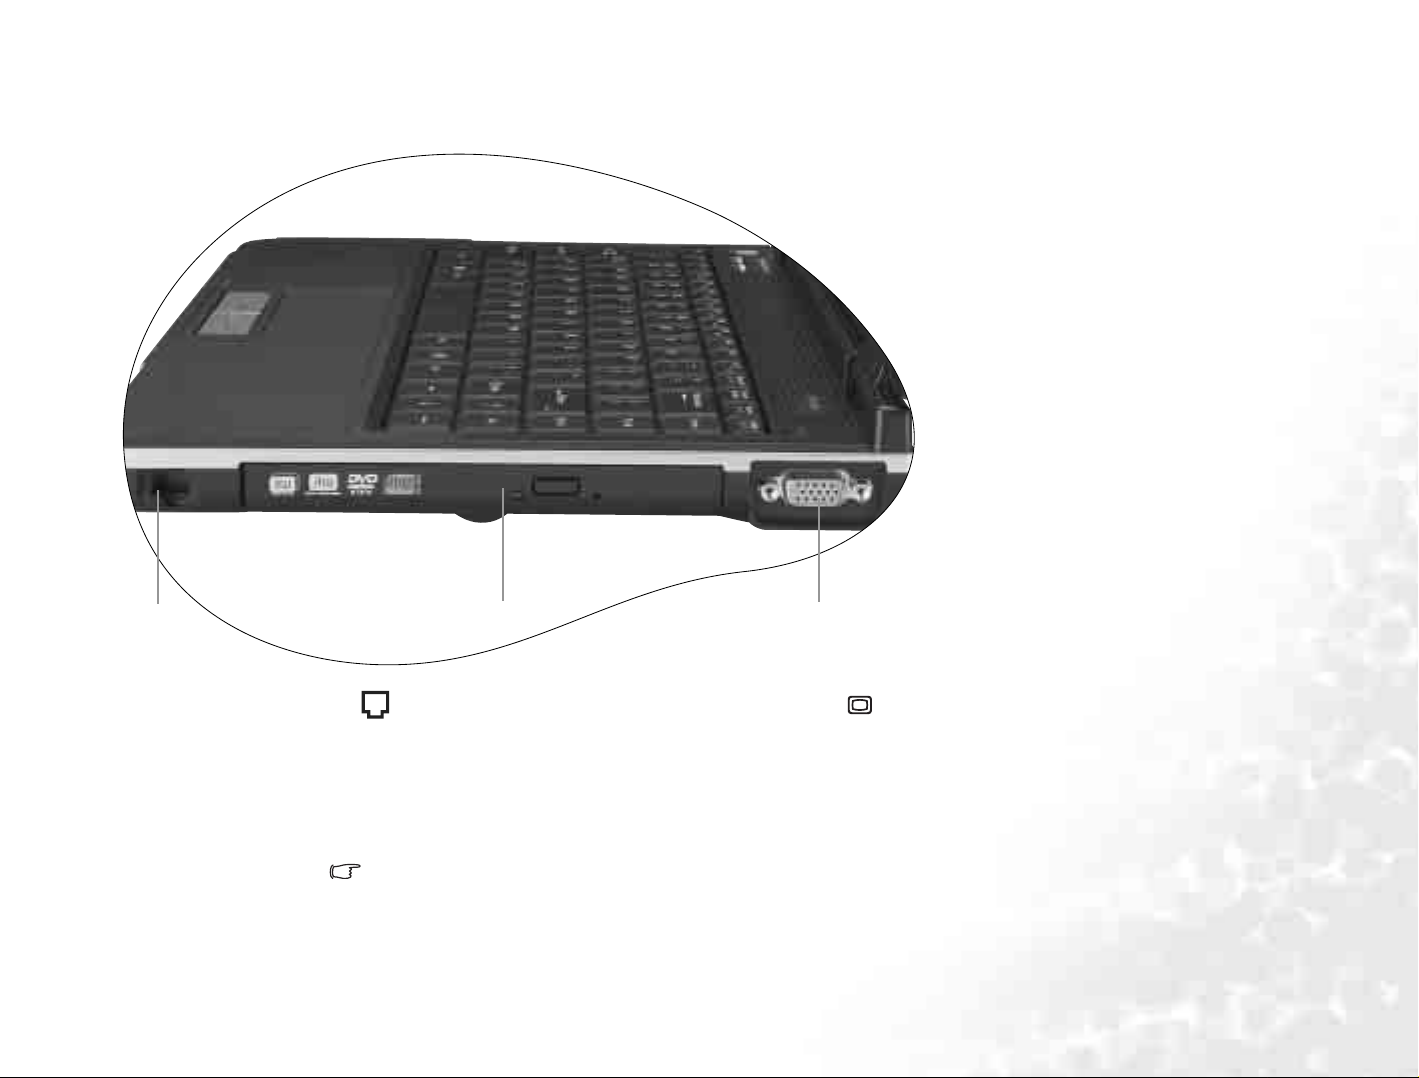
Right Side View
(1)
(2) (3)
(1) Modem Port
Accepts an analog telephone line for use with the internal modem.
DVD Super-Multi/DVD+RW/DVD & CD-RW Combo Drive
(2)
(Optional)
Supports multi-functional optical module for reading music CDs,
VCDs and DVDs or burning CD-R/CD-RW or DVD+R/DVD+RW
(optional) discs. Discs can be inserted/ejected by pressing the small
ejection button on the drive.
If you wish to open the disc tray of the drive wh en your Joyb ook
power is off, or i t ca n' t be o pe ne d u si n g t he ejection button, ins er t
a pointed object into the tray ejection hole next to the ejection button to force open the disc tray.
(3)
VGA Port
For connecting external display devices, such as monitors and pro-
jectors.
Touring Your Joybook 3
Page 8
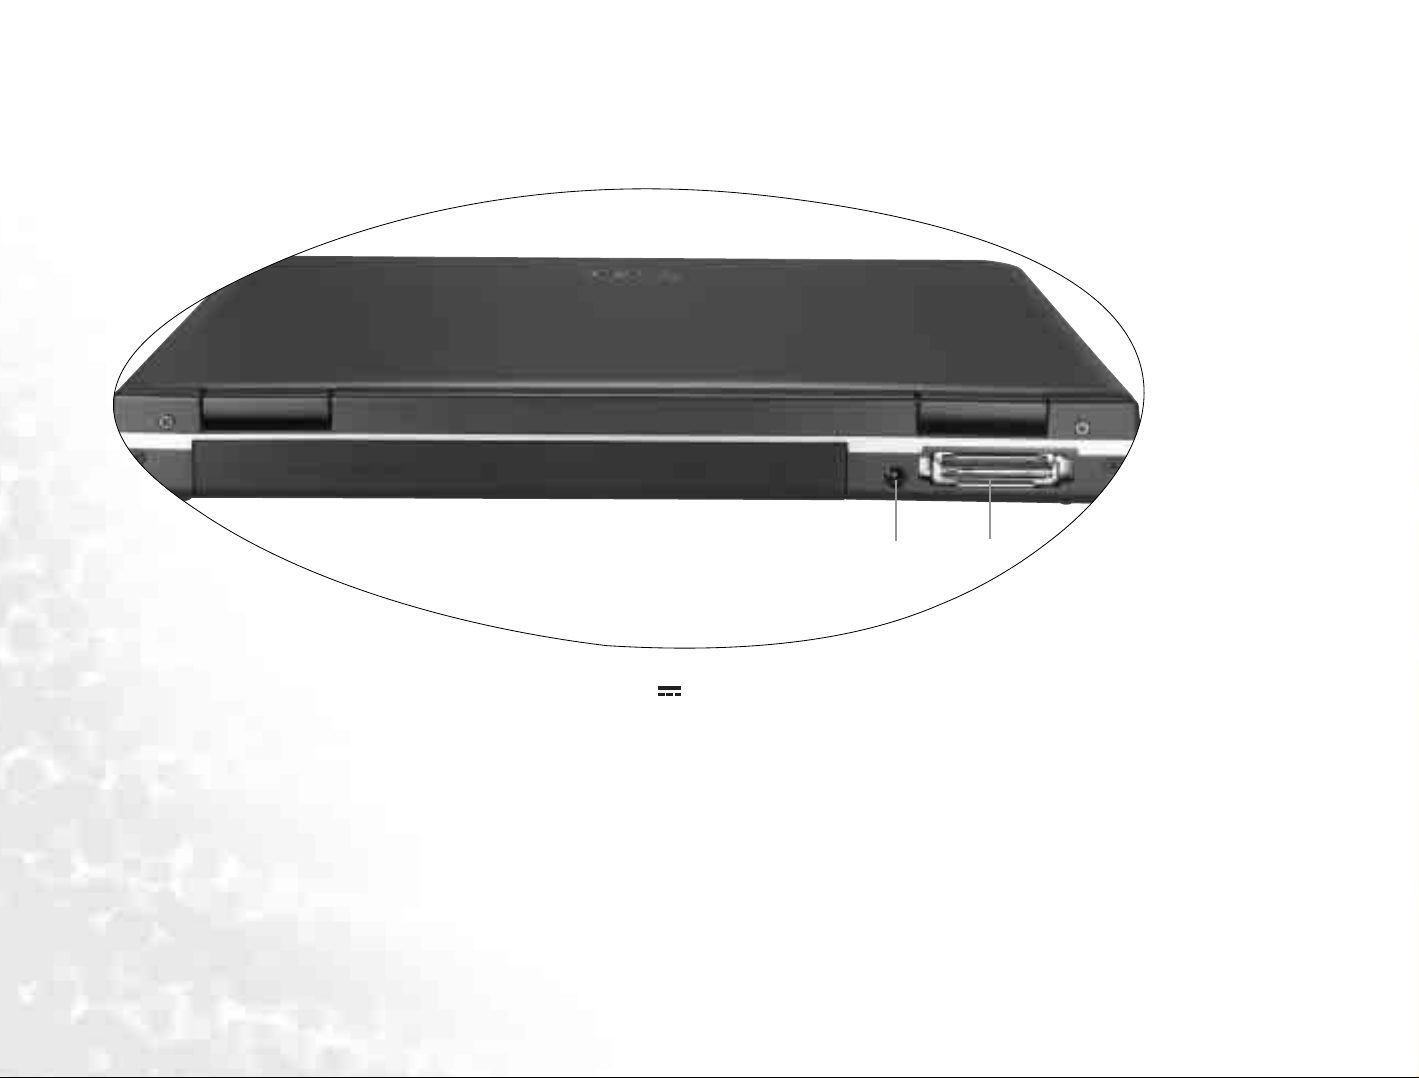
Rear View
(1)
(1) Power Jack
For connecting AC power supply.
Touring Your Joybook4
(2)
(2) Por t Replicator Po rt
For connecting to a Port Replicator to add additional ports to your Joyboook S52 such as : PS/2,
serial , parallel, USB, etc.
Page 9
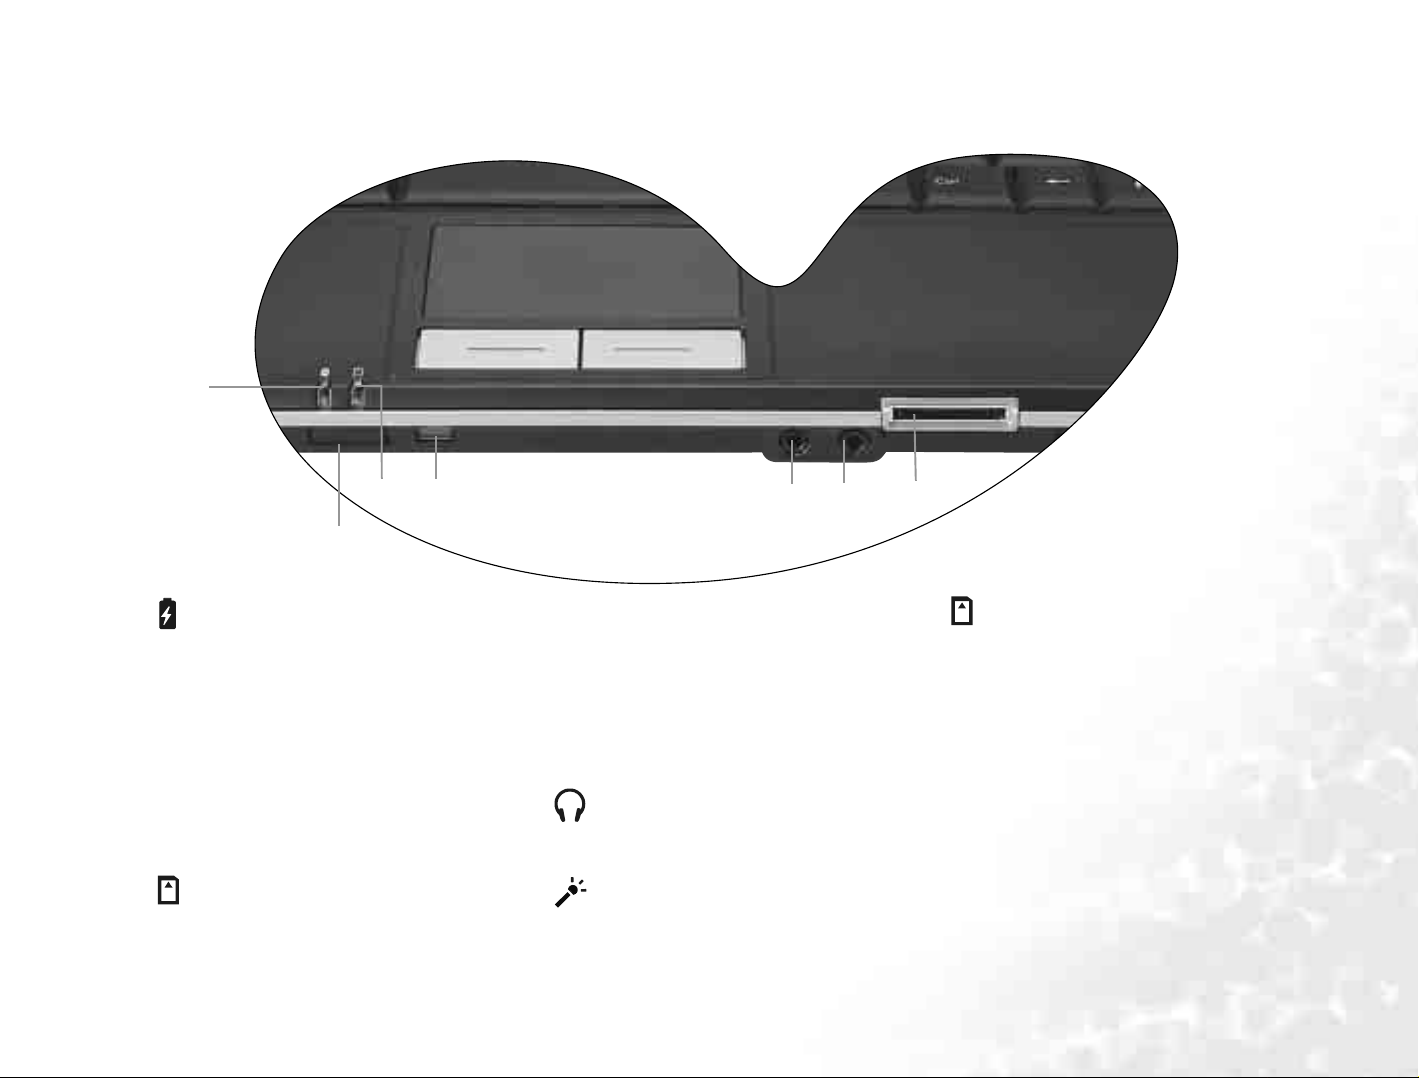
Front Pan el
(1)
(3) (4)
(2)
(1) Battery Indicator
• When Joybook is in use, lights up in blue.
• When the battery is charging, turns into amber.
• Flashing blue indicates that the battery is running low.
• Flashing amber indicates that the battery is malfunc-
tioning, in which case you should contact service personnel.
(2) Infrared port
You can connect Joybook to your PDA, mobi le phone or
other Infrared compatible devices using this port.
(3) Five-in-One Memory Card Access Indicator
Lights up when a Memory Stick, Memory Stick Pro, XD,
SD or MMC memory card is inserted.
(6) (7)
(5)
(4) Wireless Device Switch/Indicator
This is a switch/indicator combo. Press this switch to
turn on/off wireless connection function (WLAN and
Bluetooth, Bluetooth is opt ional depending on your
model).
• When the wireless LAN function is turned on, this
switch/indicatorwill light up blue.
• When the Bluetooth function is turned on, this switch/
indicatorwill light up amber.
(5) Earphone/SPDIF Audio Output Jack
Can be used to con ne c t to an ea rphone/he a dset or exter-
nal speaker for playing Joybook audio.
(6) Microphone Input Jack
Can be used to connect to a microphone for recording
sounds.
(7) Five -in - O n e Memo ry Card Slot
Reads a Memory Stick, M emory Stick Pro, XD, SD or
MMC memory card.
Touring Your Joybook 5
Page 10
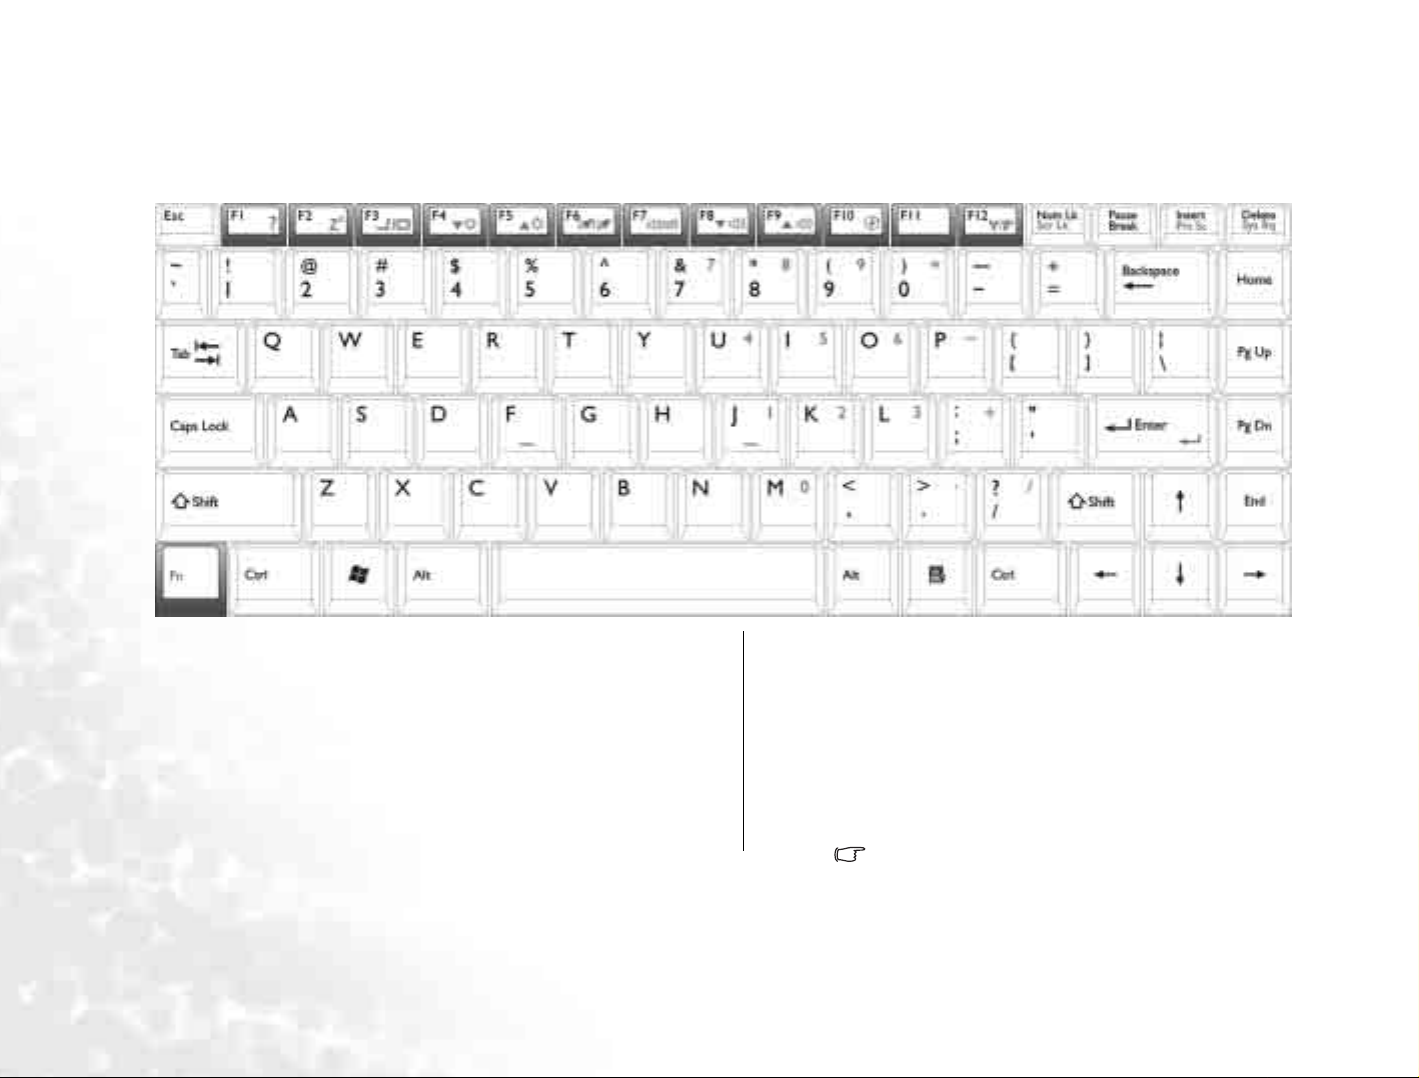
Function Hotkeys
You can use the function hotkeys to access commonly used functions or make quick settings. To use the hotkeys, press and hold the Fn (Function) key at the lower left corner
of the keyboard, and then press the desired hotkey.
Fn + F1 Opens function keys online help. Fn + F6 Activates or deactivates the touch pad.
Fn + F2 Puts Joybook into sleep mode. Fn + F7 Activates or deactivates the speakers.
Fn + F3 Switches di spla y betw een the s cr een and an ext ernal monit or/p r ojec-
tor, or allows simultaneous display.
Fn + F4 Decreases screen brightness. Fn + F10 Switches among the 3 basic power profiles of QPower.
Fn + F5 Increases screen brightness. Fn + F12 Switches between all 3 combinations of WLAN and Bluetooth on/
Fn + F8 Decreases volume.
Fn + F9 Increases volume.
off. The status is indicated b y the on-screen display.
Bluetooth is optional depending on your purchased model.
Touring Your Joybook6
Page 11
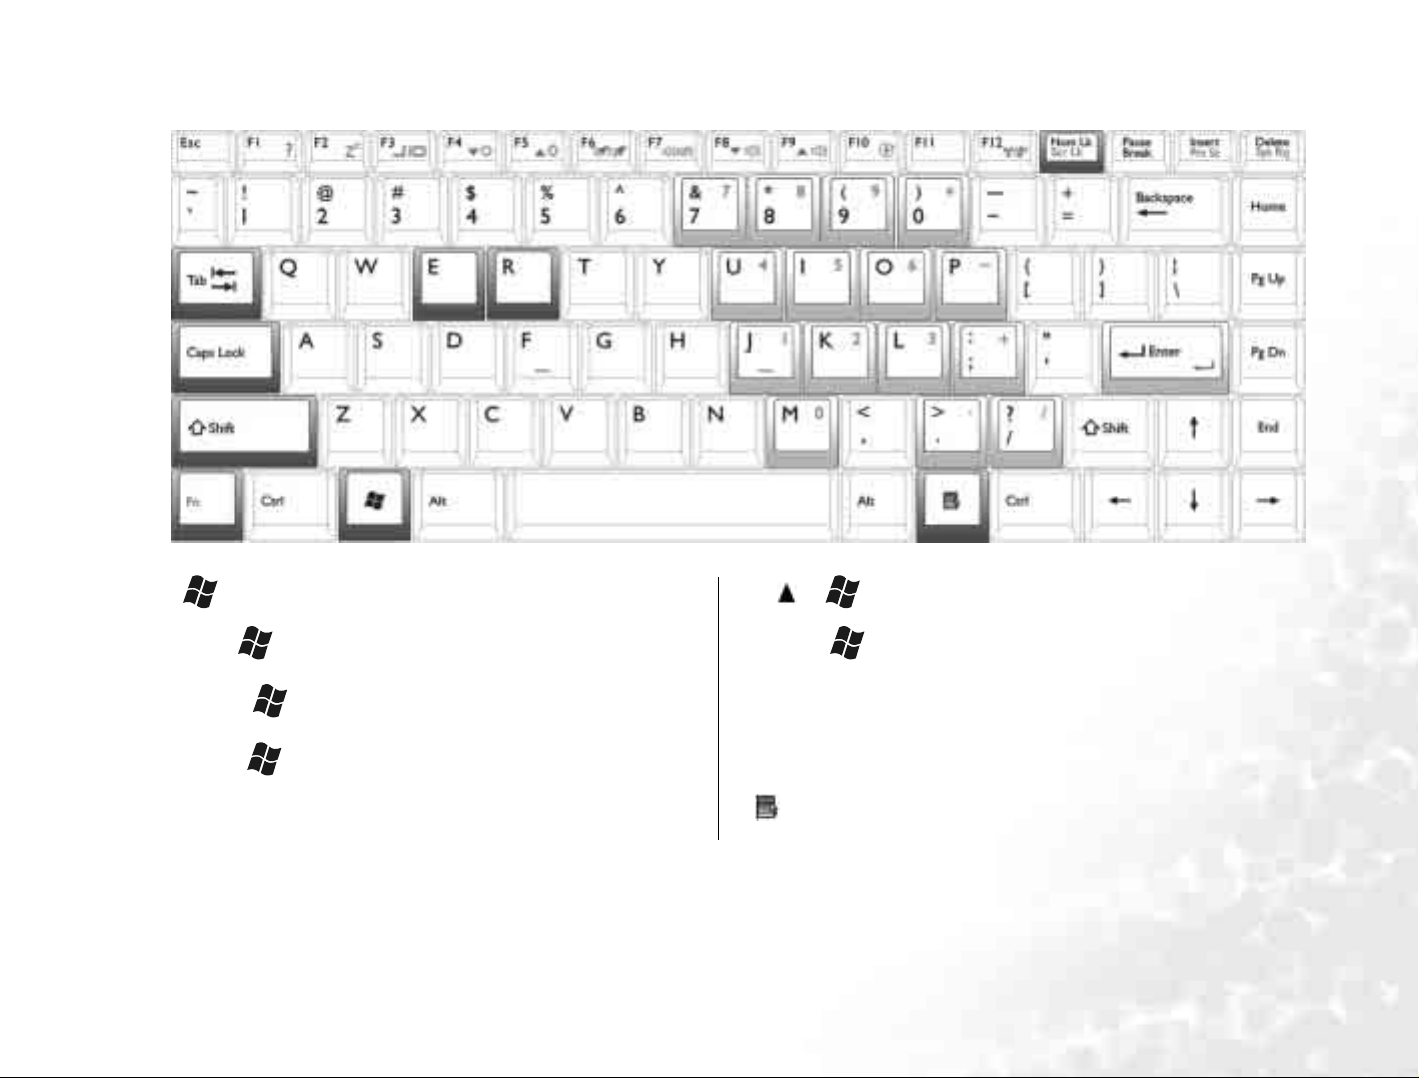
Window s Key
Functionally equivalent to clicking the Start button on
the Windows desktop.
Shift ( ) + + M
Cancels minimization of all windows.
Makes the next item on the Windows task bar active.
+ Tab
Opens the My Com puter w indow for browsing disks
+ E
and files.
Minimizes all windows. Caps lock Capitalizes all text entered.
+ M
Num lk
Application Key
Activates the Run dialogue box.
+ R
Activates or deactivates the numeric keypad integrated in
the keyboard (indicat ed by the l ight gray s hade in th e illustration above).
Provides the same function as the right touch pad button,
bringing up a contextual pop-up menu.
Touring Your Joybook 7
Page 12
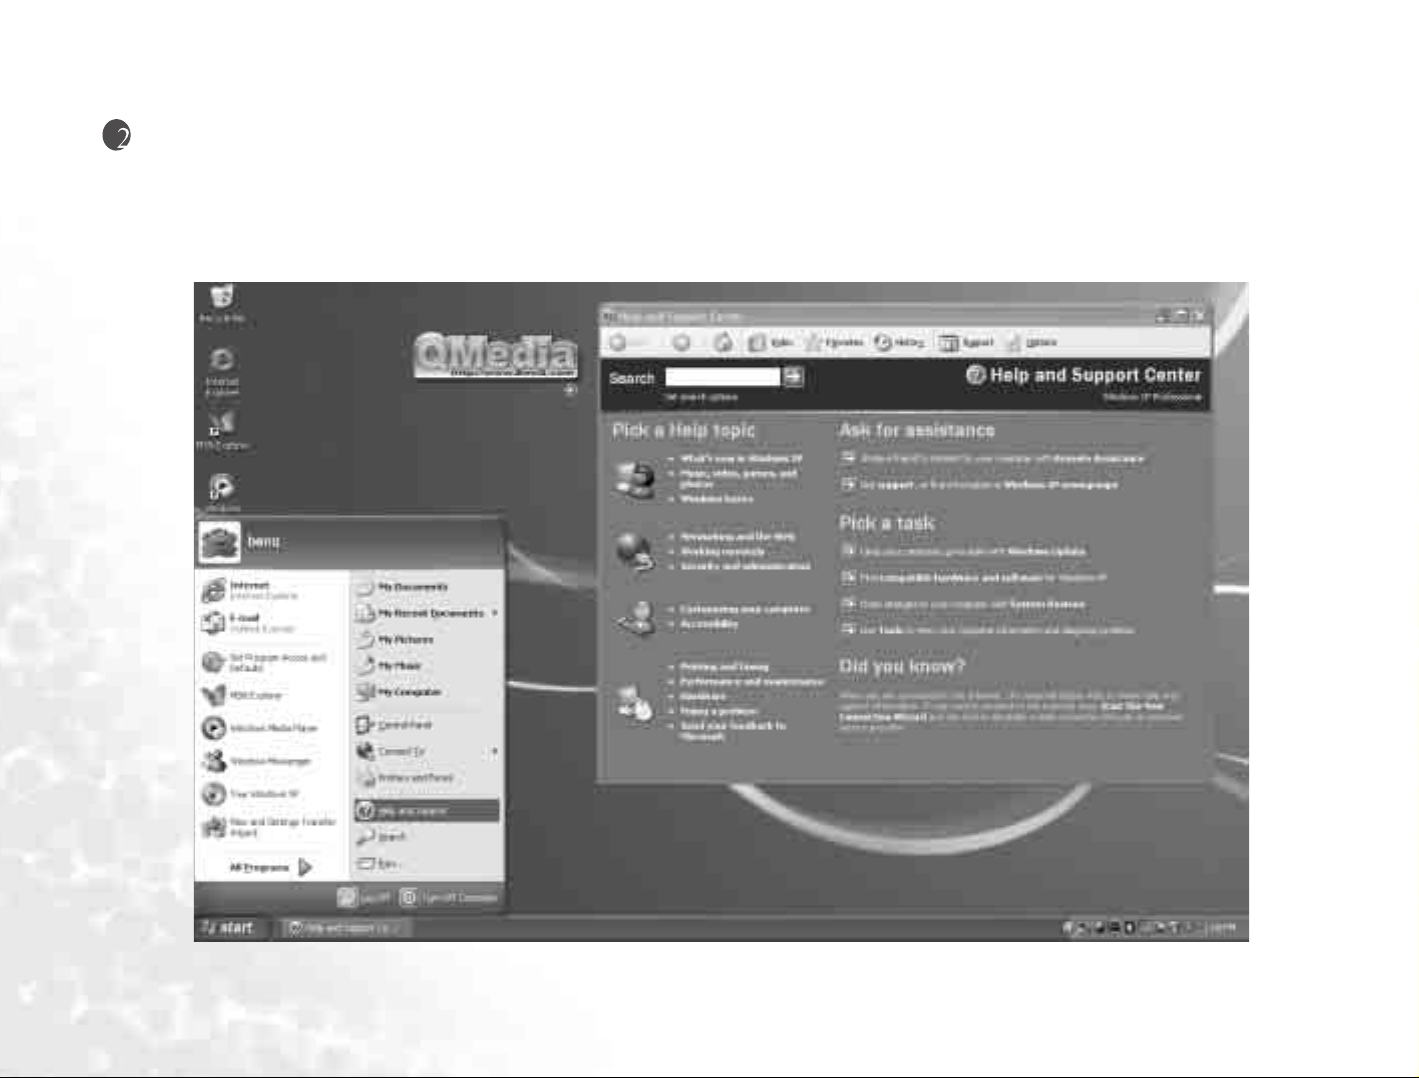
Getting Started with Windows XP
Your Joybook comes installed with Windows XP , Microsoft's latest operating system for consumer PCs. The first time you start up your Joybook, Windows XP will ask you a
few questions. Answer the ques tions t o ensur e that y our full rights are p r ot ect ed.
the specification label on the packing carton to determine the correct keyboard type
After you are done answering the questions, Joybook will restart and then you will enter Windows XP for the first time. Click Start and select Help and Support in the menu
that appears. The Help and Support Center will appear and you can find more information on how to use Windows XP here.
If you are asked to select the type of keyboard and you are not sure, please check
.
Getting Started with Windows XP8
Page 13
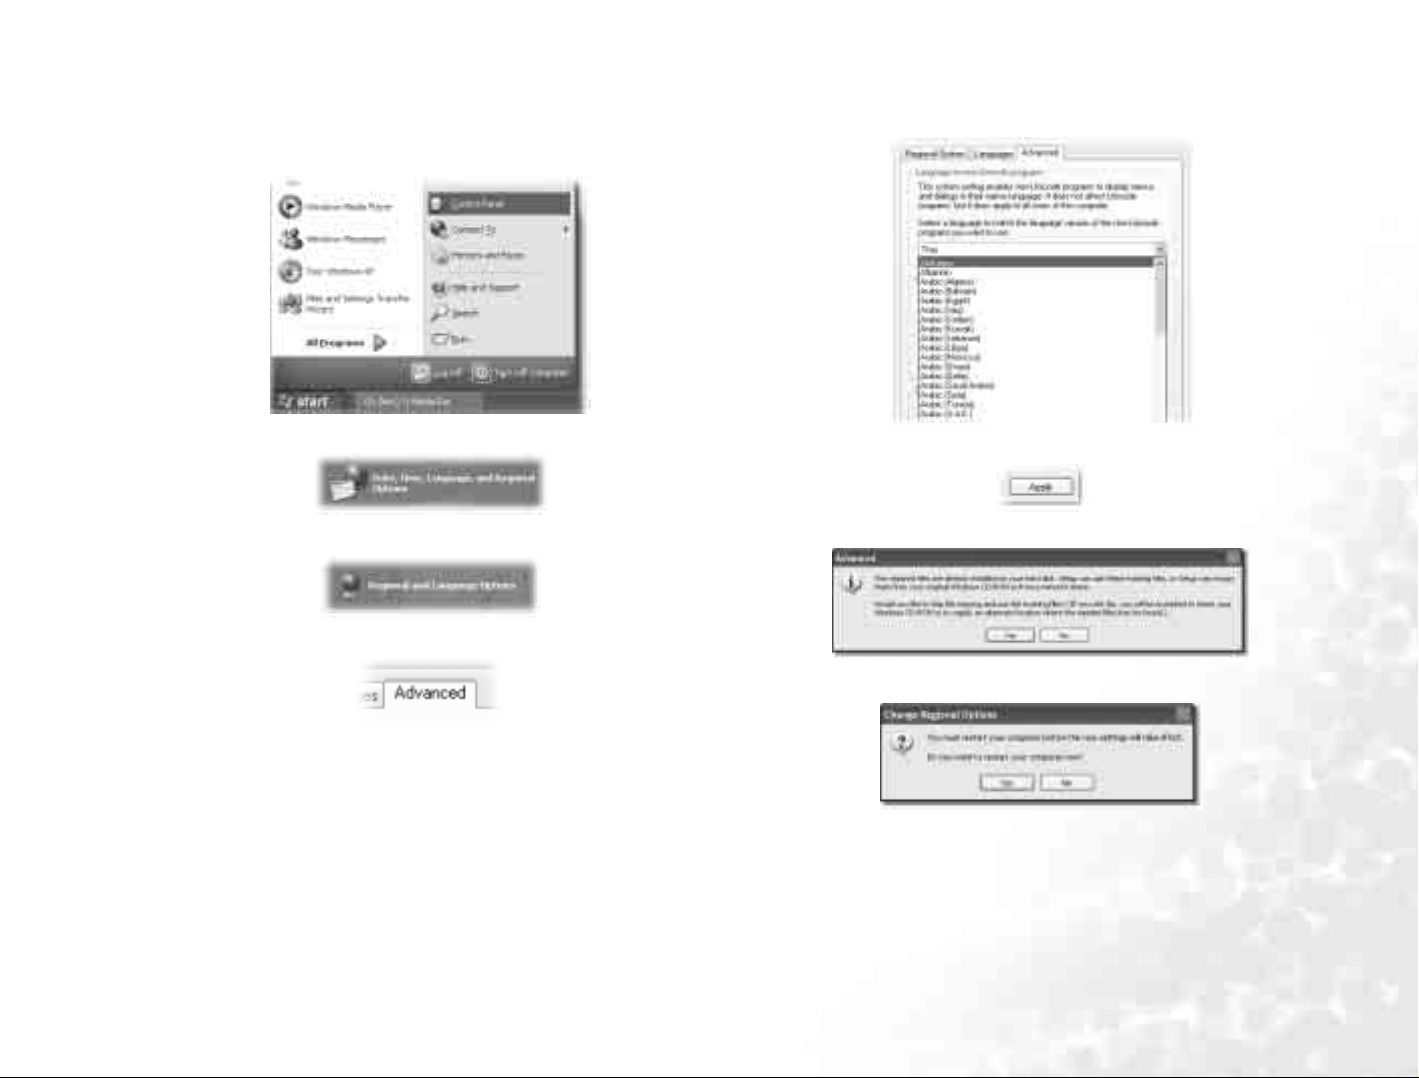
Next, please follow the steps below to setup the language for non-unicode programs settings in Windows XP.
1. Click Start and then Control Panel.
5. In the drop-down listbox, click to select your language and country.
2. Click Date, Time, Language, and Regional Options.
3. Click Regional and Language Options in the window that appears.
4. Click the Advanced tab.
6. Click Apply.
7. Click Yes.
8. Click Yes.
Getting Started with Windows XP 9
Page 14

Using the Q-Media Bar
The Q-Media Bar integrates a number of software
applications to enhance the multimedia experience on your J oy book. Click on the
small triangle button and a rotating button bar will appear.
From the Q-Media Bar, you can:
Click to start up Internet Explorer and surf the Internet.
Click to open Outlook Express for accessing e- mail.
Click to open QMusic. You can use QMusic to listen to MP3 or CD music,
burn MP3 music onto a CD (requires optional CD-burner), convert and save CD
music into MP3 format, or create your personal favorite music album.
Click to start up PowerDVD for playing DVD or movie clips.
Click to activate PowerDirector with which you can create and edit your
personal movie clips.
Click to open Photo Explorer. It allows you to easily create and s hare your
photos.
Click to open Nero Express for burning your favorite music, photos and
files onto CDs.
Setting Up QMedia Bar
Right-click on the QMedia Bar and a menu will appear on it.
You can:
• Let QMedia Bar appear on top of all open programs by selecting Always on top.
• Close QMedia Bar by sel e c t i n g Exit.
• Adjust the size of QMedia Bar on the screen by selecting Size and then select an
appropriate size.
Click to open QCamera for capturing and sharing video and photos.
Click to view the information about QMedia Bar.
Using the Q-Media Bar10
Page 15
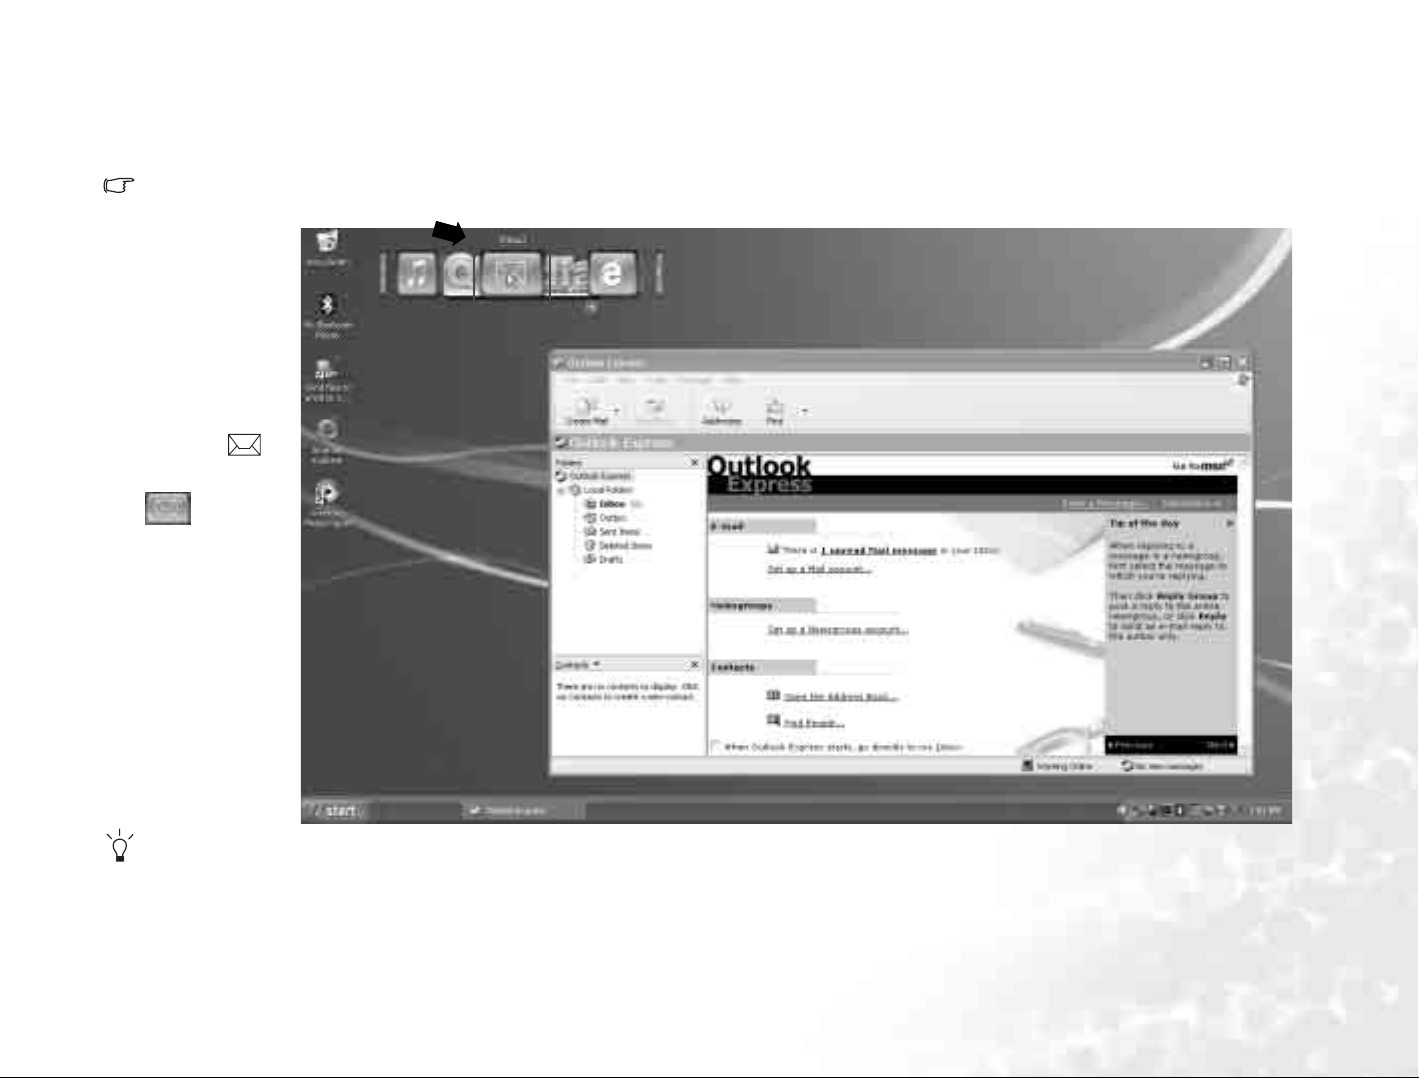
Sending and Receiving E- mail
You can use Outlook Express to send and receive e-mail.
In order to use e-mail, you must have an account with an ISP (Internet service provider) and perform needed software configuration. For detailed i n fo rmati o n on acc oun ts, passwords, e-mail servers and other settings, please consult your system administrator/ISP, or contact BenQ Customer Service for help.
1. Open Outlook Express
by pressing the
hotkey on your Joybook
or clicking on
the button on the
QMedia Bar
2. After the Outloo k
Express application window opens, y ou can start
to write, s en d and
receive e-ma i l.
-
For more information on how to use Outlook Express, please consult the on-line Help by clicking Help and then select Contents and Index.
Using the Q-Media Bar 11
Page 16
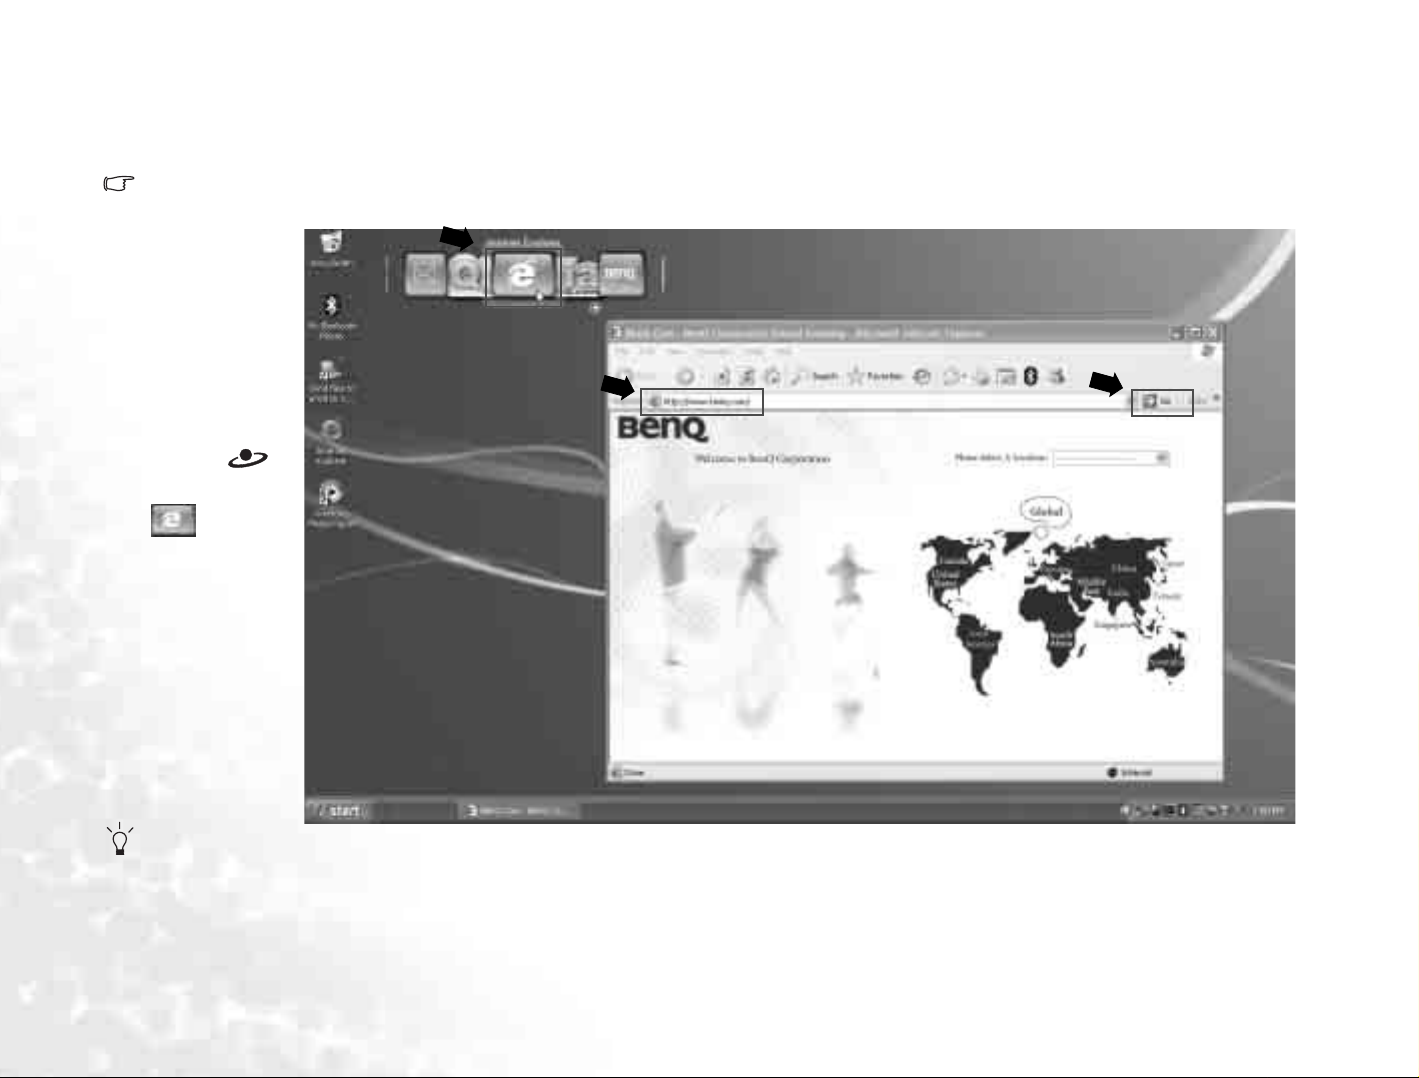
Getting Online
You can use Internet Explorer to browse web pages on the Internet and access various on-line information.
In order to get online, you must have an account with an ISP (Internet service provider) and perform needed software configuration. For detailed information on accounts, passwords and other settings, please consult your system administrator/ISP, or contact BenQ Customer Service for help.
1. Open Internet Explorer
by pressing the
hotkey on your Joybook
or clicking on
the button on the
QMedia Bar
2. After the Internet
Explorer application
window opens, enter the
address for the web page
you wish to view in the
Address field and then
click Go to.
-
For more information on how to use Internet Explorer, please consult the on-line Help by clicking Help and then select Contents and Index.
Using the Q-Media Bar12
Page 17
Using the Built-In Wireless LAN Function
With the built-in wireless LAN card on your Joybook, you can access Ethernet
network wirelessly without the constraints of network cables.
At home or in the office, y ou need an acc ess point, whic h serves as an air sta tion to
make transmission possible. Outdoors in places such as in coffee shops or library,
you can inquire the service personnel about an account.
To connect to a wireless LAN network:
1. Make sure th at y ou ar e loc at ed within the wir eless ne two rk service ar ea a nd y ou
have already obtained the user name and password for accessing such network
from the service provider.
2. Press the Wireless Device S witch, and then the Fn + F12 hotkey combination to
turn on Wireless LAN.
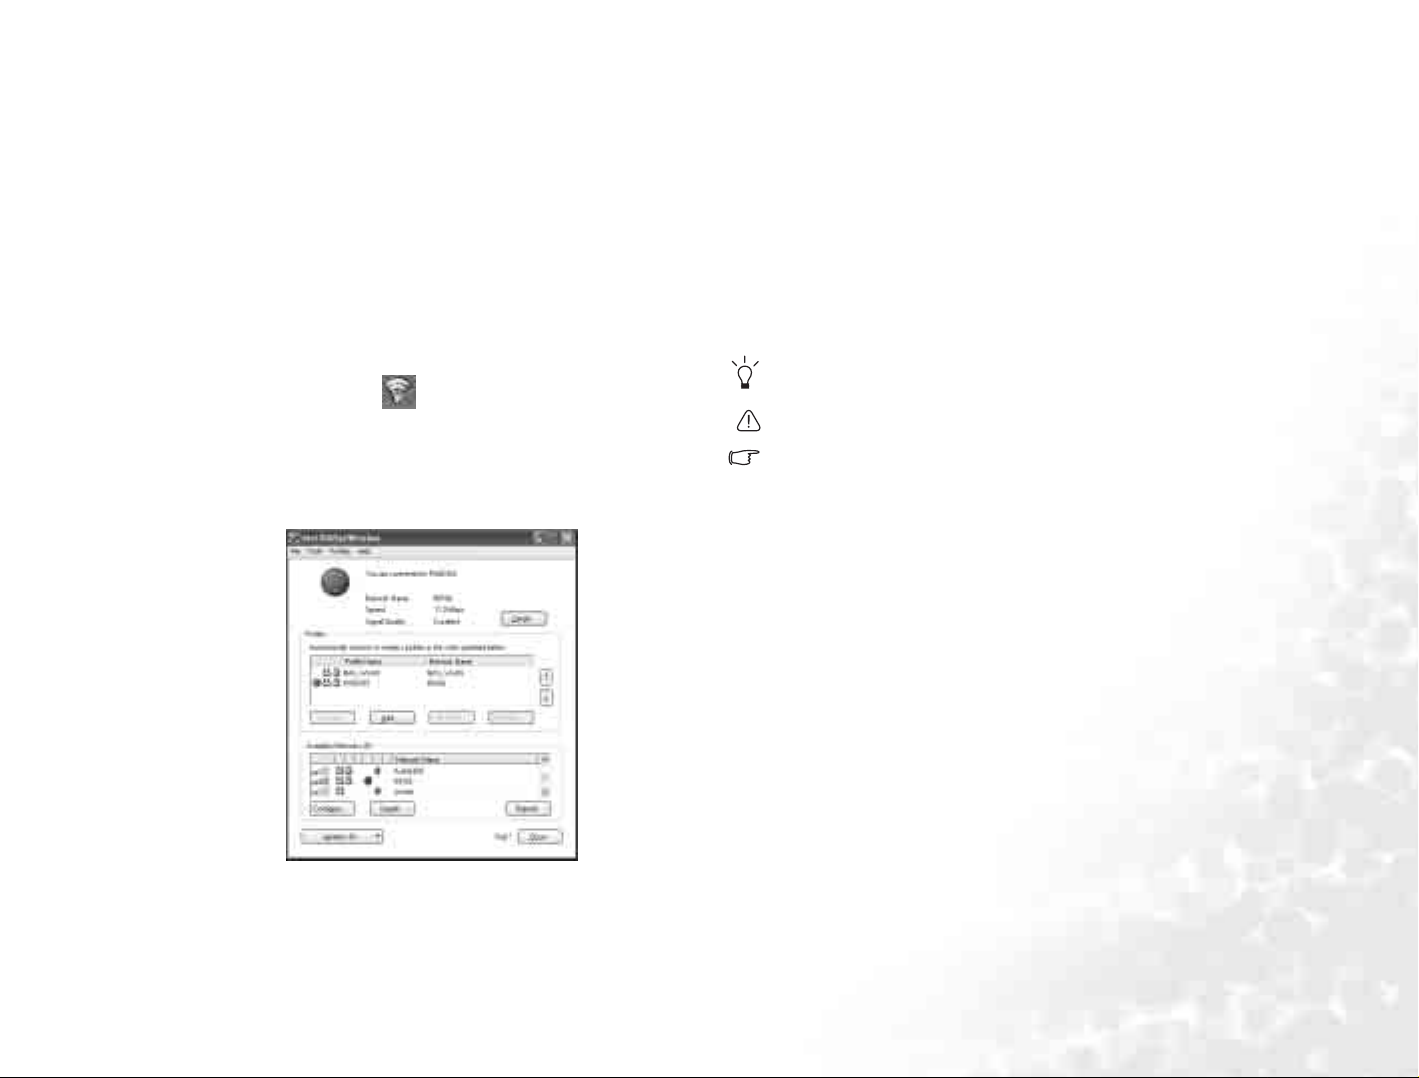
3. Click on the wireless LAN icon on the System T r ay located at the lower
right corner of the Desktop to bring up the pop-up menu.
4. If you see the ‘Use Intel PROSet/Wireless’ option in the dialog, click to select it,
if not, skip to step 6 below.
5. Click on the wireless LAN icon again to bring up the pop-up menu.
6. Click Open Intel PROSet/Wireless to bring up the utility window.
10. You may update the security settings on this page and enter a password if necessary. (Please check with your ISP for the values for these settings.) Click Next.
11. Click OK to complete the profile.
12. Back on the main page of the utility window, notice the new profile item in the
‘Profiles’ section.
13. Highlight your profile and cli ck Connect to connect to wireless LAN.
14. You will notice the wireless LAN icon on the system tray now appearing in
green to indicate connection on.
To access Internet, you may have to undergo another authorization process and
enter username and password. For details, please consult your ISP.
If you are not to use the WL AN Card in your Joyboo k, dial- up co nnect ion us ing th e
modem port, AD S L an d b ro ad ba nd tr an sm iss i on us ing th e LA N port would also do .
Please contact your local ISP to get more information.
When travelling b y air, please be sure to tur n off wireless ne tworking t o avoid any
possible risks to flight safety.
Click Help on the menu bar any time to bring up help.
7. In the ‘Available Networks’ section of the window shows a list of available networks automatically detected by your wireless LAN card.
8. Click on one of the items in that list and click Configure to create a pr o file f or it.
9. Give it a profile name and click Next.
Using the Q-Media Bar 13
Page 18

Using Bluetooth
The Bluetooth function allows you to get connected to various devices and services that support Bluetooth transmission. You can get rid of those annoying
cables when printing documents, synchronizing your PIM data with your PDA or
another PC, mobile phone or even sharing a network connection.
Bluetooth is an optional depending on your purchased model. You will see the Bluetooth icon on your desk top an d syste m tray wheth er or not yo u have the Blu etoo th
device in your syst em. The icon on the system tray will have three color values
depending on the status of Bluetooth: white to indicate Bluetooth is off, red to indicate Bluetooth is turned on, and green to indicate Bluetooth is in connection.
Initializing Bluetooth Connection
1. Press the Wireless Device S witch, and then the Fn + F12 hotkey combination to
turn on Bluetoot h.
2. Turn on the po wer of y our B luet ooth device and acti vate i ts Bl uet ooth fun ction .
• For details about how to act ivate the device’s Bluet ooth funct ion, pleas e refer to
its documentations.
• The maximum eff ectiv e ran ge of connec tion betwe en yo ur J oybo ok an d th e Blue-
tooth device is 10 meters.
• You can use your Joybook to connect to up to 7 Bluetooth devices simultaneously.
3. Double-click on the Bluetooth icon on the Windows system tray located at
the lower right corner of the Desktop. The following dialogue box will appear.
Click Next.
4. Specify a name for your Joybook in the Computer name field and click Next.
5. Click Next.
6. Check to enable the services that you want to use with your Joybook. Click
Next.
Using the Q-Media Bar14
Page 19

7. Windows will install related software for selected services.
8. Click Next.
9. The Bluetooth device discovered by your Joybook will appear in the window
below. Click to select the device and then click Next.
identical. If necessary, enter the PIN code in the PIN Code field and click Initiate Pairing.
11. The services available on the connected Bluetooth device will appear in the following window. Check to select the services you want to use. When a service is
selected, you will be prompted to perform it related settings.
10. In order to connect to the Bluetooth device, you must go through the pairing
process first. If y ou are connecting to a device that requires security connection, you must also enter the PIN code. PIN code can be specified randomly,
but the entered PIN code on your Joy book and the Bluetooth device must be
If you are done selecting and setting, click Next to search for another Bluetooth
device, or Cancel to complete the initiation process.
Using the Q-Media Bar 15
Page 20

Using the Bluetooth Services of the Connected Device
1. After your Joybook is connected to the Bluetooth device, double-click the My
Bluetooth Places icon on the Desktop. The following window will appear.
Searching for a Bluetooth Device
To search for a nearby Bluetooth device, double-click on the My Bluetooth Places
icon on the Desktop and then Sear ch for devices in range.
2. To use a service on the connected Bluetooth device, double-click a service icon
in the window. For example, if you want to start exchanging PIM (personal
information management) data, such as your e-mail messages, contacts and
business cards on your Joybook with the connected device, double-click on the
Information Exchange service icon. Your Joybook will start connecting to the
device and then exchange your PIM data with it.
• Available services w ill vary acc ording to th e type and f unctions pro vided by the
connected Bluetooth device.
• If you want to use the Audio Gateway service to play sound using the speakers on
a Bluetooth con nected PC, b e sure to select the a udio device of the PC a s Bluetooth Audio.
• If you want to use the Fa x ser vi ce to sen d fa x us in g a B lu eto o th con ne cte d P C, be
sure to activate the PC’s fax service.
• If you want to ac cess the dial-u p connection o f the Bluetoot h connected PC , be
sure to establish a dial-up connection using the Bluetooth Modem first.
Quick Connection
You can establish a Bluetooth connection quickly by right-clicking on the Bluetooth icon on Windows system tray and then select Quick Connect and a desired
Bluetooth service and device.
Using the Q-Media Bar16
Configuring Bluetooth Services on Your Joybook
In addition to using services provided by other Bluetooth devices, you can also
setup the services available on your Joybook for other devices.
To configure these services, double-click on the My B luetooth Places icon on the
Desktop and then View My Bluetooth Services.
Page 21

The available services on your Joybook will appear in the window that follows.
You can right-click on each service icon to open the configuration settings for the
selected service.
Performing Advanced Bluetooth Configurations
Right-click on the Bluetooth icon on Windows system tray and then select
Advanced Configuration.
The following dialogue box that contains all advanced Bluetooth configuration
options will appear. You can setup these options to further enhance the performance of your Bluetooth services or to configure the Bluetooth connections to fit
your personal preferences.
Using the Q-Media Bar 17
Page 22

Listening to M u si c and Creating Custom Music Collections
QMusic is the perfect tool for managing your favorite music collections. You can
use it to play music CDs and MP3 files, burn MP3 songs onto CDs, convert audio
CD tracks to MP3 format for storage on your hard disk drive, or create custom
music compilation.
Click the button on the QMedia Bar to open QMusic.
QMusic Workspace
1 2
4, 5,
6, 7
3
15
MP3 Disc Playl-
7
ists
8 Media Panel Contains all available media data and playlis ts.
9 Play Buttons
10 Volume Button For adjusting playback volume.
11 Statu s Bar Displays th e details of your song list .
12 Song List Displays songs in the media or selected playlist.
13 About QMusic Click to view QMusic version information.
14 Feature Buttons
15 Search Window
This is the location where you can arrange the
directories for your f avorite MP3 music and cr eation of CD.
Used to control the playback actions when playing
music.
Allows you to customize sound effects, setup
QMusic or change play m odes..., etc.
Allows you to search for a song in your music collection.
8
12
9 10
No. Button/Icon Description
1 Action Buttons
2 Display Area
3 System Buttons
4 Music Library Lists your music file collections.
5 My Joybee
6 My Playlists This is the place to store your own music playlists.
Using the Q-Media Bar18
Used to execute certain actions in Q M usic, such
as burning a CD, convert ing songs, stopping the
current action, adding songs or playlists..., etc.
Display the status of the actio n currently being
performed.
Controls the QMusic window or opens the on-line
Help.
This is where you can store the songs to be
updated to the Joybee Digital Audio Player.
11
13
14
Playing a Music CD
1. Insert a music CD into the optical drive of your Joybook.
2. A few seconds later, the songs of the music CD will appear in the Song List.
3. Click the Play Buttons to play the CD.
Creating a Playlist
1. Click Music Library on the Media Panel and then click the button.
2. In the dialog that appears, give the playlist a name and then click OK.
3. Click the playlist you ju st creat ed and then the button to add songs t o the
playlist.
4. In the dialog that appears, browse to select the music files you wish to add and
then click Open.
5. Repeat step 4 if you wish to add more songs to the playlist.
Creating a playlist und er Mus ic Lib r ary ad ds actu al m us ic fil es to the list, while cre ating a playlist und er My Playlist only crea tes shortcuts to the music f iles. If the
music files are deleted, error will occur.
Page 23

Converting CD Music into MP3 Format
1. Insert a music CD into the optical drive of your Joybook.
2. The songs on the music CD will automatically appear on the Song List. Click to
select the songs you wish to convert, or uncheck the unwan ted ones.
3. Click the button. A new playlist named New Album will automatically be
created on the Me dia Panel below Music Lib rary, and QMusic will start the con-
version process. Depending on the number of songs you selected, this process
may take a while.
4. When the conversion process is completed, you will see the conv erted songs on
the Song List. To change the name of the playlist, right-click on it and select
Change playlist name.
Creating an MP3 Music CD
A CD-burner is required for creating an MP3 music CD.
1. Make sure that the CD-burner is ready and there is a blank recordable disc in
the burner.
2. Right-click a playlist under Music Library and select Burn MP3 data disc.
3. Follow the instructions on the screen to proceed.
For more information on how to use QMusic, please consult the on-line Help by
clicking the button.
Using the Q-Media Bar 19
Page 24

Viewing Digital Photographs, Creating Slide Shows and Calendars
Photo Explorer can help you manage your digital photographs and other images,
letting you easily view, print, and edit them, as well as create customized slide
shows.
Click the button on the QMedia Bar to open Photo Explorer.
Photo Explorer Workspace
12
4
5
6
No. Button/Icon Description
The Folder Tree allows you to manage y our files
1 Folder Tree
2Browse Pane
3 Viewer Toolbar
easily. Right-clicking the Folder Tree displays
commands for organizi ng and adding folders to
the Favorites List.
The Browse P ane allows you t o easily look
through files in List or Thu m bnail view. Doubleclicking a file opens it in the Viewer (for image
files only) or its associated program.
The Viewe r t oolbar give s you quick access to frequently used commands.
3
4 Preview Pane
Slideshow Story-
5
board
Slideshow Tool-
6
bar
Viewing Images
1. Locate the desired image files in the Directory Tree.
2. Files in the directory you selected will be shown as th umbnai ls or in a list in the
Browse Pane. Select the image you wish to view.
3. The image you selected will be shown in the Preview Pane. Double-clicking in
the Preview Pane will open the Viewer window for a closer look at the image.
Creating a Slide Show or Screensaver
Photo Explorer gives you an easy way to create a slideshow/screen saver using your
favorite media files. You can use this feature for demonstrations, presentations, or
simply for your own entertainment.
1. Click the Slideshow button on the Viewer Toolbar.
2. In the Browse Pane, select the files you wish to use in your slideshow project.
You can use audio, video, and image files.
3. On the Slideshow toolbar, click the Add button or drag selected files to the
Slideshow Storyboard. Repeat steps 2 and 3 if necessary (especially when files
are located in different folders).
4. Re-order the files by dragging them to another frame or select a file from the
storyboard, cl ick t he Move button on the Slideshow toolbar then find the
frame where you would like to move the file and click once.
5. Remove selected files from the storyboard by clicking the Remove button
on the Slideshow toolbar.
6. Click the Slideshow Options button to apply a transition effect between
images and customize the overall appearance of the slideshow.
To make an auto-running slideshow (for compute r playback), set a constant
image duration in Default duration. Otherwise, to allow manual control of the
slideshow, select Control manually with keyboard or mouse.
The Preview Pane allows you to preview the
image file or play the audio/ v id eo f ile sel ected in
the Browse Pane.
The Slideshow Storyboard helps you crea te a
multimedia slidesh ow us in g sel ected image files,
even if these files are loca t ed in di fferen t fol ders.
Contains buttons that allow you to deal with the
slideshow files.
Using the Q-Media Bar20
Page 25

7. To set different display durations and add sound annotation to individual
images, select the image(s) in the Slideshow storyboard and the Slideshow
Options button.
8. To add backgroun d music starting at a certain image in the slideshow, drag and
drop the file(s) beneath the desired image in the Slideshow Storyboard. Each
time you add music, be it single or multiple selected files, the selected music
will be inserted as a single clip be neath the rang e of imag es it will play al ong side
with.
Repeat the above process to add more background music to various parts of the
slideshow.
If the duration of a music clip is shorter than the total duration of the range of
images which it was applied to, the music will continuously be replayed until its
corresponding images have all been displayed. To avoid replaying music, you can
synchronize the duration of images with the duration of the music by checking
both durations first before adding music.
• To append more music files to a music clip, hold down the <Ctrl> key and drag
selected files from the Browse Pane onto the starting image of the music clip.
• To move a music clip to another image, drag it to the desired image.
If the image already had accomp anying music, the transferred clip will totally
replace it.
9. Click the Show button to preview the slideshow with the present settings.
10. When you are satisfied with the slide order, click the Save button, then
define a name and location to save the slideshow file (*.UES).
11. Depend in g on the purpos e of your s l id e show, there ar e di ffe re nt me t ho ds of
preparing the file for viewing:
• The slideshow can be viewed at any time on your Jo ybook b y dou ble-c lic ki ng on
the (*.UES) file you created in step 10.
• Click the Package button to copy all the files used in the slideshow to a sepa-
rate folder where they can be easily acces sed so you can e-mai l the entire show to
a friend or relative that also uses Photo Explorer.
• Click the Export button to create a Web Slideshow that can be uploaded to a
Web server, or packaged in a self-extracting EXE file, so it can be e-mailed to a
friend or relative (Photo Explorer is not needed by the recipient).
• Click the Screen Saver button to use your slideshow as a screen saver.
The screen saver that yo u crea te is linke d to the fi les you se lecte d to make it. Mo ving or deleting these files breaks the links, so that the screen saver will not function
properly.
Making a Calendar
1. With a thumbnail selected in the Br owse Pane, click Tools on the Viewe r Toolbar and then select Calendar.
2. In the Calendar dialog box, from the Template section, select a page layout either Portrait or Landscape .
3. Select the calendar template that you prefer.
4. Move any of the calendar elements (month, year, etc.) by selecting and then
dragging it to a position you prefer.
5. Resize any of the elements by selecting it then dragging any of the nodes located
at the corners and along the sides of the element's bounding box.
6. Adjust the font type, style and color for each of the different elements by clicking the Font and Color button. In the Font and Color dialog box, select the element that you would like to modify by selecting it in the Text Preview window
or from the Item drop-down menu.
7. Now you can choose to output your calendar in different ways:
• Click the Print Setup button to configure your printer. Click Print to send the
current calendar to your printer as a print job.
• Click Wallpaper to set the current calendar as y our Windows Desktop Wallpaper .
• Click To Clipboard to send the current calendar to the clipboard so you can
open it in another program such as an image-editing program, where you could
further enhance the calendar.
8. Click Close to exit the Calendar dialog box.
For more information on how to use Photo Explorer, please consult the on-line Help
by clicking Help and then select Ulead Photo Explorer Help.
Using the Q-Media Bar 21
Page 26

Watching DVD/VCD Movies
Click the button on the QMedia Bar to open PowerDVD. With PowerDVD, you can watch DVD/VCD movies or play music with your Joybook.
When P owerDVD is opened, a control panel and a movie window will appear on
the screen.
Power DVD Control Panel
Control Buttons
123456789101112 13 14 15
16
17
18
19
20 21
No. Button/Icon Description
1 Snapshot Captures video content as bitmap image files.
2 Full Screen
Go up/AB
3
Repeat
4 Repeat Repeats titles, c hapters, songs, etc.
5 Add Bookmark Adds bookmarks for specific DVD scen es .
6 Go to Bookmark Directly goes to bookmarked scenes.
7 Karaoke Switches among karaoke modes.
8 Next Angle Switches among available angles if any.
Next Audio
9
Stream
10 Next Subtitle
11 Menu Accesses all available DVD menus.
12 Configuration Configuration settings are all located here.
Switches to full screen and back to windows
mode.
Goes up to previous secti on when navigating
DVD title menu selections. Sets points for AB
repeat function during playback.
Switches among availabl e audio streams.
Switches among availabl e s ubt i tles dur i ng pl ay-
back.
22
23
24
25
13 Select Source Selects media source for playback.
14 Eject Ejects discs from the optical drive.
15 Help Accesses online help.
16 Volume Control Increase, mute or de crease volume.
17 Step Backward Goes to previous frame.
18 Backward Scan Fast rewinds the media at different speeds.
19 Previous Returns to previous ch apter.
20 Play Plays media.
21 Next Jumps to next chapter.
22 Forward Scan Fast forwards the media at different speeds.
23 Stop Stops playback.
24 Pause Pauses playback.
25 Step Forward Goes to next frame.
Display
2
1
3
No. Button/Icon Description
Current Media
1
Type
Current Shuffle
2
Mode
Current Repeat
3
Mode
Current Audio
4
Mode
Current Subtitle
5
Language
Current Audio
6
Language
7 Current Title Dis plays curren t title.
8 Current Chapter Displays cu r rent chapte r.
9 Elapsed Time Displays elapsed time.
5
4
Displays the current med ia type.
Displays the current sh uffle mode.
Displays the current rep eat mode.
Displays the current au dio mode.
Displays the current su btitle language.
Displays the current audio language.
678
9
10
Using the Q-Media Bar22
Page 27

10 Playback status Indicates current play ba ck status.
Region Code Settings
Most of the DVD titles in today's markets are governed by a regional code that
divides the world into six separate regions. This ensures maximization of revenues
for motion picture studios' theatrical and home releases, which times and dates
vary from region to reg ion.
1. Open Power DVD and insert the DVD you wish to play into the optical drive.
2. Upon inserting your DVD, note the dialog box. Click OK.
3. After the region has been set, this dialog box will no longer prompt you unless
an encoded DVD title from another region is inserted.
PowerDVD will only allow you to set the regional settings five times until the
regional code is fixed. S ubseque ntly, playback of DV D titles will b e specifi c to one
region. Some DVD titles may not be region-specific.
Basic Operations
Playing DVD
1. Open Power DVD, insert your DVD disc and click the Play button. Be sure that
the source is correct. If not, click the Select Source button and choose the right
drive.
2. A warning message or copyright information will appear depending on the
DVD title. Usually, this content cannot be skipped over.
3. After the promotional content, you will be presented with the main menu. With
your mouse, select by clicking once. The DVD will begin playing.
4. If necessary, use the Control Buttons to access the various playback functions.
Playing VCD/SVCD
1. Open Power DVD and insert the VCD/SVCD you wish to play into the optical
drive. Be sure that the source is correct. If not, click the Select Source button
and choose the right drive.
2. Click the Play button. The VCD/SVCD will begin playing. Depending on the
VCD/SVCD title, some may offer a title menu. Depending on your title, the on
screen menu selection can be clicked on directly or use the Number Pad to
select.
3. If necessary, use the Control Buttons to access the various playback functions.
Playing Media Files
The simplest way to play me dia files is to drag and drop a file directly onto the
PowerDVD control panel or movie window. This includes all media file types that
are supported by PowerDVD and playlist formats (.m3u and .pls).
1. Open PowerDVD and open the Windows Explorer (or any fold er).
2. Browse to find the file you wish to play, click it, drag it over to the PowerDVD
control panel or movie window, and then drop it.
3. If necessary, use the Control Buttons to access the various playback functions.
Playing Audio CD
1. Open PowerDVD, insert the Audio CD you wish to p lay and click the Play button.
2. To change your Audio CD playlist, click the Menu button during playback or
during pause mode. By default, your playlist will duplicate all the tracks available on your Audio CD from the left window. Click Clear to clear your playlist
or Reset to return to the default setting.
3. Select tracks and click Add to add to your Playlist. For selecting multiple tracks,
press the <Ctrl> key when s electing or pre ss the <Shif t> k ey to select tracks in a
row.
5. Click OK when you are finished.
For more informati on on how to use PowerDVD, please refer t o the on-line Help by
clicking the Help button.
Using the Q-Media Bar 23
Page 28

Making Your Own Movies
Your Joybook can help you edit video files to create a movie that you can share
with family and friends. With a digital video camera or other source of digital
video footage, y ou can take advantage of the PoweDirector to produce your very
own cinematic masterpiece-or if you're less ambitious, just the coolest home video
ever!
Workspace View
5
Buttons
6 Smart Guide Provides function-specific tips.
7 Media Tracks Insert media clips here.
Click to switch between Timeline and Storyboard
views.
Click the button on the QMedia Bar to open PowerDirector.
PowerDirector Workspace
The PowerDirector Program
1
4
5
6
No. Area Description
1 Mode Buttons Click to switch working m odes.
2 Library Contai ns media clips, effects and transitions.
3 Preview Window
Edit Funct ion
4
Buttons
Provides playback cont ro ls to pre vi ew clips and
movies.
Open editing rooms ded ic at ed t o a specific task.
23
7
Capture Mode
When you click the button, PowerDirector enters Capture mode, in
which you can capture media from a variety of capture devices.
1
2
No. Area Description
Capture Pre-
1
view Window
Capture Device
2
Selection Area
Captured Clips
3
Area
Information Dis-
4
play Area
Displays media clips during capture.
Allows you to switch cap tu re devices and set cap-
ture limits.
Displays media clips after capture.
Displays information about captured file size and
available hard disk space.
4
3
Using the Q-Media Bar24
Page 29

The Movie-Making Process
The digital movie production process involves a combination of artistry and technology, beginning with raw video footage and ending with a movie production.
PowerDirector provides the easiest way to produce your finished movie and publish it to the medium of your choice.
Pre-Production
Before you edit your movie using PowerDirector, you must first create (or gather)
its component parts: video clips, photos, music, and narrative voice-overs. You
may collect raw footage yourself with a camcorder or other recording device, or
you may simply use non-copyright protected media files that you have on hand.
Editing
When you hav e your ra w footage on hand, y ou might expect to use P o werDir ector
to trim video and audio content to a d esired length, add a special effect to a video
clip, add transition effects between video clips..., etc.
Ready to Burn
When you are ready to burn your movie to disc, you should have several discs on
hand that are compatible with your burning drive. Make s ure not only that the
media type is correct (i.e.: that you have DVDs for a DVD drive and CDs for a CD
drive), but that your discs are all in the correct format (for example , CD-R or
DVD+RW). Keep several discs on hand in case your drive encounters errors, or to
make duplicate copies when you are satisfied with the results.
Step 1: Loading Clips into the Library
When loading media clips into PowerDirector's Library, you have two options: to
load media files individually, or to load an entire folder that contains media files
you want to use in your current project.
Load Individual Media Files
1. Click to open the Media Room in the Library.
2. Select the type of media you want to load (or All Media) from the Filter dropdown list.
3. Click and select Load media file(s). A dialog opens.
4. Locate and open the file(s) you want to add. Thumbnails of each of the media
files you have selected appear in the Library.
Load a Media Folder
1. Click to open the Media Room in the Library.
2. Click and select Load a media folder. A dialog opens.
3. Locate the folder you want to open, then click OK. All of the media files in that
folder are loaded into the Li brary.
Step 2: Managing Clips in the Workspace
Once you have loaded media files into the Library, they are ready to be used in
your movie. You can load different types of media clips into the different tracks in
the workspace, move them to different locations in your story, and delete them
from the workspace.
Adding a Clip to the Workspace
Adding Video & Image Clips
1. Click to open the Media Room in the Library.
2. Select Video, Image, or All Media from the Filter drop-do wn list to sort the clip s
in the Media Room.
3. Select a clip, then add it to the workspace. You may do this in one of the following ways:
• Click to add the clip to the Video track or to add
the clip to the PiP track.
• Drag clips to a desired position in the Video or PiP track.
You may select several clips and drag the m together in to the sam e track, pro vided
all of the clips are compatible with the destination track.
Adding Audio Clips
1. Click to open the Media Room in the Library.
2. Select Audio or All Media from the Filter drop-down list.
3. Select an audio clip, then add it to the workspace. You may do this in one of the
following ways:
• Click to add the audio clip to the Voice track or to
add the audio clip to the Music track.
• Drag one or more audio clips to a desired position in the Voice or Music track.
Audio clips can be added at any point in this track.
Step 3: Working with Effects
Adding a Video/Title/Transition Effect
1. Click an effect button ( , or ) to display the type of
effect you want to add in the Library.
Using the Q-Media Bar 25
Page 30

2. Select an effect from the Library and drag it into the desired position in the correct track in Timeline view. (This position is directly beneath the clip(s) in the
Video track that you want to affect.)
Editing an Effect
1. Double click an effect in Timeline view.
2. The corresponding effect editing window will appear allowing you to further
change the appearance of the effect.
Setting an Effect's Duration
1. Select the effect whose duration you want to set in the Timeline view.
2. Position your cursor at one end of the effect and drag the end of the clip to the
new position.
Yo u can drag the edge of a clip to lengthen it or to shorten it.
Deleting an Effect
1. Click to select the effect you want to delete in the Timeline view.
2. Press the <Del> key on the keyboard.
Step 4: Producing a Movie Disc
You may want to burn y our movie to disc so that you and your friends and family
can enjoy watching it on a computer or a disc player.
1. Click to open the Production Wizard.
2. Click , then Next. Disc production options appear on the page.
3. Select a disc format, then set your options:
• To set a destination folder for the produced movie, click Output to, then choose
a new folder.
• Country/Video Format of Disc: Specify the location where you want to play the
disc you create.
4. Check After production, make disc in Power Producer to continue the production process by burning a disc in Pow er Producer after your movie is compiled.
5. Click Next. Production details appear on the page.
6. Verify that these details are correct.
7. Click Start. The production process begins. This process may take a few minutes.
8. When production process i s complet ed, Powe r Produc er E x press will ap pea r o n
the screen. Click to start burning the movie production to the disc.
9. Have a blank disc ready in the CD-burner and click .
For more information on how to use PowerDirector and Power Producer, please
refer to the on-line Help by selecting Help.
Using the Q-Media Bar26
Page 31

Burning CDs Using Nero Express
The Nero Express software that comes with your Joybook allows you to burn different types of data to CD by simply following the easy step-by-step instructions.
Click the button on the QM edia Bar to open Nero Express.
1. Insert a blank CD into the CD-burner.
2. Take burning an audio (music) CD that you can play on any audio CD players
as an example, move the cursor onto the icon , and then click the Make
Audio CD item that appears underneath.
3. In the window that follows, click Add.
4. Browse to select the music files in the dialogue box that appears and then click
Add. Repeat this step if you want to burn more music files onto the CD.
5. When you are done selecting files, click Finished.
6. The total selected file size will be calculated and displayed by a blue bar at the
bottom part of the window. If the blue bar goes over the dotted r ed line, you
Using the Q-Media Bar 27
Page 32

have to delete some files from the selected files list by right-clicking a file and
select Delete. Click Next.
8. Nero Express will start burning files on to the CD.
7. The following window will appear. Click Burn.
Using the Q-Media Bar28
9. When the burning process has been carried out successfully, the following dialogue box will appear. Click OK.
10. Click Next.
11. You can now choose to burn another CD with the same selection of files again,
burn a CD with different files, enter Cover Designer to design the cover for the
Page 33

CD you just burned or save the setting of this CD for future use. Or, you can
simply click Exit to exit Nero Expres s .
For more information on how to use Nero Express , please consu lt the on-line Help
by clicking the icon on the Nero Express welc ome window and t hen select
Help Topics.
Using the Q-Media Bar 29
Page 34

Using QCamera
With QCamera, you can not only capture video clips and photos easily but also
manage them using different albums. What’s more, you can also burn them on
CDs so you can share them with your family and friends.
Click the button on the QMedia Bar to open QCamera.
In order to use QCamera, your must have a properly install ed video camera that
complies with t he WD M arch it ecture. For more in fo rma tio n, please refer to th e do cumentation of the video camera.
QCamera Workspace
6
1
2
3
13
14
15
No. Button/Icon Description
1 Photo Mode button Click this button to switch to the Photo Mode.
2 Video Mode button Click this button to switch to the Video Mode.
3 Edit Mode button Click this button to switch to the Edit mode.
4
23
5
7
16
17
18
19
20
21
22
10
11
12
4 Preview Window
5 Help button Click th i s button to ope n Help.
6 Minimize button
7 Close button Click this button to close QCamera.
8 Filter button
Capture button (in
Video and Photo
Mode)
9
Save button (in
8
9
Edit mode)
10 Frame button
11 Reset button
12 Album Switch
13 O p en Al bum button Click this button to open an existing album.
14 N e w Alb um button Click this button to cre at e a new album.
15 Slideshow button
16 Print Photo button
17 Burn Album butto n
Delete Photo but-
18
ton
19 Add Photo button
20 Scroll Up button
Allows you to view the image/video captured by
the video camera instantly.
Click this button to minimize QCamera as an
icon on Windows task bar.
Click this button to open the Fi lter w i ndow
where you c a n ap pl y v ar io us f ilt er effect s t o th e
photo/video in the Preview window.
In Video Mode, click this button to start capturing video. To stop capturing, click this button
again.
In Photo Mode, click this button to capture photos.
In Edit Mode, click this button to save the
photo/video.
Click this button to open the Fra m e w indow
where you can apply various frame effects to
the photo/video in the Preview window.
Click this button to remove all special effects
applied to the photo/vide o in th e Pre view window.
Click this button to open or close the album
window.
Click this button to view photos in the album as
slideshows or export s lide shows.
Click this button to print the ph otos i n Edit
Mode.
Click this button to start burnin g al bum s ont o a
CD.
Click a photo thumbna il in th e album and then
click this button to delete the selected photo.
Click this button to add new photos to the
album.
Click this button to scroll the thumbnails in the
album up.
Using the Q-Media Bar30
Page 35

21 Scroll Down button
22 Album Window
23 Status Bar
Click this button to scroll the t hum bnails in the
album down.
Displays the thumbna ils o f ph ot o/ video in current album . Click a thumbnail and the photo/
video will appear in the Preview window.
Displays the name of curr ent al bu m and the
current/total pages of thumbnai ls i n th e al bu m .
Capturing Videos
To capture videos:
1. Click the Video Mod e button to switch to the Video Mode.
2. Click the Capture button. QCamera will start capturing video from the P r eview
window. To stop capturing, click the button again.
3. The captured video will automatically be saved in the album as a thumbnail
with the icon .
Capturing Photos
To capture photos:
1. Click the Photo Mode button to switch to the Photo Mode.
2. Click the Capture button. QCamera will capture photo from the Preview window.
3. The captured photo will automatically be saved in the album as a thumbnail.
Applying Special Effects to Photos and Videos
With the Filter and Frame functions, you can easily add more fun and effects to
the captured videos and photos.
Applying Filter Effects to Photos
1. Click the Photo Mode button.
2. Click the Filter button. The Filter effect window will pop up.
3. Click to select a filter effect in the Filter effect window. The Filter effect will
appear instantly in the Preview window.
4. Click the Capture button to capture photos with the selected Filter effect.
Applying Filter Effects to Videos
1. Click the Video Mod e button.
2. Click the Filter button. The Filter effect window will pop up.
3. Click to select a filter effect in the Filter effect window. The Filter effect will
appear instantly in the Preview window.
4. Click the Capture button to capture video with the selected filter effect.
5. Click the Capture button again t o stop capturing video.
Applying Frame Effects to Photos
1. Click the Photo Mode button.
2. Click the Frame button. The Frame effect window will pop up.
3. Click to select a frame effect in the Filter effect window. The filter effect will
appear instantly in the Preview window.
4. Click the Capture button to capture photos with the selected Frame effect.
Applying Frame Effects to Videos
1. Click the Video Mode button.
2. Click the Frame button. The Frame effect window will pop up.
3. Click to select a frame effect in the Frame effect window. The frame effect will
appear instantly in the Preview window.
4. Click the Capture button to capture video with the selected frame effect.
5. Click the Capture button again t o stop capturing video.
Removing Special Effects
To remov e t he Filt er or Frame effect from the P r eview window, click the Reset button.
Creating a New Album
To create a new album:
1. Click the New Album button on the Album window. A dialog will appear asking
you enter the name of the new album.
2. Enter the name of the new album and then click OK.
Adding Photos to an Album
To import new photos into an album:
1. Click the Add Photo button on the Album window. A dialog will appear
2. Browse to select the photo(s) you want to add to the album and then click OK.
3. Repeat step 2 if you want to add more photos.
Burning Albums onto a CD
This function requires a CD-burner.
1. Make sure that the CD-burner is correctly installed and connected to your computer (if you are using an external CD-burner), and an empty recordable disc
(or a disc with enough space) is in the CD-burner.
2. Click the Burn Album button. A Burn album window will appear.
Using the Q-Media Bar 31
Page 36

3. Click to select the album you want to burn onto the CD from the list by checking the checkbox beside each album name. The total file size of selected
album(s) and remaining recordable disc space will appear instantly below.
4. If necessary, click the button beside Burner to select the CD-burner to use.
5. Click the Burn button to start burning.
Yo u can also click the Erase button to erase the recordable disc before burning.
For more information about the exciting features of QCamera, please consult the
on-line Help by clicking the Help button.
Using the Q-Media Bar32
Page 37

Using QPower
QPower is an advanced system power management tool specifically designed for
your Jo ybo ok. I n addi ti on to the sta ndar d po w er man ag emen t funct io ns pr o vided
by the Windows system, QPowe r incorporates several features which allow you to
precisely and meanwhile easily adjust system power settings. The features include:
• Flexible and comprehensive power setting options for maximizing system performance or minimizing power consumption
• Preset power profiles for easy selection and application
• Program-associable power profile design allows you to associate different appli-
cation programs with different power profiles. The specific power profile is
automatically applied when you open the corresponding application program.
Launching QPower
By default, QPower is automatically launched after you turn on your Joybook (the
icon appears on the Windows System Tray located at the lower right part of
the Desktop). Should you need to launch QPower after you close it, follow the
steps below:
1. Click the Start button on Windows Taskbar and select All Programs, QPower,
QPower.
2. The icon will appear on the Windows System Tray indicating that QPower
has been successfully launched.
Checking Battery Level
You can check the battery level of your system following the steps below:
1. Right-click on the QPower pr ofile icon on the Windows System Tray.
2. A menu containing several options and a power level ind icator will appear. Th e
power level indicator shows the percentage of the remaining power.
Selecting a Power Profile
To select a power profile:
1. Right-click on the QPower pr ofile icon on the Windows System Tray.
2. A submenu that contains several power profiles will follow. Click to select a
desired power profile.
3. When a power profile is selected, the settings will be applied instantly. Meanwhile, a message box indicating the power profile selected will also appear on
the screen.
• When a differen t power profi le is selected, t he power profile i con on the Sys tem
Tray will also be changed accordingly.
• When you place the mouse cursor over the profile icon, a tip balloon containing
the description of the power profile will appear.
• ‘Automatic Switch’ perfor ms automatic switching among di fferent corresp onding
power profiles when you move from one open program to the other and the
brightness of your screen may also be changed accordingly. By default, this
option is turned off, to enable it, right-click on the QPower profile icon on the
Windows System Tray and then check ‘Automatic Switch’ from the menu that
appears.
You can also use the function key co mbination (Fn + F10) to cycle amo ng the 3
basic power profiles: Max. Performance, Normal and Max. Battery Life.
Setting up a Power Profile
In addition to using the preset power profiles as they are, you can also change the
settings of these profiles according to your preference.
To customize a power profile:
1. Right-click on the QPower profile icon on the Windows System Tray.
2. Select Configuration... from the menu that appears.
Using the Q-Media Bar 33
Page 38

3. The following QPower window will appear.
4. Click to select a profile from the Profiles box. When a profile is selected, its
description will appear in the Profile description box below.
5. Adjust settings from the Settings box on the right by selecting opti ons from the
drop-down menus, or dragging sliders to a different position.
Please refer to the table below for the description about the setting ite ms available
in the Settings box.
Item Description Note
For specifying the period of i nactivity before the Joybook goes on
standby.
For specifying the period of i nactivity before the Joybo ok hibernates.
For specifying the action the Joybook performs when you close the
lid.
For adjusting the speed of the CPU.
The higher the
CPU speed,
the more the
power it consumes.
System
Standby
Timer
Hibernation
Lid
Close
CPU
Speed
The higher the
Brightness
Display
Turn-off
timer
Screen
Saver
HDD
Miscellaneous
6. Click the button to save the settings. You can also click the
button to cancel, or the button to reset all settings to their default val-
ues.
Turn-off
Timer
CIR
For adjusting the brightnes s level of
the screen.
For specifying the period of inac tivity before the Joybook t urns off the
screen.
For specifying the period of time
before the screensaver activates.
For specifying the period of inac tivity before the Joybook tur ns off its
hard disk.
For specifying the status of the
Infrared port of the Joybook.
This option may not be avai lable o n
certain Joybook models.
screen brightness, the more
the power it
consumes.
Select Don't
Care if you do
not want
QPower to
change the
Infrared port
status when a
different power
profile is
selected.
Associating Application Programs with Power Profiles
By default, some application programs installed in your Joybook are already associated with certain power profiles of QPower. For example, when you open the
Window Media Player program, the DVD power profile will be applied automatically. You can add, remove or change the programs that are associated with the
power profiles following the steps below.
1. Right-click on the QPower profile icon on the Windows System Tray.
2. Select Configuration... from the menu that appears.
3. The QPower window will appear.
Using the Q-Media Bar34
Page 39

4. Click to select a profile fr om the Profiles box. When doing so , the des criptio n of
the selected profile and the application programs already associated with the
profile will appear in the Profile description and Associated Applications boxes.
5. Click the button. The dialog below will appear.
QPower will search your system for installed application programs. Depending on
the number of programs installed, it may take several seconds.
6. When searching is done, the installed application programs in your system will
appear in the Available box on the left.
7. Click to select a program in the Available box and then click the button. The selected program will be added to the Current box indicating that the
association between the application program and the power profile is established. You can also drag-and-drop the program from the Available box to the
Current box directly, or simply double-click on the application program in the
Avail able bo x.
If the selected application program has already been associated with a power profile, an error message will appear. You can not associate one application program
with multiple power profiles.
Removing the Association Between Programs and Power Profiles
In addition to associating application programs with power profiles, you can also
remove the association between them following the steps below.
1. Right-click on the QPower profile icon on the Windows System Tray.
2. Select Configuration... from the menu that appears.
3. The QPower window will appear.
4. Click to select a profile from the Profiles box.
5. Click the button. QPower will search your system for installed application programs.
6. When searching is done, the installed application programs in your system will
appear in the Available box on the left.
7. Click to select a program in the Current box and then click the button. The selected program will be moved to the Available box, indicating that
the association between the application program and the power profile is
removed.
8. Click the button to save the settings, or t he button to cancel without savi n g .
For more information about QPower, please consult the on-line Help by clicking the
button.
If the application program does not appea r in the Available box, click the
button. Bro wse t o select the e x e cutable (.exe) of the applic ation p r ogram and cl ic k
Open. It will then be added to the Current box on the right.
Repeat this step if you want to associate more application programs to the power
profile. If you wish to reset the settings to their default values, click the
button.
8. Click the button to save the settings, or the button to cancel without saving.
Using the Q-Media Bar 35
Page 40

QPresentation
When you plug an overhead projector into the VGA port of your Joybook, QPresentation automatically performs the following functions.
1. Detect that the project or has been connected and begin linking up Joybook
with it. This saves you from manually pressing Fn+F3 to establish the link.
2. Determine if the projector is capable of displaying Joy book’s current screen resolution. If it cannot , then determine the next best resolution the projector can
handle and automatically reset Joybook’s screen resolution to match that. This
matching of resolutions prevents the screen on Joybook from being cut-off
when displayed on the projector.
By default, QPresentation is turned on. You can turn it off by adjusting its settings
on the taskbar.
1. Locate the QPresentation icon on the system tray of your desktop.
2. Right click on the QPresentation icon to bring a pop-up dialog.
2. To turn off QPresentation, un-check the Automatic Switch option in the popup dialog.
BenQ Surround
SRS technology brings you NEW Audio Experience. Your Joybook gives you the
feature of surround sound on your system. Powered by the SRS chip inside your
Joybook, you can now enjoy the benefits of surround sound when playing your
music and m ovies.
By default, BenQ Surround is turned on. You can turn it off by adjusting its settings on the taskbar.
2. To turn off SRS, select the Turn off SRS option in the pop-up dialog.
SmartAudio
When activated, SmartAudio can reduce microphone noise and cancel the echo
effects during a net meeting. This makes your voice sound clearer.
To activate SmartA udio:
Double click the SmartAudio icon on the system tray of your desktop. The
following dialog will appear.
• Click Microphone Nois e Reduction to activate the noise reduction function.
• Click Echo Cancellatioin to enable the echo cancellation function.
To minimize the SmartAudio dialog, click the icon.
1. Locate the SRS icon on the system tray of your desktop.
2. Right click on the SRS icon to bring a pop-up dialog.
Using the Q-Media Bar36
Page 41

Attaching External Display Devices
Attaching an External Display Device
When giving a presentation, you can output the Joybook’s video signal to an external display device, such as a projector or monitor. Press the Fn + F3 function key combination to switch between Joybook's own screen and the a ttached display device, or use simultaneous display.
Monitor
Projector
Attaching External Display Devices 37
Page 42

Installing Additional Memory
You can replace the existing memory module with a higher-capacity one. Before
you upgrade or replace memory, please check on the BenQ web site to determine
the module which can be used, or contact BenQ distributor or customer service
center. It is recommended that you take your Joybook to the BenQ distributor or
customer service center for th e upgrade or memory replacement.
The memory of your Joybook can be extended to up to 2 GB.
Please follow the steps below to consult the FAQ information and find out the
types of BenQ certified memory modules for your Joybook:
1. Connect to BenQ On-line Service and Support (http://support.BenQ.com).
2. Click FAQ.
3. Click Joybook.
1. Disconnect the AC adap ter. Turn off your Joybook and turn it over.
Memory/
Mini PCI
Cover
Battery
Installing Additional Memory38
Page 43

2. Slide the battery retainers to the open position. 3. Remove the battery as shown.
4. Use a screwdriver to remove the screw that secures the memory cover.
5. Open the cover.
Installing Additional Memory 39
Page 44

6. Align the memory module with the slot, and then insert it. When inserting, pay
attent io n to the direction of th e memory module.
7. Gently push the free edge downwards until the module locks into place.
8. Replace the cover, and use a screwdriver to secure it with the screw.
Installing Additional Memory40
9. Install the battery, and then slide the battery retainers to the original locked position. Connect the AC adapter. When you start Joybook, it will automatically test and
configure the new memory.
Page 45

Recovering Your System
Should your system become unstable and you wish to rest ore it to its original stat e
or make a backup, you can do so following either of the methods below:
1. The Windows System Restore tool
2. The Quick Recovery function of your Joybook
3. The supplied Recovery CDs
It is recommended that you try the Windows System Restore tool before attempting the other 2 options.
System recovery is a d ata destructive pro cess. You should backup all data and
applications prior to restoring. Ple ase make sure y our system is conn ected to AC
Power before continuing.
Using the Windows System Restore Tool
1. Start your Joybook to Windows.
2. Insert Recovery CD Disc 1 into the optical drive.
3. The Windows System Recovery tool will appear on the screen automatically.
Follow the on-screen instructions to proceed.
Using the Quick Recovery Function
Your Joybook provides you with a Quick Recovery method from its hard drive.
To reco ver using the quick recovery method:
1. Restart your Joybook.
2. During the restart process, press the F10 key when you see "F10 to Recover" on
the upper left part of the scr een. A lan guage selection menu will appear. Click to
select the language you prefer.
3. The following options will then appear on the screen. Use the touch pad or Tab
key to make your selection and then press the Enter key to confirm.
This process will ERASE ALL data in your system drive (C:) and restore the system to default factory configuration: restores the system disk (C:) of your Joybook
to its original, factory preload state.
If this option is selected, a ll progr ams you i nstalled or data yo u saved o n drive C:
will be erased. However, data on drive D: will not be affected.
To backup all data in your system drive (C:) to drive (D:), please click "Next".
Please make sure your system is connected to AC Power before continuing: back
up all data on drive C: to drive D:. Click Next and the following options will
appear:
Start creating backup files. First please ch eck your driv e D: for suffici ent free space
and the disk format must be FAT32. If you already have an old backup file on
drive D:, then the bac kup file will be rep lac ed: start backing up all data on drive C:
to drive D:.
• Old backup data will be overwritten by a new one.
• Before you select this option, make sure that there is enough space on drive D: for
storing the backup data and the disk fo rmat of drive D: is FAT32. For example, to
back up 6GB data on d rive C: to drive D:, yo u need at least 3GB fr ee space on
drive D:. You can follow the steps below t o ch ec k th e u se d o r available space and
disk format of drive C: and D:.
1. Click the Start button and then select My Com puter.
2. Right-click on th e C: or D: drive ico n and then sele ct Properties f rom the menu
that appears.
• Do not delete the file Mysys tem. pqi in th e MyBa ckup folde r in dr ive D:. O therwis e
the backup data will be deleted.
Restore all data to system drive (C:) from the backup data in drive D:: restore
drive C: using the backup data from drive D:.
• The default partitioning of your Joybook’s hard disk is as follows: 60% of the total
space for the C: disk, 2 GB for the hidden partition and the rest to the D: disk.
• The Quick Recover y data is stored in the PQSERVICE partition on the hard dis k
drive. Do not delete this partition, or th e Quick Recovery function will become
unavailable. If this happens, please co ntact your local BenQ serv ice center for
help.
Do not delete this partition
Recovering Your System 41
Page 46

Using the Recovery CDs
• All programs you installed or data you sav ed on dr ive C: w ill be era sed. Ho wever,
data on drive D: will not be affected.
• Recover using the Recovery CDs will cause the Quick Recovery function to
become unavailab le . If t his h ap pe ns , p le ase c on tact y ou r lo cal B en Q se rv ice ce nter for help. Besides, you will also need to install the device drivers manually from
Recovery CD Disc 2.
• Do not remove the Recovery CD when recovery is in progress.
• Make sure that the s ystem is no t in hibern ation mode b efore usin g the Recove ry
CDs.
1. Restart your Joybook.
2. When Joybook starts up, press the Esc key to enter the Boot Menu during
Power-On Self-Test (POST) while the BenQ Joybook logo is being displayed.
3. Insert the Recovery CD Disc 1 into the CD-ROM drive.
4. Select CD-ROM/DVD-ROM from Boot Menu using the up and down arrow
keys (K, L) and press the Enter key.
5. Then system will boot fr om the R eco very CD and you will see the Quic k R estor e
screen. Follow the on-screen instructions to proceed.
6. When you finish the recovery process, remember to remove the Recovery CD.
Reinstalling Software or Driver
To install/reinstall the software or driver, you can find the source files on the
Recovery CD Disc 2.
Recovering Your System42
Page 47

FAQ and Troubleshooting
The following are descriptions of situations that you may encounter during use of
the Joybook, along with basic tr oubleshooting steps. If you are not able to resolve
the issue, immediately contact a BenQ service center for assistance.
General
What is Joybook? What are the differences between Joybooks and traditional
notebooks?
BenQ call it Joybook, because BenQ has c ombined entertainment and stylish
design with traditional notebook's functions. For example, enhanced 3D processing power for gaming and movie viewing. With Joybook, you will be able to enjoy
the most exciting audio and visual experience ever!
What is a Wireless LAN (WLAN)?
A WLAN is a type of Local Area Network (LAN) that uses high frequency radio
waves rather than wires to communicate and transmit data among nodes. It is a
flexible data communication system implemented as an extension to, or as an
alternative for, a wired LAN within a building or campus.
What is IEEE 802.11a/b/g?
IEEE 802.11a/b/g is a technical specification issued by the Institute of Electrical
and Electronic Engineers (IEEE) that defines the operation of 5 GHz/54Mbps, 2.4
GHz, 11 Mbps/54Mbps, Direct Sequence Spread Spectrum Wireless Local Area
Networks (WLANs).
What is Centrino technology? What are the advantages of notebook PC's using
the Centrino technology?
The Centrino technology enhances the performance of notebook PC's at low
power consumption by optimizing the integrated design of the entire computing
system and the application environment. The major components of Centrino
technology include Pentium-M CPU, Intel 915 chipset and Intel Pro/Wireless
2100 Mini-PCI network interface card. Therefore, if a notebook PC does not use
all of these co mponents, we cannot say it uses the Centrino technology.
Battery and Power
How long should I charge the battery for the first time?
For new Joybooks, you should charge the battery for a minimum of 8 to 12 hours.
My computer won't start up with the battery inserted?
• Make sure the battery is properly inserted.
• Make sure that the battery is fully charged. If this does not work, consult your
BenQ dealer.
What should be the run time of a battery?
Run time will vary on individual Joybooks, based on the application p rograms
being used (i.e. high graphics, games), the number of times data is saved or
retrieved from the hard drive and/or optical drive, the memory of notebook, and
chemistry and capacity of the battery. A “realistic” average run-time for a battery
is 1.5 to 3 hours. Again run time will vary on applications being used and individual notebooks.
What should I do with the battery if I will not use my Joybook for a longtime?
Recharge the battery or discharge it to about 40% full, and then store it in a dry
place at about 15°C to 25°C. Extremely high or low temperature will shorten the
life of battery.
When charging the battery, the powe r indicato r on Joybook suggests that the battery is fully charged. When I check it from the Power Manager in Windows, the
battery level is only about 95%-99%. Why?
It is the result of the battery protection design of Joybook. When the power indicator on Joybook is off, it means that the battery has reached a saturated voltage:
95%-99%. At this moment, the voltage difference detected by Joybook is very
small, so it will reduce the charging current to prevent overcharging the battery
with excess current or voltage, which will damage the battery. Moreover, in order
to protect the battery from exposing to high voltage and current for a long time
during charging, the battery has been equipped with a protection circuit that will
charge the battery at low current in the final phase.
FAQ and Troubleshooting 43
Page 48

How come my notebook is not fully charged even after a full night charge?
Make sure that the Joybook is receiving power. Is the cord plugged in correctly?.
When the battery is installed in the computer and it is properly plugged in to an
AC outlet, check to see if the battery level icon is showing a charge sign. If this
does not fix the problem, the battery, the power sour ce i n the not ebook, or the AC
power cord may be defective. Consult your BenQ dealer for help and maintenance.
What should I do if the battery gets hot in my Joybook?
Take the battery out and let it cool down. If the problem persists once it is inse rted
back into the Joybook, the battery could be defective and it may need to be
replaced.
Connection
My modem does not connect at 56K speed?
Several factors can affect connect ion speed, such as line noise, number of peopl e
connecting/connected to your ISP, and the age and condition of the telephone
lines. A 56K modem does not guarantee all connections at 56K; rather it offers the
ability to connect at up to 56K speed.
Can't connect to the Internet with the built-in network interface on Joybook?
Check if the network has a fixed MAC address. Contact your network administra-
tor for further solutions.
How to prolong the life of the battery?
• Avoid frequent full discharges because this puts additional strain on the battery.
Several partial discharges with frequent recharges are better for the battery than
one deep one.
• Although memory-free, apply a deliberate full discharge once every 30 charges
to calibrate batteries with fuel gauge. Running down the battery in the equipment does this. If ignored, the battery level icon will become increasingly less
accurate. The battery life will not be affected.
• Keep the battery cool. Avoid placing it in a hot car. For prolonged storage, keep
the battery at a 40% recharge level.
• Consider removing the battery from the Joybook when running on AC power.
Joybook will not start up, even though the power button was pressed.
Check the power indicator.
• If it is not lit up, Joybook is not being supplied by power-either from an external
power source via the AC adapter or from the battery. Make sure that the AC
adapter is correctly inserted into the power jack of Joybook and a working electrical socket, and allow the battery to begin charging.
• If the power indicator is lit up in blue, the Joybook is being supplied normally
with power, meaning that the problem lies elsewhere.
• If you have added any hardware (memory for example), check if it has
been installed correctly.
• It is possible th at certain operating system files are damaged or missing.
If so, you may need to first back up all your data and then use the rest ore
CD that came with the Joybook to return the its software to original
state. Please note however that doing so will cause all of your personal
data on the hard disk drive to be lost!
Joybook is unable to use the infrared port to communicate with other devices.
Please confirm the following:
• Communication speeds for Joybook and the external device are identical.
• The infrared port is clean, and ther e are no objects blocking the path between
Joybook and th e external device.
• The distance and angle between Joybook and device do not exceed the effective
range of the port.
• You are not attempting to establish the link under conditions of direct sunlight.
• There are no incompatibilities between the communications software that is
attempting to establish the infrared link and any other communications software on the computer. For further information, please consult the manual for
the particular software.
When connecting to a local network with Joybook, the connection is unstable.
The instructions below will guide you throu gh the troubleshooting process.
1. Right-click My Comput e r and select Properties, Hardware, Device Manager.
2. Double click Network adapters. When the name of the network adapter of Joy-
book appears, double-click on it.
3. The Properties window will pop up. Click the Advanced tab, and then click the
Link speed & duplex item on the left.
4. Select the appropriate mode according to the settings of your LAN service from
the Value drop-down menu on the right, and then click OK.
• If the situation persists, use the Fn+F12 function key combination to shut down
wireless network function to reduce interference of diffe rent network c onnection modes.
FAQ and Troubleshooting44
Page 49

I have problem setting up wireless network.
Please follow the instructions below to resolve the problem:
• Have you enabled the wireless LAN function of the Joybook? Remember to use
the Fn + F12 function key combination to enable it.
• Click the Start button and select Control Panel, Network and internet Connections, Network Connections and then double-click Wireless Network Connections. Make sure the connection status is connected and with appropriate signal
strength. If you do not see the connection status, make sure your wireless device
is set up corr ectly so your Joybook can pick up the signal.
• Make sure that your wireless router or access point is broadcasting the SSID.
Refer to your wireless devic e ’s documentation for enabling thi s br oad ca sti ng f eature.
• If you are doing it correctly, right click on the wireless connection icon on
the System Tray located at the lower right corner of the Desktop and select View
available wireless network and you should see the SSID that your wireless hub or
device is broadcasting. If not, call your wireless device (router or access point)
manufacturer to get support on how to enable this broadcasting feature.
System
How should I resolve the "Low on Disk Space" or "Out of Disk Space" error messages.
Windows uses disk space for operations such as caching and virtual memory. The
Joybook may not run reliably if the hard drive’s free disk space drops under
100MB or 200 MB (for window XP). The following instructions will help you free
up the disk space.
1. Click Start and then My Computer.
2. Right click the hard drive icon and then select Properties.
3. Observe how much free space is on the hard drive.
4. To free up hard drive space, click Disk Cleanup and follow the in structions that
follow to proceed.
How do I update the driver?
Please visit BenQ on-line product support (http://Support.BenQ.com) to search
for updated sound driver software.
My system is running very slow. How can I improve performance?
System resources are the amount of memory and hard drive space that your Joy-
book can use and can degrade over time slowing the computer. However, you still
can improve the system performance by using the methods below:
• Close all open programs not being used. Use software program that are absolutely necessary. Try running virus scans and other tools when away from the
desk. Closing software program that are not necessary helps window perform
more efficiently.
• Prevent background software programs from loading. As software programs
load the small icons on the System Tray, they will be running in the backgr ound
and each one consumes valuable system resources. You can follow the steps
below to prevent application programs from running when Windows launches:
1. Click the Start button and then select Run....
2. Type “msconfig” in the Open field. This will open the system configuration util-
ity.
3. Click the Startup tab and then uncheck any task that is unwanted.
4. Click OK and restart the Joybook.
• Remove programs from the Startup folder. Removing programs from the Startup folder also helps to prevent programs from running when Windows starts
up. To do so, follow the steps below:
1. Right click anywhere in the open area on the Desktop and select New, Folder.
Give the folder a name. This folder will be used later.
2. Right click the Start button and then select Open. A folder named Programs
will appear in the Start Menu window.
3. Double click the Programs folder and then the Startup folder.
4. Right click any icon in the folder and then select Properties. The information
about the icon will appear. this will help you to judge if the program is necessary to be left in the Startup folder.
5. Select unwanted program icons, right click on them and select Cut.
6. Close the open windows to return to the windows desktop.
7. Open the folder created in step 1.
8. Select the Edit and Paste commands in the folder window. The icons that were
cut from the Startup folder are now placed in the folder.
9. Restart the Joybook. The programs removed from the Startup folder will no
longer run when Windows starts. However, you can still run them by double
clicking their icons in the f older created in step 1.
• Empty the Recy cl e B in. You can free up disk space b y c learing files you no longer
need from the Recycle Bin. To do so, right-click the Recycle Bin icon on the
Desktop and select Empty Recycle Bin.
FAQ and Troubleshooting 45
Page 50

• Delete temporary files and directories. This will increase hard disk space and
reduce the time Window takes to access the hard drive. It will also help to solve
problems associated with spooling print job.
1. Close all runn ing programs.
2. Click the Start button and sele ct All Programs, Accessories, System Tools, and
then Disk Cleanup.
3. Check the types of files you want to delete (temporary files are safe to delete).
4. Click OK.
• Use the Scan Disk and Defragment functions. The Scan Disk function checks a
hard drive for errors, while the Disk Defragment function takes all the scattered
bits of program data and groups them back together in the front of the drive.
1. Click the Start button and then select My Computer.
2. Right-click the hard drive’s icon and select Properties.
3. Click the Tools tab and then the Check Now button.
4. Check all check boxes in the dialog that follows .
5. Click Start, Yes.
6. Restart the computer. It may take a long time t o complete.
To run Disk Defragmentation in Windows XP:
1. Close all running software pr ograms.
2. Right-click the hard drive’s icon and select Properties.
3. Click the Tools tab and then the Defragment Now button.
4. Click to select a drive and then click the Defragment button. It may take a long
time to complete.
If Disk Defragmenter start itself over and over, it means that some hidden background software program is still accessing the hard drive. Restart the computer
and try again.
7. Deselect Allow the computer to turn off this device to save power.
8. Repeat steps 5 through 7 for each USB Root hub.
9. Click OK, and then close De vice Manager.
Why does the keyboard and/or palm rest get warm?
T ypically, the Jo ybook t e nds to be slightl y warm. The location of the b att ery is typ-
ically underneath the palm rest and as a result, the palm rest gets warm. The location of the processo r is typically und erneat h the k eyboar d and si nc e heat rise s, t he
keyboard may slightl y get warm. Ther e is no need t o be c oncerned . Ho wev er, sinc e
your computer has a thermally co ntr olled fan, when the CPU and/or int e rnal t emperature of the notebook reaches a certain temperature level, the fan is turned ON
and stays ON until the temperature drops to a pre-defined level.
The u, I, o, p, j, k, l keys on my Joybook are coming up as numbers instead of letters?
The number keys a re en a bl e d. Press the num lk (Number Lock) key once to disable the number lock function, and the letters will return to normal.
There is no sound coming from the speakers.
Check the following:
• The speakers may have been muted. Look at the volume control (speaker icon)
on the Windows Taskbar to see if mute has been set. If so, turn off the mute.
• The speakers may have been turned off. Use the Fn + F7 hotkey combination to
turn them on.
• The volume may have been set too low. Use the Volume Up/Down Button to
increase the volume.
• An earphone or external speakers may be connected to the audio-out jack, automatically turning off the computer's internal speakers.
USB devices quit working unexpectedly in Microsoft Windows XP.
This is because USB devices such as camera, scanners. or printer loses its connec-
tion and stops working unexpectedly. Please follow the steps below to resolve the
problem.
1. Click Start, and right click My Computer.
2. Click Properties and then Hardware.
3. Click Device Manager.
4. Double-click the Universal Serial Bus Controllers branch to expand it.
5. Right-click USB Root Hub, and then click Properties.
6. Click Power Management.
FAQ and Troubleshooting46
CD or DVD does not function.
Please verify the following:
• Joybook is turned on, and the CD or DVD discs are properly inserted in the center of the disc tray in the optical drive.
• The disc tray is closed.
• The CD or DVD is not bent or badly scratched.
• N oise fr om the optical driv e when the disk pla ys sho ws that the optical drive may
be deformed, and the computer needs to be repaired. If the disk tray does not
open after the Eject button is pressed, insert a pin into the Emergency Eject hole
to force the tray out.
Page 51

DVD movies will not play.
The region code of the DVD inserted must match that of the DVD playback soft -
ware used. This region code can be set up to five times. If you have not reached
this limit, a prompt will appear that will allow you to change the region code of
the software to match that of the move. Otherwise, you can only play back DVDs
with the same regi on code a s the l as t DVD played bac k successfully.
Why is the hard drive capacity displayed by the OS be different from its nominated capacity?
Most users may have discovered that the capacity of a 10GB hard drive will
become 9GB when displayed from the OS; and 20GB become 19GB, 40GB
become 38GB..., etc. The bigger the capacity, the bigger the difference. It is
because hard drive makers and OS developers calculate hard drive capacity in different ways. As a result, the nominated capacity is differ ent fr om the exact capacity
displayed by the OS.
Calculation of hard drive capacity
by drive makers
1GB=1,000MB
1MB=1,000KB
1KB=1,000 byte
Example of a 40GB hard drive:
Calculation by drive makers Calculation by OS developers
40GB=40,000MB
=40,000,000KB
=40,000,000,000byte
Exact capacity of a 40GB hard drive displayed in the OS:
40,000,000,000÷1024÷1024÷1024=37.2529 (GB).
Furthermore, when you partition a hard drive, the s ystem will reserve some space
on the drive for syste m files. Ther ef ore, the total capacity of a hard drive displayed
by the OS will never be the same as its nominated capacity.
I hear noise when connecting an earphone to Joybook.
The instructions below will guide you through the troubleshooting process.
• Connect the earphone to other d evices, s uch as a radio to see if y o u can still hear
that noise. If the noise persists, the earphone may be out of order.
• If you can hear the noise only when inserting, it is the result of high instantaneous current. It is a normal phenomenon.
Calculation of hard drive capacity
by OS developers
1GB=1,024MB
1MB=1,024KB
1KB=1,024 byte
40GB=40,960MB
=41,943,040KB
=42,949,672,960byte
How can I reduce the wearing of the screen spindle when I open the screen?
We suggest that you open and close your screen gently and slowly with both
hands. Apply force evenly on both hands to reduce spindle wearing and prevent
deformation or breaking of spindle due to uneven force application.
Display
There is nothing visible on the screen.
Check the power indicator.
• If it is not lit up, no power is being supplied to Joybook. Connect the AC adapter
and restart Joybook.
• If it is lit up in amber, Joybook has entered sleep mode in order to conserve
power. Simply pressing the power button should return Joybo ok to normal
operating mode.
• If it is lit up in blue, Joybook is being supplied normally with power. There are
two possible causes for the problem.
• The screen's brightness ma y b e set t oo lo w. Us e the Fn + F5 hotk ey combination to increase the brightness.
• The display mode ma y be set to use an external display. Us e the Fn + F3
hotkey combination to switch the display mode to use Joybook's own
LCD panel or to use simultaneous display.
When I connect the Joybook to an external monitor, the display is abnormal.
The instructions below will guide you through the troubleshooting proc ess.
• Use the Fn+F3 function key combination to set external video signal enabled.
• Refer to the user's manual of the external monitor to check the settings.
• Connect the cable to the Joybook and reboot the system. If the re is no displa y on
the external monitor after system reboot, connect Joybook t o a standard VGA
monitor and wait until you can see things properly on that VGA monitor. Then
connect the target display to Joybook again.
• Check if yo u hav e conn ected devices to both the S-V ideo an d V GA output on the
Joybook. If yes, disconnect the device connected to t he S-Video output on the
Joybook to enable normal signal output from the VGA output. In general, if you
have connected devices to both S-Video and VGA output on the Joybook, the SVideo output will be selected in f irst priority.
FAQ and Troubleshooting 47
Page 52

How can I judge if my LCD panel is out of order and what should I do if it happens?
If your Joybook cannot display images at the default resolu tion, please visit the
BenQ website to download and update the latest Joybook display drivers.
Contact your BenQ dealer if either of the following phenomena occurs:
• The screen shakes when the system started up normally.
• Fonts displayed on the screen are unclear and strange codes appear.
• There is no display when the hard drive is running normally.
• Colors on the screen are strange and turn into white.
• Vertical or horizontal lines appear on the screen.
• When playing back a media fi le using Window s Media Player, the frame speed is
abnormal.
• The sound changes while the screen remains the same when playing games.
FAQ and Troubleshooting48
Page 53

Information on Safety, Cleaning, and Battery Maintenance
C
C
Safety
When setting up or operating Joybook, please pay special attention to the following:
1. Keep this manual in a safe place for easy reference when needed.
2. Make sure to follow all instructions and warnings related to the system.
3. Place Joybook on stable, lev el surface, and ensure that the ventilation holes are
not obstructed.
4. Do not expose Joybook to rain or excess humidity, and keep it away from liquids (such as beverages, faucets, and so on).
5. Do not ex pos e J o yb ook t o di r ect s unl ight , and keep it a w a y from sourc es o f he at
(such as radiators, space heaters, stoves, and so on).
6. Do not expose Joybook to heavy impacts or strong vibrations. When closing the
computer, do not use excessiv e force.
7. Do not place Joybook in environments where the temperatur e is below 0 or
above 50 .
8. Do not place the computer in the area of strong magnetic fields.
9. Use an appropriate electrical outlet, and make sure that no heavy objects are
placed on the AC adapter or po wer cord.
10. The AC adapter is a high-voltage component. Do not attempt t o repair it on
your own. If it becomes damaged, please contact an authorized BenQ distributor or service center.
11. Make sure that the modem port is used only with a regular analog pho ne line.
Do not connect a digital phone line to the modem port, as this will cause damage to the modem.
°
°
Battery Maintenance
1. Fully charge/discharge battery up to 4 cycles before achieving full capacity of a
new battery.
2. Fully discharge and then fully charge the battery every two to three weeks for
battery conditions.
3. Remove fr om the device and stored in a cool, dry, clean place if the battery will
not be in use for a month or longer and recharge the battery after a storage
period.
4. Do not short-circuit. A short-circuit may cause severe damage to the battery.
5. Do not drop, hit or otherwise abuse the battery as this may result in the expo-
sure of the cell contents, which are corrosive.
6. Do not expose the battery to moisture or rain.
7. Keep b attery a wa y fro m fir e or ot her s our ces of extr eme heat. Do n ot inci nerat e.
Exposure of battery to extreme heat may result in an explosion.
8. Do not use AC adapters other than the one provided with the Joybook.
9. Do not place the battery within reach of children.
10. Follow the local laws governing the disposal of batteries. As far as possible,
submit used batteries to be recycled.
11. Use of improper batteries, or attempting to disassemble a battery, may result in
explosions. Follow vendor recommendations in using batteries of the identical
or equivalent type as replacements for worn-out batteries.
Cleaning Your Joybook
When cleaning Joybook, follow these steps:
1. Turn off Joybook, disconnect the AC adapter, and remove the battery.
2. Use a damp cloth t o wipe the outer surfac e of the c omputer. Do not apply liquid
or spray cleaners directly on the Joybook.
3. Do not use cleaners containing alcohol or acetone. Instead, use cleaning fluids
specially formulated for LCD screens.
Information on Safety, Cleaning, and Battery Maintenance 49
Page 54

Service and Support
BenQ Joybook Global Online Service
Welcome to BenQ Joybook Globa l Onli n e Service (http:/ /sup p o r t .Be n Q.com). In
order to ensur e you an enjoyable experience with your Joybook, the following
supports are provided so you can get assisted whenever and wherever you are.
• Warranty: Global warranty information of your Joybook product. For local warranty information, ple ase refer to the loca l warranty doc ume ntatio n i n the package.
• Download Center: Driv ers, documenta tions and additional soft ware fo r k eeping
your Joybook up-to-date.
• FAQ: Contains answers to frequently asked questions about Joybook as well as
additional tips.
• Contact Ce n ter : Here you can directly contact BenQ Customer Service for
answers and advice to your questions. You can also obtain the information
about the BenQ service stations in your country.
• Forum: An open space where you can post your questions and suggestions, or if
you will, answer the questions raised by other Joybook user s.
Joybook Online Registration
Register now to get free product news and lat est information about BenQ! To register, follow the steps below:
1. Refer to the illustration below to locate the 24-digit product serial number on
the bottom side of your Joybook and write it down.
Serial number
2. Connect to http://global.BenQ.com/service
3. Click Register Now to begin with registration and follow the instructions on the
screen to proceed.
Service and Support50
 Loading...