

Page 1

Joybee 200
MP3 Player
User Manual
Welcome
Page 2

Copyright
All rights reserved. No part of this publication may be reproduced,
transmitted, recorded, stored in a retrieval system, or translated into
any language or computer language, in any form or by any means,
electronic, mechanical, recording, photocopying, or otherwise,
without the prior permission of the BenQ Corporation.
Disclaimer
The BenQ Corporation shall make no warranty or representation,
either expressed or implied, with respect to the quality, accuracy or
fitness for any particular purpose of this document. The information in this document is subject to change without notice. The content of this manual has been checked and proofread prior to
publication.
*Windows is the registered trademark of Microsoft Corporation. All
trademarks or product names appearing in this manual are registered property of their respective owners.
Cautions
• This MP3 player is a delicate electronic device - DO NOT
OPEN IT.
• Do not format memory using the FAT32 format.
• Do not attempt to disassemble or modify any part of the
device.
• Avoid shock or impact to the device.
• Keep the device away from water.
• Keep the device away from extreme temperatures, humidity,
dust or direct sunlight.
Page 3

• Do not clean the device with chemical solvents. Clean the
device with a cloth dampened with water.
• Use only the adapter and accessories approved by the manufacturer. The warranty is voided if other adapters or accessories are used, which may be dangerous.
• Avoid listening at high volume, which may damage your ears
and cause loss of hearing.
• The BenQ Corporation assumes no responsibility for the loss
of data due to damage to the device, repair of the device and/
or battery replacement. Users are advised to back up all data
on other storage devices. Use of the device not in accordance
with the instructions will void the warranty.
Page 4

Memo
Page 5

Table of Contents
Introduction .................................................................................1
System requirements.................................................................... 2
Package contents .......................................................................... 3
Touring the BenQ Joybee 200 MP3 Player ................................. 4
Buttons and ports .....................................................................4
Putting leather strap on................................................................ 5
LCD display............................................................................... 9
Charging the battery..................................................................... 11
Connecting earphones and wired remote control...................... 13
Connecting the Joybee 200 to a PC ............................................. 14
Disconnecting the Joybee 200 from a PC.................................... 15
Installing the software ..................................................................17
Installing the USB driver.............................................................. 19
Installing in Windows ME/Windows 2000/Windows XP...... 19
Installing in Windows 98SE .....................................................19
Turning the Joybee 200 on and off..............................................20
Transferring data to the Joybee 200 ............................................21
Transferring data with Windows Explorer.............................. 21
Transferring files with QMusic ................................................ 21
Playing MP3/WMA music files ................................................... 22
Repeat play ................................................................................ 23
Selecting an EQ mode............................................................... 24
Selecting a playback speed........................................................ 24
Listening to FM radio................................................................... 25
Saving preset channels in memory ..........................................26
Recording FM radio.................................................................. 26
Using the recorder function......................................................... 27
Playing back recorded audio files ................................................ 28
System setup .................................................................................29
Deleting files from the Joybee 200 ........................................... 29
1
Page 6

Setting the recording options .................................................. 30
Setting up a timer recording.................................................... 33
Setting the power save option.................................................. 34
Using the lyric sync function ................................................... 35
Using the play list function...................................................... 36
Setting the date and time ......................................................... 37
Setting the language ................................................................. 38
Formatting the Joybee 200....................................................... 39
Upgrading the firmware........................................................... 40
Viewing system information.................................................... 41
Overview of QMusic .................................................................... 43
Adding music to the Joybee 200 using QMusic ......................... 47
Adding music from an audio CD to Joybee 200..................... 48
Adding files from a PC to Joybee 200...................................... 52
Updating Joybee 200 automatically with QMusic ..................... 55
Deleting files using QMusic......................................................... 58
2
Page 7

Introducing the BenQ
o
n
e
h
s
e
k
-
e
Joybee 200 MP3 Player
Introduction
Thank you for purchasing the BenQ Joybee 200 MP3 Player!
The BenQ Joybee 200 MP3 Player offers high quality audio
playback and voice recording functions at low power consumption.
The Joybee 200 supports MP3, WMA, and WAV music for-
ats for your listening pleasure. Moreover, the seven built-in
Q modes of the Joybee 200 allow you to enjoy music at the
est sound quality. In addition to being a MP3 player, the
oybee 200 also functions as a FM radio, an audio recorder,
nd a FM transmitter for music share.
The FM radio function enables you to preset up to 16 radi
stations for quick and easy listening. The recording functio
enables you to record your voice from the built-in micro
phone, from the radio receiver or from the MP3 player. Th
FM transmitter allows you to broadcast your music wit
another device equipped with a FM transceiver.
Joybee 200 not only enriches your musical life but also allow
you to carry your data everywhere. Its convenient driver-fre
plug and play function allows you to use it as a USB flash dis
on Windows 98SE/2000/ME/XP.
The Joybee 200 comes equipped with a software suite for addi
tional convenience. The QMusic software enables you to con
vert and transfer music from your PC or audio CDs to th
Joybee 200.
1
Page 8

When the batteries are fully charged, Joybee 200 offers about 10 hours
of continuous replay time for MP3 music. However, the exact replay
time depends on the condition of the battery, the volume level and
many other factors.
System requirements
Your PC must comply with the following requirements in
order to enable data transfer to your player:
• OS: Microsoft Windows 98/2000/Me/XP/98SE
(QMusic supports Windows 2000/XP/98SE)
• CPU: Pentium 200 MHz or faster
• I/O port: USB (1.1 or higher)
• Device: CD-ROM
• Hard disk space: 40 MB (minimum)
• System memory: 32 MB (minimum)
2
Page 9

Package contents
MAX
MIN
0
415
Check the contents of your Joybee 200 MP3 Player package. Contact your dealer immediately if any of the following are missing or damaged.
12 4
r
ye
la
P
3
P
M
200
ybee
o
J
5
3
7
8
9
10
11
1. BenQ Joybee 200 MP3 Player
2. Carrying pouch
3. Warranty card
4. AC power adapter & plug
5. Quick start guide
6. Software CD-ROM (E-manual, driver, QMusic, etc.)
7. Leather strap
8. FM Transmitter or Wired remote(Optional)
9. Stereo headphones
10. USB cable
11. Line-in Cable
6
3
Page 10

Touring the BenQ Joybee 200 MP3 Player
The following section describes the various components of
the Joybee 200.
Buttons and ports
Left View
MODE A-B VOL
T
T
LINE IN
Front View
Right View
Bottom View
4
12 3 4
oybeeJ200 MP3Player
56
REC
78 9 10
11
Page 11

Putting leather strap on
Follw the steps below to put the leather strap on your Joybee 200.
(1)
(3)
(2)
(4)
5
Page 12

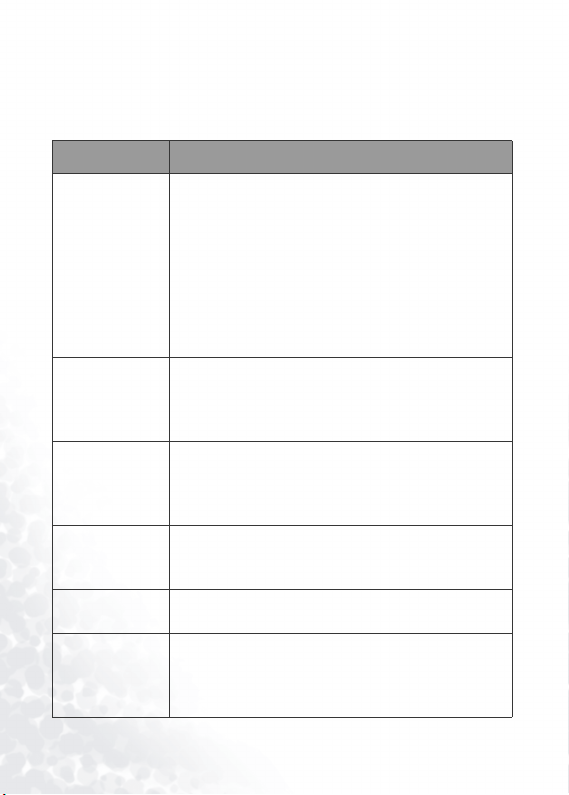
Item Description Function
(1) Mode • Press to switch modes.
MODE
• Press and hold for 2 seconds to display
options for the current mode.
• Press to cancel current setting and go
back to the previous level in setup or
playback mode.
(2) A-B repeat/
Lock)
A-B
T
• Follow this procedure to repeat a desired
section during audio playback.
i. Press once to set point A.
ii. Press again to set point B and the
section from point A to B repeats
continuously.
iii. Press again to disable the repeat
function.
• Press and hold for 2 seconds to lock or
unlock the keys.
(3) Volume control Press VOL – to decrease volume and VOL +
VOL
to increase volume.
(4) LINE IN For external audio signal recording.
(5) LCD Display Displays player status and file information.
See "LCD display" on page 9 for details.
(6) Neck strap hook For attaching the neck strap.
6
Page 13

Item Description Function
(7) Power on/off,
Play/Pause/
Stop/Enter
(8) Record Press to start recording. Press again to stop
REC
• Press and hold for 2 seconds to turn on
the Joybee 200.
• Press and hold for 2 seconds to turn the
player off. The message ‘System Off ’ is
displayed on the screen before the power
goes off.
• Press once to play an audio file in playback mode. Press once to pause playback
and press again to continue playing in
playback mode.
• Press and hold for 2 seconds to stop
playing or recording and switch to file
layout.
• Press to confirm a selection in setup
mode.
recording.
7
Page 14

Item Description Function
(9) Previous/Fast
Rewind,
Next/Fast
Forward buttons
/
(10) Earphone and
wired remote
control jack
(11) USB port Connects the Joybee 200 to a PC or to the
(12) Force shutdown Turns Joybee 200 off when system
• Press once to skip to the previous or next
file in audio file playback mode.
• Press and hold for 4 seconds to rewind
or fast forward an audio file in playback
mode.
• Press once to scroll to the previous or
next item in menu mode.
• Press and hold for 2 seconds to scroll
back or forward continuously in menu
mode.
• Press once to skip to the previous or next
channel or frequency in FM radio mode.
• Press and hold for 2 seconds to
auto-scan the frequencies in forward or
reverse direction in FM radio mode.
• Press to skip to the previous or next item
in setup mode.
Connects to earphones and wired remote
control jack.
battery charger for charging the built-in
battery.
malfuntions. Turn on the Joybee 200 by
using after force shutdown.
8
Page 15

LCD display
R
The LCD screen displays information about the player
mode and file information. The following table shows the
icons displayed on the screen and their meanings.
Icon Description
Indicates audio file being scanned in forward
direction (Forward).
Indicates audio file is being scanned in reverse
direction (Rewind).
Indicates FM radio mode.
Indicates that recording time is remaining.
Indicates recording in progress.
Indicates that recording has been paused.
Indicates single track repeat mode.
1
Indicates random mode.
Indicates random repeat mode.
RR
Indicates sampling mode.
Indicates repeat mode is disabled.
OFF
Indicates A-B repeat mode.
ALL
Indicates fast (110), slow (90) and very slow (80)
110 90
Indicates repeat mode for all files.
80
playback speeds.
Indicates MP3/WMA mode.
9
Page 16

Icon Description
Indicates voice recording mode.
Indicates audio recording mode.
Indicates FM mode.
Indicates setup mode.
Indicates battery status.
Indicates keys are locked.
Indicates player is connected to a PC with the USB
USB
port.
10
Page 17

Getting Started
0415
0415
Charging the battery
Follow these steps to charge the Joybee 200’s battery.
1. Remove the translucent rubber cover from the
charger socket. Insert one end of the power adapter
cable into the USB port of the Joybee 200 and the
other end to the adapter.
2. Connect the adapter to a wall outlet.
oybeeJ200MP3Player
11
Page 18

It takes around 1 hour to quick charge the Joybee 200
built-in battery. For fully charge of thwe battery, it takes
about 3.5 hours.
• Exact charging time depends on battery status.
• Chargers for use in some areas may not have an indicator. Check the
battery charge status using the indication on the LCD display (see
"LCD display" on page 9).
• The life of battery depends on how often it has been charged. Fre-
quent charging results in shorter playing time.
12
Page 19

Connecting earphones and wired remote control
Follow these steps to connect earphones and wired remote
control.
• Plug the earphones into the earphone jack on the
wired remote control as shown in the illustration.
oybeeJ200MP3 Player
• To connect both the wired remote control as well as
the earphones, connect the wired remote control to
the Joybee 200. Connect the earphones to earphones
jack on the wired remote control.
oybeeJ200MP3 Player
13
Page 20

Connecting the Joybee 200 to a PC
Connect the Joybee 200 to your PC with the USB cable
provided as shown in the illustration.
oybeeJ200MP3Player
When the Joybee 200 is successfully connected to the PC, a
new Removable Disk icon appears in the My Computer
window on your PC. A message saying Connection Completed along with a connection icon is also displayed on
the LCD screen of the Joybee 200.
If the dialog box “Windows found new hardware” keeps appearing on
the PC screen after the connection, press Next or OK to close the dialog
box.
14
Page 21

Disconnecting the Joybee 200 from a PC
Follow these steps to disconnect the Joybee 200 from a PC.
1. Double click the USB device icon on the taskbar.
A dialog box as shown below appears on the screen.
2. Select USB Mass Storage Device in the dialog box
and press Stop. Another dialog box appears on the
screen.
3. Select BenQ Joybee 200 MP3 Player USB Device and
press OK
15
Page 22
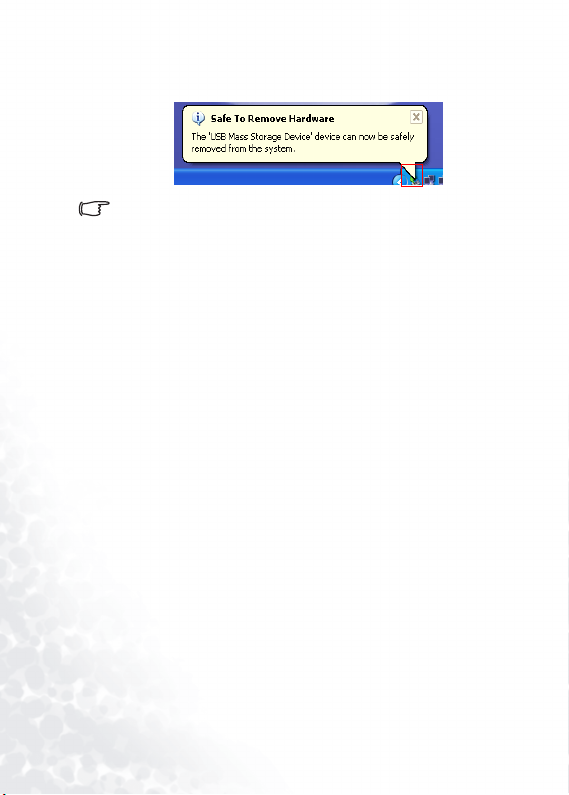
4. When the following dialog box appears on the
screen, press OK and disconnect the Joybee 200
from the PC.
The procedure described here may differ for the different operating systems.
16
Page 23

Installing the software
Insert the software CD provided with the Joybee 200 in the
CD-ROM drive on your PC. The following installation
menu is displayed on the PC screen.
If the installation menu does not appear on your PC screen, open
Explorer in Windows and locate the ‘autorun.exe’ file on the software
CD. Double-click the icon to open the installation menu.
17
Page 24
Click to select and install the desired software. Follow the
instructions on the screen to complete the installation. The
following table shows the contents and functions of the
software suite on the CD.
Item Description
Install BenQ
QMusic
Install BenQ
Joybee 200
Software
Install Windows
Media Player 9
Install Direct X 8 QMusic requires Direct X to be installed on your
Install Adobe
Acrobat Reader
Read User
Manual
QMusic is an easy-to-use file manager that allows
you to play an audio CD and MP3 files, convert
music on an audio CD into MP3 files, create
playlists, create audio CDs, and organize your CD
albums. With QMusic, you can save your music files
on the Joybee 200, and organize and update the data
stored on the Joybee 200. Note that QMusic works
only on Windows 2000/XP. Windows 2000 does not
support the CD burning function.
The player software includes Joybee 200 firmware
upgrade and memory quick format utilities.If you
are using Windows 98SE, please install this software
before connecting the Joybee 200 to your PC.
QMusic requires Windows Media Player 9 to be
installed on your system. Click this item to install
Windows Media Player 9 if you do not have it
installed.
system. Click this item to install Direct X if you do
not have it installed.
Install the Acrobat Reader to read the electronic
documentation for your MP3 player.
Click to read the User Manual in the language of
your choice. Choose from English, Simplified
Chinese, Traditional Chinese, Japanese, German,
French, Italian, Spanish, and Dutch.
18
Page 25

Installing the USB driver
Installing in Windows ME/Windows 2000/Windows XP
Follow these instructions to install a USB driver.
1. Turn on the BenQ Joybee 200 MP3 Player.
2. Connect the Joybee 200 to the USB port of your
computer using the USB cable provided.
3. A New Hardware Found message appears on the PC
screen and installation of the driver is completed
automatically.
Installing in Windows 98SE
Use the Install Joybee 200 Software option described in the
previous section to install the driver if you have
Windows 98SE running on your PC.
1. Turn on the Joybee 200.
2. Connect it to the USB port of your computer using
the USB cable provided. The Adding New Hardware
Wizard appears to install the driver.
3. Follow the instructions on the screen to complete
installation. Browse to select the files required for
installation under the Joybee 200 directory in the
BenQ folder on the disk drive where you installed
the Joybee 200 Software.
A Removable Disk icon appears in the My Computer window on your PC after installation is completed successfully.
19
Page 26

Using the BenQ Joybee 200
MP3 Player
Turning the Joybee 200 on and off
Follow these steps to turn the Joybee 200 on or off.
• Press and hold the power button
for 2 seconds to turn on the
Joybee 200. After the welcome note
is displayed, the Joybee 200 enters
whatever mode the player was in
when it was switched off.
• Press and hold down the power button for 4 seconds to
turn the player off. The BENQ logo is displayed on the
screen before the power goes off.
The Joybee 200 turns off automatically when it has been in idle mode
for more than 1 minute.
MP3 . FM . VOICE
20
Page 27

Transferring data to the Joybee 200
You can transfer music files to the Joybee 200 using Windows Explorer or the QMusic software provided. QMusic
also enables you to convert your audio CDs to MP3 files
and copy them to the player.
Transferring data with Windows Explorer
Follow these steps to transfer files to the Joybee 200 using
Windows Explorer.
1. Connect Joybee 200 to a PC with the USB cable as
described in "Connecting the Joybee 200 to a PC" on
page 14.
2. Locate your existing MP3 (.mp3) or WMA (.wma)
files in your PC.
3. Select the desired files, copy and pastethem to the
MP3 folder in Removable Disk. The selected files
will be transferred to Joybee 200.
• Do not disconnect the Joybee 200 from the PC when the message
‘Don’t remove’ is displayed on the OLED screen. Disconnect the
Joybee 200 from your PC only when the message ‘USB connect’ is
displayed alone on the screen.
• Check that there is enough memory space on the Joybee 200 before
transferring files to it.
Transferring files with QMusic
Connect it to your PC using the USB cable provided as
described in "Connecting the Joybee 200 to a PC" on page
14. Refer to "Adding music to the Joybee 200 using QMusic" on page 47 for detailed information about transferring
files to your player using the QMusic software.
21
Page 28

Playing MP3/WMA music files
Use the following procedure to quickly start listening to
your favorite music on the BenQ Joybee 200 MP3 Player.
1. Turn on the Joybee 200.
2. Press the MODE button repeatedly to switch to MP3
mode.
3. Press the key to play
the current track.
4. Use the
or keys to skip
to the previous or next tracks.
Press and hold down
the or
keys for 2 seconds to scan in the reverse or forward
direction.
5. Press to pause playback. Press the key
again to resume playback.
6. Press and hold for 2 seconds to stop playback
and switch to file layout mode.
7. Use the or but-
VOL
VOL
tons to increase or decrease
the volume as desired during
playback.The LCD screen
shows the volume setting
when you change the volume.
MP3
Love/David
002/022
MP3
VOL 15
EAS
A
32K 44KHz
EAS
A
22
Page 29
Repeat play
R
You can use the repeat function to play a selected track,
section, all files or a random file repeatedly.
1. Press and hold the MODE
button for two seconds while
a track is playing to display a
popup menu.
2. Use the
or keys to se lect
MP3
Repeat
EQ
the REPEAT option.
3. Press the key to confirm your selection.
4. Use the
through the various repeat
options.
• Choose to repeat the
• Choose to repeat all tracks.
or keys to scroll
current track.
1
ALL
MP3
One
• Choose to play a random track once.
• Choose to repeat random tracks.
• Choose to play an introductory sample of
the audio track.
• Choose to disable the repeat function.
RR
OFF
Alternatively follow these steps to repeat a desired section
of the track during playback.
1. Press the key once to set point A.
A-B
T
2. Press the key again to set point B. The section from
point A to B repeats continuously. The icon
appears at the bottom of the LCD screen.
3. Press the key again to disable the repeat function.
A-B
T
T
EAS
EAS
A
A
A-B
23
Page 30

Selecting an EQ mode
The Joybee 200 provides seven equalizer modes to enhance
the quality of audio. Select the EQ mode as described in
the following procedure.
1. Press and hold the MODE
button for two seconds while
a track is playing to display a
popup menu.
2. Use the
or keys to se lect
MP3
EAS
Repeat
EQ
the EQ option.
3. Press the key to confirm your selection.
4. Use the
or keys to scroll
through the various equalizer
options: Bass, Speech, Normal,
MP3
EAS
Bass
Classical, Jazz, POP, and Rock.
Selecting a playback speed
The Joybee 200 provides four playback speeds when playing MP3s or recorded files. Select the Speed mode as
described in the following procedure.
1. Press and hold the MODE
button for two seconds while
a track is playing to display a
popup menu.
2. Use the
or keys to se lect
MP3
EAS
Speed
Exit
the Speed option.
3. Press the key to confirm your selection.
4. Use the
or keys to scroll
through the various speed
options: Faster, Normal, Slower,
MP3
EAS
100
and Slowest.
A
A
A
A
24
Page 31

Listening to FM radio
The radio mode of the Joybee 200 enables you to listen to
FM radio as follows.
1. Turn on the Joybee 200.
2. Press the MODE button
repeatedly to switch to FM
mode.
3. Choose an FM frequency
using one of the following
procedures.
• Use the or keys to scan to the previous or
next frequency.
• Press and hold down the or keys for 2 seconds to auto-scan frequencies in the up or down
direction. Stop scanning when the desired frequency
is displayed by pressing the key.
• Press and hold the key for 2 seconds to display a list of preset channels. Use the or keys
to select the desired channel and the key to
confirm your selection.
4. Use the or but-
VOL
VOL
tons to increase or decrease
the volume as desired during
playback.The LCD screen
shows the volume setting
when you change the volume.
FM
92. 1 MHz
CH 01/32
FM
VOL 15
25
Page 32

Saving preset channels in memory
Follow these steps to save your favorite radio stations for
quick access.
1. When listening to your
favorite channel, press and
hold the MODE key for 2
FM
Save to CH 01
seconds to display a pop-up
menu.
2. Use the
or keys to choose a channel number
(1-32).
3. Press the key to confirm your selection. The cur-
rent channel is saved to the location you specified.
Recording FM radio
Follow these instructions to use the Joybee 200 to record
from the FM radio.
Do not turn off the Joybee 200 or connect or disconnect it from a PC
while recording.
1. When listening to your favorite channel, press the
key to start recording.
REC
2. Press the
recording and press it again to
resume recording.
3. Press and hold the key
for 2 seconds to stop recording.
Alternatively, you can also press the
stop recording.
All recorded radio programs are saved as MP3 files with filenames such
as FM0101. The number at the end of the filenames refers to date and
the order in which the programs were recorded. These files are saved in
the Radio folder on the Joybee 200. Use the procedure described in
"Playing back recorded audio files" on page 28 to listen to your
recorded programs. The repeat play, multiple playback speeds, and
key to pause
FM
92. 1 MHz
FM
key again to
REC
32K 32KHz
REC
26
Page 33

equalizer functions are also available when you play back a recorded
program. Refer to "Repeat play" on page 23, "Selecting an EQ mode" on
page 24, and "Selecting a playback speed" on page 24 for more details.
Using the recorder function
The Joybee 200 has a recording function to enable you to
record your voice using the built-in microphone or an
external audio signal as follows.
• Recording function will be disabled when the battery is low.
1. Press the key to start recording and speak into the
microphone.
2. Press the key to pause recording and press it again to
resume recording.
3. Press and hold the key for 2 seconds to stop recording.
Refer to "Setting the recording options" on page 30 for
more details about setting the recording parameters.
All recorded programs are saved as MP3 files with filenames such as
MIC0101 or LINE0101. The prefix indicates the source of the recording
and the number at the end of the filenames refers to date and the order
in which the programs were recorded. These files are saved in the
MICIN or LINEIN folders on the Joybee 200. Use the procedure
described in "Playing back recorded audio files" on page 28 to listen to
your recorded programs. The repeat play, multiple playback speeds,
and equalizer functions are also available when you play back a
recorded program. Refer to "Repeat play" on page 23, "Selecting an EQ
mode" on page 24, and "Selecting a playback speed" on page 24 for
more details.
27
Page 34

Playing back recorded audio files
Voice mode enables you to play back your recorded (FM,
MIC or LINEIN) files. The recorded files are saved as
MP3s with the filename indicating the source of the
recording, the date and the order in which they were
recorded. Follow these steps to play back your recorded
files.
1. Turn on the Joybee 200.
2. Press the MODE button repeatedly to switch to
VOICE mode.
3. Press the key to play the current file.
4. Use the
file. Press and hold down
onds to scan in the reverse or forward direction.
5. Press to pause playback. Press the key
again to resume playback.
6. Press and hold the for 2 seconds to stop playback and switch to file layout mode.
7. Use the or buttons to increase or
decrease the volume as desired during playback.The
LCD screen shows the volume setting when you
change the volume.
The repeat play, multiple playback speeds, and equalizer functions are
also available when you play back a recorded program. Refer to "Repeat
play" on page 23, "Selecting an EQ mode" on page 24, and "Selecting a
playback speed" on page 24 for more details.
or keys to skip to the previous or next
the or keys for 2 sec-
VOL
VOL
28
Page 35

System setup
Deleting files from the Joybee 200
Follow these instructions to delete any files from your
Joybee 200.
1. Turn on the Joybee 200.
2. Press the MODE button
repeatedly to switch to
SETUP mode.
3. Use the
the desired option as follows:
• Music File: deletes the
• Voi ce Fi le : deletes the selected recorded (FM,
•All Music: deletes all music (MP3/WMA) files.
• All Voice: deletes all recorded (FM, MICIN, or
or keys to se lect
selected music (MP3 or
WMA) file.
MICIN, or LINEIN) file.
LINEIN) files.
4. Press to confirm your selection.
5. If you selected the Music File
or Voice File options, a list of
the files is shown. Use the
or keys to scroll and select
the desired file and
to confirm your selection.
press
6. You are asked to confirm the
deletion. Use the
keys to highlight either Ye s or
No to delete the file(s) or cancel.
or
Delete
Music Share
01/ Love.mp3
02/ Joybee200.mp3
SETUP
SETUP
Music File
Voice File
SETUP
SETUP
Delete ?
Yes
No
29
Page 36

7.
Press to confirm your
selection.
8. Press the MODE key to exit
from the setup menu.
You can also use QMusic or Windows Explorer to delete files on the
Joybee 200.
SETUP
Set OK !
Setting the recording options
You can set the recording quality when recording from FM
radio, the internal microphone, or an external audio signal. You can also specify the recording source signal as well
as enable the VOR function when recording.
To set the recording quality, do the following:
1. Turn on the Joybee 200.
2. Press the MODE button repeatedly to switch to
SETUP mode.
3. Use the
the REC Setting option.
4. Press to confirm your
selection.
5. Use the
the Quality option from the
popup menu.
6. Use the or key s to se lect
the desired option.
menu provi des you with four
MP3 quality options for
or keys to se lect
or keys to se lect
The popup
SETUP
REC Setting
REC Program
SETUP
Quality
Source
SETUP
MP3-L
TVF
recording quality: MP3-L
(Low), MP3-M (Medium), MP3-H (High), and
TVF.
30
Page 37

7. Press to confirm your
selection.
SETUP
Set OK !
To specify the default source signal when recording voice
files, do the following:
1. Turn on the Joybee 200.
2. Press the MODE button repeatedly to switch to
SETUP mode.
3. Use the
highlight REC Setting from
the menu and press the
or keys to
key to confirm your
SETUP
REC Setting
REC Program
choice.
4. Use the
light Source in the menu and
press the key to confirm
your choice.
5. Use the or keys to high-
light Mic In to record from the
microphone signal or select
Line in to record from the
external audio signal connected
to the LINE IN jack.
6. Press the key to confirm your choice.
7. Press the MODE button
repeatedly to return to Play-
or keys to high-
SETUP
Source
VOR
SETUP
MIC in
Line in
SETUP
Set OK !
back Mode. Record the voice
signal as described in "Using the recorder function"
on page 27.
31
Page 38

The Joybee 200 has the VOR feature that only records
when a voice signal is detected and stops recording if there
is no voice or audio signal. This prevents blank spaces in
your recorded files. To enable the VOR feature, do the following:
1. Turn on the Joybee 200.
2. Press the MODE button repeatedly to switch to
SETUP mode.
3. Use the
highlight REC Setting from
the menu and press the
or keys to
key to confirm your
SETUP
REC Setting
REC Program
choice.
4. Use the
light VOR in the menu and
press the key to confirm
your choice.
5. Use the or keys to high-
light On to enable VOR or Off
to disable the feature.
or keys to high-
SETUP
VOR
Exit
SETUP
On
Off
6. Press the key to confirm your choice.
7. Press the MODE button
repeatedly to return to Play-
SETUP
Set OK !
back Mode.
32
Page 39

Setting up a timer recording
The Joybee 200 can be programmed to start recording
automatically at a specified time, from a specified input
source.
To set up a timer recording, do the following:
1. Turn on the Joybee 200.
2. Press the MODE button repeatedly to switch to
SETUP mode.
3. Use the
the REC Program option.
4. Press to confirm your
selection.
5. Use the
On to enable the timer recording.
6. Press to confirm your
or keys to se lect
or keys to se lect
SETUP
REC Program
Power Save
SETUP
On
Off
selection.
7. Use the
the input source
recording. Choose from Mic,
or keys to se lect
for the
SETUP
MicInput :
Line, and Radio.
8. Press to confirm your
selection.
9. Use the
the date and time when the
recording starts. Set the date
(year, month, date) and the
time (hours and minutes) using
or keys to set
SETUP
From
2004 / 05 / 26
the or keys and press after each option
to move to the next.
12
: 08
33
Page 40

10. Use the
the date and time when the
recording ends. Set the date
(year, month, date) and the
time (hours and minutes) using
or keys to set
SETUP
To
12
2004 / 05 / 26
the or keys and press after each option
to move to the next.
11. Press to confirm your
selection.
SETUP
Set OK !
Setting the power save option
The Joybee 200 has a power save option to switch it off if
no key has been pressed for a specified interval to conserve
power.
To set the power save feature, do the following:
1. Turn on the Joybee 200.
2. Press the MODE button repeatedly to switch to
SETUP mode.
3. Use the
the Power Save option.
4. Press to confirm your
selection.
5. Use the
1 min, 2 min, or 3 min as the
time interval for the power save
feature.
or keys to se lect
or keys to se lect
SETUP
Power Save
Lyric Sync
SETUP
1 min
2 min
: 08
34
Page 41

6.
Press to confirm your
selection.
SETUP
Set OK !
Using the lyric sync function
The Joybee 200 has a special feature that enables you to
know the view the lyrics on the display when playing back
music. The Lyrics editing tool in QMusic enables you to
create the lyrics and you can enable the lyrics sync feature
using the setup menu as follows:
1. Turn on the Joybee 200.
2. Press the MODE button repeatedly to switch to
SETUP mode.
3. Use the
the Power Save option.
4. Press to confirm your
selection.
5. Use the
On to enable the lyrics sync feature.
or keys to se lect
or keys to se lect
SETUP
Lyric Sync
Play List
SETUP
On
Off
6. Press to confirm your
selection.
SETUP
Set OK !
35
Page 42

Using the play list function
The Joybee 200 provides a play list feature that helps you
create play lists of your favorite songs. Create play lists
using QMusic and play them on your Joybee 200 by activating the play list feature as follows:
1. Turn on the Joybee 200.
2. Press the MODE button repeatedly to switch to
SETUP mode.
3. Use the
the Play List option.
4. Press to confirm your
selection.
5. Use the
On to enable the play list feature.
or keys to se lect
or keys to se lect
SETUP
Play List
Date - Time
SETUP
On
Off
6. Press to confirm your
selection.
SETUP
Set OK !
36
Page 43

Setting the date and time
Follow these steps to set the date and the time:
1. Turn on the Joybee 200.
2. Press the MODE button repeatedly to switch to
SETUP mode.
3. Use the
the Date - Time option.
4. Press to confirm your
selection.
5. Use the
the year, month, date, hour,
minute and second. Move to
the next field by pressing the
or keys to se lect
Date-Time
Language
or keys to set
key to confirm your
setting.
6. Press to confirm your
new settings. The time and
date are set on your player.
SETUP
SETUP
2004/05/24
16:00
SETUP
Set OK !
37
Page 44

Setting the language
Follow these steps to set the language:
1. Turn on the Joybee 200.
2. Press the MODE button repeatedly to switch to
SETUP mode.
3. Use the
the Language option.
4. Press the key to confirm your selection.
5. Use the
the desired language from the
choices provided:
or keys to se lect
Language
Format
or keys to se lect
Traditional
Chinese, Simplified Chinese,
or English
.
6. Press the key to confirm your setting. The language of your choice is
selected for the menus.
SETUP
SETUP
English
T-Chinese
SETUP
Set OK !
38
Page 45

Formatting the Joybee 200
Follow these steps to format the Joybee 200 and delete all
its contents:
1. Turn on the Joybee 200
2. Press the MODE button repeatedly to switch to
SETUP mode.
3. Use the
the Format option.
4. Press to confirm your
selection.
5. Use the
Quick for a quick format or
Complete for a complete format of the system
6.
Press the key to con-
or keys to se lect
or keys to se lect
.
SETUP
Format
Sys Upgrade
SETUP
Quick
Complete
firm your selection. Formatting begins and the message Formatting... is displayed on the screen. All
data is deleted.
39
Page 46

Upgrading the firmware
Follow these steps to upgrade the firmware of the
Joybee 200:
1. Turn on the Joybee 200
2. Press the MODE button repeatedly to switch to
SETUP mode.
3. Use the
the Sys Upgrade option.
4. Press to confirm your
selection.
or keys to se lect
Sys Upgrade
System Info
5. You will be prompted to connect the Joybee 200 to
your PC using the USB cable. Press any key to exit
this function. When connected to the PC, the screen
displays a Ready to Upgrade message.
6. The Add New Hardware Wizard appears on the
screen of your PC. Browse to select the files required
for upgrade in the update directory in the BENQ
folder on the disk drive where you installed the
Joybee 200 Digital Audio Player software. Follow the
instructions of the wizard to complete the installation process.
SETUP
40
Page 47

Viewing system information
To view information about the system such as details about
memory usage, number of music and voice files, and the
version number of the firmware, do the following:
1. Turn on the Joybee 200.
2. Press the MODE button repeatedly to switch to
SETUP mode. A menu is displayed on the screen.
3. Use the
select the System Info option.
4. Press to confirm your
selection.
5. The screen displays information about the system memory and firmware. Use the
or keys to
or keys to scroll and
SETUP
System Info
Delete
SETUP
058/059 MB
012 Music
view all the information.
6. Press the MODE key to exit the setup menu.
41
Page 48

Using QMusic
QMusic is software provided to help you to organize your
music collection. You can use it to play audio CDs or MP3s
on your PC, convert audio CD tracks into MP3 format,
create playlists, transfer music to your Joybee 200, burn
music CDs and create your own music album.
The QMusic icon appears on your Desktop after
it is successfully installed as described in "Installing the software" on page 17. Double click the
icon to launch QMusic. Alternatively, you can start QMusic by clicking Start on the Windows taskbar and clicking
Programs | QMusic2 | QMusic2.
42
Page 49

Overview of QMusic
The user interface of the QMusic program is shown in the
illustration below.
Left
panel
Actio n
buttons
Playback
buttons
Display
Right
pane
Status
bar
System
buttons
Feature
buttons
Search
window
43
Page 50

Features Description
Action buttons Provides specific QMusic functions.
Left button: Convert CD audio tracks to
MP3 formats.
Right button: Add audio files saved in your
PC to either Music Library or MP3 folder
under Joybee 200.
Left panel Displays all files supported by QMusic.
There are two default folders in your hard disk: Mu sic
Library and My Joybee. You can save and organize
your audio files here.
Music Library: All your MP3 audio files transferred
from audio CD tracks would be saved in the folders
under this root data base.
•
QMusic can auto-search CD album title and CD tracks
data base when your PC is connected to the internet.
44
Page 51

My Joybee: QMusic automatically synchronizing
function folder. When you set Joybee 200 MP3 player
automatically synchronizing every time the Joybee 200
MP3 player is connected to your PC, the audio files in
Joybee 200 will be replaced by the files here.
Joybee200(F:24 Available\Capacity...): This appears
when your Joybee 200 MP3 player is connected to your
PC. F stands for Joybee 200 MP3 player as a removable
drive and the digits following are current memory
usage status.
MP3: Joybee 200 MP3 player default folder. You can
directly drag and drop your audio files saved under the
Music Library to this folder, or you can just right click
the folder and select Add songs to copy audio files
saved in your hard disk to this folder.
FMRadio: Joybee 200 MP3 player default folder. All
your recorded FM audio files will be saved in this
folder.
MicIn: Joybee 200 MP3 player default folder. All your
recorded voice files will be saved in this folder.
Playlist: You can right click this folder to create
sub-playlists to organize all your audio files in Joybee
200/ MP3 folder. Create different playlists, drag and
drop the audio files from Joybee 200/ MP3 folder to
each playlist, and you can reorganize the playback
order in each album.
45
Page 52

Playback
buttons
Provides functions such as playing a selected
file, skipping to the next or previous files,
pausing playback, stopping playback, ejecting
a CD, and volume control.
Status bar Displays details of files, such as total number of files
and playing time.
Feature
buttons
Sets repeat or random playing of files in
playback mode and provide additional options.
Setting butting: Click to have general settings
dialogue box.
Repeat button: Click to repeat playback all
tracks.
Random button: Click to random play all
tracks.
EQ button: Click to have EQ control pane
Right panel Displays the files in the folder or media selected in the
left panel.
Search
window
System
Provides searching function. Type in a file name and
press the magnifier icon to search for a particular file.
Control QMusic window.
buttons
Display Displays progress of an action. For example, when an
audio file is being played, the name, elapsed playing
time and other information of the file is displayed
here.
For more detailed information on buttons function, please refer to
HELP file.
46
Page 53

Adding music to the Joybee 200 using QMusic
Connect the Joybee 200 to the PC using the procedure
described in "Connecting the Joybee 200 to a PC" on page 14.
The icon appears in the left panel of the
QMusic interface, and the directories on the Joybee 200 are
displayed under the icon.
You can now add files to your Joybee 200 from an audio CD
using the file conversion facility provided by QMusic or you
can directly copy your audio music files from the PC to the
Joybee 200.
47
Page 54

Adding music from an audio CD to Joybee 200
1. Put an audio CD in the CD-ROM on your PC. The
and the files on the CD appear in the right panel.
2. Select the files to be added to the Joybee 200 by
clicking the check boxes in front of the files.
icon appears in the left panel of QMusic,
48
Page 55

3. Click the icon, and QMusic starts converting
the selected files into MP3 files.
4. After the conversion is completed, a New Album is
added to the left panel. All the converted files are
placed in this album. Click the New Album to display the details of files in the right panel.
49
Page 56

5. Select the files to be added to the Joybee 200. To
select more than one file, press and hold the Ctrl key
on the keyboard while selecting the files. To select all
files, click the first file, press and hold the Shift key
on the keyboard, and then click the last file. If you
want to delete files, select files and press the Delete
key on the keyboard.
50
Page 57

6. Drag to copy the selected files from the right panel
to the MP3 directory under the icon.
• Check if there is enough memory space on Joybee 200 before trans-
ferring files to Joybee 200.
51
Page 58

Adding files from a PC to Joybee 200
Follow these steps to add files from a PC to your
Joybee 200.
1. Click the My Joybee folder in the left panel.
52
Page 59

2. Press to open a dialogue box for selecting
files. Browse and select MP3, WAV or WMA files to
be add to the Joybee 200 from the PC. Press Open to
add the selected files to My Joybee.
3. Click the icon on the QMusic interface.
53
Page 60

4. Press and QMusic starts transferring the files
in the My Joybee folder to the Joybee 200. Before
transferring the selected files to Joybee 200, QMusic
shows a dialog box to ask if you want to delete the
existing files in the My Joybee folder. If you want to
keep them, abort the transfer and back up these files,
before starting file transfer again.
• Check if there is enough memory space on Joybee 200 before trans-
ferring files to Joybee 200.
• The Joybee 200 supports WMA DRM files. To play back WMA files,
use QMusic to transfer them to the Joybee 200.
54
Page 61

Updating Joybee 200 automatically with QMusic
You can set up the Joybee 200 to be updated with the
music from the My Joybee folder automatically when it is
connected to the PC.
1. Click the My Joybee folder in the left panel.
55
Page 62

2. Press to open a dialogue box for selecting
files. Browse and select MP3, WAV or WMA files to
be added to the Joybee 200 from the PC. Press Open
to add the selected files to My Joybee.
3. Press on the right panel of QMusic in the function button area.
56
Page 63

4. In the Option dialog box shown, click the Joybee
tab.
5. Select Automatically launch QMusic when Joybee
added under Launch Settings and Automatica lly
transfer MP3 files to Joybee when added under
57
Page 64

Update Settings. Click the button to
save your settings.
6. Connect the Joybee 200 to the PC and QMusic automatically updates the files on Joybee 200 with the
files in My Joybee folder.
From now on, if you want to automatically update files on
Joybee 200, you only need to save files in the My Joybee
folder and connect the Joybee 200 to your PC. QMusic
automatically transfers the files in the folder to the
Joybee 200.
• Check if there is enough memory space on Joybee 200 before trans-
ferring files to Joybee 200.
Deleting files using QMusic
Use the following procedure to delete files on your
Joybee 200 using QMusic.
58
Page 65

1. Start QMusic.
2. Turn on the Joybee 200 and connect it to the PC
using the USB cable.
3. Locate the files to be deleted by clicking on the
MicIn or MP3 subdirectory under the
4. The files in the selected directory are displayed in the
right panel. Click to select the file to be deleted. To
select more than one file, press and hold the Ctrl key
on the keyboard while selecting the files. To select all
icon in the left panel of QMusic.
59
Page 66

files, click the first file, press and hold the Shift key
on the keyboard, and then click the last file.
5. Press the Delete key on the keyboard to delete all
selected files from the Joybee 200.
60
Page 67

Troubleshooting
Unable to transfer files to Joybee 200.
Check the following:
• The USB cable has been securely connected to the
PC and Joybee 200, and the Joybee 200 is turned on.
• The USB driver has been installed on your PC.
• The battery on Joybee 200 is charged.
Data stored in
If the power supply is unstable when the Joybee 200 is connected to a PC, it may cause data loss. Hence, we strongly
recommend you to back up all the data stored on the
Joybee 200. BenQ Corporation will make no representation on damage or indemnification arising from loss of
data.
Memory on the Joybee 200 is sufficient for the files I want to
transfer to Joybee 200, but I cannot transfer them to
Joybee 200.
The Joybee 200 allocates memory in blocks of 16 KB or
32 KB. Even a file of 1 byte size occupies one block of
memory. Hence, even if the total size of the files is not
larger than the memory size, you may not be able to transfer all files to the Joybee 200.
I cannot see anything on the screen of
• Check that the Joybee 200 is turned on and has suffi-
• The firmware of Joybee 200 may be damaged due to
Joybee 200 is lost.
Joybee 200.
cient battery charge.
improper operation. Perform Firmware Update.
61
Page 68

Service Information
If you cannot solve the problems encountered while using
the Joybee 200 with the troubleshooting guide, please contact our worldwide service locations to obtain the latest
drivers and online support services.
Regi on Country or City Te le ph on e N um be r E-mail Address
China +86-512-68092520 service@benq.com.cn
Hong Kong +852-23306188 service@benq.com.cn
Asia
Australia 61-1300-130-336 service-au@benq.com
Europe
Taiwan 0800-027-427 support@benq.com.tw
Singapore +65-6777-2229 servicesg@benq.com
Thailand +66-2-6700310-1 serviceth@benq.com
Malaysia +603-7954-8660 servicemy@benq.com
The Netherlands 0900-2367-669
Luxembo urg
Germany
Switzerland +41(0)22-567-5331 N/A
Italy +39(0)2-385-91-029 support@benq.it
UK/Ireland +44(0)207-216-0039 support@benq.co.uk
Spain +34(0)91-754-7015
Portugal +351-2-1316-4113
Austria +43(0)1-360-2772-062
Romania +40(0)259-342431
Czechoslovakia 02-24321322 service@medisoft.cz
Poland 032-373-6168 serwis@itus.pc
+32(0)2-645-32-52
0180-3232-002
(Euro €0.09/minute)
support@Benq.nlBelgium
support@benq.de
support@benq.es
support@benq.at
62
Page 69

America
Middle
East
USA +305-593-5250 compumex@fdr.com
Los Angeles 888-723-2238 BenqCS.us@benq.com
Mexico 01-800-712-7745
Chile 562-399-5000 rcox@vector.cl
The United Arab
Emirates
Iran
Kuw ait
Ye m e n
Qatar
Saudi Arabia
+971-4-2825767
support.latinamerica@be
nq.com
DhirajManghnani@benq.
com
63
 Loading...