

Page 1
The #1 Source for Donut and Bakery Equipment www.belshaw.com
OP
ERATOR’S MANUAL
TECHNICAL SUPPLEMENT
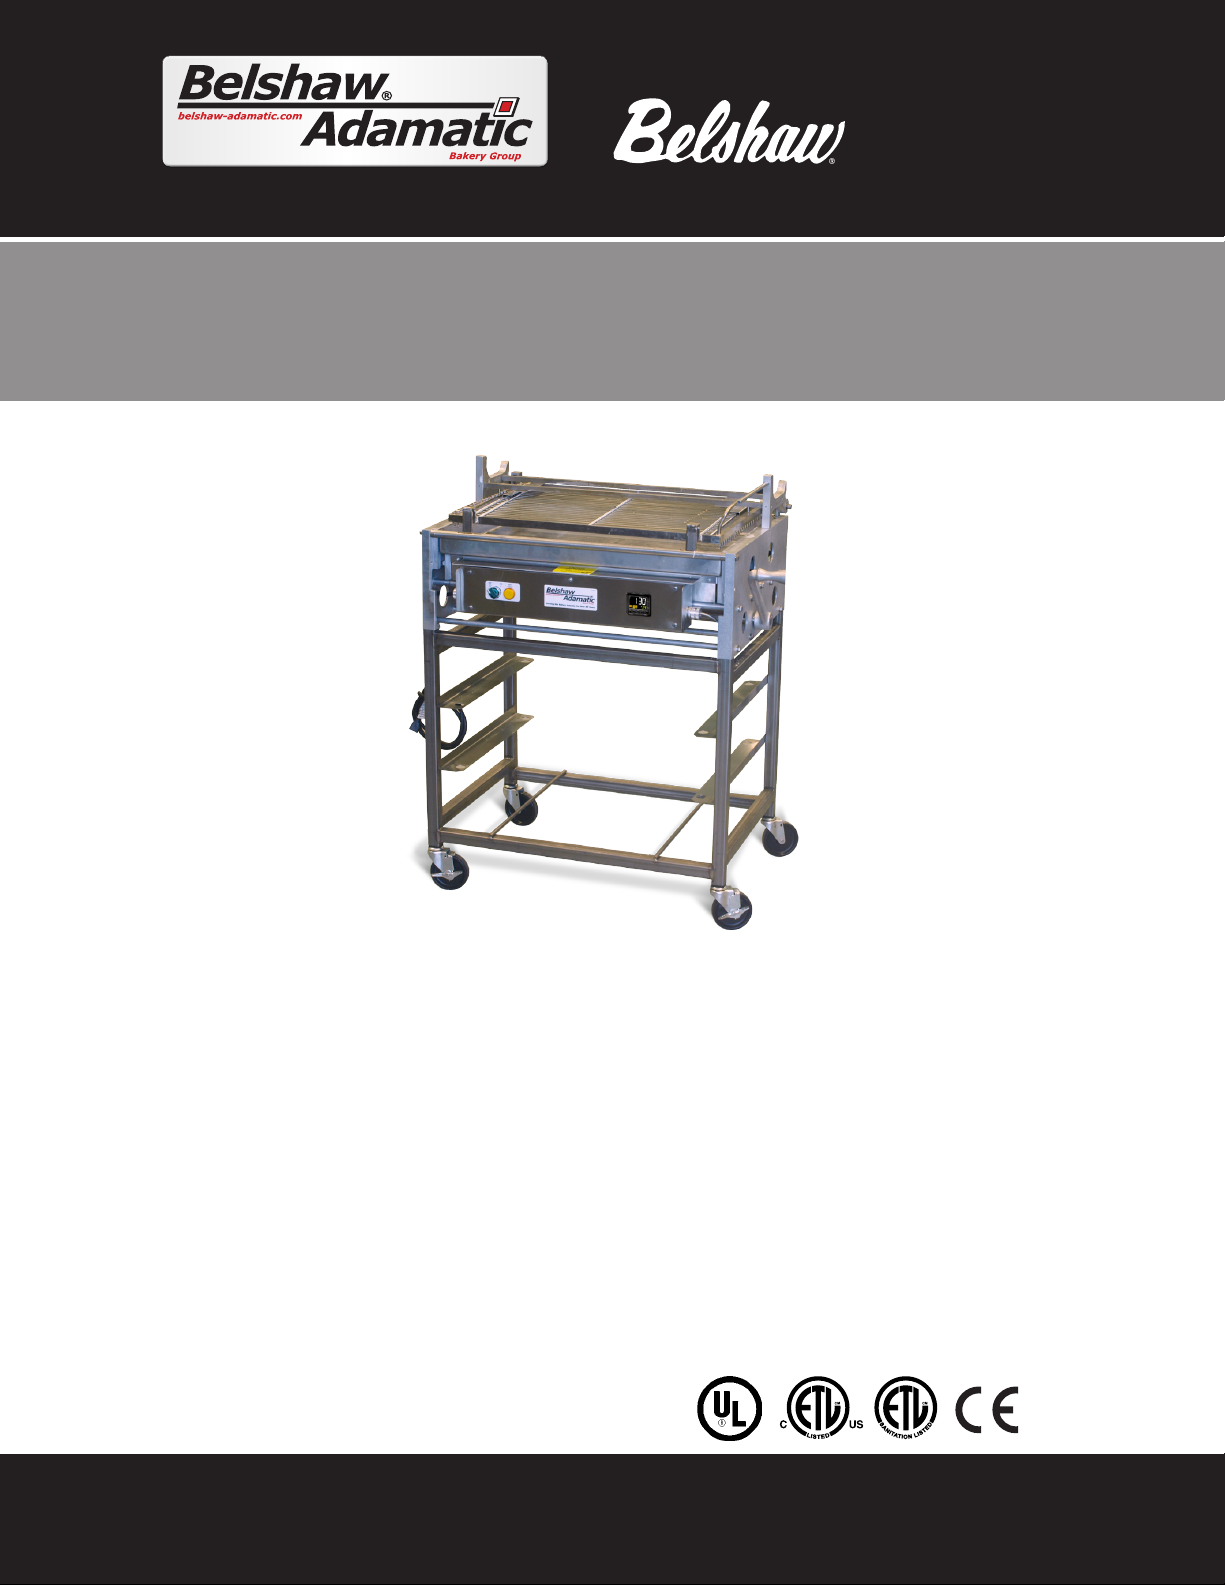
Donut Icer
HI18F - HI24F
This manual should only be used with the Item Numbers shown above.
USA/Canada 1-800-578-2547
SUPPORT
International (+1) 206-322-5474
Email service@belshaw.com
Web www.belshaw.com
Page 2

Econo-Icer HI18/HI24
Operator's Manual
Belshaw Bros., Inc.
814 44TH ST NW, Suite 103
Auburn, WA 98001 USA
Phone: (206) 322-5474 Fax: (206) 322-5425
Email: service@belshaw.com http://www.belshaw.com
Page 3

Page 4

Page 5

BELSHAW FREIGHT DAMAGE
POLICY
Belshaw has made every effort to
insure that your equipment arrives in
excellent condition. For your
protection, please inspect your
shipment for any signs of damage that
may have occurred during transport.
Please note any damage that is found
during inspection and file a freight
claim with the shipping company
immediately. Acceptance of damaged
equipment may become the
responsibility of the acceptor.
IMPORTANT
Keep This Manual For Future
Reference
.
EQUIPMENT RECORD
Please provide the information below when you correspond with us
about your machine.
Purchased by ____________________________________________________
Installed by ______________________________________________________
Date of installation __________________ Model number _________________
Serial number ____________________________________________________
042615
MN-1747EN
Belshaw Bros., Inc.
814 44th Street NW, Suite 103
Auburn, WA 98001 USA
Phone: (206) 322-5474 Fax: (206) 322-5425
Email: service@belshaw.com http://www.belshaw.com
Page 6

Contents
PREFACE......................................................................................................................................................................................2
1 OPERATION........................................................................................................................................................................4
OPERATION..................................................................................................................................................................................................4
2 INSTALLINGHI18/HI24DIGITALTEMPERATURERETROFITKIT.................................................................7
PARTSNEEDED...........................................................................................................................................................................................7
INSTALLATIONINSTRUCTIONS..................................................................................................................................................................7
3 CLEANING.........................................................................................................................................................................11
4 MAINTENANCE................................................................................................................................................................12
LUBRICATION............................................................................................................................................................................................12
FIGURE1,INSTALLINGNEWCONTROLPANEL....................................................................................................................................................................9
FIGURE2,ELEMENTCONNECTIONSONRELAY....................................................................................................................................................................9
FIGURE3,THERMOCOUPLEROUTING1................................................................................................................................................................................9
FIGURE4,THERMOCOUPLEROUTING2................................................................................................................................................................................9
FIGURE5,INSTALLATIONOFTHERMOCOUPLEBRACKET..................................................................................................................................................9
FIGURE6,INSTALLATIONOFTHERMOCOUPLE....................................................................................................................................................................9
FIGURE7,INSTALLATIONOFTHERMOCOUPLE..................................................................................................................................................................10
FIGURE8,INSTALLATIONOFTHERMOCOUPLE..................................................................................................................................................................10
FIGURE9,CONTROLS..............................................................................................................................................................................................................10
FIGURE10,TEMPERATURECONTROLLER..........................................................................................................................................................................10
iii
Page 7

Preface
The HI18/HI24 Econo-Icer is
designed for quickly and easily icing
donuts and a variety of baking
products.
The HI18/HI24 Econo-Icer is meant
to be used on a flat, stationary
surface, with the operator standing on
the handled side. The operator must
work safely at all times and follow the
instructions and warnings in this
manual.
The HI18/HI24 Econo-Icer uses
electrical elements to heat frosting in
its kettle. The machine is available
with the following electrical
configurations:
120 volts, 1 phase, 60 hertz
220 volts, 1 phase, 60 hertz
avoid electrocution or
other injury.
NEVER USE force to
assemble, disassemble,
operate, clean, or maintain
the machine.
To prevent unintentional
startup and possible fire,
UNPLUG the machine if
there is a local power
outage. When the power is
restored, it is safe to plug
the machine in again.
MAKE SURE that all
electrical cords are routed
so that no one will trip
over them.
The HI18/HI24 Econo-Icer
produces less than 70 dB(A) of
equivalent continuous A-weighted
sound pressure at work stations. This
has been determined during a run of
the machine with shortening in the
kettle, using a Bruel & Kjaer sound
level meter, type 2236.
To use the HI18/HI24 Econo-Icer
safely, heed the following warnings:
UNPLUG the machine
before attempting any
adjustment, repair,
disassembly, or cleaning to
Belshaw-Adamatic Bakery Group Econo-Icer HI18/HI24 OM, MN-1747EN
CALL 800-578-2547 or EMAIL service@belshaw.com for SUPPORT
To avoid electrocution,
MAKE SURE that no
electrical cords are frayed
or cracked and that they
do not pass through any
water or icing.
NEVER TOUCH the icing
pan once the machine is
on. The pan gets very hot,
which may cause serious
burns.
DO NOT OVERFILL the
icing pan with icing. If
shortening overflows the
2
Page 8

icing pan, it could cause
serious burns or could
cause someone to slip on
the floor and be seriously
injured.
MAKE SURE that the
machine and the icing are
cool before attempting any
adjustment, repair,
disassembly, or cleaning.
Hot icing can cause serious
burns.
BE CAREFUL never to get
icing, water, or other
materials on the floor. If
anything does get spilled
on the floor, mop it up
immediately. Materials on
the floor can cause people
to slip or fall, resulting in
serious injury or loss of
life.
Belshaw-Adamatic Bakery Group Econo-Icer HI18/HI24 OM, MN-1747EN
CALL 800-578-2547 or EMAIL service@belshaw.com for SUPPORT
3
Page 9
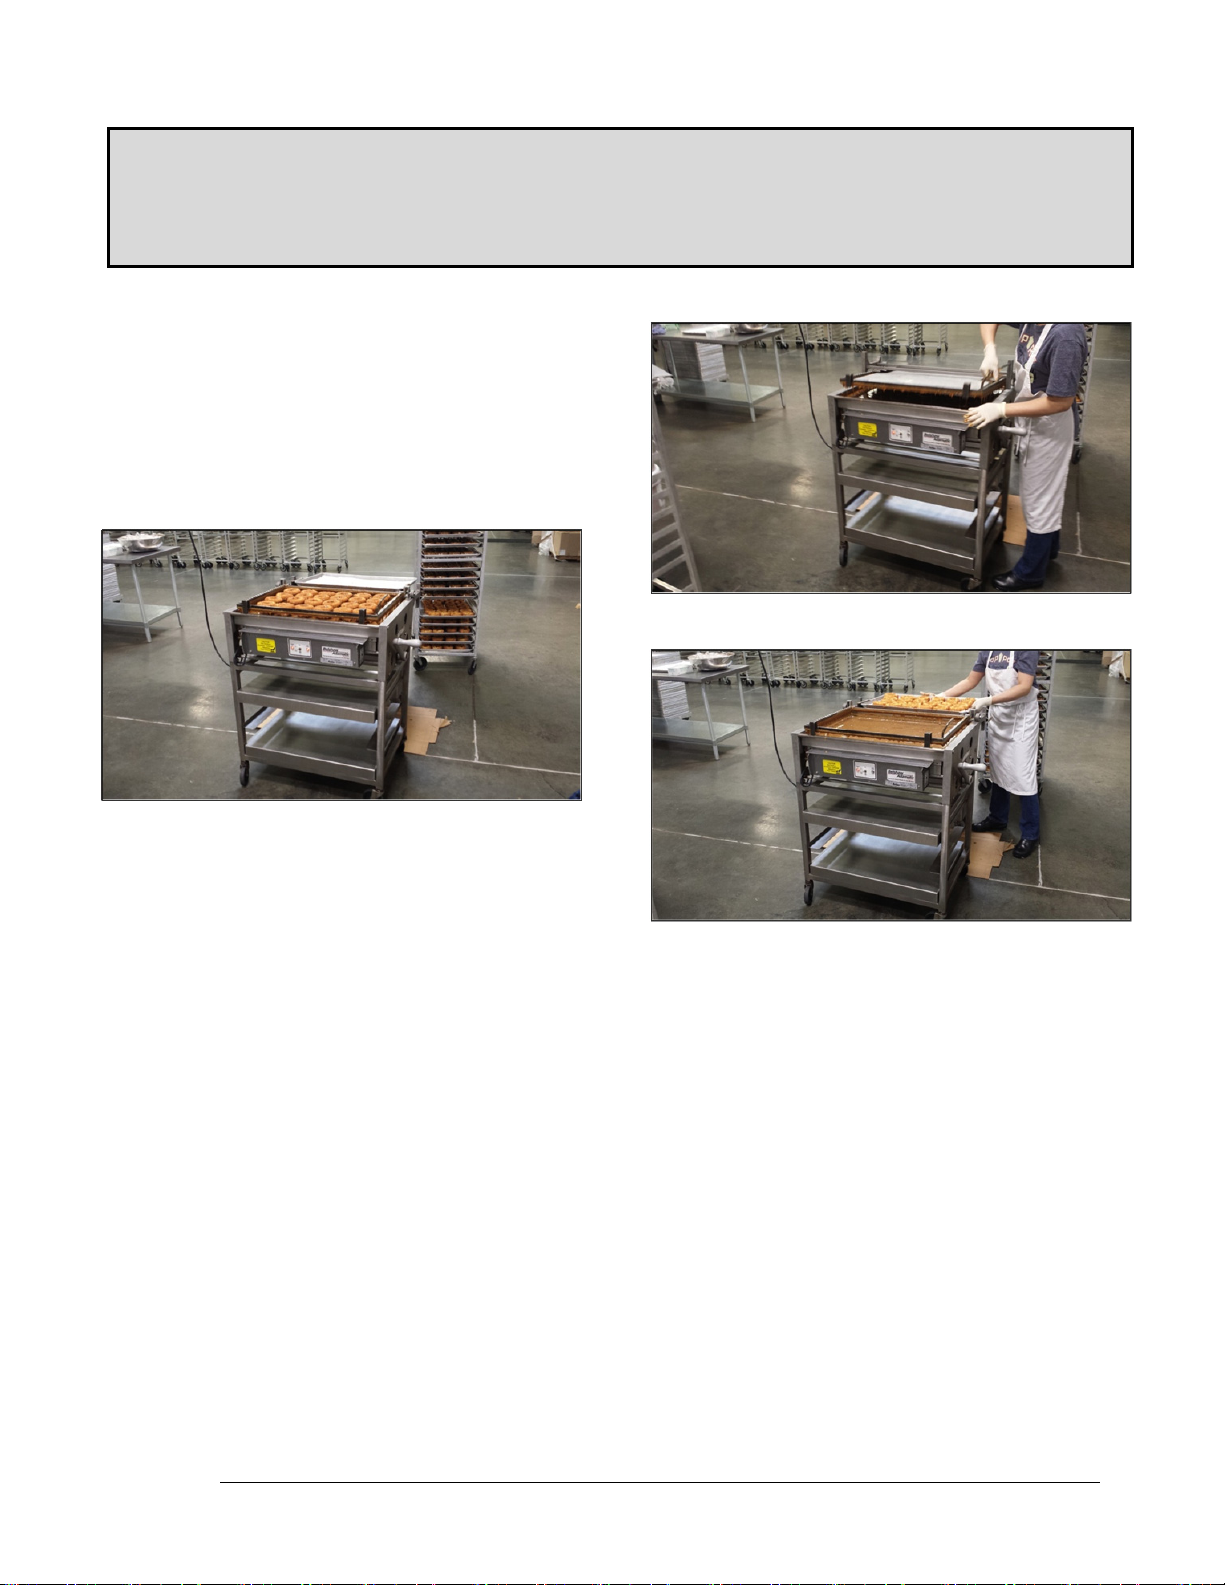
1 Operation
Operation
1. FILL Icing Pan with icing
approximately 1/2” from the top of
the pan.
2. TURN ON Heater.
3. ALLOW icing to heat for 45 minutes
to reach desired icing temperature.
The Heating Indicator Light will
turn off, and the Temperature
Controller will display the icing
temperature.
NOTE: Periodic stirring of the icing is
necessary to ensure constant, even
heating of the icing.
4. ROTATE Wire / Frame over icing.
5. SLIDE the rack of donuts into the
Rack Holder.
Belshaw-Adamatic Bakery Group Econo-Icer HI18/HI24 OM, MN-1747EN
CALL 800-578-2547 or EMAIL service@belshaw.com for SUPPORT
4
Page 10

6. ROTATE the Wire / Frame over
the rack of donuts to be iced.
7. FIRMLY GRIP the two (2) handles
and rotate the Wire / Frame and
rack of donuts to be iced.
8. RETURN the empty donut rack to
the original position.
10. LOWER the Icing Pan.
11. ROTATE the empty donut rack over
the iced donuts.
9. PUSH DOWN on the Icing Lift
Handle to raise the Icing Pan
until it reaches desired height.
Belshaw-Adamatic Bakery Group Econo-Icer HI18/HI24 OM, MN-1747EN
CALL 800-578-2547 or EMAIL service@belshaw.com for SUPPORT
12. FIRMLY GRIP the two (2) handles
and rotate the Wire / Frame and
donut rack to the original position.
5
Page 11

13. ROTATE the Wire / Frame over
the icing, remove iced donuts, and
repeat steps 1-13.
Belshaw-Adamatic Bakery Group Econo-Icer HI18/HI24 OM, MN-1747EN
CALL 800-578-2547 or EMAIL service@belshaw.com for SUPPORT
6
Page 12

2 Installing HI18/HI24 Digital
Temperature Retrofit Kit
Parts Needed
1. Heater Control Box Assembly
(HI24-1017) + Hardware:
4X .” Bolts
8X .” Washers
2X 6” High Temperature Wire
Sleeves
2. 6X Wire Ties (990-0150)
3. Thermocouple Mounting Bracket
(HI24-7008)
4. Heating Element Mounting
Hardware:
4X #10 Washers
2X #10 Nuts
Heating Panel (4X Bolts).
Remove wires from Heating
Element.
Remove old Heating Control
Box Front Cover (4X Bolts).
Remove 4X bolts connecting
the old Heating Control Box to
Heating Panel.
Remove old Heating Control
Box, including wire for
connecting to Heating
Elements, and Wire Sleeves.
3. ATTACH Retrofit Heating
Control Box:
Remove 5X bolts securing the
Front Cover of the new
Heating Control Box Assembly
and remove the cover.
Installation Instructions
1. UNPLUG HI Unit from power
source.
2. REMOVE existing Heater
Control Box:
Remove Icing Pan.
Remove Top Cover from
Belshaw-Adamatic Bakery Group Econo-Icer HI18/HI24 OM, MN-1747EN
CALL 800-578-2547 or EMAIL service@belshaw.com for SUPPORT
Place Wire Sleeves on 12 GA
white wires sticking out of the
backside of the new Heater
Control Box. (See Figure 1.)
Insert the wires and sleeves
through heating box holes.
(See Figure 1.)
Ensure sleeves are located as
shown below. (See Figure 1.)
NOTE: Grommets located in
7
Page 13

the new Heating Control Box
pop off easily. Use care
when moving wire through
grommets.
Remove Front Cover of the
new Heating Control Box
Assembly.
Remove 4X nuts and 4X
washers from long bolts on
back of new Heater Control
Box.
Install the new Heating
Control Panel onto the
Heating Box using
corresponding holes and
hardware provided in this kit.
Replace Heating Control Box
Front Cover (5X Bolts),
making sure not to pinch any
wires under the cover. DO
NOT over-tighten Front
Cover bolts. Doing so could
lead to gasket leakage.
4. Reinstall the Top Cover of
Heating Panel (5X Bolts).
Icing Pan. (See Figure 6, 7, and
8.)
9. PLUG in unit and verify all
functions work properly.
Rotate Green ON/OFF Switch
(located furthest to the left of
the unit) to the ON position.
The green light in the switch
should illuminate. (See Figure
9.)
Omron Controller (far right)
should power up and display
Current Temperature (PV,
large number) and Set Point
temperature (SV, small
number). (See Figure 10.)
To test digital temperature
controller, wrap hand around
Thermocouple, and ensure
the indicated temperature
(PV, displayed in large text)
rises.
The Set Point (SV) can be
changed by pushing the D or
U arrows. (See Figure 10.)
5. Replace Icing Pan.
6. Route Female Thermocouple wire
under the unit. (See Figures 3
and 4.)
Attach shielded thermocouple
wire to Frame using supplied
wire ties. (See Figure 4.)
7. Place Thermocouple into
indicated alignment hole on
Thermocouple Bracket. (See
Figure 5.)
8. PLACE Thermocouple Bracket on
Belshaw-Adamatic Bakery Group Econo-Icer HI18/HI24 OM, MN-1747EN
CALL 800-578-2547 or EMAIL service@belshaw.com for SUPPORT
Heat Cycle light should turn
on after approximately 5
seconds.
8
Page 14

Figure 1, Installing New Control Panel
Figure 2, Element Connections on Relay
Figure 4, Thermocouple Routing 2
Figure 5, Installation of Thermocouple
Bracket
Figure 3, Thermocouple Routing 1
Belshaw-Adamatic Bakery Group Econo-Icer HI18/HI24 OM, MN-1747EN
CALL 800-578-2547 or EMAIL service@belshaw.com for SUPPORT
Figure 6, Installation of Thermocouple
9
Page 15

Figure 7, Installation of Thermocouple
Figure 9, Controls
Figure 8, Installation of Thermocouple
Figure 10, Temperature Controller
TROUBLESHOOTING
Potential Issue
Error or Alarm present on Digital Temperature
Control
Thermocouple becomes disconnected, Digital
Temperature Control is flashing S.ERR
Device on, indicated temperature not rising Ensure Thermocouple is connected,
What To Do
Ensure Thermocouple is connected and
functioning properly
Cycle power (Green Power Switch, or
unplug unit for 10 seconds, and plug
back in)
Reconnect Thermocouple. S.ERR on
temperature controller will disappear
after a brief moment.
Cycle power if necessary to clear
controller error/alarm warning
located in the Thermocouple Bracket
and connected to the Icing Pan
Belshaw-Adamatic Bakery Group Econo-Icer HI18/HI24 OM, MN-1747EN
CALL 800-578-2547 or EMAIL service@belshaw.com for SUPPORT
10
Page 16

3 Cleaning
Once a day, clean the HI18/HI24
Econo-Icer as explained below:
1. REMOVE any debris from the
work area before disassembling
the HI18/HI24 Econo-Icer.
2. UNPLUG and REMOVE
Thermocouple and Bracket
from Icing Pan.
3. To avoid being burned, WAIT for
Icing Pan to cool before
removing; REMOVE Icing Pan.
4. UNPLUG AND REMOVE heating
panel assembly from unit.
5. CLEAN the HI18/HI24 Econo-
Icer with warm water and mild
cleaner.
6. LIFT the Tray Holder over to
the right side rest position, wash
with warm soapy water, rinse,
and wipe dry.
7. REMOVE Retainer Knob (HI240041, see parts list) that holds
the Wire / Frame in place and
lift out the Wire / Frame. Place
Wire / Frame in automatic
dishwasher. Use caution so that
the wires do not get damaged.
8. RETURN the Tray Holder to the
left side rest position.
For your safety, observe the following
warnings throughout the entire
cleaning process.
Thoroughly clean and dry
the floor if icing, water, or
other materials are spilled.
Materials spilled on the floor
can cause serious injury or
loss of life.
To avoid the possibility of
shock, unplug the unit
before cleaning.
To avoid damage to the
Wire / Frame, use caution
when removing and
transporting.
Belshaw-Adamatic Bakery Group Econo-Icer HI18/HI24 OM, MN-1747EN
CALL 800-578-2547 or EMAIL service@belshaw.com for SUPPORT
11
Page 17

4 Maintenance
Lubrication
1. USE several drops of Lubriplate
FMO-900-AW gear oil on the Lift
Handle Axle, located under the
heating panel assembly.
LUBRICATE EVERY TWO WEEKS.
2. USE Lubriplate FMO-900-AW
gear oil to lubricate the
tray Holder and Wire
Holder Pivot Pins.
LUBRICATE EVERY WEEK.
WARNING
To avoid serious burns or other injury,
always disconnect the machine from the
power source before lubricating.
Belshaw-Adamatic Bakery Group Econo-Icer HI18/HI24 OM, MN-1747EN
CALL 800-578-2547 or EMAIL service@belshaw.com for SUPPORT
12
Page 18

Econo-Icer HI18/HI24
Technical Supplement
Belshaw-Adamatic Bakery Group
TH
814 44
Auburn, WA 98001 USA
Phone: (206) 322-5474 Fax: (206) 322-5425
Email: service@belshaw.com http://www.belshaw.com
ST NW, Suite 103
Page 19

BELSHAW FREIGHT DAMAGE
POLICY
Belshaw has made every effort to
insure that your equipment arrives in
excellent condition. For your
protection, please inspect your
shipment for any signs of damage that
may have occurred during transport.
Please note any damage that is found
during inspection and file a freight
claim with the shipping company
immediately. Acceptance of damaged
equipment may become the
responsibility of the acceptor.
EQUIPMENT RECORD
IMPORTANT
Keep This Manual For Future Reference.
Please provide the information below when you correspond with us
about your machine.
Purchased by ____________________________________________________
Installed by ______________________________________________________
Date of installation __________________ Model number _________________
Serial number ____________________________________________________
042615
MN-1748EN
Belshaw-Adamatic Bakery Group
814 44th Street NW, Suite 103
Auburn, WA 98001 USA
Phone: (206) 322-5474 Fax: (206) 322-5425
Email: service@belshaw.com http://www.belshaw.com
Page 20

Contents
PREFACE......................................................................................................................................................................................2
1 MAINTENANCE...................................................................................................................................................................4
WIRETENSIONINGANDREPLACEMENT.................................................................................................................................................4
2 PROGRAMMINGTEMPERATURECONTROLLER....................................................................................................6
UNLOCKINGTHECONTROLLER.................................................................................................................................................................6
CHANGINGOPERATORSETPOINTS.........................................................................................................................................................7
CHANGINGOPERATORLEVELPARAMETERS.........................................................................................................................................8
CHANGINGINITIALLEVELPARAMETERS................................................................................................................................................8
CHANGINGADVANCEDLEVELPARAMETERS.........................................................................................................................................9
LOCKINGTHECONTROLLER...................................................................................................................................................................10
SETTINGTHECONTROLLERTODEFAULTSETTINGS.........................................................................................................................10
3 TROUBLESHOOTING.....................................................................................................................................................12
TROUBLESHOOTINGSPECIFICS..............................................................................................................................................................13
iii
Page 21

Preface
To transport the HI18/HI24 EconoIcer to the workstation and unpack it,
follow the steps listed below:
1. Use a fork lift or pallet jack to
transport the shipping crate to
workstation.
2. Break down the shipping crate.
3. Remove all packing materials,
including foam, tape, brown
paper, plastic, and white
protective coating.
The HI18/HI24 Econo-Icer is
designed for quickly and easily icing
donuts and a variety of baking
products.
The HI18/HI24 Econo-Icer is meant
to be used on a flat, stationary
surface, with the operator standing on
the handled side. The operator must
work safely at all times and follow the
instructions and warnings in this
manual.
The HI18/HI24 Econo-Icer uses
electrical elements to heat frosting in
its kettle. The machine is available
with the following electrical
configurations:
220 volts, 1 phase, 50 hertz
240 volts, 1 phase, 50 hertz
The HI18/HI24 Econo-Icer
produces less than 70 dB(A) of
equivalent continuous A-weighted
sound pressure at work stations. This
has been determined during a run of
the machine with shortening in the
kettle, using a Bruel & Kjaer sound
level meter, type 2236.
To use the HI18/HI24 Econo-Icer
safely, heed the following warnings:
UNPLUG the machine
before attempting any
adjustment, repair,
disassembly, or cleaning to
avoid electrocution or
other injury.
NEVER USE force to
assemble, disassemble,
operate, clean, or maintain
the machine.
To prevent unintentional
startup and possible fire,
UNPLUG the machine if
there is a local power
outage. When the power is
restored, it is safe to plug
the machine in again.
MAKE SURE that all
electrical cords are routed
so that no one will trip
over them.
Belshaw-Adamatic Bakery Group Econo-Icer HI18/HI24 TS, MN-1748EN
CALL 800-578-2547 or EMAIL service@belshaw.com for SUPPORT
2
Page 22

To avoid electrocution,
MAKE SURE that all
electrical cords are not
frayed or cracked and that
they do not pass through
any water or icing.
NEVER TOUCH the icing
pan once the machine is
on. The pan gets very hot,
which may cause serious
burns.
DO NOT OVERFILL the
icing pan with icing. If
shortening overflows the
icing pan, it could cause
serious burns or could
cause someone to slip on
the floor and be seriously
injured.
MAKE SURE that the
machine and the icing are
cool before attempting any
adjustment, repair,
disassembly, or cleaning.
Hot icing can cause serious
burns.
BE CAREFUL never to get
icing, water, or other
materials on the floor. If
anything does get spilled
on the floor, mop it up
immediately. Materials on
the floor can cause people
to slip or fall, resulting in
serious injury or loss of
life.
Belshaw-Adamatic Bakery Group Econo-Icer HI18/HI24 TS, MN-1748EN
CALL 800-578-2547 or EMAIL service@belshaw.com for SUPPORT
3
Page 23

1 Maintenance
Wire Tensioning and
Replacement.
The following tools are required for
wire tensioning and replacement:
5/16” Open-End Wrench
Wire Cutter
IMPORTANT
Do not use a box wrench to tighten.
This will cause too much torque, and
frame may bend and bow.
1. PLACE looped end of wire over
the Wire Retainer Pin (HI18-
0004) placing it in the groove.
2. THREAD other end of wire
through the hole in the Wire
Adjusting Pin (HI24-0020) and
BEND the end pointing up as
shown.
3. With the 5/16” open-end
wrench, LOOSEN the #10-
32X1” machine screw.
4. With the 5/16” open-end
wrench, TURN the Wiring
Adjusting Pin to tighten the
wire. Be sure the wire winds in
the groove of the pin. (This will
Belshaw-Adamatic Bakery Group Econo-Icer HI18/HI24 TS, MN-1748EN
CALL 800-578-2547 or EMAIL service@belshaw.com for SUPPORT
4
Page 24

also tighten the loop around the
Wire Retainer Pin.)
5. TIGHTEN the wire until taut,
removing all slack. Do Not Over
Tighten! Over Tightening Will
Cause The Frame To Bend
And Bow.
6. TIGHTEN the #10-32 machine
screw to hold pin in place.
7. TRIM excess tail of the end of
wire with wire cutters.
Belshaw-Adamatic Bakery Group Econo-Icer HI18/HI24 TS, MN-1748EN
CALL 800-578-2547 or EMAIL service@belshaw.com for SUPPORT
5
Page 25

2 Programming Temperature
Controller
The TJ-0184D-1 or 2 Controller
comes per-programmed and protected
so the operator cannot change the
setup parameters. To change any
settings, you must first unlock the
Controller.
Note: Only the settings that are
changed from the factory settings are
listed in this section.
Unlocking the Controller
To unlock the controller:
1. PRESS the + keys for more
than 3 seconds.
2. PRESS the key to move to the
next parameter.
3. PRESS the or to change the
parameter and from 2
to 0.
4. PRESS the + keys for more
than 1 second to return to
operator screen.
Belshaw-Adamatic Bakery Group Econo-Icer HI18/HI24 TS, MN-1748EN
CALL 800-578-2547 or EMAIL service@belshaw.com for SUPPORT
6
Page 26

2
2
PARAMETER FACTORY
DEFAULT
PRESENT
SETTING
UNIT FRONT
SETTING
Protection Parameters
Operation/Adjustment
Protect
Initial
Setting/Communications
Protect
0
1
Changing Operator Set
Points
.
.
To change operator set points: (Must
be unlocked to change Alarm Value 1.)
EXPLANATION OF
PANEL
PRESENT
SETTING
2:Display and change
of only "PV" and
"PV/SP" parameters
are allowed. [2]
2:Prohibited. [2]
1. PRESS the key to move to the
next parameter.
2. PRESS the or key to
change the parameter.
3. PRESS the key to return to
operator screen.
PARAMETER FACTORY
DEFAULT
SETTING
Operator Set Points
Set Point 0.0 125.0/50.0 °F/°C . .
Alarm Value 1 0.0 10.0/5.0 °F/°C
PRESENT
SETTING
UNIT FRONT
PANEL
EXPLANATION OF
PRESENT
SETTING
.
Belshaw-Adamatic Bakery Group Econo-Icer HI18/HI24 TS, MN-1748EN
CALL 800-578-2547 or EMAIL service@belshaw.com for SUPPORT
7
Page 27

Changing Operator Level
Parameters
To change operator level parameters:
(Must be unlocked.)
1. PRESS the key for less than 1
second.
2. PRESS the key to move to the
next parameter.
3. PRESS the or key to
change the parameter.
4. PRESS the key to return to
operator screen.
PARAMETER FACTORY
DEFAULT
SETTING
PRESENT
SETTING
UNIT FRONT
PANEL
EXPLANATION OF
PRESENT
SETTING
Operator Level
Parameters
Process Value Input Shift 0.0
Hysteresis (Heating) 1.0
Changing Initial Level
Parameters
To change initial level parameters:
(Must be unlocked.)
1. PRESS the key for more
than 1 second to adjust intial
parameters.
Belshaw-Adamatic Bakery Group Econo-Icer HI18/HI24 TS, MN-1748EN
CALL 800-578-2547 or EMAIL service@belshaw.com for SUPPORT
0.0 °F/°C
0.5 °F/°C
2. PRESS the key to move to
the next parameter.
3. PRESS the or key to
change the parameter.
4. PRESS the key for more
than 1 second return to
operator screen.
8
This is the offset
setting for
calibration.
.
Page 28

8
1
0
0
0
PARAMETER FACTORY
DEFAULT
PRESENT
SETTING
UNIT FRONT
SETTING
Initial Level Parameters
Input Type 5
Temperature Unit 0
SP Upper Limit 130.0 150.0/65.0 °F/°C
SP Lower Limit -20.0
Alarm 2 Type 2
Alarm 3 Type 2
Alarm 4 Type 2
.
.
0.0 °F/°C
.
.
.
PANEL
EXPLANATION OF
PRESENT
SETTING
8:Thermocouple [J]
(-20.0 to 400.0°C or
0.0 to 750.0°F) [8]
°F [F]
.
.
0:Alarm function OFF
[0]
0:Alarm function OFF
[0]
0:Alarm function OFF
[0]
Changing Advanced Level
Parameters
To change advanced level parameters:
(Must be unlocked.)
1. UNLOCK the controller.
Belshaw-Adamatic Bakery Group Econo-Icer HI18/HI24 TS, MN-1748EN
CALL 800-578-2547 or EMAIL service@belshaw.com for SUPPORT
2. PRESS the key for more
than 1 second to adjust intial
parameters.
3. PRESS the key until you
get to parameter .
4. PRESS the or key to
change parameter to -
169.
9
Page 29

1
1
0
PARAMETER FACTORY
DEFAULT
SETTING
Advanced Level
Parameters
Alarm 1 Latch 0
PV/SP No. 1 Display
Selection
PV Decimal Point Display 1
4
Locking the Controller
After programming: To lock the
controller:
1. PRESS the + keys for
more than 3 seconds.
2. PRESS the key to move to
the next parameter.
PRESENT
SETTING
UNIT FRONT
PANEL
EXPLANATION OF
PRESENT
SETTING
.
.
.
Enabled [oN]
1:"PV/SP/No display"
[1]
OFF [ ]
Setting the Controller to
Default Settings
To set the controller back to factory
default settings: (Must be unlocked.)
1. PRESS the key for more than
1 second to adjust intial
parameters.
3. PRESS the or key to
change the parameter
and from 0 to 2.
4. PRESS the + keys for
more than 1 second to return
to operator screen.
Belshaw-Adamatic Bakery Group Econo-Icer HI18/HI24 TS, MN-1748EN
CALL 800-578-2547 or EMAIL service@belshaw.com for SUPPORT
2. PRESS the key until you get
to parameter .
3. PRESS the or key to
change parameter to -
169.
4. CHANGE parameter from
to .
5. PRESS the key for more than
1 second to return to initial
screen.
6. PRESS the key for more than
1 second to return to operator
screen.
10
Page 30

3 Troubleshooting
If you have a problem with your
HI18/HI24 Econo-Icer that you
cannot solve, call your dealer or
another qualified technician.
If your dealer cannot help you, please
call Belshaw-Adamatic at 800-578-
2547. When you call, please specify
the following:
The MODEL NAME of the
machine.
The SERIAL NUMBER of the
machine.
The VOLTAGE, PHASE, and
CYCLE of the machine.
CAUTION
IF YOU PERFORM REPAIRS YOURSELF,
OR HAVE THEM PERFORMED BY
ANYONE OTHER THAN A SERVICE
TECHNICIAN AUTHORIZED BY
BELSHAW-ADAMATIC, YOU DO SO AT
YOUR OWN RISK.
DISCONNECT THE MACHINE FROM
THE POWER SOURCE BEFORE
DISASSEMBLING, REPAIRING, OR
WIRING.
Belshaw-Adamatic Bakery Group Econo-Icer HI18/HI24 TS, MN-1748EN
CALL 800-578-2547 or EMAIL service@belshaw.com for SUPPORT
12
Page 31

Troubleshooting Specifics
NO HEAT AND ON/OFF SWITCH DOES NOT LIGHT UP
Possible Causes What To Do
Unit not plugged in or wall electrical breaker is
tripped.
Plug unit in and/or check electrical outlet.
ON/OFF SWITCH ON AND LIT UP, HEATING LIGHT NOT ON
Possible Causes What To Do
Loose wire. Check wires.
NO HEAT, ON/OFF SWITCH ON AND LIT UP, HEATING LIGHT ON
Possible Causes What To Do
Heating element failure. Check heating element of open circuit; replace
if defective.
Relay failure. Check if relay turns on; replace if defective.
UNEVEN ICING TEMPERATURE.
Possible Causes What To Do
Icing needs stirring. Stir icing.
WIRES ARE NOT EVENLY TAUT
Possible Causes What To Do
Wires are not evenly adjusted. Tighten loose wires.
NO HEAT, ON/OFF SWITCH ON AND LIT UP, HEATING LIGHT NOT ON
Possible Causes What To Do
Loose wire. Check wires.
High limit tripped. Wait 10 minutes and recheck.
Temperature controller set too low. Adjust set point higher.
Thermocouple not plugged in. Plug thermocouple into connector.
Belshaw-Adamatic Bakery Group Econo-Icer HI18/HI24 TS, MN-1748EN
CALL 800-578-2547 or EMAIL service@belshaw.com for SUPPORT
13
Page 32

Belshaw Adamatic Bakery Group
Limited Warranty / Retur n P olicy
Subject to the terms and limitations set forth in this limited war r ant y (“Limited Warranty”), Belshaw Adamatic
Bakery Group (also referred to as “the Manufacturer”) warrants to the original purchaser (“Purchaser”) of
Manufacturer’s equip me nt and par t s ( “Pr oducts”), Belshaw Adamatic Bakery Group’s m anufacture and
assembly of Products to be free from defects in wor km anship and material which would result in product
failure under normal use and ser vice. Belshaw Adamatic Bakery Group’s entire liabi lity under this Limited
Warranty is limited to either repairing or replacing at Manufacturer’s factory or on Purchaser’s premises, at
Belshaw Adamatic Ba kery Group’s option, any Products purchased by Pur chaser which shall be determined
by the Manufacturer to be defectiv e. If necessary to return Products to Manufacturer’s factory, Products
must be shipped by Purchaser with transportation charges prepaid by Purchaser.
Belshaw Adamatic Ba kery Group reserves the right to make changes in design or add any improvement to
its Products at any time without incurring any obligati ons t o install the same on Products previously sold.
Possession, use or oper at ion of Products sold hereunder f or any other than their designed purpose, or use
of Products which are in poor repair, modified, improperly operat ed, or neglected, is done at the Purchaser’s
risk. Belshaw Adamatic Bakery Group hereby discl aims any liability for these actions and shall not be liable
for defects in or for any damages or l os s t o any property which is attributable to such actions .
Under no circumstance s shall Belshaw Adamatic Bakery Group be l i abl e for any indirect, special,
incidental, or c onsequential damages arising out of, or from the use of its Products by Purchaser, its
assignees, employees, agents or customers.
THIS LIMITED WARRANTY SHALL BE PURCHASER’S SOLE AND EXCLUSIVE REME DY WITH
RESPECT TO DEFECTIVE PRODUCTS.
Warranty Period
This Limited Warranty covers Pr oducts manufactured by Belshaw Adamatic B akery Group and sold by
Belshaw Adamatic Ba kery Group or its authorized distributor (“Distributor”) or authorized dealer (“Dealer”),
and this Limited Warranty shall extend for a period o f one (1) year from date of shipment to Purchaser, and
to the original Purchaser only.
Limited Warranty
With respect to products not manufactured by Belshaw Adamatic Bakery Group, warranty coverage shal l be
limited to the warranty of the original manufacturer of the product, or the Bel shaw Adamatic Bakery Group
Limited Warranty, w hichever is the lesser coverage period.
Replacement Products provided under the terms of this Limited Warranty are warr ant ed f or t he r em ainder of
the original warranty period applicable to the Product.
Exclusions
This Limited Warranty excludes from its coverage and does not apply to: ( a) solenoid and relay coils; ( b)
lamps; (c) “O” rings; (d) belt s; and ( e) i m pellers. This Limited Warranty also excludes the cost of labor for
removing and replacing Products subject to a warranty claim, other t han the labor incurred directly by the
Manufacturer when, in Bel shaw Adamatic Bakery Group ’s opinion, a repair of the Product by the
Manufacturer is justified.
Belshaw Bros., Inc. doing business as Belshaw Adamatic Bakery Group
www.belshaw-adamatic.com, www.belshaw.com Phone (+1) 206-322-5474
Revised 08/31/15 Limited Warranty Page 1 of 2
Page 33

Warranty Claims
In case of warranty claims relat in g t o your Product, you must follow the instructions b elow.
Report Claims to Your Authorized Distributor or Dealer or to Belshaw Adamatic Bakery Group
As soon as you discover a pr oblem, contact the Distributor or Dealer from whom you purchased t he Product
or Belshaw Adamatic Ba ker y Group. Your Distributor or Dealer will notify Belshaw Adamatic Bakery Group
for you. Only Belshaw A damat ic Customer Service can approve or authorize warranty claims.
You must state the following:
1. Your name, company name, and telephone nu m ber
2. The location, phone number, and contact nam e w here the Product is located
3. The invoice number and date of purchase of the Product
4. The Model and Serial Number of the Product, as w r it t en on t he dat a tag attached to the Product
5. A description of the prob lem and how it occurred
Shipping Damage and Missing Items
Damage to the Packagi ng or Crate. On delivery , promptly check all p ackages thoroughly for any sign of
damage. In cases of visib le damage, always note the dam age on the Delivery Receipt. Failure to note
damage is taken by the Freig ht Carr ier to mean that the package is in good condition at time of receipt, and
can result in denial of a Freight Cl ai m. Take photographs that clearly show the damage.
Damage to Products. If you find any damaged Product inside the shipment, photograph the damage both
inside and outside of the pac kag e. Do not throw the packaging away. Photos of the package and contents
are needed to show the condition of the Product at the ti me it w as r eceived.
Missing Items. As soon as you believe any items to be missing from a shipment, promptly report this to t he
Distributor or Dealer from whom the Product was purchased or to Belshaw Adamatic Bakery Group. If
possible, photograph t he ent ire contents of the delivery and email this to your Distributor or Dealer, or to
Belshaw Adamatic Customer Service at service@belshaw.com
.
Returning Products to Belsha w Adamatic Bakery Group
Under the terms of the Limited Warra nt y, you may be asked to return to Belshaw Adamatic Bakery Group
any Product that is the subject of a warranty claim. These Products must be clearly labeled with a Return
Goods Authorization Number (“RGA Number”) giv en to you by your Distributor or Dealer, or by Belshaw
Adamatic Customer Service. Products received without an RGA Number will not be proce s sed. All
Products must be shipped freight pr epaid by the Purchaser to Belshaw Adamatic Bakery Group at the
address below.
Contacting Belshaw Adamatic Bakery Group
At any time, you can contact Belshaw Adamatic Bakery G r oup cus t omer service for assistan c e
Belshaw Adamatic Ba kery Group Customer Service
814 44th St. NW, Suite 103,
Auburn WA 98001, USA
Phone: 800-578-2547 ( US A/ Canada) or (+1)206-322-5474 (Worldwide)
Email: service@belshaw.com
Office Hours: Monday – Friday, 6am to 4pm, USA Pacific Time
Belshaw Bros., Inc. doing business as Belshaw Adamatic Bakery Group
www.belshaw-adamatic.com, www.belshaw.com Phone (+1) 206-322-5474
Revised 08/31/15 Limited Warranty Page 2 of 2
Page 34

The #1 Source for Donut and Bakery Equipment
www.belshaw.com
BELSHAW ADAMATIC BAKERY GROUP
814 44th Street NW, Suite 103
Auburn, WA 98001 USA
1-800-578-2547 (USA/Canada)
(+1) 206-322-5474 (Worldwide)
service@belshaw.com
an Ali Group Company
The Spirit of Excellence
 Loading...