

Page 1
Washing Machine
User’s Manual
WMB 91242 LSC
EN
Document Number=
FR
IT
2820523419_EN / 07-09-15.(12:05)
Page 2

This product was manufactured using the latest technology in environmentally friendly conditions.
Page 3

1 Important instructions for safety and environment
This section contains safety instructions that will help protect from risk of personal injury or property damage. Failure to follow these instructions shall void any
warranty.
1.1 General safety
• This product can be used by children at and above 8 years old and by persons
whose physical, sensory or mental capabilities were not fully developed or who
lack experience and knowledge provided that they are supervised or trained on
the safe usage of the product and the risks it brings out. Children must not play
with the product. Cleaning and maintenance works should not be performed by
children unless they are supervised by someone. Children of less than 3 years
should be kept away unless continuously supervised.
• Never place the product on a carpet-covered floor. Otherwise, lack of airflow
beneath the machine will cause electrical parts to overheat. This will cause problems with your product.
• If the product has a failure, it should not be operated unless it is repaired by the
Authorized Service Agent. There is the risk of electric shock!
• This product is designed to resume operating in the event of powering on after
a power interruption. If you wish to cancel the programme, see "Cancelling the
programme" section.
• Connect the product to a grounded outlet protected by a 16 A fuse. Do not neglect to have the grounding installation made by a qualified electrician. Our company shall not be liable for any damages that will arise when the product is used
without grounding in accordance with the local regulations.
• The water supply and draining hoses must be securely fastened and remain undamaged. Otherwise, there is the risk of water leakage.
• Never open the loading door or remove the filter while there is still water in the
drum. Otherwise, risk of flooding and injury from hot water will occur.
• Do not force open the locked loading door. The loading door will be ready to open
just a few minutes after the washing cycle comes to an end. In case of forcing
the loading door to open, the door and the lock mechanism may get damaged.
• Unplug the product when not in use.
• Never wash the product by spreading or pouring water onto it! There is the risk of
electric shock!
• Never touch the plug with wet hands! Never unplug by pulling on the cable,
always pull out by grabbing the plug.
• Use detergents, softeners and supplements suitable for automatic washing machines only.
• Follow the instructions on the textile tags and on the detergent package.
• The product must be unplugged during installation, maintenance, cleaning and
repairing procedures.
• Always have the installation and repairing procedures carried out by the
Authorized Service Agent. Manufacturer shall not be held liable for damages that
may arise from procedures carried out by unauthorized persons.
3 / EN
Washing Machine / User’s Manual
Page 4
• If the power cable is damaged, it must be replaced by the manufacturer, after
sales service or a similarly qualified person (preferably an electrician) or someone
designated by the importer in order to avoid possible risks.
• Place the product on a rigid, flat and level surface.
• Do not place it on a long-pile rug or similar surfaces.
• Do not place the product on a high platform or near the edge on a cascaded surface.
• Do not place the product on the power cable.
• Never use sponge or scrub materials. These will damage the painted, chrome
plated and plastic surfaces.
1.2 Intended use
• This product has been designed for domestic use. It is not suitable for commercial use and it must not be used out of its intended use.
• The product must only be used for washing and rinsing of laundry that are marked accordingly.
• The manufacturer waives any responsibility arisen from incorrect usage or transportation.
1.3 Children's safety
• Packaging materials are dangerous to children. Keep packaging materials in a
safe place away from reach of the children.
• Electrical products are dangerous for the children. Keep children away from the
product when it is in use. Do not let them to tamper with the product. Use child
lock to prevent children from intervening with the product.
• Do not forget to close the loading door when leaving the room where the product
is located.
• Store all detergents and additives in a safe place away from the reach of the
children by closing the cover of the detergent container or sealing the detergent
package.
While washing the laundry at high temperatures, the loading
door glass becomes hot. Therefore, keep especially the children
away from the loading door of the machine while the washing
operation is in progress.
1.4 Package information
• Packaging materials of the product are manufactured from recyclable materials
in accordance with our National Environment Regulations. Do not dispose of the
packaging materials together with the domestic or other wastes. Take them to the
packaging material collection points designated by the local authorities.
4 / EN
Washing Machine / User’s Manual
Page 5

1.5 Disposing of the waste product
• This product has been manufactured with high quality parts and materials which
can be reused and are suitable for recycling. Therefore, do not dispose the product with normal domestic waste at the end of its service life. Take it to a collection point for the recycling of electrical and electronic equipment. Please consult
your local authorities to learn the nearest collection point. Help protect the environment and natural resources by recycling used products. For children's safety,
cut the power cable and break the locking mechanism of the loading door so that
it will be non-functional before disposing of the product.
1.6 Compliance with WEEE Directive
This product complies with EU WEEE Directive (2012/19/EU). This product bears a classification symbol for waste electrical and electronic
equipment (WEEE).
This product has been manufactured with high quality parts and materials which can be reused and are suitable for recycling. Do not dispose
of the waste product with normal domestic and other wastes at the
end of its service life. Take it to the collection center for the recycling of
electrical and electronic equipment. Please consult your local authori-
Compliance with RoHS Directive:
The product you have purchased complies with EU RoHS Directive (2011/65/EU).
It does not contain harmful and prohibited materials specified in the Directive.
ties to learn about these collection centers.
5 / EN
Washing Machine / User’s Manual
Page 6
2 Installation
Refer to the nearest Authorised Service Agent for installation
of the product. To make the product ready for use, review
the information in the user manual and make sure that the
electricity, tap water supply and water drainage systems are
appropriate before calling the Authorized Service Agent. If
they are not, call a qualified technician and plumber to have
any necessary arrangements carried out.
Preparation of the location and electrical, tap water and
waste water installations at the place of installation is
C
under customer's responsibility.
Make sure that the water inlet and discharge hoses
as well as the power cable are not folded, pinched or
crushed while pushing the product into its place after
installation or cleaning procedures.
WARNİNG: Installation and electrical connections of
the product must be carried out by the Authorized
B
Service Agent. Manufacturer shall not be held liable for
damages that may arise from procedures carried out by
unauthorized persons.
WARNİNG: Prior to installation, visually check if the product
has any defects on it. If so, do not have it installed.
A
Damaged products cause risks for your safety.
2.1 Appropriate installation location
• Place the machine on a rigid floor. Do not place it on a
long pile rug or similar surfaces.
• Total weight of the washing machine and the dryer -with
full load- when they are placed on top of each other
reaches to approx. 180 kilograms. Place the product
on a solid and flat floor that has sufficient load carrying
capacity!
• Do not place the product on the power cable.
• Do not install the product at places where temperature
may fall below 0ºC.
• Place the product at least 1 cm away from the edges of
other furniture.
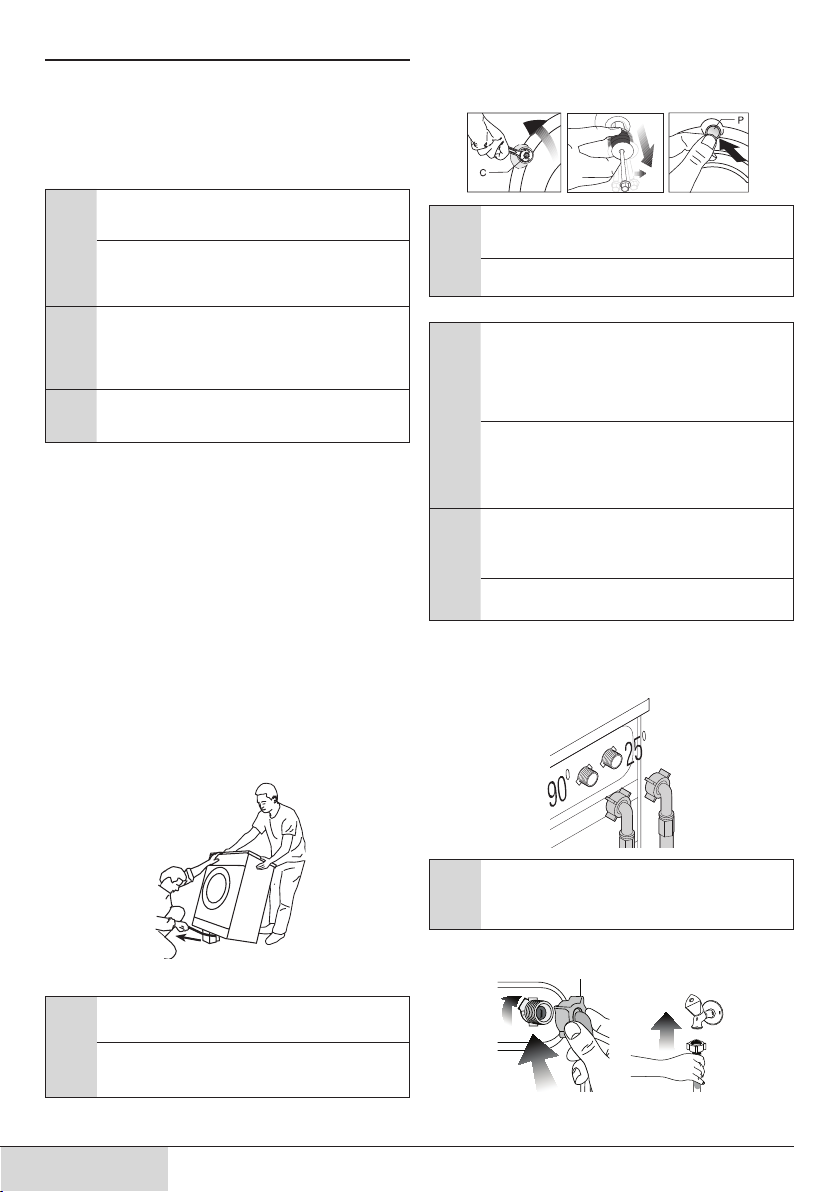
2.2 Removing packaging reinforcement
Tilt the machine backwards to remove the packaging
reinforcement. Remove the packaging reinforcement by
pulling the ribbon.
2. Remove transportation safety bolts by turning them
gently.
3. Attach the plastic covers supplied in the User Manual bag
into the holes on the rear panel.
Keep the transportation safety bolts in a safe place to
reuse when the washing machine needs to be moved
C
again in the future.
Never move the product without the transportation safety
bolts properly fixed in place!
(P)
2.4 Connecting water supply
The water supply pressure required to run the product is
between 1 to 10 bars (0.1 – 1 MPa). It is necessary to
C
have 10 – 80 liters of water flowing from the fully open
tap in one minute to have your machine run smoothly.
Attach a pressure reducing valve if water pressure is
higher.
If you are going to use the double water-inlet product
as a single
(cold) water-inlet unit, you must install the
supplied stopper to the hot water valve before operating
the product. (Applies for the products supplied with a
blind stopper group.)
WARNİNG: Models with a single water inlet should not be
connected to the hot water tap. In such a case the laundry
A
will get damaged or the product will switch to protection
mode and will not operate.
WARNİNG: Do not use old or used water inlet hoses on the
new product. It may cause stains on your laundry.
1. Connect the special hoses supplied with the product to
the water inlets on the product. Red hose (left) (max. 90
ºC) is for hot water inlet, blue hose (right) (max. 25 ºC) is
for cold water inlet.
2.3 Removing the transportation locks
WARNİNG: Do not remove the transportation locks before
taking out the packaging reinforcement.
A
WARNİNG: Remove the transportation safety bolts before
operating the washing machine! Otherwise, the product
will be damaged.
1. Loosen all the bolts with a suitable spanner until they
rotate freely
6 / EN
(C).
WARNİNG: Ensure that the cold and hot water connections
are made correctly when installing the product.
A
Otherwise, your laundry will come out hot at the end of
the washing process and wear out.
2. Tighten all hose nuts by hand. Never use a tool when
tightening the nuts.
3. Open the taps completely after making the hose
connection to check for water leaks at the connection
Washing Machine / User’s Manual
Page 7
points. If any leaks occur, turn off the tap and remove the
nut. Retighten the nut carefully after checking the seal. To
prevent water leakages and damages caused by them,
keep the taps closed when the machine is not in use.
2.5 Connecting to the drain
• The end of the drain hose must be directly connected to
the wastewater drain or to the washbasin.
WARNİNG: Your house will be flooded if the hose comes
out of its housing during water discharge. Moreover, there
A
is risk of scalding due to high washing temperatures!
To prevent such situations and to ensure smooth water
intake and discharge of the machine, fix the end of the
discharge hose tightly so that it cannot come out.
• The hose should be attached to a height of at least 40
cm, and 100 cm at most.
• In case the hose is elevated after laying it on the floor
level or close to the ground (less than 40 cm above the
ground), water discharge becomes more difficult and the
laundry may come out excessively wet. Therefore, follow
the heights described in the figure.
100cm
40cm
• To prevent flowing of dirty water back into the machine
and to allow for easy discharge, do not immerse the hose
end into the dirty water or do not drive it in the drain more
than 15 cm. If it is too long, cut it short.
• The end of the hose should not be bent, it should not be
stepped on and the hose must not be pinched between
the drain and the machine.
• If the length of the hose is too short, use it by adding
an original extension hose. Length of the hose may
not be longer than 3.2 m. To avoid water leak failures,
the connection between the extension hose and the
drain hose of the product must be fitted well with an
appropriate clamp as not to come off and leak.
2.6 Adjusting the feet
WARNİNG: In order to ensure that the product operates
more silently and vibration-free, it must stand level and
A
balanced on its feet. Balance the machine by adjusting
the feet. Otherwise, the product may move from its place
and cause crushing and vibration problems.
1. Loosen the lock nuts on the feet by hand.
2. Adjust the feet until the product stands level and
balanced.
3. Tighten all lock nuts again by hand.
WARNİNG: Do not use any tools to loosen the lock nuts.
Otherwise, they will get damaged.
A
2.7 Electrical connection
Connect the product to a grounded outlet protected by a 16
A fuse. Our company shall not be liable for any damages
that will arise when the product is used without grounding in
accordance with the local regulations.
• Connection must comply with national regulations.
• Power cable plug must be within easy reach after
installation.
• If the current value of the fuse or breaker in the house is
less than 16 Amps, have a qualified electrician install a
16 Amp fuse.
• The voltage specified in the "Technical specifications"
section must be equal to your mains voltage.
• Do not make connections via extension cables or multiplugs.
WARNİNG: Damaged power cables must be replaced by
the Authorized Service Agents.
B
Transportation of the product
1. Unplug the product before transporting it.
2. Remove water drain and water supply connections.
3. Drain all water that has remained in the product. (SEE
5.5)
4. Install transportation safety bolts in the reverse order of
removal procedure; (SEE 2.3)
Never move the product without the transportation safety
bolts properly fixed in place!
C
WARNİNG: Packaging materials are dangerous to children.
Keep packaging materials in a safe place away from
A
reach of the children.
7 / EN
Washing Machine / User’s Manual
Page 8
3 Preparation
3.1 Sorting the laundry
• Sort laundry according to type of fabric, colour, and
degree of soiling and allowable water temperature.
• Always obey the instructions given on the garment tags.
3.2 Preparing laundry for washing
• Laundry items with metal attachments such as,
underwired bras, belt buckles or metal buttons will
damage the machine. Remove the metal pieces or wash
the clothes by putting them in a laundry bag or pillow
case.
• Take out all substances in the pockets such as coins,
pens and paper clips, and turn pockets inside out and
brush. Such objects may damage the product or cause
noise problem.
• Put small size clothes such as infant's socks and nylon
stockings in a laundry bag or pillow case.
• Place curtains in without compressing them. Remove
curtain attachment items.
• Fasten zippers, sew loose buttons and mend rips and
tears.
• Wash “machine washable” or “hand washable” labeled
products only with an appropriate programme.
• Do not wash colours and whites together. New, dark
coloured cottons release a lot of dye. Wash them
separately.
• Tough stains must be treated properly before washing. If
unsure, check with a dry cleaner.
• Use only dyes/colour changers and limescale removers
suitable for machine wash. Always follow the instructions
on the package.
• Wash trousers and delicate laundry turned inside out.
• Keep laundry items made of Angora wool in the freezer
for a few hours before washing. This will reduce pilling.
• Laundry that are subjected to materials such as flour,
lime dust, milk powder, etc. intensely must be shaken off
before placing into the machine. Such dusts and powders
on the laundry may build up on the inner parts of the
machine in time and can cause damage.
3.3 Things to be done for energy saving
Following information will help you use the product in an
ecological and energy-efficient manner.
• Operate the product in the highest capacity allowed by
the programme you have selected, but do not overload;
see, "Programme and consumption table".
• Always follow the instructions on the detergent
packaging.
• Wash slightly soiled laundry at low temperatures.
• Use faster programmes for small quantities of lightly
soiled laundry.
• Do not use prewash and high temperatures for laundry
that is not heavily soiled or stained.
• If you plan to dry your laundry in a dryer, select the
highest spin speed recommended during washing
process.
• Do not use detergent in excess of the amount
recommended on the detergent package.
3.4 Initial use
Before starting to use the product, make sure that all
preparations are made in accordance with the instructions in
sections “Important safety instructions” and “Installation”.
To prepare the product for washing laundry, perform first
operation in Drum Cleaning programme. If your product
is not equipped with Drum Cleaning programme, perform
the Initial Use procedure in accordance with the methods
described under “5.2 Cleaning the loading door and the
drum” section of the user manual.
Use an anti-limescale suitable for the washing machines.
Some water might have remained in the product due to
C
the quality control processes in the production. It is not
harmful for the product.
3.5 Correct load capacity
The maximum load capacity depends on the type of laundry,
the degree of soiling and the washing programme desired.
The machine automatically adjusts the amount of water
according to the weight of the loaded laundry.
WARNİNG: Follow the information in the “Programme
and consumption table”. When overloaded, machine's
A
washing performance will drop. Moreover, noise and
vibration problems may occur.
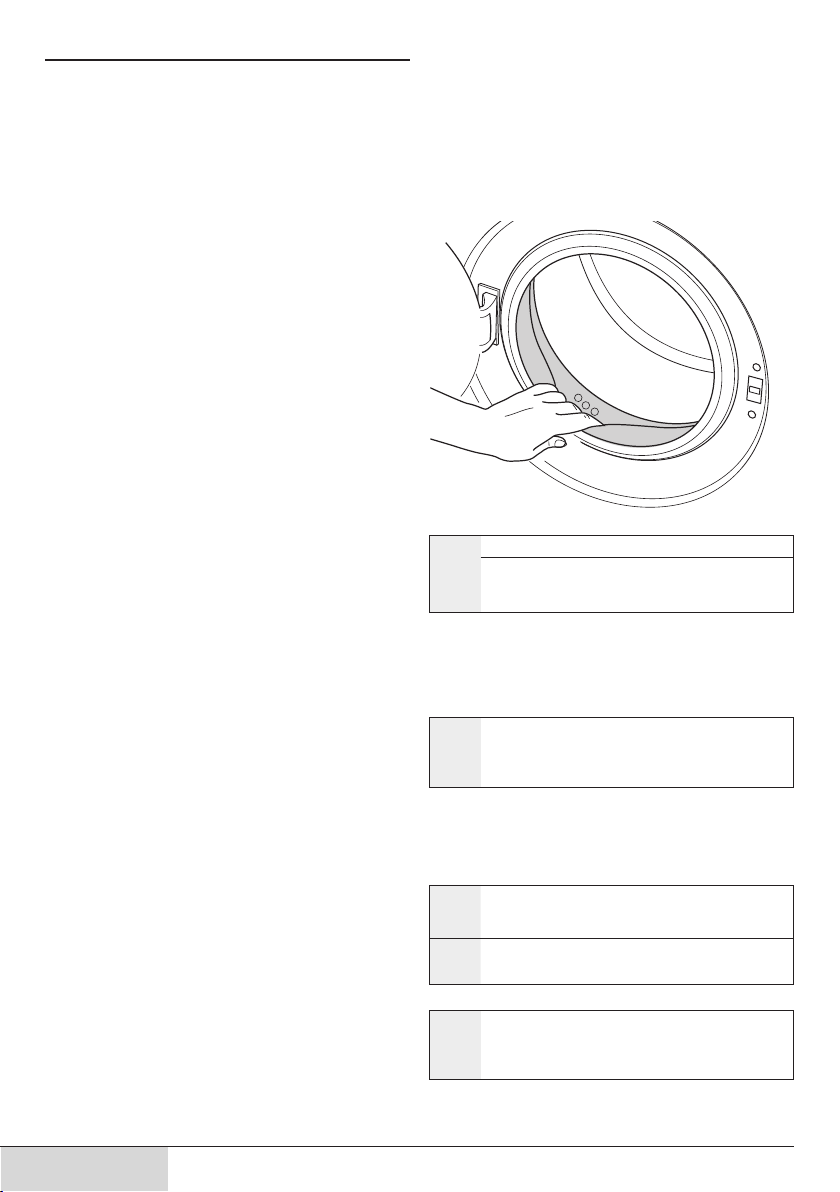
3.6 Loading the laundry
1. Open the loading door.
2. Place laundry items loosely into the machine.
3. Push the loading door to close until you hear a locking
sound. Ensure that no items are caught in the door.
The loading door is locked while a programme is running.
The door can only be opened a while after the programme
C
comes to an end.
WARNİNG: In case of misplacing the laundry, noise and
vibration problems may occur in the machine.
A
3.7 Using detergent and softener
When using detergent, softener, starch, fabric dye, bleach
or limescale remover read the manufacturer's instructions
C
on the package carefully and follow the suggested dosage
values. Use measuring cup if available.
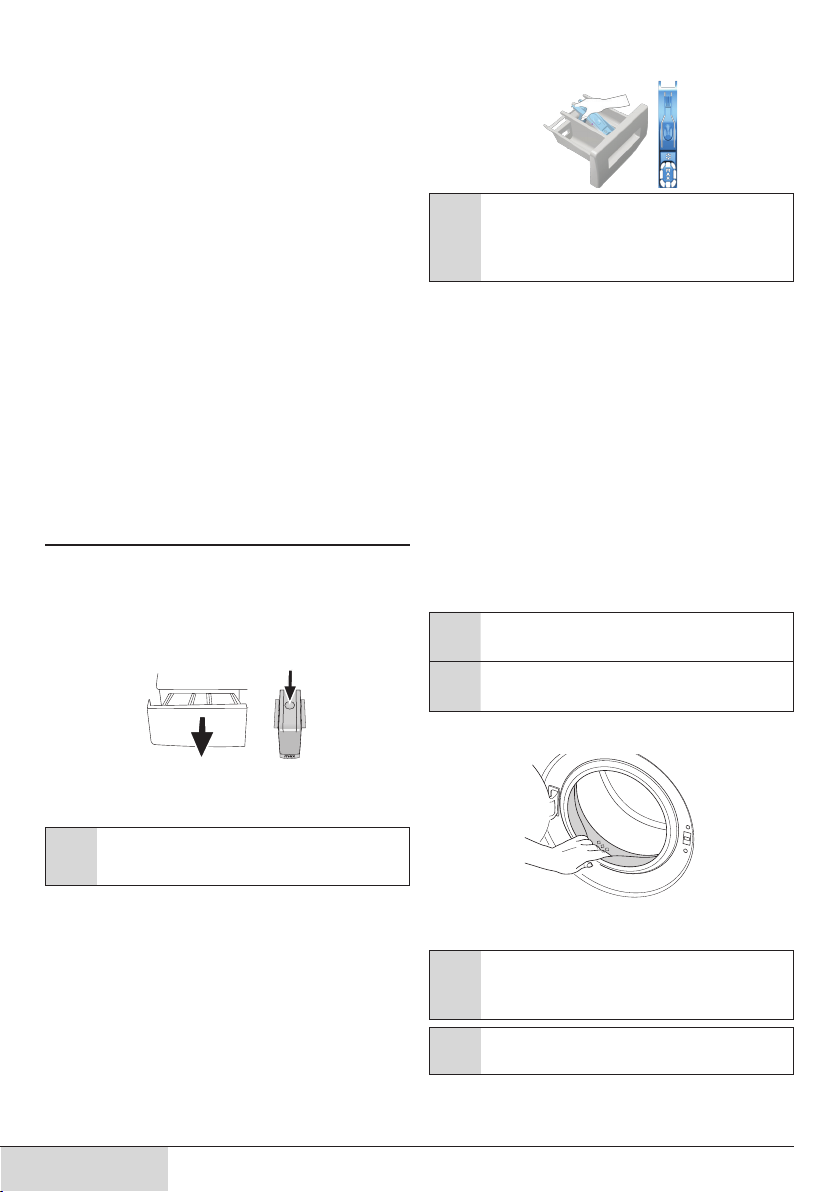
Detergent Drawer
The detergent drawer is composed of three compartments:
– (1) for prewash
8 / EN
Washing Machine / User’s Manual
Page 9
– (2) for main wash
– (3) for softener
– (*) in addition, there is siphon piece in the softener
compartment.
2
Detergent, softener and other cleaning agents
• Add detergent and softener before starting the washing
programme.
• Never leave the detergent drawer open while the washing
programme is running!
• When using a programme without prewash, do not
put any detergent into the prewash compartment
(compartment nr. "1").
• In a programme with prewash, do not put liquid detergent
into the prewash compartment (compartment nr. "1").
• Do not select a programme with prewash if you are using
a detergent bag or dispensing ball. Place the detergent
bag or the dispensing ball directly among the laundry in
the machine.
• If you are using liquid detergent, do not forget to place
the liquid detergent cup into the main wash compartment
(compartment nr. "2").
Choosing the detergent type
The type of detergent to be used depends on the type and
colour of the fabric.
• Use different detergents for coloured and white laundry.
• Wash your delicate clothes only with special detergents
(liquid detergent, wool shampoo, etc.) used solely for
delicate clothes.
• When washing dark coloured clothes and quilts, it is
recommended to use liquid detergent.
• Wash woolens with special detergent made specifically
for woolens.
WARNİNG: Use only detergents manufactured specifically
for washing machines.
A
WARNİNG: Do not use soap powder.
Adjusting detergent amount
The amount of washing detergent to be used depends
on the amount of laundry, the degree of soiling and water
hardness.
• Do not use amounts exceeding the dosage quantities
recommended on the detergent package to avoid
problems of excessive foam, poor rinsing, financial
savings and finally, environmental protection.
• Use lesser detergent for small amounts or lightly soiled
clothes.
1
3
Using softeners
Pour the softener into the softener compartment of the
detergent drawer.
• Do not exceed the (>max<) level marking in the softener
compartment.
• If the softener has lost its fluidity, dilute it with water
before putting it in the detergent drawer.
Using liquid detergents
If the product contains a liquid detergent cup:
• Make sure that you have placed the liquid detergent cup
in compartment nr. "2".
• If the liquid detergent has lost its fluidity, dilute it with
water before putting in the detergent cup.
If the product does not contain a liquid detergent cup:
• Do not use liquid detergent for the prewash in a
programme with prewash.
• Liquid detergent stains your clothes when used with
Delayed Start function. If you are going to use the Delayed
Start function, do not use liquid detergent.
Using gel and tablet detergent
Apply the following instructions when using tablet, gel and
similar detergents.
• If the gel detergent thickness is fluidal and your machine
does not contain a special liquid detergent cup, put the
gel detergent into the main wash detergent compartment
during first water intake. If your machine contains a liquid
detergent cup, fill the detergent into this cup before
starting the programme.
• If the gel detergent thickness is not fluidal or in the shape
of capsule liquid tablet, put it directly into the drum before
washing.
• Put tablet detergents into the main wash compartment
(compartment nr. “2”) or directly into the drum before
washing.
Tablet detergents may leave residues in the detergent
compartment. If you encounter such a case, place the
C
tablet detergent between the laundry, close to the lower
part of the drum in future washings.
Use the tablet or gel detergent without selecting the
prewash function.
Using starch
• Add liquid starch, powder starch or the fabric dye into the
softener compartment.
• Do not use softener and starch together in a washing
cycle.
• Wipe the inside of the machine with a damp and clean
cloth after using starch.
Using bleaches
9 / EN
Washing Machine / User’s Manual
Page 10
• Select a programme with prewash and add the bleaching
agent at the beginning of the prewash. Do not put
detergent in the prewash compartment. As an alternative
application, select a programme with extra rinse and add
the bleaching agent while the machine is taking water
from the detergent compartment during first rinsing step.
• Do not use bleaching agent and detergent by mixing
them.
• Use just a little amount (approx. 50 ml) of bleaching agent
and rinse the clothes very well as it causes skin irritation.
Do not pour the bleaching agent onto the clothes and do
not use it for coloured clothes.
• When using oxygen based bleaches, select a programme
that washes at a lower temperature.
• Oxygen based bleaches can be used together with
detergents; however, if its thickness is not the same
with the detergent, put the detergent first into the
compartment nr. “2” in the detergent drawer and wait
until the detergent flows while the machine is taking
in water. Add the bleaching agent from the same
compartment while the machine is still taking in water.
Using limescale remover
• When required, use limescale removers manufactured
specifically for washing machines only.
3.8 Tips for efficient washing
Clothes
Light colours and whites
(Recommended temperature range based
on soiling level: 40-90 °C)
It may be necessary to pre-treat the stains
Heavily Soiled
(difficult stains
such as grass,
coffee, fruits and
blood.)
Normally Soiled
(For example,
stains caused by
Soiling Level
body on collars
and cuffs)
Lightly Soiled
(No visible stains
exist.)
or perform prewash. Powder and liquid
detergents recommended for whites can be
used at dosages recommended for heavily
soiled clothes. It is recommended to use
powder detergents to clean clay and soil
stains and the stains that are sensitive to
bleaches.
Powder and liquid detergents recommended
for whites can be used at dosages
recommended for normally soiled clothes.
Powder and liquid detergents recommended
for whites can be used at dosages
recommended for lightly soiled clothes.
Heavily Soiled
Normally Soiled
Soiling Level
Lightly Soiled
Heavily Soiled
Normally Soiled
Soiling Level
Lightly Soiled
Heavily Soiled
Normally Soiled
Soiling Level
Lightly Soiled
Clothes
Colours
(Recommended temperature range based
on soiling level: cold -40 °C)
Powder and liquid detergents recommended
for colours can be used at dosages
recommended for heavily soiled clothes. It is
recommended to use powder detergents to
clean clay and soil stains and the stains that
are sensitive to bleaches. Use detergents
without bleach.
Powder and liquid detergents recommended
for colours can be used at dosages
recommended for normally soiled clothes.
Use detergents without bleach.
Powder and liquid detergents recommended
for colours can be used at dosages
recommended for lightly soiled clothes. Use
detergents without bleach.
Dark colours
(Recommended temperature range based
on soiling level: cold -40 °C)
Liquid detergents suitable for colours
and dark colours can be used at dosages
recommended for heavily soiled clothes.
Liquid detergents suitable for colours
and dark colours can be used at dosages
recommended for normally soiled clothes.
Liquid detergents suitable for colours
and dark colours can be used at dosages
recommended for lightly soiled clothes.
Delicates/Woollens/Silks
(Recommended temperature range based
on soiling level: cold -30 °C)
Prefer liquid detergents produced for
delicate clothes. Woollen and silk clothes
must be washed with special woollen
detergents.
Prefer liquid detergents produced for
delicate clothes. Woollen and silk clothes
must be washed with special woollen
detergents.
Prefer liquid detergents produced for
delicate clothes. Woollen and silk clothes
must be washed with special woollen
detergents.
10 / EN
Washing Machine / User’s Manual
Page 11
4 Operating the product
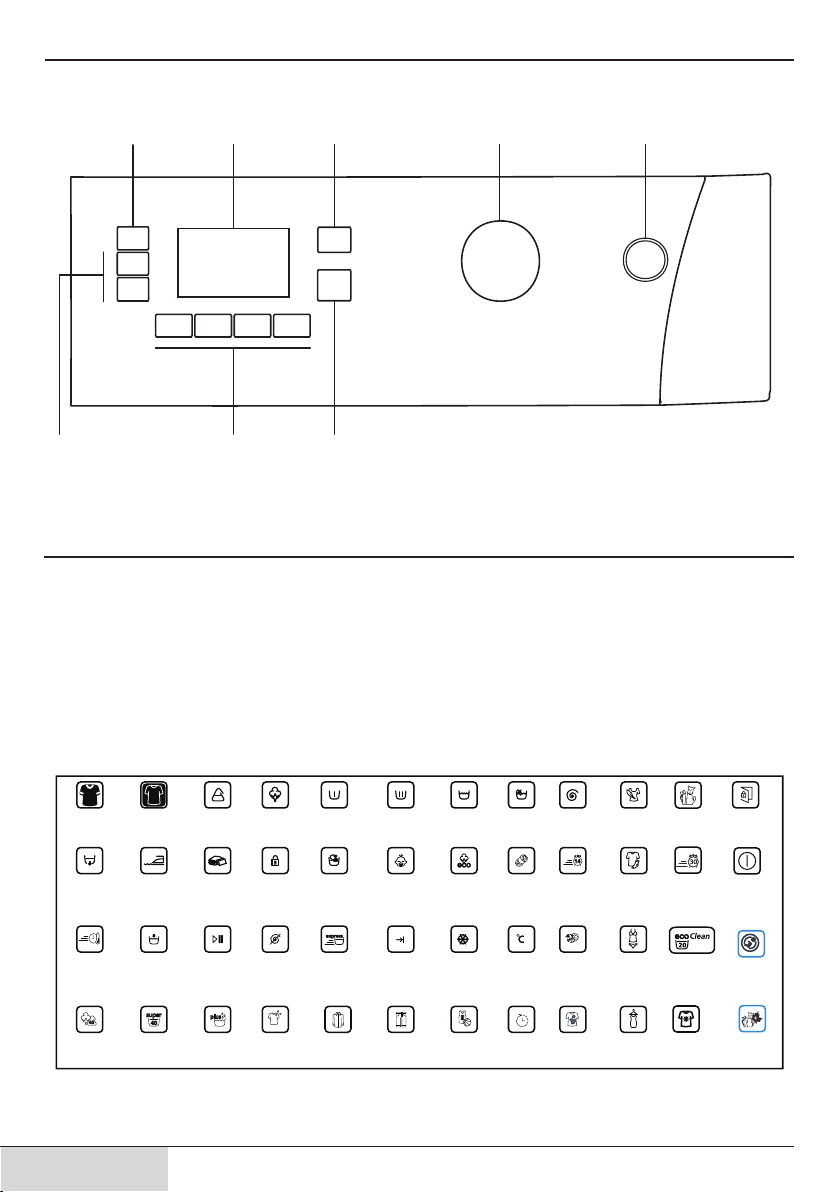
4.1 Control panel
1
2 3 4 5
8
1 - Spin Speed Adjustment button
2 - Display
3 - Temperature Adjustment button
4 - Programme Selection knob
67
5 - On / Off button
6 - Delayed Start buttons (+ / -)
7 - Auxiliary Function buttons
8 - Start / Pause / Cancel button
Dark wash
(Darkcare)
(Pump)
express
Mixed 40
(Mix40)
11 / EN
Drain
Daily
Dark wash
(Darkcare)
creasing
Rinse hold Start/
Super 40 Extra rinse
Anti-
Synthetics
Duvet
(Bedding)
Pause
(Rinse Plus)
Cottons Pre-wash Main
Child-
Hand
proof lock
No spin Quick
Freshen
up
Wash
wash
Shirts
BabyProtect Cotton
Finished Cold
wash
Jeans Sport Time delay Intensive
Rinse Wash Spin
Woollens
expres 14
Temperature
Super short
express
Self
Clean
Eco
Delicate Pet hair
Daily
Lingerie
Fasihon
care
Washing Machine / User’s Manual
removal
mini 30
Eco Clean
Anti-
allergic
Door Ready
On/Off
BabyProtect +
PHR +
Page 12
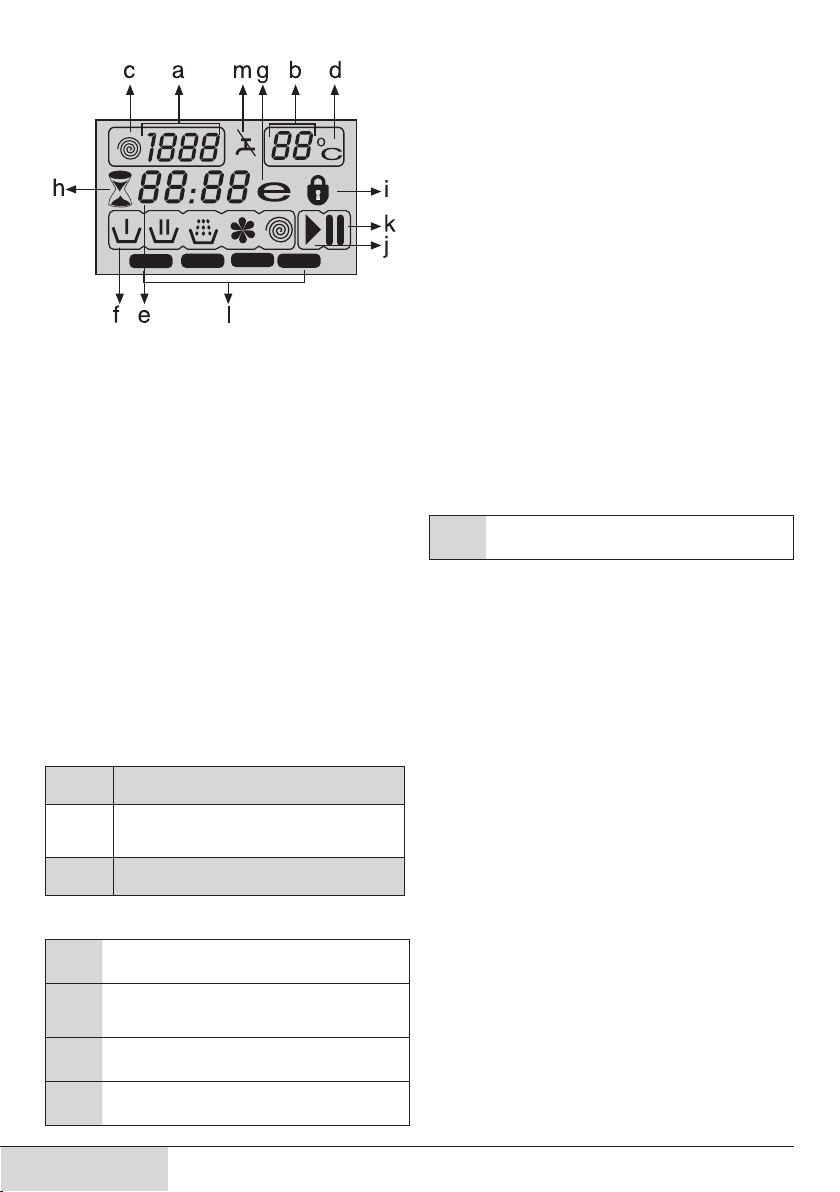
4.2 Display symbols
F3
F2
F1
a - Spin Speed indicator
b - Temperature indicator
c - Spin symbol
d - Temperature symbol
e - Remaining Time and Delayed Start indicator
f - Programme Indicator symbols (Prewash / Main Wash /
Rinse / Softener / Spin)
g - Economy symbol
h - Delayed Start symbol
i - Door Locked symbol
j - Start symbol
k - Pause symbol
l - Auxiliary Function symbols
m - No Water symbol
F4
4.3 Preparing the machine
Make sure that the hoses are connected tightly. Plug in your
machine. Turn the tap on completely. Place the laundry in the
machine. Add detergent and fabric softener.
4.4 Programme selection
Select the programme suitable for the type, quantity
and soiling degree of the laundry in accordance with the
"Programme and consumption table" and the temperature
table below.
90˚C
60˚C
40˚C30˚C- Cold
Select the desired programme with the Programme
Selection button.
C
C
C
C
Heavily soiled white cottons and linens. (coffee table
covers, tableclothes, towels, bed sheets, etc.)
Normally soiled, coloured, fade proof linens, cottons or
synthetic clothes (shirt, nightgown, pajamas, etc.) and
lightly soiled white linens (underwear, etc.)
Blended laundry including delicate textile (veil curtains,
etc.), synthetics and woolens.
Programmes are limited with the highest spin speed
appropriate for that particular type of fabric.
When selecting a programme, always consider the type
of fabric, colour, degree of soiling and permissible water
temperature.
Always select the lowest required temperature. Higher
temperature means higher power consumption.
For further programme details, see "Programme and
consumption table"
4.5 Main programmes
Depending on the type of fabric, use the following main
programmes.
• Cottons
Use this programme for your cotton laundry (such as bed
sheets, duvet and pillowcase sets, towels, bathrobes,
underwear, etc.). Your laundry will be washed with vigorous
washing action for a longer washing cycle.
• Synthetics
Use this programme to wash your synthetic clothes (shirts,
blouses, synthetic/cotton blends, etc.). It washes with a
gentle action and has a shorter washing cycle compared to
the Cottons programme.
For curtains and tulle, use the Synthetic 40˚C programme
with prewash and anti-creasing functions selected. As their
meshed texture causes excessive foaming, wash the veils/
tulle by putting little amount of detergent into the main
wash compartment. Do not put detergent in the prewash
compartment.
• Woollens
Use this programme to wash your woolen clothes. Select
the appropriate temperature complying with the tags of your
clothes. Use appropriate detergents for woolens.
4.6 Additional programmes
For special cases, additional programmes are available in
the machine.
Additional programmes may differ according to the
model of the machine.
C
• Cotton Economic
You may wash your normally soiled durable cotton and
linen laundry in this programme with the highest energy
and water saving compared to all other wash programmes
suitable for cottons. Actual water temperature may differ
from the declared cycle temperature. Programme duration
may automatically be shortened during later stages of the
programme if you wash less amount (e.g. ½ capacity or
less) of laundry. In this case energy and water consumption
will be further decreased giving you the opportunity for a
more economical wash. This feature is available for certain
models having remaining time display.
• BabyProtect
Use this programme to wash baby laundry, and the laundry
that belongs to allergic persons. Longer heating time and an
additional rinsing step provide a higher level of hygiene.
• Hand wash
Use this programme to wash your woolen/delicate clothes
that bear “not machine- washable” tags and for which hand
wash is recommended. It washes laundry with a very gentle
washing action to not to damage clothes.
• Daily Xpress
Use this programme to wash your lightly soiled cotton
clothes in a short time.
• Super Short Ekpress
Use this programme to wash your little amount of lightly
soiled cotton clothes in a short time.
12 / EN
Washing Machine / User’s Manual
Page 13

• Darkcare
Use this programme to wash your dark coloured laundry
or the laundry that you do not want it get faded. Washing
is performed with little mechanic action and at low
temperatures. It is recommended to use liquid detergent or
woolen shampoo for dark coloured laundry.
• Mixed 40
Use this programme to wash your cotton and synthetic
clothes together without sorting them.
• Duvet (Bedding)
Use this programme to wash your fiber duvets that bear
"machine washable" tag. Make sure that you have loaded
the duvet correctly in order not to damage the machine and
the duvet. Remove the duvet cover before loading the duvet
into the machine. Fold the duvet into two and load it into the
machine. Load the duvet into the machine paying attention
to place it in a way that it will not contact the bellow.
Do not load more than 1 double fibre duvet (200 x 200
cm).
C
Do not wash your duvets, pillows and etc. that contain
cotton in the machine.
C
WARNİNG: Do not wash the items apart from duvets such
as carpets, rugs and etc. in the machine. Permanent
A
damage occurs in the machine.
• Freshen up
Use this programme to remove the odour on the laundry that
are worn only for once and do not contain any stains or dirt.
• eco Clean
Use this programme, which is much more sensitive to
environment and natural resources, to wash your lightly
soiled and unstained cotton laundry (max. 3.5 kg) in a short
time and economically.
It is recommended to use liquid detergent or gel
washing detergent.
C
• Self Clean
Use this programme regularly (once in every 1-2 months) to
clean the drum and provide the required hygiene. Run the
programme without any laundry in the machine. To obtain
better results, put powder limescale remover for washing
machines into the detergent compartment II. When the
programme is over, leave the loading door ajar so that the
inside of the machine gets dry.
This is not a washing programme. It is a maintenance
programme.
C
Do not run the programme when there is something in
the machine. If you try to do so, the machine detects
that there is a load inside and aborts the programme.
C
4.7 Special programmes
For specific applications, select any of the following
programmes.
• Rinse
Use this programme when you want to rinse or starch
separately.
• Spin + Drain
Use this programme to apply an additional spin cycle for
your laundry or to drain the water in the machine.
Before selecting this programme, select the desired spin
speed and press Start / Pause / Cancel button. The machine
will spin the laundry with the set spin speed and drain the
water coming out of them.
If you wish to drain only the water without spinning your
laundry, select the Pump+Spin programme and then select
the No Spin function with the help of Spin Speed Adjustment
button. Press Start / Pause / Cancel button.
Use a lower spin speed for delicate laundries.
C
4.8 Temperature selection
Whenever a new programme is selected, the maximum
temperature for the selected programme appears on the
temperature indicator.
To decrease the temperature, press the Temperature
Adjustment button. Temperature decreases with increments
of 10° and finally, “-” symbol indicating the cold wash option
appears on the display.
If you scroll to cold wash option and press Temperature
Adjustment button again, the recommended
C
temperature for the selected programme appears on
the display. Press the Temperature Adjustment button
again to decrease the temperature.
Economy symbol
Indicates the programmes and temperatures that provide
energy savings.
Economy symbol can not be selected in Intensive and
Hygiene programmes since washing is performed in
C
long times and at high temperatures in order to provide
hygiene. Similarly, Economy symbol can not be selected
in Baby, Refresh, Drum Cleaning, Spin and Rinse
programmes as well.
4.9 Spin speed selection
Whenever a new programme is selected, the recommended
spin speed of the selected programme is displayed on the
spin speed indicator.
To decrease the spin speed, press the Spin Speed
Adjustment button. Spin speed decreases gradually. Then,
depending on the model of the product, "Rinse Hold" and
"No Spin" options appear on the display. See "Auxiliary
function selection" section for explanations of these options.
Rinse Hold option is indicated with “ ” symbol and
No Spin option is indicated with “ ” symbol.
C
13 / EN
Washing Machine / User’s Manual
Page 14
4.10 Programme and consumption table
EN
Programme (°C)
Cottons 90 9 87 2.70 1600 • • • • • 90-Cold
Cottons 60 9 85 1.80 1600 • • • • • 90-Cold
Cottons 40 9 85 1.00 1600 • • • • • 90-Cold
BabyProtect 90 9 80 2.70 1600 * • 90-30
Cotton Economic 60** 9 55 1.30 1600 • 60-Cold
Cotton Economic 60** 4.5 46 1.04 1600 • 60-Cold
Cotton Economic 40** 4.5 46 0.78 1600 • 60-Cold
Cotton Economic 40 9 80 0.95 1600 • 60-Cold
Synthetics 60 4 55 1.00 1200 • • • • • 60-Cold
Synthetics 40 4 55 0.52 1200 • • • • • 60-Cold
Eco Clean 20 3.5 45 0.16 1600 • 20
Mixed 40 (Mix 40) 40 4 55 0.62 1200 • • • • • 40-Cold
Duvet (Bedding) 40 - 60 0.60 1200 60-40
Super short express 30 2 42 0.10 1400 • • 30-Cold
Daily express 90 9 70 2.02 1400 • • 90-Cold
Daily express 60 9 70 1.20 1400 • • 90-Cold
Daily express 30 9 80 0.30 1400 • • 90-Cold
Woollens 40 2 56 0.30 1200 • • 40-Cold
Hand wash 30 1.5 40 0.25 1200 30-Cold
Darkcare 40 4 95 0.60 1200 * • 40-Cold
Self Clean 70 - 110 2.00 800 * 70
Freshen Up - 2 35 0.03 1200 • -
2
Max. Load (kg)
Water Consumption (l)
Energy Consumption (kWh)
Max. Speed***
Auxiliary functions
Prewash
Quick Wash
Rinse Plus
Anti-Creasing
Selectable
temperature range
°C
Rinse Hold
• : Selectable
* : Automatically selected, no cancelling.
** : Energy Label programme (EN 60456 Ed.3)
*** If maximum spin speed of the machine is lower then this value, you can only select up to the maximum spin speed.
- : See the programme description for maximum load.
** “Cotton eco 40°C and Cotton eco 60°C are standard cycles.” These cycles are known as ‘40°C cotton standard cycle’ and
‘60°C cotton standard cycle’ and indicated with the symbols on the panel.
The auxiliary functions in the table may vary according to the model of your machine.
C
Water and power consumption may vary subject to the changes in water pressure, water hardness and temperature, ambient
temperature, type and amount of laundry, selection of auxiliary functions and spin speed, and changes in electric voltage.
C
You can see the washing time of the programme you have selected on the display of the machine. It is normal that small
differences may occur between the time shown on the display and the real washing time.
C
14 / EN
Washing Machine / User’s Manual
Page 15

4.11 Auxiliary function selection
Select the desired auxiliary functions before starting
the programme. Furthermore, you may also select or
cancel auxiliary functions that are suitable to the running
programme by pressing the Start / Pause / Cancel button
when the machine is operating. For this, the machine must
be in a step before the auxiliary function you are going to
select or cancel.
Depending on the programme, press a, b, c or d buttons to
select the desired auxiliary function. Symbol of the selected
auxiliary function appears on the display.
Some functions cannot be selected together. If a second
auxiliary function conflicting with the first one is selected
C
before starting the machine, the function selected
first will be canceled and the second auxiliary function
selection will remain active. For example, if you want to
select Quick Wash after you have selected the Prewash,
Prewash will be canceled and Quick Wash will remain
active.
An auxiliary function that is not compatible with the
programme cannot be selected. (See “Programme and
C
consumption table”)
Auxiliary Function buttons may vary according to the
model of the machine.
C
• Prewash
A Prewash is only worthwhile for heavily soiled laundry. Not
using the Prewash will save energy, water, detergent and
time.
F1 appears on the display when you select this function (a).
• Quick Wash
This function can be used in Cottons and Synthetics
programmes. It decreases the washing times and also the
number of rinsing steps for lightly soiled laundry.
F2 appears on the display when you select this function (b).
When you select this function, load your machine
with half of the maximum laundry specified in the
C
programme table.
• Rinse Plus
This function enables the machine to make another rinsing
in addition to the one already made after the main wash.
Thus, the risk for sensitive skins (babies, allergic skins, etc.)
to be effected by the minimal detergent remnants on the
laundry can be reduced.
F3 appears on the display when you select this function (c).
• Anti-Creasing
This function creases the clothes lesser when they are being
washed. Drum movement is reduced and spinning speed is
limited to prevent creasing. In addition, washing is done with
a higher water level.
F4 appears on the display when you select this function (d).
• Rinse Hold
If you are not going to unload your clothes immediately after
the programme completes, you may use rinse hold function
to keep your laundry in the final rinsing water in order to
prevent them from getting wrinkled when there is no water
in the machine. Press Start / Pause /Cancel button after this
process if you want to drain the water without spinning your
laundry. Programme will resume and complete after draining
the water.
If you want to spin the laundry held in water, adjust the Spin
Speed and press Start / Pause / Cancel button.
The programme resumes. Water is drained, laundry is spun
and the programme is completed.
• Pet hair removal
This function helps to remove pet hair that remain on your
garments more effectively.
When you select this function, Prewash and Extra Rinse
steps are added to the normal programme. Thus, washing
is performed with more water (30%) and the pet hair is
removed more effectively.
Never wash your pets in the washing machine.
A
4.12 Time display
Remaining time to complete the programme appears on the
display while the programme is running. Tim is displayed as
“01:30” in hours and minutes format.
Programme time may differ from the values in the
“Programme and consumption table” depending on
C
the water pressure, water hardness and temperature,
ambient temperature, amount and the type of laundry,
auxiliary functions selected and the changes at the
mains voltage.
Delayed start
With the Delayed Start function the startup of the
programme may be delayed up to 24 hours. Delayed start
time can be increased by increments of 30 minutes.
Do not use liquid detergents when you set Delayed
Start! There is the risk of staining of the clothes.
C
Open the loading door, place the laundry and put detergent,
etc. Select the washing programme, temperature, spin
speed and, if required, the auxiliary functions. Set the
desired delayed start time by pressing the Delayed Start + or
- buttons. Delayed Start symbol flashes. Press Start / Pause
/ Cancel button. Delayed start countdown starts. Delayed
Start symbol illuminates steadily. Start symbol appears. “:”
sign in the middle of the delayed start time on the display
starts flashing.
Additional laundry may be loaded during the delayed
start period. At the end of the countdown, Delayed Start
C
symbol disappears, washing cycle starts and the time
of the selected programme appears on the display.
Changing the delayed start period
If you want to change the time during countdown:
Press Start / Pause / Cancel button. “:” sign in the middle of
the delayed start time on the display stops flashing. Pause
symbol appears. Delayed Start symbol flashes. Start symbol
disappears. Set the desired delayed start time by pressing
the Delayed Start + or - buttons. Press Start / Pause /
Cancel button. Delayed Start symbol illuminates steadily.
Pause symbol disappears. Start symbol appears. “:” sign
in the middle of the delayed start time on the display starts
flashing.
Cancelling the Delayed Start function
If you want to cancel the delayed start countdown and start
the programme immediately:
Press Start / Pause / Cancel button. “:” sign in the middle
of the delayed start time on the display stops flashing. Start
symbol disappears. Pause symbol and Delayed Start symbol
15 / EN
Washing Machine / User’s Manual
Page 16

flashes. Decrease the delayed start time by pressing the
Delayed Start - button. Programme duration appears after
30 minutes. Press Start / Pause / Cancel button to start the
programme.
4.13 Starting the programme
Press Start / Pause / Cancel button to start the programme.
Start symbol showing the startup of the programme will turn
on. Loading door is locked and Door Locked symbol appears
on the display. The symbol of the step from which the
programme has started appears on the display (Prewash,
Main Wash, Rinse, Softener and Spin).
4.14 Progress of programme
Progress of a running programme is indicated on the display
with a set of symbols.
Relevant symbol appears on the display at the beginning of
each programme step and all symbols remain lit at the end
of the programme. The farthermost right symbol indicates
the current programme step.
Prewash
If the Prewash auxiliary function is selected, Prewash symbol
appears on the display indicating that the prewash step has
started.
Main Wash
Main Wash symbol indicating that the main wash step has
started appears on the display.
Rinse
Rinse symbol indicating that the rinsing step has started
appears on the display.
Softener
Softener symbol indicating that the softener step has started
appears on the display.
Spin
Appears at the beginning of the final spin step and remains
lit during Spin and Pump special programmes.
If the machine does not pass to the spinning step,
Rinse Hold function might be active or the automatic
C
unbalanced load detection system might be activated
due to the unbalanced distribution of the laundry in the
machine.
4.15 Loading door lock
There is a locking system on the loading door of the
machine that prevents opening of the door in cases when
the water level is unsuitable.
Door Locked symbol appears when the loading door is
locked. This symbol will flash until the loading door becomes
ready to open when programme completes or the machine
is paused. Do not force to open the loading door in this step.
Symbol disappears when the door is ready to open. You can
open the door when the symbol disappears.
4.16 Changing the selections after
programme has started
Switching the machine to pause mode
Press the Start / Pause / Cancel button to switch the
machine to pause mode. Pause symbol appears on the
display indicating that the machine is paused. Start symbol
disappears.
Changing the speed and temperature settings for
auxiliary functions
Depending on the step the programme has reached, you
may cancel or activate the auxiliary functions; see, "Auxiliary
function selection".
You may also change the speed and temperature settings;
see, "Spin speed selection" and "Temperature selection".
Adding or taking out laundry
Press the Start / Pause / Cancel button to switch the
machine to pause mode. The programme follow-up light of
the relevant step during which the machine was switched
into the pause mode will flash. Wait until the Loading Door
can be opened. Open the Loading Door and add or take
out the laundry. Close the Loading Door. Make changes
in auxiliary functions, temperature and speed settings if
necessary. Press Start / Pause / Cancel button to start the
machine.
The loading door will not open if the water temperature
in the machine is high or the water level is above the
C
door opening.
4.17 Child Lock
Use Child Lock function to prevent children from tampering
with the machine. Thus you can avoid any changes in a
running programme.
You can switch on and off the machine with On / Off
button when the Child Lock is active. When you switch
C
on the machine again, programme will resume from
where it has stopped.
To activate the Child Lock:
Press and hold 2nd and 4th Auxiliary Function buttons for 3
seconds. “Con” appears on the display.
Same phrase will appear on the display if you press
C
To deactivate the Child Lock:
Press and hold 2nd and 4th Auxiliary Function buttons for 3
seconds. “COFF” appears on the display.
C
any button when Child Lock is enabled.
Do not forget to disable the child lock at the end of
the programme if it was enabled before. Otherwise,
machine will not allow to select a new programme.
4.18 Cancelling the programme
Press and hold Start / Pause / Cancel button for 3 seconds.
Start symbol flashes. Symbol of the step at which the
programme was cancelled remains lit. "End" appears on the
display and the programme is cancelled.
If you want to open the loading door after you have
cancelled the programme but it is not possible to open
C
the loading door since the water level in the machine
is above the loading door opening, then turn the
Programme Selection knob to Pump+Spin programme
and discharge the water in the machine.
4.19 Machine is in Rinse Hold mode
Spin symbol flashes and Pause symbol illuminates when the
machine is in Rinse Hold mode.
If you want to spin your laundry when the machine is in this
mode:
Adjust the spin speed and press Start / Pause / Cancel
button. Pause symbol disappears and Start symbol appears.
Programme resumes, discharges the water and spins the
laundry.
16 / EN
Washing Machine / User’s Manual
Page 17
If you only want to drain the water without spinning:
Just press Start / Pause / Cancel button. Pause symbol
disappears. Start symbol appears. Programme resumes and
discharges the water only.
4.20 End of programme
“End” appears on the display at the end of the programme.
Symbols of the programme steps remain lit. Auxiliary
function, spin speed and temperature that were selected at
the beginning of the programme remain selected.
4.21 Your machine is equipped
with a “Standby Mode”
In case of not starting any programme or waiting without
making any other operation when the machine is turned
on by On/Off button and while it is in selection step or if
no other operation is performed approximately 2 minutes
after the programme you selected has come to an end,
your machine will automatically switch to energy saving
mode. Brightness of indicator lights will decrease. Also,
if your product is equipped with a display showing the
programme duration, this display will completely turn off. In
case of rotating the Programme Selection knob or pressing
any button, lights and display will restore to their previous
condition. Your selections made while exiting the energy
saving mode may change. Check the appropriateness of
your selections before starting the programme. Readjust if
necessary. This is not a fault.
5 Maintenance and cleaning
Service life of the product extends and frequently faced
problems decrease if cleaned at regular intervals.
5.1 Cleaning the detergent drawer
Clean the detergent drawer at regular intervals (every
4-5 washing cycles) as shown below in order to prevent
accumulation of powder detergent in time.
If your detergent drawer is the one indicated in the following
figure:
Lift the rear part of the siphon to remove it as illustrated.
After performing the above mentioned cleaning
C
procedures, replace the siphon back to its seating and
push its front section downwards to make sure that the
locking tab engages.
5.2 Cleaning the loading door and the drum
For products with drum cleaning programme, please see
Operating the product - Programmes.
For products without drum cleaning, follow the below steps
to clean the drum:
Select
Additional Water or Extra Rinse auxiliary functions.
Use a Cottons
temperature to the level recommended on the drum
cleaning agent which can be provided from authorized
services.
product.
special drum cleaning agent (if the special agent could not
be supplied, put max. 100 g of powder anti-limescale) into
the main wash detergent compartment (compartment no.
“2”). If the anti-limescale is in tablet form, put only one tablet
into the main wash compartment no. “2”. Dry the inside of
the bellow with a clean piece of cloth after the programme
has come to an end.
C
programme without pre-wash. Set the
Apply this procedure without any laundry in the
Before starting the programme, put 1 pouch of
Repeat Drum Cleaning process in every 2 months.
1. Press the dotted point on the siphon in the softener
compartment and pull towards you until the compartment
is removed from the machine.
If more than normal amount of water and softener
mixture starts to gather in the softener compartment, the
C
siphon must be cleaned.
2. Wash the detergent drawer and the siphon with plenty of
lukewarm water in a washbasin. Wear protective gloves
or use an appropriate brush to avoid touching of the
residues in the drawer with your skin when cleaning.
3. Insert the drawer back into its place after cleaning and
make sure that it is seated well.
17 / EN
Use an anti-limescale suitable for the washing machines.
C
After every washing make sure that no foreign substance is
left in the drum.
If the holes on the bellow shown in the figure is blocked,
open the holes using a toothpick.
Foreign metal substances will cause rust stains in the
drum. Clean the stains on the drum surface by using
C
cleaning agents for stainless steel. Never use steel wool
or wire wool.
WARNİNG: Never use sponge or scrub materials. These will
damage the painted and plastic surfaces.
A
Washing Machine / User’s Manual
Page 18
5.3 Cleaning the body and control panel
Wipe the body of the machine with soapy water or noncorrosive mild gel detergents as necessary, and dry with a
soft cloth.
Use only a soft and damp cloth to clean the control panel.
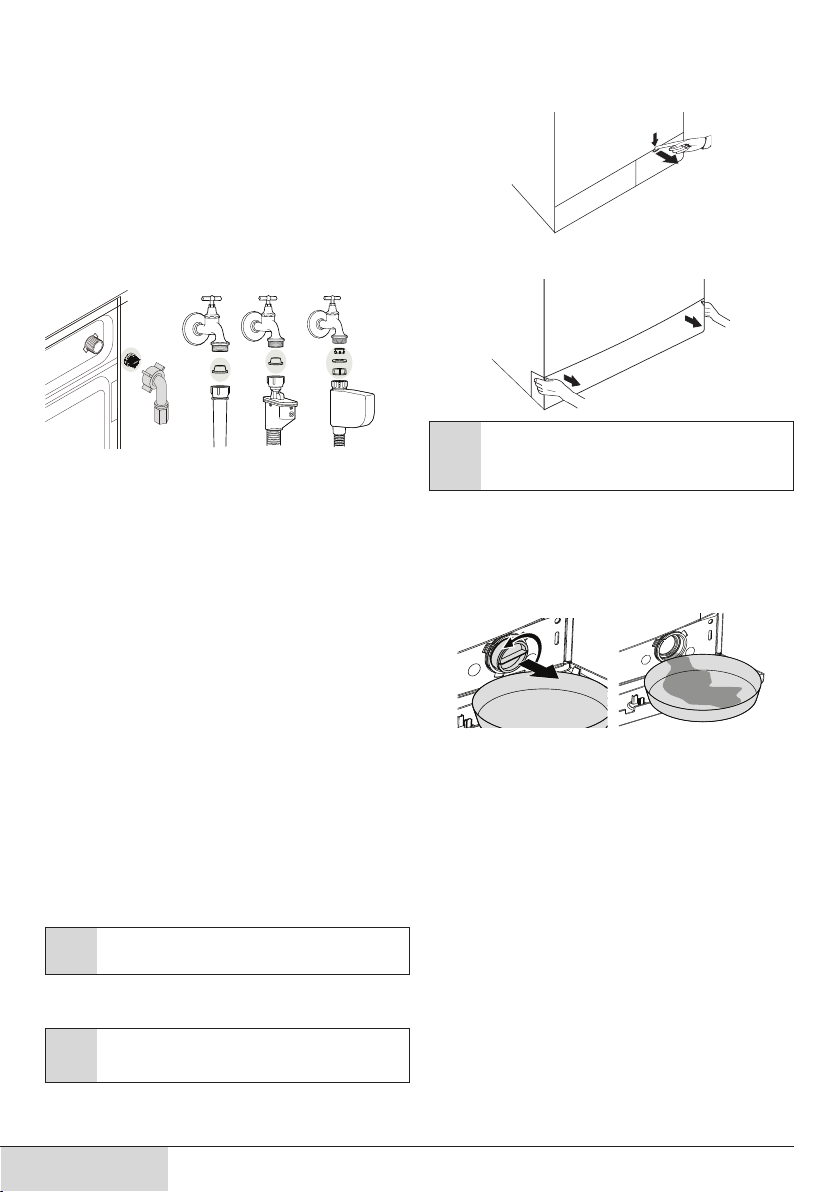
5.4 Cleaning the water intake filters
There is a filter at the end of each water intake valve at the
rear of the machine and also at the end of each water intake
hose where they are connected to the tap. These filters
prevent foreign substances and dirt in the water to enter the
washing machine. Filters should be cleaned as they do get
dirty.
1. Close the taps.
2. Remove the nuts of the water intake hoses to access
the filters on the water intake valves. Clean them with an
appropriate brush. If the filters are too dirty, take them out
by means of pliers and clean them.
3. Take out the filters on the flat ends of the water intake
hoses together with the gaskets and clean thoroughly
under running water.
4. Replace the gaskets and filters carefully in their places
and tighten the hose nuts by hand.
5.5 Draining remaining water and
cleaning the pump filter
The filter system in your machine prevents solid items
such as buttons, coins and fabric fibers clogging the pump
impeller during discharge of washing water. Thus, the water
will be discharged without any problem and the service life
of the pump will extend.
If the machine fails to drain water, the pump filter is clogged.
Filter must be cleaned whenever it is clogged or in every 3
months. Water must be drained off first to clean the pump
filter.
In addition, prior to transporting the machine (e.g., when
moving to another house) and in case of freezing of the
water, water may have to be drained completely.
WARNİNG: Foreign substances left in the pump filter may
damage your machine or may cause noise problem.
A
In order to clean the dirty filter and discharge the water:
1. Unplug the machine to cut off the supply power.
WARNİNG: Temperature of the water inside the machine
may rise up to 90 ºC. To avoid burning risk, filter must be
A
cleaned after the water in the machine cools down.
2. Open the filter cap.
If the filter cap is composed of two pieces, press the
tab on the filter cap downwards and pull the piece out
towards yourself.
If the filter cap is one piece, pull the cap from both sides at
the top to open.
You can remove the filter cover by slightly pushing
downwards with a thin plastic tipped tool, through the
C
gap above the filter cover. Do not use metal tipped tools
to remove the cover.
3. Some of our products have emergency draining hose and
some does not have. Follow the steps below to discharge
the water.
Discharging the water when the product does not have an
emergency draining hose:
a. Place a large container in front of the filter to catch water
from the filter.
b. Loosen pump filter (anticlockwise) until water starts to
flow. Fill the flowing water into the container you have
placed in front of the filter. Always keep a piece of cloth
handy to absorb any spilled water.
c. When the water inside the machine is finished, take out
the filter completely by turning it.
4. Clean any residues inside the filter as well as fibers, if
any, around the pump impeller region.
5. Install the filter.
6. If the filter cap is composed of two pieces, close the filter
cap by pressing on the tab. If it is one piece, seat the tabs
in the lower part into their places first, and then press the
upper part to close.
18 / EN
Washing Machine / User’s Manual
Page 19
6 Technical specifications
Models (EN)
Maximum dry laundry capacity (kg)
Height (cm)
Width (cm)
Depth (cm)
Net weight (±4 kg.)
Electrical input (V/Hz)
Total current (A)
Total power (W)
Spin speed (rpm/ min., max.)
Stand-by mode power (W)
Off-mode power (W)
Main model code
Single Water inlet / Double Water inlet
• Available
WMB 91242 LSC
9
84
60
59
74
230 V / 50Hz
10
2200
1200
1.00
0.20
888
• / -
Technical specifications may be changed without prior notice to improve the quality of the product.
C
Figures in this manual are schematic and may not match the product exactly.
Values stated on the product labels or in the documentation accompanying it are obtained in laboratory conditions in accordance
with the relevant standards. Depending on operational and environmental conditions of the product, these values may vary.
19 / EN
Washing Machine / User’s Manual
Page 20

7 Troubleshooting
Program does not start after closing the door.
• Start / Pause / Cancel button was not pressed. >>> *Press the Start / Pause / Cancel button.
Programme cannot be started or selected.
• Washing machine has switched to self protection mode due to a supply problem (line voltage, water pressure, etc.). >>> Press and hold
Start / Pause button for 3 seconds to reset the machine to factory settings. (See "Cancelling the programme")
Water in the machine.
• Some water might have remained in the product due to the quality control processes in the production. >>> This is not a failure; water is
not harmful to the machine.
Machine vibrates or makes noise.
• Machine might be standing unbalanced. >>> Adjust the feet to level the machine.
• A hard substance might have entered into the pump filter. >>> Clean the pump filter.
• Transportation safety bolts are not removed. >>> Remove the transportation safety bolts.
• Laundry quantity in the machine might be too little. >>> Add more laundry to the machine.
• Machine might be overloaded with laundry. >>> Take out some of the laundry from the machine or distribute the load by hand to
balance it homogenously in the machine.
• Machine might be leaning on a rigid item. >>> Make sure that the machine is not leaning on anything.
Machine stopped shortly after the programme started.
• Machine might have stopped temporarily due to low voltage. >>> It will resume running when the voltage restores to the normal level.
Programme time does not countdown. (On models with display)
• Timer may stop during water intake. >>> Timer indicator will not countdown until the machine takes in adequate amount of water.
The machine will wait until there is sufficient amount of water to avoid poor washing results due to lack of water. Timer indicator will
resume countdown after this.
• Timer may stop during heating step. >>> Timer indicator will not countdown until the machine reaches the selected temperature.
• Timer may stop during spinning step. >>> Automatic unbalanced load detection system might be activated due to the unbalanced
distribution of the laundry in the drum.
• Machine does not switch to spinning step when the laundry is not evenly distributed in the drum to prevent any damage to the machine and
to its surrounding environment. Laundry should be rearranged and re-spun.
Foam is overflowing from the detergent drawer.
• Too much detergent is used. >>> Mix 1 tablespoonful softener and ½ l water and pour into the main wash compartment of the
detergent drawer.
• Put detergent into the machine suitable for the programmes and maximum loads indicated in the “Programme and consumption table”.
When you use additional chemicals (stain removers, bleachs and etc), reduce the amount of detergent.
Laundry remains wet at the end of the programme
• Excessive foam might have occurred and automatic foam absorption system might have been activated due to too much detergent usage.
Use recommended amount of detergent.
>>>
• Machine does not switch to spinning step when the laundry is not evenly distributed in the drum to prevent any damage to the machine and
to its surrounding environment. Laundry should be rearranged and re-spun.
WARNİNG: If you cannot eliminate the problem although you follow the instructions in this section, consult your dealer or the
A
20 / EN
Authorized Service Agent. Never try to repair a nonfunctional product yourself.
Washing Machine / User’s Manual
Page 21

Lave-linge
Manuel d‘utilisation
WMB 91242 LSC
FR
Numéro de document =
IT
2820523419_FR / 07-09-15.(12:09)
Page 22

Ce produit a été fabriqué conformément aux conditions écologiques les plus récentes.
Page 23

1 Consignes importantes sur la sécurité et l'environnement
Cette section contient des consignes relatives à la sécurité qui vous aideront à prévenir les risques de blessure corporelle ou de dommage matériel. Le non-respect de
ces consignes annulera toute garantie.
1.1 Sécurité générale
• Ce produit peut être utilisé par les enfants de 8 ans et plus, par les personnes dont
les capacités physiques, sensorielles et mentales sont réduites ainsi que par les
personnes étrangères à ce type d'appareil, à condition d'être sous la surveillance
ou d'avoir reçu la formation auprès d'une personne responsable leur permettant
d'utiliser l'appareil en toute sécurité et d'éviter les risques y afférents. Les enfants
ne doivent pas jouer avec l'appareil. Le nettoyage et l'entretien de l'appareil ne doit
jamais être effectué par un enfant sans la surveillance d'une personne responsable. Les enfants âgés de moins de 3 ans doivent être tenus à l’écart à moins de
bénéficier d’un encadrement permanent.
• N'installez jamais la machine sur un sol couvert de moquette. Sinon, l’absence de
circulation d'air en-dessous de votre machine va entraîner la surchauffe des pièces
électriques. Cela provoquera des problèmes avec votre machine.
• Si le produit rencontre un problème, éviter de l'utiliser à moins qu'il ait été réparé
par l'agent de service agrée. Vous vous exposeriez à un risque d’électrocution!
• Votre lave linge a été conçu pour continuer de fonctionner en cas de coupure
d’électricité. Le cycle reprendra de l’endroit où il s’est arrêté.
• Branchez la machine à une prise équipée d’une mise à la terre et protégée par un
fusible de 16A. Ne négligez pas de demander à un électricien qualifié d'effectuer
l’installation de mise à la terre. Notre société ne pourra pas être tenue responsable
pour les dommages qui pourraient survenir si la machine est utilisée sur un circuit
électrique sans mise à la terre conformément à la réglementation locale.
• l’appareil doit être raccordé au réseau de distribution d’eau en utilisant les ensembles de raccordement neufs fournis avec l’appareil, il convient de ne pas réutiliser
des ensembles de raccordement usagés.
• Ne pas mettre en marche au moyen d’un programmateur, d’une minuterie, ou d’un
système de commande à distance séparé ou tout autre dispositif qui met l’appareil
sous tension automatiquement
• Les tuyaux d'alimentation en eau et de vidange doivent être solidement fixés et
rester en bon état. Sinon, il y a risque de fuite d'eau.
• Ne jamais ouvrir la porte ou ouvrir le filtre alors qu’il y a encore de l’eau dans le
tambour. Dans le cas contraire, vous vous exposez à un risque d'inondation et de
brûlure par l'eau chaude.
• Ne pas ouvrir le hublot verrouillée en forçant. Celle-ci sera prête à s’ouvrir juste
quelques minutes après la fin du cycle de lavage. Si vous forcez l'ouverture de la
porte de chargement, la porte et le mécanisme de verrouillage pourraient s'endommager.
• Débranchez la machine lorsque celle-ci n’est pas utilisée.
• Ne jamais laver la machine en y répandant ou en y versant de l'eau! Vous vous
exposeriez à un risque d’électrocution!
23 / FR
Lave-linge / Manuel d’utilisation
Page 24

• Ne touchez jamais la prise avec des mains mouillées! Ne débranchez jamais la
machine en tirant sur le câble, saisissez toujours la prise pour la débrancher.
• Seuls les lessives, les adoucissants, et les suppléments appropriés pour les lavelinge automatiques peuvent être utilisés.
• Respectez les conseils figurant sur les étiquettes des articles textiles et sur l’emballage de la lessive.
• Le produit doit être débranché pendant les procédures d'installation, de maintenance, d'entretien, et de réparation.
• Faites toujours appel au
service agréé
pour toute procédure d'installation et de
réparation. La responsabilité du fabricant ne saurait être engagée en cas de
dommages occasionnés lors de réparations effectuées par des personnes non
agréées.
• Si le câble d'alimentation est endommagé, il doit être remplacé par le fabricant, le
service après-vente, toute autre personne ayant qualité semblable (de préférence
un électricien) ou une personne désignée par l'importateur afin d'éviter les risques
potentiels.
• Posez le produit sur une surface rigide, plane et nivelée.
• Ne le posez pas sur un tapis à poils longs ou surfaces similaires.
• Ne posez pas ce produit sur une plateforme en hauteur ou sur le rebord d’une surface instable.
• Ne posez pas le produit sur le câble d’alimentation.
• N’utilisez jamais d’éponge ni aucun autre matériel de nettoyage. Ceux-ci endommageraient les parties peintes, chromées ou en plastique.
1.2 Utilisation prévue
• Cet appareil a été conçu pour un usage domestique. Par conséquent, il n’est pas
approprié pour un usage commercial et doit respecter l'utilisation prévue.
• Le produit ne doit être utilisé que pour le lavage et le rinçage du linge pouvant être
lavé et rincé en machine.
• Le fabricant décline toute responsabilité face à un éventuel problème survenu à
cause de l'utilisation ou du transport incorrect de l'appareil.
1.3 Sécurité des enfants
• Les matériaux d'emballage sont dangereux pour les enfants. Conservez tous les
matériaux d'emballage dans un endroit sûr, hors de portée des enfants.
• Les appareils électriques sont dangereux pour les enfants. Maintenez-les à l’écart
de la machine lorsque celle-ci fonctionne. Ne les laissez pas jouer à proximité de la
machine. Utilisez la fonction Sécurité enfant pour empêcher les enfants de jouer
avec la machine.
• N'oubliez pas de fermer le hublot au moment de quitter la pièce qui abrite la machine.
• Conservez tous les lessives et additifs soigneusement, hors de portée des enfants
en refermant le couvercle de l'emballage de la lessive ou en scellant complètement
l'emballage.
24 / FR
Lave-linge / Manuel d’utilisation
Page 25

Pendant le lavage du linge à des températures élevées, le hublot
vitrée devient chaude. C’est pourquoi nous vous recommandons,
pendant cette opération, d’y éloigner spécialement les tout-pe-
.tits
1.4 Informations relatives à l'emballage
• Les matériaux d’emballage de votre lave-linge sont fabriqués à partir des matériaux recyclables, conformément à nos réglementations nationales sur la protection de l'environnement. Ne jetez pas les matériaux d'emballage avec les ordures
ménagères habituelles ou autres déchets. Transportez-les plutôt vers les points
de collecte de matériaux d'emballage désignés par les autorités locales.
1.5 Mise au rebut de l'ancienne machine
• Cette machine a été fabriquée avec des pièces et des matériaux de haute qualité
qui peuvent être réutilisés et recyclés. Ne jetez donc pas ces matériaux avec les
ordures ménagères habituelles à la fin de leur durée de service. Transportez-les
vers un point de collecte en vue du recyclage des appareils électriques et électroniques. Veuillez contacter les autorités locales pour connaître le point de collecte
le plus proche. Contribuez à la protection de l'environnement et des ressources
naturelles en recyclant les produits usés. Pour la sécurité des enfants, coupez le
câble d'alimentation et rendez le mécanisme de verrouillage de le hublot inopérant
de sorte qu'il soit inutilisable avant d'effectuer la mise au rebut de la machine.
1.6 Conformité avec les directives WEEE
Ce produit est conforme à la directive WEEE (2012/19/UE) de l’Union européenne). Ce produit porte un symbole de classification pour la mise au rebut
des équipements électriques et électroniques (WEEE). Le présent produit a
été fabriqué avec des pièces et du matériel de qualité supérieure suscepti-
bles d’être réutilisés et adaptés au recyclage. Par conséquent, nous vous
conseillons de ne pas le mettre au rebut avec les ordures ménagères et d’autres
déchets à la fin de sa durée de vie. Au contraire, rendez-vous dans un point de collecte pour le recyclage de tout matériel électrique et électronique. Veuillez vous rapprocher des autorités de votre localité pour plus d’informations concernant le point
de collecte le plus proche.
Conformité avec la directive LdSD:
L’appareil que vous avez acheté est conforme à la directive LdSD (2011/65/UE) de
l’Union européenne. Il ne comporte pas les matériels dangereux et interdits mentionnés dans la directive.
25 / FR
Lave-linge / Manuel d’utilisation
Page 26

2 Installation
Consultez l'agent de service agréé le plus proche pour
l'installation de votre produit. Pour rendre votre machine
prête à l’emploi, veuillez lire le manuel d'utilisation et
veiller à ce que le système d'électricité, de drainage et
d’approvisionnement en eau soient adaptés avant de faire
appel à un service agréé. Si ce n’est pas le cas, contactez un
technicien et un plombier qualifiés pour que les dispositions
nécessaires soient effectuées.
La préparation de l'emplacement ainsi que des
installations liées à l'électricité, au robinet d'eau et aux
C
eaux usées sur le site de l'installation relèvent de la
responsabilité du client.
AVERTISSEMENT: L'installation et les branchements
électriques de l'appareil doivent être effectués par l'agent
B
de service agréé. La responsabilité du fabricant ne saurait
être engagée en cas de dommages occasionnés lors de
réparations effectuées par des personnes non agréées.
AVERTISSEMENT: Avant de procéder à l'installation, vérifiez
si le produit présente des défauts. Si c'est le cas, ne le
A
faites pas installer. Les produits endommagés présentent
des risques pour votre sécurité.
Vérifiez que les tuyaux d'arrivée d'eau et de vidange, ainsi
que le câble d’alimentation, ne sont pas pliés, pincés, ou
C
écrasés lorsque vous poussez le produit en place après
les procédures d'installation ou de nettoyage.
2.1 Emplacement d’installation approprié
• Installez la machine sur un sol solide. Ne la placez pas sur
une moquette ou sur des surfaces similaires.
• La charge totale du lave-linge et du sèche-linge -à pleine
charge- lorsqu'ils sont placés l’un au-dessus de l’autre
atteint environ 180 kg. Placez le produit sur un sol solide et
plat présentant la capacité de portage suffisante.
• N'installez pas le produit sur le câble d'alimentation.
• Evitez d'installer le produit dans des endroits où la
température est susceptible de descendre en dessous de
0ºC.
• Placez le produit à au moins 1 cm des autres meubles.
2.2 Retrait des renforts de conditionnement
Inclinez la machine vers l'arrière pour retirer le renfort de
conditionnement. Retirez le renfort de conditionnement en
tirant sur le ruban.
2.3 Retrait des sécurités de transport
AVERTISSEMENT: Evitez d'enlever les sécurités de transport
avant de retirer le renfort de conditionnement.
A
AVERTISSEMENT: Retirez les boulons de sécurité de
transport avant de faire fonctionner le lave-linge! Sinon, le
A
produit sera endommagé.
1. Desserrez toutes les vis à l’aide d’une clé adaptée jusqu’à
ce que celles-ci tournent librement
2. Enlevez les vis de sécurité en les dévissant à la main et en
les tournant doucement.
3. Fixez les caches en plastique, fournis dans le sachet
avec le manuel d'utilisation, dans les trous à l’arrière du
(P)
panneau.
Conservez les vis de sécurité soigneusement afin de les
réutiliser au cas où vous aurez besoin de transporter le
C
lave-linge ultérieurement.
Ne déplacez jamais l'appareil sans que les vis de sécurité
réservées au transport ne soient correctement fixées!
C
(C).
2.4 Raccordement de l’arrivée d’eau
La pression d'eau à l’arrivée requise pour faire fonctionner
la machine, doit être comprise entre 1 et 10 bars (0,1 – 1
C
MPa). (Il est nécessaire de disposer de 10 – 80 litres d’eau
de robinet (grand ouvert) en une minute, pour que votre
machine fonctionne sans problèmes.) Fixez un réducteur
de pression si la pression de l’eau est supérieure.
Si vous souhaitez utiliser votre produit à double arrivée
d'eau comme une unité à arrivée d'eau simple (Lavage
C
A
A
vous devez installer le dispositif d'obturation fourni
froid),
dans la vanne d'eau chaude avant d'utiliser le produit.
(Applicable pour les produits fournis avec un jeu de vis
d'obturation.)
AVERTISSEMENT: Les modèles à simple admission d’eau
ne doivent pas être connectés au robinet d'eau chaude.
Ce type de raccord endommagerait le linge ou le produit
passerait en mode de protection et ne fonctionnerait pas.
AVERTISSEMENT: N’utilisez pas de vieux tuyaux d’arrivée
d'eau sur votre produit neuf. Ils pourraient tacher votre
linge.
26 / FR
Lave-linge / Manuel d’utilisation
Page 27

1. Raccordez les tuyaux spéciaux fournis avec la machine aux
100cm
40cm
vannes d'arrivée d’eau de la machine. Le tuyau rouge (à
gauche) (max. 90 ºC) est celui d’arrivée d’eau chaude et le
tuyau bleu (à droite) (max. 25 ºC) est celui d’arrivée d’eau
froide.
AVERTISSEMENT: Assurez-vous que les raccordements
d’eau froide et d’eau chaude sont effectués correctement
A
lors de l’installation de votre machine. Sinon, votre linge
pourrait être chaud en fin de lavage et s’user.
2. Serrez tous les écrous des tuyaux à la main. N'utilisez
jamais un outil pour serrer ces écrous.
3. Ouvrez les robinets complètement après avoir raccordé les
tuyaux pour vérifier si de l'eau ne fuit pas par les points
de raccordement. Si vous constatez des fuites, fermez le
robinet et retirez l'écrou. Resserrez l’écrou soigneusement
après avoir vérifié le joint. Pour éviter toute fuite d’eau ou
dégât consécutif, laissez les robinets fermés lorsque la
machine n’est pas utilisée.
2.5 Raccordement du conduit d’évacuation
• L’extrémité du tuyau de vidange doit être directement
raccordée au tuyau d’évacuation des eaux usées ou au
lavabo.
AVERTISSEMENT: Votre maison sera inondée si le tuyau
sort de son logement pendant la vidange. De plus, il y
A
a un risque de brûlure en raison des températures de
lavage élevées ! Pour éviter que de telles situations ne se
produisent et pour que l'arrivée et la vidange d'eau de la
machine se fassent dans de bonnes conditions, serrez
correctement l'extrémité du tuyau de vidange de sorte qu'il
ne sorte pas.
• Le tuyau doit être attaché à une hauteur comprise entre 40
et 100 cm.
• Si le tuyau est élevé après l’avoir posé sur le niveau du sol
ou près de celui-ci (moins de 40 cm au-dessus du sol),
l’évacuation d’eau devient plus difficile et le linge peut se
mouiller considérablement. C'est pourquoi les hauteurs
décrites dans le schéma doivent être respectées.
• Pour éviter que l’eau sale ne remplisse le lave-linge à
nouveau et pour faciliter la vidange, évitez de tremper
l'extrémité du tuyau dans l'eau sale ou de l'insérer dans la
canalisation d'évacuation de plus de 15 cm. Si le tuyau est
trop long, coupez-le.
• L’extrémité du tuyau ne doit être ni coudée, ni piétinée, ni
pliée entre la canalisation et la machine.
• Si la longueur du tuyau est très courte, vous pouvez
y ajouter un tuyau d’extension d'origine. La longueur
du tuyau peut ne pas excéder 3,2 m. Pour éviter tout
dysfonctionnement occasionné par une éventuelle fuite
d’eau, le raccordement entre le tuyau d’extension et le
tuyau de vidange du produit doit être bien inséré à l'aide
d'une bride appropriée, pour empêcher toute sortie et toute
fuite.
2.6 Réglage des pieds
AVERTISSEMENT: Afin de s’assurer que votre appareil
fonctionne de façon plus silencieuse et sans vibration, il
A
doit être à niveau et équilibré sur ses pieds. Equilibrez la
machine en réglant les pieds. Sinon, la machine pourrait
se déplacer et entraîner un certain nombre de problèmes,
donc celui de la vibration.
1. Dévissez manuellement les contre-écrous sur les pieds.
2. Réglez les pieds jusqu'à ce que la machine soit à niveau et
équilibrée.
3. Serrez de nouveau tous les contre-écrous à la main.
27 / FR
Lave-linge / Manuel d’utilisation
Page 28

AVERTISSEMENT: N'utilisez aucun outil pour dévisser les
contre-écrous. Sinon, vous pouvez les endommager.
A
2.7 Branchement électrique
Branchez la machine à une prise équipée d’une mise à la
terre et protégée par un fusible de 16 A. Notre société ne
pourra pas être tenue responsable pour les dommages
qui pourraient survenir si la machine est utilisée sur un
circuit électrique sans mise à la terre conformément à la
réglementation locale.
• Le branchement doit être conforme à la réglementation en
vigueur dans votre pays.
• La prise du câble d’alimentation doit être accessible
facilement après l’installation.
• Si la valeur de courant du fusible ou du disjoncteur de
votre domicile est inférieure à 16 ampères, demandez à un
électricien qualifié d'installer un fusible de 16 ampères.
• La tension spécifiée dans la section « Caractéristiques
techniques » doit être égale à celle de votre réseau
électrique.
• Ne réalisez pas de branchements utilisant des rallonges
électriques ou des multiprises.
AVERTISSEMENT: Les câbles d’alimentation abîmés doivent
être remplacés par le Service agréé.
B
Transport de l'appareil
1. Débranchez le lave-linge avant de le transporter.
2. Retirez les raccordements de vidange et d'arrivée d'eau.
3. Vidangez toute l'eau qui est restée dans votre machine.
Voir point 5.5
4. Installez les vis de sécurité réservées au transport dans
l'ordre inverse de la procédure de retrait ; voir point 2.3.
Ne déplacez jamais l'appareil sans que les vis de sécurité
réservées au transport ne soient correctement fixées!
C
AVERTISSEMENT: Les matériaux d'emballage sont
dangereux pour les enfants. Conservez tous les matériaux
A
d'emballage dans un endroit sûr, hors de portée des
enfants.
3 Préparation
3.1 Trier le linge
• Triez le linge par type de textile, couleur, degré de saleté et
température d’eau autorisée.
• Respectez toujours les conseils figurant sur les étiquettes
de vos vêtements.
3.2 Préparation du linge pour le lavage
• Des articles avec des accastillages comme les soutiensgorge à armature les boucles de ceinture ou les boutons
métalliques endommageront la machine. Vous pouvez
enlever les pièces métalliques ou laver les vêtements en
les introduisant dans un sac à lessive ou une taie d'oreiller.
• Videz les poches de tous les corps étrangers comme les
pièces, les stylos à bille et les trombones. Retournez-les
et brossez. De tels objets peuvent endommager votre
machine ou faire du bruit.
• Mettez les vêtements de petite taille à l'exemple des
chaussettes pour enfants et des bas en nylon dans un sac
à lessive ou une taie d'oreiller.
• Mettez les rideaux dans l'appareil sans les compresser.
Retirez les éléments de fixation des rideaux.
• Fermez les fermetures à glissière, cousez les boutons
desserrés, puis raccommodez les aubes et les déchirures.
• Ne lavez les produits étiquetés « lavables en machine » ou
« lavables à la main » qu’avec un programme adapté.
• Ne lavez pas les couleurs et le blanc ensemble. Le linge
en coton neuf de couleur foncée peut déteindre fortement.
Lavez-le séparément.
• Les taches difficiles doivent être traitées correctement
avant tout lavage. En cas d’incertitude, consultez un
nettoyeur à sec.
• N’utilisez que les changeurs de couleur/teinture et les
détartrants adaptés au lave-linge. Respectez toujours les
conseils figurant sur l’emballage.
• Lavez les pantalons et le linge délicat à l’envers.
• Mettez les articles de linge en laine Angora dans le
compartiment congélateur pendant quelques heures avant
tout lavage. Cette précaution réduira le boulochage.
• Les linges intensément tachetés par des saletés comme
de la farine, de la poussière de chaux, de la poudre de lait,
etc. doivent être secoués avant d'être introduits dans la
machine. Avec le temps, de telles poussières et poudres
peuvent se former sur les surfaces internes de la machine
et occasionner des dégâts matériels.
3.3 À faire pour économiser de l'énergie
Les informations ci-après vous aideront à utiliser le produit de
manière écologique et éconergétique.
• Utilisez le produit en tenant compte de la capacité la
plus élevée autorisée par le programme que vous avez
sélectionné, mais évitez de surcharger la machine; voir la
section "Tableau des programmes et de consommation".
• Respectez toujours les conseils figurant sur l’emballage de
vos produits de lavage.
• Lavez le linge peu sale à basse température.
• Utilisez des programmes plus rapides pour de petites
quantités de linge ou pour du linge peu sale.
• N'utilisez pas le prélavage et des températures élevées
pour le linge qui n'est pas très sale.
• Si vous prévoyez de sécher votre linge dans un sèchelinge, sélectionnez la vitesse d'essorage recommandée la
plus élevée pendant le processus de lavage.
• N'utilisez pas plus de lessive que la quantité recommandée
sur l'emballage de la lessive.
28 / FR
Lave-linge / Manuel d’utilisation
Page 29

3.4 Première utilisation
1
2
3
Avant de commencer à utiliser votre machine, assurez-vous
que toutes les préparations ont été effectuées conformément
aux consignes indiquées dans les sections «Consignes
importantes de sécurité» et «Installation».
Pour préparer la machine au lavage du linge, effectuez
la première opération dans le programme Nettoyage du
tambour. Si votre lave-linge n’est pas doté du programme
Nettoyage du tambour, procédez à la Première utilisation
conformément aux méthodes décrites dans la section « 5.2
Nettoyage de la Porte de chargement et tambour » du manuel
d’utilisation.
Utilisez un anti-détartrant adapté aux lave-linge.
C
Il pourrait rester de l’eau dans votre machine suite aux
processus d’assurance qualité menés au cours de la
C
production. Ceci n’affecte pas votre machine.
3.5 Capacité de charge appropriée
La charge maximale dépend du type de linge, du degré de
saleté et du programme de lavage que vous souhaitez utiliser.
La machine ajuste automatiquement la quantité d’eau selon le
poids du linge qui s’y trouve.
AVERTISSEMENT: Veuillez suivre les informations contenues
dans le « Tableau des programmes et de consommation ».
A
Lorsque la machine est surchargée, ses performances
de lavage chutent. En outre, des bruits et des vibrations
peuvent survenir.
3.6 Charger le linge
1. Ouvrez la porte de chargement.
2. Placez les articles de linge dans la machine sans les
tasser.
3. Poussez le hublot pour la fermer jusqu’à ce que vous
entendiez un bruit de verrouillage. Veillez à ce qu’aucun
article ne soit coincé dans la porte.
C
A
Le hublot est verrouillée pendant le fonctionnement d'un
programme. La porte ne peut être ouverte que quelque
temps après la fin du programme.
AVERTISSEMENT: Si le linge est mal disposé dans la machine,
celle-ci peut émettre des bruits et vibrer.
3.7 Utilisation de lessive et d'adoucissant
Avant d'utiliser de la lessive, de l'adoucissant, de l'amidon,
du colorant, de la javel ou du détartrant, lisez attentivement
C
les instructions du fabricant portées sur l’emballage de
la lessive et respectez les recommandations de dosage.
Utilisez le gobelet gradué, le cas échéant.
Bac à produits
Le bac à produits comprend trois compartiments:
– (1) pour prélavage
- (2) pour lavage principal
– (3) pour adoucissant
– (*) en plus, il y a un siphon dans le compartiment destiné à
l'assouplissant.
Lessive, adoucissant et autres agents nettoyants
• Ajoutez la lessive et l’adoucissant avant de mettre le
programme de lavage en marche.
• Ne laissez jamais le bac à produits ouvert pendant que le
programme de lavage est en cours d’exécution !
• Lorsque vous utilisez un programme sans prélavage,
aucune lessive ne doit être mise dans le bac de prélavage
(compartiment n° "1").
• Dans un programme avec prélavage, aucun détergent
liquide ne doit être mis dans le bac de prélavage
(compartiment n° "1").
• N'utilisez pas de programme avec prélavage si vous utilisez
un sachet de lessive ou une boule de diffusion de lessive.
Vous pouvez placer ces éléments directement dans le linge
contenu dans votre machine.
• Si vous utilisez une lessive liquide, pensez à mettre le
réservoir de lessive liquide dans le compartiment de lavage
principal (compartiment n° "2").
Choix du type de lessive
Le type de lessive à utiliser dépend du type et de la couleur
du tissu.
• Utilisez des lessives différentes pour le linge coloré et le
linge blanc.
• Pour vos vêtements délicats, utilisez uniquement les
lessives spéciales (lessive liquide, shampoing à laine, etc.).
29 / FR
Lave-linge / Manuel d’utilisation
Page 30

• Pour le lavage du linge et de la couette de couleur foncée,
il est recommandé d'utiliser une lessive liquide.
• Lavez les lainages avec une lessive spéciale adaptée.
AVERTISSEMENT: N'utilisez que des lessives destinées
spécialement aux lave-linges.
A
AVERTISSEMENT: L'utilisation de savon en poudre n'est pas
recommandée.
A
Dosage de la quantité de lessive
Le dosage de la lessive à utiliser dépend de la quantité du
linge, du degré de saleté et de la dureté de l’eau.
• Ne pas utiliser des dosages dépassant les quantités
recommandées sur l’emballage de la lessive afin d’éviter
les problèmes liés à un excès de mousse, à un mauvais
rinçage, aux économies financières et, en fin de compte, à
la protection de l’environnement.
• Utilisez des doses de lessive plus petites que celles
recommandées pour de petites quantités de linge ou pour
du linge peu sale.
Utilisation d'adoucissant
Mettez l'adoucissant dans son compartiment qui se trouve à
l’intérieur du bac à produits
• Ne dépassez jamais le repère de niveau (> max <) dans le
compartiment destiné à l'assouplissant.
• Si l’adoucissant a perdu de sa fluidité, diluez-le avec de
l'eau avant de le mettre dans le bac à produits.
Utilisation de lessive liquide
Si le produit contient un réservoir pour lessive liquide:
• Pensez à introduire celui-ci dans le compartiment n° "2".
• Si la lessive liquide a perdu de sa fluidité, diluez-la avec de
l'eau avant de la mettre dans le réservoir pour détergent
liquide.
Si le produit ne contient pas de réservoir pour lessive
liquide:
• Evitez d'utiliser la lessive liquide pour le prélavage dans un
programme avec prélavage.
• La lessive liquide tache vos vêtements lorsqu'il est utilisé
avec la fonction Départ différé. Si vous comptez utiliser la
fonction Départ différé, n'utilisez pas de lessive liquide.
Utilisation du gel et de la lessive sous forme de
pastilles
Respectez les instructions suivantes lorsque vous utilisez
des gels et autres compositions détergentes sous forme de
pastilles.
• Si l'aspect de la lessive en gel est fluide et votre machine
ne contient aucun réservoir pour lessive liquide spéciale,
versez la lessive en gel dans le compartiment à produits de
lavage principal pendant la première admission d'eau. Si
votre machine est dotée d'un réservoir pour lessive liquide,
versez-y la lessive avant de démarrer le programme.
• Si l'aspect de la lessive en gel n'est pas fluide ou sous
forme de capsule liquide, versez-la directement dans le
tambour avant de procéder au lavage.
• Mettez les pastilles de lessive dans le compartiment
principal (compartiment no. "2") ou directement dans le
tambour avant de procéder au lavage.
Les lessives sous forme de pastilles peuvent laisser
des résidus dans le compartiment à lessive. En pareille
C
situation, mettez la lessive sous forme de pastilles au cœur
du linge et fermez la partie inférieure du tambour.
Utilisez la lessive sous forme de pastilles ou de gel sans
sélectionner la fonction prélavage.
C
Utilisation de l’amidon
• Ajoutez l’amidon liquide, l’amidon en poudre, ou le colorant
dans le compartiment de l’adoucissant.
• Evitez d'utiliser à la fois l'assouplissant et l'amidon dans un
cycle de lavage.
• Nettoyage l'intérieur de la machine à l'aide d'un chiffon
propre et humide après avoir utilisé l'amidon.
Utilisation des produits à blanchir
• Sélectionnez un programme avec prélavage et ajoutez
le produit à blanchir au début du prélavage. Ne mettez
pas de lessive dans le compartiment de prélavage. Vous
pouvez aussi sélectionner un programme avec rinçage
supplémentaire et ajoutez le produit à blanchir pendant
l'utilisation de l'eau en provenance du compartiment à
lessive au cours de la première phase de rinçage.
• Evitez d'utiliser un produit à blanchir et une lessive en les
mélangeant.
• Utilisez juste une petite quantité (environ 50 ml) de produit
à blanchir et rincez parfaitement les vêtements pour
éviter qu'ils n'irritent la peau. Evitez de verser le produit à
blanchir sur les vêtements et de l'utiliser avec des linges
de couleur.
• Pendant l'utilisation de l'eau de javel oxygénée,
sélectionnez un programme à basse température.
• L'eau de javel oxygénée peut être utilisée en association
avec la lessive; cependant, si sa consistance n'est pas la
même que celle de la lessive, versez d'abord la lessive
dans le compartiment n° "2" dans le bac à produits et
patientez jusqu'à ce que la lessive coule pendant l'arrivée
d'eau dans la machine. Ajoutez le produit à blanchir dans
le même compartiment pendant que l'arrivée de l'eau dans
la machine se poursuit.
Utilisation de détartrant
• Quand cela est nécessaire, utilisez les détartrants adaptés,
mis au point spécialement pour les lave-linge.
30 / FR
Lave-linge / Manuel d’utilisation
Page 31

3.8 Astuces pour un lavage efficace
Couleurs claires et blanc Couleurs Couleurs foncées
(Températures recommandées
en fonction du degré de saleté:
40-90ºC)
Il peut être nécessaire de
pré-traiter les taches ou
d'effectuer un prélavage. Les
Très sale
(taches difficiles, par
exemple d'herbe, de
café, de fruit et de
sang.)
Normalement sale
(Par exemple, taches
causées par la
Degré de saleté
transpiration sur les
cols et manchettes)
Peu sale
(Pas de tache
visible.)
lessives en poudre et liquides
recommandées pour le blanc
peuvent être utilisées aux
dosages conseillés pour les
vêtements très sales. Il est
recommandé d'utiliser des
lessives en poudre pour nettoyer
les taches de glaise et de terre
et les taches qui sont sensibles
aux produits à blanchir.
Les lessives en poudre et
liquides recommandées pour
le blanc peuvent être utilisées
aux dosages conseillés pour les
vêtements normalement sales.
Les lessives en poudre et
liquides recommandées pour
le blanc peuvent être utilisées
aux dosages conseillés pour les
vêtements peu sales.
Vêtements
(Températures recommandées
en fonction du degré de
saleté: froid-40ºC)
Les lessives en poudre et
liquides recommandées
pour les couleurs peuvent
être utilisées aux dosages
conseillés pour les vêtements
très sales. Il est recommandé
d'utiliser des lessives en
poudre pour nettoyer les
taches de glaise et de terre et
les taches qui sont sensibles
aux produits à blanchir. Utilisez
des lessives sans produit à
blanchir.
Les lessives en poudre et
liquides recommandées
pour les couleurs peuvent
être utilisées aux dosages
conseillés pour les vêtements
normalement sales. Utilisez
des lessives sans produit à
blanchir.
Les lessives en poudre et
liquides recommandées
pour les couleurs peuvent
être utilisées aux dosages
conseillés pour les vêtements
peu sales. Utilisez des lessives
sans produit à blanchir.
(Températures
recommandées en
fonction du degré de
saleté: froid-40ºC)
Les lessives liquides
recommandées pour
les couleurs et les
couleurs foncées
peuvent être utilisées
aux dosages conseillés
pour les vêtements
très sales.
Les lessives liquides
recommandées pour
les couleurs et les
couleurs foncées
peuvent être utilisées
aux dosages conseillés
pour les vêtements
normalement sales.
Les lessives liquides
recommandées pour
les couleurs et les
couleurs foncées
peuvent être utilisées
aux dosages conseillés
pour les vêtements
peu sales.
Délicats/Laine/
Soies
(Températures
recommandées en
fonction du degré de
saleté: froid-30ºC)
Utilisez de préférence
des lessives liquides
conçues pour des
vêtements délicats.
Les vêtements en
laine et en soie
doivent être lavés avec
des lessives spéciales
laine.
Utilisez de préférence
des lessives liquides
conçues pour des
vêtements délicats.
Les vêtements en
laine et en soie
doivent être lavés avec
des lessives spéciales
laine.
Utilisez de préférence
des lessives liquides
conçues pour des
vêtements délicats.
Les vêtements en
laine et en soie
doivent être lavés avec
des lessives spéciales
laine.
31 / FR
Lave-linge / Manuel d’utilisation
Page 32

4 Fonctionnement de l’appareil
4.1 Bandeau de commande
1
8
2 3 4 5
67
1 - Bouton de réglage de la vitesse d'essorage
2 - Affichage
3 - Bouton de réglage de la température
4 - Sélecteur de programmes
5 - Bouton Marche/Arrêt
6 - Boutons de départ différé (+ / -)
7 - Boutons de fonction optionnelle
8 - Bouton Départ / Pause / Annulation
Textiles
Foncés
Vidange Anti-froissage
(Repassage
Express
quotidien
(Daily Express)
d’attente
(Arrêt cuve
Mix 40 Super 40
32 / FR
Foncés
Facile)
Rinçage
pleine)
Textiles
supplémentaire
(Rinçage Plus)
Synthétique Coton Prélavage Lavage
Couette
Sécurité
enfants
Pas
Rafraîchir
Lavage à
la main
Lavage rapide
Terminé Froid
(Lavage
express)
Chemises Jeans Sport Départ
(Draps)
Départ /
Pause
Rinçage
d’essorage
principal
Protection Bébé
(BabyProtect)
Rinçage Lavage Essorage
Coton
Lainages
(Laine)
Nettoyage
en
libre-service
Intensif
Express 14
(Xpress Super Short)
Eco
Température
différé
Délicat
Super bref
express
Sous-
vêtement
Soin
Fashion
Nettoyage des
poils d’animaux
domestiques
Quotidien
Mini 30
Nettoyage Eco
(Eco Clean)
Ouverture
de porte
Marche/Arrêt
Nettoyage des
poils d’animaux
domestiques +
BabyProtect +
Lave-linge / Manuel d’utilisation
Page 33

4.2 Symboles d'affichage
F3
F2
F1
a - Indicateur de vitesse d'essorage
b - Indicateur de température
c - Symbole d'essorage
d - Symbole de température
e - Temps restant et indicateur de départ différé
f - Symboles d'indication de programme (Prélavage
g - Symbole Economie
h - Symbole de départ différé
i - Symbole de porte verrouillée
j - Symbole de départ
k - Symbole Pause
l - Symboles de fonction auxiliaire
m - Symbole d'absence d'eau
/ Lavage principal / Rinçage / Adoucissant /
Essorage)
F4
4.3 Préparation de la machine
Veillez à ce que les tuyaux soient bien connectés. Branchez
votre machine. Ouvrez le robinet complètement. Introduisez le
linge dans la machine. Ajoutez la lessive et l’adoucissant.
4.4 Sélection de programmes
Sélectionnez le programme approprié pour le type, la quantité
et le degré de saleté de votre linge à partir du "Tableau
des programmes et de consommation" et du tableau de
températures ci-après.
90˚C
60˚C
40˚C30˚C- Froid
Sélectionnez le programme désiré à l'aide du bouton de
Sélection de programmes.
C
C
C
C
Linges en coton et en lin blanc très sales. (Housses
pour tables de salon, nappes, serviettes, draps de lit,
etc.)
Linge ou vêtements synthétiques ou en coton de
couleur inaltérable, normalement sales (chemises,
chemises de nuit, pyjamas, etc.) et linge blanc
légèrement sale (sous-vêtements, etc.)
Linge mélangé comprenant les textiles délicats (rideaux
voiles, etc.), les synthétiques et les lainages.
Les programmes sont limités à la vitesse de rotation
maximale adaptée au type spécifique de vêtements.
Lors de la sélection d'un programme, prenez toujours en
compte le type de tissu, la couleur, le degré de saleté et la
température d’eau autorisée.
Sélectionnez en permanence la température nécessaire la
plus basse. Une température plus élevée est synonyme de
consommation d’énergie plus importante.
Pour plus de détails concernant le programme, consultez le
« Tableau des programmes et de consommation »
4.5 Programmes principaux
En fonction du type de tissu, utilisez les programmes
principaux suivants.
• Coton
Utilisez ce programme pour vos linges en coton (tels que
draps de lit, édredons et jeux de taies d'oreiller, serviettes,
sous-vêtements, etc.) Votre linge sera nettoyé avec des
mouvements de lavage vigoureux au cours d’un cycle de
lavage plus long.
• Synthétique
Utilisez ce programme pour laver vos linges synthétiques
(chemises, blouses, vêtements mixtes synthétiques/cotons,
etc.). Ce programme est caractérisé par un lavage doux
et un cycle de lavage plus court comparé au programme
« Cotons ».
Pour les rideaux et les tulles, utilisez le programme
« Synthétique 40˚C » avec les fonctions "Prélavage" et
"Anti-froissage" sélectionnées. Lavez les voiles/tulles
en introduisant une petite quantité de détergent dans le
compartiment de lavage principal car la texture maillée de
ces linges favorise une production excessive de mousse. Ne
mettez pas de lessive dans le compartiment de prélavage.
• Laine
Utilisez ce programme pour laver votre linge en laine.
Sélectionnez la température appropriée en respectant les
étiquettes de vos vêtements. Pour les lainages, utilisez des
lessives appropriées.
4.6 Programmes supplémentaires
Il existe des programmes supplémentaires pour des cas
spéciaux.
Les programmes supplémentaires peuvent varier en
fonction du modèle de votre machine.
C
• Coton Eco
Vous pouvez laver votre linge en coton et en lin normalement
sale avec ce programme en économisant plus d'énergie et
d'eau qu'avec tous les autres programmes de lavage adaptés
au coton. La température de l'eau réelle peut différer de
la température du cycle affichée. La durée du programme
peut être raccourcie automatiquement durant les dernières
phases du programme si vous lavez une quantité moindre
(environ ½ capacité ou moins) de linge. Dans ce cas, la
consommation d'énergie et d'eau diminuera encore, vous
offrant l'opportunité d'un lavage plus économique. Cette
caractéristique est disponible seulement sur certains modèles
dotés d'un affichage du temps restant.
• BabyProtect
Utilisez ce programme pour laver le linge de bébé et celui
des personnes allergiques. Pour des conditions d'hygiène
optimales, prévoir un temps de chauffage plus long et une
phase de rinçage supplémentaire.
• Lavage à la main
Utilisez ce programme pour laver vos vêtements en laine/
délicats portant les étiquettes « non lavable en machine » et
pour lesquels un lavage à la main est conseillé. Cela permet
de laver le linge avec des mouvements très délicats, sans
endommager vos vêtements.
• Daily Xpress
Utilisez ce programme pour laver rapidement votre linge en
coton peu sale.
• Super bref express
Utilisez ce programme pour laver rapidement une petite
quantité de linge en coton peu sale.
33 / FR
Lave-linge / Manuel d’utilisation
Page 34

• Textiles Foncés
Utilisez ce programme pour laver vos linges de couleur
foncée, ou le linge dont vous souhaitez préserver la couleur.
Le lavage se fait avec un petit mouvement mécanique et à
faibles températures. Il est recommandé d'utiliser une lessive
liquide ou un shampoing à laine pour le linge de couleur
foncée.
• Mix 40
Utilisez ce programme pour laver à la fois votre linge en coton
et votre linge synthétique sans avoir à les séparer.
• Couette (Draps)
Utilisez ce programme pour laver vos couettes en fibre portant
l'étiquette "Lavable en machine". Assurez-vous d'avoir
chargé l'édredon correctement afin de ne pas endommager
la machine et le linge. Enlevez la housse de couette avant de
charger l'édredon dans la machine. Pliez l'édredon en deux
et chargez-le dans la machine. Chargez l'édredon dans la
machine en vous assurant de l'avoir installé de sorte qu'il ne
soit pas en contact avec le soufflet.
Evitez de charger plus d'un double édredon en fibre (200
x 200 cm).
C
Evitez de laver vos couettes, oreillers, et autre linge en
coton dans la machine.
C
AVERTISSEMENT: En dehors des couettes, évitez de
laver du linge du type tapis, moquettes, etc. dans
A
votre machine. Si vous le faites, vous courez le risque
d'endommager le lave-linge de façon permanente.
• Rafraîchir
Utilisez ce programme pour éliminer des odeurs sur un linge
porté une seule fois et ne présentant ni tache, ni saleté.
• Nettoyage Eco (Eco Clean)
Utilisez ce programme, qui est beaucoup plus soucieux de
l'environnement et des ressources naturelles, pour laver votre
linge en coton peu sale et non taché (max. 3,5 kg) en peu de
temps et de façon économique.
Il est conseillé d'utiliser le détergent en liquide ou en gel.
C
• Nettoyage en libre-service
Utilisez ce programme de façon régulière (Une fois par mois
ou tous les deux mois) pour nettoyer le tambour pour plus
d'hygiène. Pour ce faire, faites fonctionner le programme sans
introduire de linge dans la machine. Pour obtenir de meilleurs
résultats, versez le détartrant en poudre pour lave-linge dans
le compartiment à détergent II. À la fin du programme, laissez
la porte entrouverte afin de faciliter le séchage de l'intérieur
de la machine.
Ceci n'est pas un programme de lavage. Au contraire, il
s'agit d'un programme d'entretien.
C
Evitez d'exécuter le programme quand la machine
contient un quelconque linge. Si vous essayez de le
C
faire, la machine détectera la présence d'une charge
à l'intérieur du lave-linge et suspendra l'exécution du
programme.
4.7 Programmes spéciaux
Pour les applications spécifiques, vous pouvez sélectionner
l’un des programmes suivants.
• Rinçage
Utilisez ce programme lorsque vous voulez effectuer un
rinçage ou un amidonnage séparément.
• Essorage+Vidange
Utilisez ce programme pour appliquer un cycle d'essorage
additionnel pour le linge ou pour drainer l'eau dans la
machine.
Avant de sélectionner ce programme, sélectionnez la vitesse
d'essorage désirée et appuyez sur le bouton « Démarrage/
Pause/Annulation ». La machine essorera le linge avec la
vitesse d'essorage réglée et vidangera l'eau qui en sortira.
Si vous voulez seulement drainer l’eau sans essorer votre
linge, sélectionnez le programme « Essorage et pompage
» et ensuite, sélectionnez la fonction « aucun essorage » à
l'aide du bouton de vitesse d'essorage. Appuyez sur le bouton
Départ/Pause/Annulation.
Utilisez une vitesse d'essorage basse pour les linges
délicats.
C
4.8 Sélection de températures
Chaque fois qu’un nouveau programme est sélectionné, la
température maximale pour ledit programme apparaît sur
l’indicateur de température.
Pour réduire la température, appuyez à nouveau sur le bouton
de réglage de la température. La température décroît par
incréments de 10° et finalement, le symbole “-” indiquant
l'option de lavage à froid apparaît à l'écran.
Si vous faites défiler l'option de lavage à froid et appuyez
à nouveau sur le bouton de réglage de la température,
C
la température recommandée pour le programme
sélectionné s'affiche à l'écran. Appuyez à nouveau sur
le bouton de réglage de la température pour réduire la
température.
Symbole Economie
Indique les programmes et températures qui permettent
d'économiser de l'énergie.
Le symbole Economie ne peut être sélectionné dans les
programmes Intensif et Hygiène puisque le lavage s'y
C
fait pendant longtemps et à des températures élevées
pour plus d'hygiène. De même, le symbole Economie
ne peut être sélectionné dans les programmes Bébé,
Rafraîchissement, Nettoyage du tambour, Essorage et
Rinçage.
4.9 Sélection de la vitesse d’essorage
Chaque fois qu’un nouveau programme est sélectionné, la
vitesse d’essorage recommandée du programme sélectionné
s'affiche sur le voyant de vitesse d’essorage.
Pour réduire la vitesse d’essorage, appuyez sur le bouton
de réglage de la vitesse d'essorage. La vitesse d'essorage
décroît graduellement. Ensuite, en fonction du modèle du
produit, "les options "Rinç attente" et "Sans essorage"
s'affichent. Pour une explication de ces options, veuillez vous
reporter à la section "Sélection des fonctions optionnelles".
L'option Rinçage d'attente est indiquée par le symbole
“ ” et l'option "Sans essorage" est indiquée par le
C
symbole “ ”.
34 / FR
Lave-linge / Manuel d’utilisation
Page 35

4.10 Tableau des programmes et de consommation
FR
Programme (°C)
Coton 90 9 87 2.70 1600 • • • • • 90-Froid
Coton 60 9 85 1.80 1600 • • • • • 90-Froid
Coton 40 9 85 1.00 1600 • • • • • 90-Froid
BabyProtect (Protection Bébé) 90 9 80 2.70 1600 * • 90-30
Coton Eco 60** 9 55 1.30 1600 • 60-Froid
Coton Eco 60** 4.5 46 1.04 1600 • 60-Froid
Coton Eco 40** 4.5 46 0.78 1600 • 60-Froid
Coton Eco 40 9 80 0.95 1600 • 60-Froid
Synthétique 60 4 55 1.00 1200 • • • • • 60-Froid
Synthétique 40 4 55 0.52 1200 • • • • • 60-Froid
Nettoyage Eco (Eco Clean) 20 3.5 45 0.16 1600 • 20
Mix 40 40 4 55 0.62 1200 • • • • • 40-Froid
Couette (Draps) 40 - 60 0.60 1200 60-40
Super bref express 30 2 42 0.10 1400 • • 30-Froid
Daily express 90 9 70 2.02 1400 • • 90-Froid
Daily express 60 9 70 1.20 1400 • • 90-Froid
Daily express 30 9 80 0.30 1400 • • 90-Froid
Laine 40 2 56 0.30 1200 • • 40-Froid
Lavage à la main 30 1.5 40 0.25 1200 30-Froid
Textiles Foncés 40 4 95 0.60 1200 * • 40-Froid
Nettoyage en libre-service 70 - 110 2.00 800 * 70
Rafraîchir - 2 35 0.03 1200 • -
7
Charge maximale (kg)
Consommation d’eau (l)
Consommation d’énergie (kWh)
Fonction optionnelle
Vitesse Max.***
Prélavage
Lavage express
Rinçage Plus
sélectionnable °C
Repassage Facile
Arrêt cuve pleine
Gamme de
température
• : Sélection possible
* : Automatiquement sélectionné, non annulable.
** : Programme du label énergétique (EN 60456 Ed.3)
*** Si la vitesse d'essorage maximale de votre appareil est inférieure, seule la vitesse d’essorage maximale sera disponible.
- : Voir la description du programme pour la charge maximale à ne pas excéder.
** « Les cycles Coton eco 40°C et Coton eco 60°C sont les cycles standard. » Ces cycles sont connus sous les noms de « Cycle Coton
40°C standard » et « Cycle Coton 60°C standard » et visibles à travers les symboles qui se trouvent sur le panneau.
Les fonctions optionnelles contenues dans le tableau peuvent varier en fonction du modèle de votre machine.
C
La consommation d'eau et d'énergie peut varier suivant les fluctuations de la pression, de la dureté et de la température de l'eau, de
la température ambiante, du type et de la quantité de linge, de la sélection des fonctions optionnelles et de la vitesse d'essorage, ainsi
C
que des variations de la tension électrique.
Le temps de lavage du programme que vous avez sélectionné s'affiche à l'écran de la machine. Il est tout à fait normal qu'il existe de
petites différences entre le temps indiqué à l'écran et le temps de lavage réel.
C
35 / FR
Lave-linge / Manuel d’utilisation
Page 36

4.11 Sélection des fonctions optionnelles
Sélectionnez les fonctions optionnelles souhaitées avant de
lancer le programme. De plus, vous pouvez aussi sélectionner
ou annuler les fonctions optionnelles qui sont adaptées au
programme en cours d’exécution en appuyant sur le bouton
"Départ/Pause/Annuler" pendant le fonctionnement de la
machine. Pour cela, la machine doit se trouver dans une
phase avant la fonction optionnelle que vous allez sélectionner
ou annuler.
En fonction du programme, appuyez sur les touches a, b, c
ou d pour sélectionner la fonction optionnelle souhaitée. Le
symbole de la fonction optionnelle sélectionnée apparaît à
l'écran.
Certaines fonctions ne peuvent pas être sélectionnées
ensemble. Si une deuxième fonction optionnelle en
C
conflit avec la première est sélectionnée avant le
démarrage de la machine, la fonction sélectionnée
en premier sera annulée et celle sélectionnée en
deuxième lieu restera active. Par exemple, si vous
voulez sélectionner la fonction Lavage rapide après avoir
sélectionné la fonction Prélavage, la fonction Prélavage
sera annulée et la fonction Lavage rapide restera active.
Une fonction optionnelle qui n’est pas compatible avec le
programme ne peut pas être sélectionnée. (Voir "Tableau
C
des programmes et de consommation")
Les boutons de fonction optionnelle peuvent varier en
fonction du modèle de votre machine.
C
• Prélavage
A Un prélavage n’est utile que si le linge est très sale. La non
utilisation du prélavage économisera de l'énergie, de l'eau, de
la lessive et du temps.
F1 apparaît à l'écran lorsque vous sélectionnez cette fonction
(a).
• Lavage Express
Cette fonction peut être utilisée pour les programmes destinés
au coton est aux fibres synthétiques. Cela diminue les durées
de lavage pour les articles peu sales, ainsi que le nombre de
cycles de rinçage.
F2 apparaît à l'écran lorsque vous sélectionnez cette fonction
(b).
Lorsque vous sélectionnez cette fonction optionnelle,
chargez votre machine avec la moitié de la quantité
C
de linge maximale spécifiée dans le tableau des
programmes.
• Rinçage Plus
Cette fonction permet à votre machine de faire un autre
rinçage en plus de celui qui a déjà été effectué après
le lavage principal. Ainsi, le risque d’irritation des peaux
sensibles (comme celles des bébés, des peaux allergiques,
etc.) due au résidu de produit de lavage sur les vêtements est
diminué.
F3 apparaît à l'écran lorsque vous sélectionnez cette fonction
(c).
• Repassage Facile
Cette fonction froisse moins les vêtements pendant leur
lavage. Avec cette fonction, le mouvement du tambour est
réduit et la vitesse d’essorage est limitée pour éviter le
froissage. Par ailleurs, le lavage est effectué avec un niveau
d’eau plus élevé.
F4 apparaît à l'écran lorsque vous sélectionnez cette fonction
(d).
• Arrêt cuve pleine
Si vous ne voulez pas décharger votre linge dès la fin du
programme, vous pouvez utiliser la fonction Rinçage d’attente
pour conserver votre linge dans l’eau de rinçage final afin
d’empêcher à vos vêtements de se froisser s'il n'y a pas
d'eau dans la machine. Appuyez sur le bouton "Départ/
Pause/Annulation" après cette procédure si vous voulez
évacuer l’eau sans essorage. Le programme reprendra son
fonctionnement et se terminera après l'évacuation de l'eau.
Si vous voulez essorer le linge contenu dans l'eau, réglez la
vitesse d'essorage et appuyez sur le bouton "Départ/Pause/
Annulation".
Le programme reprend. L'eau est évacuée, le linge est
essoré, et le programme est terminé.
• Nettoyage des poils d’animaux domestiques
Cette fonction vous aide à enlever avec plus d’efficacité les
poils d’animaux domestiques restés sur vos vêtements.
Lorsque cette fonction est sélectionnée, les phases de
prélavage et de rinçage supplémentaire sont ajoutées au
programme normal. Ainsi, le lavage se fait avec beaucoup
d’eau (30%) et les poils d’animaux domestiques sont éliminés
avec plus d’efficacité.
AVERTISSEMENT: Ne lavez jamais vos animaux
domestiques dans votre lave-linge.
A
4.12 Affichage du temps
La durée restante pour terminer le programme apparaît à
l'écran pendant l'exécution du programme. Cette durée
s'affiche suivant le format Heure-minutes ci-après “01:30”.
La durée du programme peut varier suivant les valeurs
présentées dans le "Tableau des programmes et de
C
consommation" en fonction de la pression de l'eau, de la
dureté et de la température de l'eau, de la température
ambiante, de la quantité et du type de linge, des fonctions
optionnelles sélectionnées et des changements opérés au
niveau du réseau électrique.
Départ différé
Grâce à la fonction Départ différé, le démarrage du
programme peut être différé de 24 heures. Le temps de
départ différé peut être augmenté par incréments de 30
minutes.
Ne pas utiliser de lessives liquides lors du réglage du
départ différé! Vos vêtements risquent de se tacher.
C
Ouvrez la porte de chargement, introduisez votre linge, mettez
la lessive dans son tiroir, etc. Sélectionnez le programme
de lavage, la température, la vitesse d’essorage et, le cas
échéant, sélectionnez les fonctions optionnelles. Réglez le
temps de départ différé souhaité en appuyant sur le boutons
Départ différé + ou - . Le symbole de départ différé clignote.
Appuyez sur le bouton Départ/Pause/Annulation. Le compte
à rebours du départ différé commence. Le symbole de départ
différé s'allume en continu. Le symbole de départ apparaît.
“:” le signe au milieu du temps de départ différé à l'écran
commence à clignoter.
Des vêtements supplémentaires peuvent être chargés
au cours de la période de départ différé. Au terme du
C
compte à rebours, le symbole de départ différé disparaît,
le cycle de lavage commence et la durée du programme
sélectionné apparaît à l'écran.
36 / FR
Lave-linge / Manuel d’utilisation
Page 37

Changement de la période de départ différé
Si vous souhaitez changer le temps pendant le compte à
rebours:
Appuyez sur le bouton Départ/Pause/Annulation. “:” le
signe au milieu du temps de départ différé à l'écran arrête
de clignoter. Le symbole de pause apparaît. Le symbole
de départ différé clignote. Le symbole de départ disparaît.
Réglez le temps de départ différé souhaité en appuyant sur le
boutons Départ différé + ou - . Appuyez sur le bouton Départ/
Pause/Annulation. Le symbole de départ différé s'allume en
continu. Le symbole de pause disparaît. Le symbole de départ
apparaît. “:” le signe au milieu du temps de départ différé à
l'écran commence à clignoter.
Annulation de la fonction de départ différé
Si vous voulez annuler le compte à rebours du départ différé
et commencer le programme immédiatement:
Appuyez sur le bouton Départ/Pause/Annulation. “:” le signe
au milieu du temps de départ différé à l'écran arrête de
clignoter. Le symbole de départ disparaît. Le symbole de
pause et celui de départ différé clignotent. Diminuez le temps
de départ différé en appuyant sur le bouton Départ différé. La
durée du programme apparaît après 30 minutes.
Appuyez sur le bouton Départ/Pause/Annulation pour lancer le
programme.
4.13 Lancement du programme
Appuyez sur le bouton Départ/Pause/Annulation pour lancer
le programme. Le symbole de départ indiquant le démarrage
du programme s'allumera. La porte de chargement est
verrouillée et le symbole de porte verrouillée apparaît
à l'écran. Le symbole de l'étape à partir de laquelle le
programme a commencé apparaît à l'écran (Prélavage,
Lavage principal, Rinçage, Adoucissant et Essorage).
4.14 Déroulement du programme
L'évolution d'un programme en cours d'exécution est
indiquée à l'écran grâce à un ensemble de symboles.
Un symbole approprié apparaît à l'écran au début de l'étape
de chaque programme et tous les symboles restent allumés
à la fin du programme. Le symbole le plus à droite indique la
phase du programme en cours.
Prélavage
Si la fonction optionnelle de prélavage est sélectionnée, le
symbole de prélavage apparaît à l'écran en indiquant que la
phase de prélavage a démarré.
Lavage principal
Le symbole de lavage principal indiquant que la phase de
lavage principal a commencé apparaît à l'écran.
Rinçage
Le symbole de rinçage indiquant que la phase de rinçage a
commencé apparaît à l'écran.
Adoucissant
Le symbole de l'adoucissant indiquant que la phase de
l'adoucissant a commencé apparaît à l'écran.
Essorage
Apparaît au début de la phase d'essorage final et reste allumé
pendant les programmes spéciaux Essorage et Pompage.
Si la machine ne passe pas à la phase d'essorage, il est
possible que la fonction Arrêt cuve pleine soit active ou
C
que le système de détection automatique d’une charge
non équilibrée soit être activé en raison d'une répartition
inégale du linge dans la machine.
4.15 Verrouillage de la porte de chargement
Un système de verrouillage a été prévu au niveau de la porte
de chargement de la machine pour empêcher l'ouverture de
la porte lorsque le niveau d'eau est inapproprié.
Le symbole de porte verrouillée apparaît lorsque la porte de
chargement est verrouillée. Ce symbole clignotera jusqu'à ce
que la porte de chargement soit prête à s'ouvrir une fois le
programme terminé ou la machine mise en pause. Au niveau
de cette étape, évitez de forcer l'ouverture de la porte de
chargement. Le symbole disparaît lorsque la porte est prête
à s'ouvrir. Vous pouvez ouvrir la porte après la disparition du
symbole.
4.16 Modifier les sélections après
que le programme a été lancé
Basculer la machine en mode pause
Appuyez sur le bouton « Départ/Pause/Annulation » pour
mettre la machine en mode Pause. Le symbole de pause
apparaît à l'écran pour indiquer que le lave-linge est en mode
pause. Le symbole de départ disparaît.
Changement des réglages de vitesse et de
température des fonctions optionnelles
En fonction de la phase atteinte par le programme, vous
pouvez annuler ou activer les fonctions optionnelles. voir
"Sélection des fonctions optionnelles".
Vous pouvez également modifier les réglages de vitesse et
de température; voir "Sélection de la vitesse d’essorage" et
"Sélection de température".
Ajouter ou vider le linge
Appuyez sur le bouton « Départ/Pause/Annulation » pour
mettre la machine en mode Pause. Le témoin de suivi du
programme de la phase appropriée pendant laquelle la
machine a été réglée en mode "Pause" clignotera. Patientez
jusqu'à ce que la porte de chargement puisse être ouverte.
Ouvrez la porte de chargement et ajoutez ou retirez le linge.
Fermez la porte de chargement. Effectuez des changements
dans les fonctions optionnelles, les réglages de température
et de vitesse, si cela est nécessaire. Appuyez sur le
bouton Départ/Pause/Annulation pour démarrer la machine.
La porte de chargement ne s'ouvrira pas si la
température de l'eau contenue dans la machine est
C
élevée ou si le niveau d'eau dépasse l'ouverture de la
porte.
4.17 Sécurité enfants
Utilisez la fonction Sécurité Enfant pour empêcher les enfants
de jouer avec la machine. Ainsi, vous pouvez éviter des
changements dans un programme en cours.
Vous pouvez allumer et éteindre le lave-linge en
appuyant sur le bouton Activé / Désactivé lorsque le
C
mode Sécurité enfants est activé. Lorsque vous allumez
la machine à nouveau, le programme reprend à partir de
l'endroit où il s'est arrêté.
Pour activer la sécurité enfants :
Appuyez sur les boutons de fonction optionnelle 2 et 4 et
maintenez-les enfoncés pendant 3 secondes. “Con” apparaît
à l'écran.
Le même mot apparaîtra à l'écran si vous appuyez sur
une touche lorsque le mode Sécurité enfants est activé.
C
Pour désactiver la sécurité enfants :
Appuyez sur les boutons de fonction optionnelle 2 et 4 et
maintenez-les enfoncés pendant 3 secondes. “COFF” apparaît
à l'écran.
37 / FR
Lave-linge / Manuel d’utilisation
Page 38

N'oubliez pas de désactiver le mode Sécurité enfants à
la fin du programme s'il a été activé. Si vous ne le faites
C
pas, la machine ne vous permettra pas de sélectionner
un nouveau programme.
4.18 Annulation du programme
Appuyez sur la touche Départ / Pause / Annulation et
maintenez-la enfoncée pendant 3 secondes. Le symbole de
départ clignote. Le symbole de la phase au cours de laquelle
le programme a été annulé reste allumé. "Fin"(End) apparaît à
l'écran et le programme est annulé.
Si vous voulez ouvrir la porte de chargement après avoir
annulé le programme mais cette ouverture n'est pas
C
possible puisque le niveau d'eau dans la machine est
au-dessus de l'ouverture de la porte, tournez le sélecteur
de programmes sur le programme « Essorage et
pompage » et évacuez l'eau dans la machine.
4.19 La machine est en mode
Rinçage ,d'attente
Le symbole d'essorage clignote et celui de pause s'allume
lorsque le lave-linge est en mode Rinçage d'attente.
Si vous voulez essorez votre linge lorsque la machine se
trouve dans ce mode:
Ajustez la vitesse d'essorage et appuyez sur le bouton Départ
/ Pause / Annulation. Le symbole de pause disparaît et celui
de départ différé apparaît. Le programme reprend, évacue
l'eau et essore le linge.
Si vous voulez uniquement évacuer l'eau sans procéder à
l'essorage:
Appuyez simplement sur le bouton Départ/Pause/Annulation.
Le symbole de pause disparaît. Le symbole de départ
apparaît. Le programme reprend et évacue seulement l'eau.
4.20 Fin du programme
“Fin”(End) apparaît à l'écran à la fin du programme. Les
symboles des phases du programme restent allumés. La
fonction optionnelle, la vitesse d'essorage et la température
sélectionnées au début du programme restent sélectionnées.
4.21 Votre machine est équipée
d’une option « mode Veille »
L’appareil passe automatiquement en mode économie
d’énergie lorsque vous n’avez pas encore lancé de
programme, lorsque vous attendez sans rien faire, lorsque
la machine est mise en marche à l’aide du bouton Marche
/ Arrêt et alors qu’elle se trouve à l’étape de sélection ou
alors lorsqu’aucune autre opération n’est effectuée environ 2
minutes après la fin du programme sélectionné. La luminosité
des voyants diminuera. En outre, si votre appareil est équipé
d’un écran indiquant la durée du programme, celui-ci s’éteint
complètement. La luminosité et l’écran seront restaurés
à l’état précédent lorsque vous faites tourner la molette
de sélection de programme ou lorsque vous appuyez sur
un quelconque bouton.. Les sélections effectuées lorsque
vous quittez le mode d’économie d’énergie peuvent êtres
modifiées. Vérifiez la pertinence de vos sélections avant de
lancer le programme. Réajustez si nécessaire. Ceci ne pose
aucun problème.
5 Entretien et nettoyage
Pour prolonger la durée de service de la machine et réduire la
fréquence des problèmes fréquemment rencontrés, nettoyezla à intervalles réguliers.
5.1 Nettoyage du bac à produits
Nettoyage le bac à produits à intervalles réguliers (tous les
4 à 5 cycles de lavage) tel qu'illustré ci-dessous, pour éviter
l'accumulation de détergent en poudre au fil du temps.
1. Appuyez sur le pointillé au-dessus du siphon dans le
compartiment destiné à l'assouplissant, puis tirez vers vous
jusqu’à ce que le compartiment soit enlevé de la machine.
Si plus d’une quantité d’eau normale et de mélange
d'adoucissant commence à se former dans le
C
compartiment destiné à l'assouplissant, le siphon doit être
nettoyé.
2. Lavez le bac à détergent et le siphon avec beaucoup d’eau
tiède dans une bassine. Lors du nettoyage, portez des
gants protecteurs ou utilisez une brosse appropriée pour
éviter que votre peau ne touche les résidus qui se trouvent
à l’intérieur du tiroir.
3. Remettez le bac à son emplacement initial après l'avoir
nettoyé et veillez à ce qu'il soit bien en place.
Si votre bac à détergent est celui illustré sur la figure
suivante :
Soulevez la partie arrière du siphon pour le retirer comme
sur l’illustration. Après avoir effectué les opérations
C
de nettoyage indiquées, remettez le siphon à son
emplacement et poussez la partie avant vers le bas pour
vous assurer que la patte de verrouillage s’enclenche.
5.2 Nettoyage de le hublot et du tambour
Pour les lave-linges disposant d’un programme de nettoyage
du tambour, reportez-vous à la section Fonctionnement du
produit - Programmes.
38 / FR
Lave-linge / Manuel d’utilisation
Page 39

Pour les lave-linges ne disposant pas de ce programme,
veuillez suivre attentivement les directives de nettoyage ciaprès :
Sélectionnez les fonctions auxiliaires
rinçage supplémentaire. Utilisez le programme
ou
Coton sans prélavage. Réglez
nettoyant du tambour au niveau recommandé. Vous
pouvez vous procurer cet agent auprès de nos services
Suivez cette procédure lorsque le lave-linge est
agréés.
Avant d’activer le programme, mettez 1 sachet de
vide.
produit nettoyant spécial pour tambour (si l’agent spécial n’est
pas fourni, mettez 100 g max. de poudre anticalcaire) dans le
compartiment de lavage principal (compartiment n° « 2 »). Si
le produit anticalcaire est sous forme de tablette, mettez une
seule tablette dans le compartiment de lavage principal n° «
2 ». Après avoir désactivé le programme, séchez l’intérieur du
soufflet à l’aide d’un morceau de tissu propre.
Reprenez le processus de nettoyage du tambour tous les
2 mois.
C
Utilisez un anti-détartrant adapté aux lave-linge.
C
Après chaque lavage, veillez à ce qu'aucun corps étranger ne
soit resté dans le tambour.
Si les orifices qui se trouvent sur le soufflet présenté dans le
schéma ci-dessous sont obstrués, débloquez-les à l'aide d'un
cure-dent.
Des corps étrangers en métal provoqueront des taches
de rouilles dans le tambour. Nettoyage les taches qui se
C
trouvent sur la surface du tambour à l’aide d'un agent
nettoyant pour acier inoxydable. N'utilisez jamais de laine
d'acier ni de paille de fer.
AVERTISSEMENT: N'utilisez jamais d'éponge ni de matériel
de lavage. Ces deux objets endommageront les pièces
A
peintes et celles en plastique.
Eau supplémentaire
la température de l’agent
5.3 Nettoyage de la carrosserie et
du bandeau de commande
Nettoyage la carrosserie du lave-linge avec de l'eau
savonneuse ou avec du détergent en gel doux et non corrosif,
le cas échéant, et séchez avec un chiffon doux.
Utilisez uniquement un chiffon doux et humide pour nettoyer
le bandeau de commande.
5.4 Nettoyage les filtres d'arrivée d'eau
Un filtre se trouve à l’extrémité de chaque vanne d'arrivée
d’eau, située au dos de la machine et à l’extrémité de chaque
tuyau d’admission d’eau, où ils sont raccordés au robinet. Ces
filtres empêchent les corps étrangers et la saleté qui se trouve
dans l'eau de pénétrer dans le lave-linge. Les filtres doivent
être nettoyés lorsqu'ils deviennent sales.
1. Fermez les robinets.
2. Enlevez les écrous des tuyaux d’arrivée d’eau afin
d'accéder aux filtres sur les vannes d'arrivée d’eau.
Nettoyez-les avec une brosse adaptée. Si les filtres sont
trop sales, vous pouvez les retirer à l’aide d’une pince et
les nettoyer.
3. Extrayez les filtres des extrémités plates des tuyaux
d’arrivée d’eau ainsi que les joints et nettoyez-les
soigneusement à l’eau du robinet.
4. Replacez soigneusement les joints et les filtres à leur place
et serrez les écrous du tuyau à la main.
5.5 Evacuation de l'eau restante et
nettoyage du filtre de la pompe
Le système de filtration dans votre machine empêche les
éléments solides comme les boutons, les pièces, et les fibres
de tissu, d’obstruer la turbine de la pompe au cours de
l’évacuation de l’eau de lavage. Ainsi, l'eau sera évacuée sans
problème et la durée de service de la pompe s'en trouvera
prolongée.
Si votre machine n’évacue pas l’eau, le filtre de la pompe est
obstrué. Le filtre doit être nettoyé chaque fois qu'il est obstrué
ou tous les 3 mois. L’eau doit être vidangée en premier lieu
pour nettoyer le filtre de la pompe.
De plus, avant de transporter la machine (en la déplaçant
d'une maison à une autre par exemple) et en cas de
congélation de l'eau, il peut s'avérer nécessaire d'évacuer
complètement l'eau.
AVERTISSEMENT: Les corps étrangers laissés dans le filtre
de la pompe peuvent endommager votre machine ou
A
l'amener à faire des bruits.
Pour nettoyer le filtre sale et évacuer l’eau:
1. Débranchez la machine afin de couper l’alimentation
électrique.
AVERTISSEMENT: La température de l'eau contenue
dans la machine peut monter jusqu'à 90 ºC. Pour éviter
A
tout risque de brûlure, le filtre doit être nettoyé après le
refroidissement de l'eau qui se trouve dans la machine.
39 / FR
Lave-linge / Manuel d’utilisation
Page 40

2. Ouvrez le bouchon du filtre.
Si celui-ci comprend deux pièces, appuyez sur l’onglet
qui se trouve sur le bouchon du filtre vers le bas et tirez la
pièce vers vous.
Si celui-ci comprend une pièce, tirez des deux côtés audessus pour ouvrir.
Vous pouvez retirer le couvercle du filtre en poussant
légèrement vers le bas à l'aide d'un mince objet pointu en
C
plastic, par la fente située au-dessus du couvercle du filtre.
Evitez d'utiliser des objets métalliques pointus pour enlever
le couvercle.
3. Certains de nos produits sont dotés d'un tuyau de vidange
en cas d’urgence et d'autres par contre n'en n'ont pas.
Suivez les étapes ci-dessous pour évacuer l'eau.
Pour évacuer l'eau lorsque l'appareil n'est pas doté d'un
tuyau de vidange en cas d’urgence:
a. Mettez un grand bac devant le filtre pour recueillir l’eau du
filtre.
b. Desserrez le filtre de la pompe (dans le sens inverse des
aiguilles d’une montre) jusqu’à ce que l’eau commence à
y couler. Remplissez l'eau dans le bac que vous avez placé
devant le filtre. Gardez toujours un morceau de chiffon pour
absorber toute eau déversée.
c. Lorsque l'eau contenue dans la machine est finie, sortez le
filtre complètement en le tournant.
4. Nettoyage tous les résidus à l’intérieur du filtre, ainsi que
les fibres, s’il y en a, autour de la zone de la turbine.
5. Installer le filtre.
6. Si celui-ci comprend deux pièces, fermez-le en appuyant
sur l’onglet. Si en revanche l'appareil comprend une pièce,
installez d'abord les étiquettes à leurs emplacements dans
la partie inférieure, puis appuyez sur la partie supérieure
pour fermer.
40 / FR
Lave-linge / Manuel d’utilisation
Page 41

6 Caractéristiques techniques
Modèles
Charge maximale de linge sec (kg)
Hauteur (cm)
Largeur (cm)
Profondeur (cm)
Poids net (±4 kg.)
Consommation électrique (V/Hz)
Courant total (A)
Puissance totale (W)
Vitesse d'essorage (tr/min max.)
Puissance en mode veille (W)
Puissance en mode éteint (W)
Code du modèle principal
Simple arrivée d’eau / Double arrivée d’eau
• Disponible
WMB 91242 LSC
9
84
60
59
74
230 V / 50Hz
10
2200
1200
1.00
0.20
888
• / -
C
C
C
41 / FR
Afin d’améliorer la qualité du produit, les caractéristiques techniques de cet appareil peuvent être modifiées sans préavis.
Les schémas présentés dans ce manuel sont indicatifs et peuvent ne pas correspondre exactement à votre produit.
Les valeurs indiquées sur les étiquettes de la machine ou dans les documents fournis avec celle-ci, ont été obtenues en laboratoire,
conformément aux normes applicables. Ces valeurs peuvent varier en fonction des conditions d’utilisation et d’environnement du
produit.
Lave-linge / Manuel d’utilisation
Page 42

7 Diagnostic
Le programme ne démarre pas après la fermeture de la porte.
• Vous n’avez pas appuyé sur la touche Démarrer / Pause / Annuler>>> *Appuyez sur la touche Démarrer / Pause / Annuler.
Impossible de lancer ou de sélectionner le programme.
• La machine est passée en mode de sécurité à cause des problèmes liés à l’alimentation (tension du circuit, pression d’eau, etc.).
>>> Appuyez sur le bouton « Départ/Pause » et maintenez-le enfoncé pendant 3 secondes pour rétablir les réglages par défaut de la
machine. (Voir "Annulation du programme")
Eau dans la machine.
• Il pourrait rester de l’eau dans votre machine suite aux processus d’assurance qualité menés au cours de la production. >>> Ceci ne pose
aucun problème et n’affecte nullement votre machine.
La machine vibre ou fait des bruits.
• La machine pourrait ne pas être en équilibre. >>> Réglez les pieds pour mettre la machine à niveau.
• Il se peut qu'une substance rigide soit entrée dans le filtre de la pompe. >>> Nettoyage le filtre de la pompe.
• Les vis de sécurité réservées au transport n'ont pas été enlevées. >>> Enlevez les vis de sécurité réservées au transport.
• La quantité de linge contenue dans la machine pourrait être trop faible. >>> Ajoutez du linge dans la machine.
• La machine pourrait avoir été surchargée de linge. >>> Retirez une quantité de linge de la machine ou procédez à une distribution
manuelle afin de l'équilibrer de façon homogène dans la machine.
• Vérifiez si la machine n'est pas posée sur un objet rigide. >>> Assurez-vous que la machine n'est posée sur aucun objet.
La machine s’est arrêtée juste après le démarrage du programme.
• Vérifiez si le lave-linge ne s'est pas arrêté de façon provisoire en raison d'une basse tension. >>> Elle peut reprendre son fonctionnement
lorsque la tension revient au niveau normal.
La durée du programme n'effectue aucun procédé de comptage. (Sur les modèles avec affichage)
• La minuterie pourrait s'arrêter pendant le prélèvement de l'eau. >>> L'indicateur de la minuterie n'effectuera aucun procédé de comptage
jusqu'à ce que la machine prélève une quantité adéquate d'eau. La machine attendra jusqu’à ce qu’il y ait suffisamment d’eau, pour
éviter de mauvais résultats de lavage dus au manque d’eau. L'indicateur de la minuterie reprendra le compte à rebours après ceci.
• La minuterie pourrait s'arrêter pendant la phase de chauffage. >>> L'indicateur de la minuterie n'effectuera aucun procédé de comptage
jusqu'à ce que la machine atteigne la température sélectionnée.
• La minuterie pourrait s'arrêter pendant la phase d'essorage. >>> Un système de détection automatique d’une charge non équilibrée
pourrait être activé en raison d'une répartition inégale du linge dans le tambour.
• La machine ne passe pas à la phase d'essorage lorsque le linge n’est pas uniformément réparti dans le tambour afin de prévenir tout dommage
à la machine et à son environnement. Le linge doit être disposé à nouveau et essoré une nouvelle fois.
La mousse déborde du bac à produits.
• Trop de détergent a été utilisé. >>> Mélangez 1 cuillère à soupe d'adoucissant dans ½ litre d'eau et versez ce mélange dans le
compartiment de lavage principal du bac à produits.
• Verser le détergent dans la machine appropriée pour les programmes et respectez les charges maximales indiquées dans le "Tableau des
programmes et de consommation". Si vous utilisez des produits chimiques supplémentaires (détachants, javels, etc.), diminuez la quantité du
détergent.
Le linge reste mouillé à la fin du programme
• Une quantité excessive de mousse pourrait avoir été formée et le système d'absorption automatique de mousse pourrait avoir été activé en
raison d'une utilisation excessive de détergent. >>> Utilisez la quantité de détergent recommandée.
• La machine ne passe pas à la phase d'essorage lorsque le linge n’est pas uniformément réparti dans le tambour afin de prévenir tout dommage
à la machine et à son environnement. Le linge doit être disposé à nouveau et essoré une nouvelle fois.
42 / FR
Lave-linge / Manuel d’utilisation
Page 43

Lavatrice
User Manual
WMB 91242 LSC
IT
Numero del documento=
2820523419_IT / 07-09-15.(12:13)
Page 44

Questo prodotto è stato fabbricato utilizzando la tecnologia più all'avanguardia in condizioni rispettose per l'ambiente.
Page 45

1 Istruzioni importanti per la sicurezza e l'ambiente
Questa sezione contiene istruzioni sulla sicurezza che aiutano a proteggere dal rischio
di lesioni personali o danni alla proprietà. La mancata osservanza di queste istruzioni
rende la garanzia priva di validità.
1.1 Sicurezza generale
• Questo elettrodomestico può essere utilizzato da bambini di età superiore a 8 anni e
da persone le cui capacità fisiche, sensoriali e mentali non sono pienamente sviluppate o che mancano di esperienza e conoscenza sempre che ricevano supervisione o
formazione sull'uso sicuro dell'elettrodomestico e sui rischi che comporta. I bambini
non devono giocare con l'elettrodomestico. Le operazioni di pulizia e manutenzione
non devono essere eseguite da bambini a meno che non ricevano supervisione. I
bambini di età inferiore ai 3 anni devono essere tenuti a distanza a meno che non ricevano una supervisione continua
• Non mettere mai l'elettrodomestico su un pavimento coperto da tappeto. Altrimenti la
mancanza di aria sotto l'elettrodomestico provocherà il surriscaldamento delle parti
elettriche. Ciò può provocare malfunzionamenti dell'elettrodomestico.
• Se l'elettrodomestico presenta un guasto, non deve essere utilizzato, a meno che non
sia riparato da un agente autorizzato per l'assistenza. C'è il rischio di shock elettrico!
• L'elettrodomestico è progettato per riprendere a funzionare in caso di ripristino di
corrente dopo un guasto elettrico. Se si desidera annullare il programma, vedere la
sezione "Annullamento del programma".
• Collegare l'elettrodomestico a una presa di messa a terra protetta da fusibile 16 A.
Non trascurare la possibilità di fare installare la messa a terra da un elettricista qualificato. La nostra azienda non sarà responsabile dei danni derivanti dall'uso dell'elettrodomestico senza la messa a terra conforme ai regolamenti locali.
• L'alimentazione dell'acqua e i flessibili di scarico devono essere montati in modo sicuro e restare privi di danni. Altrimenti c'è il rischio di perdite di acqua.
• Non aprire mai lo sportello né togliere il filtro mentre vi è ancora dell’acqua nel cestello. Altrimenti si verifica il rischio di allagamenti e lesioni provocate dall'acqua calda.
• Non forzare per aprire lo sportello di carico bloccato. Lo sportello di carico sarà pronto
per l’apertura pochi minuti dopo la fine del ciclo di lavaggio. Se si forza per aprire lo
sportello di carico bloccato, sportello e meccanismo di blocco potrebbero danneggiarsi.
• Scollegare l'elettrodomestico quando non è in uso.
• Non lavare mai l'elettrodomestico versando o cospargendo acqua su di esso! C'è il
rischio di shock elettrico!
• Non toccare mai la spina con le mani bagnate! Non scollegare mai tirando dal cavo,
estrarre sempre tirando dalla spina.
• Usare solo detersivi, ammorbidenti e additivi adatti alle lavatrici automatiche.
• Seguire le istruzioni sulle etichette dei tessuti e sulla confezione del detersivo.
• L'elettrodomestico deve essere scollegato durante le procedure di installazione, manutenzione, pulizia e riparazione.
• Far eseguire sempre le procedure di installazione e riparazione da un agente autorizzato
per l'assistenza
vare da procedure eseguite da persone non autorizzate.
. Il produttore non sarà ritenuto responsabile per danni che possono deri-
45 / IT
Lavatrice / Manuale utente
Page 46

• Se il cavo elettrico è danneggiato, deve essere sostituito dal produttore, dall'assistente
post-vendita o una persona con qualifica simile (preferibilmente un elettricista) o qualcuno designato dall'importatore, per evitare possibili rischi.
1.2 Uso previsto
• Questo elettrodomestico è progettato per un uso domestico. Non è adatto ad un uso
commerciale e non deve essere usato al di là dell'uso previsto.
• L'elettrodomestico può essere utilizzato esclusivamente per il lavaggio e il risciacquo
di bucato che in etichetta preveda tale tipo di lavaggio.
• Il produttore declina ogni responsabilità che derivi da uso o trasporto non corretti.
1.3 Sicurezza dei bambini
• I materiali di imballaggio sono dannosi per i bambini. Tenere i materiali di imballaggio
in un luogo sicuro lontano dalla portata dei bambini.
• I dispositivi elettrici sono pericolosi per i bambini. Tenere i bambini lontani dall'elettrodomestico mentre questo è in uso. Non lasciarli giocare con l'elettrodomestico. Usare
il blocco bambini per evitare che i bambini possano interferire con il funzionamento
dell'elettrodomestico.
• Non dimenticare di chiudere lo sportello di carico quando si esce dalla stanza in cui si
trova l'elettrodomestico.
• Conservare tutti i detersivi e gli additivi in un posto sicuro fuori dalla portata dei bambini, chiudendo il coperchio del contenitore del detersivo o sigillando la confezione.
Quando si lava il bucato a temperature elevate, il vetro dello sportello
di carico diventa caldo. Tenere, pertanto, soprattutto i bambini lontani
dallo sportello di carico dell’elettrodomestico mentre il lavaggio è in
corso.
1.4 Informazioni sulla confezione
• I materiali di imballaggio del prodotto sono realizzati di materiali riciclabili secondo le
nostre norme nazionali sull'ambiente. Non smaltire i materiali di imballaggio con i rifiuti domestici o con altri rifiuti. Portarli ai punti di raccolta del materiale di imballaggio
previsti dalle autorità locali.
1.5 Smaltimento dei rifiuti dell'elettrodomestico
• Questo elettrodomestico è stato realizzato con parti e materiali di alta qualità che
possono essere riutilizzati e sono adatti ad essere riciclati. Non smaltire, quindi, l'elettrodomestico con i normali rifiuti domestici alla fine della sua vita di servizio. Portarlo
a un punto di raccolta per il riciclo delle apparecchiature elettriche ed elettroniche.
Consultare le autorità locali per conoscere il punto di raccolta più vicino. Aiutare a
proteggere l'ambiente e le risorse naturali riciclando gli elettrodomestici usati. Per la
sicurezza dei bambini, prima di smaltire l'elettrodomestico, tagliare il cavo di alimentazione e rompere il meccanismo di blocco dello sportello di carico in modo che non
funzioni.
46 / IT
Lavatrice / Manuale utente
Page 47

1.6 Conformità alla direttiva WEEE
Questo apparecchio è conforme alla Direttiva UE WEEE (2012/19/EU). Questo
apparecchio riporta il simbolo di classificazione per i rifiuti delle apparecchiature
elettriche ed elettroniche (WEEE).
Questo apparecchio è stato realizzato con parti e materiali di alta qualità che
possono essere riutilizzati e sono adatti ad essere riciclati. Non smaltire i rifiuti
dell’apparecchio con i normali rifiuti domestici e gli altri rifiuti alla fine della vita di
servizio. Portarlo al centro di raccolta per il riciclaggio di apparecchiature elettriche ed
elettroniche. Consultare le autorità locali per conoscere la collocazione di questi centri di
raccolta.
Conformità alla Direttiva RoHS:
L’apparecchio acquistato è conforme alla Direttiva UE RoHS (2011/65/EU). Non
contiene materiali pericolosi o proibiti specificati nella Direttiva.
47 / IT
Lavatrice / Manuale utente
Page 48

2 Installazione
Rivolgersi al più vicino agente autorizzato per l'assistenza
per l'installazione dell'elettrodomestico. Per rendere
l'elettrodomestico pronto per l'uso, rivedere le informazioni
del manuale utente e assicurarsi che elettricità, fornitura di
acqua e sistemi di scarico dell'acqua siano appropriati prima
di chiamare l'agente autorizzato per l'assistenza. Se non
lo sono, chiamare un tecnico e un idraulico qualificati per
eseguire tutte le regolazioni necessarie.
La preparazione del luogo e le installazioni elettriche,
idriche e dell'acqua di scarico sul luogo della installazione
C
sono una responsabilità del cliente.
AVVİSO : Installazione e collegamenti elettrici
dell'elettrodomestico devono essere eseguiti dall'agente
B
autorizzato per l'assistenza. Il produttore non sarà
ritenuto responsabile per danni che possono derivare da
procedure eseguite da persone non autorizzate.
AVVİSO :Prima della installazione, ispezionare
visivamente l'elettrodomestico per rilevare la presenza
A
di eventuali difetti. Se è così, non farlo installare. Gli
elettrodomestici danneggiati rappresentano un rischio per
la sicurezza.
Assicurarsi che i flessibili di ingresso e scarico
dell'acqua nonché il cavo di alimentazione non siano
C
piegati, schiacciati o strappati quando si riposiziona
l'elettrodomestico dopo le procedure di installazione o
pulizia.
2.1 Posizione adeguata di montaggio
• Posizionare l'elettrodomestico su un suolo solido. Non
posizionare l'elettrodomestico su tappeti a pelo lungo o su
superfici simili.
• Il peso totale di lavatrice e asciugatrice - a pieno carico
- quando sono poste l'una sull'altra raggiunge circa 180
kg. Mettere l'elettrodomestico su una superficie solida e
piana che abbia una sufficiente capacità di sopportare il
carico!
• Non posizionare l'elettrodomestico sul cavo di
alimentazione.
• Non installare l'elettrodomestico in luoghi in cui la
temperatura può scendere al di sotto di 0ºC.
• Mettere l'elettrodomestico a una distanza di almeno 1 cm
dai bordi degli altri arredi.
2.2 Rimozione dei rinforzi dell'imballaggio
Ribaltare la lavatrice all'indietro per rimuovere i rinforzi
dell’imballaggio. Tirare il nastro per rimuovere i rinforzi
dell’imballaggio.
2.3 Rimozione dei blocchi di trasporto
AVVİSO :Non rimuovere i blocchi di trasporto prima di
aver estratto i rinforzi dell'imballaggio.
A
AVVİSO :Rimuovere i bulloni di sicurezza per il trasporto
prima di azionare la lavatrice! Altrimenti l'elettrodomestico
A
si danneggia.
1. Allentare tutti i bulloni con un’apposita chiave, sino a
quando ruoteranno liberamente
2. Rimuovere i bulloni di sicurezza di trasporto ruotandoli
delicatamente.
3. Inserire i coperchietti in plastica nei fori del pannello
posteriore, in dotazione nel sacchetto allegato al manuale
utente.
(P)
Conservare i bulloni di sicurezza in un posto sicuro per
riutilizzarli in caso di ulteriori trasporti in futuro.
C
Non spostare mai l'elettrodomestico senza avere prima
fissato correttamente i bulloni di sicurezza!
C
(C).
2.4 Collegamento della fornitura idrica
La pressione idrica necessaria per utilizzare
l'elettrodomestico è compresa tra 1 e 10 bar (0,1 – 1
C
MPa). Sono necessari 10 – 80 litri d'acqua che fluiscono
dal rubinetto completamente aperto in un minuto perché
l'elettrodomestico funzioni senza problemi. Collegare
una valvola di riduzione della pressione se la pressione
dell’acqua è più alta.
Se si usa il doppio ingresso per l’acqua come unità a
singolo ingresso dell’acqua
C
installare il tappo in dotazione con la lavatrice,
sulla valvola dell’acqua calda, prima di utilizzare
l'elettrodomestico. (Si applica agli elettrodomestici forniti
di un gruppo tappo cieco).
AVVİSO :I modelli con ingresso singolo dell'acqua non
devono essere collegati al rubinetto dell'acqua calda. In
A
questo caso il bucato si danneggia o l'elettrodomestico
passa in modalità protezione e non funziona.
AVVİSO :Non usare su elettrodomestici nuovi flessibili
per l'acqua vecchi o usati. Altrimenti il bucato potrebbe
A
macchiarsi.
1. I flessibili specifici in dotazione con la lavatrice
sono collegati alle valvole di ingresso dell'acqua
sull'elettrodomestico. Il flessibile rosso (sinistra) (max.
90 ºC) è per l'ingresso dell'acqua calda, il flessibile blu
(destra) (max. 25 ºC) è per l'ingresso dell'acqua fredda.
(fredda), è necessario
48 / IT
Lavatrice / Manuale utente
Page 49

AVVİSO :Quando si installa la lavatrice, assicurarsi che i
rubinetti di acqua calda e fredda siano collegati in modo
A
corretto. Altrimenti il bucato resta caldo alla fine del
processo di lavaggio usurandosi.
2. Stringere a mano tutti i dadi del flessibile. Non usare mai
un attrezzo per stringere i dadi.
3. Aprire completamente i rubinetti dopo aver collegato
il flessibile per controllare se ci sono perdite di acqua
nei punti di connessione. In caso di perdite, chiudere il
rubinetto e rimuovere il dado. Stringere nuovamente il
dado dopo aver controllato la guarnizione. Per evitare
perdite di acqua e danni conseguenti, tenere i rubinetti
chiusi quando la lavatrice non è in uso.
2.5 Collegamento allo scarico
• L’estremità del flessibile deve essere collegata
direttamente alla fognatura o al lavandino.
AVVİSO :La casa potrebbe allagarsi se il flessibile esce
dal suo alloggiamento durante lo scarico dell’acqua.
A
Inoltre, c'è il rischio di ustioni dovuto alle alte temperature
di lavaggio! Per evitare tali situazioni e per assicurare
ingresso e scarico dell'acqua privi di problemi, montare
l'estremità del flessibile di scarico in modo sicuro, così
che non possa fuoriuscire.
• Il flessibile deve essere installato ad un'altezza minima di
40 cm e massima di 100 cm.
• Nel caso in cui il cavo venga sollevato dopo essere stato
a livello o in prossimità del pavimento (a meno di 40 cm
dal suolo), lo scarico dell’acqua risulta più difficoltoso e
la biancheria potrebbe uscire ancora eccessivamente
bagnata. Pertanto, seguire le altezze descritte in figura.
100cm
40cm
• Per evitare il flusso di acqua sporca che rientra
nell'elettrodomestico e per consentire uno scarico facile,
non immergere l'estremità del flessibile nell'acqua sporca
o non tenerla ad una distanza superiore a 15 cm. Se il
flessibile è troppo lungo, tagliarlo.
• L'estremità del flessibile non deve essere piegata, non
deve essere calpestata e non deve essere piegata fra lo
scarico e l'elettrodomestico.
• Se la lunghezza del flessibile non è sufficiente,
aggiungere una prolunga originale per flessibili. La
lunghezza del flessibile non deve superare 3,2 m. Per
evitare guasti provocati dalla perdita dell’acqua, la
connessione tra la prolunga del flessibile e il flessibile
di scarico della lavatrice deve essere eseguita con un
morsetto adeguato che si mantenga fermo e non perda.
2.6 Regolazione dei piedini
AVVİSO :La lavatrice deve stare su una superficie
pianeggiante e in equilibrio, perché funzioni in modo
A
più silenzioso e senza vibrazioni. Mettere in equilibrio
l'elettrodomestico regolando i piedini. Altrimenti
l'elettrodomestico può spostarsi provocando problemi di
rumori e vibrazioni.
1. Allentare manualmente i controdadi posti sui piedini.
2. Regolare i piedini finché l'elettrodomestico non è allo
stesso livello e in equilibrio.
3. Stringere di nuovo a mano tutti i controdadi del flessibile.
AVVİSO :Non utilizzare alcun utensile per allentare i
controdadi. Potrebbero subire dei danni.
A
2.7 Collegamento elettrico
Collegare l'elettrodomestico a una presa di messa
a terra protetta da fusibile 16 A. La nostra azienda
non sarà responsabile dei danni derivanti dall'uso
dell'elettrodomestico senza la messa a terra conforme ai
regolamenti locali.
• Il collegamento deve essere effettuato in ottemperanza ai
regolamenti vigenti.
• Una volta terminata l'installazione, il cavo di alimentazione
deve essere a portata di mano.
• Se il valore corrente del fusibile o dell'interruttore in casa
è inferiore a 16 Amp, far installare un fusibile da 16 Amp
da un elettricista qualificato.
• La tensione specifica nella sezione "Specifiche tecniche"
deve essere uguale alla tensione di rete.
• Non eseguire collegamenti usando prolunghe o spine
multiple.
AVVİSO :Cavi di alimentazione danneggiati devono
essere sostituiti da un agente autorizzato per l'assistenza.
B
Trasporto dell'elettrodomestico
1. Scollegare l'elettrodomestico prima di trasportarlo.
2. Rimuovere i collegamenti idrici per scarico e fornitura
d'acqua.
3. Scaricare l'acqua rimasta nell'elettrodomestico. Vedere
5.5
4. Installare i bulloni di sicurezza di trasporto in ordine
inverso alla procedura di rimozione; vedere 2.3.
Non spostare mai l'elettrodomestico senza avere prima
fissato correttamente i bulloni di sicurezza!
C
AVVİSO :I materiali di imballaggio sono dannosi per i
bambini. Tenere i materiali di imballaggio in un luogo
A
sicuro lontano dalla portata dei bambini.
49 / IT
Lavatrice / Manuale utente
Page 50

3 Preparazione
3.1 Selezione del bucato
• Selezionare il bucato in base al tipo di tessuto, al
colore, al livello di sporco e alla temperatura di lavaggio
consentita.
• Rispettare sempre le istruzioni presenti sulle etichette dei
capi.
3.2 Preparazione del bucato da lavare
• Gli indumenti con accessori in metallo, quali reggiseno,
fibbie di cinture o bottoni metallici possono danneggiare
la lavatrice. Rimuovere le parti in metallo o lavare questi
capi ponendoli in una borsa apposita o nella federa di un
cuscino.
• Togliere dalle tasche tutti gli oggetti, quali monete,
penne e graffette, capovolgere le tasche e spazzolare.
Tali oggetti possono danneggiare l'elettrodomestico o
provocare problemi dovuti al rumore.
• Mettere i capi piccoli, come i calzini dei neonati e le
calze di nylon, in una borsa apposita o nella federa di un
cuscino.
• Mettere le tende all'interno senza comprimerle.
Rimuovere gli accessori dalle tende.
• Chiudere le cerniere, cucire i bottoni allentati e sistemare
strappi e lacerazioni.
• Scegliere il programma corretto per i capi che recano
scritto in etichetta “lavare in lavatrice” o “lavare a mano”.
• Non lavare insieme capi bianchi e colorati. I capi in cotone
nuovi o di colori scuri perdono molto colore. Lavarli
separatamente.
• Macchie resistenti devono essere trattate correttamente
prima del lavaggio. Se non si è sicuri, utilizzare un pulitore
a secco.
• Utilizzare solo tinte/coloranti e smacchiatori adatti per
l’utilizzo con la lavatrice. Seguire sempre le istruzioni
indicate sulla confezione.
• Lavare pantaloni e capi delicati girandoli al rovescio.
• Tenere i capi fatti in lana d’angora nel congelatore per
qualche ora prima del lavaggio. Questo ridurrà la perdita
del pelo.
• Il bucato molto sporco di materiale come farina, polvere
di calcare, polvere di latte, ecc. deve essere scosso prima
di metterlo in lavatrice. Tali tipi di polvere sul bucato
possono raccogliersi nelle parti interne della lavatrice nel
tempo e possono provocare danni.
3.3 Cose da fare ai fini del risparmio energetico
Le informazioni che seguono aiutano ad usare
l'elettrodomestico in modo ecologico e con risparmio
energetico.
• Utilizzare l'elettrodomestico alla massima capacità
consentita dal programma selezionato, ma non
sovraccaricarlo; vedere la tabella "Programma e
consumo".
• Seguire sempre le istruzioni sulla confezione del
detersivo.
• Lavare il bucato poco sporco a temperature basse.
• Usare programmi più veloci per piccole quantità di bucato
poco sporco.
• Non usare pre-lavaggio e temperature alte per bucato
poco sporco o macchiato.
• Se si desidera asciugare il bucato nell'asciugatrice,
selezionare la velocità di centrifuga più alta consigliata
durante il programma di lavaggio.
• Non usare detersivo in quantità superiore a quella
consigliata sulla confezione.
3.4 Uso iniziale
Prima di cominciare ad usare l’elettrodomestico, assicurarsi
di eseguire tutte le preparazioni secondo le istruzioni
delle sezioni “Istruzioni importanti per la sicurezza” e
“Installazione”.
Per preparare l’elettrodomestico al lavaggio del bucato,
eseguire la prima operazione del programma per la
pulizia del cestello. Se l’elettrodomestico non è dotato di
programma Pulizia cestello, eseguire la procedure Uso
iniziale secondo i metodi descritti nella sezione “5.2 Pulizia
dello sportello di carico e del cestello” del manuale utente.
Usare un anticalcare appropriato alle lavatrici.
C
Potrebbe restare dell'acqua nell'elettrodomestico in
seguito ai processi di controllo della qualità durante la
C
produzione. Non è dannosa per l'elettrodomestico.
3.5 Corretta capacità di carico
La capacità massima di carico dipende dal tipo di bucato,
dal grado di sporco e dal programma di lavaggio desiderato.
L'elettrodomestico regola automaticamente la quantità di
acqua secondo il peso del bucato che viene posto all'interno.
AVVİSO :Seguire le informazioni della tabella
“Programma e consumo”. In caso di sovraccarico, la
A
prestazione della lavatrice peggiora. Inoltre possono
verificarsi problemi di rumore e vibrazioni.
3.6 Caricamento del bucato
1. Aprire lo sportello di carico.
2. Mettere il bucato sciolto dentro all'elettrodomestico.
3. Chiudere lo sportello di carico fino a sentire un suono di
blocco. Fare attenzione a che non vi siano capi impigliati
nello sportello.
Lo sportello di carico è bloccato durante l'esecuzione dei
programmi. Lo sportello può essere aperto solo dopo un
C
certo periodo di tempo dalla fine del programma.
AVVİSO :In caso di cattivo posizionamento del bucato,
possono verificarsi rumori e vibrazioni nella lavatrice.
A
3.7 Uso di detersivo e ammorbidente
Quando si usano detersivi, ammorbidente, appretto,
tinte per tessuti, candeggina o anticalcare, leggere le
C
istruzioni del produttore sulla confezione e seguire i valori
di dosaggio consigliati. Usare la tazza di misurazione, se
disponibile.
Cassetto del detersivo
Il cassetto del detersivo è suddiviso in tre scomparti:
– (1) per pre-lavaggio
50 / IT
Lavatrice / Manuale utente
Page 51

– (2) per lavaggio principale
– (3) per ammorbidente
– (*) inoltre c'è un sifone nello scomparto
dell'ammorbidente.
3
2
Detersivo, ammorbidente e altri detergenti
• Aggiungere il detersivo e l’ammorbidente prima di avviare
il programma di lavaggio.
• Non lasciare mai il cassetto del detersivo aperto mentre il
programma è in corso!
• Quando si usa un programma senza pre-lavaggio, non
mettere detersivo nello scomparto del pre-lavaggio
(scomparto n. "1").
• Quando si usa un programma con pre-lavaggio, non
mettere detersivo liquido nello scomparto del pre-lavaggio
(scomparto n. "1").
• Non selezionare un programma con pre-lavaggio se si
usa un sacchetto detergente o una sfera detergente.
Mettere il sacchetto detergente o la sfera direttamente tra
il bucato nella lavatrice.
• Se si usa detersivo liquido, non dimenticare di mettere il
contenitore per il detersivo liquido nello scomparto per il
lavaggio principale (scomparto n. "2").
Scelta del tipo di detersivo
Il tipo di detersivo da usare dipende dal tipo e dal colore del
tessuto.
• Usare detersivi diversi per bucato bianco e colorato.
• Lavare i capi delicati solo con detersivi speciali (detersivo
liquido, shampoo per lana, ecc.) che si usano solo per
capi delicati.
• Quando si lavano capi di colore scuro e trapunte, si
consiglia di usare detersivo liquido.
• Lavare i capi in lana con un detersivo speciale specifico
per i capi in lana.
AVVİSO :Usare solo detersivi prodotti specificamente
per lavatrici.
A
AVVİSO :Non usare sapone in polvere.
A
Regolazione della quantità di detersivo
La quantità di detersivo da utilizzare dipende dal volume di
biancheria, dal grado di sporco e dalla durezza dell’acqua.
• Non utilizzare quantità superiori a quelle indicate sulla
confezione del detersivo, per evitare la formazione
eccessiva di schiuma e un risciacquo inadeguato. Inoltre
si risparmia denaro e non si inquina l’ambiente.
• Usare una quantità minore di detersivo per piccole
quantità di bucato o bucato poco sporco.
Uso di ammorbidenti
Versare l’ammorbidente nello scomparto apposito del
cassetto del detersivo.
1
• Non superare il contrassegno di livello (>max<) dello
scomparto ammorbidente.
• Se l’ammorbidente ha perso fluidità, diluirlo con acqua
prima di metterlo nel cassetto del detersivo.
Uso di detersivi liquidi
Se l'elettrodomestico contiene un contenitore per
detersivo liquido:
• Assicurarsi di aver posizionato il contenitore per detersivo
liquido nello scomparto n. "2".
• Se il detersivo liquido ha perso fluidità, diluirlo con acqua
prima di metterlo nel contenitore del detersivo.
Se l'elettrodomestico non contiene un contenitore per
detersivo liquido:
• Non usare detersivo liquido per il pre-lavaggio in un
programma con pre-lavaggio.
• Il detersivo liquido macchia il bucato se usato con la
funzione di avvio con ritardo. Se si usa la funzione di avvio
con ritardo, non usare detersivo liquido.
Uso di detersivo in gel e compresse
Applicare le istruzioni che seguono quando si usano detersivi
in compresse, gel e simili.
• Se la consistenza del detersivo in gel è fluida e la lavatrice
non contiene un contenitore speciale per detersivo
liquido, mettere il detersivo in gel nello scomparto del
lavaggio principale durante il primo carico di acqua. Se
la lavatrice contiene un contenitore per detersivo liquido,
riempirlo di detersivo prima di avviare il programma.
• Se la consistenza del detersivo in gel non è fluida o esso
è contenuto in una capsula, metterlo direttamente nel
cestello prima del lavaggio.
• Mettere il detersivo in compresse nello scomparto
lavaggio principale (scomparto n. "2") o direttamente nel
cestello prima del lavaggio.
Il detersivo in compresse può lasciare residui nello
scomparto detersivo. In questo caso, mettere il detersivo
C
in compresse nel bucato, chiudere la parte inferiore del
cestello nei lavaggi successivi.
Usare il detersivo in compresse o gel senza selezionare la
funzione di pre-lavaggio.
C
Uso dell'appretto
• Aggiungere appretto liquido, appretto in polvere o tinta
per tessuti nello scomparto per l'ammorbidente.
• Non usare insieme ammorbidente e appretto, in un ciclo
di lavaggio.
• Pulire l'interno della lavatrice con un panno umido e pulito
dopo aver usato l'appretto.
Uso di candeggina
• Selezionare un programma con pre-lavaggio e
aggiungere la candeggina all'inizio del pre-lavaggio. Non
versare detersivo nello scomparto del pre-lavaggio. Come
applicazione alternativa, selezionare un programma con
risciacquo extra e aggiungere la candeggina mentre
51 / IT
Lavatrice / Manuale utente
Page 52

l'elettrodomestico aspira l'acqua dallo scomparto
detersivo durante la prima fase di risciacquo.
• Non usare candeggina e detersivo mescolandoli.
• Usare una piccola quantità (circa 50 ml) di candeggina e
sciacquare i capi molto bene, perché provoca irritazione
della pelle. Non versare la candeggina sui capi e non
usarla per capi colorati.
• Quando si usano candeggine a base di ossigeno,
selezionare un programma che lava a temperatura
inferiore.
• La candeggina a base di ossigeno può essere usata
insieme al detersivo; però se la consistenza non è la
stessa del detersivo, mettere il detersivo prima nello
3.8 Consigli per un lavaggio efficace
Colori chiari e capi
bianchi
Molto sporco
(macchie difficili
come erba, caffè,
frutta e sangue).
Sporco normale
Livello di sporco
(Per esempio,
macchie naturali su
colletti e polsini)
Poco sporco
(Non sono presenti
macchie visibili).
(Intervallo di temperatura
consigliata basato sul livello
di sporco: 40-90ºC)
Potrebbe essere necessario
pretrattare le macchie o
eseguire il pre-lavaggio.
Detersivi in polvere e liquidi
consigliati per i capi bianchi
possono essere usati ai
dosaggi consigliati per capi
molto sporchi. Si consiglia
di usare detersivi liquidi per
pulire macchie di argilla e
creta e macchie che sono
sensibili alla candeggina.
Detersivi in polvere e liquidi
consigliati per i capi bianchi
possono essere usati ai
dosaggi consigliati per capi
con sporco normale.
Detersivi in polvere e liquidi
consigliati per i capi bianchi
possono essere usati ai
dosaggi consigliati per capi
poco sporchi.
(Intervallo di temperatura
consigliata basato sul livello di
sporco: freddo-40ºC)
Detersivi in polvere e liquidi
consigliati per i capi colorati
possono essere usati ai
dosaggi consigliati per capi
molto sporchi. Si consiglia
di usare detersivi liquidi per
pulire macchie di argilla e
creta e macchie che sono
sensibili alla candeggina.
Usare detersivi senza
candeggina.
Detersivi in polvere e liquidi
consigliati per i capi colorati
possono essere usati ai
dosaggi consigliati per capi
con sporco normale. Usare
detersivi senza candeggina.
Detersivi in polvere e liquidi
consigliati per i capi colorati
possono essere usati ai
dosaggi consigliati per capi
poco sporchi. Usare detersivi
senza candeggina.
scomparto n. "2" del cassetto del detersivo e aspettare
finché il detersivo non fluisce quando la lavatrice aspira
l'acqua. Aggiungere candeggina dallo stesso scomparto
quando la lavatrice sta ancora aspirando l'acqua.
Uso di un agente anticalcare
• Quando necessario, usare agenti anticalcare prodotti
specificamente solo per lavatrici.
Indumenti
Colori Colori scuri Delicati/lana/seta
(Intervallo di
temperatura consigliata
basato sul livello di
sporco: freddo-40ºC)
Detersivi liquidi
consigliati adatti per
capi colorati e scuri
possono essere usati ai
dosaggi consigliati per
capi molto sporchi.
Detersivi liquidi
consigliati adatti per
capi colorati e scuri
possono essere usati
ai dosaggi consigliati
per capi con sporco
normale.
Detersivi liquidi
consigliati adatti per
capi colorati e scuri
possono essere usati ai
dosaggi consigliati per
capi poco sporchi.
(Intervallo di temperatura
consigliata basato sul
livello di sporco: freddo30ºC)
Preferire i detersivi
liquidi prodotti per capi
delicati. Capi in lana e
seta devono essere lavati
con detersivi speciali per
la lana.
Preferire i detersivi
liquidi prodotti per capi
delicati. Capi in lana e
seta devono essere lavati
con detersivi speciali per
la lana.
Preferire i detersivi
liquidi prodotti per capi
delicati. Capi in lana e
seta devono essere lavati
con detersivi speciali per
la lana.
52 / IT
Lavatrice / Manuale utente
Page 53

4 Funzionamento dell'elettrodomestico
4.1 Pannello di controllo
1
2 3 4 5
8
1 - Tasto di regolazione velocità della centrifuga
2 - Display
3 - Tasto di regolazione della temperatura
4 - Manopola di selezione del programma
Lavaggio bucato
scuro
Scarico
(Pompa)
Lavaggio bucato
Anti-grinze Coperte
Sintetici Cotone Prelavaggio Lavaggio
scuro
(Piumone)
Blocco
bambini
Lavaggio a
mano
67
principale
Protezione
Bambino
(BabyProtect)
5 - Tasto di accensione / spegnimento
6 - Tasti di avvio con ritardo (+ / -)
7 - Tasti delle funzioni ausiliarie
8- Tasto avvio / pausa / annulla
Risciacquo Lavaggio Rotazione
Cotone Eco Lana
(Centrifuga)
expres 14
Super short
express
(Xpress Super Short)
Delicati
Daily
Pet hair
removal
Fasion
care
Sportello
On/Off
Daily express Pausa
Mixed 40 Super 40
risciacquo
(Risciacquo Aggiuntivo)
4.2 Simboli display
F1
53 / IT
Avvio/Pa
usa
Risciacquo
extra
F2
Nessuna
centrifuga
Rinfrescare
F3
lavaggio veloce
(Rapido)
Camicie
(Maglie)
F4
Tempo di
ritardo
Pulizia tamburoTemperatura
Intensivo
Biancheria
intima
Mini 30
Eco Lavaggio
Completo Freddo
Jeans Capi sportivi
(Sports)
a - Indicatore di velocità centrifuga
b - Indicatore temperatura
c - Simbolo centrifuga
d - Simbolo temperatura
e - Indicatore tempo rimanente e avvio con ritardo
f - Simboli indicatori del programma (prelavaggio / lavaggio
principale / risciacquo / ammorbidente / centrifuga)
g - Simbolo economy
h - Simbolo avvio con ritardo
i - Simbolo sportello bloccato
j - Simbolo avvio
k - Simbolo pausa
l - Simboli funzioni ausiliarie
m - Simbolo assenza acqua
(Eco Pulito)
(Eco Clean)
Lavatrice / Manuale utente
Page 54

4.3 Preparazione dell'elettrodomestico
Assicurarsi che i flessibili siano collegati in modo
sicuro. Collegare l'elettrodomestico alla presa elettrica.
Aprire completamente il rubinetto. Mettere il bucato
nell'elettrodomestico. Aggiungere detersivo e ammorbidente
per bucato.
4.4 Selezione programma
Selezionare il programma adatto a tipo, quantità e livello
di sporco del bucato secondo la tabella "Programma e
consumo" e la tabella "Temperatura" sotto.
90˚C
60˚C
40˚C30°CFreddo
Selezionare il programma desiderato con il tasto di selezione
del programma.
C
C
C
C
Capi bianchi e tessuti in cotone, molto sporco.
(tovagliette, tovaglie, asciugamani, lenzuola, ecc.)
Capi in cotone, lino o sintetici che non scoloriscono,
colorati, sporco normale (magliette, camicie da notte,
pigiami, ecc.) e capi bianchi leggermente sporchi
(biancheria intima, ecc.).
Bucato misto compresi tessuti delicati (tende di velo,
ecc.), capi sintetici e in lana.
I programmi sono dotati di limitatore per la velocità
di centrifuga appropriata per quel particolare tipo di
tessuto.
Quando si seleziona il programma, considerare sempre
il tipo di tessuto, il colore, il livello di sporco e la
temperatura dell'acqua consentita.
Selezionare sempre la più bassa temperatura richiesta.
Temperatura più alta significa maggiore consumo
energetico.
Per maggiori dettagli sui programmi, vedere la tabella
"Programma e consumo".
4.5 Programmi principali
A seconda del tipo di tessuto, usare i programmi principali
che seguono.
• Cotone
Usare questo programma per il bucato in cotone (come
lenzuola, federe e set da letto, asciugamani, accappatoi,
biancheria intima, ecc.). Il bucato sarà lavato con un'azione
di lavaggio vigorosa per un ciclo di lavaggio più lungo.
• Sintetici
Usare questo programma per lavare i capi sintetici
(magliette, camicie, tessuti misti sintetici/cotone, ecc.). Lava
con un'azione gentile ed ha un ciclo di lavaggio più breve
rispetto al programma Cotone.
Per tende e tulle, usare il programma Sintetici 40˚C con le
funzioni di prelavaggio e antipieghe selezionate. Poiché i
tessuti a rete provocano schiuma in eccesso, lavare veli/
tulle mettendo poco detersivo nello scomparto del lavaggio
principale. Non versare detersivo nello scomparto del prelavaggio.
• Lana
Usare questo programma per lavare i capi in lana.
Selezionare la temperatura appropriata conforme alle
etichette degli abiti. Usare detersivi appropriati per i capi in
lana.
4.6 Programmi aggiuntivi
Per casi speciali, sono disponibili programmi aggiuntivi.
I programmi aggiuntivi possono differire in funzione del
modello dell'apparecchio.
C
• Cotone Eco
È possibile lavare il bucato normalmente sporco di cotone
e lino con questo programma con il massimo risparmio di
energia e acqua, rispetto agli altri programmi di lavaggio
adatti ai capi in cotone. La temperatura reale dell'acqua può
differire dalla temperatura dichiarata del ciclo. La durata del
programma può essere abbreviata automaticamente durante
le ultime fasi del programma se si lava una minore quantità
di bucato (per es. ½ capacità o meno). In questo caso il
consumo di energia e acqua diminuisce ulteriormente dando
l'opportunità di un lavaggio ancora più economico. Questa
funzione è disponibile per determinati modelli dotati del
display del tempo rimanente.
• BabyProtect (ProtezioneBambino)
Usare questo programma per lavare il bucato dei bambini
e il bucato di persone affette da allergia. Tempi di
riscaldamento più lunghi e una fase di risciacquo aggiuntiva
forniscono un maggiore livello di igiene.
• Lavaggio a mano
Usare questo programma per lavare indumenti in lana/
delicati che portano l’etichetta “non lavare in lavatrice” per i
quali si raccomanda il lavaggio a mano. Lava il bucato con
una azione di lavaggio molto delicata per non danneggiare il
bucato stesso.
• Daily express (Quotidiano express)
Usare questo programma per lavare i capi in cotone poco
sporchi, in poco tempo.
• Super short express (Super breve express)
Usare questo programma per lavare una piccola quantità di
capi in cotone poco sporchi, in poco tempo.
• Lavaggio bucato scuro
Usare questo programma per lavare il bucato di colore
scuro o il bucato colorato, per non farli scolorire. Il lavaggio
è eseguito con una azione meccanica ridotta e a basse
temperature. Si consiglia di usare detersivo liquido o
shampoo per lana per il bucato di colore scuro.
• Mix 40
Usare questo programma per lavare i capi in cotone e
sintetici insieme, senza separarli.
• Coperte (Piumone)
Usare questo programma per lavare i piumoni che recano
l'etichetta "lavabile in lavatrice". Assicurarsi di aver caricato
correttamente il piumone per non danneggiare la lavatrice
o il piumone. Rimuovere il copripiumone prima di caricare
il piumone nell'elettrodomestico. Piegare il piumone in
due e caricarlo nell'elettrodomestico. Caricare il piumone
nell'elettrodomestico, prestando attenzione a metterlo in
modo che non tocchi il soffietto.
Non caricare più di 1 piumone doppio in fibra (200 x
200 cm).
C
Non lavare piumoni, cuscini, ecc. che contengono cotone
nella lavatrice.
C
54 / IT
Lavatrice / Manuale utente
Page 55

Non lavare articoli diversi da piumoni, come tappeti,
ecc., nell'elettrodomestico. Possono verificarsi danni
A
permanenti all'elettrodomestico.
• Rinfrescare
Usare questo programma per rimuovere gli odori dai capi
indossati una sola volta, che non presentano macchie o
sporco.
• Eco Lavaggio (Eco Clean)
Usare questo programma, che è molto più ecologico e
rispettoso delle risorse naturali, per lavare i capi in cotone
poco sporchi e senza macchine (max. 3,5 kg) in poco tempo
e in modo economico.
Si consiglia di usare detersivo liquido o detersivo in gel.
C
• Pulizia tamburo
Usare questo programma regolarmente (una volta ogni 1-2
mesi) per pulire il cestello e garantire l'igiene necessaria.
Avviare il programma senza bucato nella lavatrice.
Per ottenere risultati migliori, mettere un anticalcare in
polvere per lavatrici nello scomparto detersivo II. Quando il
programma è finito, lasciare lo sportello di carico accostato
in modo che la parte interna della lavatrice si asciughi.
Questo non è un programma di lavaggio. Si tratta di un
programma per il mantenimento.
C
Non eseguire questo programma quando c'è
qualcosa nell'elettrodomestico. Se si cerca di farlo,
C
l'elettrodomestico rileva che c'è un carico all'interno e il
programma viene interrotto.
4.7 Programmi speciali
Per applicazioni specifiche, selezionare uno dei seguenti
programmi.
• Risciacquo
Usare questo programma quando si vuole risciacquare o
inamidare separatamente.
• Centrifuga + Scarico
Usare questo programma per applicare un ciclo di centrifuga
aggiuntivo per la biancheria o per scaricare l’acqua
dall'apparecchio.
Prima di selezionare questo programma, selezionare la
velocità di centrifuga desiderata, premere il pulsante avvio/
pausa/annulla. La lavatrice centrifuga il bucato con la
velocità impostata per la centrifuga e scarica l'acqua che
ne deriva.
Se si desidera solo scaricare l'acqua senza l'azione di
centrifuga, selezionare il programma Pompa+centrifuga e
poi selezionare la funzione Nessuna centrifuga con l'aiuto
del tasto di regolazione della velocità di centrifuga. Premere
il tasto avvio/pausa/annulla.
Per il bucato delicato usare una velocità di centrifuga
inferiore.
C
4.8 Selezione della temperatura
Quando viene selezionato un nuovo programma, la
temperatura massima per il programma selezionato viene
visualizzata sull’indicatore della temperatura.
Per diminuire la temperatura, premere di nuovo il tasto di
regolazione della temperatura. La temperatura diminuisce
a scatti di 10° e infine il simbolo “-”, indicante l'opzione di
lavaggio a freddo, compare sul display.
Se si passa all'opzione di lavaggio a freddo e si preme
il tasto di regolazione della temperatura un'altra volta,
C
la temperatura consigliata per il programma selezionato
compare sul display. Premere di nuovo il pulsante
di regolazione della temperatura per diminuire la
temperatura.
Simbolo economy
Indica i programmi e le temperature che consentono un
risparmio energetico.
Il simbolo Economy non può essere selezionato nei
programmi Intensiva e Igiene poiché il lavaggio è
C
eseguito per tempi lunghi e con temperature alte per
garantire igiene. Similmente, il simbolo Economy
non può essere nemmeno selezionato per Bambini,
Rinfresco, Pulizia cestello, Centrifuga e Risciacquo.
4.9 Selezione velocità centrifuga
Quando si seleziona un nuovo programma, la velocità
di centrifuga consigliata del programma selezionato è
visualizzata sull’indicatore di velocità di centrifuga.
Per diminuire la velocità di centrifuga, premere il tasto
di regolazione della velocità di centrifuga. La velocità di
centrifuga diminuisce in modo graduale. Poi, a seconda
del modello dell'elettrodomestico, compaiono sul display le
opzioni "Pausa risc." e "No centrifuga". Vedere la sezione
"Selezione funzioni ausiliarie" per chiarimenti su queste
opzioni.
L'opzione Pausa risc. è indicata con il simbolo “ ” e
l'opzione No centrifuga è indicata con il simbolo “
C
”.
55 / IT
Lavatrice / Manuale utente
Page 56

4.10 Tabella Programma e consumo
IT
Programma (°C)
Cotone 90 9 87 2.70 1600 • • • • • 90-Freddo
Cotone 60 9 85 1.80 1600 • • • • • 90-Freddo
Cotone 40 9 85 1.00 1600 • • • • • 90-Freddo
BabyProtect (ProtezioneBambino) 90 9 80 2.70 1600 * • 90-30
Cotone Eco 60** 9 55 1.30 1600 • 60-Freddo
Cotone Eco 60** 4.5 46 1.04 1600 • 60-Freddo
Cotone Eco 40** 4.5 46 0.78 1600 • 60-Freddo
Cotone Eco 40 9 80 0.95 1600 • 60-Freddo
Sintetici 60 4 55 1.00 1200 • • • • • 60-Freddo
Sintetici 40 4 55 0.52 1200 • • • • • 60-Freddo
Eco Lavaggio (Eco Pulito) (Eco Clean) 20 3.5 45 0.16 1600 • 20
Mixed 40 (Mix 40) 40 4 55 0.62 1200 • • • • • 40-Freddo
Coperte (Piumone) 40 - 60 0.60 1200 60-40
Super short express (Super breve express) 30 2 42 0.10 1400 • • 30-Freddo
Daily express (Quotidiano express) 90 9 70 2.02 1400 • • 90-Freddo
Daily express (Quotidiano express) 60 9 70 1.20 1400 • • 90-Freddo
Daily express (Quotidiano express) 30 9 80 0.30 1400 • • 90-Freddo
Lana 40 2 56 0.30 1200 • • 40-Freddo
Lavaggio a mano 30 1.5 40 0.25 1200 30-Freddo
Lavaggio bucato scuro 40 4 95 0.60 1200 * • 40-Freddo
Pulizia tamburo 70 - 110 2.00 800 * 70
Rinfrescare - 2 35 0.03 1200 • -
26
Carico max.(Kg)
Consumo d’acqua (l)
Consumo energia (KWh)
Funzione ausiliaria
Velocità max. ***
Prelavaggio
Rapido
Extra risciacquo
Anti-grinze
°C gamma
temperatura
selezionabile
Risciacquo Aggiuntivo
• : Selezionabile
* : Selezionato automaticamente, non annullabile.
** : Etichetta Energia programma (EN 60456 Ed.3)
*** Se la velocità di centrifuga massima della lavatrice è inferiore a questo valore, si può selezionare solo fino alla velocità massima di
centrifuga.
- : Vedere la descrizione del programma per il carico massimo.
** “Cotone eco 40°C e Cotone eco 60°C sono i cicli standard”. Questi cicli sono noti come ‘ciclo standard cotone 40°C’ e ‘ciclo
standard cotone 60°C’ e sono indicati dai simboli sul pannello.
Le funzioni ausiliarie nella tabella possono variare in funzione del modello della lavatrice.
C
Il consumo di acqua ed energia potrebbe variare in base a differenze nella pressione dell'acqua, alla durezza e alla temperatura
dell'acqua, alla temperatura ambiente, al tipo e alla quantità di bucato, alla scelta di funzioni ausiliarie e a modifiche della tensione
C
elettrica.
Si può vedere il tempo di lavaggio del programma selezionato sul display dell'elettrodomestico. È normale che possano verificarsi
piccole differenze tra il tempo mostrato sul display e il tempo reale di lavaggio.
C
56 / IT
Lavatrice / Manuale utente
Page 57

4.11 Selezione funzione ausiliaria
Selezionare le funzioni ausiliarie desiderate prima di avviare
il programma. Inoltre è possibile selezionare o annullare
le funzioni ausiliarie che sono adatte all'esecuzione del
programma premendo il tasto avvio/pausa/annulla durante il
funzionamento della lavatrice. Per questo, la macchina deve
essere in una fase precedente alla funzione ausiliaria che si
sta per selezionare o annullare.
A seconda del programma, premere i tasti a, b, c o d per
selezionare la funzione ausiliaria desiderata. Il simbolo della
funzione ausiliaria selezionata compare sul display.
Alcune funzioni non possono essere selezionate insieme.
Se una seconda funzione ausiliaria è in conflitto
C
con la prima selezionata all'avvio della lavatrice, la
funzione selezionata come prima viene annullata e la
seconda funzione ausiliaria resta attiva. Per esempio,
se si desidera selezionare lavaggio veloce dopo aver
selezionato il pre-lavaggio, il pre-lavaggio sarà annullato
e il lavaggio veloce resterà attivo.
Una funzione ausiliaria che non è compatibile con il
programma non può essere selezionata. (Vedere la
C
tabella "Programma e consumo")
• Risciacquo Aggiuntivo
Se non si tolgono i capi dalla lavatrice immediatamente
dopo il completamento del programma, è possibile usare la
funzione trattieni risciacquo e lasciare il bucato nell'acqua
del risciacquo finale per evitare che si riempiano di pieghe
quando non c'è acqua nella macchina. Dopo questa
procedura, premere il tasto avvio/pausa/annulla se si
desidera scaricare l'acqua senza centrifugare il bucato.
Il programma riprende e si completa dopo lo scarico
dell'acqua.
Se si desidera centrifugare il bucato trattenuto in acqua,
regolare la velocità della centrifuga e premere il tasto avvio/
pausa/annulla.
Il programma riprende. L'acqua viene scaricata, il bucato è
centrifugato e il programma è completato.
• PHR (Rimozione peli animali)
Questa funzione aiuta a rimuovere in modo più efficace i peli
animali che restano sugli abiti.
Quando si seleziona questa funzione, sono aggiunte le fasi di
prelavaggio e risciacquo extra al programma normale. Così
il lavaggio è eseguito con più acqua (30%) e i peli animali
sono rimossi in modo più efficace.
I tasti della funzione ausiliaria possono differire a
seconda del modello della lavatrice.
C
• Prelavaggio
Conviene effettuare il pre-lavaggio solo con bucato molto
sporco. Non usare il pre-lavaggio consente di risparmiare
energia, acqua, detersivo e tempo.
F1 compare sul display quando si seleziona questa funzione
(a).
• Rapido
Questa funzione può essere utilizzata con i programmi per
il cotone e le fibre sintetiche. Essa diminuisce i tempi di
lavaggio e anche il numero di fasi di risciacquo per bucato
poco sporco.
F2 compare sul display quando si seleziona questa funzione
(b).
Quando si seleziona questa funzione, caricare
l'elettrodomestico con metà del carico massimo
C
specificato nella tabella del programma.
• Extra risciacquo
Questa funzione consente alla lavatrice di eseguire un
altro risciacquo oltre a quello già eseguito dopo il lavaggio
principale. Si riduce così il rischio che la pelle sensibile
(neonati, pelli con allergie ecc) venga attaccata dal detersivo
che rimane sul bucato.
F3 compare sul display quando si seleziona questa funzione
(c).
• Anti-grinze
Questa funzione fa formare meno grinze al bucato durante
il lavaggio. Il movimento del cestello è ridotto e la velocità
di centrifuga è limitata per evitare la formazione di pieghe.
Inoltre, il lavaggio viene eseguito con un livello di acqua
superiore.
F4 compare sul display quando si seleziona questa funzione
(d).
Non lavare mai gli animali in lavatrice.
A
4.12 Display del tempo
Il tempo rimanente al completamento del programma
compare sul display mentre il programma è in funzione. Il
tempo è visualizzato come “
Il tempo del programma può differire dai valori
della tabella "Programma e consumo" a seconda di
C
pressione dell'acqua, durezza dell'acqua e temperatura,
temperatura ambiente, quantità e tipo di bucato, funzioni
ausiliarie selezionate e cambiamenti nella tensione di
rete.
Avvio con ritardo
Con la funzione di avvio con ritardo, l'avvio del programma
può essere ritardato fino a 24 ore. Il tempo di ritardo
dell'avvio può essere aumentato a scatti di 30 minuti.
Non utilizzare detersivo liquido se si desidera effettuare
il lavaggio con avvio con ritardo! Esiste il rischio di
C
macchiare gli indumenti.
Aprire lo sportello di carico, mettere il bucato e il detersivo,
ecc. Selezionare il programma di lavaggio, la temperatura, la
velocità di centrifuga e, se necessario, le funzioni ausiliarie.
Impostare il tempo desiderato per il ritardo dell'avvio
premendo il tasto di avvio con ritardo + o -. Il simbolo avvio
con ritardo lampeggia. Premere il tasto avvio/pausa/annulla.
Comincia il conto alla rovescia per l'avvio con ritardo. Il
simbolo di avvio con ritardo si illumina fisso. Il simbolo di
avvio compare. “:” a metà del tempo di avvio con ritardo sul
display comincia a lampeggiare.
Durante il tempo del ritardo, potrà essere caricata altra
biancheria. Alla fine del conto alla rovescia, il simbolo di
C
avvio con ritardo scompare, il ciclo di lavaggio si avvia e
il tempo del programma selezionato compare sul display.
Modifica del periodo di ritardo per l'avvio
Se si desidera cambiare il tempo durante il conto alla
rovescia:
01:30” in formato ore e minuti.
57 / IT
Lavatrice / Manuale utente
Page 58

Premere il tasto avvio/pausa/annulla. “:” a metà del tempo
di avvio con ritardo sul display smette di lampeggiare. Il
simbolo di pausa compare. Il simbolo avvio con ritardo
lampeggia. Il simbolo di avvio scompare. Impostare il
tempo desiderato per il ritardo dell'avvio premendo il tasto
di avvio con ritardo + o -. Premere il tasto avvio/pausa/
annulla. Il simbolo di avvio con ritardo si illumina fisso. Il
simbolo di pausa scompare. Il simbolo di avvio compare. “:”
a metà del tempo di avvio con ritardo sul display comincia a
lampeggiare.
Annullamento della funzione di avvio con ritardo
Per annullare il tempo del ritardo durante il conto alla
rovescia e avviare immediatamente il programma:
Premere il tasto avvio/pausa/annulla. “:” a metà del tempo
di avvio con ritardo sul display smette di lampeggiare. Il
simbolo di avvio scompare. Il simbolo di pausa e il simbolo di
avvio con ritardo lampeggiano. Diminuire il tempo di ritardo
per l'avvio premendo il tasto di avvio con ritardo. La durata
del programma compare dopo 30 minuti. Premere il tasto
avvio/pausa/annulla per avviare il programma.
4.13 Avvio del programma
Premere il tasto avvio/pausa/annulla per avviare il
programma. Il simbolo di avvio che mostra l'avvio del
programma si accende. Lo sportello di carico è bloccato
e il simbolo dello sportello bloccato compare sul display. Il
simbolo della fase da cui è partito il programma compare
sul display (prelavaggio, lavaggio principale, risciacquo,
ammorbidente e centrifuga).
4.14 Avanzamento del programma
Il progredire del programma in corso è indicato sul display
con un set di simboli.
Il simbolo pertinente compare sul display all'inizio di
ciascuna fase del programma e tutti i simboli restano accesi
alla fine del programma. Il simbolo più a destra indica la fase
corrente del programma.
Prelavaggio
Se è selezionata la funzione ausiliaria di prelavaggio, il
simbolo di prelavaggio compare sul display indicando che la
fase di prelavaggio è cominciata.
Lavaggio principale
Il simbolo di lavaggio principale che indica che la fase di
lavaggio principale è cominciata compare sul display.
Risciacquo
Il simbolo di risciacquo che indica che la fase di risciacquo è
cominciata compare sul display.
Ammorbidente
Il simbolo dell'ammorbidente che indica che la fase
dell'ammorbidente è cominciata compare sul display.
Centrifuga
Compare all'inizio della fase finale di centrifuga e resta
acceso durante i programmi speciali centrifuga e pompa.
Se la lavatrice non supera la fase di centrifuga, potrebbe
essere attiva la funzione di pausa risciacquo o potrebbe
C
essersi attivato il sistema automatico di rilevamento
carico non bilanciato a causa di una distribuzione
sbilanciata del bucato nella lavatrice.
4.15 Blocco sportello di carico
C'è un sistema di blocco sullo sportello di carico della
lavatrice che impedisce l'apertura dello sportello nel caso in
cui il livello dell'acqua non è adatto.
58 / IT
Il simbolo dello sportello bloccato compare quando lo
sportello di carico è bloccato. Questo simbolo lampeggia
finché lo sportello di carico è pronto ad aprirsi quando il
programma è completo o la macchina è in pausa. Non
forzare per aprire in questa fase lo sportello di carico.
Il simbolo scompare quando lo sportello è pronto per
essere aperto. Si può aprire lo sportello quando il simbolo
scompare.
4.16 Cambiare le selezioni dopo
che il programma è iniziato
Portare la lavatrice in modalità pausa
Premere il tasto avvio/pausa/annulla per passare in modalità
pausa. Il simbolo pausa compare sul display indicando che
la macchina è in pausa. Il simbolo di avvio scompare.
Modifica delle impostazioni di velocità e temperatura
per le funzioni ausiliarie.
A seconda della fase raggiunta dal programma, si possono
annullare o attivare le funzioni ausiliarie; vedere "Selezione
funzioni ausiliarie".
Si possono anche modificare le impostazioni di velocità e
temperatura; vedere "Selezione velocità di centrifuga" e
"Selezione temperatura".
Aggiunta o rimozione bucato
Premere il tasto avvio/pausa/annulla per passare in modalità
pausa. La spia di follow-up del programma della fase da
cui la macchina è passata in modalità pausa lampeggia.
Aspettare finché non è possibile aprire lo sportello di carico.
Aprire lo sportello di carico e aggiungere o estrarre il bucato.
Chiudere lo sportello di carico. Eseguire i cambiamenti nelle
impostazioni di funzioni ausiliarie, temperatura e velocità, se
necessario. Premere il tasto avvio/pausa/annulla per avviare
la macchina.
Lo sportello di carico non si apre se la temperatura
dell'acqua nell'elettrodomestico è alta o se il livello
C
dell'acqua è al di sopra dell'apertura dello sportello.
4.17 Blocco bambini
Usare la funzione di blocco bambini per evitare che
i bambini possano interferire con il funzionamento
dell'elettrodomestico. In questo modo si possono evitare
cambiamenti ai programmi in corso.
Si può accendere e spegnere l'elettrodomestico con
il pulsante di accensione / spegnimento quando il
C
blocco bambini è attivo. Quando si accende di nuovo
l'elettrodomestico, il programma riprende dal punto in
cui si era fermato.
Per attivare il blocco bambini:
Tenere premuti i pulsanti della 2a e 4a funzione ausiliaria per
3 secondi. “Con” compare sul display.
La stessa cosa compare sul display se si preme
qualsiasi tasto quando il blocco bambini è attivo.
C
Per disattivare il blocco bambini:
Tenere premuti i pulsanti della 2a e 4a funzione ausiliaria per
3 secondi. “COFF” compare sul display.
Non dimenticare di disattivare il blocco bambini alla
fine del programma se è stato attivato prima. Altrimenti
C
la macchina non consente di selezionare un nuovo
programma.
Lavatrice / Manuale utente
Page 59

4.18 Annullamento del programma
Tenere premuto il tasto avvio/pausa/annulla per 3 secondi.
Il simbolo di avvio lampeggia. Il simbolo della fase in cui è
stato annullato il programma resta acceso. "END" compare
sul display e il programma è annullato.
Se si desidera aprire lo sportello di carico dopo
l'annullamento del programma ma non è possibile
C
aprirlo perché il livello di acqua nella macchina è al di
sopra dell'apertura dello sportello di carico, portare la
manopola di selezione del programma sul programma
Pompa+Centrifuga e scaricare l'acqua dalla macchina.
4.19 La macchina è in modalità
trattieni risciacquo
Il simbolo della centrifuga lampeggia e il simbolo pausa
si accende quando la macchina è in modalità trattieni
risciacquo.
Se si desidera centrifugare il bucato quando la macchina è
in questa modalità:
Regolare la velocità della centrifuga e premere il tasto avvio/
pausa/annulla. Il simbolo di pausa scompare e il simbolo
di avvio compare. Il programma riprende, viene scaricata
l'acqua e il bucato è centrifugato.
Se si desidera solo scaricare l'acqua senza centrifuga:
basta premere il tasto avvio/pausa/annulla. Il simbolo di
pausa scompare. Il simbolo di avvio compare. Il programma
riprende e viene solo scaricata l'acqua.
4.20 Fine del programma
“End” (Fine) compare sul display alla fine del programma.
I simboli delle fasi del programma restano accesi. La
funzione ausiliaria, la velocità di centrifuga e la temperatura
selezionate all'inizio del programma restano selezionate.
4.21 L’elettrodomestico è dotato
di “Modalità standby”
Se non si avvia alcun programma o si attende senza
eseguire alcuna operazione quando l’elettrodomestico
è attivato con il pulsante di accensione/spegnimento e
mentre si è in fase di selezione o se nessuna operazione
viene eseguita per circa 2 minuti dopo che il programma
selezionato è giunto alla fine, l’elettrodomestico passa
automaticamente in modalità di risparmio energetico.
La luminosità dell’indicatore diminuisce. Inoltre se
l’apparecchio è dotato di un display che mostra la durata del
programma, il display si spegne completamente. In caso di
rotazione della manopola di selezione del programma o se si
preme un qualsiasi pulsante, le spie e il display tornano alla
condizione precedente. Le selezioni eseguite durante l’uscita
dalla modalità di risparmio energetico possono cambiare.
Controllare l’esattezza delle selezioni prima di avviare il
programma. Regolare di nuovo se necessario. Questo non è
un guasto.
5 Manutenzione e pulizia
La vita di servizio dell'elettrodomestico è più lunga e i
problemi affrontati di frequente diminuiscono se si esegue la
pulizia ad intervalli regolari.
5.1 Pulizia del cassetto del detersivo
Pulire il cassetto del detersivo ad intervalli regolari (ogni
4-5 cicli di lavaggio) come mostrato di seguito per evitare
l'accumulo di polvere di detersivo nel tempo.
1. Premere il punto colorato sul sifone all’interno del
comparto destinato all’ammorbidente e premere sino a
quando il comparto fuoriesce dall'elettrodomestico.
Se una quantità d’acqua o una miscela di ammorbidente
superiore al normale inizia ad accumularsi nello
C
scomparto dell’ammorbidente, è necessario pulire il
sifone.
2. Lavare il cassetto del detersivo e il sifone con abbondante
acqua tiepida in un lavandino. Indossare guanti di
protezione o usare una spazzola adatta per evitare di
toccare i residui nel cassetto durante la pulizia.
3. Reinserire il cassetto dopo la pulizia ed assicurarsi che sia
posizionato bene.
Se il cassetto del detersivo è quello indicato nella figura che
segue:
Sollevare la parte posteriore del sifone per rimuoverlo,
come illustrato. Dopo aver eseguito le suddette
C
procedure per la pulizia, riposizionare il sifone in sede
e spingere la sezione anteriore verso il basso per
assicurarsi che la linguetta di blocco si impegni.
5.2 Pulizia dello sportello di
carico e del cestello
Per apparecchi dotati di programma di pulizia del cestello,
vedere Funzionamento dell’apparecchio - Programmi.
Per apparecchi non dotati di pulizia del cestello, seguire i
punti che seguono per pulire il cestello:
Selezionare le funzioni ausiliarie
Extra risciacquo. Utilizzare il programma Cotone, senza
pre-lavaggio. Impostare
raccomandato sull’agente di pulizia del cestello che
può essere fornito dall’assistenza autorizzata
questa procedura
di avviare il programma, mettere 1 sacchetto di agente
speciale per la pulizia del cestello (se non può essere fornito
un agente speciale, mettere massimo 100 gr. di polvere
senza bucato nell’apparecchio. Prima
Acqua aggiuntiva o
la temperatura sul livello
. Applicare
59 / IT
Lavatrice / Manuale utente
Page 60

anti-calcare) nello scomparto per il detersivo per il lavaggio
principale (scomparto n. “2”). Se l’anticalcare è in forma di
compresse, mettere solo una compressa nello scomparto
per il lavaggio principale n. “2”. Asciugare l’interno del
soffietto con un panno pulito dopo la fine del programma.
Ripetere la procedura di pulizia del cestello ogni 2 mesi.
C
Usare un anticalcare appropriato alle lavatrici.
C
Dopo ogni lavaggio, assicurarsi che nessuna sostanza
estranea resti nel cestello.
Se i fori del soffietto mostrato nella figura sono bloccati,
aprirli usando uno stuzzicadenti.
Sostanze metalliche estranee provocano macchie di
ruggine al cestello. Pulire le macchie sulla superficie del
C
cestello usando agenti di pulizia per acciaio inox. Non
usare mai lana di acciaio o metallica.
AVVİSO :Non usare mai una spugna o materiali
che graffiano. Questi danneggerebbero le superfici in
A
plastica e smaltate.
5.3 Pulizia del corpo e del pannello di controllo
Pulire il corpo della lavatrice con acqua saponata o detersivo
delicato in gel non corrosivo quando necessario e asciugare
con un panno morbido.
Usare solo un panno morbido e umido per pulire il pannello
di controllo.
5.4 Pulire i filtri di ingresso dell'acqua
C'è un filtro nella parte terminale di ciascuna valvola di
immissione dell’acqua sul lato posteriore della lavatrice e
anche alla fine di ciascun flessibile di immissione dell’acqua,
nel punto di collegamento al rubinetto. Questi filtri evitano
che le sostanze estranee e lo sporco dell'acqua entrino nella
lavatrice. I filtri devono essere puliti quando si sporcano.
sporchi, è possibile estrarli con le pinze e pulirli.
3. I filtri sull'estremità piatta dei flessibili di ingresso
dell'acqua devono essere estratti a mano con le relative
guarnizioni e puliti sotto l'acqua corrente.
4. Sostituire guarnizioni e filtri correttamente e quindi serrare
manualmente i dadi.
5.5 Eliminazione eventuale acqua residua
e pulizia del filtro della pompa
Il sistema filtro della lavatrice evita che gli oggetti solidi come
bottoni, monete e fibre si blocchino nella pompa durante lo
scarico dell'acqua di lavaggio. Così l'acqua sarà scaricata
senza problemi e la vita di servizio della pompa si allunga.
Se la lavatrice non scarica l’acqua, il filtro della pompa è
intasato. Il filtro deve essere pulito ogni volta che si intasa
o ogni 3 mesi. Per pulire il filtro della pompa è necessario
scaricare l’acqua.
Inoltre, prima di trasportare la lavatrice (per es., quando si
trasloca) ed in caso di congelamento dell'acqua, l'acqua
potrebbe dover essere scaricata completamente.
AVVİSO :Sostanze estranee che restano nel filtro della
pompa possono danneggiare la lavatrice o provocare
A
problemi di rumori.
Per pulire il filtro sporco e scaricare l’acqua:
1. Scollegare la lavatrice per interrompere l’alimentazione.
AVVİSO :La temperatura dell'acqua interna alla
lavatrice può arrivare fino a 90 ºC. Per evitare il rischio di
A
bruciature, il filtro deve essere pulito dopo che la lavatrice
si è raffreddata.
2. Aprire il coperchio del filtro.
Se il coperchio del filtro è composto da due elementi,
premere verso il basso la linguetta sul coperchio del filtro
e tirare l’elemento verso di sé.
Se il coperchio del filtro si compone di un unico elemento,
tirare il coperchio da entrambi i lati sulla parte alta per
aprire.
1. Chiudere i rubinetti.
2. Rimuovere i dadi dei flessibili di ingresso dell'acqua per
accedere ai filtri delle valvole di ingresso dell'acqua.
Pulirli con una spazzola appropriata. Se i filtri sono troppo
60 / IT
Si può rimuovere la copertura del filtro spingendo
leggermente verso il basso con un piccolo strumento
C
appuntito in plastica, attraverso l'apertura posta sopra la
copertura stessa del filtro. Non usare strumenti appuntiti
in metallo per rimuovere la copertura.
3. Alcuni dei nostri elettrodomestici hanno un flessibile di
scarico di emergenze e alcuni no. Seguire le fasi sotto per
scaricare l'acqua.
Lavatrice / Manuale utente
Page 61

Scarico dell'acqua quando l'elettrodomestico non ha un
flessibile di scarico di emergenza:
a. Collocare un ampio contenitore davanti al filtro per
raccogliere l’acqua in uscita dal filtro.
b. Allentare il filtro della pompa (in senso antiorario) sino a
quando l’acqua inizierà a fluire. Dirigere il flusso d’acqua
nel contenitore davanti al filtro. Utilizzare sempre un
panno per assorbire l’acqua fuoriuscita.
c. Quando l'acqua all'interno della lavatrice è finita, estrarre
completamente il filtro ruotandolo.
4. Eliminare eventuali residui nel filtro, o eventuali fibre,
attorno all'area del rotore della pompa.
5. Installare il filtro.
6. Se il coperchio del filtro si compone di due elementi,
chiuderlo premendo sulla linguetta. Se si compone di un
unico elemento, per prima cosa sistemare le linguette
nella parte inferiore in posizione e poi premere la parte
superiore per chiudere.
61 / IT
Lavatrice / Manuale utente
Page 62

6 Specifiche tecniche
Modelli
Capacità massimo di lavaggio a secco (kg)
Altezza (cm)
Larghezza (cm)
Profondità (cm)
Peso netto (±4 kg.)
Elettricità in ingresso (V/Hz)
Corrente totale (A)
Energia totale (W)
Velocità centrifuga(gpm max.)
Alimentazione modalità standby (W)
Alimentazione modalità di spegnimento (W)
Codice modello principale
Ingresso acqua singolo / ingresso acqua doppio
• Disponibile
WMB 91242 LSC
9
84
60
59
74
230 V / 50Hz
10
2200
1200
1.00
0.20
888
• / -
Le specifiche tecniche possono essere modificate senza preavviso per migliorare la qualità dell'elettrodomestico.
C
Le illustrazioni contenute in questa guida sono schematiche e potrebbero non corrispondere esattamente all'elettrodomestico in
uso.
C
I valori indicati sulle etichette dell'elettrodomestico o nella documentazione di accompagnamento sono ottenuti in laboratorio,
in conformità con gli standard di riferimento. I valori possono cambiare in funzione delle condizioni operative e ambientali
C
dell’elettrodomestico.
62 / IT
Lavatrice / Manuale utente
Page 63

7 Ricerca e risoluzione dei problemi
Il programma non si avvia dopo la chiusura dello sportello.
• Il pulsante Avvio / Pausa / Annulla non è stato premuto. >>>
Impossibile avviare o selezionare il programma.
• La lavatrice potrebbe essere in modalità protezione automatica a causa di problemi alla fornitura (tensione della
griglia, pressione dell'acqua, ecc.) >>>
impostazioni di fabbrica. (Vedere "Annullamento del programma")
Tenere premuto il pulsante avvio / pausa per 3 secondi per riportare la lavatrice alle
Acqua nella lavatrice.
• Potrebbe restare dell'acqua nell'elettrodomestico in seguito ai processi di controllo della qualità durante la
produzione. >>>
Questo non è un guasto; l'acqua non è pericolosa per la lavatrice.
La lavatrice vibra o fa rumore.
• La lavatrice potrebbe non essere in equilibrio. >>>
Regolare i piedini per livellare la lavatrice.
• Una sostanza dura potrebbe essere entrata nel filtro della pompa. >>> Pulire il filtro della pompa.
• I bulloni di sicurezza per il trasporto non sono stati rimossi. >>> Rimuovere i bulloni di sicurezza per il trasporto.
• La quantità di bucato nella lavatrice potrebbe essere scarsa. >>> Aggiungere altro bucato nella lavatrice.
• La lavatrice potrebbe essere sovraccarica di bucato. >>> Estrarre parte del bucato dalla lavatrice o distribuire il carico a
mano per renderlo più omogeneo nella lavatrice.
• La lavatrice potrebbe essere inclinata su qualcosa di rigido. >>> Assicurarsi che la lavatrice non penda su alcunché.
La lavatrice si è fermata subito dopo l’avvio del programma.
• La lavatrice può fermarsi occasionalmente a causa di bassa tensione. >>>
sarà stata riportata a livelli normali.
Il tempo del programma non esegue il conto alla rovescia. (Su modelli con display)
• Il timer potrebbe arrestarsi durante l'aspirazione dell'acqua. >>>
finché la lavatrice non aspira una quantità adeguata di acqua. La lavatrice resterà in attesa sino a quando ci sarà una quantità
di acqua sufficiente per evitare risultati di lavaggio inadeguati a causa della mancanza d’acqua. L'indicatore del timer riprende il
conto alla rovescia dopo ciò.
• Il timer potrebbe arrestarsi durante la fase di riscaldamento. >>> L'indicatore del timer non esegue il conto alla rovescia
finché la lavatrice non raggiunge la temperatura selezionata.
• Il timer potrebbe arrestarsi durante la fase di centrifuga. >>> Il sistema automatico di rilevamento carico non bilanciato
potrebbe essersi attivato a causa della distribuzione sbilanciata del bucato nel cestello.
• Se la biancheria non è disposta in maniera uniforme nel cestello, la lavatrice non eseguirà la fase della centrifuga,
per evitare danni alla lavatrice e al suo ambiente. Ridisporre la biancheria ed eseguire una nuova centrifuga.
*Premere il pulsante Avvio / Pausa / Annulla.
Riprenderà a funzionare quando la tensione
L'indicatore del timer non esegue il conto alla rovescia
La schiuma fuoriesce dal cassetto del detersivo.
• È stato usato troppo detersivo. >>>
scomparto principale del cassetto per il detersivo.
• Mettere il detersivo nell'elettrodomestico secondo il programma e i carichi massimi indicati nella tabella
“Programma e consumo”. Se si usano additivi chimici (agenti di rimozione macchie, candeggine, ecc.), ridurre la
quantità di detersivo.
Mescolare un cucchiaio di ammorbidente e mezzo litro di acqua e versare nello
Il bucato resta bagnato alla fine del programma
• Potrebbe essersi formata schiuma in eccesso e potrebbe essersi attivato un sistema di assorbimento schiuma a
causa del troppo detersivo usato. >>>
• Se la biancheria non è disposta in maniera uniforme nel cestello, la lavatrice non eseguirà la fase della centrifuga,
per evitare danni alla lavatrice e al suo ambiente. Ridisporre la biancheria ed eseguire una nuova centrifuga.
AVVİSO :Se non si riesce ad eliminare il problema nonostante si siano rispettate le istruzioni in questa sezione, consultare il
rivenditore o l'agente autorizzato per l'assistenza. Non cercare mai di riparare il prodotto da soli.
A
63 / IT
Usare la quantità di detersivo consigliata.
Lavatrice / Manuale utente
Page 64

www.beko.com
 Loading...