

Page 1
Hood
User Manual
HCA62541W HCA62541B
EN PL RO DE ES FR
NL CS SL SK UA
01M-8851153200-2917-02
Page 2

Please read this manual first!
Dear Customers!
Thank you for preferring a Beko product. We hope that you get the best results from
your product which has been manufactured with high quality and state-of-the-art
technology. Therefore, please read this entire user manual and all other accompanying
documents carefully before using the product and keep it as a reference for future use.
If you handover the product to someone else, give the user manual as well. Follow all
warnings and information in the user manual.
Remember that this user manual is also applicable for several other models. Differences
between the models are explicitly described in the manual.
Meanings of the Symbols
Following symbols are used in the various section of this manual:
Important information and useful hints about
C
usage.
A
WARNING:
tions concerning the safety of life and property.
Warning for electric shock.
Warnings for dangerous situa-
B
Warning for hot surfaces.
Lamp
Ths product has been manufactured n envronmental frendly modern plants wthout gvng any harm to the nature.
Ths applance conforms to the
WEEE regulaton.
It does not contan PCB.
Page 3
CONTENTS
ENGLISH 04-22
POLSKI 23-42
ROMÂNĂ 43-61
DEUTSCH 62-83
ESPAÑOL 84-105
FRANÇAIS 106-126
NEDERLANDS 127-148
ČESKY 149-167
SLOVENŠČINA 168-187
SLOVENSKÝ 188-207
УКРАЇНСЬКИЙ 208-232
Hood / User Manual
3 / EN
Page 4

Important safety and envronmental
1
nstructons
This section contains safety
instructions that will help protect
from risk of personal injury or
property damage. Failure to follow
these instructions invalidates the
granted warranty.
1.1 General safety
• Always have the installation and
repairing procedures carried out
by the Authorized Service Agent.
Manufacturing firm shall not be
held responsible for damages that
may be caused by unauthorized
persons.
• This appliance is not intended
for use by persons (including
children) with reduced physical,
sensory or mental capabilities, or
lack of experience and knowledge.
Children should be supervised to
ensure that they do not play with
the appliance.
1.1.1 Electrical safety
• Always unplug the appliance
from the mains supply during
installation, maintenance,
cleaning and repair operations.
• If the power cable is faulty,
it should be replaced by a
qualified person certified by
the manufacturer, after-sales
service or similar (preferably an
electrician) or a person described
by the importer.
• Operating voltage is 220 to 240
volts.
• If the appliance has a failure, it
should not be operated unless it is
repaired by the Authorized Service
Agent. There is the risk of electric
shock!
• Do not route power cable close
to hobs. Otherwise power cable
may cause fire since it melts down
easily.
• Never plug the hood before
installation is completed.
• In order to obtain the best
performance, external conductor
must not be longer than 4 m. It
must not contain more than 2
perpendicular (90°) angles and its
diameter must be min. ø120 mm.
• Disconnect the appliance from
mains before any intervention to
the internal parts of the appliance.
4 / EN
• Use the appliance with a grounded
outlet only.
Hood / User Manual
Page 5

Important safety and envronmental
1
nstructons
1.1.2 Product safety
• You can use a pipe with a diameter
of 120 mm or 150 mm on the flue
connection of the hood.
• Do not make connections to the
flues connected with stoves,
exhaust shafts or flues with rising
flames. Observe the rules set by
authorities on the discharge of
exhaust air.
• The height between the lower
surface of the hood and upper
surface of the stove/oven should
not be less than 50 cm for gas
hobs and 45 cm for electric hobs.
• Do not operate the hood without
aluminum filters and do not
remove the filters while it is
operated.
• Never touch the hood's lamps
after they are operated for a long
time. Hot lamps may burn your
hand.
• Avoid large flames beneath the
product. Otherwise, particles on
oil filter may ignite and lead to a
fire.
• Turn on the hobs after placing
pans or pots on it. Otherwise,
rising heat may deform certain
parts of your product.
• Turn off the hobs before taking
away pans or pots.
• Avoid inflammable materials under
the hood.
• Oil may ignite while frying foods.
Therefore, be careful about cloths
and curtains.
• Never leave the cooker unattended
when frying foods; otherwise hot
oil may cause fire.
• There is the risk of fire if your hood
is not cleaned in the specified
periods.
• Be extremely careful and wear
gloves when cleaning the hood.
• We advise you to operate the
appliance a few minutes before
starting to cook in order to
increase the suction power. Thus,
you shall have a continuous and
stable suction power when the
vapors arise.
• Operate your hood for 15 minutes
more after the end of cooking or
frying in order to remove the smell
and cooking vapor in the kitchen.
• When the hood is in use, especially
together with gas cookers,
make sure that environment is
ventilated with clean air.
Hood / User Manual
5 / EN
Page 6

Important safety and envronmental
1
nstructons
• Pay attention not to connect
the appliance to the flues used
by non-electrical devices. (E.g.:
Heater flue).
• Simultaneous and smooth
operation of the hood and another
device that require air is only
possible when a low pressure
of 4 Pa (0.04 mbar) is reached,
and thus the reabsorption of the
gas is avoided. This can only be
achieved by means of air coming
from uncovered openings (door,
window, ventilation openings
or other technical measures).
Pay utmost attention to provide
sufficient air flow. A flue that
provides air ingress/egress is not
enough for this purpose.
1.1.3 Children's safety
• Packaging materials are dangerous
to children. Keep packaging
materials in a safe place out of
reach of children.
• Electrical appliances are
dangerous to children. Keep
children away from the product.
Do not allow children play with the
appliance.
• This appliance can be used by the
children who are at the age of 8 or
over and by the people who have
limited physical, sensory or mental
capacity or who do not have
knowledge and experience, as
long as they are supervised with
regard to safe use of the product
or they are instructed accordingly
and understand the risks of using
the product. Children should not
play with the appliance.
•
CAUTION:
heat up when used with a cooking
device.
Accessible parts may
1.2 Intended use
• This appliance is intended for
domestic use. It is not suitable for
commercial use and it must not be
used out of its intended use.
• The manufacturer shall not be
liable for any damage caused by
improper use or handling.
• Service life of your appliance is 10
years. This is the period required
for availability of spare parts for
proper functioning of the product.
6 / EN
Hood / User Manual
Page 7
Important safety and envronmental
1
nstructons
•
WARNING:
screws in concordance with
the instructions provided in the
manual may lead to electrical
hazards.
1.3 Compliance with WEEE
Directive and disposing of the
waste product
This product complies with EU WEEE
Directive (2012/19/EU). This product
bears a classification symbol for waste
electrical and electronic equipment
(WEEE).
This product has been manufactured with high
quality parts and materials which can be reused
and are suitable for recycling. Do not dispose of
the waste product with normal domestic and other
wastes at the end of its service life. Take it to the
collection center for the recycling of electrical and
electronic equipment. Please consult your local
authorities to learn about these collection centers.
Failure to fix the
Complance wth RoHS
Drectve:
The product you have purchased complies with EU
RoHS Directive (2011/65/EU). It does not contain
harmful and prohibited materials specified in the
Directive.
1.4 Package information
Package of the product is made of
recyclable materials in accordance with
our National Legislation. Do not dispose
of the packaging materials together with the
domestic or other wastes. Take them to the
packaging material collection points designated by
the local authorities.
Hood / User Manual
7 / EN
Page 8
Techncal specfcatons of your applance
2
Technical data contained in this manual and
labels attached to the hood were obtained from
measurements and calculations in accordance
with the requirements of EU Regulation No.
65/2014 and 66/2014. This appliance complies
with the European Directives 2009/125/EC and
2011/65/EU.
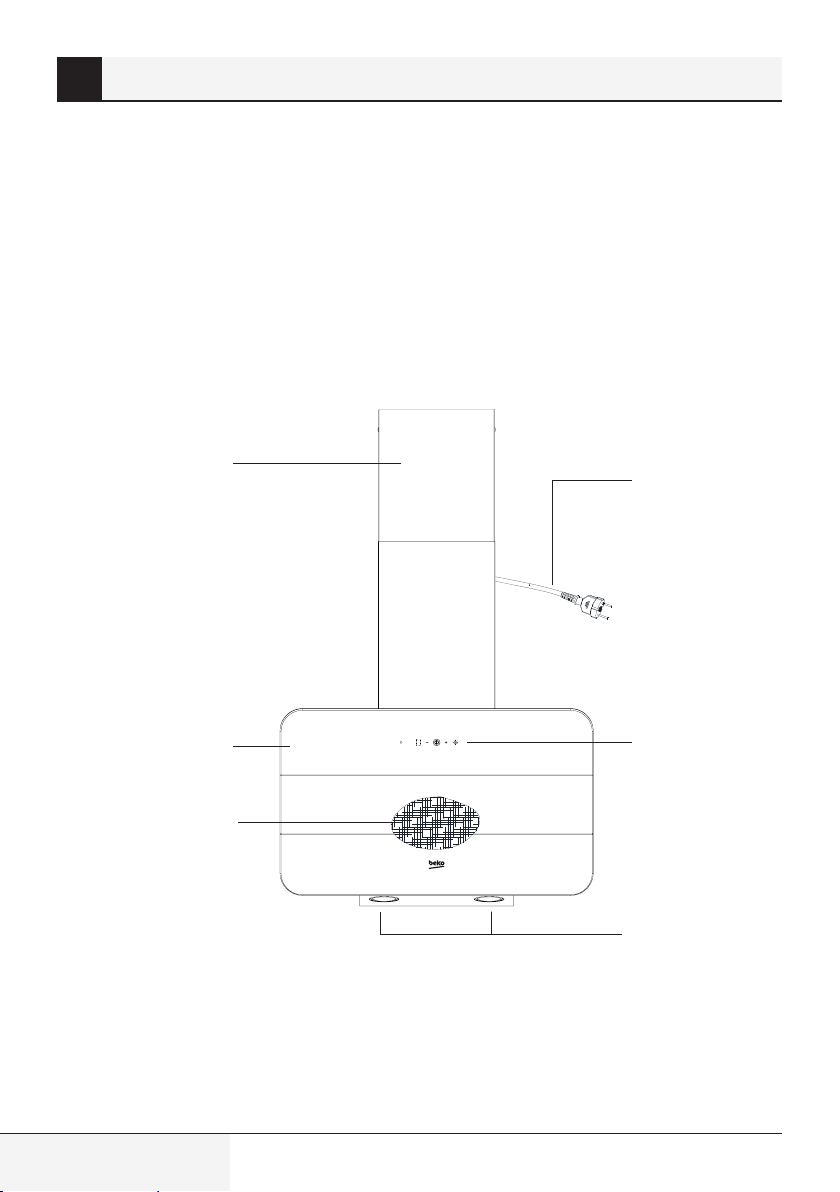
Fig.1
Explanatory figure of the kitchen hood
Chimney cover
Hinged flap
Aluminium grease filter
Power supply cord
Touch control panel
Lighting
8 / EN
Hood / User Manual
Page 9
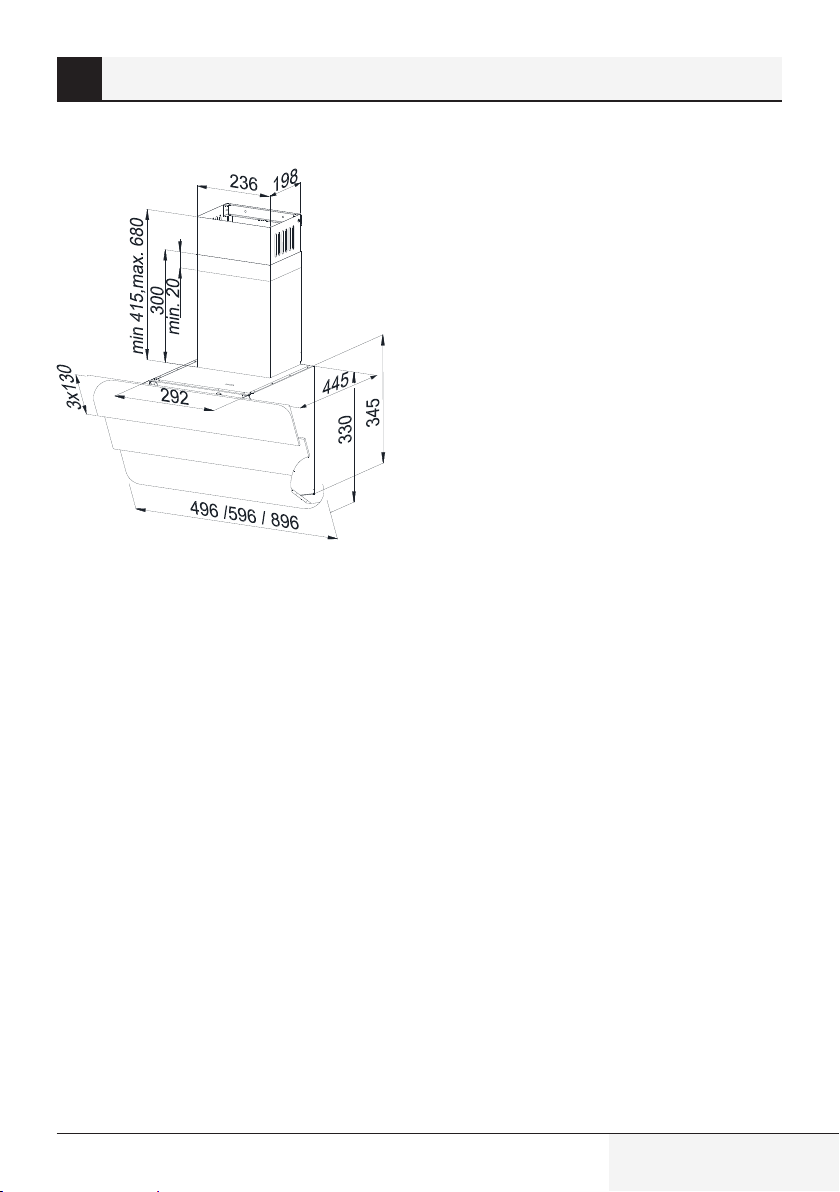
Techncal specfcatons of your applance
2
Fig.2
Dimension drawing
Hood / User Manual
9 / EN
Page 10
Operatng your applance
3
The hood is designed for suction of fumes while
preparing meals. The device can be operated in
two modes:
As extractor:
the room by means of a venting pipe. The venting
pipe is not available with the device and must be
purchased separately.
A
A
A
A
As absorber:
and odors before they are returned to the room
through the grille on the upper chimney cover. If
the hood shall work as an absorber, it is necessary
to install an active carbon filter (Fig. 10). The
carbon filter is not standard equipment; it must be
purchased from a vendor.
vapors are removed outside
Use the shortest vapor discharging
pipe possible.
The venting pipe shall have the
smoothest inner surface as possible
(it is not recommended to use pipes
of type spiro).
Use a pipe with as few bends as
possible (bending angles should not
be greater than 90 degrees).
It is not recommended to apply
section changes of the pipe (larger
to smaller e.g. air outlet Ø150 mm to
air outlet Ø120mm).
vapors are cleaned of grease
10 / EN
Hood / User Manual
Page 11
Installng your applance
4
The use of screws or fasteners
A
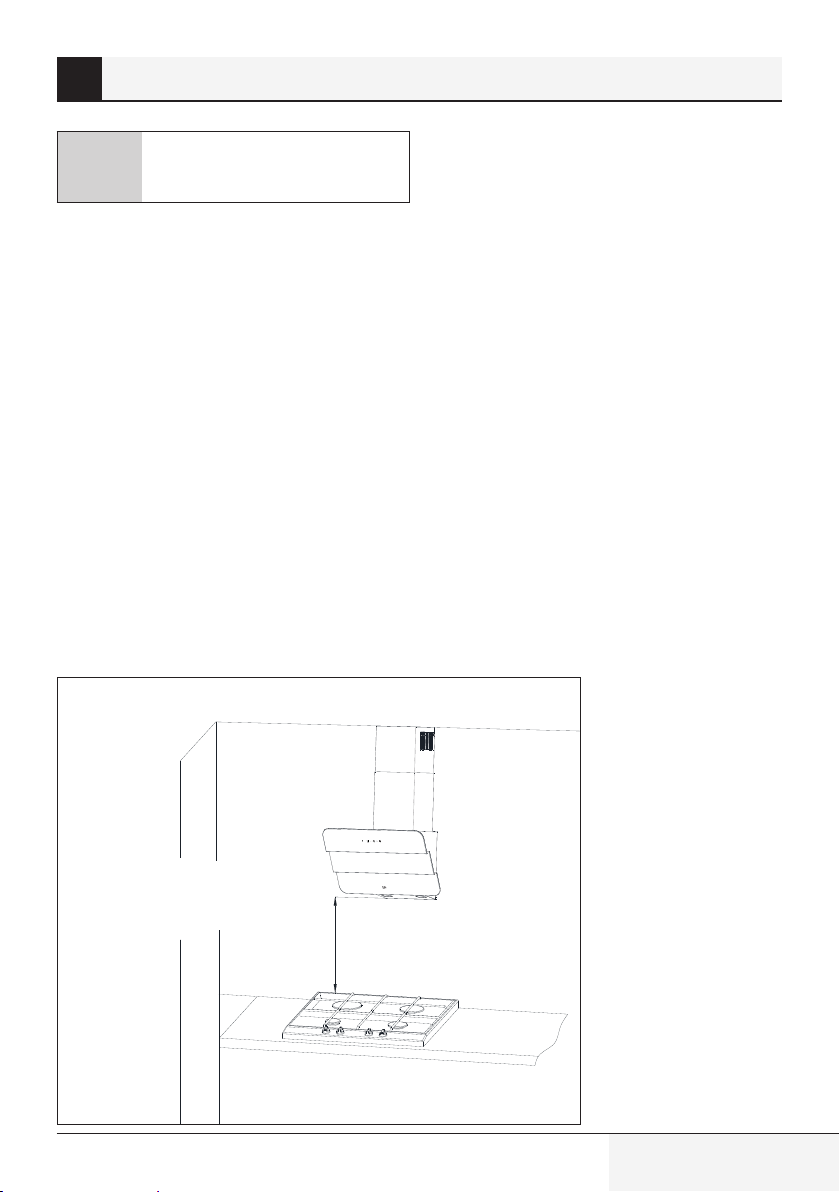
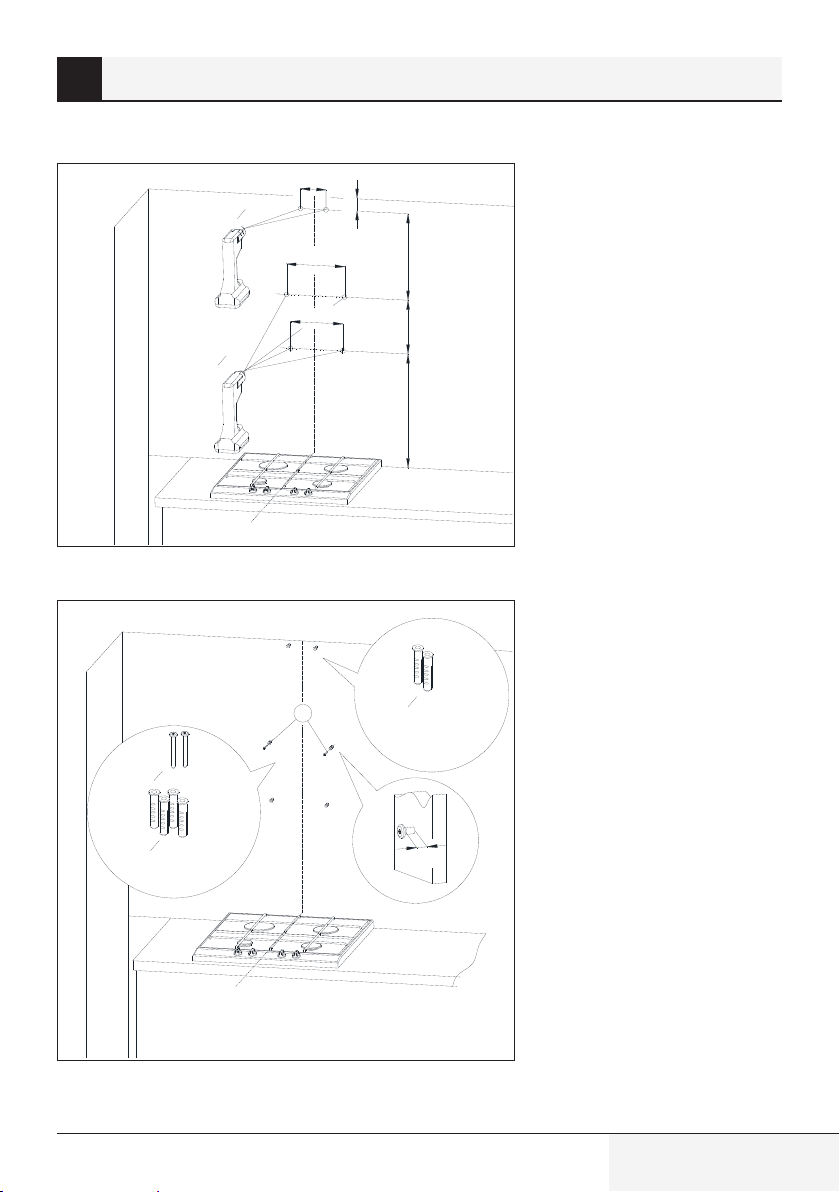
The minimum distance of hood suspension
between the surface, on which the kitchenware
are positioned on the heating device (gas or
electric cooker), and the lowest part of the kitchen
hood (Fig. 3) must be not less than 45 cm for
cookers with electric power and not less than 65
cm for gas cookers.
If the instruction manual of the heating device
contains the requirement of a greater installation
distance of the kitchen hood than indicated above,
please follow these instructions. The installation
of the hood and the hood chimney shield is shown
in the drawings (Fig. 4 - Fig. 9)
The hood is equipped with mounting anchors
suitable for the majority of the walls and ceilings.
The general provisions on the discharge of air from
rooms have to be observed during installation.
Fig.3
cooker
incompatible with the manual may
cause electric shock.
Suggested distance from the kitchen
Kuchenki gazowe L ≥ 65cm
Kuchenki elektryczne L ≥ 45cm
Hood / User Manual
L
11 / EN
Page 12
Installng your applance
4
Before installation, the following must be done:
• Check that the dimensions of the purchased
product are adapted to the selected target spot.
• Disconnect and remove (if possible) the
furniture located in the installation area of the
hood to get easy access to the ceiling or wall
to which the hood is to be fitted. If this is not
possible, the elements located near the working
area must be secured.
• Verify if there is a plug socket close to the hood
installation area and if it is possible to connect
the hood to the vent pipe evacuating the vapors
outside.
• Verify if the drilling spots do not cover
installation wires (electrical, hydraulic, etc.).
• Be equipped with the following tools: measuring
tape, pencil, drill/ driver, drill Ø8, screwdriver,
bubble level.
A
4.1 Installaton works
1. Determne the heatng element axs and
transfer t to the wall where the hood wll
be mounted on. Mark all the specfc hood
mountng ponts. Use the drll and drll holes
(Fg. 4).
2. Insert extenson bolts n the openngs. In the
two holes marked as A nsert screws (leavng
7 mm screw length on the outsde as n Fg. 5).
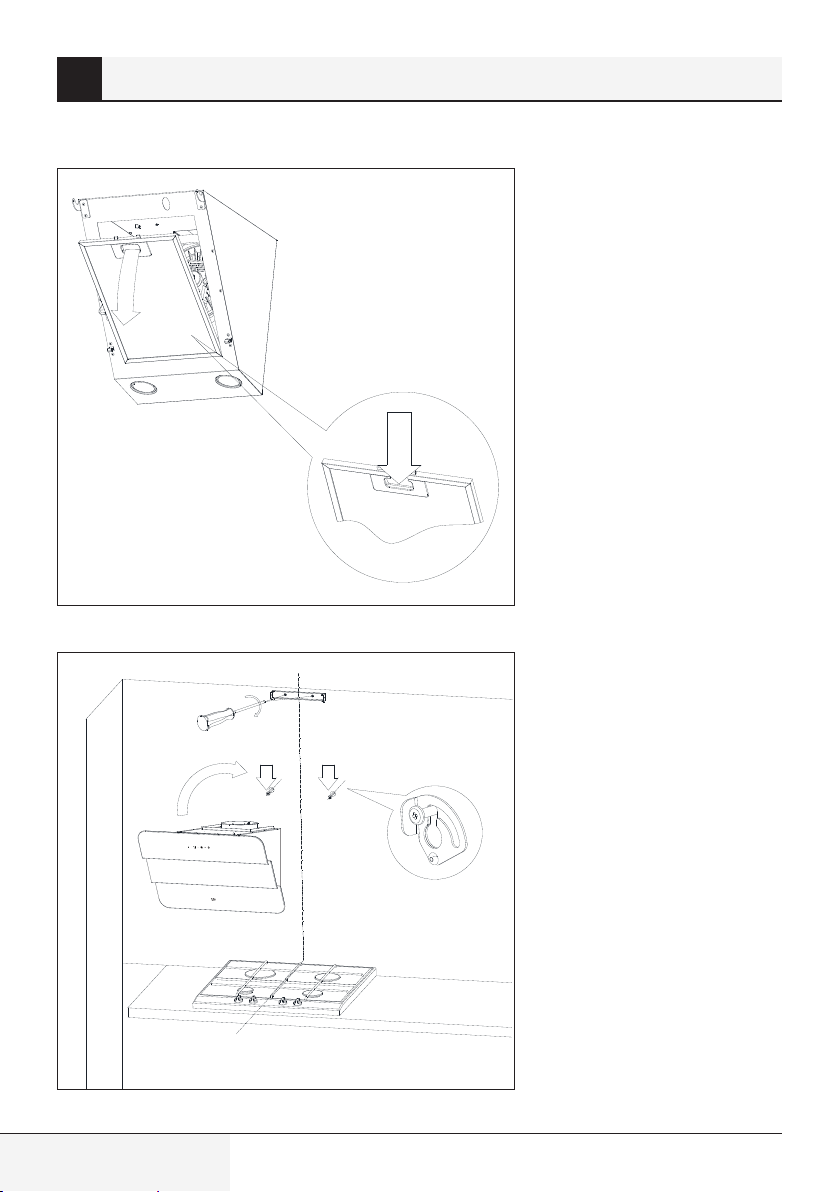
3. Open the hood flap and remove the grease flter
(Fg.6).
4. Screw the chmney cover cramp, hang the hood
on two loosely ftted screws (Fg. 7).
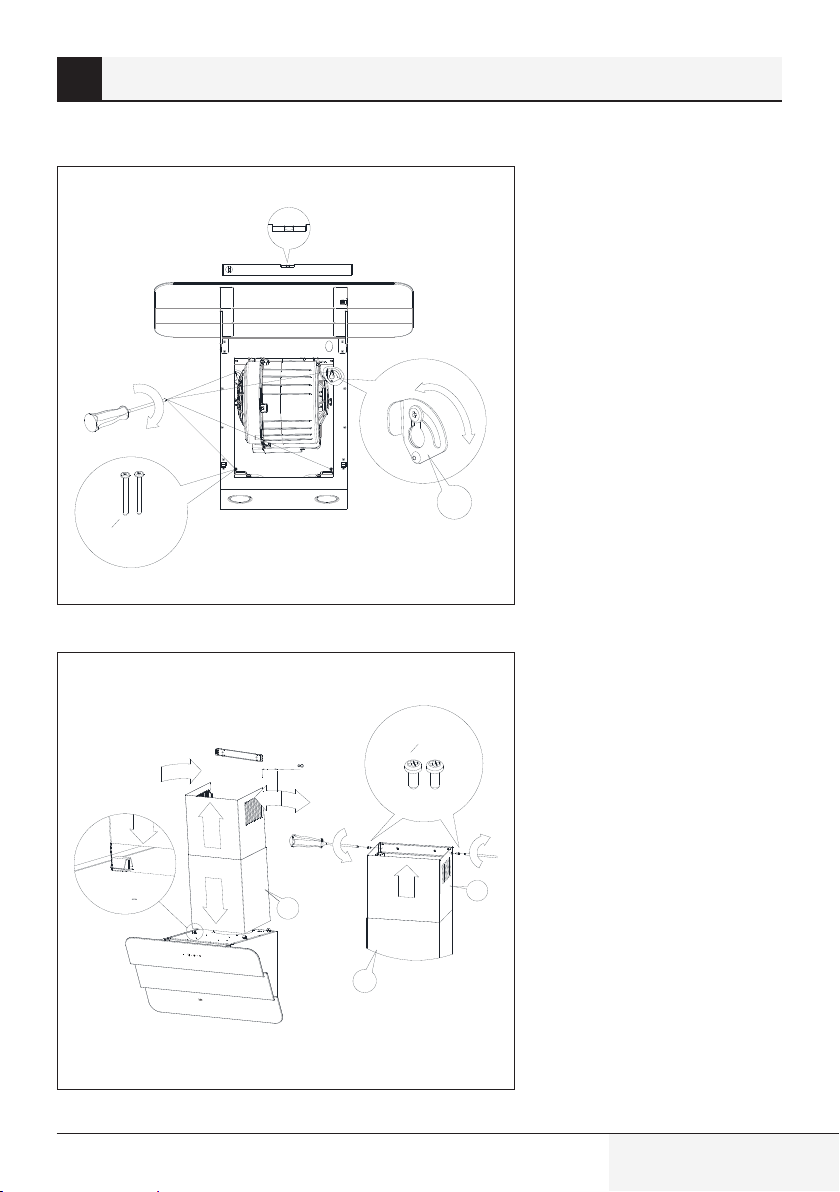
5. Place the bubble level on the ktchen hood
body. By rotatng the elements marked as A, set
the hood horzontally n accordance wth the
ndcaton of the bubble level and then tghten
the two loosely ftted screws and the two
remanng screws (Fg. 8).
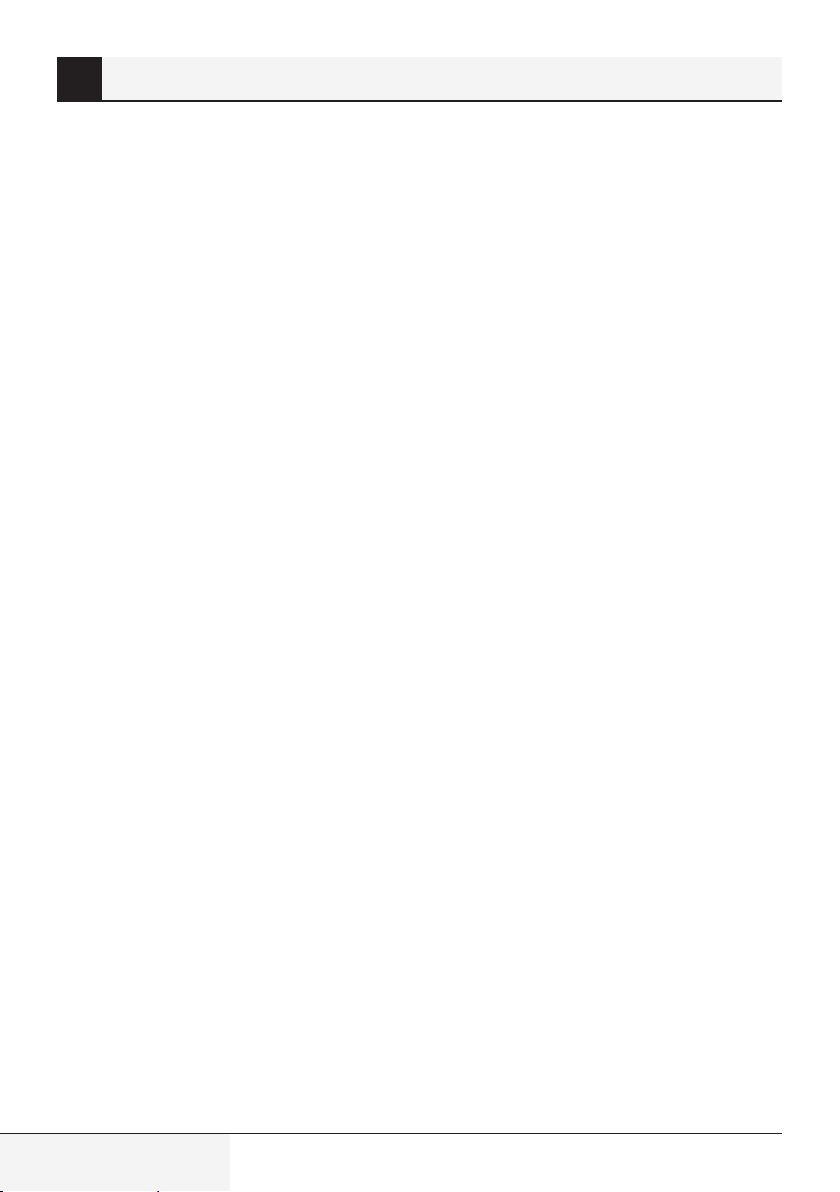
6. Put the chmney cover on the body. Then gently
pull out the part of the hood that s marked as
B upwards untl you wll be able to screw t to
the cramp prevously affxed to the wall (Fg. 9).
The installation must be carried out
very carefully, so as not to scratch
the chimney cover and the hood.
12 / EN
Hood / User Manual
Page 13
Installng your applance
4
Fig.4
Installation dimensions
2 x O8
4xO8
Fig.5
Assembly of extension bolts
155mm
min:30
245mm
max:550mm
220mm
229mm
L+90mm
2 x O5 x 45mm
4 x O8 x 40mm
Hood / User Manual
A
2 x O8 x 40mm
7mm
13 / EN
Page 14
Installng your applance
4
Fig.6
Dismantling of aluminum grease filter
2
Fig.7
Suspending the hood
1
14 / EN
Hood / User Manual
Page 15
Installng your applance
2 x O5 x 45mm
A
2 x O3,9x9,5
A
B
A
~10
1
2
2
3
4
4
4
Fig.8
Positioning the hood
Fig.9
Hood cover assembly
Hood / User Manual
15 / EN
Page 16
Installng your applance
4
4.2 Electrc connecton
The mains voltage must correspond to the voltage
indicated on the rating plate affixed to the inside
of the hood. If the kitchen hood is equipped with
a plug, it should be put in a socket connector that
meets the requirements of binding regulations
and is located in an easily accessible place. If the
hood is not fitted with a plug, the installation of
the hood should be entrusted to someone with
appropriate permissions (e.g. electrician).
16 / EN
Hood / User Manual
Page 17
Cleanng and mantenance
5
Before carrying out any maintenance operations
on the appliance, remove the plug from the
wall outlet. The hood should be cleaned with
mild cleaning agents, do not use abrasives.
Regular maintenance significantly improves the
performance and durability of the hood. The hood
should be cleaned at least once a month or every
35 hours of hood operation. To clean hood DO NOT
USE ALCOHOL-BASED AGENTS. Satin items (inox)
should be cleaned with special preparations for
that purpose.
Failure to comply with the provisions
relating to cleaning of the device and
replacement of filters may cause fire
risks. It is therefore recommended
A
to comply with the guidelines given
herein. The manufacturer is not liable for any damage to the engine or
fires caused by improper use.
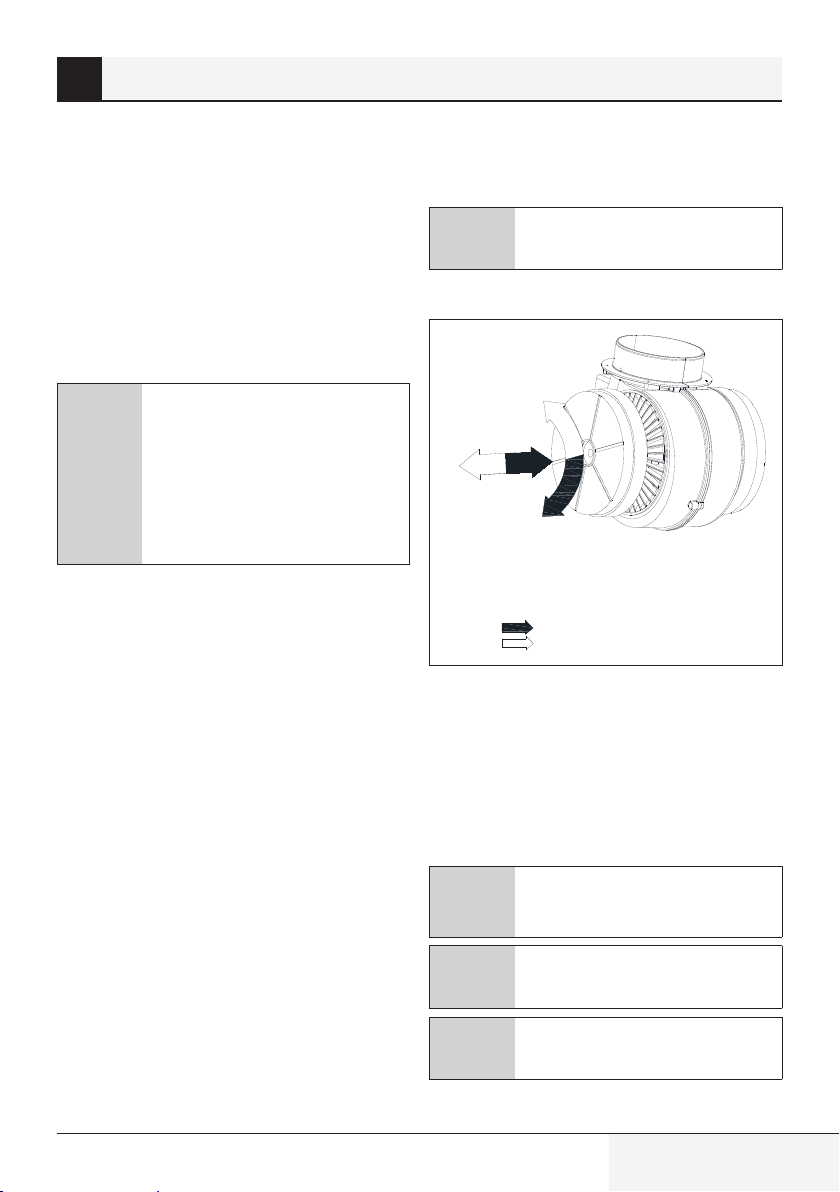
The filter should be placed on the turbine casing,
as shown in drawing (Fig. 10). The active carbon
filter should be replaced every 6 months.
A
Fig.10
5.1 Grease Flter
The hood is equipped with an aluminum filter,
which retains the fat particles from cooking. The
filter can be removed by moving the locks in the
direction of the arrows (Fig. 7). The filter should
be washed by hand by immersing for 15 minutes in
water with dishwashing liquid at a temperature of
40-50°C. After 15 minutes, you can proceed with
washing and then rinsing. The filter must be dry
before being placed in the hood. The filter can also
be washed in a dishwasher. During the washing
procedure, the filter may discolor, however it does
not affect its filtering properties. If the filter is not
cleaned regularly, it reduces the performance of
the hood and could cause the risk of fire. The filter
should be cleaned at least after each 35 hours of
hood operation.
5.2 Carbon flter
The hood can be fitted with an active carbon filter.
The carbon filter is applied only in case the hood is
not connected to the vent pipe.
Symbol
Symbol
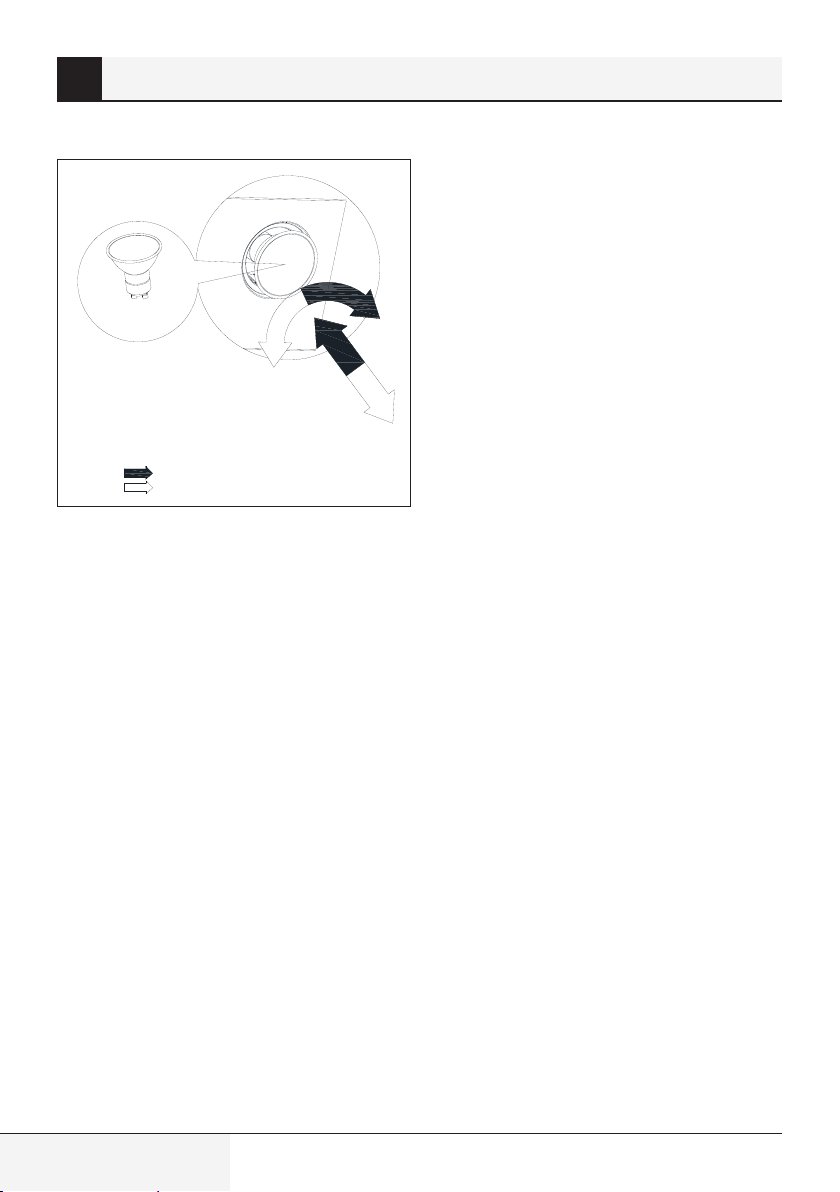
5.3 Replacng of lghtng
Prior to any work related to the replacement of
lighting, be sure to unplug the power supply. If
the hood was previously enabled, you should wait
until the light bulbs are cooled, after which you
can proceed with the replacement. The process of
exchanging the bulbs is shown in Fig. 11.
A
A
A
The carbon filter shall not be washed
nor regenerated.
Replacing the carbon filter
1
2
1
2
Filter installation
Filter dismantling
Before replacing the light bulbs,
disconnect the power supply of the
hood.
Do not touch the light bulbs when
they are hot.
Be careful not to touch the replaced
light bulb directly with hands.
Hood / User Manual
17 / EN
Page 18
5
Fig.11
Cleanng and mantenance
Replacing the lighting
Symbol
Symbol
GU10
Bulb installation
Bulb dismantling
2
1
1
2
18 / EN
Hood / User Manual
Page 19
Control of hood operaton
6
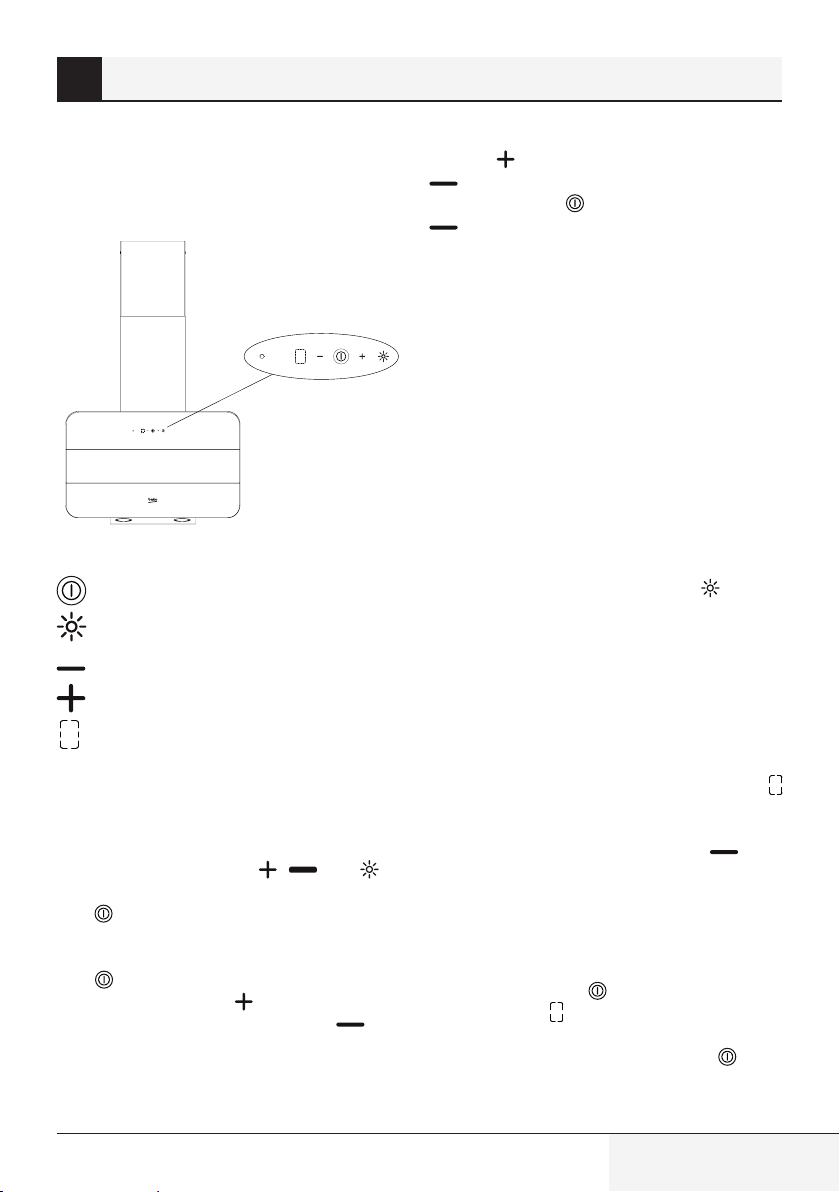
The hood is equipped with a touch control located
on the top glass panel (Fig.12).
Fig. 12
Designation of touch fields:
Localization of the touch panel
Switching on/ off the hood
Switching on/ off the hood lighting
Reduction of turbine speed
Increasing the turbine speed
The turbine speed can be increased by touching
the field , reducing – by touching the symbol
. Disabling the hood turbine is done by
touching the field or after touching the field
when the turbine is operating at first gear.
Along with the change of turbine speed, the digits
on the display change accordingly:
1- turbine operating in first gear, 2- turbine
operating in second gear, 3- turbine operating in
third gear, 4- turbine operating in intensive gear
(turbo).
In accordance with EU regulation 66/2014, the
hood is equipped with an automatic, five-minute
counter, which automatically changes the turbine
level from fourth gear into third after 5 minutes
(does not apply to the model with turbine number
“5”).
6.2 Lghtng control
To turn on the hood light, the symbol must be
pressed; another pressing of the symbol switches
the light off.
6.3 Addtonal nformaton on
the hood control
Digital display
6.1 Control of turbne
operaton
In standby mode, the control panel is not
illuminated and the fields , and are
disabled. To activate the control panel, touch the
field or use the remote control (if enclosed).
After activation, the control panel is highlighted
and the touch field symbols appear; touching the
field starts the turbine at the recently used
gear, touching the field starts the turbine at
the highest gear and touching the field starts
the turbine at the lowest gear.
The hood control is equipped with a hood operation
counter. The counter is set to 35 hours. After this
time expires, the display shows the symbol F
indicating the
the aluminum filter
“F” on the hood display, the symbol must
be touched and held continuously for about 8
seconds.
The hood control is equipped with a touch panel
lock to deactivate the touch panel, for example
when cleaning the hood. To enable the lock, touch
and hold the symbol (for about 10 seconds)
until the symbol . (dot in the lower right corner)
appears on the display. To return to normal
operation, touch and hold the symbol again
(for about 10 seconds) until the dot on the display
goes out.
Hood / User Manual
recommended cleaning of
. To delete the symbol
19 / EN
Page 20

Control of hood operaton
6
The hood control is equipped with a time switch
that disables the hood turbine after 15 minutes
from the switching on of the counter. The time
switch of the turbine does not disable the lighting
and the speed of the turbine can be freely
changed. To activate the time switch, the hood
turbine must work on any speed on the 1, 2, 3 or
intense gear. The timer is activated by holding
the symbol (for about 10 seconds), until a dot
starts to flash in the lower right corner. To disable
this feature, hold again the symbol (for about 10
seconds) or turn the hood off.
The hood control is equipped with a feature to
automatically turn off the turbine operation after
2 hours of inactivity of hood control.
The hood has a remote control (only selected
models) (Fig. 13)
Fig. 13
Remote control
Upper part of
remote control
6.5 Lghtng control va
remote control
Bottom part of remote control
The lighting is controlled
with the bottom part of
the remote control,
marked as . Enabling/
disabling the light is
done by pressing the
button with the symbol
. The buttons and are disabled.
6.4 Remote control operaton
The turbine operation is
controlled with the upper
part of the remote control,
marked as . Enabling/
disabling the turbine is done
by pressing the button with
the symbol but also and . Increasing
speed is done by pressing the button , reducing
it by pressing the button .
20 / EN
Hood / User Manual
Page 21
Control of hood operaton
6
6.6 Methods of reducng the
effect of cookng process on
the envronment
• To reduce Energy consumption, cook with using
covers on kitchenware.
• Aluminum filters must be kept clean
(recommended length of aluminum filter
operation between cleanings is max. 35h of
hood operation).
• Take care of permeability of the ventilation
pipes.
• The operation level of the turbine when cooking
shall be always set to a minimum gear, which
will allow removing the fumes at the current
intensity of cooking.
6.7 Product sheet
The product sheet is located inside the hood.
Hood / User Manual
21 / EN
Page 22

Solvng problems
7
Symptoms Cause Reparng method
Durng hood operaton, the pulsatng
letter „F” s dsplayed.
The dsplay shows only the symbol
“-.” (mnus and dot n the rght bottom
corner), the hood does not respond to
dsablng.
No symbol s shown on the dsplay, the
hood does not respond to pressng the
control felds.
The dsplay shows the symbol of one of
the gears; the hood does not respond to
pressng the control felds.
The hood turbne dsconnects after 15
mn of operaton, the dsplay shows
a pulsatng dgt .e. “1.” (current gear
number and dot n the rght bottom
corner).
On fourth gear the dgt “4” s pulsatng
on the dsplay, after 5mn the gear s
changed nto thrd.
The hood can be operated only wth
use of the control panel, t does not
respond to the remote control.
The hood has very poor vapor sucton. Probably cause s drty flters. The grease flter must be cleaned n the
One or more lght ponts do not
operate.
The hood generated excessve nose
and vbraton.
If the recommendatons above do not solve the problem, contact an authorzed home applances servce enttled to repar.
Under no crcumstances s the hood user enttled to ndependent repar. A lst of servce ponts s ncluded n the warranty card
and the webste.
After 35 hours of operaton the hood
ndcates the need for cleanng or
replacng the grease flter.
The touch control has been locked
– ths feature facltates the hood
cleanng.
The touch control s probably
suspended.
The touch control s probably
suspended
The automatc tme swtch of the
touch control has been actvated.
The hood s equpped wth a turbo
mode, whch automatcally swtches
over nto thrd gear after 5 mn of
operaton to save energy.
The battery of the remote control s
empty or the dstance s too long.
Defectve halogen/ LED bulb. The lght bulb needs to be replaced
Ths may be caused by an ncorrect
nstallaton of the hood to the wall
or ktchen cabnets. Not all provded
screws have been used or screws are
loosely ftted leavng clearance.
* apples to hoods wth touch control.
Press and hold for about 8 sec. “-” on
the touch control. The flter should be
washed n the dshwasher or replace wth
a new one.
To dsable the lock, press and hold for
about 10 sec the feld wth the symbol of
swtchng on.
Dsconnect the hood from the power
supply for about 15 sec. and swtch t on
agan.
Dsconnect the hood from the power
supply for about 15 sec. and swtch t on
agan.
To deactvate the tme swtch, press and
hold for about 10 sec the symbol „+”or
dsable the hood.
The turbo gear shall be used only wth
ntensve cookng.
Replace the battery wth a new one.
dshwasher or replace wth a new one.
The carbon flter (f present) must be
replaced wth a new one.
wth a new, compatble wth the symbol
specfed n the nstructon manual for
the cooker hood.
The hood must be mounted to a wall or
cabnet by usng all the ponts provded
for by the manufacturer. After adjustng
the poston of the hood horzontally and
vertcally, tghten all mountng screws.
22 / EN
Hood / User Manual
Page 23
Proszę najpierw przeczytać tę instrukcję obsługi!
Drodzy Klienci,
Dziękujemy za wybór wyrobu marki Beko. Mamy nadzieję, że wyrób ten, wyprodukowany
przy użyciu wysokiej jakości najnowszej technologii, okaże się w najwyższym stopniu
zadowalający. Dlatego proszę przed jego użyciem uważnie przeczytać całą tę instrukcję
obsługi i towarzyszące jej dokumenty i zachować ją do wglądu na przyszłość. Przy
przekazaniu tego wyrobu komuś innemu, proszę oddać mu także tę instrukcję. Proszę
przestrzegać wszystkich ostrzeżeń i informacji z tej instrukcji obsługi.
Proszę pamiętać, że instrukcja ta odnosi się także do kilku innych modeli. Różnice
pomiędzy nimi są wyraźnie opisane w tej instrukcji.
Znaczenie symboli
W niniejszej instrukcji stosuje się następujące symbole:
Ważne informacje i przydatne wskazówki doty-
C
czące użytkowania.
A
OSTRZEŻENIE
tuacji zagrażających bezpieczeństwu, życiu i
mieniu.
Ostrzeżenie przed porażeniem prądem.
Ostrzeżenia dotyczące sy-
B
Ostrzeżenie przed gorącymi powierzchniami.
Lampa
Urządzene zostało wyprodukowane w nowoczesnych, bezpecznych dla środowska zakładach bez wpływu na przyrodę.
Urządzene jest zgodne z dyrektywą
WEEE.
Ne zawera bfenyl
polchlorowanych (PCB).
Page 24

Ważne nstrukcje dotyczące
1
bezpeczeńs twa ochrony środowska
naturalnego
Rozdział ten zawiera instrukcje zachowania bezpieczeństwa, które
pomogą chronić się przed zagrożeniem obrażeniami ciała lub szkodami w mieniu. Nieprzestrzeganie
tych instrukcji unieważnia udzieloną gwarancję.
1.1 Bezpieczeństwo:
Zasady ogólne
• Wszystkie prace montażowe i
naprawy należy powierzać Autoryzowanemu Agentowi Serwisowemu. Producent nie odpowiada
za szkody, które mogą być spowodowane przez osoby nieupoważnione.
• Urządzenie to nie jest przezna-
czone do użytku przez osoby
(w tym dzieci) o ograniczonej
sprawności fizycznej, czuciowej
i psychicznej, niedoświadczone
i nieumiejętne. Należy zawsze
uważać na dzieci, aby nie bawiły
się tym urządzeniem.
1.1.1 Bezpeczeństwo:
Elektryczność
• Zawsze odłączaj okap od sieci na
czas montażu, konserwacji, czyszczenia i napraw.
• Jeśli przewód zasilający jest
uszkodzony, jego wymianę należy powierzyć osobie o uznanych
przez producenta kwalifikacjach,
personelowi serwisu posprzedażnego lub podobnego (najlepiej
elektrykowi) lub osobie wskazanej przez importera.
• Napięcie zasilania 220 do 240
woltów.
• W razie awarii okapu nie należy go
używać dopóki nie zostanie naprawiony przez Autoryzowanego
Agenta Serwisowego. Zagrożenie
porażeniem prądem elektrycznym!
• Nie prowadź przewodu zasilają-
cego w pobliżu kuchenki. Grozi
to pożarem od przewodu zasilającego, bo jego izolacja łatwo się
topi.
• Nie wkładaj wtyczki przewodu
zasilającego do gniazdka przed
ukończeniem montażu okapu.
• Najlepiej działają przewody ze-
wnętrzny nie dłuższe niż 4 m. Może
skręcać pod kątem prostym nie
więcej niż 2 razy, a jego średnica
musi być co najmniej Ø120 mm.
24 / PL
Okap / Instrukcja obsługi
Page 25

Ważne nstrukcje dotyczące
1
bezpeczeńs twa ochrony środowska
naturalnego
• Przed każdą interwencją we-
wnątrz okapu wyjmuj wtyczkę z
gniazdka.
• Używaj okapu tylko, jeśli przyłą-
czony jest do gniazdka z uziemieniem.
1.1.2 Bezpeczeństwo:
Wyrób
• Wylot okapu można przyłączyć
do przewodu kominowego rurą o
średnicy 120 mm lub 150 mm.
• Nie wolno przyłączać się do
przewodów kominowych połączonych z kuchenkami, szybów
wylotowych, ani przewodów kominowych, w których palą się płomienie. Przestrzegaj urzędowych
zasad zrzutu powietrza wylotowego.
• Pomiędzy dolną powierzchnią
okapu a górną powierzchnią kuchenki/ piecyka powinien być
odstęp co najmniej 50 cm od kuchenki gazowej i 45 cm od kuchenki elektrycznej.
• Nie używaj okapu bez filtrów alu-
miniowych i nie wyjmuj ich, gdy
okap działa.
• Nie dotykaj lamp okapu, jeśli paliły
się przez dłuższy czas. Można poparzyć dłonie taką gorącą lampą.
• Wystrzegaj się obfitych płomieni
pod okapem. Grozi to zapaleniem
się cząstek na filtrze oleju, co
może spowodować pożar.
• Kuchenkę włączaj dopiero po po-
stawieniu na niej garnków lub patelni. W przeciwnym razie niektóre
części okapu mogą się odkształcać
w miarę nagrzewania się.
• Wyłączaj kuchenkę zanim zdej-
miesz z niej garnki i patelnie.
• Wystrzegaj się materiałów łatwo-
palnych pod okapem.
• Podczas smażenia potraw może
się zapalić olej. Dlatego należy
uważać na tkaniny i zasłony.
• Nie wolno pozostawiać kuchenki
bez nadzoru, gdy smażą się na niej
potrawy, bo grozi to zapaleniem
się oleju i pożarem.
• Jeśli nie czyści się okapu z okre-
śloną częstotliwością, podnosi to
zagrożenie pożarem.
• Podczas czyszczenia okapu za-
chowaj szczególną ostrożność i
noś rękawice.
Okap / Instrukcja obsługi
25 / PL
Page 26
Ważne nstrukcje dotyczące
1
bezpeczeńs twa ochrony środowska
naturalnego
• Zalecamy uruchamianie okapu na
kilka minut przed rozpoczęciem
gotowania, aby nabrał mocy ssania. Dzięki temu, gdy zaczną się
opary, ssanie będzie ciągłe i stabilne.
• Nie wyłączaj okapu przez 15 minut
po zakończeniu gotowania lub
smażenia, aby usunąć z kuchni
zapach oparów gotowania.
• Gdy okap działa, zwłaszcza jeśli
działa nad kuchenką gazowa,
upewnij się, że pomieszczenie to
jest wentylowane czystym powietrzem.
• Zwróć uwagę, aby nie przyłączać
okapu do przewodów kominowych używanych przez urządzenia nieelektryczne. ( Np.: przewód
spalinowy grzejnika).
• Właściwa praca okapu równocze-
śnie z innym urządzeniem, które
wymaga powietrza, możliwa jest
tylko przy niskim ciśnieniu 4 Pa
(0,04 mbar), przy którym unika
się zwrotnego wchłaniania gazu.
Można to osiągnąć tylko przy dopływie powietrza przez nieosłonięte otwory (drzwi, okna, otwory
wentylacyjne lub innych środki
techniczne).
Zwracaj szczególną uwagę na zapewnienie wystarczającego przepływu powietrza. Do tego celu nie
wystarczy przewód kominowy,
którym dopływa/ odpływa powietrze.
1.1.3 Bezpeczeństwo:
Dzec
• Materiały opakowaniowe są nie-
bezpieczne dla dzieci. Należy trzymać je w bezpiecznym miejscu,
poza zasięgiem dzieci.
• Urządzenie elektryczne są nie-
bezpieczne dla dzieci. Trzymaj
dzieci z dala od tego okapu. Nie
pozwalaj dzieciom bawić się nim.
• Urządzenia tego mogą używać
dzieci w wieku 8 lat lub starsze
oraz osoby niepełnosprawne
fizycznie, sensorycznie lub
umysłowo, lub nieumiejętne i niedoświadczone, pod warunkiem,
że ktoś nadzoruje ich użytkowanie
pod względem bezpieczeństwa,
lub zostały odpowiednio poinstruowane i zdają sobie sprawę z
zagrożeń przy jego użytkowaniu.
Dzieci nie powinny bawić się tym
urządzeniem.
26 / PL
Okap / Instrukcja obsługi
Page 27
Ważne nstrukcje dotyczące
1
bezpeczeńs twa ochrony środowska
naturalnego
• OSTRZEŻENIE: Jeśli jest to okap
nad kuchnią, jego wystające części
mogą się nagrzewać.
1.2 Przeznaczenie
• Urządzenie to przeznaczone jest
do użytku domowego. Nie nadaje
się do zastosowań komercyjnych i
nie należy go używać niezgodnie z
przeznaczeniem.
• Producent nie ponosi odpo-
wiedzialności za szkody spowodowane niewłaściwym
użytkowaniem lub transportem.
• Okres używalności tego okapu wy-
nosi 10 lat. Jest to okres, w którym
do nabycia będą części zamienne
do utrzymania prawidłowego działania okapu.
•
OSTRZEŻENIE:
nie przykręcenia śrub zgodnie ze
wskazaniami w tej instrukcji może
zagrażać porażeniem elektrycznych.
Zaniedba-
1.3 Zgodność z dyrektywą
WEEE pozbywane sę
zużytych wyrobów
Wyrób ten zgodny jest z dyrektywą WEEE
Unii Europejskiej (2012/19/UE). Wyrób
ten oznaczony jest symbolem klasyfikacyjnym dla zużytego sprzętu elektrycznego i elektronicznego (WEEE).
Wyrób ten wykonano z części i materiałów wysokiej jakości, które mogą być odzyskane i użyte jako
surowce wtórne. Po zakończeniu użytkowania nie
należy pozbywać się go razem z innymi odpadkami
domowymi. Należy przekazać go do punktu zbiórki urządzeń elektrycznych i elektronicznych na
surowce wtórne. Gdzie jest najbliższy taki punkt
zbiórki można dowiedzieć się od władz miejscowych.
Zgodność z dyrektywą RoHS:
Wyrób ten jest zgodny z dyrektywą RoHS Unii
Europejskiej (2011 /65 / UE). Nie zawiera wskazanych w tej dyrektywie materiałów szkodliwych
i zakazanych.
1.4 Informacje o opakowanu
Opakowanie tego wyrobu wykonano z
materiałów nadających się do recyklingu,
zgodnie z naszym ustawodawstwem krajowym.. Nie wyrzucaj materiałów opakowaniowych do śmieci wraz z innymi odpadkami domowymi. Oddaj je w jednym z wyznaczonych przez
władze lokalne punktów zbiórki materiałów opakowaniowych.
Okap / Instrukcja obsługi
27 / PL
Page 28

2 Dane technczne okapu
Dane techniczne zawarte w niniejszej instrukcji
obsługi oraz na dołączonych do okapu etykietach
zostały uzyskane poprzez wykonanie pomiarów i
obliczeń zgodnie z wymogami rozporządzenia UE
nr 65/2014 oraz 66/2014. Produkt jest zgodny z
dyrektywami 2009/125/EC i 2011/65/EU.
Rys.1
Rysunek poglπdowy okapu kuchennego.
Os ≥ ona kominowa
Klapa uchylna
Filtr przeciwt ≥
uszczowy aluminiowy
Przewûd zasilajπcy
Panel sterowania
dotykowy
Oúwietlenie
28 / PL
Okap / Instrukcja obsługi
Page 29

2 Dane technczne okapu
Rys.2
Rysunek gabarytowy.
Okap / Instrukcja obsługi
29 / PL
Page 30

3 Obsługa okapu
Okap jest przeznaczony do zasysania oparów
podczas przygotowywania posiłków. Urządzenie
może pracować w dwóch trybach:
Jako wyciąg:
pomieszczenia za pomocą rury odprowadzającej.
Rura odprowadzająca nie jest dostępna w komplecie z urządzeniem i należy ją zakupić oddzielnie.
A
A
A
A
opary usuwane są na zewnątrz
Należy używać jak najkrótszego
przewodu odprowadzającego opary.
Należy używać przewodu odprowadzającego o jak najgładszej powierzchni wewnętrznej (nie zaleca
się stosowania rur typu spiro).
Stosować przewód o jak najmniejszej liczbie zagięć (kąty zgięć nie
powinny być większe niż 90 stopni).
Nie zaleca się stosowania zmian
przekroju przewodu (większego na
mniejszy np. wylot powietrza Ø150
mm na wylot powietrza Ø120mm).
Jako pochłaniacz:
tłuszczu i zapachów zanim zostaną zwrócone do
pomieszczenia przez kratki w górnej osłonie komina. Aby okap pracował jako pochłaniacz należy
zainstalować filtr węglowy (Rys.10). Filtr węglowy nie jest wyposażeniem standardowym, należy
dokupić go u sprzedawcy.
30 / PL
opary są oczyszczane z
Okap / Instrukcja obsługi
Page 31

4 Montaż okapu
Niezgodne z instrukcją zastosowanie śrub lub elementów mocujących
A
Minimalna odległość zawieszenia okapu między
powierzchnią, na której znajdują się naczynia na
urządzeniu grzewczym (kuchenka gazowa, elektryczna), a najniższą częścią okapu kuchennego
(Rys.3) powinna wynosić, nie mniej niż 45 cm dla
kuchenek o zasilaniu elektrycznym i nie mniej niż
65 cm dla kuchenek gazowych. Jeżeli w instrukcji
obsługi urządzenia grzewczego podana jest większa odległość instalowania okapu kuchennego
niż wskazana powyżej, należy dostosować się
do takich wskazań. Montaż okapu i osłony kominowej okapu przedstawiony jest na rysunkach
(Rys.4 - Rys.9) Okap wyposażony jest w kołki mocujące odpowiednie do większości ścian i sufitów.
Podczas montażu należy przestrzegać ogólnie
obowiązujących przepisów dotyczących odprowadzenia powietrza z pomieszczeń.
Rys. 3
grzewczej.
może grozić porażeniem prądem
elektrycznym.
Sugerowana odleg≥oúÊ od p ≥ yty
Kuchenki gazowe L ≥ 65cm
Kuchenki elektryczne L ≥ 45cm
Okap / Instrukcja obsługi
L
31 / PL
Page 32

4 Montaż okapu
Przed przystąpieniem do instalacji należy:
• Sprawdzić, czy wymiary zakupionego produktu
są dostosowane do wybranego miejsca docelowego.
• Odłączyć i usunąć (jeżeli istnieje taka możli-
wość) meble znajdujące się w obszarze instalacji okapu, aby uzyskać łatwy dostęp do sufitu
lub ściany na której ma być zamontowany okap.
Jeśli nie jest to możliwe należy zabezpieczyć
elementy znajdujące się w pobliżu wykonywanych prac.
• Sprawdzić, czy w pobliżu strefy montowania
okapu znajduje się gniazdko wtykowe i czy
można podłączyć okap do przewodu wentylacyjnego odprowadzającego opary na zewnątrz.
• Sprawdzić, czy w miejscach w których będą
wykonane wiercenia nie znajdują się przewody
instalacyjne (elektryczne, hydrauliczne itp.).
• Wyposażyć się w następujące narzędzia:
miarkę, ołówek, wiertarkę /wkrętarkę, wiertło
Ø8, śrubokręt, poziomicę.
4.1 Czynnośc montażowe:
1. Wyznaczyć oś elementu grzewczego i przenieść ją na ścianę gdzie będzie zamontowany
okap. Zaznaczyć wszystkie charakterystyczne
punkty mocowań okapu. Użyć wiertarki i wywiercić otwory (Rys. 4).
2. W wywiercone otwory włożyć kołki rozporowe. W dwa otwory oznaczone literą A również
wkręcić wkręty (pozostawiając 7mm długości
wkrętu na zewnątrz kołka Rys.5).
3. Otworzyć klapę okapu i wymontować filtr przeciwtłuszczowy (Rys.6).
4. Przykręcić zworę osłony kominowej, zawiesić okap kuchenny na dwóch niedokręconych
wkrętach (Rys. 7).
5. Umieścić poziomicę na korpusie okapu kuchennego. Obracając elementem oznaczonym literą
A ustawić okap w poziomie zgodnie ze wskazaniem poziomicy, a następnie dokręcić dwa już
wkręcone po części wkręty i wkręcić dwa pozostałe (Rys.8).
6. Umieścić na korpusie osłonę kominową.
Następnie delikatnie wysuwać część okapu
oznaczoną literą B ku górze, do momentu aż
będzie możliwość przykręcenia jej do zwory
wcześniej przymocowanej do ściany (Rys. 9).
Tę operację montażu należy przeprowadzić bardzo ostrożnie, aby nie
A
porysować osłony komina i samego
okapu.
32 / PL
Okap / Instrukcja obsługi
Page 33

4 Montaż okapu
Rys. 4
Rys. 5
Wymiary montaøowe.
155mm
2 x O8
245mm
220mm
4xO8
Montaø ko≥kûw rozporowych.
A
2 x O5 x 45mm
min:30
max:550mm
229mm
L+90mm
2 x O8 x 40mm
4 x O8 x 40mm
Okap / Instrukcja obsługi
7mm
33 / PL
Page 34

4 Montaż okapu
Rys. 6
Demontaø filtra aluminiowego przeciwt
≥ uszczowego.
2
Rys. 7
Zawieszanie okapu.
1
34 / PL
Okap / Instrukcja obsługi
Page 35

4 Montaż okapu
2 x O5 x 45mm
A
2 x O3,9x9,5
A
B
A
~10
1
2
2
3
4
4
Rys. 8
Rys. 9
Ustawianie okapu kuchennego.
Montaø os ≥ ony kominowej.
Okap / Instrukcja obsługi
35 / PL
Page 36

4 Montaż okapu
4.2 Podłączene elektryczne
Napięcie sieciowe musi odpowiadać napięciu
wskazanemu na tabliczce umieszczonej w wewnętrznej części okapu. Jeżeli okap wyposażony
jest we wtyczkę należy ją umieścić w gniazdku
wtykowym spełniającym wymagania obowiązujących przepisów i znajdującym się w łatwo dostępnym miejscu. Jeżeli okap nie jest wyposażony
we wtyczkę, instalacje okapu należy powierzyć
osobie z odpowiednimi uprawnieniami (np. elektrykowi).
36 / PL
Okap / Instrukcja obsługi
Page 37

5 Czyszczene konserwacja
Przed wykonaniem jakichkolwiek czynności związanych z konserwacją urządzenia, należy wyjąć
wtyczkę z gniazdka. Okap należy czyścić łagodnymi środkami czyszczącymi, nie należy używać środków ściernych. Regularna konserwacja
znacznie poprawia jakość pracy i trwałość okapu.
Czynność czyszczenia okapu należy powtarzać
przynajmniej raz w miesiącu lub co 35 godzin
pracy okapu. Do mycia okapu w żadnym wypadku NIE WOLNO STOSOWAĆ ŚRODKÓW NA BAZIE
ALKOHOLU. Elementy satynowe (inox) należy
czyścić specjalnymi preparatami przeznaczonymi
do tego celu.
Nieprzestrzeganie przepisów dotyczących czyszczenia urządzenia i
wymiany filtrów może powodować
powstanie zagrożenia pożarem.
Zaleca się zatem przestrzeganie
A
podanych wskazówek. Producent
nie ponosi odpowiedzialności za
ewentualne uszkodzenia silnika lub
pożary spowodowane niewłaściwym użytkowaniem.
5.1 Fltr przecwtłuszczowy
Okap jest wyposażony w filtr aluminiowy, który
zatrzymuje cząstki tłuszczu pochodzące z gotowania. Filtr wyjmuje się poprzez przesunięcie zamków w kierunku wskazanym strzałkami
(Rys.7). Filtr powinien być myty ręcznie poprzez
zanurzenie na 15 minut w wodzie z płynem do
mycia naczyń o temperaturze 40-50ºC. Po upływie 15 minut należy rozpocząć mycie następnie i
dokładnie opłukać filtr. Filtr musi być suchy przed
ponownym umieszczeniem w okapie. Filtr może
być również myty w zmywarkach. Filtr podczas
mycia może się odbarwić co, nie ma wpływu na
jego właściwości filtrowania. Nie czyszczony regularnie filtr zmniejsza wydajność okapu i może
przyczynić się do powstania pożaru. Filtr należy
czyścić przynajmniej co 35 godzin pracy okapu.
5.2 Fltr węglowy
Okap może być wyposażony w filtr węglowy. Filtr
węglowy stosuje się wyłącznie, kiedy okap nie
jest podłączony do przewodu wentylacyjnego.
Filtr należy umieścić na obudowie turbiny, jak ilustruje to rysunek (Rys.10). Filtr węglowy powinien
być wymieniany co 6 miesięcy.
Nie wolno myć lub regenerować fil-
A
Rys. 10
Symbol
Symbol
tra węglowego.
Wymiana filtra wÍ glowego.
1
2
1
2
montaø ltra
demontaø ltra
5.3 Wymana ośwetlena
Przed przystąpieniem do jakichkolwiek prac związanych z wymianą oświetlenia, należy odłączyć
zasilanie. Jeżeli okap był wcześniej włączony należy odczekać aby żarówki się ochłodziły i po ochłodzeniu można przystąpić do ich wymiany. Proces
wymiany żarówki przedstawia rysunek 11.
Przed wymianą żarówek należy
A
odłączyć zasilanie okapu.
Okap / Instrukcja obsługi
37 / PL
Page 38

5 Czyszczene konserwacja
Nie należy dotykać żarówek dopóki
A
A
Rys. 11
są gorące.
Należy uważać, aby nie dotykać
bezpośrednio zakładanej żarówki
rękami.
Wymiana oúwietlenia.
Symbol
Symbol
GU10
montaø øarûwki
demontaø øarûwki
2
1
1
2
38 / PL
Okap / Instrukcja obsługi
Page 39

6 Sterowane pracą okapu
Okap wyposażony jest w sterowanie dotykowe
znajdujące się na szybie górnej (Rys.12).
Rys. 12
Oznaczenia pól dotykowych:
Wyúwietlacz cyfrowy
Usytuowanie panelu dotykowego.
Pole dotykowe w≥πczajπce / wy≥aczajπce
okap
Pole dotykowe w≥πczajπce / wy≥πczajπce
oúwietlenie okapu
Pole dotykowe zmniejszajπce prídkoúê
turbiny
Pole dotykowe zwií kszajπce prídkoúê turbiny
6.1 Sterowane pracą turbny
Zwiększenie prędkości turbiny odbywa się przez
dotknięcie symbolu , zmniejszenie przez dotknięcie symbolu . Wyłączenie turbiny okapu
następuje po dotknięciu pola lub po dotknięciu
pola gdy turbina pracuje na pierwszym biegu.
Wraz ze zmianą prędkości pracy turbiny zmieniają
się odpowiednio cyfry na wyświetlaczu: 1- praca
turbiny na pierwszym biegu, 2- praca turbiny na
drugim biegu, 3- praca turbiny na trzecim biegu,
4- praca turbiny na biegu intensywnym (turbo).
Zgodnie z rozporządzeniem EU 66/2014 okap wyposażony jest w automatyczny, pięciominutowy
licznik zmieniający samoistnie poziom biegu turbiny z czwartego na trzeci po upływie 5 minut (nie
dotyczy modelu z turbiną o numerze „5”).
6.2 Sterowane ośwetlenem
Aby włączyć oświetlenie okapu należy dotknąć
symbolu , ponowne dotknięcie powoduje wyłączenie oświetlenia.
6.3 Dodatkowe nformacje
dotyczące sterowana okapem
Sterownik okapu wyposażony jest w licznik czasu
pracy okapu. Licznik ustawiony jest na 35 godzin.
Po upływie tego czasu na wyświetlaczu pojawia
się symbol F , który sygnalizuje zalecane czyszzczenie filtra aluminiowego. Aby usunąć znak „F”
na wyświetlaczu okapu należy dotknąć i przytrzymać symbol „ w sposób ciągły” przez około 8
sekund.
W trybie czuwania sterowanie jest niepodświetlone i nie działają pola , ani . W celu aktywacji sterowania należy dotknąć pola lub użyć
pilota (jeśli jest dołączony). Po aktywacji, sterowanie się podświetla i pojawiają się symbole pól dotykowych, dotknięcie pola powoduje włączenie
turbiny na ostatnio używanym biegu, dotknięcie
pola powoduje uruchomienie turbiny na najwyższym biegu, dotknięcie pola powoduje
uruchomienie turbiny na najniższym biegu.
Okap / Instrukcja obsługi
Sterownik okapu wyposażony jest w blokadę panelu dotykowego służącą do dezaktywowania panelu dotykowego np. podczas czyszczenia okapu.
Aby włączyć blokadę należy przytrzymać symbol
(przez około 10 sekund) aż pojawi się na wyświetlaczu symbol . ( kropka w dolnym prawym
rogu). Aby powrócić do normalnej pracy należy
ponownie przytrzymać symbol (przez około 10
sekund) na wyświetlaczu zgaśnie kropka.
39 / PL
Page 40

6 Sterowane pracą okapu
Sterownik okapu wyposażony jest w wyłącznik
czasowy turbiny okapu, który wyłącza turbinę
okapu po upływie 15 minut od włączenia licznika.
Wyłącznik czasowy turbiny nie wyłącza oświetlenia, a prędkości turbiny można dowolnie zmieniać.
Aby wyłącznik czasowy mógł zostać włączony turbina okapu musi pracować na dowolnej prędkości
biegu 1, 2, 3, intensywnym. Aktywacja timera następuje poprzez przytrzymanie symbolu (przez
około 10 sekund), aż na wyświetlaczu w prawym
dolnym rogu zacznie pulsować punkt. Wyłączenie
tej funkcji można dokonać przez ponowne przytrzymanie symbolu (około 10 sekund) lub wyłączenie okapu.
Sterownik okapu wyposażony jest w funkcję automatycznego wyłączenia pracy turbiny po upływie 2 godzin bezczynności sterowania okapem.
Okap posiada pilot do zdalnego sterowania (dotyczy wybranych modeli) (Rys . 13)
Rys. 13
Pilot zdalnego sterowania.
6.5 Sterowane ośwetlenem
przy pomocy plota
bolem . Przyciski z symbolem , są nieaktywne.
6.4 Sterowane pracą turbny
przy pomocy plota
Za sterowanie oświetleniem odpowiada dolna
część pilota oznaczona
symbolem . Włączenie
/ wyłączenie oświetlenia
odbywa się przez naciśnięcie przycisku z sym-
Za sterowanie pracą turbiny
odpowiada górna część pilota
oznaczona symbolem .
Włączenie / wyłączenie turbiny odbywa się przez naciśnięcie przycisku z symbolem
ale też i . Zwiększanie prędkości odbywa
się przez naciskanie przycisku , zmniejszanie
przez naciskanie przycisku .
40 / PL
Okap / Instrukcja obsługi
Page 41

6 Sterowane pracą okapu
6.6 Sposoby zmnejszena
wpływu procesu gotowana
na środowsko
• W celu zmniejszenia zużycia energii należy goto-
wać w naczyniach pod przykrywką.
• Filtry aluminiowe okapu należy utrzymywać w
czystości (zalecany czas pracy filtra aluminiowego pomiędzy jego czyszczeniami wynosi max
35h pracy okapu).
• Należy dbać o drożność przewodów wentylacyj-
nych.
• Poziom pracy turbiny podczas gotowania należy
zawsze ustawiać na minimalny bieg, który pozwoli na usunięcie oparów przy aktualnej intensywności gotowania.
6.7 Karta produktu
Karta produktu umieszczona jest wewnątrz okapu.
Okap / Instrukcja obsługi
41 / PL
Page 42

7 Rozwązywane problemów
Objawy Przyczyny
Sposoby naprawy
wystąpena
Podczas pracy okapu na wyświetlaczu
pojawia się pulsująca litera “F”.
Wyświetlacz pokazuje jedynie znak “-.”
(minus oraz kropka w prawym dolnym
rogu), okap nie reaguje na próbę włączenia.
Na wyświetlaczu nie pojawia się żaden
symbol, okap nie reaguje na naciskanie
pól sterowania.
Wyświetlacz pokazuje symbol jednego z
biegów, okap nie reaguje na naciskanie
pól sterowania.
Turbina okapu wyłącza się po 15min
pracy, na wyświetlaczu pulsuje np. “1.”
(numer aktualnego biegu i kropka w
prawym dolnym rogu wyświetlacza).
Na czwartym biegu pulsuje cyfra “4” na
wyświetlaczu, po 5min bieg zmieniany
jest na trzeci.
Okap można obsługiwać jedynie za pomocą panelu sterowania, nie reaguje
na pilota
Okap słabo zasysa opary. Prawdopodobną przyczyną są zanie-
Nie świeci jeden lub więcej punkt
świetlny.
Okap generuje nadmierny hałas i wibracje.
Jeśli powyższe zalecenia nie rozwiązują problemów, należy skontaktować się z autoryzowanym serwisem AGD uprawnionym do
naprawy. Pod żadnym pozorem użytkownik okapu nie jest uprawniony do samodzielnych napraw. Wykaz punktów serwisowych
znajduje się na karcie gwarancyjnej oraz na stronie internetowej.
Po 35 godzinach pracy okap sygnalizuje
konieczność wyczyszczenia lub wymiany filtra przeciwtłuszczowego.
Panel dotykowy został zablokowany jest to funkcja ułatwiająca mycie okapu.
Prawdopodobnie zawiesił się panel
sterowania.
Prawdopodobnie zawiesił się panel
sterowania.
Został aktywowany automatyczny wyłącznik czasowy panelu sterowania.
Okap wyposażony jest w tryb turbo,
który po 5min pracy automatycznie
zmienia bieg na trzeci w celu oszczędzania energii.
Wyczerpała się bateria w pilocie lub odległość jest zbyt duża.
czyszczone filtry
Przepalona żarówka halogenowa / ledowa.
Przyczyną może być nieprawidłowy
montaż okapu do ściany lub szafki kuchennej. Nie przykręcono wszystkich
przewidzianych wkrętów lub nie dokręcono wkrętów, pozostawiając luz.
* dotyczy okapów ze sterowaniem dotykowym
Należy nacisnąć i przytrzymać przez ok. 8s
pole “-” na sterowaniu dotykowym. Filtr
należy umyć w zmywarce lub wymienić
na nowy.
Aby wyłączyć blokadę należy nacisnąć i
przytrzymać przez ok. 10s pole z symbolem włącznika.
Należy odłączyć okap od źródła zasilania
na ok. 15s i włączyć go ponownie.
Należy odłączyć okap od źródła zasilania
na ok. 15s i włączyć go ponownie.
Aby deaktywować wyłącznik czasowy należy nacisnąć i przytrzymać przez ok. 10s
symbol plus lub wyłączyć okap.
Trybu turbo należy używać jedynie przy
intensywnym gotowaniu.
Należy wymienić baterię na nową.
Filtr przeciwtłuszczowy należy umyć w
zmywarce lub wymienić na nowy. Filtr węglowy (jeśli występuje) należy wymienić
na nowy.
Żarówkę należy wymienić na nową, zgodną z symbolem podanym w instrukcji obsługi okapu.
Okap musi być zamontowany do ściany
lub szafki z wykorzystaniem wszystkich
punktów przewidzianych przez producenta. Po wyregulowaniu położenia okapu w pionie i w poziomie należy dokręcić
wszystkie wkręty montażowe.
42 / PL
Okap / Instrukcja obsługi
Page 43

Vă rugăm să citiți mai întâi acest manual!
Stimaţi clienţi!
Vă mulţumim pentru că preferați un produs Beko. Sperăm să obțineți cele mai bune
rezultate de la produsul dumneavoastră, care a fost fabricat la o calitate înaltă și cu
tehnologii performante. În acest scop, vă rugăm să citiți cu grijă și în întregime acest
manual de utilizare și toate celelalte documente însoțitoare înainte de a utiliza produsul
și să le păstrați pentru consultări ulterioare. Dacă predați produsul altei persoane,
oferiți-i și manualul de utilizare. Respectaţi toate avertismentele și informaţiile din
manualul de utilizare.
Reţineţi că acest manual de utilizare este valabil și pentru alte modele. Diferenţele
dintre modele sunt descrise în manual în mod clar.
Semnificaţia simbolurilor
Următoarele simboluri sunt utilizate în diverse părți ale acestui manual de utilizare:
Informații importante și sugestii utile cu privire
C
la utilizare.
A
AVERTISMENT:
situații periculoase referitoare la siguranța vieții
și a bunurilor.
Avertisment privind șocurile electrice.
Avertismente pentru
B
Avertisment pentru suprafețe fierbinți.
Lampă
Acest produs a fost fabricat în fabrici moderne, prietenoase cu mediul înconjurător, fără a dăuna naturii.
Acest produs este conform cu
regulamentul DEEE.
Nu conţine PCB.
Page 44

Instrucțiuni importante referitoare la
1
siguranță și la mediul înconjurător
Această secţiune conţine
instrucţiuni de siguranță care
vă vor ajuta să vă protejați de
riscul vătămărilor personale sau
pagubelor materiale. Nerespectarea
acestor instrucțiuni anulează
garanția furnizată.
1.1 Siguranţă generală
• Procedurile de instalare și de
reparare trebuie efectuate
întotdeauna de către un agent de
service autorizat. Producătorul
nu își asumă răspunderea pentru
daunele survenite ca urmare
a procedurilor efectuate de
persoane neautorizate.
• Acest aparat nu este destinat
utilizării de către persoane
(inclusiv copii) cu capacităţi fizice,
senzoriale sau mentale reduse
sau fără experienţă și cunoștinţe.
Copiii trebuie supravegheaţi
pentru a nu se juca cu aparatul.
1.1.1 Siguranţă electrică
• În timpul procedurilor de instalare,
întreținere, curățare și reparare,
deconectaţi întotdeauna produsul
de la priză.
• În cazul în care cablul de alimentare
este defect, acesta trebuie
înlocuit de o persoană calificată
și certificată de producător, de
centrul de service post-vânzare
sau similar (de preferință un
electrician) sau de o persoană
descrisă de importator.
• Tensiunea de funcţionare este
cuprinsă între 220 și 240 de volţi.
• Dacă aparatul are o defecţiune,
acesta nu trebuie utilizat decât
dacă este reparat de un agent de
service autorizat. Există riscul de
șoc electric!
• Nu trasaţi cablul de alimentare în
apropierea plitelor. În caz contrar,
cablul de alimentare poate să
provoace incendiu, deoarece se
topește ușor.
• Nu conectaţi hota la priză înainte
de finalizarea montării.
• Pentru o funcţionare optimă,
conducta externă de evacuare
nu trebuie să fie mai lungă de 4
m. Nu trebuie să aibă mai mult
de două unghiuri drepte (90°),
iar diametrul trebuie să fie de
minimum ø120 mm.
44 / RO
Hotă / Manual de utilizare
Page 45

Instrucțiuni importante referitoare la
1
siguranță și mediu înconjurător
• Înainte de a interveni asupra
componentelor interne ale
produsului, deconectați produsul
de la priză.
• Utilizaţi produsul doar cu o priză
cu împământare.
1.1.2 Siguranţa produsului
• Dumneavoastră puteți folosi o
conductă cu diametrul de 120 mm
sau de 150 mm pentru racordul de
evacuare al hotei.
• Nu racordaţi hota la căi de
evacuare conectate la sobe, la
hornuri pentru gaze arse sau la
căi de evacuare prin care se ridică
flăcări. Respectaţi regulile stabilite
de autorităţi privind evacuarea
gazelor arse.
• Distanța dintre suprafața
inferioară a hotei și suprafața
superioară a mașinii de gătit/
cuptorului nu trebuie să fie mai
mică de 50 de cm pentru plitele pe
gaz și de 45 de cm pentru plitele
electrice.
• Nu utilizați hota fără filtrele de
aluminiu și nu scoateți filtrele în
timpul funcţionării.
• Nu atingeţi niciodată lămpile
hotei după ce au fost aprinse timp
îndelungat. Lămpile fierbinți vă
pot arde mâna.
• Evitaţi flăcările mari sub produs. În
caz contrar, particulele din filtrul
de ulei se pot aprinde, provocând
un incendiu.
• Porniţi plitele după ce ați pus
cratițele sau oalele pe acestea. În
caz contrar, căldura care se ridică
poate deforma unele piese ale
produsului.
• Opriţi plitele înainte de a lua
cratițele sau oalele.
• Evitaţi materialele inflamabile sub
hotă.
• În timpul prăjirii alimentelor, uleiul
se poate aprinde. Așadar, fiți
atenți cu materialele textile și cu
perdelele.
• În timpul prăjirii alimentelor, nu
lăsaţi niciodată mașina de gătit
nesupravegheată; în caz contrar,
uleiul încins poate cauza un
incendiu.
• Dacă hota nu este curățată la
intervale specifice, există riscul de
incendiu.
• În momentul când curățați hota,
fiți foarte atenți și purtați mănuși.
Hotă / Manual de utilizare
45 / RO
Page 46

Instrucțiuni importante referitoare la
1
siguranță și mediu înconjurător
• Vă recomandăm să operați
aparatul cu câteva minute înainte
de începerea gătirii, pentru a mări
forţa de aspirare. În acest fel, forţa
de aspirare va fi continuă și stabilă
în momentul când se ridică vaporii.
• Utilizați hota alte 15 minute după
finalizarea gătirii sau prăjirii,
pentru a elimina mirosul și vaporii
de gătire din bucătărie.
• În momentul când hota este
utilizată, în special împreună
cu mașinile de gătit pe gaz,
asigurați-vă că mediul este
ventilat cu aer curat.
• Fiți atenți să nu conectați produsul
la căile de evacuare utilizate de
dispozitivele non-electrice. (De
ex.: Calea de evacuare a unui
boiler).
• Utilizarea simultană și fluentă
a hotei și a altui dispozitiv care
necesită o cantitate de aer
este posibilă doar atunci când o
presiune scăzută de 4 Pa (0,04
mbar) este atinsă, fiind astfel
evitată reabsorbirea gazului.
Acest lucru poate fi realizat prin
mijloacele de admisie a aerului
din deschiderile descoperite (ușă,
fereastră, goluri de ventilație sau
alte măsuri tehnice).
Fiți foarte atenți să furnizați
un debit suficient de aer. O cale
de evacuare care furnizează
admisia/evacuarea aerului nu este
suficientă pentru acest scop.
1.1.3 Siguranţa copiilor
• Ambalajele sunt periculoase
pentru copii. Păstraţi ambalajele
într-un loc sigur, departe de copii.
• Aparatele electrice sunt
periculoase pentru copii. Țineți
copiii departe de produs. Nu
permiteți copiilor să se joace cu
produsul.
• Acest produs poate fi utilizat
de copii de la 8 ani în sus și de
persoane cu capacitate fizică,
senzorială sau mentală limitată
sau care nu au cunoștințe și
experiență, atât timp cât sunt
supravegheați pentru utilizarea
în siguranță a produsului sau sunt
instruiți corespunzător sau înțeleg
riscurile de utilizare a produsului.
Nu permiteți copiilor să se joace
cu produsul.
•
ATENȚIE:
hota este utilizată împreună cu un
dispozitiv de gătire, componentele
accesibile se pot încălzi.
În momentul când
46 / RO
Hotă / Manual de utilizare
Page 47

Instrucțiuni importante referitoare la
1
siguranță și mediu înconjurător
1.2 Utilizare destinată
• Acest aparat este destinat uzului
1.3 Conformitate cu Directiva
DEEE și de depozitare a
deșeurilor
casnic. Nu este destinat pentru uz
comercial și nu trebuie folosit în
alte scopuri.
• Producătorul nu își asumă
răspunderea pentru daunele
produse în urma utilizării sau
manipulării incorecte.
• Durata de funcţionare a
aparatului este de 10 ani. Aceasta
este perioada impusă pentru
disponibilitatea pieselor de schimb
necesare funcţionării produsului.
•
AVERTISMENT:
Nerespectarea fixării șuruburilor
conform instrucțiunilor furnizate
în aceste manual poate conduce
la pericole electrice.
Acest produs a fost fabricat cu componente și cu
materiale de înaltă calitate, care pot fi refolosite
și reciclate. La sfârșitul duratei de funcționare,
nu eliminați produsul împreună cu deșeurile
menajere și cu alte tipuri de deșeuri. Transportați-l
la un punct de colectare pentru reciclarea
echipamentelor electrice și electronice. Vă rugăm
să contactaţi autorităţile locale, pentru a afla unde
se află aceste puncte de colectare.
Conformitate cu Directiva
RoHS:
Produsul pe care l-ați achiziționat este conform
cu Directiva RoHS UE (2011/65/UE). Acesta
nu conține materiale periculoase și interzise
specificate în această Directivă.
Acest produs este conform cu Directiva
DEEE a UE (2012/19/UE). Acest produs a
fost marcat cu simbolul de clasificare
pentru deșeuri de echipamente electrice
și electronice (DEEE).
Hotă / Manual de utilizare
1.4 Informaţii cu privire la
ambalaj
Ambalajul produsului este fabricat din
materiale reciclabile, conform Legislaţiei
Naţionale. Materialele utilizate pentru
ambalaj nu trebuie să fie eliminate împreună cu
deșeurile menajere sau cu orice alt tip de deșeuri.
Transportați-le la punctele de colectare destinate
ambalajelor, amenajate de autoritățile locale.
47 / RO
Page 48

Specificaţii tehnice ale aparatului
2
Datele tehnice cuprinse în acest manual și etichetele
lipite pe hotă au fost obținute prin măsurători și calcule în
conformitate cu cerințele Regulamentului UE nr. 65/2014
și 66/2014. Acest produs este conform cu Directivele
Europene 2009/125/CE și 2011/65/UE.
Fig.1
Figura explicativă a hotei de bucătărie
Protecţie horn
Capac cu balamale
Filtru de grăsime din
aluminiu
Cablu de alimentare
Panou de comandă
tactil
Iluminare
48 / RO
Hotă / Manual de utilizare
Page 49

Specificaţii tehnice ale aparatului
2
Fig.2
Desen cu dimensiuni
Utilizarea aparatului
3
Hota este proiectată pentru absorbția fumului
în timp ce se pregătesc felurile de mâncare.
Dispozitivul poate fi operat în două moduri:
Ca extractor:
printr-o țeavă de aerisire. Conducta de evacuare
nu este disponibilă împreună cu dispozitivul și
trebuie achiziționată separat.
vaporii sunt scoși din încăpere
A
A
Utilizați cea mai scurtă conductă de
A
A
Hotă / Manual de utilizare
descărcare a vaporilor.
Conducta de evacuare trebuie să
aibă cea mai netedă suprafață
interioară (nu se recomandă
utilizarea țevilor tip spiro).
Ca aspirator:
și de mirosuri înainte de a se întoarce în cameră
prin grilaj pe protecția hornului de deasupra. Dacă
hota va funcționa ca un aspirator, este necesar
să se instaleze un filtru cu carbon activ (Fig. 10).
Filtrul de carbon nu este un echipament standard;
trebuie să fie cumpărat de la un furnizor.
Folosiți o țeavă cu cât mai puține
coturi posibil (unghiurile de îndoire
nu trebuie să fie mai mari de 90 de
grade).
Nu se recomandă să se aplice
schimbări de secțiune ale țevii (mai
mari sau mai mici, de exemplu ieșiri
de aer de Ø150 mm, la ieșiri de aer de
Ø120 mm).
vaporii sunt curățați de grăsime
49 / RO
Page 50

Montarea aparatului
4
Utilizarea șuruburilor sau a
elementelor de fixare incompatibile
A
Distanța minimă de suspendare a hotei între
suprafața pe care sunt așezate ustensilele de
bucătărie pe dispozitivul de încălzire (aragaz cu
gaz sau electric) și partea inferioară a hotei de
bucătărie (Fig. 3) trebuie să fie de cel puțin 45 cm
pentru mașinile de gătit electrice și nu mai puțin
de 65 cm pentru mașinile de gătit cu gaz.
Dacă manualul de instrucțiuni al dispozitivului de
încălzire conține cerința unei distanțe mai mari de
instalare a hotei de bucătărie decât cea indicată
mai sus, urmați aceste instrucțiuni. Instalarea
hotei și a protecției coșului pentru hotă este
prezentată în desene (Fig. 4 - Fig. 9)
Hota este echipată cu buloane de ancorare de
montaj adecvate pentru majoritatea pereților
și plafoanelor. Dispozițiile generale privind
evacuarea aerului din încăperi trebuie să fie
respectate în timpul instalării.
Fig.3
bucătărie
cu manualul poate provoca șocuri
electrice.
Distanța recomandată de la aragazul de
Kuchenki gazowe L ≥ 65cm
Kuchenki elektryczne L ≥ 45cm
50 / RO
L
Hotă / Manual de utilizare
Page 51

Montarea aparatului
4
Înainte de instalare, trebuie întreprinse
următoarele:
• Verificați dacă dimensiunile produsului
achiziționat sunt adaptate locului vizat selectat.
• Deconectați și scoateți (dacă este posibil)
mobilierul amplasat în zona de instalare a hotei,
pentru a avea acces ușor la tavan sau la peretele
de care trebuie montată hota. Dacă acest lucru
nu este posibil, elementele situate în apropierea
zonei de lucru trebuie să fie securizate.
• Verificați dacă există o priză în apropierea
zonei de instalare a hotei și dacă este posibilă
conectarea hotei la conducta de aerisire care
evacuează vaporii din exterior.
• Verificați dacă punctele de găurire nu acoperă
cablurile de instalare (electrice, hidraulice etc.).
• Echipați-vă cu următoarele instrumente: bandă
de măsurare, creion, burghiu/dispozitiv de
cuplare, burghiu Ø8, șurubelniță, poloboc.
6. Puneți protecția coșului pe corpul aparatului.
Apoi ridicați ușor partea hotei care este marcată
cu B, până când puteți să o înșurubați în clema
fixată anterior pe perete (Fig.9).
A
4.1 Lucrări de montare
1. Determinați axa elementului de încălzire și
transferați-o pe peretele pe care va fi montată
hota. Marcați toate punctele specifice de
montare a hotei. Utilizați burghiul și orificiile de
foraj (Fig. 4).
2. Introduceți șuruburile de extensie în deschideri.
În cele două orificii marcate cu A, introduceți
șuruburi (lăsând o lungime de 7 mm a șurubului
în exterior, ca în Fig. 5).
3. Deschideți clapeta hotei și scoateți filtrul de
grăsime (Fig.6).
4. Înșurubați clema de protecție a coșului, prindeți
hota pe două șuruburi strânse ușor (Fig.7).
5. Așezați polobocul pe corpul de bucătărie al
hotei. Prin rotirea elementelor marcate cu A,
poziționați hota orizontal, în conformitate cu
indicația polobocului și apoi strângeți tare cele
două șuruburi strânse ușor și cele două șuruburi
rămase (Fig.8).
Instalarea trebuie efectuată foarte
atent, pentru a nu zgâria protecția
coșului și hota.
Hotă / Manual de utilizare
51 / RO
Page 52

Montarea aparatului
4
Fig.4
Dimensiuni de instalare
155mm
2 x O8
4xO8
Fig.5
Montarea șuruburilor de extensie
min:30
245mm
max:550mm
220mm
229mm
L+90mm
52 / RO
2 x O5 x 45mm
4 x O8 x 40mm
A
2 x O8 x 40mm
7mm
Hotă / Manual de utilizare
Page 53

Montarea aparatului
4
Fig.6
Demontarea filtrului de grăsime din
aluminiu
2
1
Fig.7
Suspendarea hotei
Hotă / Manual de utilizare
53 / RO
Page 54

Montarea aparatului
2 x O5 x 45mm
A
2 x O3,9x9,5
A
B
A
~10
1
2
2
3
4
4
4
Fig.8
Poziționarea hotei
Fig.9
Asamblare protecție hotă
54 / RO
Hotă / Manual de utilizare
Page 55

Montarea aparatului
4
4.2 Conexiunea electrică
Tensiunea de alimentare trebuie să corespundă
tensiunii indicate pe plăcuța cu caracteristici
tehnice aplicată în interiorul hotei. Dacă hota de
bucătărie este echipată cu un ștecher, acesta
trebuie introdus într-un conector de priză care
îndeplinește cerințele obligatorii și se află într-un
loc ușor accesibil. Dacă hota nu este prevăzută cu
o priză, instalarea hotei trebuie să fie încredințată
unei persoane cu permise corespunzătoare (de ex.
electrician)
Hotă / Manual de utilizare
55 / RO
Page 56

Curățarea și întreținerea
5
Înainte de a efectua orice operațiune de
întreținere a aparatului, scoateți ștecherul din
priza de perete. Hota trebuie curățată cu agenți
de curățare ușori, nu utilizați abrazivi. Întreținerea
regulată îmbunătățește semnificativ performanța
și durabilitatea hotei. Hota trebuie curățată cel
puțin o dată pe lună sau la fiecare 35 de ore de
funcționare a hotei. Pentru curățarea hotei, NU
UTILIZAȚI AGENȚI PE BAZĂ DE ALCOOL. Articolele
satinate (inox) trebuie curățate cu preparate
speciale în acest scop.
Nerespectarea dispozițiilor
referitoare la curățarea
dispozitivului și la înlocuirea
filtrelor poate provoca riscuri de
incendiu. Prin urmare, se recomandă
A
respectarea recomandărilor din
acest document. Producătorul nu
este răspunzător pentru eventualele
daune produse motorului sau pentru
incendiile cauzate de utilizarea
necorespunzătoare.
5.2 Filtru de carbon
Hota poate fi echipată cu un filtru de carbon activ.
Filtrul de carbon se aplică doar în cazul în care hota
nu este conectată la conducta de aerisire.
Filtrul trebuie așezat pe carcasa turbinei, așa cum
se arată în desen (Fig. 10). Filtrul de carbon activ
trebuie înlocuit la fiecare 6 luni.
A
Fig.10
Înlocuirea filtrului cu carbon
2
5.1 Filtru de grăsime
Hota este echipată cu un filtru din aluminiu, care
reține particulele de grăsime de la gătit. Filtrul
poate fi scos prin deplasarea opritoarelor în
direcția săgeților (Fig. 7). Filtrul trebuie spălat
manual, prin cufundare timp de 15 minute în apă
cu lichid de spălat vase, la o temperatură de 4050°C. După 15 minute, puteți continua cu spălarea
și apoi cu clătirea. Filtrul trebuie să fie uscat înainte
de a fi introdus în hotă. Filtrul poate fi spălat și în
mașina de spălat vase. În timpul procedurii de
spălare, filtrul poate să se decoloreze, dar acest
lucru nu afectează proprietățile sale de filtrare.
Dacă filtrul nu este curățat în mod regulat, se
reduce performanța hotei, ceea ce poate provoca
riscul de incendiu. Filtrul trebuie curățat cel puțin
după fiecare 35 de ore de funcționare a hotei.
Symbol
Symbol
Filtrul de carbon nu trebuie să fie
spălat și nici regenerat.
1
1
2
Filter installation
Filter dismantling
56 / RO
Hotă / Manual de utilizare
Page 57

Curățarea și întreținerea
5
5.3 Înlocuirea becurilor
Înainte de orice lucrare referitoare la înlocuirea
becurilor, asigurați-vă că ați deconectat sursa de
alimentare. Dacă hota a fost activată anterior,
trebuie să așteptați până se răcesc becurile, după
care le puteți înlocui. Procesul de schimbare a
becurilor este arătat în Fig. 11.
Înainte de a înlocui becurile,
A
A
A
Fig.11
deconectați sursa de alimentare a
hotei.
Nu atingeți becurile atunci când
sunt fierbinți.
Aveți grijă să nu atingeți becul
înlocuit direct cu mâinile.
Înlocuirea becurilor
GU10
1
Symbol
Symbol
Hotă / Manual de utilizare
Bulb installation
Bulb dismantling
2
1
2
57 / RO
Page 58

Comanda de funcționare a hotei
6
Hota este echipată cu o comandă tactilă, situată
pe panoul de sticlă superior (Fig.12).
Fig. 12
Desemnarea câmpurilor tactile:
Afișaj digital
Localizarea panoului tactil
Pornirea/oprirea hotei
Pornirea/oprirea becurilor hotei
Reducerea vitezei turbinei
Creșterea vitezei turbinei
6.1 Comanda de funcționare a
turbinei
În modul de așteptare, panoul de control nu
este iluminat și câmpurile , și sunt
dezactivate. Pentru a activa panoul de control,
atingeți câmpul sau folosiți telecomanda (dacă
este inclusă). După activare, panoul de control
este evidențiat și apar simbolurile câmpului tactil;
prin atingerea câmpului se pornește turbina
la viteza utilizată recent, prin atingerea câmpului
se pornește turbina la cea mai mare treaptă de
viteză și prin atingerea câmpului se pornește
turbina la cea mai joasă treaptă de viteză.
Viteza turbinei poate fi mărită prin atingerea
câmpului și redusă prin atingerea simbolului
. Dezactivarea turbinei hotei se face prin
atingerea câmpului sau după atingerea
câmpului , atunci când turbina funcționează
la prima treaptă de viteză. Odată cu schimbarea
vitezei turbinei, cifrele de pe afișaj se modifică în
consecință:
1 - turbină care funcționează în prima treaptă de
viteză, 2 - turbină care funcționează în treapta
a doua, 3 - turbină care funcționează în treapta
a treia, 4 - turbină care funcționează în treapta
intensivă (turbo).
În conformitate cu Regulamentul UE 66/2014,
hota este echipată cu un contor automat, de cinci
minute, care schimbă automat nivelul turbinei de
la treapta a patra la a treia după 5 minute (nu se
aplică modelului cu numărul turbinei „5”).
6.2 Comandă iluminat
Pentru a activa iluminatul hotei, trebuie apăsat
simbolul ; o altă apăsare a simbolului oprește
iluminatul.
6.3 Informații suplimentare
despre comanda hotei
Sistemul de control al hotei este echipat cu un
contor de funcționare a hotei. Contorul este setat
la 35 de ore. După expirarea acestui timp, pe ecran
se afișează simbolul F, care indică
recomandată a filtrului de aluminiu
Pentru a șterge simbolul „F” de pe afișajul hotei,
simbolul trebuie să fie atins și menținut astfel
continuu, timp de aproximativ 8 secunde.
Dispozitivul de control al hotei este echipat cu un
blocaj al panoului tactil, pentru a dezactiva panoul
tactil, de exemplu când curățați hota. Pentru a
activa blocajul, atingeți și țineți apăsat simbolul
(timp de aproximativ 10 secunde), până când
simbolul . (punct din colțul din dreapta jos) apare
pe afișaj.
curățarea
.
58 / RO
Hotă / Manual de utilizare
Page 59

Comanda de funcționare a hotei
6
Pentru a reveni la funcționarea normală, atingeți
din nou și țineți apăsat simbolul (timp de
aproximativ 10 secunde), până când punctul de pe
afișaj se stinge.
Dispozitivul de control al hotei este echipat
cu un comutator de timp, care dezactivează
turbina hotei după 15 minute de la pornirea
contorului. Comutatorul de timp al turbinei nu
dezactivează iluminarea, iar viteza turbinei
poate fi schimbată în mod liber. Pentru a activa
comutatorul de timp, turbina hotei trebuie să
funcționeze cu orice viteză, pe treapta 1, 2, 3 sau
la nivel intens. Temporizatorul este activat prin
menținerea simbolului (timp de aproximativ 10
secunde), până când un punct începe să lumineze
intermitent în colțul din dreapta jos. Pentru a
dezactiva această funcție, țineți apăsat din nou
simbolul (timp de aproximativ 10 secunde) sau
opriți hota.
Dispozitivul de control al hotei este echipat
cu o caracteristică pentru oprirea automată a
funcționării turbinei după 2 ore de inactivitate a
controlului hotei.
Hota are o telecomandă (doar modelele selectate)
(Fig.13)
Fig. 13
Telecomandă
6.4 Funcționarea
telecomenzii
simbolul , dar și și . Viteza poate fi mărită
apăsând butonul și poate fi redusă apăsând
butonul .
Funcționarea turbinei este
controlată cu partea
superioară a telecomenzii,
marcată ca . Activarea/
dezactivarea turbinei se face
prin apăsarea butonului cu
Upper part of
remote control
Hotă / Manual de utilizare
Bottom part of remote control
59 / RO
Page 60

Comanda de funcționare a hotei
6
6.5 Comandă iluminatului prin
telecomandă
Iluminatul este controlat
cu partea de jos a
telecomenzii, marcată ca
. Activarea/
dezactivarea luminii se
face prin apăsarea
butonului cu simbolul .
Butoanele și sunt dezactivate.
6.6 Metode de reducere a
efectului procesului de gătire
asupra mediului
• Pentru a reduce consumul de energie, gătiți cu
ajutorul protecțiilor pe ustensilele de bucătărie.
• Filtrele din aluminiu trebuie să fie păstrate
curate (timpul recomandat de operare a filtrului
de aluminiu între curățări este de cel mult 35 de
ore de funcționare a hotei).
• Aveți grijă de permeabilitatea conductelor de
ventilație.
• Nivelul de funcționare a turbinei la gătire trebuie
să fie întotdeauna setat la o treaptă minimă,
ceea ce va permite îndepărtarea fumului la
intensitatea curentă de gătit.
6.7 Fișă produs
Fișa produsului este așezată în interiorul hotei.
60 / RO
Hotă / Manual de utilizare
Page 61

Rezolvarea problemelor
7
Simptome Cauză Metoda de reparare
În timpul funcționării hotei, se afișează
intermitent litera „F”.
Afișajul arată numai simbolul „-.”
(minus și punct în colțul din dreapta
jos), hota nu răspunde la dezactivare.
Pe afișaj nu este afișat niciun simbol,
hota nu răspunde la apăsarea
câmpurilor de control.
Afișajul arată simbolul uneia dintre
treptele de viteze; hota nu răspunde la
apăsarea câmpurilor de control.
Turbina hotei se deconectează după
15 min. de funcționare, pe afișaj apare
o cifră intermitentă, adică „1.” (numărul
vitezei curente și punct în colțul din
dreapta jos).
La treapta a patra, cifra „4” apare
intermitent pe afișaj, iar după 5 min.,
viteza trece în treapta a treia.
Hota poate fi acționată numai cu
ajutorul panoului de control, nu
răspunde la telecomandă.
Hota are o aspirație foarte scăzută de
vapori.
Unul sau mai multe puncte de lumină
nu funcționează.
Hota a generat zgomot și vibrații
excesive.
Dacă recomandările de mai sus nu rezolvă problema, contactați un service autorizat pentru reparații de electrocasnice. În
niciun caz utilizatorul hotei nu are dreptul la reparații independente. O listă de puncte de service este inclusă în cardul de
garanție și pe pagina de internet.
După 35 de ore de funcționare, hota
indică necesitatea curățării sau
înlocuirii filtrului de grăsime.
Comanda tactilă a fost blocată această caracteristică facilitează
curățarea hotei.
Comanda tactilă este probabil
suspendată.
Comanda tactilă este probabil
suspendată
A fost activat comutatorul automat de
timp al comenzii tactile.
Hota este echipată cu un mod turbo,
care trece automat în treapta a treia
după 5 minute de funcționare, pentru
a economisi energie.
Bateria telecomenzii este goală sau
distanța este prea lungă.
Probabil este cauzată de filtrele
murdare.
Bec halogen/LED defect. Becul trebuie înlocuit cu unul nou,
Acest lucru poate fi cauzat de instalarea
incorectă a hotei pe dulapurile de
pe perete sau de bucătărie. Nu s-au
folosit toate șuruburile furnizate sau
șuruburile sunt montate slab, lăsând
spațiu liber.
* se aplică la hote cu control tactil.
Țineți apăsat timp de aproximativ 8 sec.
„-” de pe comanda tactilă. Filtrul trebuie
spălat în mașina de spălat vase sau
înlocuit cu unul nou.
Pentru a dezactiva blocarea, țineți apăsat
timp de aproximativ 10 sec. câmpul cu
simbolul de pornire.
Deconectați hota de la sursa de
alimentare timp de aproximativ 15 sec. și
reporniți-o.
Deconectați hota de la sursa de
alimentare timp de aproximativ 15 sec. și
reporniți-o.
Pentru a dezactiva comutatorul de
timp, țineți apăsat simbolul „+” timp de
aproximativ 10 sec. sau dezactivați hota.
Treapta turbo va fi utilizată doar la gătit
intensiv.
Înlocuiți bateria cu una nouă.
Filtrul de grăsime trebuie curățat în
mașina de spălat vase sau înlocuit cu unul
nou. Filtrul de carbon (dacă există) trebuie
înlocuit cu unul nou.
compatibil cu simbolul specificat în
manualul de instrucțiuni pentru hota
aragazului.
Hota trebuie montată pe perete sau pe
dulap, folosind toate punctele prevăzute
de producător. După reglarea poziției
hotei orizontal și vertical, strângeți toate
șuruburile de montare.
Hotă / Manual de utilizare
61 / RO
Page 62

Bitte zunächst diese Anleitung lesen!
Sehr geehrte Kundin, sehr geehrter Kunde,
Danke, dass Sie sich für ein Produkt der Marke Beko entschieden haben. Wir hoffen,
dass Sie mit diesem Produkt, das mit den höchsten Qualitätsanforderungen und der
modernsten Technologie hergestellt wurde, beste Ergebnisse erzielen. Bitte lesen Sie
die gesamte Bedienungsanleitung und alle anderen Begleitdokumente aufmerksam,
bevor Sie das Produkt verwenden; bewahren Sie sie zum künftigen Nachschlagen
sicher auf. Wenn Sie das Produkt an einen Dritten weitergeben, händigen Sie bitte
auch diese Anleitung aus. Befolgen Sie alle Warnhinweise und Informationen in dieser
Anleitung.
Bitte denken Sie daran, dass diese Anleitung auch für einige andere Modelle erstellt
wurde. Unterschiede zwischen den Modellen werden in der Anleitung klar und deutlich
beschrieben.
Bedeutung der Symbole
Folgende Symbole werden in den verschiedenen Abschnitten dieser Anleitung
verwendet:
Wichtige Informationen und nützliche Tipps zur
C
Verwendung.
A
WARNUNG:
Situationen im Hinblick auf die Sicherheit von
Leib, Leben und Eigentum.
Warnung vor Stromschlägen.
Warnhinweise zu gefährlichen
B
Warnung vor heißen Flächen.
Lampe
Dieses Produkt wurde in umweltfreundlichen, modernen Einrichtungen ohne schädliche Auswirkungen auf die Natur
Dieses Gerät erfüllt die WEEERichtlinie.
hergestellt.
Es enthält kein PCB.
Page 63

Wichtige Hinweise zu Sicherheit und
1
Umwelt
Dieser Abschnitt enthält
Sicherheitsanweisungen, die
beim Schutz vor Personenund Sachschäden helfen.
Bei Nichtbeachtung dieser
Anweisungen erlischt die gewährte
Garantie.
1.1 Allgemeine Sicherheit
• Lassen Sie Installations- und
Reparaturarbeiten immer von
einem autorisierten Servicedienst
durchführen. Der Hersteller
übernimmt keine Haftung für
Schäden, die von unautorisierten
Personen verursacht wurden.
• Dieses Gerät darf nicht von
Personen (einschließlich Kindern)
benutzt werden, die unter
körperlichen oder geistigen
Einschränkungen leiden oder
denen es an der nötigen Erfahrung
im Umgang mit solchen Geräten
mangelt. Kinder sollten soweit
beaufsichtigt werden, dass sie
nicht mit dem Gerät spielen.
1.1.1 Elektrische Sicherheit
• Trennen Sie das Gerät bei
Installations-, Wartungs-,
Reinigungs- und
Reparaturarbeiten immer von der
Stromversorgung.
• Falls das Netzkabel defekt ist, sollte
es vom Hersteller, Kundendienst
oder einer ähnlich qualifizierten
Person (idealerweise einem
Elektriker) bzw. einer vom
Importeur genannten Person
ersetzt werden.
• Die Betriebsspannung beträgt
220 bis 240 Volt.
• Falls das Gerät einen Fehler
aufweist, darf es erst nach
Reparatur durch den autorisierten
Servicedienst wieder in Betrieb
genommen werden. Es besteht
Stromschlaggefahr!
• Netzkabel nicht in der Nähe von
Kochfeldern verlegen. Andernfalls
kann das Netzkabel einen Brand
verursachen, falls es wegen zu
großer Hitze schmilzt.
• Die Dunstabzugshaube niemals
vor Abschluss der Installation an
die Stromversorgung anschließen.
Dunstabzugshaube / Bedienungsanleitung
63 / DE
Page 64

Wichtige Hinweise zu Sicherheit und
1
Umwelt
• Zur Erzielung optimaler Leistung
darf der Abzug nicht länger als
4 m sein. Er darf nicht mehr als
2 Knicke (90 °) haben und sein
Durchmesser muss mind. ø 120
mm betragen.
• Trennen Sie das Gerät vor jeglicher
Handhabung der internen Teile des
Gerätes von der Stromversorgung.
• Verwenden Sie das Gerät nur mit
einer geerdeten Steckdose.
1.1.2 Produktsicherheit
• Sie können ein Rohr mit einem
Durchmesser von 120 oder 150
mm am Abluftanschluss der
Dunstabzugshaube verwenden.
• Keine Verbindungen zu Schächten
herstellen, die mit Öfen,
Abluftschächten oder Kaminen
mit aufsteigenden Flammen
verbunden sind. Beachten Sie
behördliche Richtlinien zur
Ableitung von Abluft.
• Der Abstand zwischen
der Unterkante der
Dunstabzugshaube und der
Oberkante des Herdes/Ofens
sollte nicht weniger als 50 cm
bei Gasherden und 45 cm bei
Elektroherden betragen.
• Dunstabzugshaube nicht ohne
Aluminiumfilter betreiben; Filter
nicht entfernen, während die
Dunstabzugshaube in Betrieb ist.
• Lampen der Dunstabzugshaube
niemals berühren, wenn sich
das Gerät bereits längere
Zeit in Betrieb befindet. Die
Lampen können heiß sein und
Verbrennungen verursachen.
• Vermeiden Sie hohe Flammen
unter dem Gerät. Andernfalls
können sich im Aluminiumfilter
angesammelte Partikel entzünden
und einen Brand verursachen.
• Schalten Sie Kochfelder erst
ein, nachdem Sie Kochgeschirr
darauf gestellt haben. Andernfalls
kann die steigende Temperatur
bestimmte Teile Ihres Produktes
verformen.
• Schalten Sie die Kochfelder
ab, bevor Sie das Kochgeschirr
herunternehmen.
• Vermeiden Sie entflammbare
Materialien unter der
Dunstabzugshaube.
• Öl kann sich beim Braten
entzünden. Achten Sie daher
besonders auf Kleidung und
Vorhänge.
64 / DE
Dunstabzugshaube / Bedienungsanleitung
Page 65

Wichtige Hinweise zu Sicherheit und
1
Umwelt
• Lassen Sie das Kochgerät niemals
unbeaufsichtigt, während Sie
braten; heißes Öl kann Feuer
fangen.
• Falls die Dunstabzugshaube
nicht in den angegebenen
Intervallen gereinigt wird, besteht
Brandgefahr.
• Seien Sie bei der Reinigung der
Dunstabzugshaube extrem
vorsichtig, tragen Sie Handschuhe.
• Zur Steigerung der Saugleistung
empfehlen wir Ihnen, das Gerät
einige Minuten vor Beginn des
Kochens oder Bratens in Betrieb
zu nehmen. Dadurch erhalten
Sie eine kontinuierliche und
stabile Saugleistung, sobald
Küchendünste entstehen.
• Die Dunstabzugshaube nach
Abschluss des Kochens oder
Bratens 15 Minuten weiterlaufen
lassen, damit Gerüche und
Küchendünste entfernt werden.
• Achten Sie bei der Benutzung
der Dunstabzugshaube –
insbesondere in Verbindung
mit Gasherden – auf eine
ausreichende Frischluftzufuhr.
1.1.3 Sicherheit von Kindern
• Achten Sie darauf, das Gerät
nicht an Abzugsschächte
anzuschließen, die von nicht
elektrischen Geräten verwendet
werden. (Bsp.: Heizungsschacht)
• Die gleichzeitige Verwendung
der Dunstabzugshaube und eines
weiteren, Luft ansaugenden
Gerätes ist nur möglich, wenn
ein Unterdruck von mindestens
4 Pa (0,04 mbar) erreicht und
dadurch ein Zurückströmen des
Gases vermieden wird. Dazu muss
Luft durch nicht abgedeckte
Öffnungen (Tür, Fenster,
Lüftungsöffnungen oder andere
technische Maßnahmen) in den
Raum strömen können. Achten
Sie darauf, dass ausreichend
Luft zugeführt wird. Ein Schacht,
der den Luftein- und -austritt
ermöglicht, ist für diesen Zweck
nicht ausreichend.
• Verpackungsmaterialien
können für Kinder gefährlich
sein. Bewahren Sie
Verpackungsmaterialien an
einem sicheren Ort außerhalb der
Reichweite von Kindern auf.
Dunstabzugshaube / Bedienungsanleitung
65 / DE
Page 66

Wichtige Hinweise zu Sicherheit und
1
Umwelt
• Elektrische Geräte können für
Kinder gefährlich sein. Halten Sie
Kinder stets vom Produkt fern.
Verbieten Sie Kindern, mit dem
Gerät zu spielen.
• Dieses Gerät darf von Kindern ab
8 Jahren sowie von Personen mit
eingeschränkten körperlichen,
sensorischen oder geistigen
Fähigkeiten oder einem Mangel an
Wissen und Erfahrung verwendet
werden, sofern sie im Hinblick
auf eine sichere Benutzung
des Gerätes beaufsichtigt
werden oder entsprechend
angeleitet wurden und die damit
verbundenen Gefahren verstehen.
Kinder dürfen nicht mit dem Gerät
spielen.
•
ACHTUNG:
können sich bei der Verwendung
mit dem Kochgerät aufheizen.
Zugängliche Teile
• Der Hersteller haftet nicht
für Schäden aufgrund von
unsachgemäßer Benutzung oder
Handhabung.
• Die Betriebslebenszeit des Gerätes
beträgt 10 Jahre. Dies entspricht
dem Verfügbarkeitszeitraum von
Ersatzteilen, damit das Produkt
richtig funktioniert.
•
WARNUNG:
Schrauben nicht entsprechend
den Anweisungen in der Anleitung
befestigen, können elektrische
Gefahren entstehen.
Falls Sie die
1.2 Zweckmäßiger Gebrauch
• Dieses Gerät ist für den privaten
Gebrauch bestimmt. Es eignet sich
nicht zum kommerziellen Einsatz
und darf nicht zweckentfremdet
verwendet werden.
66 / DE
Dunstabzugshaube / Bedienungsanleitung
Page 67

Wichtige Hinweise zu Sicherheit und
1
Umwelt
1.3 Entsorgung von
Altgeräten:
Dieses Produkt erfüllt die Vorgaben der EU-WEEEDirektive (2012/19/EU). Das Produkt wurde mit
einem Klassifizierungssymbol für elektrische und
elektronische Altgeräte (WEEE) gekennzeichnet.
Dieses Gerät wurde aus hochwertigen
Materialien hergestellt, die
wiederverwendet und recycelt werden
können. Entsorgen Sie das Gerät am
Ende seiner Einsatzzeit nicht mit dem
regulären Hausmüll; geben Sie es stattdessen bei
einer Sammelstelle zur Wiederverwertung von
elektrischen und elektronischen Altgeräten ab.
Ihre Stadtverwaltung informiert Sie gerne über
geeignete Sammelstellen in Ihrer Nähe.
Einhaltung von RoHSVorgaben:
Das von Ihnen erworbene Produkt erfüllt die
Vorgaben der EU-RoHS Direktive (2011/65/EU).
Es enthält keine in der Direktive angegebenen
gefährlichen und unzulässigen Materialien.
1.4 Informationen zur
Verpackung
Die Verpackung des Produkts wurde
gemäß unserer nationalen
Gesetzgebung aus recyclingfähigen
Materialien hergestellt. Entsorgen Sie
die Verpackungsmaterialien nicht mit dem
Hausmüll oder anderem Müll. Bringen Sie sie zu
einer von der Stadtverwaltung bereitgestellten
Sammelstelle für Verpackungsmaterial.
Dunstabzugshaube / Bedienungsanleitung
67 / DE
Page 68

Technische Daten des Gerätes
2
Die technischen Daten in diesem
Handbuch und auf den an die
Dunstabzugshaube angebrachten
Etiketten wurden in Erfüllung der EUVerordnungen 65/2014 und 66/2014
erhoben und berechnet. Dieses Gerät
erfüllt die Vorgaben der europäischen
Richtlinien 2009/125/EG und 2011/65/
EU.
Abb. 1 Erläuternde Abbildung der
Dunstabzugshaube
Kamindeckel
Scharnierklappe
Aluminium-Fettfilter
Netzkabel
Sensorbedienfeld
Beleuchtung
68 / DE
Dunstabzugshaube / Bedienungsanleitung
Page 69

Technische Daten des Gerätes
2
Abb. 2
Dimensionszeichnung
Dunstabzugshaube / Bedienungsanleitung
69 / DE
Page 70

Gerät bedienen
3
Diese Dunstabzugshaube dient zum
Absaugen von Rauch und Dampf, die
beim Zubereiten von Speisen entstehen.
Das Gerät kann auf zwei Arten betrieben
werden:
Als Absauger: Die Dünste werden durch
ein Ventilationsrohr aus dem Raum
abgeführt. Ein solches Absaugrohr
gehört nicht zum Lieferumfang.
Halten Sie die Dunstabfuhrleitung
A
A
A
A
Als Absorber: Die Dünste werden
von Fett und Gerüchen befreit und
die gefilterte Luft wird durch das
Gitter oben am Kamindeckel wieder
in den Raum zurückgeleitet. Wird
die Dunstabzugshaube als Absorber
eingesetzt, muss unbedingt ein
Aktivkohlefilter (Abb. 10) eingesetzt
werden. Dieser Aktivkohlefilter wird
nicht standardmäßig mitgeliefert,
sondern muss getrennt erstanden
werden.
so kurz wie möglich.
Die Abzugsrohre müssen innen so
glatt wie möglich sein (verwenden
Sie keine gewellten Rohre).
Die Rohre sollten so wenig Kurven
wie möglich enthalten (die
Kurvenwinkel sollten 90 ° nicht
überschreiten).
Die Abluftleitung sollte keine
Durchmesserveränderungen
enthalten (vor allem nicht von groß
auf kleiner, z.B. von 150 auf 120 mm
Ø am Wandeintritt).
70 / DE
Dunstabzugshaube / Bedienungsanleitung
Page 71

Gerät installieren
4
Die Verwendung von im Handbuch
nicht empfohlenen Schrauben oder
A
Der Mindestabstand beim Aufhängen der
Haube zwischen der Kochflächenhöhe
(Gasflamme oder Elektroplatte) und
dem untersten Rand der Abzugshaube
(Abb. 3) muss bei Elektroherden 45 cm
bzw. bei Gasherden 65 cm betragen.
Falls die Anleitung des Herdes einen
größeren Montageabstand von
Abzugshauben verlangt, befolgen Sie
diese Anweisungen. Die Montage von
Abzugshaube und Kaminverkleidung
geht aus den Abbildungen 4 bis 9 hervor.
Befestigungselementen könnte zu
Stromschlägen führen.
Die Dunstabzugshaube wird mit
Befestigungselementen geliefert, die
für die meisten Wände und Decken
geeignet sind. Die allgemeinen
Vorkehrungen für ausreichenden
Luftaustausch im Raum müssen für die
Installation beachtet werden.
Abb. 3
Empfohlener Abstand zum Herd
Kuchenki gazowe L ≥ 65cm
Kuchenki elektryczne L ≥ 45cm
L
Dunstabzugshaube / Bedienungsanleitung
71 / DE
Page 72

Gerät installieren
4
Beachten Sie vor der Montage des Gerätes bitte
Folgendes:
• Prüfen Sie, ob die Abmessungen des Gerätes
zum Montageort passen.
• Demontieren Sie (falls möglich) die an die
Montagestelle angrenzenden Möbel, um
leichten Zugang zur Decke oder Wand zu
bekommen, an die die Absaughaube montiert
werden soll. Ist dies nicht möglich, prüfen Sie,
dass die Elemente in der Nähe der Montagestelle
sicher befestigt sind.
• Prüfen Sie, ob sich eine geeignete Steckdose
im Montagebereich befindet sowie, ob die
Abzugshaube problemlos an die Abluftleitung
zur Abfuhr der Dünste nach außen
angeschlossen werden kann.
• Prüfen Sie, dass unter den vorgesehenen
Bohrlöchern keine Strom-, Gas-, Wasser- oder
andere Leitungen verlaufen.
• Halten Sie folgendes Werkzeug bereit: Maßband,
Bleistift, Bohrschrauber, 8-mm-Bohrer,
Schraubendreher, Wasserwaage.
5. Legen Sie die Wasserwaage auf die Haube
6. Befestigen Sie den Kamindeckel am Gehäuse.
4.1 Montage
1. Bestimmen Sie die Heizelementachse und
markieren Sie diese an der Wand, an der die
Dunstabzugshaube montiert werden soll.
Markieren Sie alle Haubenmontagepunkte.
Bohren Sie die Befestigungslöcher (Abb. 4).
2. Setzen Sie Spreizschrauben in die Bohrlöcher
ein. Schrauben Sie die vorgesehenen Schrauben
in die zwei Löcher „A“ ein. Diese müssen 7 mm
herausstehen, siehe Abb. 5.
3. Öffnen Sie die Haubenklappe und entfernen
den Fettfilter (Abb. 6).
4. Schrauben Sie die Kamindeckelschellen an,
hängen Sie die Haube an zwei noch locker
angezogenen Schrauben auf (Abb. 7).
auf. Stellen Sie die mit A markierten Elemente
durch Drehen so ein, dass die Haube laut
Wasserwaage waagerecht hängt. Ziehen Sie
dann die beiden lockeren Schrauben sowie die
beiden anderen Schrauben fest (Abb. 8).
Ziehen Sie nun vorsichtig den als B markierten
Teil der Haube nach oben heraus, bis Sie ihn
an die vorher an die Wand fixierte Schelle
schrauben können (Abb. 9).
Bei diesen Arbeiten sollten Sie
sehr vorsichtig vorgehen, um ein
A
Verkratzen der Haube oder des
Kamindeckels zu vermeiden.
72 / DE
Dunstabzugshaube / Bedienungsanleitung
Page 73

Gerät installieren
4
Abb. 4
Abb. 5
Montageabmessungen
155mm
2 x O8
245mm
220mm
4xO8
Spreizschrauben montieren
A
min:30
max:550mm
229mm
L+90mm
2 x O8 x 40mm
2 x O5 x 45mm
4 x O8 x 40mm
7mm
Dunstabzugshaube / Bedienungsanleitung
73 / DE
Page 74

Gerät installieren
4
Abb. 6
Abb. 7
Aluminumfettfilter demontieren
2
1
Dunstabzugshaube aufhängen
74 / DE
Dunstabzugshaube / Bedienungsanleitung
Page 75

Gerät installieren
2 x O5 x 45mm
A
2 x O3,9x9,5
A
B
A
~10
1
2
2
3
4
4
4
Abb. 8
Abb. 9
Dunstabzugshaube positionieren
Haubenabdeckung montieren
Dunstabzugshaube / Bedienungsanleitung
75 / DE
Page 76

Gerät installieren
4
4.2 Elektrischer Anschluss
Stellen Sie sicher, dass die Netzspannung
mit der am Typenschild an der Innenseite der
Dunstabzugshaube angegebenen Spannung
übereinstimmt. Kommt die Dunstabzugshaube
mit einem Kabel mit Stecker, sollte dieser in eine
passende Steckdose eingesteckt werden, die
den Elektroinstallationsnormen entspricht und
leicht zugänglich ist. Hat die Dunstabzugshaube
keinen Stecker, muss die Installation von einer
qualifizierten Person (z.B. einem Elektriker)
vorgenommen werden.
76 / DE
Dunstabzugshaube / Bedienungsanleitung
Page 77

Reinigung und Wartung
5
Schalten Sie das Gerät vor jeglichen
Wartungsarbeiten ab oder ziehen Sie
den Netzstecker aus der Steckdose.
Reinigen Sie die Abzugshaube nur mit
sanften Reinigungsmitteln, verwenden
Sie keine Scheuermittel. Eine
regelmäßige Instandhaltung verbessert
die Leistung und Lebensdauer der
Haube bedeutet. Die Haube sollte
zumindest einmal im Monat oder nach
je 35 Stunden Betriebszeit gereinigt
werden. Verwenden Sie zum Reinigen
KEINE ALKOHOLHALTIGEN MITTEL.
Die Elemente mit matter Oberfläche
(aus Edelstahl) sollten mit einem
Spezialmittel für dieses Material
gereinigt werden.
Jegliche Nichteinhaltung der
Anweisungen zum Reinigungen
des Gerätes und Auswechseln des
Filters können zu hoher Brandgefahr
führen. Halten Sie sich also immer
A
strikt an die Anweisungen in dieser Anleitung. Der Hersteller haftet nicht für Schäden oder Brände
aufgrund von unsachgemäßer
Benutzung oder Handhabung.
Der Filter kann auch in der Spülmaschine
gereinigt werden. Durch das Waschen
könnte der Filter seine Farbe verändern,
was jedoch seine Filtereigenschaften
nicht beeinträchtigt. Wird dieser Filter
nicht regelmäßig gereinigt, verringert
sich die Leistung der Abzugshaube und
entsteht Brandgefahr. Der Filter sollte
daher zumindest nach je 35 Stunden
Betriebszeit gereinigt werden.
5.2 Aktivkohlefilter
Die Abzugshaube kann mit einem
Aktivkohlefilter ausgestattet werden.
Dies ist jedoch nur nötig, wenn die
Haube nicht an einen Dunstabzug
angeschlossen ist.
5.1 Fettfilter
Die Dunstabzugshaube ist mit einem
Aluminiumfilter ausgestattet, der
die beim Kochen ausgestoßenen
Fettpartikel auffängt. Dieser Filter
kann durch Bewegen der Verschlüsse
in Pfeilrichtung herausgenommen
werden (Abb. 7). Der Filter sollte 15
Minuten lang in 40 bis 50 °C warmem
Spülmittelwasser eingeweicht
und dann von Hand ausgespült
werden. Vor Wiedereinsetzen muss
der Filter vollständig trocken sein.
Dunstabzugshaube / Bedienungsanleitung
77 / DE
Page 78

Reinigung und Wartung
5
Der Filter wird wie in Abb. 10 gezeigt,
in das Gebläsegehäuse eingesetzt.
Der Kohlefilter sollte alle 6 Monate
ausgewechselt werden.
Der Kohlefilter darf nicht ausgewa-
A
Abb. 10 Aktivkohlefilter ersetzen
Symbol
Symbol
schen oder regeneriert werden.
1
2
1
2
Filter installation
Filter dismantling
A
Abb. 11
Symbol
Symbol
Achten Sie darauf, die neuen
Lampen nicht direkt mit den Fingern
anzufassen.
Leuchtmittel auswechseln
GU10
Bulb installation
Bulb dismantling
1
2
1
2
5.3 Leuchtmittel austauschen
Vergewissern Sie sich vor jeglicher Arbeit an
der Beleuchtung, die Stromversorgung zu
unterbrechen. War die Beleuchtung vorher in
Betrieb, warten Sie, bis die Lampen abgekühlt sind,
bevor Sie sie austauschen. Der Austauschvorgang
wird in Abb. 11 gezeigt.
Trennen Sie vor Austausch der
A
A
78 / DE
Leuchtmittel die Stromversorgung
der Haube.
Berühren Sie die Lampen nicht, solange sie noch heiß sind.
Dunstabzugshaube / Bedienungsanleitung
Page 79

Bedienung der Dunstabzugshaube
6
Die Dunstabzugshaube wird mechanisch
bedient(Abb. 12).
Abb. 12
Lage der Sensorsteuerung
Die Gebläsestufe steigt durch Berühren von Feld
und verringert sich durch Berühren von .
Zum Abschalten des Gebläses drücken Sie auf
oder auf , wenn es auf der niedrigsten Stufe
läuft. Die Anzeige auf dem Display passt sich der
jeweiligen Gebläsestufe an:
1 - Gebläse auf erster Stufe, 2 - Gebläse auf zweiter
Stufe, 3 - Gebläse auf dritter Stufe, 4 - Gebläse auf
höchster Stufe (Turbo).
In Erfüllung der EU-Verordnung 66/2014 ist die
Dunstabzugshaube mit einem Fünf-MinutenTimer ausgestattet, der das Gebläse nach 5
Minuten Betrieb in der Turbo-Stufe automatisch
zurück in die dritte Stufe schaltet (gilt nicht für
Modelle mit fünf Gebläsestufen).
6.2 Beleuchtung steuern
Bestimmung der Berührungstasten:
Ein-/Ausschalten der Dunstabzugshaube
Ein-/Ausschalten der Beleuchtung
Verringerung der Gebläsestufe
Steigerung der Gebläsestufe
Digitalanzeige
6.1 Gebläse steuern
Im Bereitschaftsmodus leuchtet die
Sensorsteuerung nicht und sind die Felder ,
und deaktiviert. Berühren Sie zum Aktivieren
des Bedienfelds das Feld oder benutzen die
Fernbedienung (falls vorhanden). Nach dem
Aktivieren leuchtet die Sensorsteuerung auf
und erscheinen die Bedienfeldsymbole; durch
Berühren von Feld läuft das Gebläse auf der
zuletzt verwendeten Stufe an, mit dem Feld
geht es auf die höchste Stufe, während das
Gebläse am Feld auf die niedrigste Stufe
gestellt wird.
Betätigen Sie zum Einschalten der Beleuchtung
das Symbol . Die nächste Betätigung dieses
Symbols schaltet das Licht wieder aus.
6.3 Weitere Angaben zur
Haubensteuerung
Die Haubensteuerung ist mit einem
Betriebsstundenzähler ausgestattet. Dieser ist
auf 35 Stunden eingestellt. Nach Ablauf dieser
Zeit erscheint das Symbol F auf dem Display,
um anzuzeigen, dass der
gereinigt werden muss
zum Löschen des Symbols „F“ auf dem Display
acht Sekunden lang das Symbol .
Die Haubensteuerung ist mit einer
Bedienfeldblockade ausgestattet, um das
Bedienfeld zu deaktivieren, wenn das Gerät
zum Beispiel gereinigt wird. Betätigen Sie zum
Blockieren des Bedienfelds zehn Sekunden lang
das Symbol , bis das Symbol . (Punkt in der
unteren rechen Ecke) auf dem Display erscheint.
Kehren Sie zum Normalbetrieb zurück, indem
Sie erneut zehn Sekunden lang das Symbol
drücken, bis der Punkt auf dem Display
verschwindet.
Aluminiumfilter
. Betätigen Sie
Dunstabzugshaube / Bedienungsanleitung
79 / DE
Page 80

Bedienung der Dunstabzugshaube
6
Die Haubensteuerung ist mit einem Timer
ausgestattet, der das Gebläse 15 Minuten nach
Einschalten des Timers ausschaltet. Dieser
Gebläsetimer schaltet nicht die Beleuchtung aus
und funktioniert mit jeglicher Gebläsestufe. Um
diesen Timer zu aktivieren, muss das Gebläse
auf einer beliebigen Stufe laufen. Sie aktivieren
diesen Timer durch ca. zehn Sekunden langes
Betätigen des Symbols , bis ein Punkt in der
rechten unteren Displayecke zu Blinken beginnt.
Diese Funktion deaktivieren Sie durch erneutes
zehnsekündiges Betätigen des Symbols oder
durch Ausschalten der Dunstabzugshaube.
Die Haubensteuerung schaltet das Gebläse
automatisch nach zwei Stunden ohne jegliche
Betätigung eines Bedienelements aus.
Einige Modelle dieser Dunstabzugshaube werden
mit einer Fernbedienung geliefert (Abb. 13).
Abb. 13
Upper part of
remote control
Fernbedienung
6.5 Beleuchtung mit der
Fernbedienung steuern
ausschalten. Die Tasten und haben keine
Funktion.
Bottom part of remote control
Die Haubenbeleuchtung
wird mit dem unteren als
markierten Teil der
Fernbedienung
gesteuert. Sie können
die Beleuchtung mit der
Taste ein- und
6.4 Mit der Fernbedienung
steuern
Das Gebläse wird mit dem
oberen als markierten Teil
der Fernbedienung
gesteuert. Sie können das
Gebläse mit den Tasten ,
und ein- und
ausschalten. Die Gebläsestufe steigern Sie mit der
Taste und verringern sie mit .
80 / DE
Dunstabzugshaube / Bedienungsanleitung
Page 81

Bedienung der Dunstabzugshaube
6
6.6 Methoden zur Vermeidung
der Umweltbeeinträchtigung
durch Kochen
• Sie sparen Energie, wenn Sie immer nur Töpfe
mit Deckel verwenden.
• Die Aluminiumfilter müssen immer sauber
gehalten werden (sie sollten spätestens nach je
35 Stunden Betrieb gereinigt werden).
• Achten Sie darauf, dass die Abluftleitungen
richtig dicht bleiben.
• Die Gebläsestufe sollte immer so gewählt
werden, dass sie gerade ausreicht, um den
jeweils entwickelten Kochdunst komplett
abzusaugen.
6.7 Produktdatenblatt
Das Produktdatenblatt wird in die Haube eingelegt
mitgeliefert.
Dunstabzugshaube / Bedienungsanleitung
81 / DE
Page 82

Problembehebung
7
Anzeichen Ursache Lösung
Im Haubenbetrieb wird blinkend der
Buchstabe „F“ angezeigt.
Das Display zeigt nur die Anzeige „-.“
(Minuszeichen und Punkt unten rechts)
und die Haube reagiert nicht auf
Ausschaltversuche.
Auf dem Display erscheint kein
Symbol, die Haube reagiert auf keine
Betätigung der Sensorsteuerung.
Auf dem Display erscheint das Symbol
einer der Stufen, aber die Haube
reagiert auf keine Betätigung der
Sensorsteuerung.
Das Gebläse schaltet sich nach ca. 15
Minuten Betrieb ab und das Display
zeigt eine blinkende Nummer, z. B. „1.“
(aktuelle Gebläsestufe und ein Punkt in
der rechten unteren Ecke).
In der vierten Stufe blinkt „4“ auf dem
Display. Nach fünf Minuten wird das
Gebläse automatisch auf die dritte
Stufe heruntergeschaltet.
Die Dunstabzugshaube reagiert nicht
auf die Fernbedienung, jedoch wohl
auf die Sensorsteuerung.
Die Absaugleistung der
Dunstabzugshaube ist schlecht.
Eine oder mehrere Lampen leuchten
nicht.
Die Dunstabzugshaube macht
Geräusche und vibriert.
Nach 35 Betriebsstunden zeigt das
Gerät an, dass der Fettfilter gereinigt
oder ausgetauscht werden muss.
Die Sensorsteuerung wurde blockiert,
um die Reinigung des Filters zu
erzwingen.
Die Sensorsteuerung ist
wahrscheinlich blockiert.
Die Sensorsteuerung ist
wahrscheinlich blockiert.
Die automatische Zeitsteuerung der
Sensorsteuerung wurde aktiviert.
Die Dunstabzugshaube ist mit einem
Turbomodus ausgestattet, der
nach 5 Minuten zum Energiesparen
automatisch auf Stufe drei
zurückschaltet.
Die Batterie der Fernsteuerung ist leer
oder der Bedienabstand zu groß.
Wahrscheinlich ist der Filter voll. Reinigen Sie den Filter in der
Halogen- oder LED-Lampen defekt. Tauschen Sie defekte Lampen immer
Dies kann an einer schlechten
Montage an der Wand oder an die
Küchenschränke liegen. Nicht alle
mitgelieferten Schrauben wurden
verwendet, oder sind nicht fest
montiert.
Drücken Sie 8 Sekunden lang die Taste „-“
an der Sensorsteuerung. Reinigen Sie den
Filter in der Spülmaschine oder setzen
einen neuen ein.
Um diese Blockierung wieder freizugeben,
drücken Sie 10 Sekunden lang das Feld
mit dem Einschaltsymbol.
Trennen Sie die Dunstabzugshaube 15
Sekunden lang von der Stromversorgung
und schließen sie wieder an.
Trennen Sie die Dunstabzugshaube 15
Sekunden lang von der Stromversorgung
und schließen sie wieder an.
Geben Sie die Zeitschaltung wieder
frei, indem Sie 10 Sekunden lang auf
das Symbol „+“ drücken oder die Haube
deaktivieren.
Die Turbostufe sollte nur bei intensiver
Dunstentwicklung aktiviert werden.
Setzen Sie eine neue Batterie ein.
Spülmaschine oder setzen einen neuen
ein. Tauschen Sie den Kohlefilter (falls
vorhanden) gegen einen neuen aus.
nur gegen neue mit den im Handbuch
der Dunstabzugshaube verlangten
technischen Daten aus.
Die Dunstabzugshaube muss an
allen vom Hersteller vorgesehenen
Befestigungspunkten solide an eine Wand
oder einen Schrank montiert werden.
Ziehen Sie nach sorgfältiger vertikaler
und horizontaler Nivellierung der Haube
alle Montageschrauben fest an.
82 / DE
Dunstabzugshaube / Bedienungsanleitung
Page 83

Problembehebung
7
* Gilt für Dunstabzugshauben mit Sensorsteuerung.
Lässt sich das Problem mit diesen Empfehlungen nicht lösen, wenden Sie sich an einen zum Reparieren von unseren
Haushaltsgeräten autorisierten technischen Service. Der Nutzer der Dunstabzugshaube darf das Gerät unter keinen
Umständen anderweitig reparieren. Eine Liste unserer Servicestellen finden Sie auf der Garantiekarte und unserer Webseite.
Dunstabzugshaube / Bedienungsanleitung
83 / DE
Page 84

¡Lea este manual antes de utilizar el aparato!
Estimados clientes:
Gracias por elegir un producto Beko. Esperamos que obtenga los mejores resultados de
nuestro producto ya que ha sido fabricado con gran calidad y con tecnología de última
generación. Por tanto, le aconsejamos que lea este manual del usuario con atención y
todos los demás documentos adjuntos antes de utilizar el aparato y que lo guarde para
futuras consultas. Si va a entregar este aparato a otra persona, proporciónele también
el manual del usuario. Siga todas las advertencias e instrucciones incluidas en este
manual.
Recuerde que este manual del usuario también es válido para otros modelos. Las
diferencias entre los modelos se describen explícitamente en el manual.
Significado de los símbolos
Los siguientes símbolos se usan en las diversas secciones del presente manual:
Información importante y consejos útiles sobre
C
su uso.
A
ADVERTENCIA:
nes peligrosas sobre la seguridad de las personas y la propiedad.
Advertencia sobre posibles descargas eléctricas.
Advertencias de situacio-
B
Advertencia sobre superficies calientes.
Lámpara
Este producto se ha fabricado en plantas de fabricación modernas y que hacen uso de procesos respetuosos con el
Este aparato es conforme a la normativa
sobre aparatos eléctricos y electrónicos y
la gestión de sus residuos (RAEE).
medio ambiente.
No contiene PCB.
Page 85

Instrucciones importantes para la
1
seguridad y el medio ambiente
Esta sección contiene instrucciones
de seguridad que ayudarán a la
protección contra los riesgos de
lesiones personales o daño a la
propiedad. El incumplimiento de
estas instrucciones causará la
pérdida de la garantía.
1.1 Seguridad general
• Los procedimientos de instalación
y reparación deben ser siempre
llevados a cabo por el servicio
técnico autorizado. El fabricante
no se responsabilizará por daños
resultantes de procedimientos
llevados a cabo por personas no
autorizadas.
• Este aparato no ha sido
diseñado para que lo usen niños
o adultos con sus facultades
físicas, sensoriales o mentales
reducidas, o bien que carezcan
de la experiencia y conocimientos
necesarios. Vigile a los niños para
asegurarse de que no jueguen con
este electrodoméstico.
1.1.1 Seguridad eléctrica
• Desconecte el producto
de la corriente durante los
procedimientos de instalación,
mantenimiento, limpieza y
reparación.
• En caso de que el cable de
alimentación esté defectuoso,
deberá ser sustituido por el
fabricante, su servicio técnico
o una persona cualificada
(preferentemente un electricista)
o alguien designado por el
importador.
• El voltaje de funcionamiento es de
entre 220 y 240 voltios.
• Si el aparato presenta un fallo, no
debe ponerse en funcionamiento
salvo que sea reparado por el
servicio técnico autorizado. ¡Existe
riesgo de descargas eléctricas!
• No haga pasar el cable de
electricidad cerca de las placas.
En caso contrario, el cable de
electricidad puede causar un
incendio, ya que se derrite
fácilmente.
• Nunca enchufe la campana
extractora antes de que se haya
completado la instalación.
• Para obtener el máximo
rendimiento, el conductor externo
no debe superar los 4 metros de
longitud. No debe contener más de
2 ángulos perpendiculares (90°) y
su diámetro debe ser de como mín.
ø120 mm.
Campana extractora / Manual del usuario
85 / ES
Page 86

Instrucciones importantes para la
1
seguridad y el medio ambiente
• Desconecte el aparato antes de
cualquier intervención en las
partes internas del mismo.
• Use el aparato únicamente con un
enchufe con toma a tierra.
1.1.2 Seguridad del producto
• Se puede utilizar un tubo de 120
mm o 150 mm de diámetro para
la conexión de la chimenea de la
campana extractora.
• No realice las conexiones a
chimeneas conectadas a los
fogones, conductos de ventilación
o chimeneas con llamas. Siga
las reglas establecidas por las
autoridades sobre la descarga de
los escapes de aire.
• La altura entre la superficie
inferior de la campana extractora y
la superficie superior de la cocina/
horno no debe ser inferior a 50 cm
para placas a gas y a 45 cm para
placas eléctricas.
• No ponga en funcionamiento la
campana extractora sin filtros
de aluminio y no quite los filtros
mientras esta se encuentre en
funcionamiento.
• Nunca toque las lámparas
de la campana extractora
después de que haya estado en
funcionamiento por un tiempo
prolongado. Las lámparas
calientes pueden quemarle la
mano.
• Evite que haya llamas de grandes
dimensiones debajo del aparato.
En caso contrario, las partículas
en el filtro de aceite pueden
prenderse fuego y generar un
incendio.
• Encienda las placas después
de haber colocado encima las
sartenes u ollas. De lo contrario,
la temperatura elevada puede
deformar algunas partes de su
producto.
• Apague las placas antes de retirar
las sartenes u ollas.
• Evite colocar materiales
inflamables debajo de la campana
extractora.
• El aceite puede prenderse fuego
mientras se están realizando
frituras. Por lo tanto, tenga
cuidado con los trapos y cortinas.
• Nunca desatienda la olla cuando
fría alimentos; de lo contrario el
aceite caliente podría causar un
incendio.
86 / ES
Campana extractora / Manual del usuario
Page 87

Instrucciones importantes para la
1
seguridad y el medio ambiente
• Existe riesgo de incendio si su
campana extractora no se limpia
en los períodos especificados.
• Sea extremadamente cuidadoso
y utilice guantes cuando limpie la
campana extractora.
• Le recomendamos que ponga en
funcionamiento el aparato algunos
minutos antes de comenzar
a cocinar para incrementar la
potencia de aspiración. Así,
tendrá una potencia de aspiración
continua y estable cuando
empiece a salir vapor.
• Haga funcionar su campana
extractora durante 15 minutos
más después de terminar de
cocinar o freír para eliminar los
olores y el vapor de cocción de la
cocina.
• Cuando la campana se esté
utilizando, especialmente junto
con cocinas a gas, asegúrese de
que el ambiente se ventile con aire
limpio.
• Preste atención a no conectar el
aparato a las chimeneas utilizadas
por dispositivos no eléctricos. (Ej.:
chimeneas de los sistemas de
calefacción).
• El funcionamiento simultáneo
y preciso de la campana y otro
dispositivo que necesite aire es
únicamente posible cuando se
alcance una presión baja de 4
Pa (0,04 mbar). Así se evita la
reabsorción del gas. Esto sólo
se puede conseguir mediante el
aire procedente de las aperturas
no cubiertas (puerta, ventana,
orificios de ventilación u otras
medidas técnicas). Ponga especial
atención para proporcionar un flujo
de aire suficiente. Una chimenea
que posibilite la entrada/salida
de aire no es suficiente para este
propósito.
1.1.3 Seguridad de los
niños
• Los materiales de embalaje
son peligrosos para los niños.
Mantenga los materiales de
embalaje en un lugar seguro, fuera
del alcance de los niños.
• Los aparatos eléctricos son
peligrosos para los niños.
Mantenga a los niños lejos de este
producto. No deje que los niños
jueguen con el aparato.
Campana extractora / Manual del usuario
87 / ES
Page 88

Instrucciones importantes para la
1
seguridad y el medio ambiente
• Los niños de ocho o más años y
las personas con las capacidades
físicas, sensoriales o mentales
limitadas o que no tengan los
conocimientos y la experiencia
necesarios pueden usar este
aparato siempre y cuando lo
hagan bajo supervisión o bien
comprendan las instrucciones
de uso seguro del aparato y sus
riesgos potenciales. No deje que
los niños jueguen con el aparato.
•
PRECAUCIÓN:
accesibles pueden calentarse
cuando se usen con un aparato de
cocción.
1.2 Uso previsto
• Este aparato se ha diseñado para
uso doméstico. No es adecuado
para uso comercial y no debe
utilizarse fuera de su uso previsto.
Las partes
•
ADVERTENCIA:
N o
arreglar los tornillos según las
instrucciones indicadas en el
manual puede causar riesgos
eléctricos.
1.3 Conformidad con la
normativa WEEE y eliminación
del aparato al final de su vida
útil:
Este producto es conforme con la directiva de
la UE sobre residuos de aparatos eléctricos y
electrónicos (WEEE) (2012/19/UE). Este producto
incorpora el símbolo de la clasificación selectiva
para los residuos de aparatos eléctricos y
electrónicos (WEEE).
Este aparato se ha fabricado con piezas
y materiales de primera calidad, que
pueden ser reutilizados y son aptos
para el reciclado. No se deshaga del
producto junto con sus los residuos
domésticos normales y de otros tipos al final de su
vida útil. Llévelo a un centro de reciclaje de
dispositivos eléctricos y electrónicos. Solicite a las
autoridades locales información acerca de dichos
centros de recogida.
• El fabricante no será responsable
por ningún daño ocasionado por
su utilización o manipulación
inadecuada.
• La vida útil del aparato es de 10
años. Este es el período necesario
para que haya disponibilidad de
repuestos para el funcionamiento
correcto del producto.
88 / ES
Cumplimiento de la directiva
RoHS:
El producto que ha adquirido es conforme con la
directiva de la UE sobre la restricción de sustancias
peligrosas (RoHS) (2011/65/UE). No contiene
ninguno de los materiales nocivos o prohibidos
especificados en la directiva.
Campana extractora / Manual del usuario
Page 89

Instrucciones importantes para la
1
seguridad y el medio ambiente
1.4 Información de embalaje
El embalaje del producto está fabricado
con material reciclable de acuerdo con
las normativas nacionales sobre medio
ambiente. No se deshaga del material
de embalaje ni de los desechos domésticos o de
otro tipo. Llévelos a los puntos de recogida de
material de embalaje designados por las
autoridades locales.
Campana extractora / Manual del usuario
89 / ES
Page 90

Especificaciones técnicas de su aparato
2
Los datos técnicos incluidos en este
manual y las etiquetas adjuntas
en la campana extractora fueron
obtenidos a partir de mediciones y
cálculos conformes a los requisitos de
la regulación de la UE n.º 65/2014 y
66/2014. Este aparato cumple con las
directivas europeas 2009/125/CE y
2011/65/UE.
Fig. 1 Figura explicativa de la campana
extractora de cocina
Cubierta de la
chimenea
Tapa abatible
Filtro antigrasa de
aluminio
Cable de
alimentación
eléctrica
Panel de control
táctil
Iluminación
90 / ES
Campana extractora / Manual del usuario
Page 91

Especificaciones técnicas de su aparato
2
Fig. 2
Plano de dimensiones
Campana extractora / Manual del usuario
91 / ES
Page 92

Funcionamiento de su aparato
3
La campana está diseñada para
la aspiración de humos durante la
preparación de las comidas. El dispositivo
puede manejarse de dos modos:
Como extractor: los vapores se evacuan
fuera de la sala mediante una tubería de
ventilación. La tubería de ventilación no
se suministra junto con el dispositivo y
debe adquirirse por separado.
Utilice una tubería de descarga de
A
A
A
A
Como absorbedor: la grasa y los
olores del vapor se eliminan antes de
devolverlos a la sala a través de la rejilla
situada en la cubierta superior de la
chimenea. Si la campana se va utilizar
como absorbedor, es necesario instalar
un filtro de carbono activo (fig. 10). El
filtro de carbono no forma parte del
equipamiento estándar; debe adquirirse
en un proveedor.
vapor lo más corta posible.
La tubería de ventilación debe tener
la superficie interior lo más lisa
posible (no se recomienda el uso de
tuberías de tipo espiral).
Utilice una tubería con tan pocos
codos como sea posible (los ángulos
acodados no deben superar los 90
grados).
No se recomienda modificar el
calibre de la tubería (de mayor a
menor, p. ej. una salida de aire de
Ø150 mm a una de Ø120mm).
92 / ES
Campana extractora / Manual del usuario
Page 93

Instalación de su aparato
4
El uso de tornillos o sujeciones
A
La distancia mínima de suspensión de la
campana entre la superficie en la que se
sitúan las piezas de la batería de cocina
sobre el dispositivo calentador (cocina
eléctrica o de gas), y la parte más baja
de la campana de cocina (fig. 3) no debe
ser inferior a 45 cm para las cocinas con
alimentación eléctrica y no menos de 65
cm para las de gas.
Si el manual de instrucciones del
dispositivo calentador plantea el
requisito de una mayor distancia de
instalación de la campana de cocina
que la indicada anteriormente, siga
estas instrucciones. La instalación de la
campana extractora y la pantalla de la
chimenea de la campana se muestra en
los planos (fig. 4 - fig. 9)
incompatibles con el manual pueden
provocar una descarga eléctrica.
La campana extractora viene equipada
con anclajes de montaje aptos para
la mayoría de las paredes y techos.
Durante la instalación deben tenerse
en cuenta las disposiciones generales
sobre la descarga de aire procedente de
las salas.
Fig. 3
Distancia recomendada desde la cocina
Kuchenki gazowe L ≥ 65cm
Kuchenki elektryczne L ≥ 45cm
L
Campana extractora / Manual del usuario
93 / ES
Page 94

Instalación de su aparato
4
Antes de la instalación, deberán realizarse las
siguientes operaciones:
• Compruebe que las dimensiones del producto
adquirido están adaptadas al lugar de destino
seleccionado.
• Desconecte y retire (si es posible) el mobiliario
situado en la zona de instalación de la campana
extractora para facilitar el acceso al techo o
a la pared donde debe encajarse la campana
extractora. En caso de que esto no sea posible,
deben asegurarse los elementos situados cerca
del área de trabajo.
• Compruebe si hay una toma de enchufe cerca
del punto de instalación de la campana y si es
posible conectar la campana a la tubería de
ventilación para evacuar los vapores del exterior.
• Revise que los puntos de perforación no cubran
los cables de instalación (eléctricos, hidráulicos,
etc.).
• Equípese con las siguientes herramientas:
cinta métrica, lápiz, taladro con brocas de Ø8,
destornillador, nivel de burbuja.
5. Coloque el nivel de burbuja en el cuerpo de
la campana extractora. Ajuste la campana
horizontalmente según la indicación del nivel de
burbuja girando los elementos marcados como
A, y luego apriete los dos tornillos flojos y los dos
tornillos restantes (fig. 8).
6. Coloque la cubierta de la chimenea en el
cuerpo. Luego tire suavemente la parte de la
campana marcada como B hacia arriba hasta
que sea capaz de atornillarla al anclaje colocado
anteriormente en la pared (fig. 9).
A
4.1 Trabajos de instalación
1. Determine el eje del elemento calentador y
transfiéralo a la pared donde debe montarse la
campana. Marque todos los puntos de montaje
de la campana extractora específicos. Use el
taladro y los orificios de taladrado (fig. 4).
2. Introduzca los pernos de expansión en las
aberturas. En los dos orificios marcados como
A introduzca los tornillos (dejando 7 mm de
longitud del tornillo en la parte exterior, tal
como se muestra en la fig. 5).
3. Abra la tapa de la campana extractora y retire el
filtro antigrasa (fig. 6).
4. Atornille el anclaje de la cubierta de la chimenea,
cuelgue la campana en los dos tornillos flojos
(fig. 7).
La instalación debe realizarse
con sumo cuidado para no rayar
la cubierta de la chimenea y la
campana extractora.
94 / ES
Campana extractora / Manual del usuario
Page 95

Instalación de su aparato
4
Fig. 4
Dimensiones de la instalación
2 x O8
4xO8
Fig. 5
Montaje de los pernos de expansión
155mm
min:30
245mm
max:550mm
220mm
229mm
L+90mm
A
2 x O8 x 40mm
2 x O5 x 45mm
4 x O8 x 40mm
7mm
Campana extractora / Manual del usuario
95 / ES
Page 96

Instalación de su aparato
4
Fig. 6
Desmontaje del filtro antigrasa de aluminio
2
Fig. 7
Colgado de la campana
1
96 / ES
Campana extractora / Manual del usuario
Page 97

Instalación de su aparato
2 x O5 x 45mm
A
2 x O3,9x9,5
A
B
A
~10
1
2
2
3
4
4
4
Fig. 8
Colocación de la campana
Fig. 9
Montaje de la cubierta de la campana
extractora
Campana extractora / Manual del usuario
97 / ES
Page 98

Instalación de su aparato
4
4.2 Conexión eléctrica
La tensión de la red eléctrica debe corresponder
a la indicada en la placa de datos pegada en el
interior de la campana. Si la campana de cocina
tiene un enchufe, éste debe conectarse a una
toma de corriente que cumpla los requisitos de
las normativas obligatorias y estar localizada en
un lugar de fácil acceso. Si la campana no dispone
de un enchufe, la instalación de la campana debe
encomendarse a una persona cualificada (p. ej. un
electricista).
98 / ES
Campana extractora / Manual del usuario
Page 99

Limpieza y mantenimiento
5
Antes de realizar cualquier operación
de mantenimiento en el aparato,
desenchúfelo de la toma de corriente
de pared. La campana debe limpiarse
con productos de limpieza neutros, no
utilice productos de limpieza abrasivos.
El mantenimiento periódico mejora
significativamente el rendimiento y la
vida útil de la campana extractora. La
campana extractora debe limpiarse al
menos una vez al mes o cada 35 horas
de funcionamiento. Para limpiar la
campana, NO UTILICE AGENTES A BASE
DE ALCOHOL. Los elementos satinados
(inox) deben limpiarse con preparados
especiales para ello.
El incumplimiento de estas disposiciones relacionadas con la limpieza
del dispositivo y la sustitución de
filtros puede provocar riesgos de
incendio. Por lo tanto, se recomienda
A
cumplir con las pautas aquí descritas. El fabricante no se hace responsable de cualquier daño ocasionando al motor o los incendios provocados por un uso indebido.
El filtro también puede lavarse en el
lavavajillas. Durante el procedimiento
de lavado, el filtro puede decolorarse,
aunque esto no afecta a sus
propiedades de filtrado. Si el filtro no se
limpia periódicamente, el rendimiento
de la campana extractora disminuirá y
podría generarse un riesgo de incendio.
El filtro debe limpiarse al menos cada 35
horas de funcionamiento de la campana
extractora.
5.2 Filtro de carbono
La campana extractora puede montarse
con un filtro de carbono activo. El filtro
de carbono solo se aplica en el caso
de que la campana extractora no esté
conectada a la tubería de ventilación.
El filtro debe colocarse en la carcasa de
la turbina, tal y como se muestra en el
plano (fig. 10). El filtro de carbono activo
debe sustituirse cada 6 meses.
El filtro de carbono no debe lavarse
A
ni regenerarse.
5.1 Filtro antigrasa
La campana extractora está equipado
con un filtro de aluminio, el cual retiene
las partículas de grasa procedentes
de la cocción. El filtro puede retirarse
moviendo los cierres en la dirección de
las flechas (fig. 7). El filtro debe limpiarse
a mano sumergiéndolo durante 15
minutos en agua con líquido lavavajillas
a una temperatura de 40-50ºC. Después
de 15 minutos, puede continuar con
el lavado y luego el aclarado. El filtro
debe secarse antes de colocarse en la
campana extractora.
Campana extractora / Manual del usuario
99 / ES
Page 100

Limpieza y mantenimiento
5
Fig. 10 Sustitución del filtro de carbono
1
2
Symbol
Symbol
1
2
Filter installation
Filter dismantling
5.3 Sustitución de la
iluminación
Antes de realizar cualquier trabajo relacionado
con la sustitución o iluminación, asegúrese
de desconectar la fuente de alimentación. Si
la campana fue activada anteriormente, debe
esperar hasta que las bombillas se enfríen, luego
ya puede seguir con su sustitución. El proceso
de sustitución de las bombillas se muestra en la
figura 11.
Fig. 11
Symbol
Symbol
Sustitución de la iluminación
GU10
1
1
Bulb installation
Bulb dismantling
2
2
A
A
A
100 / ES
Antes de sustituir las bombillas, desconecte la campana extractora de la
alimentación eléctrica.
No toque las bombillas cuando estén
calientes.
Tenga cuidado de no tocar la bombilla reemplazada directamente con
las manos.
Campana extractora / Manual del usuario
 Loading...