

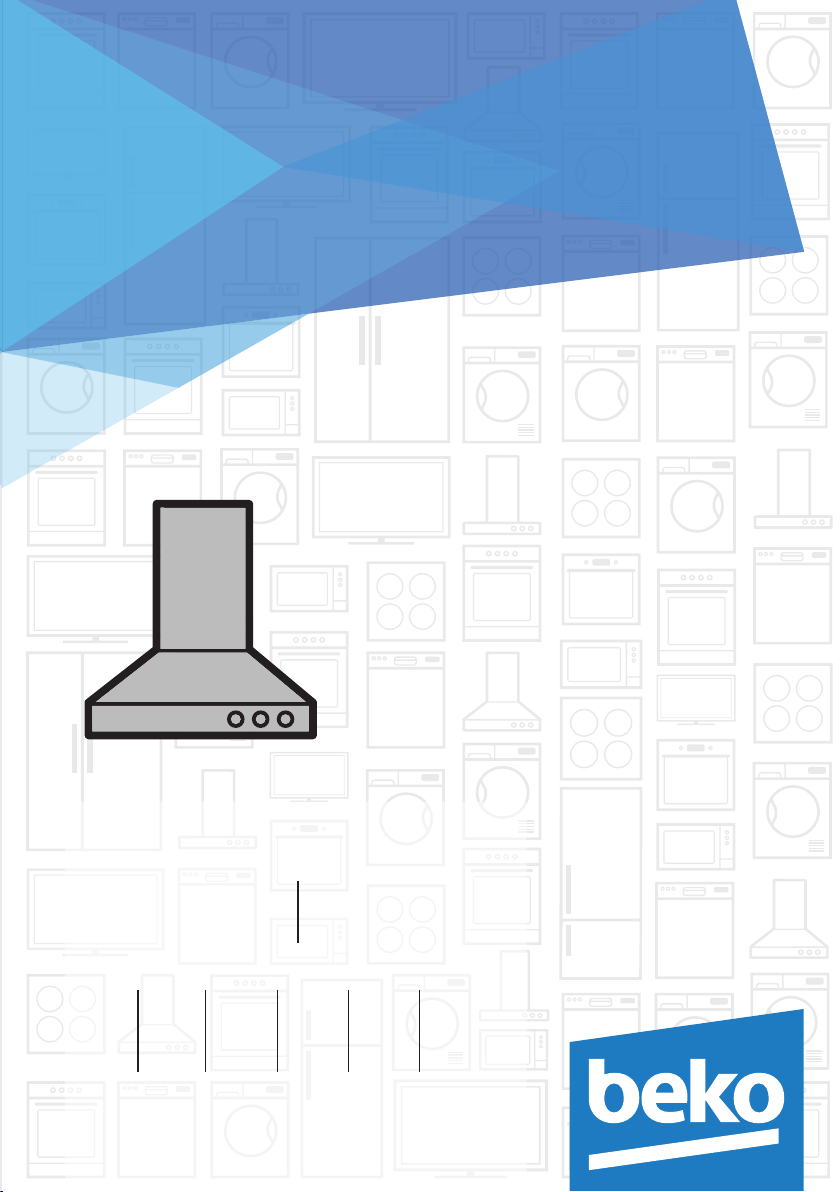
Hood
User Manual
HCA62320W
HCA62320B
EN PL RO DE ES FR
NL CS SL SK UA BG
01M-8851163200-4117-02
HCA62320WH
HCA62320BH
Please read this manual first!
Dear Customers!
Thank you for preferring a Beko product. We hope that you get the best results from
your product which has been manufactured with high quality and state-of-the-art
technology. Therefore, please read this entire user manual and all other accompanying
documents carefully before using the product and keep it as a reference for future use.
If you handover the product to someone else, give the user manual as well. Follow all
warnings and information in the user manual.
Remember that this user manual is also applicable for several other models. Differences
between the models are explicitly described in the manual.
Meanings of the Symbols
Following symbols are used in the various section of this manual:
Important information and useful hints about
C
usage.
A
WARNING:
tions concerning the safety of life and property.
Warning for electric shock.
Warnings for dangerous situa-
B
Warning for hot surfaces.
Ths product has been manufactured n envronmental frendly modern plants wthout gvng any harm to the nature.
Ths applance conforms to the
WEEE regulaton.
It does not contan PCB.
CONTENTS
ENGLISH 04-20
POLSKI 21-37
ROMÂNĂ 38-54
DEUTSCH 55-74
ESPAÑOL 75-94
FRANÇAIS 95-112
NEDERLANDS 113-131
ČESKY 132-149
SLOVENŠČINA 150-167
SLOVENSKÝ 168-185
УКРАЇНСЬКИЙ 186-205
български 206-229
Hood / User Manual
3 / EN

Important safety and envronmental
1
nstructons
This section contains safety
instructions that will help protect
from risk of personal injury or
property damage. Failure to follow
these instructions invalidates the
granted warranty.
1.1 General safety
• Always have the installation and
repairing procedures carried out
by the Authorized Service Agent.
Manufacturing firm shall not be
held responsible for damages that
may be caused by unauthorized
persons.
• This appliance is not intended
for use by persons (including
children) with reduced physical,
sensory or mental capabilities, or
lack of experience and knowledge.
Children should be supervised to
ensure that they do not play with
the appliance.
1.1.1 Electrical safety
• Always unplug the appliance
from the mains supply during
installation, maintenance,
cleaning and repair operations.
• If the power cable is faulty,
it should be replaced by a
qualified person certified by
the manufacturer, after-sales
service or similar (preferably an
electrician) or a person described
by the importer.
• Operating voltage is 220 to 240
volts.
• If the appliance has a failure, it
should not be operated unless it is
repaired by the Authorized Service
Agent. There is the risk of electric
shock!
• Do not route power cable close
to hobs. Otherwise power cable
may cause fire since it melts down
easily.
• Never plug the hood before
installation is completed.
• In order to obtain the best
performance, external conductor
must not be longer than 4 m. It
must not contain more than 2
perpendicular (90°) angles and its
diameter must be min. ø120 mm.
• Disconnect the appliance from
mains before any intervention to
the internal parts of the appliance.
4 / EN
• Use the appliance with a grounded
outlet only.
Hood / User Manual

Important safety and envronmental
1
nstructons
1.1.2 Product safety
• You can use a pipe with a diameter
of 120 mm or 150 mm on the flue
connection of the hood.
• Do not make connections to the
flues connected with stoves,
exhaust shafts or flues with rising
flames. Observe the rules set by
authorities on the discharge of
exhaust air.
• The height between the lower
surface of the hood and upper
surface of the stove/oven should
not be less than 55 cm for gas
hobs and 45 cm for electric hobs.
• Do not operate the hood without
aluminum filters and do not
remove the filters while it is
operated.
• Never touch the hood's lamps
after they are operated for a long
time. Hot lamps may burn your
hand.
• Avoid large flames beneath the
product. Otherwise, particles on
oil filter may ignite and lead to a
fire.
• Turn on the hobs after placing
pans or pots on it. Otherwise,
rising heat may deform certain
parts of your product.
• Turn off the hobs before taking
away pans or pots.
• Avoid inflammable materials under
the hood.
• Oil may ignite while frying foods.
Therefore, be careful about cloths
and curtains.
• Never leave the cooker unattended
when frying foods; otherwise hot
oil may cause fire.
• There is the risk of fire if your hood
is not cleaned in the specified
periods.
• Be extremely careful and wear
gloves when cleaning the hood.
• We advise you to operate the
appliance a few minutes before
starting to cook in order to
increase the suction power. Thus,
you shall have a continuous and
stable suction power when the
vapors arise.
• Operate your hood for 15 minutes
more after the end of cooking or
frying in order to remove the smell
and cooking vapor in the kitchen.
• When the hood is in use, especially
together with gas cookers,
make sure that environment is
ventilated with clean air.
Hood / User Manual
5 / EN

Important safety and envronmental
1
nstructons
• Pay attention not to connect
the appliance to the flues used
by non-electrical devices. (E.g.:
Heater flue).
• Simultaneous and smooth
operation of the hood and another
device that require air is only
possible when a low pressure
of 4 Pa (0.04 mbar) is reached,
and thus the reabsorption of the
gas is avoided. This can only be
achieved by means of air coming
from uncovered openings (door,
window, ventilation openings
or other technical measures).
Pay utmost attention to provide
sufficient air flow. A flue that
provides air ingress/egress is not
enough for this purpose.
1.1.3 Children's safety
• Packaging materials are dangerous
to children. Keep packaging
materials in a safe place out of
reach of children.
• Electrical appliances are
dangerous to children. Keep
children away from the product.
Do not allow children play with the
appliance.
• This appliance can be used by the
children who are at the age of 8 or
over and by the people who have
limited physical, sensory or mental
capacity or who do not have
knowledge and experience, as
long as they are supervised with
regard to safe use of the product
or they are instructed accordingly
and understand the risks of using
the product. Children should not
play with the appliance.
CAUTION:
•
heat up when used with a cooking
device.
Accessible parts may
1.2 Intended use
• This appliance is intended for
domestic use. It is not suitable for
commercial use and it must not be
used out of its intended use.
• The manufacturer shall not be
liable for any damage caused by
improper use or handling.
• Service life of your appliance is 10
years. This is the period required
for availability of spare parts for
proper functioning of the product.
6 / EN
Hood / User Manual
Important safety and envronmental
1
nstructons
•
WARNING:
screws in concordance with
the instructions provided in the
manual may lead to electrical
hazards.
1.3 Compliance with WEEE
Directive and disposing of the
waste product
This product complies with EU WEEE
Directive (2012/19/EU). This product
bears a classification symbol for waste
electrical and electronic equipment
(WEEE).
This product has been manufactured with high
quality parts and materials which can be reused
and are suitable for recycling. Do not dispose of
the waste product with normal domestic and other
wastes at the end of its service life. Take it to the
collection center for the recycling of electrical and
electronic equipment. Please consult your local
authorities to learn about these collection centers.
Failure to fix the
Complance wth RoHS
Drectve:
The product you have purchased complies with EU
RoHS Directive (2011/65/EU). It does not contain
harmful and prohibited materials specified in the
Directive.
1.4 Package information
Package of the product is made of
recyclable materials in accordance with
our National Legislation. Do not dispose
of the packaging materials together with the
domestic or other wastes. Take them to the
packaging material collection points designated by
the local authorities.
Hood / User Manual
7 / EN
Techncal specfcatons of your applance
2
Technical data contained in this manual and
labels attached to the hood were obtained from
measurements and calculations in accordance
with the requirements of EU Regulation No.
65/2014 and 66/2014. This appliance complies
with the European Directives 2004/108/EC,
2006/95/EC, 2009/125/EC and 2011/65/EU.
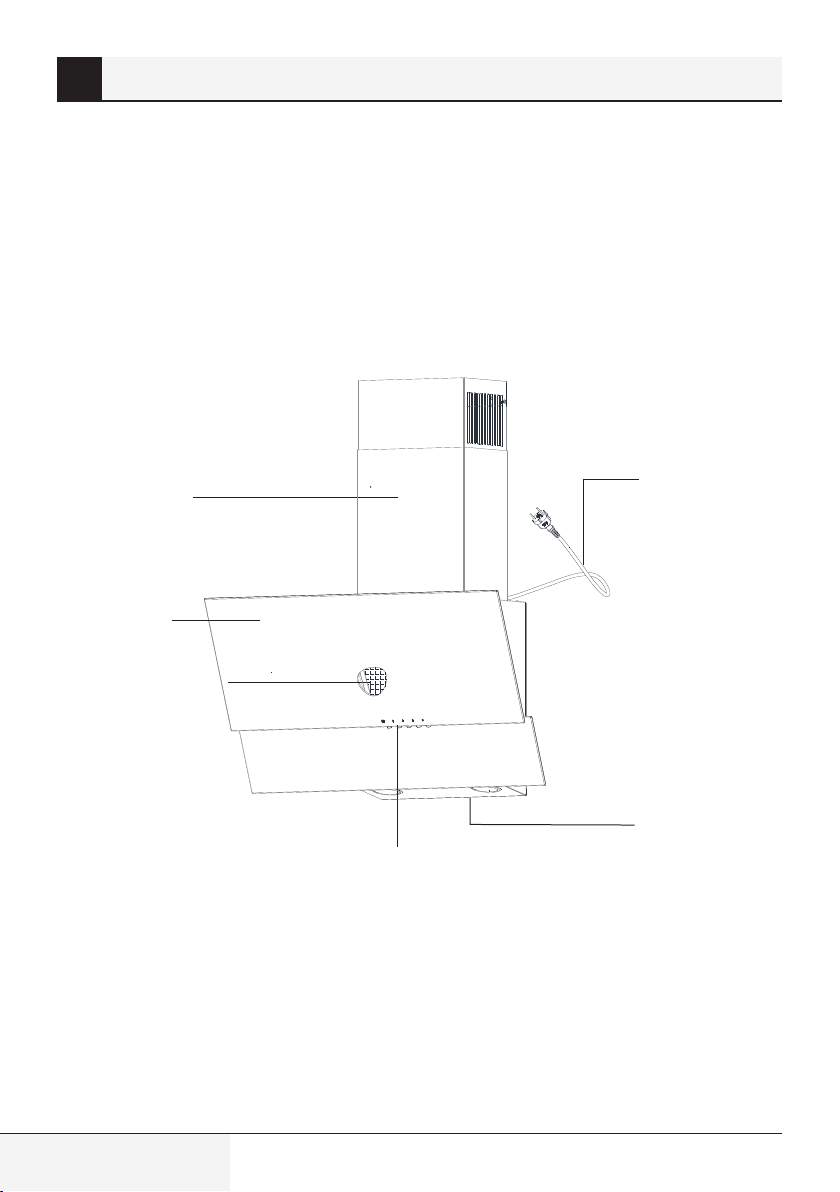
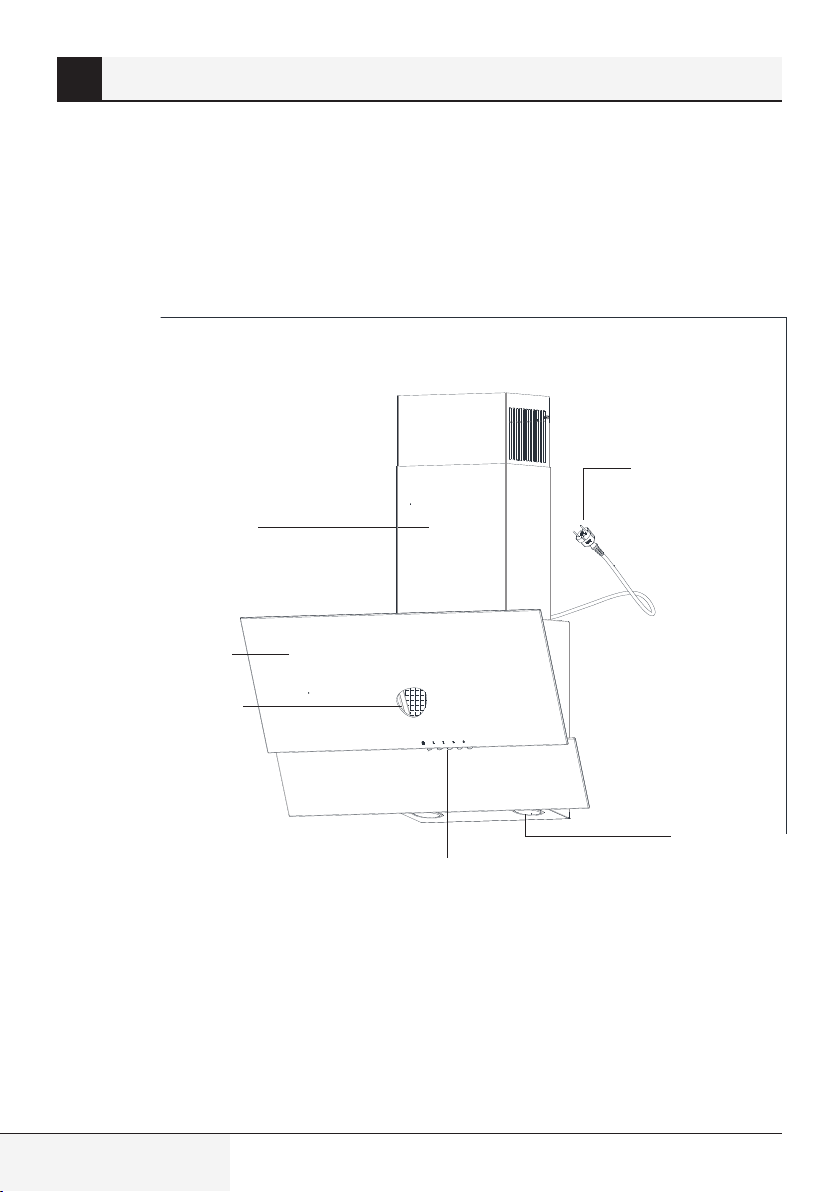
Fig.1
Explanatory figure of the kitchen hood
Chimney cover
Hinged flap
Aluminium grease filter
Power supply cord
Lighting
Mechanical control
8 / EN
Hood / User Manual
Techncal specfcatons of your applance
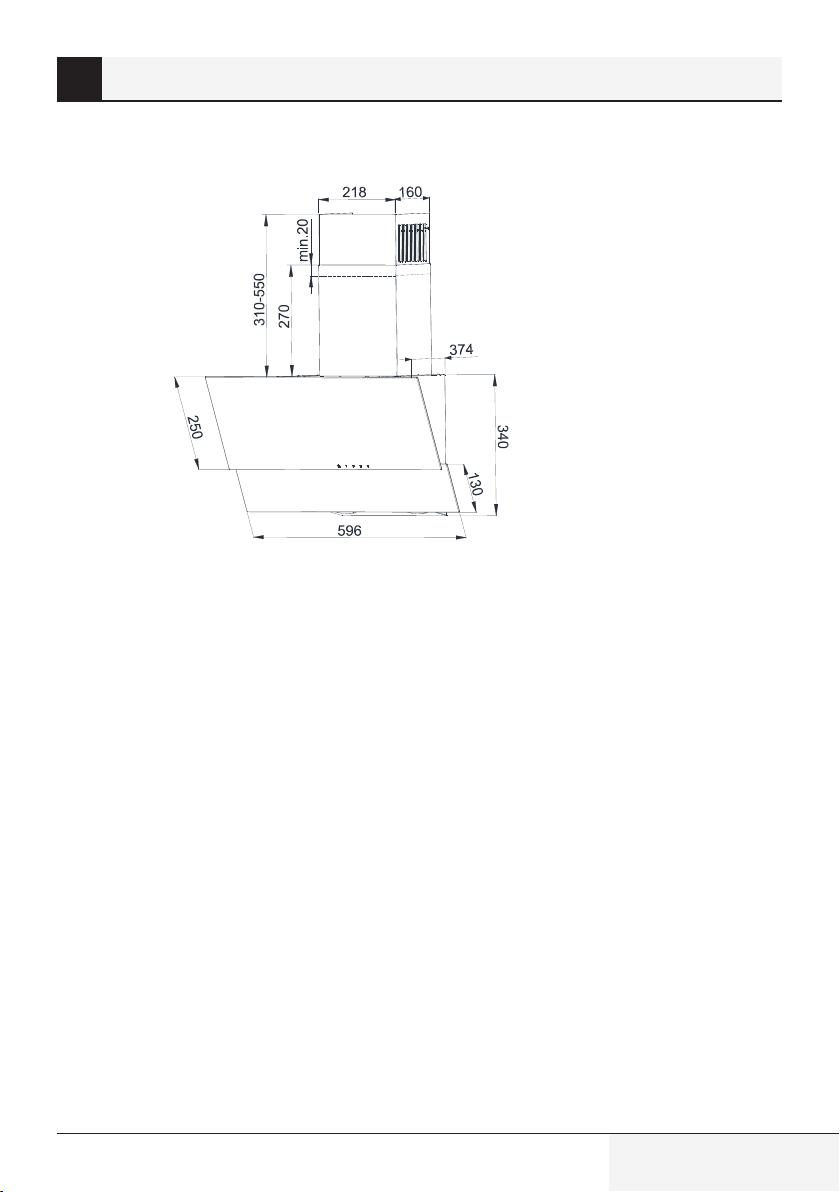
2
Fig.2
Dimension drawing
Hood / User Manual
9 / EN
Operatng your applance
3
The hood is designed for suction of fumes while
preparing meals. The device can be operated in
two modes:
As extractor:
the room by means of a venting pipe. The venting
pipe is not available with the device and must be
purchased separately.
A
A
A
A
As absorber:
and odors before they are returned to the room
through the grille on the upper chimney cover. If
the hood shall work as an absorber, it is necessary
to install an active carbon filter (Fig. 10). The
carbon filter is not standard equipment; it must be
purchased from a vendor.
vapors are removed outside
Use the shortest vapor discharging
pipe possible.
The venting pipe shall have the
smoothest inner surface as possible
(it is not recommended to use pipes
of type spiro).
Use a pipe with as few bends as
possible (bending angles should not
be greater than 90 degrees).
It is not recommended to apply
section changes of the pipe (larger
to smaller e.g. air outlet Ø150 mm to
air outlet Ø120mm).
vapors are cleaned of grease
10 / EN
Hood / User Manual
Installng your applance
4
The use of screws or fasteners
A
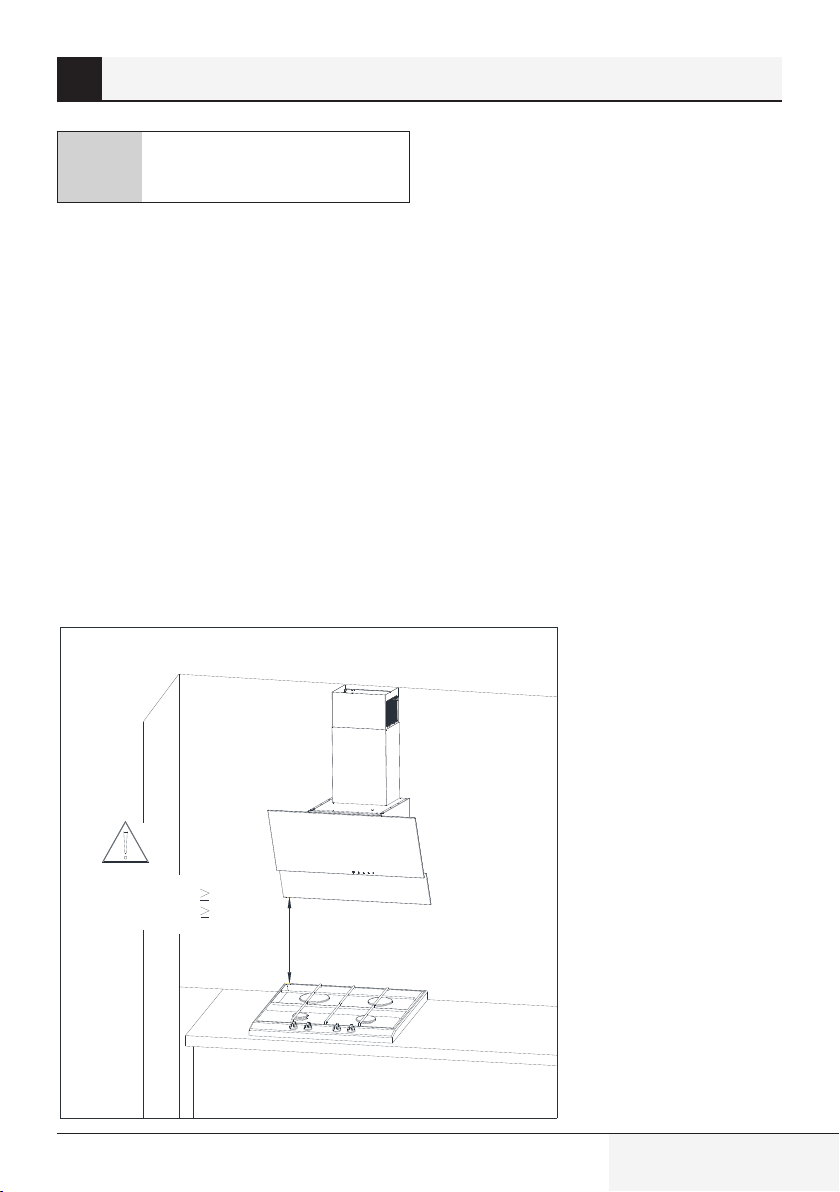
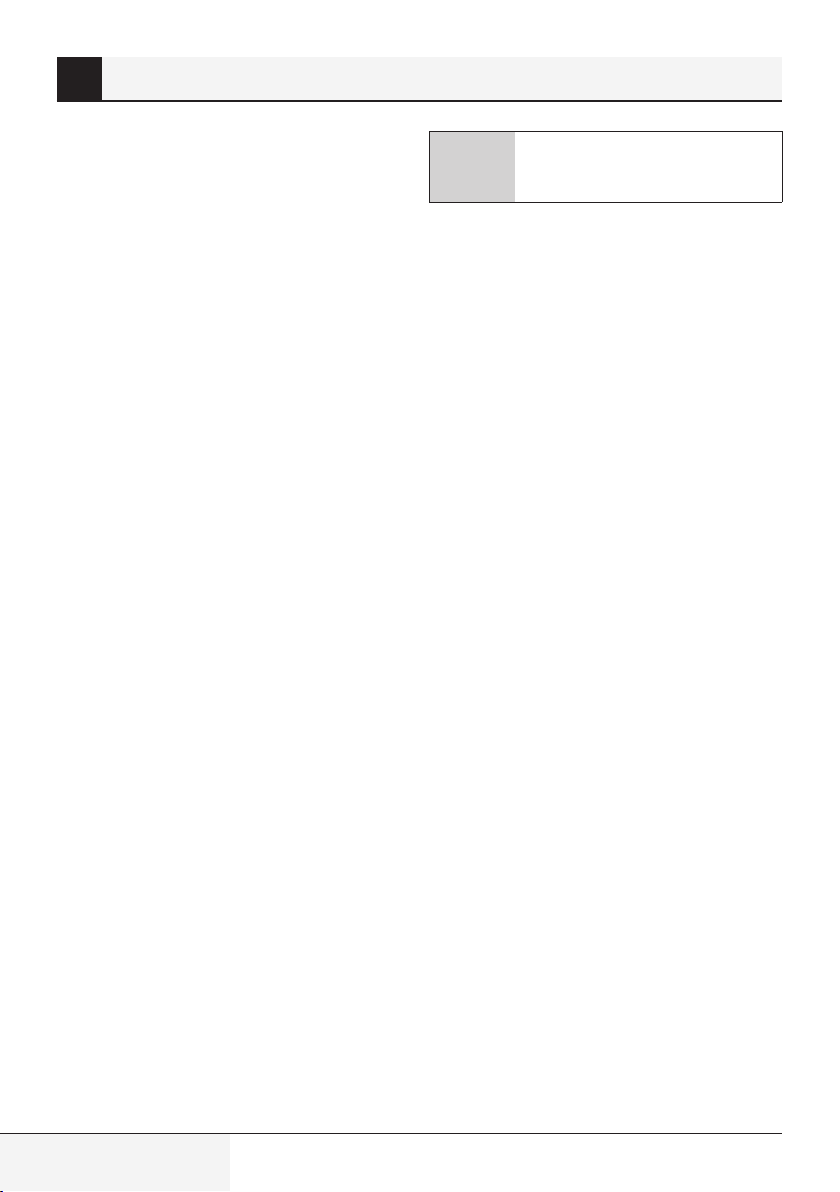
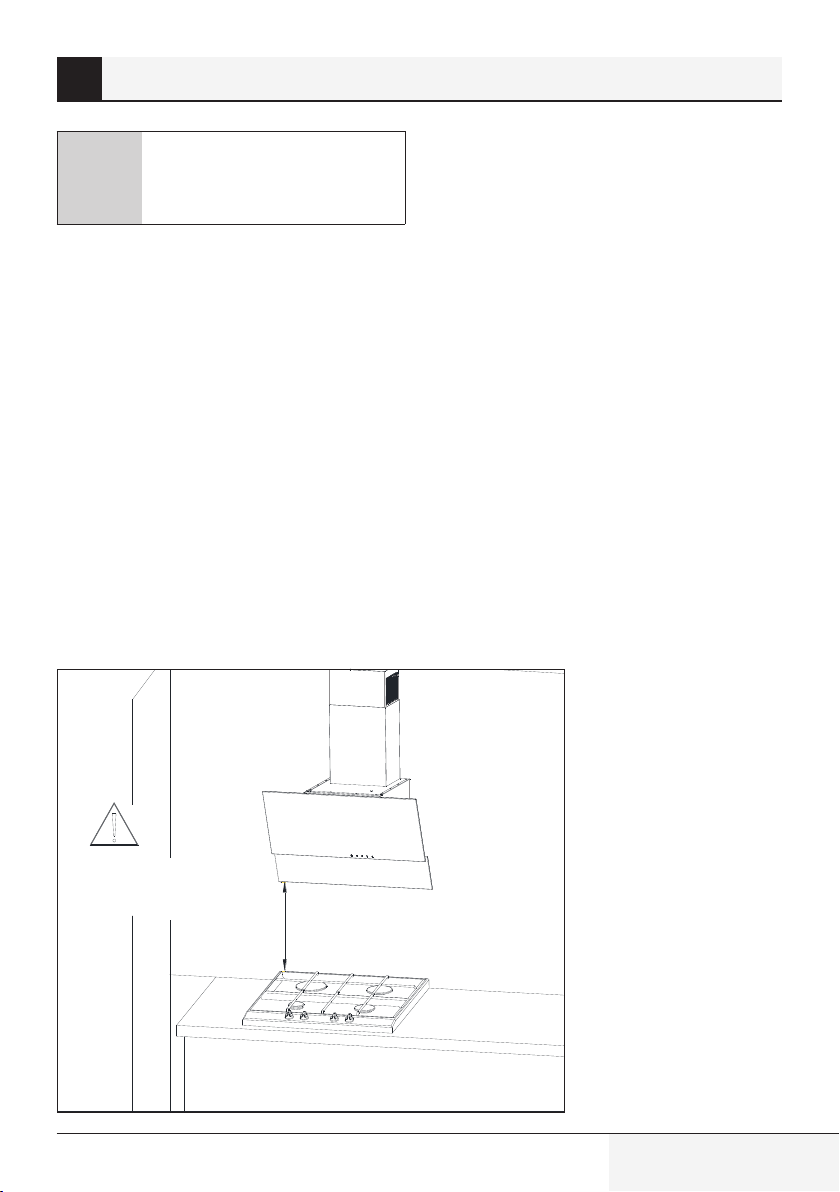
The minimum distance of hood suspension
between the surface, on which the kitchenware
are positioned on the heating device (gas or
electric cooker), and the lowest part of the kitchen
hood (Fig. 3) must be not less than 45 cm for
cookers with electric power and not less than 55
cm for gas cookers.
If the instruction manual of the heating device
contains the requirement of a greater installation
distance of the kitchen hood than indicated above,
please follow these instructions. The installation
of the hood and the hood chimney shield is shown
in the drawings (Fig. 4 - Fig. 9)
The hood is equipped with mounting anchors
suitable for the majority of the walls and ceilings.
The general provisions on the discharge of air from
rooms have to be observed during installation.
Fig. 3 Suggested distance from the kitchen cooker.
incompatible with the manual may
cause electric shock.
Gas stove L 65cm
Electric cooker L 45cm
55cm
Hood / User Manual
L
11 / EN
Installng your applance
4
Before installation, the following must be done:
• Check that the dimensions of the purchased
product are adapted to the selected target spot.
• Disconnect and remove (if possible) the
furniture located in the installation area of the
hood to get easy access to the ceiling or wall
to which the hood is to be fitted. If this is not
possible, the elements located near the working
area must be secured.
• Verify if there is a plug socket close to the hood
installation area and if it is possible to connect
the hood to the vent pipe evacuating the vapors
outside.
• Verify if the drilling spots do not cover
installation wires (electrical, hydraulic, etc.).
• Be equipped with the following tools: measuring
tape, pencil, drill/ driver, drill Ø8, screwdriver,
bubble level.
A
4.1 Installaton works
1. Determne the heatng element axs and
transfer t to the wall where the hood wll
be mounted on. Mark all the specfc hood
mountng ponts. Use the drll and drll holes
(Fg. 4).
2. Insert extenson bolts n the openngs. In the
two holes marked as A nsert screws (leavng
7 mm screw length on the outsde as n Fg. 5).
3. Open the hood flap and remove the grease flter
(Fg.6).
4. Screw the chmney cover cramp, hang the hood
on two loosely ftted screws (Fg. 7).
5. Place the bubble level on the ktchen hood
body. By rotatng the elements marked as A, set
the hood horzontally n accordance wth the
ndcaton of the bubble level and then tghten
the two loosely ftted screws and the two
remanng screws (Fg. 8).
6. Put the chmney cover on the body. Then gently
pull out the part of the hood that s marked as
B upwards untl you wll be able to screw t to
the cramp prevously affxed to the wall (Fg. 9).
The installation must be carried out
very carefully, so as not to scratch
the chimney cover and the hood.
12 / EN
Hood / User Manual

Installng your applance
4
Fig.4
Installation dimensions
2 x O8
4xO8
Fig.5
Assembly of extension bolts
155mm
min:30
245mm
max:550mm
220mm
229mm
L+90mm
2 x O5 x 45mm
4 x O8 x 40mm
Hood / User Manual
A
2 x O8 x 40mm
7mm
13 / EN
Installng your applance
225mm
4 x O8
2 x O8
220mm
142mm
L+90mm 229mm max:550mm
min:30
Fig. 4 Instalation dimensions.
4
Fig. 5 Assembly of extension bolts.
14 / EN
2 x O5 x 45mm
4 x O8 x 40mm
A
2 x O8 x 40mm
7mm
Hood / User Manual

Installng your applance
Fig. 6 Suspending the hood.
4
Fig. 7 Dismantling of aluminium grease filter.
Hood / User Manual
2
1
15 / EN
Installng your applance
4
Fig. 8 Positioning the hood.
Fig. 9 Hood cover assembly.
2 x O5 x 45mm
B
A
A
Be extremely careful when parting chimney cover
4.2 Electrc connecton
The mains voltage must correspond to the voltage
indicated on the rating plate affixed to the inside
of the hood. If the kitchen hood is equipped with
a plug, it should be put in a socket connector that
meets the requirements of binding regulations
and is located in an easily accessible place. If the
hood is not fitted with a plug, the installation of
the hood should be entrusted to someone with
appropriate permissions (e.g. electrician).
2 x O3,9x9,5
B
16 / EN
Hood / User Manual
Cleanng and mantenance
Fig. 10 Replacing the carbon filter.
5
Before carrying out any maintenance operations
on the appliance, remove the plug from the
wall outlet. The hood should be cleaned with
mild cleaning agents, do not use abrasives.
Regular maintenance significantly improves the
performance and durability of the hood. The hood
should be cleaned at least once a month or every
35 hours of hood operation. To clean hood DO NOT
USE ALCOHOL-BASED AGENTS. Satin items (inox)
should be cleaned with special preparations for
that purpose.
Failure to comply with the provisions
relating to cleaning of the device and
replacement of filters may cause fire
risks. It is therefore recommended
A
to comply with the guidelines given
herein. The manufacturer is not liable for any damage to the engine or
fires caused by improper use.
5.1 Grease Flter
The hood is equipped with an aluminum filter,
which retains the fat particles from cooking. The
filter can be removed by moving the locks in the
direction of the arrows (Fig. 7). The filter should
be washed by hand by immersing for 15 minutes in
water with dishwashing liquid at a temperature of
40-50°C. After 15 minutes, you can proceed with
washing and then rinsing. The filter must be dry
before being placed in the hood. The filter can also
be washed in a dishwasher. During the washing
procedure, the filter may discolor, however it does
not affect its filtering properties. If the filter is not
cleaned regularly, it reduces the performance of
the hood and could cause the risk of fire. The filter
should be cleaned at least after each 35 hours of
hood operation.
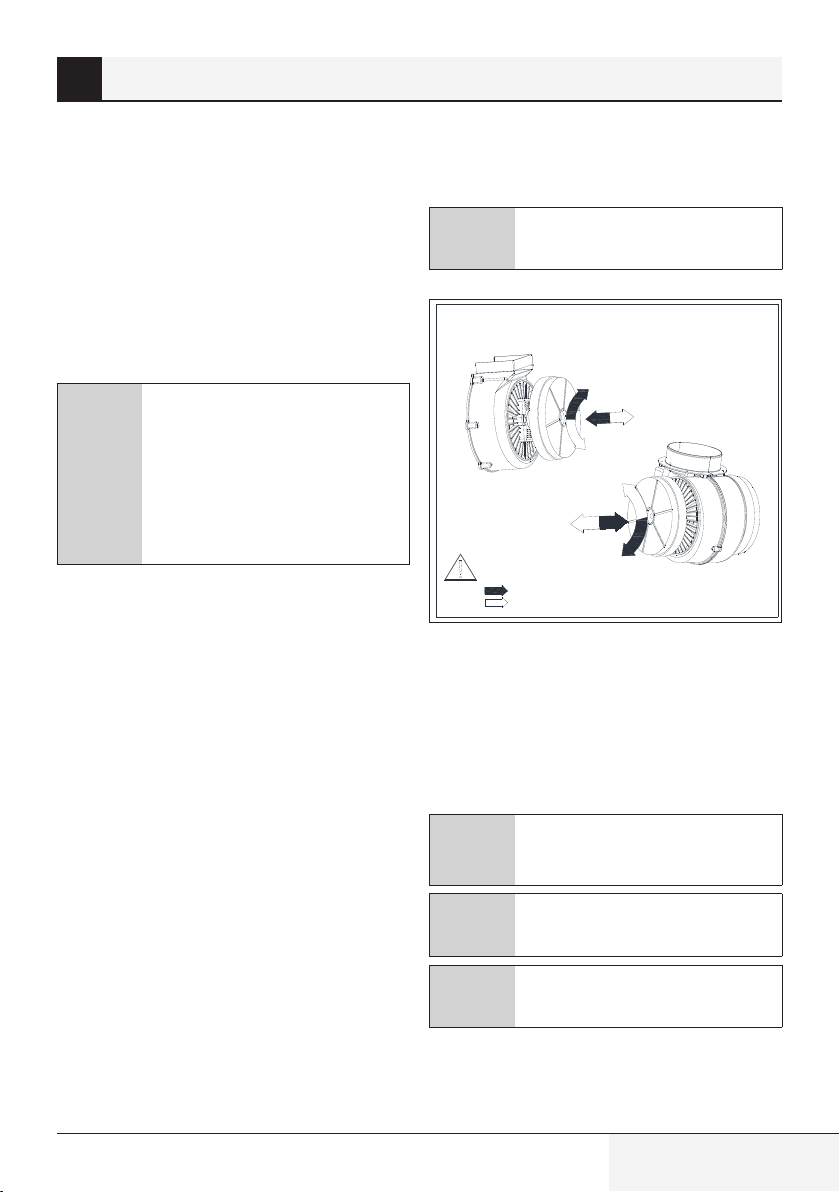
5.2 Carbon flter
The hood can be fitted with an active carbon filter.
The carbon filter is applied only in case the hood is
not connected to the vent pipe.
The filter should be placed on the turbine casing,
as shown in drawing (Fig. 10). The active carbon
filter should be replaced every 6 months.
The carbon filter shall not be washed
A
Symbol Filter installation
Symbol Filter dismanting
nor regenerated.
When replacing the carbon filter pay attention to
the type of used turbine.
2
2
2
1
1
1
2
1
2
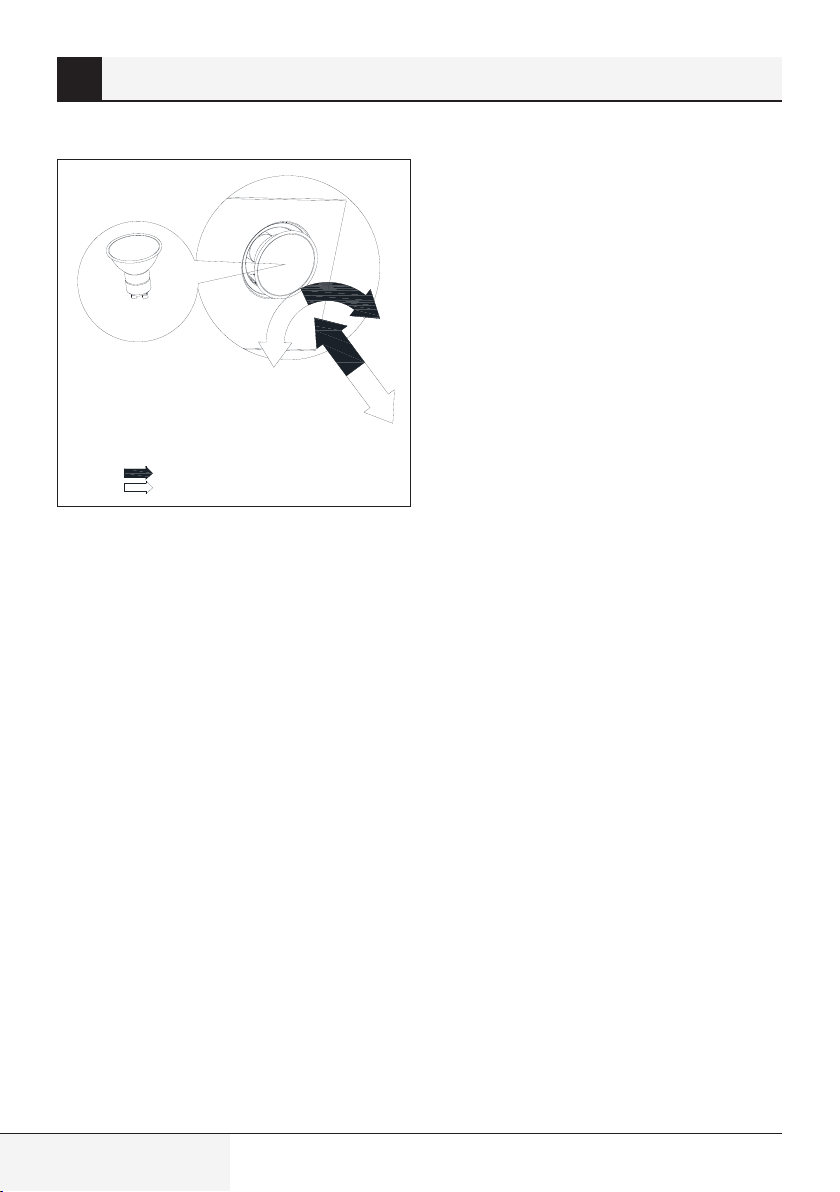
5.3 Replacng of lghtng
Prior to any work related to the replacement of
lighting, be sure to unplug the power supply. If
the hood was previously enabled, you should wait
until the light bulbs are cooled, after which you
can proceed with the replacement. The process of
exchanging the bulbs is shown in Fig. 11.
Before replacing the light bulbs,
A
A
A
disconnect the power supply of the
hood.
Do not touch the light bulbs when
they are hot.
Be careful not to touch the replaced
light bulb directly with hands.
Hood / User Manual
17 / EN
Cleanng and mantenance
5
Fig.11
Replacing the lighting
Symbol
Symbol
GU10
Bulb installation
Bulb dismantling
2
1
1
2
18 / EN
Hood / User Manual
Control of hood operaton
6
6.1 Control of the hood
The hood is equipped with a mechanical control.
• Pressing the “0” - disables the turbine hood.
• Pressing the “1” - to turn the turbine hood with
a minimum speed.
• Pressing the “2” - turns the turbine hood with an
average speed.
• Pressing the “3” - turns the turbine hood at
maximum speed.
Higher speed means more air flow.
• Press the button
Repeat pressing the button to turn off the
lighting.
- to turn on the lights.
6.2Methods of reducng the
effect of cookng process on
the envronment
• To reduce Energy consumption, cook with using
covers on kitchenware.
• Aluminum filters must be kept clean
(recommended length of aluminum filter
operation between cleanings is max. 35h of
hood operation).
• Take care of permeability of the ventilation
pipes.
• The operation level of the turbine when cooking
shall be always set to a minimum gear, which
will allow removing the fumes at the current
intensity of cooking.
Hood / User Manual
19 / EN
Solvng problems
7
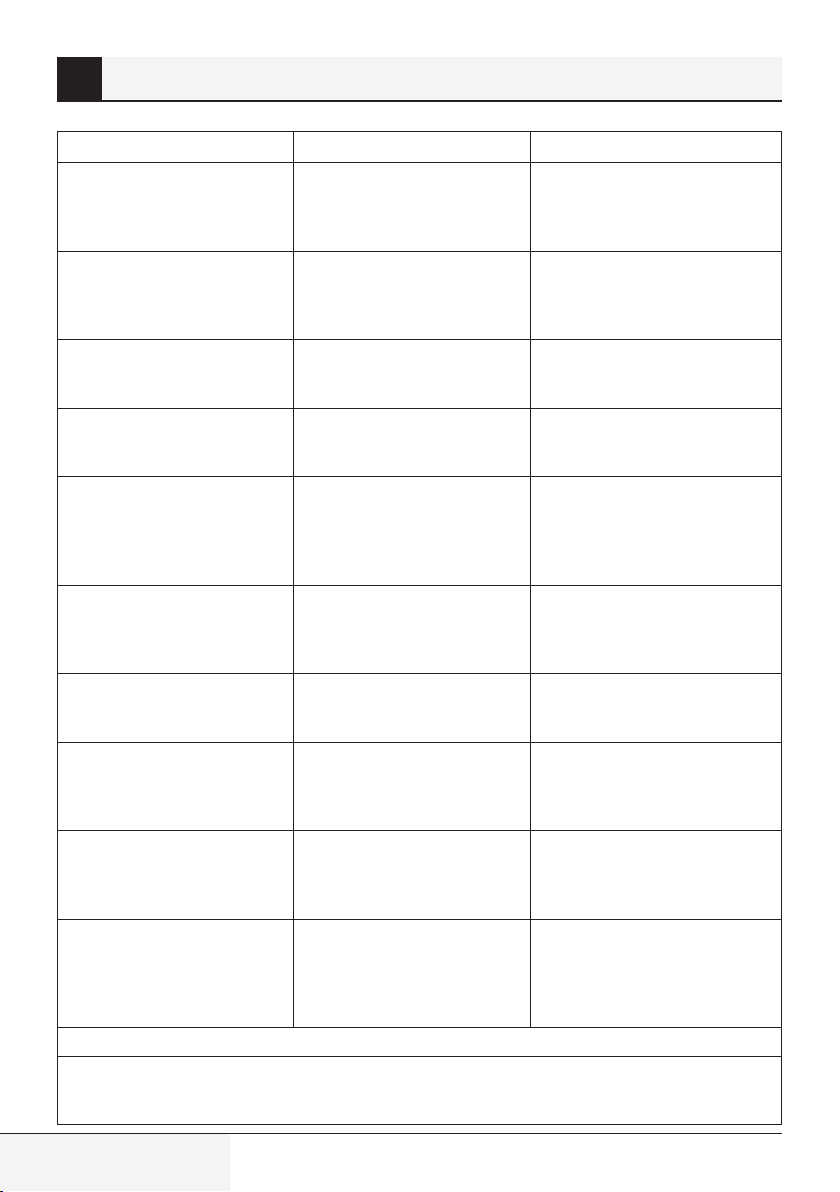
Symptoms Cause Reparng method
Durng hood operaton, the pulsatng
letter „F” s dsplayed.
The dsplay shows only the symbol
“-.” (mnus and dot n the rght bottom
corner), the hood does not respond to
dsablng.
No symbol s shown on the dsplay, the
hood does not respond to pressng the
control felds.
The dsplay shows the symbol of one of
the gears; the hood does not respond to
pressng the control felds.
The hood turbne dsconnects after 15
mn of operaton, the dsplay shows
a pulsatng dgt .e. “1.” (current gear
number and dot n the rght bottom
corner).
On fourth gear the dgt “4” s pulsatng
on the dsplay, after 5mn the gear s
changed nto thrd.
The hood can be operated only wth
use of the control panel, t does not
respond to the remote control.
The hood has very poor vapor sucton. Probably cause s drty flters. The grease flter must be cleaned n the
One or more lght ponts do not
operate.
The hood generated excessve nose
and vbraton.
If the recommendatons above do not solve the problem, contact an authorzed home applances servce enttled to repar.
Under no crcumstances s the hood user enttled to ndependent repar. A lst of servce ponts s ncluded n the warranty card
and the webste.
After 35 hours of operaton the hood
ndcates the need for cleanng or
replacng the grease flter.
The touch control has been locked
– ths feature facltates the hood
cleanng.
The touch control s probably
suspended.
The touch control s probably
suspended
The automatc tme swtch of the
touch control has been actvated.
The hood s equpped wth a turbo
mode, whch automatcally swtches
over nto thrd gear after 5 mn of
operaton to save energy.
The battery of the remote control s
empty or the dstance s too long.
Defectve halogen/ LED bulb. The lght bulb needs to be replaced
Ths may be caused by an ncorrect
nstallaton of the hood to the wall
or ktchen cabnets. Not all provded
screws have been used or screws are
loosely ftted leavng clearance.
* apples to hoods wth touch control.
Press and hold for about 8 sec. “-” on
the touch control. The flter should be
washed n the dshwasher or replace wth
a new one.
To dsable the lock, press and hold for
about 10 sec the feld wth the symbol of
swtchng on.
Dsconnect the hood from the power
supply for about 15 sec. and swtch t on
agan.
Dsconnect the hood from the power
supply for about 15 sec. and swtch t on
agan.
To deactvate the tme swtch, press and
hold for about 10 sec the symbol „+”or
dsable the hood.
The turbo gear shall be used only wth
ntensve cookng.
Replace the battery wth a new one.
dshwasher or replace wth a new one.
The carbon flter (f present) must be
replaced wth a new one.
wth a new, compatble wth the symbol
specfed n the nstructon manual for
the cooker hood.
The hood must be mounted to a wall or
cabnet by usng all the ponts provded
for by the manufacturer. After adjustng
the poston of the hood horzontally and
vertcally, tghten all mountng screws.
20 / EN
Hood / User Manual
Proszę najpierw przeczytać tę instrukcję obsługi!
Drodzy Klienci,
Dziękujemy za wybór wyrobu marki Beko. Mamy nadzieję, że wyrób ten, wyprodukowany
przy użyciu wysokiej jakości najnowszej technologii, okaże się w najwyższym stopniu
zadowalający. Dlatego proszę przed jego użyciem uważnie przeczytać całą tę instrukcję
obsługi i towarzyszące jej dokumenty i zachować ją do wglądu na przyszłość. Przy
przekazaniu tego wyrobu komuś innemu, proszę oddać mu także tę instrukcję. Proszę
przestrzegać wszystkich ostrzeżeń i informacji z tej instrukcji obsługi.
Proszę pamiętać, że instrukcja ta odnosi się także do kilku innych modeli. Różnice
pomiędzy nimi są wyraźnie opisane w tej instrukcji.
Znaczenie symboli
W niniejszej instrukcji stosuje się następujące symbole:
Ważne informacje i przydatne wskazówki doty-
C
czące użytkowania.
A
OSTRZEŻENIE
tuacji zagrażających bezpieczeństwu, życiu i
mieniu.
Ostrzeżenie przed porażeniem prądem.
Ostrzeżenia dotyczące sy-
B
Ostrzeżenie przed gorącymi powierzchniami.
Urządzene zostało wyprodukowane w nowoczesnych, bezpecznych dla środowska zakładach bez wpływu na przyrodę.
Urządzene jest zgodne z dyrektywą
WEEE.
Ne zawera bfenyl
polchlorowanych (PCB).

Ważne nstrukcje dotyczące
1
bezpeczeńs twa ochrony środowska
naturalnego
Rozdział ten zawiera instrukcje zachowania bezpieczeństwa, które
pomogą chronić się przed zagro
żeniem obrażeniami ciała lub szkodami w mieniu. Nieprzestrzeganie
tych instrukcji unieważnia udzielo
ną gwarancję.
-
-
1.1 Bezpieczeństwo:
Zasady ogólne
• Wszystkie prace montażowe i
naprawy należy powierzać Auto
ryzowanemu Agentowi Serwisowemu. Producent nie odpowiada
za szkody, które mogą być spowo
dowane przez osoby nieupoważnione.
• Urządzenie to nie jest przezna
czone do użytku przez osoby
(w tym dzieci) o ograniczonej
sprawności fizycznej, czuciowej
i psychicznej, niedoświadczone
i nieumiejętne. Należy zawsze
uważać na dzieci, aby nie bawiły
się tym urządzeniem.
1.1.1 Bezpeczeństwo:
Elektryczność
• Zawsze odłączaj okap od sieci na
czas montażu, konserwacji, czysz
czenia i napraw.
-
-
-
-
• Jeśli przewód zasilający jest
uszkodzony, jego wymianę na
leży powierzyć osobie o uznanych
przez producenta kwalifikacjach,
personelowi serwisu posprzedaż
nego lub podobnego (najlepiej
elektrykowi) lub osobie wskaza
nej przez importera.
• Napięcie zasilania 220 do 240
woltów.
• W razie awarii okapu nie należy go
używać dopóki nie zostanie na
prawiony przez Autoryzowanego
Agenta Serwisowego. Zagrożenie
porażeniem prądem elektrycz
nym!
• Nie prowadź przewodu zasilają
cego w pobliżu kuchenki. Grozi
to pożarem od przewodu zasila
jącego, bo jego izolacja łatwo się
topi.
• Nie wkładaj wtyczki przewodu
zasilającego do gniazdka przed
ukończeniem montażu okapu.
• Najlepiej działają przewody ze
wnętrzny nie dłuższe niż 4 m. Może
skręcać pod kątem prostym nie
więcej niż 2 razy, a jego średnica
musi być co najmniej Ø120 mm.
-
-
-
-
-
-
-
-
22 / PL
Okap / Instrukcja obsługi

Ważne nstrukcje dotyczące
1
bezpeczeńs twa ochrony środowska
naturalnego
• Przed każdą interwencją we-
wnątrz okapu wyjmuj wtyczkę z
gniazdka.
• Używaj okapu tylko, jeśli przyłą
czony jest do gniazdka z uziemieniem.
1.1.2 Bezpeczeństwo:
Wyrób
• Wylot okapu można przyłączyć
do przewodu kominowego rurą o
średnicy 120 mm lub 150 mm.
• Nie wolno przyłączać się do
przewodów kominowych połą
czonych z kuchenkami, szybów
wylotowych, ani przewodów ko
minowych, w których palą się płomienie. Przestrzegaj urzędowych
zasad zrzutu powietrza wyloto
wego.
• Pomiędzy dolną powierzchnią
okapu a górną powierzchnią ku
chenki/ piecyka powinien być
odstęp co najmniej 55 cm od ku
chenki gazowej i 45 cm od kuchenki elektrycznej.
• Nie używaj okapu bez filtrów alu
miniowych i nie wyjmuj ich, gdy
okap działa.
• Nie dotykaj lamp okapu, jeśli paliły
się przez dłuższy czas. Można po
parzyć dłonie taką gorącą lampą.
• Wystrzegaj się obfitych płomieni
pod okapem. Grozi to zapaleniem
się cząstek na filtrze oleju, co
może spowodować pożar.
• Kuchenkę włączaj dopiero po po
stawieniu na niej garnków lub patelni. W przeciwnym razie niektóre
części okapu mogą się odkształcać
w miarę nagrzewania się.
• Wyłączaj kuchenkę zanim zdej
-
miesz z niej garnki i patelnie.
• Wystrzegaj się materiałów łatwo
-
palnych pod okapem.
• Podczas smażenia potraw może
się zapalić olej. Dlatego należy
uważać na tkaniny i zasłony.
• Nie wolno pozostawiać kuchenki
bez nadzoru, gdy smażą się na niej
potrawy, bo grozi to zapaleniem
się oleju i pożarem.
-
• Jeśli nie czyści się okapu z okre
śloną częstotliwością, podnosi to
zagrożenie pożarem.
-
• Podczas czyszczenia okapu za
chowaj szczególną ostrożność i
noś rękawice.
-
-
-
-
-
-
Okap / Instrukcja obsługi
23 / PL

Ważne nstrukcje dotyczące
1
bezpeczeńs twa ochrony środowska
naturalnego
• Zalecamy uruchamianie okapu na
kilka minut przed rozpoczęciem
gotowania, aby nabrał mocy ssa
nia. Dzięki temu, gdy zaczną się
opary, ssanie będzie ciągłe i sta
bilne.
• Nie wyłączaj okapu przez 15 minut
po zakończeniu gotowania lub
smażenia, aby usunąć z kuchni
zapach oparów gotowania.
• Gdy okap działa, zwłaszcza jeśli
działa nad kuchenką gazowa,
upewnij się, że pomieszczenie to
jest wentylowane czystym po
wietrzem.
• Zwróć uwagę, aby nie przyłączać
okapu do przewodów komino
wych używanych przez urządzenia nieelektryczne. ( Np.: przewód
spalinowy grzejnika).
• Właściwa praca okapu równocze
śnie z innym urządzeniem, które
wymaga powietrza, możliwa jest
tylko przy niskim ciśnieniu 4 Pa
(0,04 mbar), przy którym unika
się zwrotnego wchłaniania gazu.
Można to osiągnąć tylko przy do
pływie powietrza przez nieosłonięte otwory (drzwi, okna, otwory
wentylacyjne lub innych środki
techniczne).
-
-
1.1.3 Bezpeczeństwo:
Dzec
-
-
-
-
Zwracaj szczególną uwagę na za
pewnienie wystarczającego przepływu powietrza. Do tego celu nie
wystarczy przewód kominowy,
którym dopływa/ odpływa powie
trze.
• Materiały opakowaniowe są nie-
bezpieczne dla dzieci. Należy trzymać je w bezpiecznym miejscu,
poza zasięgiem dzieci.
• Urządzenie elektryczne są nie
bezpieczne dla dzieci. Trzymaj
dzieci z dala od tego okapu. Nie
pozwalaj dzieciom bawić się nim.
• Urządzenia tego mogą używać
dzieci w wieku 8 lat lub starsze
oraz osoby niepełnosprawne
fizycznie, sensorycznie lub
umysłowo, lub nieumiejętne i nie
doświadczone, pod warunkiem,
że ktoś nadzoruje ich użytkowanie
pod względem bezpieczeństwa,
lub zostały odpowiednio poin
struowane i zdają sobie sprawę z
zagrożeń przy jego użytkowaniu.
Dzieci nie powinny bawić się tym
urządzeniem.
-
-
-
-
-
24 / PL
Okap / Instrukcja obsługi
Ważne nstrukcje dotyczące
1
bezpeczeńs twa ochrony środowska
naturalnego
• OSTRZEŻENIE: Jeśli jest to okap
nad kuchnią, jego wystające części
mogą się nagrzewać.
1.2 Przeznaczenie
• Urządzenie to przeznaczone jest
do użytku domowego. Nie nadaje
się do zastosowań komercyjnych i
nie należy go używać niezgodnie z
przeznaczeniem.
• Producent nie ponosi odpo
wiedzialności za szkody spowodowane niewłaściwym
użytkowaniem lub transportem.
• Okres używalności tego okapu wy
nosi 10 lat. Jest to okres, w którym
do nabycia będą części zamienne
do utrzymania prawidłowego dzia
łania okapu.
•
OSTRZEŻENIE:
Zaniedbanie przykręcenia śrub zgodnie ze
wskazaniami w tej instrukcji może
zagrażać porażeniem elektrycz
nych.
-
-
-
-
1.3 Zgodność z dyrektywą
WEEE pozbywane sę
zużytych wyrobów
Wyrób ten zgodny jest z dyrektywą WEEE
Unii Europejskiej (2012/19/UE). Wyrób
ten oznaczony jest symbolem klasyfikacyjnym dla zużytego sprzętu elektrycznego i elektronicznego (WEEE).
Wyrób ten wykonano z części i materiałów wysokiej jakości, które mogą być odzyskane i użyte jako
surowce wtórne. Po zakończeniu użytkowania nie
należy pozbywać się go razem z innymi odpadkami
domowymi. Należy przekazać go do punktu zbiórki urządzeń elektrycznych i elektronicznych na
surowce wtórne. Gdzie jest najbliższy taki punkt
zbiórki można dowiedzieć się od władz miejscowych.
Zgodność z dyrektywą RoHS:
Wyrób ten jest zgodny z dyrektywą RoHS Unii
Europejskiej (2011 /65 / UE). Nie zawiera wskazanych w tej dyrektywie materiałów szkodliwych
i zakazanych.
1.4 Informacje o opakowanu
Opakowanie tego wyrobu wykonano z
materiałów nadających się do recyklingu,
zgodnie z naszym ustawodawstwem krajowym.. Nie wyrzucaj materiałów opakowaniowych do śmieci wraz z innymi odpadkami domowymi. Oddaj je w jednym z wyznaczonych przez
władze lokalne punktów zbiórki materiałów opakowaniowych.
Okap / Instrukcja obsługi
25 / PL
2 Dane technczne okapu
Dane techniczne zawarte w niniejszej instrukcji
obsługi oraz na dołączonych do okapu etykietach
zostały uzyskane poprzez wykonanie pomiarów
i obliczeń zgodnie z wymogami rozporządzenia
UE nr 65/2014 oraz 66/2014. Produkt jest zgodny z dyrektywami 2004/108/EC, 2006/95/EC,
2009/125/EC i 2011/65/EU.
Rys.1
Rysunek poglπdowy okapu kuchennego.
Os ≥ ona kominowa
Klapa uchylna
Przewûd zasilajπcy
Filtr przeciwt ≥
uszczowy aluminiowy
26 / PL
Oúwietlenie
Panel sterowania
dotykowy
Okap / Instrukcja obsługi

2 Dane technczne okapu
Rys.2
Rysunek gabarytowy.
Okap / Instrukcja obsługi
27 / PL
3 Obsługa okapu
Okap jest przeznaczony do zasysania oparów
podczas przygotowywania posiłków. Urządzenie
może pracować w dwóch trybach:
Jako wyciąg:
pomieszczenia za pomocą rury odprowadzającej.
Rura odprowadzająca nie jest dostępna w komplecie z urządzeniem i należy ją zakupić oddzielnie.
A
A
A
A
opary usuwane są na zewnątrz
Należy używać jak najkrótszego
przewodu odprowadzającego opary.
Należy używać przewodu odprowadzającego o jak najgładszej powierzchni wewnętrznej (nie zaleca
się stosowania rur typu spiro).
Stosować przewód o jak najmniejszej liczbie zagięć (kąty zgięć nie
powinny być większe niż 90 stopni).
Nie zaleca się stosowania zmian
przekroju przewodu (większego na
mniejszy np. wylot powietrza Ø150
mm na wylot powietrza Ø120mm).
Jako pochłaniacz:
tłuszczu i zapachów zanim zostaną zwrócone do
pomieszczenia przez kratki w górnej osłonie komina. Aby okap pracował jako pochłaniacz należy
zainstalować filtr węglowy (Rys.10). Filtr węglowy nie jest wyposażeniem standardowym, należy
dokupić go u sprzedawcy.
28 / PL
opary są oczyszczane z
Okap / Instrukcja obsługi
4 Montaż okapu
Niezgodne z instrukcją zastosowanie śrub lub elementów mocujących
A
Minimalna odległość zawieszenia okapu między
powierzchnią, na której znajdują się naczynia na
urządzeniu grzewczym (kuchenka gazowa, elektryczna), a najniższą częścią okapu kuchennego
(Rys.3) powinna wynosić, nie mniej niż 45 cm dla
kuchenek o zasilaniu elektrycznym i nie mniej niż
55 cm dla kuchenek gazowych. Jeżeli w instrukcji
obsługi urządzenia grzewczego podana jest większa odległość instalowania okapu kuchennego
niż wskazana powyżej, należy dostosować się
do takich wskazań. Montaż okapu i osłony kominowej okapu przedstawiony jest na rysunkach
(Rys.4 - Rys.9) Okap wyposażony jest w kołki mocujące odpowiednie do większości ścian i sufitów.
Podczas montażu należy przestrzegać ogólnie
obowiązujących przepisów dotyczących odprowadzenia powietrza z pomieszczeń.
Rys. 3
grzewczej.
może grozić porażeniem prądem
elektrycznym.
Sugerowana odleg≥oúÊ od p ≥ yty
Kuchenki gazowe L_55cm
Kuchenki elektryczne L_45cm
L
Okap / Instrukcja obsługi
29 / PL
4 Montaż okapu
Przed przystąpieniem do instalacji należy:
• Sprawdzić, czy wymiary zakupionego produktu
są dostosowane do wybranego miejsca docelowego.
• Odłączyć i usunąć (jeżeli istnieje taka możli-
wość) meble znajdujące się w obszarze instalacji okapu, aby uzyskać łatwy dostęp do sufitu
lub ściany na której ma być zamontowany okap.
Jeśli nie jest to możliwe należy zabezpieczyć
elementy znajdujące się w pobliżu wykonywanych prac.
• Sprawdzić, czy w pobliżu strefy montowania
okapu znajduje się gniazdko wtykowe i czy
można podłączyć okap do przewodu wentylacyjnego odprowadzającego opary na zewnątrz.
• Sprawdzić, czy w miejscach w których będą
wykonane wiercenia nie znajdują się przewody
instalacyjne (elektryczne, hydrauliczne itp.).
• Wyposażyć się w następujące narzędzia:
miarkę, ołówek, wiertarkę /wkrętarkę, wiertło
Ø8, śrubokręt, poziomicę.
4.1 Czynnośc montażowe:
1. Wyznaczyć oś elementu grzewczego i przenieść ją na ścianę gdzie będzie zamontowany
okap. Zaznaczyć wszystkie charakterystyczne
punkty mocowań okapu. Użyć wiertarki i wywiercić otwory (Rys. 4).
2. W wywiercone otwory włożyć kołki rozporowe. W dwa otwory oznaczone literą A również
wkręcić wkręty (pozostawiając 7mm długości
wkrętu na zewnątrz kołka Rys.5).
3. Otworzyć klapę okapu i wymontować filtr przeciwtłuszczowy (Rys.6).
4. Przykręcić zworę osłony kominowej, zawiesić okap kuchenny na dwóch niedokręconych
wkrętach (Rys. 7).
5. Umieścić poziomicę na korpusie okapu kuchennego. Obracając elementem oznaczonym literą
A ustawić okap w poziomie zgodnie ze wskazaniem poziomicy, a następnie dokręcić dwa już
wkręcone po części wkręty i wkręcić dwa pozostałe (Rys.8).
6. Umieścić na korpusie osłonę kominową.
Następnie delikatnie wysuwać część okapu
oznaczoną literą B ku górze, do momentu aż
będzie możliwość przykręcenia jej do zwory
wcześniej przymocowanej do ściany (Rys. 9).
Tę operację montażu należy przeprowadzić bardzo ostrożnie, aby nie
A
porysować osłony komina i samego
okapu.
30 / PL
Okap / Instrukcja obsługi
 Loading...