

Beko GNE V322 S, GNE V 320 X, GNEV320S, GNE V322 P, GNE V322 PX User manual [EN,RU,FR,DE,PT,IT,UK,NL,BG,HU]
Page 1

GNE V322 S
GNE V 320 X
GNEV320S
GNE V322 P
Refrigerator
Холодильник
Réfrigérateur
Kühlschrank
Frigorífico
Frigorifero
Šaldytuvas
Холодильники
Koelka st
Хладилник
Hűtőszekrény
GNE V322 PX
Page 2

Please read this manual first!
This means that this product must be handled pursuant to European Directive
the environment. For further information, please contact your local or regional
Recycling
Dear Customer,
We hope that your product, which has been produced in modern plants and
checked under the most meticulous quality control procedures, will provide you
an effective service.
For this, we recommend you to carefully read the entire manual of your product
before using it and keep it at hand for future references.
This manual
• Will help you use your appliance in a fast and safe way.
• Read the manual before installing and operating your product.
• Follow the instructions, especially those for safety.
• Keep the manual in an easily accessible place as you may need it later.
• Besides, read also the other documents provided with your product.
Please note that this manual may be valid for other models as well.
Symbols and their descriptions
This instruction manual contains the following symbols:
Important information or useful usage tips.
C
A Warning against dangerous conditions for life and property.
B Warning against electric voltage.
This product is supplied with the selective sorting symbol for waste electrical
and electronic equipment (WEEE).
2002/96/EC in order to be recycled or dismantled to minimise its impact on
authorities.
Electronic products not included in the selective sorting process are potentially
www.beko.com
dangerous for the environment and human health due to the presence of
hazardous substances.
This product was manufactured using the latest technology in environmentally friendly conditions.
Page 3

CONTENTS
1 Your Refrigerator 3
2 Important Safety Warnings 4
Intended use ........................................ 4
For products with a water dispenser;
Child safety
HCA Warning
Things to be done for energy saving
Reccomendations for freshfood
compartment
.......................................... 6
....................................... 6
....................................... 7
.... 6
..... 7
3 Installation 8
Points to be considered when retransporting your refrigerator
Before operating your refrigerator
Electric connection............................... 9
Disposing of the packaging
Disposing of your old refrigerator
Placing and Installation
Floor balance adjustment
Adjusting the gap between the upper
.................................................. 12
door
Installing Water Filter
Connection of the Water Pipe to the
Refrigerator
Connection of Water Hose to the Jug
Connection of the Water Pipe to the Cold
Water Mains Line
Prior to first use of Ice/Water Dispenser
........................................ 14
.............................. 16
................ 8
......... 8
.................. 9
.......... 9
......................... 9
................... 10
......................... 13
16
18
4 Preparation 19
5 Using your refrigerator 20
Setting the fridge compartment
temperature
Setting the freezer compartment
temperature
Fresh Freeze Function
Quick Cool Function........................... 22
Vacation Button
Auto Eco Button (Special Economy
function)
Ioniser ............................................... 22
Key Lock Button
Water Dispenser Illumination
Water/Ice Type Selection
Ice/Water Dispenser
Using the Ice Dispenser
Ice Off
Using the water spring
Spillage Tray
Sliding Body Shelves
Blue light
................................................... 25
Ion:
Egg tray
Fresh Freeze Compartment
Crisper humidity control sliders........... 25
Recommendations for preservation of
frozen food
Defrosting
Replacing the Interior Light Bulb
....................................... 21
....................................... 21
........................ 21
................................. 22
............................................ 22
................................ 22
.............. 22
.................... 22
........................... 22
..................... 23
................................................ 23
....................... 24
...................................... 24
.......................... 24
........................................... 25
............................................. 25
................ 25
........................................ 26
.......................................... 26
......... 26
6 Maintenance and cleaning 28
Protection of plastic surfaces ............ 28
Chiller compartment
Icebox and Water Dispenser
........................... 29
.............. 29
7 Recommended solutions for
the problems 30
EN
2
Page 4
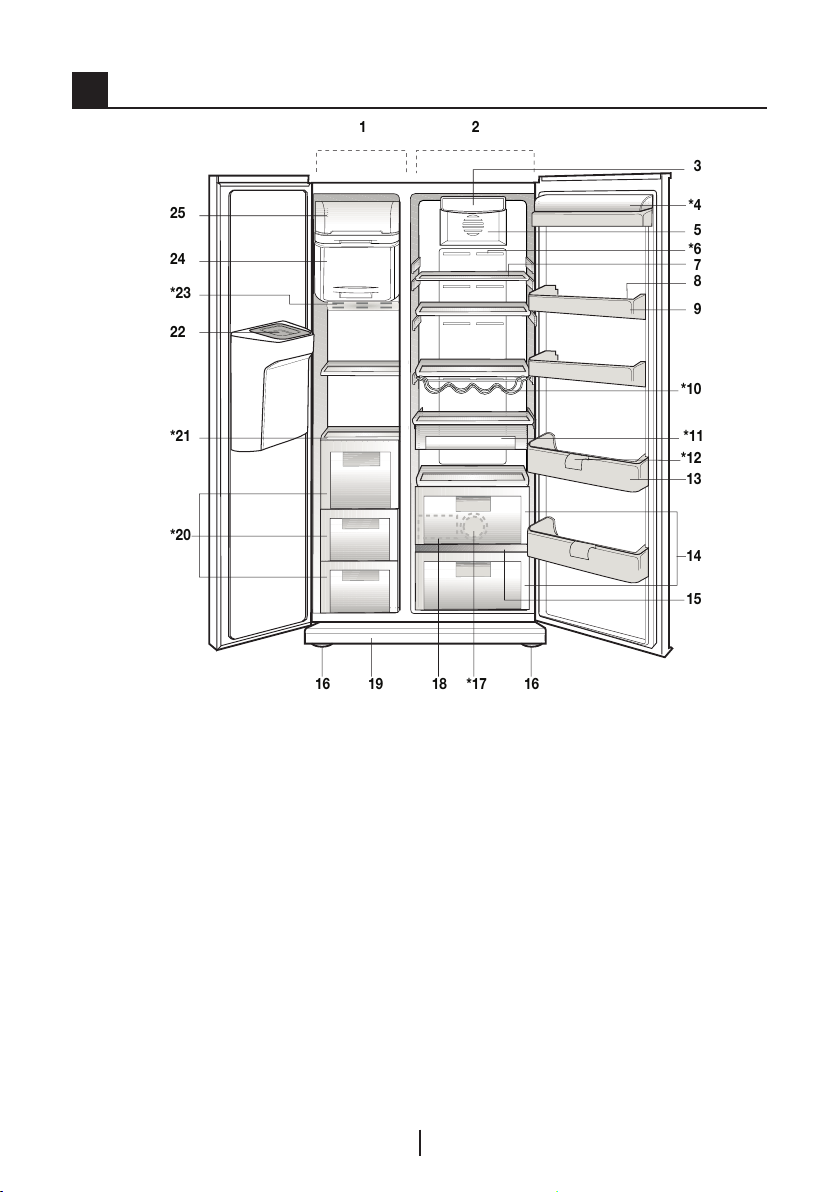
1 Your Refrigerator
2
1
8
9
14
19
7
13
16
*4
16
3
5
24
*21
*20
25
22
*23
*6
*10
15
*1718
*11
*12
1. Freezer compartment
2. Fridge compartment
3. Fridge compartment interior light
4. Butter and cheese lid
5. Fan
6. Ioniser
7. Fridge compartment glass shelves
8. Egg tray
9. Fridge compartment door racks
10. Wine cellar
11. Chiller compartment
12. Bottle holder
13. Bottle shelves
C Figures that take place in this instruction manual are schematic and may not
correspond exactly with your product. If the subject parts are not included in the
14. Crisper compartments
15. Crisper cover
16. Adjustable front legs
17. Blue light
18. Water reservoir
19. Ventilation lid
20. Freezer compartment drawers
21. Freezer Compartment glass shelves
22. Ice duct lid
23. Freezer compartment interior light
24. Fresh Freeze compartment
25. Ice container
* OPTIONAL
product you have purchased, then it is valid for other models.
EN
3
Page 5

2 Important Safety Warnings
Please review the following
information. Failure to observe this
information may cause injuries or
material damage. Otherwise, all
warranty and reliability commitments
will become invalid.
The usage life of the unit you
purchased is 10 years. This is the
period for keeping the spare parts
required for the unit to operate as
described.
Intended use
This product is intended to be used
– indoors and in closed areas such as
homes;
– in closed working environments such
as stores and offices;
– in closed accommodation areas such
as farm houses, hotels, pensions.
• This product should not be used
outdoors.
General safety
• When you want to dispose/scrap
the product, we recommend you
to consult the authorized service in
order to learn the required information
and authorized bodies.
• Consult your authorized service for
all your questions and problems
related to the refrigerator. Do not
intervene or let someone intervene to
the refrigerator without notifying the
authorised services.
• For products with a freezer
compartment; Do not eat cone ice
cream and ice cubes immediately
after you take them out of the freezer
compartment! (This may cause
frostbite in your mouth.)
• For products with a freezer
compartment; Do not put bottled and
canned liquid beverages in the freezer
compartment. Otherwise, these may
burst.
• Do not touch frozen food by hand;
they may stick to your hand.
• Unplug your refrigerator before
cleaning or defrosting.
• Vapor and vaporized cleaning
materials should never be used in
cleaning and defrosting processes of
your refrigerator. In such cases, the
vapor may get in contact with the
electrical parts and cause short circuit
or electric shock.
• Never use the parts on your
refrigerator such as the door as a
means of support or step.
• Do not use electrical devices inside
the refrigerator.
• Do not damage the parts, where
the refrigerant is circulating, with
drilling or cutting tools. The refrigerant
that might blow out when the gas
channels of the evaporator, pipe
extensions or surface coatings are
punctured causes skin irritations and
eye injuries.
• Do not cover or block the ventilation
holes on your refrigerator with any
material.
• Electrical devices must be repaired
by only authorised persons. Repairs
performed by incompetent persons
create a risk for the user.
EN
4
Page 6
• In case of any failure or during
a maintenance or repair work,
disconnect your refrigerator’s mains
supply by either turning off the
relevant fuse or unplugging your
appliance.
• Do not pull by the cable when pulling
off the plug.
• Place the beverage with higher proofs
tightly closed and vertically.
• Never store spray cans containing
flammable and explosive substances
in the refrigerator.
• Do not use mechanical devices
or other means to accelerate the
defrosting process, other than those
recommended by the manufacturer.
• This product is not intended to be
used by persons with physical,
sensory or mental disorders or
unlearned or inexperienced people
(including children) unless they are
attended by a person who will be
responsible for their safety or who will
instruct them accordingly for use of
the product
• Do not operate a damaged
refrigerator. Consult with the service
agent if you have any concerns.
• Electrical safety of your refrigerator
shall be guaranteed only if the earth
system in your house complies with
standards.
• Exposing the product to rain, snow,
sun and wind is dangerous with
respect to electrical safety.
• Contact authorized service when
there is a power cable damage to
avoid danger.
• Never plug the refrigerator into
the wall outlet during installation.
Otherwise, risk of death or serious
injury may arise.
• This refrigerator is intended for only
storing food items. It must not be
used for any other purpose.
• Label of technical specifications is
located on the left wall inside the
refrigerator.
• Never connect your refrigerator to
electricity-saving systems; they may
damage the refrigerator.
• If there is a blue light on the
refrigerator, do not look at the blue
light with optical tools.
• For manually controlled refrigerators,
wait for at least 5 minutes to start the
refrigerator after power failure.
• This operation manual should be
handed in to the new owner of the
product when it is given to others.
• Avoid causing damage on power
cable when transporting the
refrigerator. Bending cable may cause
fire. Never place heavy objects on
power cable. Do not touch the plug
with wet hands when plugging the
product.
• Do not plug the refrigerator if the wall
outlet is loose.
• Water should not be sprayed directly
on inner or outer parts of the product
for safety purposes.
• Do not spray substances containing
inflammable gases such as propane
gas near the refrigerator to avoid fire
and explosion risk.
EN
5
Page 7

• Never place containers filled with
water on top of the refrigerator,
otherwise this may cause electric
shock or fire.
• Do not overload your refrigerator
with excessive amounts of food. If
overloaded, the food items may fall
down and hurt you and damage
refrigerator when you open the door.
Never place objects on top of the
refrigerator; otherwise, these objects
may fall down when you open or
close the refrigerator's door.
• As they require a precise
temperature, vaccines, heat-sensitive
medicine and scientific materials
and etc. should not be kept in the
refrigerator.
• If not to be used for a long time,
refrigerator should be unplugged. A
possible problem in power cable may
cause fire.
• The plug's tip should be regularly
cleaned; otherwise, it may cause fire.
• The plug’s tip should be cleaned
regularly with a dry cloth; otherwise, it
may cause fire.
• Refrigerator may move if adjustable
legs are not properly secured on the
floor. Properly securing adjustable
legs on the floor can prevent the
refrigerator to move.
• When carrying the refrigerator, do not
hold it from door handle. Otherwise, it
may be snapped.
• When you have to place your product
next to another refrigerator or freezer,
the distance between devices should
be at least 8cm. Otherwise, adjacent
side walls may be humidified.
For products with a water
dispenser;
Pressure of water mains should be
minimum 1 bar. Pressure of water
mains should be maximum 8 bars.
• Use only potable water.
Child safety
• If the door has a lock, the key should
be kept away from reach of children.
• Children must be supervised to
prevent them from tampering with the
product.
HCA Warning
If your product's cooling system
contains R600a:
This gas is flammable. Therefore, pay
attention to not damaging the cooling
system and piping during usage and
transportation. In the event of damage,
keep your product away from potential
fire sources that can cause the
product catch a fire and ventilate the
room in which the unit is placed.
Ignore this warning if your
product's cooling system contains
R134a.
Type of gas used in the product is
stated in the type plate which is on the
left wall inside the refrigerator.
Never throw the product in fire for
disposal.
EN
6
Page 8
Things to be done for energy
temperature
sensor
food
MILK
juice
etc.
temperature
sensor
MILK
juice
etc.
temperature
sensor
saving
• Do not leave the doors of your
refrigerator open for a long time.
• Do not put hot food or drinks in your
refrigerator.
• Do not overload your refrigerator so
that the air circulation inside of it is not
prevented.
• Do not install your refrigerator
under direct sunlight or near heat
emitting appliances such as ovens,
dishwashers or radiators.
• Pay attention to keep your food in
closed containers.
• For products with a freezer
compartment; You can store
maximum amount of food items in
the freezer when you remove the
shelf or drawer of the freezer. Energy
consumption value stated for your
refrigerator has been determined
by removing freezer shelf or drawer
and under maximum load. There
is no harm to use a shelf or drawer
according to the shapes and size of
food to be frozen.
• Thawing frozen food in fridge
compartment will both provide energy
saving and preserve the food quality.
Reccomendations for
freshfood compartment
* OPTIONAL
• Please do not let any foodstuff to
come to contact with the temperature
sensor in freshfood compartment.
In order to maintain freshfood
compartment at ideal storage
temperature, the sensor must not be
blocked by fodstuffs.
• Do not place hot foodstuff in your
appliance.
EN
7
Page 9
3 Installation
C Please remember that the
manufacturer shall not be held liable if
the information given in the instruction
manual is not observed.
Points to be considered
when re-transporting your
refrigerator
1. Your refrigerator must be
emptied and cleaned prior to any
transportation.
2. Shelves, accessories, crisper and etc.
in your refrigerator must be fastened
securely by adhesive tape against any
jolt before repackaging.
3. Packaging must be tied with thick
tapes and strong ropes and the
rules of transportation printed on the
package must be followed.
C Always remember...
Every recycled material is an
indispensable source for the nature
and for our national resources.
If you wish to contribute to recycling
the packaging materials, you can
get further information from the
environmental bodies or local
authorities.
Before operating your
refrigerator
Before starting to use your refrigerator
check the following:
1. Is the interior of the refrigerator dry
and can the air circulate freely in the
rear of it?
2. Clean the interior of the refrigerator as
recommended in the “Maintenance
and cleaning” section.
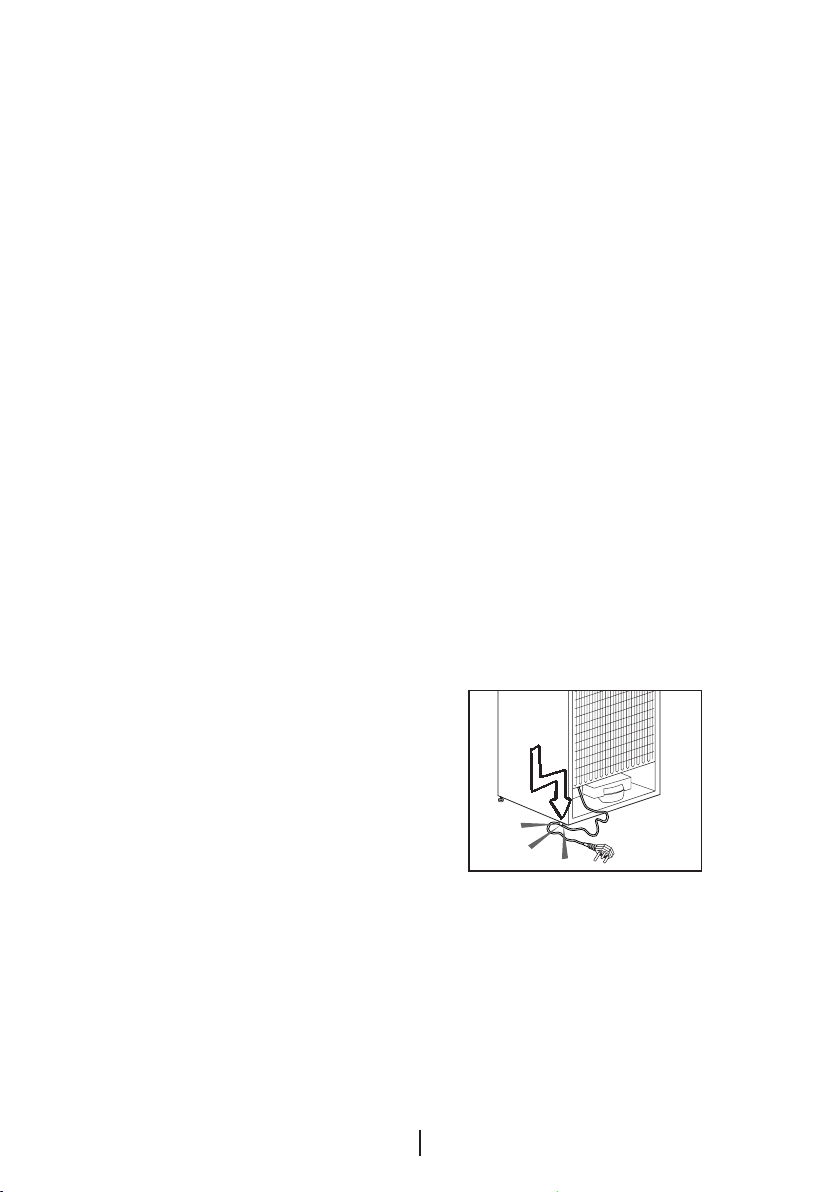
3. Insert the 2 plastic wedges onto the
rear ventilation as illustrated in the
following figure. Unscrew the existing
ones and use the screws given in the
same bag of wedges. Plastic wedges
will provide the required distance
between your refrigerator and the wall
in order to allow the air circulation.
4. Plug the refrigerator into the wall
outlet. When the door is open the
respective interior light will come on.
5. You will hear a noise as the
compressor starts up. The liquid and
gases sealed within the refrigeration
system may also give rise to noise,
even if the compressor is not running
and this is quite normal.
EN
8
Page 10

6. Front edges of the refrigerator may
feel warm. This is normal. These
areas are designed to be warm to
avoid condensation.
Electric connection
Connect your refrigerator to a
grounded socket which is being
protected by a fuse with the
appropriate capacity.
Important:
B The connection must be in
compliance with national regulations.
B The power cable plug must be easily
accessible after installation.
B
The specified voltage must be equal
to your mains voltage.
B Extension cables and multiway plugs
must not be used for connection.
B A damaged power cable must be
replaced by a qualified electrician.
B The appliance must not be operated
before it is repaired! There is danger
of electric shock!
Disposing of the packaging
A
The packing materials may be
dangerous for children. Keep the
packing materials out of the reach
of children or dispose them of by
classifying them in accordance
with the waste instructions. Do not
dispose them of along with the normal
household waste.
The packing of your refrigerator is
produced from recyclable materials.
Disposing of your old
refrigerator
Dispose of your old machine without
giving any harm to the environment.
A You may consult your authorized
dealer or waste collection center of
your municipality about the disposal
of your refrigerator.
A
Before disposing of your refrigerator,
cut out the electric plug and, if there
are any locks on the door, make them
inoperable in order to protect children
against any danger.
Placing and Installation
B
Caution: Never plug the refrigerator
into the wall outlet during installation.
Otherwise, risk of death or serious
injury may arise.
A If the entrance door of the room
where the refrigerator will be installed is
not wide enough for the refrigerator to
pass through, than call the authorised
service to have them remove the
doors of your refrigerator and pass it
sideways through the door.
1. Install your refrigerator to a place
that allows ease of use.
2. Keep your refrigerator away from
heat sources, humid places and direct
sunlight.
3. There must be appropriate air
ventilation around your refrigerator in
order to achieve an efficient operation.
If the refrigerator is to be placed in a
recess in the wall, there must be at
least 5 cm distance with the ceiling
and at least 5 cm with the wall.
If the floor is covered with a carpet,
your product must be elevated 2.5 cm
from the floor.
EN
9
Page 11
4. Place your refrigerator on an even
floor surface to prevent jolts.
5. Do not keep your refrigerator in
ambient temperatures under 10°C.
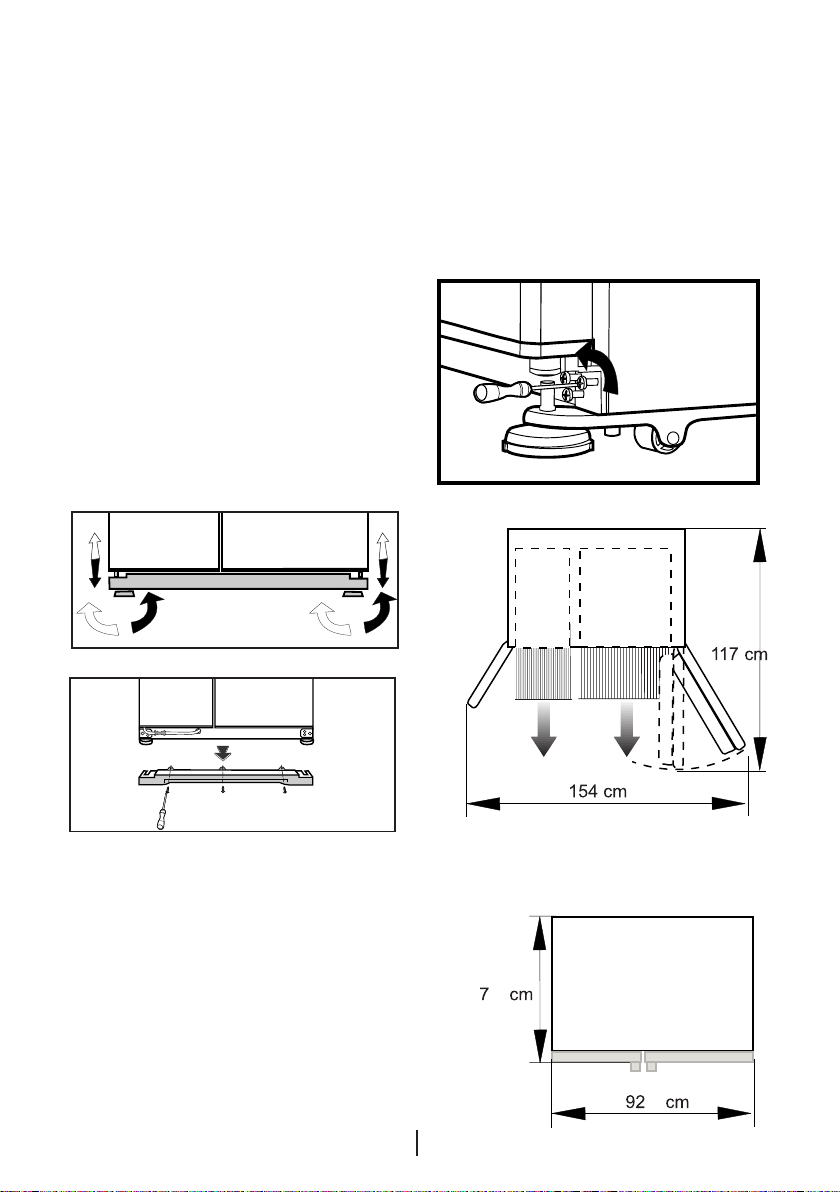
Floor balance adjustment
If your refrigerator is unbalanced;
You can balance your refrigerator by
turning the front legs of it as illustrated
in the figure. (See Figure A) The corner
where the leg exists is lowered when
you turn in the direction of black
arrow and raised when you turn in the
opposite direction. Taking help from
someone to slightly lift the refrigerator
will facilitate this process.
2. Loosen the three screws of the
hinges of the lower door, which you
wish to escalate, with the help of a
screwdriver as shown in the figure
below. (Do not remove completely)
(See Figure C)
2
(C)
(A)
4
1 2 3
(B)
Door height adjustment
In case there is a problem with the
alignment of the doors with respect
to each other, they may be re-aligned
vertically in the order given below.
Ensure that door shelves are empty
when adjusting the door height.
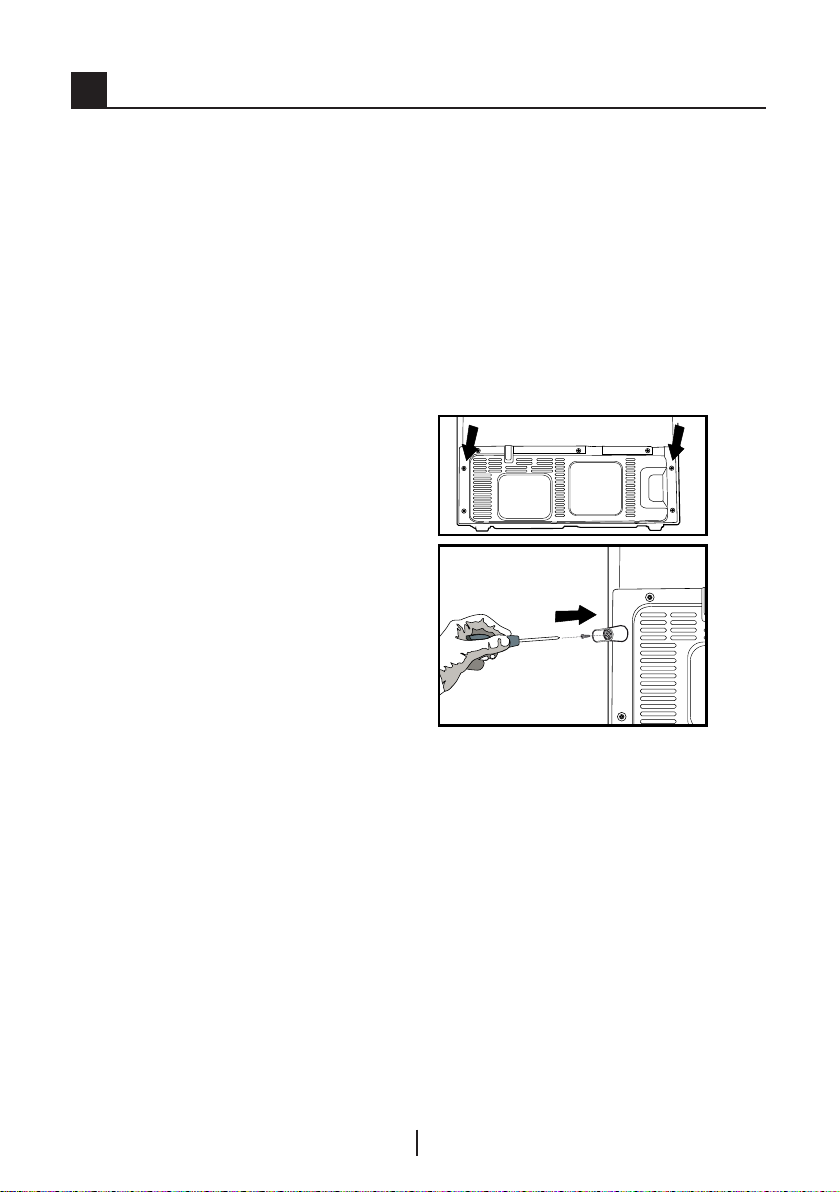
1. Remove the lower ventilation cover
by unscrewing its screws as shown in
the figure below. (See Figure B)
10
2
EN
Page 12

• If the freezer compartment door is
lower than the fridge compartment
door, bring them to the same level by
turning the turning the elevation screw
on the freezer compartment side in
the direction of arrow using a M6 Allen
wrench as illustrated in Figure D.
• If the freezer compartment door is
higher than the fridge compartment
door, bring them to the same level
by turning the elevation screw on
the freezer compartment side in the
reverse direction of arrow using a M6
Allen wrench as illustrated in Figure D.
After bringing the doors to the same
level by elevating the front part with
the aid of the elevation screws,ensure
the doors of the refrigerator shall close
properly. If the doors do not close
properly, this might adversely affect the
efficiency of the refrigerator.
11
(D)
EN
Page 13
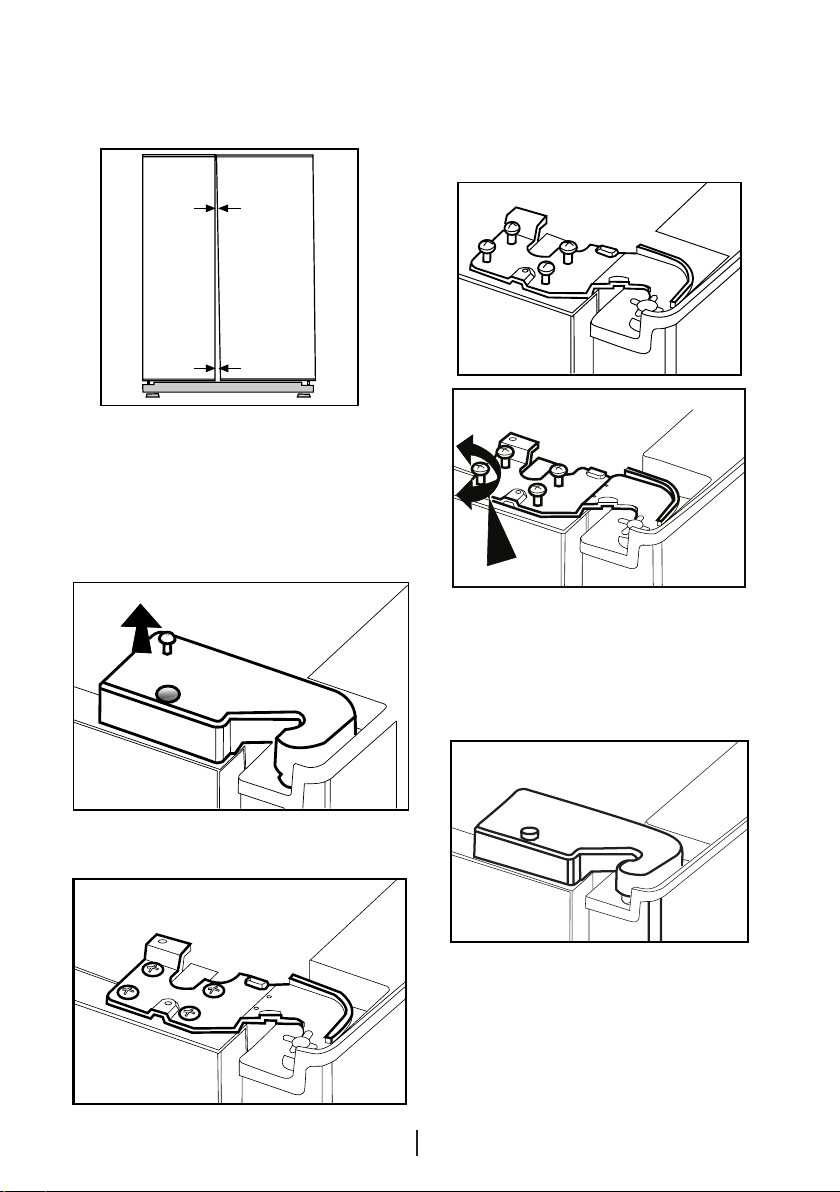
Adjusting the gap between
the upper door
C You can adjust the gap between
the fridge compartment doors as
illustrated in the figures.
Door shelves should be empty when
adjusting the door height.
switch off the refrigerator power
before removing hinge covers and
this situation should be made to
take care.
C Using a screwdriver, remove the
screw of upper hinge cover of the door
you want to adjust.
C Adjust the door appropriately as
you desire by loosing the screws.
Because of being wires in the
hinge cover of the freezer door,
C
Fix the door you have adjusted by
tightening the screws without changing
the position of the door.
C Replace the hinge cover and fix
with the screw.
EN
12
Page 14
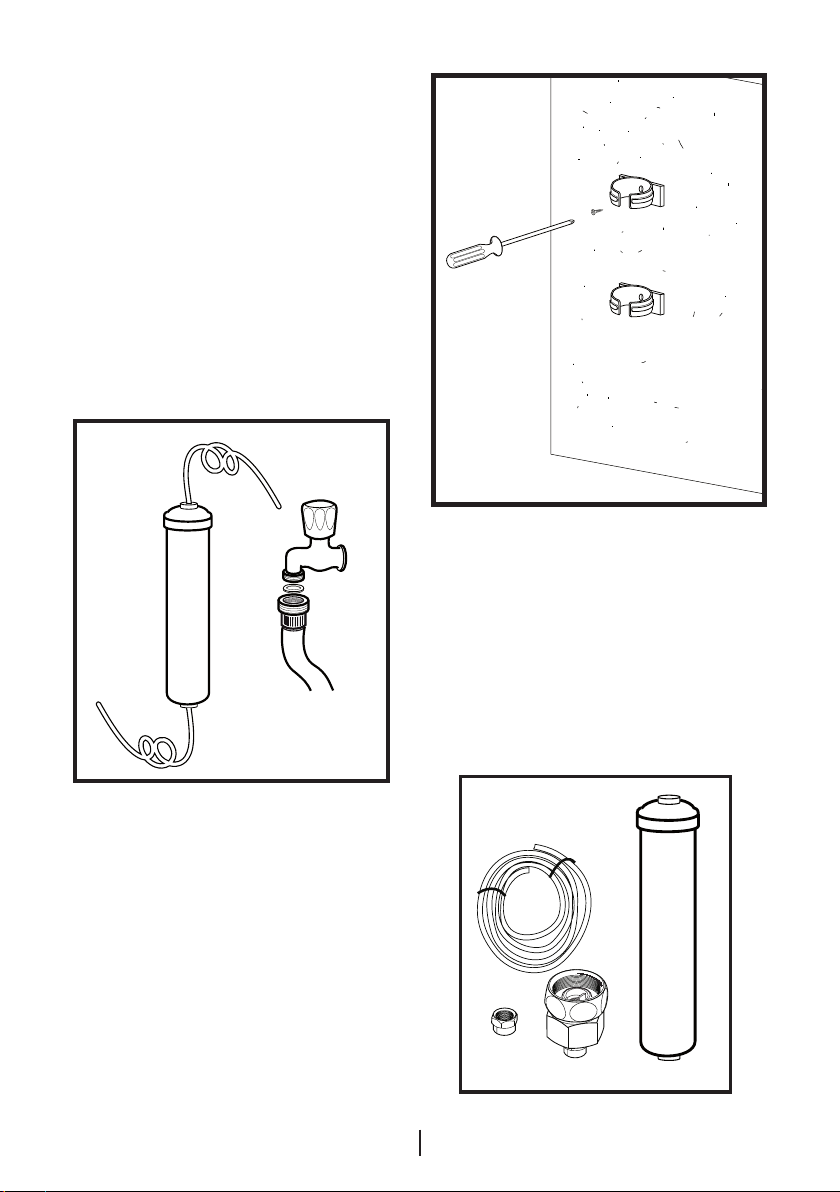
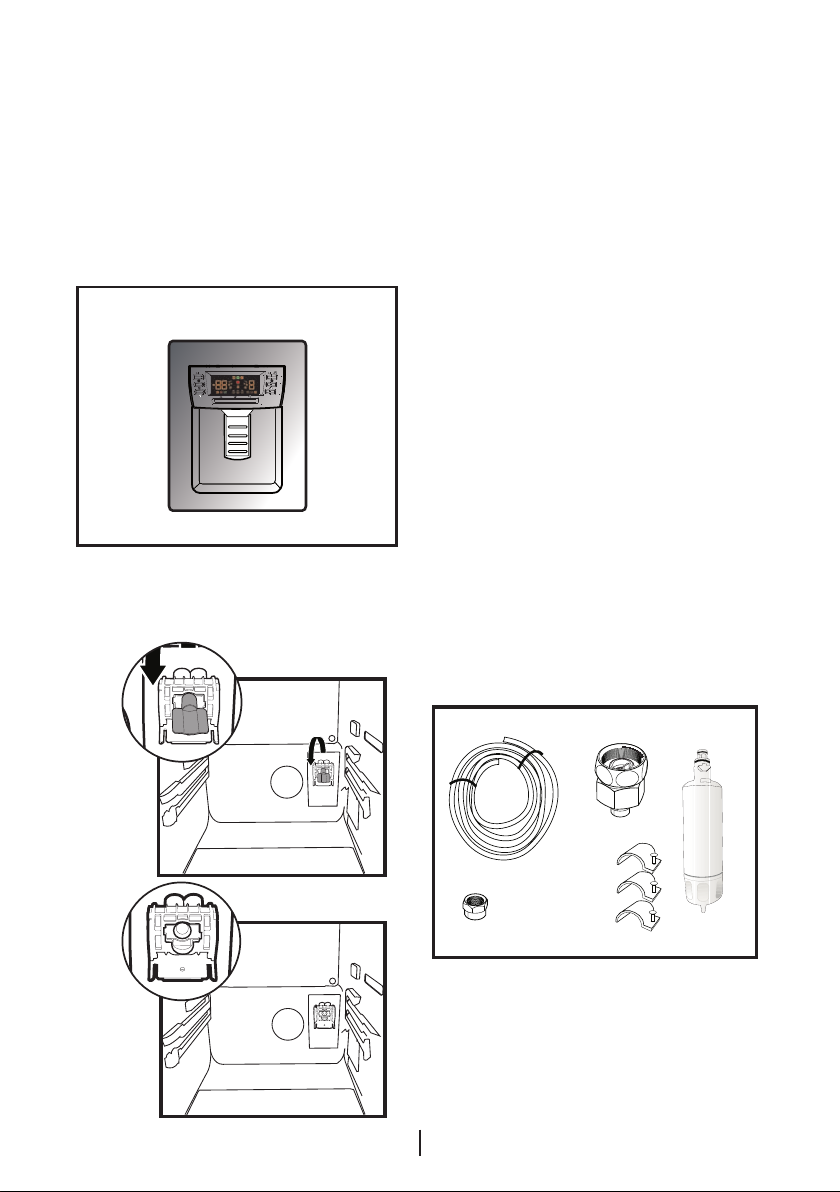
Installing Water Filter
(in some models)
Installation Requirements
Two different water sources may be
connected to the refrigerator for water
supply: the mains cold water supply
and water in a jug.
A pump should be used for jug water
usage.
Check that the parts stated below are
supplied with your appliance.
3. 5 meter long water pipe (1/4 inch in
diameter)
4. Cold mains water valve with mesh
filter (Tap Adapter)
5. Water Filter to be fitted to the bracket
inside the fridge compartment.
1. Union for connection of the water
pipe to the rear of the appliance
2. 3 pieces of pipe clips (In case
required to secure the water pipe)
C Note: Since the following parts are
not required in use with a jug, they
may not be found in the product you
purchased.
13
EN
2
3
1
4
Page 15
1
2
Water connection to the
refrigerator
Please follow the instructions
below.
a
a
b
c
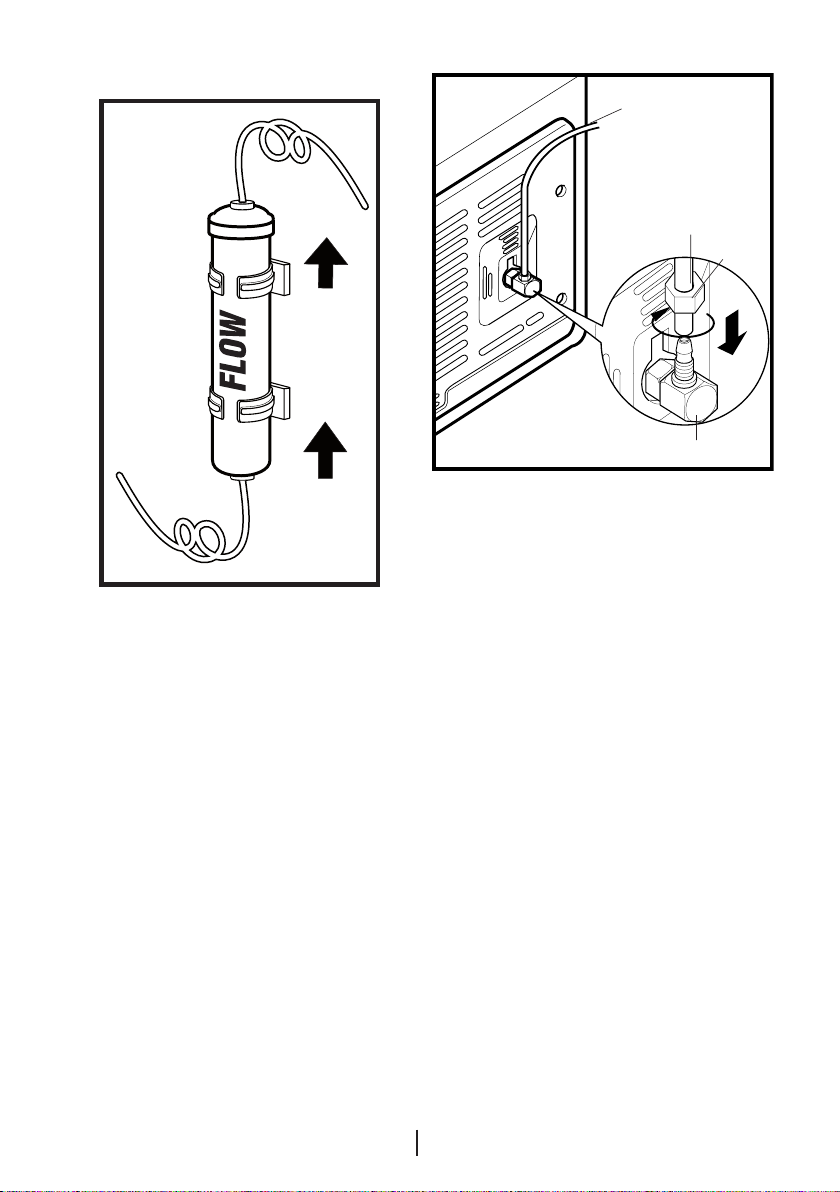
Connection of the Water
Pipe to the Refrigerator
1. After installing the union onto the
water pipe, insert the water pipe to
the refrigerator inlet valve by pressing
downwards firmly.
2. Fix union as seen in the opposite
figure, by squeezing by hand on the
refrigerator inlet valve.
(a- Water Pipe, b-Union, c-Valve)
C Note 1: You should not need to
tighten the union with a tool to achieve
water tight assembly. In case of a leak
use a spanner or a pair of pliers to
tighten the union.
To fit the water filter follow the
instructions below referring to figures
supplied:
EN
14
Page 16
1. Press ice cancel button on the
display. (Figure 1)
2. Remove the filter cover in the fridge
compartment by pulling it forward.
(Figure 2)
3. Take out the water filter by-pass
cover by rotating it downwards.
(Figure 3-4)
A Warning: Make sure that the “Ice
off” mode is active before taking out
the by-pass cover.
Note: It is normal that a few drops of
water drip after the cover has been
taken out.
4. Remove the lid on top of the water
filter to place it as shown in the figure
and turn upwards to lock it. (Figure 5)
5. Press ice cancel button on the
display again to exit from this mode.
Water filter should be replaced every
6 months. The water filter must be
removed as shown in the figure when
it is going to be replaced or when it will
no longer be used and by-pass cover
must be attached. It must be made
sure that Ice Off mode is active before
taking it out.
A Warning: Water filter cleans some
foreign particles in the water. It does
not purify water from microorganisms.
A Warning: Ice Off button must
always be pressed during replacement
of the water filter or installing the bypass cover.
15
EN
3
1
4
2
5
Page 17
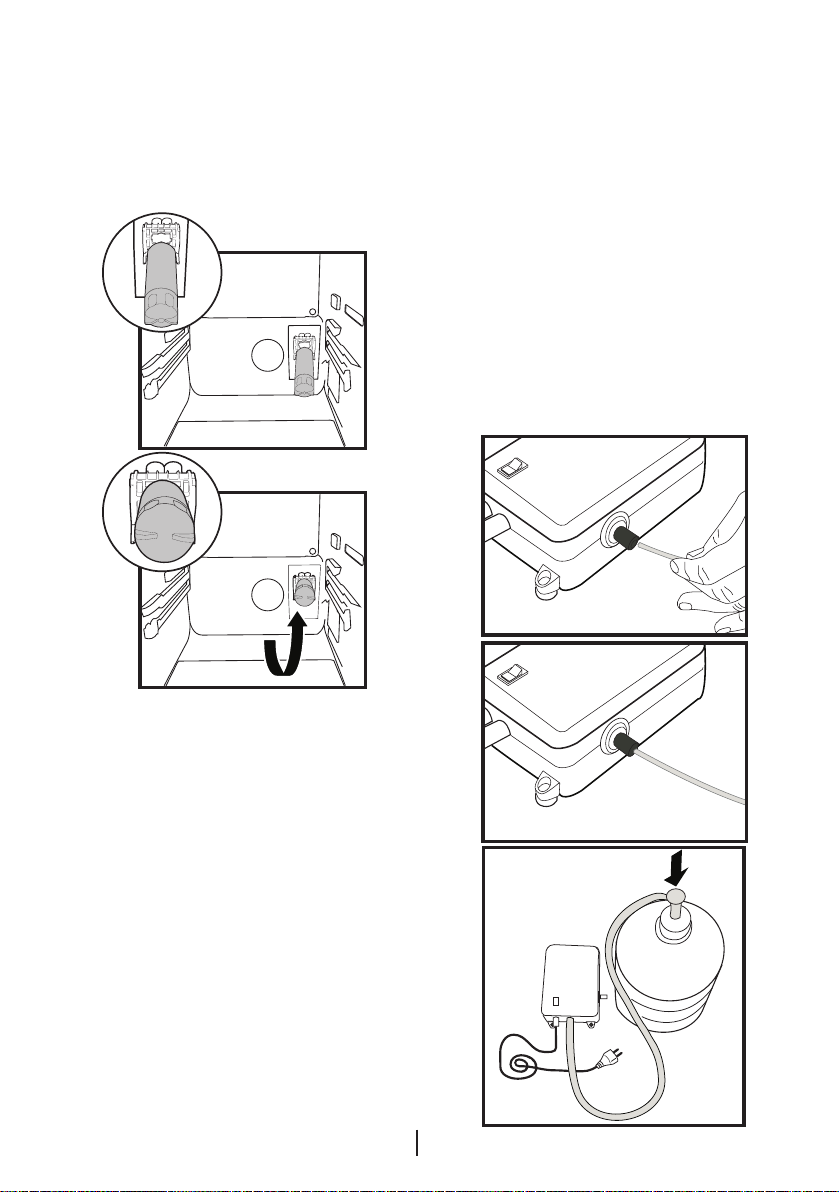
Connection of Water Hose to
the Jug
(in some models)
To connect water to the refrigerator
from a jug, a pump is needed. Follow
C Note: You may refer to the user
manual of the pump while making the
water connection.
Connection of the Water
Pipe to the Cold Water Mains
Line
(in some models)
If you want to use your refrigerator by
connecting it to the cold water mains
line,
you will have to connect a standard
1/2” valve connection fitting to the cold
water supply in your house. In case
1a
the instructions below after connecting
one end of the water pipe coming
out of the pump to the refrigerator as
described on the previous page.
1. Finish the connection by pushing
the other end of the water pipe into
the water pipe inlet of the pump as
shown in the figure.
2. Put and fix the pump hose into the
jug as shown in the figure.
3. After completing the connection, plug
in and run the pump.
To provide an efficient operation of the
pump, wait for 2-3 minutes after
starting the pump.
16
1b
2
EN
Page 18
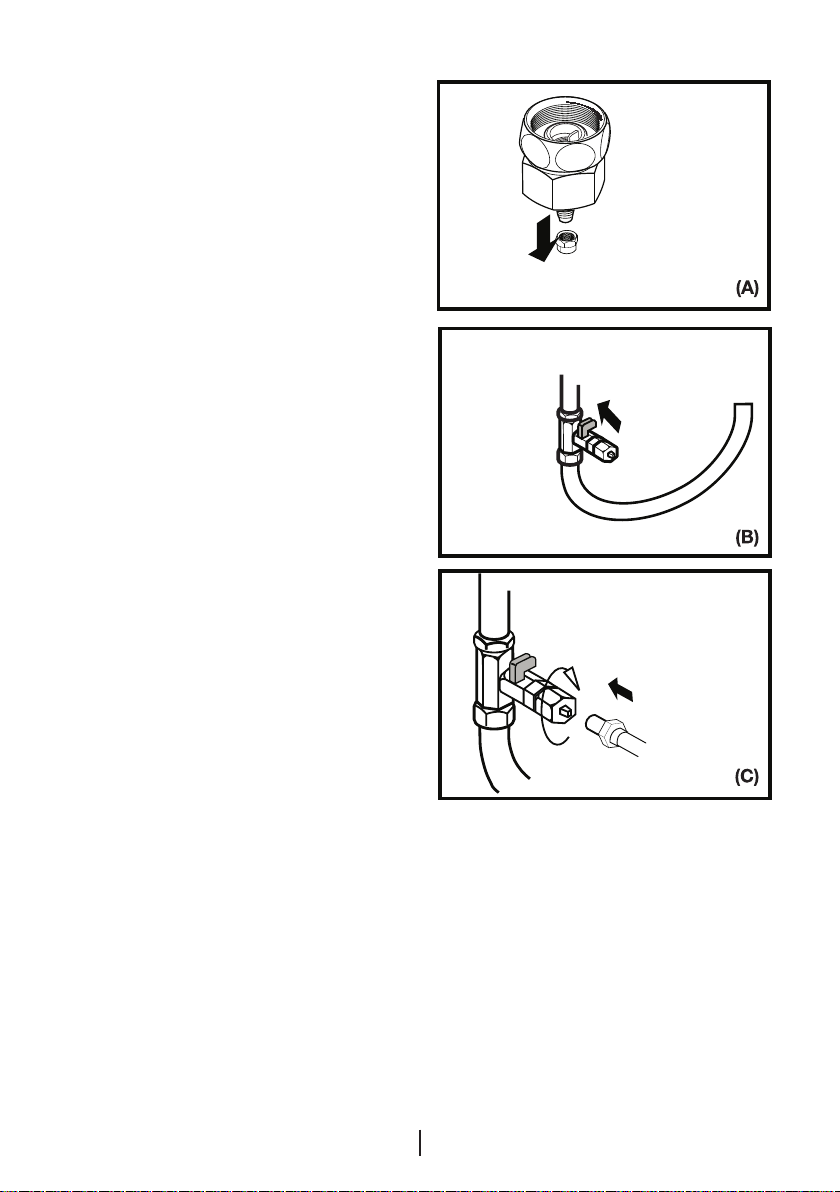
this valve is not present or in case
you are not sure, consult a qualified
plumber.
1. Separate the union from the tap
adaptor. (Figure A)
2. Install the tap adaptor to 1/2” valve
fitting as shown in the figure. (Figure
B)
3. After inserting the water pipe to the
union, install it to the tap adaptor
and insert to the tap as shown in the
figure. (Figure C)
4. Tighten the union manually. In case of
a leak use a spanner or a pair of pliers
to tighten the union.
A Warning: Secure the water pipe
to suitable points by means of the
pipe clips supplied to avoid any
damage or displacement or accidental
disconnection.
A Warning: After turning on the water
valve, make sure that there is no
leakage at both connection points of
the water pipe. In case of a leak, turn
off the valve immediately and tighten all
joints again using a spanner or a pair
of pliers.
A Warning: Make sure that standard
1/2" valve fitting fed by cold mains
water supply is available and is turned
off fully.
Note -1: There is no need to use water
filter in case a jug is used.
Note -2: Pump must be used when jug
will be used.
17
EN
Page 19

Prior to first use of Ice/Water
Dispenser
C Water mains pressure must not be
below 1 bar.
C Water mains pressure must not be
over 8 bars.
C The first 10 glasses of water should
not be consumed.
C 12 hours must pass to obtain ice
from the Ice Dispenser for the first
time. If there is not enough ice in the
ice dispenser, ice may not be obtained
from ice dispenser.
C Pumps must be used in case the
supply water pressure drops below 1
bar or if a jug is going to be used.
C Water system of the refrigerator
must be connected to the cold water
line. It must not be connected to hot
water line.
C No water may be obtained in the
initial startup of the refrigerator. This
is caused by the air in the system. To
discharge air from the system, press
Dispenser latch for periods of 1 minute
until water comes from the Dispenser.
Water flow may be irregular in the
beginning. Irregular water flow will be
normalized after the air in the system is
discharged.
C At the initial startup of the
refrigerator approx.12 hours must pass
before cold water can be obtained.
C Approximately the first 30 cubes
of ice to be obtained from the Ice
Dispenser must not be used.
C Always use the water filter when a
jug is not being used.
C Water mains pressure must be
between 1-8 bars for the operation
of Ice/Water Dispenser smoothly. For
this, check that 1 glass of water (100
cc) can be filled in 10 seconds.
18
EN
Page 20

4 Preparation
C Your refrigerator should be installed at
least 30 cm away from heat sources
such as hobs, ovens, central heater
and stoves and at least 5 cm away
from electrical ovens and should not
be located under direct sunlight.
C The ambient temperature of
the room where you install your
refrigerator should at least be 10°C.
Operating your refrigerator under
cooler conditions than this is not
recommended with regard to its
efficiency.
C Please make sure that the interior
of your refrigerator is cleaned
thoroughly.
C If two refrigerators are to be installed
side by side, there should be at least
2 cm distance between them.
C When you operate your refrigerator
for the first time, please observe the
following instructions during the initial
six hours.
- The door should not be opened
frequently.
- It must be operated empty without
any food in it.
- Do not unplug your refrigerator. If
a power failure occurs out of your
control, please see the warnings in
the “Recommended solutions for
the problems” section.
C Original packaging and foam
materials should be kept for future
transportations or moving.
19
EN
Page 21
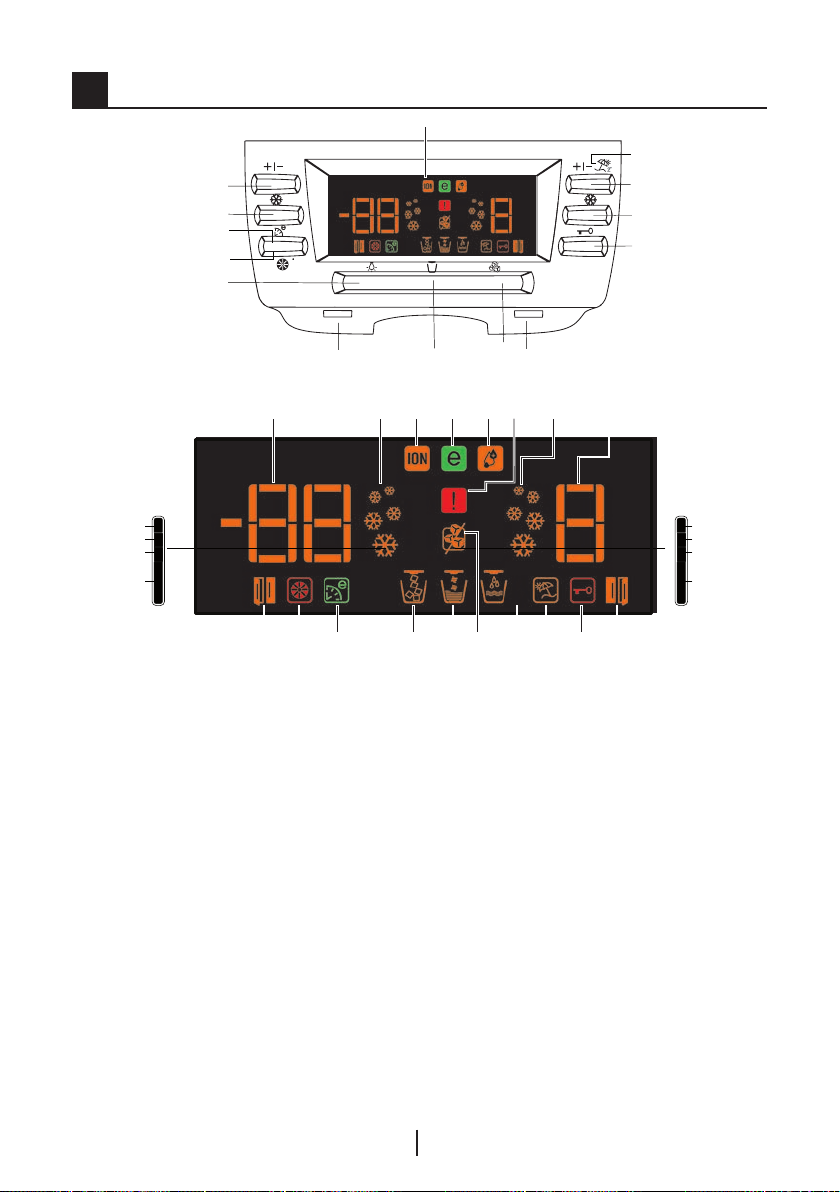
5 Using your refrigerator
12
11
10
9
8
3
6
*
1
2
3
4
6
7
5
-24 °C
-22 °C
-20 °C
-18 °C
1. Fridge Set button
2. Vacation mode button
3. Quick fridge button
4. Key lock button
5. Ice Off button
6. Water Dispenser Lights
7. Ice / Wate selection button
8. Water Dispenser light button
9. Filter Reset button
10. Auto Eco button
11. Quick freeze button
12. Freezer Set button
13. Economy mode indicator
14. High humidity indicator
15. Quick cool indicator
29 1413
30
26 25 24 23 19
1528
17
20212227
16. Fridge temperature setting indicator
17. High temperature/error warning indicator
18. Fridge door open indicator
19. Key Lock indicator
20. Vacation mode indicator
21. Water indicator
22. No ice indicator
23. Crash Ice indicator
24. Cube Ice indicator
25. Auto Eco indicator
26. Filter reset indicator
27. Freezer door open indicator
28. Freezer Compartment Temperature Setting
indicator
29. Fast Freeze indicator
30. Ioniser indicator
OPTIONAL
16
2 °C
4 °C
6 °C
8 °C
18
C Figures that take place in this instruction manual are schematic and may not
correspond exactly with your product. If the subject parts are not included in the
product you have purchased, then it is valid for other models.
EN
20
Page 22
Freezer
Compartment
Adjustment
-15°C 4°C This is the normal recommended
-18,-21 or -24°C 4°C These settings are recommended
Fresh Freeze 4°C Use this when you wish to freeze
-15°C or colder 2°C If you think that your fridge
-15°C or colder Quick Cool You can use it when your fridge
Setting the fridge
compartment temperature
Fridge compartment temperature
can be set at one of the following
temperatures:
8,6,4 and 2°C
Press the Fridge Set button to change.
The temperature will decrease by 2°C.
Every time you press the button, the
temperature will go down and then
return to the highest setting. Release
at the desired temperature and the
new set temperature will be stored.
If you think that your food is colder
than you desire, you can adjust
the temperature setting of fridge
compartment to 6 or 8.
Setting the freezer
compartment temperature
Freezer temperature can be set at one
of the following temperatures : -15 /
-18 / -21 / -24 and -24°C
Fridge
Compartment
Adjustment
Explanations
setting.
when the ambient temperature
exceeds 30°C.
your food or make ice in a short
time. Your refrigerator will return to
its previous mode when the process
is over.
compartment is not cold enough
because of the hot conditions or
frequent opening and closing of the
door.
compartment is overloaded or if you
wish to cool down your food rapidly.
Press the Freezer Set button to
change. The temperature will decrease
by 2°C. Every time you press the
button, the temperature will go down
and then return to the highest setting.
Release at the desired temperature
and the new set temperature will be
stored.
Fresh Freeze Function
When you press “Fresh Freeze”
button, the compressor will run for
about 14 hours. Fresh Freeze indicator
will glow.To cancel this function press
Fresh Freeze button again. Fresh
Freeze indicator will turn off and return
to its normal settings. Fresh Freeze will
cancel itself automatically after about
12 hours if you do not cancel it.
If you want to freeze large amounts
of fresh food, press the Fresh Freeze
button 14 hours before putting the
food into the freezer compartment.
21
EN
Page 23

Quick Cool Function
When you press Quick Cool button,
the temperature of the compartment
will be colder than the adjusted values.
This function can be used for food
placed in the fridge compartment and
required to be cooled down rapidly.
After pressing the Quick Cool button,
Quick Cool indicator will glow.To
cancel this function press Quick Cool
button again. Quick Cool indicator
will turn off and return to its normal
settings. Quick Cool function will
cancel itself automatically in case you
do not cancel it.
Vacation Button
In case the fridge compartment will
not be used for a long time, the usage
of the fridge compartment may be
cancelled by pressing on the Vacation
Button. By this way, the refrigerator
may operate more economically. Press
on Vacation Button for 3 seconds
to activate this function. When this
function is active, the door of the fridge
compartment must be kept closed
and no food must be left in the fridge
compartment.
Auto Eco Button (Special
Economy function)
When “Auto Eco” button is pressed,
Auto Economy Function will be
activated. If the door of the fridge
compartment is kept closed for a long
time when this function is selected,
the fridge compartment will switch to
a more economic operation mode to
save electricity automatically. When the
Auto Eco button is pressed again, this
function is deactivated.
Ioniser
The ioniser helps purify the air in the
fridge and is carried out automatically
Key Lock Button
The key lock is activated when this
button is pressed for 3 seconds and
all buttons and the dispenser latch will
not work. If you want to deactivite key
lock press again for 3 seconds.
Water Dispenser Illumination
When the Light button is pressed, the
water dispenser lamp will light up and
it will go off when the button is pressed
again. This illumination will also light
up when the water dispenser latch is
pressed, and it will go off a short while
after the latch is released.
Water/Ice Type Selection
With Dispenser Selection button, either
one of “water”, “ice cube” or “crushed
ice” options is selected.
Ice/Water Dispenser
With its three different functions, the
dispenser efficiently meets your cold
water, cube ice and crushed ice needs
without having to open the door of
the refrigerator. It is a continuous cold
water and ice source without adding
water. User friendly control panel
provides the following dispensing
functions:
Note:
• Water or ice can be dispensed for a
maximum of 90 seconds at each use.
• When the freezer door is open, the
dispenser will not work.
Ice Cube Crushed Ice Cold
Water
EN
22
Page 24

Using the Ice Dispenser
C
Please note, first ice cubes will
not be ready before 12 hours after
switching on the appliance.
In case you do not need ice, such as
during winter or in case you are on
vacation, select the ice off function.
C Ice device produces approximately
110 cubes of ice in 24 hours and this
amount may change according to
the frequency of opening of doors,
refrigerator settings and power outage.
Produced ice may be obtained from
the dispenser as cube ice or crushed
ice.
It is normal to get crushed ice from
the dispenser in a longer time than in
getting the ice cubes and also flowing
of some crushed ice before the ice
cubes drop if crushed ice option had
been selected before selecting ice
cube option.
C If the ice dispenser hasn’t been
used for a long time or after a power
cut the ice may form clumps or if the
ice has taken on a change in smell or
taste then the ice must be disposed of
and the icebox cleaned thoroughly.
Warnings
C No ice must be added to the ice
dispenser compartment. This may
adversely affect the ice supply or
crushing the ice.
A It is normal to have a couple of ice
cubes stuck together in the icebank.
A Moving parts such as blades in
a housing at the ice outlet of the
dispenser must not be touched to
avoid injury.
A Never use sharp objects to break
the ice in the icebox. This may cause
damage on the icebox.
A Food stuff should never be placed
into the icebox for quick cooling
purposes.
A When the icebox is to be removed for
any reason, first of all Ice Off Button
must be pressed.
Ice Off
C
To stop ice formation, Ice Off
button is pressed. When Ice Off is
selected, no water will be taken into
the Icematic. However, already existing
ice can be taken from the dispenser.
To restart ice formation, Ice Off button
must be pressed again.
Warning: If you do not use the ice
dispenser, do not forget to put ice
duct cover into the ring inside of the
freezer door. (See. Your Refrigerator
section)
FILTER Reset Button:
Water filter should be replaced every
six months. Filter reset indicator lits if
water filter needs to be changed Press
filter Reset Button for 3 seconds to
remove filter reset indicator warning.
23
EN
Page 25
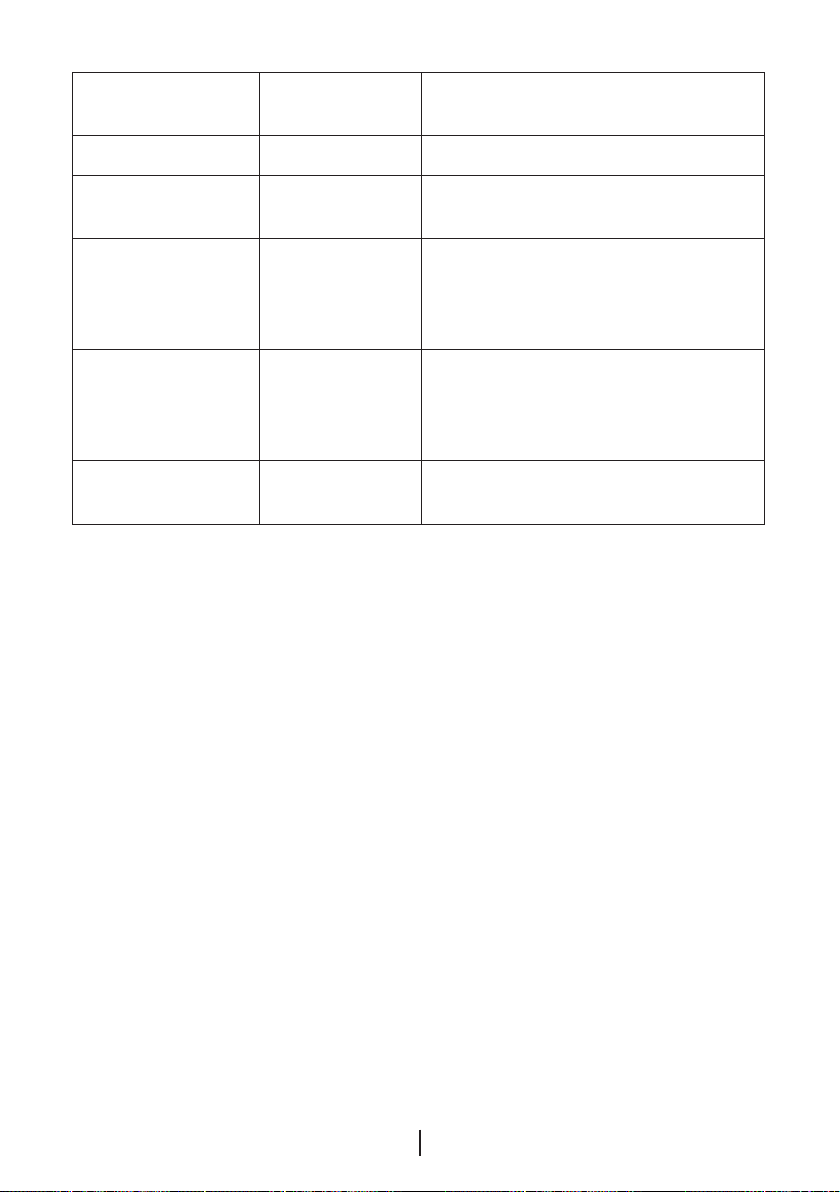
Using the water spring
Warnings
It is normal for the first few glasses of
water taken from the dispenser to be
warm.
In cases where the water dispenser
has not been used frequently, sufficient
amount of water must be drained from
the dispenser to get fresh water.
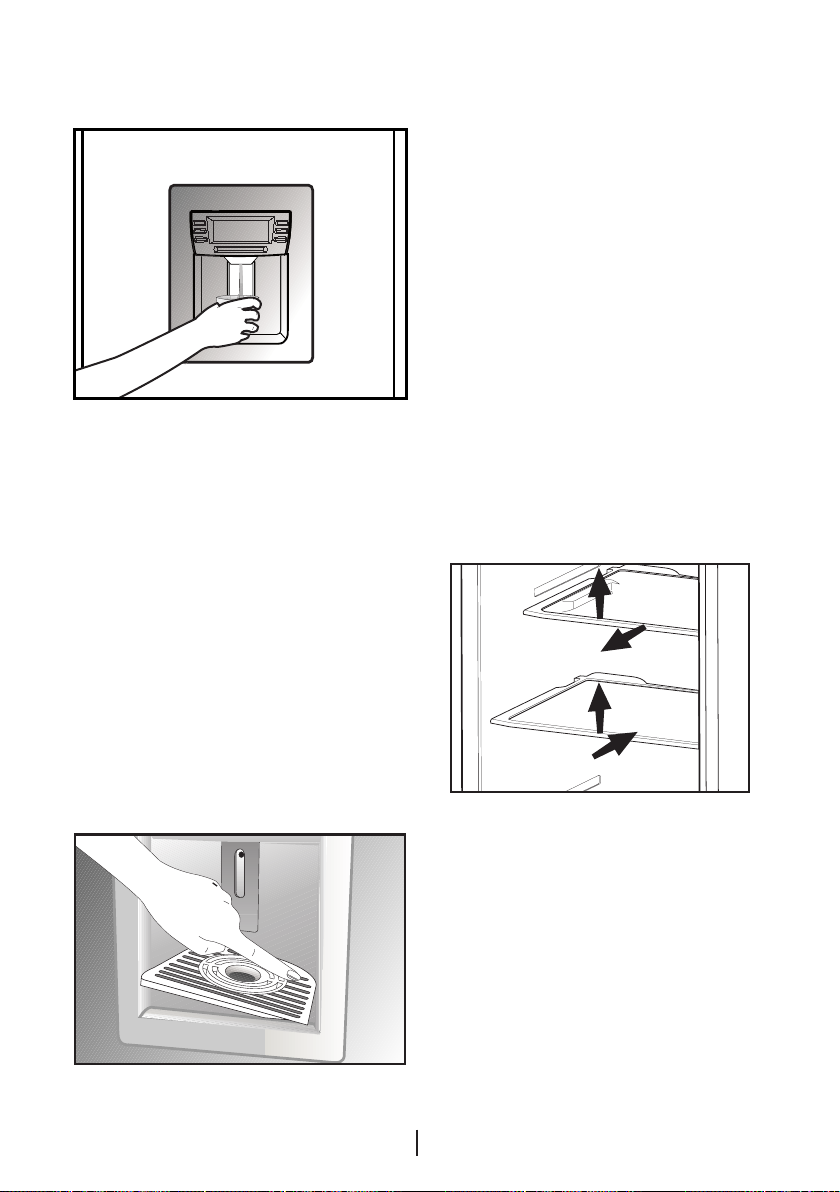
Spillage Tray
Water drops that drip during use,
accumulates in the spillage tray. You
can remove spillage tray by pulling
it to yourself or pressing on its edge
(depending on the model). You can
remove the water with a sponge or a
soft cloth.
Sliding Body Shelves
Sliding body shelves can be pulled
by slightly lifting up from the front and
moved back and forth. They come to
a stop point when pulled towards front
to allow you reach the foods placed at
the back of the shelf; when it is pulled
after slightly lifted upwards at the
second stop point, the body shelf will
be released.
The shelf should be hold tightly from
the bottom as well in order to prevent
it from tipping over. The body shelf is
placed on the rails at the sides of the
refrigerator body by bringing it to one
lower or one upper level.
The body shelf should be pushed
backwards to seat it completely.
1
2
3
4
24
EN
Page 26
Blue light
Foodstuff stored in the crispers that
are enlightened with a blue light
continue their photosynthesis by
means of the wavelength effect of blue
light and thus, preserve their freshness
and increase their vitamin content.
Ion:
Air is ionized by means of the ionizer
system in the fridge compartment air
duct. Thanks to this system, air-borne
bacteria and particles that cause
odour are removed.
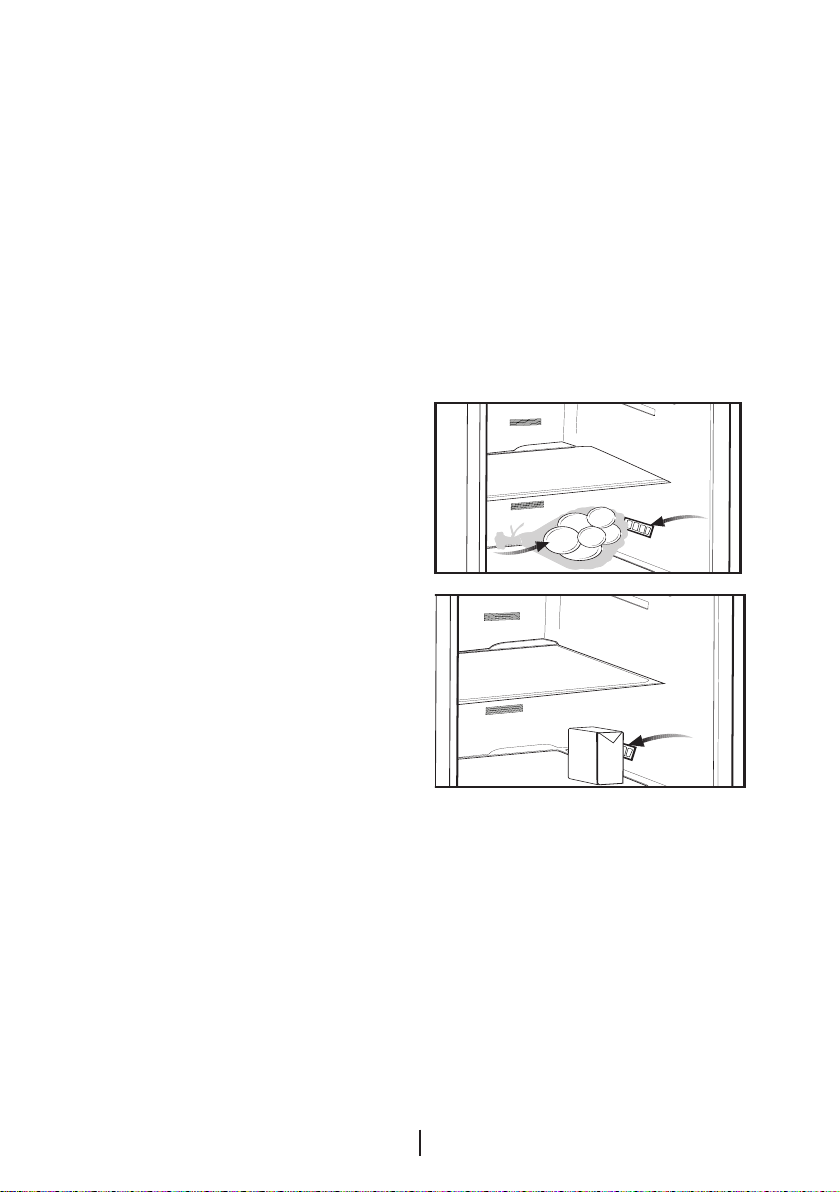
Egg tray
You can install the egg holder to the
desired door or body shelf.
Never store the egg holder in the
freezer compartment
Crisper humidity control
sliders
Crisper of your refrigerator is
designed especially fresh to keep your
vegetables freshly without loosing their
humidity. Cold air circulates basically
around the crisper and the amount of
the cold air passing through the crisper
is controlled by the sliders on the front
side of the crisper cover.
You can adjust the humidity control
sliders to a suitable position according
to the humidity and cooling condition
of your food in the crisper.
If you want your food in the crisper
to cool more, open the holes of the
humidity control sliders and if you
want them to cool less and keep their
humidity for a longer time, close the
holes.
Fresh Freeze Compartment
This compartment freezes your food
quickly and preserves their tastes and
nutritional values.
25
EN
Page 27

Recommendations for
preservation of frozen food
• Prepacked commercially frozen
food should be stored in accordance
with the frozen food manufacturer's
instructions for a ( 4 star) frozen
food storage compartment.
• To ensure that the high quality
achieved by the frozen food
manufacturer and the food retailer is
maintained, the following should be
remembered:
1.Put packets in the freezer as quickly
as possible after purchase.
2.Ensure that contents are labelled
and dated.
3.Do not exceed "Use By", "Best
Before" dates on the packaging.
If there is a power failure do not
open the freezer door. Even if the
power failure lasts up to the time
specified on Type Label (inside left of
the refrigerator), frozen food will not
be affected. In case the failure lasts
longer, the food must be checked and
when necessary, must be consumed
immediately or must be frozen after
cooked.
Defrosting
The fridge and freezer compartments
defrost automatically.
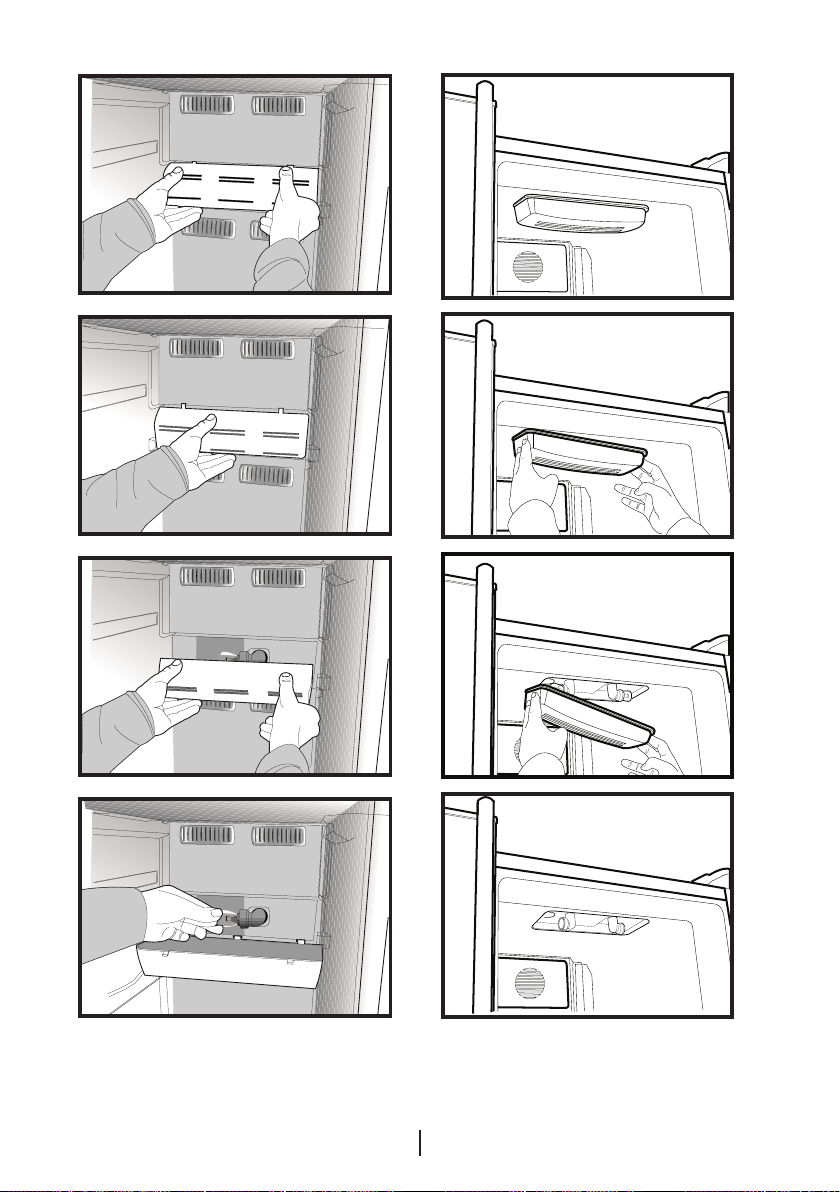
Replacing the Interior Light
Bulb
Should the light fail to work, proceed
as follows:
1. Switch off at the socket outlet and
pull out the mains plug.
Remove all shelves and drawers for
easy access.
2. Illumination illumination cover in
fridge section is opened by pressing
by hand; first release one side and
then the other by pressing on the sides
as shown in the figures.
3. First check that the bulb has not
worked loose by ensuring that it
is screwed securely in the holder.
Reinsert the plug and switch on. If the
bulb works, reinstall the light cover by
inserting the rear lug and pushing up
to locate the front two lugs.
4.If the light still fails to work, switch
off at the socket outlet and pull out
the mains plug. Replace the bulb with
a new 15 watt (max) screw cap E14
(SES) bulb.
5.Carefully dispose of the burnt-out
light bulb immediately.
Replacement light bulb can easily be
obtained from a good local electrical or
DIY store.
26
EN
Page 28
EN27EN
Page 29

6 Maintenance and cleaning
A Never use gasoline, benzene or
similar substances for cleaning
purposes.
B We recommend that you unplug the
appliance before cleaning.
B Never use any sharp abrasive
instrument, soap, household
cleaner, detergent and wax polish for
cleaning.
C Use lukewarm water to clean the
cabinet of your refrigerator and wipe it
dry.
C Use a damp cloth wrung out in
a solution of one teaspoon of
bicarbonate of soda to one pint of
water to clean the interior and wipe it
dry.
B Make sure that no water enters the
lamp housing and other electrical
items.
B If your refrigerator is not going to be
used for a long period of time, unplug
the power cable, remove all food,
clean it and leave the door ajar.
C Check door seals regularly to ensure
they are clean and free from food
particles.
A To remove door racks, remove all the
contents and then simply push the
door rack upwards from the base.
Protection of plastic
surfaces
C
Do not put the liquid oils or oil-cooked
meals in your refrigerator in unsealed
containers as they damage the
plastic surfaces of your refrigerator. In
case of spilling or smearing oil on the
plastic surfaces, clean and rinse the
relevant part of the surface at once
with warm water.
28
Page 30
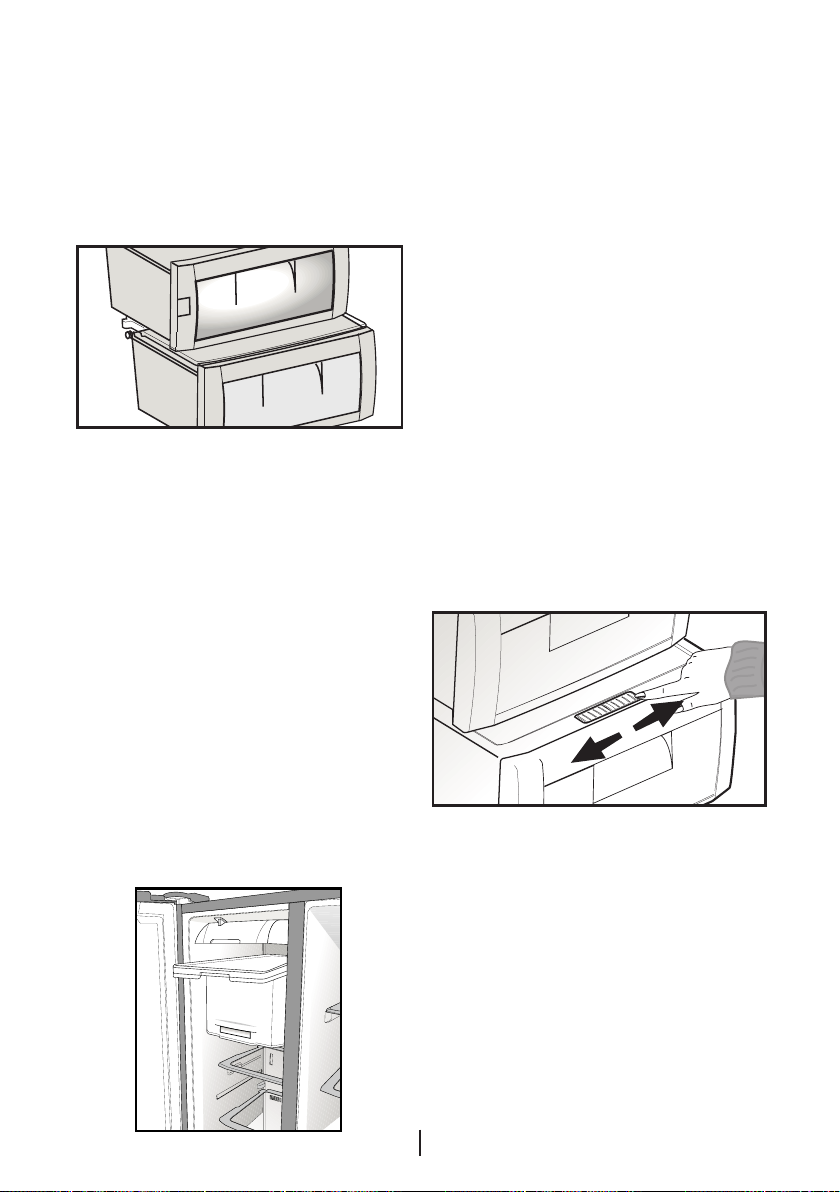
Chiller compartment
If you wish to use the storage
container under the shelf as the Chiller
compartment, the storage container
under the shelf should be placed as
shown in the picture.
Chiller compartments enable the
foods to be frozen become ready
for freezing. You can also use these
compartments to store your food at a
temperature a few degrees below the
fridge compartment.
You can increase the inner volume of
your refrigerator by removing any of
the chiller compartments. To do this,
pull the compartment towards yourself;
the compartment will lean against the
stopper and stop. This compartment
will be released when you lift it about 1
cm and pull it towards yourself.
Icebox and Water Dispenser
C
Follow the procedure and warnings
below to clean the icebox:
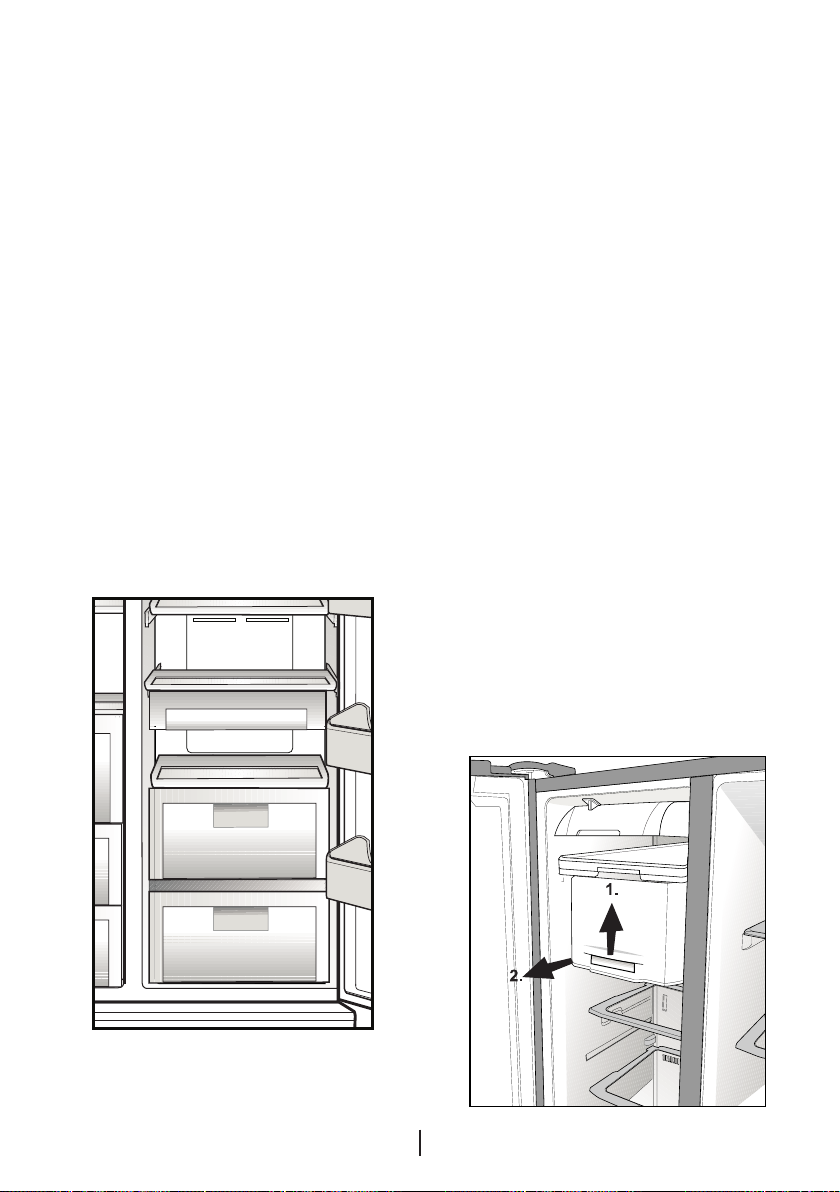
A Remove the Icebox by lifting first
and then pulling towards yourself as
shown in the diagram.
A Empty the ice in the Icebox if any.
To take out the stuck ice, use objects
that are not sharp to avoid any
damage on the Icebox.
A Pay attention that the inside of
the Icebox is not wet/damp before
placing it back to its housing.
A If you want to get ice from the ice
dispenser after placing the Icebox
back to its housing and closing the
freezer door, exit from Ice Off mode
by pressing the Ice Off key again.
A Do not touch moving parts like
the knife in the Icebox.
C Leave the Water Reservoir
empty when you are not going to
use for a long time
EN
29
Page 31

7 Recommended solutions for the problems
Please review this list before calling the service. It might save you time and
money. This list includes frequent complaints that are not arising from defective
workmanship or material usage. Some of the features described here may not
exist in your product.
The refrigerator does not operate.
• Is the refrigerator properly plugged in? Insert the plug to the wall socket.
• Is the fuse of the socket which your refrigerator is connected to or the main fuse
blown out? Check the fuse.
Condensation on the side wall of the fridge compartment (MULTIZONE, COOL
CONTROL and FLEXI ZONE).
• Very cold ambient conditions. Frequent opening and closing of the door. Highly
humid ambient conditions. Storage of food containing liquid in open containers.
Leaving the door ajar. Switching the thermostat to a colder degree.
• Decreasing the time the door left open or using it less frequently.
• Covering the food stored in open containers with a suitable material.
• Wipe the condensation using a dry cloth and check if it persists.
Compressor is not running
• Protective thermic of the compressor will blow out during sudden power
failures or plug-out plug-ins as the refrigerant pressure in the cooling system of
the refrigerator has not been balanced yet. Your refrigerator will start running
approximately after 6 minutes. Please call the service if the refrigerator does not
startup at the end of this period.
• The fridge is in defrost cycle. This is normal for a full-automatically defrosting
refrigerator. Defrosting cycle occurs periodically.
• Your refrigerator is not plugged into the socket. Make sure that the plug is
properly fit into the socket.
• Are the temperature adjustments correctly made?
• Power might be cut off.
30
EN
Page 32

The fridge is running frequently or for a long time.
• Your new product may be wider than the previous one. This is quite normal.
Large refrigerators operate for a longer period of time.
• The ambient room temperature may be high. This is quite normal.
• The refrigerator might have been plugged in recently or might have been loaded
with food. Cooling down of the refrigerator completely may last for a couple of
hours longer.
• Large amounts of hot food might have been put in the refrigerator recently. Hot
food causes longer running of the refrigerator until they reach the safe storage
temperature.
• Doors might have been opened frequently or left ajar for a long time. The warm
air that has entered into the refrigerator causes the refrigerator to run for longer
periods. Open the doors less frequently.
• Freezer or fridge compartment door might have been left ajar. Check if the doors
are tightly closed.
• The refrigerator is adjusted to a very low temperature. Adjust the refrigerator
temperature to a warmer degree and wait until the temperature is achieved.
• Door seal of the fridge or freezer may be soiled, worn out, broken or not properly
seated. Clean or replace the seal. Damaged/broken seal causes the refrigerator
to run for a longer period of time in order to maintain the current temperature.
Freezer temperature is very low while the fridge temperature is sufficient.
• The freezer temperature is adjusted to a very low temperature. Adjust the freezer
temperature to a warmer degree and check.
Fridge temperature is very low while the freezer temperature is sufficient.
• The fridge temperature might have been adjusted to a very low temperature.
Adjust the fridge temperature to a warmer degree and check.
Food kept in the fridge compartment drawers are freezing.
• The fridge temperature might have been adjusted to a very low temperature.
Adjust the fridge temperature to a warmer degree and check.
Temperature in the fridge or freezer is very high.
• The fridge temperature might have been adjusted to a very high degree.
Fridge adjustment has an effect on the temperature of the freezer. Change
the temperature of the fridge or freezer until the fridge or freezer temperature
reaches to a sufficient level.
• Doors might have been opened frequently or left ajar for a long time; open them
less frequently.
• Door might have been left ajar; close the door completely.
• Large amount of hot food might have been put in the refrigerator recently. Wait
until the fridge or freezer reaches the desired temperature.
• The refrigerator might have been plugged in recently. Cooling down of the
refrigerator completely takes time.
31
EN
Page 33

The operation noise increases when the refrigerator is running.
• The operating performance of the refrigerator may change due to the changes in
the ambient temperature. It is normal and not a fault.
Vibrations or noise.
• The floor is not even or it is weak. The refrigerator rocks when moved slowly.
Make sure that the floor is strong enough to carry the refrigerator, and level.
• The noise may be caused by the items put onto the refrigerator. Items on top of
the refrigerator should be removed.
There are noises coming from the refrigerator like liquid spilling or spraying.
• Liquid and gas flows happen in accordance with the operating principles of your
refrigerator. It is normal and not a fault.
There is a noise like wind blowing.
• Fans are used in order to cool the refrigerator. It is normal and not a fault.
Condensation on the inner walls of refrigerator.
• Hot and humid weather increases icing and condensation. It is normal and not a
fault.
• Doors might have been left ajar; make sure that the doors are closed fully.
• Doors might have been opened frequently or left ajar for a long time; open them
less frequently.
Humidity occurs on the outside of the refrigerator or between the doors.
• There might be humidity in the air; this is quite normal in humid weather. When
the humidity is less, condensation will disappear.
Bad odour inside the refrigerator.
• Inside of the refrigerator must be cleaned. Clean the inside of the refrigerator with
a sponge, lukewarm water or carbonated water.
• Some containers or package materials might cause the smell. Use a different
container or different brand packaging material.
The door is not closing.
• Food packages may prevent the door's closing. Replace the packages that are
obstructing the door.
• The refrigerator is not completely upright on the floor and rocking when slightly
moved. Adjust the elevation screws.
• The floor is not level or strong. Make sure that the floor is level and capable to
carry the refrigerator.
Crispers are stuck.
• The food might be touching the ceiling of the drawer. Rearrange food in the
drawer.
32
EN
Page 34

Пожалуйста, сначала прочтите данное руководство!
Уважаемый покупатель!
Надеемся, что наше изделие, выпущенное на современных предприятиях, и
проверенное с помощью самых тщательных процедур контроля качества, будет
надежно служить вам.
Поэтому, прежде чем пользоваться изделием, рекомендуем внимательно и
полностью изучить данное руководство и хранить его под рукой для использования в
справочных целях в будущем.
Данное руководство
• Поможет вам быстро и безопасно пользоваться изделием.
• Прежде чем устанавливать изделие и пользоваться им, прочтите руководство.
• Соблюдайте инструкции, особенно в отношении техники безопасности.
• Храните руководство в легко доступном месте, так как оно может понадобиться
вам в будущем.
• Кроме того, прочитайте другие документы, поставляющиеся в комплекте с
изделием.
Просим учесть, что данное руководство по эксплуатации может применяться и для
других моделей.
Символы и их описания
В данном руководстве по эксплуатации используются следующие символы:
C Важная информация или полезные советы по эксплуатации.
A Предупреждение об опасности для жизни и имущества.
B Предупреждение об опасном напряжении электросети.
RU
1
Page 35

СОДЕРЖАНИЕ
1 Холодильник 3
2 Важные указания по технике
безопасности 4
Использование по назначению ........ 4
Для изделий с раздатчиком
охлажденной воды:
Безопасность детей
Предупреждение органов
здравоохранения............................... 6
Рекомендации по экономии
электроэнергии
Рекомендации по использованию
отделения для свежих продуктов
........................... 6
.......................... 6
................................. 7
... 7
3 Установка 8
Что следует учитывать при
транспортировке холодильника
Перед эксплуатацией холодильника
Подключение к электросети
Утилизация упаковки
Утилизация старого холодильника
Размещение и установка
Регулировка положения на полу
Регулировка зазора между верхними
дверцами
Установка водяного фильтра
Подключение водопроводной трубы к
холодильнику.
Подсоединение шланга подачи воды к
баку
Подключение водопроводной трубы к
водопроводной линии
(в некоторых моделях)
Прежде чем использовать
распределитель льда/воды
......................................... 12
.................................. 14
................................................. 16
........................ 9
.................... 16
................... 16
....... 8
8
............ 9
.. 9
.................. 9
.... 10
........ 13
............ 18
4 Подготовка 19
5 Эксплуатация
холодильника 20
Регулировка температуры
холодильного отделения
Регулировка температуры
морозильного отделения
Функция замораживания свежих
продуктов
Функция быстрого охлаждения
Кнопка режима временного
отключения
Кнопка «Auto Eco» (функция особо
экономичного режима)
Ионизатор
Кнопка блокировки клавиш
Подсветка распределителя воды
Выбор воды/льда
Распределитель льда/воды
Использование распределителя
льда
Функция отключения льда
Пользование краном подачи воды
Лоток для разлитых продуктов
Выдвижные полки
Синий свет
Ионизация:
Лоток для яиц.................................. 25
Отделение замораживания свежих
продуктов
Регуляторы влажности в контейнерах
для фруктов и овощей
Рекомендации по хранению
замороженных продуктов
Размораживание
Замена лампочки внутреннего
освещения
........................................ 21
..................................... 22
....................................... 22
............................ 22
.................................................. 23
....................................... 25
..................................... 25
........................................ 25
............................. 26
....................................... 26
................ 21
................ 21
...... 22
.................... 22
........... 22
.. 22
............ 22
............. 23
24
..... 24
........................... 24
.................... 25
............... 26
6 Обслуживание и чистка 28
Защита пластмассовых
поверхностей .................................. 28
Отделение охладителя
Контейнер для льда и распределитель
................................................. 29
воды
................... 29
7 Рекомендации
по устранению
неисправностей 30
RU
2
Page 36

1 Холодильник
2
1
8
9
14
19
7
13
16
*4
16
3
5
24
*21
*20
25
22
*23
*6
*10
15
*1718
*11
*12
1. Морозильное отделение
2. Холодильное отделение
3. Внутреннее освещение холодильной
камеры
4. Крышка отсека для масла и сыра
5. Вентилятор
6. Ионизатор
7. Стеклянные полки холодильного
отделения
8. Лоток для яиц
9. Дверная стойка морозильной камеры
10. Отсек для вин
11. Лотки для закусок
12.
Держатель для бутылок
13. Полки для бутылок
14. Отделения для овощей и фруктов
C Цифры, приведенные в данном руководстве по эксплуатации, являются
схематическими и могут не полностью соответствовать вашему изделию. Если
некоторые компоненты не входят в состав приобретенного вами изделия, они
15. Крышка контейнера для фруктов и
овощей
16. Регулируемые передние ножки
17. Синий свет
18. Водяной бак
19. Вентиляционная решетка
20. Выдвижные контейнеры для
морозильной камеры
21. Стеклянные полки морозильной
камеры
22. Крышка контейнера для льда
23. Внутреннее освещение камеры
24. Отделение замораживания свежих
морозильника
продуктов
25. Лоток для льда
*необязательный
действительны для других моделей.
RU
3
Page 37

2 Важные указания по технике безопасности
Обязательно ознакомьтесь со следующей
информацией. Игнорирование данной
информации может привести к
причинению травм или повреждению
имущества. Кроме того, гарантийные
обязательства и обязательства по
эксплуатационной надёжности утратят
силу.
Срок службы приобретенного вами
изделия составляет 10 лет. Это срок,
в течение которого предоставляются
запасные части, необходимые для
нормальной работы изделия.
Использование по
назначению
Это изделие предназначено для
использования
– в помещении и на закрытых
пространствах, например, в доме;
– в закрытых рабочих помещениях,
например, в магазинах и офисах;
– в закрытых жилых помещениях,
например, в загородных домах,
гостиницах, пансионах.
• Это изделие предназначено для
использования только в помещении.
Общие правила техники безопасности
• В случае необходимости утилизировать
или уничтожить изделие для
получения необходимой информации
рекомендуется обратиться в
фирменный сервисный центр, а также в
местные органы власти.
• По всем вопросам, касающимся
холодильника, обращайтесь в
фирменный сервисный центр. Не
вмешивайтесь в работу изделия
и не разрешайте этого другим без
уведомления фирменного сервисного
центра.
• Для изделий с морозильным
отделением: не ешьте мороженое в
рожках и кубики льда сразу после их
извлечения из морозильного отделения!
(Это может вызвать обморожение
полости рта.)
• Для изделий с морозильным
отделением: не помещайте напитки
в бутылках и банках в морозильное
отделение. Они могут лопнуть.
• Не дотрагивайтесь до замороженных
продуктов – они могут примерзнуть к
рукам.
• Отключайте холодильник от сети перед
чисткой или размораживанием.
• Ни в коем случае не используйте для
чистки и размораживания холодильника
пар или аэрозольные чистящие
средства. В этом случае пар может
попасть на электрические компоненты,
что приведет к короткому замыканию
или поражению электрическим током.
• Ни в коем случае не используйте
холодильник или его части (например,
дверцу) в качестве подставки или
опоры.
• Не используйте электрические приборы
внутри холодильника.
• Не допускайте повреждения частей,
в которых циркулирует хладагент,
используя режущие или сверлильные
инструменты. Хладагент может
вырваться из пробитого испарителя,
трубопроводов или покрытий
поверхности и вызвать раздражение
кожи и поражение глаз.
• Ни в коем случае не закрывайте и
не закупоривайте вентиляционные
отверстия холодильника.
• Ремонт электрического оборудования
должны производить только
квалифицированные специалисты.
Ремонт, выполненный некомпетентными
лицами, может создать опасность для
потребителя.
• В случае неполадок во время
эксплуатации, а также при проведении
техобслуживания или ремонта
отключите холодильник, выключив
соответствующий предохранитель или
вынув шнур питания из розетки.
• Не тяните за сетевой шнур, вынимая
вилку из розетки.
• Крепкие спиртные напитки следует
RU
4
Page 38

хранить в плотно закрытом виде и
вертикальном положении.
• Нельзя хранить в холодильнике
банки с горючими и взрывоопасными
веществами.
• Для ускорения процесса
размораживания не используйте
механические устройства или
другие средства, кроме тех, которые
рекомендованы производителем.
• Данный электроприбор не предназначен
для использования лицами (включая
детей) с ограниченными физическими,
сенсорными и интеллектуальными
возможностями либо не имеющими
опыта и знаний. Они могут пользоваться
электроприбором только под
наблюдением лица, ответственного
за их безопасность, или под его
руководством.
• Ни в коем случае нельзя пользоваться
неисправным холодильником. При
возникновении вопросом обращайтесь к
квалифицированному специалисту.
• Электрическая безопасность
гарантируется только в том случае,
если система заземления в вашем доме
соответствует стандартам.
• Воздействие на устройство дождя,
снега, солнца или ветра опасно с точки
зрения электробезопасности.
• В случае повреждения шнура питания и
т.п. обратитесь в фирменный сервисный
центр, чтобы не подвергать себя
опасности.
• Ни в коем случае нельзя включать
холодильник в розетку во время
установки. Это может привести к
серьезным травмам или смерти.
• Этот холодильник предназначен только
для хранения пищевых продуктов. Его
нельзя использовать для каких-либо
иных целей.
• Табличка с техническими
характеристиками находится слева на
внутренней стенке холодильника.
• Ни в коем случае нельзя подключать
холодильник к электронным системам
экономии электроэнергии, поскольку это
может привести к его поломке.
• При наличии в холодильнике синей
подсветки не смотрите на нее через
оптические устройства.
• При отключении от сети электропитания
холодильника с ручным управлением
подождите не менее 5 минут, прежде
чем подключать его снова.
• В случае продажи изделия эту
инструкцию по эксплуатации следует
передать новому владельцу.
• При транспортировке холодильника
избегайте повреждения шнура
питания. Изгибание шнура питания
может привести к возгоранию. Не
ставьте на него тяжелые предметы.
При подключении холодильника к сети
электропитания не прикасайтесь к
вилке влажными руками.
• Ни в коем случае нельзя подключать
холодильник к плохо закрепленной
стенной розетке сети электропитания.
• Из соображений безопасности не
допускайте попадания воды на внешние
или внутренние части холодильника.
• Не распыляйте рядом с холодильником
воспламеняющиеся газы, такие как
газ пропан, ввиду риска пожара или
взрыва.
• Не ставьте сосуды с водой на
холодильник, поскольку это может
привести к поражению электрическим
током или пожару.
• Не загружайте холодильник продуктами
сверх меры. Если холодильник
перегружен, продукты могут выпасть
при открытии дверцы и травмировать
вас или повредить холодильник. Не
кладите предметы на холодильник,
поскольку они могут упасть при
открытии или закрытии дверцы.
• В холодильнике нельзя хранить
вещества, требующие определенных
RU
5
Page 39

температурных условий, такие как
вакцины, термочувствительные
медикаменты, материалы для научных
исследований и т.п.
• Холодильник следует отключить
от электросети, если он не будет
использоваться в течение длительного
времени. Неисправность шнура питания
может привести к возгоранию.
• Необходимо регулярно очищать
концы вилки шнура электропитания;
несоблюдение этого условия может
привести к пожару.
• Необходимо регулярно очищать
контакты вилки шнура питания сухой
тканью. Несоблюдение этого правила
может привести к пожару.
• Холодильник может смещаться, если
регулируемые ножки не зафиксированы
на полу. Фиксирование регулируемых
ножек на полу предотвратит смещение
холодильника.
• При перемещении холодильника не
держите его за ручку. В противном
случае он может поломаться.
• При установке холодильника
расстояние между ним и другим
холодильником или морозильником
должно составлять минимум 8
см. В противном случае боковые
прилегающие стенки будут
увлажняться.
• Следует присматривать за детьми и не
разрешать им портить холодильник.
Предупреждение органов
здравоохранения
Если система охлаждения вашего
изделия содержит R600a:
Этот газ огнеопасен, поэтому будьте
осторожны, чтобы не повредить
систему охлаждения и трубопроводы
при эксплуатации и во время
транспортировки. В случае повреждения
уберите устройство подальше от
потенциальных источников огня, которые
могут привести к возгоранию, а также
проветривайте помещение, в котором
находится устройство.
Не обращайте внимания на
предупреждение, если система
охлаждения вашего изделия содержит
R134a.
Тип газа, используемого изделием,
указан на паспортной табличке,
расположенной слева на внутренней
стенке холодильника.
Не сжигайте изделие в целях утилизации.
Для изделий с раздатчиком
охлажденной воды:
Давление в водопроводной линии не
должно быть ниже 1 бара. Давление в
водопроводной линии не должно быть
выше 8 бар.
• Используйте только питьевую воду.
Безопасность детей
• Если на дверце есть замок, ключ
следует хранить в недоступном для
детей месте.
RU
6
Page 40

Рекомендации по экономии
temperature
sensor
food
MILK
juice
etc.
temperature
sensor
MILK
juice
etc.
temperature
sensor
электроэнергии
• Не оставляйте дверцу холодильника
открытой на длительное время.
• Не кладите в холодильник горячие
продукты или напитки.
• Не перегружайте холодильник, чтобы не
нарушать циркуляцию воздуха.
• Не устанавливайте холодильник в
местах, где на него попадают прямые
солнечные лучи, или поблизости от
источников тепла, таких как плита,
посудомоечная машина или радиатор
отопления.
• Следите за тем, чтобы контейнеры с
продуктами были закрыты.
• Для изделий с морозильным
отделением: в морозильное
отделение холодильника можно
заложить максимальное количество
продуктов, если достать из него полку
или ящик. Указанное в технических
характеристиках энергопотребление
холодильника определено при
условии, что полка или ящик
морозильного отделения извлечены,
и в него загружено максимально
возможное количество продуктов.
Полку и ящик можно использовать
для замораживания продуктов в
соответствии с их формой и размером.
• Таяние замороженных продуктов в
холодильном отделении обеспечит
экономию электроэнергии и сохранение
качества продуктов.
Рекомендации по
использованию отделения
для свежих продуктов
*необязательный
• Не допускайте какого-либо контакта
продуктов с температурным датчиком в
отделении для свежих продуктов. Для
поддержания идеальной температуры
хранения в отделении для свежих
продуктов датчик не должен закрываться
хранящимися там продуктами.
•Не помещайте в холодильник горячие
продукты.
RU
7
Page 41

3 Установка
C Помните, что производитель не
несет ответственности в случае
несоблюдения указаний, приведенных
в настоящем руководстве.
Что следует учитывать
при транспортировке
холодильника
1. Из холодильника следует вынуть все
продукты и промыть его перед любой
транспортировкой.
2. Перед упаковкой все полки,
оборудование, контейнеры для
фруктов и овощей и т.п. в холодильнике
должны быть хорошо закреплены от
тряски при помощи клейкой ленты.
3. Упаковывая холодильник с помощью
плотных лент и прочных веревок,
следует придерживаться правил
транспортировки, напечатанных на
упаковке.
C Помните!
Вторичное использование материалов
очень важно для сохранения природы и
наших национальных богатств.
Если вы хотите отправить на
переработку материалы упаковки, более
подробную информацию можно получить
в экологических учреждениях или в
органах местной власти.
Перед эксплуатацией
холодильника
Перед началом эксплуатации изделия
проверьте следующее:
1. Сухо ли внутри холодильника, и может
ли воздух свободно циркулировать
позади него?
2. Выполните чистку холодильника в
соответствии с рекомендациями,
приведенными в разделе
«Обслуживание и чистка».
3. Включите холодильник в сеть. При
открытии дверцы загорается лампочка
внутреннего освещения.
4. При запуске компрессора будет слышен
шум. Жидкость и газы, находящиеся
внутри герметичной системы
охлаждения, также могут создавать
шум, независимо от того, работает
компрессор или нет, что является
вполне нормальным явлением.
5. Передние кромки холодильника могут
казаться теплыми. Это нормально. Эти
области должны нагреваться, чтобы
избежать конденсации.
6. Вставьте 2 пластиковых клина на
задней стенке холодильника, как
показано на следующем рисунке.
Пластиковые клинья обеспечат
необходимое расстояние между
холодильником и стеной для
надлежащей циркуляции воздуха.
RU
8
Page 42

Подключение к
электросети
Подсоедините морозильную камеру к
правильно установленной заземленной
розетке, защищенной предохранителем
с соответствующим номиналом.
Важно!
B Подключение следует выполнять в
соответствии с действующими в стране
правилами.
B Вилка сетевого шнура должна быть
легко доступна после установки.
B Напряжение и допустимые параметры
предохранителей указаны в разделе
«Технические характеристики».
B Напряжение в сети должно
соответствовать указанному
напряжению.
B Запрещается использовать
при установке удлинители и
многоконтактные штепсельные вилки.
B Поврежденный шнур питания должен
быть заменен квалифицированным
электриком.
B Запрещается пользоваться изделием
до его ремонта. Имеется опасность
поражения электрическим током.
Утилизация упаковки
Упаковочные материалы
A
могут быть опасны для детей. Храните
упаковочный материал в недоступном
для детей месте или утилизируйте
его, рассортировав в соответствии с
правилами утилизации отходов. Не
утилизируйте их вместе с обычными
бытовыми отходами.
Упаковочные материалы холодильника
изготовлены из материалов, подлежащих
вторичной переработке.
Утилизация старого
холодильника
Утилизация старого изделия должна
выполняться экологически безопасным
способом.
A Чтобы узнать, как утилизировать
изделие, вы можете обратиться к
авторизованному дилеру или в пункт
сбора отходов по месту жительства.
A Прежде чем утилизировать
холодильник, отрежьте шнур питания
и, в случае наличия замков на
дверце, выведите их из строя, чтобы
предотвратить создание опасных
ситуаций для детей.
Размещение и установка
Внимание! Не включайте
B
холодильник в розетку во время
его установки. В противном случае,
существует опасность получения
серьезных травм или смертельного
случая.
A Если дверь помещения, в котором
будет установлен холодильник,
недостаточно широка, обратитесь в
авторизованный сервисный центр за
помощью в снятии дверец холодильника
и пронести в дверь холодильник боком.
1. Устанавливайте холодильник в месте,
удобном для его использования.
2. Холодильник должен находиться
в месте, удаленном от источника
тепла, мест повышенной влажности,
защищенном от прямых солнечных
лучей.
3. Для более эффективной работы
необходимо обеспечить хорошую
вентиляцию вокруг холодильника. Если
холодильник устанавливается в нише
стены, минимальное расстояние до
потолка должно составлять не менее 5
см и 5 см до стены.
Если пол имеет ковровое покрытие,
следует поднять холодильник на 2,5 см
над уровнем пола.
4. Холодильник должен стоять на ровной
поверхности для того, чтоб не возникала
тряска.
RU
9
Page 43

5. Температура помещения, в котором
находится холодильник, не должна быть
меньше 10°C.
Регулировка положения на
полу
Если холодильник расположен
неустойчиво:
Вы можете отрегулировать устойчивое
положение холодильника вращением
передних ножек, как показано на
рисунке. (См. рис. А.) Угол холодильника,
под которым находится ножка, будет
опускаться, если поворачивать ее
в направлении черной стрелки, или
подниматься, если поворачивать ее в
противоположном направлении. Если
слегка приподнять холодильник, это
облегчит процесс.
Регулировка дверей по высоте
При возникновении проблемы
с подгонкой установки дверей
относительно друг друга, их можно
подровнять по вертикали в порядке,
1. Снимите нижнюю вентиляционную
крышку, открутив винты, как показано
на рисунке ниже. (См. рис. B.)
2. С помощью отвертки ослабьте три
винта в петлях нижней двери, которую
требуется поднять, как показано на
рисунке ниже. (Полностью не снимать.)
2
(C)
(A)
4
1 2 3
(B)
указанном ниже. При регулировке
высоты дверей убедитесь в том, что в
них нет продуктов.
10
2
RU
Page 44

(См. рис. C.)
* Если дверь морозильной камеры ниже,
чем дверь холодильной, выровнять их
можно, регулируя с помощью торцового
ключа M6 поворот винта регулировки
высоты, который находится со стороны
морозильной камеры, как это показано
на рис. Г.
* Если дверь морозильной камеры выше,
чем дверь холодильной, выровнять их
можно, регулируя с помощью торцового
ключа M6 поворот винта регулировки
высоты, который находится со стороны
морозильной камеры, как это показано
на рис. Г.
После того, как двери были
отрегулированы по высоте с помощью
винтов регулировки высоты, они должны
закрываться правильно. Если двери
не закрываются должным образом,
это может повлиять на эффективность
работы холодильника.
11
(D)
RU
Page 45

Регулировка зазора между
верхними дверцами
C Вы можете отрегулировать зазор
между дверцами холодильной камеры,
как указано на рисунке.
C Используя отвертку, выньте винт
из крышки верхней петли той двери,
которую нужно отрегулировать.
Центровой
винт
C Отрегулируйте дверь по своему
усмотрению, немного ослабляя винты.
Во время регулировки дверей по высоте
двери холодильника должны быть
пустыми.
12
C
Зафиксируйте отрегулированную
дверь, затянув винты, не изменяя
положения двери.
C Установите на место крышку петли и
зафиксируйте винтом.
RU
Page 46

Установка водяного
фильтра
(в некоторых моделях)
Требования по установке
Для подачи воды к холодильнику можно
подсоединить два разных источника
воды: линию подачи холодной воды и
воду из бака.
Во втором случае следует использовать
насос.
3. 5-метровая водопроводная труба
(диаметром 1/4 дюйма).
4. Клапан в водопроводной линии с
сетчатым фильтром (переходная
втулка).
5. Водяной фильтр следует прикрепить к
скобе внутри холодильной камеры.
Проверьте, входят ли указанные
ниже запчасти в комплект поставки
холодильника.
1. Гайка для подключения водопроводной
трубы к задней стороне прибора.
2. 3 скобы водосточной трубы (если они
требуются для крепления водосточной
трубы).
C Примечание. В случае использования
воды из бака эти запчасти не требуются,
поэтому могут не входить в комплект
поставки.
13
RU
2
4
3
1
Page 47

1
2
Подключение воды к холодильнику
Пожалуйста, соблюдайте указанные
ниже инструкции.
Подключение
водопроводной трубы к
холодильнику.
a
a
b
c
1. После установки гайки на
водопроводную трубу вставьте трубу во
впускной клапан холодильника, сильно
нажав его вниз.
2. Закрепите гайку, как показано на
рисунке, надавив рукой на впускной
клапан холодильника.
(a – водопроводная труба, b – гайка, c –
клапан)
C Примечание 1. Чтобы узел был
водонепроницаемым, не нужно
закручивать гайку каким-либо
инструментом. В случае утечки
закрутите гайку гаечным ключом или
плоскогубцами.
Для установки водяного фильтра
соблюдайте приведенные ниже
инструкции и следуйте приведенным
рисункам.
RU
14
Page 48

1. Нажмите кнопку остановки
образования льда на дисплее. (Рис. 1)
2. Снимите крышку воздушного фильтра
в холодильном отделении, потянув ее
на себя. (Рис. 2)
3. Снимите крышку обводной линии
водяного фильтра, вращая ее вниз.
(Рис. 3-4)
A Внимание! Перед снятием крышки
убедитесь в отключении режима
образования льда.
Примечание. Падение нескольких капель
воды после снятия крышки является
нормальным явлением.
4. Снимите крышку на водяном фильтре,
чтобы установить ее, как показано
на рисунке, и поверните вверх для
фиксации. (Рис. 5)
5. Снова нажмите на кнопку остановки
образования льда на дисплее для
выхода из данного режима.
Водяной фильтр требуется менять
каждые шесть месяцев. Если водяной
фильтр подлежит замене или больше
не используется, его следует снять,
как показано на рисунке, и прикрепить
крышку обводной линии. Перед снятием
крышки убедитесь в отключении режима
образования льда.
A Внимание! Водяной фильтр
предназначен для удаления из воды
инородных частиц. Он не очищает воду
от микроорганизмов.
15
RU
3
1
4
2
5
Page 49

A Внимание! При замене водяного
фильтра или установке крышки обводной
линии всегда необходимо нажать на
кнопку «Ice Оff».
C Примечание. Выполняя подключение
воды, обращайтесь к руководству
пользователя насоса.
Подключение
водопроводной трубы к
водопроводной линии
(в некоторых моделях)
Подсоединение холодильника к линии
подачи холодной воды в вашем доме
осуществляется через стандартный
патрубок с клапаном 1/2". Если такой
клапан отсутствует или вы не уверены
в своих действиях, обратитесь к
квалифицированному водопроводчику.
1a
Подсоединение шланга
подачи воды к баку
(в некоторых моделях)
Для подачи в холодильник воды из
бака необходим насос. Выполните
изложенные ниже инструкции
после подсоединения одного конца
водопроводной трубы, выходящей из
насоса, к холодильнику, как описано на
предыдущей странице.
1. Завершите соединение, вставив
другой конец водопроводной трубы в
соответствующее входное отверстие
насоса, как показано на рисунке.
2. Вставьте и закрепите шланг насоса в
бак, как показано на рисунке.
3. По завершении монтажа подсоедините
насос к сети питания и включите его.
Эффективная работа насоса начнется
через 2-3 минуты после его включения.
16
1b
2
RU
Page 50

1. Отсоедините гайку от переходной
втулки. (Рис. А)
2. Установите переходную втулку в
патрубок с клапаном 1/2", как показано
на рисунке. (Рис. B)
3. После надевания гайки на
водопроводную трубу установите ее на
переходную втулку и вставьте втулку,
как показано на рисунке. (Рис. C)
4. Закрутите гайку вручную. В случае
утечки закрутите гайку гаечным
ключом или плоскогубцами.
A Внимание! С помощью скоб
закрепите водопроводную трубу в
соответствующих местах для того, чтобы
избежать повреждений, смещения или
случайного отсоединения.
A Внимание! После поворота водяного
клапана проверьте, чтобы в обеих точках
соединения водяной трубы не было
утечки. При наличии утечки немедленно
отключите клапан и снова затяните все
соединения, воспользовавшись гаечным
ключом или плоскогубцами.
A Внимание! Убедитесь в наличии
стандартного патрубка с клапаном 1/2" в
линии подачи холодной воды и в том, что
он полностью отключен.
Примечание -1. В случае использования
бака нет необходимости в работе
водяного фильтра.
Примечание -2. В случае использования
бака необходим насос.
17
RU
Page 51

Прежде чем использовать
распределитель льда/воды
C Давление в водопроводной линии не
должно быть ниже 1 бара.
C Давление в водопроводной линии не
должно быть выше 8 Бар.
C Если давление воды в магистральной
линии упало ниже 1 бара, и в случае
подачи воды из бака необходимо
использовать насосы.
C Водяная система холодильника
должна быть подключена к линии
холодной воды. Ее нельзя подключать к
линии горячей воды.
C При первоначальном включении
холодильника воду получить нельзя. Это
вызвано наличием воздуха в системе.
Для выпуска воздуха из системы
нажимайте на защелку распределителя с
интервалом 1 минуту до тех пор, пока из
него не покажется вода. В начале поток
воды может быть неравномерным. Он
нормализуется после выпуска воздуха из
системы.
C При первоначальном включении
холодильника до получения холодной
воды должно пройти ориентировочно 12
часов.
C Для бесперебойной работы
распределителя льда/воды давление
в водопроводной линии должно быть в
пределах 1-8 бар. Для этого проверьте,
можно ли наполнить стакан воды (100
куб. см) за 10 секунд.
C Первые 10 стаканов воды потреблять
нельзя.
C Для первого получения льда из
распределителя должно пройти
ориентировочно 12 часов. Если в
распределителе недостаточно льда, его
нельзя получить из распределителя.
C Около 30 первых кубиков льда,
полученных из распределителя,
использовать нельзя.
C Если бак не используется,
применяйте водяной фильтр.
18
RU
Page 52

4 Подготовка
C Ваш холодильник следует установить,
по крайней мере, в 30 см от источников
тепла, таких как газовые конфорки,
плиты, батареи центрального
отопления и печи, и, по крайней мере,
в 5 см от электрических плит, в месте,
куда не попадает прямой солнечный
свет.
C Температура воздуха в помещении, где
устанавливается холодильник, должна
быть не менее 10°С. Использовать
холодильник при более низкой
температуре не рекомендуется в связи
с его низкой эффективностью в таких
условиях.
C Содержите внутреннее пространство
холодильника в чистоте.
C Если два холодильника
устанавливаются рядом, то между
ними должно быть расстояние не менее
2 см.
C При первом включении холодильника
просим соблюдать следующие
инструкции во время первых шести
часов работы.
- Не открывайте часто дверцу.
- Холодильник должен быть пустым,
без продуктов внутри.
- Не отключайте холодильник от
сети. Если произошло отключение
электроэнергии не по вашей вине, см.
указания в разделе «Рекомендации по
устранению неполадок».
C Оригинальную упаковку и пленку
следует сохранить для последующей
транспортировки или перевозки
изделия.
19
RU
Page 53

5 Эксплуатация холодильника
*
12
11
10
9
8
3
6
7
1
2
3
4
6
5
16
1528
20212227
18
-24 °C
-22 °C
-20 °C
-18 °C
26 25 24 23 19
1 Кнопка настройки холодильного
отделения
2. Кнопка режима временного
отключения
3. Кнопка быстрого охлаждения
4. Кнопка блокировки клавиш
5. Кнопка отключения льда
6. Индикаторы распределителя воды
7. Кнопка выбора льда/воды
8. Кнопка подсветки распределителя
воды
9. Кнопка замены фильтра
10. Кнопка «Auto Eco»
11. Кнопка быстрого замораживания
12. Кнопка настройки морозильника
13. Индикатор экономичного режима
14. Индикатор высокой влажности
15. Индикатор быстрого охлаждения
16. Индикатор настройки температуры
холодильника
29 1413
30
17
17. Индикатор высокой температуры/
предупреждения об ошибке
18. Индикатор открытия двери
холодильника
19. Индикатор блокировки
20. Индикатор режима временного
отключения
21. Индикатор воды
22. Индикатор отсутствия льда
23. Индикатор разрушения льда
24. Индикатор кубиков льда
25. Индикатор «Auto Eco»
26. Индикатор замены фильтра
27. Индикатор открытия двери
морозильника
28. Индикатор настройки температуры
морозильного отделения
29. Индикатор быстрой заморозки
30. Индикатор ионизатора
ДОПОЛНИТЕЛЬНО
C Цифры, приведенные в данном руководстве по эксплуатации, являются
схематическими и могут не полностью соответствовать вашему изделию. Если
некоторые компоненты не входят в состав приобретенного вами изделия, они
действительны для других моделей.
2 °C
4 °C
6 °C
8 °C
20
RU
Page 54

Регулировка
морозильного
отделения
-15°C 4°C Это рекомендуемые стандартные
-18, -21 или -24°C 4°C Рекомендуется использовать при
Камера для
замораживания
свежих продуктов
-15°C или ниже 2°C Рекомендуется для ситуаций, когда
-15°C или ниже Quick Cool Рекомендуется использовать в тех случаях,
Регулировка
холодильного
отделения
4°C Используйте эту функцию, когда
Регулировка температуры
холодильного отделения
Можно установить одно из следующих
значений температуры холодильного
отделения:
8, 6, 4 и 2°C
Нажмите на кнопку настройки
холодильного отделения для изменения
настройки. Температура уменьшится
на 2°С. При каждом нажатии кнопки
температура будет снижаться, и затем
вернется к высшему значению. По
достижении нужной температуры
отпустите кнопку, и новая настройка
температуры будет сохранена.
Если вы считаете, что продукты
охладились сильнее, чем нужно, вы
можете отрегулировать температуру в
холодильном отделении до значений 6
или 8.
Регулировка температуры
морозильного отделения
Можно установить одно из следующих
значений температуры морозильного
отделения: -15 / -18 / -21 / -24 и -24°C
Нажмите на кнопку настройки
Пояснения
настройки.
температуре окружающей среды выше
30°C.
необходимо быстро заморозить продукты
или за короткое время получить лед.
По завершении процесса холодильник
переключится в предыдущий режим.
возможной причиной недостаточно низкой
температуры в холодильной камере
является жаркая погода или частое
открывание двери.
когда холодильная камера перегружена или
же нужно быстро охладить продукты.
морозильного отделения для изменения
настройки. Температура уменьшится
на 2°С. При каждом нажатии кнопки
температура будет снижаться, и затем
вернется к высшему значению. По
достижении нужной температуры
отпустите кнопку, и новая настройка
температуры будет сохранена.
Функция замораживания
свежих продуктов
При нажатии кнопки «Fresh Freeze»
компрессор будет работать около
14 часов. Будет гореть индикатор
быстрого замораживания. Для отмены
данной функции снова нажмите на
кнопку «Fresh Freeze». Индикатор
быстрого замораживания выключится,
а температура вернется к своему
нормальному значению. Функция
замораживания свежих продуктов
отключится автоматически через 12
часов, если вы не отмените ее.
Если вы хотите заморозить большое
количество свежих продуктов, нажмите
кнопку замораживания свежих
продуктов за 14 часов до того, как
поместите продукты в морозильное
отделение.
21
RU
Page 55

Функция быстрого
охлаждения
При нажатии на кнопку быстрого
охлаждения температура в камере
станет меньше заданных значений.
Этот режим используется в тех случаях,
когда нужно быстро охладить продукты,
помещенные в холодильное отделение.
После нажатия на кнопку быстрого
охлаждения загорится соответствующий
индикатор. Для отмены данной функции
снова нажмите на кнопку быстрого
охлаждения. Индикатор быстрого
охлаждения выключится, а температура
вернется к своему нормальному
значению. Функция быстрого
охлаждения отключится автоматически
в случае, если ее не отменить.
Кнопка режима
временного отключения
В случае, если холодильное отделение
не будет использоваться в течение
длительного времени, его использование
можно отменить путем нажатия на
кнопку Vacation (временное отключение).
При этом холодильник может работать
более экономично. Для включения
функции нажмите на кнопку «Vacation»
и удерживайте ее в течение 3 секунд.
При включенном режиме временного
отключения дверь холодильного
отделения должна оставаться закрытой,
и в нем не должно оставаться никаких
продуктов.
Кнопка «Auto Eco»
(функция особо
экономичного режима)
При нажатии кнопки «Auto Eco»
активизируется автоматическая
экономичная функция. Если при выборе
данной функции не открывать дверцу
холодильного отделения в течение
длительного времени, то холодильное
отделение автоматически переключится
на более экономичный режим работы
в целях экономии электроэнергии. При
повторном нажатии на кнопку «Auto Eco»
функция отключается.
22
Ионизатор
Ионизатор помогает очищать воздух в
холодильном отделении. Он работает
автоматически.
Кнопка блокировки
клавиш
Блокировка активируется при нажатии
на эту кнопку в течение 3 секунд.
При этом все кнопки и защелка
распределителя работать не будут. Для
деактивации блокировки опять нажмите
на эту же кнопку в течение 3 секунд.
Подсветка распределителя
воды
При нажатии на кнопку «Light» загорится
лампочка распределителя воды, которая
погаснет при повторном нажатии кнопки.
Кроме того, подсветка включается при
нажатии на защелку распределителя
воды и гаснет через некоторое время
после того, как отпустить защелку.
Выбор воды/льда
С помощью кнопки «Выбор
распределителя» выбирают режим
«вода», «кубики льда» или «колотый
лед».
Распределитель льда/воды
Благодаря трем режимам работы
распределитель эффективно
удовлетворит ваши потребности в
воде, кубиках льда и колотом льде без
открытия дверей холодильника. Он
является непрерывным источником
холодной воды и льда без добавления
воды. Понятная для пользователя
панель позволяет выбирать следующие
функции распределения.
Примечание.
• Воду или лед можно распределять
максимум 90 секунд при каждом
использовании.
• При открытой двери морозильного
отделения распределитель не работает.
Кубики льда Колотый лед
Холодная вода
RU
Page 56

Использование
распределителя льда
Имейте в виду, что первые кубики
C
льда будут готовы только через 12 часов
после включения прибора.
Если вам не нужен лед, например,
зимой или во время отпуска, выключите
функцию генерирования льда.
C Устройство для образования
льда производит приблизительно 110
кубиков за 24 часа; это количество
может меняться в зависимости
от частоты открытия дверей,
настроек холодильника и нарушения
энергоснабжения. Образовавшийся лед
можно получать из распределителя в
виде кубиков или в виде колотого льда.
Получение колотого льда занимает
больше времени, чем получение кубиков;
нормальным также считается выпадение
некоторого количества колотого льда
перед кубиками в случае выбора опции
колотого льда до выбора функции
кубиков льда.
C Если распределитель льда не
использовался продолжительное время
либо после перебоя в электропитании,
и лед сбился в комки или же изменился
вкус и запах льда, то лед необходимо
выбросить, а контейнер для льда
тщательно вымыть.
Предостережения
C В отсек распределителя льда
нельзя добавлять лед. Это может
отрицательно повлиять на подачу льда
или его дробление.
A Нормальным явлением является
слипание нескольких кубиков льда в
накопителе.
A Во избежание травм не дотрагивайтесь
до движущихся частей, таких как
лезвия в корпусе на выпуске льда из
распределителя.
A Никогда не пользуйтесь острыми
предметами для разрезания льда в
контейнере. Это может привести к
повреждению контейнера.
A Никогда не следует помещать продукты
в накопитель для льда с целью их
быстрого охлаждения.
A Если по какой-то причине контейнер
для льда следует извлечь, то перед
этим необходимо нажать на кнопку
активизации функции отключения
льда.
Функция отключения льда
Чтобы остановить образование льда,
C
нажмите на кнопку «Ice Off». При выборе
функции отключения льда вода не будет
попадать в ледогенератор. Однако уже
образовавшийся лед можно получить
из распределителя. Чтобы снова начать
образование льда, необходимо снова
нажать на кнопку «Ice Off».
Предупреждение. Если вы не
пользуетесь распределителем льда,
не забудьте установить крышку на
канал подачи льда в кольце внутри
двери морозильника. (См. раздел
«Холодильник».)
Кнопка замены фильтра
Водяной фильтр требуется менять
каждые шесть месяцев. Индикатор
замены фильтра загорается, если
необходимо заменить водяной фильтр.
Чтобы снять предупреждение о
необходимости замены фильтра,
нажмите кнопку замены фильтра и
удерживайте ее 3 секунды.
23
RU
Page 57

Пользование краном
подачи воды
Предостережения
Первые несколько стаканов воды,
вышедшей из распределителя, могут
быть теплыми. Это вполне нормально.
Если распределитель воды используется
нечасто, то для получения свежей воды
необходимо слить некоторое количество
воды из распределителя.
Лоток для разлитых
продуктов
Капли воды, падающие во время
работы, накапливаются в лотке для
разлитых продуктов. Вы можете достать
лоток, потянув его на себя или нажав на
край (в зависимости от модели). Воду
можно удалить с помощью губки или
мягкой ткани.
Выдвижные полки
Чтобы выдвинуть выдвижную полку,
слегка приподнимите ее спереди, после
чего ее можно сдвинуть назад и вперед.
Полку можно выдвинуть вперед до
упора, чтобы достать продукты в конце
полки. Чтобы вынуть полку, сдвиньте ее
до второго упора, слегка приподнимите и
потяните на себя.
Крепко придерживайте полку
снизу, чтобы она не перевернулась.
Полки холодильного отделения
устанавливаются на направляющие,
расположенные на боковых стенках, и их
можно переставлять выше или ниже.
Чтобы установить полку на место,
сдвиньте ее назад до конца.
1
2
3
4
24
RU
Page 58

Синий свет
В продуктах, хранящихся в контейнерах
для фруктов и овощей с синей
подсветкой, продолжается процесс
фотосинтеза, благодаря длине волн
синего света и, таким образом, они
сохраняют свою свежесть, а содержание
витаминов в них увеличивается.
Ионизация:
Воздух ионизируется с помощью
системы ионизации в воздухопроводе
холодильного отделения. Благодаря
этой системе переносимые по воздуху
бактерии и частицы, образующие запахи,
удаляются.
Лоток для яиц
Вы можете установить держатель для
яиц на полочку двери или обычную
полку, как вам удобнее.
Никогда не помещайте держатель для
яиц в камеру морозильника.
Регуляторы влажности в
контейнерах для фруктов
и овощей
Контейнер для фруктов и овощей
предназначен специально для их
сохранения в свежем виде, чтобы они
не теряли влагу. Холодный воздух
циркулирует, в основном, вокруг
контейнера для фруктов и овощей,
а количество холодного воздуха,
поступающего в контейнер, регулируется
ползунковыми регуляторами на передней
панели крышки контейнера.
Вы можете регулировать положение
ползунковых регуляторов влажности
в зависимости от условий влажности
и степени охлаждения продуктов в
отделении для фруктов и овощей.
Если вы хотите, чтобы продукты в
контейнере для фруктов и овощей
охлаждались сильнее, откройте
отверстия ползунковых регуляторов,
а если хотите, чтобы они охлаждались
меньше и дольше сохраняли свою
влажность, закройте отверстия.
Отделение замораживания
свежих продуктов
В этом отделении продукты быстро
замораживаются и сохраняют свой вкус
и питательную ценность.
25
RU
Page 59

Рекомендации по хранению
замороженных продуктов
• Упакованные продукты,
предварительно замороженные в
промышленных условиях, следует
хранить в соответствии с инструкциями
их производителей для
(4-звездочного) отделения хранения
замороженных продуктов.
• Чтобы обеспечить сохранение
наилучшего качества замороженных
производителем и продавцом продуктов,
следует помнить следующее:
1. Поместите пакеты в морозильник как
можно быстрее после их приобретения.
2. Проверьте, чтобы содержимое было
маркировано и датировано.
3.Не используйте продукты после
завершения срока их реализации.
В случае прекращения подачи
электроэнергии не открывайте дверцу
морозильного отделения. Даже если
отсутствие электроэнергии превышает
время, указанное в табличке с
описанием технических характеристик
изделия слева на внутренней стенке
холодильника, это не повлияет на
замороженные продукты. Если оно
длится дольше, то продукты необходимо
проверить и, при необходимости,
немедленно употребить в пищу или
заморозить после приготовления.
Размораживание
Холодильная и морозильная камера
размораживаются автоматически.
Замена лампочки
внутреннего освещения
Если лампочка вышла из строя, следуйте
приведенным ниже инструкциям.
1. Выключите выключатель на розетке и
выньте из розетки шнур питания.
Для облегчения доступа вытащите все
полки и ящики.
2. Крышки лампочек подсветки в
морозильном и холодильном отделениях
можно открыть, нажав на них вручную;
освободите сначала одну сторону, потом
вторую, как показано на рисунках.
3. Сначала убедитесь, что неработающая
лампа плотно закручена. Вставьте вилку
в розетку и включите прибор. Если
лампа заработала, установите на место
крышку рассеивателя, вставив сначала
задний выступ, а затем нажмите ее
вверх, чтобы установить на место два
передних выступа.
4. Если лампа все же не работает,
выключите прибор, вытянув вилку
электропитания из настенной розетки.
Замените лампу новой (с максимальной
мощностью 15Вт), с соответствующим
цоколем E14 (SES).
5. Сразу же осторожно утилизируйте
перегоревшую лампочку.
Запасную электролампу можно свободно
приобрести в магазине электротоваров
или хозтоваров.
26
RU
Page 60

RU27RU
Page 61

6 Обслуживание и чистка
A Ни в коем случае не используйте
бензин, бензол или подобные вещества
для чистки.
B Перед чисткой рекомендуем
отсоединить изделие от электросети.
C Не используйте для чистки острые
абразивные инструменты, мыло,
бытовые чистящие средства, моющие
средства и восковую политуру.
C Корпус изделия промойте теплой водой
и затем вытрите насухо.
C Протрите внутреннюю поверхность
изделия хорошо отжатой тканью,
смоченной в растворе питьевой соды
(1 чайная ложка на пол-литра воды), и
вытрите насухо.
B Не допускайте попадания воды
в корпус лампочки и в другие
электрические компоненты.
B Если холодильник не будет
использоваться в течение длительного
времени, отключите сетевой шнур,
извлеките все продукты, выполните
чистку и оставьте дверцу приоткрытой.
C Регулярно проверяйте, не испачкан ли
уплотнитель дверцы частицами пищи.
C Для снятия полок в дверце полностью
разгрузите их, а затем просто
приподнимите вверх.
Защита пластмассовых
поверхностей
• Не храните жидкое масло или
продукты, приготовленные с
добавлением масла, в морозильной
камере в открытых контейнерах,
так как они могут повредить
пластмассовые поверхности. Если
же масло протекло или попало на
пластмассовую поверхность, сразу же
очистите и промойте это место теплой
водой.
28
Page 62

Отделение охладителя
Если вы собираетесь использовать
контейнер для хранения под
полкой в качестве отделения
охладителя, то контейнер для
хранения под полкой следует
разместить так, как показано на
рисунке.
Отделение охладителя подготавливает
продукты к заморозке. Кроме того, эти
отделения можно использовать для
хранения продуктов при температуре, на
несколько градусов ниже температуры
холодильной камеры.
Вы можете освободить место внутри
холодильника, вынув любой из
охладителей. Для этого потяните
лоток на себя, пока он не упрется в
ограничитель. Затем приподнимите
лоток приблизительно на 1 см и снова
потяните на себя.
Контейнер для льда и
распределитель воды
Перед очисткой контейнера для
C
льда следуйте приведенным ниже
инструкциям:
A Вытащите контейнер для льда,
приподняв его и потянув на себя, как
показано на схеме.
A Удалите лед из контейнера, если он
имеется. Чтобы извлечь прилипший
лед, пользуйтесь неострыми
предметами, чтобы не повредить
контейнер.
A Прежде, чем устанавливать контейнер
обратно в корпус, проследите, чтобы
внутри он не был мокрым/влажным.
A Если вы хотите извлечь лед из
распределителя после установки
контейнера обратно в корпусе и
закрытия двери морозильника,
выйдите из режима отключения льда,
снова нажав на кнопку «Ice Off».
A Не дотрагивайтесь до движущихся
частей, таких как ножи в контейнере
для льда.
C Водяной бак должен быть пустым
в случае его неиспользования в
течение длительного времени.
29
RU
Page 63

7 Рекомендации по устранению неисправностей
Прежде чем обращаться в сервисный центр, просмотрите этот перечень. Это может
помочь вам сэкономить время и деньги. Ниже перечислены часто возникающие
проблемы, причиной которых не являются дефекты производства или материалов.
Некоторые из функций, описанных здесь, могут отсутствовать в вашем изделии.
Холодильник не работает.
• Правильно ли включен холодильник в сеть? Вставьте вилку в розетку электросети.
• Не перегорел ли предохранитель розетки, в которую включена морозильная
камера, и главный предохранитель? Проверьте предохранитель.
Конденсация на боковой стенке холодильного отделения (MULTI ZONE, COOL
CONTROL и FLEXI ZONE).
• Очень низкая температура окружающей среды. Частое открывание и закрывание
дверцы. Изделие работает в условиях повышенной влажности. Хранение
продуктов, содержащих жидкость, в открытых контейнерах. Неплотно закрыта
дверца. Переключите термостат на более низкую температуру.
• Уменьшите время открывания дверцы или открывайте ее реже.
• Накройте продукты, хранящиеся в открытых контейнерах, соответствующим
материалом.
• Вытрите конденсат сухой тканью и проверьте, не образуется ли он снова.
Не работает компрессор
• Термозащита компрессора может сработать при неожиданных отключениях
энергоснабжения либо при выключениях-включениях прибора, поскольку давление
хладагента в системе охлаждения не успевает стабилизироваться. Холодильник
начнет работать ориентировочно через 6 минут. Если по истечении этого времени
холодильник не заработал, обратитесь в сервисный центр.
• Холодильник находится в режиме размораживания. Это нормально для полностью
автоматически размораживающегося холодильника. Цикл размораживания
выполняется периодически.
• Холодильник не включен в розетку электросети. Убедитесь, что вилка должным
образом включается в розетку.
• Правильно ли отрегулирована температура?
• Возможно, отключена подача электроэнергии.
Холодильник включается слишком часто или работает слишком долго.
30
RU
Page 64

• Ваш новый холодильник может быть больше, чем предыдущий. Это вполне
нормально. Большие холодильники работают в течение более длительного времени.
• Возможно, температура в помещении повышена. Это вполне нормально.
• Возможно, холодильник был недавно включен или загружен продуктами. Полное
охлаждение холодильника может продолжаться на пару часов дольше.
• Возможно, в холодильник недавно поместили большое количество горячих
продуктов. Горячие продукты в холодильнике заставляют его работать дольше, пока
не будет достигнута нужная температура хранения.
• Возможно, дверцы часто открываются либо были приоткрыты в течение
длительного времени. Теплый воздух, попадающий в холодильник, заставляет его
работать дольше. Открывайте дверцы реже.
• Неплотно закрыта дверца морозильного или холодильного отделения. Проверьте,
плотно ли закрыты дверцы.
• Холодильник отрегулирован на очень низкую температуру. Отрегулируйте
температуру холодильника до более высокого значения и подождите, пока
установленная температура не будет достигнута.
• Уплотнитель двери холодильного или морозильного отделения, возможно,
загрязнен, изношен, разорван или неправильно установлен. Почистите или
замените уплотнитель. Поврежденный/разорванный уплотнитель заставляет
холодильник работать дольше для того, чтобы поддерживать текущую температуру.
Температура в морозильном отделении слишком низкая, в то время как
температура в холодильном отделении достаточная.
• Температура морозильного отделения установлена на очень низкое значение.
Отрегулируйте температуру морозильного отделения на более высокое значение и
проверьте работу.
Температура холодильного отделения очень низкая, в то время как температура в
морозильном отделении достаточная.
• Возможно, температура холодильного отделения отрегулирована на очень низкое
значение. Отрегулируйте температуру холодильного отделения до более высокого
значения и проверьте работу.
Замерзают продукты в выдвижных контейнерах холодильного отделения.
• Возможно, температура холодильного отделения отрегулирована на очень низкое
значение. Отрегулируйте температуру холодильного отделения до более высокого
значения и проверьте работу.
Температура в холодильном и морозильном отделении слишком высокая.
• Возможно, температура холодильного отделения отрегулирована на очень высокое
значение. Настройка холодильного отделения влияет на температуру морозильного
отделения. Измените температуру холодильного или морозильного отделения, пока
не будет достигнут нужный уровень температуры.
• Возможно, дверцы часто открываются либо были приоткрыты в течение
длительного времени; открывайте их реже.
• Возможно, дверца холодильника приоткрыта; закройте ее полностью.
• Возможно, в холодильник недавно поместили большое количество горячих
продуктов. Подождите, пока холодильное или морозильное отделение достигнет
нужной температуры.
• Возможно, морозильник был недавно включен в сеть. На полное охлаждение
холодильника потребуется время.
Уровень рабочего шума повышается во время работы холодильника.
31
RU
Page 65

• Рабочие характеристики изделия могут изменяться в зависимости от изменений
температуры окружающей среды. Это нормально и не является неисправностью.
Вибрация или шум.
• Пол неровный или нетвердый. При медленном перемещении морозильник дрожит.
Убедитесь в том, что пол ровный и достаточно прочный, чтобы выдержать вес
холодильника.
• Шум могут вызывать предметы, поставленные на холодильник. Посторонние
предметы следует убрать с холодильника.
Из холодильника доносится шум льющейся или распыляющейся жидкости.
• Расход жидкости и газа изменяется в соответствии с принципами работы изделия.
Это нормально и не является неисправностью.
Слышен шум, похожий на шум ветра.
• Для охлаждения холодильника используются вентиляторы. Это нормально и не
является неисправностью.
Конденсация влаги на внутренних стенках холодильника.
• Жаркая и влажная погода способствует образованию льда и конденсации влаги.
Это нормально и не является неисправностью.
• Возможно, дверцы холодильника приоткрыты; убедитесь, что они полностью
закрыты.
• Возможно, дверцы часто открываются либо были приоткрыты в течение
длительного времени; открывайте их реже.
Появление влаги снаружи холодильника или между дверцами.
• Воздух может быть влажным; это вполне нормально при влажной погоде. Когда
влажность уменьшится, конденсация исчезнет.
Неприятный запах внутри холодильника.
• Следует выполнить чистку внутри холодильника. Протрите внутреннюю часть с
помощью губки, теплой или газированной воды.
• Некоторые контейнеры или упаковочные материалы также могут быть источником
запаха. Используйте другой контейнер или упаковочный материал другой марки.
Дверца не закрыта, как следует.
• Упаковки продуктов могут препятствовать закрыванию дверцы. Переместите
упакованные продукты, препятствующие закрытию дверцы.
• Холодильник стоит не совсем вертикально, это может вызвать дрожание даже при
незначительном перемещении. Отрегулируйте регулировочные винты.
• Пол неровный или нетвердый. Убедитесь в том, что пол ровный и может выдержать
вес холодильника.
Контейнеры для фруктов и овощей прилипли.
• Возможно, продукты касаются верхней части контейнера. Переместите продукты в
контейнере.
32
RU
Page 66

Veuillez d’abord lire la notice d’utilisation !
Chère cliente, cher client,
Nous espérons que votre produit, qui a été fabriqué dans des usines modernes
et vérifié au terme des procédures de contrôle de qualité les plus méticuleuses,
vous aidera efficacement.
Pour cette raison, nous vous conseillons de lire attentivement tout le manuel
d’utilisation de votre produit avant de vous en servir, et de le conserver ensuite
pour une utilisation ultérieure.
Le présent manuel
• vous aidera à utiliser votre produit avec rapidité et sécurité.
• Lisez le manuel avant d’installer et de faire fonctionner votre produit.
• Respectez les instructions, notamment celles relatives à la sécurité.
• Conservez ce manuel dans un endroit facilement accessible car vous pouvez
en avoir besoin ultérieurement.
•En plus, lisez également les autres documents fournis avec votre produit.
Veuillez noter que ce manuel peut également être valide pour d’autres modèles.
Symboles et descriptions
Vous retrouverez les symboles suivants dans le présent manuel :
C Informations importantes ou astuces.
A Avertissement relatif aux conditions dangereuses pour la vie et la propriété.
B Avertissement relatif à la tension électrique.
Page 67

Table des matières
1 Votre réfrigérateur 3
2 Précautions importantes
pour votre sécurité 4
Utilisation prévue ............................... 4
Pour les appareils dotés d'une fontaine
à eau ; ...............................................6
Sécurité enfants .................................6
Avertissement HCA
Mesures d’économie d’énergie ..........7
Recommandations pour le
compartiment produits frais
...........................7
............... 8
3 Installation 9
Points à prendre en compte lorsque
vous transportez à nouveau votre
produit.
Avant de faire fonctionner votre
réfrigérateur
Branchement électrique
Mise au rebut de l’emballage
Mise au rebut de votre ancien
réfrigérateur
Disposition et Installation
Réglage de la stabilité au sol ............11
Réglage du jeu entre les portes
supérieures
Installation du filtre à eau
Raccordement du tuyau d'alimentation
en eau au réfrigérateur
Raccordement du tuyau de vidange à
la carafe
Raccordement du tuyau d'alimentation
en eau à l'arrivée d'eau
(Dans certains modèles) ..................17
Avant toute première utilisation de la
glace/du distributeur d'eau
..............................................9
.......................................9
................... 10
...........10
.....................................10
.................10
...................................... 13
................14
..................... 15
.........................................17
...................17
.............19
4 Préparation 20
5 Utilisation du
réfrigérateur 21
Réglage de la température du
compartiment réfrigérateur
Réglage de la température du
compartiment congélateur
Fonction Congélation rapide (Fast
Freeze)
Fonction de refroidissement rapide
(Quick Cool)
Bouton Vacances
Bouton Auto Eco (Fonction Economie
spéciale)
Ioniseur
Bouton Key Lock
Eclairage du distributeur
Sélection du type de glace/d’eau
Distributeur d'eau et glace
Utilisation de l'appareil à glaçons
Ice Off
Utilisation de la fontaine
Socle du distributeur
Etagères coulissantes
Éclairage bleu
Ion:
Compartiment Ultra Congélation
Manettes de contrôle d’humidité du
bac à légumes
Casier à œufs
Recommandations concernant la
conservation des aliments congelés
Dégivrage
Remplacer l'ampoule intérieure
............................................22
.....................................23
............................23
.......................................... 23
..........................................23
............................. 23
.............................................. 25
..................................27
................................................. 27
................................. 27
.................................. 27
........................................28
..............22
............... 22
.................. 23
...............24
...................26
........................ 26
......................26
6 Entretien et nettoyage 30
Protection des surfaces en
plastique.
Appareil à glaçons et distributeur
Compartiment Zone fraîche
........................................30
............. 32
7 Solutions recommandées
aux problèmes 33
FR
2
..... 24
..... 24
......27
28
........28
..... 31
Page 68

2
1
8
9
14
19
7
13
16
*4
16
3
5
24
*21
*20
25
22
*23
*6
*10
15
*1718
*11
*12
1 Votre réfrigérateur
25.
Range-bouteilles
*EN OPTION
C Les illustrations présentées dans cette notice d’utilisation sont schématiques
et peuvent ne pas correspondre exactement à votre produit. Si des pièces
présentées ne sont pas comprises dans le produit que vous avez acheté, elles
sont valables pour d’autres modèles.
FR
3
Page 69

2 Précautions importantes pour votre sécurité
Veuillez examiner les informations
suivantes : Le non respect de ces
consignes peut entraîner des blessures
ou dommages matériels. Sinon, tout
engagement lié à la garantie et à la
fiabilité du produit devient invalide.
La durée de vie du produit que vous
avez acheté est de 10 ans. Il s’agit
ici de la période au cours de laquelle
vous devez conserver les pièces
de rechange nécessaires à son
fonctionnement.
Utilisation prévue
Ce produit est prévu pour une
utilisation
– en intérieur et dans des zones
fermées telles que les maisons ;
– dans les environnements de travail
fermées, tels que les magasins et les
bureaux ;
– dans les lieux d'hébergement fermés,
tels que les fermes, hôtels, pensions.
• Cet appareil ne doit pas être utilisé
en extérieur.
Sécurité générale
• Avant de vous débarrasser de
votre appareil, veuillez consulter les
autorités locales ou votre revendeur
pour connaître le mode opératoire et
les organismes de collecte agréés.
• Consultez le service après-vente
agréé concernant toutes questions
ou problèmes relatifs au réfrigérateur.
N’intervenez pas ou ne laissez
personne intervenir sur le réfrigérateur
sans le communiquer au service
après-vente agréé.
• Pour les produits équipés d'un
compartiment congélateur :
ne mangez pas de cônes de
crème glacée ou des glaçons
immédiatement après les avoir sortis
du compartiment de congélation !
(Cela pourrait provoquer des
engelures dans votre bouche).
• Pour les produits équipés d'un
compartiment congélateur : ne
placez pas de boissons en bouteille
ou en cannette dans le compartiment
de congélation. Cela peut entraîner
leur éclatement.
• Ne touchez pas des produits
congelés avec les mains, ils
pourraient se coller à celles-ci.
• Débranchez votre réfrigérateur avant
de le nettoyer ou de le dégivrer.
• La vapeur et des matériaux de
nettoyage pulvérisés ne doivent
jamais être utilisés pour les processus
de nettoyage ou de dégivrage de
votre réfrigérateur. La vapeur pourrait
pénétrer dans les pièces électriques
et provoquer des courts-circuits ou
des électrocutions.
• Ne jamais utiliser les pièces de votre
réfrigérateur telles que la porte,
comme un support ou une marche.
• N’utilisez pas d’appareils électriques
à l’intérieur du réfrigérateur.
• N’endommagez pas les pièces où
circule le liquide réfrigérant avec
des outils de forage ou coupants.
Le liquide réfrigérant qui pourrait
s’échapper si les canalisations de
gaz de l’évaporateur, les rallonges de
tuyau ou les revêtements de surface
étaient percés, peut irriter la peau et
provoquer des blessures aux yeux.
FR
4
Page 70

• Ne pas couvrir ou obstruer les orifices
de ventilation du réfrigérateur.
• Les appareils électriques peuvent être
réparés seulement par des personnes
autorisées. Les réparations réalisées
par des personnes ne présentant pas
les compétences requises peuvent
présenter un risque pour l’utilisateur.
• En cas de dysfonctionnement ou
lors d'opérations d’entretien ou de
réparation, débranchez l’alimentation
électrique du réfrigérateur soit en
désactivant le fusible correspondant,
soit en débranchant l’appareil.
• Ne tirez pas sur le câble lorsque vous
débranchez la prise.
• Placez les boissons alcoolisées
verticalement, dans des récipients
convenablement fermés.
• Ne conservez jamais des aérosols
contenant des substances
inflammables et explosives dans le
réfrigérateur.
• N’utilisez pas d'outils mécaniques ou
autres dispositifs pour accélérer le
processus de décongélation autres
que ceux qui sont recommandés par
le fabricant.
• Ce produit n'est pas conçu pour être
utilisé par des personnes (enfants
compris) souffrant de déficience
physique, sensorielle, mentale, ou
inexpérimentées, à moins d’avoir
obtenu une autorisation auprès des
personnes responsables de leur
sécurité.
• Ne faites pas fonctionner un
réfrigérateur endommagé. Consultez
le service agréé en cas de problème.
• La sécurité électrique du réfrigérateur
n’est assurée que si le système de
mise à la terre de votre domicile est
conforme aux normes en vigueur.
• L’exposition du produit à la pluie, la
neige, au soleil ou au vent présente
des risques concernant la sécurité
électrique.
• Contactez le service agréé quand un
câble d'alimentation est endommagé
pour éviter tout danger.
• Ne branchez jamais le réfrigérateur
à la prise murale au cours de
l’installation. Vous vous exposeriez à
un risque de mort ou à de blessures
graves.
• Ce réfrigérateur est conçu seulement
pour conserver des aliments. Par
conséquent, il ne doit pas être utilisé
à d'autres fins.
• L'étiquette avec les caractéristiques
techniques est située sur le mur
gauche à l'intérieur du réfrigérateur.
• Ne branchez jamais votre réfrigérateur
à des systèmes d'économie
d'énergie, cela peut l'endommager.
• S'il y a une lumière bleue sur le
réfrigérateur, ne la regardez pas avec
des outils optiques.
• Pour les réfrigérateurs contrôlés
manuellement, attendez au moins 5
minutes pour allumer le réfrigérateur
après une coupure de courant.
• Si cet appareil venait à changer de
propriétaire, n'oubliez pas de remettre
la présente notice d’utilisation au
nouveau bénéficiaire.
• Evitez d'endommager le câble
d'alimentation quand vous
transportez le réfrigérateur. Tordre
le câble peut entraîner un incendie.
Ne placez jamais d'objets lourds sur
le câble d'alimentation. Évitez de
toucher à la prise avec des mains
mouillées au moment de brancher
l'appareil.
FR
5
Page 71

• Évitez de brancher le réfrigérateur
lorsque la prise de courant électrique
a lâché.
• Pour des raisons d'ordre sécuritaire,
évitez de vaporiser directement
de l'eau sur les parties externes et
internes du réfrigérateur.
• Ne pulvérisez pas de substances
contenant des gaz inflammables
comme du propane près du
réfrigérateur pour éviter tout risque
d'incendie et d'explosion.
• Ne placez jamais de récipients
pleins d'eau en haut du réfrigérateur,
ils pourraient causer des chocs
électriques ou incendie.
• Ne surchargez pas votre réfrigérateur
avec des quantités de nourriture
excessives. S'il est surchargé,
les aliments peuvent tomber,
vous blesser et endommager le
réfrigérateur quand vous ouvrez la
porte. Ne placez jamais d'objets audessus du réfrigérateur, ils pourraient
tomber quand vous ouvrez ou fermez
la porte du réfrigérateur.
• Les produits qui nécessitent un
contrôle de température précis
(vaccin, médicament sensible à la
chaleur, matériels scientifiques, etc.)
ne doivent pas être conservés dans le
réfrigérateur.
• Si le réfrigérateur n'est pas utilisé
pendant longtemps, il doit être
débranché. Un problème avec le
câble d'alimentation pourrait causer
un incendie.
• Le bout de la prise électrique doit être
nettoyé régulièrement, sinon il peut
provoquer un incendie.
• Le bout de la prise électrique doit être
nettoyé régulièrement à l’aide d’un
chiffon sec, sinon il peut provoquer
un incendie.
• Le réfrigérateur peut bouger si ses
pieds réglables ne sont pas bien
fixés sur le sol. Bien fixer les pieds
réglables sur le sol peut empêcher le
réfrigérateur de bouger.
• Quand vous transportez le
réfrigérateur, ne le tenez pas par la
poignée de la porte. Cela peut le
casser.
• Quand vous devez placer votre
produit près d'un autre réfrigérateur
ou congélateur, la distance entre les
appareils doit être d'au moins 8 cm.
Sinon, les murs adjacents peuvent
être humidifiés.
Pour les appareils dotés
d'une fontaine à eau ;
La pression de l'alimentation en eau
doit être au minimum de 1 bar. La
pression de l'alimentation en eau doit
être au maximum de 8 bars.
• Utilisez uniquement de l’eau potable.
Sécurité enfants
• Si la porte a un verrouillage, la clé doit
rester hors de portée des enfants.
• Les enfants doivent être surveillés
et empêchés de s'amuser avec le
produit.
FR
6
Page 72

Avertissement HCA
Si le système de refroidissement
de votre appareil contient R600a:
Ce gaz est inflammable. Par
conséquent, veuillez prendre garde à
ne pas endommager le système de
refroidissement et les tuyauteries lors
de son utilisation ou de son transport.
En cas de dommages, éloignez votre
produit de toute source potentielle de
flammes susceptible de provoquer
l’incendie de l’appareil. De même,
placez le produit dans une pièce
aérée.
Ne tenez pas compte de cet
avertissement si le système de
refroidissement de votre appareil
contient R134a.
Le type de gaz utilisé dans l'appareil
est mentionné sur la plaque
signalétique située sur le mur gauche à
l'intérieur du réfrigérateur.
Ne jetez jamais l'appareil au feu pour
vous en débarrasser.
Mesures d’économie
d’énergie
• Ne laissez pas les portes du
réfrigérateur ouvertes pendant une
durée prolongée.
• N’introduisez pas de denrées ou
de boissons chaudes dans le
réfrigérateur.
• Ne surchargez pas le réfrigérateur
pour ne pas obstruer pas la
circulation d'air à l’intérieur.
• N’installez pas le réfrigérateur à la
lumière directe du soleil ou près
d’appareil émettant de la chaleur tels
qu’un four, un lave-vaisselle ou un
radiateur.
• Veillez à conserver vos denrées dans
des récipients fermés.
• Pour les produits équipés d'un
compartiment congélateur : vous
pouvez conserver une quantité
maximale d'aliments dans le
congélateur quand vous enlevez
l'étagère ou le tiroir du congélateur.
La consommation d'énergie
précisée pour votre réfrigérateur a
été déterminée en enlevant l'étagère
ou le tiroir du congélateur et avec la
charge maximale. Il n'y aucun risque
à utiliser une étagère ou un tiroir en
fonction des formes et tailles des
denrées à congeler.
• La décongélation des aliments dans
le compartiment réfrigérateur permet
de faire des économies d'énergie et
de préserver la qualité des aliments.
FR
7
Page 73

Recommandations pour le
temperature
sensor
food
MILK
juice
etc.
temperature
sensor
MILK
juice
etc.
temperature
sensor
compartiment produits frais
*EN OPTION
• Ne laissez aucun aliment entrer
en contact avec le capteur de
température dans le compartiment
produits frais. Afin de conserver
le compartiment produits frais à la
température de conservation idéale, le
capteur ne doit pas être encombré par
des aliments.
• Ne placez pas de denrées chaudes
dans votre appareil.
FR
8
Page 74

3 Installation
C Veuillez noter que le fabricant ne
pourra être tenu responsable si les
informations fournies dans cette
notice d’utilisation ne sont pas
respectées.
Points à prendre en compte
lorsque vous transportez à
nouveau votre produit.
1. Le réfrigérateur doit être vidé et
nettoyé avant tout transport.
2. Les clayettes, accessoires, bac à
légumes, etc. de votre réfrigérateur
doivent être fixés solidement avec de
la bande adhésive avant de remballer
l’appareil, pour le protéger en cas de
chocs.
3. L’emballage doit être fixé avec une
bande adhésive forte et des cordes
solides, et les normes de transport
indiquées sur l’emballage doivent être
appliquées.
C N'oubliez jamais...
Chaque matériau recyclé est
une participation indispensable
à la préservation de la nature et
conservation de nos ressources
nationales.
Si vous souhaitez contribuer à recycler
les matériaux d’emballage, vous
pouvez obtenir des informations
supplémentaires auprès des
organismes environnementaux ou des
autorités locales.
Avant de faire fonctionner
votre réfrigérateur
Avant de commencer à faire
fonctionner votre réfrigérateur, vérifier
les points suivants :
1. L’intérieur du réfrigérateur est sec et
l’air peut circuler librement à l’arrière?
2. Insérez les 2 cales en plastique
entre les câbles du condenseur, tel
qu’illustré dans la figure suivante.
Les cales en plastique maintiendront
la distance nécessaire entre votre
réfrigérateur et le mur pour permettre
une bonne circulation de l’air. (Le
schéma présenté est fourni à titre
indicatif et peut ne pas correspondre
exactement avec votre produit).
3. Nettoyez l’intérieur du réfrigérateur tel
qu’indiqué dans la section « Entretien
et nettoyage ».
4. Branchez le réfrigérateur dans la prise
murale. Lorsque la porte est ouverte,
l'éclairage intérieur correspondant
s'allumera.
5. Vous remarquerez un bruit lorsque le
compresseur se met en marche. Le
liquide et les gaz intégrés au système
du réfrigérateur peuvent également
faire du bruit, que le compresseur soit
en marche ou non. Ceci est tout à fait
normal.
FR
9
Page 75

6. Les parties antérieures du
réfrigérateur peuvent chauffer. Ce
phénomène est normal. Ces zones
doivent en principe être chaudes pour
éviter tout risque de condensation.
Branchement électrique
Branchez votre réfrigérateur à une
prise de mise à la terre protégée
par un fusible ayant une capacité
appropriée.
Important:
B Le branchement doit être conforme
aux normes en vigueur sur le territoire
national.
B La fiche de câble d’alimentation doit
être facilement accessible après
installation.
BLa tension spécifiée doit être égale à
votre tension de secteur.
B Les rallonges et prises multivoies
ne doivent pas être utilisés pour
brancher l’appareil.
B Un câble d’alimentation endommagé
doit être remplacé par un électricien
qualifié.
B L’appareil ne doit pas être mis en
service avant d’être réparé ! Un risque
de choc électrique existe!
Mise au rebut de l’emballage
ALes matériaux d’emballage peuvent
être dangereux pour les enfants. Tenez
les matériaux d’emballage hors de
portée des enfants ou débarrassezvous-en conformément aux consignes
sur les déchets. Ne les jetez pas
aux côtés des ordures ménagères
ordinaires.
L’emballage de votre appareil est
produit à partir des matériaux
recyclables.
Mise au rebut de votre
ancien réfrigérateur
Débarrassez-vous de votre
ancien réfrigérateur sans nuire à
l’environnement.
A Vous pouvez consulter le service
après-vente agrée ou le centre
chargé de la mise au rebut dans votre
municipalité pour en savoir plus sur la
mise au rebut de votre produit.
A Avant de procéder à la mise au rebut
de votre machine, coupez la prise
électrique et, le cas échéant, tout
verrouillage susceptible de se trouver
sur la porte. Rendez-les inopérants
afin de ne pas exposer les enfants à
d’éventuels dangers.
Disposition et Installation
B Attention: Ne branchez jamais le
réfrigérateur à la prise murale au cours
de l’installation. Vous vous exposeriez
à un risque de mort ou à de blessures
graves.
A Si la porte d’entrée de la pièce
où sera installé le réfrigérateur n’est
pas assez large pour laisser passer le
réfrigérateur, appelez alors le service
après-vente pour faire retirer les portes
du réfrigérateur et le faire passer
latéralement.
1. Installez le réfrigérateur dans un
emplacement qui permette une
utilisation pratique.
2. Maintenez le réfrigérateur éloigné
de toutes sources de chaleur, des
endroits humides et de la lumière
directe du soleil.
3. Une ventilation d’air autour du
réfrigérateur doit être aménagée pour
obtenir un fonctionnement efficace.
10
FR
Page 76

Si le réfrigérateur est placé dans un
enfoncement du mur, il doit y avoir
un espace d’au moins 5 cm avec le
plafond et d’au moins 5 cm avec le
mur. Si le sol est couvert de moquette,
votre produit doit être surélevé à 2,5
cm du sol.
4. Placez le réfrigérateur sur un a de
surface plane afin d’éviter les à-coups.
(A)
4
1 2 3
(B)
5. N'exposez pas le réfrigérateur à des
températures ambiantes inférieures à
10 °C.
Réglage de la stabilité au sol
Si le réfrigérateur n’est pas stable.
Vous pouvez équilibrer le réfrigérateur
en tournant les pieds avant, tel
qu’illustré dans le schéma. (Voir
Schéma A) Le côté où se trouve le
pied s’abaisse lorsque vous tournez
dans le sens de la flèche noire, et
s’élève lorsque vous tournez dans
le sens opposé. Si vous vous faites
aider par quelqu’un pour légèrement
soulever le réfrigérateur, l’opération
s’en trouvera simplifiée.
Réglage de la hauteur de la porte
En cas de problème avec le réglage
des portes, celui-ci peut être effectué
verticalement, par ascension, suivant
l’ordre donné ci-dessous. Veillez à
ce que les clayettes de la porte soient
vides lors du réglage de la hauteur de
la porte.
2
(C)
2
11
FR
Page 77

1. Retirez la plinthe du couvercle en enlevant ses vis, tel qu’illustré sur le schéma.
(Voir Schéma B)
2. À l’aide d’un tournevis, desserrez les trois vis des charnières de porte
inférieures, sur lesquelles vous souhaitez travailler, tel qu’indiqué sur le schéma
ci-dessous. (Ne pas retirer complètement)
(Voir Schéma C)
* Si la porte du compartiment de congélation est plus basse que celle du
compartiment de réfrigération, amenez-les à la même hauteur, en tournant la
vis d’élévation située du côté du compartiment de congélation, dans le sens
indiquée par la flèche, en utilisant une clé hexagonale M6, tel qu’illustré dans le
schéma D.
• Si la porte du compartiment de congélation est plus haute que celle du
compartiment de réfrigération, amenez-les à la même hauteur, en tournant la
vis d’élévation située du côté du compartiment de congélation, dans le sens
indiquée par la flèche, en utilisant une clé hexagonale M6, tel qu’illustré dans le
schéma D.
Après avoir égalisé la hauteur des portes en élevant la partie avant à l’aide des
vis d’élévation, les portes du réfrigérateur devraient se fermer convenablement.
Si les portes ne se ferment pas correctement, cela peut nuire aux performances
du réfrigérateur.
12
(D)
FR
Page 78

Réglage du jeu entre les
portes supérieures
C Vous pouvez régler le jeu entre
les portes du compartiment de
réfrigération comme illustré sur les
schémas.
C A l’aide d’un tournevis, retirez la vis
du cache de la charnière supérieure de
la porte que vous souhaitez régler.
Vis centrale
C Ajustez la porte de manière
appropriée à votre gré en desserrant
les vis.
Les étagères de la porte doivent être
vides pour effectuer le réglage de la
hauteur.
C
Fixez la porte que vous avez réglée
en serrant les vis sans modifier la
position de la porte.
C Replacez le cache de la charnière
et fixez la vis.
FR
13
Page 79

Installation du filtre à eau
(Dans certains modèles)
Conditions d’installation
Deux différentes sources d'eau
peuvent être connectées au
réfrigérateur pour l'alimentation en eau:
l'arrivée d'eau et l'eau contenue dans
une carafe.
Une pompe est requise pour que l'eau
de la carafe puisse être utilisée.
3. Tuyau d'alimentation en eau de 5
mètres (1/4 pouce de diamètre)
4. Robinet d’adduction d’eau froide
(Adaptateur de robinet)
5. Filtre à eau à intégrer à l’intérieur du
compartiment réfrigérateur.
Assurez-vous que les pièces ci-
dessous ont été fournies avec votre
appareil.
1. Écrou de raccordement du tuyau
d'alimentation en eau à l’arrière de
l’appareil
2. 3 pièces de collier de fixation (Si
nécessaire à la sécurisation du tuyau
d'alimentation en eau)
C Remarque: Dans la mesure où les
pièces ci-après ne doivent pas être
utilisées avec une carafe, elles peuvent
ne pas se trouver dans le produit que
vous avez acheté.
14
FR
2
3
1
4
Page 80

a
1
2
a
c
Raccordement du tuyau
d'alimentation en eau au
réfrigérateur
b
Raccordement du tuyau
d'alimentation en eau au réfrigérateur
Veuillez suivre les instructions cidessous :
15
1. Après l'installation du raccord
au tuyau d'alimentation en eau,
insérez celui-ci à l'arrivée d'eau du
réfrigérateur en appuyant solidement
vers le bas.
2. Fixez le raccord tel qu’illustré dans
le schéma ci-dessous, en appuyant
avec la main sur l'arrivée d'eau du
réfrigérateur.
(a- Conduite d'eau, b-raccord, c-Valve)
C Remarque 1: Il n’est pas nécessaire
de serrer le raccord avec un outil pour
parvenir à un assemblage étanche. En
cas de fuite, utilisez une clé à molette
ou une pince pour le faire.
Pour installer le filtre à eau, suivez les
instructions ci-dessous, renvoyant aux
schémas fournis :
FR
Page 81

1. Appuyez sur le bouton d'annulation
de glace à l'écran. (Schéma 1)
2. Retirez le couvercle du filtre du
compartiment réfrigérateur en le tirant
vers l'avant. (Schéma 2)
Remarque : Il est tout à fait normal que
quelques gouttes d’eau tombent après
le retrait du couvercle.
4. Retirez le couvercle qui se trouve
au-dessus du filtre à eau et mettez-
le comme indiqué dans le schéma
et tournez-le vers le haut pour le
verrouiller. (Schéma 5)
5. Appuyez une nouvelle fois sur le
bouton d'annulation de glace à
l’écran pour quitter ce mode.
Le filtre à eau doit être remplacé tous
les 6 mois. Le filtre à eau doit être
retiré tel qu’illustré sur le schéma
lorsqu'il sera remplacé ou ne sera plus
utilisé et le couvercle de dérivation doit
être fixé. Veuillez vous assurer que le
mode "Ice Off" est actif avant de le
sortir.
3. Retirez le couvercle de dérivation du
filtre à eau en le faisant pivoter vers le
bas. (Schéma 3-4)
A Avertissement: Veillez à ce que
le mode "Ice Off" soit actif avant de
retirer le couvercle de dérivation.
3
1
4
2
A Avertissement: Le filtre à eau
sert à nettoyer les corps étrangers
dans l’eau. En conséquence, il ne
débarrasse pas celle-ci des microorganismes.
A Avertissement: Appuyez
sur le bouton "Ice Off" avant le
remplacement du filtre à eau ou
l'installation du couvercle de dérivation.
FR
16
5
Page 82

Raccordement du tuyau de
vidange à la carafe
(Dans certains modèles)
Pour alimenter le réfrigérateur en eau
à partir d'une carafe, une pompe est
nécessaire. Suivez les instructions
ci-dessous après avoir raccordé une
extrémité du tuyau d'alimentation
en eau allant de la pompe vers le
réfrigérateur tel que décrit dans la
page précédente.
1. Terminez le raccordement en
poussant l'autre extrémité du conduit
d'eau à l'intérieur de l'arrivée du
tuyau d'eau comme indiqué dans le
schéma.
2. Mettez et fixez le tuyau à pompe
dans la carafe comme illustré dans le
schéma.
3. À la fin du raccordement, branchez et
utilisez la pompe.
Pour que la pompe fonctionne de
manière efficace, patientez 2 à 3
minutes.
17
C Remarque: vous pouvez consulter
le manuel de l'utilisateur de la pompe
pendant le raccordement du tuyau
d'alimentation en eau.
Raccordement du tuyau
d'alimentation en eau à
l'arrivée d'eau
(Dans certains modèles)
1a
1b
2
FR
Page 83

Si vous voulez utiliser votre
réfrigérateur en le raccordant au tuyau
d'alimentation en eau principal,
Vous aurez à raccorder une installation
de valve standard ½ à l'alimentation en
eau chaude de votre domicile. Si cette
valve est absente de votre appareil ou
si vous n’en êtes pas sûr, consultez un
plombier qualifié.
1. Séparez le raccord de l’adaptateur du
robinet. (Schéma A)
2. Installez l’adaptateur du robinet à
l’installation d’une valve standard ½
comme indiqué dans l'illustration.
(Schéma B)
3. Après avoir inséré le tuyau
d'alimentation au raccord, installez-le
sur l’adaptateur du robinet et insérez-
le sur le robinet comme indiqué dans
le schéma. (Schéma C)
4. Serrez le raccord manuellement. En
cas de fuite, utilisez une clé à molette
ou une pince pour le faire.
A Avertissement: Sécurisez le tuyau
d'alimentation en eau à des points
appropriés, au moyen de Colliers
de fixation fournies pour éviter tout
dommage, déplacement ou coupure
accidentelle.
A Avertissement: Après avoir tourné
le robinet de prise d’eau, veillez à
ce qu’il n’y ait pas de fuite aux deux
points de raccordement du tuyau
d'alimentation en eau. En cas de fuite,
arrêtez la valve immédiatement et
serrez tous les joints à nouveau à l’aide
d’une clé à molette ou d’une pince.
18
FR
Page 84

A Avertissement: Veillez à ce que
l’installation de la valve standard ½,
alimentée par l'arrivée d'eau, soit
disponible et complètement fermée.
Remarque -1 : Nul besoin d’utiliser
un filtre à eau au cas où vous vous
servez d’une carafe
Remarque -2 : La pompe sera utilisée
lorsque la carafe le sera également.
Avant toute première
utilisation de la glace/du
distributeur d'eau
C La pression des tuyaux
d'alimentation en eau ne doit pas être
en dessous de 1 bar.
C La pression des tuyaux
d'alimentation en eau ne doit pas être
supérieure à 8 barres.
C Les pompes doivent être utilisées
au cas où la pression des tuyaux
d'alimentation en eau chute d'un bar
ou si une carafe sera utilisée.
être irrégulier au départ. Tout débit
d’eau irrégulier sera normalisé après
évacuation de l’air du système.
C Au cours du démarrage initial du
réfrigérateur, il faut attendre environ 12
heures pour obtenir de l'eau fraîche.
C La pression des conduites
principales d’eau doit être comprise
entre 1 et 8 barres pour un bon
fonctionnement de la glace/
Refroidisseur d’eau. Pour cela, vérifiez
qu’un verre d’eau (100 cc) peut se
remplir en 10 secondes.
C Les 10 premiers verres d’eau ne
doivent pas être consommés.
C Il faut attendre 12 heures pour
obtenir de la glace de l’appareıl à
glaçons pour la première fois. Au cas
où il n’y a pas suffisamment de glace
dans le tiroir à glaçons, celle-ci peut ne
pas être obtenue du tiroir à glaçons.
C Le réseau d’alimentation en eau
du réfrigérateur doit être raccordé au
tuyau d'alimentation. Il ne doit pas être
raccordé à un tuyau d'alimentation en
eau chaude.
C Aucune eau ne peut être obtenue
au cours du fonctionnement initial
du réfrigérateur. Cette situation est
provoquée par l’air à l’intérieur du
système. Pour vider l’air du système,
appuyez sur la broche pendant une
minute jusqu’à ce que l’eau sorte
de la fontaine. Le débit d'eau peut
19
C Les 30 premiers glaçons environ à
être obtenus de l’appareıl à glaçons ne
doivent pas être utilisés.
C Utilisez toujours le filtre à eau
lorsqu'une carafe n'est pas utilisée.
FR
Page 85

4 Préparation
•Votre réfrigérateur doit être installé
à au moins 30 cm des sources
de chaleur telles que les plaques
de cuisson, les fours, appareils de
chauffage ou cuisinières, et à au moins
5 cm des fours électriques. De même,
il ne doit pas être exposé à la lumière
directe du soleil.
•La température ambiante de la
pièce où vous installez le réfrigérateur
doit être d’au moins 10°C. Faire
fonctionner l’appareil sous des
températures inférieures n’est pas
recommandé et pourrait nuire à son
efficacité.
•Veuillez vous assurer que l’intérieur
de votre appareil est soigneusement
nettoyé.
•Si deux réfrigérateurs sont installés
côte à côte, ils doivent être séparés
par au moins 2 cm.
•Lorsque vous faites fonctionner le
réfrigérateur pour la première fois,
assurez-vous de suivre les instructions
suivantes pendant les six premières
heures.
- La porte ne doit pas être ouverte
fréquemment.
- Le réfrigérateur doit fonctionner à
vide, sans denrées à l’intérieur.
- Ne débranchez pas le réfrigérateur.
Si une panne de courant se
produit, veuillez vous reporter aux
avertissements dans la section
« Solutions recommandées aux
problèmes ».
•L’emballage et les matériaux de
protection d’emballage doivent
être conservés pour les éventuels
transports ou déplacements à venir.
20
FR
Page 86

5 Utilisation du réfrigérateur
*
12
11
10
9
8
3
6
7
1
2
3
4
6
5
16
1528
2 °C
4 °C
6 °C
8 °C
20212227
18
-24 °C
-22 °C
-20 °C
-18 °C
29 1413
30
26 25 24 23 19
17
du réfrigérateur
1. Bouton Fridge Set
2. Bouton Mode vacances
3. Bouton Réfrigération rapide
4. Bouton Key Lock
5. Bouton Ice Off
6. Témoins Distributeur
7. Bouton de sélection Eau/Glace
8. Bouton Eclairage Distributeur
9. Bouton de réinitialisation du filtre
10. Bouton Auto Eco
11. Bouton de congélation rapide
12. Bouton Réglage du Congélateur
13. Indicateur mode Economie
14. Indicateur d'humidité élevée
15. Indicateur de refroidissement rapide
16. Indicateur de règlement de la température
17. Température élevée/Indicateur
d’avertissement d'erreur
18. Indicateur de porte du réfrigérateur ouverte
19. Voyant verrouillage des commandes
20. Indicateur du mode Vacances
21. Indicateur d'eau
22. Indicateur Aucune glace
23. Indicateur de glace pilée
24. Indicateur de glaçons
25. Témoin Auto Eco
26. Indicateur de réinitialisation du filtre
27. Indicateur de porte du congélateur ouverte
28. Indicateur de réglage de température du
compartiment de congélation
29. Indicateur de congélation rapide
30. Témoin ioniseur
EN OPTION
C Les illustrations présentées dans cette notice d’utilisation sont schématiques
et peuvent ne pas correspondre exactement à votre produit. Si des pièces
présentées ne sont pas comprises dans le produit que vous avez acheté, elles
sont valables pour d’autres modèles.
FR
21
Page 87

Réglage du
compartiment de
congélation
-15°C 4°C Voici le réglage normal recommandé.
-18,-21 ou -24°C 4°C Ces réglages sont recommandés lorsque
Compartiment Ultra
Congélation
-15°C ou plus froid 2°C Si vous pensez que le compartiment
-15°C ou plus froid Refroidissement
Réglage du
compartiment de
réfrigération
4°C Utilisez ce réglage lorsque vous souhaitez
rapide
Explications
la température ambiante dépasse 30 °C
surgeler des denrées ou fabriquer de la
glace en peu de temps. Le réfrigérateur
retournera à son mode de fonctionnement
précédent lorsque le processus sera
terminé.
de réfrigération n’est pas assez froid à
cause de la chaleur ou des ouvertures /
fermetures fréquentes de la porte.
Vous pouvez utiliser ce réglage lorsque
le compartiment de réfrigération est
surchargé ou lorsque vous souhaitez
refroidir rapidement vos denrées.
Réglage de la température
Réglage de la température
du compartiment
réfrigérateur
La température du compartiment
réfrigérateur peut être réglée à l’une
des températures suivantes :
8, 6,4 et 2°C
Appuyez sur le bouton Fridge Set
(Réglage du réfrigérateur) pour
modifier. La température baissera
de 2°C. A chaque appui, le bouton
s’enfoncera, puis tournera dans le
sens de la température la plus haute.
Relâcher à la température souhaitée
et la nouvelle température réglée sera
stockée.
Si vous estimez que vos denrées
sont plus froides que souhaitées,
vous pouvez ajuster le réglage de
la température du compartiment
réfrigérateur à 6 ou 8.
du compartiment
congélateur
La température du congélateur peut
être réglée à l’une des températures
suivantes : -15 / -18 / -21 / -24 et
-24°C
Appuyez sur le bouton Freezer
Set (Réglage du congélateur) pour
modifier. La température baissera
de 2°C. A chaque appui, le bouton
s’enfoncera, puis tournera dans le
sens de la température la plus haute.
Relâcher à la température souhaitée
et la nouvelle température réglée sera
stockée.
Fonction Congélation rapide
(Fast Freeze)
Lorsque vous appuyez sur le bouton
« Congélation rapide », le compresseur
fonctionnera pendant environ 14
FR
22
Page 88

heures. L'indicateur de Congélation
rapide s'illuminera. Pour annuler
cette fonction, appuyez à nouveau
sur le bouton « Congélation rapide. »
L'indicateur de Congélation rapide
s'éteindra et retournera à son réglage
normal. Cet indicateur s’annulera
automatiquement après 12 heures si
vous ne le faites pas.
Si vous souhaitez congeler de grandes
quantités de produits frais, appuyez
sur le bouton Fresh Freeze 14 heures
avant d'introduire les produits frais
dans le compartiment de congélation
rapide.
Fonction de refroidissement
rapide (Quick Cool)
Lorsque vous appuyez sur le bouton
« Refroidissement rapide », la
température du compartiment sera
plus froide que les valeurs de réglage.
Cette fonction peut être utilisée
pour les denrées placées dans le
compartiment de réfrigération que l’on
souhaite refroidir rapidement.
Après avoir appuyé sur le bouton
« Refroidissement rapide », l'indicateur
de refroidissement rapide s'illuminera.
Pour annuler cette fonction,
appuyez à nouveau sur le bouton
« Refroidissement rapide. » L’indicateur
de refroidissement rapide s’éteindra
et retournera à son réglage normal. La
fonction de refroidissement rapide se
désactivera automatiquement au cas
où vous ne le faites pas.
Bouton Vacances
Au cas où le compartiment
réfrigérateur ne sera pas utilisé
pendant longtemps, son utilisation
peut être annulée en appuyant sur
le bouton « Vacation ». Ainsi, le
réfrigérateur peut fonctionner plus
économiquement. Appuyez sur le
bouton Vacances pendant 3 secondes
pour activer cette fonction. Lorsque
cette fonction est active, la porte du
compartiment réfrigérateur doit restée
fermée et aucune denrée ne doit y être
laissé.
Bouton Auto Eco (Fonction
Economie spéciale)
Lorsque le bouton « Auto Eco »
est appuyé, la fonction Auto
Eco sera activée. Si la porte du
compartiment réfrigérateur reste
fermée pendant longtemps lorsque
cette fonction est sélectionnée, le
compartiment réfrigérateur basculera
automatiquement vers un mode de
fonctionnement plus économique
pour économiser l'électricité. Lorsque
vous appuyez à nouveau sur le bouton
« Auto Eco », cette fonction est
désactivée.
Ioniseur
L'ioniseur aide à purifier l'air à
l'intérieur du réfrigérateur et se
déclenche automatiquement
Bouton Key Lock
Le verrouillage est activé lorsque
ce bouton est appuyé pendant 3
secondes, et lorsque tous les boutons,
ainsi que le verrou du refroidisseur
d’eau, ne fonctionneront pas. Si vous
voulez désactiver le verrouillage une
nouvelle fois, appuyez pendant 3
secondes.
Eclairage du distributeur
Lorsque le bouton « Eclairage » est
appuyé, la lampe du refroidisseur
d’eau s’éclairera et s’éteindra lorsque
le bouton sera à nouveau appuyé.
23
FR
Page 89

Cet éclairage s’allumera également
quand vous appuierez sur le verrou du
refroidisseur d’eau avant de s’éteindre
lorsque vous relâcherez le verrou.
Sélection du type de glace/
d’eau
Avec le bouton « Sélection du
distributeur » l’une des options « eau »,
« glaçons », ou « glace pilée » est
sélectionnée.
Distributeur d'eau et glace
Avec ses trois fonctions différentes, le
distributeur vous offre une eau fraîche,
des glaçons et de la glace pilée sans
avoir à ouvrir la porte du réfrigérateur.
C’est une source intarissable d’eau
fraîche et de glace, sans ajout d’eau.
Un bandeau de commande convivial
fournit les fonctions suivantes :
Remarque :
• L'eau ou la glace peut être délivrée
pendant un maximum de 90 secondes
environ à chaque utilisation.
• Lorsque la porte du congélateur est
ouverte, la fontaine ne fonctionnera
pas.
C Le glacier produit environ 110
glaçons en 24 heures et cette quantité
peut varier suivant la fréquence
d’ouverture des portes, les réglages du
réfrigérateur, et la panne d'électricité.
La glace produite peut être obtenue de
la fontaine sous forme de glaçon ou de
glace concassée.
Il est tout à fait normal que l’obtention
des glaces concassées de la fontaine
prenne plus de temps que l’obtention
des glaçons. Par ailleurs, la glace
s’écoule avant le glaçon si l’option
glace concassée a été sélectionnée
avant celle du glaçon.
C Si le distributeur de glace n'a
pas été utilisé pendant une période
prolongée ou après une coupure
d'alimentation, la glace peut former
des blocs ou si la glace présente une
odeur ou un goût différents, jetez-la et
nettoyez soigneusement l'appareil à
glaçons.
Glaçon Glace pilée Eau fraîche
Utilisation de l'appareil à
glaçons
C Veuillez noter que les premiers
glaçons ne seront pas prêts avant 12
heures après que l’appareil ait été mis
en marche.
Au cas où vous n’avez pas besoin
de glace, comme pendant l’été ou
pendant vos vacances, activez la
fonction Ice Off.
24
FR
Page 90

Avertissements
C Aucune glace ne doit être ajoutée à
l'appareil à glaçons. Ceci peut nuire
à la production de glace ou à son
concassage.
A C'est un phénomène normal que
d'avoir deux glaçons bloqués dans
l'appareil à glaçons.
A Il faut éviter de déplacer des pièces
de l'appareil, comme les lames, pour
éviter de se blesser.
A Ne jamais utiliser d'objets pointus
pour casser la glace dans l'appareil
à glaçons. Ce geste est susceptible
d'endommager cet appareil.
A Les denrées alimentaires ne
doivent jamais être introduites dans
l'appareil à glaçons à des fins de
refroidissement rapide.
A Lorsque l'appareil à glaçons doit être
retiré pour une raison ou pour une
autre, vous devez d'abord appuyer
sur le bouton Ice Off.
Ice Off
C Pour empêcher la formation
de cristaux, appuyez sur lebouton
« Ice Off. » Lorsque cette option est
sélectionnée, l'eau ne circule plus dans
le distributeur de glaçons. Toutefois,
du givre déjà existant peut être
retiré du distributeur. Pour reprendre
la formation de glace, appuyez à
nouveau sur le bouton « Ice Off. »
Attention : Si vous n'utilisez pas
l'appareil à glaçons, n'oubliez pas
de mettre le couvercle du conduit à
glaçons à l'intérieur de la porte du
congélateur. (Voir la section « Votre
réfrigérateur »)
Bouton de réinitialisation du filtre :
Le filtre à eau doit être remplacé
tous les 6 mois. L'indicateur de
réinitialisation du filtre s'allume si le
filtre à eau doit être changé. Appuyez
sur le bouton de réinitialisation du filtre
pendant 3 secondes pour annuler
l'alerte de l'indicateur de réinitialisation
du filtre.
25
FR
Page 91

Utilisation de la fontaine
Avertissements
Il est tout à fait normal que les
premiers verres d’eau tirés du
distributeur soient chauds.
Dans des cas où le distributeur n’a
pas été utilisé fréquemment, une
quantité d’eau suffisante doit y être
retirée afin d’obtenir de l’eau fraîche.
Socle du distributeur
Les gouttes d’eau qui tombent au
cours de leur utilisation, s’accumulent
dans le socle du distributeur. Vous
pouvez enlever le bac à projections en
le tirant vers vous ou en appuyant sur
son bord (selon le modèle). Vous
pouvez retirer l’eau à l’aide d’une
éponge ou d’un chiffon doux.
Etagères coulissantes
Les étagères coulissantes peuvent
être basculées légèrement en les
soulevant par l’avant. Vous pouvez
alors les coulisser ainsi vers l’avant et
l’arrière. Lorsque vous les basculez,
elles reposeront sur une butée vous
permettant d’atteindre les denrées
placées à l’arrière de l’étagère. Si vous
tirez dessus après les avoir soulevées
une fois arrivé à la seconde butée,
l’étagère sera libérée.
L’étagère doit être fermement
maintenue par la bas pour éviter
qu’elle ne bascule complètement.
L’étagère est placée sur des rails sur
les côtés du réfrigérateur. Vous pouvez
la placer sur un niveau supérieur ou un
niveau inférieur.
L’étagère doit être poussée pour
revenir complètement en place.
1
2
3
4
26
FR
Page 92

Éclairage bleu
Les denrées conservées dans les
bacs à légumes sont éclairées par
une lumière bleue qui, grâce aux
effets de sa longueur d’onde, permet
aux fruits et légumes de continuer la
photosynthèse et ainsi de conserver
leur fraîcheur et leur teneur en
vitamines.
Ion:
L’air est ionisé au moyen du système
d’ionisation qui se trouve dans le
conduit d’aération du compartiment
réfrigérateur. Grâce à ce système,
les bactéries et les particules en
suspension dans l’air qui sont à
l’origine de l’odeur sont enlevées.
Manettes de contrôle
d’humidité du bac à légumes
Le bac à légumes de votre
réfrigérateur a été spécialement conçu
pour vous aider à conserver vos
denrées au frais sans que celles-ci
n’aient à perdre de leur humidité. L’air
frais circule fondamentalement autour
du bac à légumes et sa quantité est
contrôlée au moyen des commandes
situées sur le devant de son couvercle.
Vous pouvez ajuster les curseurs de
réglage de l’humidité à une position
appropriée selon les conditions de
refroidissement et d’humidité de vos
denrées contenues dans le bac à
légumes.
Si vous souhaitez que ces denrées se
rafraîchissent davantage, ouvrez les
orifices des curseurs de réglage de
l’humidité. Si vous souhaitez en
revanche qu’elles se rafraîchissent
moins et conservent leur humidité
pendant une longue période, fermez
lesdites orifices.
Compartiment Ultra
Congélation
Ce compartiment congèle rapidement
vos aliments tout en préservant leurs
saveurs et leurs valeurs nutritives.
Casier à œufs
Vous pouvez installer le support à
oeufs sur un balconnet de la porte ou
de l’intérieur que vous souhaitez.
Ne placez jamais le support à oeufs
dans le compartiment de congélation.
FR
27
Page 93

Recommandations
concernant la conservation
des aliments congelés
• Pour un compartiment des denrées
congelées (4 étoiles), les
aliments préemballés et surgelés,
destinés à un usage commercial,
doivent être conservés conformément
aux instructions du fabricant de
produits congelés.
• Afin de veiller à ce que la qualité
supérieure recherchée par le fabricant
et le détaillant des produits congelés
soit atteinte, il convient de se rappeler
les points suivants :
1.Mettre les emballages dans le
congélateur aussi rapidement que
possible après achat.
2. S’assurer que le contenu est
étiqueté et daté.
3.Ne pas dépasser les dates
« à consommer avant le » et « à
consommer de préférence avant le »
figurant sur l’emballage.
En cas de panne de courant, n’ouvrez
pas la porte du congélateur. Même
si la durée de la coupure d’électricité
atteint la durée indiquée sur l’étiquette
(à l’intérieur gauche du réfrigérateur),
les aliments congelés n’en seront pas
affectés. Au cas où la coupure dure
plus longtemps, l’aliment doit être
contrôlé et, le cas échéant, consommé
immédiatement ou congelé après
cuisson.
Dégivrage
Les compartiments réfrigérateur
et congélateur dégivrent
automatiquement.
Remplacer l'ampoule
intérieure
Si l’ampoule ne fonctionne pas,
procédez comme suit.
1. Déconnecter la prise de courant et
débrancher la prise d’alimentation.
Pour un accès facile, retirez toutes les
étagères et les tiroirs.
2. Pour ouvrir les couvercles
d’illumination des sections
congélateur et réfrigérateur, appuyez
manuellement; relâchez d’abord un
côté, puis l’autre, en appuyant sur
les côtés comme indiqué dans les
schémas.
3. Vérifiez d’abord que l’ampoule ne
s’est pas desserrée en s’assurant
qu’elle soit bien vissée dans son
support. Réinsérez la prise et mettez
en marche l’appareil. Si l’ampoule
fonctionne, réinstallez le diffuseur en
insérant le tenon arrière et en poussant
vers le haut.
4. Si l’ampoule ne fonctionne toujours
pas, déconnectez la prise de courant
et débranchez la prise d’alimentation.
Remplacez l’ampoule par une nouvelle
ampoule de 15 watts (max.) à pas de
vis E14 (SES).
5. Jetez soigneusement l’ampoule
grillée immédiatement.
Les ampoules de remplacement se
trouvent facilement dans les magasins
de matériel électrique ou de bricolage
locaux.
28
FR
Page 94

FR29FR
Page 95

6 Entretien et nettoyage
A N’utilisez jamais d’essence, de
benzène ou de matériaux similaires
pour le nettoyage.
B Nous vous recommandons de
débrancher l’appareil avant de
procéder au nettoyage.
C N’utilisez jamais d'ustensiles
tranchants, savon, produit de
nettoyage domestique, détergent et
cirage pour le nettoyage.
C Utilisez de l’eau tiède pour nettoyer la
carrosserie du réfrigérateur et séchezla soigneusement à l'aide d'un
chiffon.
C Utilisez un chiffon humide imbibé
d’une solution composée d'une
cuillère à café de bicarbonate de
soude pour un demi litre d’eau
pour nettoyer l’intérieur et séchez
soigneusement.
B Prenez soin de ne pas faire couler
d'eau dans le logement de la
lampe et dans d’autres éléments
électriques.
B En cas de non utilisation de votre
réfrigérateur pendant une période
prolongée, débranchez le câble
d’alimentation, sortez toutes les
denrées, nettoyez-le et laissez la
porte entrouverte.
C Inspectez les joints de porte
régulièrement pour vérifier qu’ils
sont propres et qu'il n'y a pas de
particules de nourriture.
C Pour retirer les balconnets de portes,
sortez tout son contenu puis poussez
simplement le balconnet vers le haut
à partir de la base.
Protection des surfaces en
plastique.
• Ne placez pas d’huiles ou de plats
huileux dans le réfrigérateur dans
des récipients non fermés, car les
graisses peuvent endommager les
surfaces en plastique du réfrigérateur.
Si vous versez ou éclaboussez de
l’huile sur les surfaces en plastique,
nettoyez et lavez les parties
souillées avec de l’eau chaude
immédiatement.
30
Page 96

Appareil à glaçons et
distributeur
Veuillez suivre la procédure et
C
les avertissements ci-dessous pour
nettoyer l'appareil à glaçons:
A Retirez l'appareil à glaçons en le
soulevant d'abord, puis en le tirant
vers vous tel qu'illustré dans le
schéma ci-contre.
A Videz la glace dans le récipient à
glaçons, s’il y en a. Sortez la glace
bloquée, utilisez des objets non
pointus pour éviter d’abîmer le
récipient à glaçons.
A Veillez à ce que l’intérieur du récipient
à glaçons ne soit pas mouillé/humide
avant de le remettre dans son
logement.
A Après avoir remis le récipient à
glaçons à son emplacement initial et
fermé la porte du congélateur, quittez
le mode « Ice Off » en appuyant à
nouveau sur la touche « Ice Off ».
A Ne pas toucher aux pièces
mobiles comme les lames de
l'appareil à glaçons.
C Laissez le réservoir d'eau vide
lorsque vous ne comptez pas vous
en servir pendant une période
prolongée.
31
FR
Page 97

Compartiment Zone fraîche
Si vous souhaitez utiliser le récipient
de conservation qui se trouve sous le
balconnet en guise de compartiment
Zone fraîche, installez-le comme
indiqué à l’image.
Les compartiments de zone fraîche
vous permettent de préparer les
aliments à congeler. Vous pouvez
également utiliser ces compartiments
si vous souhaitez conserver vos
aliments à une température quelque
peu inférieure à celle du compartiment
de réfrigération.
Vous pouvez augmenter le volume
interne de votre réfrigérateur en
enlevant le compartiment Zone
fraîche souhaité. Pour ce faire,
tirez le compartiment vers vous ; le
compartiment s’appuiera contre la
butée et s’arrêtera. Ce compartiment
se libère en le soulevant d’environ 1
cm et en le tirant vers vous.
32
FR
Page 98

7 Solutions recommandées aux problèmes
Veuillez vérifier la liste suivante avant d’appeler le service après-vente. Cela
peut vous faire économiser du temps et de l'argent. Cette liste regroupe les
problèmes les plus fréquents ne provenant pas d’un défaut de fabrication ou
d’utilisation du matériel. Il se peut que certaines des fonctions décrites ne soient
pas présentes sur votre produit.
Le réfrigérateur ne fonctionne pas.
• Le réfrigérateur est-il correctement branché ? Insérez la prise dans la prise
murale.
• Est-ce que le fusible ou la douille de raccord du réfrigérateur sont connectés ou
est-ce que le fusible principal a sauté ? Vérifiez le fusible.
Condensation sur la paroi intérieure du compartiment réfrigérateur.
(MULTIZONE, COOL CONTROL et FLEXI ZONE).
• Température ambiante très basse. Ouvertures et fermetures fréquentes de la
porte. Humidité ambiante très élevée. Conservation de denrées liquides dans
des récipients ouverts. Porte laissée entrouverte. Réglez le thermostat à un
niveau de froid supérieur.
• Réduisez les temps d’ouverture de la porte ou utilisez-la moins fréquemment.
• Couvrez les denrées dans des récipients ouverts à l’aide d’un matériau adapté.
• Essuyez la condensation à l’aide d’un tissu sec et vérifiez si elle persiste.
Le compresseur ne fonctionne pas.
• Le dispositif de protection thermique du compresseur sautera en cas de
coupures soudaines du courant ou de débranchement intempestif, en effet
la pression du liquide réfrigérant du système de refroidissement ne sera pas
équilibrée. Le réfrigérateur recommencera à fonctionner normalement après 6
minutes environ. Veuillez contacter le service après-vente si le réfrigérateur ne
redémarre pas après cette période.
• Le réfrigérateur est en mode de dégivrage. Cela est normal pour un réfrigérateur
à dégivrage semi-automatique. Le cycle de dégivrage se déclenche
régulièrement.
• Le réfrigérateur n’est pas branché à la prise. Assurez-vous que la prise est
branchée à la prise murale.
• Les réglages de température sont-ils corrects ?
• Il se peut qu'il y ait une panne d'électricité.
Le réfrigérateur fonctionne fréquemment ou pendant de longue périodes.
33
FR
Page 99

• Votre nouveau réfrigérateur est peut être plus large que l’ancien. Ceci est tout
à fait normal. Les grands réfrigérateurs fonctionnent pendant une période de
temps plus longue.
• La température ambiante de la salle peut être élevée. Ceci est tout à fait normal.
• Le réfrigérateur pourrait y avoir été branché tout récemment ou pourrait avoir
été chargé de denrées alimentaires. Le refroidissement complet du réfrigérateur
peut durer quelques heures de plus.
• D’importantes quantités de denrées chaudes ont peut être été introduites
dans le réfrigérateur récemment. Les denrées chaudes provoquent un
fonctionnement prolongé du réfrigérateur avant d’atteindre le niveau de
température de conservation raisonnable.
• Les portes ont peut être été ouvertes fréquemment ou laissées entrouvertes
pendant une durée prolongée. L’air chaud qui entre dans le réfrigérateur le
fait fonctionner pendant de plus longues périodes. Ouvrez les portes moins
souvent.
• La porte du réfrigérateur ou du congélateur ont peut être été laissées
entrouvertes. Vérifiez que les portes sont bien fermées.
• Le réfrigérateur est réglé à une température très basse. Réglez la température
du réfrigérateur à un degré supérieur et attendez jusqu’à ce que la température
soit bonne.
• Le joint de la porte du réfrigérateur ou du congélateur peut être sale, déchiré,
rompu ou mal en place. Nettoyez ou remplacez le joint. Tout joint endommagé/
déchiré fait fonctionner le réfrigérateur pendant une période de temps plus
longue afin de conserver la température actuelle.
La température du congélateur est très basse alors que celle du réfrigérateur
est correcte.
• La température du congélateur est réglée à une température très basse. Réglez
la température du congélateur à un degré supérieur et vérifiez.
La température du réfrigérateur est très basse alors que celle du congélateur
est correcte.
• Il se peut que la température du réfrigérateur a réglée à une température très
basse. Réglez la température du réfrigérateur à un degré supérieur et vérifiez.
Les denrées conservées dans les tiroirs du compartiment de réfrigération
congèlent.
• Il se peut que la température du réfrigérateur a réglée à une température très
basse. Réglez la température du réfrigérateur à un degré supérieur et vérifiez.
La température dans le réfrigérateur ou le congélateur est très élevée.
34
FR
Page 100

• La température du réfrigérateur a peut être été réglée à un degré très élevé. Le
réglage du réfrigérateur a un effet sur la température du congélateur. Modifiez la
température du réfrigérateur ou du congélateur jusqu’à ce qu’elles atteignent un
niveau correct.
• Les portes ont peut être été ouvertes fréquemment ou laissées entrouvertes
pendant une durée prolongée; ouvrez-les moins fréquemment.
• La porte est peut être restée ouverte; refermez complètement la porte.
• D’importantes quantités de denrées chaudes ont peut être été introduites dans
le réfrigérateur récemment. Attendez que le réfrigérateur ou le congélateur
atteigne la bonne température.
• Le réfrigérateur y a peut être été branché récemment. Le refroidissement
complet du réfrigérateur nécessite du temps.
Le niveau sonore augmente lorsque le réfrigérateur est en marche.
• Les caractéristiques de performance du réfrigérateur peuvent changer en raison
des variations de la température ambiante. Cela est normal et n’est pas un
défaut.
Vibrations ou bruits
• Le sol n’est pas plat ou n'est pas solide. Le réfrigérateur oscille lorsqu’on le
bouge lentement. Assurez-vous que le sol est plat et suffisamment solide pour
supporter le réfrigérateur.
• Les bruits peuvent être produits par les objets placés sur le réfrigérateur. Enlevez
tout ce qu'il y a au-dessus du réfrigérateur.
Le réfrigérateur produit des bruits semblables à de l’eau qui coule ou à la
pulvérisation d’un liquide.
• Des écoulements de gaz et de liquides se produisent dans le réfrigérateur, de
par ses principes de fonctionnement Cela est normal et n’est pas un défaut.
Le réfrigérateur produit des bruits semblables à du vent.
• Les ventilateurs sont utilisés pour refroidir le réfrigérateur. Cela est normal et n’est
pas un défaut.
Condensation sur les parois intérieures du réfrigérateur.
• Un temps chaud et humide augmente la formation de givre et de condensation.
Cela est normal et n’est pas un défaut.
• La porte est peut être restée ouverte; assurez-vous que les portes sont
complètement fermées.
• Les portes ont peut être été ouvertes fréquemment ou laissées entrouvertes
pendant une durée prolongée; ouvrez-les moins fréquemment.
De l’humidité est présente à l’extérieur ou entre les portes du réfrigérateur.
• Il y a peut être de l'humidité dans l'air; ceci est tout à fait normal par un temps
humide. Lorsque l’humidité est faible, la condensation disparaîtra.
Présence d’une mauvaise odeur dans le réfrigérateur.
35
FR
 Loading...